

Page 1

Page 2

TABLE OF CONTENTS
1 INTRODUCTION ........................................................... 1-1
1.1 Overview ...................................................................................................... 1-1
1.2 Safety Instructions ........................................................................................ 1-2
1.3 Important Notes ........................................................................................... 1-3
1.4 System Requirements .................................................................................. 1-3
2 OVERVIEW .................................................................. 2-1
2.1 Overview of the RED Rocket Board .............................................................. 2-1
2.2 Overview of the SDI Panel ............................................................................ 2-3
3 INSTALLATION ............................................................ 3-1
3.1 Driver / Firmware Download ......................................................................... 3-1
3.2 Hardware Installation .................................................................................... 3-1
3.2.1 Preparing the Computer ................................................................... 3-1
3.2.2 Installation of the SDI Panel .............................................................. 3-2
3.2.3 Installation of the Board .................................................................... 3-3
3.2.4 Finishing the Installation.................................................................... 3-4
3.3 Driver Installation .......................................................................................... 3-5
3.3.1 Mac ................................................................................................... 3-5
3.3.2 Windows ........................................................................................... 3-7
3.4 Upgrading Firmware ..................................................................................... 3-10
3.5 Validating RED Rocket Board Installation ..................................................... 3-10
3.5.1 Mac ................................................................................................... 3-10
3.5.2 Windows ........................................................................................... 3-12
A APPENDIX................................................................... A-1
A.1 Technical Data ............................................................................................. A-1
A.2 Hardware Specifications .............................................................................. A-2
A.3 Video Rasters ............................................................................................... A-3
A.
4 Signal In- and Outputs ................................................................................. A-4
A.5 Conformity Declarations ............................................................................... A-5
A.5.1 RoHS Compliance ............................................................................ A-5
A.5.2 EC Declaration of Conformity (CE Marking) ...................................... A-5
A.5.3 FCC Compliance Statement ............................................................. A-5
RED Rocket Installation Guide
May 14, 2010
Page 3
1 INTRODUCTION
1.1 OVERVIEW
This guide instructs you in the installation of the RED Rocket board, SDI panel, driver, and firmware as
well as testing of the installation.
To use this guide you should have experience installing hardware components in a computer system and
be familiar with the hardware structure and interior of such a system. Additionally, you should have general knowledge in the field of digital video and be comfortable working with computer software.
In detail the chapters contain the following information:
1 INTRODUCTION
2 OVERVIEW
3 INSTALLATION
A APPENDIX
Includes system requirements necessary to run RED
Rocket, safety instructions, and important notes.
Provides an overview of the RED Rocket board and SDI
panel.
Describes the installation of the RED Rocket board hardware and driver/firmware as well as testing of the installation.
Provides technical details and general information about
the RED Rocket board.
INSTLLATION GUIDE DISCLAIMER
RED has made every effort to provide clear and accurate information in this Installation Guide, which is
provided solely for the user’s information. While thought to be accurate, the information in this document
is provided strictly “as is” and RED will not be held responsible for issues arising from typographical errors
or user’s interpretation of the language used herein that is different from that intended by RED. All safety
and general information is subject to change as a result of changes in local, federal or other applicable
laws.
RED reserves the right to revise this Installation Guide and make changes from time to time in the content
hereof without obligation to notify any person of such revisions or changes. In no event shall RED, its employees or authorized agents be liable to you for any damages or losses, direct or indirect, arising from
the use of any technical or operational information contained in this document.
© 2009-2010 RED.COM, INC.
All trademarks, trade names, logos, icons, images, and product names used in association with the accompanying product are the copyrights, trademarks or other intellectual property owned and controlled
exclusively by Red.com, Inc.
MAY 14, 2010 © 2009-2010 RED.COM, INC.
1-1
Page 4

1.2 SAFETY INSTRUCTIONS
To use the RED Rocket board correctly please adhere to the following:
CAUTION: Please read the following safety instructions very carefully before attempting any installation and/or performing any work on the RED Rocket board.
If the RED Rocket board is not used in compliance with the safety instructions, the warranty and all
resulting liability claims will be void.
GENERAL
The RED Rocket board has been built according to the applying safety regulations. To minimize the possibility of a faulty operation of the device all manuals and guides must be available at all times at the operation site. Before installing and/or using the RED Rocket board the manuals and guides available for the
RED Rocket board must be read and observed.
- Use the RED Rocket board only in good working order.
- The system you are trying to install the RED Rocket board in usually works with voltages that can be
hazardous to your health. Never work on the system or access its interior with the power cable(s) attached and plugged into a power source. Make sure the power supply is disconnected from the components you intend to work on.
- Computer hardware contains components that are sensitive to electrostatic discharge. If you touch
them without precautionary measures, they can be destroyed. Use a wrist strap connected to ground
when accessing electronic parts and take care of grounding the video system. Avoid touching the
components of the computer system and the RED Rocket board whenever possible.
- Computer hardware contains components that are sensitive to changing voltages. Connecting or dis-
connecting the RED Rocket board to or from peripheral hardware while any of them is switched on
may damage the hardware. Switch off all peripheral hardware before connecting or disconnecting anything.
- Use the board only in compliance with the technical data outlined in section A-1 TECHNICAL DATA.
- The RED Rocket board may not be misused, abused, physically damaged, neglected, exposed to fire,
water or excessive changes in the climate or temperature, or operated outside maximum rating.
- Do not perform any changes or extensions to the RED Rocket board whatsoever.
ENVIRONMENTAL CONDITIONS
For error-free working and a long service life, the RED Rocket board needs some basic environmental
conditions:
- Do not expose the RED Rocket board to sources of heat, such as direct sunlight or a radiator.
- The chassis of the computer system where the RED Rocket board is installed must be equipped with
sufficient ventilation for cooling reasons.
- Avoid areas with high humidity or dust. Best operating conditions are given in an air-conditioned site.
- Do not expose the RED Rocket board to strong electric or magnetic fields.
- Avoid areas where The RED Rocket board will be subject to vibrations or shocks.
1-2
© 2009-2010 RED.COM, INC. MAY 14, 2010
Page 5
1.3 IMPORTANT NOTES
The following provides information about the conformity of the product.
DECLARATION OF CONFORMITY
This product has been tested according to applicable national and international directives and regulations. Further information about this can be
found in section A-5 CONFORMITY DECLARATIONS.
1.4 SYSTEM REQUIREMENTS
REQUIRED HARDWARE
These are the minimum hardware requirements that the computer system has to meet if you want to use
the RED Rocket board.
- PCI-e x16 physical slot providing at least 8 lanes (x8)
- 2048 MB RAM
SUPPORTED OPERATING SYSTEMS
The RED Rocket board can be used with the following operating systems:
- Mac OS X 10.5
- Windows XP SP2 or later (Vista coming soon)
- Linux (Red Hat)
NOTE: Be sure that you have installed the latest System Updates and/or Service Packs for your
system; otherwise you may encounter software and/or hardware problems.
REQUIRED SOFTWARE
The RED Rocket board requires the RED Rocket driver and upgraded firmware to operate. The driver,
firmware and ROCKETcine-X! are available for download at http://www.red.com/support. Please contact third party software vendors about availability of RED Rocket enabled software.
MAY 14, 2010 © 2009-2010 RED.COM, INC.
1-3
Page 6

2 OVERVIEW
2.1 OVERVIEW OF THE RED ROCKET BOARD
2
1
PCIe x8 Connector
3 4
Figure 2-1: RED Rocket Board
MAY 14, 2010 © 2009-2010 RED.COM, INC.
2-1
Page 7
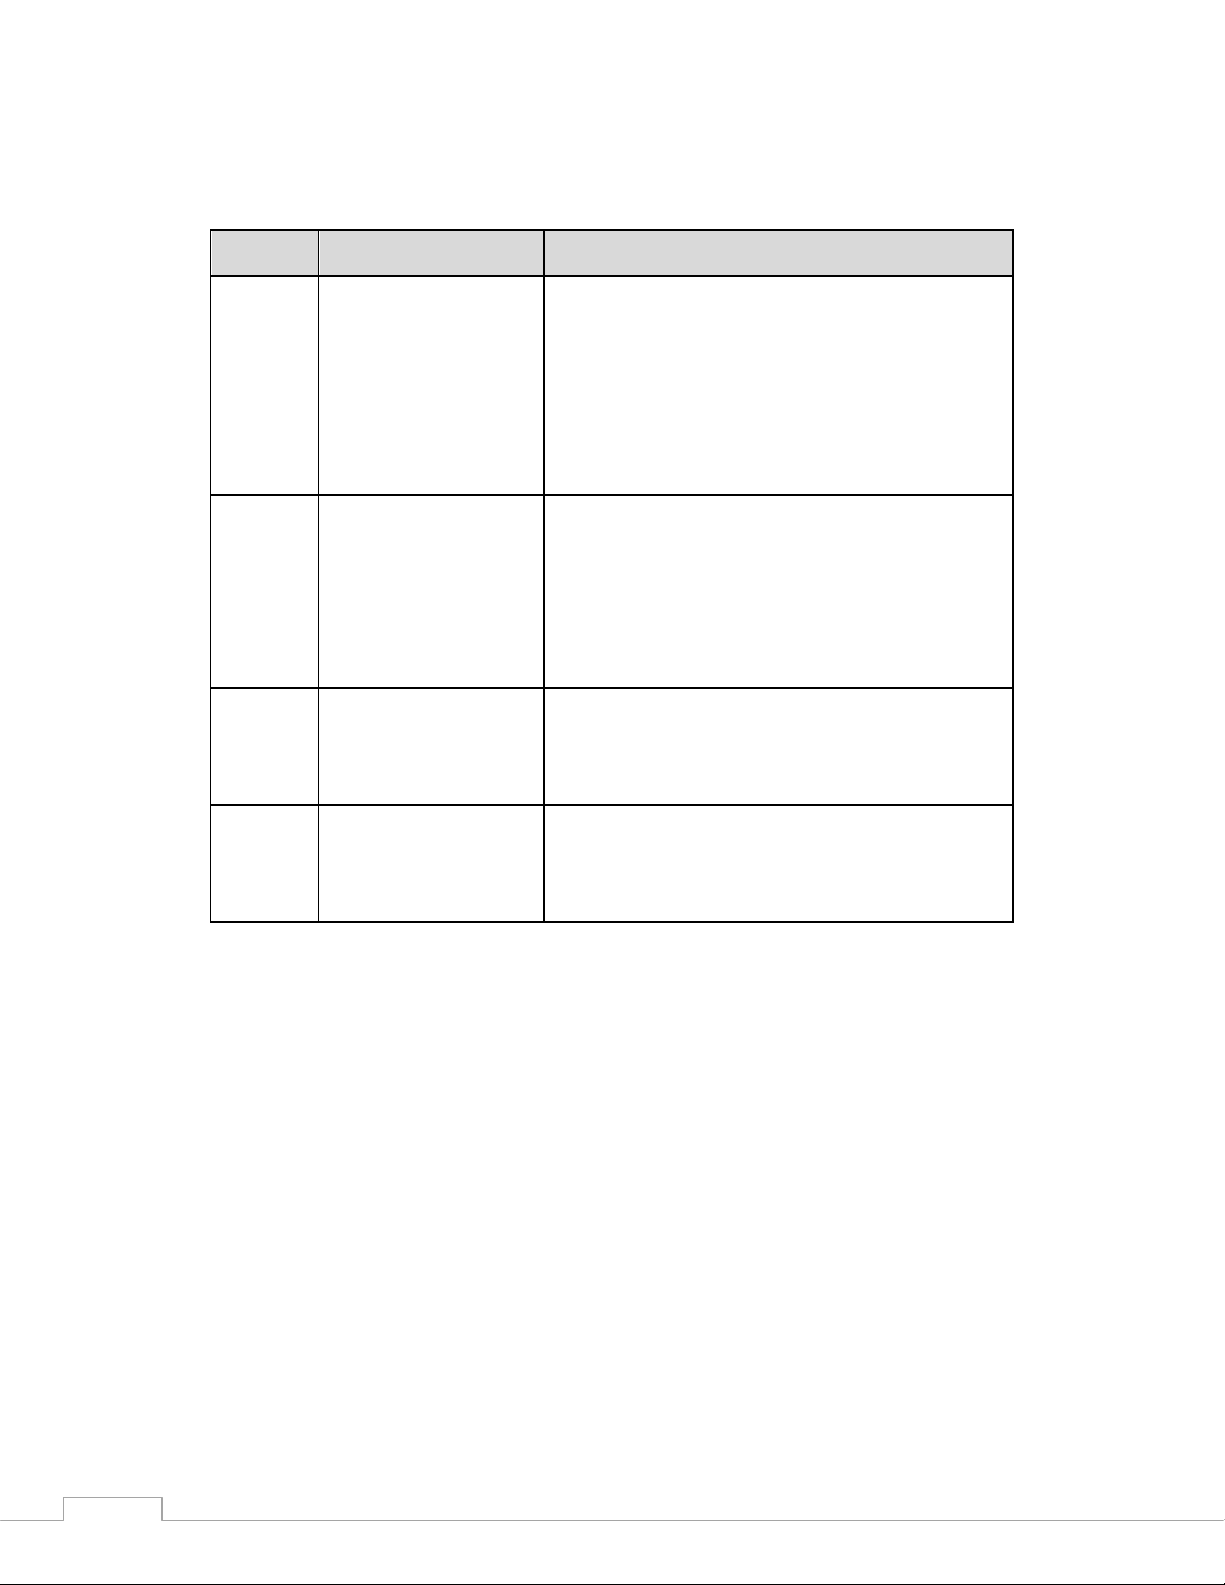
Table 2-1: RED Rocket Board Connector Description
NO. ITEM DESCRIPTION
1
2
DVI C/D
DVI A/B
DMS-59 connector for an output of digital
RGB 8 bit video signals (channel C/D, used
for two single-link connections in quad display applications); it can be connected to a
breakout cable to provide two standard DVI
connectors; a pin-out of this connector can
be found in section A-4 SIGNAL IN AND
OUTPUTS.
DMS-59 connector for an output of digital
RGB 8 bit video signals (channel A/B, two
single-link connections); it can be connected
to a breakout cable to provide two standard
DVI connectors; a pin-out of this connector
can be found in section A-4 SIGNAL IN AND
OUTPUTS.
3
4
SDI OUT A
SDI OUT B
MCX connector for an output of digital video
signals (serial digital interface, port A); either
output of YUV in single-link or first stream of
RGB in dual-link mode.
MCX connector for an output of digital video
signals (serial digital interface, port B); output
of the second stream of RGB in dual-link
mode.
2-2
© 2009-2010 RED.COM, INC. MAY 14, 2010
Page 8
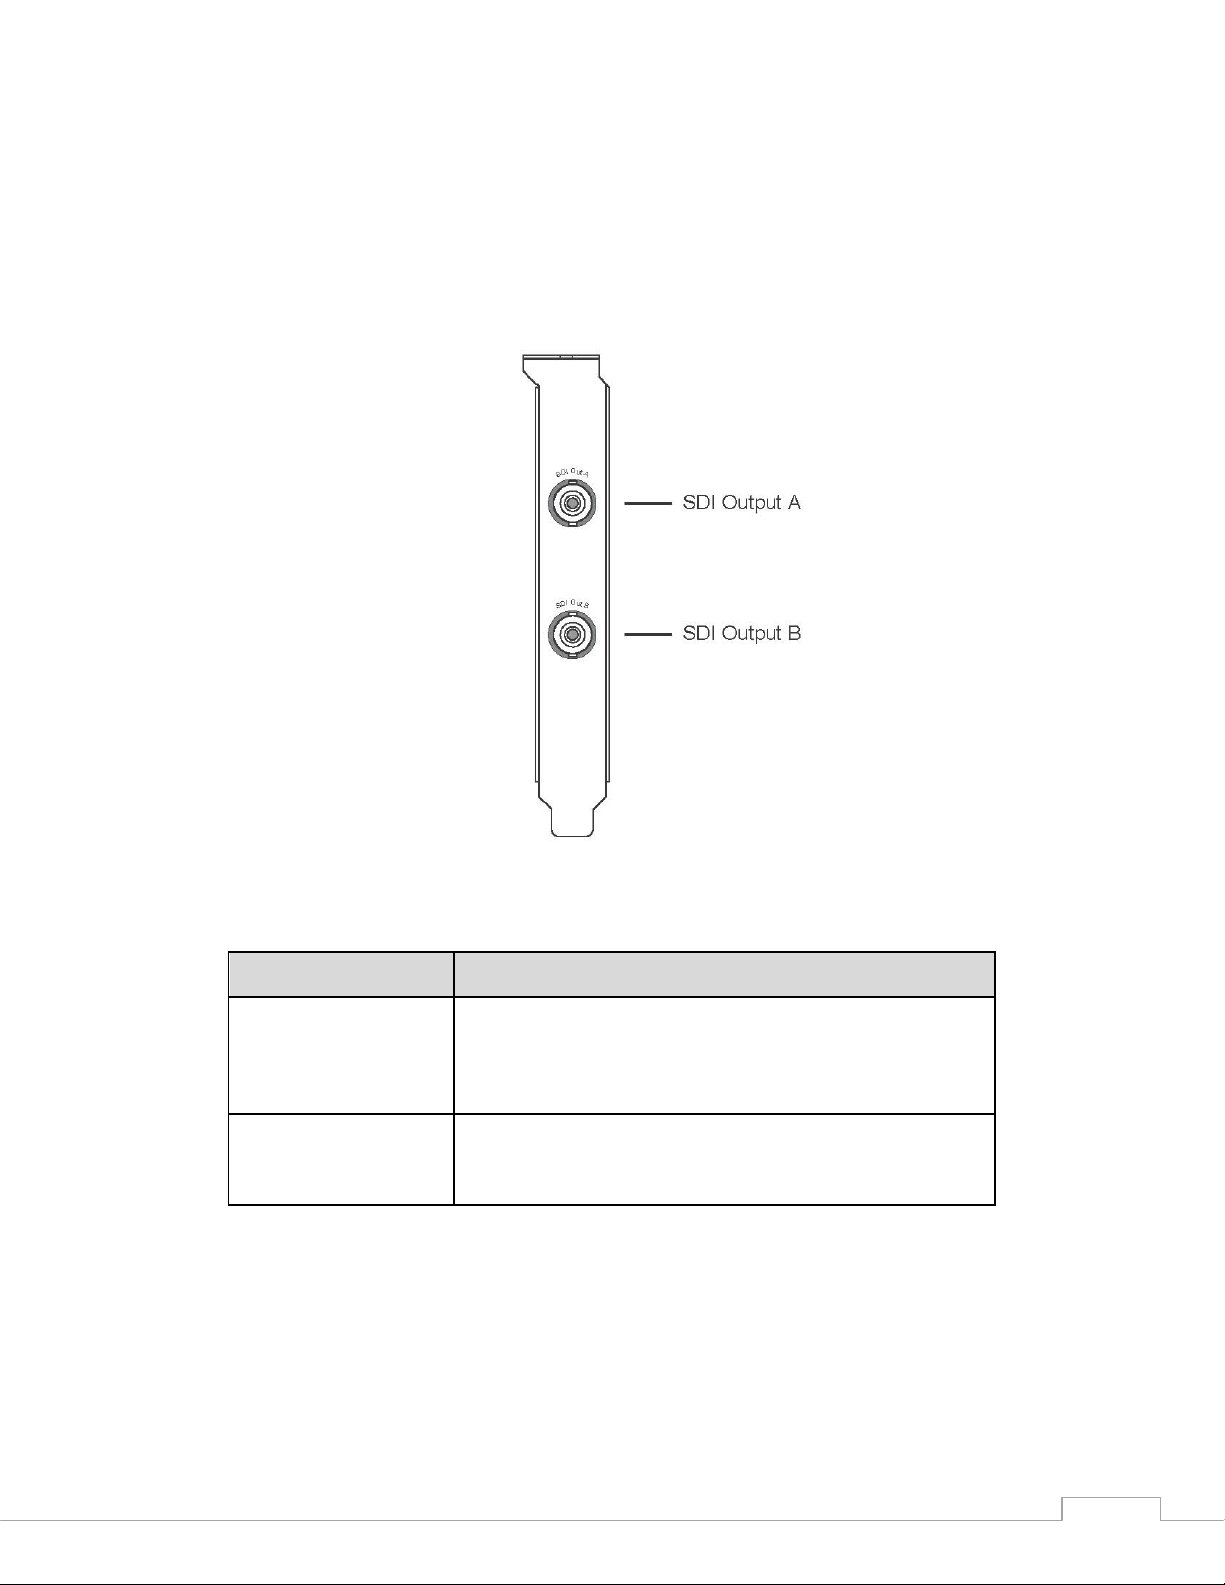
2.2 OVERVIEW OF THE SDI PANEL
The SDI panel provides the SDI (Serial Digital Interface) connectors of the RED Rocket board.
Figure 2-2: SDI Panel
Table 2-2: SDI Panel Connector Description
NOTE: When the RED Rocket Breakout Box is ON and connected to the RED Rocket board, the SDI
outputs of the RED Rocket board will become inoperative.
ITEM DESCRIPTION
BNC connector for an output of digital video signals
SDI Output A
SDI Output B
(serial digital interface, port A); either output of YUV
in single-link or first stream of RGB in dual-link
mode.
BNC connector for an output of digital video signals
(serial digital interface, port B); output of the second
stream of RGB in dual-link mode.
MAY 14, 2010 © 2009-2010 RED.COM, INC.
2-3
Page 9

3 INSTALLATION
This chapter outlines installation of the RED Rocket board into a computer. The installation is performed in
several steps:
1. Downloading driver and firmware
2. Preparing computer for hardware installation
3. Installing SDI panel
4. Installing RED Rocket board
5. Connecting audio/video equipment to RED Rocket board and SDI panel.
6. Installing driver
7. Installing firmware
8. Verifying installation of RED Rocket board
3.1 DRIVER/FIRMWARE DOWNLOAD
This procedure outlines downloading the RED Rocket board firmware and driver.
1. Go to http://www.red.com/support and locate the RED Rocket Installer.
2. Download the RED Rocket Installer to your desktop. The drivers, firmware and installation instruc-
tions for the RED Rocket board are located inside the installation package.
3. After downloading, you will see the new compressed (zipped) folder.
4. Open the zipped folder and extract the operating system specific folder (Windows or Mac) to the
desktop for the drivers and the firmware.
NOTE: On some Mac machines, when the file is downloaded, it will automatically be unzipped in
your download folder.
NOTE: It is OK to perform the driver installation prior to RED Rocket board installation; however, the
firmware must be upgraded before using the RED Rocket board but after the driver has been installed.
5. Shut down the computer.
6. Go to 3.2 HARDWARE INSTALLATION to install the SDI panel and RED Rocket board.
3.2 HARDWARE INSTALLATION
3.2.1 PREPARING THE COMPUTER
Before installing the RED Rocket board the computer system has to be prepared for the installation by performing the following:
1. Ensure computer is turned off and power is disconnected.
WARNING: The computer system you are installing the RED Rocket board in works with voltages
that can be hazardous to your health.
MAY 14, 2010 © 2009-2010 RED.COM, INC.
3-1
 Loading...