

RED LOTO HYDRO 16, LOTO HYDRO 23 with exchanger, LOTO HYDRO 23 Installation Manual

INSTALLATION GUIDE GB
Instructions in English
PELLET STOVE
LOTO HYDRO 16
LOTO HYDRO 23
LOTO HYDRO 23 with exchanger
PART 2 - OPERATION AND CLEANING

II
TABLE OF CONTENTS
TABLE OF CONTENTS ..................................................................................................II
14PRECAUTIONS BEFORE STARTUP ............................................................................3
15CONTROL PANEL ....................................................................................................4
16MENU ITEMS AND OPERATION ................................................................................5
17 SAFETY DEVICES AND ALARMS .............................................................................21
18RECOMMENDATIONS FOR SAFE USE .......................................................................25
19CLEANING AND MAINTENANCE..............................................................................26
20FAULTS/CAUSES/SOLUTIONS .................................................................................32
21CIRCUIT BOARD ...................................................................................................35

3
14-PRECAUTIONS BEFORE START-UP
Technical Dept. - All rights reserved - Reproduction prohibited
GENERAL PRECAUTIONS
Remove any objects that may burn from the brazier (manual, various adhesive labels or any polystyrene).
Check that the brazier is positioned correctly and rests properly on the base.
The rst start-up may not be successful as the feed screw is empty and does not always manage to load the brazier
with the required amount of pellets in time to light the ame.
CANCEL THE FAILED IGNITION ALARM. REMOVE THE PELLETS LEFT IN THE BRAZIER AND REPEAT THE START-UP.
If after repeated attempts, the ame fails to ignite, despite a regular ow of pellets in the brazier, which must rest snugly against the
slots and be clean without any ash incrustations. If no anomaly is found during this inspection, there may be a problem with the
product components or installation may not be correct.
REMOVE THE PELLETS FROM THE BRAZIER AND CONTACT AN AUTHORISED TECHNICIAN.
Do not touch the boiler during the rst lighting, as it is during this phase that the paint sets. If you touch the paint,
you may expose the steel surface.
If necessary, touch up the paint with the spray can of the specic colour. (See ‘’Pellet stove accessories’’).
It is good practice to ensure eective ventilation in the room during the initial start-up, as the boiler will emit some
smoke and smell of paint.
ATTENTION!
Please ensure the brazier is clear of ALL pellets and ash build up following any failed ignitions. Failure to clear out
the brazier prior to resetting may result in further failed ignitions or in certain conditions an explosive ignition.
Do not stand close to the stove and, as mentioned, air the room. The smoke and smell of paint will disappear after about an hour of
operation, however, they are not harmful in any case.
The boiler will be subject to expansion and contraction during the lighting and cooling down stages, and may therefore make slight
creaking noises.
This is absolutely normal as the structure is made of laminated steel and must not be considered a defect.
It is extremely important to make sure the boiler does not reach high temperatures straight away, but to increase the temperature
gradually using low power at rst.
This will prevent damaging the ceramic or serpentine stone tiles, the welds and the steel structure.
DO NOT EXPECT HEATING EFFICIENCY IMMEDIATELY!!!
ATTENTION!
If during operation or initial ignition you encounter combustion smoke spillage in to the room from the
appliance or the ue then please switch o the appliance, ventilate the room and contact the installation
/ service technician immediately.
7
2 3 4
61 5
4
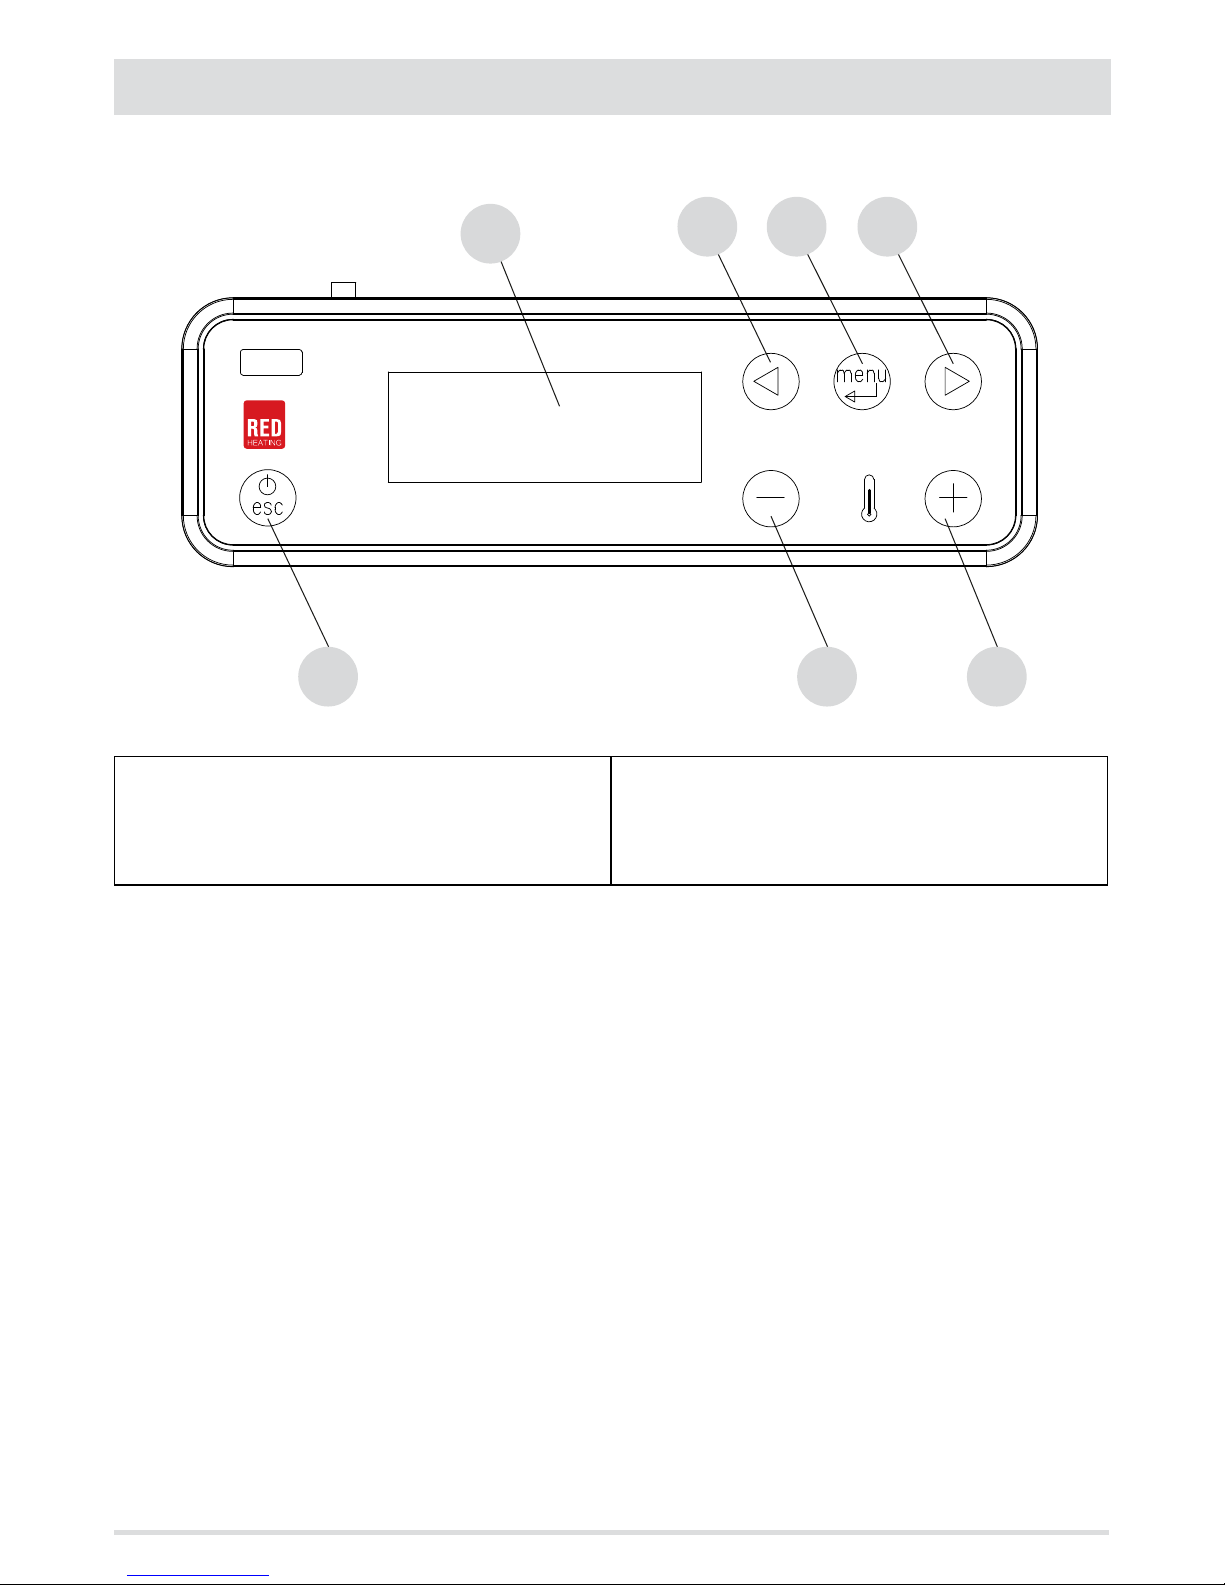
15-CONTROL PANEL
CONTROL PANEL DISPLAY
Menu options
KEY
1. Switching on/switching o the boiler
2. Scrolling down through the programming menu
3. Menu
4. Scrolling up the programming menu
5. Decrease set temperature / programming functions.
6. Increase set temperature / programming functions.
7. Display.
MAIN MENU
Press key 3 (menu) to access. The options accessed are:
• Date and Time
• Timer
• Sleep (only when boiler is on)
• Settings
• Info
Date and time conguration
Congure the time and date as follows:
• Press the “menu” key.
• Select “Date and Time”.
• Press “menu” to conrm.
• Scroll through with the arrow keys and select the variables to be edited one at a time: Day, Hour, Min, Num. day, Month, Year.
• Press “menu” to conrm
• Use the + and - keys to edit.
• Finally, press “menu” to conrm and “esc” to exit.

5
16-MENU ITEMS AND OPERATION
Technical Dept. - All rights reserved - Reproduction prohibited
PROGRAMMED MODE (TIMER) - Main menu
The current time and date must be congured to ensure correct operation of the timer.
There are six congurable TIMERS; for each one, the user can select a start and stop time and the days of the week when it is in use.
When one or more programs are active, the status of the boiler and the TIMER “n” alternate on the display. “n” is the number of timer
programs in use, separated by dashes.
Example:
TIMER 1 Timer 1 program active.
TIMER 1-4 Timer 1 and 4 programs active.
TIMER 1-2-3-4-5-6 All timer programs active.
EXAMPLE OF PROGRAMMING
With the boiler on or o:
• access the MENU,
• scroll to the TIMER item using the <> arrows,
• press the “Menu” key
• the system shows “P1” (Press the <> keys to move through the timers P2, P3, P4, P5, P6)
• Press the “Menu” key to activate “P1”.
• press + - and select “ON”
• press the “Menu” key to conrm
At this point the start time is 00:00. Press the + - key to set the start time and press the “menu” key to conrm.
Next, the proposed stop time is 10 minutes later than the congured start time: press the + key and edit the stop time, and press the
“menu” key to conrm.
Next, you are asked to set the days of the week when the congured timer is to be enabled or disabled. Press the - or + keys to select the
day you want to activate the time. It will light up white, then conrm with the “menu” key. If no day is selected for enabling the timer, the
timer program is no longer enabled on the status window.
Next, program the other days or press “ESC” to exit. Repeat this procedure to program the other timers.
EXAMPLES OF PROGRAMMING
P1 P2
on o day on o day
08:00 12:00 mon 11:00 14:00 mon
Boiler on between 08:00 and 14:00
P1 P2
on o day on o day
08:00 11:00 mon 11:00 14:00 mon
Boiler on between 08:00 and 14:00
P1 P2
on o day on o day
17:00 24:00 mon 00:00 06:00 tue
Boiler on between 17:00 on Monday to 06:00 on Tuesday

6
16-MENU ITEMS AND OPERATION
NOTES ON USE OF THE TIMER
• The timer always starts the boiler with the last temperature and ventilation settings (or with the default settings at 20°C and V3 if
they have never been altered).
• The start time can be between 00:00 and 23:50
• If the stop time has not yet been saved, the program proposes a start time at +10 minutes.
• If a timer program turns o the boiler at 24:00 on one day and another program starts it up at 00:00 on the next day: the boiler
remains on.
• A program has a start-up and/or shut-down time that overlap the times of another program: if the boiler is already on, the start has
no eect while OFF turns o the boiler.
• When the boiler is on and the timer is active, pressing the OFF key turns o the boiler; the boiler then restarts automatically at the
next time of the timer.
• When the boiler is o and the timer is active, pressing the ON key turns on the boiler; the boiler then stops automatically at the next
time of the timer.
SLEEP FUNCTION (main menu)
Sleep may be activated only when the boiler is on and allows you to quickly set a time for the product to turn o.
To set the Sleep function, proceed as follows:
• Enter the MENU
• Scroll to the SLEEP item with the <> arrows
• Press Menu
• Set the turn-o time you want using the + and - keys.
The panel shows a default time of 10 minutes after the current time, which can be adjusted with key 4 up to the following day (i.e. the
turn-o can be delayed for a maximum of 23 hours and 50 minutes).
If the SLEEP function is active with the TIMER active, the former has priority, therefore the boiler will not turn o at the time set in the
timer program but at the time set by the sleep function, even if it comes after the time set by the timer.
ADJUSTMENTS MENU
To access the menu, proceed as follows:
• Press the - + keys
• Scroll with the <> arrows and select “Set Amb. T” or “Set Water T”
• Press “menu” to enter the option selected.
• Change with the + - keys.
• Press “menu” to conrm and “esc” to exit.

7
16-MENU ITEMS AND OPERATION
Technical Dept. - All rights reserved - Reproduction prohibited
SETTINGS MENU
The SETTINGS menu is for conguring use of the boiler:
a. Language.
b. Cleaning (shown only when boiler is o ).
c. Feed screw loading (shown only when boiler is o).
d. Tones.
e. External thermostat (activation).
f. Auto Eco (activation).
g. Eco Turn-o T (default 10 minutes)
h. Pump on T (default 50°C).
i. Auxiliary boiler (default deactivated).
j. Pellet recipe.
k. Fumes rpm % ventilation.
l. Maximum power (1-5 - default 5).
m. Component test (shown only when boiler is o).
n. “Chimney sweeper” function (can be enabled only when boiler is on, for checking emissions in eld).
o. System conguration (factory settings: system 02).
p. Season
q. Technical menu.
NOTE: Some of the options listed above cannot be enabled in certain “system congurations”.
a - Language
Select the language as follows:
• Press the “menu” key.
• Use the arrow keys to scroll through and select “Settings”
• Press “menu” to conrm.
• Use the arrow keys to scroll through and select “language”.
• Press “menu” to conrm.
• Use the + - keys to select the required language (IT/EN/DE/FR/ES/NL/PL/DA)
• Press “menu” to conrm and “esc” to exit.
b - Cleaning
Select “Cleaning” (only with boiler o) as follows:
• Press the “menu” key.
• Use the arrow keys to scroll through and select “Settings”
• Press “menu” to conrm.
• Use the arrow keys to scroll through and select ‘’Cleaning’’
• Press “menu” to conrm.
• Use the + - keys to select “On”.
• Press “menu” to conrm and “esc” to exit.

8
16-MENU ITEMS AND OPERATION
c - Load feed screw
This is for lling the pellet loading system. This can be enabled only when the boiler is o. A 180” countdown appears. The auger stops
automatically at the end of the countdown and the menu closes.
To select ‘’Load auger’’ (only with boiler o) proceed as follows:
• Press the “menu” key.
• Use the arrow keys to scroll through and select “Settings”
• Press “menu” to conrm.
• Scroll with the arrows and select “Load auger”.
• Press “menu” to conrm.
• With the + - keys, select “Enable”.
• Press “menu” to conrm and “esc” to exit.
d - Tones
This function is disabled by default. To enable it proceed as follows:
• Press the “menu” key.
• Use the arrow keys to scroll through and select “Settings”
• Press “menu” to conrm.
• Use the arrow keys to scroll through and select ‘’Tones’’
• Press “menu” to conrm.
• Use the + - keys to select “On”.
e - External thermostat
EXTERNAL THERMOSTAT (not included with the boiler, it must be provided by the user)
The temperature of the boiler can also be controlled by an external thermostat in the room. It should be positioned centrally in the room
where the boiler is installed. It provides a closer match between the heating temperature requested of the boiler and the actual room
temperature it provides.
Connect the wires of the external thermostat to points 1-2 of the terminal block on the boiler.
Once the thermostat has been connected it needs to be enabled.
To do this, proceed as follows:
• Press the “menu” key.
• Scroll with the arrows to “Settings”.
• Press “menu” to select.
• Now use the arrows to scroll to “External thermostat”.
• Press “menu” to select.
• Press the - + keys.
• Select “On” to activate the external thermostat.
• Press the “menu” key to conrm.
• Press the “esc” key to exit.
f - Auto-Eco activation
To select the Auto-Eco function, proceed as follows:
• Press the “menu” key.
• Use the arrow keys to scroll through and select “Settings”
• Press “menu” to conrm.
• Scroll with the arrows and select “Auto-Eco”.
• Press “menu” to conrm.
• Use the + - keys to select “On”.
• Press “menu” to conrm and “esc” to exit.

9
16-MENU ITEMS AND OPERATION
Technical Dept. - All rights reserved - Reproduction prohibited
g - Eco Stop T
To select the Eco Stop T function, proceed as follows:
• Press the “menu” key.
• Use the arrow keys to scroll through and select “Settings”
• Press “menu” to conrm.
• Scroll with the arrows and select ‘’T Eco o’’.
• Press “menu” to conrm.
• Enter the minutes with the + - keys.
• Press “menu” to conrm and “esc” to exit.
AUTO ECO MODE
For activation of the “Auto Eco” mode and time settings, see paragraphs 8 f and 8 g respectively.
The ‘’ECO stop T’’ can be adjusted to ensure correct operation in the various environments in which the boiler can be installed and to avoid
constant stopping and starting when the room temperature is subject to sudden change (drafts, poorly insulated rooms, etc.).
The ECO stop procedure is activated automatically when all the power recall devices included in the “system conguration” are satised:
room temperature probe/external thermostat (congurations 1-2-3), ow switch (conguration 2), thermostat/ntc (10 kΩß3435) puer
(conguration 4-5) or thermostat/ntc (10 kΩ ß3435) boiler (conguration 2-3). If all the devices present are satised, the time begins
to decrease “T ECO stop” (10 minutes default, can be changed in the “Settings” menu). During this phase, the panel alternates between
displaying ON with a small ame and Crono (if active) - Eco active. The minutes counting down to the Eco Stop are shown at the top of the
display. The ame moves to P1 and remains there until the set “T Eco Stop” time reaches zero, and if the conditions are still satised, turns
o the boiler. The ECO stop count is cancelled if one of the devices recalls power.
When the boiler begins to turn o, the panel shows: O - Eco Active - ashing small ame.
When the boiler turns o, OFF-ECO appears on the display with the ame symbol o.
The following conditions have to be met simultaneously for the ECO to restart:
• Power recall
• 5 minutes have passed since shut-down.
• TH
2
O < TSetH2O.
• If the power is recalled by the domestic hot water (DHW), the 5’ are ignored and the boiler starts up as required.
NOTE: In conguration 4 - 5 the Auto Eco mode is enabled automatically. Also when in conguration 2 - 3, with the ‘summer’ function set,
it is enabled automatically. Where it is prescribed that it should be enabled, the mode cannot be disabled.
h - T Pump On
This option enables adjustment of the pump activation temperature.
Select the Pump On T function as follows:
• Press the “menu” key.
• Use the arrow keys to scroll through and select “Settings”
• Press “menu” to conrm.
• Scroll with the arrows and select “T Pump On”.
• Press “menu” to conrm.
• Use the + - keys to change the °C.
• Press ‘’menu’’ to conrm and ‘’esc’’ to exit.
i - Auxiliary boiler
An additional module (optional) must be installed to allow the start-up of an auxiliary boiler when the main boiler is o or has been
stopped due to an alarm. The default settings have this function disabled. To enable the function, go to the settings menu.

10
16-MENU ITEMS AND OPERATION
j - Pellet Recipe
This function is for adapting the boiler to the type of pellet in use. As there are many types of pellet available on the market, the operation
of the boiler can vary considerably according to the quality of the fuel. When the pellets clog up the brazier due to excess loading of fuel
or when the ames are high even at low power, or when the ames are low, it is possible to decrease/increase the amount of pellets in
the brazier:
Available values:
-3 = A decrease of 30% on the factory setting.
-2 = A decrease of 20% on the factory setting.
-1 = A decrease of 10% on the factory setting.
0 = No changes.
1 = An increase of 5% on the factory setting.
2 = An increase of 10% on the factory setting.
3 = An increase of 15% on the factory setting.
Edit the recipe as follows:
• Press the “menu” key.
• Use the arrow keys to scroll through and select “Settings”
• Press “menu” to conrm.
• Scroll with the arrows and select “Pellet recipe’’
• Press “menu” to conrm.
• Alter the % with the + - keys.
• Press ‘’menu’’ to conrm and ‘’esc’’ to exit.
k - Fumes rpm % ventilation
In the event the installation presents problems in extracting smoke (lack of draft or even pressure in the duct), it is possible to increase
the smoke and ash extraction speed. This change resolves all the potential problems related to pellets clogging in the brazier and deposits
forming at the bottom of the brazier itself caused by poor quality fuel or fuel that produces a lot of ash. The extraction speed may be
altered between -30% to +50%, with increments of 10 percent at a time. Negative variation can be necessary if the ame is too low.
To alter this parameter, proceed as follows:
• Press the “menu” key.
• Use the arrow keys to scroll through and select “Settings”
• Press “menu” to conrm.
• Scroll with the arrows and select “Fumes rpm Var.”
• Press “menu” to conrm.
• Alter the % with the + - keys.
• Press ‘’menu’’ to conrm and ‘’esc’’ to exit.

11
16-MENU ITEMS AND OPERATION
Technical Dept. - All rights reserved - Reproduction prohibited
l - Maximum power
Allows you to set the maximum power limit of the ames which the boiler can use to reach the set target temperature.
Modify the power as follows:
• Press the “menu” key.
• Use the arrow keys to scroll through and select “Settings”
• Press “menu” to conrm.
• Scroll with the arrows and select ‘’Maximum power’’.
• Press “menu” to conrm.
• Change the power from 01 to 05 using the + - keys.
• Press ‘’menu’’ to conrm and ‘’esc’’ to exit.
m - Components test
This can be done only when the boiler is o and allows you to select the components to be tested:
• Spark plug: it is turned on for a xed test period of 1 minjute during which the panel displays the countdown in seconds.
• Feed screw: it is powered for a xed period of 1 minute during which the panel displays the countdown in seconds.
• Extractor: it is activated at 2500 rpm for a xed period of 1 minute during which the panel displays the countdown in seconds.
• Exchanger: enables you to conduct the test in V5 for a xed period of 1 minute during which the panel displays the countdown in
seconds.
• Pump: it is activated for a xed period of 10 seconds during which the panel displays the countdown.
• 3-way valve: the 3-way valve is activated for a xed test period of 1 minute during which the panel displays the countdown in
seconds.
Enable the “Component test” function (only with boiler o) as follows:
• Press the “menu” key.
• Use the arrow keys to scroll through and select “Settings”
• Press “menu” to conrm.
• Use the arrow keys to scroll through and select ‘’Component test’’
• Press “menu” to conrm.
• Use the + - keys to select the test to be carried out.
• Press ‘’menu’’ to conrm and ‘’esc’’ to exit.
n - Chimney sweep Function
This function can only be activated when the boiler is on and power is supplied, and it forces operation of the boiler at the parameters
P5, with the ventilator (if present) in V5. Any corrections to the loading/smoke ventilation percentage must be read. This state lasts 20
minutes, the countdown is displayed on the panel. During this interval, the system ignores any thermostat/puer/room set point/ set
point H
2
0 values, only the safety shut-down at 85°C remains active. The technician can stop this phase at any moment by quickly pressing
the on/o key. Enable the “Chimney sweeper” function as follows:
• Press the “menu” key.
• Use the arrow keys to scroll through and select “Settings”
• Press “menu” to conrm.
• Use the arrow keys to scroll through and select ‘’Chimney sweeper function’’
• Press “menu” to conrm.
• Use the + - keys to select “On” (O by default)
• Press ‘’menu’’ to conrm and ‘’esc’’ to exit.
 Loading...