

Page 1

User Guide
Page 2

Content
Welcome .....................................................................................................................................5
Getting Started
......................................................................................................................... 5
Initial setup................................................................................................................................. 5
Setting a SIM card .................................................................................................................... 5
Locking and unlocking the screen ........................................................................................... 7
Screen and Display.................................................................................................................. 8
The home screen ..................................................................................................................... 8
Notifications ............................................................................................................................. 11
Managing Apps .......................................................................................................................14
Downloading apps .................................................................................................................. 14
Removing apps ....................................................................................................................... 14
Deleting apps .......................................................................................................................... 15
Managing permissions ........................................................................................................... 15
Setting default apps
................................................................................................................ 15
Internet and Sharing .............................................................................................................. 15
Configuring the network ......................................................................................................... 15
Controlling data use ................................................................................................................ 18
Calls and Contacts ................................................................................................................19
Making phone calls ................................................................................................................. 19
Answering calls ....................................................................................................................... 22
Setting call options ................................................................................................................. 23
Contacts ....................................................................................................................................24
Creating a new contact .......................................................................................................... 24
Importing/exporting contacts ................................................................................................. 25
Create a personal name card ................................................................................................ 26
Managing contacts ................................................................................................................. 26
Messaging ................................................................................................................................28
Sending a message .................................................................................................................... 28
Replying to a message ........................................................................................................... 28
Deleting messages ................................................................................................................. 29
Camera and Video .................................................................................................................29
Camera interface .................................................................................................................... 29
Taking photos ..........................................................................................................................29
Taking quick photos ................................................................................................................30
Recording videos .................................................................................................................... 30
Panorama ................................................................................................................................ 30
Beauty mode........................................................................................................................... 30
Histogram ................................................................................................................................ 31
Timelapse ................................................................................................................................ 31
Slow motion ............................................................................................................................ 31
Selecting flash modes ............................................................................................................ 31
Viewing 4V mode photos and videos .................................................................................... 32
Camera setting ....................................................................................................................... 32
Page 3

Tools ...........................................................................................................................................34
Calendar .................................................................................................................................. 34
Clock ....................................................................................................................................... 35
File manager ............................................................................................................................ 37
Phone Settings ........................................................................................................................39
Switch on or off airplane mode .............................................................................................. 39
NFC ......................................................................................................................................... 39
Cast your screen .................................................................................................................... 40
Managing the battery .............................................................................................................. 40
Display settings ....................................................................................................................... 40
Setting Sound ......................................................................................................................... 42
Viewing the phone storage..................................................................................................... 42
Setting the screen unlock method ......................................................................................... 43
Setting a fingerprint ................................................................................................................. 43
Setting smart lock ................................................................................................................... 43
Restoring factory settings ....................................................................................................... 43
Setting the volume and sound alerts ..................................................................................... 44
Accessibility ............................................................................................................................. 44
Page 4

Welcome
Hello! Welcome to HYDROGEN One. In this manual, you will learn about HYDROGEN One’s basic
operation and features.
Before reading the contents of this manual, please note:
The functions described in this manual are those featured on your phone as it is now.
If the descriptions do not match your phone’s actual functions due to software or hardware
changes, then please use the functions as they actually are on your phone.
Getting Started
Initial setup
Please read the quick start guide inside the box before using your phone.
When you first turn on the device, follow the instructions on the screen to choose your language,
connect to a network, migrate data, log in to a Google account, record a fingerprint, set
a password, and personalize the device.
Setting a SIM card
Enabling or disabling a SIM card
If you want to stop one of your SIM cards from being used to make calls, send messages,
or access the Internet, you have the option to disable that SIM card.
1. From the home screen, swipe up to access app list.
2. Tap
3. Tap Network & Internet > SIM cards.
4. Click the switches besides the two SIM cards to enable or disable each SIM card.
5. Confirm your choice when prompted.
When re-enabling a previously disabled SIM card, the phone will restore the previous
SIM card settings, including your mobile data preferences.
Renaming a SIM Card
By default, each SIM card is named after the carrier, but you can rename your SIM card to make it
easier to remember.
1. From the home screen, swipe up to access app list.
2. Tap
3. Tap the SIM card name, and enter a new name.
4. Tap OK.
Settings.
Settings > Network & Internet > SIM cards.
Page 5

Setting the preferred card for mobile data
Select which SIM card is preferred for mobile data. Once set, the phone will connect to the mobile
network using this card. No mobile data will be consumed via the other SIM card.
1. From the home screen, swipe up to access app list.
2. Tap
3. Tap Cellular data, and select an SIM card as the preferred card.
Settings > Network & Internet > SIM cards.
Setting a preferred card for phone calls
Select which SIM card is preferred for phone calls. All phone calls will be made using this SIM card.
1. From the home screen, swipe up to access app list.
2. Tap
3. Tap Calls, and select your preferred SIM card for phone calls or select Ask every time.
If you don’t set a preferred card for calls, you will have to select a SIM card each time you make
a phone call.
Settings > Network & Internet > SIM cards.
Setting a preferred card for messages
Select which SIM card is preferred for messages. All text messages will be sent using this card.
1. From the home screen, swipe up to access app list.
2. Tap
3. Tap SMS messages, and select your preferred SIM card for messages
or select Ask every time.
If you don’t set a preferred card for phone-calls, you will have to select a SIM card each time
you send a message.
Settings > Network & Internet > SIM cards.
Locking and unlocking the screen
By default, your phone’s screen will automatically lock after a period of time. You can set the screen
lock time and method.
Setting the lock screen method
1. From the home screen, swipe up to access app list.
2. Tap
You can choose one of the following lock screen methods.
• None: Do not lock the screen.
• Swipe: Swipe up on the screen to unlock your device.
• Pattern: Draw a pattern on the screen to unlock your device.
• PIN: Set a PIN code for unlocking the screen.
• Password: Enter a password to unlock the device.
Settings > Security & location > Screen lock.
To remove the screen unlock password, select None and follow the onscreen instructions.
Page 6
Unlocking the screen
1. Press Power/Lock button to turn on the screen.
2. Swipe the screen up to unlock it.
• When pattern, PIN, or password unlock has been set up, you need to draw the pattern,
enter the PIN or a password to unlock the screen.
• Please enter the password to unlock the screen from time to time to prevent it being
forgotten after using the iris and fingerprint options for a long period.
Screen and Display
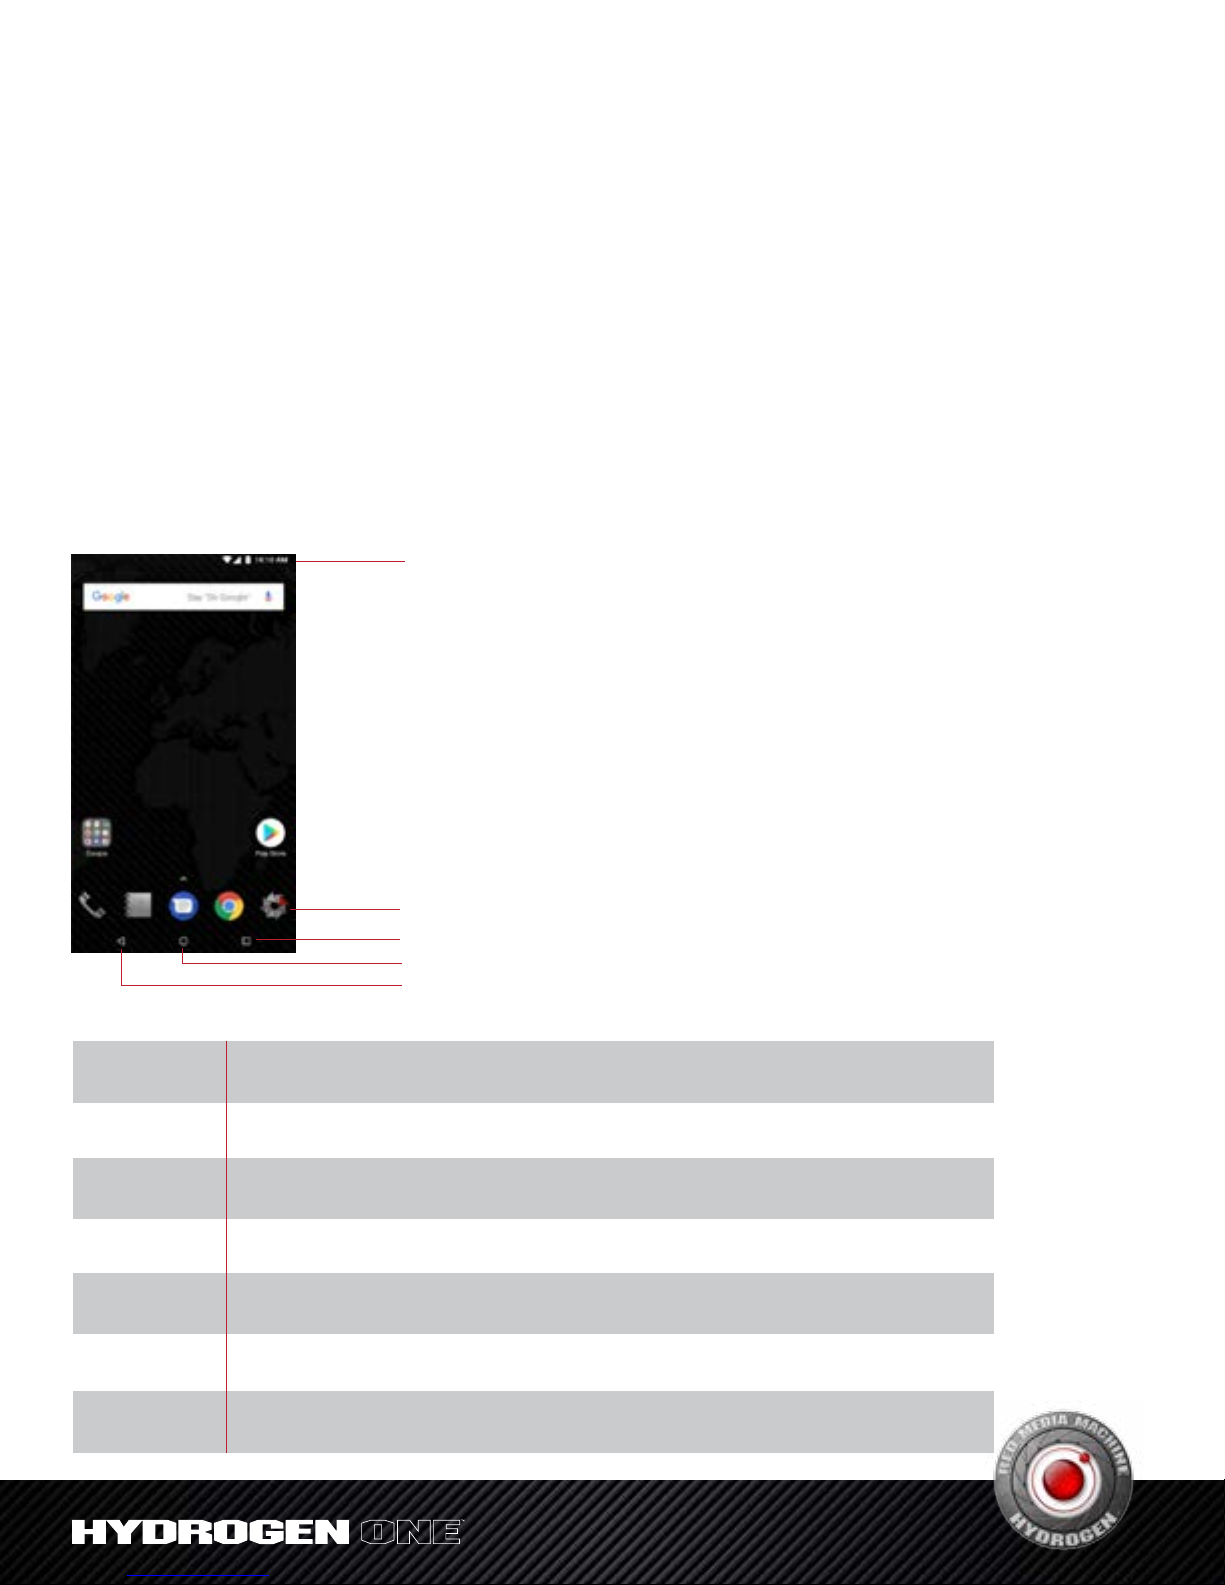
The home screen
The home screen interface
Status bar
Screen gestures
Tap
Double tap
Tap and hold
Swipe
Drag
Spread fingers
apart
Pinch fingers
together
Tap an item on the screen once. For example, tap to select an option or open
an app on the home screen.
Tap the target on the screen twice in quick succession. For example, double tap
an image in full screen mode to zoom in or out.
Tap and hold a target until the phone vibrates, then proceed to the next step. For
example, tap and hold an app in the home screen to allow you to move the app icon.
Swipe your fingers on the screen. For example, swipe up or down your contact list
to scroll through it.
Tap and hold an icon until the phone vibrates, then move it to another position
on the screen. For example, drag an icon to change its position.
Spread two fingers apart on the screen. For example, spread two fingers apart to
zoom in on a picture.
Pinch two fingers together on the screen. For example, pinch two fingers together
to zoom out on a picture.
Favorite apps
Recent apps
Home
Back
Page 7
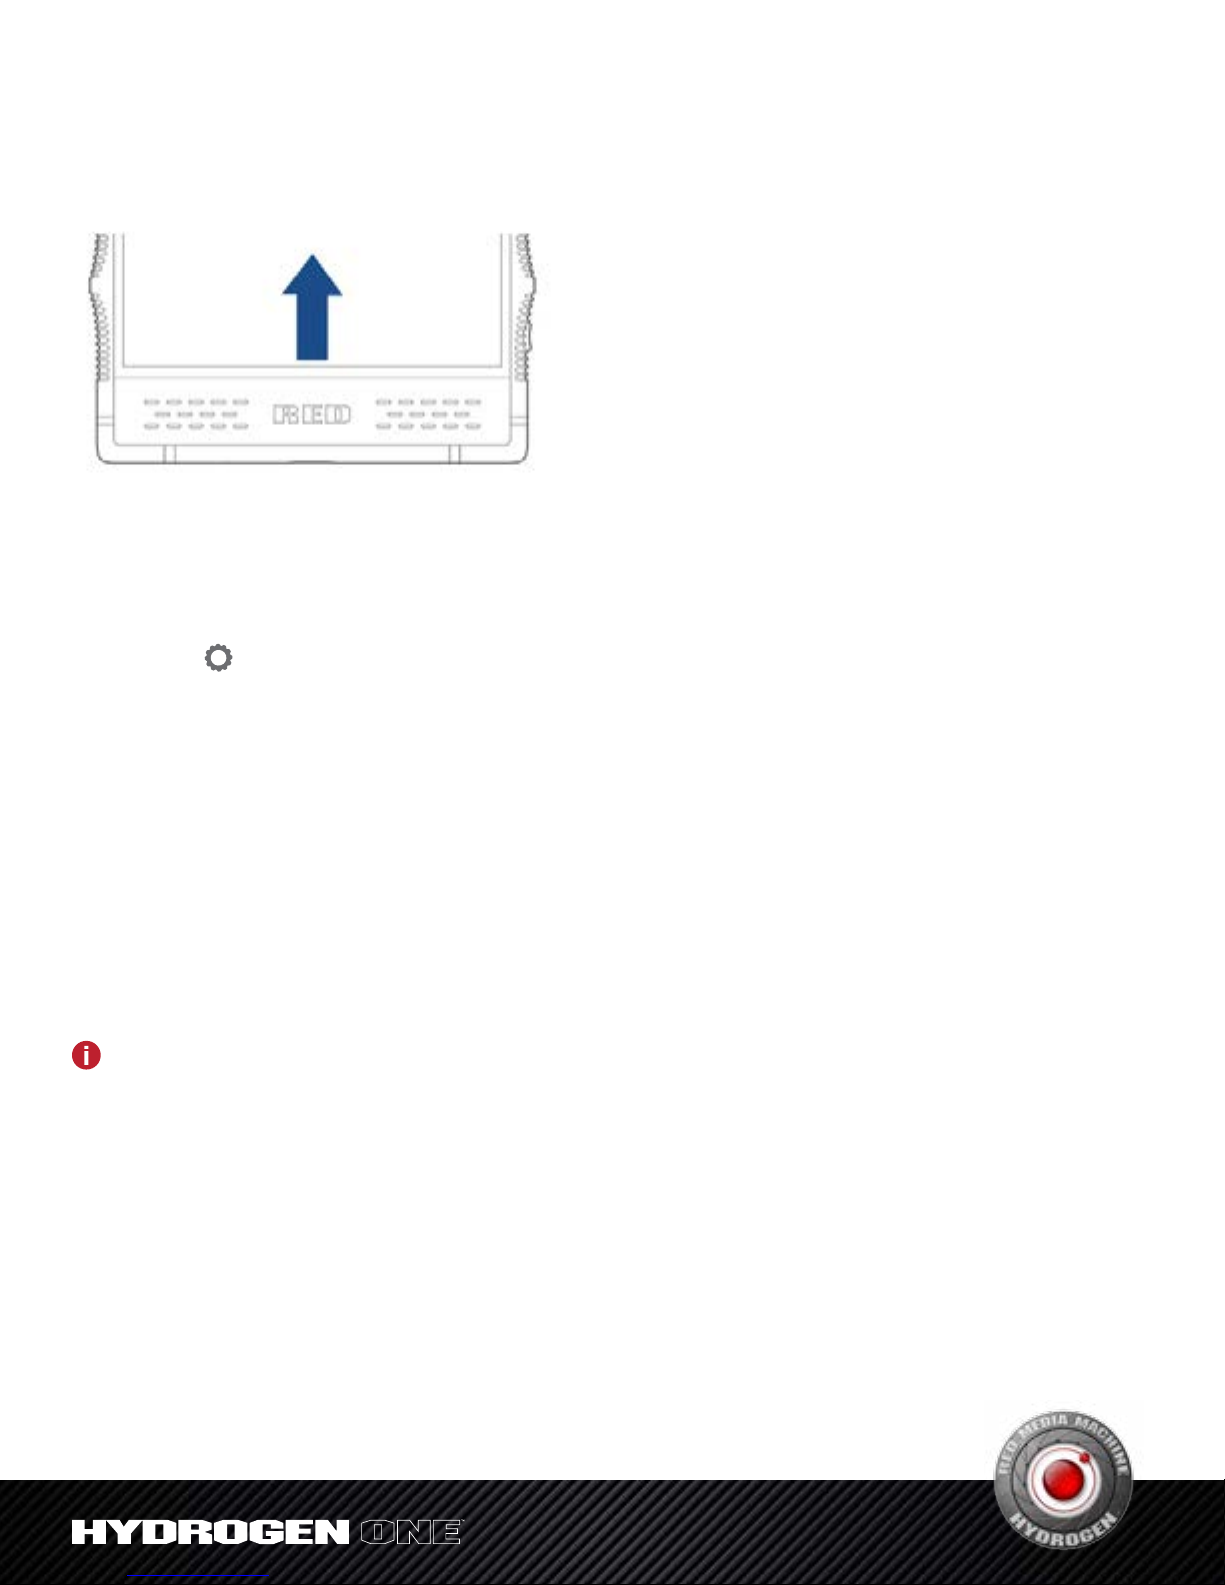
Revealing hidden navigation icons
In some circumstances, such as when you are taking a photo or viewing an image, the device
automatically hides the navigation icons at the bottom of the screen. Swipe up from the bottom of the
screen to reveal the hidden navigation icons.
Customizing the home screen
Setting the wallpaper
1. From the home screen, swipe up to access app list.
2. Tap
3. Tap Display > Wallpaper.
4. Select a picture from the gallery or a pre-saved wallpaper, and then click Set wallpaper
in the top of the screen. Follow the onscreen instructions to set the picture as a
wallpaper for the home screen or the lock screen, or both.
Settings.
Setting the home screen switch effect
Your phone comes loaded with numerous special effects for switching between home screens.
1. Tap and hold an empty area on the home screen until the phone vibrates.
2. Tap Transitions.
3. Select a special effect for switching between home screens.
Adding widgets
Widgets cannot be added if there is not enough empty space on the home screen. Please first
ensure there’s enough empty space on the current home screen, or create a new home screen.
1. Tap and hold an empty area on the home screen until the phone vibrates.
2. Tap Widgets.
3. Select a widget and drag it to home screen.
Moving icons or widgets
Tap and hold an icon on the home screen until the phone vibrates, and then drag it to
a new position.
Page 8

Resizing widgets
Only some widgets can be resized.
1. Tap and hold a widget until the phone vibrates.
2. Drag the dots appearing around the widget to adjust its size.
3. Tap any empty space on the screen to finish.
Deleting widgets
Tap and hold the widget until the phone vibrates, and then drag it onto REMOVE at the top
of the screen.
Adjusting the font size on the home screen
You can set a bigger font size for the home screen if you feel the text is too small.
1. From the home screen, swipe up to access app list.
2. Tap
Settings > Display > Advanced.
3. Tap Font size.
4. Follow the instructions and drag the slider to make the font size larger or smaller.
Creating a folder
On the home screen, drag an application icon onto another application icon to create a folder.
Renaming a folder
Tap a folder and then tap the folder’s name in the folder details interface to rename it.
Adding objects to a folder
Tap and hold an icon on the home screen until the phone vibrates, and then drag it onto
the desired folder icon.
Quickly browsing folders
If the home screen has multiple folders, you can quickly switch between folders by touching
different folder names at the top of the screen when viewing a folder’s details.
If the home screen has multiple folders, you can quickly switch between folders by swiping left
or right when viewing a folder’s details.
Taking screenshots
You can take a screenshot of the screen by pressing the Power/Lock button and the Volume Down
button simultaneously.
The screenshot will be saved to Internal storage/Pictures/Screenshots/.
Viewing recently opened apps
To view a list of recently opened apps, tap
Tap an app window to access it.
. Scroll up and down to view the apps.
Page 9

Notifications
Opening the notification bar
1. Depending on the screen mode, you can:
• When the screen is unlocked: swipe down from the top of the screen to open
the notification bar.
• When the screen is locked: tap the Power/Lock button to turn on the screen, and swipe
down from the top of the screen to open the notification bar.
2. View or close notifications using the switches, or tap a notification to see more details.
A password is needed when the screen is locked.
You can set up how to display notifications when the screen is locked at Settings > Apps
& notifications > Notifications. For details, see Setting how notifications are displayed.
Viewing notifications
When the screen is locked, turn on the screen and all new notifications will be displayed on the
screen. When the screen is unlocked, swipe down from the top of the screen to open the
notification bar and view the list of notifications.
Setting how notifications are displayed
You can set up how to display notifications on your phone, adjust the level of detail, and change which
apps can send notifications.
1. From the home screen, swipe up to access app list.
2. Tap
3. Tap Apps & notifications > Notifications.
4. You can:
• Tap App notifications, and select an application to switch notification on.
• Tap On the lock screen, set up how notifications are displayed when the screen
is locked.
• Switch Allow notification dots on and off.
• Switch Blink light on and off.
• Tap Default notification sound, select a ringtone and tap OK to save as the
default notification sound.
Settings.
Setting the do not disturb mode
Enabling do not disturb
In the do not disturb mode, your phone will remain silent when you do not want to be disturbed, and
it will neither make sounds nor vibrate. You can also set the screen not to light up for notifications to
avoid visual distractions.
1. Swipe down from the top of the screen with two fingers.
Page 10
2. Tap the
• Select Total silence to disable all sounds and vibrations (including alarm clock, music,
video and games), while still being able to make phone calls.
• Select Alarms only to disable all sounds and vibrations except for the alarm clock.
• Select Priority only to disable all sounds and vibrations from the alarm clock,
reminders, and events other than calls from designated callers.
3. Select how long do not disturb mode lasts:
• To keep do not disturb mode on indefinitely, tap Until you turn off Do Not Disturb.
on the right of Do not disturb, or Priority only. You can:
• To enable do not disturb for a specific period, tap
the time.
4. Tap Done.
Customizing do not disturb options
1. From the home screen, swipe up to access app list.
2. Tap
3. Tap Sound > Do not disturb preferences. You can:
• Tap Priority only allows to allow only certain content types to play sounds or vibrate.
• Tap Block visual disturbances to allow or prevent notifications lighting up the screen
in do not disturb mode.
• Tap rules under Automatic rules, and switch them on or off. Each do not disturb rule
contains options including duration, start and end time and do not disturb type.
Settings.
+ or — to increase or decrease
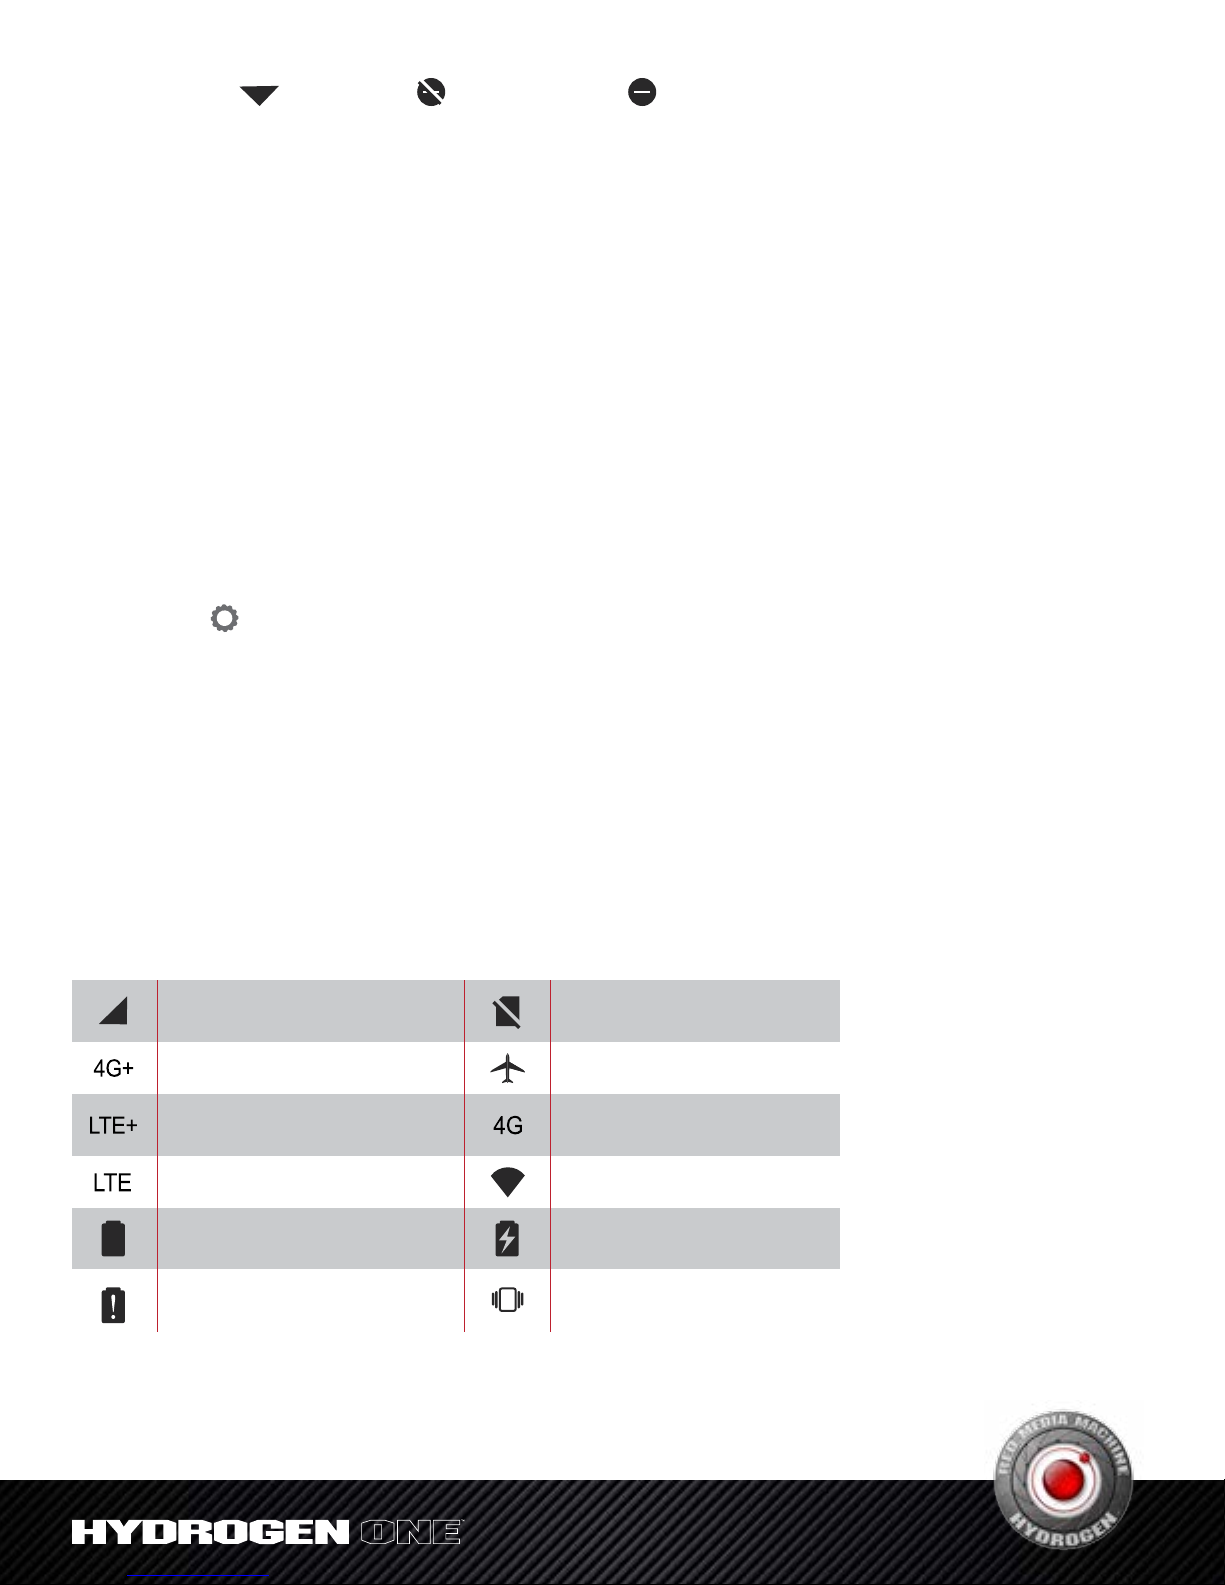
Status icons
In the status bar, different status icons have different meanings:
Signal strength
No SIM card found
Connected over 4G+
Connected over LTE+
Connected over LTE
Battery full
Battery low
Flight mode enabled
Connected over 4G
Connected over Wi-Fi
Charging
Vibration mode enabled
Page 11

Managing Apps
Downloading apps
To protect your phone, please download apps from the Google Play Store on your phone.
Downloading apps from other sources may cause unforeseeable damage to your phone.
To download apps from the Google Play Store, please visit play.google.com/store/apps to learn how
to download and install apps.
Removing apps
Tap and hold an icon on the home screen until the phone vibrates, and then drag it to REMOVE at the
top of the screen.
Apps removed from the home screen can be found in app list.
Deleting apps
Tap and hold an icon on the home screen until the phone vibrates, tap , and then tap
UNINSTALL > OK.
Pre-loaded apps cannot be deleted.
Managing permissions
1. From the home screen, swipe up to access app list.
2. Tap
3. Tap Apps & notifications > App permissions.
4. Select a type of permission, and the apps requesting that permission will be displayed
in a list.
5. Use the switches to turn the permissions for the apps on or off, enabling
or disabling access.
If you disable certain permissions for system apps, you might lose some of the phone’s basic
functionality. To you want to disable such permissions, you can tap DENY ANYWAY to dismiss
the warning.
Settings.
Setting default apps
1. From the home screen, swipe up to access app list.
2. Tap
3. Tap Apps & notifications > Advanced > Default apps and buttons.
4. You can select default apps for the functions listed for the current domain.
Settings.
Page 12

Internet and Sharing
Configuring the network
Activating mobile data
1. From the home screen, swipe up to access app list
2. Tap
3. Tap Network & Internet > Data usage.
4. Switch on Mobile data.
Setting the preferred mobile network
1. From the home screen, swipe up to access app list.
2. Tap
3. Tap Network & Internet > Mobile network > Advanced.
4. Tap Preferred network type and select the preferred network type.
Activating mobile data roaming
When you move outside of the area covered by your mobile service contract to another part of the
country or overseas, you will need to pay roaming fees if you need to connect to the Internet using
mobile data. Please consult your carrier for details.
Settings.
Settings.
1. From the home screen, swipe up to access app list.
2. Tap
3. Tap Network & Internet > Mobile network.
4. To select the SIM card for mobile data roaming, switch on Roaming.
Settings.
Sharing your mobile network
The mobile network cannot be shared in the business domain.
Sharing a network via a USB cable
1. Use a USB cable to connect your phone to a PC.
2. From the home screen, swipe up to access app list.
3. Tap
4. Tap Network & Internet > Hotspot & tethering.
5. Switch on USB tethering.
Sharing a network via Bluetooth
1. From the home screen, swipe up to access app list.
2. Tap
3. Tap Network & Internet > Hotspot & tethering.
4. Switch on Bluetooth tethering.
Settings.
Settings.
Page 13

Using your device as a Wi-Fi hotspot
1. From the home screen, swipe up to access app list.
2. Tap
3. Tap Network & Internet > Hotspot & tethering.
4. Switch on Wi-Fi hotspot.
To change the Wi-Fi hotspot name, network security options and other properties,
tap Set up Wi-Fi hotspot.
Settings.
Wi-Fi
Connecting to Wi-Fi
Please do not connect to unknown Wi-Fi networks to prevent data or property loss.
1. From the home screen, swipe up to access app list.
2. Tap
3. Tap Network & Internet > Wi-Fi, and turn on the switch. Available Wi-Fi networks
will be displayed in a list.
4. You can:
• Connect to a Wi-Fi network: tap the Wi-Fi network you want to connect to.
A password may be needed for encrypted networks.
Settings.
• Manually refresh the Wi-Fi network list: tap
• Manually add a Wi-Fi network: swipe down the Wi-Fi network list, tap
and follow the instructions to enter the network properties.
> Refresh to refresh the Wi-Fi list.
+,
Controlling data use
Setting a data alert
You can set up data alert to avoid exceeding the data limit for your contract. When data usage is approaching the limit, the phone will display a warning to remind you to conserve data.
1. From the home screen, swipe up to access app list.
2. Tap
3. Tap Network & Internet > Data usage > Billing cycle.
4. Switch on Set data warning.
5. Tap Data warning to select a unit of measurement and enter a number for the data limit.
6. Tap SET.
Setting data usage restrictions
1. From the home screen, swipe up to access app list.
2. Tap
3. Tap Network & Internet > Data usage > Billing cycle.
4. Switch on Set data limit, and after reading the warning, tap OK.
5. Tap Data limit to select a unit of measurement and enter a number for the data limit.
6. Tap SET.
Settings.
Settings.
Page 14

Controlling data usage for apps
If you want to limit how much data apps use, you can allow certain apps to connect to the Internet
without restrictions while making other apps send and receive data less frequently and only while in use.
1. From the home screen, swipe up to access app list.
2. Tap
3. Tap Network & Internet > Data usage > Data saver > Unrestricted data.
4. Switch on to allow the app unrestricted Internet access.
5. Tap
Once enabled, the mobile data saving program applies to both personal and business
domains simultaneously.
Settings.
, then tap Off to enable the mobile data saving program.
Calls and Contacts
Making phone calls
Smart dialing
When making phone calls, the phone can find the relevant contact by telephone number or the pinyin
or alphabetic spelling of their names.
1. On the home screen, tap
2. Tap
make a call to a person named Jane Smith with the number 12345678900, simply enter
123 or JS, and the phone will present this contact and contacts with similar information.
and enter the contact’s number or the letters in their name. For example, to
Phone.
Making phone calls from the contact list
1. On the home screen, tap Contacts.
2. Tap
in the search box.
3. Tap the number to be dialed.
and enter the first few numbers of the phone number or the initials of the contact
Making phone calls from the call log
1. On the home screen, tap
2. Tap
3. Tap the call log entry to be dialed.
.
Phone.
Page 15

Using your phone during a call
Turn on mute so the caller cannot hear sounds from your end.
Open the dial pad.
Switch between the receiver, speaker or Bluetooth headset.
Place the current call on hold.
Dial another call.
During a phone call, you can swipe up from the bottom of the screen, and tap
interface without interrupting the call. To return to the call interface, tap the green call bar at the top of
the screen.
to leave the call
Dialing an extension number
1. On the home screen, tap Phone.
2. Open the dial pad and enter the main number.
3. Tap
4. Enter the extension number.
5. Tap
When dialing a number, you can also enter the pause symbol “,” by touching and holding the * key.
to the left of the number, then tap Add 2-sec pause to enter the pause symbol “,”.
.
Speed dial
With the speed dial feature you can assign telephone numbers to dial pad number keys. Tap and hold
a speed dial number key to dial a pre-set number quickly.
Assigning a speed dial number
1. On the home screen, tap
2. Tap
3. Tap and hold any number between 2 and 9.
4. Tap YES in the pop-up window.
5. Tap a number, you can:
to open the dial pad.
Phone.
• Enter a number.
• Tap
Calling a speed dial number
1. On the home screen, tap
2. Open the dial pad.
3. Tap and hold a number key assigned a speed dial number.
and select a number from your contacts.
Phone.
Page 16

Making international phone calls
Please first ensure international calling services or international roaming services have
been enabled with your carrier.
1. On the home screen, tap
2. Tap
3. Tap and hold the 0 key to insert the + symbol, and then enter the country code,
area code, and phone number.
4. Tap
to open the dial pad.
.
Phone.
Making an emergency call
In the event of an emergency, you can make emergency calls from your device even without
a SIM card. However, you must be in an area with cellular coverage.
As different countries have different emergency numbers, please first confirm the local
emergency number.
You cannot dial an emergency number if there is no cellular coverage where you are.
Please do not rely on your mobile phone as the only means of seeking help.
1. On the home screen, tap
2. Open the dial pad.
3. Enter the emergency number.
4. Tap
.
Phone.
Answering calls
Accepting calls
When a call is incoming, the screen will light up and display the incoming number or the caller’s
contact information. You can:
• Swipe up
• Swipe down to reject the call.
• Swipe from
When you using the phone, a call is incoming, you can tap DECLINE to reject the call,
or tap ANSWER to answer the call.
to answer the call.
to decline with message.
Switching between calls
If you receive a new incoming call while on the phone, you can tap
The original call will be kept on hold. To resume the original call, tap Change on the call interface
to put the new call on hold.
to answer the new call.
Sending a quick text response
When receiving an incoming call which cannot be answered right away, you can respond quickly with
a text message to inform the caller of the situation.
1. In the incoming call interface, swipe from
.
Page 17

2. Select a message from the template list. The incoming call will be rejected and the caller will
receive the text message.
3. You can pre-set a quick text response in call settings. See Setting a quick text response
Setting a quick text response for details.
Making a conference call
When you need to communicate with multiple parties, you can choose to set up a conference call.
Conference calling must be supported by your carrier. Please ensure you have activated
this service. For more details, please consult your carrier.
1. On the home screen, tap
2. Once the call is connected, tap the dial pad and call the second participant.
3. When the second call is connected, the call to the first participant will be put on hold.
At this time, you can tap Merge in the call interface to start the conference call.
4. To add more participants, just repeat steps 2 and 3.
Tap Manage conference call during a call to view a list of participants. You can:
• Tap
• Tap
to remove a participant from the conference call and keep them in a separate call.
to end a call with a participant.
Phone to call the first participant.
Setting call options
Setting a quick text response
When there is an incoming call, you can send a pre-set message to provide a quick response.
Pre-set messages can be customized.
1. On the home screen, tap
2. Tap
3. Tap Quick responses.
4. Select and edit a pre-set message.
5. Tap OK.
> Settings in the search box at the top.
Phone.
Setting a blacklist
You can add a number to the blacklist to stop nuisance calls. Calls and messages from blacklisted
numbers will be blocked.
1. On the home screen, tap
2. In the search box at the top, tap
3. Enter the number you want to block.
4. Tap BLOCK.
To remove a number from the blacklist, tap
Phone.
> Settings > Call blocking.
next to the number, and then tap UNBLOCK.
Page 18

Contacts
Creating a new contact
Adding a contact
The number of contacts that can be saved on your phone depends on the amount of free
space on your phone. The more free space, the more contacts that can be saved.
The number of contacts that can be saved on the SIM card depends on its specifications.
Please consult your carrier for details.
1. On the home screen, tap
2. Tap
3. Tap Saving to. You can:
• Save a contact to your Google account.
• Save a contact to your SIM card.
4. Enter the name, number and other information of the new contact.
5. Tap More fields to enter more information.
6. Tap
or selecting one from the gallery.
7. Tap SAVE.
.
to create an avatar for a contact by taking their picture
Contacts.
Saving a contact from the call log
1. On the home screen, tap Phone.
2. Tap
3. Tap
4. Tap
• Tap
• Tap a contact to save the unknown number.
.
on the right of the call log entry from the unknown number.
, you can:
to create a new contact.
5. Tap SAVE.
Importing/exporting contacts
Importing contacts from a microSD card
1. On the home screen, tap Contacts.
2. Tap
3. Select a .vcf file to import.
Importing contacts from a SIM card
1. On the home screen, tap Contacts.
2. Tap
3. Tap SIM card name.
4. Tap the contacts you want to import.
5. Tap IMPORT.
> > Import > .vcf file.
> > Import.
Page 19

Exporting contact information to a microSD card
1. On the home screen, tap Contacts.
2. Tap
3. Enter the name, and tap SAVE.
> > Export > Export to .vcf file.
Exporting contact information to a SIM card
1. On the home screen, tap Contacts.
2. Tap
3. Tap SIM card name.
4. Select the contacts you want to export, and tap OK.
Contacts saved on a SIM card can be identified in the address book by the SIM card icon.
> > Export.
Create a personal name card
1. On the home screen, tap Contacts.
2. Tap
3. Tap
4. Enter the name, number and other information.
5. Tap
6. Tap SAVE.
> > My info.
.
to create an avatar by taking a picture or selecting one from the gallery.
Managing contacts
Editing contacts
You can edit the information saved for a contact, such as telephone number or email address,
at any time.
1. On the home screen, tap
2. Tap the contact you want to edit.
3. Tap
4. Tap SAVE.
to edit the contact’s information.
Creating frequent contacts
You can get in touch with your contacts more easily by creating frequent contacts.
1. On the home screen, tap
2. Tap the contact you want to save as a frequent contact.
3. In the contact details view, you can:
• Add contacts to your favorites: tap
• Create a contact shortcut on the home screen: tap
and follow the instructions on the screen.
Contacts.
Contacts.
.
> Create shortcut
Page 20

Linking contacts
When there are multiple records for the same contact in the contact list, you can link these records
and remove the duplicate entries.
1. On the home screen, tap
2. Tap the contact to be linked.
3. Tap
4. Tap the contacts to be linked.
To unlink contacts, tap a contact and then tap
> Link.
Contacts.
> View linked contacts > UNLINK.
Sharing contacts
1. On the home screen, tap Contacts.
2. Tap and hold the contact you want to share, and then tap
share multiple contacts, select multiple contacts to be shared together.
3. Select the sharing method and follow the instructions on the screen.
> Share. If you want to
Deleting contacts
1. On the home screen, tap Contacts.
2. Tap and hold the contacts you want to delete, and then tap
3. Tap OK.
.
Messaging
Sending a message
1. On the home screen, tap Messages.
2. Tap
3. You can:
• Tap the recipient box and enter the name or number of the recipient,
and the phone will automatically present relevant contacts.
• Tap
4. Enter the message content. Tap to add extra information such as attachments.
5. Tap
is inserted in the phone, tap
Replying to a message
1. On the home screen, tap Messages.
2. Tap the message you want to reply to.
3. You can:
.
to add a recipient group from the address book.
or to send the message from SIM card 1 or SIM card 2. If only one SIM card
to send.
• Reply: tap
If only one SIM card is inserted in the phone, tap
or to send the message from SIM card 1 or SIM card 2.
to send.
Page 21

• Forward the message: tap and hold the body text of the message then tap .
• Call back: tap
• Save an unknown number: tap
.
> Add contact.
Deleting messages
1. On the home screen, tap Messages.
2. Tap the message you want to delete.
3. You can:
• Delete a message: tap and hold the message you want to delete, then tap
• Delete a conversation: tap
> Delete, and tap DELETE
Camera and video
Camera interface
Automatic/
Manual Mode
Blur background
Flash
HDR
Filter
Camera settings
.
Switch cameras
Still/Video mode
Take a photo
2D/4V mode
Photos
Taking photos
1. On the home screen, tap Camera.
2. When you have composed your photo in the screen, tap
at the top of the screen to put the camera in 4V mode. Tap
Taking quick photos
Press and hold the shortcut button to light up the screen and access the camera. After you have
composed your photo in the screen, press the shortcut button again to take the photo.
You can also swipe up on the
the camera.
icon in the bottom right corner of the lock screen to access
to take the photo. Tap
to take a 4V mode photo.
Page 22

Recording videos
1. In the home screen, tap Camera.
2. Tap
3. Tap to start recording. When recording, tap to stop recording.
to switch to video mode. Tap
to put the camera in 4V mode.
Panorama
1. On the home screen, tap Camera.
2. Tap
3. Tap
4. Tap
Exit panorama mode: tap Panorama in the screen and tap OK.
> Panorama.
and move the phone as directed to take the photo.
to stop.
Beauty mode
1. On the home screen, tap Camera.
2. Tap
Exit beauty mode: tap Beauty, and tap OK.
> Beauty, select from the list and drag the slider to adjust the effect.
Histogram
You can use Histogram to see the light histogram for the current scene being captured.
1. On the home screen,
2. Tap
3. Drag the histogram in the specified area.
Exit histogram mode: Tap
> .
.
Camera.
Timelapse
When the camera is in 2D video mode, tap
rate, or choose a custom capture frame rate, and then tap
tap
Exit timelapse mode: tap Timelapse.
to stop recording.
>
, select a recording frame rate and capture frame
to start recording. When recording,
Slow motion
When the camera is in 2D video mode, tap
recording. When recording, tap
to stop recording.
>
, select 2X or 4X, and then tap to start
Exit slow motion mode: Tap Slow motion.
Page 23

Selecting flash modes
When the camera is open, tap or in the top right corner to quickly switch between the two flash
modes: Automatic mode and Manual mode.
Automatic mode
When the camera is pointing at the subject of the photo, press the shortcut button or on the
camera screen to take a photo with the appropriate level of exposure, light and shade.
Manual mode
If you want to choose your own camera settings, select Manual mode to separately set the shutter
speed and ISO.
•
the camera will take to take a photo.
•
of the camera.
: Drag this icon to adjust the shutter speed. The larger the value, the longer
: Drag this icon to adjust the ISO. The larger the value, the greater the light sensitivity
Viewing 4V mode photos and videos
Use RED Player to browse 4V mode photos and videos shot with the device.
1. From the home screen, swipe up to access app list.
2. Tap
• Tap
• Tap
• Tap
3. Select the 4V mode photo or video you want to view from the folder.
If you use the device’s pre-installed Photos app to view the 4V mode photos or videos, the viewing
effect will be altered.
RED Player. You can:
, select a folder, and tap the 4V mode photo or video you want to view.
to select the file order.
to change the browsing method.
Camera setting
Adjusting color
1. In the home screen, tap Camera.
2. Tap
3. Tap SAVE.
4. Enter name and tap SAVE the adjusted color tones.
Load a color tone: in Adjust color screen, tap LOAD and select a color tone file from the list.
Reset color tone: in Adjust color screen, tap RESET.
Exit adjust color mode: tap
> . Drag the slide left or right to adjust the camera’s default color tones.
.
Page 24

Default color tone is saved as Look_Default.LXK in Internal storage/DCIM/Favorite Looks.
Setting resolution and frame rate
You can change the resolution of the front or back camera. When in 2D mode, you can only
change the 2D resolution and video frame rate. When in 4V mode, you can only change the
4V mode resolution and frame rate.
When the camera is open, tap
• Tap Still and select the resolution of photo.
• Tap Video and select the recording resolution and frame rate.
> . You can:
Setting 2D video format
When the camera is in 2D video mode, tap > 2D Video to select the video format.
Setting storage location
If a microSD card is installed in the phone, you can select default storage location of photos
and videos.
1. In the home screen, tap
2. Tap
> Storage. You can select phone or microSD card as the default storage.
Camera.
Setting self timer
When the camera is in 2D mode, tap > Self timer to switch in different timer.
1. In the home screen, tap
2. Tap
> Self timer to select a countdown time (disable, 3s, 5s, or 10s).
Camera.
Tools
Calendar
The calendar interface
Settings menu.
Touch to return the current date.
Current date.
Touch to add an event.
Page 25

Creating an event
1. From the home screen, swipe up to access app list.
31
2. Tap
3. Tap
Calendar.
.
4. Select event type.
5. Enter information such as the event name.
6. Tap SAVE.
Modifying events
1. From the home screen, swipe up to access app list.
31
2. Tap
Calendar.
3. Select the event you want to modify in the calendar.
4. Tap
. For recurring events, you can choose to modify one future event,
or all future events.
5. Modify the event information.
6. Tap SAVE.
Deleting an event
1. From the home screen, swipe up to access app list.
31
2. Tap
3. Select the events you want to delete.
4. Tap
5. Tap DELETE.
Calendar.
> Delete.
Clock
Setting an alarm
1. From the home screen, swipe up to access app list.
2. Tap
3. Tap
4. Move the clock hands and tap AM or PM to set the alarm time.
5. Tap OK.
6. You have the option to set other items.
7. Tap
World clock
1. From the home screen, swipe up to access app list.
2. Tap
3. Tap
4. Tap
Setting the timer
1. From the home screen, swipe up to access app list.
2. Tap
Clock.
> .
to finish setting.
Clock.
.
to add a new world clock.
Clock.
Page 26

3. Tap .
4. Enter the time to count down.
5. Tap
after starting the countdown, you can:
• Tap
• Tap “+1:00” to add one minute to the countdown.
• Tap RESET to reset the countdown.
• Tap ADD TIMER to add a new countdown.
• Tap DELETE to delete a countdown.
The phone will play a sound at the end of the countdown. You can then stop the countdown
or extend its duration.
to pause the countdown.
Stopwatch
1. From the home screen, swipe up to access app list.
2. Tap
3. Tap
4. Tap
• Tap
• Tap LAP to record the current time.
5. Tap RESET to clear the time and stop timing.
Clock.
.
to start timing. You can:
to pause the stopwatch.
File manager
Searching for files
1. From the home screen, swipe up to access app list.
2. Tap
3. You can:
• Search by category: under the CATEGORIES tab, there are pre-set file categories
that can be searched.
• Search by path: under the FOLDER tab, you can search under the path where
the file might be saved.
• Search by file name: tap
FileManager.
, enter the file name and then tap .
Checking storage
Tap FileManager followed by Storage Information to check how much of the phone’s storage
is available.
Creating a new folder
1. From the home screen, swipe up to access app list.
2. Tap
3. Go to the FOLDER tab, and go to path where you want to create the folder.
4. Tap
FileManager.
> New folder.
Page 27

5. Enter the folder name.
6. Tap OK.
Copying a file or folder
1. From the home screen, swipe up to access app list.
2. Tap
3. Go to the FOLDER tab, tap and hold the file or folder you want to copy, and then tap
4. Tap PASTE inside the destination folder to place the file.
FileManager.
Moving a file or folder
1. From the home screen, swipe up to access app list.
2. Tap
3. Go to the FOLDER tab, tap and hold the file or folder you want to move, and then tap
4. Tap PASTE inside the destination folder to place the file.
FileManager.
Deleting a file or folder
1. From the home screen, swipe up to access app list.
2. Tap
3. Tap and hold the file or folder you want to delete, and then tap
4. Tap DELETE.
FileManager.
.
.
.
Setting how files are displayed
1. From the home screen, swipe up to access app list.
2. Tap
3. Tap
4. You can:
• Show or hide specific files: check or uncheck Show Hidden Files.
• Simplify the file display: check Only Show FileName to hide information
such as creation time and size when viewing files.
• Change display order: check or uncheck Descending Sort to display the files
in ascending or descending order.
FileManager.
> Settings.
Phone settings
Switch on or off airplane mode
You must follow the instructions of airplane staff regarding whether you may use your device
in flight mode after take-off.
Switch airplane mode on or off from the notification panel:
1. Swipe down from the top of the screen, open the notification panel.
2. Tap Airplane mode.
Page 28

Switch airplane mode on or off from Settings:
1. From the home screen, swipe up to access app list.
2. Tap
3. Tap Network & Internet.
4. Turn on or off the Airplane mode switch.
Settings.
NFC
Turning NFC on and off:
1. From the home screen, swipe up to access app list.
2. Tap
3. Tap Connected devices.
4. Switch NFC on and off.
Turning Android Beam on and off:
1. From the home screen, swipe up to access app list.
2. Tap
3. Tap Connected devices.
4. Switch on NFC.
5. Tap Android Beam, and then tap the switch on and off.
Settings.
Settings.
Cast your screen
Your phone support showing the screen and audio on a TV. To confirm if your TV support cast
function, please check the TV manual or contact the TV manufacturer.
1. From the home screen, swipe up to access app list.
2. Tap
3. Tap Connected devices > Cast.
4. Select and tap the device from the list to show your screen.
To stop casting your screen, swipe down from the top of the screen, and tap Disconnect
on the cast notification.
Settings.
Managing the battery
Battery optimization
Your phone turns on battery optimization by default for all installed apps. Apps are not active when
you are not using the phone, or not used for a few days.
1. From the home screen, swipe up to access app list
2. Tap
3. You can:
Settings > Battery > Battery optimization.
• Select an app, and optimize it or not.
• Tap
> Advanced optimization, turn Advanced optimization on or off.
Page 29

Display settings
Setting brightness
Your phone enables brightness auto adjusting as default, which can adjust screen brightness
automatically according to the environment. You can also adjust the screen brightness by yourself.
1. Swipe down from the top of the screen with two fingers, open the notification panel.
2. You can:
• Drag
• Tap
to adjust the brightness.
to stop auto-adjusting the brightness.
Night light
To make it easier to look at your phone in dim light, please turn on the night light mode.
1. From the home screen, swipe up to access app list.
2. Tap
• Tap Schedule, select start and end times.
• Switch Status on or off, adjust the color.
Settings > Display > Night Light > Schedule. You can:
Setting sleep mode
1. From the home screen, swipe up to access app list.
2. Tap
3. Select Sleep period from the list.
Settings > Display > Sleep.
Setting the screen rotation mode
1. From the home screen, swipe up to access app list.
2. Tap
3. Tap Display.
4. Turn Auto-rotate screen on to rotate the screen in line with the phone’s orientation.
Settings.
Setting the font size and screen display size
You can enlarge or shrink font size and items on the screen.
1. From the home screen, swipe up to access app list.
2. Tap
3. Tap Font size or Display size.
4. Follow the instructions on the screen and drag the slider to the left or right.
Settings > Display > Advanced.
Setting screen saver
When your phone is charging or docked, the screen saver can display a clock, photos,
or colorful backgrounds.
1. From the home screen, swipe up to access app list.
2. Tap
Settings > Display > Advanced > Screen Saver.
Page 30

3. Tap Screen Saver. You can:
• Set when the screen saver shows: tap When to start, and select an option.
• Choose what your screen saver shows: tap Current screen saver, and select an option.
• Choose a display mode: Tap
.
Setting sound
From the home screen, swipe up to access app list, and tap
You can configure the following settings:
• Volume: drag the slide to adjust media, alarm, or ring volume.
• Audio 3D: turn Audio 3D Effect on and off, or choose a headsets mode.
• Ringtone: choose an audio file as the phone ringtone, notification sound, or alarm sound.
• Other sounds and vibrations: turn other sounds or vibration on and off.
Settings > Sound.
Viewing the phone storage
You can view the memory of your phone.
1. From the home screen, swipe up to access app list.
2. Tap
3. Tap Internal shared storage or SD card (if you have a SD card in the phone).
Settings > Storage.
Setting the screen unlock method
1. From the home screen, swipe up to access app list.
2. Tap
3. Enter your password.
4. Select a screen lock method.
Settings > Security & location > Screen lock.
Setting a fingerprint
1. From the home screen, swipe up to access app list.
2. Tap
3. Enter your password.
4. Tap Add fingerprint.
5. Follow the onscreen instructions.
If your phone is unable to recognize your fingerprint, please enter the password instead.
Settings > Security & location > Fingerprint.
Setting smart lock
1. From the home screen, swipe up to access app list.
2. Tap
3. Enter your password.
4. You can switch on the following functions:
Settings > Security & location > Smart lock.
Page 31

• Keep your phone unlocked while it is on you.
• Add location where your phone should be unlocked.
• Add device to keep your phone unlocked when it is nearby.
• Set up facial recognition.
Restoring factory settings
All data in the phone’s internal storage will be cleared when restoring factory settings.
Please back up all your important data and files before restoring the phone to prevent
any unnecessary loss.
1. From the home screen, swipe up to access app list.
2. Tap
• Reset network settings: Tap Reset Wi-Fi, mobile & Bluetooth > RESET SETTINGS
> RESET SETTINGS.
• Reset app preferences: Tap Reset app preferences > RESET APPS.
• Restore factory settings: Tap Erase all data (factory reset) > RESET PHONE
> ERASE EVERYTHING.
Settings > System > Reset options. You can:
Setting the volume and sound alerts
1. From the home screen, swipe up to access app list.
2. Tap
Settings > Sound to adjust the volume of media, alarms and ringtones.
Accessibility
Select to speak
Turning Select to Speak on and off:
1. From the home screen, swipe up to access app list.
2. Tap
To turn Select to Speak on:
1. Turn the switch on.
2. Tap OK, and enter the password if you have one.
To turn Select to Speak off:
Turn the switch off and tap OK.
Using Select to Speak
Settings > Accessibility > Select to Speak.
1. Tap the accessibility icon . If you have turned on more than one accessibility tool
that uses the accessibility button, tap and hold the button to switch between tools.
2. Tap text or an image on the screen.
To hear multiple items, drag your finger across the screen.
Page 32

TalkBack
Turning TalkBack on and off
1. From the home screen, swipe up to access app list.
2. Tap
To turn on TalkBack:
1. Tap the switch.
2. Tap OK.
To turn off TalkBack:
1. Tap the switch. You’ll see a green outline. Double tap the switch.
2. Tap OK.
3. Double tap OK.
Setting TalkBack
1. From the home screen, swipe up to access app list.
2. Tap
3. You can adjust default speech settings, verbosity, volume, audible feedback settings,
gestures, and more.
Settings > Accessibility > TalkBack.
Settings > Accessibility > TalkBack > Settings.
 Loading...