


RT-590
Table of contents
 Loading...
!"#$%&'()*#+*,
Model # RT-590!
REC TEC GRILLS
STAMPEDE
RT-590

!
REC TEC GRILLS
STAMPEDE
RT-590

-./010234
5!/(!678!!/(69:(
!0;<3
8!(0!7(97!/:(!/(69:((
=!)>6971>;:().7:/1.;9(10(!/(0:./(7?19(
.@@;1.0=:A(
7!(@/:B:07(10C6/<D(0:B:/(.77:)@7(7!()!B:(
2/1;;(-?1;:(?!7D(!/(-17?!67(.99197.0=:A(
0:B:/(97!/:(.0<(2/1;;(10(.(9).;;(9@.=:(!/(
@;.=:(10(.(B:?1=;:(60;:99(=!)@;:7:;<(=!!;(
.08(51/:(19(B:/151:8(.9(:E7102619?:8(
;:.B:(.()101)6)(!5(FGH(=1/=6)5:/:0=:(
>:7-::0(2/1;;D(8:=I9D(?!69:9(!/(.0<(
=!)>6971>;:().7:/1.;9A(
69:(!0(;:B:;(2/!608(.-.<(5/!)(
!B:/?.02102(/!!59(!/(:.B:9AJ

!
REC TEC GRILLS
STAMPEDE
RT-590

REC TEC STAMPEDE
;$KK$%(5%LM(/*N(*#O(/L#
Congratulations on the purchase of your new REC TEC STAMPEDE Wood Pellet Grill!
With proper care and maintenance, your grill will provide you years of trouble free operation. Please
review the following information carefully for useful tips and information that will help you utilize
your grill’s extensive features and benefits.
Your REC TEC STAMPEDE is by far and away the most bang for your buck and comes fully
loaded with a HotFlash Ceramic Ignition System, Stainless Steel Body and state-of-the-art Wi-Pellet
Wifi Technology. Your REC TEC’s revolutionary Smart Grill Technology™ automatically adjusts
the rate at which REC TEC Premium Hardwood Pellets are introduced into the fire pot to maintain
a consistent temperature like no other grill you have ever used. The result is the simplest and most
convenient way for a backyard enthusiast to Cook, Bake, Roast, Grill or Slow Smoke their favorite
foods while adding flavor profiles that can only come from a real wood fire. Just set your temperature and let your REC TEC take all the guess work out of your next cookout.
We want you to join the vibrant and growing community of REC TEC owners. Whether you want
to contribute your own tips and recipes, learn from others, or a bit of both, please jump right in.
You now have an incredible tool for cooking. Let’s see how you use it!
Join our online community at:
Thank you for choosing REC TEC GRILLS!!
Ray Carnes & Ron Cundy, Co-Founders, REC TEC Industries, LLC
1
Website: rectecgrills.com
Facebook: facebook.com/rectecgrills
Twitter: twitter.com/rectecgrills
YouTube: youtube.com/rectecgrills
Instagram: instagram.com/rectecgrills
PQGR9D(/$T(7$T(1#O+'K%U$'D(;;=

=L#K$#K'(
Letter From Ray and Ron 1...........................................................................
Important Safety Information 3....................................................................
Carton Contents 4.........................................................................................
Assembling Your REC TEC STAMPEDE 5...................................................
SPECS 7.........................................................................................................
Initial Setup Procedure 8..............................................................................
Temperature Probes 8...................................................................................
Operating your REC TEC STAMPEDE 9......................................................
Tips, Tricks, and Temps 11...........................................................................
Maintenance and Cleaning 13......................................................................
Transport & Storage 13.................................................................................
Troubleshooting 14.......................................................................................
Manual Start Up: 17.......................................................................................
Controller Schematic 18...............................................................................
Cooking Notes 19..........................................................................................
Recipes 21......................................................................................................
REC TEC STAMPEDE
2
FOUR (4) Year Non-transferable Limited Warranty ...............................24
PQGR9D(/$T(7$T(1#O+'K%U$'D(;;=

1MVL%K*#K(9*W$KN(1#WL%M*KUL#
-*%#U#XY(/$*O(*,,(9*W$KN(1#WL%M*KUL#(>$WL%$(!V$%*KU#X(
2%U,,
For outdoor use only. Do not use in any enclosed area. Use on Level Surface, away from overhanging eaves.
Keep grill 60” or more from any combustible surface.
To prevent grease fires, clean your fire pot and drip pan on a regular basis
(es
peciall
y after cooking greasy foods at lower temperatures). In the event
of a grease fire, unplug the grill and leave lid closed until the fire is out.
Do not put anything flammable in the storage area under the grill.
Never plug-in your REC TEC STAMPEDE without the service access panels locat
ed under the controller installed.
Never put your grill in a vehicle without first ensuring that it is completely
cool and that
no hot embers, pellets or ashes remain in the fire pot or auger.
Occasionally, your REC TEC STAMPEDE should be checked for fire pot
obst
ructions to make sure proper air flow is maintained. See cleaning in-
structions in this manual for correct procedures.
Your REC TEC STAMPEDE gets very hot; keep young children and animals a
way while in use.
Use heat-resistant barbecue mitts or gloves when operating this unit. Long
handled, non-plast
ic utensils are also recommended.
Do not touch cooking chamber or attempt to move your REC TEC STAMPEDE while operating
or while the grill is hot. Make sure the fire is com-
pletely out and that the grill is completely cool before transporting the grill.
Before covering your grill, make sure that the grill has cooled completely.
Never put your hand in the pellet hopper or attempt to service any part of
your REC T
EC STAMPEDE while your grill is plugged in.
3
PQGR9D(/$T(7$T(1#O+'K%U$'D(;;=
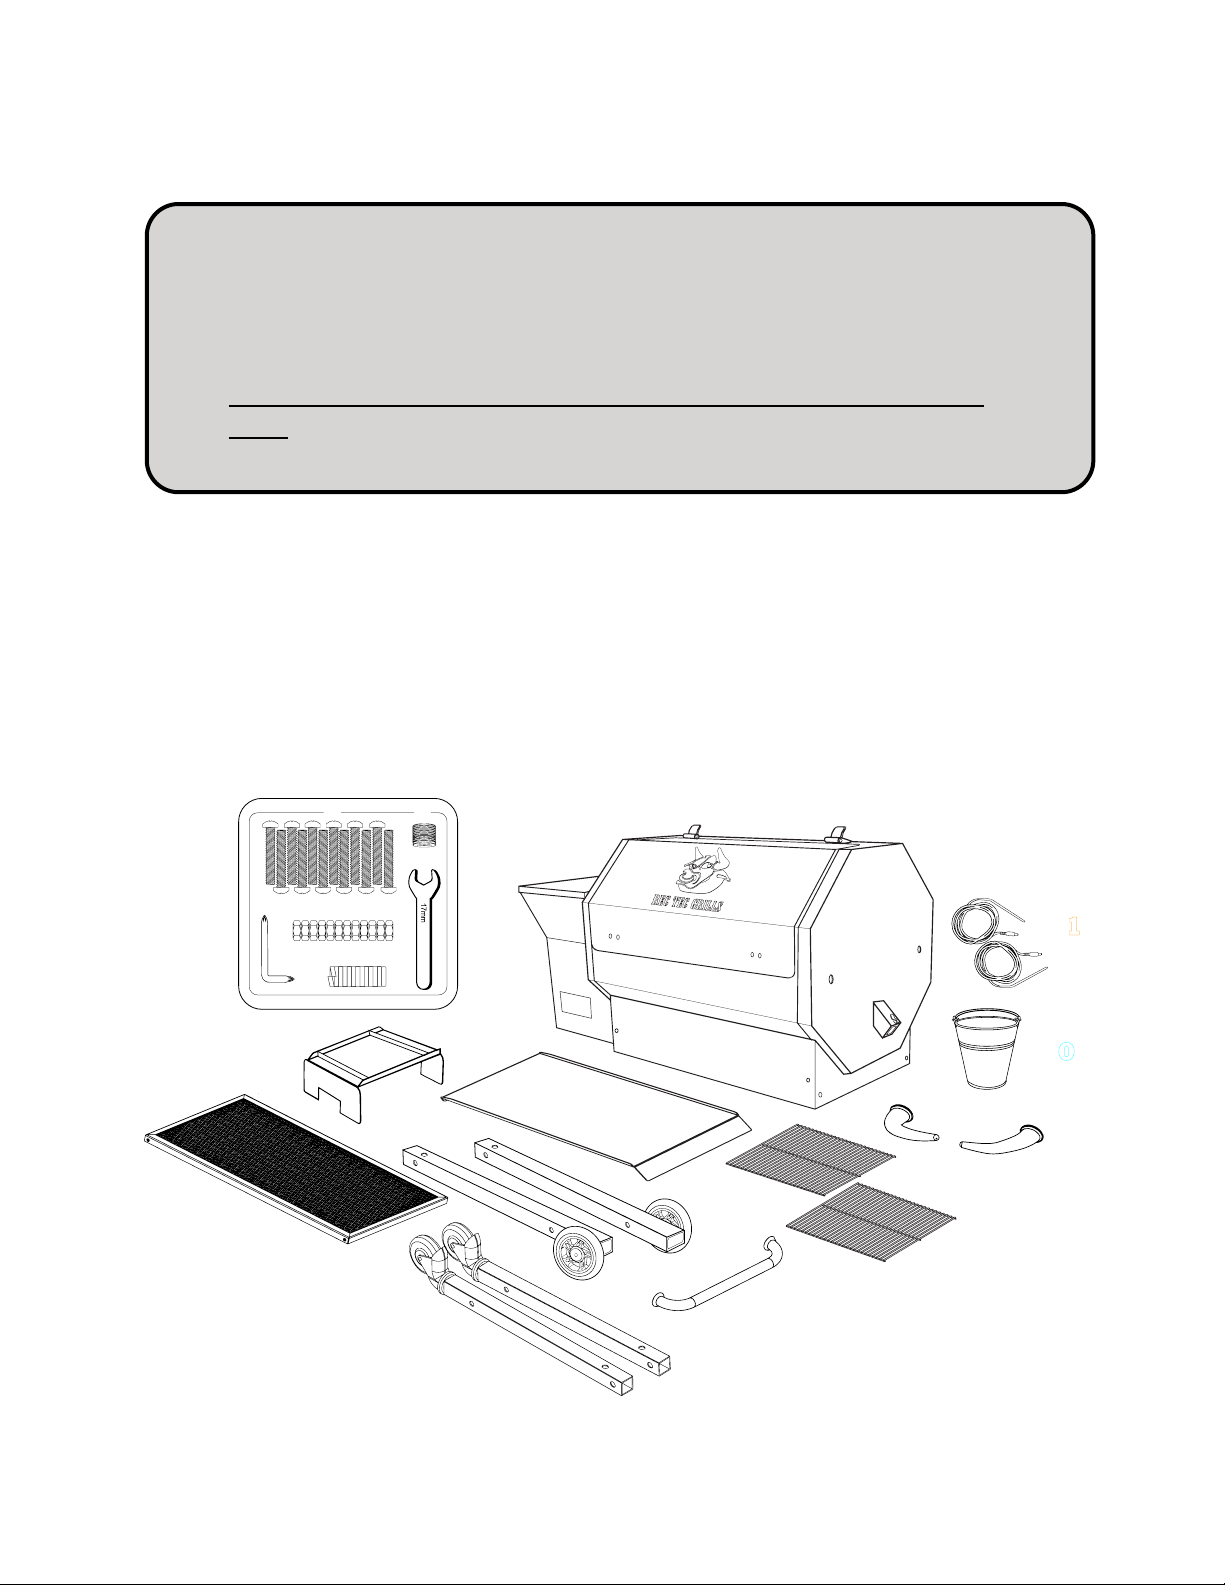
=*%KL#(=L#K$#K'
Your carton contains the following:
Z 1- drip pan - #8
Z 2- cooking grates - #9
Z 1- drip bucket - #10
Z 2- temperature probes - #11
Z 1- hardware packet - #12
4
Please note that during shipping some movement may have taken place, so a
complete visual inspection is required. Be sure to inspect entire grill after removing the protective shipping carton. Some surfaces may be sharp, so wear
gloves when assembling.
Do not plug in the grill until it is fully assembled and you’re ready to
cook.
#1
F
D
C
E
B
#3
#6
#7
#10
#4
#8
#9
#5
#1
1
#12
A
☐ 1- REC TEC STAMPEDE body - #1
☐ 2- caster wheel legs - #2
☐ 2- wheeled legs - #3
☐ 1- bottom shelf - #4
☐ 2- bull horn handles - #5
☐ 1- large pull bar handle - #6
☐ 1- flame deflector - #7
#2
PQGR9D(/$T(7$T(1#O+'K%U$'D(;;=

.''$M[,U#X(<L+%(/:=(7:=(97.)@:8:
STEP 1 – Unpack and Prepare for Assembly
Remove all items from inside grill body and lay grill body on its back. For ease of assembly, complete steps 1-5 below before standing grill upright.
Tip: Flatten the cardboard box out and lay everything on it. This serves as a good working area and it helps
prevent the grill from getting scratched or damaged during installation.
STEP 2 – Attach Legs
Attach legs with fixed wheels (#3) on the left side, with wheels facing outward to the front and back
of grill. Attach legs with the rotating casters (#2) on the right side of the grill
.
Attach all four legs using bolts (A), flat washers (B), lock washers (C) and nuts (D)
DO NOT FULLY TIGHTEN HARDWARE
All hardware is found in included Hardware Packet (#12)
STEP 3 – Attach Bottom Shelf
Align shelf (#4) between grill legs and attach using 4 bolts (A), flat washers (B), lock washers (C)
and nuts (D).
FULLY TIGHTEN HARDWARE
STEP 4 – Install Pull bar Handle
Attach the pull bar handle (#6) using the two bolts that are screwed into the handle.
The beauty ring stays attached to the pull bar handle.
STEP 5 – Bull Horn Handle Assembly
Attach bull horn handles (#5) to grill lid using the small bolts that are screwed into handle.
Proper placement will result in the handle facing inward with the tip slightly upward.
STEP 6 – Stand Grill Upright
You will need two people to do this as the grill is very heavy.
5
A
B
C
D
Correct Hardware Arrangement
PQGR9D(/$T(7$T(1#O+'K%U$'D(;;=
Loading...