

Recaro Tian Elite operation manual

TIAN ELITE
Bedienungsanleitung / User guide / Istruzioni per l’uso /
Gebruiksaanwijzing / Instrukcja obsługi / Notice d’utilisation/
Manual de instrucciones / Manual de instruções /
Használati útmutató / Instrucțiuni de utilizare /
Οδηγίε λειτουργία / Guiado usuário
UN R44/04
Gr. 1/2/3, 9-36 kg
DE PLIT ES HUEN FRNL PT RO EL

2

DE – WARNUNG! Diese Kurzanleitung dient nur der Übersicht. Um maximale Sicherheit und maximalen Komfort für Ihr Kind zu erreichen, ist es unbedingt
notwendig, die gesamte Gebrauchsanleitung aufmerksam zu lesen.
EN – WARNING! This Quick Reference Guide is intended to provide only an overview. In order to achieve maximum safety and comfort for your child, it is
essential to read the entire instruction manual carefully.
IT – AVVERTENZA! Queste istruzioni brevi rappresentano solo un riepilogo. Per garantire sicurezza e comfort massimi per il vostro bambino è
assolutamente necessario leggere con attenzione le istruzioni per l’uso in tutte le loro parti.
NL – WAARSCHUWING! Deze beknopte gebruiksaanwijzing dient enkel als overzicht. Voor een maximale veiligheid en maximaal comfort voor uw kind is
het absoluut noodzakelijk om de hele gebruiksaanwijzing aandachtig te lezen.
PL – OSTRZEŻENIE! Niniejsza skrócona instrukcja służy tylko jako rozeznanie. Aby zapewnić dziecku maksymalne bezpieczeństwo imaksymalny komfort,
należy bezwzględnie uważnie przeczytać całą instrukcję obsługi fotelika samochodowego.
FR–AVERTISSEMENT! Ce guide rapide ne sert que de vue d’ensemble. Pour une sécurité et un confort maximaux pour votre enfant, il est impératif de
lire attentivement l’intégralité du manuel d’utilisation.
ES – ¡ADVERTENCIA! Esta guía breve constituye una introducción general. Para lograr la máxima seguridad y comodidad del niño, es imprescindible leer
con atención todo el manual de instrucciones.
PT — ATENÇÃO! O presente guia rápido tem como único objetivo facultar uma visão geral. A fim de proporcionar ao seu filho a máxima segurança e
conforto, é impreterível ler atentamente todas as instruções de utilização.
HU – FIGYELMEZTETÉS! Ez a rövid útmutató csak áttekintésre szolgál. Gyermeke maximális biztonsága és kényelme érdekében feltétlenül olvassa el
figyelmesen a teljes használati útmutatót.
RO – AVERTISMENT! Aceste instrucțiuni pe scurt oferă numai o privire de ansamblu. Pentru a garanta întreaga siguranță și confortul maxim pentru copilul
dvs., este neapărat necesar să citiți cu atenție toate instrucțiunile de utilizare.
EL – ΠΡΟΕΙΔΟΠΟΙΗΣΗ! Οι παρούσε σύντοε οδηγίε παρέχουν όνο ια συνοπτική εικόνα. Για να εξασφαλίσετε τη έγιστη ασφάλεια και άνεση για το παιδί σα, πρέπει
να διαβάσετε οπωσδήποτε προσεκτικά όλε τι οδηγίε χρήση.
3

in Gr. 1
KURZANLEITUNG GR. 1, 9-18 KG / QUICK REFERENCE GUIDE GR. 1, 9-18 KG / ISTRUZIONI BREVI GR. 1, 9-18 KG /
BEKNOPTE GEBRUIKSAANWIJZING GR. 1, 9-18 KG / SKRÓCONA INSTRUKCJA ROZM. 1, 9–18 KG /
GUIDE RAPIDE GROUPE 1, 9-18KG / GUÍA BREVE GRUPO 1, 9-18 KG / GUIA RÁPIDO GR. 1, 9–18 KG /
RÖVID ÚTMUTATÓ GR. 1, 9-18 KG / INSTRUCȚIUNI PE SCURT GR. 1, 9-18 KG / ΣΎΝΤΟΜΕΣ ΟΔΗΓΙΕΣ ΟΜ. 1, 9 18 Κ ΙΛΑ
1 2 3 4
R
5 6 7 8
2x
disabled
4
9 10 11
12
in Gr. 2/3
KURZANLEITUNG GR. 2/3, 15-36 KG / QUICK REFERENCE GUIDE GR. 2/3, 15-36 KG / ISTRUZIONI BREVI GR. 2/3, 15-36 KG /
BEKNOPTE GEBRUIKSAANWIJZING GR. 2/3, 15-36 KG / SKRÓCONA INSTRUKCJA ROZM. 2/3, 15–36 KG /
GUIDE RAPIDE GROUPE 2/3, 15-36KG / GUÍA BREVE GRUPO 2/3, 15-36 KG / GUIA RÁPIDO GR. 2/3, 15–36 KG /
RÖVID ÚTMUTATÓ GR. 2/3, 15-36 KG / INSTRUCȚIUNI PE SCURT GR. 2/3, 15-36 KG / ΣΎΝΤΟΜΕΣ ΟΔΗΓΙΕΣ ΟΜ. 2/3, 1536 ΚΙΛ Α
1 2 3 4
R
5 6 7 8
optional
9 10 11
12
5

ZULASSUNG
Tian Elite
UN R44/04, Gruppe: 1/2/3, Körpergewicht: 9-36 kg.
Nur zur Benutzung auf Sitzen in Fahrzeugen geeignet, die mit
nach der UN Regelung Nr. 16 oder anderen vergleichbaren
Standards genehmigten 3-Punkt-Gurten ausgestattet sind. Dies
ist ein Sitz der Gewichtsklasse I, II und III für Kinder mit einem
Körpergewicht von 9 bis 36 kg. Geprüft und zugelassen nach
UN R44/04. Maximale Körpergröße 150 cm.
HOMOLOGATION
Tian Elite
UN R44/04, Group: 1/2/3, body weight: 9-36 kg.
Only suitable for use on vehicle seats fitted with three-point
belts, approved in accordance with UN Regulation No. 16 or
comparable standards. This car seat belongs to weight class I, II
and III for children weighing between 20 and 80 lbs/9 and 36 kg.
Tested and approved according to UN R44/04. Maximum child
height 150 cm.
OMOLOGAZIONE
Tian Elite
UN R44/04, gruppo: 1/2/3, peso corporeo: 9-36 kg.
Adatto solo per l’uso su sedili di autovetture equipaggiate con
cinture di sicurezza a 3 punti omologate conformemente alla
regolamentazione UN n. 16 o secondo altri standard paragonabili.
Questo è un seggiolino della classe di peso I, II e III per bambini
con un peso corporeo da 9 fino a 36 kg. Testato e approvato
secondo la Direttiva UN R44/04. Statura massima 150 cm.
6
SICHERHEIT IST VERTRAUENSSACHE
Vielen Dank, dass Sie sich für RECARO entschieden haben. Dank einzig
artiger Erfahrung revolutioniert RECARO seit über 100 Jahren das Sitzen
im Auto, im Flugzeug und im Rennsport. Dieses konkurrenzlose Know-how
fließt in die Entwicklung jedes unserer Kindersicherheitssysteme ein. Un
ser Ziel ist es, Ihnen Produkte zu bieten, die in puncto Design, Funktionalität, Komfort und Sicherheit neue Maßstäbe setzen. Bei der Entwicklung
des Kindersitzes standen Sicherheit, Komfort und Bedienfreundlichkeit im
Vordergrund. Das Produkt wird unter besonderer Qualitätsüberwachung
hergestellt und erfüllt strengste Sicherheitsanforderungen.
Wir wünschen Ihnen viel Spaß und allzeit sichere Fahrt.
Ihr RECARO Kids Team
WARNUNG! Der Kindersitz darf nicht verändert werden und die
Montage- und Bedienungsanleitung ist sorgfältig zu befolgen, da sonst
entsprechende Gefährdungen beim Transport Ihres Kindes nicht aus
geschlossen werden können.
WARNUNG! Damit Ihr Kind richtig geschützt werden kann, ist es unbedingt notwendig, den Kindersitz so zu verwenden, wie es in dieser
Anleitung beschrieben wird.
HINWEIS! Bewahren Sie die Anleitung immer griffbereit in dem dafür
vorgesehenen Fach am Kindersitz auf.
HINWEIS! Durch länderspezifische Anforderungen
(z.B. Farbkennzeichnungen am Kindersitz) können Produktmerkmale in
ihrer äußeren Erscheinung variieren. Die korrekte Funktionsweise des
Produktes wird davon jedoch nicht beeinflusst.
HINWEIS! Der Dreipunktgurt darf nur durch die dafür vorgesehenen
Führungen verlaufen. Die Gurtführung wird in diesem Handbuch genau
beschrieben und ist zudem am Kindersitz rot markiert.
-
-
-

SAFETY IS A MATTER OF TRUST
Thank you very much for choosing RECARO. Thanks to our unique
experience, RECARO has been revolutionising car, aircraft and racing
car seating for over 100 years. This unrivalled expertise is incorporated
into the development of all our child safety systems. Our aim is to offer
you products which set new standards in terms of design, functionality,
comfort and safety. When designing the child car seat, our focus was
on safety, comfort and usability. The product is manufactured under
exceptional quality control and fulfils the strictest safety requirements.
We hope you have lots of fun and wish you a safe journey at all times.
Your RECARO Kids Team
LA SICUREZZA È UNA QUESTIONE DI FIDUCIA
Grazie per aver scelto RECARO. Con la sua esperienza unica RECARO
rivoluziona da oltre 100 anni i sedili delle auto, degli aerei e negli sport
da competizione. Questo know-how senza pari sfocia nello sviluppo di
ognuno dei nostri sistemi per la sicurezza per bambini. Il nostro obiettivo
è di offrirvi prodotti che diventino nuovi punti di riferimento per design,
funzionalità, comfort e sicurezza. In primo piano nello sviluppo del
seggiolino auto sono stati la sicurezza, il comfort e la facilità d’uso. Il
prodotto viene fabbricato applicando un particolare controllo di qualità e
soddisfa i più severi requisiti di sicurezza.
Vi auguriamo buon divertimento e un viaggio sempre sicuro.
Il vostro team di RECARO Kids
WARNING! The child seat must not be modified in any way, and the
instructions for installation and use
must be followed carefully, otherwise your child could be put at risk
while travelling.
WARNING! To ensure that your child is properly protected, it is
absolutely essential that you use the child car seat as described in
this guide.
NOTICE! Always keep this guide ready to hand in the compartment
provided on the child car seat.
NOTICE! Due to country-specific requirements
(e.g. colour labelling on the child car seat), the product features may vary
in terms of their external appearance. However, this does not affect the
correct functioning of the product.
NOTICE! The three-point belt must only be passed through the designated
routing guides. The belt routing guide is described in detail in this manual
and is also marked in red on the child car seat.
AVVISO! Conservare le istruzioni sempre a portata di mano nello
scomparto apposito del seggiolino auto.
AVVISO! A causa di requisiti nazionali specifici
(ad es. contrassegni colorati sul seggiolino auto) l’estetica del prodotto può
variare. Ciò però non influisce sul suo corretto funzionamento.
AVVISO! La cintura di sicurezza a tre punti deve essere allacciata solo
facendola passare nelle guide apposite. La guida della cintura viene
descritta con precisione in questo manuale e inoltre è contrassegnata di
rosso sul seggiolino auto.
DE PLIT ES HUEN FRNL PT RO EL
AVVERTENZA! Al seggiolino non devono essere apportate modifiche.
Seguire scrupolosamente le istruzioni per l’uso e il montaggio per
escludere pericoli durante il trasporto del bambino.
AVVERTENZA! Affinché il vostro bambino possa essere protetto nel
modo migliore, è assolutamente necessario usare il seggiolino auto
così come descritto in queste istruzioni.
7

DE – INHALT
ZULASSUNG ...............................................................................................6
ERSTMONTAGE ........................................................................................10
ZUM SCHUTZ DES FAHRZEUGS .............................................................. 10
DER RICHTIGE PLATZ IM FAHRZEUG ...................................................... 12
SICHERHEIT IM FAHRZEUG .....................................................................16
EINBAU DES KINDERSITZES INS FAHRZEUG GR. 1, 9-18 KG ..................18
ANPASSEN AN DIE KÖRPERGRÖSSE ......................................................20
ANSCHNALLEN MITTELS 5-PUNKT-GURTSYSTEM – GRUPPE 1 (9-18 KG) ...22
SO IST IHR KIND RICHTIG GESICHERT– 5-PUNKT-GURTSYSTEM
GRUPPE 1 (9-18 KG) ..........................................................................................24
UMBAU VON GRUPPE 1 ZU GRUPPE 2/3 ................................................26
EINBAU DES KINDERSITZES MIT SEATFIX GR. 2/3 ................................. 30
EINBAU DES KINDERSITZES INS FAHRZEUG GR. 2/3, 15-36 KG ............ 32
ANSCHNALLEN MITTELS 3-PUNKT-GURT – GRUPPE 2/3 (15-36 KG) ...... 34
SO IST IHR KIND RICHTIG GESICHERT – 3-PUNKT-GURT
GRUPPE 2/3 (15-36 KG) .............................................................................36
EINSTELLEN DER BEINAUFLAGE ............................................................36
SOUND SYSTEM .......................................................................................38
EINSTELLEN DER RUHEPOSITION ..........................................................38
ENTFERNEN DES SITZBEZUGES.............................................................. 40
REINIGUNG ............................................................................................... 42
PFLEGE ..................................................................................................... 42
VERHALTEN NACH EINEM UNFALL ......................................................... 44
PRODUKTINFORMATION .........................................................................44
PRODUKTLEBENSDAUER ........................................................................44
ENTSORGUNG ..........................................................................................46
GARANTIEBESTIMMUNGEN ....................................................................48
8

EN – CONTENTS IT – INDICE
HOMOLOGATION .......................................................................................6
FIRST INSTALLATION ................................................................................ 11
PROTECTING THE VEHICLE ...................................................................... 11
POSITIONING THE SEAT CORRECTLY IN THE VEHICLE .......................... 13
SAFETY IN THE VEHICLE .......................................................................... 17
INSTALLING THE CHILD CAR SEAT IN THE VEHICLE GR. 1, 9-18 KG ......19
ADAPTING TO BODY SIZE ......................................................................... 21
STRAPPING IN WITH 5-POINT HARNESS SYSTEM - GROUP 1 (9-18 KG) ... 23
SECURING YOUR CHILD CORRECTLY – 5-POINT HARNESS SYSTEM
GROUP 1 (9-18 KG) ...........................................................................................25
SWITCHING FROM GROUP 1 TO GROUP 2/3 ..........................................27
INSTALLING THE CHILD CAR SEAT WITH SEATFIX GR. 2/3 .....................31
INSTALLING THE CHILD CAR SEAT IN THE VEHICLE GR. 2/3, 15-36 KG ...33
STRAPPING IN USING 3-POINT HARNESS – GROUP 2/3 (15-36 KG) ......35
SECURING YOUR CHILD CORRECTLY – 3-POINT HARNESS
GROUP 2/3 (15-36 KG) ..............................................................................37
ADJUSTING THE LEG REST ...................................................................... 37
SOUND SYSTEM .......................................................................................39
ADJUSTING THE REST POSITION ............................................................ 39
REMOVING THE SEAT COVER .................................................................. 41
CLEANING ................................................................................................. 43
CARE ......................................................................................................... 43
WHAT TO DO AFTER AN ACCIDENT ........................................................45
PRODUCT INFORMATION ........................................................................45
PRODUCT SERVICE LIFE .......................................................................... 45
DISPOSAL .................................................................................................47
WARRANTY CONDITIONS ........................................................................49
OMOLOGAZIONE .......................................................................................6
PRIMO MONTAGGIO ................................................................................ 11
PER LA PROTEZIONE DELLA VETTURA ................................................... 11
LA POSIZIONE GIUSTA NELLA VETTURA ................................................ 13
SICUREZZA NELLA VETTURA ................................................................... 17
MONTAGGIO DEL SEGGIOLINO AUTO NELLA VETTURA GR. 1, 9-18 KG ...19
ADATTAMENTO ALLA STATURA DEL BAMBINO ..................................... 21
ALLACCIARE CON IL SISTEMA DI CINTURE A 5 PUNTI –
GRUPPO 1 (9-18 KG) .................................................................................23
COSÌ IL VOSTRO BAMBINO È PROTETTO NEL MODO GIUSTO –
SISTEMA DI CINTURE A 5 PUNTI 1 (9-18 KG) .................................................25
PASSAGGIO DAL GRUPPO 1 AL GRUPPO 2/3 .........................................27
MONTAGGIO DEL SEGGIOLINOAUTO CON SEATFIX GR. 2/3 .......................31
MONTAGGIO DEL SEGGIOLINO AUTO NELLA VETTURA GR. 2/3, 15-36 KG ...33
ALLACCIARE CON LA CINTURA A 3 PUNTI – GRUPPO 2/3 (15-36 KG) ...35
COSÌ IL VOSTRO BAMBINO È PROTETTO NEL MODO GIUSTO –
CINTURA A 3 PUNTI 2/3 (15-36 KG) ..........................................................37
REGOLAZIONE DEL POGGIAGAMBE ......................................................37
SOUND SYSTEM .......................................................................................39
REGOLAZIONE DELLA POSIZIONE DI RESTO .........................................39
RIMOZIONE DEL RIVESTIMENTO DEL SEGGIOLINO .............................41
PULIZIA ..................................................................................................... 43
CURA ......................................................................................................... 43
COMPORTAMENTO DOPO UN INCIDENTE .............................................45
INFORMAZIONI SUL PRODOTTO .............................................................45
DURATA DEL PRODOTTO ......................................................................... 45
SMALTIMENTO ......................................................................................... 47
DISPOSIZIONI DI GARANZIA .................................................................... 49
DE PLIT ES HUEN FRNL PT RO EL
9

ERSTMONTAGE
1
R
2
Schieben Sie die mitgelieferten Seitenprotektoren des „Advanced Side
Protection“ Systems (ASP) türseitig in die dafür vorgesehenen Montage
öffnungen (1), außen an den Schulterstützen. Drücken Sie den Pin um das
ASP zu arretieren.
HINWEIS! Bitte bewahren Sie die Gebrauchsanweisung immer im dafür
vorgesehenen Fach (2) auf der Rückseite auf.
WARNUNG! Stellen Sie sicher, dass Sie diese Gebrauchsanweisung
sorgfältig lesen, verstehen und befolgen.
HINWEIS! Auch ohne die Seitenprotektoren bietet der Sitz ausreichend
Seitenaufprallschutz. Ist im Fahrzeug genügend Platz vorhanden, empfeh
len wir die mitgelieferten ASP Elemente türseitig anzubringen.
-
-
ZUM SCHUTZ DES FAHRZEUGS
An einigen Autositzen aus empfindlichem Material (z.B. Velours, Leder,
etc.) können durch die Benutzung von Kindersitzen mögliche Gebrauchs
spuren und/oder Abfärbungen auftreten. Um das zu vermeiden, können
Sie z.B. den RECARO Car Seat Protector verwenden. Ferner weisen wir in
diesem Zusammenhang auf unsere Reinigungshinweise hin, die vor der
ersten Verwendung des Kindersitzes unbedingt beachtet werden sollten.
10
-

FIRST INSTALLATION
Push the included side protectors of the "Advanced Side Protection"
System (ASP) on the door side into the mounting holes (1) provided, on
the outside of the shoulder supports. Press the pin down to lock the ASP.
NOTICE! Please always keep the user manual in the compartment (2)
provided for this purpose on the back of the seat.
WARNING! Make sure that you read, understand and follow these
instructions carefully.
NOTICE! Even without the side protectors, the seat provides sufficient
protection against side impact. If the vehicle provides sufficient space, we
recommend installing the supplied ASP elements on the door side.
PRIMO MONTAGGIO
Spingere i protettori laterali in dotazione del sistema "Advanced Side
Protection" (ASP) sul lato della porta nelle aperture di montaggio previste
allo scopo (1), poste esternamente ai poggiaspalle. Premere il perno per
bloccare l'ASP.
AVVISO! Conservare le istruzioni per l'uso sempre nello scomparto
apposito (2) sul retro.
AVVERTENZA! Accertarsi che queste istruzioni per l'uso vengano lette
con attenzione, comprese e rispettate.
AVVISO! Il seggiolino offre una protezione da collisione laterale adeguata
anche senza i protettori laterali. Se all’interno della vettura vi è spazio a
sufficienza, suggeriamo di montare gli elementi ASP forniti in dotazione
sul lato porta.
PROTECTING THE VEHICLE
On some car seats made of sensitive material (e.g. velour, leather,
etc.), the use of child car seats can potentially cause signs of wear and/
or discolouration. To prevent this, you can use the RECARO Car Seat
Protector, for example. In this context, we would also like to draw your
attention to our cleaning instructions, which must be followed before using
the child car seat for the first time.
PER LA PROTEZIONE DELLA VETTURA
Su alcuni sedili auto in materiale sensibile (ad es. in velour, pelle, ecc.),
l’uso dei seggiolini auto può lasciare eventuali tracce d’uso e/o intaccare il
colore. Per evitare ciò è possibile usare ad es. RECARO Car Seat Protector.
Inoltre, in questo contesto ricordiamo le nostre istruzioni per la pulizia
che devono essere assolutamente osservate prima del primo uso del
seggiolino auto.
DE PLIT ES HUEN FRNL PT RO EL
11

DER RICHTIGE PLATZ IM FAHRZEUG
Der Kindersitz ist mit eingeklapptem Seatfix auf allen Fahrzeugplätzen mit
Dreipunkt Automatikgurt verwendbar, die im Fahrzeughandbuch für die
„universelle“ Verwendung zugelassen sind.
WICHTIG! Eine komplette Liste der Fahrzeuge finden Sie unter
www.recaro-kids.com.
WARNUNG! Der Sitz ist nicht für die Verwendung mit einem 2-Punkt-
oder Beckengurt geeignet. Wird der Sitz mit einem 2-Punkt-Gurt
gesichert, kann es bei einem Unfall zu schweren oder gar tödlichen
Verletzungen des Kindes kommen.
WARNUNG! Der Kindersitz ist im Auto so zu befestigen, dass er nicht
durch die Vordersitze oder die Fahrzeugtüren eingeklemmt wird.
12

POSITIONING THE SEAT CORRECTLY IN
THE VEHICLE
With retracted Seatfix, the child car seat can be used on all vehicle seats
with inertia reel three-point seat belts which are approved in the vehicle
owner’s manual for "universal" use.
IMPORTANT! For a complete list of vehicles, please go to
www.recaro-kids.com.
WARNING! The seat is not suitable for use with a two-point or lap belt.
If the seat is secured using a two-point belt, an accident may result in
severe or even fatal injuries to the child.
LA POSIZIONE GIUSTA NELLA VETTURA
Il seggiolinoauto può essere usato con Seatfix chiuso su tutti i posti della
vettura dotati di cintura di sicurezza automatica a tre punti omologati
secondo il manuale della vettura per l'uso "universale".
IMPORTANTE! Un elenco completo delle autovetture è riportato al sito
www.recaro-kids.com.
AVVERTENZA! Il seggiolino non è adatto all’uso con una cintura di
sicurezza a 2 punti o del bacino. Se il seggiolino viene assicurato con
una cintura a 2 punti, in caso di incidente il bambino può subire lesioni
gravi o addirittura mortali.
WARNING! Install the child seat in the vehicle in such a way that it is
not clamped by the front seats or the vehicle door.
AVVERTENZA! Il seggiolino è fissato nel veicolo in modo tale che non
venga bloccato dai sedili anteriori o
dalle porte del veicolo.
DE PLIT ES HUEN FRNL PT RO EL
13

WARNUNG! Der Diagonalgurt muss schräg nach hinten verlaufen und
darf nie nach vorn zum oberen Gurtpunkt in Ihrem Fahrzeug führen.
Sollte dies nicht einzustellen sein z.B. durch Vorschieben des Autosit
zes oder Verwendung auf einem anderen Sitzplatz, so ist der Kindersitz
für dieses Fahrzeug nicht geeignet. Im Zweifelsfall wenden Sie sich an
den Kindersitzhersteller. Gepäckstücke oder andere Gegenstände im
Fahrzeug, die bei einem Unfall Verletzungen verursachen können, müs
sen immer gut befestigt werden. Sie können zu tödlichen Geschossen
im Fahrzeug werden.
WARNUNG! Auf Fahrzeugplätzen, die quer zur Fahrtrichtung angeordnet sind, ist die Verwendung des Sitzes nicht zulässig. Auf
rückwärtsgerichteten Fahrzeugsitzen, wie z.B. in einem Van oder
Minibus, ist die Verwendung zulässig, sofern der Fahrzeugsitz für die
Beförderung eines Erwachsenen zugelassen ist. Zu beachten ist, dass
die Kopfstütze des Autositzes bei rückwärtsgerichtetem Einbau nicht
entfernt werden darf!
WARNUNG! Bitte lassen Sie Ihr Kind nie unbeaufsichtigt im Fahrzeug
zurück. Die Kunststoffteile des Kindersitzes heizen sich in der Sonne
auf. Ihr Kind kann sich daran verbrennen. Schützen Sie Ihr Kind und den
Kindersitz vor intensiver Sonneneinstrahlung (z.B. indem Sie ein helles
Tuch über den Sitz legen).
-
-
14

WARNING! The diagonal belt must run back at a recline and must
never run forward to the upper belt point in your vehicle. If it is not
possible to adjust the seat in this way, e.g. by pushing the car seat
forward or using it on another seat, the child car seat is not suitable
for this vehicle. If in doubt, contact the child car seat manufacturer.
Luggage or other objects in the vehicle which may cause injury in the
event of an accident must always be firmly securely. Otherwise, they
may be thrown around, causing fatal injuries.
WARNING! The seat may not be used on vehicle seats which are
facing to the side of the direction of travel. Use of the seat is permitted
on rear-facing vehicle seats, e.g. in a van or minibus, provided that the
vehicle seat is approved for transporting an adult. Please note that
the headrest of the car seat must not be removed when fitting on a
rear-facing seat!
WARNING! Please never leave your child unattended in the vehicle.
The plastic parts of the child car seat heat up in the sun. Your child may
sustain burns. Protect your child and the child car seat from direct sun
exposure (e.g. by placing a light-coloured cloth over the seat).
AVVERTENZA! La cintura diagonale deve essere allacciata
diagonalmente direttamente verso il lato posteriore e mai facendola
passare al di sopra del poggiatesta dall'altra parte del seggiolino. Se ciò
non fosse realizzabile ad es. spingendo in avanti il sedile auto o usando
un altro sedile, vuol dire che il seggiolino auto non è idoneo a questa
vettura. In caso di dubbi, rivolgersi al produttore del seggiolino auto.
Bagagli o altri oggetti nella vettura in caso di incidente possono causare
lesioni e devono essere sempre ben fissati. Nella vettura possono
diventare proiettili letali.
AVVERTENZA! Il seggiolino non può essere usato su sedili auto
disposi trasversalmente alla direzione di marcia. L'uso su sedili auto
rivolti in direzione opposta al senso di marcia, come ad es. in un van o
minibus, è consentito a condizione che il sedile auto sia omologato per
il trasporto di un adulto. Considerare che il poggiatesta del sedile auto
in caso di montaggio nella direzione opposta al senso di marcia non
può essere rimosso!
AVVERTENZA! Non lasciare mai incustodito il vostro bambino
nell’autovettura. I componenti di plastica del seggiolino auto al sole si
riscaldano. Il bambino può subire ustioni. Proteggere il bambino e il
seggiolino auto dai forti raggi del sole (ad es. coprendo il seggiolino con
un panno chiaro).
DE PLIT ES HUEN FRNL PT RO EL
15

SICHERHEIT IM FAHRZEUG
WARNUNG! Der Kindersitz muss, auch dann wenn er nicht benutzt
wird, immer korrekt mit dem Fahrzeuggurt im Fahrzeug befestigt sein.
Bereits bei einer Notbremsung oder einem geringen Aufprall können
unbefestigte Teile andere Mitfahrer und Sie selbst verletzen.
Achten Sie zum Schutz aller Fahrzeuginsassen stets darauf, dass:
▪ die umklappbaren Rückenlehnen der Fahrzeugsitze eingerastet sind und
sich in einer aufrechten Position befinden
▪ bei Einbau des Kindersitzes auf dem Beifahrersitz, dieser in der hinters
ten Position steht
▪ im Fahrzeug alle beweglichen Gegenstände gesichert sind
▪ alle Personen im Fahrzeug angeschnallt sind
WARNUNG! Achten Sie darauf, dass Gepäckstücke und andere
Gegenstände ausreichend gesichert sind, besonders auf der Hutabla
ge, da diese im Fall eines Zusammenstoßes Verletzungen verursachen
könnten.
16
-
-

SAFETY IN THE VEHICLE
WARNING! The child car seat must always be correctly secured in the
vehicle with the vehicle seat belt, even when it is not in use. In the
event of emergency braking or a minor impact, unsecured components
may injure other passengers or you.
To protect all vehicle occupants, always ensure that:
▪ foldable backrests on the vehicle seats are locked in place in their
upright position
▪ if the child car seat is installed on the front passenger seat, this is
adjusted to its rearmost position
▪ all movable objects in the vehicle are properly secured
▪ all persons in the vehicle are buckled up
WARNING! Always ensure that items of luggage and other objects
are adequately secured, particularly those on the parcel shelf, as these
could cause injury in the event of a collision.
SICUREZZA NELLA VETTURA
AVVERTENZA! Il seggiolino auto anche se non in uso deve essere
sempre fissato correttamente nella vettura con la relativa cintura di
sicurezza. Già in caso di una frenata di emergenza o di una collisione
minima, componenti non fissati possono ferire i passeggeri e il
conducente stesso.
Per la sicurezza di tutti gli occupanti della vettura prestare sempre
attenzione che
▪ gli schienali ribaltabili dei sedili auto siano bloccati e in posizione
verticale
▪ in caso di montaggio del seggiolino auto sul sedile del passeggero
anteriore, quest’ultimo sia nella posizione più posteriore possibile
▪ nella vettura tutti gli oggetti mobili siano fissati
▪ tutti gli occupanti della vettura abbiano allacciato la cintura di sicurezza
AVVERTENZA! Assicurarsi che eventuali bagagli e altri oggetti siano
fissati adeguatamente, soprattutto quelli disposti sul ripiano posteriore,
poiché potrebbero causare lesioni in caso di scontri.
DE PLIT ES HUEN FRNL PT RO EL
17

6
in Gr. 1
18
disabled
2x
EINBAU DES KINDERSITZES INS
FAHRZEUG GR. 1, 9-18 KG
Stellen Sie den Kindersitz auf den entsprechenden Fahrzeugsitz im Auto:
▪ Führen Sie die Schlosszunge des Fahrzeuggurts (3) hinter dem 5-Punkt-
3
4
5
7
8
Gurt des Kindersitzes entlang.
WARNUNG! Gurt nicht verdrehen.
▪ Rasten Sie die Schlosszunge im Gurtschloss des Fahrzeugs (4) ein.
▪ Fädeln Sie den Beckengurt (5) durch die beiden roten Gurtführungen (6),
welche sich unterhalb des Polsters an der Sitzfläche befinden.
▪ Achten Sie darauf, dass der Gurt straff über die roten Gurtführungen am
Sitz verläuft.
▪ Führen Sie den Diagonalgurt (7) hinter der Rückenplatte (8) entlang, an
der Kopfstütze vorbei, nach oben. Führen Sie den Gurt hierzu durch die
rote Gurtführung am Sitzbereich.
HINWEIS! Den Diagonalgurt nicht durch die obere Gurtführung fädeln.
▪ Ziehen Sie nun kräftig am Diagonalgurt (7), um den ganzen Autogurt
zu straffen.
WARNUNG! Das Auto-Gurtschloss darf auf keinen Fall in der Gurtführung liegen. Ist dies der Fall, versuchen Sie es auf einem anderen
Sitzplatz.
▪ Vergewissern Sie sich, dass der Kindersitz fest eingebaut ist. Straffen
Sie anderenfalls den Autogurt nochmals.
HINWEIS! Ziehen Sie den Kindersitz am Gurtzeug nach vorn. Er darf sich
nur wenig oder garnicht bewegen lassen

INSTALLING THE CHILD CAR SEAT IN THE
VEHICLE GR. 1, 9-18 KG
Place the child car seat on the appropriate vehicle seat in the car:
▪ Guide the belt tongue of the vehicle belt (3) behind the 5-point belt of
the child car seat.
WARNING! Do not twist the belt.
▪ Lock the belt tongue into place in the vehicle's belt lock (4).
▪ Thread the lap belt (5) through the two red-coloured belt guides (6)
located underneath the upholstery on the seat surface.
▪ Make sure that the belt runs taut over the red belt guides on the seat.
▪ Feed the diagonal belt (7) behind the rear plate (8) and past the
headrest, upwards. Guide the belt through the red belt guide on the
seat surface.
NOTICE! Do not thread the diagonal belt through the upper belt guide.
▪ Now pull the diagonal belt (7) firmly to tighten the entire vehicle seat belt.
WARNING! The vehicle belt lock must never be in the belt guide. If
this is the case, try it on another seat.
▪ Make sure that the child car seat is securely installed. If not, please
tighten the vehicle seat belt again.
NOTICE! Pull forwards on the harness of the child car seat. It must move
only slightly or not at all
MONTAGGIO DEL SEGGIOLINO AUTO
NELLA VETTURA GR. 1, 9-18 KG
Posizionare il seggiolino auto sul sedile auto corrispondente:
▪ Far passare la fibbia della chiusura della cintura della vettura (3) dietro
alla cintura a 5 punti del seggiolinoauto.
AVVERTENZA! Non attorcigliare la cintura.
▪ Far scattare la fibbia nella chiusura della cintura della vettura (4).
▪ Infilare la cintura del bacino (5) nelle due guide rosse della cintura (6)
che i trovano sotto l'imbottitura sulla superficie di seduta.
▪ Prestare attenzione che la cintura sia tesa sulle guide rosse della cintura
del seggiolino.
▪ Far passare la cintura diagonale (7) dietro la piastra posteriore (8) sul
poggiatesta e quindi verso l'alto. A tal scopo far passare la cintura nella
guida rossa della cintura sull'area di seduta.
AVVISO! Non infilare la cintura diagonale nella guida superiore della cintura.
▪ Quindi tirare con forza la cintura diagonale (7) per tendere l'intera cintura
della vettura.
AVVERTENZA! La chiusura della cintura della vettura non deve trovarsi
in nessun caso nella guida della cintura. Se ciò si verifica provare su
un altro sedile.
▪ Accertarsi che il seggiolinoauto sia montato in modo fisso. In caso
contrario tendere nuovamente la cintura della vettura.
AVVISO! Tirare in avanti il seggiolinoauto dalle cinture. Deve poter essere
spostato solo di poco o per niente
DE PLIT ES HUEN FRNL PT RO EL
19
15
14
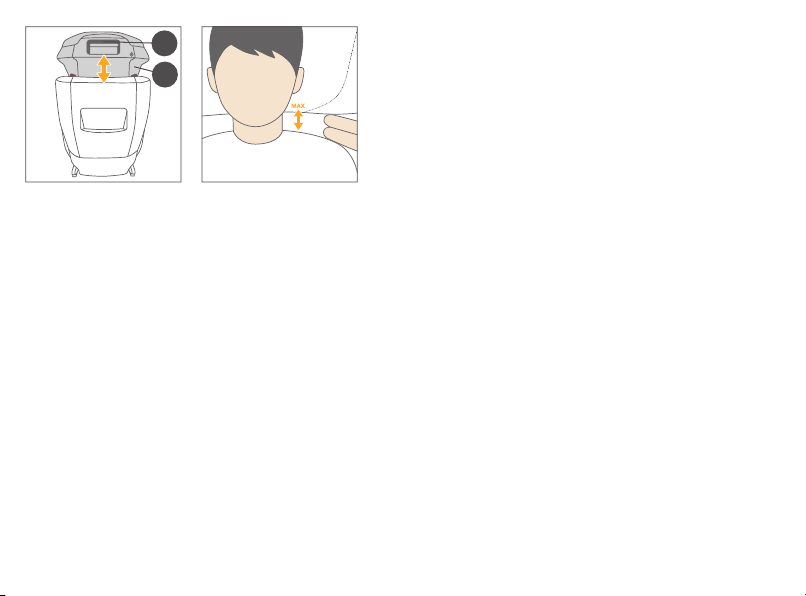
ANPASSEN AN DIE KÖRPERGRÖSSE
ANPASSEN DER KOPFSTÜTZE
HINWEIS! Nur eine in optimaler Höhe eingestellte Kopfstütze (14) ge
währt Ihrem Kind größtmöglichen Schutz und Komfort. Die Höhenverstellung kann in 11 Positionen erfolgen.
▪ Die Kopfstütze (14) muss so eingestellt werden, dass der Abstand
zwischen den Schultern des Kindes und der Kopfstütze max. 3 cm (ca. 2
Finger) nicht überschreitet
▪ Betätigen Sie die Einstelltaste (15) an der Rückseite der Kopfstütze und
führen Sie die Kopfstütze in die gewünschte Position
-
20

ADAPTING TO BODY SIZE
ADJUSTING THE HEADREST
NOTICE! The headrest (14) guarantees maximum protection and comfort
for your child only if it is adjusted to the optimum height. The height can be
adjusted to one of 11 positions.
▪ Adjust the headrest (14) so that the distance between the child's
shoulders and the headrest does not exceed 3 cm (approx. 2 fingers)
▪ Activate the adjustment button (15) on the back of the headrest and
move the headrest to the required position
ADATTAMENTO ALLA STATURA DEL
BAMBINO
ADATTAMENTO DEL POGGIATESTA
AVVISO! Solo un poggiatesta regolato all’altezza ottimale (14) garantisce
la massima sicurezza e il massimo comfort per il vostro bambino. La
regolazione in altezza può essere eseguita in 11 posizioni.
▪ Il poggiatesta (14) deve essere regolato in modo che la distanza tra le
spalle del bambino e il poggiatesta non superi max. 3 cm (circa 2 dita)
▪ Azionare il tasto di regolazione (15) posto sul retro del poggiatesta e
portare il poggiatesta alla posizione desiderata
DE PLIT ES HUEN FRNL PT RO EL
21
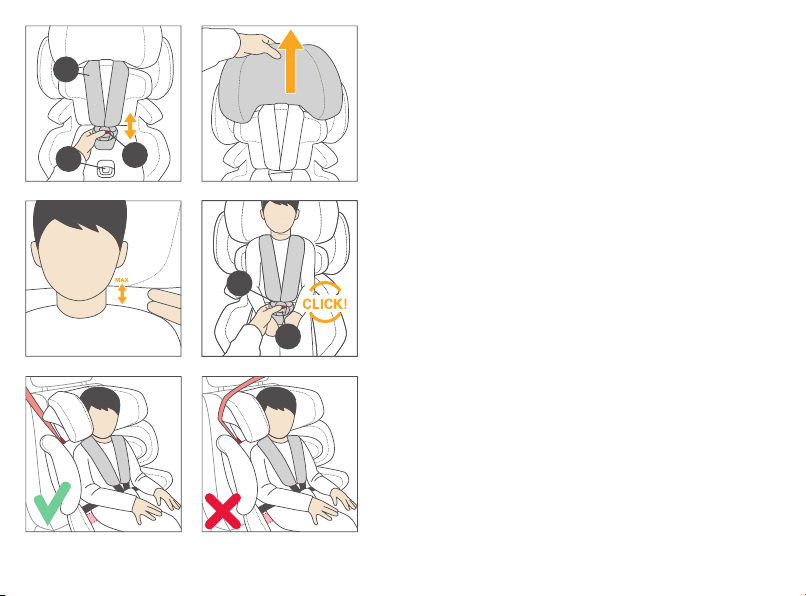
ANSCHNALLEN MITTELS 5-PUNKT-
16
17
19
20
21
22
GURTSYSTEM – GRUPPE 1 (9-18 KG)
HINWEIS! Achten Sie darauf, dass die Kopfstütze ordnungsgemäß eingerastet ist, bevor Sie den Kindersitz verwenden (siehe Kapitel: „ANPASSEN
AN DIE KÖRPERGRÖSSE“).
HINWEIS! Sorgen Sie dafür, dass der Kindersitz frei von Spielsachen und
harten Objekten ist.
HINWEIS! Die Schultergurte (16) sind mit der Kopfstütze fest verbunden
und müssen nicht separat eingestellt werden.
▪ Lockern Sie die Schultergurte (16), indem Sie die Verstelltaste am
Zentralversteller (17) betätigen und gleichzeitig beide Schultergurte nach
vorne ziehen.
HINWEIS! Bitte ziehen Sie immer am Schultergurt und nicht an den
Schulterpolstern, die an der Kopfstütze befestigt sind.
▪ Öffnen Sie das Gurtschloss durch kräftiges Drücken der roten Taste (19).
▪ Setzen Sie Ihr Kind in den Kindersitz.
▪ Führen Sie die Schultergurte (16) gerade über die Schultern Ihres
Kindes.
HINWEIS! Achten Sie darauf, dass die Schultergurte (16) nicht
verdreht sind.
▪ Führen Sie die beiden Schlosszungen (20) zusammen und rasten Sie
diese im Gurtschloss (21) mit einem hörbaren „KLICK“ ein.
▪ Ziehen Sie behutsam am Zentralverstellgurt, um die Schultergurte so
weit zu straffen, bis diese am Körper Ihres Kindes anliegen.
HINWEIS! Für den optimalen Schutz Ihres Kindes sollten die Schulter
gurte so nahe wie möglich am Körper und die Hüftgurte tief an der Hüfte
anliegen.
-

STRAPPING IN WITH 5-POINT HARNESS
SYSTEM - GROUP 1 (9-18 KG)
NOTICE! Make sure that the headrest is properly engaged before using
the child car seat (see section: "ADAPTING TO BODY SIZE").
NOTICE! Make sure that there are no toys or hard objects on the child
car seat.
NOTICE! The shoulder belts (16) are permanently attached to the headrest
and do not need to be adjusted separately.
▪ Loosen the shoulder belts (16) by pressing the adjustment button on
the central adjuster (17) and simultaneously pulling both shoulder belts
forward.
NOTICE! Please always pull on the shoulder belt and not on the shoulder
pads, which are attached to the headrest.
▪ Open the belt lock by firmly pressing the red button (19).
▪ Seat your child in the child car seat.
▪ Feed the shoulder belts (16) straight over your child's shoulders.
NOTICE! Make sure that the shoulder belts (16) are not twisted.
▪ Bring the two belt tongues (20) together and engage them in the belt
lock (21) with an audible "CLICK".
▪ Gently pull the central adjustment belt to tighten the shoulder belts until
they are resting against your child's body.
NOTICE! For optimum protection of your child, the shoulder belts should
fit as close as possible to the body and the hip belts should lie low on
the hips.
ALLACCIARE CON IL SISTEMA DI
CINTURE A 5 PUNTI – GRUPPO 1 (9-18 KG)
AVVISO! Prestare attenzione che il poggiatesta si sia bloccato
correttamente prima di usare il seggiolinoauto.
AVVISO! Fare in modo che nel seggiolinoauto non siano presenti
giocattoli o oggetti duri.
AVVISO! Le cinture per le spalle (16) sono collegati in modo fisso al
poggiatesta e non devono essere regolate separatamente.
▪ Allentare le cinture per le spalle (16) azionando il tasto di regolazione
centrale (17) e contemporaneamente tirando in avanti le due cinture
per le spalle.
AVVISO! Tirare sempre la cintura per le spalle e non le imbottiture per le
spalle fissate al poggiatesta.
▪ Aprire la chiusura della cintura premendo con forza sul tasto rosso (19).
▪ Sedere il bambino nel seggiolino auto.
▪ Far passare le cinture per le spalle (16) diritte sulle spalle del bambino.
AVVISO! Prestare attenzione che le cinture per le spalle (16) non siano
attorcigliate.
▪ Congiungere le due linguette della fibbia (20) e inserirle nella chiusura
della cintura di sicurezza (21) fino a udire un chiaro "CLIC".
▪ Tirare leggermente la cintura di regolazione centrale per tendere le
cinture per le spalle in modo che aderiscano al corpo del bambino.
AVVISO! Per la protezione ottimale del vostro bambino le cinture per le
spalle devono poggiare quanto più vicino possibile al corpo e le cinture del
bacino devono poggiare in basso sui fianchi.
DE PLIT ES HUEN FRNL PT RO EL
23

SO IST IHR KIND RICHTIG GESICHERT–
5-PUNKT-GURTSYSTEM GRUPPE 1 (9-18 KG)
Um die bestmögliche Sicherheit Ihres Kindes zu gewährleisten, prüfen Sie
bitte vor Beginn der Fahrt, ob…
▪ die Rückenlehne des Kindersitzes möglichst vollflächig an der Rücken
lehne des Fahrzeugsitzes anliegt.
▪ der Fahrzeug-Gurt korrekt entlang den Gurtführungen gelegt ist und fest
angezogen wurde.
▪ das 5-Punkt-Gurtsystem an die Körpergröße Ihres Kindes angepasst
wurde, die Schultergurte nicht verdreht sind, das Gurtsystem geschlos
sen und der Gurt fest angezogen ist.
24
-
-

SECURING YOUR CHILD CORRECTLY –
5-POINT HARNESS SYSTEM
GROUP 1 (9-18 KG)
In order to ensure optimum safety for your child, please always check
before commencing travel that…
▪ the backrest of the child car seat lies completely flush with the backrest
of the vehicle seat.
▪ the vehicle seat belt is correctly positioned along the belt guides and
has been firmly tightened.
▪ the 5-point harness system has been adjusted to the height of your
child, the shoulder belts are not twisted, the harness system is closed
and the belt is firmly tightened.
COSÌ IL VOSTRO BAMBINO È PROTETTO
NEL MODO GIUSTO – SISTEMA DI CINTURE
A 5 PUNTI 1 (9-18 KG)
Per garantire la migliore sicurezza del bambino controllare prima dell'inizio
del viaggio che...
▪ lo schienale del seggiolino auto poggi quanto più possibile
completamente allo schienale del sedile auto.
▪ la cintura della vettura poggi correttamente nelle guide della cintura e
che sia ben tesa.
▪ il sistema di cinture a 5 punti sia stato adattato correttamente alla
statura del bambino, che le cinture per le spalle non siano attorcigliate,
che il sistema di cinture sia chiuso e che la cintura sia ben tesa.
DE PLIT ES HUEN FRNL PT RO EL
25

UMBAU VON GRUPPE 1 ZU GRUPPE 2/3
Bringen Sie die Kopfstütze (14) in die höchstmögliche Position für Gr. 1 bis
zu einem Widerstand, um mit dem Umbau beginnen zu können.
Anschließend gehen Sie wie folgt vor:
▪ Lockern Sie die Schultergurte (16) vollständig auf maximale Länge,
indem Sie die Verstelltaste am Zentralversteller (17) betätigen und
gleichzeitig beide Schultergurte nach vorne ziehen.
▪ Öffnen Sie das Gurtschloss (21), indem Sie die rote Taste drücken (19).
▪ Lösen Sie die Polster (18) von den Schultergurten (16) und das Polster
vom Gurtschloss (22).
▪ Anschließend entfernen Sie die Bezüge im Rückenbereich des
Kindersitzes.
▪ Heben Sie den Bezug von der Sitzfläche (31) und anschließend den
Komfort-Schaumstoff (32) hoch, bis das Staufach (23) in der Sitzfläche
zugänglich ist.
22
16
1814
19
21
17
32
31
23
26

SWITCHING FROM GROUP 1 TO GROUP 2/3
Bring the headrest (14) into the highest possible position for Group 1 until
you feel resistance, in order to be able to start the conversion.
Then proceed as follows:
▪ Loosen the shoulder belts (16) completely to maximum length by
pressing the adjustment button on the central adjuster (17) and
simultaneously pulling both shoulder belts forward.
▪ Open the belt lock (21) by pressing the red button (19).
▪ Detach the pads (18) from the shoulder belts (16) and the pad from the
belt lock (22).
▪ Then remove the covers in the back section of the child car seat.
▪ Pull up the cover from the seating area (31) and then lift up the comfort
foam (32) until the storage compartment (23) can be accessed.
PASSAGGIO DAL GRUPPO 1 AL GRUPPO 2/3
Prima di cominciare la conversione, portare il poggiatesta (14) nella
posizione più alta possibile per la gr. 1 fino ad avvertire una resistenza.
Quindi procedere come descritto di seguito:
▪ Allentare le cinture per le spalle (16) completamente alla lunghezza
massima azionando il tasto di regolazione centrale (17) e
contemporaneamente tirando in avanti le due cinture per le spalle.
▪ Aprire la chiusura della cintura (21) premendo il tasto rosso (19).
▪ Staccare le imbottiture (18) dalle cinture per le spalle (16) e l'imbottitura
dalla chiusura della cintura (22).
▪ Quindi rimuovere i rivestimenti dal retro del seggiolinoauto.
▪ Sollevare il rivestimento dalla superficie di seduta (31) e quindi l'espanso
comfort finché (32) non è possibile accedere alla vano portaoggetti (23)
nella superficie di seduta.
DE PLIT ES HUEN FRNL PT RO EL
27

▪ Ziehen Sie nun das Gurtschloss durch das Sitzpolster und verstauen Sie
es im Staufach.
▪ Verschließen Sie die Abdeckung wieder. Bitte bewahren Sie die Gurt
polster sorgfältig auf.
▪ Verstauen Sie außerdem die Schlosszungen (20) in den dafür vorgese
henen Aussparungen im Sitz (24).
▪ Fädeln sie die Befestigung der Gurtpolster durch die zweite Öffnung in
der Rückenplatte, dass diese sicher verstaut sind.
▪ Nun führen Sie den Gurt durch die Öffnung in der Rückenplatte, um
diesen zu verstauen.
▪ Ziehen Sie nun den Komfort-Schaumstoff und Sitzbezüge wieder auf.
HINWEIS! Der Sitz kann nicht für die Gruppe 2/3 verwendet werden, be
vor das Gurtschloss im Staufach untergebracht ist.
WARNUNG! Die Verwendung des integrierten Gurtsystems ist für die
Gr. 2/3 (> 18kg) nicht erlaubt!
HINWEIS! Wenn Sie den Kindersitz wieder in die Gr. 1 zurückbauen, gehen
Sie in exakt umgekehrter Reihenfolge vor. Nutzen Sie die vorangegange
nen Anweisungen um zu überprüfen, ob alle Teile vorhanden sind.
-
-
-
-
24
20
28

▪ Now pull the belt lock through the seat pad and stow it in the storage
compartment.
▪ Close the cover again. Please keep the belt pads stored away safely.
▪ Please also store the belt tongues (20) in the recesses provided in the
seat (24).
▪ Thread the belt pad attachment through the second opening in the rear
plate so that these are securely stowed.
▪ Now feed the belt through the opening in the rear plate to stow it away.
▪ Now pull the comfort foam and seat covers back on.
NOTICE! The seat cannot be used for Group 2/3 until the belt lock is
housed in the storage compartment.
WARNING! Use of the built-in harness system is not permitted for
Group 2/3 (> 18kg)!
NOTICE! If you are restoring the child car seat to Group 1, please proceed
in the exact reverse order. Use the previous instructions to check that all
parts are present.
▪ Ora tirare la chiusura della cintura nell'imbottitura del seggiolino e riporta
nel vano apposito.
▪ Richiudere la copertura. Conservare l'imbottitura della cintura con cura.
▪ Inoltre riporre le fibbie della chiusura (20) nelle rientranze apposite del
seggiolino (24).
▪ Infilare il fissaggio delle imbottiture delle cinture nella seconda apertura
della piastra posteriore in modo che siano conservate in modo sicuro.
▪ Ora infilare la cintura nell’apertura della piastra sul retro per conservarla.
▪ Riposizionare quindi l’espanso comfort e i rivestimenti del seggiolino.
AVVISO! Il seggiolino non può essere usato per il gruppo 2/3 prima che la
chiusura della cintura sia stata riposta nel vano apposito.
AVVERTENZA! L'uso del sistema di cinture integrato non è consentito
per la gr. 2/3 (> 18 kg)!
AVVISO! Se il seggiolinoauto viene riconvertito alla gr. 1, procedere
esattamente nella sequenza inversa. Seguire le istruzioni precedenti per
controllare se sono presenti tutti i componenti.
DE PLIT ES HUEN FRNL PT RO EL
29

10
in Gr. 2/3
30
optional
11
13
12
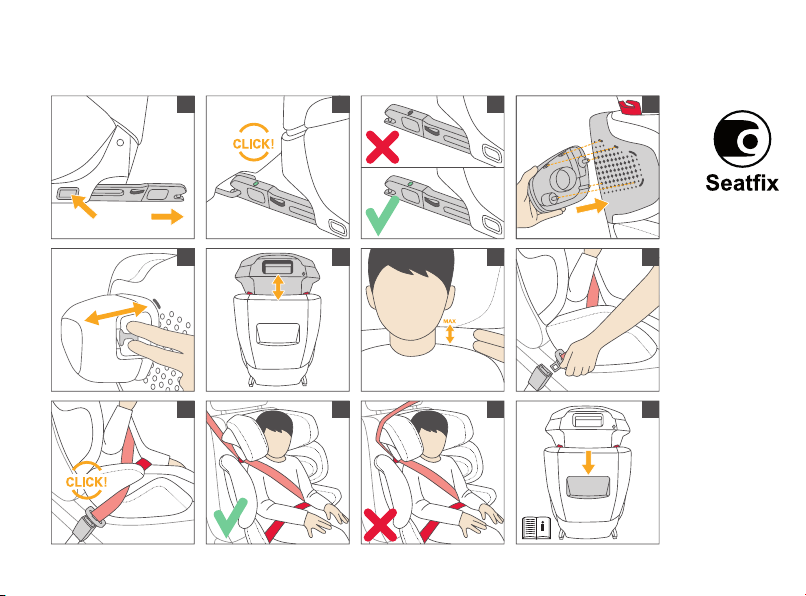
EINBAU DES KINDERSITZES MIT
SEATFIX GR. 2/3
9
EINBAU
Mit Seatfix können Sie den Kindersitz mit dem Fahrzeug verbinden und
so die Sicherheit Ihres Kindes erhöhen. Seatfix sichert den Kindersitz bei
Nichtgebrauch. Ihr Kind muss weiterhin mit dem 3-Punkt-Gurt Ihres Fahr
zeuges angeschnallt werden.
HINWEIS! Die ISOFIX Befestigungspunkte (9) sind zwei Metalllaschen
pro Sitzplatz und befinden sich zwischen Rückenlehne und Sitzfläche des
Fahrzeugsitzes. Im Zweifelsfall nehmen Sie die Bedienungsanleitung Ihres
Fahrzeuges zu Hilfe.
▪ Betätigen Sie die Einstelltaste (10) an der Seite
▪ Ziehen Sie die beiden Seatfix Konnektoren (11) heraus
▪ Schieben Sie die beiden Seatfix Konnektoren in die ISOFIX Befesti
gungspunkte (9), bis diese mit einem hörbaren „KLICK“ einrasten
▪ Vergewissern Sie sich, dass der Sitz gut hält, indem Sie versuchen ihn
herauszuziehen
▪ Der Sicherheitsindikator (12) muss nun an den beiden Konnektoren
grün sein
Schieben Sie den Kindersitz zurück, bis er vollflächig an der Rückenlehne
des Fahrzeugs anliegt.
HINWEIS! Sind die ISOFIX Befestigungspunkte (9) in ihrem Fahrzeug
schwer zu erreichen, können Sie die mitgelieferten ISOFIX Einführhilfen
(13) verwenden.
▪ Hängen Sie die mitgelieferten ISOFIX Einführhilfen (13) mit der längeren
Lasche nach oben in den beiden ISOFIX Befestigungspunkten (9) ein. In
manchen Fahrzeugen eignet sich eine entgegengesetzte Einbaurichtung
der ISOFIX Einführhilfen (13) besser
-
-
 Loading...