

Recaro Polaric User Manual [nl]

Polaric
D
Montage - Anleitung
GB
Installation Instructions
F
Instructions de montage
NL
Montage- en gebruiksaanwijzing
SLO
Navodilo za montažo
PL
Instrukcja montażu
S
Monterings- och bruksanvisning
N
Montasjeanvisning
DK
Montagevejledning
FIN
Asennus - Ohje
LT
Montavimo instrukcija
LV
Mont≥®as instrukcija
Diese Montage- und Gebrauchsanleitung unbedingt dem Kunden aushändigen. Druckfehler, Irrtümer und technische Änderungen
vorbehalten. ACHTUNG – Für späteres Nachschlagen unbedingt aufbewahren.
These instructions must always be handed to the customer. Errors and omissions excepted. Subject to amendment.
WARNING – Keep for future reference.
Ces instructions de montage et d
AVERTISSEMENT – à conserver pour les futurs besoins de référence.
Deze montagehandleiding/gebruiksaanwijzing moet te allen tijde aan de klant worden afgegeven. Drukfouten, vergissingen en
technische wijzigingen voorbehouden. LET OP – Voor latere raadpleging bewaren.
Ta navodila za sestavo in uporabo je potrebno obvezno izroßiti stranki. Tiskarske in druge napake ter tehnißne spremembe
pridr®ane. POZOR - navodila obvezno shranite za kasnejšo uporabo!
Tę instrukcję montażu i użytkowania należy koniecznie przekazać klientowi. Zastrzega się prawo do pomyłek, błędów w druku
i zmian technicznych. UWAGA - Zachować w celu późniejszego zasięgania informacji.
Denna monterings-och bruksanvisning måste lämnas över till kunden. Tryckfel, misstag och tekniska ändringar förbehålls.
OBS – Måste sparas för att kunna läsa igen senare.
Denne montasje- og bruksanvisningen skal overleveres kunden. Det tas forbehold om trykkfeil, feil og tekniske endringer.
OBS – Oppbevares for senere referanse.
Denne montage- og brugsvejledning skal altid udleveres til kunden. Trykfejl, fejl og tekniske ændringer forbeholdes.
OBS - skal opbevares til senere brug.
Nämä asennus- ja käyttöohjeet tulee ehdottomasti luovuttaa asiakkaalle. Painovirheet ja erehdykset mahdollisia, oikeus teknisiin
muutoksiin pidätetään.
{i montavimo ir naudojimo instrukcija b‰tinai privalo b‰ti #teikta pirk|jui. Pasiliekame teis… · spaudos klaidas, netikslumus
ir techninius pakeitimus. DÉMESIO – B‰tinai iƒsaugokite tam, kad v|liau gal|tum|te papildomai pasiskaityti.
Izsniedziet ƒo mont≥®as un lietoƒanas pam≥c⁄bu klientam. Nenesam atbild⁄bu par drukas kÙ‰d≥m, kÙ‰d≥m un tehnisk≥
rakstura izmai_≥m. UZMANIBU - noteikti uzglab≥jiet v‡l≥kai izmantoƒanai.
,
utilisation doivent être impérativement remises au client. Sous réserve d
HUOMIO – Säilytä ehdottomasti myöhempiä lukukertoja varten.
B‡rnu droƒ⁄bas jostu aplikƒanas un pievilkƒanas sist‡ma, I grupa (9-18 kg)
Kinder-Rückhaltesystem, Gruppe I (9-18 kg)
Child Restraint System, Group I (9-18 kg)
Système de retenue d'enfant, Groupes I (9-18 kg)
Bevestigingssysteem voor kinderen Groep I (9-18 kg)
Otroški varnostni sistem, Skupina I (9-18 kg)
System zabezpieczenia dziecka, Grupa I (9-18 kg)
Barnsits-system, Grupp I (9 - 18 kg)
Barnesikring for bil, Gruppe I (9 - 18 kg)
Barnestolsystem, gruppe I (9-18 kg)
Lastenistuin, Ryhmä I (9-18 kg)
Vaik· saugumo sistema, grup| I (9-18 kg)
,
erreurs et de modifications.
RECARO GmbH & Co. KG, Competence Center Child Safety, Guttenbergstr. 2, 95352 Marktleugast - Mannsflur
Telefon: +49/(0)9255/77-66, Fax: +49/(0)9255/77-13, E-Mail: info@recaro-cs.com, www.recaro-cs.com
5118-4-14/1 - Version 220311

Inhaltsverzeichnis
Table of Contents
D
GB
Inhalt Table of contents Kapitel Chapter
Einbau / Ausbau Installation / Removal 1
Einbau des Sitzes Installing the seat 1.1 – 1.9
Ausbau des Sitzes Removing the seat 1.10 – 1.11
Anschnallen des Kindes Safeguarding the child 2
Bedienung des Gurtsystems Operating the belt system 2.1 – 2.6
Höheneinstellung der Gurte Adjusting the height of the belts 2.7 – 2.8
Handhabung Handling 3
Einstellen der Liegeposition Adjusting the reclining position 3.1
Tragen des Kindersitzes Carrying the child seat 3.2
Abnehmen des Kopfpolsters Removing the headrest 3.3 – 3.5
Abnehmen des Bezuges Removing the cover 3.6 – 3.8
Hinweise Advice 4
Sicherheitshinweise Safety advice 4.1
Allgemeine Hinweise General advice 4.2
Gewährleistung Warranty 4.3
Schutz Ihres Fahrzeugs Protecting your vehicle 4.4
5119-4-04/1
Sehr geehrte Eltern,
herzlichen Glückwunsch! Getreu unserer Devise "weil es Ihnen Ihr Kind wert ist" haben Sie sich für ein
hochwertiges Qualitätsprodukt aus dem Hause RECARO entschieden. Hohe Sicherheit, beste Ergonomie,
aktuelles Design, Komfort und höchste Qualität sind für uns Pflicht. So werden zum Beispiel nur bei RECARO
alle Kindersitze wie Autositze behandelt und nach strengen Vorgaben der Automobilindustrie geprüft.
Allzeit gute Fahrt wünscht Ihnen das RECARO Competence Center Child Safety!
Dear Parents,
Congratulations! In line with our motto “Because your child is worth it" you have chosen a high-grade
quality product from RECARO. For us, outstanding safety, best ergonomics, state-of-the-art design, comfort
and highest quality are obligatory. For example, at RECARO, all child seats are treated like car seats and
are tested in accor
dance with the strict requirements of the automotive industry.
The RECARO Child Safety Competence Centre wishes you a safe journey at all times!

Kapitel 1 – Einbau / Ausbau
Chapter 1 – Installation / Removal
Kinderautositz Polaric der Altersgruppe I,
9 – 18 kg Körpergewicht, zur ausschließlichen Befestigung
mit Isofix-System. Der Kindersitz entspricht der ISOFIXGrößenklasse C. Bitte informieren Sie sich im Fahrzeughandbuch über die dafür zugelassenen Sitze. Geprüft und zugelassen nach ECE 44/04 bei einem Frontaufprall bei 50 km/h.
Einbau nur gegen die Fahrtrichtung zulässig.
Car seat Polaric for age group I. Child body weight 9 – 18 kg.
Suitable only for the Isofix mounting system. The car seat is
intended for ISOFIX size class C. Please read the car
manufacturer’s handbook to check on which passenger
seats the Polaric can be mounted.
Tested and approved in accordance with ECE 44/04 for a
front impact at 31 mph (50 km/h). May only be fitted
rearward facing.
1.1 - 1.9 Einbau des Sitzes
Stecken Sie die Einführhilfen durch den Polsterschlitz von
Rückenlehne und Sitzfläche auf die Isofixbügel, nicht erforderlich bei bereits fest installierten Einführhilfen, z.B. BMW.
Achten Sie darauf, dass die offene Seitenfläche oben ist.
1
GBD
5120-4-06/1
5084F-4-01/1
1.1 - 1.9 Installing the seat
Push the insertion guides through the upholstery slot between
the backrest and seat onto the Isofix brackets. This is not
necessary where such guides have already been installed,
e.g. BMW.
Ensure that the open side area faces upwards.
Klappen Sie den Stützfuß bis zum Anschlag nach unten.
Fold the support foot fully downwards.
1.1
1.2
5092F-4-00/1
5090F-4-00/1
Kapitel 1 – Einbau / Ausbau
Chapter 1 – Installation / Removal
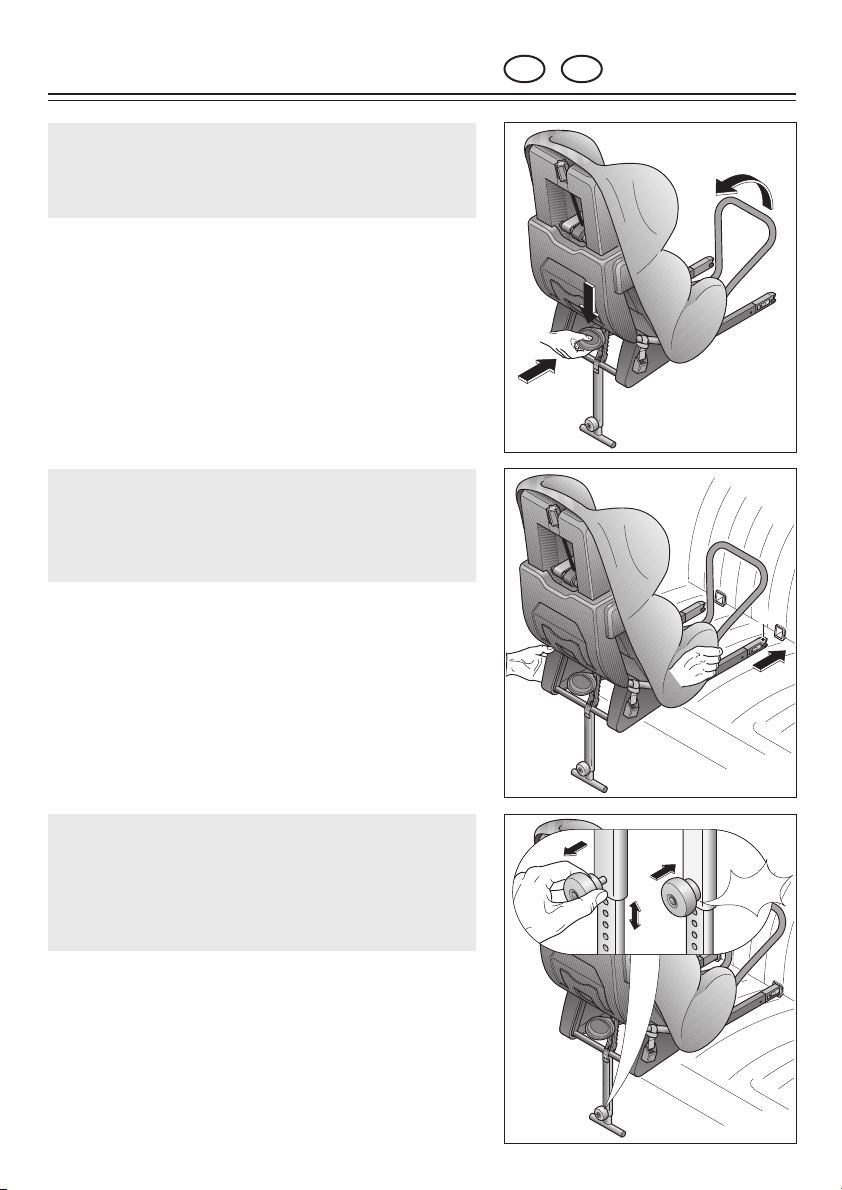
Drücken Sie den Knopf am Rasthebel und schieben Sie
diesen nach unten. Dadurch wird der Reboardbügel zum
Kindersitz geschwenkt.
Push the button on the locking lever and push the lever
down. This swivels the rear bracket towards the child seat.
GBD
5121-4-06/1
1.3
Stecken Sie die Isofixkonnektoren in die Einführhilfen, bis sie
einrasten; dabei muss die grüne Markierung am Konnektor
sichtbar werden. Prüfen Sie die Verrastung durch beidseitiges
Ziehen an den Isofixholmen.
Insert the Isofix connectors in the guides until they engage;
the green marking on the connector must be visible. Check
that they have engaged by pulling on both sides of the
Isofix spars.
1.4
Stützfuß einstellen:
Ziehen Sie den Rastknopf heraus und verstellen Sie den
Stützfuß so, dass er auf dem Fahrzeugboden aufliegt. Lassen
Sie dann den Rastknopf los und achten darauf, dass der
bewegliche Teil des Stützfußes eingerastet ist.
Adjust the support foot.
Pull out the locking button and adjust the support foot so
that it rests firmly on the floor. Release the locking button
and ensure that the movable part of the support foot is
engaged.
5091F-4-00/1
A
5093F-4-00/1
Klick
1.5
5094F-4-00/1
Kapitel 1 – Einbau / Ausbau
Chapter 1 – Installation / Removal
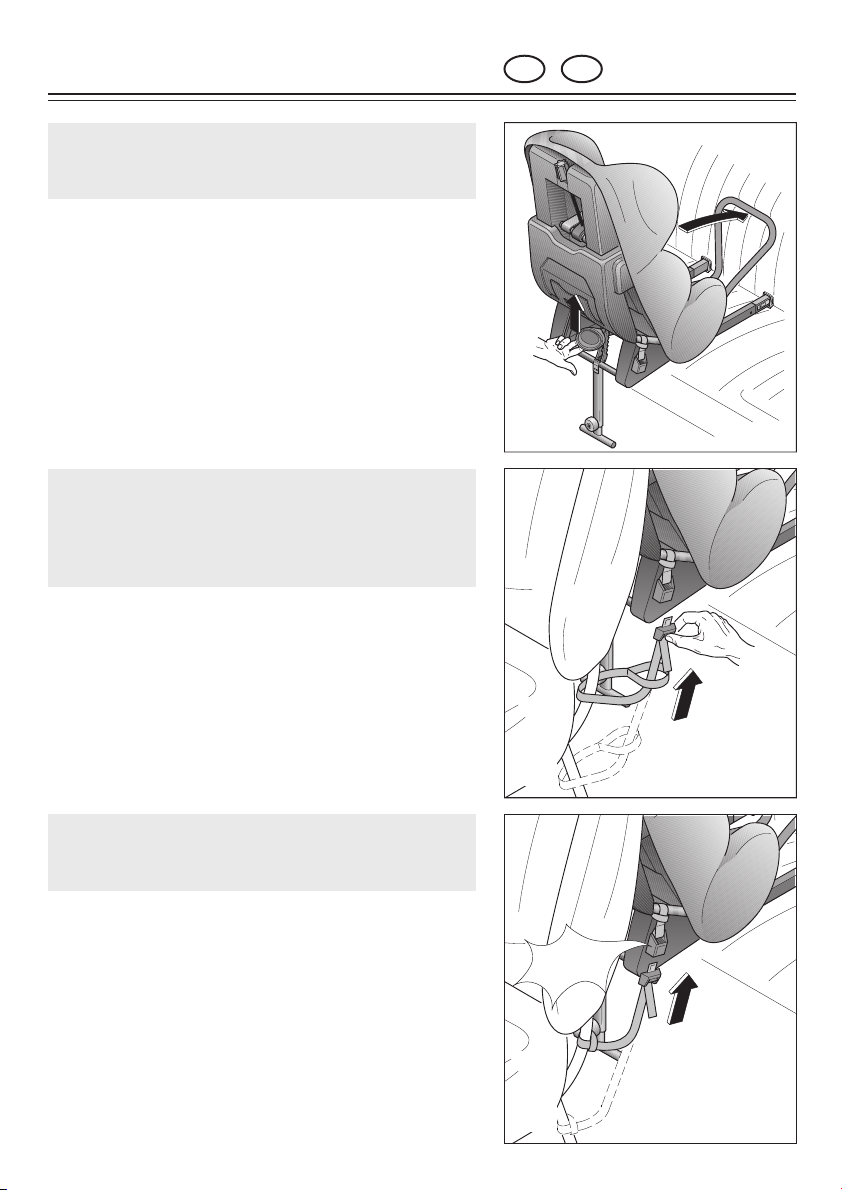
Drücken Sie jetzt den Rasthebel so weit nach oben, bis der
Stützbügel straff an der Lehne des Fahrzeugsitzes anliegt.
Now push the locking lever upwards until the supporting
clip is firmly against the backrest of the car seat.
GBD
5122-4-06/1
1.6
Legen Sie die Unterteile der Spanngurte um ein Befestigungsrohr des Vordersitzes möglichst nah am Fahrzeugboden.
Fädeln Sie die Gurtschlosshälften durch die Schlaufen und
ziehen Sie diese fest.
Place the lower sections of the belt around a fastening tube
of the front seat, as close as possible to the floor of the
vehicle. Thread the buckle sections through the loops and
pull them tight.
1.7
Stecken Sie die Gurtschlosshälften zusammen. Diese müssen
mit einem hörbaren “Klick” einrasten.
Push the buckle halves together. These must engage with
an audible “Click”.
Klick
5112F-4-00/1
5115F-4-02/1
1.8
5113F-4-02/1
Kapitel 1 – Einbau / Ausbau
Chapter 1 – Installation / Removal
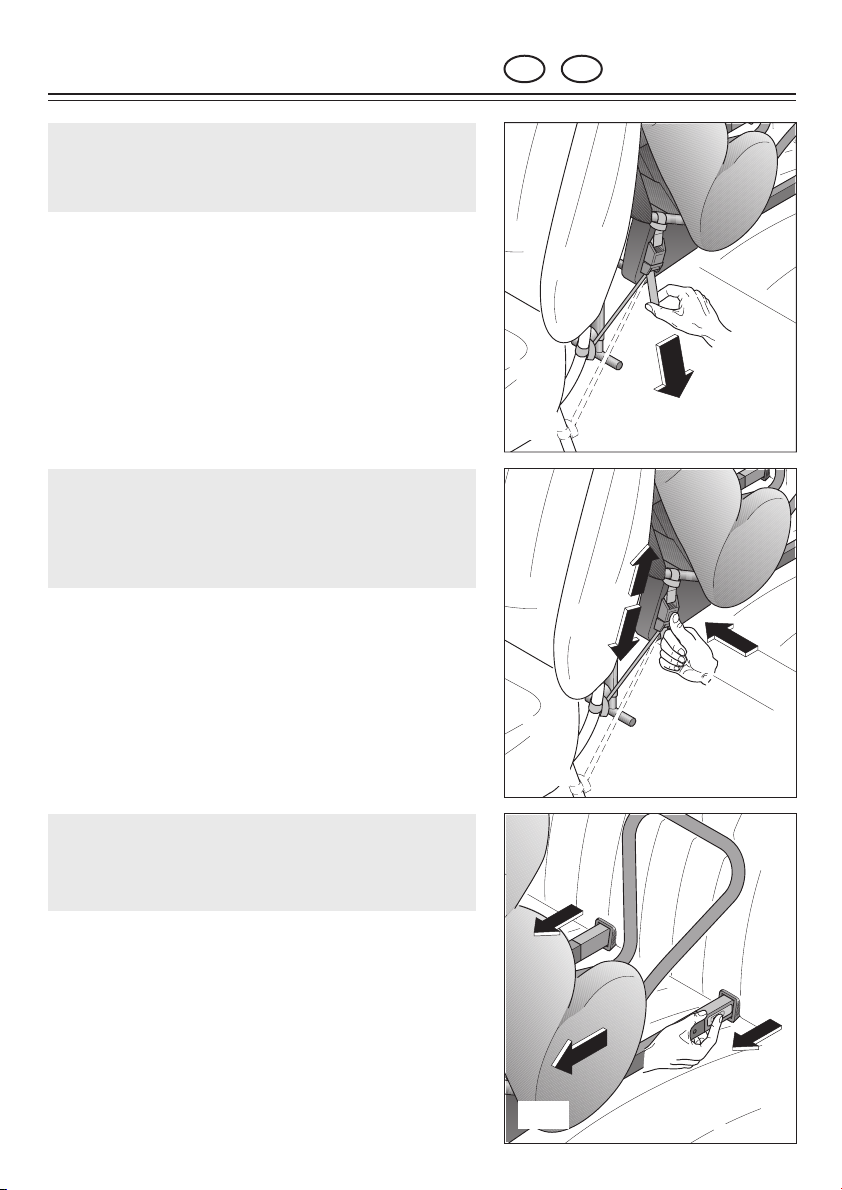
Ziehen Sie an den freien Enden der Spanngurte kräftig nach
unten, bis diese straff gespannt sind und kontrollieren Sie
diese Spannung nach jedem Verstellen des Vordersitzes.
Pull the free ends of the belts firmly downwards until they
are tight. Check this tension whenever the front seat is
readjusted.
GBD
5123-4-06/1
1.9
1.10 - 1.11 Ausbau des Sitzes
Drücken Sie die roten Tasten an den Spanngurten, dann
öffnet sich das Gurtschloss.
1.10 - 1.11 Removing the seat
Press the red buttons on the belts so as to open the buckle.
1.10
Bewegen Sie beide Schieber an den Isofixkonnektoren in
Pfeilrichtung (Bild 1.11), bis sich die Verrastung löst. Jetzt
können Sie die Konnektoren aus den Einführhilfen ziehen.
Push the two sliders on the Isofix connectors in the direction
of the arrow (Fig. 1.11) until they are disengaged. Now you
can pull the connectors out of the guides.
5114F-4-02/1
5116F-4-02/1
1.11
5117F-4-00/1

Kapitel 2 – Anschnallen des Kindes
Chapter 2 – Safeguard the Child
2.1 - 2.6 Bedienung des Gurtsystems
Zum Verlängern der Gurte drücken Sie den Zentralversteller
(1) nach unten, halten ihn gedrückt und ziehen an den
Schultergurten (2).
GBD
5124-4-02/1
2.1 – 2.6 Operating the belt system
To lengthen the belts, press the central adjuster (1)
downwards, keep it down and pull on the shoulder straps
(2).
2.1
Öffnen Sie das Schloß durch Betätigen der roten Taste in
Pfeilrichtung.
Open the lock by actuating the red button in the direction
of the arrow.
2.2
Legen Sie die Gurte außen ab.
2
1
5085F-4-00/1
763F-4-01/1
Take off the belts.
2.3
5086F-4-00/1

Kapitel 2 – Anschnallen des Kindes
Chapter 2 – Safeguard the Child
Setzen Sie Ihr Kind in den Sitz und führen Sie die Arme des
Kindes durch die Schultergurte.
Place your child in the seat and guide the arms of the child
through the shoulder belts.
GBD
5125-4-04/1
2.4
Schließen Sie das Schloß, in dem Sie die beiden Zungen
aufeinander legen (1) und mit einem hörbaren Klick ins
Schloß einrasten (2).
2
Close the lock by placing the two latches on top of each
other (1) and engage with an audible click in the lock (2).
2.5
Straffen Sie die Gurte durch Ziehen des Zentralgurtes in
Pfeilrichtung. Die Gurte müssen straff anliegen.
Tighten the straps by pulling the central belt in the direction
of the arrow. The straps should be pulled tight.
5087F-4-00/1
1
PRESS
Klick
1236F-4-00/1
2.6
5088F-4-00/1

Kapitel 2 – Anschnallen des Kindes
Chapter 2 – Safeguard the Child
2.7 - 2.8 Höheneinstellung der Gurte
Die Höhe der Schultergurte kann stufenlos eingestellt werden.
Durch Drehen im Uhrzeigersinn nach oben und gegen den
Uhrzeigersinn nach unten.
2.7 - 2.8 Adjusting the height of the belts
The height of the shoulder straps can be infinitely adjusted.
By turning clockwise upwards and counter-clockwise
downwards.
GBD
5126-4-04/1
2.7
Die Markierungen im hinteren Bereich am Sitz sollen nur Anhaltspunkte sein. Orientieren Sie sich am Bild 2.8.
Ensure the belts fit as shown in diagram 2.8a. The belt position
in 2.8b is incorrect.
2.8b
5106F-4-00/1
2.8a
1216-4-03/1
 Loading...