

Recaro Mako Elite 2 operation manual

MAKO ELITE 2
Bedienungsanleitung / User guide / Istruzioni per l’uso /
Gebruiksaanwijzing / Instrukcja obsługi / Notice d’utilisation /
Manual de instrucciones / Manual de instruções /
Használati útmutató / Instruciuni de utilizare /
Οδηγίε λειτουργία
UN R129/02, i-Size
100-150 cm (ca. 3,5-12 Jahre) / 100-150 cm (ca. 3,5-12 Years) /
100-150 cm (circa 3,5-12 anni) / 100-150 cm (ongev. 3,5-12 jaar) /
100-150 cm (około 3,5-12 lat) / 100-150 cm (3,5-12 ans environ) /
100-150 cm (aprox. de 3 a 12 años) / 100-150 cm (aprox. 3,5-12 anos) /
100-150 cm (kb. 3–12 éves korig) / 100-150 cm (aprox. 3,5-12 ani) /
100-150 cm (περίπου 3,5-12 ετών)
DE PLIT ES HUEN FRNL PT RO EL
www.recaro-kids.com

DE – WARNUNG! Diese Kurzanleitung dient nur der Übersicht. Um maximale Sicherheit und maximalen Komfort für Ihr Kind zu erreichen, ist
EN – WARNING! The following short instruction is intended to provide only an overview. In order to achieve maximum security and comfort
IT – ATTENZIONE! La seguente guida rapida intende fornire solo una panoramica. Per garantire la massima sicurezza e il comfort del bambino,
NL – WAARSCHUWING! De onderstaande korte gebruiksaanwijzing is enkel bedoeld om een overzicht te geven. Voor de maximale veiligheid en
PL – OSTRZEŻENIE! Poniższa krótka instrukcja ma na celu jedynie przekazanie ogólnych informacji.. W celu zapewnienia Twojemu dziecku maksymalnego
FR – AVERTISSEMENT ! Le guide rapide suivant vise à ne fournir qu’une vue d’ensemble. Afin d’assurer un maximum de sécurité et de confort à
ES – ¡ADVERTENCIA! Estas breves instrucciones solo tienen por objeto proporcionar una visión general. Para garantizar la máxima seguridad y
PT – ADVERTÊNCIA! As instruções breves que se seguem, têm como objetivo fornecer apenas uma visão geral. Para obter a máxima segurança
HU – FIGYELEM! A következő rövid útmutató csak áttekintést tartalmaz. Gyermeke maximális biztonsága és kényelme érdekében elengedhetetlen, hogy
RO – AVERTISMENT! Următoarele instruciuni succinte sunt concepute exclusiv ca prezentare generală. Pentru a obine nivelul maxim de securitate i confort
EL – ΠΡΟΕΙΔΟΠΟΙΗΣΗ! Η παρακάτω σύντοη οδηγία προορίζεται να παρέχει όνο ια γενική επισκόπηση. Για να επιτύχετε τη έγιστη ασφάλεια και άνεση για το
es unbedingt notwendig, die gesamte Gebrauchsanleitung aufmerksam zu lesen.
for your child it is absolutely imperative that you read the whole instruction manual carefully.
è assolutamente necessario leggere attentamente l’intero manuale d’uso.
comfort van uw kind is het beslist noodzakelijk dat u de gehele handleiding zorgvuldig doorleest.
bezpieczeństwa i komfortu konieczne jest uważne zapoznanie się z całą instrukcją obsługi.
votre enfant, il est impératif que vous lisiez attentivement l’ensemble du manuel d’utilisation.
comodidad para su hijo, es imprescindible que lea atentamente el manual de instrucciones completo.
e conforto para a criança, é absolutamente indispensável ler atentamente todo o manual de instruções.
Ön gondosan végigolvassa a teljes használati útmutatót.
pentru copilul dvs., este absolut necesar să citii cu atenie întregul manual de instruciuni.
παιδί σα, είναι απολύτω απαραίτητο να διαβάσετε προσεκτικά ολόκληρο το εγχειρίδιο οδηγιών.
2

KURZANLEITUNG / SHORT INSTRUCTION / GUIDA RAPIDA / KORTE GEBRUIKSAANWIJZING / INSTRUKCJA SKRÓCONA / GUIDE RAPIDE /
INSTRUCCIONES BREVES / INSTRUÇÕES BREVES / RÖVID ÚTMUTATÓ / INSTRUC IUNI SUCCINTE / ΣΥΝΤΟΜΗ ΟΗΓΙΑ
1
2
3
4
R
5
9
6
10
7
11
8
12
3
ZULASSUNG
Mako Elite 2
UN R129/02 i-Size
Größe: 100-150 cm
Alter: ca. 3,5-12 Jahre
Nur geeignet für Fahrzeugsitze mit Dreipunktgurt,
die nach UN Regelung Nr. R16 oder gleichwertigem
Standard zugelassen sind. Kindersitz der UN R129/02
Kategorie „i-Size” für Körpergrößen von 100-135 cm.
Kindersitz der UN R129/02 Kategorie „fahrzeugspezi
fisch“ für Körpergrößen von 135-150 cm.
HOMOLOGATION
Mako Elite 2
UN R129/02 i-Size
Height: 100-150cm
Age: ca. 3,5-12 Years
Only suitable for vehicle seats with automatic threepoint belts, approved in accordance UN regulation no.
R16 or a comparable standard. i-Size booster seat for
stature height 100 cm – 135 cm.
Specific vehicle booster seat for stature height 135
cm – 150 cm.
OMOLOGAZIONE
Mako Elite 2
UN R129/02 i-Size
Altezza: 100-150 cm
Età: circa 3,5-12 anni
Idoneo solo per sedili auto con cinture automatiche a
tre punti, approvate in conformità con il Regolamento
n. R16 delle Nazioni Uniteo uno standard equivalente.
Rialzo della seduta i-Size per altezze comprese tra 100
cm e 135 cm.
Rialzo della seduta specifico per il veicolo per altezze
comprese tra 135 cm e 150 cm.
SICHERHEIT IST
VERTRAUENSSACHE
Vielen Dank, dass Sie sich für RECARO entschieden haben. Dank einzigartiger Erfahrung revolutioniert RECARO seit über 100 Jahren das Sitzen
im Auto, im Flugzeug und im Rennsport. Dieses konkurrenzlose Know-how
fließt in die Entwicklung jedes unserer Kindersicherheitssysteme ein. Un
ser Ziel ist es, Ihnen Produkte zu bieten, die in puncto Design, Funktionalität, Komfort und Sicherheit neue Maßstäbe setzen. Bei der Entwicklung
des Kindersitzes standen Sicherheit, Komfort und Bedienfreundlichkeit im
Vordergrund. Das Produkt wird unter besonderer Qualitätsüberwachung
hergestellt und erfüllt strengste Sicherheitsanforderungen.
Wir wünschen Ihnen viel Spaß und allzeit sichere Fahrt.
Ihr RECARO Kids Team
WARNUNG! Damit Ihr Kind richtig geschützt werden kann, ist es
unbedingt notwendig, den Kindersitz so zu verwenden, wie es in dieser
Anleitung beschrieben wird.
HINWEIS! Bewahren Sie die Anleitung immer griffbereit in dem dafür
vorgesehenen Fach am Kindersitz auf.
HINWEIS! Durch länderspezifische Anforderungen
(z.B. Farbkennzeichnungen am Kindersitz) können Produktmerkmale in
ihrer äußeren Erscheinung variieren. Die korrekte Funktionsweise des
Produktes wird davon jedoch nicht beeinflusst.
HINWEIS! Der Dreipunktgurt darf nur durch die dafür vorgesehenen
Führungen verlaufen. Die Gurtführung wird in diesem Handbuch genau
beschrieben und ist zudem am Kindersitz rot markiert.
-
4

SAFETY IS A MATTER OF TRUST
Thank you for choosing RECARO. Thanks to our unique experience
RECARO has been revolutionising car, aircraft and racing car seating for
over 100 years. This unrivaled expertise feeds into the development of all
of our child safety systems. Our aim is to offer you products which set
new standards in terms of design, functionality, comfort and safety. We
can assure you that safety, comfort and ease of use were our highest
priorities when developing the child seat. This product is manufactured
under exceptional quality control and meets the strictest safety
requirements.
We wish you lots of fun and a safe journey every time.
Your RECARO Kids team
WARNING! In order to keep your child properly protected it is absolutely
essential that you use the child seat as described in this manual.
NOTE! Always keep this instruction manual at hand in the compartment
that has been provided for that purpose on the child seat.
NOTE! Due to country-specific requirements (e.g. colour labelling on the
child seat), the product features may vary in their external appearance.
This, however, does not affect the correct functioning of the product.
NOTE! The three-point belt must only be passed through the designated
routings. The belt routings are described in detail in this manual and are
marked in red on the child seat.
LA SICUREZZA È UNA QUESTIONE DI
FIDUCIA
Grazie per aver scelto RECARO. RECARO vanta da più di 100 anni
un’esperienza unica nel settore che ha consentito di rivoluzionare i
seggiolini per auto, aereo e vetture da corsa. Questa competenza senza
pari alimenta lo sviluppo di tutti i nostri sistemi di sicurezza per bambini. Il
nostro scopo è offrire prodotti che definiscano nuovi standard in termini di
design, funzionalità, comfort e sicurezza. Vi assicuriamo che la sicurezza,
il comfort e la facilità d’uso sono le nostre massime priorità durante lo
sviluppo dei seggiolini per auto. Questo prodotto viene fabbricato nel
rispetto di un eccezionale controllo della qualità e soddisfa i più rigorosi
requisiti di sicurezza.
Vi auguriamo tanto divertimento e un viaggio sicuro ogni volta che lo userete.
Il team RECARO Kids
ATTENZIONE! Per assicurare la corretta protezione del bambino è asso
lutamente essenziale usare il seggiolino per bambini nel modo descritto
in questo manuale.
NOTA! Conservare sempre il presente manuale d’uso a portata di mano
nell’apposito scomparto nel seggiolino per bambini.
NOTA! A causa di requisiti specifici per il Paese (ad esempio etichetta a
colori sul seggiolino per bambini), le caratteristiche del prodotto possono
variare nell’aspetto esteriore. Questo, tuttavia, non influisce sul corretto
funzionamento del prodotto.
NOTA! La cintura a tre punti deve essere fatta passare unicamente
attraverso le guide designate. Le guide per la cintura vengono descritte in
dettaglio in questo manuale e sono contrassegnate in rosso sul seggiolino
per bambini.
-
DE PLIT ES HUEN FRNL PT RO EL
5

DE
INHALT
ZULASSUNG .............................................................................................. 4
ERSTMONTAGE .........................................................................................8
ZUM SCHUTZ DES FAHRZEUGS ............................................................... 8
DER RICHTIGE PLATZ IM FAHRZEUG ......................................................10
SICHERHEIT IM FAHRZEUG .....................................................................14
EINBAU DES KINDERSITZES INS FAHRZEUG .........................................14
EINBAU DES KINDERSITZES MIT ISOFIX.................................................16
ANPASSEN AN DIE KÖRPERGRÖSSE .................................................... 18
ANSCHNALLEN MITTELS FAHRZEUGGURT ........................................... 20
IST IHR KIND RICHTIG GESICHERT? ....................................................... 22
EINSTELLEN DER BEINAUFLAGE ........................................................ 22
SOUND SYSTEM ......................................................................................24
EINSTELLEN DER RUHEPOSITION ......................................................... 24
ENTFERNEN DES SITZBEZUGES............................................................. 26
REINIGUNG ............................................................................................. 28
PFLEGE ................................................................................................... 28
VERHALTEN NACH EINEM UNFALL ........................................................ 30
PRODUKTINFORMATION ........................................................................30
PRODUKTLEBENSDAUER .......................................................................30
ENTSORGUNG ......................................................................................... 32
GARANTIEBESTIMMUNGEN ................................................................... 34
6

EN
CONTENT
IT
CONTENUTO
HOMOLOGATION ......................................................................................4
FIRST INSTALLATION ................................................................................. 9
PROTECTING THE VEHICLE ....................................................................... 9
CORRECT POSITION IN THE VEHICLE ..................................................... 11
SAFETY IN THE VEHICLE ..........................................................................15
INSTALLING THE CHILD SEAT IN THE VEHICLE ......................................15
INSTALLING THE CHILD SEAT WITH ISOFIX ............................................17
ADJUSTING TO THE BODY SIZE ..............................................................19
STRAPPING WITH VEHICLE SEAT BELT ..................................................21
SECURING THE CHILD CORRECTLY ....................................................... 23
EXTENSION OF LEG REST ................................................................... 23
SOUND SYSTEM ......................................................................................25
ADJUSTING THE REST POSITION ........................................................... 25
REMOVING THE SEAT COVER ................................................................. 27
CLEANING ............................................................................................... 29
PRODUCT CARE ...................................................................................... 29
WHAT TO DO AFTER AN ACCIDENT ....................................................... 31
PRODUCT INFORMATION ......................................................................31
PRODUCT LIFESPAN ...............................................................................31
DISPOSAL ................................................................................................ 33
WARRANTY .............................................................................................. 35
OMOLOGAZIONE ...................................................................................... 4
PRIMO MONTAGGIO ................................................................................. 9
PROTEZIONE DEL VEICOLO ...................................................................... 9
CORRETTA POSIZIONE NEL VEICOLO ..................................................... 11
SICUREZZA NEL VEICOLO .......................................................................15
MONTAGGIO DEL SEGGIOLINO PER BAMBINI NEL VEICOLO .............15
MONTAGGIO DEL SEGGIOLINO PER BAMBINI CON ISOFIX .................17
REGOLAZIONE DEL SEGGIOLINO IN BASE ALLA TAGLIA DEL BAMBINO ..19
FISSAGGIO CON LA CINTURA DI SICUREZZA ........................................ 21
FISSAGGIO CORRETTO DEL BAMBINO ................................................. 23
ESTENSIONE DEL POGGIAGAMBE ..................................................... 23
SISTEMA AUDIO ...................................................................................... 25
REGOLAZIONE DELLA POSIZIONE DI RESTO ........................................ 25
RIMOZIONE DELLA FODERA DEL SEGGIOLINO ................................... 27
PULIZIA ................................................................................................... 29
CURA DEL PRODOTTO ............................................................................ 29
COSA FARE DOPO UN INCIDENTE ......................................................... 31
INFORMAZIONI SUL PRODOTTO ........................................................... 31
DURATA DEL PRODOTTO ........................................................................ 31
SMALTIMENTO ........................................................................................ 33
GARANZIA ................................................................................................ 35
DE PLIT ES HUEN FRNL PT RO EL
7
ERSTMONTAGE
1
R
2
Schieben Sie mitgelieferten Seitenprotektoren des „Advanced Side
Protection“ Systems (ASP) türseitig in die dafür vorgesehenen Montage
öffnungen 1, außen an den Schulterstützen. Drücken Sie den Pin um das
ASP zu arretieren.
HINWEIS! Bitte bewahren Sie die Gebrauchsanweisung immer im dafür
vorgesehenen Fach 2 auf der Rückseite auf.
WARNUNG! Stellen Sie sicher, dass Sie diese Gebrauchsanweisung
sorgfältig lesen, verstehen und befolgen.
HINWEIS! Auch ohne die Seitenprotektoren bietet der Sitz ausreichend
Seitenaufprallschutz. Ist im Fahrzeug genügend Platz vorhanden, empfeh
len wir die mitgelieferten ASP Elemente türseitig anzubringen.
-
-
ZUM SCHUTZ DES FAHRZEUGS
An einigen Autositzen aus empfindlichem Material (z.B. Velours, Leder,
etc.) können durch die Benutzung von Kindersitzen mögliche Gebrauchs
spuren und/oder Abfärbungen auftreten. Um das zu vermeiden, können
Sie z.B. den RECARO Car Seat Protector verwenden. Ferner weisen wir
in diesem Zusammenhang auf unsere Reinigungshinweise hin, die vor der
ersten Verwendung des Kindersitzes unbedingt beachtet werden sollten.
8
-

FIRST INSTALLATION
PRIMO MONTAGGIO
Insert the “Advanced Side Protection” pads (ASP) door-sided of the shoulder
rest into the appropriate installation holes 1. Press the pin down to lock
the ASP.
NOTE! Please keep the instruction manual close by for future reference by
storing it in the compartment 2 at the back of the seat.
WARNING! Make sure to read, understand and follow the instruction
manual.
NOTICE! Even without the side protectors, the seat provides sufficient
protection against side impact. If the vehicle provides sufficient space, we
recommend installing the supplied ASP elements on the door side.
PROTECTING THE VEHICLE
Traces of use and/or discoloration can appear on some vehicle seats made
from delicate materials (e.g. velour, leather, etc.) if car seats are used. You
can avoid this by using, e.g. the RECARO Car Seat Protector. In this con
text also see our cleaning directions. It is essential that these are followed
before the first use of the child seat.
Inserire le imbottiture “Advanced Side Protection” (ASP) nelle imbottiture
per le spalle nei relativi fori di montaggio sul lato dello sportello 1. Premere
il perno per bloccare l’ASP.
NOTA! Tenere a portata di mano il manuale d’uso per futuri riferimenti
conservandolo nello scomparto 2 sul retro del seggiolino.
AVVISO! Il sedile offre una protezione adeguata da collisione laterale an
che senza i protettori laterali. Se all’interno veicolo vi è spazio a sufficienza,
suggeriamo di montare gli elementi ASP forniti in dotazione sul lato porta.
PROTEZIONE DEL VEICOLO
Su alcuni sedili auto fatti di materiali delicati (ad esempio, velluto, pelle,
ecc.) possono comparire tracce di usura e/o scolorimento in seguito all’uso
-
di seggiolini auto. Questo problema può essere evitato usando, ad esem
pio, il Coprisedile RECARO. In questo contesto si consiglia di consultare
anche le nostre indicazioni per la pulizia. È essenziale seguirle prima del
primo utilizzo del seggiolino per bambini.
DE PLIT ES HUEN FRNL PT RO EL
ATTENZIONE! Assicurarsi di leggere, comprendere e rispettare il
manuale d’uso.
-
-
9

10
Volkswagen Golf 7
DER RICHTIGE PLATZ IM FAHRZEUG
Dies ist ein Kinderrückhaltesystem der Kategorie „i-Size“. Es ist nach
der Regelung ECE R129 zur Verwendung auf solchen Fahrzeugsitzen
genehmigt worden, die gemäß den Angaben des Fahrzeugherstellers im
Fahrzeughandbuch für i-Size Rückhaltesysteme geeignet sind. Verfügt Ihr
Fahrzeug über keinen i-Size Sitzplatz überprüfen Sie bitte anhand der auf der
Homepage befindlichen Typenliste, ob der Einbau erlaubt ist.
Der Sitz ist für Körpergrößen von 135-150 cm als fahrzeugspezifisch klassi
fiziert und für Befestigung am Sitz der folgenden Automodelle geeignet:
WICHTIG: Eine komplette Liste der Fahrzeuge finden Sie unter
www.recaro-kids.com
WARNUNG! Der Sitz ist nicht für die Verwendung mit einem 2-Punktoder Beckengurt geeignet. W ird der Sitz mit einem 2-Punkt-Gurt gesichert,
kann es bei einem Unfall zu schweren oder gar tödlichen Verletzungen
des Kindes kommen.
-

CORRECT POSITION IN THE VEHICLE
This is an i-Size Child Restraint System. It is approved to ECE R129, for
use in i-Size compatible vehicle seating positions as indicated by vehicle
manufacturers in the vehicle users’ manual. If your vehicle does not have
an i-Size seating position, please check the vehicle typelist on our home
page whether the installation is allowed.
The seat is classified as vehicle specific for stature height 135-150cm and
is suitable for fixing into the seat position of the following cars:
IMPORTANT: For a complete list of cars, please visit www.recaro-kids.com
WARNING! The child seat is not suitable for use with a two-point or lap
belt. If the seat is secured using a two-point belt, an accident may result
in severe or even fatal injuries to the child.
CORRETTA POSIZIONE NEL VEICOLO
Questo è un sistema di ritenuta per bambini i-Size. È omologato ai sensi
del regolamento UN/ ECE R129 per l’utilizzo in sedili auto compatibili con
i sistemi i-Size, come indicato dal costruttore del veicolo nel manuale
-
del veicolo. Se il veicolo non è dotato di sedili i-Size, controllare se il
montaggioè consentito nell’elenco dei tipi di veicoli disponibile nella nostra
pagina principale.
Il sedile è classificato come specifico per il veicolo per altezze comprese
tra 135-150 cm ed è idoneo per essere montato sui sedili delle seguenti
auto:
IMPORTANTE: Per un elenco completo delle auto, visitare il sito Web
www.recaro-kids.com
ATTENZIONE! Il seggiolino per bambini non è idoneo per essere usato
con una cintura a due punti o una cintura subaddominale. Se il seggioli
no viene fissato con una cintura a due punti, un eventuale incidente può
causare lesioni gravi o anche letali al bambino.
-
DE PLIT ES HUEN FRNL PT RO EL
11

WARNUNG! Der Diagonalgurt muss schräg nach hinten verlaufen und darf
nie nach vorn zum oberen Gurtpunkt in Ihrem Fahrzeug führen. Sollte dies
nicht einzustellen sein z.B. durch Vorschieben des Autositzes oder Verwen
dung auf einem anderen Sitzplatz, so ist der Kindersitz für dieses Fahrzeug
nicht geeignet. Im Zweifelsfall wenden Sie sich an den Kindersitzhersteller.
Gepäckstücke oder andere Gegenstände im Fahrzeug, welche bei einem
Unfall Verletzungen verursachen können, müssen immer gut befestigt
werden. Sie können zu tödlichen Geschossen im Fahrzeug werden.
WARNUNG! Auf Fahrzeugplätzen, die quer zur Fahrtrichtung angeord
net sind, ist die Verwendung des Sitzes nicht zulässig. Auf rückwärtsgerichteten Fahrzeugsitzen, wie z.B. in einem Van oder Minibus, ist die
Verwendung zulässig, sofern der Fahrzeugsitz für die Beförderung eines
Erwachsenen zugelassen ist. Zu beachten ist, dass die Kopfstütze bei
rückwärtsgerichtetem Einbau nicht entfernt werden darf!
WARNUNG! Bitte lassen Sie Ihr Kind nie unbeaufsichtigt im Fahrzeug
zurück. Die Kunststoffteile des Kindersitzes heizen sich in der Sonne
auf. Ihr Kind kann sich daran verbrennen. Schützen Sie Ihr Kind und den
Kindersitz vor intensiver Sonneneinstrahlung (z.B. indem Sie ein helles
Tuch über den Sitz legen).
-
-
12

WARNING! The diagonal belt must run back at a recline and must
never run forward to the upper belt point in your vehicle. If it is not
possible to adjust the seat in this way, e.g. by pushing the child seat
forward or using it on another seat, this child seat is not suitable for
your vehicle. Contact the child seat manufacturer if in doubt. Luggage or
other objects present in the vehicle that may cause injury in the event
of an accident must always be firmly secured. Otherwise, they may be
thrown, causing fatal injuries.
WARNING! The child seat may not be used on vehicle seats facing to
the side of the direction of travel. Use of the child seat is permitted
on rear facing seats, e.g. in a van or minibus, provided that the seat
is permitted for transporting an adult. It is essential to ensure that the
vehicle headrest is not removed when the child seat is installed in a rear
facing vehicle seat.
WARNING! Never leave your child unattended in the car. The plastic
parts in the child restraint system heat up in sun and the child may
sustain burns. Protect your child and the child seat from direct sun expo
sure (e.g. by covering it with a light colored cloth).
ATTENZIONE! La cintura di sicurezza diagonale deve scorrere inclinata
dal retro del seggiolino e non deve mai essere condotta in avanti verso
il punto superiore della cintura nel veicolo. Se non è possibile regolare
il seggiolino in questo modo, ad esempio spingendo il seggiolino per
bambini in avanti oppure usandolo su un diverso sedile, questo seggio
lino per bambini non è idoneo per il veicolo. In caso di dubbi, rivolgersi
al produttore del seggiolino per bambini. Bagagli o altri oggetti presenti
nel veicolo che potrebbero causare lesioni in caso di incidente devono
essere sempre fissati in modo sicuro. Altrimenti potrebbero essere
scagliati nell’abitacolo e causare lesioni letali.
ATTENZIONE! Il seggiolino per bambini non può essere usato su
sedili auto rivolti lateralmente rispetto alla direzione di marcia. L’uso del
seggiolino per bambini è consentito su sedili rivolti in direzione contraria
al senso di marcia, ad esempio in un furgone o minibus, purché il sedile
sia omologato per il trasporto di un adulto. È essenziale assicurarsi
che il poggiatesta del veicolo non venga rimosso quando il seggiolino
per bambini viene montato su un sedile rivolto in direzione contraria al
-
senso di marcia.
ATTENZIONE! Non lasciare mai il bambino incustodito in auto. Le
parti in plastica del sistema di ritenuta per bambini si scaldano sotto il
sole e potrebbero causare ustioni al bambino. Proteggete il bambino
e il seggiolino per bambini dall’esposizione diretta al sole (ad esempio,
coprendolo con un telo di colore chiaro).
-
DE PLIT ES HUEN FRNL PT RO EL
13

SICHERHEIT IM FAHRZEUG
WARNUNG! Der Kindersitz muss, auch dann wenn er nicht benutzt wird,
immer korrekt mit dem Fahrzeuggurt im Fahrzeug befestigt sein. Bereits
bei einer Notbremsung oder einem geringen Aufprall können unbefestigte
Teile andere Mitfahrer und Sie selbst verletzen.
Achten Sie zum Schutz aller Fahrzeuginsassen stets darauf, dass:
• die umklappbaren Rückenlehnen der Fahrzeugsitze eingerastet sind und
sich in einer aufrechten Position befinden
• bei Einbau des Kindersitzes auf dem Beifahrersitz, dieser in der hintersten
Position steht
• im Fahrzeug alle beweglichen Gegenstände gesichert sind
• alle Personen im Fahrzeug angeschnallt sind
EINBAU DES KINDERSITZES INS
FAHRZEUG
Stellen Sie den Kindersitz auf den entsprechenden Fahrzeugsitz im Auto:
• Achten Sie unbedingt darauf, dass die Rückenlehne des Kindersitzes
vollflächig an der Rückenlehne des Fahrzeugsitzes anliegt
• Sollte die Kopfstütze des Fahrzeuges störend sein, ziehen Sie diese
ganz heraus oder nehmen Sie diese ganz ab (Ausnahme siehe Abschnitt
„DER RICHTIGE PLATZ IM FAHRZEUG“)
WARNUNG! Die Rückenlehne des Kindersitzes muss an der Lehne des
Fahrzeuges flächig aufliegen.
WARNUNG! Benutzen Sie niemals andere als die in der Bedienungs
anleitung beschriebenen und am Sitz markierten Punkte, um den
Kindersitz zu befestigen.
14
-

SAFETY IN THE VEHICLE
WARNING! The child seat must always be secured correctly with the
vehicle belt in the vehicle even when not in use. In case of an emergency
brake or accident, an unsecured child seat may injure other passengers
or yourself.
In order to guarantee the best possible safety for all passengers make
sure that:
• foldable backrests in the vehicle are locked in their upright position
• when installing the child seat on the front passenger seat, adjust the
vehicle seat in rearmost position
• you properly secure all objects likely to cause injury in the case of an
accident
• all passengers in the vehicle are buckled up
SICUREZZA NEL VEICOLO
ATTENZIONE! Il seggiolino per bambini deve essere sempre fissato in
modo corretto con la cintura di sicurezza del veicolo, anche quando non
viene usato. In caso di una frenata di emergenza o di un incidente un
seggiolino per bambini non fissato può causare lesioni ad altri passeggeri
o al conducente.
Per garantire la migliore sicurezza possibile di tutti i passeggeri, assicurarsi
di osservare le seguenti precauzioni:
• Bloccare in posizione verticale gli schienali ribaltabili nel veicolo
• Quando il seggiolino per bambini viene montato sul sedile anteriore del
passeggero, regolare il sedile nella posizione più arretrata possibile
• Fissare adeguatamente tutti gli oggetti che potrebbero causare lesioni
in caso di incidente
• Allacciare la cintura di sicurezza di tutti i passeggeri nel veicolo
INSTALLING THE CHILD SEAT IN THE
VEHICLE
Place the child seat on the appropriate seat in the vehicle:
• Always ensure that the entire surface of the backrest of the child seat is
placed fully against the backrest of the vehicle seat
• If the headrest of the vehicle is in the way, pull it out all the way or
remove it completely (for exceptions to this, please refer to the section
“CORRECT POSITION IN THE VEHICLE”)
WARNING! The full surface of the backrest of the child seat must be
against the backrest of the vehicle.
WARNING! Do not use any load bearing contact points other than
those described in the instructions and marked in the child restraint.
MONTAGGIO DEL SEGGIOLINO PER
BAMBINI NEL VEICOLO
Posizionare il seggiolino per bambini sul sedile appropriato nel veicolo:
• Assicurarsi sempre che l’intera superficie dello schienale del seggiolino
• Se il poggiatesta del veicolo è d’intralcio, estrarlo al massimo o rimuo
DE PLIT ES HUEN FRNL PT RO EL
per bambini aderisca completamente allo schienale del sedile del veicolo
verlo completamente (per le eccezioni a questa istruzione vedere la
sezione “CORRETTA POSIZIONE NEL VEICOLO”)
ATTENZIONE! L’intera superficie dello schienale del seggiolino per
bambini deve aderire allo schienale del sedile del veicolo.
ATTENZIONE! Non usare punti di contatto di sostegno del carico diversi
da quelli descritti nelle istruzioni e contrassegnati nel sistema di ritenuta
per bambini.
-
15

EINBAU DES KINDERSITZES MIT ISOFIX
EINBAU
Mit dem ISOFIX können Sie den Kindersitz mit dem Fahrzeug verbinden
4
3
5
6
5
7
16
und so die Sicherheit Ihres Kindes erhöhen. ISOFIX sichert den Kindersitz
bei Nichtgebrauch. Ihr Kind muss weiterhin mit dem 3-Punkt-Gurt Ihres
Fahrzeuges angeschnallt werden.
HINWEIS! Die ISOFIX Befestigungspunkte 5 sind zwei Metalllaschen
pro Sitzplatz und befinden sich zwischen Rückenlehne und Sitzfläche des
Fahrzeugsitzes. Im Zweifelsfall nehmen Sie die Bedienungsanleitung Ihres
Fahrzeuges zu Hilfe.
• Betätigen Sie die Einstelltaste 3 an der Seite
• Ziehen Sie die beiden ISOFIX Konnektoren 4 heraus
• Schieben Sie die beiden ISOFIX Konnektoren in die ISOFIX Befesti
gungspunkte 5 bis diese mit einem hörbaren „KLICK“ einrasten
• Vergewissern Sie sich, dass der Sitz gut hält, indem Sie versuchen ihn
herauszuziehen
• Der Sicherheitsindikator 6 muss nun an den beiden Konnektoren grün
sein
Schieben Sie den Kindersitz zurück, bis er vollflächig an der Rückenlehne
des Fahrzeugs anliegt.
HINWEIS! Sind die ISOFIX Befestigungspunkte 5 in ihrem Fahrzeug
schwer zu erreichen, können Sie die mitgelieferten ISOFIX Einführhilfen
7 verwenden.
• Hängen Sie die mitgelieferten ISOFIX Einführhilfen 7 mit der längeren
Lasche nach oben in den beiden ISOFIX Befestigungspunkten 5 ein. In
manchen Fahrzeugen eignet sich eine entgegengesetzte Einbaurichtung
der ISOFIX Einführhilfen 7 besser
-

INSTALLING THE CHILD SEAT WITH ISOFIX
INSTALLATION
Using the ISOFIX, you can fix the child seat to the vehicle, thereby increasing
your child’s safety. ISOFIX secures the seat when it is not in use.The child
still needs to be secured with the three-point belt of your vehicle.
NOTE! The ISOFIX anchorage 5 points are two metallic clips for each seat
and are positioned between the backrest and the seating surface of the
vehicle seat. In case of doubt, please refer to the driver’s manual of your
vehicle.
• Use the adjustment button 3 at the side of the child seat
• Pull the two ISOFIX connectors 4 as far as they will go
• Push the two ISOFIX connectors into the ISOFIX anchorage points 5
until these lock into place with an audible ‘CLICK’
• Ensure that the child seat is secure by trying to pull it out
• The safety indicator 6 must now be clearly visible on the two connectors
Push the child seat backwards until the full surface of the backrest of the
child seat is against the backrest of the vehicle.
NOTE! Are the ISOFIX anchorage points 5 hard to reach in your vehicle,
you can use the supplied ISOFIX guides 7.
• Insert the supplied ISOFIX guides 7 with the longer strap upwards into
the two ISOFIX anchorage points 5. In some vehicles, it is better to
mount the ISOFIX guides 7 in the opposite direction
MONTAGGIO DEL SEGGIOLINO PER
BAMBINI CON ISOFIX
MONTAGGIO
Con il sistema ISOFIX è possibile fissare il seggiolino per bambini al
veicolo in modo da aumentare la sicurezza del bambino. Il sistema ISOFIX
consente di assicurare il seggiolino quando non viene usato. Il bambino
deve sempre essere assicurato con la cintura di sicurezza a tre punti del
veicolo.
NOTA! I punti dell’ancoraggio ISOFIX 5 sono composti da due clip metalliche
per ogni sedile posizionate tra lo schienale e la superficie di seduta del
sedile auto. In caso di dubbi, consultare il manuale per il conducente del
proprio veicolo.
• Usare il pulsante di regolazione 3 sul lato del seggiolino per bambini
• Estrarre i due connettori ISOFIX 4 fino al punto di arresto
• Inserire i due connettori ISOFIX nei punti di ancoraggio ISOFIX 5 fino a
quando non scattano in posizione con un “CLIC” udibile
• Assicurarsi che il seggiolino per bambini sia ben fissato provando a
tirarlo
• L’indicatore di sicurezza 6 adesso deve essere ben visibile sui due
connettori
Spingere all’indietro il seggiolino per bambini fino a quando l’intera
superficie dello schienale del seggiolino non aderisce allo schienale del
sedile del veicolo.
NOTA! Se i punti di ancoraggio ISOFIX 5 sono difficili da raggiungere nel
proprio veicolo, è possibile usare le guide ISOFIX fornite in dotazione 7.
• Inserire le guide ISOFIX in dotazione 7 nei due punti di ancoraggio ISOFIX
5 con la linguetta più lunga in alto. In alcuni veicoli è meglio montare le
guide ISOFIX 7 in direzione opposta
DE PLIT ES HUEN FRNL PT RO EL
17

AUSBAU
Führen Sie die Einbauschritte in umgekehrter Reihenfolge durch:
• Entriegeln Sie die ISOFIX Konnektoren 4 beidseitig, indem Sie an der
Schlaufe ziehen und die Konnektoren drücken
5
4
• Ziehen Sie den Sitz aus den ISOFIX Befestigungspunkten 5
• Schieben Sie die ISOFIX Konnektoren 4 bis zum Anschlag hinein
HINWEIS! Durch das Zurückschieben der ISOFIX Konnektoren 4 schonen
Sie nicht nur den Fahrzeugsitz, sondern schützen auch die ISOFIX Konnek
toren vor Verunreinigung und Beschädigung.
-
9
8
ANPASSEN AN DIE KÖRPERGRÖSSE
ANPASSEN DER KOPFSTÜTZE
HINWEIS! Nur eine in optimaler Höhe eingestellte Kopfstütze 8 gewährt
Ihrem Kind größtmöglichen Schutz und Komfort. Die Höhenverstellung
kann in 11 Positionen erfolgen.
• Die Kopfstütze 8 muss so eingestellt werden, dass der Abstand
zwischen den Schultern des Kindes und der Kopfstütze max. 3 cm (ca. 2
Finger) nicht überschreitet
• Betätigen Sie die Einstelltaste 9 an der Rückseite der Kopfstütze und
führen Sie die Kopfstütze in die gewünschte Position
18

REMOVING THE CHILD SEAT FROM THE VEHICLE
Perform the installation steps in the reverse order.
• Unlock the ISOFIX connectors 4 by pulling the loop on both sides and by
pushing the connectors
• Pull the child seat out of the ISOFIX anchorage 5 points
• Push the connectors 4 in as far as they will go.
NOTE! By pushing back the ISOFIX connectors 4, you are not just protec
ting the vehicle seat but also the connectors from dirt and damage.
RIMOZIONE DEL SEGGIOLINO PER BAMBINI DAL VEICOLO
Eseguire i passaggi di montaggio in ordine inverso.
• Sbloccare i connettori ISOFIX 4 tirando l’anello su entrambi i lati e
spingendo i connettori
• Estrarre il seggiolino per bambini dai punti di ancoraggio ISOFIX 5
• Spingere i connettori 4 all’interno fino al punto di arresto.
-
NOTA! Spingendo i connettori ISOFIX 4 indietro nella posizione iniziale
si protegge non solo il sedile dell’auto ma anche i connettori stessi da
sporcizia e danni.
ADJUSTING TO THE BODY SIZE
ADJUSTING THE HEADREST
NOTE! The headrest 8 ensures the best possible protection for your child
only if it is adjusted to the optimum height. There are 11 height positions
that can be set.
• The headrest 8 must be adjusted so that max. 3 cm (ca. two finger‘s
width) or less remains free between the child’s shoulder and the
headrest
• Activate the adjustment handle 9 on the bottom side of the headrest
and move it into the required position
REGOLAZIONE DEL SEGGIOLINO IN BASE
ALLA TAGLIA DEL BAMBINO
REGOLAZIONE DEL POGGIATESTA
NOTA! Il poggiatesta 8 assicura la migliore protezione possibile al bambino
solo se è regolato all’altezza ottimale. Può essere regolato su 11 posizioni.
• Il poggiatesta 8 deve essere regolato in modo che restino non più di 3
• Azionare la maniglia di regolazione 9 sul lato inferiore del poggiatesta e
DE PLIT ES HUEN FRNL PT RO EL
cm (circa due dita) di spazio tra le spalle del bambino e il poggiatesta
spostarla nella posizione desiderata
19

ANSCHNALLEN MITTELS FAHRZEUGGURT
Setzen Sie ihr Kind in den Kindersitz. Ziehen Sie den Dreipunktgurt weit heraus
und führen Sie diesen vor Ihrem Kind entlang zum Gurtschloss 10.
11
10
14
13
12
15
10
20
WARNUNG! Den Gurt auf keinen Fall verdrehen.
Stecken Sie die Gurtzunge 11 in das Gurtschloss 10. Dieses muss mit einem
hörbaren „KLICK“ einrasten. Als nächstes legen Sie den Beckengurt 12 in die
unteren roten Gurtführungen 13 des Kindersitzes ein. Ziehen Sie nun kräftig am
Diagonalgurt 14, um den Beckengurt 12 zu straffen. Je enger der Gurt anliegt,
desto besser kann er vor Verletzungen schützen.
HINWEIS! Auf der Seite des Gurtschlosses 10 müssen der Diagonalgurt 14
und der Beckengurt 12 zusammen in die untere Gurtführung 12 eingelegt sein.
WARNUNG! Das Fahrzeuggurtschloss 10 darf keinesfalls über die Armlehne
reichen. Ist die Gurtpeitsche zu lang, ist der Kindersitz für eine Verwendung
auf dieser Position im Fahrzeug nicht geeignet. Bitte wenden Sie sich im
Zweifelsfall an den Hersteller Ihres Fahrzeugs.
Der Beckengurt 12 sollte auf beiden Seiten des Sitzkissens in den unteren
Gurtführungen liegen.
HINWEIS! Bringen Sie Ihrem Kind von Anfang an bei, immer auf eine straffe
Gurtführung zu achten und bei Bedarf, selbst den Gurt festzuziehen.
WARNUNG! Der Beckengurt 12 muss auf beiden Seiten so tief wie möglich
über der Leistenbeuge Ihres Kindes verlaufen, um im Falle eines Unfalls
optimal wirken zu können.
Nun führen Sie den Diagonalgurt 14 durch die obere rote Gurtführung 15 in der
Kopfstütze bis er sich innerhalb der Gurtführung befindet. Achten Sie darauf,
dass der Diagonalgurt zwischen Schulteraußenkante und Hals Ihres Kindes
verläuft. Falls erforderlich, passen Sie durch Verstellen der Kopfstützenhöhe den
Gurtverlauf an. Die Höhe der Kopfstütze 8 kann auch im eingebauten Zustand
im Auto eingestellt werden.

STRAPPING WITH VEHICLE SEAT BELT
Place your child in the child seat. Pull the three-point belt right out and feed
it along the belt buckle 10 in front of your child.
WARNING! Never twist the belt.
Insert the belt tongue 11 into the belt buckle 10. It must lock into place
with an audible “CLICK”. Next, place the lap belt 12 in the lower belt guide
13 of the child seat. Now pull the diagonal belt 14 firmly to tighten the
lap belt 12. The tighter the belt sits, the better it provides protection from
injury.
NOTE! On the side of the belt buckle 10, the diagonal belt 14 and the lap
belt 12 must be inserted together in the lower belt guide 13.
WARNING! The vehicle belt buckle 10 must never cross the arm rest. If
the belt system is too long, the child seat is not suitable for use in this
position in the vehicle. In case of doubt, please consult the manufactu
rer of your vehicle.
The lap belt 12 should have been fed through the lower belt guides on
both sides of the seat cushion.
NOTE! Teach your child from the start to always ensure that the belt is
tight and, if neccessary, how to tighten the belt themselves.
WARNING! The lap belt 12 must run as low as possible on both sides
along your child’s groin to have optimum effect in the event of an
accident.
Now feed the diagonal belt 14 through the red upper belt guide 15 in the
headrest until it is inside the belt guide. Ensure that the diagonal belt runs
between the outside of the shoulder and the neck of your child. If neces
sary, adjust the height of the headrest 8 to change the position of the belt.
The height of the headrest can still be adjusted while in the car.
FISSAGGIO CON LA CINTURA DI SICUREZZA
Posizionare il bambino nel seggiolino per bambini. Estrarre la cintura di sicurezza a
tre punti e farla scorrere davanti al bambino portandola fino alla fibbia 10.
Inserire la linguetta della cintura di sicurezza 11 nella sua fibbia 10. Deve scattare in
posizione con un “CLIC” udibile. Quindi posizionare la cintura subaddominale 12
nella guida inferiore della cintura 13 del seggiolino per bambini. Successivamente
tirare saldamente la cintura diagonale 14 per tendere la cintura subaddominale 12.
Più la cintura è tesa, maggiore è la protezione da lesioni.
NOTA! Sul lato della fibbia della cintura di sicurezza 10, la cintura diagonale 14 e la
cintura subaddominale 12 devono essere fatte passare insieme nella guida inferiore
della cintura 13.
-
La cintura subaddominale 12 deve essere fatt a passare attraverso le guide inferiori
della cintura su entrambi i lati del cuscino di seduta.
NOTA! Insegnare al bambino fin dall’inizio a controllare sempre che la cintura sia
tesa e a tenderla autonomamente, se necessario.
A questo punto far passare la cintura diagonale 14 attraverso la guida superiore
-
rossa della cintura 15 nel poggiatesta fino a quando non si trova nella guida della
cintura. Assicurarsi che la cintura diagonale scorra tra l’esterno della spalla e il collo
del bambino. Se necessario, regolare l’altezza del poggiatesta 8 per cambiare la po
sizione della cintura. L’altezza del poggiatesta è regolabile anche all’interno dell’auto.
DE PLIT ES HUEN FRNL PT RO EL
ATTENZIONE! Non attorcigliare mai la cintura.
ATTENZIONE! La fibbia della cintura di sicurezza del veicolo 10 non deve mai
attraversare il bracciolo. Se il sistema di cinture è troppo lungo, il seggiolino per
bambini non è adatto all‘uso in questa posizione nel veicolo. In caso di dubbio,
contattare il fabbricante del veicolo.
ATTENZIONE! La cintura subaddominale 12 deve scorrere più bassa possibile
su entrambi i lati lungo l’inguine del bambino per avere l’effetto ottimale in caso
di incidente.
-
21

IST IHR KIND RICHTIG GESICHERT?
Um die bestmögliche Sicherheit Ihres Kindes zu gewährleisten, prüfen Sie
bitte vor Beginn der Fahrt, ob:
• die Rückenlehne des Kindersitzes vollflächig an der Rückenlehne des
Fahrzeugsitzes anliegt
• der Beckengurt 12 auf beiden Seiten des Sitzkissens in den unteren
roten Gurtführungen 13 verläuft
• der Diagonalgurt auf der Gurtschlossseite auch in der unteren roten
Gurtführung 13 des Sitzes verläuft
• der Diagonalgurt 14 durch die rot markierte Gurtführung 15 der Schulter
stütze verläuft
• der Diagonalgurt 14 schräg nach hinten verläuft
• der gesamte Gurt straff ist und nicht verdreht am Körper des Kindes
anliegt
• der Beckengurt 12 möglichst niedrig an der Hüfte anliegt
• die Position der Kopfstütze 8 ordnungsgemäß eingestellt wurde
• bei Verwendung von ISOFIX der Sitz beidseitig mit den Konnektoren 4 in
den ISOFIX Befestigungspunkten eingerastet ist und die beiden grünen
Sicherheitsindikatoren 6 deutlich zu sehen sind
-
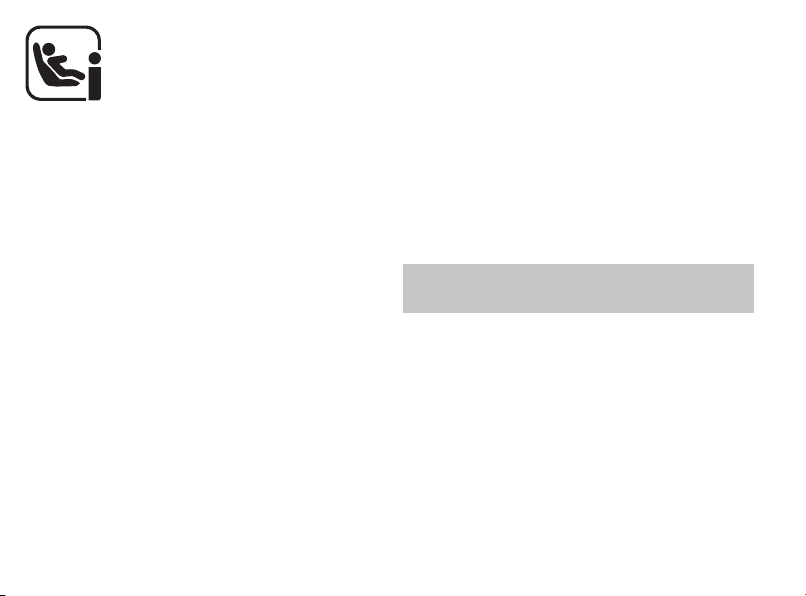
EINSTELLEN DER BEINAUFLAGE
Betätigen Sie den Griff 16 an der vorderen Kante der Sitzauflage 17 und
ziehen Sie diese nach vorne.
16
17
22

SECURING THE CHILD CORRECTLY
To ensure optimum safet y for your child, please always check before
commencing travel that:
• the backrest of the child seat lies completely flush with the backrest of
the child seat
• the lap belt 12 has been fed through the red lower belt guides 13 on
both sides of the seat cushion
• the diagonal belt 14 on the belt buckle side has also been fed through
the red lower belt guide 13 of the seat
• the diagonal belt 14 has been fed through the belt guide 15 marked red
in the shoulder rest
• the diagonal belt 14 is at a recline backwards
• the entire belt 12 is tightly against your child’s body and is not twisted
• the lap belt sits low on the pelvis
• the headrest 8 has been adjusted to the correct height
• if using ISOFIX the seat has locked into place on both sides with the
connectors 4 into the ISOFIX anchorage points and both green safety
indications 6 can be seen clearly
FISSAGGIO CORRETTO DEL BAMBINO
Per garantire la sicurezza ottimale del bambino, prima di iniziare il viaggio
controllare sempre che:
• lo schienale del seggiolino per bambini sia completamente aderente allo
schienale del sedile dell’auto
• la cintura subaddominale 12 passi attraverso le guide inferiori della
cintura rosse 13 su entrambi i lati del cuscino di seduta
• anche la cintura diagonale 14 dal lato della fibbia passi attraverso la guida
inferiore rossa della cintura 13 del seggiolino
• la cintura diagonale 14 passi attraverso la guida della cintura 15 contras
segnata in rosso nel poggia-spalle
• la cintura diagonale 14 scorra verso il basso inclinata
• L’intera cintura 12 poggi tesa contro il corpo del bambino e non sia
attorcigliata
• la cintura subaddominale poggi in basso sull’inguine del bambino
• il poggiatesta 8 sia stato regolato all’altezza corretta
• se si usa il sistema ISOFIX, il seggiolino sia stato bloccato in posizione
su entrambi i lati con i connettori 4 ben fissati ai punti di ancoraggio
ISOFIX e che entrambi gli indicatori di sicurezza verdi 6 siano ben visibili
-
EXTENSION OF LEG REST
To extend the leg rest, push the button 16 on the front 17 of the seat and
pull it outwards.
ESTENSIONE DEL POGGIAGAMBE
Per estendere il poggiagambe, premere il tasto 16 sul lato anteriore 17 del
seggiolino ed estrarre il poggiagambe.
DE PLIT ES HUEN FRNL PT RO EL
23

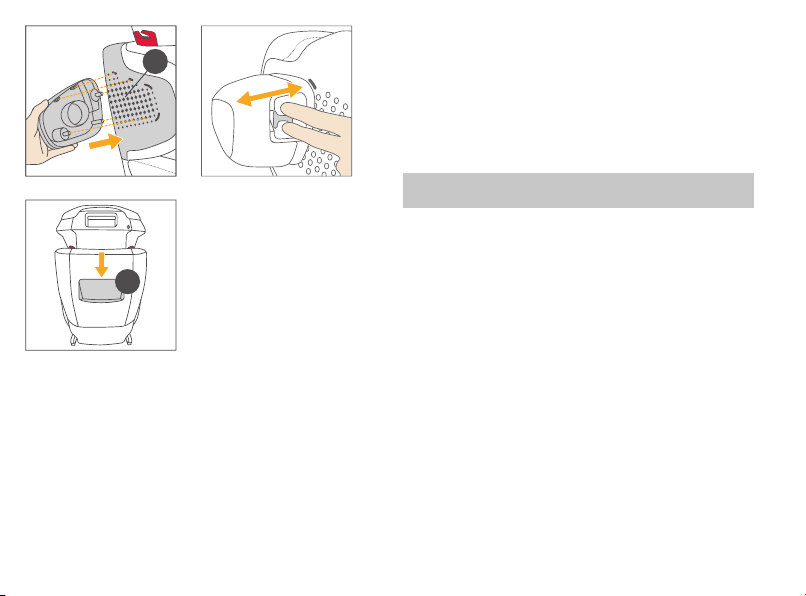
SOUND SYSTEM
• An der Hinterseite der Kopfstütze ist die Buchse 18 zum Anschluss
eines handelsüblichen Musikabspielgerätes
• Die Anschlussleitung zum Soundsystem ist enthalten
• Sie können sie vor der Verwendung unter dem Polster verlegen
• Die Tasche 19 für das Abspielgerät befindet sich an der rechten Seite
des Sitzkissens
HINWEIS: Vermeiden Sie Schlaufenbildung im Kopf- und Übergangsbereich
von Sitzfläche und Rückenlehne! Ziehen Sie dazu das Anschlusskabel an
der Sitzfläche etwas heraus und verstauen die Überlänge in der für das
Abspielgerät vorgesehenen Tasche 19.
WARNUNG! Um Hörschäden zu vermeiden, achten Sie bitte darauf,
dass Ihr Kind Musik oder Hörspiele nicht für längere Zeit mit großer
Lautstärke hört. Die „Europäische Spielzeugrichtlinie“ und die zu
gehörige Europa-Norm EN 71 / 1 legen die maximale Lautstärke für
Kinderspielzeug fest. Danach sind für „ohrnahes Spielzeug“ höchstens 80
Dezibel zulässig. Zum Vergleich: So laut ist es in einer belebten Straße.
Dieser Grenzwert gilt für Spielzeug, das meist nahe am Ohr benutzt
wird. Die Norm geht von einem Abstand von 2,5 Zentimetern aus.
-
19
16
EINSTELLEN DER RUHEPOSITION
Der Kindersitz kann durch Herausziehen des Verstellgriffes 20 wie dargestellt, in eine Ruheposition gebracht werden.
20
24

SOUND SYSTEM
• The socket 18 for the connection of a commercial music player is located
rear side of the headrest
• The connection cable for the sound system is enclosed
• It can be laid underneath the upholstery before use
• The pocket 19 for the music player is on the right hand side of the seat
cushion
NOTE: Avoid the formation of cable loops in the head area and area between
the seat and backrest! To do this pull out the connecting cable slightly in
the seat and stow the excess length in the music player pocket 19.
WARNING! To prevent hearing impairment, ensure that your child does
not listen to music or audio media at high volume for extended periods.
The European Toy Safety Directive and the corresponding European
Standard EN 71 / 1 stipulate the maximum volume for toys. Accordingly,
the maximum volume for “toys in close proximity to ears” must not
exceed 80 decibels. For your reference: this is the sound level of a busy
street. This limit value applies to toys that are mostly used close to the
ear. The standard assumes a distance of 2.5 centimetres.
SISTEMA AUDIO
• La presa 18 per il collegamento di un lettore di musica disponibile in
commercio è posizionata sul lato posteriore del poggiatesta
• Il cavo di collegamento per il sistema audio è incluso in dotazione
• Può essere fatto passare sotto la fodera prima dell’uso
• La tasca 19 per il lettore di musica è su lato destro del cuscino di seduta
NOTA! Evitare che nel cavo si formino cappi nell’area della testa e nell’area
tra il seggiolino e lo schienale! a tale scopo estrarre solo parzialmente il
cavo di collegamento dal seggiolino e riporre il resto nella tasca del lettore
di musica 19.
ATTENZIONE! Per impedire danni all’udito, assicurarsi che il bambino
non ascolti musica o altro materiale audio ad alto volume per periodi di
tempo prolungati. La direttiva europea sulla sicurezza dei giocattoli e il
corrispondente standard europeo EN 71 / 1 definiscono il volume massimo
per i giocattoli. Di conseguenza il volume massimo per i “giocattoli in
prossimità delle orecchie” non devono superare gli 80 decibel. Per rife
rimento: questo è il livello sonoro di una strada trafficata. Questo valore
limite si applica ai giocattoli che vengono usati principalmente vicino alle
orecchie. Lo standard presume una distanza di 2,5 centimetri.
ADJUSTING THE REST POSITION REGOLAZIONE DELLA POSIZIONE DI RESTO
The child seat can be brought into a rest position by pulling out the control
element 20 as shown.
Il seggiolino per bambini può essere portato in una posizione di riposo
estraendo l‘elemento di controllo 20 come mostrato.
-
DE PLIT ES HUEN FRNL PT RO EL
25

ENTFERNEN DES SITZBEZUGES
Der Bezug besteht aus 6 Teilen, die mittels Gummiband, Druckknöpfen
oder Haken am Sitzgestell befestigt sind. Sobald Sie alle Befestigung
lösen, können die Einzelteile abgenommen werden.
• Ziehen Sie den Kopfstützenbezug nach vorne hin ab
• Ziehen Sie die Schulterbezüge nach vorne hin ab
• Entfernen Sie nun den Rückenbezug
• Entfernen Sie den Sitzflächenbezug
• Ziehen Sie die Beinauflage heraus und entfernen Sie dessen Bezug
• Um die Bezüge wieder zu befestigen, verfahren Sie in umgekehrter
Reihenfolge
HINWEIS! Achten Sie bei der Wiederanbringung des Beinauflagenbezugs
darauf, dass der Sitzschaum korrekt aufliegt.
WARNUNG! Der Kindersitz darf keinesfalls ohne Bezug verwendet
werden.
26

REMOVING THE SEAT COVER
The cover consists of 6 components fixed to the seat shell by elastic loops,
snap buttons and brackets. Once you have released all the fastenings, you
can remove the individual components for washing.
• Remove the headrest cover by pulling it forwards
• Remove the shoulder cover by pulling it forwards
• Remove the backrest cover
• Remove the seat surface cover
• Extend the leg rest fully and remove the leg rest cover
• To fix the cover again on the seat carry out the steps in reverse order
NOTE! When remounting the leg rest cover ensure that the seating foam
of the leg rest is pressed close against the seat shell.
WARNING! The child seat must under no circumstances be used
without the cover.
RIMOZIONE DELLA FODERA DEL
SEGGIOLINO
La fodera è composta da 6 componenti fissati al telaio con passanti elastici,
bottoni a pressione e staffe. Dopo che sono stati rilasciati tutti i dispositivi
di fissaggio, è possibile rimuovere i singoli componenti per lavarli.
• Rimuovere la fodera del poggiatesta tirandola in avanti
• Rimuovere la fodera delle spalle tirandola in avanti
• Rimuovere la fodera dello schienale
• Rimuovere la fodera della superficie di seduta
• Estendere completamente il poggiagambe e rimuoverne la fodera
• Per applicare nuovamente la fodera sul seggiolino, eseguire i passaggi
in ordine inverso
NOTA! Quando viene reinserita la fodera del poggiagambe, assicurarsi che
la schiuma del cuscino del poggiagambe venga premuta a stretto contatto
con il telaio.
ATTENZIONE! Il seggiolino per bambini non deve essere assolutamente
usato senza la fodera.
DE PLIT ES HUEN FRNL PT RO EL
27

f94
28
i
,
REINIGUNG
Es ist darauf zu achten, dass nur ein Originalsitzbezug verwendet wird,
da auch der Bezug ein wesentlicher Bestandteil der Funktion ist. Ersatz
bezüge erhalten Sie im Fachhandel.
HINWEIS! Entfernen Sie bitte vor dem Waschen alle herausnehmbaren
Schaumteile aus und von den Bezügen. Diese dürfen nicht mitgewaschen
werden. Bitte den Bezug vor der ersten Verwendung waschen. Der Bezug
darf bei max. 30°C im Schonwaschgang gewaschen werden. Sollten Sie
mit mehr als 30°C waschen, kann es zu Ausfärbungen kommen. Bitte den
Bezug gesondert von anderer Wäsche waschen und keinesfalls maschinell
trocknen! Den Bezug keinesfalls in der prallen Sonne trocknen! Die Kunst
stoffteile können mit einem milden Reinigungsmittel und warmen Wasser
gewaschen werden.
WARNUNG! Bitte auf keinen Fall chemische Reinigungs- oder Bleich
mittel verwenden!
-
-
PFLEGE
Um die größtmögliche Schutzwirkung Ihres Kindersitzes zu gewährleisten,
ist es unbedingt notwendig, dass Sie Folgendes beachten:
• Alle wichtigen Teile des Kindersitzes sollten regelmäßig auf Beschädigungen kontrolliert werden. Die mechanischen Bauteile müssen
einwandfrei funktionieren
• Es ist unbedingt notwendig darauf zu achten, dass der Kindersitz nicht
zwischen harten Teilen wie Fahrzeugtür, Sitzschiene usw. eingeklemmt
wird und dadurch beschädigt werden könnte
• Der Kindersitz muss nach einem Sturz, Unfall oder einer anderen Form
der direkten Beeinträchtigung unbedingt vom Hersteller überprüft
werden
WARNUNG! Der Bezug ist integraler Bestandteil des Kindersitz-Sicher
heitskonzeptes. Der Kindersitz darf aus diesem Grund keinesfalls ohne
Bezug oder mit dem Bezug eines anderen Kindersitzes verwendet werden.
-
-

CLEANING
It is important to use an original seat cover only since the cover is an
essential part of the function. You may obtain spare covers at your retailer.
NOTE! Please remove all removeable foam pads from and out of the covers before washing. These pads should not be washed. Please wash the
cover before you use it the first time. Seat covers are machine washable
at max. 30°C on delicate cycle. If you wash it at higher temperature, the
cover fabric may lose colour. Please wash the cover separately and never
dry it mechanically! Do not dry the cover in direct sunlight! You can clean
the plastic parts with a mild detergent and warm water
WARNING! Please do not use chemical detergents or bleaching agents
under any circumstances!
PULIZIA
È importante usare esclusivamente una fodera originale, perché questa è
parte essenziale del funzionamento del seggiolino. È possibile richiedere
fodere di ricambio al proprio rivenditore.
NOTA! Prima del lavaggio, si prega di rimuovere tutte le parti e le imbottiture in espanso dai rivestimenti. Le parti in espanso non devono essere
lavate. Lavare la fodera prima di usarla per la prima volta. Le fodere del
seggiolino possono essere lavate in lavatrice a max. 30°C con un program
ma per i capi delicati. Un lavaggio a temperature superiori può determinare
lo scolorimento del tessuto della fodera. Lavare la fodera separatamente e
non asciugarla in asciugatrice! Non lasciar mai asciugare la fodera alla luce
solare diretta! Le parti in plastica possono essere pulite con un detergente
delicato e acqua tiepida.
ATTENZIONE! Non usare mai detergenti chimici o candeggianti!
-
PRODUCT CARE
To guarantee that your child seat provides the maximum protection, it is
essential to comply with the following points:
• All major components of the child seat must be regularly checked for
damage. The mechanical parts must work without problems
• Make sure that the child seat is not jammed between hard parts such as
the car door, seat rails etc., which can damage it
• If e.g. the child seat is dropped, it must be tested by the manufacturer
before being used again
WARNING! The cover is an integral component of the child seat‘s
safety design. The child seat must therefore never be used without the
cover or with a cover of a different child seat.
CURA DEL PRODOTTO
Per garantire che il seggiolino per bambini fornisca la massima protezione,
è essenziale rispettare quanto segue:
• Tutti i principali componenti del seggiolino per bambini devono essere
• Assicurarsi che il seggiolino per bambini non resti incastrato tra elementi
• Se il seggiolino per bambini subisce una caduta, deve essere controllato
DE PLIT ES HUEN FRNL PT RO EL
controllati regolarmente alla ricerca di danni. Le parti meccaniche devono
funzionare senza problemi.
duri, quali la portiera o le guide dei sedili, che potrebbero danneggiarlo.
dal produttore prima di essere nuovamente usato.
ATTENZIONE! La fodera è una parte integrante della progettazione
della sicurezza del seggiolino per bambini. Quindi il seggiolino per
bambini non deve essere mai usato senza la fodera o con la fodera di un
differente seggiolino per bambini.
29

VERHALTEN NACH EINEM UNFALL
WARNUNG! Aufgrund eines Unfalls können am Kindersitz Beschädigungen auftreten, die mit bloßem Auge nicht erkennbar sind. Bitte
tauschen Sie nach einem Unfall unbedingt den Sitz aus. Im Zweifelsfall
wenden Sie sich an den Händler oder Hersteller.
PRODUKTINFORMATION
Bei Fragen wenden Sie sich zuerst an Ihren Händler. Folgende Angaben
sollten Ihnen vorliegen:
• Seriennummer (siehe Aufkleber)
• Marke und Typ des Autos und die Position des Sitzes, auf dem der
Kindersitz benutzt wird
• Gewicht, Alter und Größe des Kindes
Weitere Informationen zu unseren Produkten finden Sie auch unter
www.recaro-kids.com
PRODUKTLEBENSDAUER
Dieser Kindersitz ist so ausgelegt, dass er bei gewöhnlicher Nutzung für
die gesamte Produktlebensdauer von ca. 9 Jahren seine Eigenschaften erfüllt.
Durch den langsamen Verschleiß des Kunststoffs, beispielsweise durch
Sonneneinstrahlung (UV), können sich die Eigenschaften des Produkts gering
fügig verschlechtern. Da in Fahrzeugen sehr große Temperaturschwankungen
herrschen und andere unvorhersehbare Belastungen auftreten können, ist
es notwendig, folgende Punkte zu beachten:
• Wenn das Fahrzeug längere Zeit der prallen Sonne ausgesetzt ist, muss
der Kindersitz aus dem Fahrzeug entfernt oder mit einem hellen Tuch
abgedeckt werden
• Prüfen Sie regelmäßig alle Kunststoff- und Metallteile des Kindersitzes
auf Beschädigung oder Veränderung von Form oder Farbe. Stellen Sie
eine Veränderung fest, ist der Kindersitz zu entsorgen oder muss vom
Hersteller geprüft und gegebenenfalls ausgetauscht werden
• Veränderungen des Stoffes, insbesondere das Ausbleichen, sind normal
und stellen keine Beeinträchtigung dar
30
-
 Loading...