

Connecting a monitor / TV
Using an external display device is useful when you are giving a presentation or
watching a video or movie through your monitor.
You have to buy a connection cable additionally.
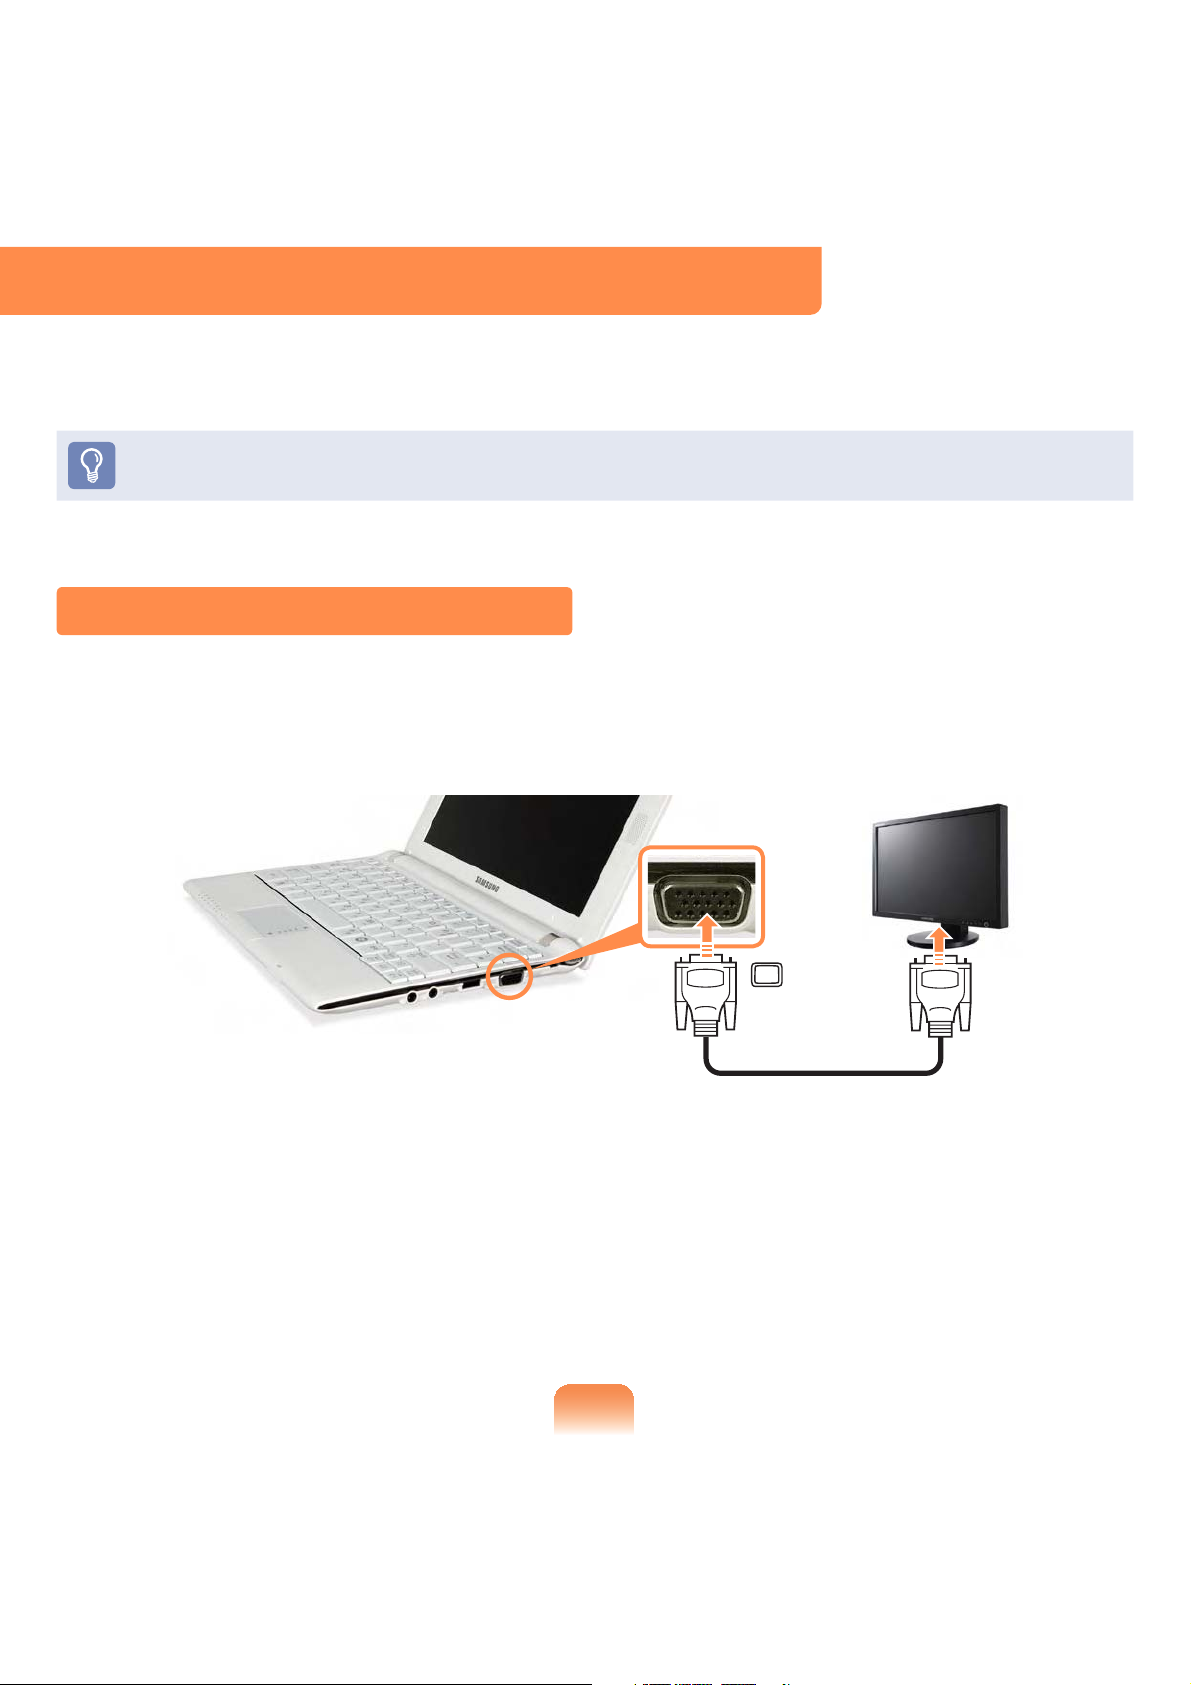
Connecting to the Monitor / TV
Connect the computer to the RGB port of the monitor or TV using a monitor cable
(15 -pin).
71
Viewing Through a Monitor / TV
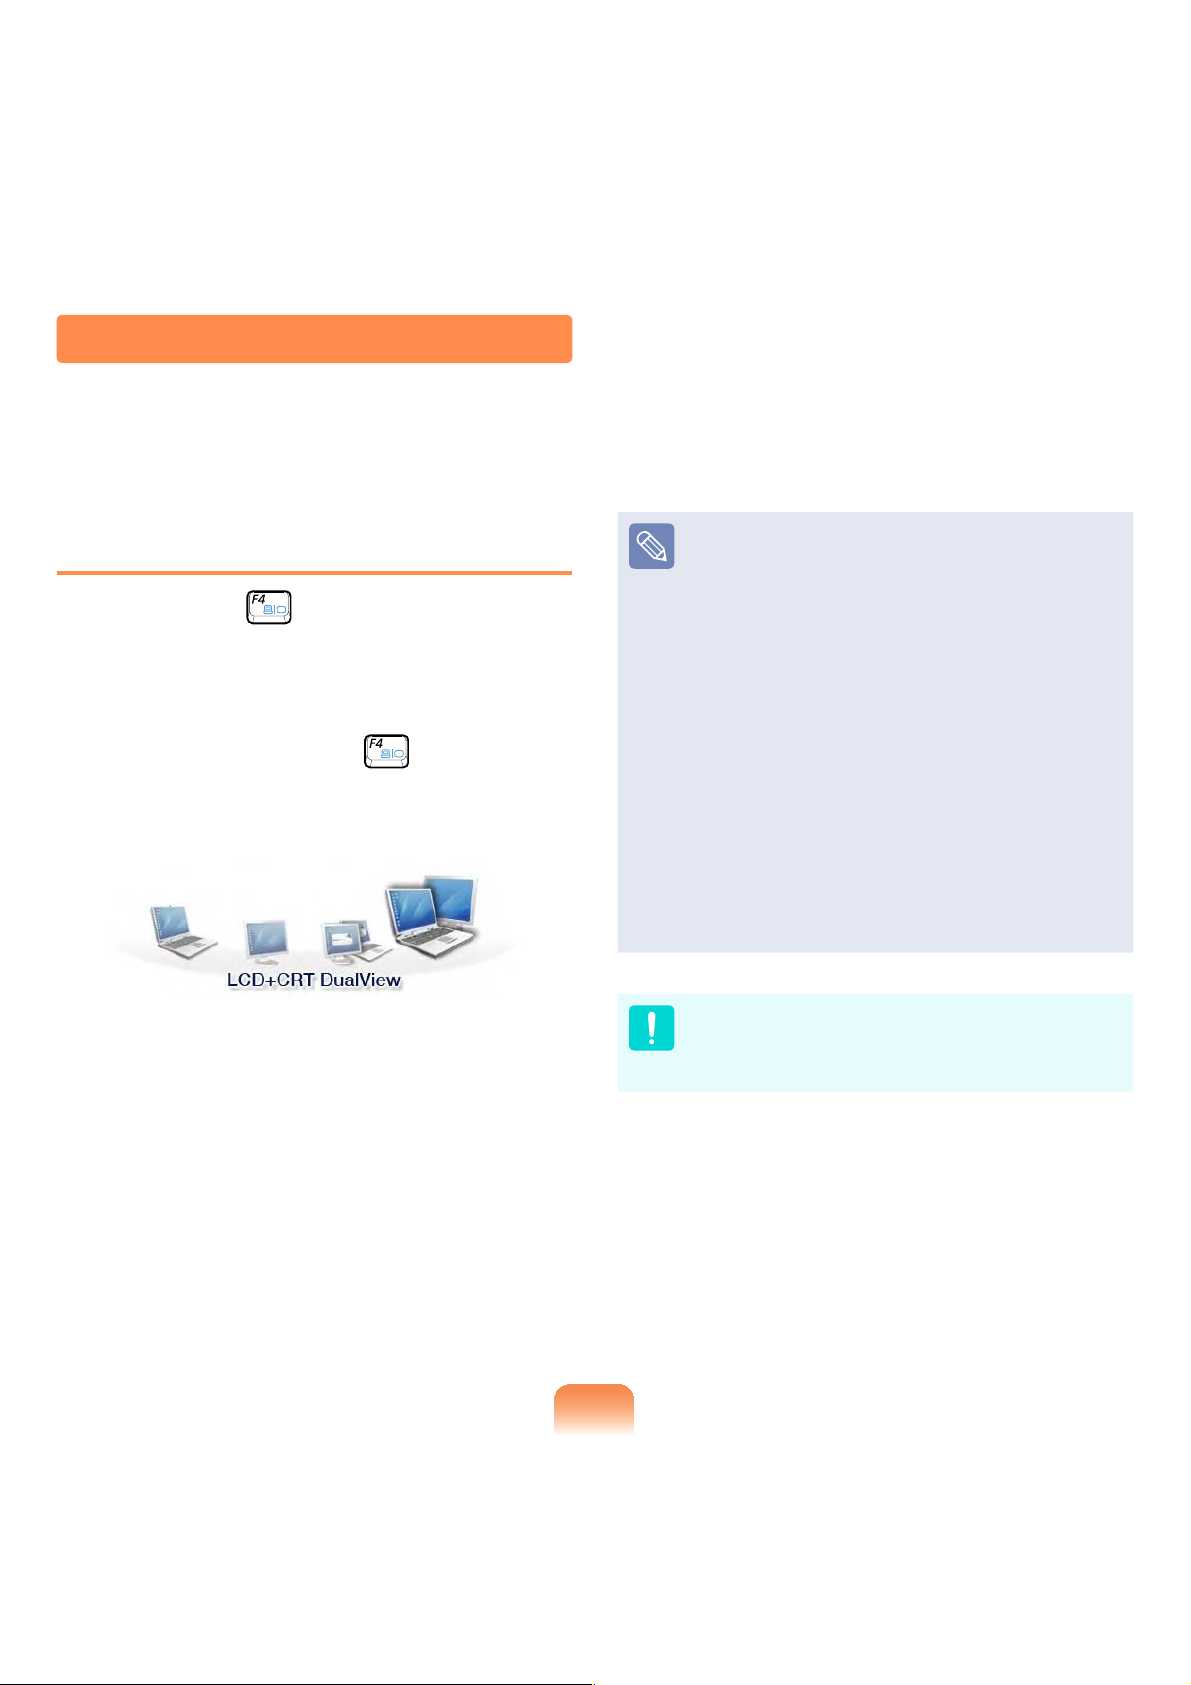
You can switch the display device using the shortcut key.
Switching the Display Device using
the Shortcut Key
Press the Fn + key combination
once. Then the Easy Display Manager
screen appears in which you can select a
display device.
Whenever you press the
holding down the Fn key, the selected
option is changed.
Example) Selecting LCD+CRT
Dual View
key while
LCD: Notebook Screen
CRT: External Monitor Screen
LCD+CRT Clone : Notebook+
External Monitor Screen
LCD+CRT DualView: Notebook+
External Monitor Screen in Dual
View
What is Dual View?
Dual View is a function that
enables you to view a computer
screen over two display devices.
It is convenient when you need a
wide screen.
External Monitor / TV is not
supported in the DOS Command
Prompt window.
72
Using Dual View to View Extended Screen
Dual View is a function that enables you to view a computer screen over two display
devices. This is convenient when needing a wide screen for work.
In Dual View mode, you can select the screen resolution and color quality for each
display device, as if there were two separate graphics cards.
Connect the external display device
1
(e.g. a monitor or a projector) to the
corresponding port of the system. To
connect a TV, connect the TV to the
TV output port of the system.
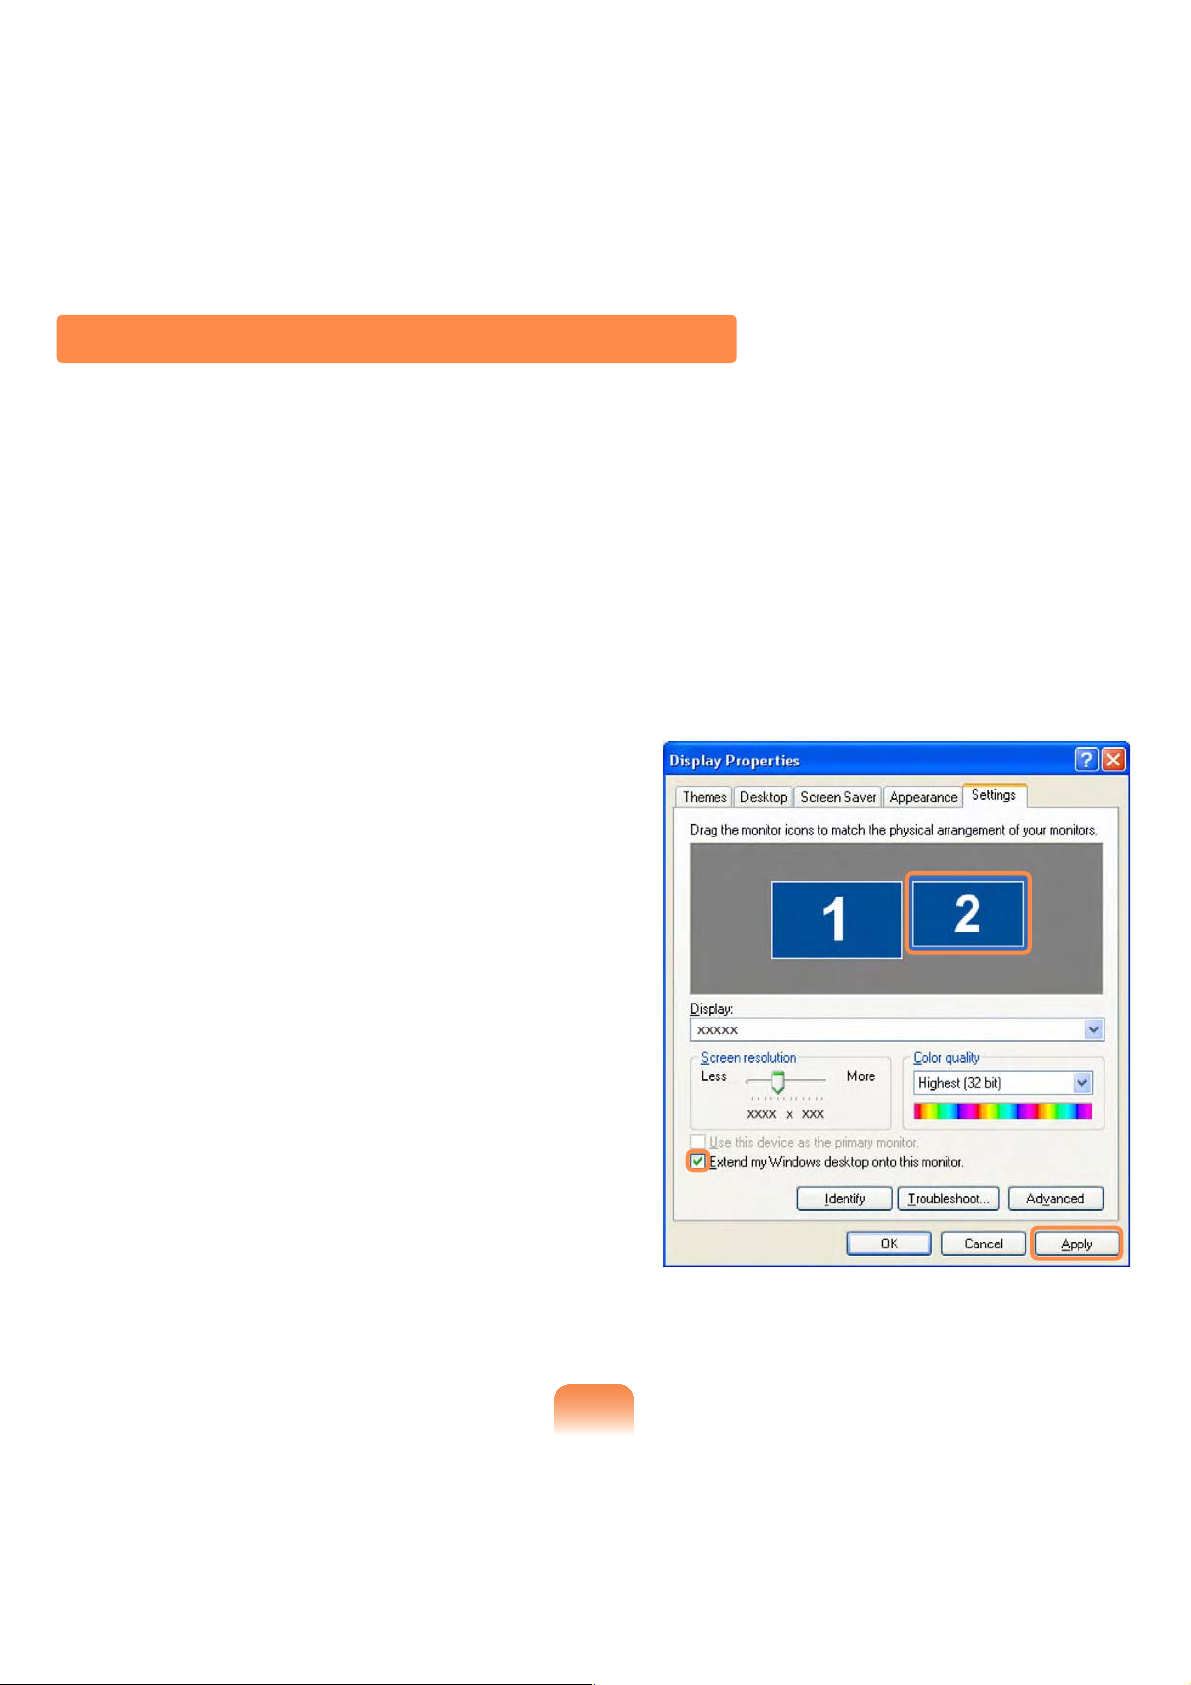
Press touchpad right button on the
2
desktop, click Properties, and then
click the Settings tab.
Click the monitor 2 icon, select the
3
Extend my Windows desktop onto
this monitor check box, and then
click Apply.
73

When the configuration is complete,
4
click Identify on the left side of
Troubleshoot. The primary display
device(the LCD) is indicated as 1,
and the secondary display device is
indicated as 2. Now you can view the
screen through two monitors.
1 : Primary 2 : Secondary
When you use Dual View,
configuring the LCD as the
'Primary' monitor is recommended.
If the screen of the secondary
display device is displayed at
1024x768 pixels, with 32bit colors,
change the settings to the desired
screen resolution and color quality
in the [Display Properties] dialog
box.
Deactivating Dual View Mode
Click the monitor 2 icon, clear the
Extend my Windows desktop onto this
monitor check box, and then click Apply.
To move a window between
display devices in Dual View
mode
Click the title bar of the window in the
primary display device (1, the LCD),
and drag it to the secondary display
device (2). The window is moved to
the secondary display device.
74
Adjusting the Volume
You can adjust the volume using the keyboard and the volume control program.
Adjusting the Volume using the
Keyboard
Press the Fn + key combination or
Fn +
volume.
Press the Fn +
turn the volume on or off.
key combination to adjust the
key combination to
Adjusting the Volume using the
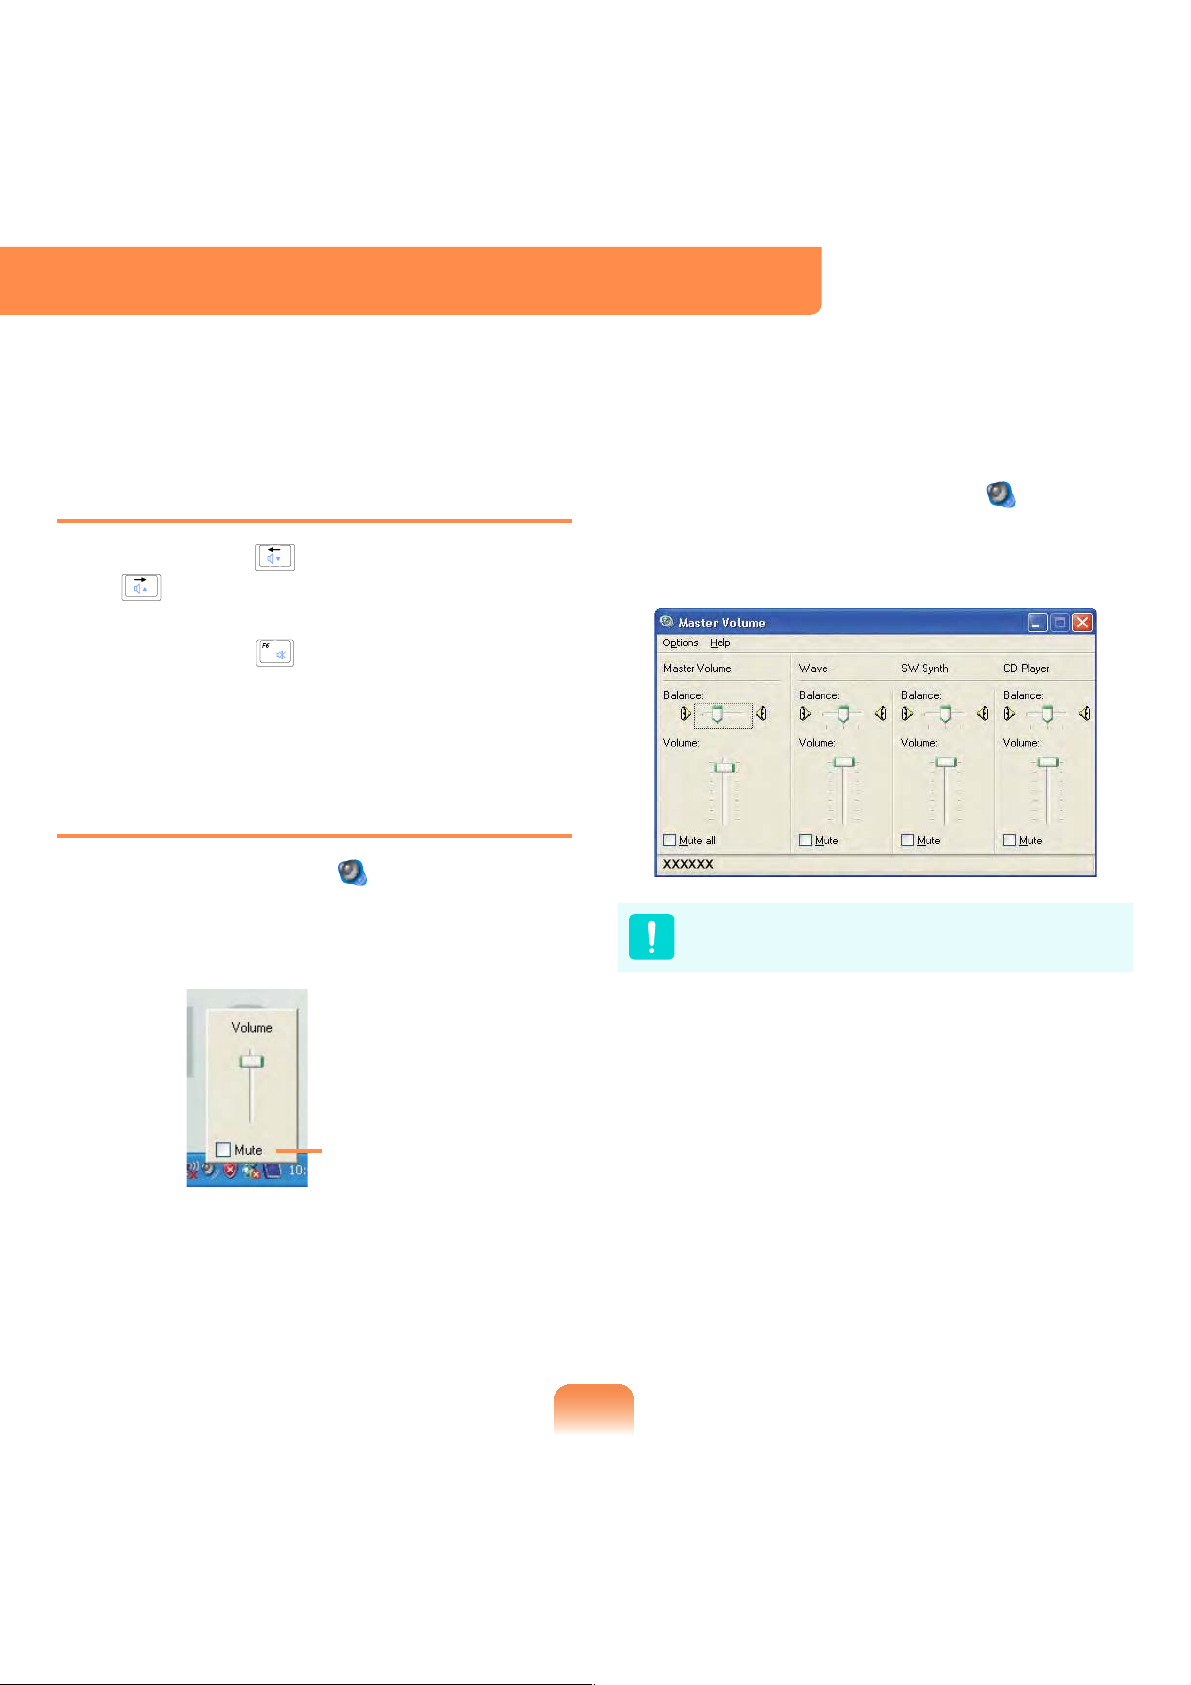
Volume Adjustment Program
Click the Volume icon on the taskbar
and slide the volume control bar to adjust
the volume.
For advanced volume control options,
double-click the Volume icon
adjust the volume level in the volume
control program.
When you turn the system on, a
booting noise may occur.
, and
Mute
75

Using SRS
The SRS function enables you to
experience more stereophonic sound by
expanding the space-perception through
the stereo speaker.
This function is available for specific
models only.
Click Start > Control Panel >
1
Sound, Speech and Audio Devices
> SRS Control Panel.
Check the Enable checkbox and
2
select a mode. Then you can listen
to sound through the selected SRS
effect.
WOW XT (Music): Select to listen to
music.
TruSurround XT (Movie/Video):
Select to watch a movie.
The SRS function is only
supported for a computer’s built-in
speakers or headphones.
It is recommended uncheking the
SRS option before recording, and
checking it before play. It is to
prevent sound distortion because
of double application of SRS effect
when user plays the file recorded
by using stereo mix.
76
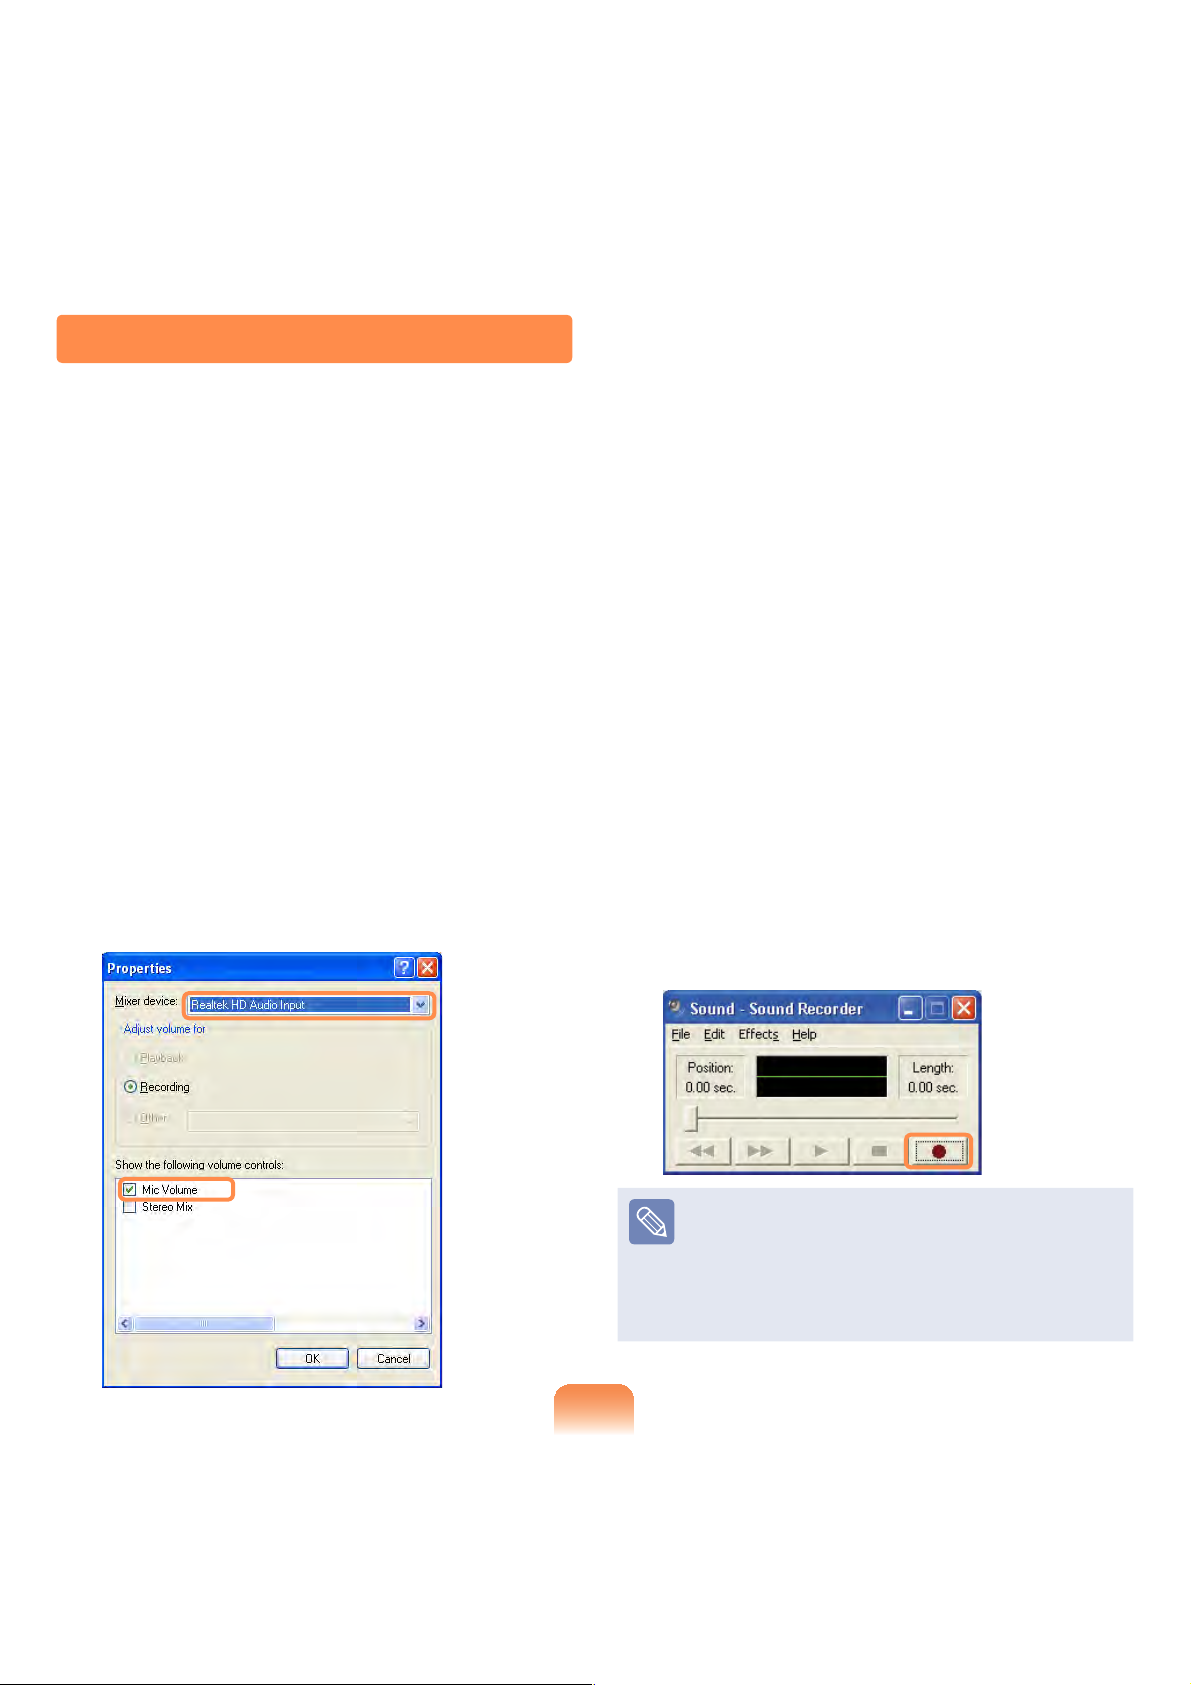
Using Recorders
This section describes how to perform recording on a computer by using Windows
Recorder.
Connect a microphone to the
1
microphone jack.
you can also use the internal MIC.
Click Start > Control Panel >
2
Sounds, Speech, and Audio
Devices > Sounds and Audio
Devices.
Click Advanced from Volume and
3
then, click Options > Properties.
Select Realtek HD Audio input from
4
the mixer device to select Recording
from Adjust Volume for.
Select Mic Volume from Show the
5
following volume controls and click
OK.
When Recording Control window
6
appears, check the Select checkbox.
Increase the recording volume to
increase the recording sensitivity and
close the window.
Click Start > All Programs >
7
Accessories > Entertainment >
Sound Recorder.
Click the Record button to perform
8
recording.
77
The default recording duration of
Windows is 60 seconds. Download
a dedicated recording program from
the Internet to record audio data for a
long time.

Chapter 3.
Using Microsoft
Windows XP
About Microsoft Windows XP 79
Windows XP Screen Layout 81
Control Panel 85
The screen shots used in this chapter may differ from actual
screens depending on the Windows XP version and model.
About Microsoft Windows XP
Microsoft Windows XP (hereinafter referred to as Windows) is the basic operating
system for computers.
You should know how to use Windows in order to use your computer properly. Use
Tour Windows XP as well as Help and Support to learn about how to use Windows.
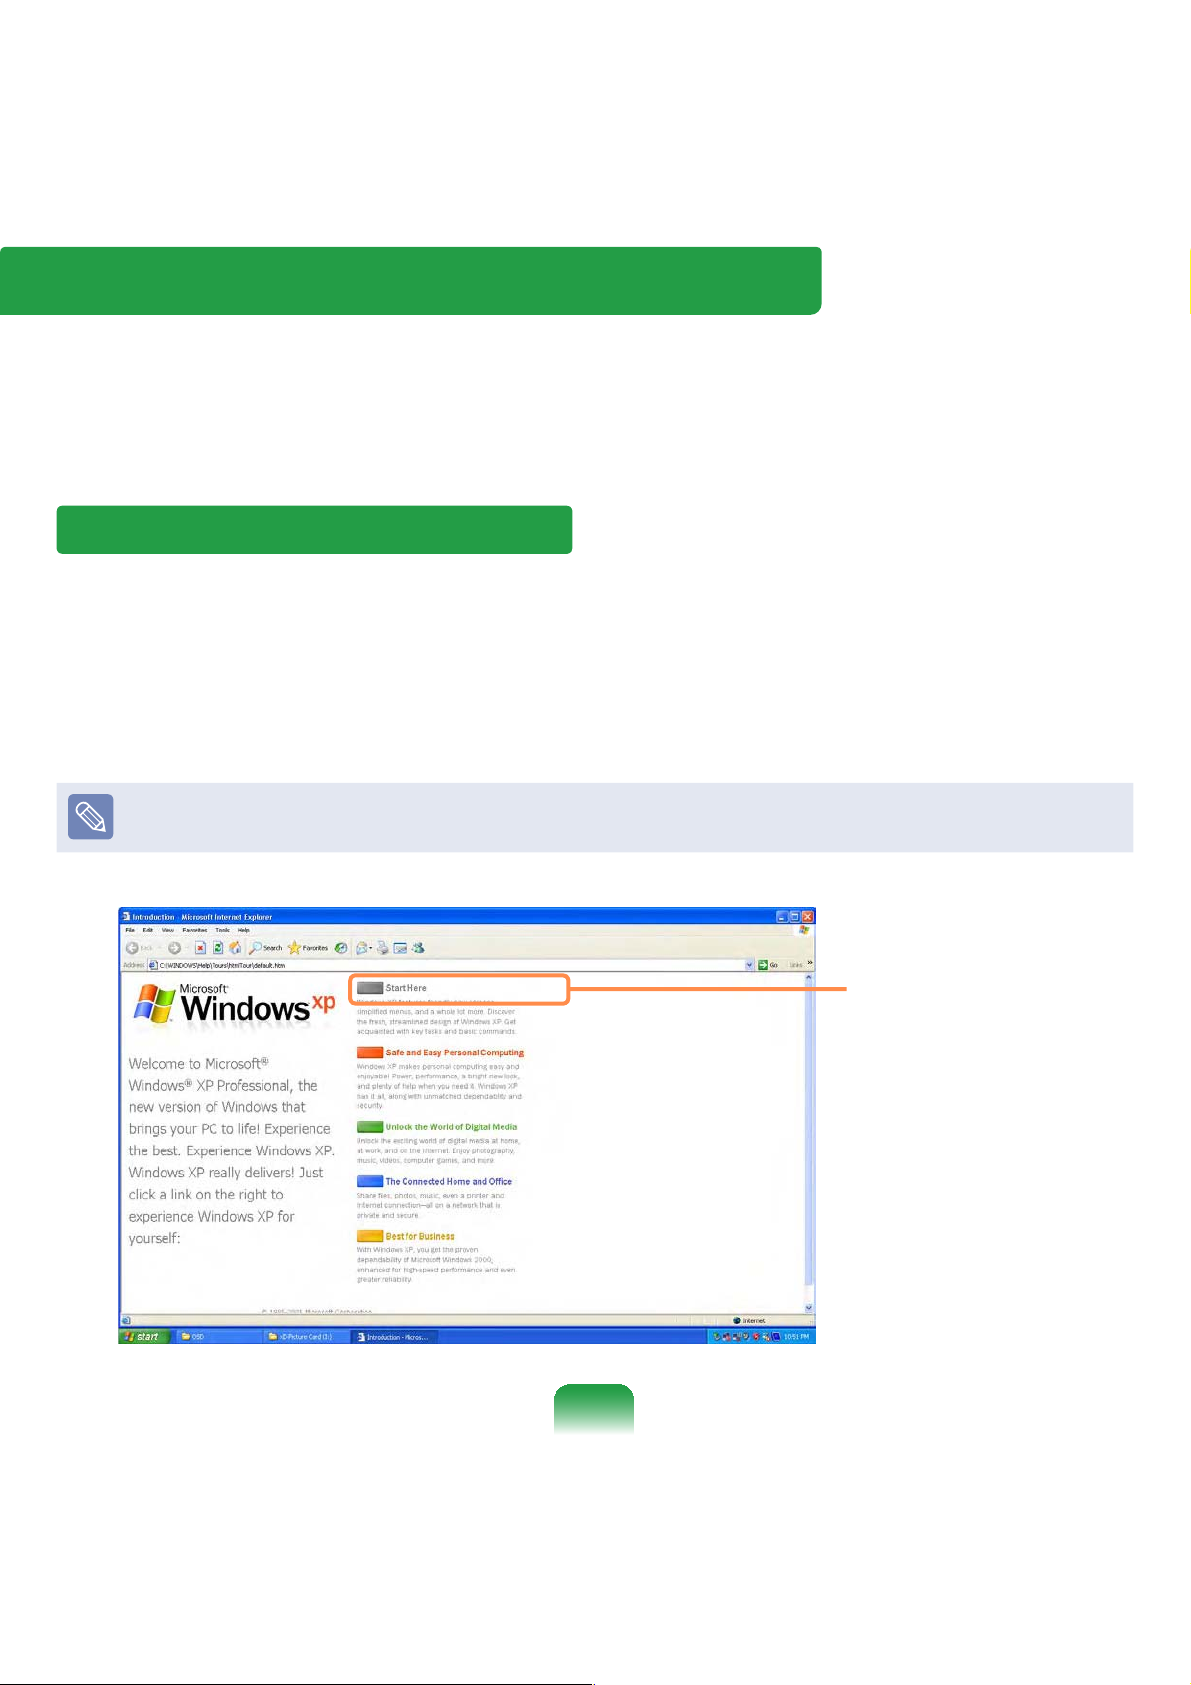
Tour Windows XP
Tour Windows XP introduces the basic features and characteristics of Windows.
Click Start > Tour Windows XP.
Or, click Start > All Programs > Accessories > Tour Windows XP.
Click the title at the right to view the description of the Windows features.
The screen layout may differ depending on the computer model and the operating
system.
79
Click the title.
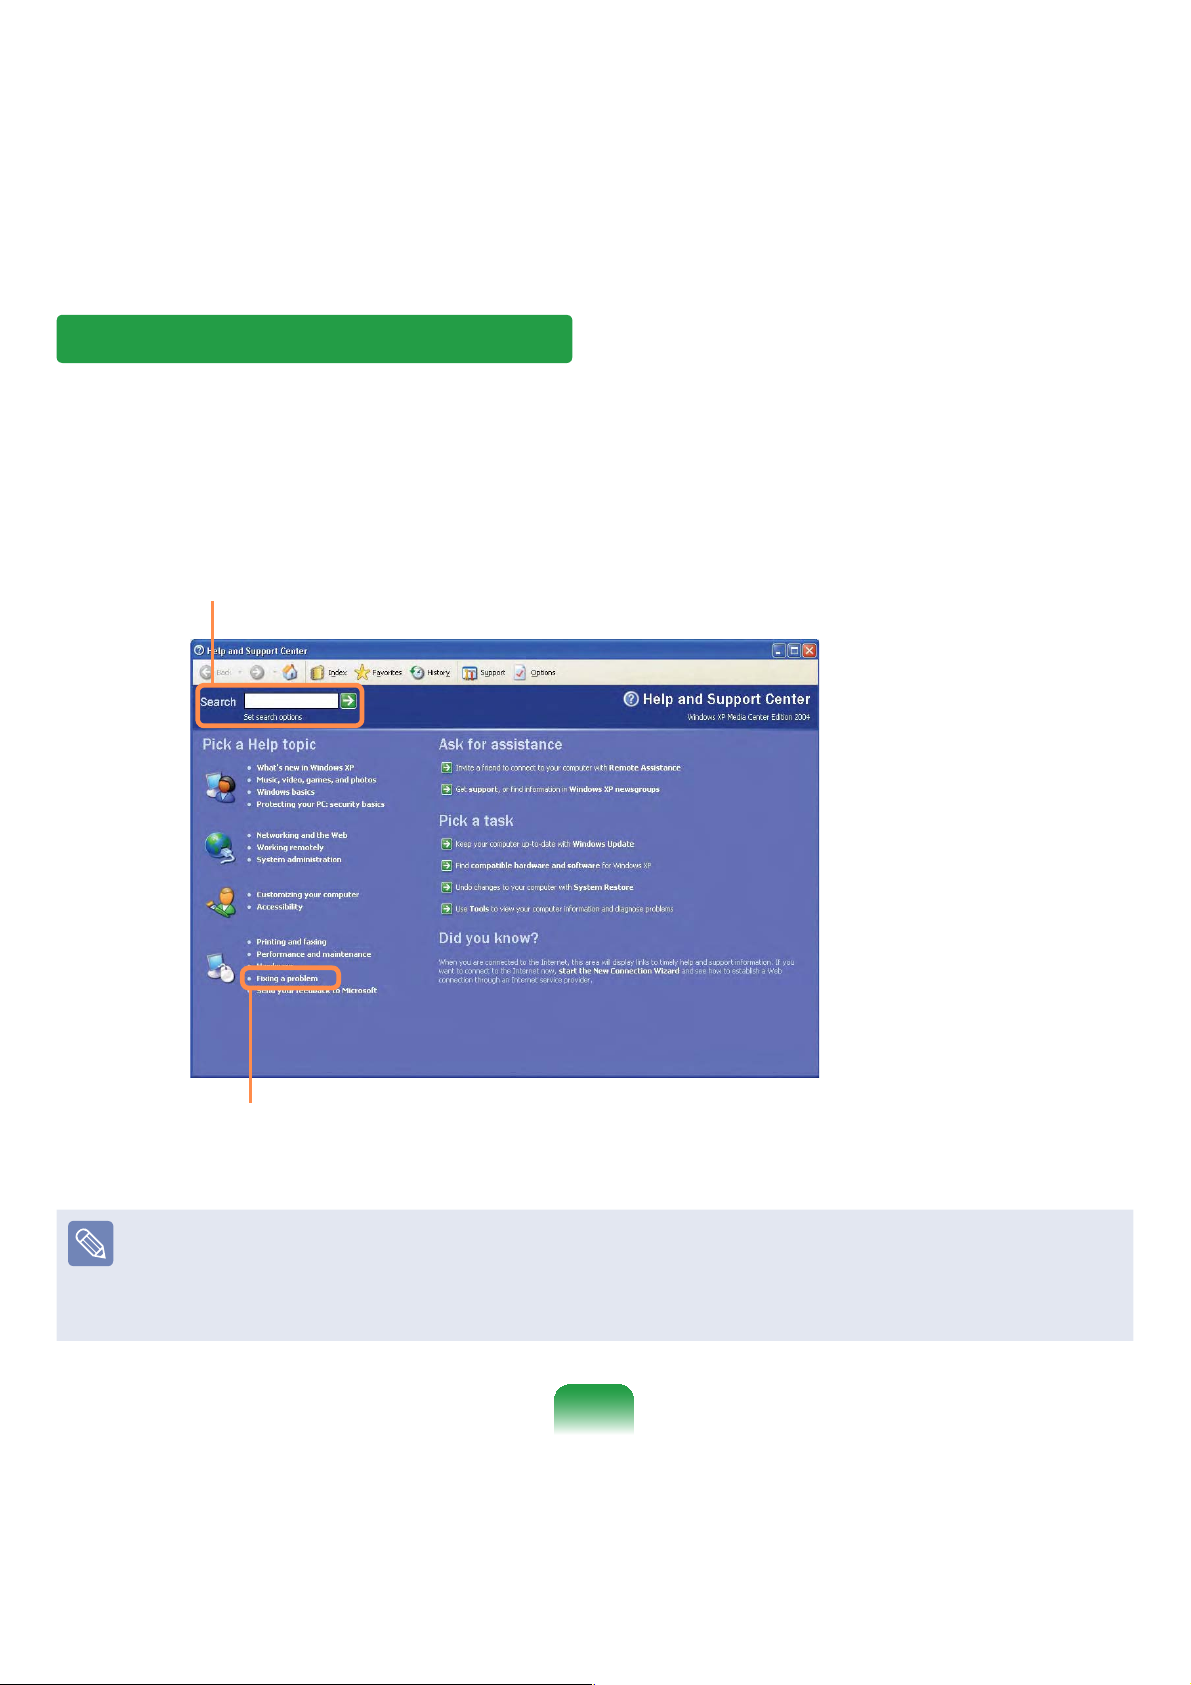
Help and Support
Help and Support allows you to view the features and usage of Windows. Also, it allows
you to search the information you want by entering a search keyword.
Click Start > Help and Support.
Search: Enter a search keyword to view the Help.
Fixing a problem: If a problem occurs, you can get help.
How to Change Desktop (Background Picture)
What's new in Windows XP > Windows XP articles : Walkthrough ways to use
your PC. After clicking Walkthrough : Personalize your PC, you can view the way to
change the background picture on Customize Desktop.
80
Windows XP Screen Layout
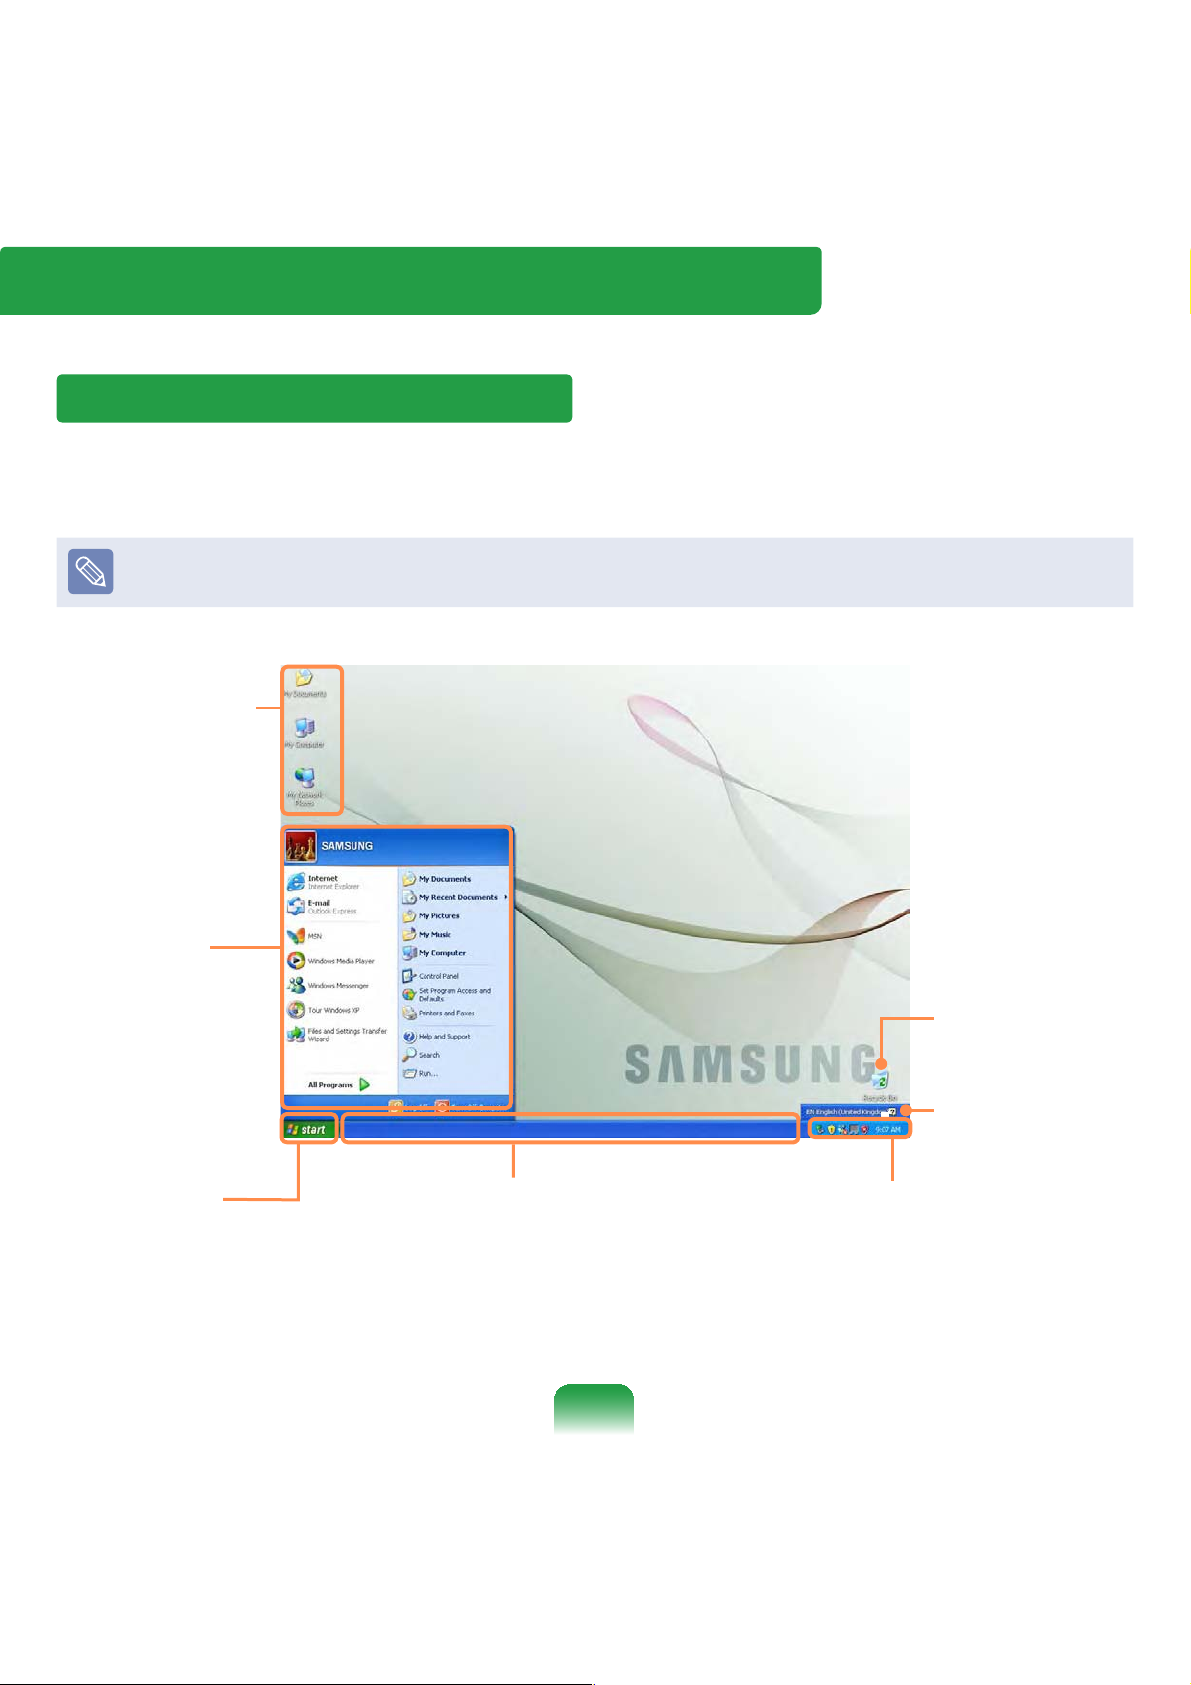
Desktop
If you turn on the computer, the Desktop will appear. The Desktop is the work space
(screen) of a computer and is configured as follows:
The screen layout may differ depending on the computer model and the operating
system.
Shortcut Icons
You can launch
programs by
clicking the
shortcut icons
on the Desktop.
Start Menu
The menu
from which
you can launch
programs.
Start button
Press the start button.
The Start menu appears.
Taskbar
Currently running
programs are
displayed here.
81
Recycle Bin
You can drop
useless files and
folders here.
Language Bar
Switches text
input language.
System Tray with Clock
Shows some running program
icons. Icons not being used are
hidden. If you click the arrow
mark on the left, you can view
hidden icons.
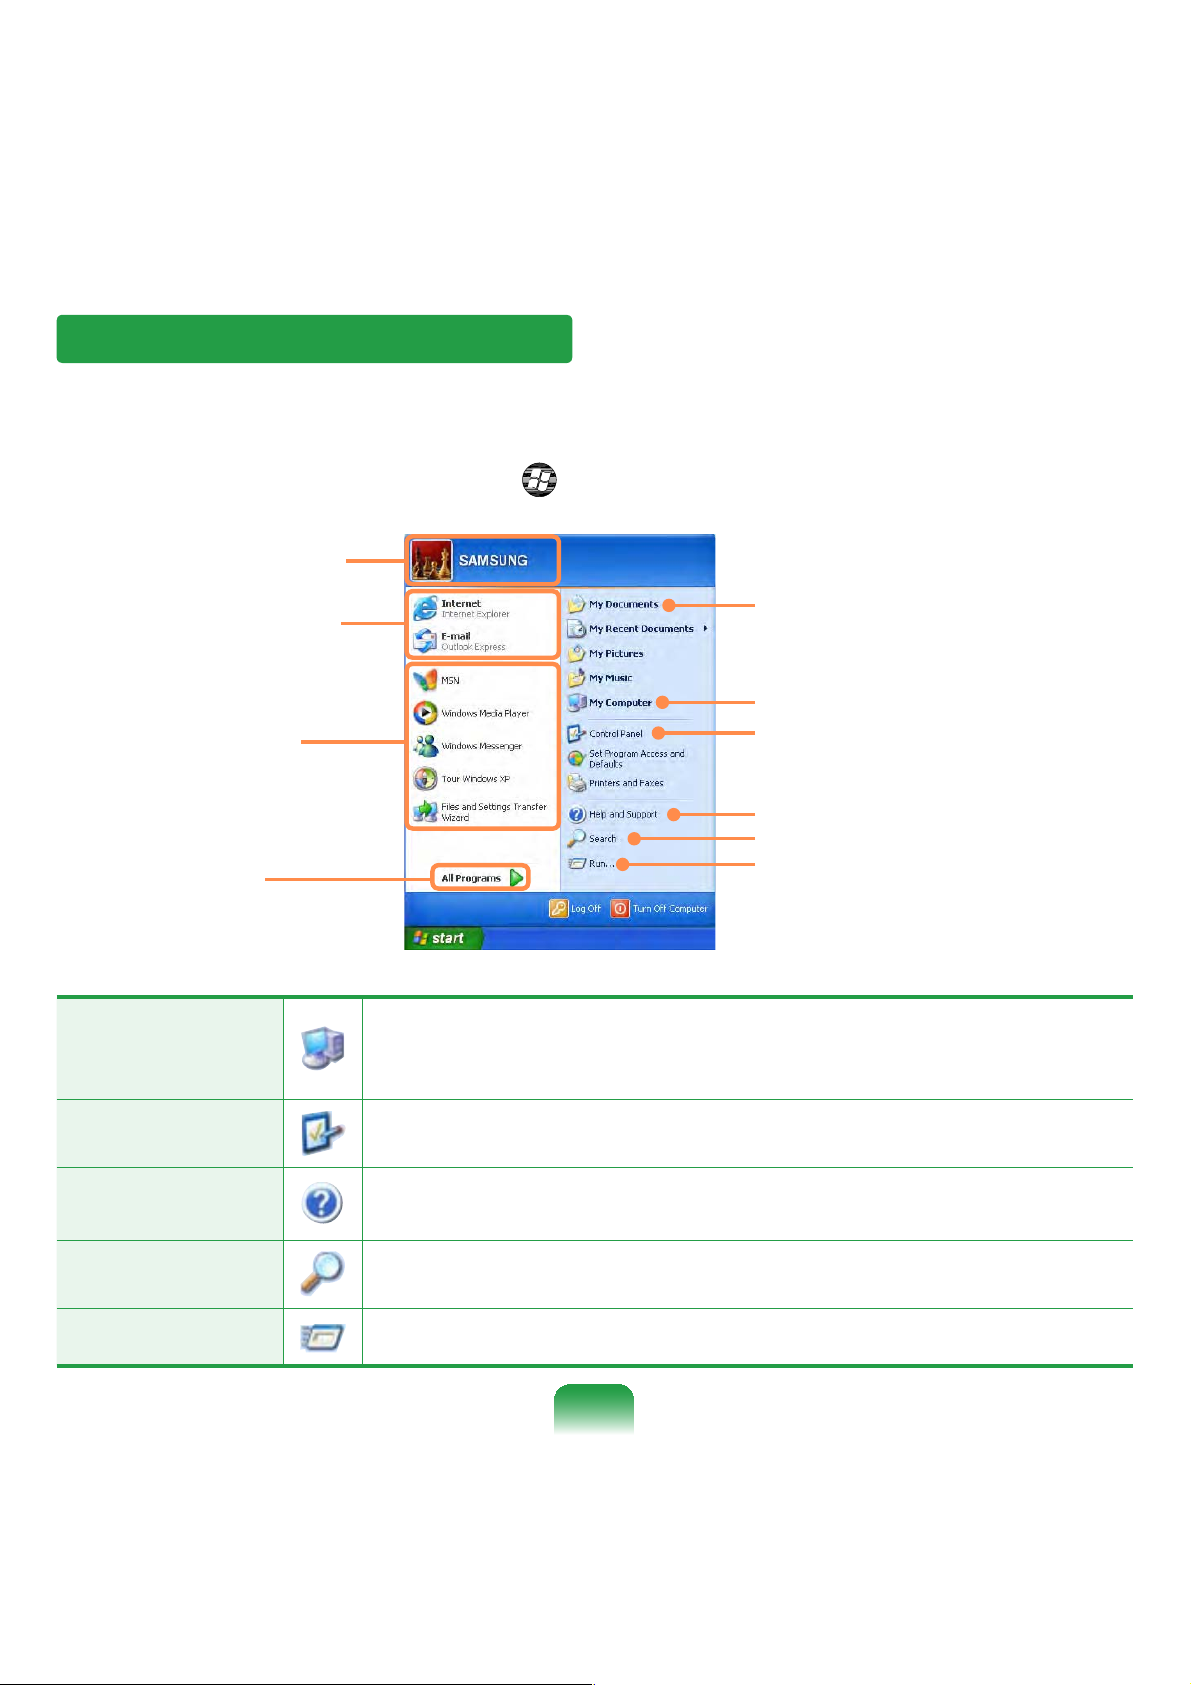
Start Menu
The menu from which you can launch programs.
Click Start. The Start menu appears.
Alternatively, press the Windows key
User account name
Items that are pined
to the Start menu.
Frequently used
programs
All Programs
Displays the contents of the hard disk, the CD-ROM drive, the
My Computer
network drive(s), and floppy disks.
It can also be used to search and open files and folders.
on the keyboard.
My Documents folder
My Computer
Control Panel
Help and Support
Search
Run
Control Panel
Help and
Support
Search
Run
Enables users to configure settings on the computer.
Provides on-line help, information on Windows and
troubleshooting.
Enables users to search for information in files or the Internet.
Run programs or documents.
82
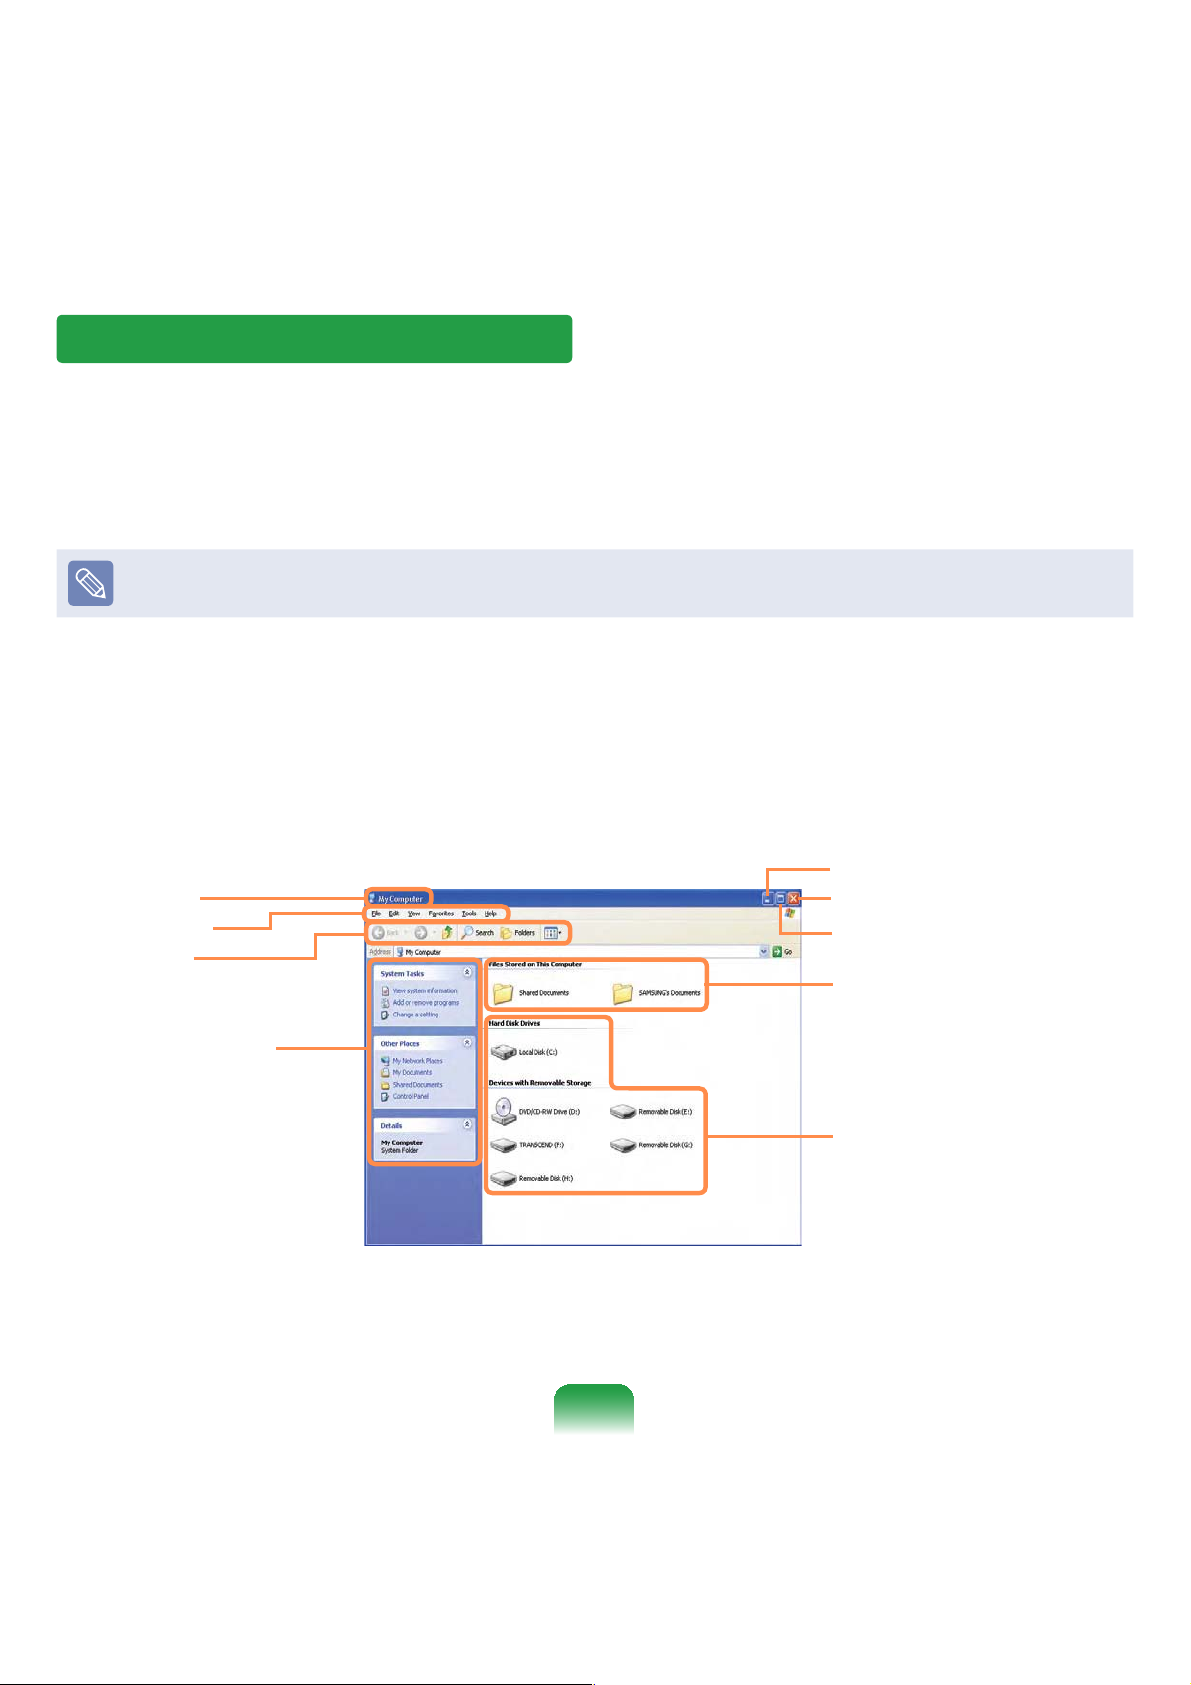
Window
A window is a basic foundation for operating your computer. For instance, a window of
your computer is configured as follows:
Click Start > My Computer.
Displayed menus and names may be varied.
Double-click the Local Disk, which is a hard disk drive, to view the folders and files
saved in your computer.
If any folder or file is not shown, click Show Folder Contents.
Minimize button
Title Bar
Menu Bar
Toolbar
Close button
Maximize button
Folder Icon
Fast Operation
Window
Drive Icon (Memory)
83

What is a Drive?
A drive is a storage device that can read or write data such as folders and files.
What is a Folder?
A folder is just like a cabinet that keeps files or folders. You can keep files or folders of
similar kinds in a folder.
What is a File?
A file is the minimum unit of materials created by using a program and is also called
data.
How to View the Entire Drive Structure
Click the folder icon from the Toolbar to view the drive structure.
Click the icon again to return to the Fast Operation window.
84
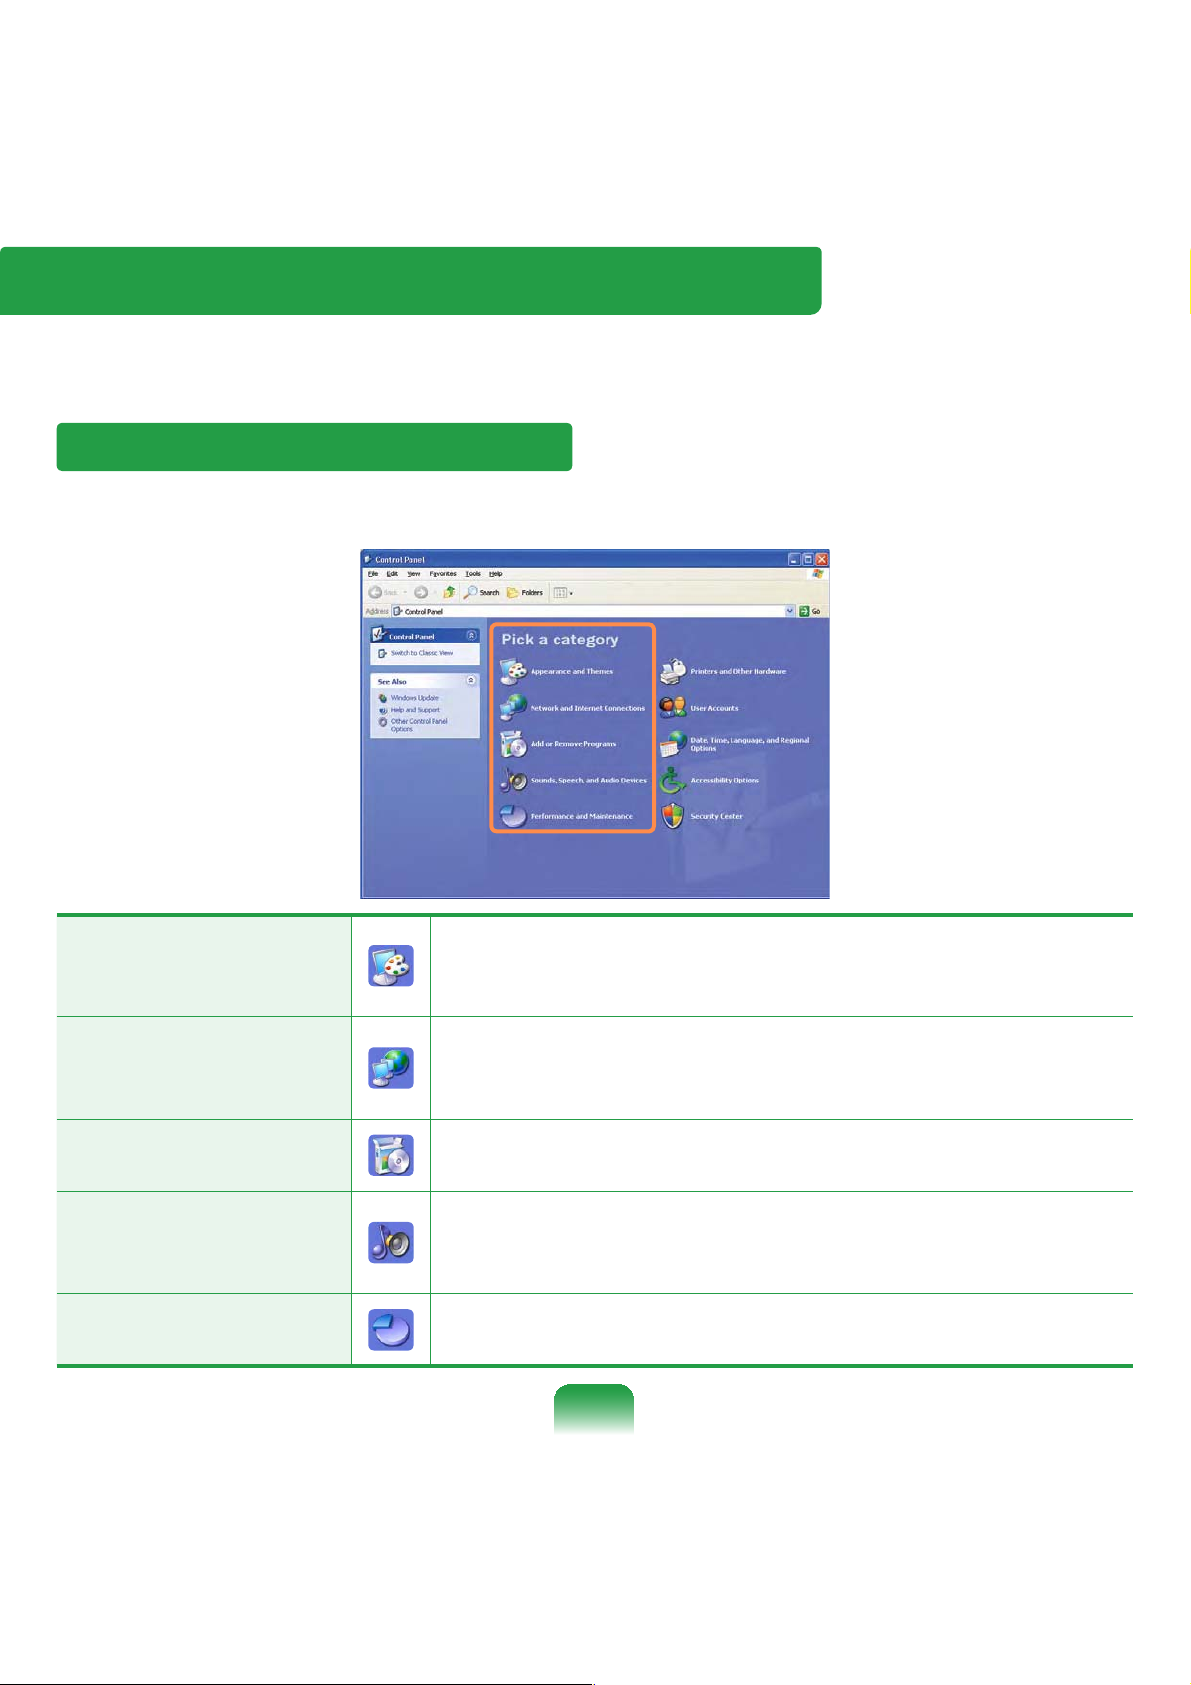
Control Panel
The Control Panel has a group of tools that enable the user to configure the Windows-
related settings.
Running Control Panel
Click Start > Control Panel.
Appearance and
Themes
Network and Internet
Connections
Add or Remove
Programs
Sounds, Speech, and
Audio Devices
Performance and
Maintenance
Change the appearance of desktop items, apply a theme
or screen saver to your computer, or customize the Start
menu and Taskbar.
Connect to the Internet, create a home or small office
network, configure network settings to work from home,
or change modem, phone, and Internet settings.
Install or remove programs and Windows components.
Change the entire sound scheme or individual sounds
made by your computer, or configures the settings for
your speakers and recording devices.
Schedule regular maintenance checks, increase space on
your hard disk, or configure energy-saving settings.
85
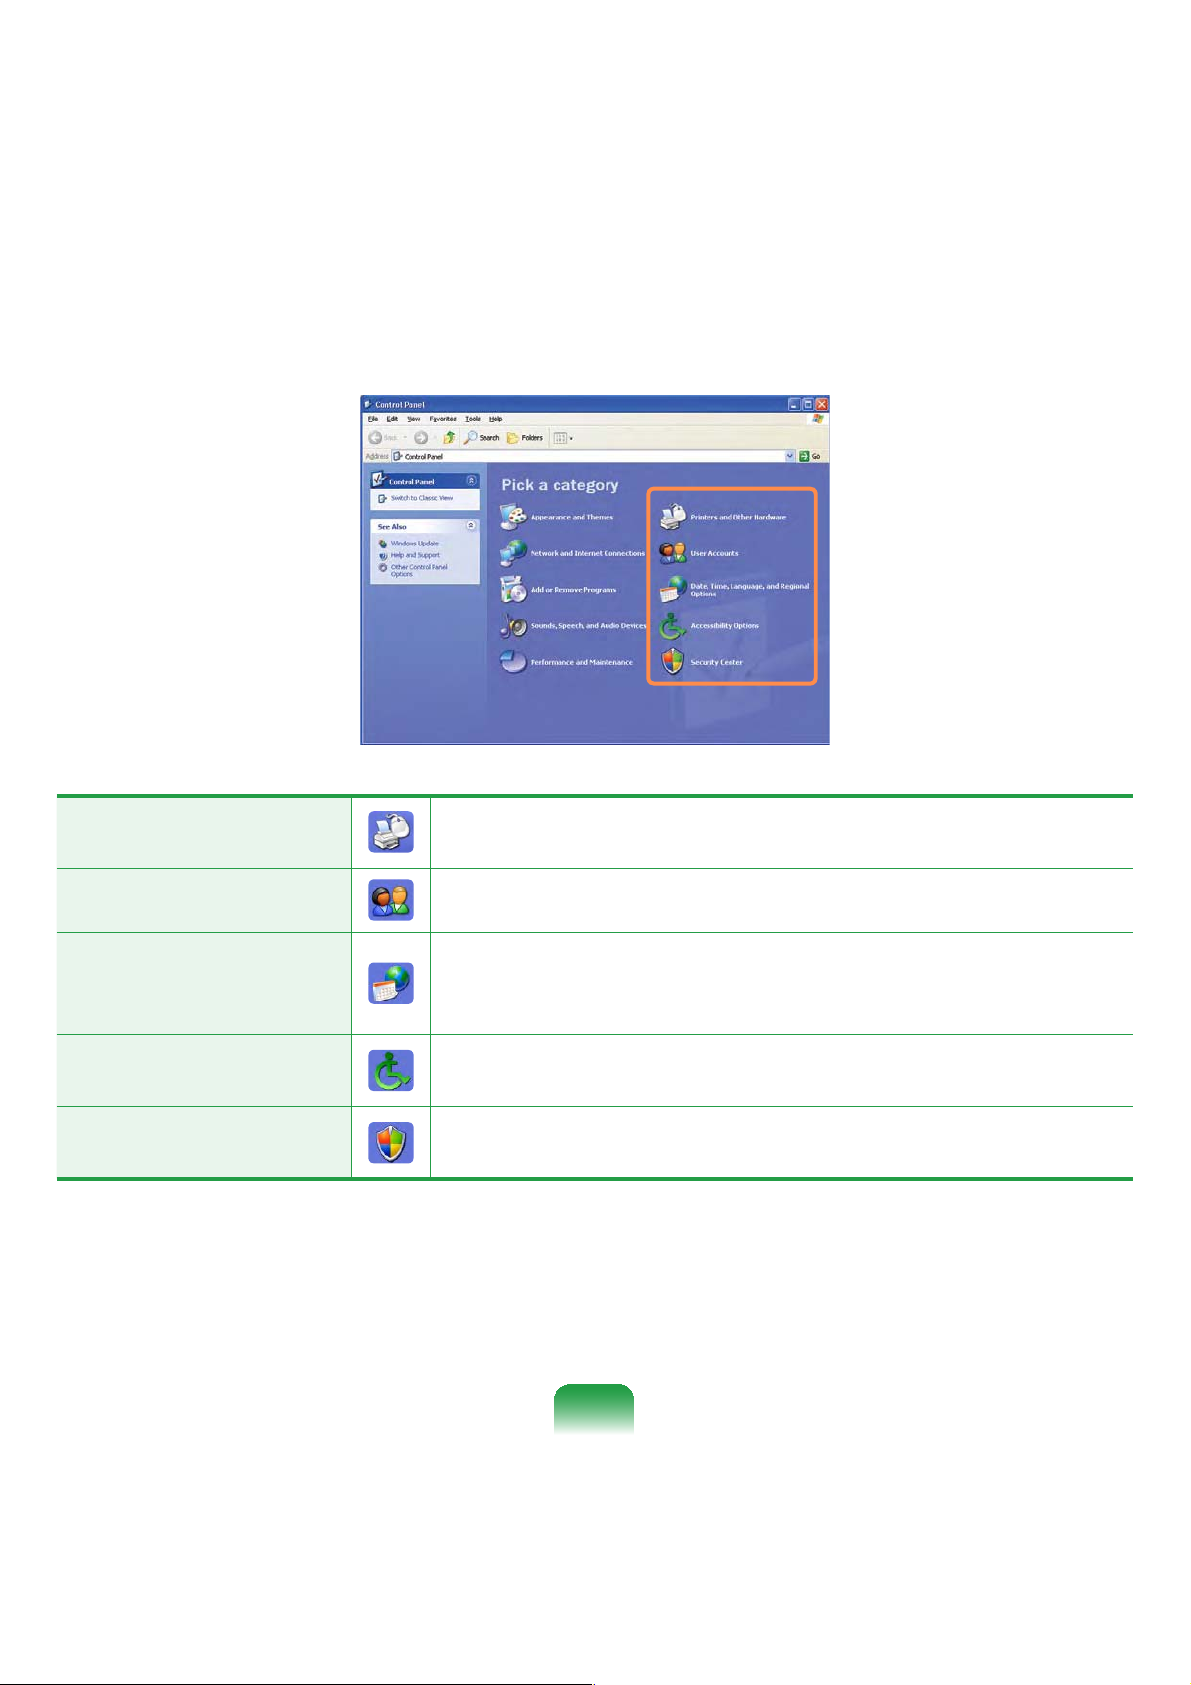
Click Start > Control Panel.
Printers and Other
Hardware
User Accounts
Date, Time,
Language, and
Regional Options
Accessibility Options
Security Center
Change the settings for your printer, keyboard, mouse,
camera, and other hardware.
Change user account settings, passwords, and pictures.
Change the date, time, and time zone for your computer,
the language to use, and the way numbers, currencies,
dates, and times are displayed.
Adjust your computer settings for vision, hearing, and
mobility.
View your current security status and access important
settings to help protect your PC.
86
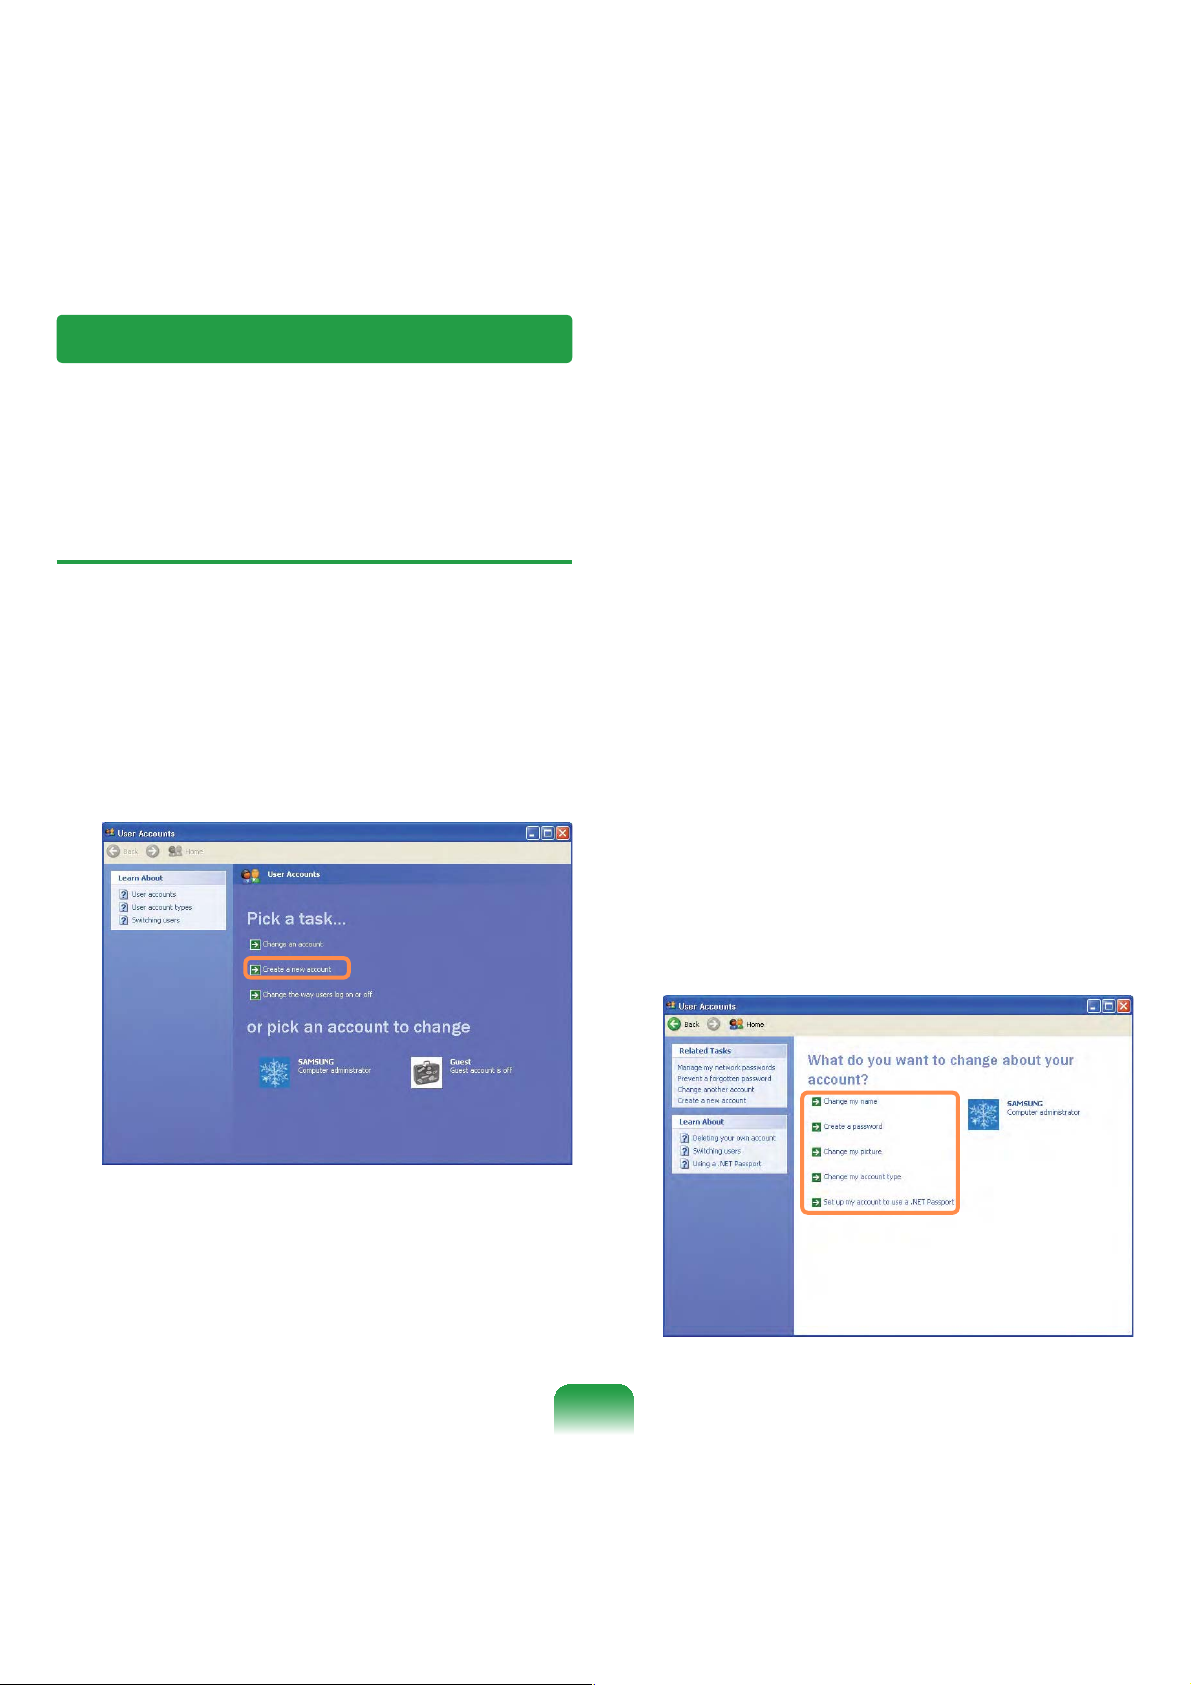
User Account
Windows XP allows to set multiple users with accounts.
This section describes how to add a user account and to switch a it.
How to Add a User Account
Click Start > Control Panel.
1
Click User Account and Create a
2
new Account in sequence.
Enter your name and click Next.
3
Select an account type and click the
4
Create Account button. Then, check
the created account from the User
Account window.
Click the target account and change
5
the user account information.
You can change the account name,
password, account type, and picture.
87
To Delete User Account
How to Switch a User
Click Start > Control Panel > User
1
Account.
Select the user account to be deleted
2
and click Delete Account.
The administrator account cannot be
deleted. It can only be renamed or
disabled.
Click Start > Logoff.
1
Click Switch User.
2
Click the user name to be switched
3
from the Welcome screen. Then you
can log on with a new user name.
88

Changing Resolution and Color
A resolution is the number of pixels displayed on the screen. If you set the resolution to
a higher value, items on the screen will be displayed smaller and the screen looks wider
than the pervious. As color quality gets higher, more colors can be represented.
Click Start > Control Panel >
1
Appearance and Themes > Change
the screen resolution.
Move the slider bar
to set the resolution.
Click Settings and change the
2
resolution and color quality. Then,
click OK.
You can select a
graphic chip set.
Click the pull-down
menu button to
select the number of
colors you want.
It is recommended to set the resolution and color quality depending on the LCD type
of your computer as the following:
LCD Type Resolution Color Quality
WSVGA 1024 x 600 Strongest (32-bit)
89

Chapter 4.
Using the Network
Wired Network 91
Wireless Network 94
Using the Easy Network Manager
(Optional) 100

Wired Network
A wired network is a network environment used for a company network or broadband
internet connection at home.
You can also configure the network settings using the Easy Network Manager. 100
Connect a LAN cable to the
1
computer’s LAN port.
Click Start > Control Panel >
2
Network and Internet Connections
> Network Connection.
Select Local Area Connection and
3
click the right button of the touch pad
and select Properties.
The LAN Device name may differ
depending on your computer’s
Network Device.
91

Click General tab and select a LAN
4
driver from Connect using:. Select
Internet Protocol(TCP/IP) and click
Properties.
The displayed LAN driver may vary
depending on the LAN device type.
Click Install to add a network
component as shown in the figure
below: You can add a client, a
service, or a protocol.
Configure IP settings.
5
Select Obtain an IP address
automatically when using DHCP. If
you use a static IP, select Use the
following IP address and enter the
values.
92
If the IP of your computer is not
automatically assigned, contact the
network administrator.
If all settings are made, click OK. Now
6
the network configuration is finished.

Using both DHCP and a fixed IP
simultaneously
Using the Alternate Configuration
providing by Windows XP, you can set
both automatic and fixed IP addresses
and then you can select to use either of
them to connect to the Internet.
Click Start > Control Panel >
1
Network and Internet Connections
> Network Connection > Local
Area Connection by using the right
button of the touch pad and click
Properties.
Select Internet Protocol (TCP/IP)
2
and click Properties.
Select the Alternate Configuration
3
tab, select User configured and fill in
the fields.
When the setting completes, click OK.
4
93

Wireless Network
A wireless network allows computers to share resources or an internet connection
without using LAN cables between them.
This description is applied only to the models equipped with wireless LAN cards or
devices. You can set a wireless network by using Easy Network Manager as well.
100
A wireless LAN device is optional when purchasing. Click a symbol,
> Control Panel > Performance and Maintenance > System > Hardware Tab >
Device Manager > Network Adapter to check the device type.
Some of the pictures shown in this description may vary depending on the wireless
LAN device.
, from Start
.
Press the Fn +
Once the wireless LAN is enabled, the wirelss LED
key and enable the wireless LAN features to use wireless LAN.
Types of Wireless LAN Connections
The types of wireless LAN connections
are as follows. The following describes
how to use the wireless LAN based on
AP connections.
AP Connections
You can connect to the Internet or a
computer on the network by connecting
to AP on an AP-enabled network.
What is Access Point (AP)?
AP is a network device that connects
wired LAN to wireless LAN and
corresponds to the wireless hub of a
wired network. Also, AP allows you
to connect more than one computer
where wireless LAN is enabled.
turns on.
Small Office Network
The small office network interconnects
computers where wireless LAN is
enabled wirelessly and is called Peerto-Peer (or Ad HOC). This method
enables the configuration of a small
office network in one computer.
Then, another computer is connected
to the computer wirelessly for
communications.
For more information on how to
establish connections, see the
information from Start > Help and
Support > Networking and Web.
When you use Ad-Hoc, you have to
change the McAfee Firewall settings.
169
94

Connecting to Wireless LAN
If an AP exists near your location, you can easily connect to wireless LAN in the
method provided by Windows XP.
The following description is based on Windows XP Service Pack 3; thus, the pictures
may vary.
Click the Wireless Network
1
Connection icon
using the right button of the touch
pad. Then, click View Available
Wireless Networks.
from the Taskbar
Select an AP to be connected and
2
click Connect.
If a network key is set in the AP, the
network key input window will appear.
Enter the network key in the input
window and click OK.
95
For a network key, contact the
network administrator.
Once Connected to AP is displayed,
3
you can use a wireless network.

To check the network connections
Place the mouse on the Wireless
Network Connection icon
Taskbar. Then, the status will appear.
from the
96

Connecting to computer-to-computer networks
(peer-to-peer or ad hoc)
In computer-to-computer wireless networks, you can wirelessly connect 2 or more
computers that have wireless LAN modules. Using this method, a computer that is
not connected to the Internet can share the Internet by accessing another computer
connected to the Internet.
You can connect by completing the following steps:
Step 1. Set up a computer-to-computer network on a computer.
Step 2. Connect to the configured computer from other computers.
Step 1. Setting up a computer-tocomputer network
Right-click on the Wireless Network
1
Connection
and select View Available Wireless
Networks.
icon on the taskbar,
Click Change the order of Preferred
2
Networks.
On the Wireless Network tab, click
3
Advanced.
97

Clear ‘Automatically connect to
4
non-default network’ check box, if
it is selected.Select ‘Computer-to-
computer (ad hoc) networks only’, and
click Close.
In the Wireless Networks tab, click
5
Add.
Enter the network name (e.g.
6
samsung), and unselect ‘The key is
provided for me automatically’. Enter
the encryption key in the Network key
field, and click OK.
To prevent a network connection
from an unauthorized user, it would
be better to configure a network
key (encryption key). A network key
consists of 5 ~ 13 alphanumeric
characters (e.g. magic), or of 10 ~ 26
hexadecimal numbers (ahexadecimal
number is represented by numbers
‘0’ to ‘9’ or letters ‘a’ to ‘f’).
Check that the configured network
7
name (e.g. samsung) is in the
’Preferred networks’ item, and click
OK.
98

Step 2. Connecting to the
configured computer
Right-click on the Wireless Network
1
Connection
and select View Available Wireless
Networks.
Select the wireless network
2
name (e.g. samsung) specified in
”Connecting to computer-to-computer
networks (peer-to-peer or ad hoc)” on
page
97, and click Connect.
icon on the taskbar,
Enter a cryptographic key in the
3
network key box and click Connect.
If the network key is not configured
in ”Connecting to computer-to-
computer networks (peer-to-peer
or ad hoc)” on page
Connect, without any keystrokes.
When connected to the wireless
network, the system displays
Connected in the selected network of
the Network Connection window.
97, just click
99
Checking the connection status
Move the mouse pointer over the
Wireless Network Connection
icon on the taskbar, and the
connection status is displayed.

Using the Easy Network ManagerEasy Network Manager (Optional)
Easy Network Manager is a program that helps configure the network settings.
Easy Network Manager provides the following features.
You can easily configure the network and printer settings.
You can immediately use the network without having to define new network
settings again after moving to another location.
By configuring the network settings (IP address, printer settings, etc.) for each
location, you can immediately access the network without following the network
setting procedures each time regardless of your location.
You can diagnose the network status.
103
102
100~101
Network Settings
This section describes the procedures to connect to the Internet by setting up a
network. The setting up procedures include procedures to add a printer to the network.
To use a wired LAN, connect the LAN
1
cable to the LAN port.
To use the wireless LAN, you have
to turn the wireless LAN on first
by pressing the Fn +
the wireless LAN is turned on, the
Wireless LAN LED lights up.
keys. If
Select a network location icon and
4
enter the name of the location (e.g.
Home). Click the Next button.
Click Start > All Programs >
2
Samsung > Easy Network Manager
> Easy Network Manager.
Click the Add button.
3
100

Select Direct Connection and click
5
the Next button.
Select the LAN device, setup the IP
6
address and click the Next button.
Click Add Printer and set up a printer
7
according to the wizard.
When the printer has been added,
click the Refresh button, select the
newly added printer and then click the
Finish button.
To not add a printer, click the Finish
button.
When the network settings are
8
complete, the Do you want to move
to the newly added location now?
message appears. Click the Cancel
button.
An icon for the added location is
created. The network settings have
been completed.
Select Device
Select a device to be connected
to the Internet. Select either
Wired LAN or Wireless LAN.
IP Settings
To use a static IP address, fill in the
fields. For the IP address information,
ask your network administrator.
Obtain an IP address automatically
Select DHCP to use this option
(automatic IP setting).
If you select OK, the network settings
for the added location are applied.
To add a new location, repeat the
procedures from Step 3 above.
101

Using in Another LocationAnother Location
By configuring the network settings (IP address, printer setting, etc.) for each location,
you can immediately access the network in one click, without performing the network
setting procedures regardless of your location.
Click Start > All Programs >
1
Samsung > Easy Network Manager
> Easy Network Manager when
connected to the Internet.
Select an icon that represents the
2
corresponding location from the
Saved Locations window and then
click Move.
If the Internet connection is a wired
3
LAN, you can immediately load the
settings for the new location and the
corresponding network connection
information is displayed in the Current
Location Information window.
To connect to a wireless LAN, select
the AP Setting from the menu.
The available APs are represented
as icons. If you double-click an AP
icon to connect to, the computer is
connected to the AP through the
wireless LAN and you are moved to
the corresponding location.
Click the AP Setting menu item at the
top of the screen and double-click one
of the available APs.
Available
AP Icon
PC Icon
The closer to the PC icon at the
bottom of the screen, the stronger
the signal from the AP is, while the
further from the icon, the weaker
the signal strength is.
If a network key is required,
request the key from your network
administrator.
AP Setting is supported in Windows
XP SP3 or higher and Vista only.
102

Diagnosing the Network Status
You can diagnose the network state and find solutions for why you cannot connect to
the network.
Launch Easy Network Manager.
1
Select Diagnosis from the menu.
2
The Network Connections window
3
appears.
Click Start to start the network
diagnosis.
When the diagnosis is complete, a
4
device with a problem is marked by a
X mark icon with a description of the
problem at the bottom of the window.
103

Chapter 5.
Using Applications
Introducing Programs 105
CyberLink YouCam (Optional) 109
Samsung Update Plus (Optional) 111
McAfee SecurityCenter (Optional) 113
Using Samsung Magic Doctor (Optional) 118
Reinstalling Software (Optional) 119

Introducing Programs
Using the software supplied with the Samsung computer, you can easily use functions
and troubleshoot problems.
Try to use the software after learning about the basic use of the software. For detailed
information, refer to the help section of the corresponding software.
The software programs provider may vary, depending on your computer model.
In addition, some pictures may differ from actual product depending on the computer
model and software version.
105

Multi Media Functions
Easy Network Manager
(Optional)
CyberLink YouCam (Optional)
Using this program, you can easily
capture photos and videos with your
web camera. CyberLink YouCam
makes it more fun to have online video
chats or to record videos with live
effects.
109
Management Functions
Samsung Update Plus (Optional)
Samsung Update Plus is a software
function that examines and updates the
Samsung software and drivers installed
on your Samsung computer to the most
recent versions.
McAfee SecurityCenter
This is a security solution that detects
and removes computer viruses and
protects the computer from Internet
threats.
113
111
(Optional)
Easy Network Manager is a program
that enables you to easily configure the
network settings.
You can configure the network settings
for each location and you can also
diagnose the network status.
Samsung Battery ManagerSamsung Battery Manager
(Optional)
SamsungBatteryManagerisapowerSamsung Battery Manager is a power
management program that provides
easy-to-use power management and
power saving settings so that the
battery usage time can be extended.
138
Battery Life Extender (Optional)
The Battery Life Extender is a battery
power management program that
enables extending the battery life.
140
100
106

Easy Display Manager (Optional)
Easy Display Manager is a program
that displays the changed setting on the
screen when a setting is changed by
pressing the shortcut keys, and enables
changing the display mode through the
Display Settings window.
MS Live Skydrive
(Optional)
If you double-click the Microsoft
Live icon
when the computer is
connected to the Internet, you can visit
the website that allows you to use free
web storage provided by Microsoft.
If you sign up and log onto the website,
you can use the web storage for free.
For more information, refer to the help
center on the website.
Example) The icon that appears when
pressing the Fn +
keys to change the screen
brightness.
Easy SpeedUP Manager (Optional)
This program enables you to select
operation mode when you need
maximum system performance or lownoise/low power consumption with oneclick.
60
For Windows XP model, Easy
SpeedUp Manager function is provided
in Magic Keyboard program.
If you reinstall Windows XP, you have
to install the Magic Keyboard program
additionally using the System Software
Media in order to use this function.
Easy Resolution Manager
(Optional)
This program allows you to set a
resolution of 1024x768 pixels on a
computer that supports a resolution
less than 1024x768 pixels.
You can view the whole picture when
running a program or game that
supports a resolution of 1024x768
pixels.
However, when the resolution is set
to 1024x768 pixels, the picture on the
screen may be distorted.
107

Phoenix FailSafe #(Optional)
Phoenix FailSafe is a program
developed by Phoenix Technologies
LTD, that enables PC users to protect
and track their PC via the FailSafe
website when their PC is lost or stolen.
For more information, please refer to
the online help of the software or the
FailSafe website.
Troubleshooting Functions
SAMSUNG Magic Doctor
(Optional)
SAMSUNG Magic Doctor is
troubleshooting software provided
by Samsung Computer for system
diagnosis, and restoring the system.
The system diagnosis function enables
users to diagnose system problems
without assistance from others.
118
Samsung Recovery Solution
(Optional)
Samsung Recovery Solution provides
a Restore Function that enables you
to easily restore your computer to a
previous, normal state when a problem
occurs with your computer, as well as
a Backup Function that enables you
to easily save your computer’s current
status and your data.
For models with an SSD (Solid State
Disk), Samsung Recovery Solution is
not provided.
108

CyberLink YouCam (Optional)
CyberLink YouCam makes it more fun to have online video chats or to record videos
with live effects.
The program versions described in this manual are subject to change and the
screen images and terms in this manual may differ from actual product.
For more information on how to use the program, refer to the online help.
Do not take pictures or record video of someone without their permission.
Do not take pictures or record video in locations where photography is prohibited.
Do not take pictures or record video in locations where you could violate another
person’s privacy.
Double click the CyberLink YouCam icon on the Desktop. Or click Start > All
1
programs > Samsung > CyberLink YouCam > CyberLink YouCam.
Emotion
effects
Function buttons
Avatars,Frames,Filters and Distortions
109
Preview Window
All captured
content

If you click the settings button ,
you can configure the capture,
display and document settings.
Click the Snapshot or
2
Capture button
the camera. A snapshot is taken or
video starts recording.
To stop a video recording, click
the Stop
recording is stopped.
By applying several effects or
avatars to your photos or videos
while capturing, you can make
your own contents fun and
interesting.
in front of
button. The
You can view your captured photos
3
and videos in the All captured
content window.
You can view a picture or watch a
video by double-clicking it.
110

Samsung Update Plus (Optional)
Samsung Update Plus is software that examines and updates the Samsung software
and drivers installed on your Samsung computer to the optimal version.
To check for updates and update your computer using Samsung Update Plus, your
computer must be connected to the Internet.
The update search result may differ depending on your computer model.
Samsung Update Plus does not provide updates for applications installed after
purchasing the computer.
To update the software and drivers
Select Start > All Programs >
1
Samsung > Samsung Update Plus
> Samsung Update Plus.
If this is the first time you are running
the program, a window will appear
asking you if you agree to the
agreement in the window.
Click Agree to use this software.
If you click on Check for updates,
2
new updates are searched for.
111

If there are available software or
3
driver updates for your computer, the
available updates will be listed. Select
the required updates from the list
and click Install Update to start the
update. (The update list on the screen
may differ depending on the computer
model.)
Automatic update items display
By default, your computer is
configured to automatically check
for updates. If there is a new update
available, this is notified in the
notification area. Click the balloon
help icon in the notification area.
Here you will be able to find the
latest available updates.
Updates that must be installed
separately.
If you select an update item that
must be installed separately, a
message appears informing you of
this. Follow the instruction message
to correctly install it.
112

McAfee SecurityCenter (Optional)
McAfee SecurityCenter (a virus/spyware detection and protection software that includes
a firewall function. Hereafter, referred to as “McAfee”) is software that protects your PC
from various Internet threats as well as detecting and removing viruses.
For more detailed information on the program, refer to the McAfee help.
You can register McAfee when connected to the Internet.
McAfee software is optional. It may not be supplied for some models or it may be
supplied through the McAfee installation icon. When the installation icon is provided,
you have to install the program referring to the Installing McAfee section.
A different anti-virus program may be provided depending on the computer model.
Installing McAfee
For some models, an Install McAfee Web Essentials icon is located on the Desktop.
In this case, you can install the McAfee software according to the following procedures
and then use the McAfee software.
For some models, a McAfee Security Center icon
the software is already installed, the installation step is not required.
n Double click the Install McAfee Web
Essentials icon
l The Chain Installer window
opens and the installation begins
automatically. Please wait for a
moment.
on the Desktop.
W When the installation is complete, the
Chain Installer window disappears.
113
is located on the Desktop, since

Using McAfee
To use McAfee, user registration is required. If a user is not registered, even though
virus inspection is supported, your PC will not be completely protected because the
virus information will not be updated with the latest information. The procedures to
inspect and heal viruses after the user registration will be described below.
User Registration
The Program Setup screen appears
1
while booting. Click Next.
If the Program Setup screen does
not appear, right-click over the
McAfee icon
then select Product Setup from the
pop-up menu.
in the Taskbar and
The Create New McAfee Account
3
item appears.
Be sure to fill in all the fields and
click Next. The Program Setup
Completed window appears.
If you have already registered with
McAfee, click Login and enter
the registered email address and
password to login. The Program
Setup Completed window appears.
The End User License Agreement
2
appears.
Check if the country has been
correctly selected and then click
Accept.
114

Inspecting and Healing Viruses
The procedures to check if the computer’s
files or information have been infected
by a virus and to heal viruses found by
McAfee are described below.
If a virus has been found, click View
3
Results.
The viruses are listed. Since the
corresponding viruses have already
been removed, you can use your
computer without any concern.
Click Start > All Programs > McAfee
1
> McAfeeSecurityCenter.
Click the Scan button on the left side
2
of the program. The Scan begins.
At this time, if a virus is found, it
is immediately healed during the
inspection.
For possible virus infections
(where it is not completely certain),
the Detected message appears.
In this case, the items will be
maintained or deleted depending
on your decision.
To deal with new viruses,
please always keep
McAfeeSecurityCenter up to date.
In general, it is automatically
updated when connected to the
Internet. Alternatively, you can
update it manually by clicking
Update
to the Internet.
after connecting
115

Configuring the McAfee Firewall
The McAfee Firewall is configured
for the product when purchasing the
product in order to protect the computer
from viruses. However, if the firewall is
activated, you may not connect to the
network or the Internet properly. In this
case, you have to change the settings as
follows.
Method 1) When you need to select
Allow Access in the Server
or Internet Access Request
window.
When you connect to a bank, stock
market, or gaming website, an access
request window appears. In this case,
select Allow Access in the window
and click OK. Then you can install the
program normally or open the page.
116

Method 2) When you need to
deactivate the Firewall
If you cannot connect to the Internet when
using a broadband Internet service, you
can connect to the Internal normally if you
disable the McAfee Firewall. However,
since it may cause a security problem, be
careful when doing so.
n Double-click the McAfee Security
Center icon from the Desktop.
l Click the Advanced menu at the
bottom left and click Configure >
Internet&Network.
W Tur n the Internet&Network at the
right to Off, set the Select when to
re-enable firewall to Never and then
click OK.
j Click Home in the left menu pane
and click Ignore next to the ‘Firewall
protection is disabled’ message.
It is recommended activating
the Windows Firewall for your
computer's safety when you have
disabled the McAfee Firewall. To
activate the Windows Firewall, click
Start > Control Panel > Windows
Firewall > Change Settings >
On(recommended).
117

Using Samsung Magic Doctor (Optional)
Magic Doctor is troubleshooting software provided by Samsung Computer. A user can
diagnose system problems via one-click or by selecting diagnostic items.
The screens used in this manual may differ from actual screens according to the
program version.
Diagnosing the System
Select Start > All Programs >
1
Samsung > Samsung Magic Doctor
> Samsung Magic Doctor.
Click the Diagnose the System icon.
2
When the system status diagnostics
3
are complete, the diagnostics result
appears.
If a problem has been found, click on
Cure for Samsung Magic Doctor to
cure the problem.
The system status diagnostics start.
118

Reinstalling Software (Optional)
If you have reinstalled the Windows operating system, or the system and program
do not operate properly, you can re-install the driver and program using the System
Software Media.
When software is not working properly, it is recommended removing the software
using the Add or Remove Programs of the Control Panel and reinstalling the
software using the System Software Media.
The System Software Media is supplied as a CD or DVD depending on your
computer model.
To use the System Software Media, the external USB ODD must be connected to
the computer. The following descriptions are supposing that the external USB ODD
is connected.
Some model is not supplied System Software Media depending on your computer
model.
Running the System Software Media
Insert the System Software Media into the CD-ROM drive. The initial screen appears
automatically.
119

Standard
Installation
This displays a list of drivers or programs that are not currently installed
on your computer from the system software Media provided.All
necessary components are installed using the factory defaults.
Minimum
Installation
Custom
Installation
This displays the components (driver, Windows programs,etc) that, if not
installed, may cause problems with the system performance.You can
install only required components.
You can customize the installation of drivers and programs.
Installing drivers and programs
Select Standard Installation in
1
the System Software Media main
screen.
The system is scanned to display the
2
drivers and programs that need to be
installed.
Click OK.
3
The drivers and programs are
automatically installed as factory
defaults.
When done, restart the system.
4
120

Chapter 6.
Settings and Upgrade
LCD Brightness Control 122
BIOS Setup 124
Setting a Boot Password 128
Changing the Boot Priority 131
Upgrading Memory 132
Battery 134
Using the Security Lock Port 142

LCD Brightness Control
You can adjust the LCD brightness in 8 levels.
Adjusting LCD Brightness Using
Keyboard
Press the Fn+ or Fn+ to adjust
the brightness of LCD.
The LCD brightness has eight levels of
degree.
By pressing the Fn+
brighter by one level of degree.
, the LCD gets
Adjusting LCD Brightness Using
Samsung Battery Manager
Appropriate LCD brightness is set
for each mode in Samsung Battery
Manager. In user settings mode, you can
select the brightness level.
(for example, in Customized mode)
In this mode, you can change the
brightness and device setting details.
Click Start > All Programs > Samsung
> Samsung Battery Manager >
Samsung Battery Manager.
455

LCD Brightness
The LCD brightness settings for maximum battery mode, general mode, and maximum
performance mode in Samsung Battery Manager are not maintained when your
computer reboots.
Only the LCD brightness setting in the user settings mode is maintained once you
reboot the computer.
For information on the other features of Samsung Battery Manager, see the
description on batteries.
To Maintain the Changed LCD Brightness After Reboot
Configure the following settings to maintain the LCD brightness set using the screen
adjustment key or Samsung Battery Manager.
138
n Turn on the computer. If the SAMSUNG logo appears, press the F2 key. Then,
setup will start.
l Change the value of Brightness Mode Control on the Boot menu to User Control.
W Press the F10 key to save the change and complete setup.
How to Reduce Battery Consumption
Adjust the screen brightness to a darker value or select the maximum battery mode
in Samsung Battery Manager to reduce battery consumption.
Bad pixels of an LCD
The LCD may have less than 4 bad pixels but it does not affect the computer
performance. This product may have bad pixels of the same level as the products
made by other companies.
Caution for Cleaning up LCD
Wipe the LCD from the center to the outside with a soft cloth soaked in a computerdedicated detergent. If you wipe the LCD firmly, it may have damage.
123

BIOS Setup
The BIOS Setup enables you to configure your computer hardware according to your
needs.
Use the BIOS setup to define a boot password, change the booting priority, or add a
new device.
Since incorrect settings may cause your system to malfunction or crash, take care
when configuring the BIOS.
The functions of the BIOS setup are subject to change for product function
enhancement purposes.
The BIOS Setup menus and items may differ depending on your computer model.
Entering the BIOS Setup
Turn the computer on.
1
When the booting screen (SAMSUNG logo) appears, press the F2 key to enter the
2
BIOS Setup.
Press the F12 key while the booting
screen(SAMSUNG logo) appears,
the system will try to boot from the
network.
457

After a moment, the BIOS setup screen appears.
3
The items in the BIOS setup may differ depending on the product.
Setup Menu
Help
Help for the
selected
item appears
automatically.
Setup Items
125

The BIOS Setup Screen
Menu Description
Main Used to change the basic system and environment settings.
Advanced
Security Used to configure security functions, including passwords.
Boot Used to set the boot priority and other boot options
Exit Used to exit the Setup either saving the changes or not.
Used to configure advanced functions on your computer for devices and
chipsets.
126

System Setup Keys
In the Setup, you have to use the keyboard.
F1 Press to view the Setup Help.
Up & Down
Keys
F5/F6
F9
ESC
Left & Right
Keys
Enter
F10
The keyboard image and color may differ from the actual keyboard.
Press to move up and down.
Press to change the item value.
Press to load the default Setup settings.
Press to return to a higher level menu or to move to the
Exit menu.
Press to move to another menu.
Press to select an item or to enter a sub menu.
Press to save the changes and exit Setup.
127

Setting a Boot Password
When setting a password, you have to enter a password to use the computer or enter
the BIOS Setup.
By configuring a password, you can restrict system access to authorized users only and
protect data and files saved on the computer.
Do not lose or forget your password.
If you have forgotten your password, contact a Samsung service center. In this case, a
service fee will be charged.
Setting a Supervisor Password
A Supervisor Password is required to turn
the computer on or to start the System
Setup.
When setting a Supervisor Password,
users other than a supervisor cannot use
the computer.
Select the Security menu in the BIOS
1
Setup.
In the Set Supervisor Password
2
item, press <Enter>.
45;

Enter a password, press <Enter>, re-
3
enter the password for confirmation,
and press <Enter> again.
The password can be up to 8
alphanumeric characters. Special
characters are not allowed.
When a message confirming the
4
password configuration appears in
the Setup Notice window, press
<Enter>.
The supervisor password has been
set.
The supervisor password is required
to turn the computer on or to enter the
BIOS Setup.
Setting a User Password
The User Password restricts access
to the computer or for configuring the
BIOS Setup, like a Supervisor Password.
However, the Setup items that can
be configured with a User Password
are restricted, unlike for a Supervisor
Password.
Before configuring a user password, a
supervisor password must have been
configured. Deactivating the supervisor
password also deactivates the user
password.
In the Set User Password item, press
<Enter> and complete the procedures
from Step 3 of Setting a Supervisor
Password.
Setting Up a Boot Password
To setup a boot password, the
administrator password (Set Supervisor
Password) should be set in advance.
Set the Password on boot item to
Enabled.
Once a boot password is set, you have
to enter a password to boot up the
computer.
129

Setting up a Hard Disk Drive
Password (Optional)
A supervisor password must be set using
the Set Supervisor Password menu.
If you set a password for a hard disk
drive, it cannot be accessed from another
computer.
Press <Enter> in the Set HDD
Password item and define a password as
described in Step 3 of the Setting up the
Supervisor Password.
Deactivating the Password
Press <Enter> on the password
1
to be deactivated. For example, to
deactivate a supervisor password in
the Set Supervisor Password item,
press <Enter>.
In the Enter Current Password
2
item, enter the currently configured
password and press <Enter>.
The hard disk drive password setting
function is not provided for some
models.
Changing the hard disk drive
password
For security purposes, you can only
change a hard disk drive password
after restarting the computer by
pressing the computer Power button.
If you cannot change the hard
disk drive password or the HDD
Password Frozen message appears
when entering the BIOS Setup and
then selecting Security > HDD
Password, press the Power button
to turn the computer on again.
Leave the Enter New Password item
3
field empty, and press <Enter>.
Leave the Confirm New Password
4
field empty, and press <Enter>.
In the Setup Notice window, press
5
<Enter>.
The password is deactivated.
130
 Loading...