

Page 1

Service Manual
TRC- 9A/1 1
3
-
CHANNEL /6-CHANNEL C.B.
MOBILE TRANSCEIVER
Catalog Number:
21 - 139/141
CUSTOM MANUFACTURED FOR RADIO SHACK A TANDY CORPORATION COMPANY
Page 2
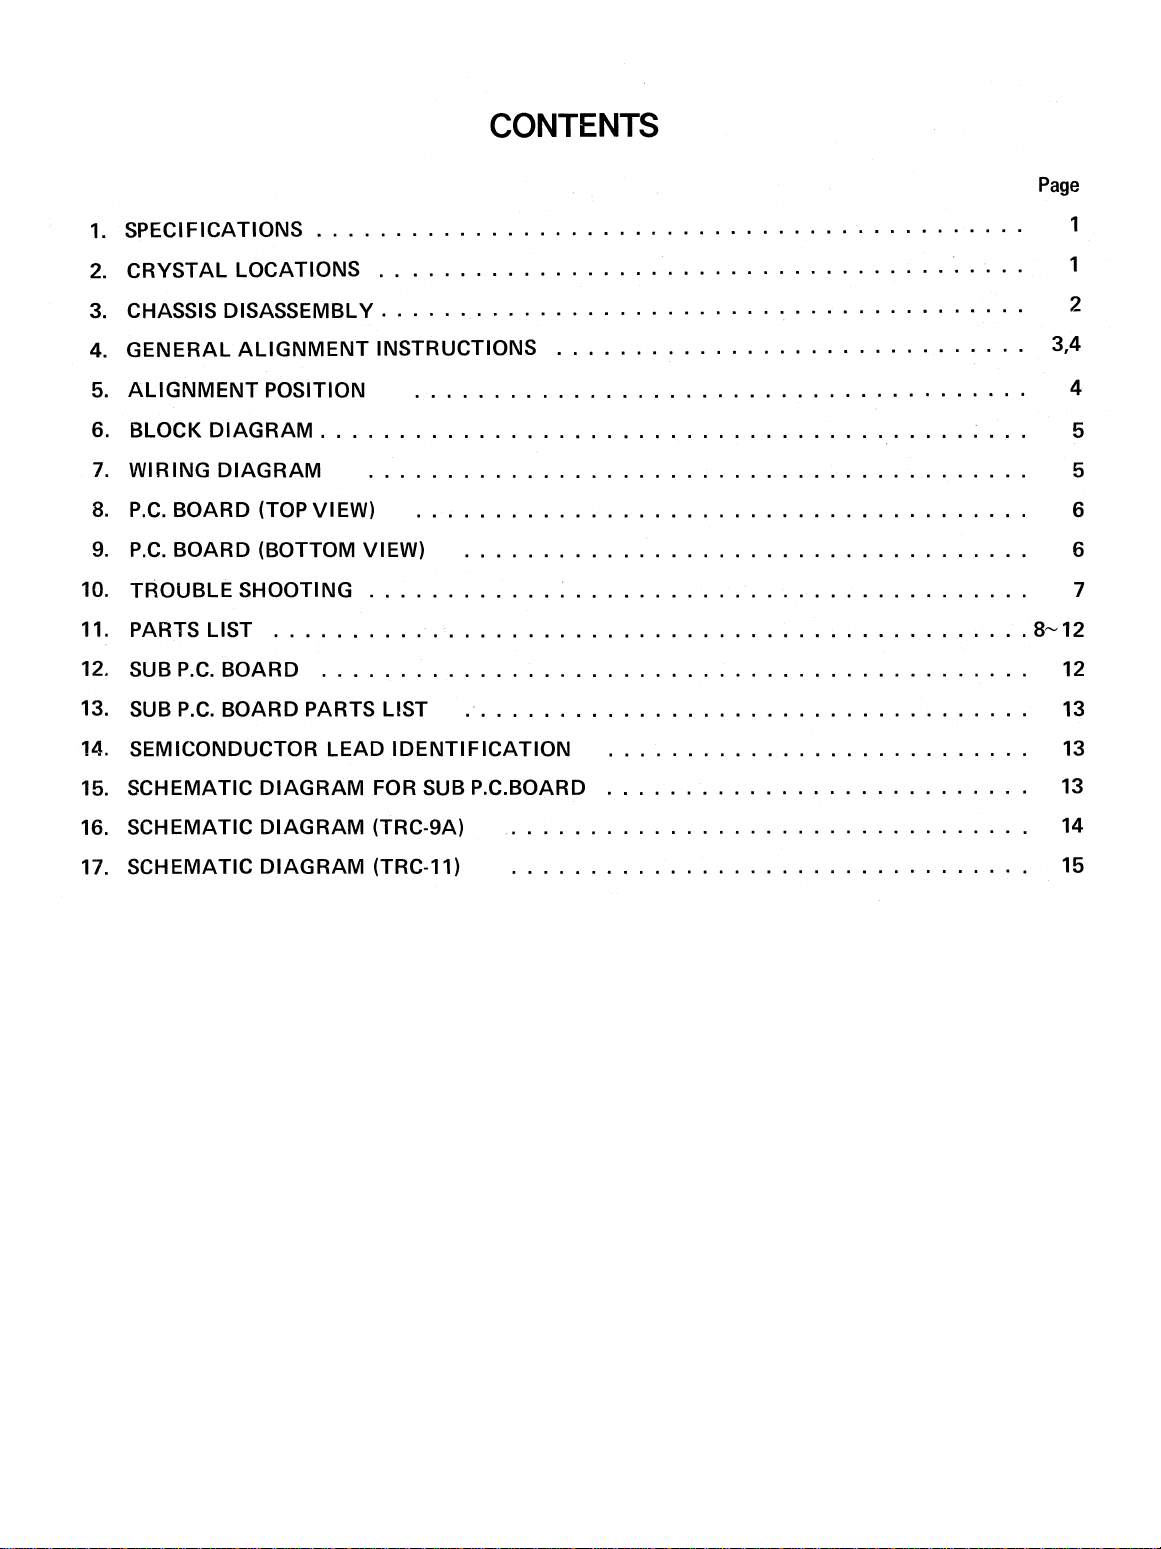
CONTENTS
Page
SPECIFICATIONS
1.
CRYSTAL LOCATIONS
2.
CHASSIS DISASSEMBLY
3.
GENERAL ALIGNMENT INSTRUCTIONS
4.
5.
ALIGNMENT POSITION
6.
BLOCK DIAGRAM
7.
WIRING DIAGRAM
8.
P.C. BOARD (TOP VIEW)
9.
P.C. BOARD (BOTTOM VIEW)
10.
TROUBLE SHOOTING
11.
PARTS LIST
12.
SUB P.C. BOARD
13.
SUB P.C. BOARD PARTS LIST
14.
SEMICONDUCTOR LEAD IDENTIFICATION
SCHEMATIC DIAGRAM FOR SUB P.C.BOARD
15.
3,4
8-12
12
13
13
1
1
2
4
5
5
6
6
7
13
SCHEMATIC DIAGRAM (TRC-9A)
16.
SCHEMATIC DIAGRAM (TRC-11)
17.
14
15
Page 3
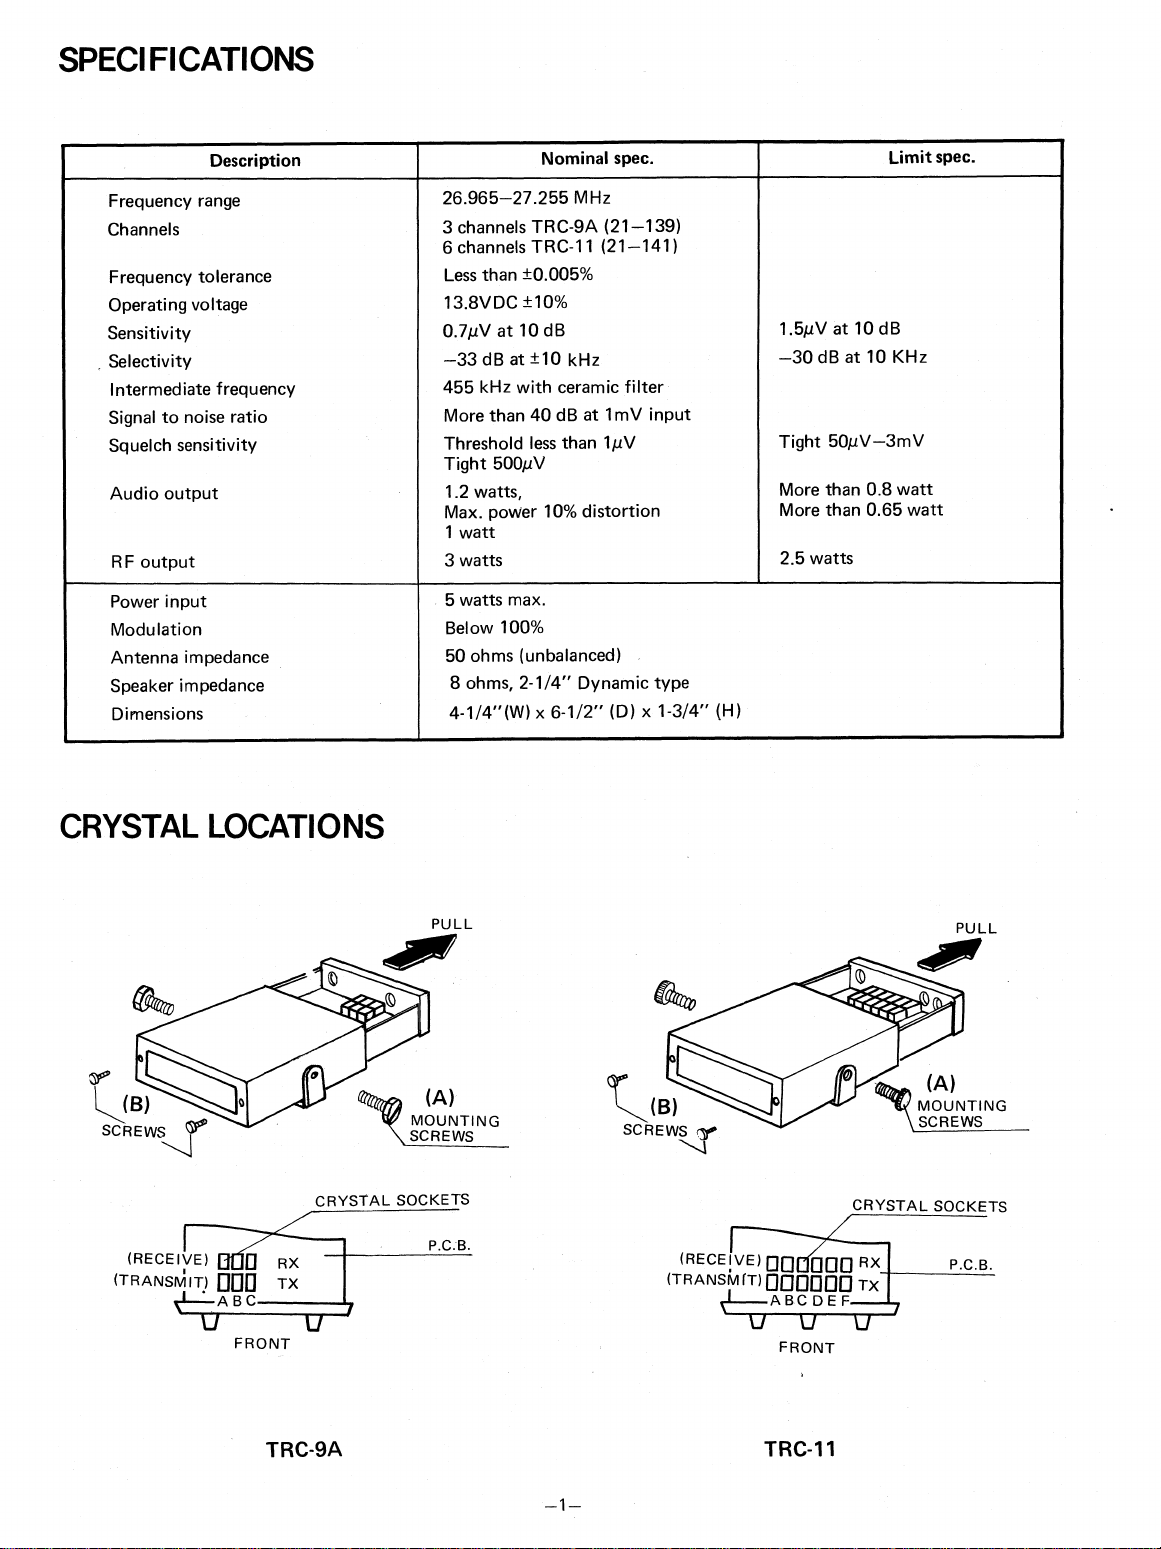
SPECIFICATIONS
Description
Frequency range
Channels
Frequency tolerance
Operating voltage
Sensitivity
Selectivity
Intermediate frequency
Signal to noise ratio
Squelch sensitivity
Audio output
RF output
Power input
Modulation
Antenna impedance
Speaker impedance
Dimensions
Nominal spec.
26.965-27.255 MHz
3 channels TRC-9A (21-139)
6 channels TRC-11 (21-141)
Less than ±0.005%
-
13.8VDC
0.70/ at 10 dB
—33 dB at ±10 kHz
455 kHz with ceramic filter
More than 40 dB at 1mV input
Threshold less than 1AV
Tight 5000
1.2 watts,
Max. power 10% distortion
1 watt
3 watts
5 watts max.
Below 100%
50 ohms (unbalanced)
8 ohms, 2-1/4" Dynamic type
4-1/4"(W) x 6-1/2" (D) x 1-3/4" (H)
±10%
Limit spec.
1.50 at 10 dB
—30 dB at 10 KHz
Tight 50AV-3mV
More than 0.8 watt
More than 0.65 watt
2.5 watts
CRYSTAL LOCATIONS
TRC-9A
TRC-11
—1—
Page 4
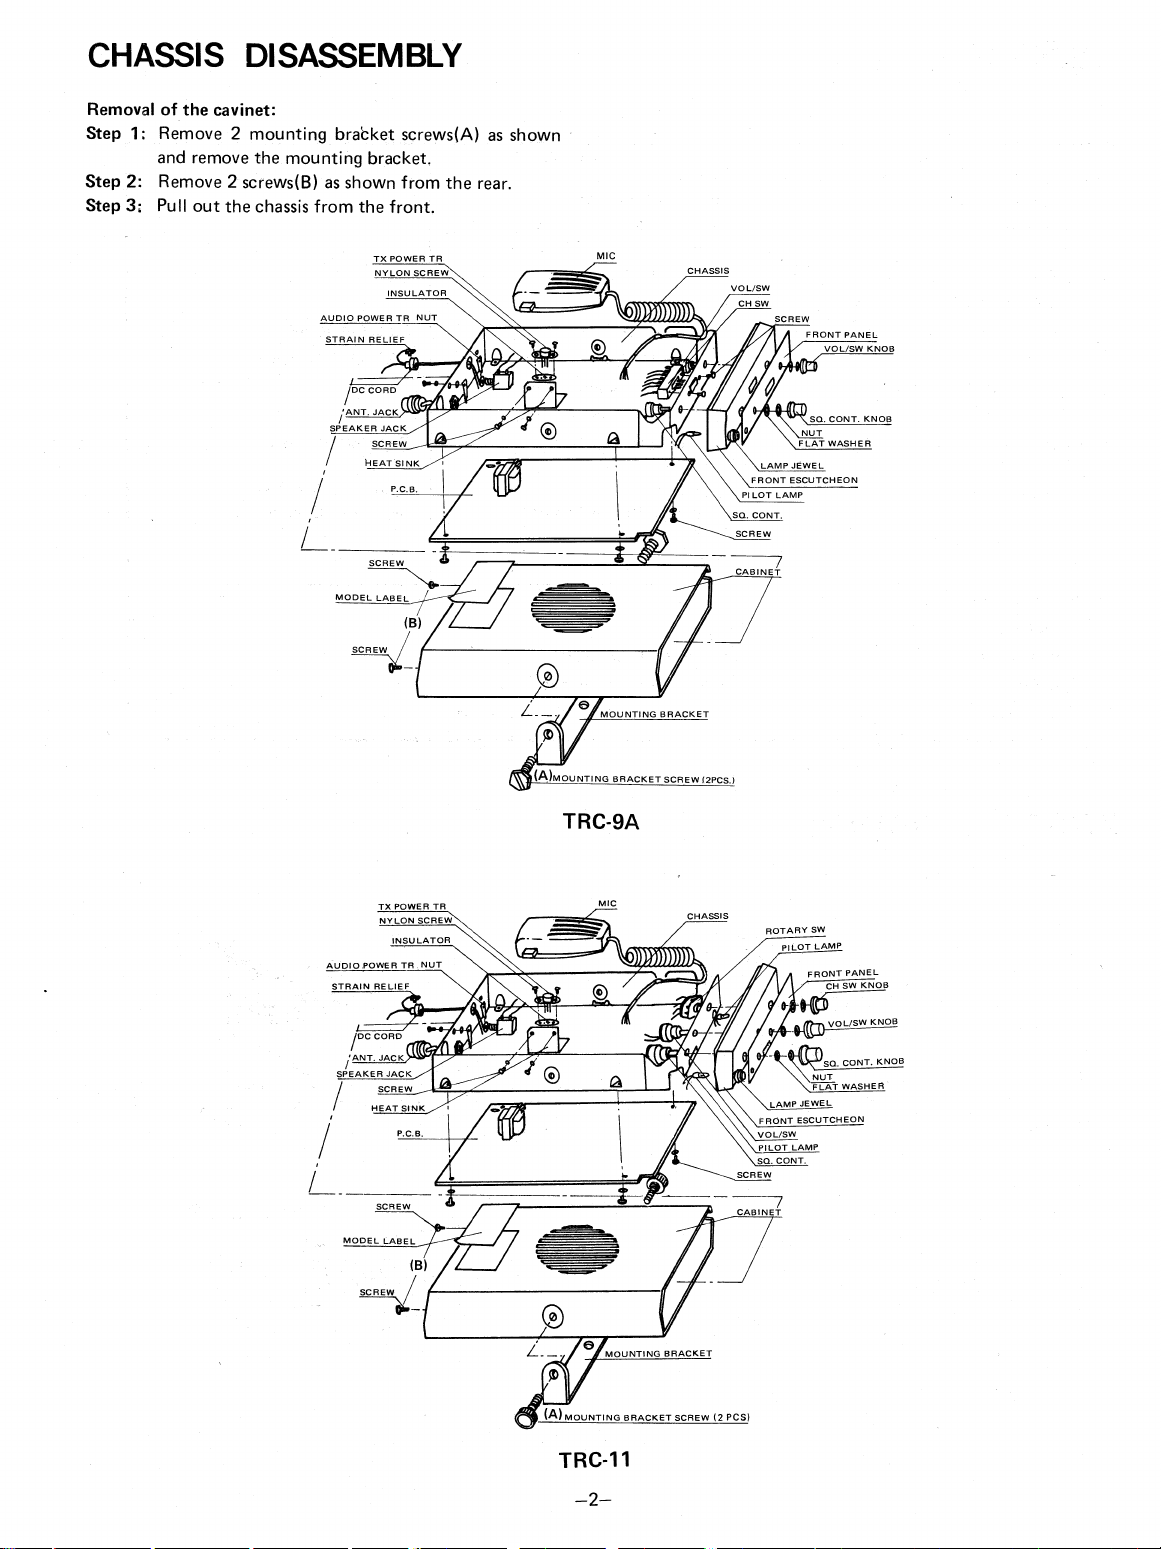
CHASSIS DISASSEMBLY
Removal of the cavinet:
Step 1:
Step 2:
Step 3: Pull
Remove 2 mounting braCket screws(A) as shown
and remove the mounting bracket.
Remove 2 screws(B) as shown from the rear.
out the chassis from the front.
Page 5
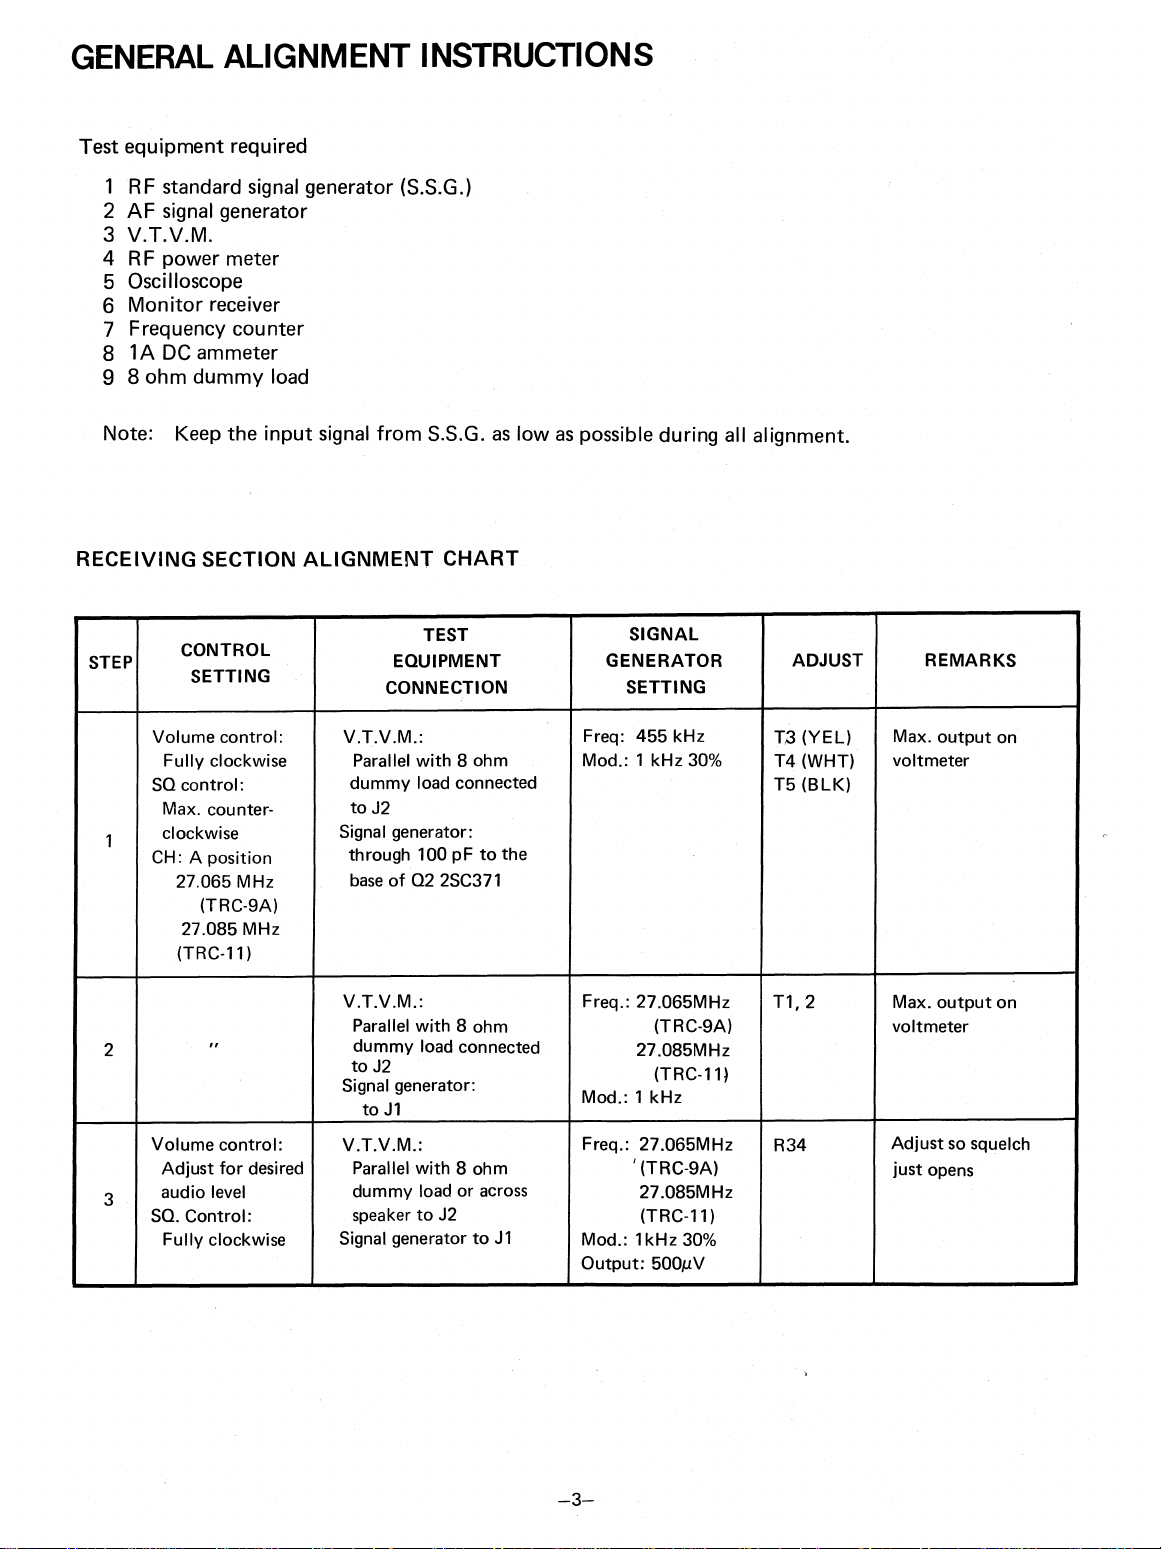
GENERAL ALIGNMENT INSTRUCTIONS
Test equipment required
1 RF standard signal generator (S.S.G.)
2 AF signal generator
3 V.T.V.M.
4 RF power meter
5 Oscilloscope
6 Monitor receiver
7 Frequency counter
8 1A DC ammeter
9 8 ohm dummy load
Note: Keep the input signal from S.S.G. as low as possible during all alignment.
RECEIVING SECTION ALIGNMENT CHART
STEP
1
2
3
CONTROL
SETTING
Volume control:
Fully clockwise
SQ control:
Max. counterclockwise
CH: A position
27.065 MHz
(TRC-9A)
27.085 MHz
(TRC-11)
fl
Volume control:
Adjust for desired
audio level
SQ. Control:
Fully clockwise
TEST
EQUIPMENT
CONNECTION
V.T.V.M.:
Parallel with 8 ohm
dummy load connected
to J2
Signal generator:
through 100 pF to the
base of Q2 2SC371
V.T.V.M.:
Parallel with 8 ohm
dummy load connected
to J2
Signal generator:
to J1
V.T.V.M.:
Parallel with 8 ohm
dummy
speaker to
Signal generator to J1
load or across
J2
SIGNAL
GENERATOR
SETTING
Freq: 455 kHz
Mod.: 1 kHz 30%
Freq.: 27.065MHz
(TRC-9A)
27.085MHz
(TRC-11)
Mod.: 1 kHz
Freq.: 27.065MHz
' (TRC-9A)
27.085MHz
(TRC-11)
Mod.: 1kHz 30%
Output: 500µV
ADJUST
T3 (YEL)
T4 (WHT)
T5 (B LK)
T1, 2
R34
REMARKS
Max. output on
voltmeter
Max. output on
voltmeter
Adjust so squelch
just opens
Page 6

TRANSMITTING SECTION ALIGNMENT CHART
STEP
1
2
3
4
CONTROL
SETTING
CH: A position
27.065MHz
(TRC-9A)
27.085MHz
(TRC-11)
Press the P.T.T. SW.
,,
"
TEST
EQUIPMENT
CONNECTION
Power meter (50 ohms):
to J1
1A ammeter:
in series with lead between
modulation winding of
T8 and collector of Q14
Oscilloscope:
in parallel with power
meter
"
„
Power meter (50 ohms):
to J1
1 A ammeter:
in series with lead between
modulation winding of
T8 and collector of Q14.
TEST
EQUIPMENT
SETTING
Supply voltage:
13.8 volts
II
„
Vary supply voltage
from 15 to 12 volts.
ADJUST
T9, 10
L5, 6
T9
REMARKS
Max. power output
Peak on the Power
meter and dip on the
ammeter to get 3
watts output at J1
(or max output)
If no output, adjust
T-9 to assure output
at both voltage
extremes.
Audio frequency generator:
5
6
Repeat steps 2 to 4.
"
to C23 (or talk into
Microphone).
ALIGNMENT POSITION
=]=1
fl
9
Reset the supply
voltage to 13.8 volts.
T7
Check modulation
—4—
Page 7

BLOCK DIAGRAM
ANT.
TX XTAL
Q1
RF
RX XTAL
MIC
Q12
TX OSC
Q2
MIX.
Q5
RX OSC
Q6
MIC. AMP
Q13
DRIVER
Q3
1st IF
Q7
SQ
Q8
AF
Q14
FINAL
SQ
Q4
2nd IF
Q9
AF
D3, D4
DET. ANL
Q10
AF POWER
Q11
AF POWER
VOL
WIRING DIAGRAM
TRC-9A and TRC-11
Note: 6 crystal sockets with lead wires (wires color BRN,RED and ORG.) are TRC-9A.
—5—
Page 8

P. C. BOARD (TOP VIEW)
R64 is used for TRC-11 only.
*1
Crystal socket D, E and F used for TRC-11 only.
* *2
P.C. BOARD (BOTTOM VIEW)
Page 9

TROUBLE SHOOTING
Symptom
1) Pilot lamp and channel indicator (TRC-11 only)
lamps do not light and set does not operate when
power is on.
2) Fuse blows when power switch is on.
3) Pilot lamp or channel indicator lamp (TRC-11
only) does not light.
4) Pilot lamp comes on but no sound on any channel.
Possible cause
A)
Faulty power cord.
Defective power switch SW2.
B)
2A fuse blown.
C)
A)
Defective Electrolytic capacitor.
B)
Defective audio power
amplifier transistor
C)
Defective TX final Transistor Q14 or Q13.
D)
Defective zener diode D7.
A)
Defective pilot lamp or resistor R63.
B)
(TRC-11 only) Defective channel indicator lamp or
resistor R64.
C)
Short circuit in the B+ Circuit.
A)
Faulty EXT. Speaker jack J2.
B)
Poor crystal socket contact or crystal loose in socket.
C)
Defective zener diode D5.
D)
Weak crystal.
Q10
or
Q11.
5) Transmitter does not operate or no modulation.
6) Squelch control does not operate.
A)
Faulty P.T.T. switch.
B)
Defective microphone cartridge.
C)
Faulty transistor Q12, 13, or Q14.
D)
Faulty microphone cord.
Defective T8 Transformer modulation winding.
E)
F)
Defective resistor R57 or R59.
G)
Faulty transistor Q6 or Q7,
A)
Defective transistor Q7.
B)
Faulty VR2 or R34.
Page 10

Ref. No.
Description
RS Parts Number
MFR's Parts Number
Channel switch Knob (TRC-11 only)
Lamp 1
Lamp 2
J1
J2
SPK
Pilot Lamp 7V 50mA L=190mm
Channel indicator lamp (TRC-11 only)
7V 50mA L=190mm
Lamp Jewel
Lamp Holder (TRC-11 only)
Fuse 2A
P.C. Board
Antenna jack connector
Speaker Jack
Speaker
Line cord strain relief
Rubber bushing
Rubber bushing (New type)
FOR CANADIAN/D.O.C. MODELS ONLY
SUB P.C. BOARD
K-1074
L-0263
L-0263
HB-0706
X-4269
J-6244
J-0592
S-4335
HB-0705
NOTE: Modulation limiting stage for Canadian model TRC-9A and TRC-11
GE-18D-4433
GE-17D-3438
LH-141
GE-18C-4305
SO-239 273
JA-C-011
P0642AA
SR-3P-4
GE-15D-2699
GE-19D-4607
SUB P.C. BOARD WIRING DIAGRAM
(TOP VIEW)
(BOTTOM VIEW)
Yellow
Black
Page 11

SUB P.C. BOARD PARTS LIST
(Modulation limiting stage for Canadian model TRC-9A and TRC-11)
C62
C63
C64
R66,
R67
R68
Q15
D10
Ref. No.
69
Description
4.7 AF/16WV
Electrolytic
Ceramic
Ceramic
Carbon film
Carbon film
Carbon film
Transistor. Silicon, Toshiba
Diode,
P.C. Board
Silicon
0.001µF
0.04µF
10KS2
47K2
1K2
CAPACITORS
RESISTORS
1/4W
1/4W
1/4W
SEMICONDUCTORS
MISCELLANEOUS
± 5%
± 5%
± 5%
RS Parts Number
MFR's Parts Number
CE04W IC470B
MC-60
MC-100
ELR 1/4 103J
ELR 1/4 473J
ELR 1/4 102J
2SC373
1N60
GE-19D-4788
Page 12

1.
SW1a-b:
CHANNEL SW.
2.
SW2:
POWER SW W/VR1
3.
RESISTANCE VALUES IN OHMS.
4.
CAPACITANCE VALUES IN MF.
5.
VOLTAGES ARE MEASURED WITH V.T.V.M.
UNDER FOLLOWING CONDITIONS:
VOLUME MINIMUM
SQUELCH MAXCLOCKWISE.
K=1000
P=MMF
TRC-9A
CAT.No. 21-139
Page 13

NOTE:
1.
SW1a-b:
CHANNEL SW.
2.
SW2:
3.
RESISTANCE VALUES IN OHMS
indicated
4.
CAPACITANCE VALUES IN MF
indicated (P=MMF).
5.
VOLTAGES ARE MEASURED WITH
V.T.V.M. UNDER FOLLOWING CONDITIONS:
VOLUME MINIMUM
SQUELCH MAX. CLOCKWISE.
POWER SW W/VR1 VOL. CONT.
(K=1000).
unless otherwise
unless otherwise
TRC-11
CAT.No. 24-141
Page 14

RADIO SHACK Q A TANDY CORPORATION COMPANY
U.S.A.: FORT WORTH, TEXAS 76107
CANADA: BARRIE, ONTARIO, CANADA L4M 4W5
TANDY CORPORATION
AUSTRALIA
280-316 VICTORIA ROAD
RYDALMERE, N.S.W. 2116
BELGIUM
PARC INDUSTRIEL DE NANINNE
5140 NANINNE
WEONESBURY, STAFFS WF10 7JN
U. K.
BILSTON ROAD
6A4-4000
Printed in Japan
 Loading...