

Page 1
Operating instructions
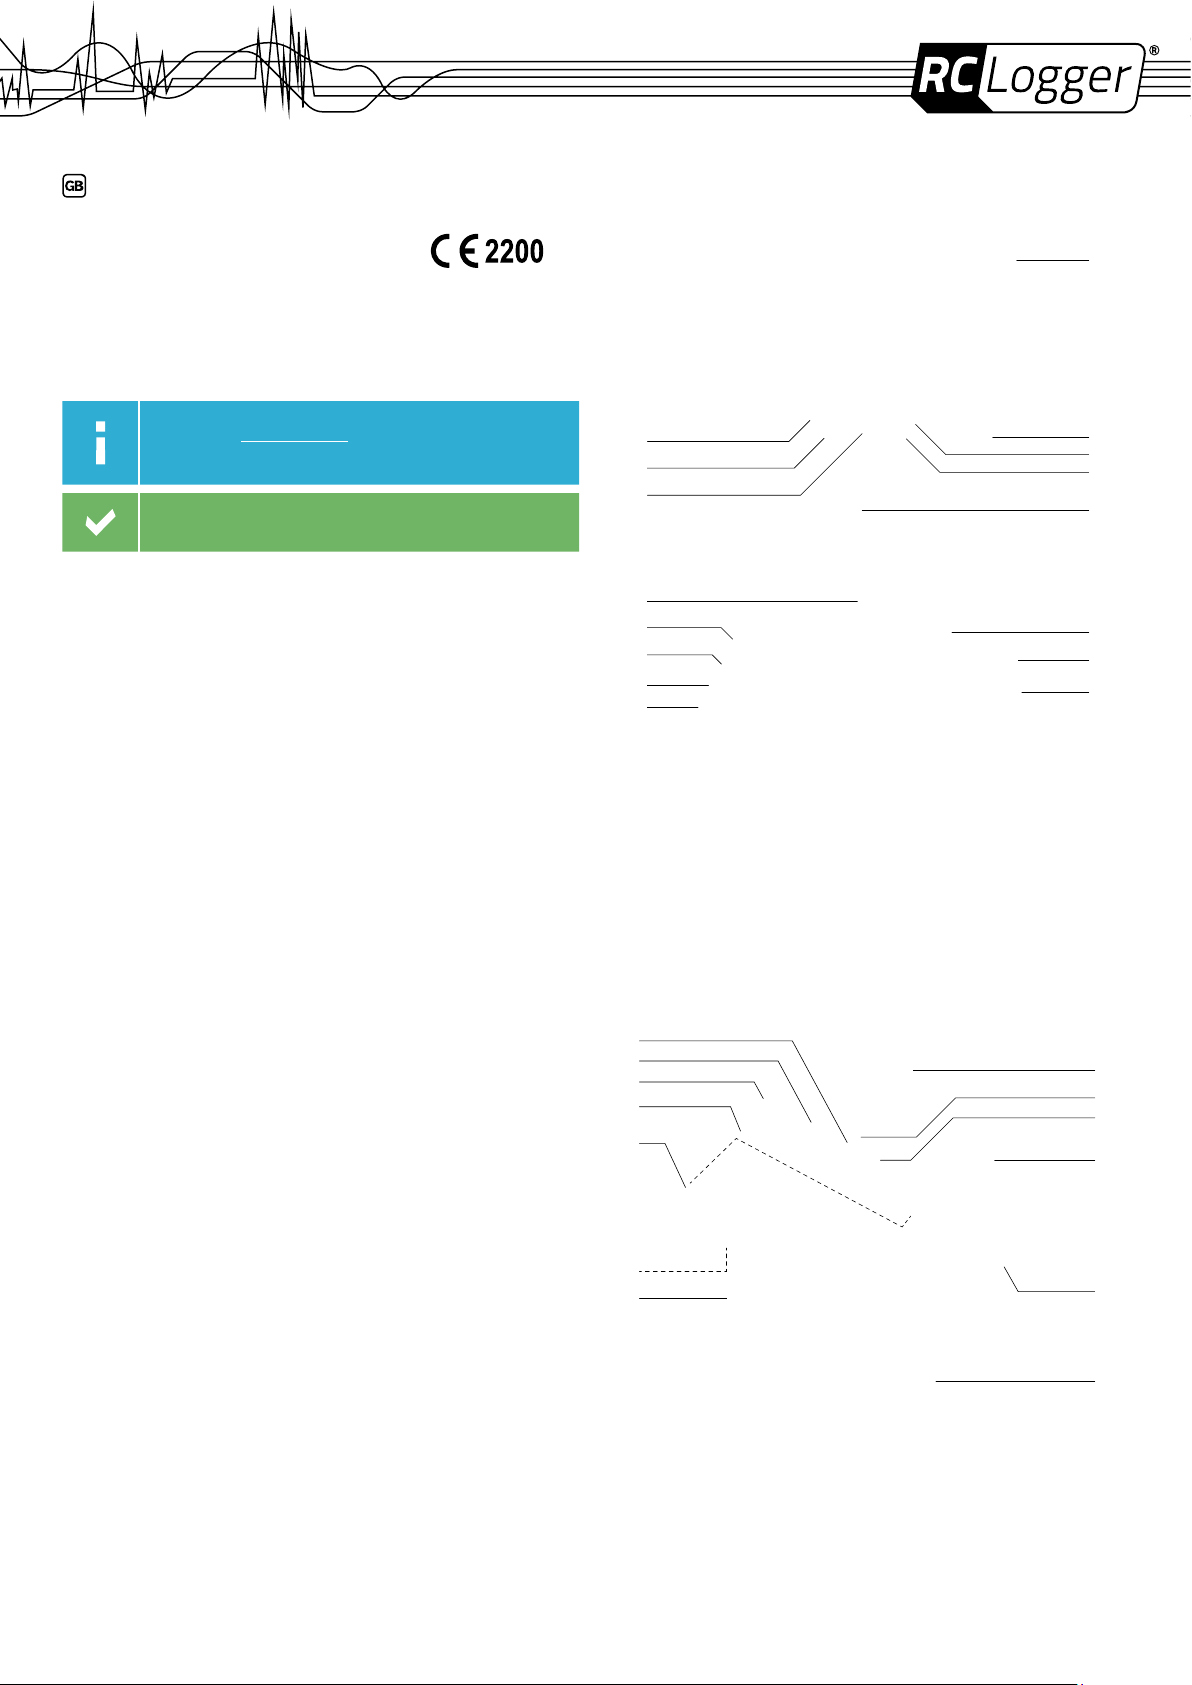
PARTS
RC Logger FPV Goggles
No. 89141RC
INTENDED USE
Please download the latest version of the operating instructions from
our website at www.rclogger.com. Navigate to the product page and
open the ”Downloads” tab. Click on ”Operating instructions” to start
the download.
Make this product available to third parties only together with its
operating
instructions.
Use the FPV Goggles in combination with the Navigator 250 FPV camera. It allows you to enjoy a rst
person view (FPV) of your ight.
Do not directly look into the sun in order not to damage the goggles.
For safety and approval purposes (CE), you must not rebuild and/or modify this product. If you use
the product for purposes other than those described above, the product may be damaged. In addition,
improper use can cause hazards such as short circuiting, re, electric shock etc. Read the instructions
carefully and keep them. Make this product available to third parties only together with its instructions.
This product complies with the statutory national and European requirements. All company names and
product names are trademarks of their respective owners. All rights reserved.
This product is in compliance with the essential requirements and other relevant provisions of the
Directive 1999/5/EC.
PRODUCT FUNCTIONS
The product features the following main functions:
> Live video transmission from a FPV camera
> Live video export
> Playback of external video
DELIVERY CONTENT
> FPV Goggles
> Battery Charger
> LiPo Battery Pack
> 2x 5.8 GHz Antenna
> 2x AV-out cables
> 4x Charging Cable (Europe/ US/ UK/ Australia type)
> 12 V/DC cable with BEC plug
> Cable for Futaba transmitter
> Cable for JR transmitter
> Cleaning cloth
> Case
> Safety hint sheet
6
7
8
12
13
14
15
16
1 Antenna
2 Antenna port
3 – button
4 + button
5 Front camera
6 MODE button (Menu: Next)
7 MENU button (Menu: Esc)
8 OK button
LIPO BATTERY PACK
29
28
27
26
25
1
2
3
4
5
9
10
11
9 IPD adjuster
10 DC IN Power supply socket
11 PPM IN socket
12 Cooling fan
13 HDMI IN socket
14 AV IN socket
15 AV OUT socket
16 Earphone jack
17
18
19
20
24
23
17 Arm strap
18 On/Off button
19 Charging port
20 Battery
21 Nose
22 Power adapter with charging cable
23 Power supply cable
21
22
24 Strap holder
25 Contacts
26 Charging base
27 D-tap port
28 Battery unlocking mechanism
29 Indicator lights
Page 2
SAFETY INSTRUCTIONS
Read the operating instructions carefully and especially observe the
safety information. If you do not follow the safety instructions and
information on proper handling in these instructions, we assume
no liability for any resulting personal injury or damage to property.
Such cases will invalidate the warranty/guarantee.
General
> The product is not a toy. Keep it out of the reach of children and pets.
> Do not leave packaging material lying around carelessly. These may become dangerous playing
material for children.
> Protect the product from extreme temperatures, direct sunlight, strong jolts, high humidity, moisture,
ammable gases, vapours and solvents.
> Do not use the product in rain.
> Do not place the product under any mechanical stress.
> If it is no longer possible to operate the product safely, take it out of operation and protect it from any
accidental use. Safe operation can no longer be guaranteed if the product:
» is visibly damaged,
» is no longer working properly,
» has been stored for extended periods in poor ambient conditions or
» has been subjected to any serious transport-related stresses.
> Please handle the product carefully. Jolts, impacts or a fall even from a low height can damage
the product.
> Do not expose the lenses to direct sunlight. The lens will focus the sun’s energy and irreparably
damage the LCDs.
> The product must not be exposed to water or moisture.
> Only use supplied accessories in combination with this product.
> Do not disassemble the product. There are no serviceable parts inside.
> Avoid magnetic elds. They can affect the performance of the product.
> Keep the product away from open re.
> The product is not water or dust proof. Keep it away from dust and water.
> Make sure no water or other liquid enters the product.
> The eye cups may cause skin irritation. In case of skin irritation take the goggles off immediately and
consult a doctor if irritation persists.
PREPARING THE GOGGLES
> Screw the two antennas (1) onto the antenna ports (2).
> Adjust the head strap to the desired length.
> After putting the goggles on, adjust the interpupillary distance (IPD) with the two IPD adjusters (9).
POWER SUPPLY
The goggles do not have a built-in power supply. You are required to supply the goggles with power from
an external power source. Make use of the following options:
> LiPo battery pack (supplied)
> A suitable external LiPo battery (refer to technical data)
LiPo pack
Charging it:
1. Insert the battery (20) into the charging base (26). Hook the noses (21) into the slots in the base
and make sure the battery contacts slide into the contacts (25) in the base.
2. Lower the battery and press slightly to lock it. Ensure it is locked before you charge it.
3. Connect the cable of the power adapter (22) to the charging port (19) and the power adapter to a
suitable socket outlet. Use the socket type suitable for your country.
4. The red and blue indicator lights (29) light up. The blue indicator lights ash. When all indicator
lights are off, the battery is fully charged.
» A full charging cycle takes about 3.5 hours.
> In order to release the battery, push the battery unlocking mechanism (28) up to unlock the battery.
You can now remove it from the tray.
When to charge it:
Each blue indicator light represents 25 % of the battery capacity. During use, the blue indicator lights are
lit and go off one after the other (the indicator light of the quarter in use ashes). When the red indicator
light ashes, charge the battery. If, for example, three indicator lights are off, you have max. 25 % battery
capacity left.
> Turn the battery pack off before charging.
> Remove the battery from the charging base if you do not use it for a prolonged period of time. Recharge
the battery from time to time.
Wearing it:
Guide the arm strap (17) through the strap holder (24) at the bottom of the charger. You can then wear
it on your left or right arm during use.
Supplying the goggles with power:
1. Disconnect the power adapter from the battery pack.
2. Connect the D-tap jack of the power supply cable (23) to the D-tap port (27) on the charger.
3. Connect the other end of the power supply cable to the DC IN power supply socket on the goggles.
4. Turn the power supply on and off as needed. Study the following table.
Turn battery pack ON Turn battery pack OFF
A short press followed by a long press of the
On/Off button (18).
5. You can now use the goggles.
> Before you disconnect the goggles, turn the battery pack off.
> With a fully charged battery and depending on its condition you can operate the goggles for approx.
90 minutes.
A short press followed by a long press of the
On/Off button (18).
External LiPo battery
1. Connect the supplied 12 V/DC cable with BEC connector to the DC IN power supply socket (10)
on the goggles.
2. Connect an external battery (not supplied) delivering between 7 and 28 V/DC to the BEC connector.
SELECTING MODES
Press the MODE (6) button to switch between modes.
DIV mode
> The goggles constantly compare the RSSI (Received Signal Strength Indicator) of antenna 1
(ANT1) and antenna 2 (ANT2), and then switch to the strongest signal.
> The AV OUT port outputs diversity signal for your video recorder or external display.
> The AV OUT port only works in DIV mode.
AV IN mode
> Connect an external video source and play back video on your goggles.
> Antennas are deactivated automatically in this mode.
HDMI IN mode
> Play HDMI video on the goggles from an external video source.
> The goggles display a maximum resolution of 1920 x 1080 / 60 Hz.
> Antennas are deactivated automatically in this mode.
> After activating the HDMI mode you may experience a delay of up to 11 seconds before HDMI
video is played back.
FRONT FACING CAMERA
> While in any mode, tap the OK button (8) to enable the front facing camera function. This switches
the goggles to a full screen view of the front facing camera feed. Tap the OK button to return to
the previous mode.
> Note that PIP (Picture in picture) is automatically disabled when you switch to the front camera.
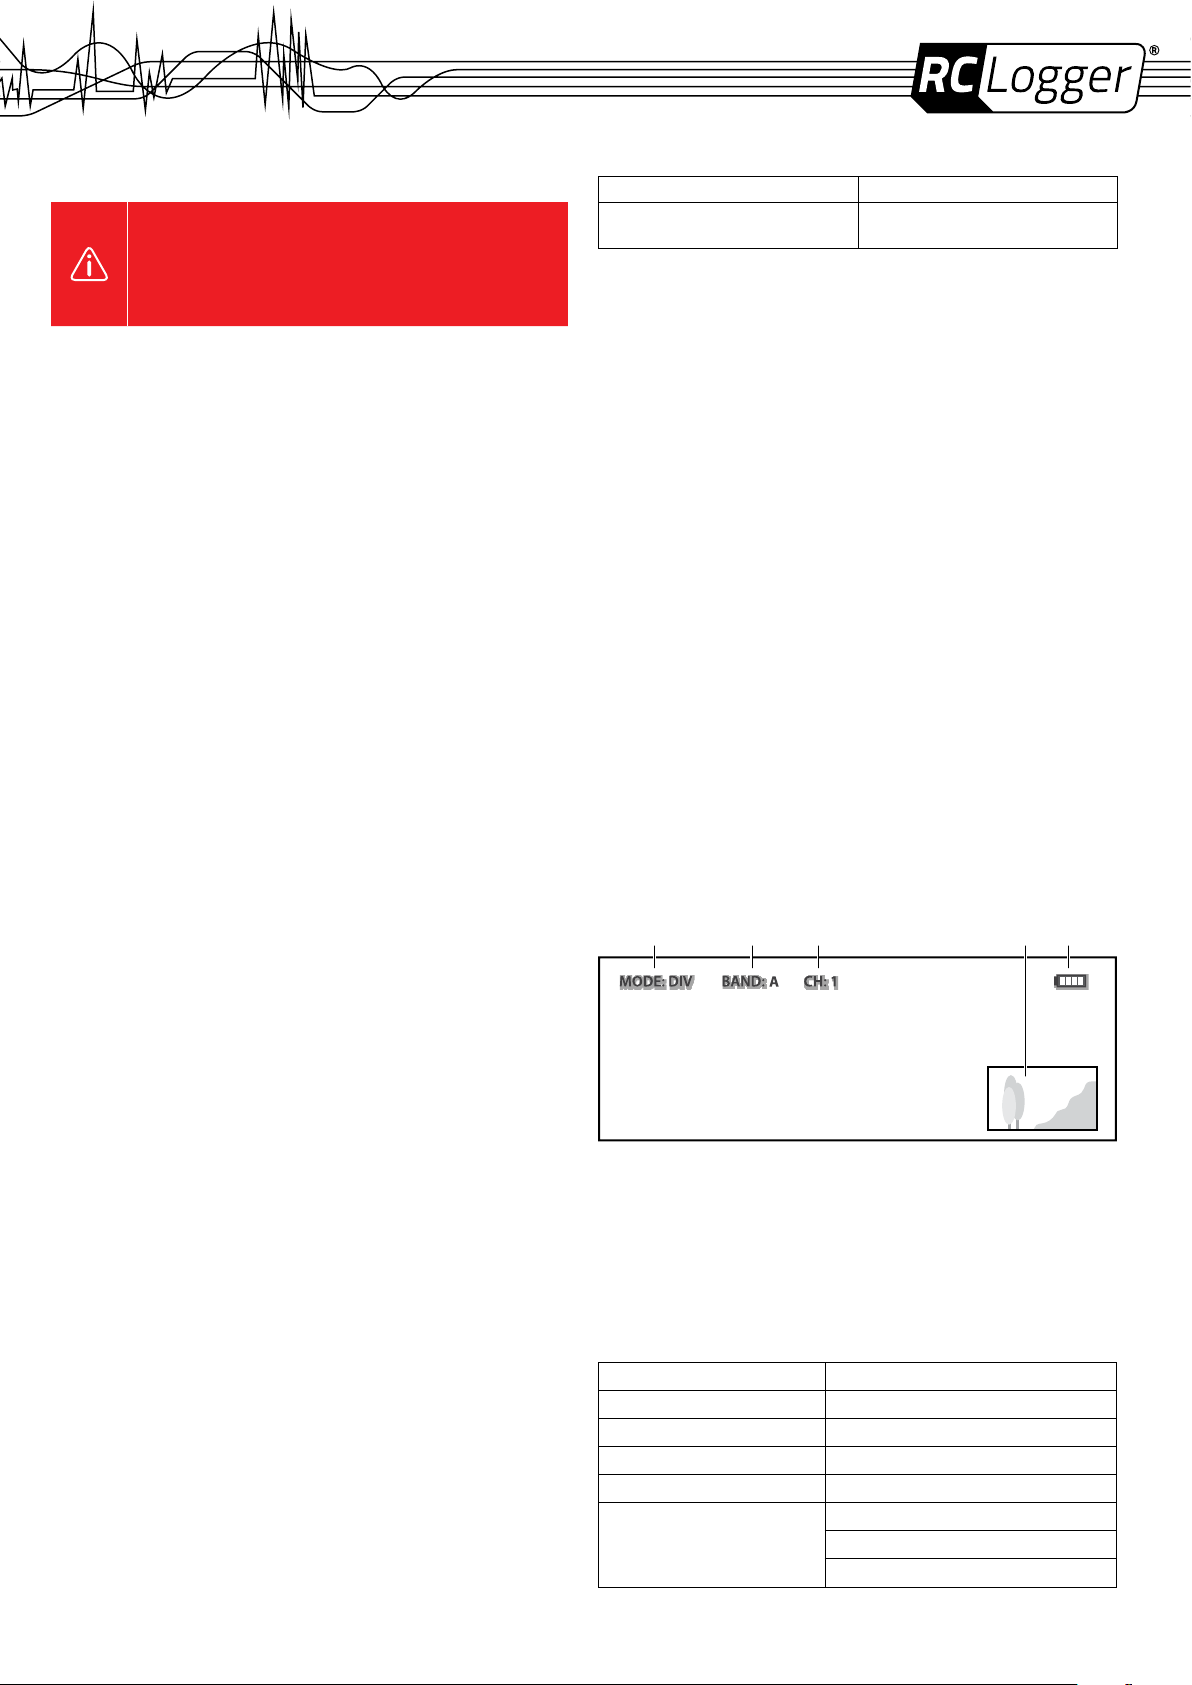
FPV VIEW
A B C ED
A Selected mode
B Selected band
C Selected channel
D PIP (Picture in Picture)
E Battery charge condition
SETTINGS AND MENU NAVIGATION
Press the MENU button (7) to enter the menu.
Menu tree
You may refer to the below menu tree when changing settings.
General settings System settings
RF Band (A, B, F) Power (DC, 2S-6S)
Volume (+/-) Language
Image (Brightness, Contrast, …) Display (Aspect ratio: 16:9 or 4:3)
PIP (On/Off; Size, …) Menu show
Menu (Timer, transparency)
OSD (Timer out, transparency)
PPM channel (Select PPM channel)
Page 3

Navigation
Button Function
+ (4) Increase volume
Increase value
– (3) Decrease volume
Decrease value
OK (8) Select menu item
MENU (7) Enter menu
Go up
Exit to save
MODE (6) Switch between modes
Flip through menu items/settings
Important general settings
PIP function (Picture in Picture):
> To enable PIP, select Menu > General settings > PIP and switch it to ON.
> The secondary image can be made smaller or larger by selecting size. Cycle through the three sizes
of 420 x 240, 266 x 160 and 133 x 80 using the – and + buttons.
> The second image can be moved by selecting position. Toggle between the eight positions by using
the – and + buttons.
> Long hold the OK button to activate and deactivate PIP on screen.
Volume:
> Earphones can be connected to the earphone jack (16).
> Use the + and – buttons to increase and decrease the volume.
> When the goggles are powered off, the volume is automatically reset to 0.
Important system settings
Power:
> Select the cell count corresponding to the number of cells of your external battery.
> The battery charge condition is displayed on screen. When the ‘battery depleted’ symbol shows,
connect a fully charged battery.
Language:
> Change menu language.
Display ratio:
> Select the aspect ratio: 16:9 or 4:3
Menu show:
> Choose to have the menu and OSD information appear on screen permanently or disappear after a
set time, or congure the transparency of the overlay.
> Settings for menu and OSD information are independently congurable.
Reset menu:
> Return goggles to factory default settings.
When using the PIP function or HDMI input the unit operates as a higher temperature
and the built-in cooling fan will turn on.
Do not cover the exhaust and keep it clean at all times.
PAIRING
The pairing of goggles and video transmitter happens in two steps:
1. Select the RF band in the general settings corresponding to the RF band of the video transmitter.
2. Select the PPM channel in the system settings corresponding to the PPM channel of the video
transmitter (You can assign switch positions for activating/deactivating PIP or the front facing
camera).
Notes:
> Select a channel with little interference. When the transmitter is turned off, check each channel for
interference and look for a consistent background. In case of interference, horizontal lines appear.
> Through the radio controller, you can open the Picture-in-picture function or close it. Also, you
can change the Picture-in-picture image size by connecting the transmitter to the PPM IN socket.
BEFORE FLYING
> Perform a range test. Other electronic devices and the surroundings can affect the range.
> The video signal is affected by obstacles (e.g. human bodies, concrete walls, houses etc.).
Maximum range can only be achieved in a clear line of sight.
> It takes some time to adapt to FPV ying. Practice in a familiar setting until you feel comfortable.
CLEANING AND CARE
> The goggles do not require any maintenance, do not disassemble them. Maintenance or repairs
may be carried out by a professional only.
> Do not let liquid enter the goggles.
> Clean the exterior of the goggles using a clean, soft, dry cloth only.
> Do not use any aggressive cleaning agents or chemical solutions as these may damage the
housing causing discoloration and/or malfunction.
> Keep the goggles in the protective case when not in use.
PRODUCT SUPPORT
Visit http://www.rclogger.com/support or call +852 2559 2662 for product support. Additionally visit our
Online Ticket System at http://support.rclogger.com for any RC Logger inquiry.
DISPOSAL
In order to preserve, protect and improve the quality of environment, protect human health
and utilise natural resources prudently and rationally, the user should return unserviceable
product to relevant facilities in accordance with statutory regulations. The crossed-out
wheeled bin indicates the product needs to be disposed separately and not as municipal
Consequently you comply with your legal obligations and contribute to environmental protection!
waste.
FCC COMPLIANCE STATEMENT
Grantee Code: 2ACIM
Product Code: -SPX01
FCC IDENTIFIER: 2ACIM-SPX01
Statement according to FCC part 15.19
This device complies with Part 15 of the FCC Rules. Operation is subject to the following two conditions:
> This device may not cause harmful interference, and
> This device must accept any interference received, including interference that may cause undesired
operation.
Statement according to FCC part 15.21
Changes or modications not expressly approved by the party responsible for compliance could void
the user’s authority to operate the equipment.
TECHNICAL DATA
Battery pack:
Base ....................................................... Input: 12 – 16 V/DC
Battery .................................................... Type: LiPo, 3 cells
Power adapter:
Input........................................................ 110 – 240 V/AC, 50/60 Hz, max. 0.7 A
Output ..................................................... 12 V/DC, 2 A
Goggles:
Power supply .......................................... 7 – 28 V/DC, 1 A
Power consumption ................................ 6.8 W / 12 V/DC
Display .................................................... FOV: 30° (diagonal)
Interpupillary distance ............................. 59.5 – 69.5 mm (adjustable)
Luminance .............................................. 350 cd/m
Wireless receiver .................................... Antenna port: 2x SMA, 50 Ohm
AV interface ............................................ø3.5 mm jack, video input, stereo audion input
HDMI interface ........................................ C-Type connector
DIV AV interface ..................................... Diversity receiving, video/audio output
Ear out interface ..................................... ø3.5 mm jack, Stereo 16 Ω / 150 mW
PPM IN interface .................................... ø3.5 mm jack, supports 8 channel PPM IN
Front camera .......................................... FOV: 100° (diagonal)
Operating temperature ........................... +10 to +65 °C (+50 to +149 °F)
Dimensions ............................................. 169 x 70 x 42 mm
Weight .................................................... approx. 182 g
Frequencies:
Band Frequency in MHz
CH1 CH2 CH3 CH4 CH5 CH6 CH7
A 5865 5845 5825 5805 5785 5765 5745
B 5733 5752 5771 5790 5809 5828 5847
F 5740 5760 5780 5800 5820 5840 5860
These operating instructions are published by CEI Conrad Electronic International (HK) Limited, 18th Floor, Tower 2,
Nina Tower, No. 8 Yeung Uk Road, Tsuen Wan, New Territories, Hong Kong. All rights including translation reserved.
Reproduction by any method, e.g. photocopy, microlming, or the capture in electronic data processing systems
require the prior written approval by the editor. Reprinting, also in part, is prohibited. The operating instructions reect
the current technical specications at time of print.
© 2016 by CEI Conrad Electronic International (HK) Limited 89141RC_v1_0316_02_m_en_(3)
Output: 9.6 – 12.6 V/DC
Input: 10 – 28 V/DC, 2 A
Output: 11.1 V, 1000 mAh
Resolution: 854 x 480 (WVGA)
2
TV System: NTSC/PAL
Video output level: 1.0Vp-p Typ, 75 Ohm
Audio output level: 1.0Vp-p Typ, 10 kOhm
HDMI 1.3 Digital input, HDMI Audio in
Resolutions: 1920 x 1080p50, 1920 x 1080p60, 1920 x
1080i50, 1920 x 1080i60, 1280 x 720p50, 1280 x 720p60,
720 x 576p50, 720 x 480p60, 720 x 576i50, 720 x 480i60
Resolution: 640 x 480 (VGA)
 Loading...