

Operating instructions
RC EYE OneCam TX
No. 89049RC
1. INTRODUCTION
Dear customer,
Thank you for making the excellent decision to purchase this RC Logger® product. You now have
a high-quality product with a name that represents outstanding products.
This product complies with the applicable National and European standards and regulations. We
kindly request the user to follow the operating instructions, to preserve this condition and to ensure
safe operation! These operating instructions relate to this product. They contain important notices
on commissioning and handling. Please take this into consideration when you pass the product on
to third parties. Please keep these instructions for further reference!
All company names and product designations contained herein are trademarks of the respective
owners. All rights reserved.
We wish you a great deal of enjoyment with your new RC Logger® product!
Please download the latest version of the operating instructions from our
website at www.rclogger.com. Navigate to the product page and open the
“Downloads” tab. Click on “Operating instructions” to start the download.
Version
09/13
> Also observe the safety and operating instructions of any other devices which are connected
to the product.
> Not following the instructions in these operating instructions may result in dangers such as short
circuit, re, electric shock, etc. Observe the safety information under all circumstances!
Miscellaneous
> Consult an expert when in doubt about operation, safety or connection of the device.
> Maintenance, modications and repairs are to be performed exclusively by an expert or at a
qualied shop.
> If you have questions which remain unanswered by these operating instructions, contact our
technical support service or other technical personnel.
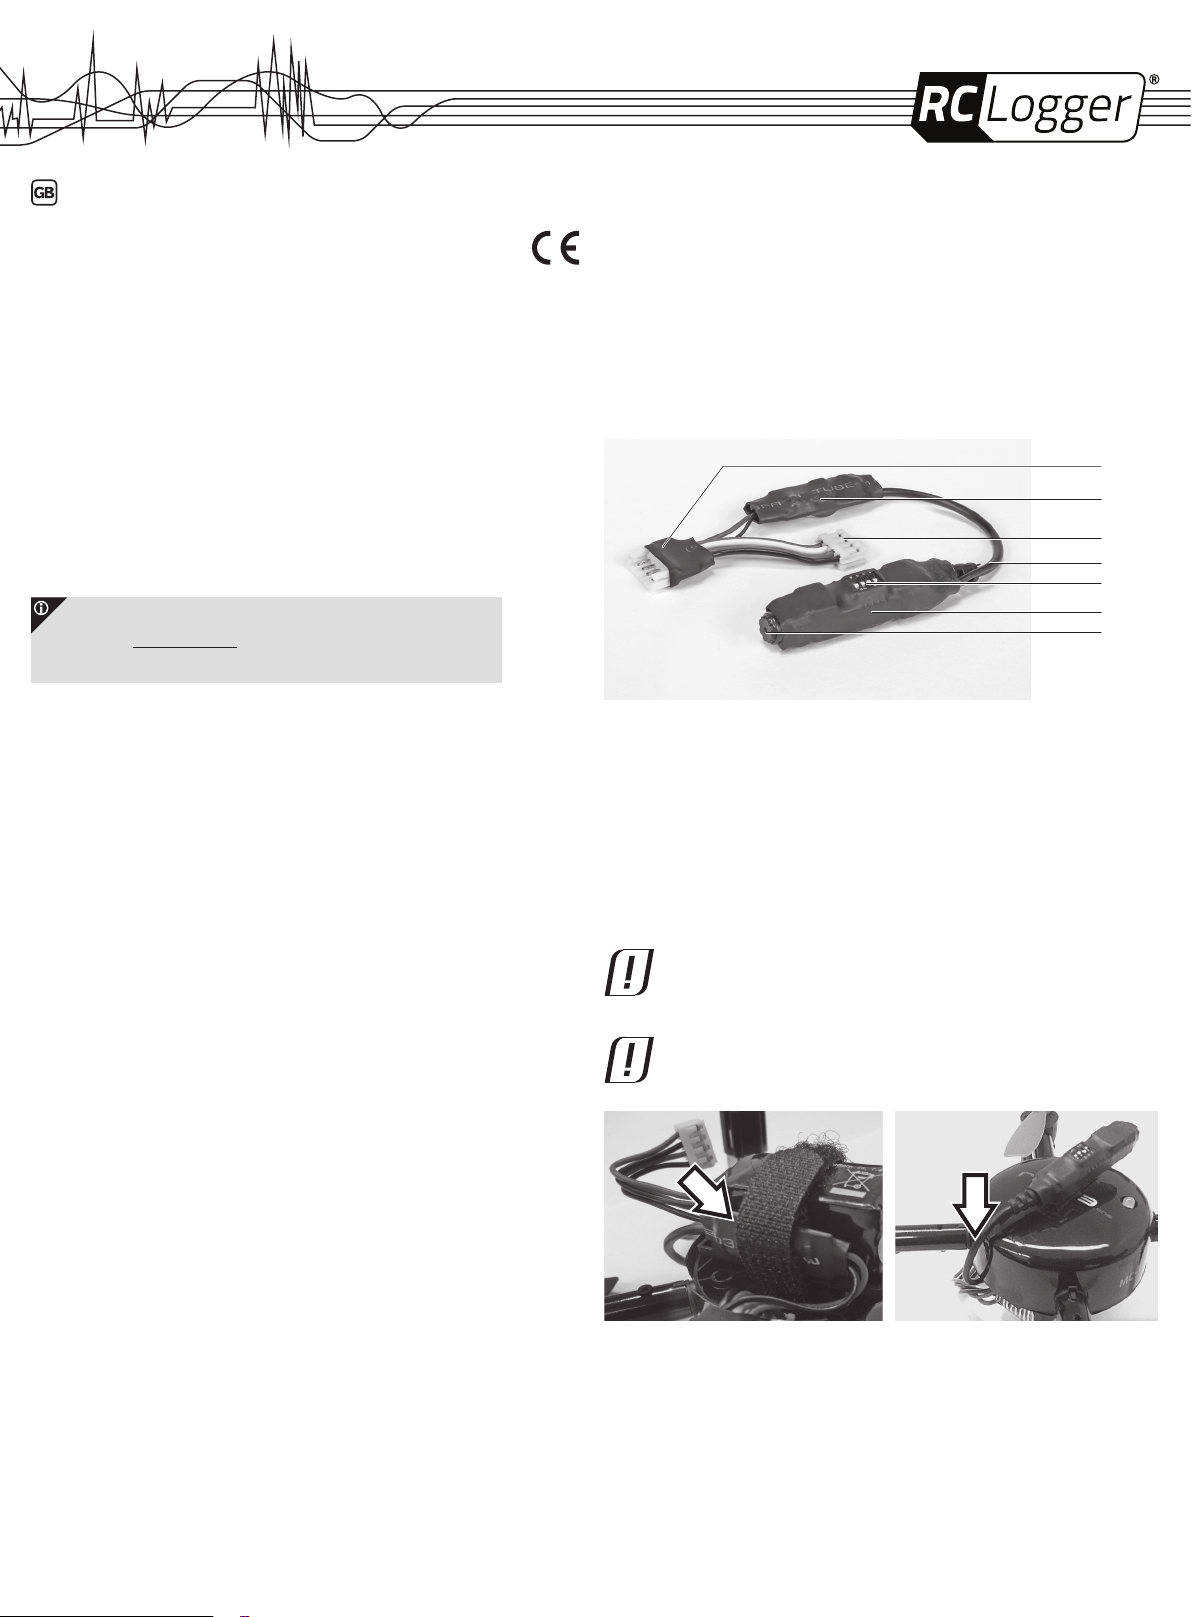
5. OPERATING ELEMENTS
1
2
3
4
5
6
7
2. INTENDED USE
The model “RC EYE OneCam TX” is a light-weight wireless camera, equipped with a CMOS image
sensor and 5.8 GHz wireless AV transmitting technology.
The camera is solely designed to be used in a model making environment and shall never be
used for surveillance purposes of any kind. The camera shall only be used in dry locations and
environments. The product must not become damp or wet. This product is not a toy and not suitable
for children under 14 years of age.
For safety and approval purposes (CE), you must not rebuild and/or modify this product. If you
use the product for purposes other than those described above, the product may be damaged. In
addition, improper use can cause hazards such as short circuiting, re, electric shock etc. Read
the instructions carefully and keep them. Make this product available to third parties only together
with its operating instructions.
3. DELIVERY CONTENT
1 x RC EYE OneCam TX
2 x Double sided tape (30 x 8 mm)
Operating instructions
4. SAFETY INSTRUCTIONS
Read the operating instructions carefully and especially observe the safety information. If you do
not follow the safety instructions and information on proper handling in this manual, we assume
no liability for any resulting personal injury or damage to property. Such cases will invalidate the
warranty/guarantee.
Surveillance
> You must strictly adhere to national laws governing the use of such camera devices. Misuse may
result in legal prosecution.
Persons / Product
> The device is not a toy. Keep it out of the reach of children and pets.
> Do not leave packaging material lying around carelessly. These may become dangerous playing
material for children.
> Protect the product from extreme temperatures, direct sunlight, strong jolts, high humidity,
moisture, ammable gases, vapours and solvents.
> Do not place the product under any mechanical stress.
> If it is no longer possible to operate the product safely, take it out of operation and protect it from
any accidental use. Safe operation can no longer be guaranteed if the product:
- is visibly damaged,
- is no longer working properly,
- has been stored for extended periods in poor ambient conditions or
- has been subjected to any serious transport-related stresses.
> Please handle the product carefully. Jolts, impacts or a fall even from a low height can damage
the product.
1 Female connector (Connects to “RC EYE One S” battery)
2 Power board
3 Male connector (Connects to “RC EYE One S”)
4 Antenna
5 Dip switches
6 Main camera
7 Camera lens
Not shown: Double sided tape
6. MOUNTING THE CAMERA
The camera and its electronis components are very delicate. Do not use sharp
objects, such as knives or pliers to handle the camera. Any defects to electric
cables may result in short circuits and damage the camera. Do not pull the
electric cables!
The camera MUST be mounted securely at all times. An improperly mounted
camera can damage not only the camera but also your “RC EYE One S”.
Fig. 1 Fig. 2
1. Carefully slide the camera out of the antistatic bag.
2. Put your “RC EYE One S” quad-copter on a clean and stable surface.
3. Connect the male connector (3) of the camera to the female input port on the “RC EYE One S”.
4. Put the battery in place as usual. Secure the battery including, power board (2) and camera
cables with the Velcro
cannot be caught and entangled while the rotors are in motion. Do not establish the power
connection yet!
5. Clean the canopy top with a damp cloth and little diswashing liquid. Take care that no water
enters the product! Dry the canopy top.
®
strap (see Fig. 1). Attention! It is very important to ensure the cables
6. Peel off the protective foil on one side of the double sided tape.
7. Stick the double sided tape along the middle axis on the canopy top (The camera lens (7)
shall eventually sit between the two red propellers). Peel off the remaining protective foil of the
double sided tape.
8. Afx the camera to the tape, with the camera lens (7) facing the red propellers (“facing front”).
The dip switches (5) must face up so that you are able to select the channels.
9. Make sure to guide the cable along the middle of the canopy to prevent it from getting entangled
during operation of the “RC EYE One S” (see Fig. 2).
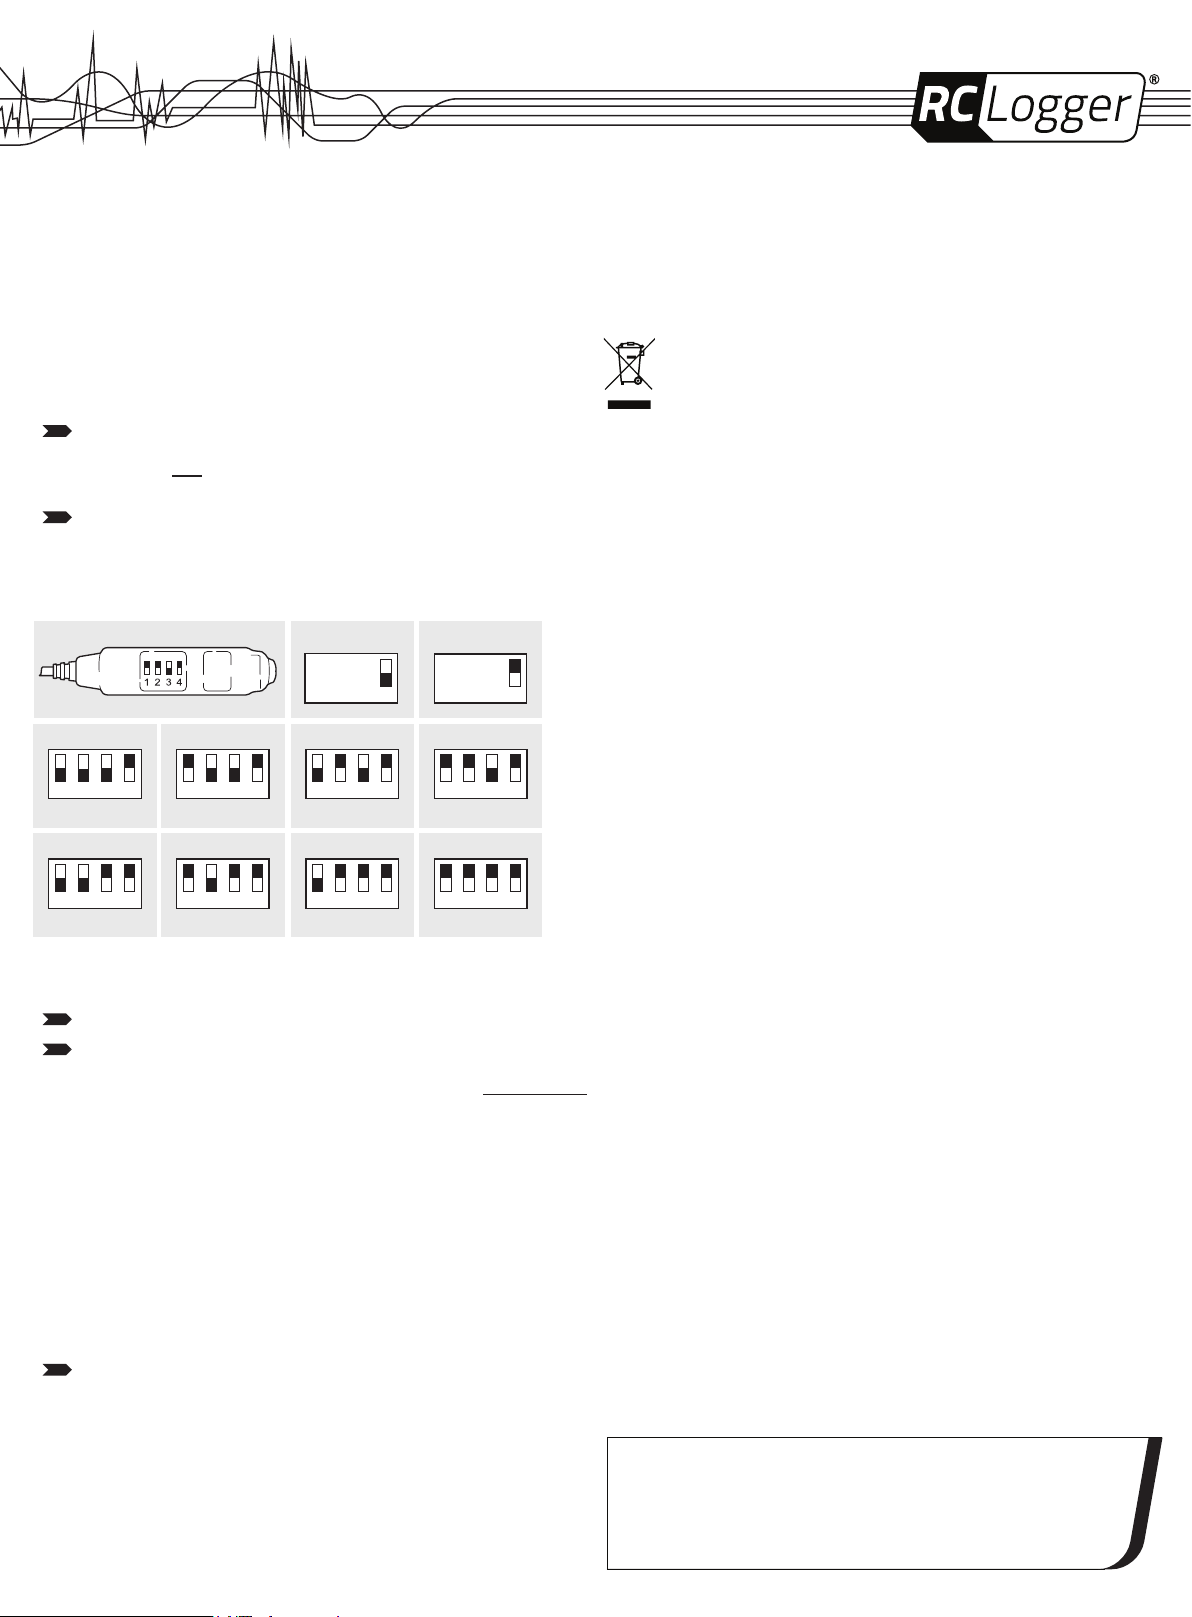
7. OPERATION
Selecting channel and output format
The channel selection must be in line with the channel selection on your display device
(receiving device). The free eld operating distance of the camera to the display device is
approximately 60 m. Obstacles such as walls or magnetic interferences can shorten the
operating distance.
Before you set the output format (PAL/NTSC) disconnect the power supply to the camera.
The camera will only stream video with the set output format after you restart the camera.
Please select channel (frequency) and video output format (PAL, NTSC) as illustrated in below
diagram (see Fig. 3). Use a thin and dull object to set the switches, e.g a tooth-pick. Sharp objects
damage the switches.
CH1
1 2 3 4
( 5.733 GHz )
CH2
1 2 3 4
( 5.752 GHz )
PAL
4
CH3
1 2 3 4
( 5.771 GHz )
NTSC
4
CH4
1 2 3 4
( 5.790 GHz )
8. MAINTENANCE, CARE AND REPAIR
> Disconnect the power supply to the camera before cleaning and maintenance.
> Regularily clean the camera with a dry cloth. To clean the lens you may use a cotton butt and a
suitable lens cleaning agent.
> Repairs should only be handled by a professional.
9. DISPOSAL
In order to preserve, protect and improve the quality of environment, protect human
health and utilise natural resources prudently and rationally, the user should return
unserviceable product to relevant facilities in accordance with statutory regulations.
The crossed-out wheeled bin indicates the product needs to be disposed separately
and not as municipal waste.
Consequently you comply with your legal obligations and contribute to environmental protection!
10. FCC COMPLIANCE STATEMENT
FCC ID: 2AARVRCE-ONE-CAMTX
Statement according to FCC part 15.19:
This device complies with Part 15 of the FCC Rules. Operation is subject to the following two
conditions:
> This device may not cause harmful interference, and
> This device must accept any interference received, including interference that may cause
undesired operation.
Statement according to FCC part 15.21:
Modications not expressly approved by this company could void the user’s authority to operate
the equipment.
11. PRODUCT SUPPORT
Visit “http://www.rclogger.com/index.php/contact-us” or call +852 2559 2662 for product support.
Additionally visit our support forum at “http://rclogger.com/forum”.
CH5
1 2 3 4
( 5.809 GHz )
CH6
1 2 3 4
( 5.828 GHz )
CH7
1 2 3 4
( 5.847 GHz )
CH8
1 2 3 4
( 5.866 GHz )
Fig. 3
Connecting to display device
Keep the operating instructions for the “RC EYE One S” and our display device ready.
The following compatible RC Logger devices can be purchased to be operated in
conjunction with the camera: RC EYE OneCam 5.8 GHz RX (89050RC) and 5.8 GHz
Video TX RX Set (20015RC). Please visit the RC Logger website at www.rclogger.com
for more information.
1. For the camera to work properly in conjunction with a suitable display device, study the
instruction manual that came with your display device carefully.
2. Set the channel and output format. Use the dip switches (5) on the camera (see “Selecting
channel and output format”) and for the display device set the channel as described in its
operating instructions.
3. Connect the male battery connector to the female connector (1) on the camera. Once the
control indicator light on the “RC EYE One S” lights up, the camera is supplied with power and
signal transmission is started.
4. Turn on your display device. Once pairing between camera and display device is successfully
established, image transmission can take place.
5. After use turn the camera off by disconnecting the battery.
Do not continuously operate the camera for more than 1 hour to avoid damage. After
operating for 1 hour let the camera cool down completely before using it again.
12. TECHNICAL DATA
Power supply ..................................................... 7 – 15 V/DC
Current consumption ......................................... max. 200 mA
Frequency .......................................................... 5.733 – 5.866 GHz
CMOS sensor .................................................... 0.3 Mega Pixels
Resolution .......................................................... 640 x 480 (VGA)
Angle of view ..................................................... 55°
Illumination ........................................................ min. 3 Lux/f1.2
Format ............................................................... PAL, NTSC
Channel ............................................................. 8 channels
Operating distance ............................................ max. 60 m (open eld)
Operating conditions .......................................... -10 to +50 °C, 85 % RH (non condensing)
Storage conditions ............................................. -20 to +60 °C, 90 % RH (non condensing)
Dimensions (L x W x H) ..................................... Main camera: 43 x 9 x 9 mm
Power board: 30 x 10.5 x 7 mm
Weight ............................................................... approx. 7.5 g
These operating instructions are published by CEI Conrad Electronic International (HK) Limited, 18th Floor,
Tower 2, Nina Tower, No. 8 Yeung Uk Road, Tsuen Wan, New Territories, Hong Kong.
All rights including translation reserved. Reproduction by any method, e.g. photocopy, microlming, or the
capture in electronic data processing systems require the prior written approval by the editor. Reprinting, also
in part, is prohibited. The operating instructions reect the current technical specications at time of print. We
reserve the right to change the technical or physical specications.
© 2013 by CEI Conrad Electronic International (HK) Limited V2_0913-JH

Bedienungsanleitung
RC EYE OneCam TX
Best.-Nr. 89049RC
1. EINFÜHRUNG
Lieber Kunde,
Mit dem Kauf dieses RC Logger® Produktes haben Sie eine ausgezeichnete Entscheidung
getroffen, vielen Dank dafür. Sie halten nun ein erstklassiges Gerät in den Händen, dessen Name
für hervorragende Produkte steht.
Dieses Produkt entspricht den derzeit gültigen nationalen und europäischen Normen und
Vorschriften. Wir bitten den Benutzer höichst, allen Anweisungen zu folgen, für den einwandfreien
Zustand sowie für eine sichere Bedienung des Gerätes zu sorgen. Diese Bedienungsanleitung
bezieht sich speziell auf dieses Produkt. Sie enthält wichtige Angaben zur Inbetriebnahme und
Handhabung. Bitte vergessen Sie nicht, diese Anleitung dem Gerät beizulegen, falls Sie es an Dritte
weitergeben. Bitte bewahren Sie diese Anleitung zum späteren Nachschlagen auf!
Alle darin enthaltenen Firmennamen und Produktbeschreibungen sind Warenzeichen der jeweiligen
Eigentümer. Alle Rechte vorbehalten.
Wir wünschen Ihnen eine Menge Spaß mit Ihrem neuen RC Logger®-Produkt.
Bitte laden Sie die neueste Ausgabe der Bedienungsanleitung von
unserer Website herunter, unter www.rclogger.com. Navigieren Sie bis zur
Produktseite und öffnen Sie das Register “Downloads”. Klicken Sie auf
“Bedienungsanleitungen”, um den Download zu starten.
2. BESTIMMUNGSGEMÄSSE VERWENDUNG
Das Modell “RC EYE OneCam TX” ist eine leichte drahtlose Kamera, die mit einem CMOSBildsensor ausgestattet ist und sich einer drahtlosen 5,8 GHz AV-Übertragungstechnologie bedient.
Die Kamera dient ausschließlich zur Verwendung im Modellbaubereich und darf niemals zur
Überwachung beliebiger Art benutzt werden. Die Kamera darf nur an trockenen Orten und Umfeld
benutzt werden. Das Produkt darf nicht feucht oder nass werden. Dieses Produkt ist kein Spielzeug
und nicht für Kinder unter 14 Jahren geeignet.
Aus Sicherheits- und Zulassungsgründen (CE), dürfen Sie das Produkt nicht umbauen und/oder
verändern. Falls Sie das Produkt für andere, als die zuvor beschriebenen Zwecke verwenden,
kann das Produkt beschädigt werden Weiterhin kann eine unsachgemäße Verwendung Gefahren
wie zum Beispiel Kurzschluss, Brand, Stromschlag, etc. hervorrufen. Übergeben Sie das Produkt
nur zusammen mit der Bedienungsanleitung an dritte Personen.
3. LIEFERUMFANG
1 x RC EYE OneCam TX
2 x doppelseitiges Klebeband (30 x 8 mm)
Bedienungsanleitung
4. SICHERHEITSHINWEISE
Lesen Sie sich die Bedienungsanleitung aufmerksam durch und beachten Sie insbesondere
die Sicherheitshinweise. Falls Sie die Sicherheitshinweise und die Angaben zur sachgemäßen
Handhabung in dieser Bedienungsanleitung nicht befolgen, übernehmen wir für dadurch
resultierende Personen-/Sachschäden keine Haftung. In solchen Fällen erlischt die Gewährleistung/
Garantie.
Überwachung
> Bitte halten Sie sich strengstens an die nationalen Gesetze bezüglich der Verwendung solcher
Kamerasysteme. Missbrauch kann zur strafrechtlichen Verfolgung führen.
Personen/Produkt
> Dieses Gerät ist kein Spielzeug. Halten Sie außer Reichweite von Kindern und Haustieren.
> Bitte lassen Sie niemals das Verpackungsmaterial achtlos herumliegen. Dieses könnte für
Kinder zu einem gefährlichen Spielzeug werden.
> Schützen Sie das Gerät vor extremen Temperaturen, direkter Sonneneinstrahlung, starken
Stößen und Schlägen, hoher Feuchtigkeit, Nässe, entammbaren Gasen, Dämpfen und
Lösungsmitteln.
> Bitte setzen Sie das Produkt keiner mechanischen Belastung aus.
> Wenn kein sicherer Betrieb mehr möglich ist, nehmen Sie das Produkt außer Betrieb und
schützen Sie es vor unbeabsichtigter Verwendung. Ein sicherer Betrieb ist nicht mehr
gewährleistet, wenn das Produkt:
- sichtbar beschädigt ist,
Version
09/13
- nicht mehr einwandfrei funktioniert,
- über einen längeren Zeitraum unter schlechten Umgebungsbedingungen gelagert wurde
oder
- erheblichen Transportbelastungen ausgesetzt wurde.
> Gehen Sie vorsichtig mit dem Gerät um. Stöße, Schläge oder ein Fall aus bereits geringer Höhe
können das Produkt beschädigen.
> Bitte beachten Sie auch die Sicherheits- und Bedienungsanweisungen anderer Geräte, die an
diesem Produkt angeschlossen sind.
> Die Nichtbeachtung der Anweisungen in dieser Bedienungsanleitung kann zu Gefahren führen,
wie z. B. Kurzschluss, Brand, Stromschlag, usw. Beachten Sie die Sicherheitsanweisungen
unter allen Umständen!
Verschiedenes
> Bitte wenden Sie sich an einen Experten, wenn Sie in Bezug zur Bedienung, Sicherheit oder
zum Anschluss des Gerätes unsicher sind.
> Wartungsarbeiten, Änderungen und Reparaturen dürfen ausschließlich von einem Fachmann
oder von einem zugelassenen technischen Kundendienst ausgeführt werden.
> Sollten Sie Fragen haben, zu denen Sie in dieser Bedienungsanleitung keine Antworten nden,
kontaktieren Sie bitte unseren technischen Kundendienst oder ähnliches Fachpersonal.
5. BEDIENELEMENTE
1
2
3
4
5
6
7
1 Weiblicher Steckverbinder (zum Anschluss an die “RC EYE One S” -Batterie)
2 Netzteilplatine
3 Männlicher Steckverbinder (zum Anschluss an den “RC EYE One S”)
4 Antenne
5 DIP-Schalter
6 Hauptkamera
7 Kameralinse
Ohne Abbildung: Doppelseitiges Klebeband
6. MONTAGE DER KAMERA
Die Kamera und ihre elektronischen Komponenten sind sehr empndliche Teile.
Bitte verwenden Sie keine spitzen Gegenstände, wie z. B. Messer oder Zangen,
um die Kamera zu montieren. Defekte an den elektrischen Kabeln können zum
Kurzschluss und damit zur Beschädigung der Kamera führen. Bitte ziehen Sie
nicht am Kabel.
Die Kamera MUSS jederzeit sicher montiert sein. Eine unsachgemäß montierte
Kamera kann nicht nur die Kamera selbst, sondern auch Ihren “RC EYE One S”
beschädigen.
Abb. 1 Abb. 2

1. Schieben Sie die Kamera vorsichtig aus dem Antistatikbeutel heraus.
2. Legen Sie Ihren “RC EYE One S” Quad-Copter auf eine saubere, stabile Fläche.
3. Stecken Sie den männlichen Steckverbinder (3) der Kamera auf die weibliche Eingangsbuchse
des “RC EYE One S”.
4. Legen Sie die Batterie wie üblich ein. Sichern Sie die Batterie einschl. Netzteilplatine (2) und
Kamerakabel mit dem Klettverschlussband (siehe Abb. 1). Achtung! Es ist sehr wichtig, die
Kabel so zu verlegen, dass sie sich nicht verfangen und in die sich bewegenden Rotoren
geraten können. Bitte stellen Sie zu diesem Zeitpunkt noch keine Stromversorgung her!
5. Reinigen Sie die Schutzkappe oberhalb mit einem feuchten Tuch und etwas üssigem
Spülmittel. Achten Sie darauf, dass kein Wasser in das Gerät dringt! Trocknen Sie das Oberteil
der Schutzkappe.
6. Ziehen Sie die Schutzfolie auf einer Seite des doppelseitigen Klebebandes ab.
7. Kleben Sie das doppelseitige Klebeband an der Mittelachse entlang auf das Oberteil der
Schutzkappe (die Kameralinse (7) bendet sich zwischen den beiden roten Propellern). Ziehen
Sie die restliche Schutzfolie des doppelseitigen Klebebandes ab.
8. Befestigen Sie die Kamera am Band, wobei sich die Kameralinse (7) gegenüber der zwei
roten Propeller benden muss (“nach vorn gerichtet”). Die DIP-Schalter (5) müssen nach oben
gerichtet sein, sodass Sie die Kanäle wählen können.
9. Führen Sie die Kabel an der Mitte der Schutzkappe entlang, damit es sich während der
Bedienung des “RC EYE One S” nicht verfangen kann (siehe Abb. 2).
7. INBETRIEBNAHME
Kanal und Videoausgabeformat wählen
Die Auswahl der Kanäle muss mit der Kanalwahl auf Ihrem Anzeigegerät (Empfangsgerät)
übereinstimmen. Die Bedienreichweite der Kamera im freien Feld beträgt ungefähr 60 m.
Hindernisse wie z. B. Wände oder elektromagnetische Störungen können die Reichweite
verkürzen.
Bevor Sie das Videoausgabeformat (PAL/NTSC) bestimmen, trennen Sie die
Stromversorgung zur Kamera. Die Kamera wird erst nach einem Neustart Videosignale
mit dem eingestellten Videoausgabeformat liefern.
Wählen Sie den Kanal (die Frequenz) und das Videoausgabeformat (PAL, NTSC) wie in
nachstehendem Diagramm gezeigt (siehe Abb. 3). Verwenden Sie einen dünnen, stumpfen
Gegenstand, um die Schalter einzustellen, z.B. einen Zahnstocher. Spitze Gegenstände
beschädigen die Schalter.
4. Schalten Sie Ihr Anzeigegerät ein. Sobald die Synchronisierung zwischen Kamera und
Anzeigegerät erfolgreich durchgeführt wurde, kann die Bildübertragung stattnden.
5. Schalten Sie die Kamera nach Verwendung aus, indem Sie die Batterie abklemmen.
Bedienen Sie die Kamera nicht länger als 1 Stunde ohne Unterbrechung, um Schäden zu
vermeiden. Nach einer Bedienung von 1 Stunde sollten Sie die Kamera vollständig
abkühlen lassen, bevor Sie sie erneut benutzen.
8. WARTUNG, PFLEGE UND REPARATUR
> Klemmen Sie die Stromversorgung von der Kamera ab, bevor Sie Reinigungs- und
Wartungsarbeiten daran durchführen.
> Reinigen Sie die Kamera nur mit einem trockenen Tuch. Zum Reinigen der Linse können Sie ein
Wattestäbchen und etwas Linsenreiniger verwenden.
> Reparaturen dürfen nur von einem Fachmann durchgeführt werden.
9. ENTSORGUNG
Zur Erhaltung und zum Schutz der Umwelt sowie zur Verbesserung ihrer Qualität,
zum Schutz unserer Gesundheit und zur umsichtigen und rationellen Verwendung
der natürlichen Ressourcen sollte der Endverbraucher das Altgerät unter Einhaltung
der gesetzlichen Vorschriften zu entsprechenden Sammelstellen bringen. Das
Zeichen der durchgestrichenen Mülltonne mit Rädern bedeutet, dass dieses Produkt
separat entsorgt werden muss und nicht in den Hausmüll geworfen werden darf.
Sie erfüllen damit die gesetzlichen Verpichtungen und leisten Ihren Beitrag zum Umweltschutz.
10. FCC COMPLIANCE STATEMENT
FCC ID: 2AARVRCE-ONE-CAMTX
Statement according to FCC part 15.19:
This device complies with Part 15 of the FCC Rules. Operation is subject to the following two
conditions:
> This device may not cause harmful interference, and
> This device must accept any interference received, including interference that may cause
undesired operation.
Statement according to FCC part 15.21:
Modications not expressly approved by this company could void the user’s authority to operate
the equipment.
CH1
1 2 3 4
( 5,733 GHz )
CH5
1 2 3 4
( 5,809 GHz )
CH2
1 2 3 4
( 5,752 GHz )
CH6
1 2 3 4
( 5,828 GHz )
PAL
4
CH3
1 2 3 4
( 5,771 GHz )
CH7
1 2 3 4
( 5,847 GHz )
NTSC
4
CH4
1 2 3 4
( 5,790 GHz )
CH8
1 2 3 4
( 5,866 GHz )
Abb. 3
Anschluss an ein Anzeigegerät
Halten Sie die Bedienungsanleitung des “RC EYE One S” sowie des Anzeigegerätes
immer griffbereit.
Folgende kompatible RC Logger-Geräte sind in Verbindung mit der Kamera käuich
erhältlich: RC EYE OneCam 5.8 GHz RX (89050RC) und 5.8 GHz Video TX RX Set
(20015RC). Weitere Informationen erhalten Sie auf der RC Logger-Website unter
www.rclogger.com.
1. Damit die Kamera einwandfrei in Verbindung mit einem geeigneten Anzeigegerät arbeitet,
sollten Sie die Bedienungsanleitung Ihres Anzeigegerätes sorgfältig durchlesen.
2. Stellen Sie Kanal und Videoausgabeformat ein. Verwenden Sie die DIP-Schalter (5) auf der Kamera
(siehe “Kanal und Videoausgabeformat wählen”) und stellen Sie den Kanal für das Anzeigegerät wie
in der Bedienungsanleitung beschrieben ein.
3. Schließen Sie den männlichen Steckverbinder der Batterie am weiblichen Steckverbinder (1)
auf der Kamera an. Sobald sich die Kontrolllampe auf dem “RC EYE One S” einschaltet, wird
die Kamera mit Strom versorgt und die Signalübertragung beginnt.
11. PRODUKT-SUPPORT
Wenn Sie technische Hilfe benötigen, besuchen Sie bitte “http://www.rclogger.com/index.php/
contact-us” oder rufen Sie uns an unter +852 2559 2662. Zusätzlich erhalten Sie Hilfe von unserem
Support-Forum unter “http://rclogger.com/forum”.
12. TECHNISCHE DATEN
Stromversorgung ............................................... 7 – 15 V/DC
Stromverbrauch ................................................. max. 200 mA
Frequenz ........................................................... 5,733 – 5,866 GHz
CMOS-Sensor ................................................... 0,3 Megapixel
Auösung ........................................................... 640 x 480 (VGA)
Blickwinkel ......................................................... 55°
Beleuchtung ....................................................... mind. 3 Lux/f1,2
Format ............................................................... PAL, NTSC
Kanal ................................................................. 8 Kanäle
Bedienungsreichweite ....................................... max. 60 m (freies Feld)
Betriebsbedingungen ......................................... -10 bis +50 °C, 85 % rF (nicht kondensierend)
Lagerbedingungen ............................................. -20 bis +60 °C, 90 % rF (nicht kondensierend)
Abmessungen (L x B X H) ................................. Hauptkamera: 43 x 9 x 9 mm
Netzteilplatine: 30 x 10,5 x 7 mm
Gewicht .............................................................. ca. 7,5 g
Diese Bedienungsanleitung wurde von CEI Conrad Electronic International (HK) Limited, 18th Floor, Tower
2, Nina Tower, No. 8 Yeung Uk Road, Tsuen Wan, New Territories, Hong Kong veröffentlicht. Alle Rechte
vorbehalten, einschl. Übersetzung. Die Vervielfältigung durch irgendeine Methode, d.h. Fotokopie, Mikrolm
oder in einer digitalen, elektronischen, optischen oder in anderer Form erfordert die vorherige schriftliche
Genehmigung vonseiten des Herausgebers. Die Vervielfältigung durch Drucken, auch teilweise, ist ebenso
untersagt. Diese Bedienungsanleitung entspricht dem technischen Stand bei Drucklegung. Wir behalten uns
das Recht zu technischen oder physischen Änderungen ohne Vorankündigung vor.
© 2013 by CEI Conrad Electronic International (HK) Limited V2_0913-JH
 Loading...