

Page 1
COWBOY DIES
PRODUCT INSTRUCTIONS
Page 2
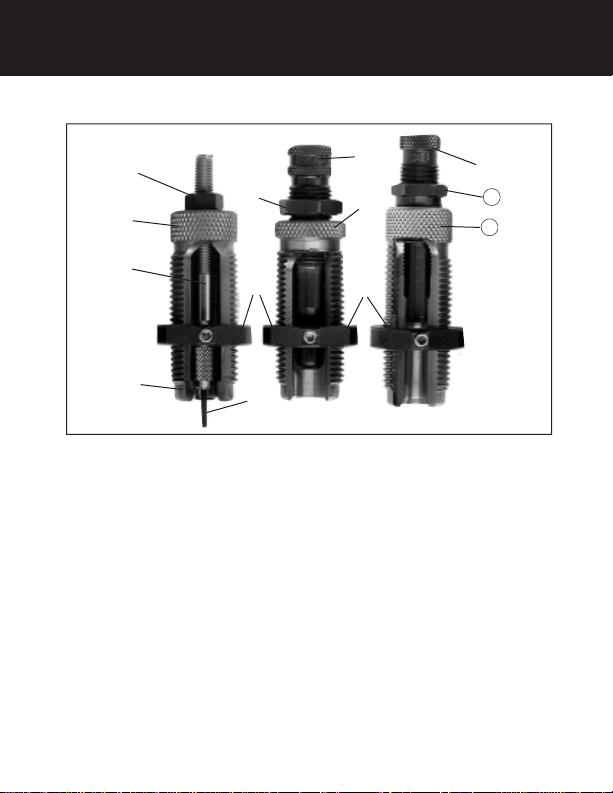
PARTS LIST FOR 3 DIE SET
➃
➀
➂
➄
➉
➈
➇
➅
➁
➅
1
11
➆
Note: The photo above is not the actual RCBS Cowboy Die set, but represents the components of a three die set.
KEY PART # DESCRIPTION
1 709644 Lock Ring 1/2-20
2 – Sizer Die
3 709617 Decapping Rod
4 709618 Decap Pin Holder
5 90164 Decapping Pin
6 709646 Lock Ring 7/8-14
7 709645 Lock Ring 9/16-18
8 – Expander
9 – Expander Die Body
10 – Seater Plug
11 – Seater Die Body
Page 3

IMPORTANT: READ THIS SECTION FIRST
Before using the RCBS Cowboy Dies, read the instruction manual carefully to fully learn
how to safely operate the related reloading equipment. Failure to properly operate certain
reloading equipment can result in severe personal injury and/or equipment damage. If you
have read these instructions and still do not understand some operation, call us at 1-800-
533-5000 and a technician will assist you. This instruction manual contains specific safety
and operating information. It should be considered a permanent part of your reloading
equipment and remain with the equipment at all times for easy reference.
SAFETY
Reloading is an enjoyable and rewarding hobby that can be conducted safely. But, as with
any hobby, carelessness or negligence can make reloading hazardous. This product has
been designed from the beginning with the user’s safety in mind. When reloading, safety
rules must be followed. By observing these rules, the chance of a hazardous occurrence
causing personal injury or property damage is minimized.
GENERAL
• Use all equipment as the manufacturer recommends. Study the instructions carefully
and become thoroughly familiar with the operation of the product. If you do not
have written instructions, request a copy from the equipment manufacturer.
• Don’t take short cuts. Attempting to bypass established procedures is an invitation
to an accident.
• Observe “good housekeeping” in the reloading area. Keep tools and components
neat, clean and orderly. Promptly and completely clean up primer and powder spills.
• Reload only when you can give your undivided attention. Do not reload when
fatigued or ill, or under the influence of medications or alcohol. Develop a reload
ing routine to avoid mistakes which may prove hazardous. Don’t rush - load at a
leisurely pace.
• Always wear adequate eye protection to protect your eyes from flying particles. You
assume unnecessary risk when reloading without wearing safety glasses.
LOADING DATA
• Use only laboratory tested reloading data. We highly recommend the current
SPEER Reloading Manual.
• OBSERVE ALL WARNINGS ABOUT THE USE OF MAXIMUM LISTED
LOADS.
PRIMERS AND POWDER
• Store primers and powder beyond the reach of children and away from heat, dampness, open flames and electrical equipment. Avoid areas where static electricity is evident.
• Do not use primers of unknown identity. Scrap unknown primers in accordance with
applicable regulations.
• Keep primers in the original factory container until ready to use. Return unused
primers to the same factory packaging for safety and to preserve their identity. Primer
Page 4

packaging is designed to provide safe storage.
• DO NOT store primers in bulk. The blast of just a few hundred primers is sufficient
to cause serious injury to anyone nearby.
• DO NOT force primers. Use care in handling primers.
• DO NOT have more than one can of powder on the bench at one time. Powder
cans should be stored away from the bench to avoid picking up the wrong one.
• DO NOT use any powder unless its identity is positively known. The only positive
identification is the manufacturer’s label on the original canister. Discard all mixed
powders and those of uncertain identity.
• If you use a powder measure, replace the lids on both the powder hopper and powder
can after the powder hopper has been filled.
• When using a powder measure, settle the powder in the powder hopper before charging any cases. Throw and check the weight of at least ten charges. This will assure you
that the correct powder charge is being thrown.
• When you finish a reloading session, pour any remaining powder back into its original factory container. This will preserve the identity and shelf life of the powder.
• DO NOT smoke while reloading.
RECORD KEEPING
• Keep complete records of reloads. Apply a descriptive label to each box showing the
date produced, and the primer, powder and bullet used. Labels for this purpose are
packed with SPEER bullets.
Never attempt to guess at the identity of your ammunition.
Because RCBS has no control over the choice of components,
the manner in which they are assembled, the use of this product,
or the guns in which the resulting ammunition may be used,
we assume no responsibility, expressed or implied, for the
use of ammunition reloaded with this product.
Page 5

FEATURES
RCBS Cowboy Dies match tough steel to the tough jobs. The die bodies are
machined and hardened until they’re tough enough to meet our standards, yet
smooth enough to handle the most delicate brass case.
Sizer dies are vented to avoid case damage and are made to absolutely precise
tolerances. And there’s extra muscle where it counts, in the headed decapping
pin. Expander decapping units are designed so the decapping pin can be
replaced, if necessary. Seater dies have a unique design which aligns the bullet
with the case mouth an instant before seating.
Interior polishing helps brass work smoothly with
very little friction and cannot chip or peel with age.
All RCBS Cowboy Dies feature a solid brass lock
ring that allows tight control over precise adjustments. RCBS dies are manufactured with the standard 7/8”-14 thread and are designed for use with a
shell holder having a lip thickness of 0.125”. Any
variations of these dimensions may cause headspace
or insufficient sizing problems.
GENERAL INFORMATION
Reloading rifle or pistol ammunition with lead (non-jacketed) bullets requires a
3-Die Set. The first die sizes and decaps the case. The second die expands the
case neck to the correct diameter to securely hold the lead bullet and flare the
case mouth to avoid shaving lead off the bullet. The third die seats and crimps
the bullet
PACKAGING
All RCBS Cowboy Dies are packaged in
convenient and attractive traditional
storage boxes specially designed by
RCBS to protect your dies in shipment
and during storage. A sturdy cradle
holds the dies firmly in place to prevent
damage and rolling around. Each box
contains a label for recording your
favorite loads and can be adhered to the
inside lid for quick reference. The die
caliber is listed on the outside of the box
for easy identification.
A label is provided with each die box for
recording your favorite loads.
Page 6

CUSTOMER SERVICE
All RCBS Cowboy Dies are carefully checked and thoroughly inspected before
shipping. Each die will reload fired cases from any standard chamber of the caliber stamped on the die. Should the die perform unsatisfactorily, call or write to
RCBS, explaining the problem in detail. In most cases we can help you overcome the problem without the inconvenience and expense of returning the dies.
If necessary, we will authorize the return of the dies. Do not attempt to alter the
dies in any way.
Cowboy seater plugs are designed to fit bullets cast in RCBS Cowboy Bullet
Moulds. It is impossible to make one seater plug fit every possible variation in
bullet style and weight. If the seater plug furnished with the seater die does not
fit the bullet you are using, a custom seater plug will have to be produced.
Please provide us with t
wo sample bullets – both will be returned with the new
seater plug – along with your order and payment. Be sure to specify caliber and
1/2”-20 thread size. Call, e-mail or write RCBS Customer Service for current
price so that you can include payment and avoid any unnecessary delay. Note:
We do not keep bullets on file, so you must send samples to guarantee a perfect
fit.
Send your order and payment with securely packed sample bullets to:
RCBS Customer Service
Custom Seater Plug
605 Oro Dam Blvd.
Oroville, CA 95965-5718
The seater plug for Cowboy calibers can be removed by screwing the seater
plug up and out of the die after the lock ring has been loosened.
A case stuck in the sizer die may be removed with an RCBS Stuck Case
Remover–available from your RCBS dealer. Or you may return the sizer die
along with your name and address. We will remove the stuck case or replace the
die under terms of the RCBS Lifetime Warranty.
PREPARING THE DIES
Some sizer dies for bottleneck type cases contain a small vent hole through
which trapped air escapes during resizing. Sometimes the vent hole will plug up
with factory polishing material. This material will scratch and dent cases unless it
is removed. To clean, unscrew the decap unit from the die. Insert a straightened
paper clip, needle or similar object into the vent hole. This will push the material
into the die body. The debris can then be easily removed by cleaning the inside
of the die using a patch saturated with Outers Solvent. Reassemble the die.
IMPORTANT: We find that most scratching of the die interior is caused by
Page 7

nickel cases or grit on the brass surface. If you are using nickel pistol cases, we
recommend that you use a carbide sizer die. This die is hard enough to resist
the scratching that nickel cases cause. The best method for cleaning brass cases
of grit is to tumble them. Tumbling the cases will clean the surface and prevent
scratching the internal die surface. Your cases should be cleaned periodically to
protect both your dies and the chamber of your firearms. The RCBS Vibratory
Case Cleaner is recommended for cleaning cases. Before storing dies, lightly
spray them with Outers Tri Lube or Metal Seal to protect them from rust.
PREPARING THE CASES
Clean and inspect cases before lubricating and
sizing. Discard any cases with indications of a
split neck or partial head separation. Check cases
for the correct overall length. If necessary, trim
after sizing. If bullets are to be crimped, it is
imperative that cases be trimmed to the same
overall length. Trimmed case mouths should be
deburred and lightly chamfered inside and out
with an RCBS Deburring Tool or use the RCBS
Three Way Cutter in your case trimmer.
Cases must be properly lubricated before sizing.
Over-lubrication will result in a dented case
shoulder. Improper or no lubrication will result in
a case stuck in the sizer die. For best results use
RCBS Case Slick Spray Lube or Case Lube-2 applied to an RCBS Case Lube Pad.
Case mouths should be very lightly lubricated with an RCBS Case Neck Brush.
These accessories are available from your dealer as individual items or combined
in the RCBS Case Lube Kit. Do not lubricate the shoulders of bottle-neck type cases.
After the cases are lubricated they
are ready to go through the
reloading steps.
3-DIE SET FOR BOTTLENECK RIFLE AND
PISTOL CASES
The decapping pin is adjusted
by loosening the small lock ring
at the top of the die and turning
the decapping unit until the desired setting is obtained. When the decapping
Lightly chamfer the case mouth with
a Deburring Tool to remove rough
edges for easier bullet seating.
Roll cases on an RCBS Case Lube Pad for proper lubrication.
Page 8

unit is adjusted correctly, the decapping pin will protrude below the bottom of
the die just enough to reliably knock out the spent primer (approx. 1/4”). Trim
cases after the sizing and expanding operation. We suggest trimming 10 thousandths less than the maximum length. The next step is to prime the case and
then fill it with the predetermined powder charge. Then seat the bullet. Usually
the reloader performs one operation at a time on each lot of cases; sizing and
decapping, priming and filling them with powder and then seating the bullets.
SIZING WITH CARBIDE SIZER DIES
Screw the Sizer Die into the press until the die touches the top of the shell
holder when the shell holder is brought up to the top of the press stroke.
Tighten the large lock ring. DO NOT CAM OVER.
SIZING WITH STANDARD STEEL SIZER DIES
Screw the Sizer Die into the press until the die touches the top of the shell
holder when the shell holder is brought up to the top of the press stroke. Be
sure all play is removed from the press leverage system. To do this, adjust the
die as above, lower the shell holder and set the die 1/8 to 1/4 of a turn lower.
Set the large lock ring. The decapping unit is adjusted by loosening the small
lock ring at the top of the die and turning the decapping rod until the desired
setting is obtained. When the decapping unit is adjusted correctly, the decapping pin will protrude below the bottom of the die just enough to reliably
knock out the spent primer (approx. 1/4”).
Important: Do not allow the decapping unit to contact the web of the case.
EXPANDING
Screw the expander die into the press until the die touches the top of the shell
holder when the shell holder is brought up to the top of the press stroke. Place
PLEASE NOTE:
A Tungsten Carbide Sizer Die will give a lifetime of perfect service if
properly cared for. However, the die will not withstand severe
impact, such as dropping. The shell holder should never strike the
bottom of the die. When using a Carbide Sizer Die it is not necessary
to lubricate a pistol straight-wall case. Screw the die into the press
until it just touches the shell holder. DO NOT CAM OVER.
Page 9

a sized case in the
shell holder and
run it into the
expander die. The
case mouth should
be expanded and
flared (belled) just
enough to accept
the bullet when
placed on top of
the case. The expander is tapered and may be adjusted for
more or less flaring (belling) by loosening the lock ring
on top of the die and turning the expander up or down.
BULLET SEATING AND CRIMPING FOR
ROLL CRIMP
IMPORTANT: Please read instructions carefully. Do not
adjust the seater die down against the shell holder as it will distort or crush the
case. If the bullet you are using has a crimping groove, the bullet can be seated
and crimped using the following instructions. Before proceeding, cases must be
trimmed to the same overall length to assure a consistent crimp. The crimping
feature is machined into the seater die body. It is not a special attachment to
the seater plug. The die must be moved up or down to obtain the proper crimp
adjustment. To adjust, the seater die, place a sized, primed and powder-charged
case into the shell holder and run it to the top of the press stroke.
Screw the seater die into the press until you feel it touch the mouth of the
case. Back the die up one full turn and set the large lock ring. This will leave a
gap between the bottom
of the die and the shell
holder. Next, lower the
case and insert a bullet
in the case mouth.
Slowly run the case and
bullet into the seater die.
Check the bullet for
proper seating depth. If
the bullet is not seated
properly, adjust the
Screw the sizer die into the
reloading press.
Notice the sizer die is adjusted so
it contacts the shell holder.
The standard RCBS steel die is shown on
the left. The carbide insert is visible in the
carbide sizer die on the right.
Seater dies in our 3-die sets
use a “through-the-top”
style seater plug as shown
above.This allows for easy
cleaning.
Page 10

seater plug until the proper depth (in the middle of the crimp groove) is
obtained.
Next, adjust the die to crimp. While the uncrimped cartridge is still in the
seater die, unscrew the seater plug several turns. Screw the seater die downward
until you feel it touch the mouth of the case. Lower the reloaded cartridge and
adjust the seater die down about 1/8th of a turn. Run the reloaded cartridge
into the die and then check the crimp. If more crimp is needed, repeat the preceding step by adjusting the die downward 1/8th of a turn at a time. Overcrimping of the cartridge will cause bulging and may affect chambering. After
you are satisfied with the crimp, run the completed cartridge into the seater die,
set the large lock ring and then lower the seater plug until it touches the bullet.
Tighten the seater plug lock ring. Once the seater die is properly adjusted, the
bullet is seated and crimped in one operation.
Page 11

REPLACEMENT PARTS
The Decapping Unit (Key 3, 4, & 5) and Decapping Pins (Key 5) may be available
from your dealer. If not, they and all other replacement parts should be ordered from
RCBS Customer Service. See the back panel of this instructions booklet for phone
number or address.
3-Die 3-Die 3-Die Carbide
Full Length Roll Crimp Roll Crimp Decap Decap
Caliber Set Set Set Unit Pin
.25-20 Winchester 11850 – – 09628 90164
.30-30 Winchester 14650 – – 09628 90164
.32 S&W Long/.32 S&W – – 21451 09628 90164
.32 Winchester Special 15750 – – 09628 90164
.32-20 Winchester – 18151 – 09628 90164
.32-40 WCF 32550 – – 09628 90164
.357 Magnum/.38 Spec. – – 18251 09628 90164
.38 S&W – 20351 – 09628 90164
.38-40 WCF – 35651 – 09628 90164
.38-55 Winchester – 36551 – 09628 90164
.40-65 Winchester-410” – 36651 – 09628 90164
.44 S&W Russian/.44 Special – – 18651 09628 90164
.44-40 WCF – 18851 – 09628 90164
.45 S&W Schofield/.45 Colt – – 19151 09628 90164
.45-70 U.S. Gov’t – 20951 – 09628 90164
PLEASE NOTE:
These instruction photos are for general die use and information. The photos shown may not necessarily portray exact
RCBS Cowboy Dies, however the information is accurate and
useful.
Please call RCBS Customer Service for any questions:
1-800-533-5000
Page 12

PRECISIONEERED®RELOADING EQUIPMENT
We think that we make the very best
reloading equipment in the world.
If you agree, please tell your friends.
If you disagree, tell us - we want to do something about it!
Customer Service
1-800-533-5000 (US or Canada) or 530-533-5191
Hours: Monday - Thursday, 6:30am - 3:00pm (hours may vary)
e-mail: rcbs.tech@atk.com • www.rcbs.com
RCBS • 605 Oro Dam Blvd. • Oroville, CA 95965
CCI • SPEER • RCBS
OUTERS • RAMLINE • ORBEX • FEDERAL
7200496/0104
 Loading...