

Page 1
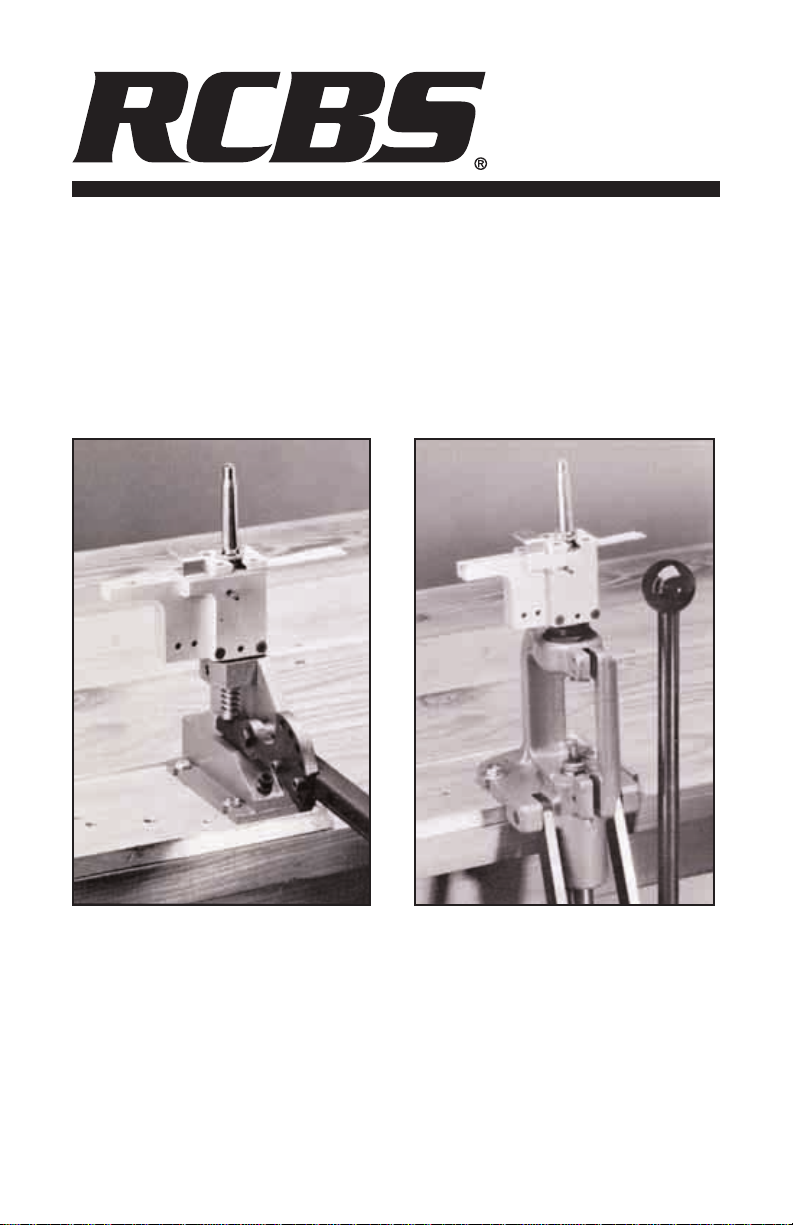
APS Bench-Mounted Priming Tool APS Press-Mounted Priming Tool
PRODUCT INSTRUCTIONS
APS
TM
PRIMING TOOL
Page 2

IMPORTANT
Before using the APS Priming Tools
from RCBS, read this instruction
manual carefully to learn how to
safely operate the products. Failure
to properly operate the tools may
result in personal injury and/or equipment damage. If you have read these
instructions and still do not understand some operation, call us at 800533-5000 or 530-533-5191 and a
technician will assist you. Our customer service hours are listed on the
back side of this instruction manual.
These instructions contain specific
safety and operating information. It
should be considered a permanent
part of your reloading equipment and
remain with the equipment at all times
for easy reference.
SAFETY
Reloading is an enjoyable and rewarding hobby that can be conducted
safely. But, as with any hobby, carelessness or negligence can make
reloading hazardous. This product
has been designed from the beginning with the user’s safety in mind.
When reloading, safety rules must
be followed. By observing these rules,
the chance of a hazardous occurrence causing personal injury or
property damage is minimized.
GENERAL
• Use all equipment as the manufacturer recommends. Study the
instructions carefully and become
thoroughly familiar with the operation of the product. If you do not
have written instructions, request
a copy from the equipment manufacturer.
• Don’t take short cuts. Attempting
to bypass established procedures
is an invitation to an accident.
• Observe “good housekeeping” in the
reloading area. Keep tools and
components neat, clean and orderly.
Promptly and completely clean up
any powder spills.
• Reload only when you can give
your undivided attention. Do not
reload when fatigued or ill. Develop
a reloading routine to avoid mistakes. Don’t rush – load at a
leisurely pace.
• Always wear adequate eye protection to protect your eyes from flying particles. You assume
unnecessary risk when reloading
without wearing safety glasses.
PRIMERS AND POWDER
• Store primers and powder beyond
the reach of children and away
from heat, dampness, open flames
and electrical equipment.
• DO NOT use primers of unknown
identity.
• Keep primers in the original factory container until ready to use.
Return unused primers to the same
factory packaging for safety and
to preserve their identity.
• DO NOT store primers in bulk. The
blast of just a few primers is sufficient to cause serious injury to
anyone nearby.
• DO NOT force primers. Use care
in handling primers.
• DO NOT smoke while handling
powder or primers.
LOADING DATA
• Use only laboratory tested reloading data. We highly recommend
the use of the SPEER Reloading
Manual.
• OBSERVE ALL WARNINGS
ABOUT THE USE OF MAXIMUM
LISTED LOADS.
RECORD KEEPING
• Keep complete records of reloads.
Apply a descriptive label to each
box showing the date produced,
and the primer, powder and bullet used. Labels for this purpose are
packed with SPEER bullets. Never
attempt to guess at the identity of
your ammunition.
2
Page 3
• This product is intended for use
by persons familiar with proper
handloading practices and their
own loading equipment. If you are
uncertain as to the operation of
any of your equipment, contact the
equipment manufacturer for additional assistance.
Because RCBS has no control over
the choice of components, the manner in which they are assembled,
the use of this product, or the guns
in which the resulting ammunition
may be used, no responsibility –
either expressed or implied – is
assumed for the use of ammunition
reloaded with this product.
GENERAL INFORMATION
ABOUT APS PRIMING
The APS Priming System is an entirely
new way to prime cases. It’s fast, it’s
safe and it’s convenient. This revolutionary system eliminates the handling of loose primers and the
contamination that goes with it. Plus,
it insures a smooth feed and a highly
sensitive feel with every primer seated.
There are two APS tools; one is
bench-mounted
and the other is
press-mounted. Each one is designed
to fit specific reloading needs. The
bench-mounted
tool is for the reloader
who likes to prime cases on a separate dedicated piece of equipment.
This way the priming tool is always
ready to use when you need it. The
press-mounted tool works the same
way as the bench-mounted tool except
it attaches to your reloading press.
It has standard 7/8x14 threads to fit
in the die station.
Both tools use the new APS primer
strips. Each strip is color-coded for
identification and holds 25 primers.
With each handle stroke, a fresh
primer is seated into the case and
the primer strip advances through
the APS body to position another
primer for seating. The primer strips
are designed to connect to each other
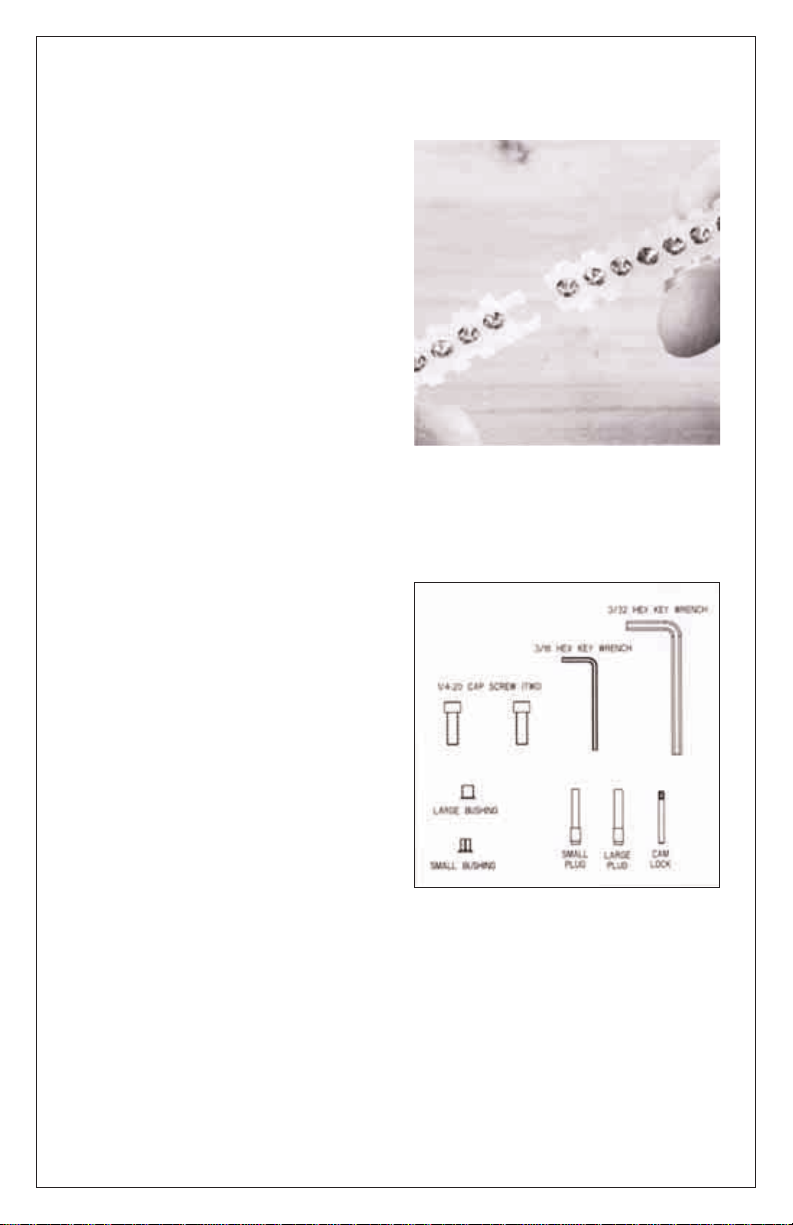
for continuous feed. See photo #3.
Please call us if you have any questions at any time while assembling or
operating this equipment.
APS BENCH-MOUNTED
PRIMING TOOL INSTRUCTIONS
Carefully unpack the priming tool
and look for the following items:
• APS bench-mounted tool
• APS handle
• One small bushing
• One large bushing
• Small primer plug
• Large primer plug
• Cam lock pin
3
Photo #3
Page 4
• Hex key wrench, 3/32
• Hex key wrench, 3/16
• 1/4-20 socket head cap screw (2)
Securely fasten the APS tool to a
sturdy bench using the four slots in
the base. This APS tool can also be
mounted to an RCBS Accessory Base
Plate-2. Mounting the priming tool
to a solid surface like the base plate
gives the tool added stability.
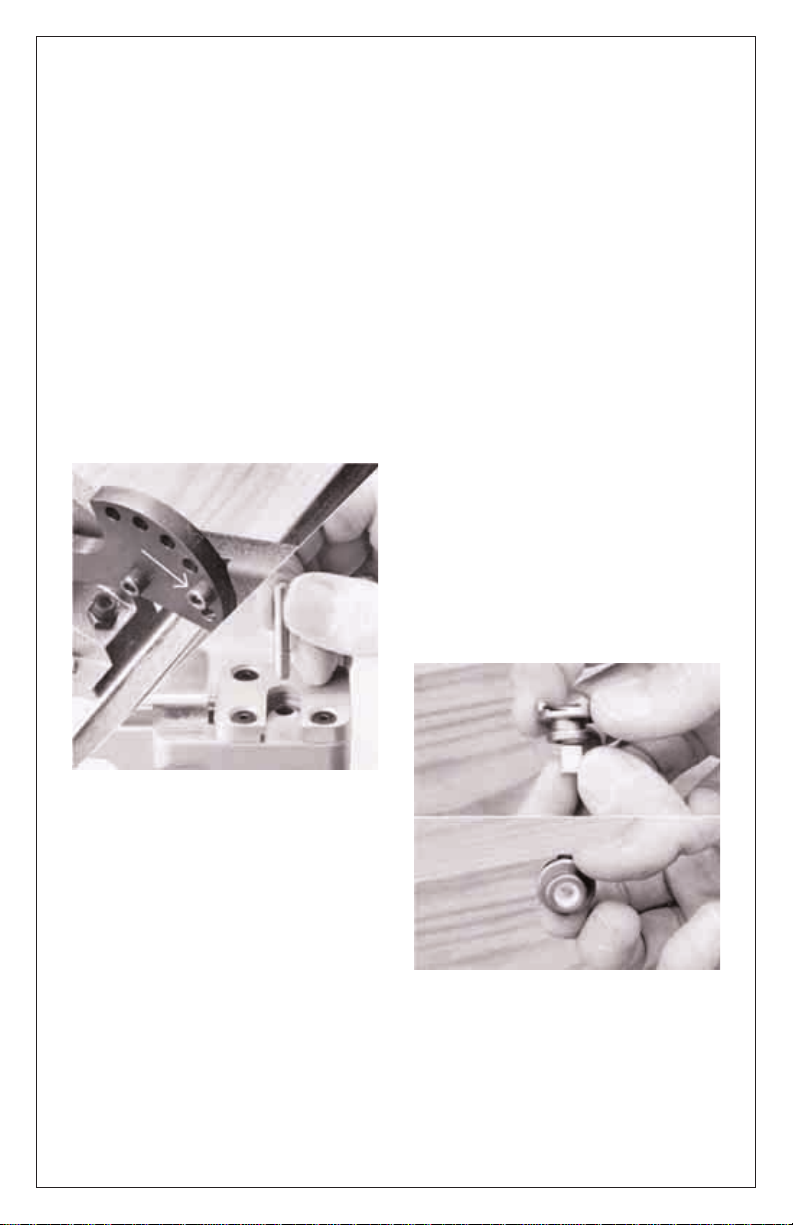
Using the two cap screws attach the
operating handle so it is in a comfortable position. The mounting holes
allow you to position the handle from
below horizontal to vertical. See
photo #4.
Now, select the correct size primer
plug for the primer size you will be
using. There is a small primer plug for
seating small primers and a large
primer plug for seating large primers.
Each primer plug has a shoulder on
it and is bigger on one end. See photo
#4. IMPORT ANT: LOWER THE HAN-
DLE ON THE PRIMING TOOL
BEFORE YOU INSERT THE LARGE
END OF THE PRIMER PLUG INTO
THE HOLE ON TOP OF THE TOOL.
If you tried to install the primer plug
before you read these instructions, you
probably did not first lower the handle. And if that’s the case, you’ll notice
that the primer plug has disappeared
down inside the body of the tool. If that
happens, you’ll need to disassemble the tool to retrieve the primer
plug. To do this, remove the four flat
head screws on the top cap. Lift off
the top cap and the top plate and
then remove the plug. Reinstall the top
plate correctly for clearance and
safety and replace the top cap and the
four flat head screws. And the next
time, remember to lower the operating handle before installing the primer
plug. Make sure you seat the primer
plug firmly in the cam hole.
Next, select the correct size plastic
bushing for the primer size you will
be using. There is a small bushing for
small primers and a large bushing
for large primers. Here’s a quick way
to tell which is the large bushing and
which is the small. Just remember
the small bushing has a seam, the
large bushing is smooth. These bushings center the primer when the
primer rod pushes a primer up through
the shell holder.
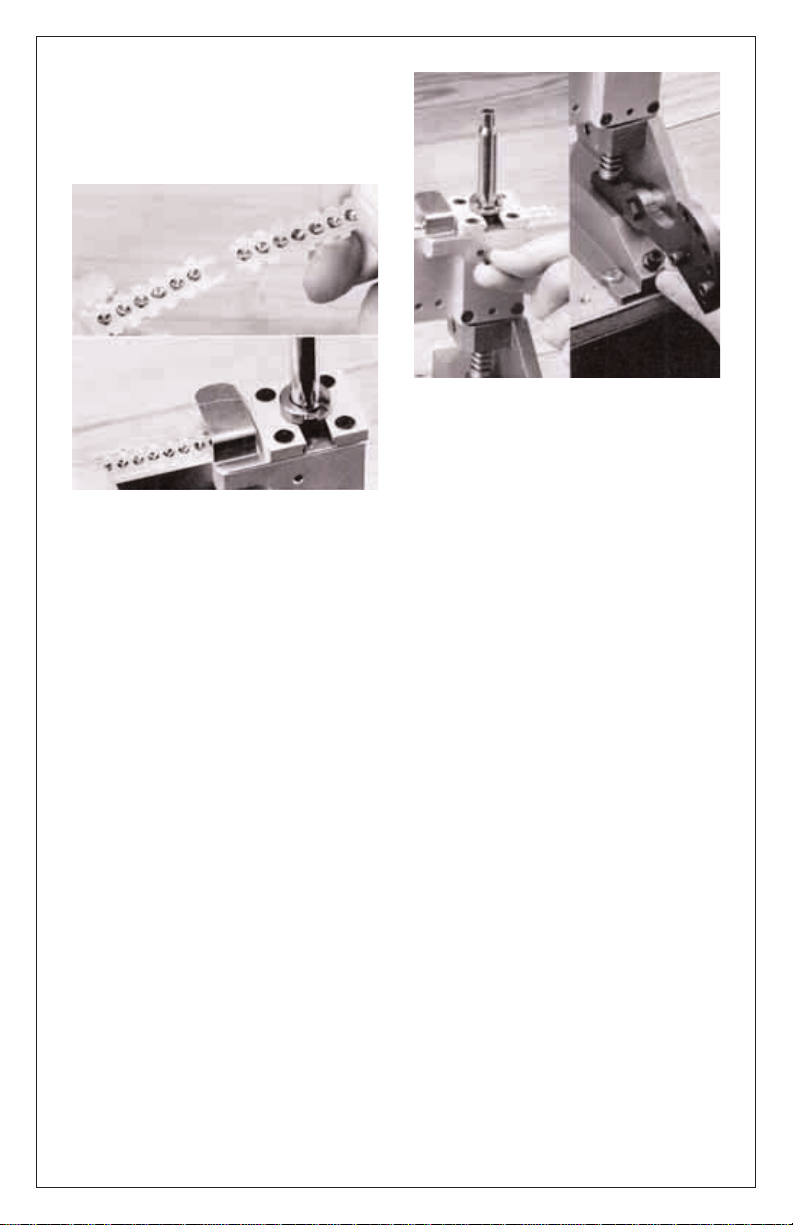
Take the correct size plastic bushing
in one hand and the shell holder you
will be using in the other and place
the bushing into the bottom of the
shell holder. See photo #5. Then
raise the handle and insert the shell
4
Photo #4
Photo #5
Page 5
holder and bushing into the slot on the
tool. By rotating the shell holder
counter-clockwise while pressing
unit firmly to the rear of the slot.
Peel a strip from the package of APS
primers and take a look at the ends.
One end of the strip is cut square
and the other end has two little hooks
on it. See photo #6. The end with the
hooks is the end that feeds into the
tool. Hold the strip so the primers
are anvil-side-up and insert the strip
into the tool until it clicks in place.
See photo #6. If the strip does not
slip in easily, it is probably because
the “step” where the hooks connect
to the strip is hitting the face of the tool.
To help it into position, you may need
to lift up on the square cut (left) end
of the strip to get the step under the
edge of the tool. If the strip is inserted
backwards (square end first) the
primer plug can wedge in the strip
and you will have to disassemble.
Insert a case into the shell holder
and lower the handle to seat a primer.
Then STOP with the handle down!
Insert the the cam lock pin to adjust
the primer depth. See photo #7. The
cam lock pin will stop the strip from
advancing while making this adjustment. Use the primer adjustment
screw on the base of the priming
tool. Raise the handle and remove
case and check for primer seating
depth. Turn screw clockwise for
deeper seating depth and counterclockwise for less seating depth. See
photo #7. The adjustment screw limits the handle travel at the seating
depth you want (flush – .004 deep)
and prevents crushing primers. If
you did not use the pin to stop the strip
from advancing, another primer is
in place to be seated. Do not return
the primed case to the shell holder
and try to seat the primer deeper
without clearing the second primer
from the machine. Remove and discard the second primer.
Once you are satisfied with the primer
seating depth you are ready to prime
cases. With the handle down, pull
the cam lock pin out of the tool and
start priming. Be sure to operate the
handle through the full stroke – all
the way up and all the way down.
Remember, the primer strips are
designed to connect to each other. So
for continuous primer feeding, just
connect another strip onto the end
of the strip in the tool when there is
at least one inch of the ramp available
to support the new strip. See photo
#8. The strip can be removed at any
point in the process by pushing or
pulling the strip through the right-hand
side of the tool.
5
Photo #6
Photo #7
Page 6

APS PRESS-MOUNTED
PRIMING TOOL INSTRUCTIONS
Carefully unpack the press-mounted
tool and look for the following items:
• APS press-mounted tool
• One small bushing
• One large bushing
• Small primer plug
• Large primer plug
• Cam lock pin
• Adjustment rod assembly
• 7/8-14 lock nut
• Hex key wrench 3/32
To install the APS Press-Mounted
Priming Tool, first install 7/8-14 nut
on the tool adapter. See photo #9.
Thread the tool into your reloading
press approximately seven turns. The
ramp on the tool should be pointing to
the left. Then tighten the lock nut.
Install the adjustment rod assembly
into the ram of the press just like a
shell holder. See photo #10. Slowly
lower the press handle to the bottom of its travel. If it stops before
reaching the bottom of its travel,
stop, raise the handle and either
adjust the toolhead up a couple of
turns, and/or the adjustment rod
down. See photo #10.
Now, select the correct size primer
plug for the primer size you will be
using. There is a small primer plug for
6
Photo #9
Photo #10
Photo #8
Page 7

seating small primers and a large
primer plug for seating large primers.
Each primer plug has a shoulder on
it and is bigger on one end. See
photo #11. IMPORTANT: LOWER
THE HANDLE ON THE PRESS
BEFORE YOU INSERT THE LARGE
END OF THE PRIMER PLUG INTO
THE HOLE ON TOP OF THE TOOL.
If you tried to install the primer plug
before you read these instructions,
you probably did not first lower the
handle. And if that’s the case, you’ll
notice that the primer plug has disappeared down inside the body of
the tool. If that happens, you’ll need
to disassemble the tool to retrieve
the primer plug. To do this, remove
the four flat head screws on the top
cap. Lift off the top cap and top plate
and remove the plug. Reinstall the top
plate correctly for clearance and
safety and replace the top cap and the
four flat head screws. And next time,
remember to lower the operating
handle before installing the primer
plug. Make sure to seat the primer
plug firmly in the cam hole.
Next, select the correct size plastic
bushing for the primer size you will
be using. There is a small bushing for
small primers and a large bushing
for large primers. Here’s a quick way
to tell which is the large bushing and
which is the small. Just remember
the small bushing has a seam, the
large bushing is smooth. These bushings center the primer when the
primer rod pushes a primer up through
the shell holder.
Take the correct size plastic bushing
in one hand and the shell holder you
will be using in the other and place
the bushing into the bottom of the
shell holder. See photo #12. Then
raise the handle and insert the shell
holder and bushing into the slot on the
tool by rotating the shell holder
counter-clockwise while pressing
unit firmly to the rear of the slot.
Peel a strip from the package of APS
primers and take a look at the strip
ends. One end of the strip is cut
square and the other end has two
little hooks on it. See photo #13. The
end with the hooks is the end that
feeds into the tool. Insert the strip
into the tool until it clicks in place. See
photo #13. If the strip does not slip
in easily, it is probably because the
step where the hooks connect to the
strip is hitting the face of the tool.
To help it into position, you may need
to lift up on the square cut (left) end
of the strip to get the step under the
edge of the tool.
7
Photo #12
Photo #11
Page 8

Insert a case into the shell holder and
lower the handle slowly and carefully.
The press handle should go all the
way to the bottom with very little resistance. Remember you have the
mechanical advantage of compound
leverage. More than enough leverage to crush primers, bend the
primer plug and bend the rim of
the case – so don’t force it! If the
handle stops part way down, insert
the cam lock pin. The cam lock pin will
stop the strip from advancing while
making this adjustment. See photo
#14. Then lift the handle back up and
turn the adjustment rod in the shell
holder depth adjustment assembly
down a little and try again. When the
handle travels easily to the bottom
of its stroke, check the primer seating
depth. For high primers, back the
adjustment rod out a little. If the primer
cup is flattened (crushed), turn the
adjustment rod down a little further
until you get the correct seating depth.
When the proper priming seating
depth is achieved (flush – .004 deep)
with the handle all the way down,
remove the cam lock pin. Then raise
the handle and tighten the 1/4-28
lock nut.
You’re now ready to prime cases.
Remember, the primer strips are
designed to connect to each other.
So for continuous primer feeding,
just connect another strip onto the
end of the strip in the tool when there
is at least one inch of the ramp available to support the new strip. See
photo #15. The strip can be removed
at any point in the process by pushing or pulling the strip through the
right-hand side of the tool.
PRIMER STRIP COLOR ID
CHART
APS Primer Strips are color-coded to
prevent confusion and misidentification. To minimize the number of colored
primer strips, we not only used the
8
Photo #14
Photo #15
Photo #13
Page 9

various colors for designating primer
type but also for primer size. For example, there are two white primer strips;
one for large pistol primers and one for
small pistol primers.
White Primer Strip:
#300 Large Pistol, Standard
#500 Small Pistol, Standard
Red Primer Strip:
#350 Large Pistol, Magnum
#550 Small Pistol, Magnum
Yellow Primer Strip:
#200 Large Rifle, Standard
#400 Small Rifle, Standard
Blue Primer Strip:
#250 Large Rifle, Magnum
#450 Small Rifle, Magnum
Black Primer Strip:
#BR2 Large Rifle, Benchrest
#BR4 Small Rifle, Benchrest
Orange Primer Strip:
#34 7.62mm (Military)
#41 5.56mm (Military)
CUSTOMER SERVICE
After reading these instructions, if
you have any questions or need additional help in using the APS Priming
Tools, call us at the factory. We’ll be
glad to help.
APS STRIP LOADER
INSTRUCTIONS
The APS Strip Loader is for those
reloaders who may have a supply of
CCI primers in conventional traytype packaging and now, because
of the APS Priming Tools, they need
those primers loaded into strips. As
the name implies, the strip loader
allows you to fill empty primer strips
with your favorite primers. With each
push of the handle the strip loader will
quickly seat 25 primers into a strip.
After loading the strips with primers
the strips are ready to be used in an
APS Priming Tool.
The tape covering CCI strips of APS
primers is an important safety feature
of the packaging. The tape serves
to prevent the detonation of a single primer from causing detonation
of other primers in close proximity.
Always cover loaded primer strips, not
in use, with APS tape. Never store
quantities of loaded primer strips
without covering them with tape.
Covering the primers with APS tape
also serves to protect them from contamination during storage. To apply
the tape, simply peel the backing
from a section from the tape. Lay
the tape on a flat surface with the
adhesive surface up. Lay up to four
loaded strips, side-by-side, anvil side
down and press firmly into place.
IMPORTANT: Before you operate
the strip loader it is vitally important
that you read these instructions and
fully understand how this product
works. Become familiar with the
loader by going through a few “dry
runs.” Along with these instructions
there are some handy tips and suggestions that will make the tool easier to use.
Carefully unpack the strip loader and
look for the following items:
• Strip loader assembly
• Handle lever
• Tray lid
• Strips
• Tape
Place the strip loader on a flat sur-
face and attach the handle lever as
shown in photo #16. You may need
to depress or push down on the primer
seating bar so the handle lever will
slip into the four slots at the back of
the tool. See photo #16. Under the
primer seating bar you’ll see there are
25 pins...one for each hole in the
primer strip. These pins help to locate
the empty strips in the tool and to
position the primers in the strip. Once
the handle lever is installed, push
down on the lever and watch what
9
Page 10

happens. While pushing on the handle lever, notice the 25 pins will retract
allowing insertion of strip.
Now it’s time to try a “dry run.” Don’t
put any primers on the tray just yet.
The dry run will help you become
comfortable with installing and removing the primer strip from the tool.
With a little practice you’ll soon learn
the “feel” for how far to depress the
handle lever.
First, take an empty strip in your
right hand. Hold it by the square end
and with the flat side of the strip facing up. See photo #17. Now, with
your left hand, push part way down
on the handle lever until the 25 pins
are just flush with the bottom of the
primer channel. See photo #18. At the
same time insert the empty strip into
the loader from the right-hand side of
the tool. The strip should slide right
into the tool. See photo #19. If it does
not, it is because the handle lever is
not pressed down far enough or is
pressed down too far. Try moving
Photo #18
Photo #19
10
Photo #16
Photo #17
Page 11

the handle lever up or down until the
strip feeds into the loader. Slide the
strip into the loader leaving about
1'' of the strip out of the tray. Do not
release the lever. Attach another
strip by inserting the hooks of the
strip into the square end of the first
strip. See photo #20. This will help you
to position the first strip fully into the
loader. There are two little guide
marks etched into the tray, one on
the left side of the tool and one on
the right side of the tool. These
marks are used to line up the strips
as shown in photo #21. These should
help you to position the strip over the
top of the 25 pins. Move the strip
in and out of the tool and keep in
mind that the goal is to align the
holes in the strip with the pins.
Practice these steps until you’re
comfortable with the process.
Now you’re ready to add primers to
the tray. Make sure there is an
empty strip correctly positioned
in the loader. Also make sure the
strip is the correct color and size
for the primer being loaded. Never,
ever, under any circumstances,
load primers into a strip that is
not the correct color for the primer
being loaded. See the color coding
chart on page 9 for the correct
color. Using the wrong color strip
can lead to misidentification of
the primers. Using the wrong
primers in a handload can create
a dangerous condition that could
result in damage to your firearm
and physical injury. Place a pack-
age of primers upside down on the
grooved surface of the loader and
slide the sleeve off the primer package. See photo #22. Shake the strip
loader right to left so the specially
grooved surface flips all the primers
right-side up (anvil side up). Place the
tray lid on the strip loader.
Photo #21
Photo #20
Photo #22
11
Page 12

Next, tilt the strip loader away from
you until there is a primer in each
hole of the strip (you may need to
rock the tool to the left and right to
move the primers into position.) See
photo #23. Then tilt the tool towards
you to move all the extra primers
back away from the strip. Check to
confirm there is a primer in each
hole, but no extra primers are in the
strip area. See photo #24.
To seat the primers into the strip,
first read and then follow the steps
listed below. (Remember the dry run.)
• Be sure there is a primer in each
hole of the strip.
• Press down on the handle lever
(apply firm, even pressure). See
photo #25.
• Do not release the pressure on
the handle lever.
• Slowly raise the handle lever while
gently pushing on the right end of
the strip with the empty strip. See
photo #26.
• As the lever raises, you will be
able to push the strip through the
tool with the empty strip.
• Attach another empty strip to the
second strip as described above, and
repeat these steps. See photo #27.
12
Photo #23
Photo #24
Photo #25
Photo #26
Page 13

If the primer strip does not come out
check to be certain the primers
are seated deep enough. If primers
are not seated to flush or below, they
will not function in the APS tools.
Continue this process until you have
filled all the strips you need. Return
any unused primers to their original
factory packaging.
The tape covering CCI strips of APS
primers is an important safety feature
of the packaging. The tape serves
to prevent the detonation of a single primer from causing detonation
of other primers in close proximity.
Always cover loaded primer strips, not
in use, with APS tape. Never store
quantities of loaded primer strips
without covering them with tape.
Covering the primers with APS tape
also serves to protect them from contamination during storage. To apply
the tape, simply peel the backing
from a section from the tape. Lay
the tape on a flat surface with the
adhesive surface up. Lay up to four
loaded strips, side-by-side, anvil side
down and press firmly into place.
See photo #28.
If you have any questions or are having difficulty, don’t struggle, ask the
folks who built it. Call 1 (800) 533-
5000.
Helpful hints…
1. You may have to straighten strip if
flat surface is bowed.
2. It helps to have a strip in place on
each end while using the strip
loader.
3. You may wish to color the etched
guide marks with a felt pen for
better visibility.
4. If strips do not index correctly in the
APS tool, check:
a. strip inserted correctly (hook
end first)
b. to see that strips have not devel-
oped physical damage from
misuse.
13
Photo #27 Photo #28
Page 14

14
Page 15

Page 16

7200528/0803
CCI • SPEER • RCBS
OUTERS • RAMLINE • ORBEX • FEDERAL
PRECISIONEERED®RELOADING EQUIPMENT
We think that we make the very best
reloading equipment in the world.
If you agree, please tell your friends.
If you disagree, tell us - we want to do something about it!
Customer Service
1-800-533-5000
(US or Canada) or
530-533-5191
Hours: Monday - Thursday, 6:30am - 3:00pm (hours may vary)
e-mail: rcbs.tech@atk.com • www.rcbs.com
RCBS • 605 Oro Dam Blvd. • Oroville, CA 95965
 Loading...