

Page 1

Page 2
WARNING
To reduce the risk of fire or
electric shock, do not
expose this product to rain
or moisture.
RiSK OF ELECTRICSHOCK
DO NOT OPEN
To reduce the risk of electric shock, do not
remove cover (or back). No user-serviceable
parts inside. Refer servicing to qualified
service personnel.
_k This symbol indicates
"dangerous voltage" inside
the product that presents a
risk of electric shock or
personal injury.
1
This symbol indicates |
important instructions
J
accompanying the
product.
Caution: To prevent electric shock, match wide blade of plug to wide slot,
fully insert.
Attention: Pour _viter les chocs electriques, introduire la lame la plus large de
la fiche dans la borne correspondante de la prise et pousser jusqO au fond.
Cable TV Installer: This reminder is provided to call your attention to Article
820-40 of the National Electrical Code (Section 54 of the Canadian Electrical
Code, Part 1) which provides guidelines for proper grounding and, in
particular, specifies that the cable ground shall be connected to the grounding
system of the building as close to the point of cable entry as practical.
CAUTION: Changes or modifications not expressly approved by the party responsible for compliance
with the FCC Rules could void the user's authority to operate this equipment.
IATTENTION 1
if you purchase a universal remote control from your local retailer, please contact the remote
manufacturer for the required programming code.
TV/CATV MODE SELECTION 1
When shipped from the factory, the TV/CATV menu option is set to the "CATV" (Cable Television)
mode. If not using CATV, set this menu option to the "TV" position.
Product Registration
Please fill out the product registration card and return it immediately. Returning the card allows us to
contact you if needed.
Keep your sales receipt to obtain warranty parts and service and for proof of purchase. Attach it here and
record the serial and model numbers in case you need them. The numbers are located on the back of the
product.
Model No.
Serial No.
Purchase Date:
Dealer/Add ress/Phene:
Page 3
IMPORTANT SAFEGUARDS
1. READ INSTRUCTIONS
All the safety and operating instructions should be read before the unit is operated.
2. RETAIN INSTRUCTIONS
The safety and operating instructions should be retained for future reference.
3. HEED WARNINGS
All warnings on the unit and in the operating instructions should be adhered to.
4. FOLLOW INSTRUCTIONS
All operating and use instructions should be followed.
5. CLEANING
Unplug this unit from the wall outlet before cleaning. Do not use liquid cleaners or aerosol cleaners.
Use a damp cloth for cleaning.
6. ATTACHMENTS
Do not use attachments not recommended by the unit's manufacturer as they may cause hazards.
7. WATER AND MOISTURE
Do not use this unit near water. For example, near a bathtub, washbowl, kitchen sink, or laundry tub. in a wet
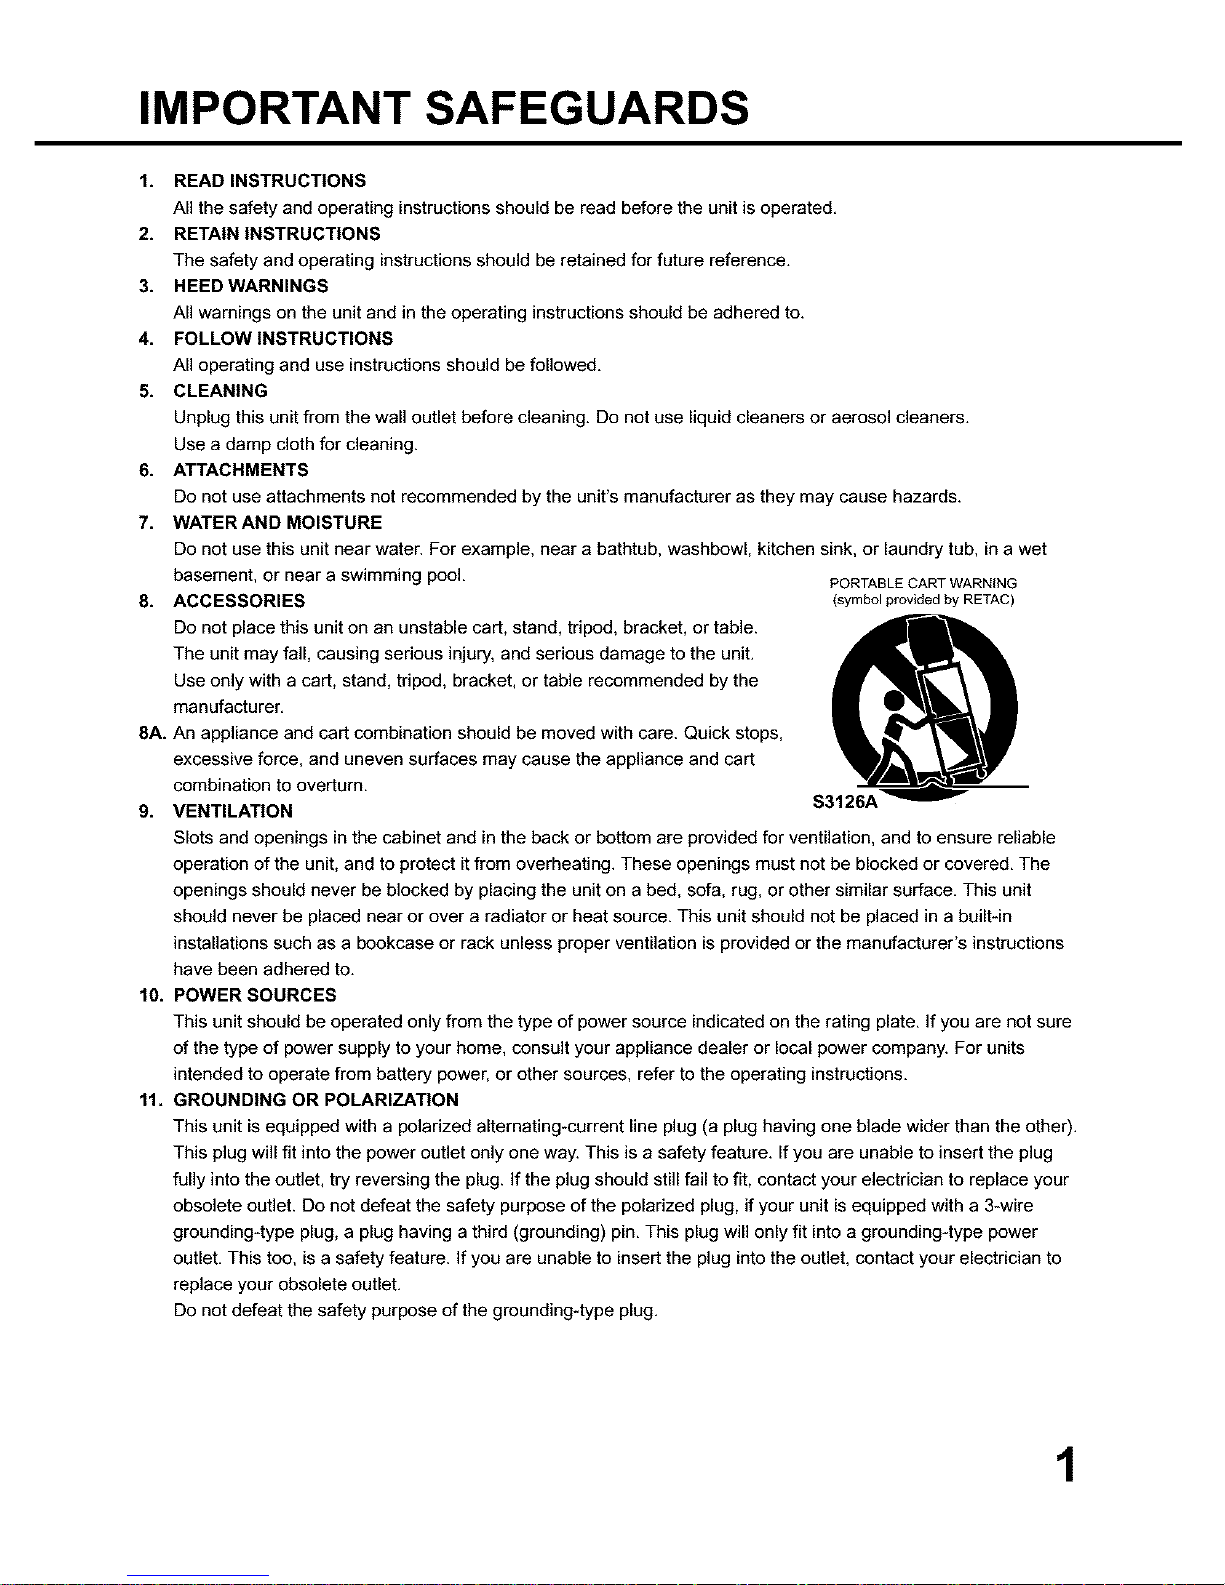
basement, or near a swimming pool. PORTABLECARTWARNING
8. ACCESSORIES (symbol provided by RETAC)
Do not place this unit on an unstable cart, stand, tripod, bracket, or table.
6)
The unit may fall, causing serious injury, and serious damage to the unit.
Use only with a cart, stand, tripod, bracket, or table recommended by the
manufacturer.
8A. An appliance and cart combination should be moved with care. Quick stops,
excessive force, and uneven surfaces may cause the appliance and cart
combination to overturn.
9. VENTILATION S3126A
Slots and openings in the cabinet and in the back or bottom are provided for ventilation, and to ensure reliable
operation of the unit, and to protect it from overheating. These openings must not be blocked or covered. The
openings should never be blocked by placing the unit on a bed, sofa, rug, or other similar surface. This unit
should never be placed near or over a radiator or heat source. This unit should not be placed in a built-in
installations such as a bookcase or rack unless proper ventilation is provided or the manufacturer's instructions
have been adhered to.
10. POWER SOURCES
This unit should be operated only from the type of power source indicated on the rating plate. If you are not sure
of the type of power supply to your home, consult your appliance dealer or local power company. For units
intended to operate from battery power, or other sources, refer to the operating instructions.
11. GROUNDING OR POLARIZATION
This unit is equipped with a polarized alternating-current line plug (a plug having one blade wider than the other).
This plug will fit into the power outlet only one way. This is a safety feature. If you are unable to insert the plug
fully into the outlet, try reversing the plug. If the plug should still fail to fit, contact your electrician to replace your
obsolete outlet. Do not defeat the safety purpose of the polarized plug, if your unit is equipped with a 3-wire
grounding-type plug, a plug having a third (grounding) pin. This plug will only fit into a grounding-type power
outlet. This too, is a safety feature. If you are unable to insert the plug into the outlet, contact your electrician to
replace your obsolete outlet.
Do not defeat the safety purpose of the grounding-type plug.
1
Page 4
IMPORTANT SAFEGUARDS (CONTINUED)
12. POWER-CORD PROTECTION
Power-supply cords should be routed so that they are not likely to be walked on or pinched by items placed
upon or against them, paying particular attention to cords at plugs, convenience receptacles, and the point
where they exit from the appliance.
13. LIGHTNING
To protect your unit from a lightning storm, or when it is left unattended and unused for long periods of time,
unplug itfrom the wall outlet and disconnect the antenna or cable system. This will prevent damage to the unit
due to lightning and power line surges.
14. POWER LINES
An outside antenna system should not be located in the vicinity of overhead power lines or other electric light or
power circuits, or where it can fall into such power lines or circuits. When installing an outside antenna system,
extreme care should be taken to keep from touching such power lines or circuits, as contact with them might be
fatal.
15. OVERLOADING
Do not overload wall outlets and extension cords, as this can result in a risk of fire or electric shock.
16. OBJECTAND LIQUID ENTRY
Do not push objects through any openings in this unit, as they may touch dangerous voltage points or short out
parts that could result in fire or electric shock. Never spill or spray any type of liquid into the unit.
17. OUTDOOR ANTENNA GROUNDING
]f an outside antenna or cable system is connected to the unit, be sure the antenna or cable system is grounded
so as to provide some protection against voltage surges and built-up static charges, Section 810 of the National
Electrical Code, ANSI/NFPA 70, provides information with respect to proper grounding of the mast and support-
ing structure, grounding of the lead-in wire to an antenna discharge unit, size of grounding conductors, location
of antenna discharge unit, connection to grounding electrodes, and requirements for the grounding electrode.
18. SERVICING
Do not attempt to service this unit yourself as opening or removing covers may expose you to dangerous voltage
or other hazards, Refer all servicing to qualified service personnel,
19. DAMAGE REQUIRING SERVICE
Unplug this unit from the wall outlet and refer servicing to qualified service personnel under the following
conditions:
a, When the power-supply cord or plug isdamaged,
b, If liquid has been spilled, or objects have fallen into the unit,
c, If the unit has been exposed to rain or water,
d, If the unit does not operate normally by following the operating instructions, Adjust only those controls
that are covered by the operating instructions, as an improper adjustment of other controls may result in
damage and will often require extensive work by a qualified technician to restore the unit to its normal
operation,
e, If the unit has been dropped or the cabinet has been damaged,
f, When the unitexhibits a distinct change in performance, this indicates a need for service,
20. REPLACEMENT PARTS
When replacement parts are required, be sure the service technician uses replacement parts specified by the
manufacturer or those that have the same characteristics as the original part,
Unauthorized substitutions may result in fire, electric shock or other hazards,
21. SAFETY CHECK
Upon completion of any service or repairs to this unit, ask the service technician to perform safety checks to
determine that the unit is in proper operating condition.
2
Page 5

22. WALL OR CEILING MOUNTING
The product should be mounted to a wall or ceiling only as recommended by the manufacturer.
23. HEAT
The product should be situated away from heat sources such as radiators, heat registers, stoves, or other
products (including amplifiers) that produce heat.
24. NOTE TO CATV SYSTEM INSTALLER
This reminder is provided to call the CATV system installer's attention to Article 820-40 of the NEC that provides
guidelines for proper grounding and, in particular, specifies that the cable ground shall be connected to the
grounding system of the building, as close to the point of cable entry as practical.
EXAMPLE OF ANTENNA GROUNDING AS PER THE
NATIONAL ELECTRICAL CODE
ANTENNA
WIRE
GROUND
CLAMP
ELECTRIC
SERVICE
EQUIPMENT
NEC-NATIONAL ELECTRICAL CODE
$2898A
ANTENNA
UNIT
(NEC SECTION 810-20)
GROUNDING CONDUCTORS
(NEC SECTION 810-21)
GROUND CLAMPS
POWER SERVICE GROUNDING
ELECTRODE SYSTEM
(NEC ART 250, PART H)
3
Page 6

FEATURES
Color TV With Video Cassette Recorder - Unique space saving design combines a 9" color TV and a video
cassette recorder.
High Quality Picture Technology - This TV/VCR equipped "HQ" incorporates VHS High Quality technology. A built-in
detail enhancer is used to boost the recorded signal and provide maximum picture quality during playback.
It is compatible with other VHS video cassette recorders.
120V AC or DC Operation - This TVNCR is designed to operate from household AC current or from a 12V DC car
cigarette lighter socket.
181 Channel Tuner- Receives standard VHF and UHF broadcast channels and up to 113 cable channels. The
actual number of channels received depends upon channel reception in your area or your cable system.
Closed Caption Decoder With Full Text Mode * Displays text captions or full screen text on the screen for hearing
impaired viewers.
8-Programs/I-Month Programmable Timer With Everyday/Every Week Capability - The built-in timer allows
automatic absentee recording of up to 8 TV programs within 1 month. It is also possible to record a program which is
broadcast at the same time everyday or every week.
Auto Clock Set - Once your TVNCR is plugged into the AC outlet, it automatically sets the correct date and time.
On-Screen TV Display And VC R Programming - When you select a channel or make other changes, the TV will show
an indicator on the screen for a few seconds. Timer recording can be programmed and confirmed on the screen.
Picture Adjustments Using The Remote Control - The On-Screen display allows precise remote control adjustment
of BRIGHTNESS, CONTRAST, COLOR, TINT and SHARPNESS.
Automatic Playback/Rewind-Stop-Eject - When loading a cassette tape without the erase prevention tab, this TV/
VCR will automatically play back the cassette tape at the correct speed. When a tape reaches its end during play-
back, recording (except during OTR and Timer Record) and fast forward, it will automatically stop, rewind, stop and
eject the tape.
Programmable ONIOFF Timer - Allows you to automatically turn on or off the TV/VCR at a set time.
Programmable TV Sleep Timer - Operable from the remote control, the TV can be programmed up to 120 minutes
to turn off automatically.
Full Load Tape Transport - Permits rapid access between modes.
Automatic Repeat Play System - When Auto Repeat option is turned on, the TV/VCR will automatically play back
the same cassette tape repeatedly.
One-Touch Timer Recording (OTR) - Simply by pressing the REC/OTR button, the TV/VCR can be programmed
for up to 5 hours of recording with an immediate start.
AudioNideo Input/Output Jacks - A VCR or other video device may be hooked up to this TV/VCR for dubbing or
playback purposes.
2 Speed Picture Search - 3 or 5 times normal speed in SP mode (7X or 9X in LP and 9X or 15X in SLP).
2 Speed Record, 3 Speed Playback - Records in SP and SLP mode and plays in SP, LP, SLP mode.
Skip Search - When the SKIP SEARCH button is pressed during playback, the TV/VCR will automatically
search forward in 30 second increments to a maximum of 3 minutes with each press of the SKIP SEARCH
button, and then return to normal playback.
Real Time Tape Counter With Zero Return - The counter displays the real tape time and the zero return can be
used to return the tape to a preselected position (00:00:00) while the counter can be used to locate programs.
Digital Auto Tracking - Automatically adjusts tracking during playback for the best possible picture.
On-Screen 3 Language Display - You can select one of 3 languages, English, Spanish or French for on-screen
programming.
TV Monitor - When the TV MONL button on the remote control is pressed during playback, the TV channel selected
on the TVNCR can be viewed.
V-Chip - The V-Chip function can rate a TV program or movie content. It allows you to set a restriction level.
4
Page 7
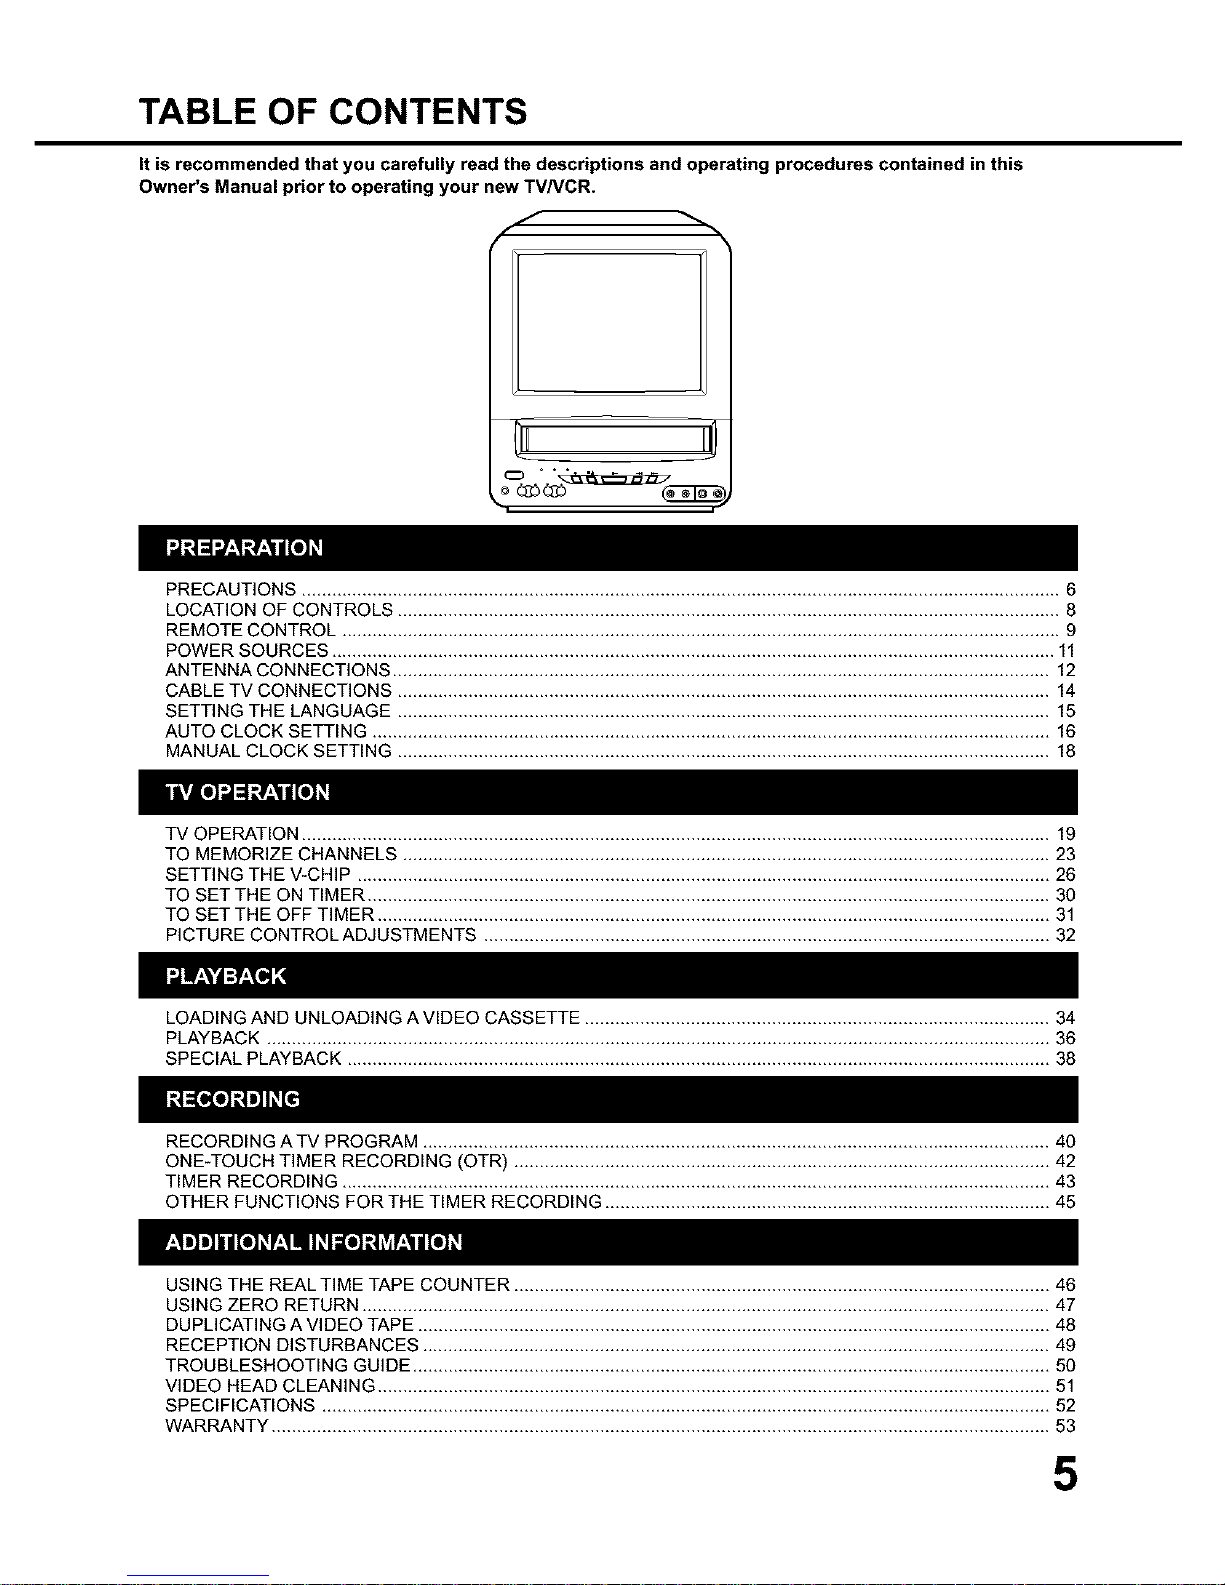
TABLE OF CONTENTS
It is recommended that you carefully read the descriptions and operating procedures contained in this
Owner's Manual prior to operating your new TV/VCR.
J
n r
PRECAUTIONS ...................................................................................................................................................... 6
LOCATION OF CONTROLS ................................................................................................................................... 8
REMOTE CONTROL .............................................................................................................................................. 9
POWER SOURCES ............................................................................................................................................... 11
ANTENNA CONNECTIONS .................................................................................................................................. 12
CABLE TV CONNECTIONS ................................................................................................................................. 14
SETTING THE LANGUAGE ................................................................................................................................. 15
AUTO CLOCK SETTING ...................................................................................................................................... 16
MANUAL CLOCK SETTING ................................................................................................................................. 18
TV OPERATION .................................................................................................................................................... 19
TO MEMORIZE CHANNELS ................................................................................................................................ 23
SETTING THE V-CHIP ......................................................................................................................................... 26
TO SET THE ON TIMER ....................................................................................................................................... 30
TO SET THE OFF TIMER ..................................................................................................................................... 31
PICTURE CONTROL ADJUSTMENTS ................................................................................................................ 32
LOADING AND UNLOADING AVIDEO CASSETTE ............................................................................................ 34
PLAYBACK ........................................................................................................................................................... 36
SPECIAL PLAYBACK ........................................................................................................................................... 38
RECORDING ATV PROGRAM ............................................................................................................................ 40
ONE-TOUCH TIMER RECORDING (OTR) .......................................................................................................... 42
TIMER RECORDING ............................................................................................................................................ 43
OTHER FUNCTIONS FOR THE TIMER RECORDING ........................................................................................ 45
USING THE REAL TIME TAPE COUNTER .......................................................................................................... 46
USING ZERO RETURN ........................................................................................................................................ 47
DUPLICATING A VIDEO TAPE ............................................................................................................................. 48
RECEPTION DISTURBANCES ............................................................................................................................ 49
TROUBLESHOOTING GUIDE .............................................................................................................................. 50
VIDEO HEAD CLEANING ..................................................................................................................................... 51
SPECIFICATIONS ................................................................................................................................................ 52
WARRANTY .......................................................................................................................................................... 53
5
Page 8
PRECAUTIONS
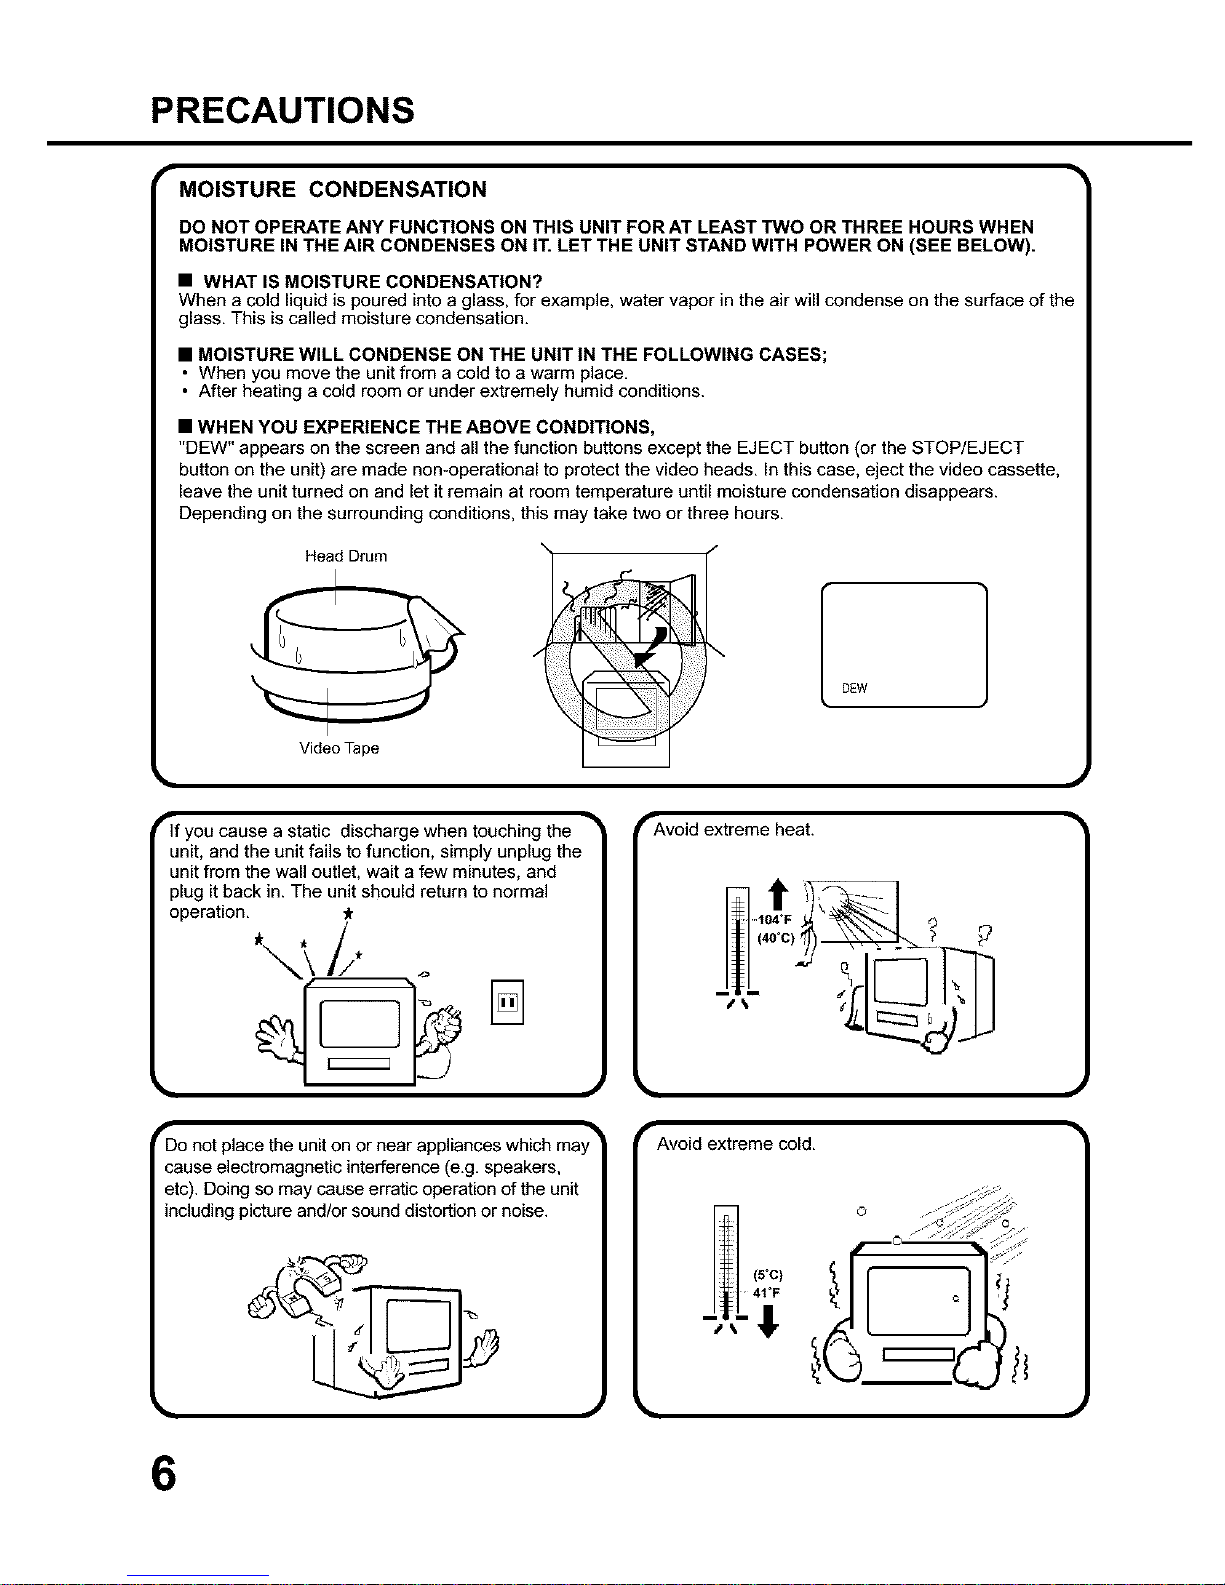
MOISTURE CONDENSATION
DO NOT OPERATE ANY FUNCTIONS ON THIS UNIT FOR AT LEAST rwo OR THREE HOURS WHEN
MOISTURE IN THE AIR CONDENSES ON IT. LET THE UNIT STAND WITH POWER ON (SEE BELOW).
• WHAT IS MOISTURE CONDENSATION?
When a cold liquid is poured into a glass, for example, water vapor in the air will condense on the surface of the
glass. This is called moisture condensation.
• MOISTURE WILL CONDENSE ON THE UNIT IN THE FOLLOWING CASES;
• When you move the unit from a cold to a warm place,
• After heating a cold room or under extremely humid conditions.
• WHEN YOU EXPERIENCE THE ABOVE CONDITIONS,
"DEW" appears on the screen and all the function buttons except the EJECT button (or the STOP/EJECT
button on the unit) are made non-operational to protect the video heads. In this case, eject the video cassette,
leave the unit turned on and let it remain at room temperature until moisture condensation disappears.
Depending on the surrounding conditions, this may take two or three hours.
Head Drum
Video Tape
"If you cause a static discharge when touching the _
unit, and the unit fails to function, simply unplug the
unit from the wall outlet, wait a few minutes, and
plug it back in. The unit should return to normal
operation, t
_Avoid extreme heat.
o not place the unit on or near appliances which may
cause electromagnetic interference (e.g. speakers,
etc). Doing so may cause erratic operation of the unit
including pictureand/or sound distortion or noise.
6
Page 9

rAvoid extreme moisture and dust,
The ventilation holes prevent overheating. Do not
block or cover these holes. Especially avoid
covering the holes with soft materials such as cloth
or paper.
rDo not insert fingers or any other objects into the •
cassette loading slot. Do not spray cleaner or wax
directly on the unit or use forced air to remove dust.
NOf
_ J
"-Keep the unit away from flower vases, sinks, etc. if •
liquids should be spilled into the unit, serious
damage will result. If you spill any liquids into the
unit, unplug the AC power cord immediately and
consult qualified service personnel before attempt-
ing to use it again.
"-Avoid places subject to strong vibration, Use in •
a horizontal (flat) position only,
"When you finish operating the unit, always unload
the cassette and turn off the power.
• J • J
When you leave your home for a long time, unplug
the AC power cord.
OK
To protect the unit from a lightning storm, unplug the
AC power cord from the wall outlet and disconnect
the antenna,
7
Page 10
LOCATION OF CONTROLS
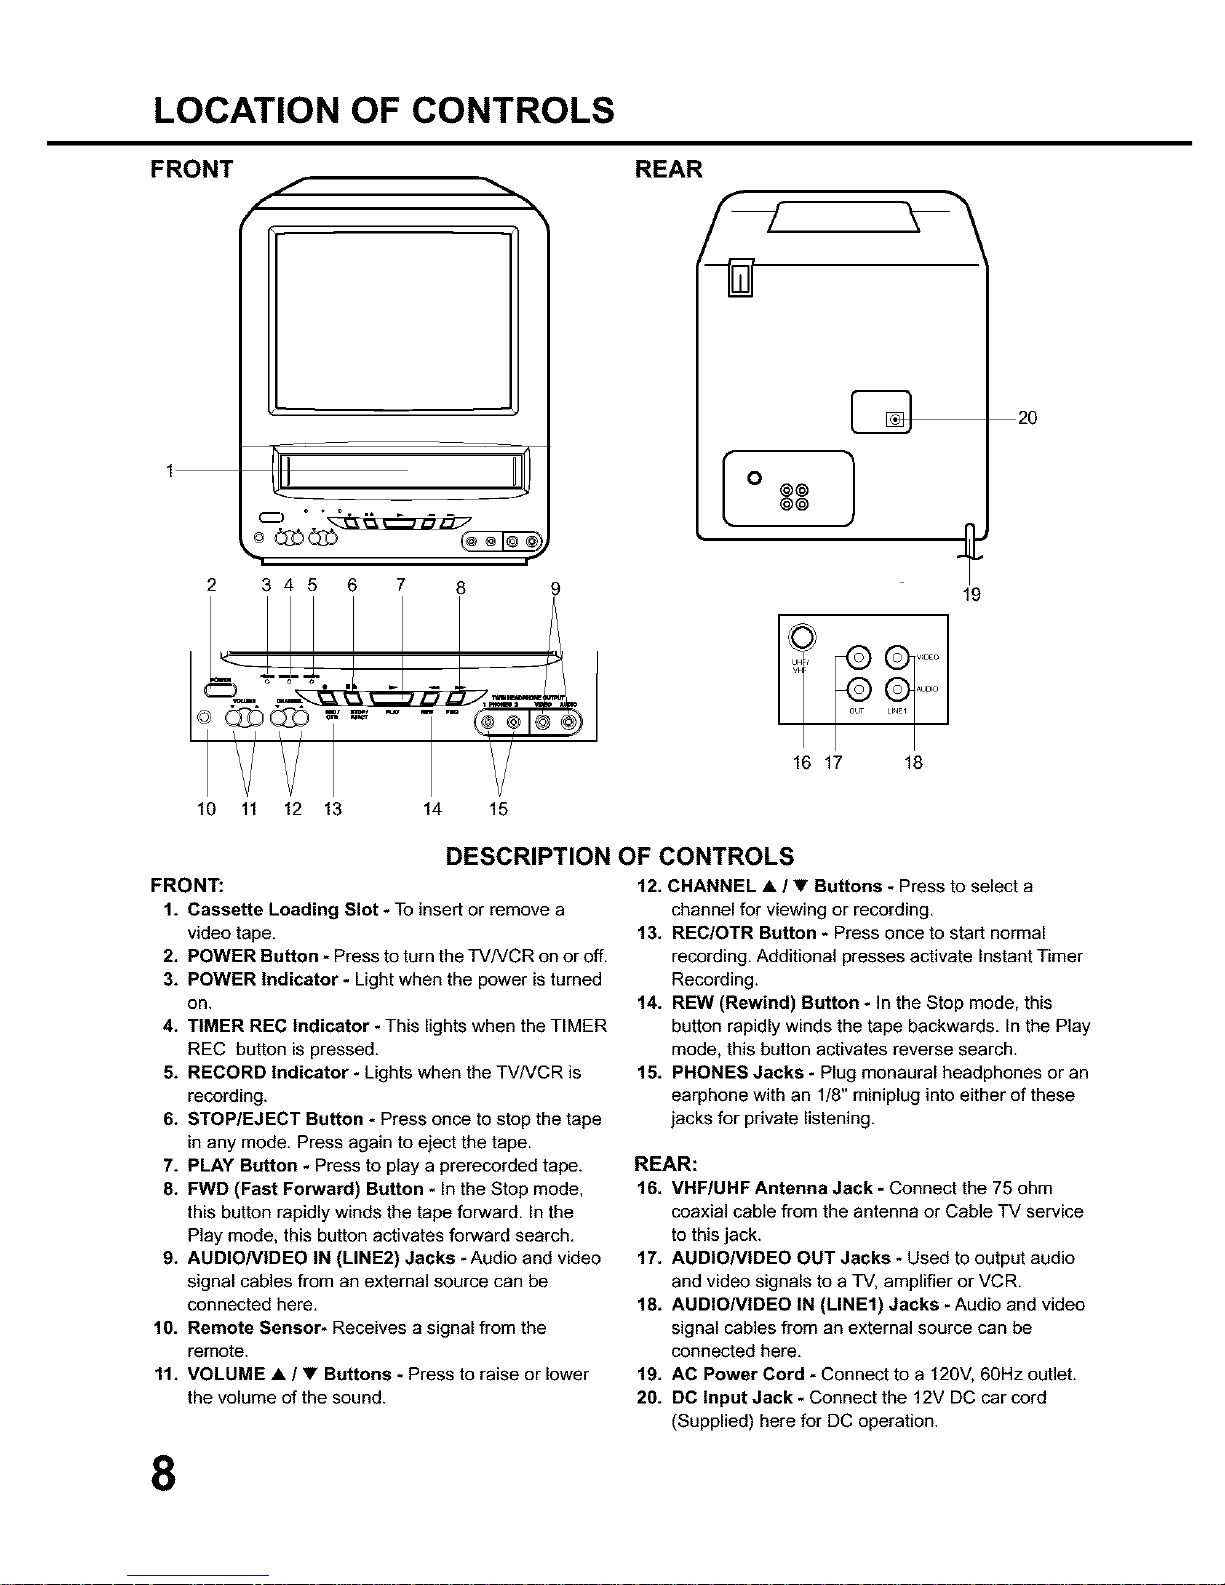
FRONT
t _ _,
j
2 345 6 7 8
10 11 12 13 14 15
REAR
I 0 @@ 1@©
19
ALD_O
16 17 18
20
DESCRIPTION OF CONTROLS
FRONT:
1. Cassette Loading Slot - To insert or remove a
video tape.
2. POWER Button * Press to turn the TVNCR on or off.
3. POWER Indicator - Light when the power is turned
on.
4. TIMER REC Indicator - This lights when the TIMER
REC button is pressed.
5. RECORD Indicator - Lights when the TVNCR is
recording.
6. STOP/EJECT Button =Press once to stop the tape
in any mode. Press again to eject the tape.
7. PLAY Button - Press to play a prerecorded tape.
8. FWD (Fast Forward) Button - In the Stop mode,
this button rapidly winds the tape forward. In the
Play mode, this button activates forward search.
9. AUDIONIDEO IN (LINE2) Jacks -Audio and video
signal cables from an external source can be
connected here.
10. Remote Sensor- Receives a signal from the
remote.
11. VOLUME • / • Buttons - Press to raise or lower
the volume of the sound.
12. CHANNEL • / • Buttons - Press to select a
channel for viewing or recording.
13. REC/OTR Button - Press once to start normal
recording. Additional presses activate Instant Timer
Recording.
14. REW (Rewind) Button - In the Stop mode, this
button rapidly winds the tape backwards. In the Play
mode, this button activates reverse search.
15. PHONES Jacks - Plug monaural headphones or an
earphone with an 1/8" miniplug into either of these
jacks for private listening.
REAR:
16. VHF/UHF Antenna Jack - Connect the 75 ohm
coaxial cable from the antenna or Cable TV service
to this jack.
17. AUDIONIDEO OUT Jacks - Used to output audio
and video signals to a TV, amplifier or VCR.
18. AUDIONIDEO IN (LINE1) Jacks -Audio and video
signal cables from an external source can be
connected here.
19. AC Power Cord * Connect to a 120V, 60Hz outlet.
20. DC Input Jack - Connect the 12V DC car cord
(Supplied) here for DC operation.
8
Page 11
REMOTE CONTROL
2O
16 21 --
j 22
23
J 24
25
26
27
28
29
DESCRIPTION OF CONTROLS
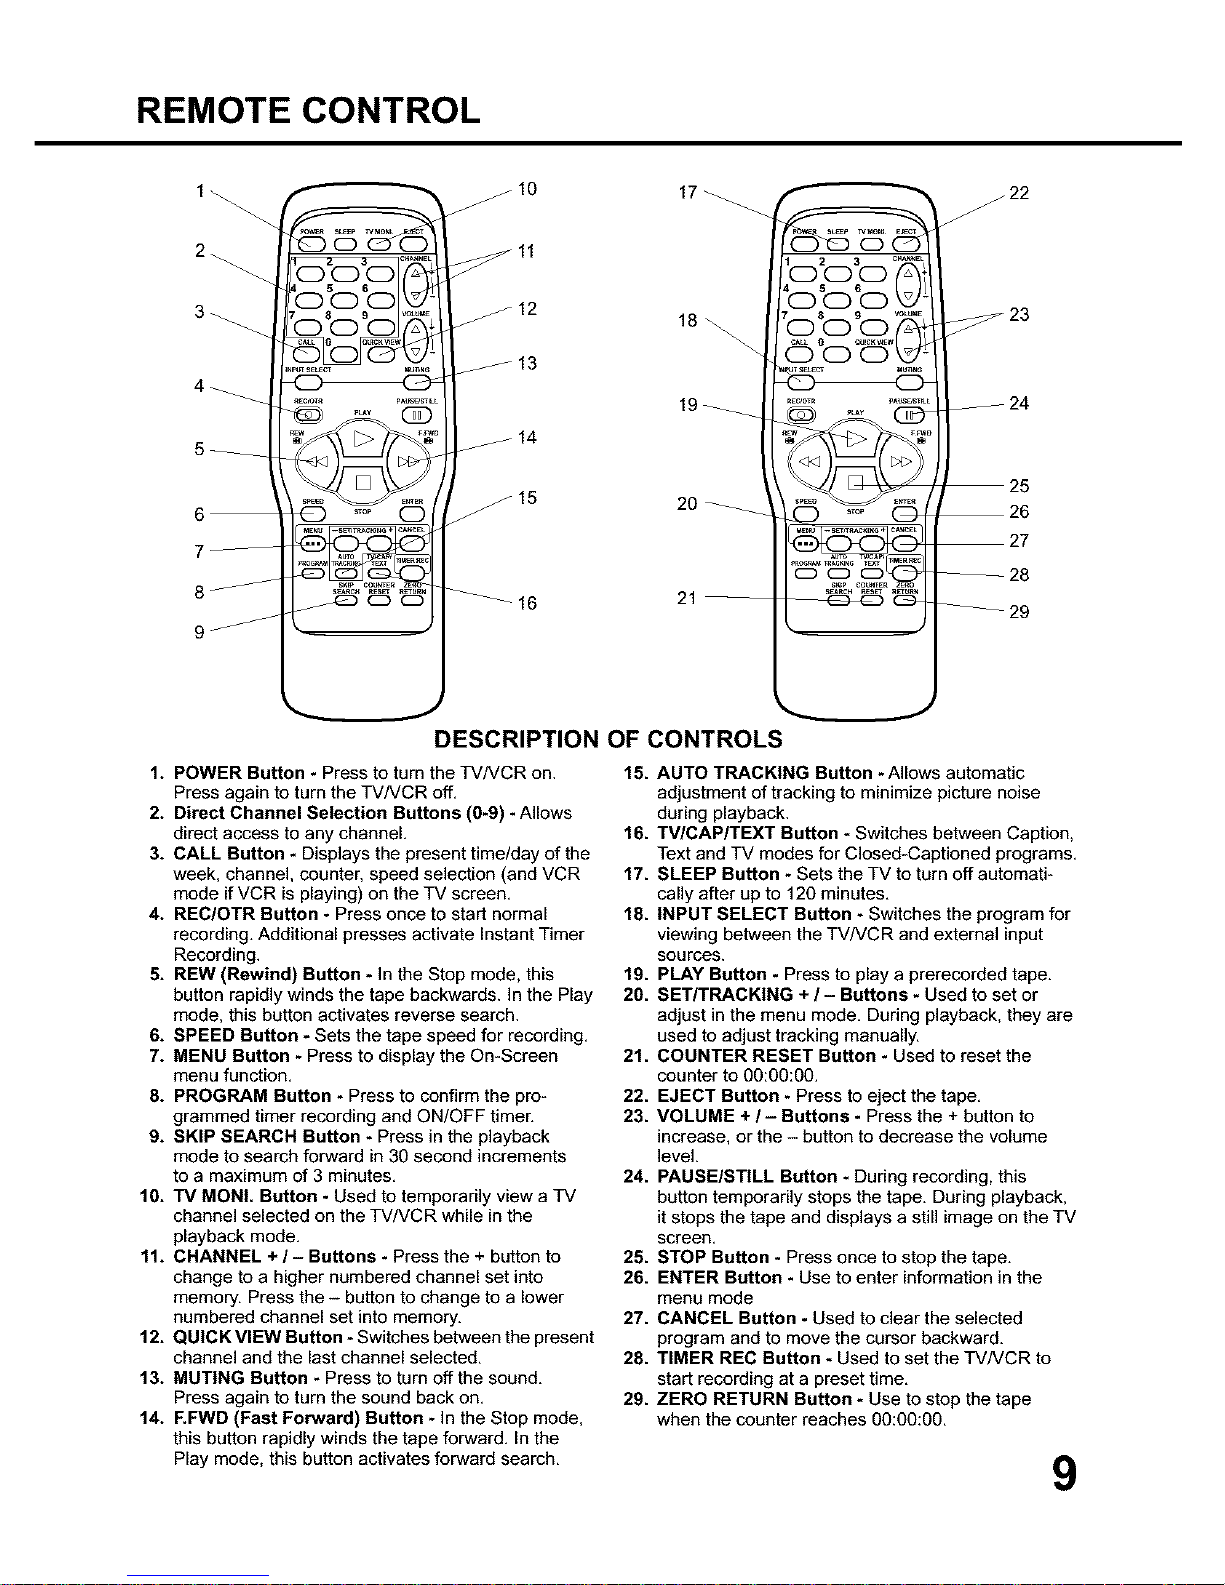
1. POWER Button * Press to turn the TVNCR on.
Press again to turn the TVNCR off.
2. Direct Channel Selection Buttons (0_9) * Allows
direct access to any channel.
3. CALL Button * Displays the present time/day of the
week, channel, counter, speed selection (and VCR
mode if VCR is playing) on the TV screen.
4. REC/OTR Button - Press once to start normal
recording. Additional presses activate Instant Timer
Recording.
5. REW (Rewind) Button - In the Stop mode, this
button rapidly winds the tape backwards. In the Play
mode, this button activates reverse search.
6. SPEED Button - Sets the tape speed for recording.
7. MENU Button _ Press to display the On-Screen
menu function.
8. PROGRAM Button - Press to confirm the pro-
grammed timer recording and ON/OFF timer.
9. SKIP SEARCH Button - Press in the playback
mode to search forward in 30 second increments
to a maximum of 3 minutes.
10. TV MONI. Button * Used to temporarily view a TV
channel selected on the TVNCR while in the
playback mode.
11. CHANNEL + / - Buttons * Press the + button to
change to a higher numbered channel set into
memory. Press the - button to change to a lower
numbered channel set into memory.
12. QUICK VIEW Button - Switches between the present
channel and the last channel selected.
13. MUTING Button - Press to turn offthe sound.
Press again to turn the sound back on.
14. F.FWD (Fast Forward) Button _ In the Stop mode,
this button rapidly winds the tape forward. In the
Play mode, this button activates forward search.
15. AUTO TRACKING Button -Allows automatic
adjustment of tracking to minimize picture noise
during playback.
16. TV/CAP/TEXT Button - Switches between Caption,
Text and TV modes for Closed-Captioned programs.
17. SLEEP Button - Sets the TV to turn off automati-
cally after up to 120 minutes.
18. INPUT SELECT Button - Switches the program for
viewing between the TVNCR and external input
sources.
19. PLAY Button * Press to play a prerecorded tape.
20. SET/TRACKING + / - Buttons - Used to set or
adjust in the menu mode. During playback, they are
used to adjust tracking manually.
21. COUNTER RESET Button * Used to reset the
counter to 00:00:00.
22. EJECT Button _ Press to eject the tape.
23. VOLUME + / - Buttons - Press the + button to
increase, or the - button to decrease the volume
level.
24. PAUSE/STILL Button * During recording, this
button temporarily stops the tape. During playback,
it stops the tape and displays a still image on the TV
screen.
25. STOP Button * Press once to stop the tape.
26. ENTER Button * Use to enter information in the
menu mode
27. CANCEL Button - Used to clear the selected
program and to move the cursor backward.
28. TIMER REC Button - Used to set the TVNCR to
start recording at a preset time.
29. ZERO RETURN Button - Use to stop the tape
when the counter reaches 00:00:00.
9
Page 12
REMOTE CONTROL (CONTINUED)
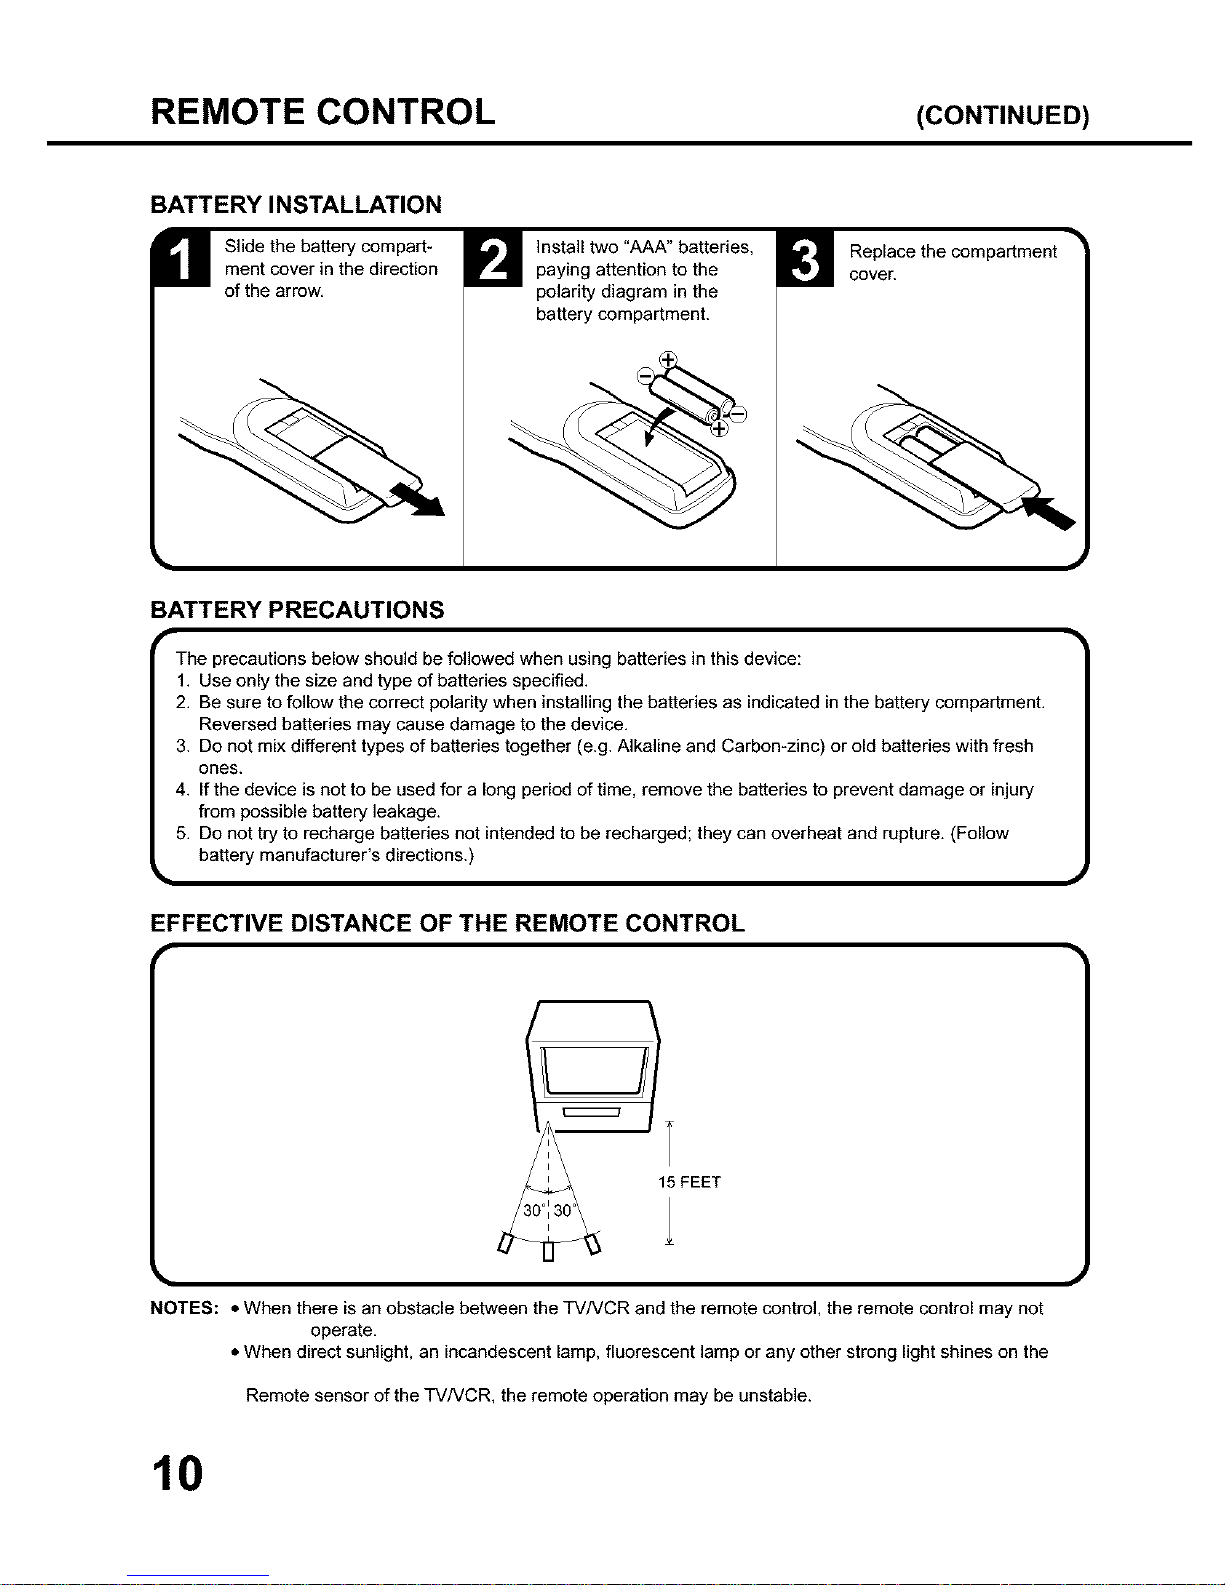
BATTERY INSTALLATION
Slide the battery compart-
ment cover in the direction
of the arrow.
install two "AAA" batteries,
paying attention to the
polarity diagram in the
battery compartment.
Replace the compartment
cover.
BATTERY PRECAUTIONS
The precautions below should be followed when using batteries in this device:
1. Use only the size and type of batteries specified.
2. Be sure to follow the correct polarity when installing the batteries as indicated in the battery compartment.
Reversed batteries may cause damage to the device.
3. Do not mix different types of batteries together (e.g. Alkaline and Carbon-zinc) or old batteries with fresh
ones.
4. Ifthe device is not to be used for a long period of time, remove the batteries to prevent damage or injury
from possible battery leakage.
5. Do not try to recharge batteries not intended to be recharged; they can overheat and rupture. (Follow
battery manufacturer's directions.)
EFFECTIVE DISTANCE OF THE REMOTE CONTROL
_I FEET
NOTES: • When there is an obstacle between the TVNCR and the remote control, the remote control may not
operate,
• When direct sunlight, an incandescent lamp, fluorescent lamp or any other strong light shines on the
Remote sensor of the TVNCR, the remote operation may be unstable.
10
Page 13
POWER SOURCES
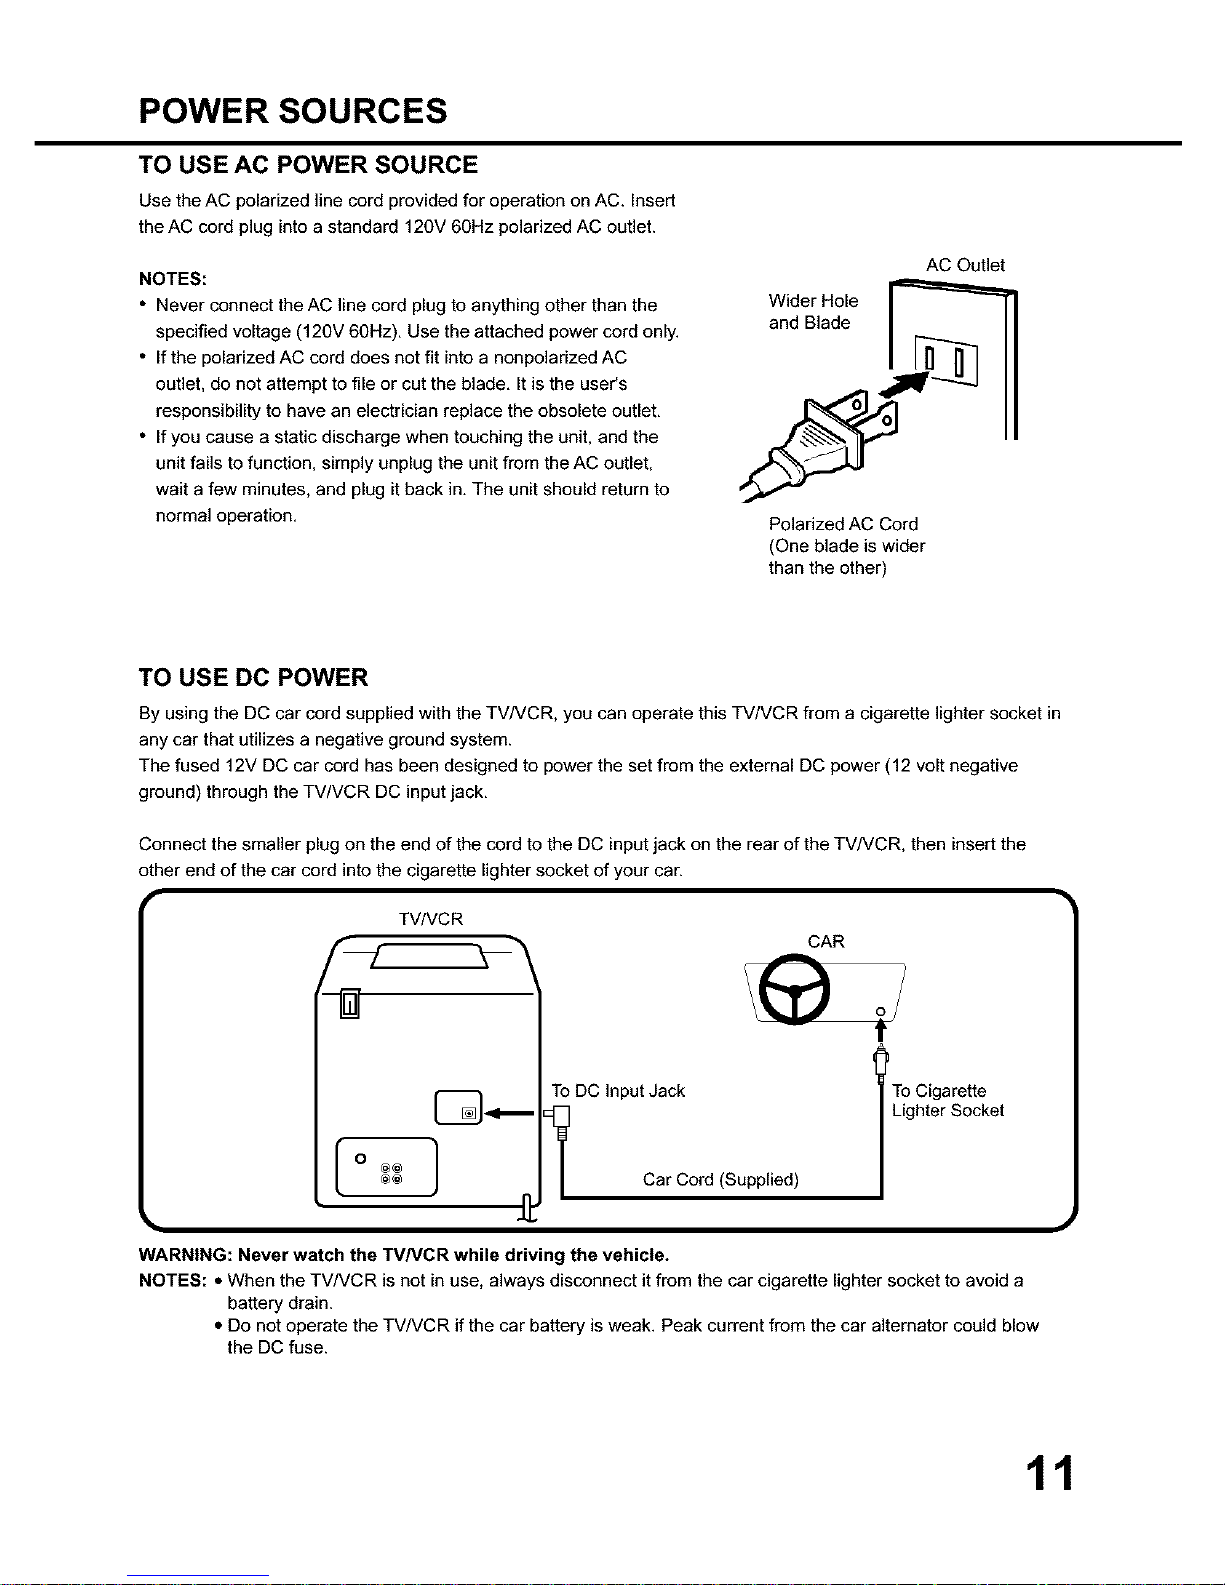
TO USE AC POWER SOURCE
Use the AC polarized line cord provided for operation on AC. Insert
theAC cord plug into a standard 120V 60Hz polarized AC outlet.
NOTES:
• Never connect the AC line cord plug to anything other than the
specified voltage (120V 60Hz). Use the attached power cord only.
• If the polarized AC cord does not fit into a nonpolarized AC
outlet, do not attempt to file or cut the blade. It is the user's
responsibility to have an electrician replace the obsolete outlet.
• If you cause a static discharge when touching the unit. and the
unit fails to function, simply unplug the unit from the AC outlet,
wait a few minutes, and plug it back in. The unit should return to
normal operation.
AC Outlet
Wider Hole
__._and Blade
Polarized AC Cord
(One blade is wider
than the other)
TO USE DC POWER
By using the DC car cord supplied with the TVNCR, you can operate this TV/VCR from a cigarette lighter socket in
any car that utilizes a negative ground system.
The fused 12V DO car cord has been designed to power the set from the external DO power (12 volt negative
ground) through the TV/VCR DC input jack.
Connect the smaller plug on the end of the cord to the DC input jack on the rear of the TVNCR, then insert the
other end of the car cord into the cigarette lighter socket of your car.
TV/VCR
I 0 @@@@
To DO Input Jack arette
Lighter Socket
Car Cord (Supplied)
WARNING: Never watch the TV/VCR while driving the vehicle.
NOTES: • When the TVNCR is not in use, always disconnect it from the car cigarette lighter socket to avoid a
battery drain.
• Do not operate the TVNCR if the car battery is weak. Peak current from the car alternator could blow
the DC fuse.
11
Page 14
ANTENNA CONNECTIONS
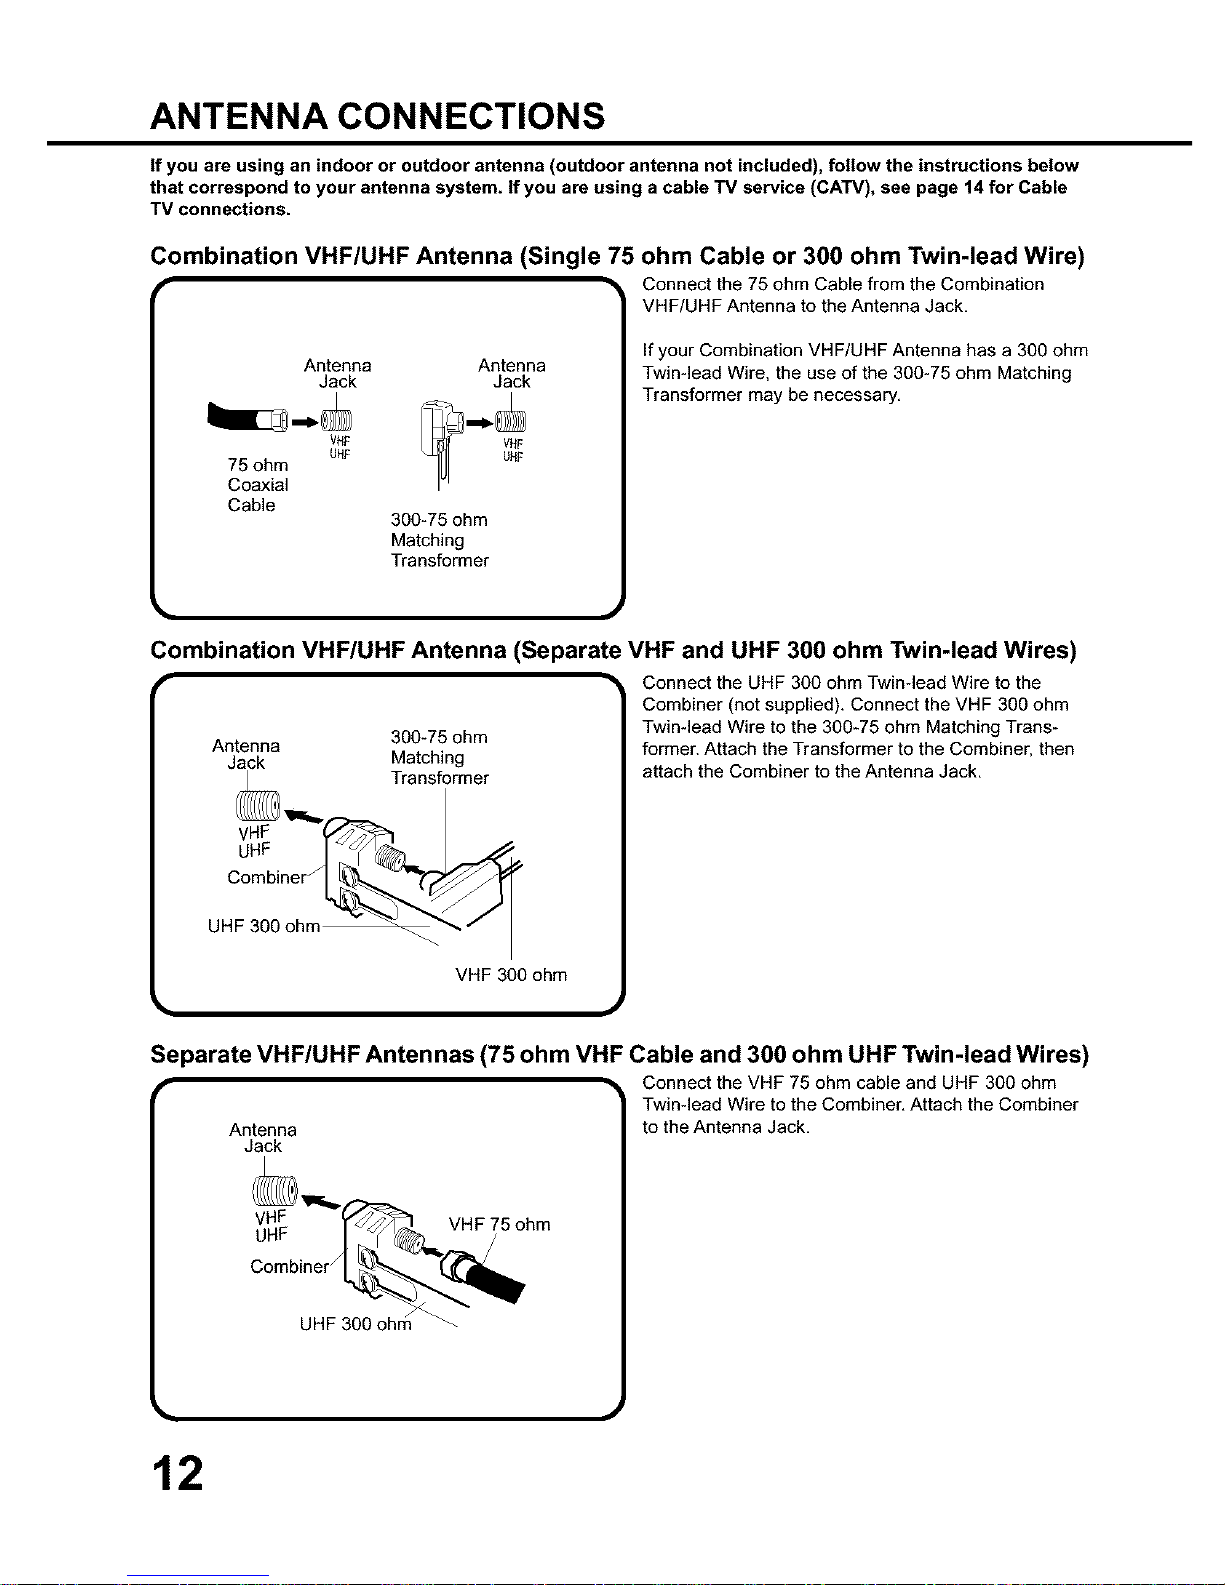
If you are using an indoor or outdoor antenna (outdoor antenna not included), follow the instructions below
that correspond to your antenna system. If you are using a cable TV service (CAW), see page 14 for Cable
TV connections.
Combination VHF/UHF Antenna (Single 75 ohm Cable or 300 ohm Twin-lead Wire)
• -_ Connect the 75 ohm Cable from the Combination
Antenna Antenna
Jack Jack
VHF
UHF
75 ohm
Coaxial
Cable
300-75 ohm
Matching
Transformer
VHF/UHF Antenna to the Antenna Jack.
If your Combination VHF/UHF Antenna has a 300 ohm
Twin-lead Wire, the use of the 300-75 ohm Matching
Transformer may be necessary.
Combination VHF/UHF Antenna (Separate VHF and UHF 300 ohm Twin-lead Wires)
Antenna 300-75 ohm
Jack Matching
vH_F_)) Transformer
UHF 300 ohm _ /
VHF 300 ohm
Connect the UHF 300 ohm Twin-lead Wire to the
Combiner (not supplied). Connect the VHF 300 ohm
Twin-lead Wire to the 300-75 ohm Matching Trans-
former. Attach the Transformer to the Combiner, then
attach the Combiner to the Antenna Jack.
Separate VHF/UHF Antennas (75 ohm VHF Cable and 300 ohm UHF Twin-lead Wires)
• -_ Connect the VHF 75 ohm cable and UHF 300 ohm
Twin-lead Wire to the Combiner. Attach the Combiner
Antenna to the Antenna Jack.
Jack
12
Page 15
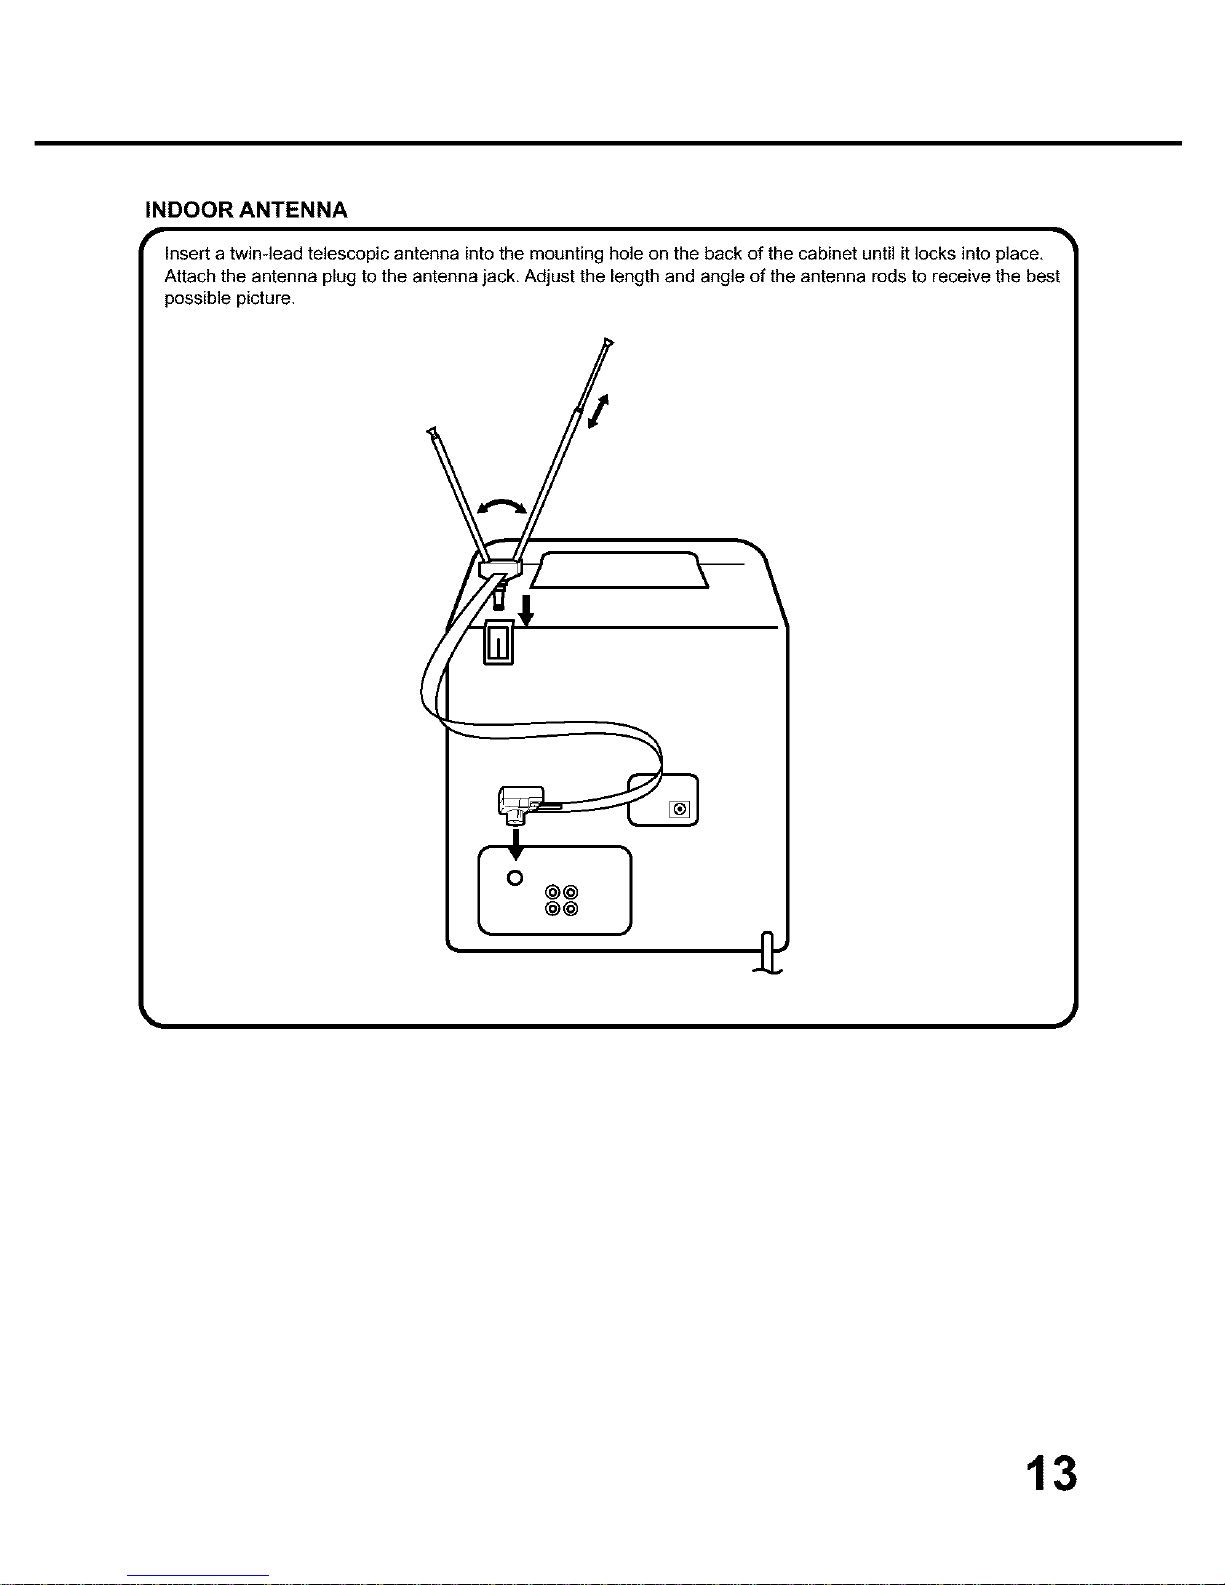
INDOOR ANTENNA
,v •
Insert a twin-lead telescopic antenna into the mounting hole on the back of the cabinet until it locks into place,
Attach the antenna plug to the antenna jack, Adjust the length and angle of the antenna rods to receive the best
possible picture.
(o'oo1
@@
13
Page 16
CABLE TV CONNECTIONS
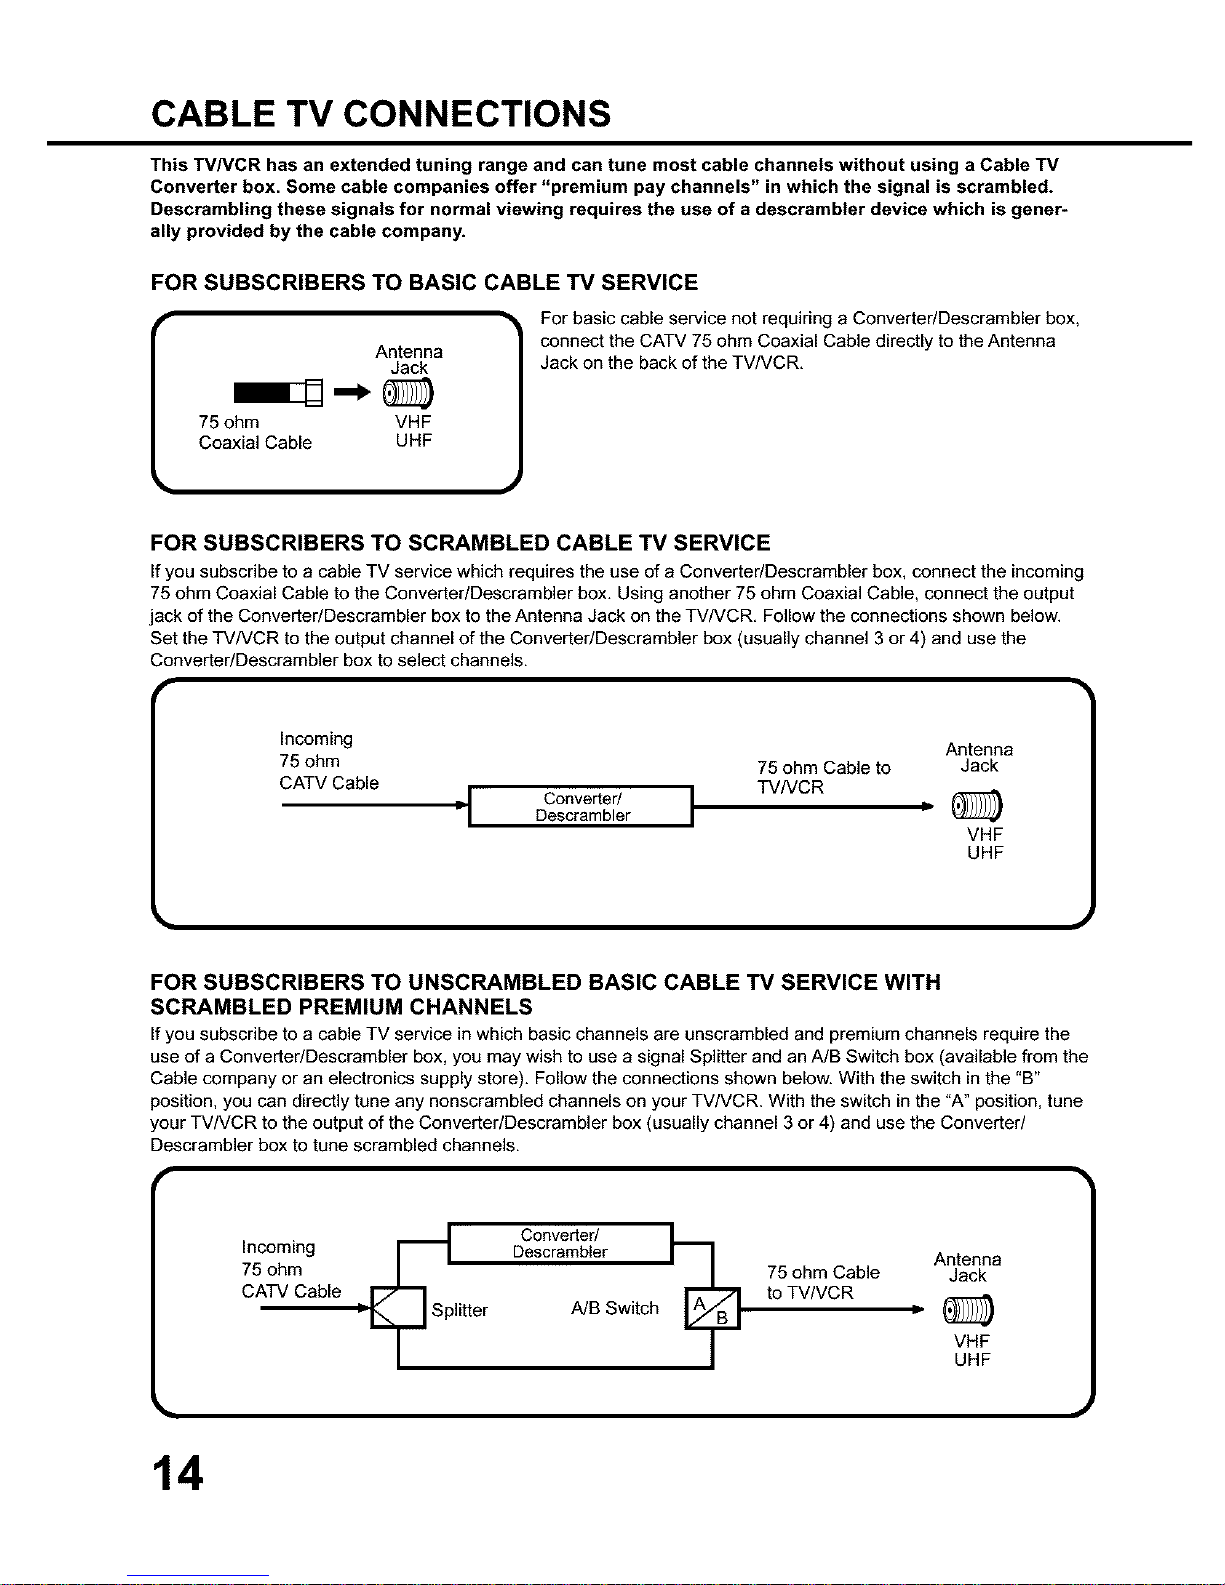
This TVNCR has an extended tuning range and can tune most cable channels without using a Cable TV
Converter box. Some cable companies offer "premium pay channels" in which the signal is scrambled.
Descrambling these signals for normal viewing requires the use of a descrambler device which is gener-
ally provided by the cable company.
FOR SUBSCRIBERS TO BASIC CABLE TV SERVICE
Antenna
Jack
75 ohm VHF
Coaxial Cable UHF
• For basic cable service not requiring a Converter/Descrambler box,
connect the CATV 75 ohm Coaxial Cable directly to the Antenna
Jack on the back of the TVNCR.
FOR SUBSCRIBERS TO SCRAMBLED CABLE TV SERVICE
If you subscribe to a cable TV service which requires the use of a Converter/Descrambler box, connect the incoming
75 ohm Coaxial Cable to the Converter/Descrambler box. Using another 75 ohm Coaxial Cable, connect the output
jack of the Converter/Descrambler box to the Antenna Jack on the TVNCR. Follow the connections shown below.
Set the TVNCR to the output channel of the Converter/Descrambler box (usually channel 3 or 4) and use the
Converter/Descrambler box to select channels.
Incoming Antenna
75 ohm 75 ohm Cable to Jack
CATV Cable TV/VCR
='I Converter/Descrambler I D
VHF
UHF
FOR SUBSCRIBERS TO UNSCRAMBLED BASIC CABLE TV SERVICE WITH
SCRAMBLED PREMIUM CHANNELS
If you subscribe to a cable TV service in which basic channels are unscrambled and premium channels require the
use of a Converter/Descrambler box, you may wish to use a signal Splitter and an A/B Switch box (availablefrom the
Cable company or an electronics supply store). Follow the connections shown below. With the switch in the "B"
position, you can directly tune any nonscrambled channels onyour TV/VCR. With the switch in the "A"position, tune
your TV/VCR to the output of the Converter/Descrambler box (usually channel 3 or 4) and use the Converter/
Descrambler boxto tune scrambled channels.
_Sp Converter/
Incoming Descrambler Antenna
75 ohm 75 ohm Cable Jack
CATV Cable to TV/VCR
litter A/B Switch t,
VHF
UHF
14
Page 17

SETTING THE LANGUAGE
This TVNCR can display the on screen language in English, Spanish or French.
Language selection (step 3) will automatically appear on the screen when you press the MENU button
initially. Select language to use the other menu options.
Press the MENU button.
Press the SET/TRACKING + or - button to
select the SYSTEM SET-UP option, then press
the ENTER button.
MENU -- SETITRACKING + ENTER
| TIMERRECSET
| TVSET-UP
| CHSET-UP
AUTO REPEAT ON_OFF
SYSTEMSET-UP
<÷J-JENTEPJMENU> ,_
Press the SET/TRACKING + or- button to
select the LANGUAGE option, then press the
ENTER button.
-- SET/TRACKING+ ENTER
• SYSTEM SET-UP
| STANDARDTiME
| DAYUGHT SAVINGTIME
(÷J-/ENTEPJM£NU>
k
Press the SET/TRACKING + or - button to
select the desired language: English (ENG-
LISH), Spanish (ESPANOL) or French
(FRANCAIS), then press the ENTER button.
--SET/TRACKING+ ENTER
LANGUAG_ID]OMNLANGUE_ENGUSHFRANCAIsESPANOL1
(+/=/ENTE_MENU>
Press the MENU button twice to return to
normal TV viewing.
MENU
%
15
Page 18

AUTO CLOCK SETTING
The Auto Clock function will automatically set the built-in clock (Month, Day, Year and Time) when the TVNCR
is connected to an Antenna or Cable system and it is turned off. As the TVNCR searches for a receivable
station in your area and it receives a broadcast signal for Auto Clock, the Auto Clock needs several minutes
to set itself.
AUTO CLOCK SETTING
1. Connect the Antenna or Cable system.
• If you use a cable box, turn it on.
2. Plug the AC Power cord to the AC outlet.
3. Make sure the TV/VCR is turned off.
• If you press the POWER button, the Auto Clock set is not effective.
4. Wait at least three minutes and press the POWER button.
5. Press the CALL button to check the clock on the screen.
6. Ifthe clock is not set, check the Antenna condition. The Auto Clock does not function depend on the reception
condition.
• ==
AUTO CLOCK ADJUSTMENT
I The Auto Clock Adjustment will be performed at 12:00 PM everyday if you turn off the TVNCR.
• If you use a cable box and you want Auto Clock adjustment to be performed, the cable box must be left on.
J
• The Auto Clock Adjustment is not effective when the timer recording is in the stand by mode.
• The Auto Clock Adjustment is not effective when the a difference of more than 5 minutes exits between the built-
in clock time and the actual time.
TO SET AUTO CLOCK TO OFF
frWhen shipped from factory the AUTO CLOCK option is set to ON. •
But if you do not want Auto Clock set (Adjustment):
1. Turn on the TV/VCR.
2. Press the MENU button.
3. Press the SET/TRACKING + or- button to select the SYSTEM SET-UP option, then press the ENTER button.
4. Press the SET/TRACKING + or- button to select the AUTO CLOCK option.
5. Press the ENTER button to select OFF.
6. Press the MENU button repeatedly to return to the normal screen.
• When the AUTO CLOCK is set to OFF, the Auto Clock adjustment is not functioned.
Set the clock manually (see page 18). J
TO SET STANDARD TIME
"-in the rare event that you live within broadcast range of two stations in two different time zones, the TV/VCR •
recognize the wrong station for the Auto Clock set.
To correct the situation:
1. Press the MENU button.
2. Press the SET/TRACKING + or- button to select the SYSTEM SET-UP option, then press the ENTER button.
3. Press the SET/TRACKING + or - button to select the STANDARD TIME option, then Press the ENTER button.
4. Press the SET/TRACKING + or - button to select your time zone, then press the ENTER button.
GMT - 4 hours (GMT: Greenwich Mean Time)ATLANTIC
EASTERN
CENTRAL
MOUNTAIN
PACIFIC
ALASKA
HAWAII
AUTO
GMT - 5 hours
GMT - 6 hours
GMT - 7 hours
GMT - 8 hours
GMT - 9 hours
GMT - 10 hours
AUTO SET
5. Press the MENU button twice to return to the normal screen.
J
16
Page 19

DAYLIGHT SAVING TIME SETTING
You can set the Daylight saving time automatically or manually,
M ress the MENU button. Press the SET/
TRACKING + or - button to select the SYSTEM
SET-UP option, then press the ENTER button.
MENU --SET/TRACKING4, ENTER
| TIMERRECSET
| TVSET-UP
| CHSET-UP
AUTOREPEAT ON_OFF
SYSTEMSET-UP
{+/-IENTERIMENU) ._
Press the SET/TRACKING + or- button toselect the DAYLIGHT SAVING TIME option,
then press the ENTER button,
--SET/TRACKING+ ENTER
| CLOCKSET
II LANGUAGE/ED_OMNLANGUE
IIAUTOCLOCK )ON OFF
STANDARDTIME
DAYUGHTSAVING TiME
<÷I-IENTERIMENU} J
Press the SET/TRACKING + or- button to select one of the options, then press the ENTER button.
Press the MENU button until the MENU screen is cleared.
-- SETITRACKING +
ENTER MENU
%%
DAYUGHTSAVING TIME 1
_0N
OFF
AUTO
{+/-/ENTER/MENU)
ON: for manual setting
(forward one hour)
OFF: for manual setting
(back one hour)
AUTO: for automatic setting
(read XDS in the signal)
When you want to set the Daylight Saving Time manually,
on the first Sunday in April you set to "ON", and on the last
Sunday in October you set to "OFF".
NOTES: • When shipped from factory, the DAYLIGHT SAVING TIME option is set to AUTO position,
• When the clock is not set, Daylight Saving Time setting is not available,
• When there is no Daylight Saving Time in your area, always select OFF position in step 3,
17
Page 20

MANUAL CLOCK SETTING
You must set the date and time manually for Timer Recordings, ON/OFF Timer and Daylight Saving Time if
the Auto Clock process did not set them correctly.
EXAMPLE: Setting the clock to "8:30 AM", 26th (FRO October, 2001.
Press the MENU button.
Press the SET + or - button to select the SYS-
TEM SET-UP option, then press the ENTER but-
ton.
MENU --SET/TRACKING ÷ ENTER
| T_MERRECSET
| W SET-UP
| CHSET-UP
_AUTOREPEATON_OF_
- _SYSTEMSET-UP
<+]-IENTERIMENU}
Press the SET/TRACKING + or - button to
select the CLOCK SET option, then press the
ENTER button.
--SET/TRACKING4- ENTER
• \/SYSTEM SET-UP
-I CLOCK SET
*II'*LANGUAGE/IDIOMNLANGUE
| AUTOCLOCK _0N OFF
| STANDARDTIME
| DAYUGHTSAVING T_ME
(+/HENTER/MENU)
Press the SET/TRACKING
+ or - button to set the month,
then press the ENTER button.
--SET/TRACKING+ ENTER
r CLOCKSET ' ' 1
MONTH--_{}--
T_ME 12:00AM
<+/-]ENTER]CANCEL/MENU>
Set the day, year and time
as in step 3.
--SET/TRACKING + ENTER
[CLOCKSET]
MONTH 1{}
DAY 26(FRI)
YEAR 2
T_ME
(+/-/ENTER/CANCEL/MENU)
After setting the clock, date and time
starts functioning automatically.
[
8;30AM FR_
NOTES: • After a power failure or disconnection of the power plug, the time display will be lost. In this case. set the
present time again if the Auto Clock did not set correctly.
• To move cursor backward, press the CANCEL button.
18
Page 21

TV OPERATION
To turn on the TV/VCR, Set the TV/CATV menu
press the POWER button, option to the appropriate
position. (See page 23.)
POWER
Adjust the volume level by
pressing the VOLUME + or-
button. The volume level will
be indicated on the screen by green
bars. As the volume level increases,
so do the number of bars. If the
volume decreases, the number of
green bars also decreases.
TV - VHF/UHF Channels
VOLUME 1_[ VOLUME 32
CATV - CABLE TV Channels
I!
VHF/UHF/CATV CHANNELS
TV CATV
VHF VHF
2-13 2-13
UHF STD/HRC/IRC
14-69 14-36
(A)(W)
37-59
(AA)(WW)
60-85
(AAA)(ZZZ)
86-94
(86) (94)
95-99
(A-5) (A-l)
100-125
(100) (125)
01
(5A)
Press the Direct Channel selection buttons to select the channel.
TV mode direct channel selection
When the TV/CATV menu option is in the TV position,all channels can be instantly selected by using two
buttons. (for example, to select channel 2, press "0", then "2". Ifyou press only "2", channel selection will be delayed for
a few seconds.) For channels 10 and above, press the 2 digits in order.
CATV mode direct channel selection 0 1 2
ToWhenthe TV/CATV menu °ption is in the CATV positi°n' channels can be selected as foUows: _1_ _1__SELECTCATV CHANNELS:
1-9 Press "0" twice, then 1-9 as needed. Example, to select channel 2, press "002".
10-19 Press "0", then the remaining 2 digits. Example, to select channel 12, press "012".
20-99 Press the 2 digits in order. Example, to select channel 36, press "36".
100-125 Press the 3 digits in order. Example, to select channel 120, press "120".
NOTE FOR CHANNELS 1-19:
If only 1 or 2 buttons are pressed, the corresponding channel will be selected in 2 seconds.
I CH012 ]
NOTES: • Ifa channel with no broadcast is selected, the sound will automatically be muted.
• If a station being viewed stops broadcasting, the TV will automatically shut itself off after 15 minutes.
19
Page 22

TV OPERATION (CONTINUED)
MUTING
Press this button to turn off the sound. The TV/VCR's
sound will be silenced and "MUTING" will briefly appear
on the screen. The sound can be turned back on by
pressing this button again or one of the VOLUME + or
- buttons.
MUTING
:HANNEL + / -
rPress and release the CHANNEL + or- button, The •
channel automatically stops at the next channel set
into memory, Press and hold the button down to
change channels more quickly.
For proper operation, before selecting channels, they
should be set into the memory.
CHANNEL
CH012
CALL
Press the CALL button. The clock, date, channel number, real time tape counter, tape speed and VCR
operation will be indicated.
Press CALL button again to disappear the call display.
CALL
%
Current time
I 8:47AMTHU CH 012
00:04:38 P
ReaITime Counter ,
7VCR operation
Channel No.
_Tape In
Tape Speed
_utoRepeat
VCR operation
I1_ : Play
: Rewind
: Fast-forward
m. : Eject
• : Recording
I1| : Pause
• : Stop
NOTE: To listen through the headphone, insert a headphone (not supplied) with a 1/8" mini plug into PHONES jack
on the front. The sound from the TV speaker is muted.
20
Page 23

SLEEP
To set the TV/VCR to turn off after a preset amount of time, press the SLEEP button on the remote control.
The clock will count down 10 minutes for each press of the SLEEP button (120, 110, ...10, 0). After the sleep
time is programmed, the display will appear briefly every ten minutes to remind you that the sleep timer is
operating. To confirm the sleep timer setting, press the SLEEP button and the remaining time will be momen-
tarily displayed. To cancel the sleep timer, press the SLEEP button repeatedly until the display turns to 0.
SLEEP
SLEEP1
120
TV/CAPTIO N/TEXT
Press this button to switch between normal TV and
the two closed caption modes (captions and full
screen text). Closed captioning will display text on the
screen for hearing impaired viewers.
TV/CAP/
TEXT
%
CAPTIONCH1 I
QUICK VIEW
rThis button allows you to go back to the last channel "_
selected by pressing the QUICK VIEW button. Press
this button again to return to the last channel you
were watching.
QUICKVIEW
CH0_2I
NOTES: • If using an indoor antenna or if TV reception is very poor, the Closed Caption Decoder text may not appear.
In this case, adjust the antenna for better reception or use an outdoor antenna.
• When activating the Closed Captioned Decoder, there will be a short delay before the Closed Captioned
text appears on the screen.
• Closed Captioned TV programs can be recorded and played back on a VCR with the Closed Captioned text
intact. The Closed Captioning text will disappear during Cue, Rewind and Pause modes or if the VCR
tracking is not adjusted properly.
X J
• Closed Captioned text is only displayed in locations where it is available. "J 1
h |
Page 24

TV OPERATION (CONTINUED)
WHAT IS CLOSED CAPTIONING?
This television has the capability to decode and display
Closed Captioned television programs. Closed
Captioning will display text on the screen for hearing
impaired viewers or it will translate and display text in
another language.
CLOSED CAPTIONING WITH A VCR
Closed Captioned programs can be recorded and played
back on a VCR with the Closed Captioned text intact.
The Closed Captioned text will disappear during Cue
(Fast Forward Search), Review (Rewind Search) and
Pause Modes or if the VCR tracking is not adjusted
properly.
TO VIEW CLOSED CAPTIONS
Press the TV/CAP/TEXT button on the remote control to
switch between normal TV and the two Closed Caption
Modes (Captions and Full Screen Text).
Captions: This Closed Caption Mode will display text
on the screen in English or another language (depend-
ing on the setting of the Closed Captions CH. 1 or 2).
Generally, Closed Captions in English are transmitted
on Captions Channel 1 and Closed Captions in other
languages are transmitted on Captions Channel 2.
Text: The Text Closed Caption Mode will usually fill the
screen with a programming schedule or other information.
After selecting a Closed Caption Mode, it will stay in
effect until it is changed, even if the channel is changed.
if the Captions signal is lost due to a commercial or a
break in the signal, the Captions will reappear when the
signal is received again.
If the channels are changed, the Captions will be
delayed approximately 10 seconds.
The Captions will appear in places on the screen where
they will least interfere with the picture, usually on the
bottom of the screen. News programs will usually show
three-line Closed Captions which scroll onto the screen.
Most other shows provide two or three lined Captions
placed near the character who is speaking so the viewer
can follow the dialogue.
Words in italics or underlined describe titles, words in
foreign languages or words requiring emphasis. Words
that are sung usually appear enclosed by musical notes.
For television programs broadcasting with Closed Cap-
tions, look in your TV guide for the Closed Captions
symbol (CC).
• When selecting Closed Captions, the captioning will be delayed approximately 10 seconds.
• If no caption signal is received, no captions will appear, but the television will remain in the Caption Mode.
• Misspellings or unusual characters may occasionally appear during Closed Captioning. This is normal with
Closed Captioning, especially with live programs. This is because during live programs, captions are also
entered live. These transmissions do not allow time for editing.
• When Captions are being displayed, on-screen displays, such as volume and mute may not be seen or may
interfere with Closed Captions.
• Some cable systems and copy protection systems may interfere with the Closed Captioned signal.
• If using an indoor antenna or if TV reception is very poor, the Closed Caption Decoder may not appear or
may appear with strange characters or misspelled words. In this case, adjust the antenna for better reception
or use an outdoor antenna.
22
Page 25

TO MEMORIZE CHANNELS
This TVNCR is equipped with a channel memory feature which allows channels to skip up or down to the
next channel set into memory, skipping over unwanted channels. Before selecting channels, they must be
programmed into the TVNCR's memory. In addition to normal VHF and UHF channels, this TVNCR can
receive up to 113 Cable TV channels. To use this TVNCR with an antenna, set the TV/CATV menu option to
the TV mode. When shipped from the factory, this menu option is in the CATV mode.
TV/CATV SELECTION
Press the MENU button.
MENU
%
Press the SET/TRACKING + or- button to
select the CH SET-UP mode, then press the
ENTER button.
--SET/TRACKING+ ENTER
MENU 1
| TIMERRECSET
_'TV SET-UP
- | CH SET-UP
*_'AUT0 REPEAT ON_FF
| SYSTEMSET-UP
_+/=/ENTE_MENU/
CATV CHART
The chart below is typical of many cable system channel allocations.
Number on this TV: 14 15 16 17 18 19 20 21 22
Corresponding CATV channel: A B C D E F G H I
23 24 25 26 27 28 29 30 31 32 33 34 35 36 37 38 39 40
J K L M N O P Q R S T U V W AA BB CC DD
41 42 43 44 45 46 47 48 49 50 51 52 53 54 55 56 57 58
EE FF GG HH II JJ KK LL MM NN OO PP QQ RR SS TT UU VV
59 60 61 62 63 64 65 66 67 68 69 70 71 72 73 74 75 76
WW AAA BBB CCC DDD EEE FFFGGG HHH Ill JJJ KKK LLL MMM NNNOOO PPP
77 78 79 80 81 82 83 84 85 86 87 88 89 90 91 92 93 94
RRR SSS TTT UUU VVVVWVWXXX YYY ZZZ 86 87 88 89 90 91 92 93 94
95 96 97 98 99 100 101 102 103 104 105 106 107 108 109 110 111 112
A-5 A-4 A-3 A-2 A-1 100 101 102 103 104 105 106 107 108 109 110 111 112
113 114 115 116 117 118 119 120 121 122 123 124 125 01
113 114 115 116 117 118 119 120 121 122 123 124 125 5A
Press the SET/TRACKING
+ or - button to select the
TV/CATV mode.
--SET/TRACKING +
| ADD/DELETE
<÷J-/ENTER]MENU>
Press the ENTER button
to select the TV or CATV
mode. The arrow indicates
the selected mode.
ENTER
%
the MENU screen is cleared.
MENU
%
23
Page 26

TO MEMORIZE CHANNELS (CONTINUED)
AUTOMATIC MEMORY TUNING
Press the MENU button.
MENU
%
Press the SET/TRACKING + or - button to
select the CH SET-UP mode, then press the
ENTER button.
-- SET/TRACKING+ ENTER
l T(MERRECSET
_IzTVSET-UP
- l CH SET-UP
ZI_AUT0REPEAT ON_0F_
mSYSTEMSET-UP
<+/-/ENTER/MENU_
Press the SET/TRACKING + or - button to
select the AUTO CH MEMORY mode, then
press the ENTER button. The TV/VCR will
begin memorizing all the channels available in
your area.
-- SET/TRACKING+ ENTER
-I AUTOCHMEMORY
ZI\AOOYDELETE
<+/-/ENTeR/MENU>
Press the MENU button until the MENU
screen is cleared.
MENU
%
24
Page 27

TO ADD/DELETE CHANNELS
Press the MENU button,
MENU
%
Press the SET/TRACKING +
or- button to select the CH
SET-UP mode, then press
the ENTER button.
-- SET/TRACKING + ENTER
|TIMERRECSET
_I/_SET-UP
-I CH SET-UP
_I\AUTO REPEAT ON)'OFF
| SYSTEMSETUP
<÷Y-/ENTERYMENU>
+ or - button to select the
ADD/DELETE mode, then
press the ENTER button.
-- SET/TRACKING + ENTER
| TV bCATV
",.I/AUT0 CH MEMORY
-/I ADDIDELETE
<÷J-/ENTER]MENU>
Select the desired channel
to be memorized or deleted
using SET/TRACKING + or
- button, or using the Direct Chan-
nel Selection buttons (10 keys,
0-9), or CHANNEL + or - button.
--SET/TRACKING+
Press the ENTER button to
select the ADD or DELETE. If
you select an unmemorized
channel, the Channel indication will be
red. If you select the ADD mode, the
Channel indication changes from red to
green and the channel will bememorized.
Ifyou select a memorized channel, the
Channel indication will be green. If you
select the DELETE mode, the Channel
indication changes from green to red
and the channel will be deleted from the
ENTER ADD CH OG3
_ 1_9]÷] /ENTEPJMENU)
Press the MENU button unti_the MENU screen is cleared.
MENU
%
25
Page 28
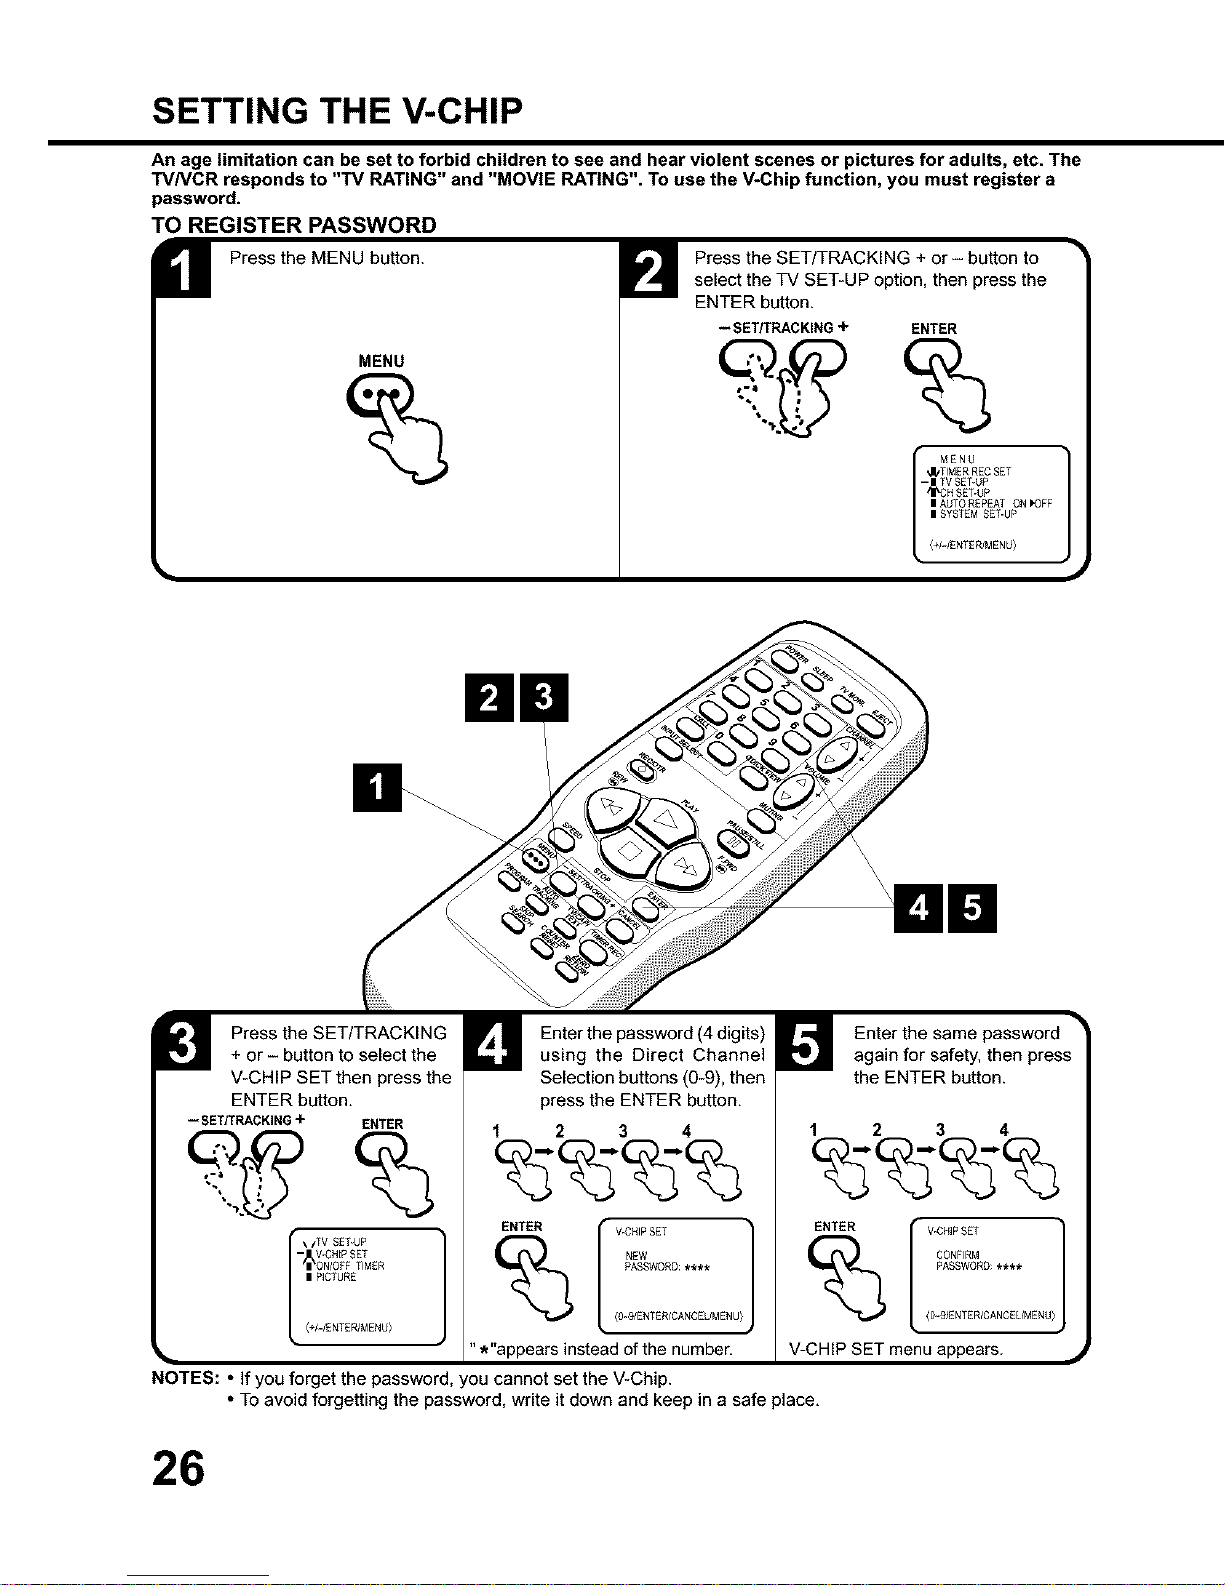
SETTING THE V-CHIP
An age limitation can be set to forbid children to see and hear violent scenes or pictures for adults, etc. The
TVNCR responds to "TV RATING"and "MOVIE RATING". To use the V-Chip function, you must register a
password.
TO REGISTER PASSWORD
Press the MENU button.
MENU
%
Press the SET/TRACKING + or - button to
select the TV SET-UP option, then press the
ENTER button.
ENTER
-- SET/TRACKING +
%
• MENU ),
'JI/TIMERRECSET
- | TV SET-UP
'I_CH SET.Up
| AUTOREPEAT ONIOFF
| SYSTEMSET-UP
<+/WENTER/MENU)
Press the SET/TRACKING
+ or - button to select the
V-CHIP SET then press the
ENTER button.
-- SET/TRACKING + ENTER
<+/4ENTEPJMENU}
Enter the password (4 digits)
using the Direct Channel
Selection buttons (0-9). then
press the ENTER button.
1 2 3 4
ENTER[V CH'PSET1
NEW
PASSWORD:****
(0 9/ENTER/CANCEUMENU)
"*"appears instead of the number.
NOTES: • If you forget the password, you cannot set the V-Chip.
Enter the same password
again for safety, then press
the ENTER button.
1 2 3 4
CONFIRM
PASSWORD:_
/D-gYENTER/CANCEUMENU)
V-CHIP SET menu appears.
• To avoid forgetting the password, write it down and keep in a safe place.
26
Page 29

TO SET THE V-CHIP
In the V-CHIP SET menu, press the SET/
TRACKING + or- button to select the TV
RATING, then press the ENTER button,
--SET/TRACKING + ENTER
• l
V-CHIPSET
•_I/V-CHIP OFF
- TVRATING TV-PG
_MOVJ£ RATING PG-13
| CHANGEPASSWORD |
J
<÷Y-/ENTEP#MENU>
Press the SET/TRACKING + or- button to
display the desired setting, then press the
ENTER button,
-- SET/TRACKING+ ENTER
I V_HIP : I
(+,%l_NTER_ENU)
OFF : TV RATING is not set
TV-Y : All children
TV-Y7 : 7 years old and above
TV-G : General Audience
TV-PG: Parental guidance
TV-14 : 14 years old and above
TV-MA: 17 years old and above
• When you select TV- Y7, TV-PG, TV-14 or TV-MA,
Dress the CALL button to show the contained rating,
Press the SET/TRACKING + or - button to select the
desired item you want, Press the ENTER button to
select OFR
Press the SET/TRACKING + or- button to •select the MOVIE RATING, then press the
ENTER button
--SET/TRACKING+
ENTER
V-CHtPSET
I',""]
"i/TV RATING : TVq_G
-- MOV[ E RATING :PG=I 3
HANGEPASSWORD
(÷/-/ENTER/MENU) J
NOTE: The V-Chip function is activated only on programs and tapes that have the rating signal,
27
Page 30

SETTING THE V-CHIP (CONTINUED)
Press the SET/TRACKING + or- button to select desired rating, then press the ENTER button,
--SETKRACKING + ENTER
I V-CHIPSET
I V-CHIP OFF
"@I'_RATING P(
L 2"I'CMANGEPASSWORg\
<÷]-]ENTER]MENU}
OFF : MOVIE RATING is not set
G : All ages
PG : Parental guidance
PG*13 : Parental guidance
less than 13 years old
R : Under 17 years old
Parental guidance suggested
NC17 : 17 years old and above
X : Adult only
Press the SET/TRACKING
+ or - button to select
V-CHIP SET,
--SET/TRACKING +
I MOVIERA]3NG : PG-18
mCHANGEPi_S_
(_ENTER_ENU)
To use after the TV is protected
Press the ENTER button to
Display ON,
ENTER
%
V-CHIPSET 1
-'_I/V.CHIP ; ON
I MOVIERATING :PG-$3
I CHANGEPASSWORD
(+/HENTER/MENU)
the MENU screen is cleared.
MENU
%
When the program applied to the V-Chip setting is received, enter the password, Protection can be cancelled,
28
Page 31

TO CHANGE PASSWORD
r
1. Press the MENU button.
2. Press the SET/TRACKING + or - button to select the TV SET-UP,
then press the ENTER button. MENU
'J/TLMERRECSET
- I _ SET-UP
'I_CH SET-UP
I AUTO REPEAT ON _OFF
| SYSTEMSET-UP
(÷/-/ENTER/_fENU)
3. Press the SET/TRACKING + or - button to select the V-CHIP SET,
then press the ENTER button.
\/TV SET-UP
- V-CHIPSET
L (+I-]ENTER/MENU}
]
4. Enter the Password using the Direct Channel Selection button (0-9),
then press the ENTER button.
I V-CHiPSET )
PASSWORD....
(O-g/ENTEPJCANCEUMENU)
5. Press the SET/TRACKING + or- button to select CHANGE PASSWORD,
then press the ENTER button.
[_tl V-CHIPSET i
| V-CHIP ;ON
| TV RATING ;I_G
_I/MOVIERATING ;PG-_3
CHANGE PASSWORD
L j
PASSWORD_ ....
(_91ENTER/MENUI
6. Enter the new password using the Direct Channel Selection button
(0-9), then press the ENTER button.
I V-CH_PSET ]
I V-CH_P :ON
I TV RATING :TVq_G
I MOV[ERATING :PG-13
| CHANGEPASSWORD
NEW
PASSWORD:....
(0-g/ENTER/_fENU)
7. Enter the same password again for the safety, then press the ENTER
button.
8. Press the MENU button repeatedly to return to normal screen.
I V-CH_PSET )
I V-CH_P :ON
I TV RATING :1_fq_G
I MOVIERATING :PG-13
| CHANGE
CONFERM
PASSWORD:....
(0-g/ENT_R/_fENU)
29
Page 32

TO SET THE ON TIMER
This feature allows you to have the TVNCR automatically turn "ON" at a predetermined time. If you program the
"ON" timer once, the TV/VCR will turn "on" the programmed day (daily/weekly) at the same time to the same
channel.
EXAMPLE: Turning on the TV to channel 12 at 7:00 AM, MONDAY-FRIDAY.
Press the MENU button.
Press the SET/TRACKING +
or - button to select the TV
SET-UP option, then press the
ENTER button.
MENU -- SET/TRACKING ÷ ENTER
"JbTIM[RRECSF
I I TVSET-UP
/II_CHSE%UP
I AUTOREPEAT ON )OFF
I SYSTEMSET-UP
(+/HENTER/MENU>
Press the SET/TRACKING
+ or - button to select the
ON/OFF TIMER option, then
press the ENTER button.
--SET/TRACKING + ENTER
,,I/v-c HIPSET
-| ON'OFF T_MER
tI_PICTURE
(÷/-3ENTER/MENU}
+ or - button to select the
ON TIMER option, then
press the ENTER button.
--SET/TRACKING + ENTER
f -_°N/OFFTmM_R 1
N TIMER
NON-SAT CANCEL
| OFF TIMER
12:00AM CANCEL
<+/-/ENTEPJCANCEUMENU)
Press the SET/TRACKING
+ or - button to set the
desired hour, then press the
ENTER button.
-- SET/TRACKING+ ENTER
ON,OFF TIMER ]
I 0 T_M£R
-N_:eOAM CHO01
I OFF TIM[R
12;OOAM CANCEL
{+/ /ENT£RfCANCEUM£NU}
Set the desired minute,
channel and daily or weekly
timer date as in step 4.
-- SET/TRACKING + ENTER
[-t
| ON T_MER
\7 {10All1 CH012
-MON-FR - CANCEL
I I \
| OFF TIMER
12:00AM CANCEL
{*/4ENTf_CANCEUMENU)
Press the SET/TRACKING
+ or - button to select the
SET mode, then press the
ENTER button. Press the MENU
button repeatedly to return to normal
screen.
--SET'TRACKING.I, ENTER NENIJ
I O_ TIMER
7;00AM CH012 \ i
Mo.._, -_F,-
| OFF T_MER
12:00AM CANCEL
(÷/ /_NTER/CANCEUMENU}
NOTES: • The TV/VCR will automatically turn off approximately 1 hour later after the ON TIMER turns on if no OFF
TIMER has been set. To continue watching the TV, press any button to cancel the one hour automatic
shut off.
• To cancel ON timer, follow above steps 1-5, then press the SET/TRACKING + or - button to select the
CANCEL. Press the MENU button repeatedly to return to the normal screen.
• After setting the ON TIMER, 1" of the OFF TIMER will flash on and off. If you wish to set the OFF
TIMER, press the ENTER button then follow the steps 4-6 on page 31.
0 • If you want to correct the digits while setting, press the CANCEL button until the item you want to
correct, then press the SET/TRACKING + or - button to correct the desired setting.
Page 33

TO SET THE OFF TIMER
This feature allows you to have the TVNCR turn "OFF" automatically at a predetermined time. If you pro-
gram the OFF TIMER once, the TVNCR will automatically turn off at the same time everyday.
EXAMPLE: Turning off the TV at 11:30 PM
M ress the MENU button,
Press the SET/TRACKING +or
- button to select the TV SET-
UP option, then press the ENTER button,
MENU --SET/TRACKING + ENTER
I MENU }
_TIMER RECBET
I I TVSET-UP
•_CH SE%UP
I AUTOREPEAT ON)OFF
| SYSTEMSET-UP
(+/-/ENTER/MENU)
Press the SET/TRACKING
+ or - button to select the
ON/OFF TIMER option,
then press the ENTER button,
--SET/TRACKING + ENTER
TV SET-UP }
\I/V-C HIPSET
-I ON/OFF T_MER
_PICTURE
(÷/-/ENTEPJMENU_
Press the SET/TRACKING '
+ or - button to select the
OFF TIMER option, then
press the ENTER button,
--SET/TRACKING + ENTER
O_O_FTIMER ]
| ON TIMER
7:00AM CH012
MON-FR_ SET
OFFT_MER
L 2:00AM CNNCEJ_
(+]4E NTE R/CANC EUME NU}
Press the SET/TRACKING
+ or - button to set the
desired hour, then press the
ENTER button,
--SET/TRACKING + ENTER
| ON TIMER
7:00AM CH012
MON-FRI SET
II OR_/TIMER
_00PM C_CEL
<+I-IENTERICANCEUMENU>
Press the SET/TRACKING
+ or - button to set the
desired minute, then press
the ENTER button.
--SET/TRACKING+ ENTER
| ON TIMER
7_@AM CH012
MON-FRI SET
| OFF_J ER
H/3_ CANCE
l <÷I-IENTERICANcEL/MENU)
Press the
+ or - button to select the
SET mode, then press the
MENU button repeatedly to return
to the normal screen,
MENU
_--SETITRACKING ÷ %
I ON TIMER
700AM CH012
MON-FRI SET
I OFF T_MER \ *'
11:30PM -SE_-
(+/4ENTERiCANCEUMENU}
NOTES: • If a station being viewed stops broadcasting, the TV will automatically shut itself off after 15 minutes.
• To cancel OFF timer, follow above step 1-5, then press the SET/TRACKING + or - button to select the
CANCEL. Press the MENU button to return to the normal screen.
• To confirm the ON/OFF TIMER:
Press the PROGRAM button twice to indicate the programs on the screen. _ 4
/
Page 34

PICTURE CONTROL ADJUSTMENTS
Picture controls are factory preset but you can adjust them individually as follows:
H o display the picture adjustment screen, press
the MENU button. Press the SET/TRACKING
+ or- button to select the TV SET-UP option,
then press the ENTER button.
MENU -- SET/TRACK(NG ÷ ENTER
MENU
"J_T(MERRECSET
- mTVSET-UP
linCH SET-UP
mAUTOREPEAT ON>O_F
| SYSTEM SET-UP
<+Y-IENTERYMENU>
]
Press the SET/TRACKING + or - button to
select the PICTURE option, then press the
ENTER button.
-- SET/TRACKING + ENTER
TV SET-UP ]
mV-CH[PSET
•JE,ON/OFF TIMER
-IN\PICTURE
<+I_ENTERIMENU)
BRIGHTNESS CONTRAST
on the screen, then press the SET/TRACKING + or-
button to adjust the brightness of the picture. When
the SET + button is pressed, the darker portions of
the picture become lighter.
rPress
the ENTER button until "CONTRAST" appears
on the screen, then press the SET/TRACKING + or-
button to adjust the contrast of the picture. Pictures look
sharpest in the daytime (bright light) by increasing the
contrast. At night (dim light), the sharpest picture is
obtained by reducing the contrast.
ENTER -- SET/TRACKING +
<÷BR_ENU> NOT=: R_gf_sNjoeRrA!oSTmdaxe_altm
32
Page 35

COLOR
#'Press the ENTER button until "COLOR" appears on
the screen, then press the SET/TRACKING + or -
button to adjust the color intensity of the picture. The
control should be set when colors appear normal in
intensity and brilliance,
ENTER -- SET/TRACKING ÷
'\
\
\
\
\
\
\
\
\
\
\
\
\
\
\
\
\
\
\
\
SHARPNESS
Press the ENTER button until "SHARPNESS" appears
on the screen, then press the SET/TRACKING + or
- button to adjust the sharpness of the picture.
ENTER -- SET/TRACKING ÷
TINT
Press the ENTER button until "TINT" appears on the
screen, then press the SET/TRACKING + or - button
to adjust the tint of the picture. This determines how
accurately the colors are reproduced by the TV.
Adjusting the tint for natural facial tone is the best
method of obtaining accurate color reproduction of
the entire picture.
CANCEL
Pressing the CANCEL button while making picture
adjustments will return all adjustments to the factory
CANCEL
preset levels,
NOTE: The On-screen display will disappear 6 seconds after finishing an adjustment or by pressing the MENU
button three times. The settings can only be adjusted when they are displayed on the TV screen.
33
Page 36

LOADING AND UNLOADING A VIDEO CASSETTE
Use only video cassette tapes marked _.
LOADING
rPush the center of the tape until it is automatically retracted into the TV/VCR. •
AUTOMATIC POWER ON AND PLAY
When loading a cassette tape without the erase prevention tab intact, the TVNCR will turn on automatically
and playback will start immediately.
Insert the cassette with its labelled side facing you.
An inverted video cassette cannot be inserted.
f
_-- -%
J
UNLOADING
To unload a video cassette, press the EJECT
button on the remote control, or press the
STOP/EJECT button on the TVNCR twice. The
first press will stop the tape in any mode. The
second press will eject the tape.
EJECT
AUTOMATIC EJECT
If the TVNCR automatically rewinds the tape to the
beginning (AUTO REWIND FEATURE), the tape will
=be ejected automatically. (See NOTE on page 41.)
NOTES: • Always eject the tape when not in use.
• The cassette tape can be ejected even if the POWER is "OFF".
Pull the cassette out.
34
Page 37

TO PREVENT ACCIDENTAL ERASURE TO RECORD AGAIN
After recording, break off the erase prevention tab if Cover the hole with vinyl tape.
you do not wish to record over the tape. Be careful the tape does not extend past the edges of
the video cassette housing.
TAPE SPEED AND MAXIMUM PLAYBACK/RECORDING TIME
VIDEO CASSETTE TAPE
1--160 1--120 1--90 1--60
2-2/3 hours 2 hours 1-1/2 hours 1 hour
5-1/3 hours 4 hours 3 hours 2 hours
8 hours 6 hours 4-1/2 hours 3 hours
SP (Standard Play)
LP (Long Play)
SLP(SuperLongPlay)
1--30
30 minutes
1 hour
1-1/2 hours
35
Page 38

PLAYBACK
To play a prerecorded tape.
TO START PLAYBACK
Toturn on the TVNCR, press the POWERbutton.
POWER
%
Load a prerecorded tape. (When loading a
cassette tape without the erase prevention tab,
playback will start automatically.)
TO STOP PLAYBACK
Press the PLAY button to begin playback.
" •" will appear on the screen.
PLAY
,]
Press the STOP button once. The tape will stop, but
remain fully loaded and ready to play.
"•" will appear on the screen.
Q .]
• • •
NOTE: This TVNCR selects the tape speed SP,LP or SLP automatically.
36
Page 39

TO REWIND OR FORWARD THE TAPE RAPIDLY
Press the REW (Rewind) button in the Stop mode. Press the RFWD (Fast Forward) button in the Stop
"_1" will appear on the screen, mode. "I_" will appear on the screen.
FORWARD/REVERSE PICTURE SEARCH
If you want to see the tape during REW or FWD mode, press and hold the REW or RFWD button. The backward
or forward visual search picture will be seen on the screen. Release to return to the REW or FWD mode.
\\\\\\\
\\\\\\\\\\\\\\\
\
;KING CONTROLS
When a tape is played, the Digital Auto Tracking system automatically
adjusts the tracking to obtain the best possible picture. If noise bars appear
during playback, adjust the tracking manually as follows:
• Press the SET/TRACKING + or - button to obtain the best possible picture.
"MANUAL TR." will appear for 4 seconds on the screen. To resume
automatic tracking, press the AUTO TRACKING button. "AUTO TR." will
appear for 4 seconds on the screen.
TO MONITOR A TV PROGRAM
rPress the TV MONl,(Monitor) •
button while in the playback mode.
The video tape will continue to
play while the picture switches to
the TV channel selected on the
VCR. Press the button to return to
the playback picture.
AUTO
-- SETITRACKING ÷ TRACKING
"IVMONL
%
37
Page 40

SPECIAL PLAYBACK
TO VISUALLY SEARCH FOR DESIRED POINTS
When either the RFWD or REW button is pressed in the PLAYBACK mode, the speed search picture will appear.
When pressed twice, the search picture will increase speed. Speed search time depends upon the speed used
during recording. See chart below.
To rewind or fast forward a tape, press the STOP button, and then press the REW or RFWD button.
To visually search backward, press the REW button
once or twice in the PLAYBACK mode.
Press the PLAY button to resume normal viewing
• speed.
SPEED SEARCH TIMES \\
\
ONCE TWICE
To visually search forward, press the RFWD button
once or twice in the PLAYBACK mode.
EFWD
Press the PLAY button to resume normal viewing
speed.
SP (Standard Play) 3 X 5 X
LP (Long Play) 7 X 9 X
SLP (Super Long 9 X 15 X
• Play) •
\
\
\
\
\
SKIP SEARCH
\
\
\
\
TO WATCH STILL PICTURE
Press the SKIP SEARCH button in the PLAY mode. The VCR will
search forward through approximately 30 seconds of the tape (e.g.
unwanted commercial time) for each press of the SKIP SEARCH
button (maximum six presses) and then resume normal playback.
For example : 1 press: 30 seconds of tape
2 press: 60 seconds of tape
3 press: 90 seconds of tape
SKIP
SEARCH
%
P- •
Press the PAUSE/STILL button in the
PLAYBACK mode.
PAUSE/STILL
%
Press the PLAY button or PAUSE/
STILL button to resume normal
_layback,
NOTES: • Best results during speed search and still playback can be obtained with video cassettes recorded in the
"SLP" mode.
• The audio output is muted during Speed Search and Still.
• A few noise bars will appear on the TV screen during Speed Search and Still.
8 • To prevent damage to the tape, Still and Speed Search mode is automatically changed to the Playback
mode after 5 minutes.
Page 41

TO WATCH A TAPE REPEATEDLY
Press the MENU button,
MENU
%
Press the SET/TRACKING + or - button to
select the AUTO REPEAT option.
-- SET/TRACKING+
I MENU 1
| TIMER RECSET
| TV SET-UP
"_'CH SET-UP
- | AUTO REPEAT ON )'OFF
_f'sYSI"EM SET-UP
(+/_ENTER/MENU)
J
Press the ENTER button to select the ON
position.
ENTER
%
I MENU 1
| TIMER RECSET
| TV SET-UP
_I/CH SET-UP
-| AUTOREP£ATN3N OFF
_I"SYSI"EM SET-UP
(+/_ENTER/MENU)
Press the MENU button. If you press the PLAY •
button, the tape will play over and over until the
repeat mode is canceled.
MENU
%
J
NOTE: To cancel repeat mode, follow above steps 1 and 2, then press the ENTER button to select the OFF position.
Press the MENU button to return to the TV.
The repeat function is canceled automatically when the unit is switched off or the tape is ejected.
39
Page 42

RECORDING A TV PROGRAM
RECORDING AND VIEWING THE SAME TV PROGRAM
To turn on the TVNCR, press the POWER
button.
POWER
Load a cassette tape with the erase prevention
tab intact.
Press the SPEED button to select the desired
tape speed SP or SLP. The counter and SP or
SLP will appear on the screen about 4 sec-
onds.
SPEED
Set the TV/CATV option to the appropriate
position. (See page 23.)
TV - VHF/UHF channels
CATV - CABLE TV channels
NOTES: • If power is switched off during recording, the TV set goes off and the VCR continues to record. Press the
STOP button to halt the recording and turn off the VCR.
• The TV/VCR Channel cannot be changed during recording.
40
Page 43

_1_ Press the Direct Channel Selection buttons or
CHANNEL + or - button to select the channel
to be recorded. (Example: Channel 12)
0 1 2 CHANNEL
CH012 I
Press the REC/OTR button."• "and the channel number will appear on the
screen and the REC/OTR indicator will light.
REC/OTR
[1
CH012
REC/OTR
I\
TO STOP RECORDING
p_
Press the STOP button to stop
recording, " •" will appear on
the screen,
NOTES: • AUTO REWIND FEATURE
TO STOP RECORDING TEMPORARILY
• Press the PAUSE/STILL button to avoid recording unwanted material.
"II" will appear on the screen and the REC/OTR indicator will blink on
and off. Press the PAUSE/STILL button or the REC/OTR button to
continue the recording.
PAUSE/STILL
NOTE:
The PAUSE mode will be changed to STOP mode after five minutes to
prevent damage to the tape.
"}
REC/OTR
mmOmm
This TVNCR will automatically rewind the video cassette when the tape has ended (except during OTR
and Timer Record). It will also eject the video cassette.
• If the erase prevention tab is removed, the tape will eject when the REC/OTR button is pressed for
recording. 41
Page 44

ONE-TOUCH TIMER RECORDING (OTR)
The One-Touch Timer Recording feature provides a simple and convenient way to make a timed recording.
EXAMPLE: One-Touch timer recording for 30 minutes.
Press the POWER button
to turn on the TVNCR.
POWER
Load a video cassette
with the erase prevention
tab intact.
Press
to select the desired tape
speed (SP or SLP).
SP or SLP will appear on
the screen.
SPEED
%
D
Set the TV/CATV option
to the appropriate setting,
TV - VHF/UHF channels
CATV - CABLE TV channels
Press the Direct Channel
Selection buttons or CHANNEL
+ or - button to select the
channel to be recorded.
(Example: Channel 12)
CHANNEL
0 1 2
o.
Press the REC/OTR button"
to begin recording. Press
the button again to stop
recording after 30 minutes. Each
additional press of the REC/OTR
button will increase recording time
as shown below, up to a maximum
of 5 hours. "OTR" will appear on
the screen.
REC/OTR
CH 012
NOTES: • Press the REC/OTR button to increase the time needed for recording. (See the chart below.)
Press _t_ 85t_:ooS 9 times
Recordingtime NORMAL REC
• To cancel OTR, press the STOP button.
• The TV/VCR channel cannot be changed during recording.
Page 45

TIMER RECORDING
Timer recording can be programmed on-screen with the remote control. The built*in timer allows automatic
unattended recording of up to 8 programs within 1 month.
EXAMPLE: Program a timer recording for 23rd day, channel 007 (CATV), 7:00 - 9:30 PM (Tape speed : SLP)
• Load a video cassette with the erase prevention tab intact. The TVNCR will automatically turn on.
• Set the TV/CATV selection to the appropriate position. (see page 23.)
• See page 9 and 10, REMOTE CONTROL operation.
Press the MENU button.
MENU
%
Check the TIMER REC SET option is selected,
then press the ENTER button.
ENTER
%
E \/MENU ]
-I TIMERRECSET
/I_TV SET-UP
I CH SET-UP
I AUTOREPEAT ON K)FF
| SYSTEMSET-UP
(÷/_ENTER/MENU)
J
Press the SET/TRACKING + or - button to
select the PROGRAM position, then press the
ENTER button.
-- SET/TRACKING + ENTER
Press the SET/TRACKING + or - button to
select the date, then press the ENTER button.
-- SET/TRACKING + ENTER
.......... I ]:<ii;i S,AR_,_,_OAM
END -- : -
CH 0i2
2i;:E sP E0sP
N C L/ (+/HENTERfCANCEUMENU)
NOTES: • If programming is performed without a tape in the TV/VCR, or with a tape without an erase prevention
tab, the Timer Recording is not possible. If a tape without an erase prevention tab is in the TV/VCR, the
tape will be ejected.
• To record from the external equipment press the SET/TRACKING + or- button repeatedly until % 1(from
AUDIO/VIDEO IN jacks on the rear)" or "L 2 (from AUDIO/VIDEO IN jacks on the front)" appears when
setting the channel in step 5. A'_
i.1,_]1
Page 46

TIMER RECORDING (CONTINUED)
Set the start time, end time, channel and tape speed as in step 4.
-- SET/TRACKING+
ENTER
%
r TIMER REC SET ]DATE 23{THUJ}
START 7 ; 00 PM
END 9;30PM /
CH _7¢
SPEED1_
1,<+/-_E"TER/CA"CEUME"U>J
iJ2:Eo:T 2, 2i: ,2i;
To set the timer for another program, press the
SET/TRACKING + or - button until the number
of the second program blinks, then press the ENTER
button. Repeat steps 4 to 5 to set the second program.
M ress the TIMER REC button. The T.REC
indicator will light. The Timer is programmed, when
the programmed time is reached, the recording is
automatically started.
TIMER REC
T.REC
mOrn
/\
To cancel timer recording, press the button again and
T.REC indicator will go out.
NOTES: • The VCR section cannot be used while the T.REC indicator is lit. If you want to use the VCR operation,
press the TIMER REC button to deactivate the timer.
• After a power failure or disconnection of the power plug, all programmed recording setting and time display
will be lost upon resumption of power. In this case, reset the clock (see pages 16-18.) and reprogram any
timer recordings.
• If you want to correct the digits while setting, press the CANCEL button until the item you want to correct,
then press the SET/TRACKING + or - button to correct the desired setting.
Page 47

OTHER FUNCTIONS FOR THE TIMER RECORDING
TO SET DAILY/WEEKLY TIMER TO CONFIRM THE SETTINGS
rWhen setting the date in the step 4 on page 43, press
the SET/TRACKING - button repeatedly when the
current day is displayed.
The setting changes as follows; -
Example
Thecurrentday (Friday) --->SUN*SAT (Sundayto Saturday)
f 4,
MON-SAT (Mondayto Saturday)
One monthlater 4,
minusoneday MON-FRI (Mondayto Friday)
t 4,
WKL-WED <--- WKL-THU (WeeklyThursday)
(WeeklyWednesday)
After setting, press ENTER button.
Press the PROGRAM button once. The TV screen
displays the timer program list.
Press the PROGRAM button again. The TV screen
displays the ON/OFF timer setting.
(once) (twice)
23 TH 7:00PM930PM 0078LP- _" \_N/OFF TIMER
-_-_'-t!--I -_--\--x -\ | _\
CH012
MON-FRI SET
| OFF TIMER
1130PM SET
i;/-5ENTERICA-NC?LJMENU-> {+I-IENTEPJCANCELIMENU)
Press the PROGRAM button 3 times. The screen
returns to the normal screen.
TO CANC
Press the SET/TRACKING + or - button to select
the TIMER REC SET option in the MENU. then
press the ENTER button.
Press the SET/TRACKING + or - button to select
the unnecessary program, and press the CANCEL
button to cancel the program.
CANCEL
[
F THE PROGRAM OVERLAPS ANOTHER
NOTE: Do not overlap programs as portions of the
conflicting programs will be lost. The first
recording time has priority over the next
recording time as shown in the diagram.
8:00 9:00 10:00 11:00
NOTES: • The everyday/every week recording can be made continuously until the recording is canceled or the tape
reaches the end.
• During timer recording, the automatic rewinding mechanism does not function.
• You can correct or cancel the programmed setting in program confirm mode.
45
Page 48

USING THE REAL TIME TAPE COUNTER
The On*Screen Real Time Tape Counter shows the tape running time in Hours, Minutes and Seconds.
You can easily determine how long the tape has been running or how much time is left on the tape.
TO VIEW THE COUNTER DISPLAY
Press the CALL button to display the Real Time
Tape Counter.
CALL
%
Press the COUNTER RESET button to set the
counter to "00:00:00".
COUNTER
RESET
%
Begin Playback or Recording to start the tape.
the counter will display the elapsed time.
PLAY
When you wish to make the counter disap-
pear, press the CALL button once again.
CALL
%
NOTES: • If you rewind the tape from "00:00:00", a minus sign ("-") will be displayed in front of the time.
• When you load a tape, the counter will reset to "00:00:00".
• The counter does not function on nonrecorded (blank) sections of the tape. When you rewind,
fast forward or play tapes through blank sections, the counter stops.
J
Page 49

USING ZERO RETURN
The zero return function provides a convenient method of rapidly returning to the starting point of recording
or playback. The starting point can be indexed for any location on the tape by pressing the COUNTER
RESET button and ZERO RETURN button.
Press the CALL button to display the counter.
CALL
%
840AM THU CH 01
Before playback or recording, press the
COUNTER RESET button to set the counter
to "00:00:00".
COUNTER
RESET
%
01
00:00:00 SP
Begin playback or recording,
PLAY
Press the STOP button.
_1_ Press the ZERO RETURN _
button. The tape will rewinc
and automatically stop at
the "00:00:00" position.
ZERO
RETURN
47
Page 50

DUPLICATING A VIDEO TAPE
if you connect the TVNCR to another VCR or CAMCORDER, you can duplicate a previously recorded tape.
Make all connections before turning on the power.
Insert a blank cassette with the erase preven-
tion tab intact into the TV/VCR.
Insert a previously recorded cassette into the
playback VCR or Camcorder.
CONNECTIONTO ANOTHER VCR
PLAYBACK VCR
RECORDING TV/VCR
AUDIONIDEO CORD (NOT SUPPLIED)
Press the INPUT SELECT button twice to
select AUDIO/VIDEO input position. The "LINE
2" will appear on the screen.
INPUTSELECT
NOTE: You can also use the rear AUDIO/VIDEO IN
Jacks. Select "LINE 1" by pressing the INPUT
SELECT button, j
CONNECTION TO CAMCORDER
For duplicating a previouslyrecorded tape from a camcorder,
follow the camcorder manufacturer's instructions. A typical
camcorder dubbing hook-up is shown below.
PLAYBACK
CAMCORDER
AUDIONIDEO CORD
(NOT SUPPLIED)
RECORDING TV/VCR
To VIDEO/AUDIO IN _
H
Press the REC/OTR button
on the remote control of the
TV/VCR, then press the
PAUSE/STILL button.
REC/OTR PAUSE/STILL
Press the PLAY Button on the
playback VCR, then press the
PAUSE/STILL button.
PAUSE/
STILL
Press the PAUSE/STILL
buttons on both units
simultaneously to begin the
duplicating process.
PAUSE/
PAUSE/STILL STILL
%%
NOTES: • It is recommended that the tape speed be set to the SP mode on the TV/VCR for best results.
• Unauthorized recording of copyrighted television programs, films, video cassettes and other materials
may infringe the rights of copyright owners and be contrary to copyright laws.
Page 51

RECEPTION DISTURBANCES
Most types of television interference can be remedied by adjusting the height and position of the VHF/UHF
antenna. Outdoor antennas are recommended for best results. The most common types of television interfer-
ence are shown below. If one of these symptoms appear when the TV/VCR is connected to a Cable TV system,
the disturbance may be caused by the local Cable TV company broadcast.
IGNITION
Black spots or horizontal streaks may appear, the picture may flutter or
drift. Usually caused by interference from automobile ignition systems,
neon lamps or AC powered tools and appliances such as drills or hair
dryers.
GHOSTS
Ghosts are caused by the television signal following two paths. One is the
direct path and the other is reflected by tall buildings, hills or other large
objects. Changing the direction or position of the antenna may improve the
reception.
SNOW
If the TV/VCR is located far from the TV station, in a fringe reception
area where the signal is weak, small dots may appear in the picture.
If the signal is extremely weak, the installation of a larger external
antenna may be necessary.
RADIO FREQUENCY INTERFERENCE (RFI)
Caused by two-way radios, this type of interference produces moving
ripples or diagonal streaks in the picture. Some cases may cause a loss of
contrast in the picture. Changing the direction and position of the antenna
or installing an RFI filter may improve the picture.
CARE AND MAINTENANCE
To prevent fire or shock hazard, disconnect the TV/VCR from the AC/DC power sources before cleaning.
The finish on the cabinet may be cleaned with mild soap and a soft. damp cloth and cared for as other furniture. Use
caution when cleaning or wiping the plastic parts.
Page 52

TROUBLESHOOTING GUIDE
Check the following chart before requesting service.
SYMPTOMS CAUSE I PAG_
POWER
No power. The AC power cord is not connected.
Although the power is Cassette is not inserted.
on, the TVNCR does
not operate. TIMER REC button is depressed.
TV BROADCAST RECEPTION
POSSIBLE SOLUTIONS
Connect the AC power cord to the AC
11
outlet,
Insert a video cassette. 34
Press the TIMER REC button. 44
TV station experiencing problems. Try another channel. 19
Picture control is not adjusted. Check picture control adjustments. 32, 33
Check for source of reception distur-
Poor or no picture. Possible local interference, bance. 49
Antenna (CATV) connector is not Check CATV connection or VHF/UHF
connected or possible local interference, antenna, reposition or rotate antenna. 12, 14
TV station experiencing problems. Try another channel. 19
Picture control is not adjusted. Check picture control adjustments. 32, 33
Possible local interference. Check for source of reception distur-
49
bance.
Poor or no color,
Antenna (CATV) connector is not Check CATV connection or VHF/UHF
connected or possible local interference, antenna, reposition or rotate antenna. 12, 14
TV station experiencing problems. Try another channel. 19
Antenna (CATV) connector is not Check CATV connection or VHF/UHF
Picture wobbles
connected or possible local interference, antenna, reposition or rotate antenna. 12, 14
or drifts.
Cable TV channel is scrambled. Try another channel. 19
CATV connector is not connected. Check all CATV connections. 14
TV/CATV Mode menu option is set to the Set the TV/CATV Menu option to the 23
No CATV reception. TV mode. CATV mode.
Cable TV service interrupted. Contact your Cable TV company. 14
TV/CATV Mode menu option is not set to Make sure TV/CATV menu option is in
23
No reception above the appropriate mode. the appropriate mode.
channel 13. UHF antenna is not connected. Check UHF antenna. 12
TV station experiencing problems. Try another channel. 19
Antenna (CATV) connector is not Check CATV connection or VHF/UHF 12,14
Poor or no sound, connected or possible local interference, antenna, reposition or rotate antenna.
Possible local interference. Check for source of reception distur- 49
bance.
MUTING button is depressed. Check that MUTING button has not 20
been pressed.
TV shuts off. TV station stopped broadcasting. Tune new channel. 19
Sleep timer is set. Set Sleep Timer to "0". 21
50
Page 53

• SYMPTOMS POSSIBLE SOLUTIONS
CAUSE
TV station experiencing problems or
program tuned is not closed captions,
PAGE '_
19, 21
Try another channel.
Closed caption is not
activated. Check CATV connection of VHF/UHF
TV signal is weak. antenna, reposition or rotate antenna. 12, 14
The TV/CAP/TEXT button is not Press the TV/CAP/TEXT button to 21, 22
depressed, turn on the closed caption.
RECORDING
TV recording does not The video cassette's erase prevention Place a piece of vinyl tape over
work. tab is broken off. the hole. 35
The time is not set correctly. Reset the present time. 18
Timer recording does The recording start/end time is not Reset the start/end time. 43, 44
not work. set correctly.
The TIMER REC button has not been Press the TIMER REC button (the
pressed (the T.REC indicator is not lit.). T.REC indicator is lit.). 44
PLAYBACK
Tape is old or worn. Replace the tape. --
Noise bars appear on Tracking adjustment is beyond range Adjust tracking manually using the
the screen, of automatic tracking circuit. SET/TRACKING +/- buttons on 37
the remote control,
Video heads are dirty. Clean the video heads, 52
REMOTE CONTROL
The remote control is not aimed at the Aim the remote control at the
sensor, remote sensor, 10
Distance is too far or too much light Operate within 15 feet or reduce
10
Remote control does in the room. the light of the room.
not operate.
There is an obstacle in the path of the Clear the path of the beam. 10
beam.
The batteries are weak, Replace the batteries. 10
The batteries are not inserted Insert correctly,
correctly, 10
VIDEO HEAD CLEANING
VIDEO HEAD CLOGGING
The video heads are the means by which the TV/VCR reads the picture from the tape during playback. In the
unlikely event that the heads become dirty enough to be clogged, no picture will be played back. This can easily be
determined if, during playback of a known good tape, there is good sound, but no picture (picture is extremely
snowy). If this is the case, use a high quality head cleaning system or have them cleaned professionally.
Good Picture Snowy Picture
51
Page 54

VIDEO HEAD CLEANING
Video head cleaning is needed when the playback picture becomes unclear. This signifies that the heads are getting
dirty and can occur when playing poor quality or damaged tapes. If the heads require cleaning, use an equivalent high
quality chemical non-abrasive (wet) head cleaning tape or have them cleaned professionally. If playing a head cleaning
tape in the VCR once does not improve the picture, play it several times before requesting service.
DO NOT ATTEMPT TO CLEAN THE VIDEO HEADS OR SERVICE THE UNIT BY REMOVING THE TOP COVER.
NOTES: • Video heads may eventually wear out and should be replaced when they fail to produce clear pictures.
• To help prevent video head clogging, use only good quality VHS tapes. Discard worn out tapes.
SPECIFICATIONS
TELEVISION
Picture Tube:
Tuner Type:
Receiving Channels:
Antenna Input:
Speaker:
Audio Output Power:
VCR
Video System:
Video Signal:
Cassette Tape:
Audio Track:
Tape Speed:
EFWD/REW Time:
Speed Search:
GENERAL
Power Source:
Power Consumption:
Dimensions:
Weight:
Inputs/Outputs:
Storage Temperature:
Operating Temperature:
Accessories:
52
(Specifications are subject to change without notice.)
9" (measured diagonally)
Quartz PLL Frequency Synthesized
VHF 2-13, UHF 14-69
CATV 14-36 (A)-(W)
37-59 (AA)-(VVW)
60-85 (AAA)-(ZZZ)
86-94 (86)-(94)
95-99 (A-5)-(A- 1)
100-125 (100)-(125)
01 (5A)
VHF/UHF In 75 ohms coaxial
3", 8 ohms x 1
1.2W
VHS, 2 Rotary Heads Helical Scanning System.
NTSC Color
VHS
1Track
SP: 33.35 mm/sec.
LP: 16.67 mm/sec.
SLP: 11.12 mm/sec.
RFWD: Approx. 4 minutes and 50 seconds
REW: Approx. 2 minutes and 30 seconds
('i--120 Cassette)
SP 3 & 5 x Normal Speed
LP 7 & 9 x Normal Speed
SLP 9 & 15 x Normal Speed
AC 120V 6OHz, DC 12V
54 Watts (AC 120V), 48 Watts (DC12V)
W 10-15/16" x D 12-5/16" x H 12-1/4"
19.4 Ibs
Video: In (RCA) lVp-p 175 ohm
Out (RCA) 1Vp-p 175 ohm
Audio: In (RCA) -8dB / 50K ohm
Out (RCA) -8dB / 1K ohm
-20°C to 6O°C (-4°F to 140°F)
5°C to 40°C (41 °F to 104°F)
Telescopic Antenna with 300-75 ohm Matching Transformer
12V DC Car Cord
Remote Control and Battery (UM4x2 pcs)
Page 55

Limited Warranty
What your warranty covers:
• Defects in material or workmanship.
For how long after your purchase:
• 90 days from date of purchase for labor charges.
• One year from date of purchase for parts.
• Two years from date of purchase for picture tube.
The warranty period for rental units begins with the first rental or 45 days from date of
shipment to the rental firm, whichever comes first.
What we will do:
• Pay any Authorized RCA VCR Service Center the labor charges to repair your TV/VCR.
• Pay any Authorized RCA VCR Service Center for the new or, at our option, rebuilt replacement
parts and picture tube required to repair your TV/VCR.
How you get service:
• For screen sizes of 26" and smaller: Take your RCA TV/VCR to any Authorized RCA VCR Service
Center and pick up when repairs are complete.
• For screen sizes larger than 26": Request home or pick up, repair, and return service from any
Authorized RCA VCR Service Center, provided that your TVNCR is located within the geographic
territory covered by an Authorized RCA VCR Service Center. If not, you must take your TVNCR to
the Service Center location at your own expense, or pay for the cost the Service Center may
charge to transport your unit to and from your home.
• To identify your nearest Authorized RCA VCR Service Center, ask your Dealer, look in the Yellow
Pages, or call 1-800-336-1900.
• Proof of purchase in the form of a bill of sale or receipted invoice which is evidence that the
product is within the warranty period must be presented to obtain warranty service. For rental
firms, proof of first rental is also required.
What your warranty does not cover:
• Customer instruction. (Your Owner's Manual describes how to install, adjust, and operate
your TVNCR. Any additional information should be obtained from your Dealer.)
• Installation and related adjustments.
• Signal reception problems not caused by your TV/VCR.
• Damage from misuse or neglect.
• Cleaning of video/audio heads.
• Batteries.
• Customer replacement fuses.
• Images burnt onto the screen.
• A TVNCR that has been modified or incorporated into other products or is used for institutional
or other commerdal purposes.
• A TV/VCR purchased or serviced outside the USA.
• Acts of nature, such as but not limited to lightning damage.
Product Registration:
• Please complete and mail the Product Registration Card packed with your set. It will make it
easier to contact you should it ever be necessary. The return of the card is not required for
warranty coverage.
53
Page 56

Limited Warranty (continued)
Limitation of Warranty:
THE WARRANTY STATED ABOVE IS THE ONLY WARRANTY APPLICABLE TO THIS
PRODUCT. ALL OTHER WARRANTIES, EXPRESS OR IMPLIED (INCLUDING ALL IMPLIED
WARRANTIES OF MERCHANTABILITY OR FITNESS FOR A PARTICULAR PURPOSE) ARE
HEREBY DISCLAIMED. NO VERBAL OR WRITTEN INFORMATION GIVEN BY THOMSON
MULTIMEDIA INC., ITS AGENTS OR EMPLOYEES SHALL CREATE A GUARANTY OR IN
ANY WAY INCREASE THE SCOPE OF THIS WARRANTY.
REPAIR OR REPLACEMENT AS PROVIDED UNDER THIS WARRANTY IS THE EXCLUSIVE
REMEDY OF THE CONSUMER. THOMSON MULTIMEDIA INC. SHALL NOT BE LIABLE
FOR INCIDENTAL OR CONSEQUENTIAL DAMAGES RESULTING FROM THE USE OF THIS
PRODUCT OR ARISING OUT OF ANY BREACH OF ANY EXPRESS OR IMPLIED WARRANTY ON
THIS PRODUCT. THIS DISCLAIMER OF WARRANTIES AND LIMITED WARRANTY ARE
GOVERNED BY THE LAWS OF THE STATE OF INDIANA. EXCEPT TO THE EXTENT PROHIBITED
BY APPLICABLE LAW, ANY IMPLIED WARRANTY OF MERCHANTABILITY OR FITNESS FOR A
PARTICULAR PURPOSE ON THIS PRODUCT IS LIMITED TO THE APPLICABLE WARRANTY
PERIOD SET FORTH ABOVE.
HOW state law relates to this warranty:
• Some states do not allow the exclusion nor limitation of incidental or consequential damages, or
limitations on how long an implied warranty lasts, so the above limitations or exclusions may not
appty to you.
• This warranty gives you specific legal rights, and you also may have other rights that vary from
state to state.
If you purchased your product outside the United States:
• This warranty does not apply. Contact your dealer for warranty information.
Service calls which do not involve defective materials or workmanship are not covered by
this warranty. Costs of such service calls are the sole responsibility of the purchaser.
Please do not send any products to the Indianapolis address listed in this manual or on the carton. This will
only add delays in service for your product.
02001 Thomson multimedia inc.
Trademark(s)@ Registered
Marca(s) Registrada(s)
Printed in Thailand
TOCOM 15775590
Thomson multimedia Inc.
10330 North Meridian Street
Indianapolis, IN 46290
 Loading...