

Page 1
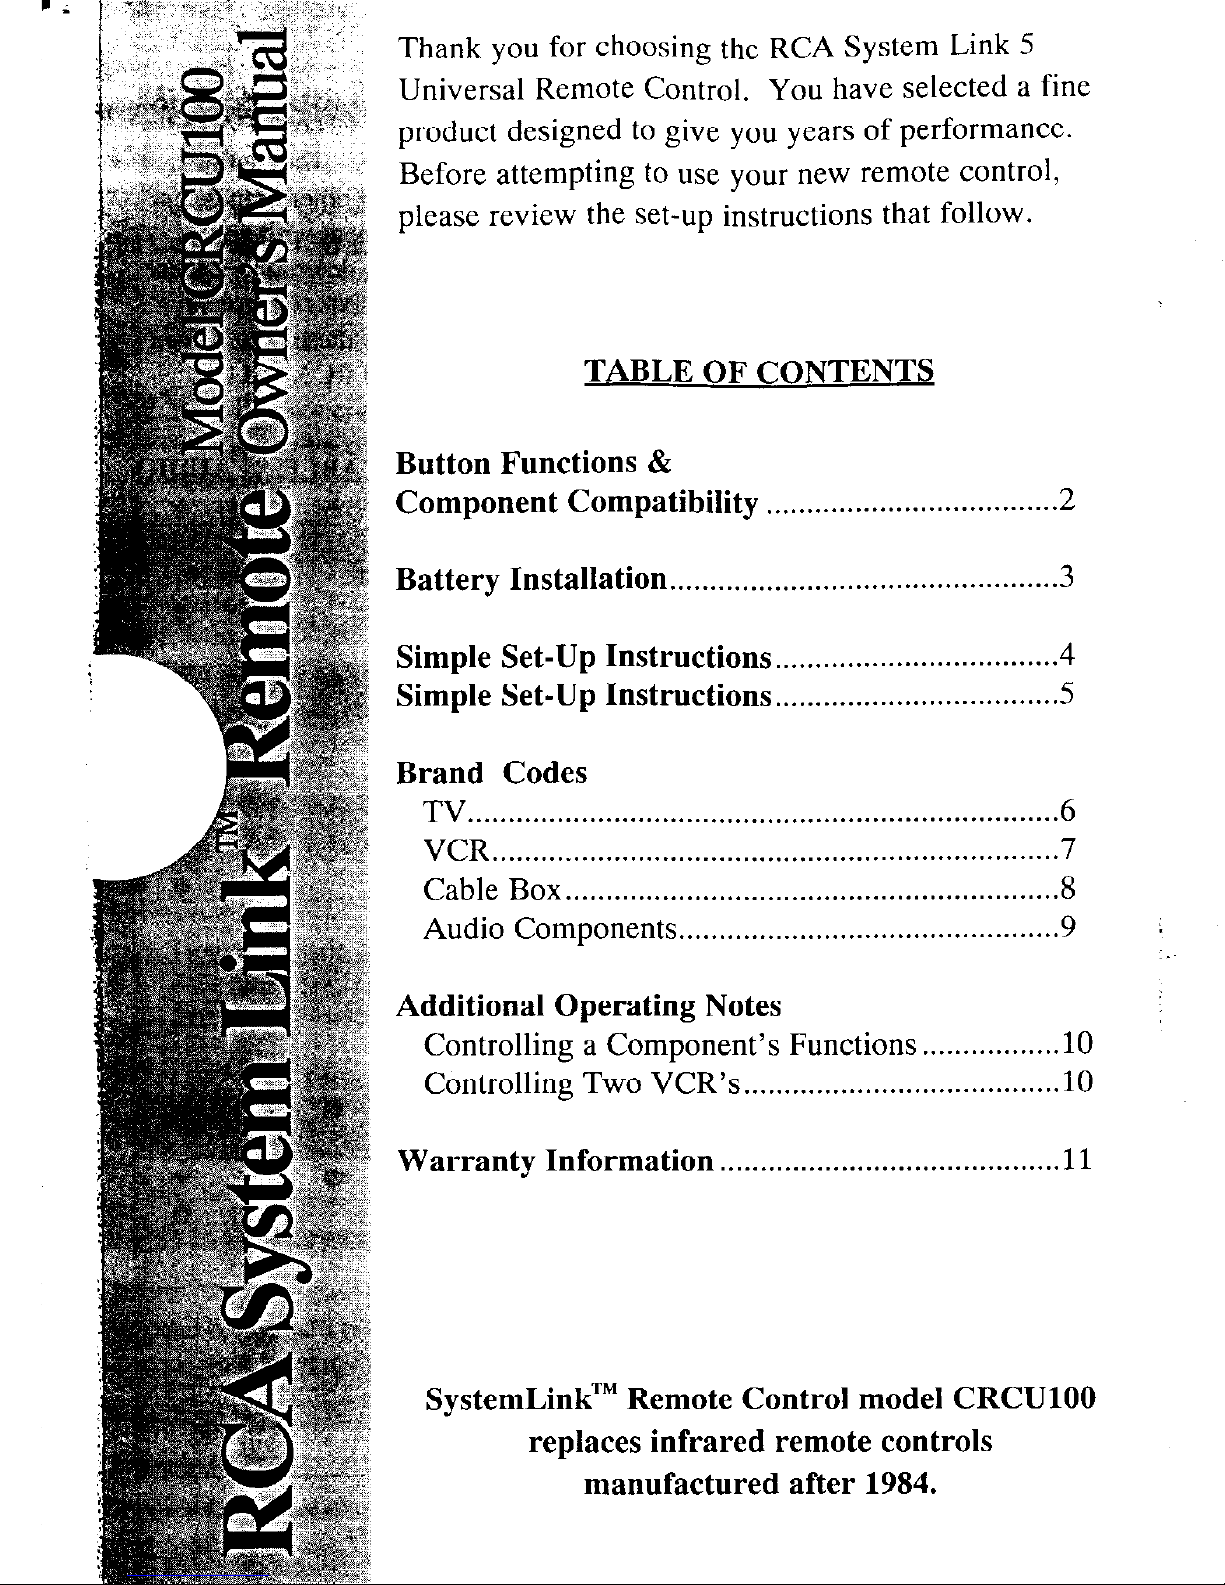
Thank you for choosing the RCA System Link 5
Universal Remote Control. You have selected a fine
product designed to give you years of performance.
Before attempting to use your new remote control,
please review the set-up instructions that follow.
TABLE OF CONTENTS
Button Functions &
Component
Compatibility
. . . . . . . . . . . . . . . . . . . . . . . . . . . . . . . . . . . . 2
Battery Installation
. . . . . . . . . . . . . . . . . . . . . . . . . . . . . . . . . . . . . . . . . . . . . . . .
3
Simple
Set-Up Instructions..
................................ .4
Simple
Set-Up Instructions..
................................ .5
Brand Codes
TV..
......................................................................
.6
VCR..
....................................................................
7
Cable
Box.. ..........................................................
.8
Audio
Components.. ............................................
.9
Additional Operating Notes
Controlling a Component’s Functions . . . . . . . . . . . . . . . . . 10
Controlling
Two VCR’s . . . . . . . . . . . . . . . . . . . . . . . . . . . . . . . . . . . . . . . 10
Warranty
Information . . . . . . . . . . . . . . . . . . . . . . . . . . . . . . . . . . . . . . . . . .
11
SystemLinkTM Remote Control model CRCUlOO
replaces infrared remote controls
manufactured after 1984.
Page 2
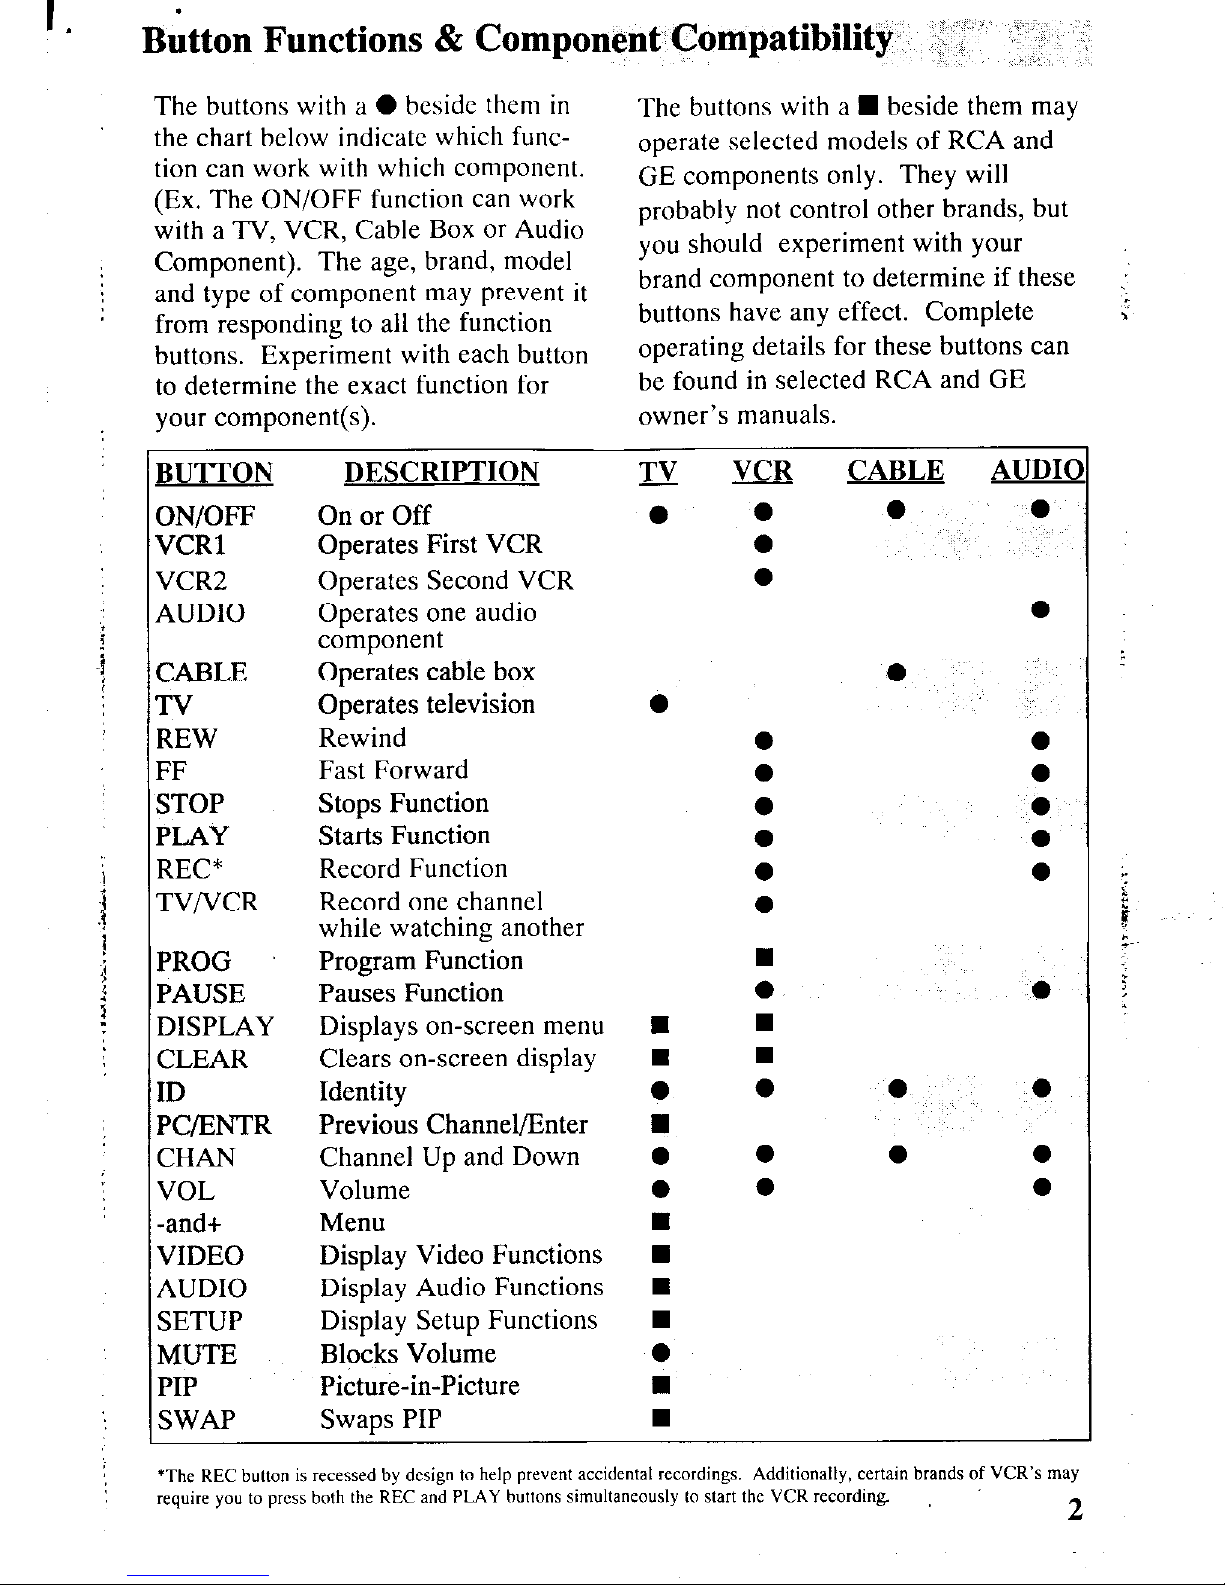
your component(s).
owner’s manuals.
BUTTON
DESCRIPTION
TV
VCR CABLE AUDI(
ON/OFF
On or Off
0
0
0
0
VCR1
Operates First VCR
0
VCR2
Operates Second VCR
l
AUDIO
Operates one audio
l
component
CABLE
Operates cable box
0
TV
Operates television
0
REW
Rewind
0
0
FF
Fast Forward
0
0
STOP
Stops Function
0
0
PLAY
Starts Function
0
0
REC*
Record Function
0
0
TV/VCR
Record one channel
0
while watching another
PROG
Program Function
n
PAUSE
Pauses Function
0
0
DISPLAY
Displays on-screen menu
n
n
CLEAR
Clears on-screen display w
n
ID
Identity
0
0
0
0
PC/ENTR
Previous Channel/Enter
n
CHAN
Channel Up and Down 0
0
0
0
VOL
Volume
0
0
0
-and+
Menu
n
VIDEO
Display Video Functions
n
AUDIO
Display Audio Functions
n
SETUP
Display Setup Functions
n
MUTE
Blocks Volume
0
PIP
Picture-in-Picture
n
SWAP
Swaps PIP
n
B&ton Functions & Component Compatibility,
:: ‘_‘. ‘[‘,
/
The buttons with a 0 beside them in
The buttons with a w beside them may
the chart below indicate which function can work with which component.
operate selected models of RCA and
(Ex. The ON/OFF function can work
GE components only. They will
with a TV, VCR, Cable Box or Audio
probably not control other brands, but
Component). The age, brand, model
you should experiment with your
and type of component may prevent it
brand component to determine if these
:
from responding to all the function
buttons have any effect. Complete
c
buttons. Experiment with each button
operating details for these buttons can
to determine the exact function for
be found in selected RCA and GE
*The REC button is recessed by design to help prevent accidental recordings. Additionally, certam brands of VCR’s may
require you to press both the REC and PLAY buttons simultaneously to start the VCR recording
2
Page 3
InstalhgReplacing Batter&
‘T:-
Operating
Your Remote
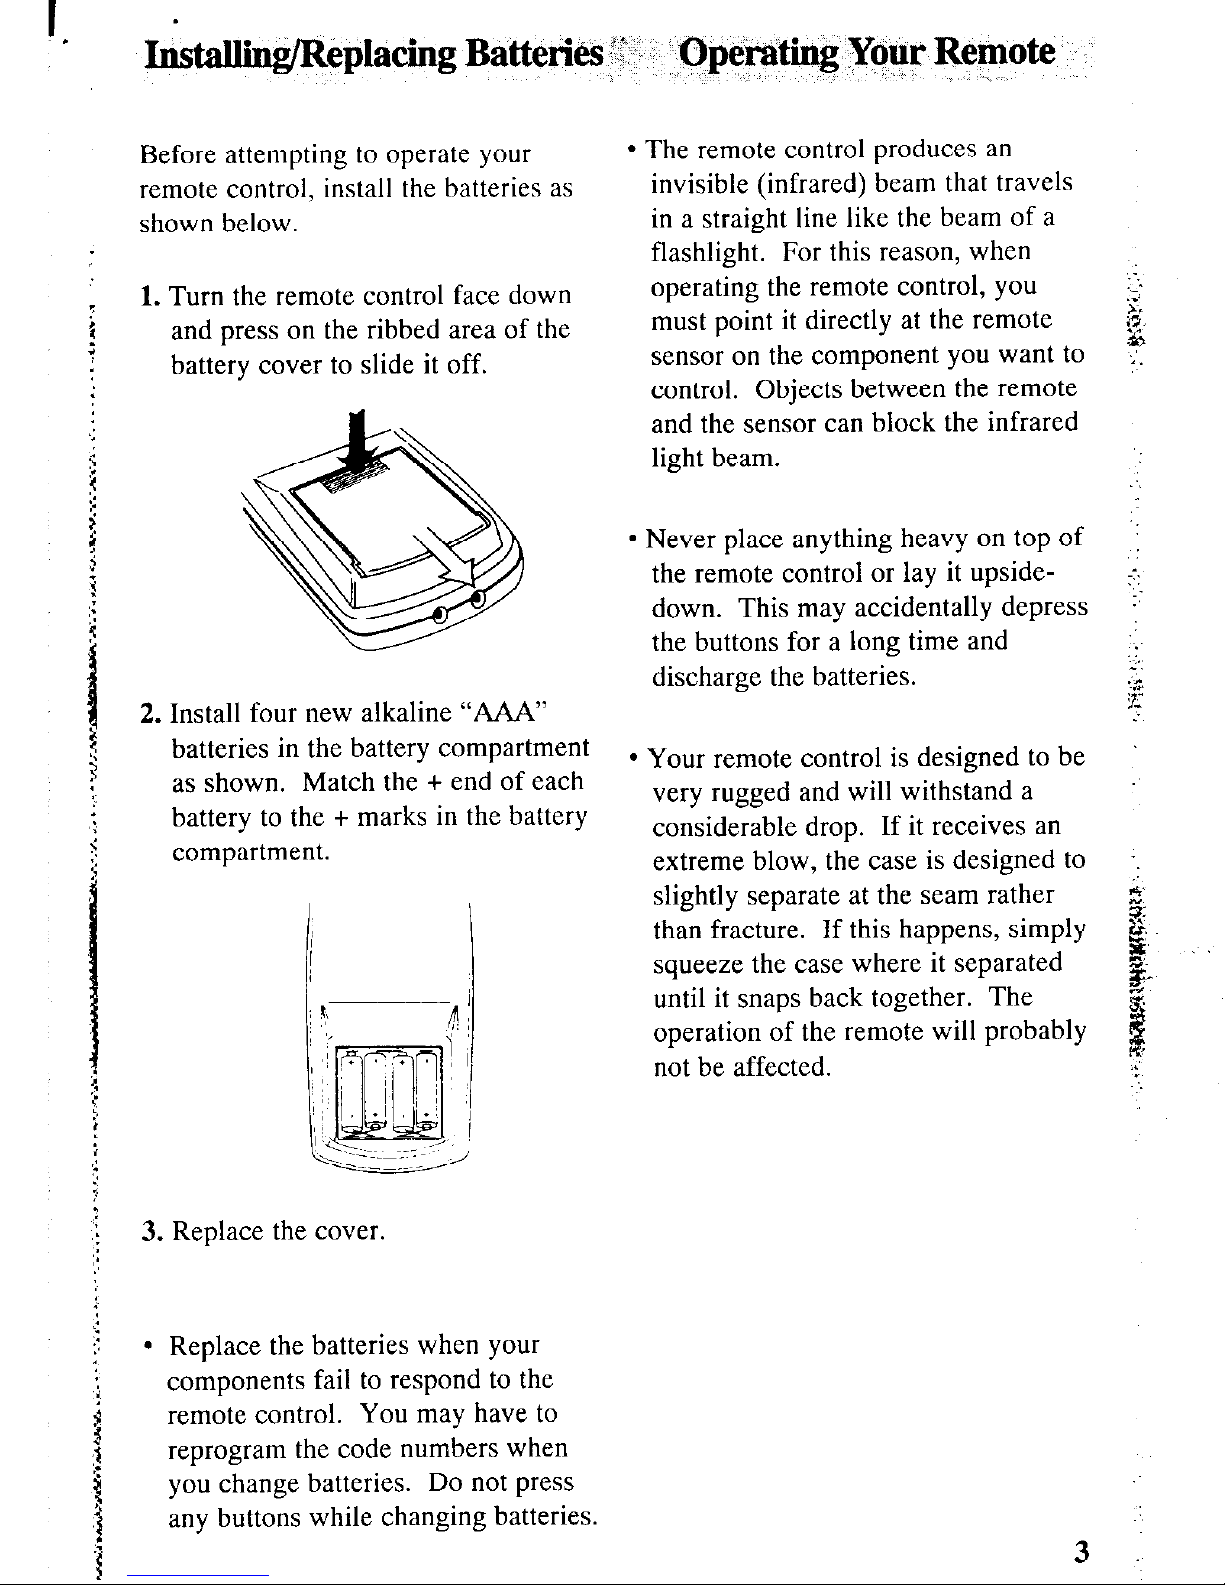
Before attempting to operate your
remote control, install the batteries as
shown below.
1. Turn the remote control face down
and press on the ribbed area of the
battery cover to slide it off.
2. Install four new alkaline “AAA”
batteries in the battery compartment
as shown. Match the + end of each
battery to the + marks in the battery
compartment.
l
The remote control produces an
invisible (infrared) beam that travels
in a straight line like the beam of a
flashlight. For this reason, when
operating the remote control, you
must point it directly at the remote
sensor on the component you want to
control. Objects between the remote
and the sensor can block the infrared
light beam.
l
Never place anything heavy on top of
the remote control or lay it upside-
down. This may accidentally depress
the buttons for a long time and
discharge the batteries.
l
Your remote control is designed to be
very rugged and will withstand a
considerable drop. If it receives an
extreme blow, the case is designed to
slightly separate at the seam rather
than fracture. If this happens, simply
squeeze the case where it separated
until it snaps back together. The
operation of the remote will probably
not be affected.
3. Replace the cover.
l
Replace the batteries when your
components fail to respond to the
remote control. You may have to
reprogram the code numbers when
you change batteries. Do not press
any buttons while changing batteries.
3
Page 4
Simple
set-yp Instructlom-
\
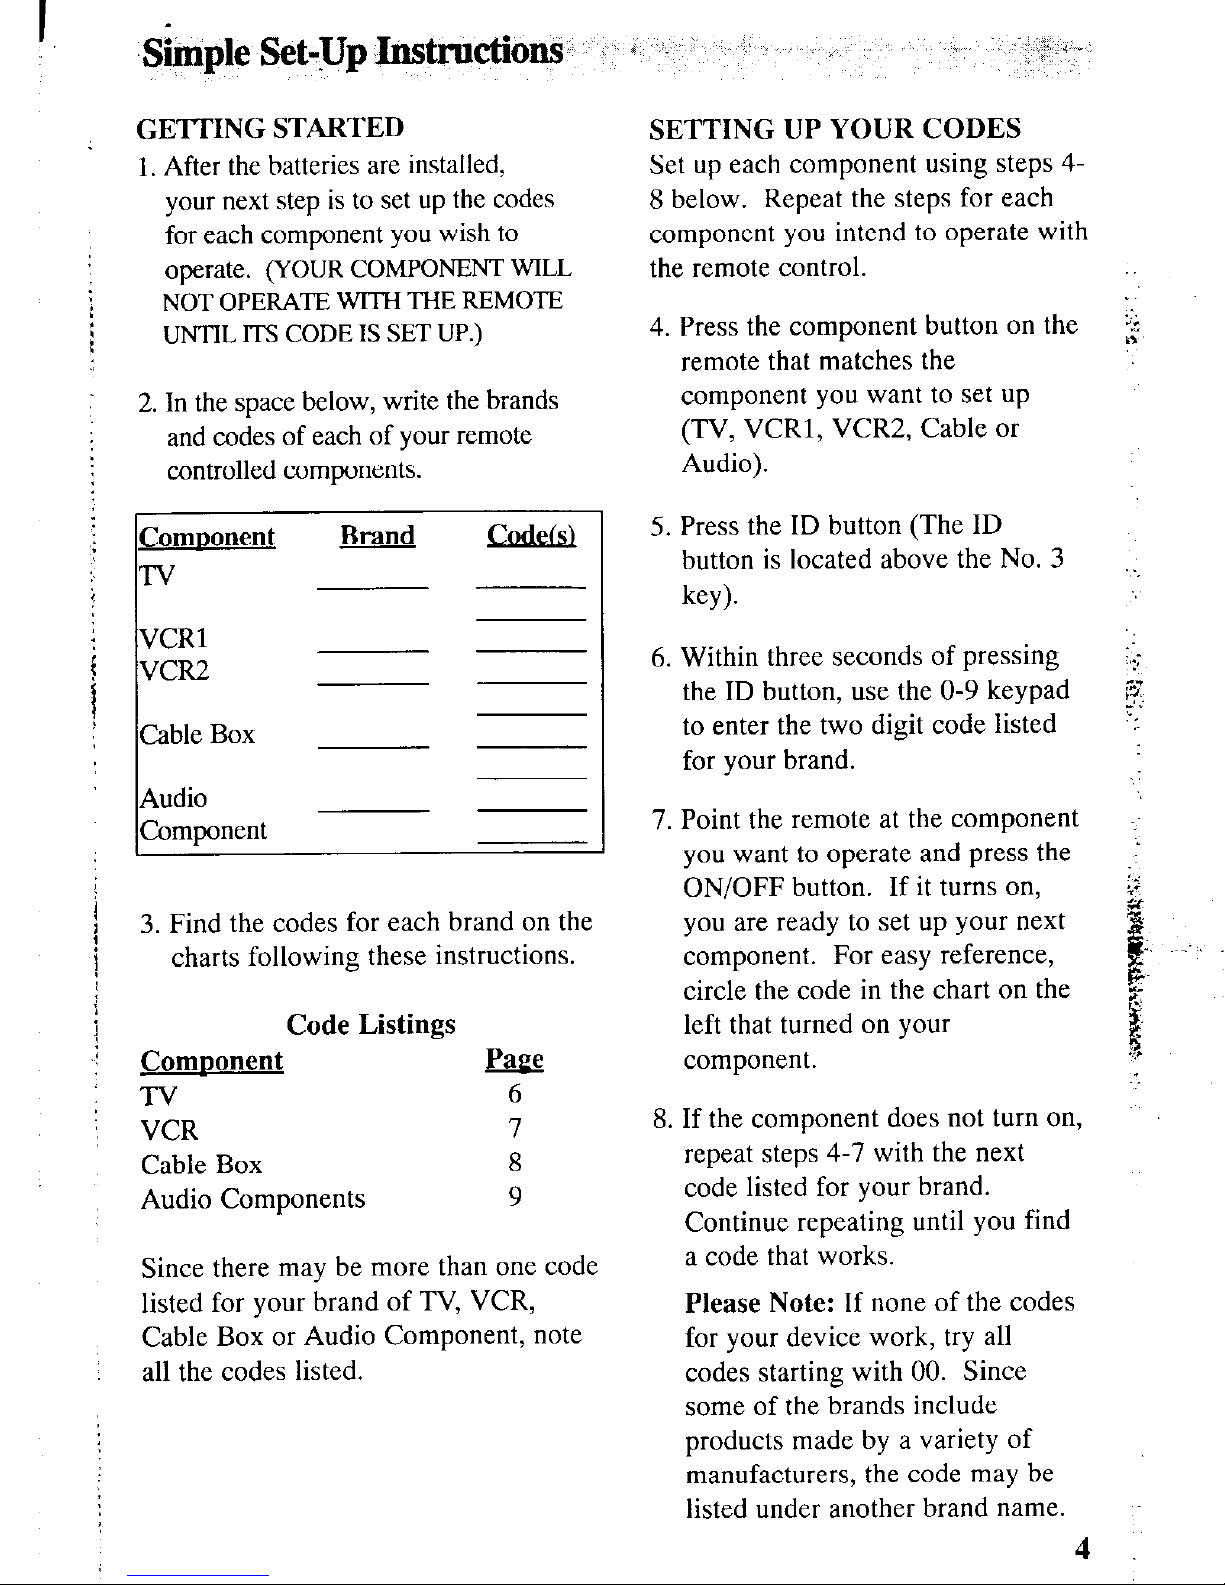
GETTING STARTED
1. After the batteries are installed,
your next step is to set up the codes
for each component you wish to
operate. (YOUR COMPONENT WILL
NOT OPERATE WITH THE REMOTE
UNTIL ITS CODE IS SET UP.)
2. In the space below, write the brands
and codes of each of your remote
controlled components.
ComDonent
Brand
Code(s)
TV
~ ___
VCR1
VCR2
~ ~
Cable Box
~ ~
Audio
Component
3.
Find the codes for each brand on the
charts following these instructions.
Code Listings
ComDonent
m
TV
6
VCR
7
Cable Box
8
Audio Components
9
Since there may be more than one code
listed for your brand of TV, VCR,
Cable Box or Audio Component, note
all the codes listed.
SETTING UP YOUR CODES
Set up each component using steps 48 below. Repeat the steps for each
component you intend to operate with
the remote control.
Press the component button on the
remote that matches the
component you want to set up
(TV, VCRl, VCR2, Cable or
Audio).
Press the ID button (The ID
button is located above the No. 3
key).
Within three seconds of pressing
the ID button, use the O-9 keypad
to enter the two digit code listed
for your brand.
7. Point the remote at the component
you want to operate and press the
ON/OFF button. If it turns on,
you are ready to set up your next
component. For easy reference,
circle the code in the chart on the
left that turned on your
component.
8. If the component does not turn on,
repeat steps 4-7 with the next
code listed for your brand.
Continue repeating until you find
a code that works.
Please Note:
If none of the codes
for your device work, try all
codes starting with 00. Since
some of the brands include
products made by a variety of
manufacturers, the code may be
listed under another brand name.
:
:.:;
5;
1 .
Page 5

MISE EN ROUTE
1. Aprks avoir
install6
les piles,
programmez les codes pour chaque
composant que vous dksirez
commander. (LE COMPOSANT NE
FONCTIONNE AVEC LA
tiLJ?COMMANDE QU’UNE FOIS QUE
SON CODE EST PROGRAMMk.)
2. Dans l’espace ci-dessous, inscrivez les
marques et les codes de chacun des
composants command& par la
t&kommande.
ComDosant
TklCviseur
Maraue
Code(s)
MagnCtoscope 1
~ ~
Magnttoscope 2
~ ~
CXblodlecteur
3. Trouvez le code de chaque marque
dans les tableaux a la suite de ces
instructions.
Liste de codes
Comwsant
m
TklCviseur
6
Magnktoscope
7
CgblosClecteur
8
Composants audio
9
fitant donnC qu’il peut exister plus d’un
code pour la marque de votre tClCviseur,
magnttoscope, dblostlecteur ou
composant audio, notez tous les codes
Cnum&s.
PROGRAMMATION DES CODES
Programmez chaque code en suivant
les Ctapes 4 k 8 ci-dessous. RCpttez
les Ctapes pour chaque composant que
vous dCsirez commander avec la
tC1Ccommande.
4. Appuyez sur le bouton de
composant de la tClCcommande
correspondant au composant que
vous dksirez programmer (TV, VCR
1, VCR 2, Cable ou Audio).
5. Appuyez sur le bouton ID (audessus de la touche 3).
6. Dans le trois secondes suivant
l’enfoncement du bouton ID, utilisez
les touches 0 g 9 pour entrer le code
& deux chiffres correspondant g la
marque de I’appareil.
7. Pointez la tClCcommande en
direction du composant 5
commander et appuyez sur le bouton
ON/OFF. Si l’appareil s’allume,
vous pouvez programmer le composant suivant. Pour faciliter la
;
rCf&ence encerclez le code dans le 1.
tableau 2 gauche qui a permis d’al-
’
lumer le composant. composant.
i
8.
Si le composant ne se met pas en
marche, rCpCtez les &apes 4 & 7
avec le code suivant pour la marque.
Continuez ainsi jusqu’?i ce que vous
trouviez un code qui fonctionne.
Remarque: Si aucun des codes
convient ?I votre appareil, essayez
tous !es codes en commencant par
00. Etant donnC que certaines
marques comprennent des produits
fabriquks par diffkrents fabricants,
le code peut figurer sous un autre
nom de marque.
5
Page 6

4kai ...............................................
02
NAD .......................................... 18,23
Anam National
................................ 38
NEC ............................ 11,14,19,27,38
AOC ..................................... 11,19,27
Panasonic.. ............................ 12,13,38
Candle.. ................................. 11,27,33
Philco ........................ 06,07,10,(more)
Citizen ............................. 11,27,33,64
............ 11,13,16,19,27,33,35,37,38,43
Colortyme.. ................................ 11.27
Philips ....................... 06,07,10,(more)
Concerto .................................... 11,27
......................
11,13,16,33,35,37,38,43
Contec, Cony
...............
36,37,40,42,64
Pioneer.. ........................... 11,27,45,62
Craig ..............................................
64
Portland ................................ 11,19,27
Curtis
Mathes
...................
00,11,15,27
ProScan ..................................... 00,46
CXC.. .............................................
64
Proton.. ................................. 11,27,37
Daewoo ................................. 11,19,27 Quasar
.......................................
12,38
Daytron.. .................................... 11,27
Radio Shack .______ 00,21,25,36,37,59,64
Electrohome..
..........
06,11,14,27,38,61
RCA.. ........ 00,06,11,19,27,34,38,44,46
Emerson.. ..........
11,26,27,28,29,(more)
Realistic.. .......................................
21
......................
30,31,32,37,42,53,64,65
Sampo.. ...................................... 11,27
Envision .................................... 11,27
Samsung ........
06,11,14,15,19,27,36,37
Fisher
...............................
17,21,39,41 Sanyo.. .................... 17,21,39,56,57,58
Funai ......................................... 21,64
Scott.. ............................... 11,28,37,64
GE..
...................
.00,08,09,11,12,27,38
Sears.. ...............
00,06,11,14,17,(more)
Goldstar.. .......
03,04,06,11,19,27,37,50
......................
18,21,23,27,39,40,41,51
Hallmark.. .................................. 11,27
Sharp ........ 11,20,25,27,37,52,53,59,60
Hitachi..
.09,11,27,36,37,40,47,63
Sony.. .............................................
02
........
Infinity.. .........................................
13
Soundesign ............................ 11,27,33
JBL ................................................
13
Sylvania.. .................... 06,07,10(more)
Jensen.. ...................................... 11,27
......................
11,13,16,27,33,35,43,49
JCPenney ..................... 00,08,11,19,27
Symphonic.. ....................................
64
JVC..
.................
.12,24,36,37,40,48,51
Tatung.. ..........................................
38
Kawasho ............................... 02,11,27
Technics. ........................................
12
Kenwood .......................... 06,11,14,27
Techwood.. ................................ 11,27
Kloss Novabeam
........................
35,43
Tecknika .............
11,19,27,33,36,37,40
Loewe ............................................
13
TMK .......................................... 11,27
Luxman ...................................... 11,27
Toshiba.. ............................... 18,21,23
LXI. ............................. 13,18,21,23,54
Universal ................................... 08,09
Magnavox .................. 06,07,10,(more)
Victor .............................................
51
.........................
.11,13,16,27,33,35,43
Vidtech.. .................................... 19,27
Marantz ................................. 11,13,27
Wards.. .............
00,05,06,07,08,(more)
MGA..
......
.06,11,14,19,22,27,41,56,61
........ 09,10,11,13,19,25,27,28,35,43,59
Mitsubishi .................. 06,11,14,(more)
Yamaha.. .......................... 06,14,19,27
..........................
19,22,27,41,55,56,61
Zenith .............................................
01
MTC.. ................................... 11,19,27
6
Page 7

Aiwa.. ............................................
15
Akai.. ............................... 03,17,22,23
Audio Dynamics ........................
14,16
Broksonic.. .....................................
10
Candle.. ...............................
,07,09,13
Canon ...........................................
.08
Capehart.. ......................................
.Ol
Citizen.. ................................
07,09,13
Colortyme .....................................
.14
Craig.. .......................................
07,12
Curtis Mathes .............. 00,07,08,14,15
Daewoo.. .......................................
,13
dbx.. ..........................................
14,16
Dimensia.. ......................................
00
Dynatech.. ......................................
15
Electrohome
..................................
.27
Emerson.. .............. 08,09,10,13,(more)
......................... .15,20,23,27,34,41,42
Fisher .......................... 02,12,18,19,43
Funai.. ...........................................
.15
GE.. ................................. 00,07,08,32
Goldstar.. ...................................
09,14
Harmon Kardon.. ............................
14
Hitachi..
.......................... .05,15,35,36
Instant Replay ................................
08
JCL.. ..............................................
08
JCPenney.. .... .02,05,07,08,14,16,30,35
JVC.. ............................... .02,14,16,30
Kenwood.. ........................ 02,14,16,30
Lloyd .............................................
15
Logik.. ..........................................
.31
Magnavox.. ................................
OS,29
Marantz ................. .02,08,14,16,29,30
Marta .............................................
09
MEI ...............................................
08
Memorex.. ....................... .08,09,12,15
MGA.. .......................................
04,27
Midland.. .......................................
.32
Minolta.. ....................................
05,35
Mitsubishi ................... 04,05,27,35,40
Montgomery Ward.. .......................
.06
MTC ..........................................
07,15
Multitech ..........................
07,15,31,3i
NEC.. ...............................
02,14,16,3C
Panasonic.. .....................................
08
Pentax .......................................
05,35
Philco.. ......................................
08,2S
Philips .......................................
08,29
Pioneer . ..05,16,33(Lase r Disc Player)
ProScan.. .......................................
.OU
Quartz.. ..........................................
02
Q
uasar ............................................
08
RCA.. ................. 00,05,07,08,28,35,37
Radio Shack/Realistic..
. ..02,06,(more)
......................... .08,09,12,15,19,27,43
Samsung.. ....................
07,13,22,32,42
Sansui.. .........................................
.16
Sanyo ........................................
02,12
Scott.. ...................................
04,13,41
Sears.. ...... .02,05,09,12,15,18,19,35,43
Sharp ...............................
06,24,27,39
Shintom.. .............................
.17,26,31
Sony.. ...................................
17,26,38
Sylvania.. ..............................
08,15,29
Symphonic .....................................
15
Tandy.. ......................................
02,15
Tashiko
.........................................
.09
Tatung.. ..........................................
30
Teat ..........................................
15,30
Technics.. ......................................
.08
Teknika.. ..........................
08,09,15,21
Toshiba.. ...............................
05,13,19
Totevision .................................
07,09
Unitech
..........................................
07
Vector Research.. ......................
.14,16
Victor ............................................
16
Video Concepts. .........................
14,16
Videosonic .....................................
07
Wards ................... 05,06,07,08,(more)
.................... .09,12,13,15,25,27,31,35
Yamaha.. ..........................
02,14,16,30
Zenith.. .................................
11,17,26
7
Page 8

[TV Brand
Code(s)
ABC ..............................................................................................................
22,46
Anvision ........................................................................................................
07,08
Cablestar .......................................................................................................
07,08
Eagle .............................................................................................................
07,OS
Eastern International ..........................................................................................
02
General Instrument ............................................................
04,05,15,22,23,24,25,46
G1400 ................................................................................
04,05,15,23,24,25,30,36
Hamlin ............................................................................................
03,12,13,34,48
Hitachi .....................................................................................................
37,43,46
Jerrold ......................................................................................
04,05,15,23,(more)
......................................................................................
....... .24,25,30,36,45,46,47
Macom ..........................................................................................................
37,43
Magnavox .................................................................................
07,08,19,21,(more)
...................................................................................
..........
.26,28,29,32,33,40,41
NSC ...................................................................................................................
09
Oak.. ........................................................................................................
01,16,38
Oak Sigma .........................................................................................................
16
Panasonic .................................................................................................
03,27,39
Phillips ................................................................
07,08,19,21,26,28,29,32,33,40,41
Pioneer.
....................................................................................................
18,20,24
RCA.. ............................................................................................................
00,27
Randtek .........................................................................................................
07,08
Regal ........................................................................................................
03,12,13
Regency ........................................................................................................
02,33
Samsung ............................................................................................................
44
Scientific Atlanta ......................................................................................
03,22,35
Signature ............................................................................................................
46
Sprucer ..............................................................................................................
27
Starcom ..............................................................................................................
46
Sylvania
............................................................................................................. 11
Teknika. .............................................................................................................
06
Texscan .........................................................................................................
10,ll
Tocom ..................................................................................................
17,21,49,50
Unika .......................................................................................................
31,32,41
Universal .......................................................................................................
51,52
Viewstar ...................................................................................
07,08,19,21,(more)
..............................................................................................
26,28,29,32,33,40,41
Warner Amex .....................................................................................................
44
Zenith ...........................................................................................................
14,42
8
Page 9

I_
ads
Aiwa
Akai
Denon
Dimensia
Dynamic Bass
Emerson
Fisher
Hitachi
JVC
Kenwood
Kyocera
Lotte (NEC)
Magnavox
Marantz
Mitsubishi
Nakamichi
Panasonic
Philips
Pioneer
RCA
Realistic
Sansui
Scott
Sherwood
Sony
Teat
I’echnics
Yamaha
AMP
01
02,os
23
16,58
17,74
09
6.5
22,76
15,59
20
12
62
14
24
11,13
21
10
l&19
03
29
30,35
74
57
07
25
66
67
63
32
67,70,77
65
76
59
75
61
68
38
36
62
61
42
39
03
07,43,44
63,66
45
66
49
52
46
69
50
CD
TAPE
PHON
60
06
05
26,27
28
33,34
71,72
37
40,41
06
55,56
48,53
51
73
05
47
AUX
04
31
Page 10

c
Additional Operating Notes
Controlling a Component’s
Function:
Press the correct component button to
tell the remote which component you
want to control. Then press the
desired function button. For example,
to turn the TV on: First hit the TV
button, then the ON/OFF button. Or
to operate the fast forward function of
a VCR, first hit the VCR button, then
the fast forward arrow button.
Number Buttons:
Press two numbers to select channel.
Press a “0” before a single-digit
channel number.
For some TV’s there will be a
2-second delay before the channel will
change.
For other brands of TV’s, you will
need to press the
PC/ENTER
button
after selecting the two number
buttons.
VCR On/Off Switch:
Some older VCR’s do not have an
ON/OFF
switch on their remote
controls and cannot be turned on and
off remotely. If you have this type of
VCR, you can test the code number
by pressing the
CHAN
button instead
of the
ON/OFF
button. Make sure the
VCR is alreadv turned on when vou
test the code number.
Controlling Two VCR’s
This remote can control
two VCR’s
independently as long as each VCR
operates in a different remote
transmitting code.
Some newer RCA VCR’s are capable
of working on either of two remote
codes. These VCR’s have either a
switch labeled
VCRIIVCR2
or an
on-screen display titled
REMOTE
VCRlIVCR2. You
can then set your
new VCR to respond to the remote’s
VCR2 button and your older VCR to
respond to the VCR1 button.
Some older RCA VCR’s have a
NORM/UNIFIED
switch that can also
respond to either the VCR1 or VCR2
button on the remote. Place this
switch in the
UNIFIED
position for
the VCR to respond to the VCR1 button or in the NORM position for the
VCR2 button. In the NORM position,
you must program the VCR2 button to
respond to code number 05.
If neither of your VCR’s has
switchable code capability, you may
still be able to use the
VCRlIVCR2
feature to control two VCR’s of the
same brand since many older VCR’s
use remote codes that are different
than newer VCR’s, You may want to
experiment to see what works with
your particular VCR’s,
10
Page 11

.
Limited Warranty
Thomson Consumer Electronics Canada, Inc. warrants that for 90 days from
date of purchase this product is free from defects in material and workmanship.
If the item is defective within that period, return it at your ex
ense to the
dealer from whom it was purchased to
ether with the proof o purchase for
P
replacement. This warranty excludes
$: efects or damage due to misuse, abuse,
or neglect.
THE FOREGOING WARRANTY IS IN LIEU OF ALL OTHER
WARRANTIES, EXPRESS OR IMPLIED, INCLUDING BUT NOT
LIMITED TO THE IMPLIED WARRANTIES OF MERCHANTABILITY
AND FITNESS FOR A PARTICULAR PURPOSE. IN NO EVENT SHALL
THOMSON CONSUMER ELECTRONICS BE LIABLE FOR SPECIAL,
INDIRECT, INCIDENTAL, OR CONSEQUENTIAL DAMAGES
WHETHER IN CONTRACT, TORT, OR NEGLIGENCE.
This warrant
warranties w
iI.
gives you specific legal rights which are in addition to statutory
rch may vary from Province to Province and whrch take prece-
dence over the terms of this warranty.
Garantie 1imitCe
Thomson Electroni
ue Grand Public du Canada, Inc. garantit que pendant un
ate d’achat, ce produit est hbre de defauts de matertaux et
oeuvre. S’il devient defectueux durant cette periode, le retoumer a
ses frais au marchand vendeur, en m&me tern
s ue la
reuve d’achat, pour
obtenir un remplacement. Cette garantie exe ut es de auts ou dommages
P? *P
attribuables a la mauvaise utilisatton, a I’abus ou a la neghgence.
LA PRESENTE GARANTI
E REMPLACE TOUTES LES AUTRES
GARANTIES EXPRESSES OU IMPLICITES, DONT NOTAMMENT LES
GARANTIES’IMPLICITES DE VALEUR MqRCHANDE ET D’APIITUDE
A UN USAGE PARTICULIER. THOMSON ELECIRONIQUE GRAND
PUBLIC DU CANADA, INC. NE SERA EN AUCUN TEMPS TENUE
RESPONSABLE DES DOMMAGES SPECIAUX, INDIRECTS,
ACCIDENTELS OU ACCESSORIES, DE FACON CONTRACTUELLE OU
DELICTUELLE OU PAR NEGLIGENCE.
La presente garantie vous con&e des droits ICgaux s@fi ues, en pluqde cer-
3
taines garantres statutaires pouvant vaner d’une provmce a
autre et qut ont
prCsCance sur Ies conditions de la presente garantre.
System Link Help Line
If you need additional set-up help, call
our toll-free SystemLink Help Line at
l-800-338-0376
Monday through Friday 8AM-6PM EST.
I-
11
Page 12

Thomson Consumer Electronics Canada, Inc.
Thomson klectronique Grand Public du Canada, Inc.
7400A Bramalea Road
Mississauga, Ontario, Canada
L5S 1x1
01993
Thomson Consumer Electronics, Inc.
Trademark(s) (R) Registered
Printed in U.S.A.
Part Number IQ57 142-03A
Deptford Part Number CRK59H2
Cl59288
(Rev 9-94)
I- ...
 Loading...