

Page 1
User manual
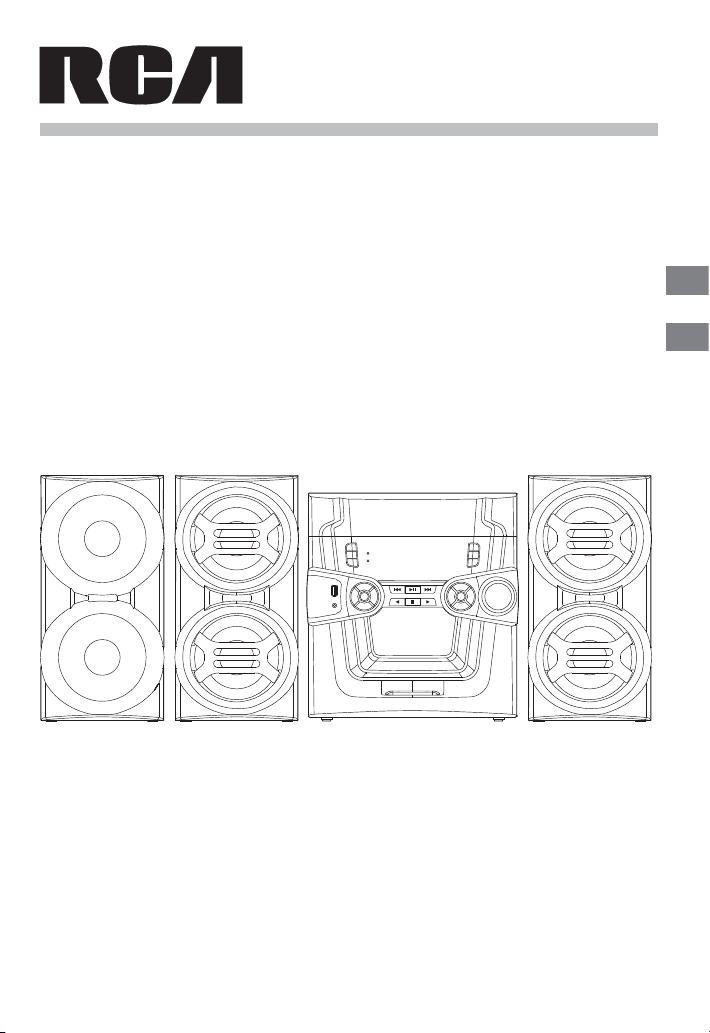
500W 5-CD Mini System
with Bluetooth Receiver
Miniequipo de 500W con reproductor para 5 discos
y receptor de Bluetooth
RS3965SB
EN
E
It's important to read this instruction prior to using your new product for the fi rst
time.
Es importante que lea este libro de instrucciones antes de usar su nuevo producto
por primera vez.
Page 2
Safety Precautions
SEE MAR KING ON BO TTOM / BACK O F PRODUC T
CAUTION: TO REDUCE THE RISK OF ELECTRIC SHOCK, DO
NOT R EMOV E COV ER ( OR B AC K) . NO U SE RSE RV IC EA BL E
PART S IN SID E. RE FE R SER VIC ING T O QUA LIF IED S ERV IC E
PERSONNEL.
Caution:
This product utilizes a laser. Use of controls or
adjustments or performance of procedures other
than those specified may result in hazardous
radiation exposure. Do not open covers and do
not repair yourself. Refer servicing to qualified
personnel.
This product contains a low power laser device.
WARNING: TO PREVENT FIRE OR ELECTRICAL
SHOCK HAZARD, DO NOT EXPOSE THIS PRODUCT
TO RAIN OR MOISTURE.
CAUTION: USE OF CONTROLS OR ADJUSTMENTS
OR PERFORMANCE OF PROCEDURES OTHER THAN
THOSE SPECIFI ED MAY RESULT IN HAZAR DO US
RADIATION EXPOSURE.
CAUTION: DANGER OF EXPLOSION IF BATTERY IS
INCORRECTLY REPLACED. R EPLACE ONLY WITH
THE SAME OR EQUIVALENT TYPE.
WARNING: MAINS PLUG IS USED AS DISCONNECT
DEVICE AND IT SHOULD REMAIN READILY
OPERABLE DURING INTENDED USE. IN ORDER
TO DISCONNECT THE MAINS PLUG FROM MAINS
COMPLE TELY, THE M AINS PLUG SHO ULD BE
DISCONNECTED FROM THE MAINS SOCKET
OUTLET COMPLETELY.
TH E LI GHT NING FL ASH AND A RROWH EAD W IT HIN
TH E TR IAN GLE IS A WARN IN G SIG N ALERT ING YOU OF
"DANGEROUS VOLTAGE" INSIDE THE PRODUCT.
THE EXCLAMATION POINT WITHIN THE TRIANGLE
IS A WARNI NG SI GN ALER TIN G YOU OF I MPO RTAN T
INSTRUCTIONS ACCOMPANYING THE PRODUCT.
FCC information
This device complies with part 15 of the FCC
Rules. Operation is subject to the following two
conditions: (1) This device may not cause harmful
interference, and (2) this device must accept any
interference received, including interference that
may cause undesired operation.
This equipment has been tested and found to
comply with the limits for a Class B digital device,
pursuant to part 15 of the FCC Rules. These limits
are designed to provide reasonable protection
against harmful interference in a residential
installation. This equipment generates, uses
and can radiate radio frequency energy and, if
not installed and used in accordance with the
instructions, may cause harmful interference
to radio communications. However, there is no
guarantee that interference will not occur in a
particular installation. If this equipment does
cause harmful interference to radio or television
reception, which can be determined by turning
the equipment off and on, the user is encouraged
to try to correct the interference by one or more of
the following measures:
– Reorient or relocate the receiving antenna.
– Increase the separation between the
equipment and receiver.
– Connect the equipment into an outlet on a
circuit diff erent from that to which the receiver
is connected.
– Consult the dealer or an experienced radio/TV
technician for help.
WARNING:
Changes or modifications to this unit
not expressly approved by the party responsible
for compliance could void the user's authority to
operate the equipment.
This Class B digital apparatus complies
with Canadian ICES-003.
- 1 -
Page 3

IMPORTANT SAFETY INSTRUCTIONS
Some of the following information may not apply
to your particular product; however, as with
any electronic product, precautions should be
observed during handling and use.
• Read these instructions.
• Keep these instructions.
• Heed all warnings.
• Follow all instructions.
• Do not use this apparatus near water.
• Clean only with dry cloth.
• Do not block any ventilation openings.
Install in accordance with the manufacturer’s
instructions.
• Do not install near any heat sources such
as radiators, heat registers, stoves, or other
apparatus (including amplifiers) that produce
heat.
• Do not defeat the safety purpose of the
polarized or grounding-type plug. A polarized
plug has two blades with one wider than the
other. A grounding type plug has two blades
and a third grounding prong. The wide blade
or the third prong is provided for your safety. If
the provided plug does not fi t into your outlet,
consult an electrician for replacement of the
obsolete outlet.
• Protect the power cord from being walked on
or pinched particularly at plugs, convenience
receptacles, and the point where they exit from
the apparatus.
• Only use attachments / accessories specifi ed by
the manufacturer.
• Use only with the cart, stand, tripod, bracket,
or table specifi ed by the manufacturer, or sold
with the apparatus. When a cart is used, use
caution when moving
the cart/apparatus
combination to avoid
injury from tip-over.
• Unplug this apparatus during lightning storms
or when unused for long periods of time.
• Refer all servicing to qualified service
personnel. Servicing is required when the
apparatus
as power-supply cord or plug is damaged, liquid
has been spilled or objects have fallen into the
apparatus, the apparatus has been exposed to
rain or moisture, does not operate normally, or
has been dropped.
has been damaged in any way, such
Portable Cart Warning
ADDITIONAL SAFETY INFORMATION
• Apparatus shall not be exposed to dripping
or splashing and no objects fi lled with liquids,
such as vases, shall be placed on the apparatus.
• Always leave sufficient space around the
product for ventilation. Do not place product in
or on a bed, rug, in a bookcase or cabinet that
may prevent air fl ow through vent openings.
• Do not place lighted candles, cigarettes, cigars,
etc. on the product.
• Connect power cord only to AC power source
as marked on the product.
• Care should be taken so that objects do not fall
into the product.
• Do not attempt to disassemble the cabinet.
This product does not contain customer
serviceable components.
• Main plug is used as disconnect device and it
should remain readily operable during intended
use. In order to disconnect the apparatus from
the mains completely, the mains plug should
be disconnected from the mains socket outlet
completely.
IF YOUR PRODUCT OPERATES ON BATTERIES,
adhere to the following precautions:
A. Do not mix old and new batteries.
B. Do not mix alkaline, standard (carbon-zinc), or
rechargeable (NiCd, NiMH, etc) batteries.
C. Any battery may leak electrolyte or explode if
disposed of in fire or an attempt is made to
charge a battery not intended to be recharged.
D. Discard leaky batteries immediately. Leaking
batteries can cause skin burns or other personal
injury. When discarding batteries, be sure to
dispose of them in the proper manner, according
to your state/provincial and local regulations.
E. Battery shall not be exposed to excessive heat
such as sunshine, fi re or the like.
EN
- 2 -
Page 4

Important Information
Precautions
• Thi s unit us es a l ase r to r ead the m us ic on
the disc. Th e lase r me chan is m co rr es po nds
to the cartridge and stylus of a record player.
Alth ou gh this pro duc t in co rpo ra tes a laser
pi ck-u p len s, i t is comp letel y safe wh en
operated according to directions.
• Disc s rotate at hi gh speed inside the player.
Do n ot u se da ma ged , warpe d, or c racke d
discs.
• Do not to uch the p ic k- up le ns w hic h is
located inside the disc compartment. To keep
dust from colle cting on the pick-u p lens, do
not leave the compartment door open for an
extended period of time. If the lens becomes
dir ty, clean it with a soft brush, or use an air
blower brush designed for camera lenses.
For your safety
The AC power plug is polarized (one blade is
wider than the other) and only fits into AC power
outlets one way. If the plug won’t go into the outlet
completely, turn the plug over and try to insert it
the other way. If it still won’t fit, contact a qualified
electrician to change the outlet, or use a different
one. Do not attempt to bypass this safety feature.
CAUTION: TO PREVENT ELECTRIC SHOCK, MATCH
WIDE BLADE OF PLUG TO WIDE SLOT, FULLY INSERT.
Service information
This product should be serviced only by those
specially trained in appropriate servicing
techniques. For instructions on how to obtain
service, refer to the warranty included in this Guide.
Technical specifi cations
Power supply: 120V~60Hz
The descriptions and characteristics given in this
document are given as a general indication and
not as a guarantee. In order to provide the highest
quality product possible, we reserve the right to
make any improvement or modification without
prior notice. The English version serves as the final
reference on all products and operational details
should any discrepancies arise in other languages.
- 3 -
Page 5
Getting Started
Unpacking the system
You should have the following:
• one main unit
(with three speakers)
• one remote control (with 2 AAA batteries)
• one AM loop antenna
• user manual
Connections
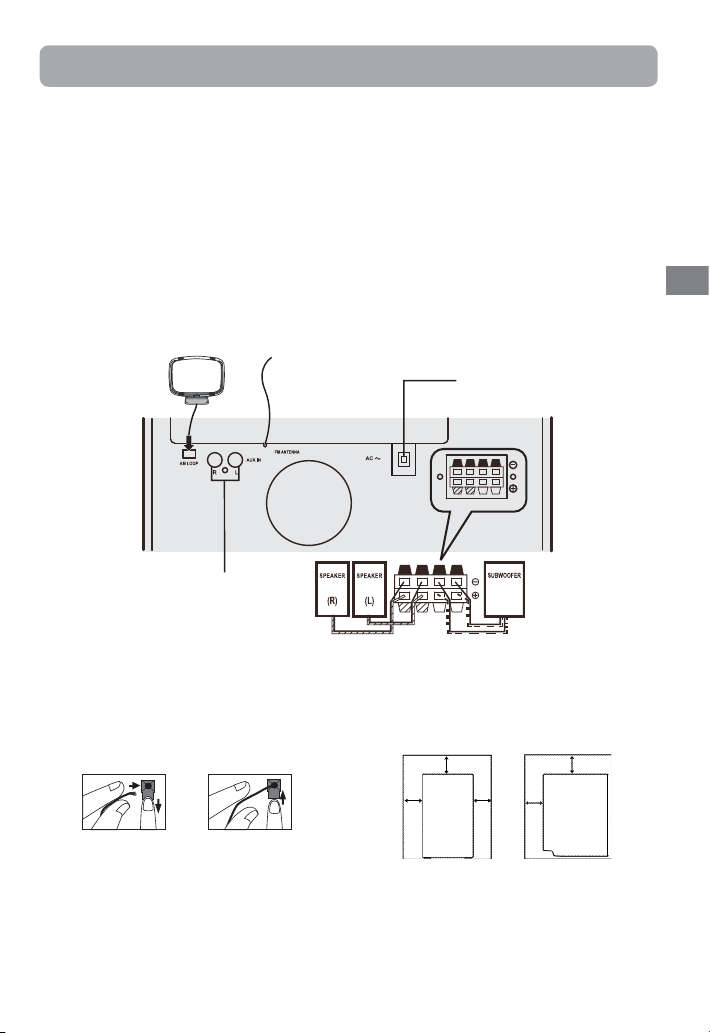
Back view
1. AM loop antenna jack
2. FM pigtail antenna
3. Speaker jacks
4. AUX IN jacks
AM loop antenna
(included)
Jacks for external
sound input
Connecting speakers
Each main speaker has a black/red wire, and
subwoofer has two pairs of black/purple wires.
When connecting the speakers, match the red/
purple wires to the red/purple jacks and the black
wires to the black jacks on the main unit.
21
Push speaker
terminal tab down
to insert wire.
Release tab to lock
wire in the terminal.
FM antenna
Using FM and AM antennas
Before you use your audio system, you’ll want to make
sure both the FM and AM antennas are positioned
properly. Uncoil the FM antenna at the back of the
unit, making sure it is fully extended (you may even
want to tape it to the wall behind the unit if possible,
the higher the better).
You’ll also need to connect the AM antenna loop to
the back of the unit if you listen to AM stations. Rotate
the AM loop antenna for better reception.
To an AC outlet
Installation
To ensure sufficient ventilation, keep the spacing
shown below free from other surfaces:
4”
4”4”
Front view
4”
2”
Side view
EN
NOTE: Make sure the insulation is completely
removed from the ends of the speaker wires at all
connection points.
- 4 -
Page 6
Unit Controls
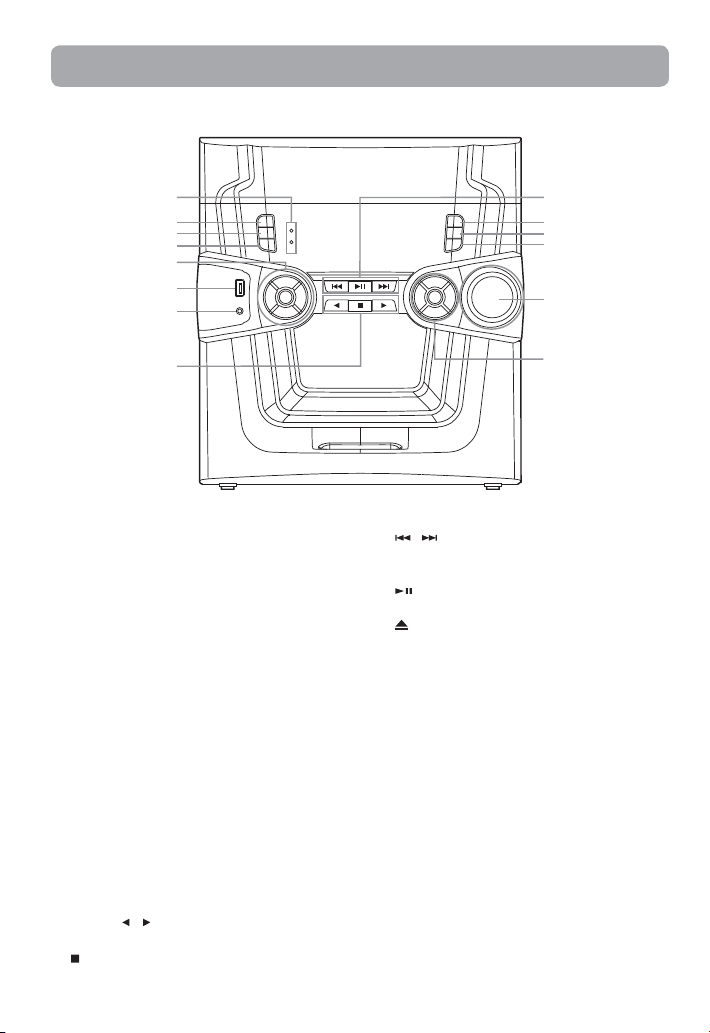
Main Unit
1
2
3
4
5
6
7
8
1. Power indicator – Illuminates when the unit is
in standby.
Bluetooth indicator
2. POWER – To turn power on or off (STANDBY
mode).
3. TIMER – To turn the timer on/off; press and
hold to enter the timer setting mode.
4. CLOCK – To show time and enter clock setting
mode.
5. AUTO PROG / BAND – To auto-preset radio
stations in FM mode; To toggle between AM
and FM.
SOURCE – To select among CD player, TUNER,
BT, LINE IN and AUX sources.
PROG – To enter program mode for CD and
tuner.
SLEEP – To select the time interval in minutes
before the unit turns off.
6. USB jack – For charging only.
7. LINE IN – Ø3.5mm jack for external audio
sources.
8. PRESET
/ – To select the previous or next
preset stations in tuner mode.
– To stop CD playback.
9
10
11
12
13
14
9. / / TUN +/- – To tune radio frequency; to
skip CD track; to fast search through current
CD track.
/ PAIRING – To play and pause CD playback;
to pair the bluetooth.
– To open or close the disc tray.
10.
11. DISC SKIP – To skip to the next CD in the tray
in CD mode.
12. DIMMER – To adjust display brightness.
13. VOLUME – To increase/decrease the volume.
14. SHUFFLE – To turn on/off random playback.
PLAY MODE – To cycle between different play
mode.
BASS – To turn BASS on or off.
EQ – To select the equalizer presets.
- 5 -
Page 7
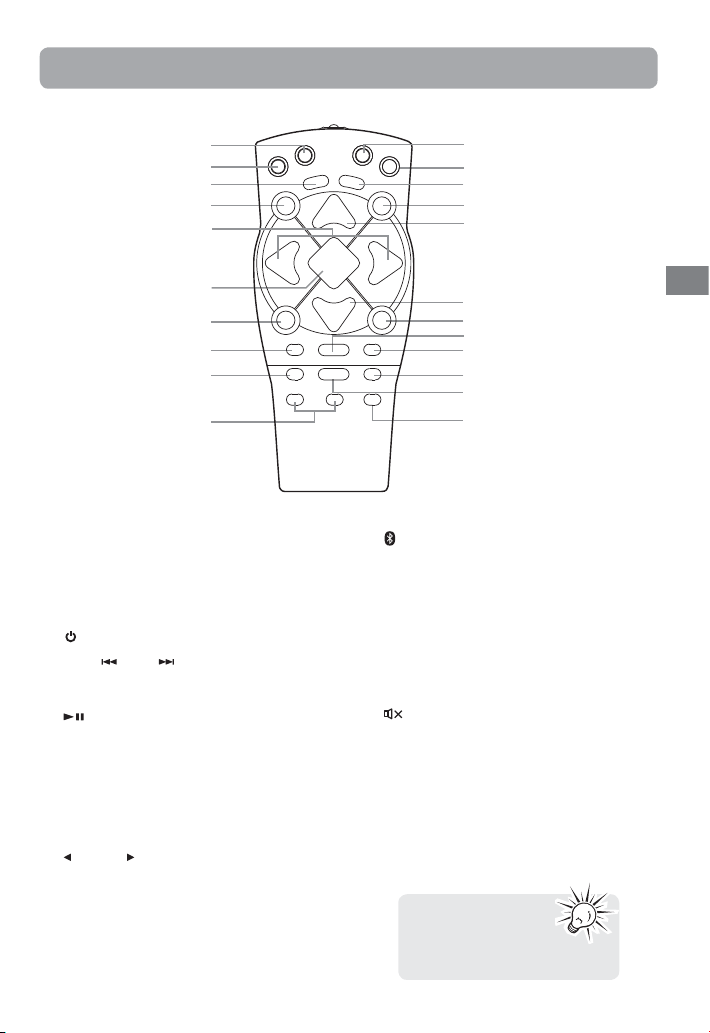
Remote Control
Remote control
1
2
3
4
5
11
12
13
14
15
6
7
8
9
10
1. TUNER – To select the tuner and change the
radio band.
2. CD – To select the CD player.
3. INFO – To select among disc display
information.
4.
– To turn power on or off (STANDBY mode).
5. PREV/
6.
7. OPEN/CLOSE – To open and close CD disc tray.
8. PLAY MODE – To cycle between different play
9. FM ST. – To switch between FM ST ON and FM
10.
,NEXT/ – To tune radio frequency;
to skip CD track; to fast search through current
CD track.
/ PAIRING – To play and pause CD
playback; to pair the bluetooth.
mode.
ST OFF.
PRESET – To select previous / next tuner
preset station.
16
17
18
19
20
21
22
– To select the bluetooth mode.
11.
12. LINE IN / AUX – To select the external sound
input from LINE IN jack or AUX IN jacks.
13. BASS – To turn BASS on or off.
14. DIMMER – To adjust display brightness.
15. VOL+ – To increase the volume.
16. VOL - – To decrease the volume.
17. STOP – To stop playing CD.
– To mute and restore audio output.
18.
19. SHUFFLE – To turn on/off random playback.
20. INTRO – To turn INTRO mode on or off to play
the first 10 seconds of each track.
21. DISC SKIP – To skip to next CD in CD mode.
22. SLEEP – To select the time interval in minutes
before the unit turns off.
EN
- 6 -
The remote control must
be inserted with 2 “AAA”
batteries prior to use.
Page 8
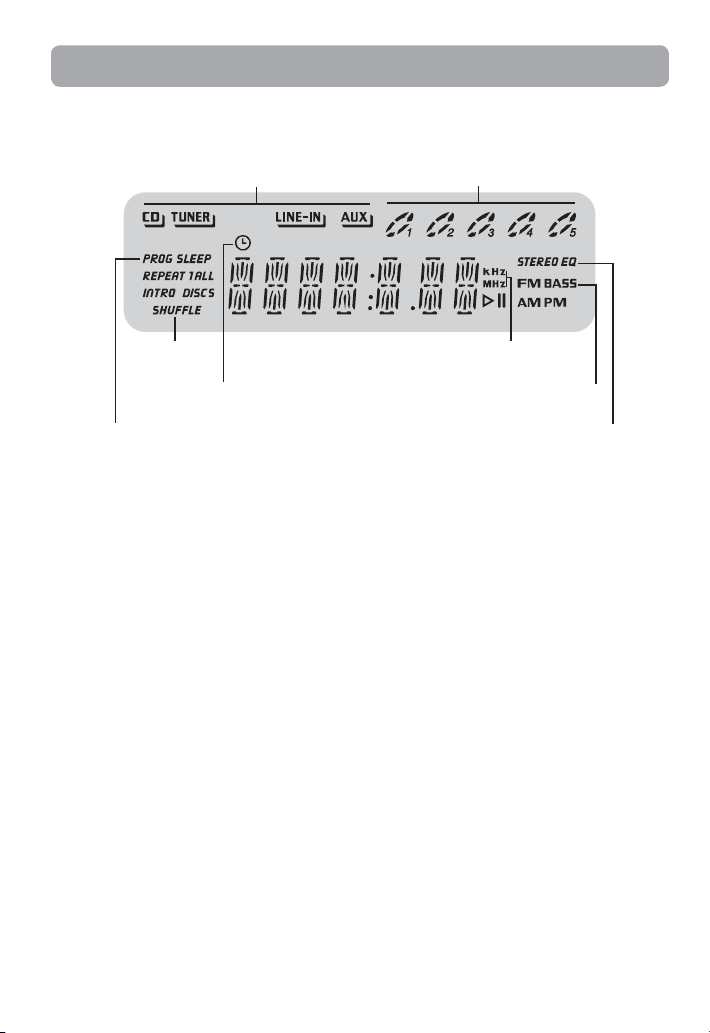
Display
Source indication
CD tray status:
Lights when loaded
Flashes for the current disc
Animates when playing
Playback
mode status
Timer activated
PROG – program playback mode activated
SLEEP – sleep mode activated
Display brightness
1. Press and hold DIMMER for more than 2 seconds.
2. While “DIM 1” is displayed, press DIMMER repeatedly to select the desired level (DIM 1–3).
Radio bands
BASS – bass boost activated
STEREO – FM stereo mode activated
EQ – preset equalizer activated
- 7 -
Page 9
Clock and Timer
Setting the clock
1. Press and hold CLOCK until the hour fl ashes on
the display.
2. Press / to set the hour and then press
CLOCK to shift to minute digits.
3. Press
4. Press CLOCK to save settings.
/ to set the minute.
• When system is ON, you can tap
CLOCK to display the current time
– it will display time for about 2
seconds.
Setting the timer
•
For RADIO timer, tune in to a desired station.
• For CD timer, insert a CD into the unit.
1. Press and hold TIMER until ON (timer on time)
appears with the hour fl ashing.
2. For setting time, press / to set the hour
and then press TIMER to shift to the minute
digits.
3. Press / to set the minute.
4. Press TIMER to change to OFF (timer off time)
with hour fl ashing. Repeat steps 2 & 3 for timer
off time setting.
5. Press TIMER to select the source. Press /
to select among TUNER, CD or BT (Bluetooth).
6. Press TIMER to set the volume. Adjust the
timer volume by pressing / to select the
desired volume level.
Note: To avoid startling you or other
individuals in your home, this product will not
turn on at a volume higher than 15.
7. Press TIMER to save settings.
Activating the timer
Tap TIMER to turn on/off the timer. The timer is
active when the clock icon is lit.
Sleep mode
You can select the time interval in minutes before
the unit turns off automatically.
1. Press SLEEP to select among OFF, 120, 90, 60, 45,
30, 15, 10 and 5 minutes. The sleep icon lights
on the display when sleep mode is activated.
2. When sleep is activated, press SLEEP once to
view remaining sleep time. Press SLEEP again
when the remaining sleep time is displayed to
change the sleep time.
• Sleep is automatically de-activated when the unit
is turned off .
Sound Features
Bass boost
Press BASS to turn on/off boosting the bass
frequency. The BASS icon lights on the display when
it is activated.
Muting audio
Press on the remote control to cut or restore the
sound.
Using preset equalizer curves
Press EQ on the unit to select among FLAT, ROCK,
POP, JAZZ, CLASSIC and CUSTOM. The display
shows your selection briefly.
Creating a Custom Curve
1. Press EQ on the unit to select the CUSTOM
mode.
2. While CUSTOM is displayed, press / to
cycle among the displayed BASS and TREB
range levels.
3.While BASS or TREB is displayed, adjust the
volume to set the associated gain between -10
- +10.
4. Press EQ to exit.
EN
- 8 -
Page 10

CD Playback
CD-R / RW
This unit is compatible with CD-RW/
CD-R discs for playback.
Notes on CD-R/RW Disc:
• Do not affix any type of labels to either side
(recordable or labeled side) of a CD-R/RW disc
as this may result in the unit malfunctioning.
• To avoid damages to the CD-R/RW disc, do not
open the disc compartment door while the
disc is being read.
• Do not load an unrecorded CD-R/RW disc into
the unit. This may take a longer time to read
the disc.
• Playback capability for CD-RW discs may vary
due to variations in the quality of the CD-RW
disc and the recorder used to create the disc.
Please take care when loading or
unloading discs in the disc drawer.
Read below for details.
• Remove all discs from the disc drawer
before moving or transporting the unit.
• Do not put discs in the trays of the disc
drawer when they are still moving.
• Do not push or force the rotation of the
disc trays. Always use the DISC SKIP button.
• Do not put discs in any unexposed disc
trays. Only put disc in tray that is fully
exposed.
• If an error occurs and the disc drawer does
not close, empty all disc trays and try again.
Loading discs
1. Press SOURCE repeatedly to select CD mode.
2. Press OPEN/CLOSE or to open the drawer.
3. Insert up to fi ve discs with label face up. (Press
DISC SKIP to rotate the disc carrier.)
4. Press OPEN/CLOSE or to close the drawer.
Loaded disc position icon lights.
Selecting discs
Press DISC SKIP to skip discs.
Playing discs
• Press to begin or pause playback, and press
to stop playback.
• Press / to select a specifi c track.
Searching through a CD
Press and hold / to search through a CD
while it is playing.
Shu ing play order
Press SHUFFLE to turn on/off the playing of tracks
in random order.
Sampling tracks
Press INTRO to play the first 10 seconds of each
track on the current disc, all discs in the tray, or turn
INTRO mode off by pressing INTRO again.
Play mode
Press PLAY MODE to cycle between Repeat 1,
Repeat 1 Disc, Repeat All Discs, 1 Disc, and All Discs.
• Press INFO repeatedly to view elapsed track
time, track remain time and disc remain time
during playback.
CD Program
You can program the CD player to play up to any
99 tracks on the CDs in the tray.
1. While the CD player is stopped, press PROG to
enter program mode. The system displays the
next available program number: “- - P 01,” with “-
-” fl ashing, prompts you for the fi rst track in the
program list.
2. Press
3. Press PROG to assign the selected track to the
Playing a program List
While in PROGRAM mode, press .
Displaying the program List
1. While the CD player is stopped, press PROG to
2. Press PROG repeatedly to list each track
Deleting program List
While in PROG mode, press and hold for 3
seconds. The unit displays the message “CLEAR”.
- 9 -
/ to select a track (Press DISC SKIP
to select a track from a diff erent disc).
program number. You are prompted for the
next track in the program list. (In CD program
mode, PROG icon will be lit.)
enter PROGRAM mode.
assignment in the program list.
Page 11

Radio
Bluetooth Pairing
Press SOURCE or TUNER on the remote control to
select TUNER.
Selecting tuner band
Press AUTO PROG / BAND on the unit or TUNER on
the remote control to select between AM and FM
radio bands.
Tuning to a station
Press / to select frequencies. Press and
hold to start auto searching for the next available
station.
Presetting stations
Manually setting presets
1. Press / to access the desired frequency.
2. Press PROG button. The most recently accessed
program location will be displayed.
3. If a different program location is preferred,
press / to select the desired preset
number (1-32).
4. Press PROG to store the selected frequency at
that preset.
Auto preset programming (FM only)
Press and hold AUTO PROG / BAND for 2 seconds to
scan stations in the FM band. The stations will then
be stored as preset channels. A maximum of 32
stations can be stored.
Beware of your preset channels being erased
accidentally because the scanning and storing
process is automatic upon pressing and holding
the button for 2 seconds.
You can stop the automatic scan by pressing TUN+/
TUN - button, but the erased stations cannot be
recovered.
Using presets
Press PRESET to access the previous or next
preset station. The display first shows the preset
program number and after a few seconds, the
frequency will be displayed. (e.g. P 01 is preset 1)
Suppressing stereo signal
Press FM ST. to select between ST ON and ST OFF
for stereo FM stations.
Before Bluetooth pairing, you should turn on the
Bluetooth function of your other device (such as,
mobile phone with Bluetooth function) and select
RS3965SB.
1. Press SOURCE repeatedly on the unit or press
the
on the remote control to select BT
(Bluetooth) mode.
2. The Bluetooth indicator blinks at slow speed
and it auto searches for the last paired
Bluetooth device in memory.
3. Once it enters the pairing status, the Bluetooth
indicator will blinks at high speed.
4. Press PAIRING for 3 seconds to start pairing.
• If the Bluetooth pairing is successful, the
Bluetooth indicator will illuminate.
• If the Bluetooth pairing is not fixed, the
Bluetooth indicator will blink at slow speed.
Please try pairing again.
Note: If your Bluetooth device (such as,
phone) needs the password while pairing, please
enter 4-digit number: 0000.
Enjoy the music through Bluetooth
• Press to begin or pause playback.
• Press / to select a specifi c track.
• Press and hold / to start moving
backward/forward at high speed.
mobile
LINE IN/AUX IN
Play external sound through the speaker
system
Press SOURCE on the unit repeatedly to select LINE IN
or AUX mode.
Or press LINE IN/AUX on the remote control to
change to LINE IN/AUX mode from CD, TUNER or BT
mode; press LINE IN again to change to AUX mode.
Suggest using Ø3.5mm LINE IN jack
for mp3 player and AUX IN jacks for
auxiliary equipment such as DVD,
VCR or PC.
EN
- 10 -
Page 12

Troubleshooting Tips
Additional Information
System will not turn on
• Check power cord for a secure connection.
• Unplug the unit for a moment, and then plug
into power source again.
• Check the outlet by plugging in another
device.
No sound
• Increase the volume setting.
• Check connection to speakers.
• Check that you have selected the appropriate
function: CD, TUNER, LINE IN/AUX or BT.
• Make sure mute is off .
• Make sure headphones are not plugged in.
Poor radio reception
• Check antenna connection.
• Move antenna.
• Turn off nearby electrical appliances, such
as hair dryer, vacuum cleaner, microwave,
fl uorescent lights.
CD does not play
• Check that CD is in the tray.
• Check that CD label is facing up.
• Check that PAUSE mode is not on.
• Check that CD function is selected.
• Use CD lens cleaner.
• Clean the disc.
• Try another CD.
CD sound skips
• Clean the disc.
• Check disc for warping, scratches, or other
damage.
• Check if something is causing the system to
vibrate. If so, move the system.
• Make sure the speakers are at least 3 feet away
or on a diff erent surface from the main unit.
CD button will not respond, or does not change
discs when you press DISC SKIP
• Switch to another function (TUNER, LINE IN/
AUX or BT) and then back to CD.
Remote control does not work
• Check that the batteries are properly installed.
• Replace weak batteries.
• Check the system is plugged into power
source.
• Point the remote directly at the system’s front
panel.
• Move closer to the system.
• Remove any obstacles between the remote
and the system.
Disconnect the audio system from the power
source before performing any maintenance.
Cleaning
Clean the exterior of the system using a soft dust
cloth.
CD Player
CAUTION! This system operates with a laser. It
must be opened by only a qualified technician.
Handling CDs
• Do not touch the signal surfaces. Hold CDs by
the edges, or by one edge and the hole. Do
not affix labels or adhesive tapes to the label
surfaces. Do not scratch or damage the label.
CDs rotate at high speeds inside the player. Do
not use damaged (cracked or warped) CDs.
Cleaning CDs
• Dirty CDs can cause poor sound quality. Always
keep CDs clean by wiping them gently with
a soft cloth from the inner edge toward the
outer perimeter.
•
If a CD becomes dirty, wet a soft cloth in water,
wring it out well, wipe the dirt away gently, and
then remove any water drops with a dry cloth.
• Do not use record cleaning sprays or antistatic
agents on CDs. Also, never clean CDs with benzene, thinner, or other volatile solvents which
may cause damage to disc surface.
CD Lens Care
When your CD lens gets dirty it can also cause the
system to output poor sound quality. To clean the
lens you will need to purchase a CD lens cleaner
which can maintain the output sound quality of
your system. For instructions on cleaning the CD
lens, refer to the ones accompanying the lens
cleaner.
- 11 -
Page 13

Limited Warranty
AVC MULTIMEDIA (“AVC”) makes the following limited warranty. This limited warranty extend to the original
consumer purchaser and is limited to non-commercial use of the product.
One Year Parts & Labor Warranty
AVC products purchased in the United States or Canada are warranted to be free from defects in materials
or workmanship for a period of one year from the date of their original retail purchase. If the unit fails to
conform to this warranty, we will service the product using new or refurbished parts and products, at AVC’s
sole discretion.
During a period of one year from the eff ective warranty date, AV C will provide, when needed, service labor
to repair a manufacturing defect at its designated Service Center. To obtain warranty service in the United
States or Canada, you must fi rst call our Customer Support Center at 1-877-252-6873, during the hours
listed in the box below. The determination of service will be made by AVC Customer Support. PLEASE DO
NOT RETURN YOUR UNIT TO AVC WITHOUT PRIOR AUTHORIZATION.
New or remanufactured replacements for defective parts or products will be used for repairs by AVC at its
designated Service Center for one year from the eff ective warranty date. Such replacement parts or products are warranted for an additional one year from the date of repair or replacement. The Customer will be
required to ship the unit to the Service Center indicated at the time Customer Support is contacted to make
the necessary repairs. The customer is responsible for all transportation charges to the service facility.
Packaging and Shipping Instruction
When you send the product to the AVC service facility you must use the original carton box and packing
material or an equivalent as designated by AVC.
Your Responsibility
(1) You must retain the original sale receipt to provide proof of purchase.
(2) These warranties are eff ec tive only if the product is purchased and operated in the United States or Canada.
(3) Warranties extend only to defects in material or workmanship, and do not extend to any product or parts
which have been lost or discarded, or damage to product or parts caused by misuse, accident, improper
operation or maintenance, or use in violation of instructions provided with the product, or to product which
has been altered or modifi ed without authorization of AVC , or to products or parts thereof which have had
the serial number removed or changed.
Out of Warranty
In the event your product requires repair after the limited warranty period has expired, please
contact our Customer Support Center at
Hours: Monday–Thursday: 9am–7pm, Friday: 9am–5pm, Saturday: 9am–NOON Eastern time.
Important:
You are responsible for any transportation, shipping or insurance relative to the return of product
to our Product Returns Center.
All warranties implied by state law, including the implied warranties of merchantability and fi tness for
a particular purpose, are expressly limited to the duration of the limited warranties set forth above.
With the exception of any warranties implied by state law as hereby limited, the foregoing warranty
is exclusive and in lieu of all other warranties, guarantees, agreements and similar obligations of
manufacturer or seller with respect to the repair or replacement of any parts. In no event shall AVC be
liable for consequential or incidental damages.
1-877-252-6873 or www.RCAav.com
EN
- 12 -
Page 14

Limited Warranty
No person, agent, distributor, dealer or company is authorized to change, modify or extend the terms of
these warranties in any manner whatsoever. The time within action must be commenced to enforce any
obligation of AVC arising under the warranty or under any statute, or law of the United States or Canada or
any state thereof, is hereby limited to one year from the date of purchase. This limitation does not apply to
implied warranties arising under state law.
This warranty gives you specifi c legal rights and you may also have other rights, which may vary, from state
to state. Some states do not allow limitation on how long an implied warranty lasts, when an action may
be brought, or the exclusion or limitation of incidental or consequential damages, so the above provisions
may not apply to you.
For more information on other products and services, please visit our web site at
Important: Also keep your “Bill of Sale” as proof of purchase.
Model no. ................................................................................ Product name ...........................................................................
Type of set ............................................................................................................................................................................................
Serial no. .................................................................................. Invoice no. .................................................................................
Date purchased ..................................................................... Dealer name ..............................................................................
FOR SERVICE AND REPAIR, PLEASE VISIT
www. RCAav.com
www.RCAav.com
Speci cations and external appearance are subject to change without notice.
Need more help?
Please visit online help at http://www.RCAav.com
- 13 -
Page 15

Precauciones de seguridad
SEE MAR KING ON BO TTOM / BACK O F PRODUC T
PR EC AU CI ON: N O RE MU EVA LA CUBI ER TA (O R E VE RS O)
PARA REDUCIR EL RIESGO DE ELECTROCUCION. NO HAY
PAR TE S INT ER NA S, RE US AB LE S PO R EL USUARI O. PA RA
SERVICIO REFERIRSE A TECNICOS ESPECIALIZADOS.
PRECAUCION:
Este producto utiliza un láser. El uso de controles o
ajustes o la ejecución de procedimientos distintos
a aquellos especificados en el presente documento
pueden resultar en exposición peligrosa a la
radiación. No abra las cubiertas y no efectúe
reparaciones usted mismo. Refiera el servicio a
personal calificado.
Este producto contiene un dispositivo láser de baja
potencia.
ADVERTENCIA: PARA PREVENIR FUEGO O
SHOCK ELÉCTRICO, NO EXPONGA EL PRODUC TO
A LLUVIA O HUMEDAD.
CUIDADO: AL USAR LOS CONTROLES, HACER
AJ US TES O LLE VAR A CABO PRO CEDI MIENTOS
DI STINT OS A LOS Q UE S E ESPECIFIC AN EN
EL MANUAL, PUEDE QUEDAR EXPUESTO A
RADIACION PELIGROSA.
PRECAUCIÓN: PELIGRO DE EXPLOSIÓN SI
LA BATERÍA SE REPONE INCORRECTAMENTE.
REPONER SÓLO CON EL MISMO TIPO O UN TIPO
EQUIVALENTE.
ADVERTENCIA: EL TOMACORRIENTE SE
USA COMO DISPOSITIVO DE DESCONEXIÓN
Y DEBE E STAR SIE MPRE DISP ONIBL E PARA
SU FUNCIONAMIENTO DURANTE SU USO.
PAR A DESCONE CTAR COMPLETA MENTE E L
TOMACORRIENTE DE LA RED ELÉCTRICA, EL
TOMACORRIENTE DEBE ESTAR DESCONECTADO
TOTALMENTE DEL ENCHUFE DE LA PARED
CONECTADO A LA RED ELÉCTRICA.
EL SIGNO DEL RAYO Y LA FLECHA DENTRO DEL
TRIANGULO ES UN SIGNO DE ADVERTENCIA
ALERTANDOLO DEL “PELIGROSO VOLTAJE” DENTRO
DEL PRODUCTO.
THE EXCLAMATION POINT WITHIN THE TRIANGLE
IS A WARNING SIGN ALERTING YOU OF IMPORTANT
INSTRUCTIONS ACCOMPANYING THE PRODUCT.
Información FCC
Este aparato cumple con la Parte 15 de las Normas
FCC. El funcionamiento de la unidad está sujeto a
las dos condiciones siguientes:
(1) Este aparato no puede provocar interferencias
perjudiciales y
(2) este aparato debe aceptar toda interferencia
que reciba incluso aquellas que provoquen un
funcionamiento incorrecto.
Este aparato ha sido puesto a prueba y se ha verificado
que cumple con las restricciones de los equipos
digitales clase B, en conformidad con el Capítulo 15
del Reglamento de la FCC. Dichas restricciones están
diseñadas para proporcionar la debida protección contra
interferencia dañina en las instalaciones residenciales.
Este equipo genera, usa y puede irradiar energía de
frecuencias radiales y, de no instalarse y usarse según las
instrucciones, puede causar interferencia dañina para las
comunicaciones de radio. No obstante, no hay garantía
de que en una instalación específica no se produzca
interferencia. Si este equipo causara interferencia en la
recepción de la radio o la televisión (lo quer se puede
determinar encendiendo y apagando el equipo),
le sugerimos al usuario que intente corregir dicha
interferencia, adoptando una o más de las siguientes
medidas:
– Reoriente o ubique en otro lugar la antena de
recepción.
– Aumente la distancia que separa al equipo del
receptor.
– Conecte el equipo a un enchufe de pared que se
encuentre en un circuito diferente a donde tenga
conectado el receptor.
– Pida ayuda al vendedor o a un técnico de radios y
televisores con experiencia.
ADVERTENCIA: los cambios o modificaciones que
se hagan a esta unidad, que no estén expresamente
aprobados por la parte responsable de hacer cumplir las
reglas de funcionamiento de este aparato, pueden anular
la autoridad del usuario para operar este equipo.
Cumple con la especificación
Canadiense ICES-003 clase B.
- 1 -
E
Page 16

IMPORTANTE INSTRUCCIONES DE SEGURIDAD
Alguna de la siguiente información quizá no se
aplique a su producto en particular. Sin embargo,
como con cualquier producto electrónico, se deben
tomar precauciones durante su manejo y uso.
• Lea estas instrucciones.
• Conserve estas instrucciones.
• Tome en cuenta todas las advertencias.
• Siga todas las instrucciones.
• No use este aparato cerca del agua.
• Limpie solamente con un paño seco.
• No bloquee ninguna de las aperturas de
ventilación. Instale de acuerdo con las
instrucciones del fabricante.
• No instale cerca de fuentes de calor tales como
radiadores, registros de calor, estufas, u otros
aparatos (incluyendo amplifi cadores) que
produzcan calor.
• No elimine el propósito de seguridad de la
clavija polarizada o del tipo a tierra. Una clavija
polarizada tiene dos cuchillas, una más ancha
que la otra. Una clavija del tipo a tierra tiene
dos cuchillas y una tercera punta para conexión
a tierra. La cuchilla ancha o la tercera punta son
suministradas para su seguridad. Si la clavija
suministrada no se adapta dentro de su toma
de corriente, consulte a un electricista para que
reemplace la toma de corriente obsoleta.
• Proteja el cable de corriente de pisotones o
machucones particularmente en las clavijas,
receptáculos de conveniencia, y en punto
donde salen del aparato.
• Use solamente accesorios/aditamentos especifi
cados por el fabricante.
• Use solamente con el
carro, soporte, trípode,
consola, o mesa especifi
cados por el fabricante,
o vendidos con el
aparato. Cuando se
utiliza un carro, tenga precaución al mover
la combinación de carro/aparato para evitar
lesión ocasionada por volcadura.
• Desconecte este aparato durante tormentas
eléctricas o cuando no sea utilizado por largos
períodos de tiempo.
• Refi era todo el servicio a personal de servicio
califi cado. El servicio es requerido cuando el
aparato ha sido dañado de alguna forma, tal
como daño a la clavija o al cable de corriente,
cuando se ha derramado líquido o han caído
Portable Cart Warning
objetos dentro del aparato, el aparato ha sido
expuesto a lluvia o humedad, no funciona
normalmente, o ha sido tirado.
INFORMACION ADICIONAL DE SEGURIDAD
• El aparato no debe quedar expuesto a goteos
o salpicaduras de líquidos, y, por lo tanto, no
se deben colocar sobre el aparato objetos que
contengan líquidos, como por ejemplo vasos.
• Siempre deje sufi ciente espacio para
ventilación alreadedor del producto. No ponga
el producto en la cama, alfombra, librero o
gabinete que pueda obstruir la corriente de
aire a través de apeturas de ventilación.
• No pongan velas, cigarillos o cigarros
encendidos encima de producto.
• Conecte sólo en receptáculos de corriente
alterna como esta indicado en el producto.
• Tome precauciones para evitar que caigan
objetos dentro del producto.
• Carros y Estantes–El artefacto deberá ser usado
sólo con carros y estantes que hayan sido
recomendados por el fabricante.
• Cada vez que el enchufe principal o el
conectador del aparato se usen como
dispositivo de desconexión, dicho dispositivo
de desconexión debe estar siempre listo para
su funcionamiento.
SI SU PRODUCTO FUNCIONA CON PILAS, haga
caso a las precauciones siguientes:
A. No mezcle les baterías viejas y nuevas.
B. No mezcle (NiCd, NiMH, etc.) las baterías
alcalinas, estándares (carbón-cinc), o recargables.
C. Cualquier pila puede explotar o gotear electrólito
si se echa en un fuego o si trata de cargar una
pila no recargable.
D. Deseche inmediatemente pilas con fuga. Estas
pueden causar quemaduras a la piel otra herida
personal.
Cuando deseche las baterías asegúrese de
deshacerse de ellas en una manera apropiada,
de acuerdo con las regulaciones locales o del
estado.
E. La baterís no debe exponerse al calor excesivo
como es el caso de la luz del sol, fuego o
similares.
- 2 -
Page 17

Información importante
Precauciones
• Este reproductor de discos compactos utiliza
un láser para leer la música del disco. El
mecanismo del láser corresponde a la cápsula
y al estilo de un grabador. A pesar de que
este equipo tiene una lente de capación de
láser incorporado, es completamente seguro
cuando se lo utiliza de acuerdo con las
instrucciones.
• El disco gira a alta velocidad dentro del
reproductor. No utilice discos dañados,
doblados o rayados.
• No toque la lente de captación del láser que
se encuentra dentro del compartimiento del
disco. Para evitar que se acumule el polvo en
la lente (de captación del láser), no deje la
puerta del compartimiento abierta por mucho
tiempo. Si la lente se ensucia, límpiela con un
cepillo suave o utilice un cepillo soplador para
entes de cámaras.
Para su seguridad
El adaptador de corriente CA está polarizado (una
de sus patas es más grande que la otra) y sólo
encajará en salidas de potencia CA de una manera.
Si tiene Usted dificultad en introducir el adaptador
en la caja del tomacorriente en su totalidad,
intente cambiar la posición del adaptador. Si
aún así no consigue encajarlo, contacte a un
electricista calificado para que sustituya la caja del
tomacorriente, o utilice una diferente. No intente
pasar desapercibido estas normas de seguridad.
ADVERTENCIA: PARA PREVENIR FUEGO O
SHOCK ELÉCTRICO, COINCIDA LA PATA GRANDE
DEL ENCHUFE CON LA RANURA GRANDE DEL
TOMACORRIENTE.
Epecificación técnica
Suministro de Potencia: 120V~60Hz
Las descripciones y características de este manual
del usuario constituyen exclusivamente una
referencia general y no una garantía. Con el fin
de proporcionarle un producto con la más alta
calidad, nos reservamos el derecho de efectuar
cambios o modificaciones sin previo aviso. En caso
de cualquier discrepancia entre distintos idiomas,
la versión inglesa prevalecerá como la referencia
final válida en todos los detalles del producto y de
su funcionamiento.
E
Información del servicio
Este producto debe ser atendido sólo por
aquellas personas especialmente entrenadas en
técnicas apropiadas de mantenimiento. Para mas
instrucciones de cómo obtener servicio, refiérase a
la garantía incluida en este manual.
- 3 -
Page 18

Cómo empezar
Desempacando del sistema
Debe tener lo siguiente:
• una unidad principal (con dos altavoces)
• un control remoto
• una antena aerial AM
• manual del usuario
Conexión
Vista trasera
1. Conector del dispositivo de antena para AM
2. Antena flexible para FM
3. Conectores para los altavoces
4. Receptáculos de AUX IN
FM
antena aerial AM
(suministrado)
Receptáculo para
conexión de fuentes
de audio
Conexión de las bocinas
Cada parlante principal tiene un alambre negro y uno rojo,
y el subwoofer tiene dos pares de alambres de color negro
y púrpura. Al conectar las bocinas, haga coincidir los
cables rojo con los receptáculos rojo y los cables negros
con los receptáculos negros en la unidad principal.
21
Empuje la pestaña del
terminal del altavoz
hacia abajo para
introducir el cable.
NOTA: Asegúrese de que los extremos de los cables
del altavoz no contengan materia aislante en todos
los puntos de conexión.
Suelte la pestaña para
que el cable quede
sujeto en el terminal.
antena
Usando las antenas de FM y AM
Antes de utilizar su sistema de audio, deberá
asegurarse de que ambas antenas, FM y AM, están
posicionadas de forma correcta. Desenrosque
la antena FM de la parte trasera de la unidad, a
segurándose de que esté totalmente extendida
(quizá quiera incluso sostenerla con cinta adhesiva a
la pared detrás de la unidad, si es posible, cuanto más
alta mejor).
También deberá conectar la antena de AM a la parte
trasera de la unidad si escucha estaciones AM. Haga
rotar la antena de AM para conseguir una mejor
recepción.
al enchufe de CA
de la pared
Instalación
Para asegurar suficiente ventilación, deje los
espacios que se muestra a continuación libres de
otras superficies:
4”
4”4”
vista delantera
- 4 -
4”
2”
vista lateral
Page 19

Controles de la unidad
Unidad principal
1
2
3
4
5
6
7
8
1. Indicador Power – se ilumina cuando la unidad
está en modalidad de suspensión.
Indicador Bluetooth
2. POWER – Enciende o Apaga la fuente de
Potencia (modo STANDBY).
3. TIMER – Enciende y apaga el temporizador;
oprima y mantenga presionado para ingresa al
modo de ajuste del temporizador.
4. CLOCK – Muestra la hora e ingresa al modo de
ajuste del reloj.
5. AUTO PROG / BAND – Cambia entre AM
y FM. También se usa para programar
automáticamente estaciones de radio, bajo la
modalidad de banda FM.
SOURCE – Selecciona la fuente entre
reproductor CD, TUNER, BT, LINE IN y AUX
sources.
PROG – Ingresa al modo programa para el CD y
Sintonizador.
SLEEP – Selecciona el intervalo de tiempo en
minutos antes de que la unidad se apague.
6. Enchufe USB – sólo para cargas.
7. LINE IN – (Ø3.5mm) Receptáculo para conexión
de fuentes de audio.
9
10
11
12
13
14
8. PRESET
9.
10.
11. DISC SKIP – Salta al siguiente CD en la
12. DIMMER – Ajusta la brillantez de la pantalla.
13. VOLUME – Aumenta / disminuye el volumen.
14. SHUFFLE – Apaga/enciende la CD
PLAY MODE – Selecciona entre modos CD
BASS – Enciende o apaga REALCE DE BAJOS.
EQ – para elegir las preselecciones del
/ – Elige la estación previa/siguiente
de preselección del sintonizador.
– Detiene la pista del CD.
/ / TUN +/- – Sintoniza la frecuencia de
radio, va a la pista del CD, para realizar una
búsqueda a alta velocidad a través de la pista
del CD que tenga seleccionado.
/ PAIRING – Reproduce o pausa el CD; para
alinear el bluetooth.
– Abre o cierra la bandeja del disco.
bandeja.
reproducción aleatoria.
reproducción.
ecualizador.
- 5 -
E
Page 20

CONTROL REMOTO
Control remoto
1
2
3
4
5
11
12
13
14
15
6
7
8
9
10
1. TUNER –
cambia la banda de radio en el modo Sintonizador.
2. CD – Selecciona el reproductor de CD.
3. INFO – Selecciona entre información de
visualización deldisco.
4.
(modo EN ESPERA).
5. PREV/
de radio, va a la pista del CD, para realizar una
búsqueda a alta velocidad a través de la pista
del CD que tenga seleccionado.
6.
alinear el bluetooth.
7. OPEN/CLOSE – Abre y cierra la bandeja del
disco CD.
8. PLAY MODE – Selecciona entre modos CD
reproducción.
9. FM ST. – Conmuta entre los modos ST ON
(Enciende) y OFF (Apaga).
10.
de preselección del sintonizador.
11. – Para seleccionar la modalidad de
bluetooth.
Selecciona sintonizador de radio y
– Para encender o apagar (modo STANDBY)
,NEXT/ – Sintoniza la frecuencia
/ PAIRING – Reproduce y pausa el CD; para
PRESET – Elige la estación previa/siguiente
16
17
18
19
20
21
22
12. LINE IN / AUX – para seleccionar la entrada de
sonido externo a través del enchufe LINE IN o
de los enchufes AUX IN.
13. BASS – Enciende o apaga REALCE DE BAJOS.
14. DIMMER – Ajusta la brillantez de la pantalla.
15. VOL+ – Aumenta el volumen.
16. VOL - – Disminuye el volumen.
17. STOP – Detiene la pista del CD.
18.
– Silencia y restaura la salida de audio.
19. SHUFFLE – Apaga/enciende la CD
reproducción aleatoria.
20. INTRO – Apaga o enciende el modo INTRO
para reproducir los primeros 10 segundos de
cada pista en modo CD.
21. DISC SKIP – Salta al siguiente CD en la
bandeja.
22. SLEEP – Selecciona el intervalo de tiempo en
minutos antes de que la unidad se apague.
Antes de utilizar el
control remoto, debe
colocarle 2 pilas “AAA”
baterías.
- 6 -
Page 21

Pantalla
indicación de origen
Estatus de la bandeja de CD:
Se ilumina al cargar
Parpadea para el disco actual
Se anima al reproducir
estatus del
modo
reproducir
PROG – modo reproducción de programa activado
SLEEP – modo dormir activado
Ajustando la Brillantez de la Pantalla
1. Oprima y mantenga presionado DIMMER por más de 2 segundos.
2. Mientras que el conmutador es visualizado (“DIM 1”), oprima y suelte DIMMER para seleccionar el
nivel deseado (DIM 1 - 3).
temporizador activado
bandas de radio
BASS – bass boost activated
STEREO – modo FM estéreo activado
EQ – preset equalizer activated
E
- 7 -
Page 22

Reloj/Temporizado
Ajustando la hora
1. Oprima y mantenga presionado CLOCK hasta
que la hora parpadee en la pantalla.
2. Oprimir / para ajustar la hora y luego
oprima CLOCK para cambiar a los dígitos de los
minutos.
3. Oprima
4. Oprima CLOCK para guardar los ajustes.
• Cuando el equipo esta ON, usted
/ para ajustar los minutos.
puede oprimir CLOCK para visualizar la hora – La hora aparecerá en
el visualizador por alrededor de 2 segundos.
Ajustando el temporizador
• Para la opción de temporizador con RADIO,
sintonice una estación que desee escuchar.
• Para la opción de temporizador con CD,
introduzca un disco compacto en la unidad.
1. Oprima y mantenga presionado TIMER hasta
que aparezca ON con la hora parpadeando (ON
– temporizador tiempo encendido).
2. Para ajustar la hora, oprima / para ajustar
la hora y luego oprima TIMER para cambiar a
dígitos de minutos.
3. Oprima / para ajustar los minutos.
4. Oprima TIMER para cambiar a OF (temporizador
tiempo apagado ) con la hora parpadeando.
Repetir pasos 2 y 3 para los ajuste de
temporizador tiempo apagado.
5. Oprima TIMER para seleccionar el origen.
Oprima / para seleccionar entre TUNER,
CD (SINTONIZADOR, DISCO).
6. Oprima TIMER para ajustar el volumen. Ajuste
el volumen en la unidad principal o oprima
/ en el control remoto para seleccionar el
volumen de nivel deseado.
NOTA: para evitar que usted u otras personas
en su hogar se sobresalten, este producto no
se encenderá a un nivel de volumen más alto
que el nivel 15.
7. Oprima TIMER para guardar los ajustes.
Activando el Temporizador
Oprima el botón TIMER para activar/desactivar el
temporizador. El temporizador esta activa cuando
el icono
del indicador del reloj se encienda.
Modo de adormitar
Usted puede seleccionar el intervalo de tiempo
en minutos antes que su equipo se apague
automáticamente.
1. Oprima SLEEP en el control remoto para
seleccionar entre OFF, 120, 90, 60, 45, 30, 15, 10
y 5 minutos. El icono de apagado automático
centellea en el despliegue cuando se activa el
modo de apagado automático.
2. Cuando está activado el apagado automático,
oprima SLEEP una vez para visualizar el período
restante hasta el apagado automático. Oprima
SLEEP de nuevo cuando se esté exhibiendo el
período restante hasta el apagado automático
para modifi car el intervalo para apagado
automático.
• El apagado automático se desactiva
automáticamente cuando se apaga la unidad.
Características del Sonido
Realce de bajos
Oprima BASS para encender/apagar la frecuencia del
potenciador del bajo. El ícono “BASS” se ilumina en la
pantalla cuando es activado.
Enmudeciendo el sonido
Oprima
sonido.
Uso de las curvas preseleccionadas del
ecualizador
Presione EQ para activar y elegir entre FLAT, ROCK,
POP, JAZZ, CLASSIC y CUSTOM. La pantalla muestra
brevemente su selección.
Creación de una curva personalizada
1. Presione EQ para seleccionar el modo CUSTOM.
2. Mientras CUSTOM se visualice, presione
para alternar entre los niveles de rango de
nivel de bajos y agudos desplegados.
3. Cuando aparezca BASS o TREB ajuste e VOLUME
para seleccionar el incremento respectivo entre
-10 – +10.
4. Presione EQ para guardar las configuraciones.
- 8 -
en el control remoto para cortar el
/
Page 23

Reproductor de CD
CD-R / RW
Esta unidad permite la reproducción de
discos CD-RW/CD-R.
Notas sobre el disco CD-R/RW:
• No pegue ningún tipo de etiqueta a ninguno
de los lados (grabables o con etiqueta) de un
disco CD-R/RW, ya que podría provocar un mal
funcionamiento del equipo.
• Para evitar daños en el disco CD-R/RW disc, no
abra la puerta del compartimiento del disco
mientras se esté leyendo el disco.
• No cargue un disco CD-R/RW no grabado en la
unidad. Podría provocar que se tardase más en
leer el disco.
La capacidad de reproducción de discos CD-RW puede
•
variar debido las variaciones en la calidad del disco CDRW y la grabadora utilizada para crear el disco.
Favor de tener cuidado al cargar o
retirar discos en el compartimiento de
discos. Para detalles lea lo siguiente.
Retire todos los discos del compartimiento de
•
discos antes de mover o transportar la unidad.
• No coloque discos en del compartimiento de
discos cuando estén en movimiento.
• No empuje o force la rotación de las
bandejas del disco. Use siempre el botón
DISC SKIP (SALTAR DISCO).
• No coloque discos en alguna bandeja de
discos no expuesta.
• Cuando ocurra un error y el compartimiento
del disco no cierre, vacíe todas las bandejas
del disco e intente otra vez.
Cargando discos
1. Oprima SOURCE repetitivamente para
seleccionar el modo CD.
2. Oprima OPEN/CLOSE o para abrir el girador.
3.
Inserte cinco discos con el rótulo hacia arriba. (Oprima
DISC SKIP para rotar el cargador del disco.)
4. Oprima OPEN/CLOSE o para cerrar el girador.
Cargue el disco cuando el icono se ilumine.
Para seleccionar un disco
Presione DISC SKIP para saltar discos.
Reproducción de discos
• Oprima para empezar o hacer pausa
ejecutar, y oprima para detener la ejecución.
• Oprima / para seleccionar una pista
específi camente.
Buscando a través del CD
Oprima y mantenga presionado
a través de un CD mientras se este ejecutando.
/ para buscar
Orden de ejecuciones al azar
Oprima SHUFFLE para encender/apagar la
ejecución de pistas en orden al azar. (Control
Remoto solamente).
Muestreo de pistas
Oprima INTRO para ejecutar los primeros 10
segundos de cada pista del disco actual, todos los
discos en la bandeja, o para apagar el modo INTRO
(Control Remoto solamente).
Mode reproducción
Oprima PLAY MODE para seleccionar reproduce
repetir la pista actual, reproduce todos los discos,
repetir todos los discos, la disco actual o repetir el
disco actual (Repeat 1, Repeat 1 Disc, Repeat All
Discs, 1 Disc, y All Discs).
• Oprima INFO repetitivamente para visualizar el
lapso de tiempo de la pista, número de la pista,
tiempo restante de la pista y tiempo restante
del disco.
Programa de CD
Usted puede programar el equipo de disco
compacto CD para ejecutar hasta 99 pistas en los
CDs de la bandeja.
Mientras que el equipo de disco compacto CD
1.
no esta en ejecución, oprima PROG para entrar
al modo de pro gramación. En el sistema se
visualizará el número del próximo programa
disponible “- -P: 01,” con “- -” parpadeando, lo lleva
a la primera pista en la lista de programación.
2. Oprima / para seleccionar una pista
(presione DISC SKIP para seleccionar una pista
de un dis co distinto).
Oprima PROG para asignar la pista seleccionada a
3.
un número de programa. Después de 3 segundos,
lo lleva a la siguiente pista en el listado de
programación. (En el modo de programación de
CD, el icono de PROG se iluminará.)
Ejecutando un Listado de Programas
Mientras este en el modo PROGRAM, oprima .
Visualizando el Listado de Programas
1. Mientras que el equipo de disco compacto
CD esta detenido, oprima PROG para entrar al
modo PROGRAM.
2. Oprima PROG repetitivamente para incluir en
la lista cada una de las pistas asignadas en el
listado de programación.
Borrando el listado de programas
Mientras que en el modo PROGRAM, oprima y
mantenga presionado
equipo se visualizará el mensaje CLEAR.
- 9 -
por 3 segundos. En el
E
Page 24

Sintonizador
Alineamiento del Bluetooth
Oprima SOURCE o TUNER (Control remoto) para
seleccionar TUNER.
Selección de la banda
Oprima AUTO PROG / BAND (unidad) o oprima
TUNER (control remoto) para seleccionar entre las
bandas de radio AM y FM.
Sintonizando una estación
Oprima
Presione y sostenga para explorar frecuencias.
Ajustando las preselecciones
Ajustando las preselecciones manualmente
1. Oprima / para accesar la frecuencia
2. Oprima el botón PROG una vez. La posición del
3. Si se ha escogido una posición de programa
4. Oprima PROG para guardar la frecuencia
Preprogramación Auto Programada (solamente
para FM)
Oprima y mantenga presionado el botón de AUTO
PROG/BAND o por 2 segundos para escanear
estaciones en la banda FM. Las estaciones serán
guardadas en los canales preprogramados. Un
máximo de 32 estaciones pueden ser guardadas.
Se advierte que los canales preprogramados
pueden ser borrados accidentalmente porque el
proceso de escaneo al igual que al guardarlos se
hace de manera automáticamente hasta que se
oprima el botón o por 2 segundos.
Usted puede detener la lectura automática al
presionar el botón TUN+/TUN-, pero las estaciones
que se borren no se podrán recuperar.
Usando preprogramaciones
Oprima
preseleccionada anterior o a la siguiente. En
la pantalla aparecerá primero el número del
programa preseleccionado y después de unos
momentos, aparecerá la frecuencia (P 01 es la
preselección 1).
Eliminando señales estéreo
Oprima FM ST. para conmutar entre ST ON
(Enciende) y ST OFF (Apaga) por estaciones FM
estéreo. (Control Remoto solamente)
/ para seleccionar las frecuencias.
deseada.
programa más reciente será visualizado.
diferente, oprima / para mover al número
preprogra mado deseado (1-32).
seleccionada en esa preprogramación.
PRESET para acceder a la estación
Antes de alinear el bluetooth, usted debe encender
la función de bluetooth del otro dispositivo (tal
como, su teléfono celular con función de bluetooth)
y seleccionar luego RS3965SB.
1. Oprima reiteradamente el botón SOURCE de la
unidad u oprima el botón
para seleccionar la modalidad BT (Bluetooth).
2. El indicador de Bluetooth parpadeará lentamente
y el equipo buscará automáticamente en la
memoria el último dispositivo con bluetooth con
el que se haya alineado.
3. Una vez que el equipo acceda al estatus de
alineamiento, el indicador de Bluetooth empezará
a parpadear rápidamente.
4. Oprima PAIRING durante 3 segundos para dar
inicio al alineamiento.
• Si el alineamiento de Bluetooth se lleva
a cabo exitosamente, el indicador de
Bluetooth se iluminará.
• Si el alineamiento de Bluetooth no funciona,
el indicador de Bluetooth parpadeará
lentamente. Intente hacer nuevamente el
alineamiento.
Nota: si su dispositivo de Bluetooth (tal como, su
teléfono celular) precisa de la clave mientras realiza el
alineamiento, ingrese el número de cuatro dígitos 0000.
Disfrute de la música a través de Bluetooth
• Oprima para empezar o hacer pausa ejecutar.
• Oprima / para seleccionar una pista
específi camente.
•
Oprima y mantenga apretado / para comenzar a
moverse hacia atrás o hacia adelante a alta velocidad.
del control remoto
Modalidad LINE IN/AUX IN
Reproduzca el sonido de una fuente externa a
través de los parlantes
Oprima reiteradamente el botón SOURCE de la
unidad para seleccionar la modalidad LINE IN o AUX.
O bien, oprima LINE IN/AUX en el control remoto para
cambiar a la modalidad de LINE IN al estar bajo la
modalidad de CD, TUNER o BT. Oprima nuevamente
LINE IN/AUX para cambiar a la modalidad AUX.
Sugerimos el uso de un enchufe hembra LINE IN de 3,5 mm de diámetro para
el reproductor de mp3 y de enchufes
hembra AUX IN de este mismo diámetro para
equipos auxiliares, tales como reproductores de
DVD, videograbadoras o computadoras.
- 10 -
Page 25

Resolviendo problemas
Información adicional
Equipo no enciende
Revise el cable de corriente para asegurar el enchufado.
•
• Desenchufe el equipo por un momento, y
enchúfelo nuevamente en la fuente de potencia.
Revise el tomacorriente enchufando otro aparato.
•
No hay sonido
• Aumente el nivel de volumen.
• Revise las conexiones de los parlantes.
• Revise que haya seleccionado la función
correcta: CD, TUNER, LINE IN/AUX o BT.
• Asegúrese que mute esta apagado.
• Asegúrese de que los audífonos no están
conectados.
Recepción de radio pobre
• Revise la conexión de la antena.
• Mueva la antena.
• Apague cualquier electrodomésticos cercano,
como secadoras, aspiradoras, microondas, luces
fluorescentes.
El CD no ejecuta
• Revise que el CD este en la bandeja.
• Revise que el rótulo del CD este hacia arriba.
• Revise que el modo PAUSE no este encendido.
• Revise que la función de CD este seleccionado.
• Use el limpiador de lentes de CD.
• Limpie el disco.
• Pruebe otro CD.
Saltos de sonidos del CD
• Limpie el disco.
• Cheque que el disco no tenga combaduras, ray-
ones, u otro daño.
• Cheque si algo está causando que el sistema
vibre. Si es así, mueva el sistema.
• Asegúrese de que las bocinas estén al menos
a tres pies de distancia o sobre una superfi cie
diferente de la de la unidad principa.
Cuando oprima DISC SKIP, el botón de CD no
responden, o no cambia discos.
• Escoja otra función (TUNER, iPod, LINE IN/AUX) y
luego vuelva a CD.
El control remoto no trabaja
• Revise que las baterías hayan sido instaladas
apropiadamente.
• Reemplace baterías débiles.
• Revise que el equipo haya sido enchufado en la
fuente de potencia.
• Apunte el control remoto directamente a la
parte frontal del equipo.
• Muévase más cerca al equipo.
• Quite cualquier obstáculos entre el control
remoto y el equipo.
Desenchufe el equipo de sonido de cualquier
fuente de potencia antes de hacer cualquier acción
de mantenimiento.
Limpieza
Limpie el exterior del equipo con un paño suave.
Reproductor de CD
¡ADVERTENCIA! Este sistema funciona con láser.
Sólo debe abrirse por un técnico cualificado.
Manejo de los CDs
• No toque las superfi cies de las señales. Agarre
los CDs por los bordes o por un borde y el agujero. No pegue etiquetas ni cintas adhesivas a
las superfi cies de etiquetas. No arañe ni dañe
la etiqueta. Los CDs giran a mucha velocidad
dentro del reproductor. No utilice CDs deteriorados (rotos o rallados).
Limpieza de los CDs
• Los CDs sucios pueden hacer que la calidad
del sonido sea mala. Mantenga siempre los
CDs limpios frotándolos suavemente con un
paño suave desde el borde interior hacia el
perímetro externo.
•
Si un CD se ensucia, empape un paño suave en
agua, escúrralo bien, elimine con suavidad la
suciedad y después elimine también todas las
gotas de agua que hayan caído con un paño
seco.
• No utilice pulverizadores de limpieza para
discos ni agentes antiestáticos sobre los
CDs. Asimismo, no limpie nunca los CDs con
benceno, disolvente o cualquier otro solvente
volátil que pueda dañar la superfi cie del
disco.
Cuidado de las lentes del CD
Cuando las lentes del CD se ensucian, también
puede hacer que la calidad del sonido sea mala.
Para limpiarlas, tendrá que comprar un limpiador
de lentes mediante el cual podrá mantener la
misma calidad de sonido de su sistema. Para más
instrucciones sobre cómo limpiar las lentes del CD,
consulte las que acompañan al limpiador de lentes.
- 11 -
E
Page 26

Garantía limitada
AVC MULTIMEDIA (“AVC”) ofrece la siguiente garantía limitada, la cual se extiende al comprador-consumidor
original y está limitada al uso no comercial del producto.
Garantía de repuestos y reparaciones por Uno Año
Los productos AVC que se hayan comprado en los Estados Unidos o Canadá tienen una garantía de uno año
a partir de la fecha original de compra en caso de presentar defectos en los materiales o en su fabricación. Si
la unidad no se encuentra en conformidad a esta garantía, nosotros repararemos el producto usando piezas
y productos nuevos y reparados, según lo estime AVC únicamente.
Durante un período de uno año a partir de la fecha efectiva de la garantía, AVC proporcionará, cuando sea
necesario, mano de obra de reparación para reparar defectos de fabricación en su centro de reparaciones
designado. Para obtener los servicios de la garantía en los Estados Unidos o Canadá, usted deberá llamar
primero a nuestro Centro de Servicio para el Cliente al 1-877-252-6873 durante las horas que se indican
en el recuadro más abajo. La decisión de si bien usted está facultado para recibir estos servicios la tomará
la oficina de Respaldo al Cliente de AVC. POR FAVOR NO DEVUELVA ESTA UNIDAD A AVC SIN CONTAR
CON AUTORIZACIÓN PREVIA.
En los centros designados para reparaciones y por un período de uno año a contar de la fecha de efectividad
de la garantía, AVC utilizará piezas o productos de recambio nuevos o refabricados al efectuar reparaciones de
productos o piezas defectuosas. Dichos productos o piezas de recambio cuentan con una garantía adicional
de uno año a contar de la fecha del cambio o de la reparación. Para poder hacer las reparaciones que sean
necesarias, el cliente deberá enviar la unidad al centro de reparaciones que se le indique al contactarse
con la oficina de respaldo al cliente. El cliente es responsable por todos los gastos de envío al centro de
reparaciones.
Instrucciones para envolver la unidad y para su envío
Cuando usted envíe el producto al centro de reparaciones de AVC, usted debe utilizar la caja de cartón y el
material de embalaje original o un tipo de embalaje equivalente, según lo establezca AVC.
Su responsabilidad
(1) Usted debe guardar la boleta de venta original como prueba de su compra.
(2) Estas garantías sólo son efectivas si el producto ha sido comprado y puesto a funcionar en Estados Unidos o
Canadá.
(3) Las garantías sólo se extienden en caso de materiales o de fabricación defectuosa y no se extiende a productos
o piezas que se hayan perdido o tirado a la basura, ni a productos o piezas dañadas a causa del mal uso de la
unidad, de accidentes, del funcionamiento o mantenimiento inapropiados del equipo, así como tampoco en
caso de no haber seguido las instrucciones que acompañan este producto, o de haber modifi cado o alterado
el producto sin la autorización de AVC, o de haber quitado o cambiado el número de serie de las piezas o del
producto.
Fuera de la Garantía
En caso que su producto necesite ser reparado y que el período de garantía ya haya expirado, sírvase
contactarse con el Centro de Ayuda al Cliente en el fono
Hora: Lunes–Jueves: 9am–7pm, Viernes: 9am–5pm, Sábado: 9am–MEDIODÍA Tiempo del Este.
Importante :
Usted se hace responsable de cualesquier gastos por razones de transporte, envío o seguro
relacionados con la devolución del producto al Centro de Devoluciones de Productos.
Todas las garantías implícitas según la ley de un estado, incluidas las garantías implícitas de
comercialización y de aptitud para un propósito específi co, están limitadas expresamente a la duración
de la garantía limitada expuesta más arriba. Con la excepción de cualesquiera garantías implícitas
según la ley de un estado, que por la presente quedan limitadas, la garantía precedente tiene carácter
de exclusiva y predomina sobre las demás garantías, cauciones, acuerdos y obligaciones similares del
vendedor o del fabricante con respecto a la reparación o al reemplazo de cualesquier partes del aparato.
AVC en ningún caso se hará responsable de daños fortuitos ni de daños resultantes de cualquier otra
situación que no sea la indicada en la garantía limitada de este aparato.
1-877-252-6873 o www.RCAav.com
- 12 -
Page 27

Garantía limitada
Ninguna persona, agente, distribuidor, comerciante ni empresa está autorizada para cambiar, modifi car o
extender los términos de estas garantías en ninguna manera, cualquiera que ésta fuese. El tiempo dentro
del cual se debe iniciar una acción para hacer cumplir cualquier obligación de AVC que surja en virtud de la
garantía o de cualquier estatuto o ley de Estados Unidos o Canadá o de cualesquier de sus estados, queda
aquí limitado a uno año a contar de la fecha de adquisición del producto. Esta restricción no se aplica a las
garantías implícitas planteadas en virtud de la ley de un estado.
Esta garantía le brinda derechos legales específi cos y puede que usted también tenga otros derechos que
pueden variar, dependiendo del estado. Algunos estados no ponen límite en cuanto a la duración de una
garantía implícita, a cuándo se puede tomar acción, o a la exclusión o limitación de los daños fortuitos o
consiguientes, de modo que es posible que las disposiciones anteriores no sean aplicables en su caso.
Para mayor información acerca de otros productos y servicios, sírvase contactar nuestra página de internet
en la siguiente dirección:
Importante: Guarde su “Boleta de venta” como prueba de su compra.
N° de modeo ........................................................................... Nombre del producto ............................................................
Tipo de aparato ...................................................................................................................................................................................
N° de serie ................................................................................ N° de recibo ...............................................................................
Fecha de compra ................................................................... Nombre del comerciante .....................................................
www.RCAav.com
E
PARA RESPALDO TÉCNICO, SERVICIO Y REPARACIÓN, POR FAVOR VISTITA
www.RCAav.com
Les spécifications et l’apparence extérieure sont sous réserve de changement sans
préavis.
¿Necesita Más Ayuda?
Por favor visite ayuda online en http: //www.RCAav.com
Printed in China
Impreso en China
811-296591W030
- 13 -
 Loading...