

RCA RPW091 Instruction Manual

Model No.:RPW091

Notes
2
5
6
7
10
11
12
14
15
16
17
1
Co ntent s
Safety and pr eca uti ons ... ... ... .......... ... ... ... ... ... ............. ... ... ... ... ... ..........
Installat ion o f the w ash er.. ... ... .......... ... ... ... ... ... ............. ... ... ... ... ... .........
Preparati on be for e was hin g.. ... .......... ... ... ... ... ... ... .......... ... ... ... ... ... ........
Parts ident ifi cat ion o f the w ash er.. .......... ... ... ... ... ... ... .......... ... ... ... ... ... ....
Instructi on of t he wa she r ope rat ion p anel......... ... ... ... ... ... .......... ... ... ... ... .
Quick start ... ... ... ... ... ............. ... ... ... ... ... .......... ... ... ... ... ... ............. ... ... ...
The m ain w ash ... ... ... .......... ... ... ... ... ... ............. ... ... ... ... ... .......... ... ... ... ...
Special fea tur es. ... ... ... ... .......... ... ... ... ... ... ............. ... ... ... ... ... .......... ... ...
About the proc edu re of f ull a uto mat ic wa sh program..... ... ... ... ... ... .......... ... .
Cleaning an d Mai nte nan ce of t he wa shi ng machine..... ... ... ... ... ... ............. ... ... ... ... .
Identify usual trouble of washer..............................................................................
Malfuncti on di spl ay an d sol uti ons ............. ... ... ... ... ... .......... ... ... ... ... ... .....
Technical spe cif ica tio ns. ... ... .......... ... ... ... ... ... ............. ... ... ... ... ... .......... ... ... ... .
8
17
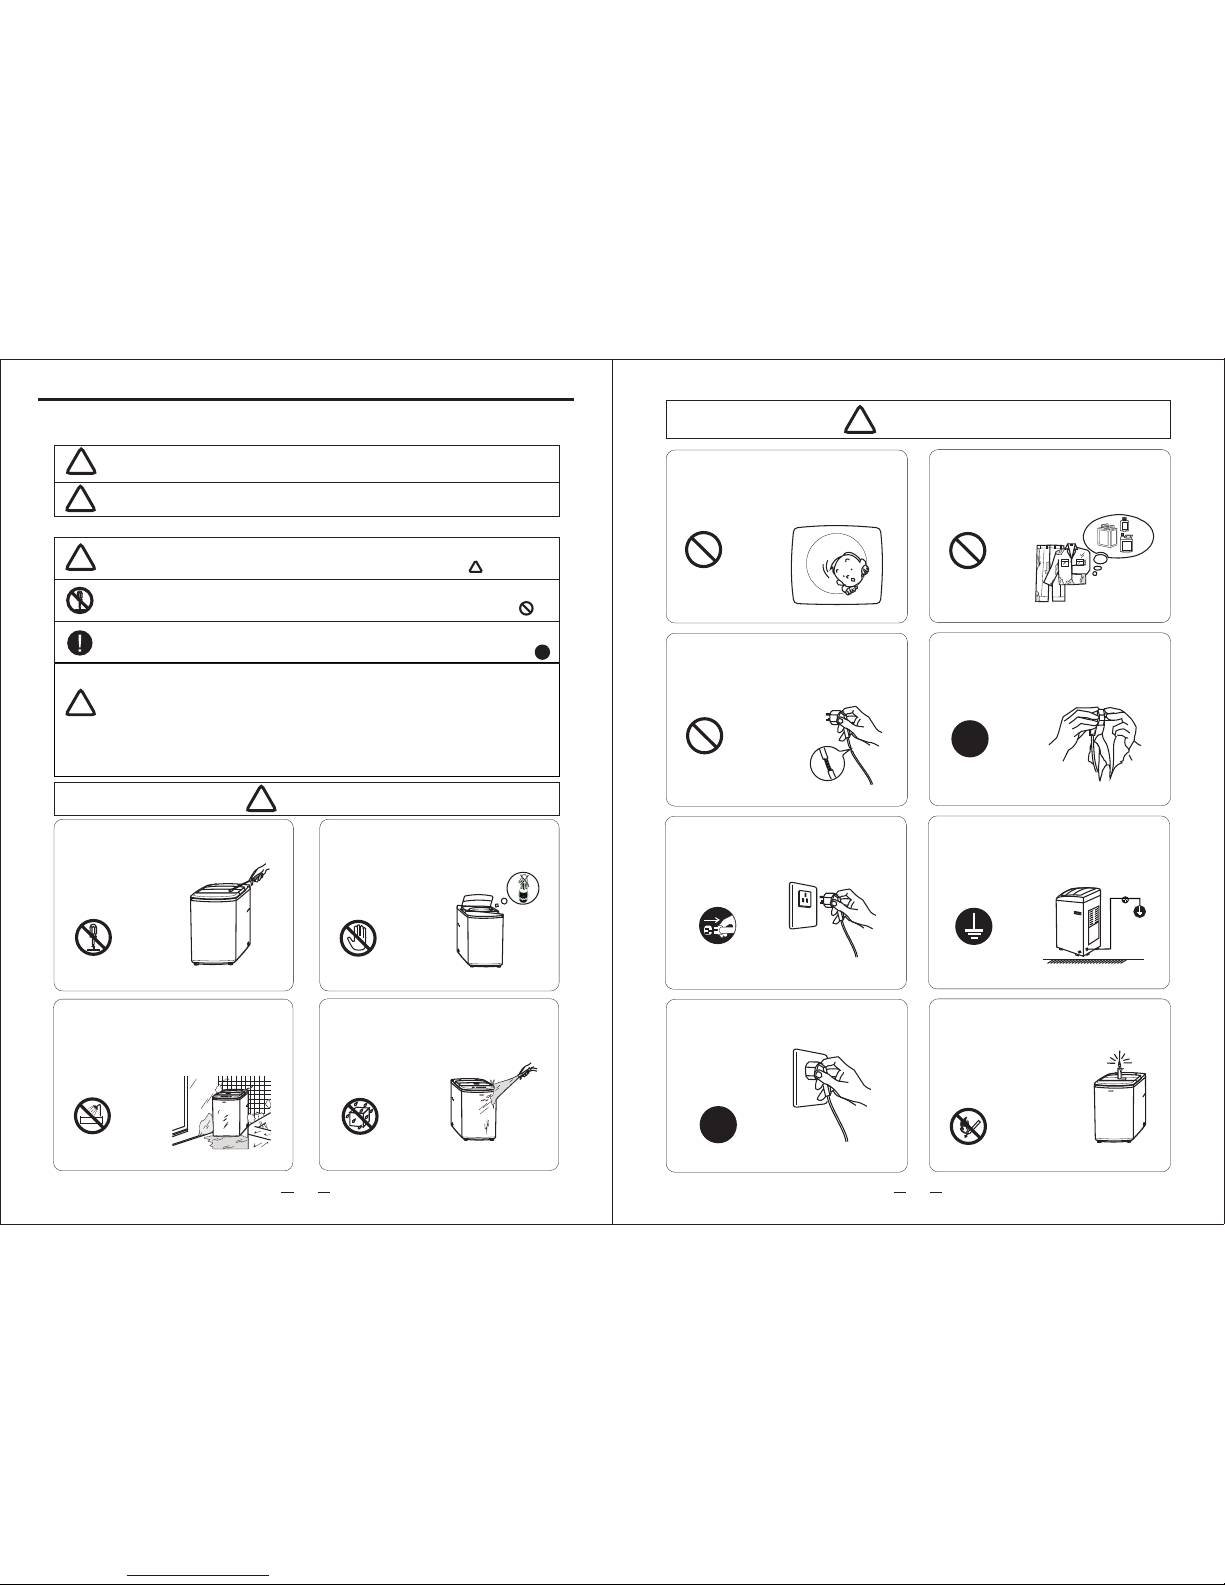
Please do not let children climb the
machine or peer into the rotating
spin barrel to avoid accidents.
It is prohibited to wash the clothes
touching with kerosene, gasoline,
alcohol and other flammable materials.
Please do not damage power flexible
cord and power plug to avoid electric
shocking, short circuit and catching
fire.
Regularly clean the power plug to
remove dust and dirt to avoid contact
failure.
Please pull out plug from the socket
if the machine is not in use.
Please well connect the earth line of
socket to avoid electric shocking by
accidental leakage.
(earthing)
Please insert the power plug tightly.
!
!
!
小天鹅
Prohibited
Prohibited
Prohibited
Smoke and fire prohibited
Earthing
Pull out the plug
Warning
Please do not place on the washer
burning candle, mosquito-repellent
incense, cigarette and other
flammable things, as well
as electric stove, air
heating fan and other
heating
sources.
3
2
Safety and precautions
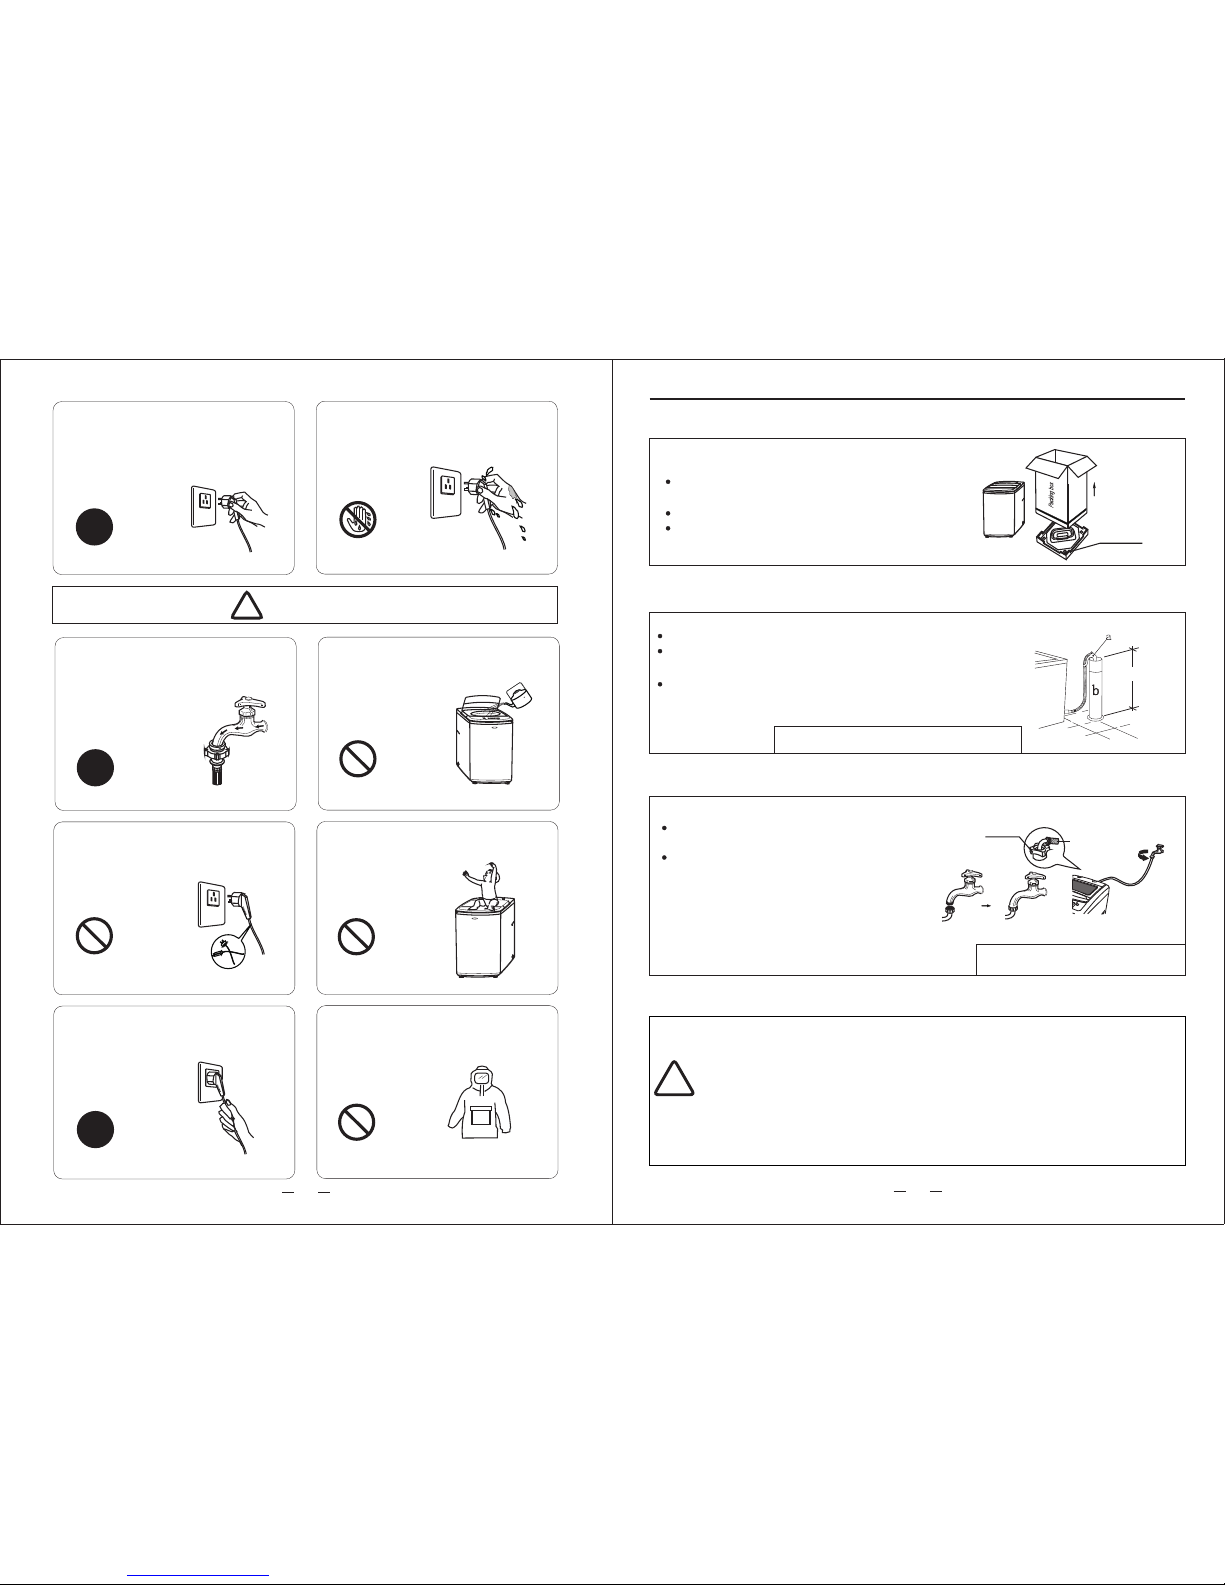
Please do not directly rinse the
machine with water when
cleaning.
Please do not install the machine in
damp and raining environment to avoid
electric shocking, catching fire, faults
and distortion
accidents.
No dampness
No rinsing
小天鹅
小天鹅
Observe the following items in order to prevent from injuring yourself, others
and the damage of property:
Please observe following contents of graphics.
!
Warning
Caution
This indicates serious injury or death to human
being may be caused.
This will remind you that injury to people and
damage to property may occur.
This graphics represents (operation prohibited), and detailed
prohibitive items will be displayed inside the graphics.
This graphics represents(cause attention),and detailed
cautions will be displayed inside the graphics.
This graphic represents (forcible execution), and detailed
forcible execution items will be displayed inside the graphics.
Warning
No dismantling
No touching
Please do not disassembly
and assembly the
machine without
authorization.
Please do not insert your hand
and take out clothes inside the
spin barrel before
it is fully stopped.
This appliance is not intended for use by persons (including
children) with reduced physical, sensory or mental capabilities,
or
lack
knowledge, unless they have been
of experience and
given supervision
or instruction concerning
use of the appliance
by a person responsible for their safety.
Children
should be
supervised to ensure that they do not play with the appliance.
!
!
!
!
5
Installation of the washer
Remove package
Remove package and take out the bottom board of
the cabinet on the foam cover.
Open the lid of washer's door and take out accessories.
A trial operation or washing on the foamed cushion is
strictly forbidden.
Base foamed cushion
The h eight o f drain h ose (“a ”)sho uld bet ween 86 -100 cm .
Dia meter o f “b”sh uld not l ess tha n 3 cm, and f low cap acity
not l ess tha n 40 L/Mi n.
FOR U PPER DR AIN SYS TEM ONLY
86~100 cm
Placement of upper water drain hose
Bef ore was hing ma chine s tarts , user sh ould ha ng up the
dra in pipe 8 6-100 cm heig ht from t he floo r.
Installation of water inlet pipe
Put the water inlet pipe(which has
metallic filtering bag) screw on to the tap.
Tightly screw another end of water
inlet hose on water inlet valve .
(with rubber seal ring inside).
Note: When tightening the
clamping nut, evenly apply the
force and do not twist the water
inlet valve to avoid breaking of
water inlet valve joint.
Onl y for mod el with d ouble
scr ew thre ad wate r inlet p ipe
Water inlet hose
Clamping nut
Please use correct power source.
Please do not pull out or insert the
plug with wet hands to avoid electric
shocking.
Please ensure that the water inlet pipe
is connected and the tap is opened
before washing
clothes.
Customers are not allowed to change
the power line without permission.
It is strictly prohibited to place and sit
children or lay
weights on the
washer.
Please do not pull the electric cord
when pulling out the
plug.
Please do not wash down jacket,
raincoat, fishing coat and similar
clothes in the
washer.
!
!
!
!
Wet hands are
prohibited
+
+
小天鹅
>50 C
小天鹅
The water temperature shall not exceed
50℃ when washing
with warm water.
Prohibited
Prohibited
Prohibited
Prohibited
Caution
4
!
If the supply cord is damaged, it must be replaced by the
manufacturer, its service agent or similarly qualified persons
in order to avoid a hazard. The instructions for appliances
connected to the water mains by detachable hose-sets shall
state that the new hose-sets supplied with the appliance are
to be used and that old hose-sets should not be reused.The
openings must not be obstructed by a carpet.This appliance
is for indoor use only.
7
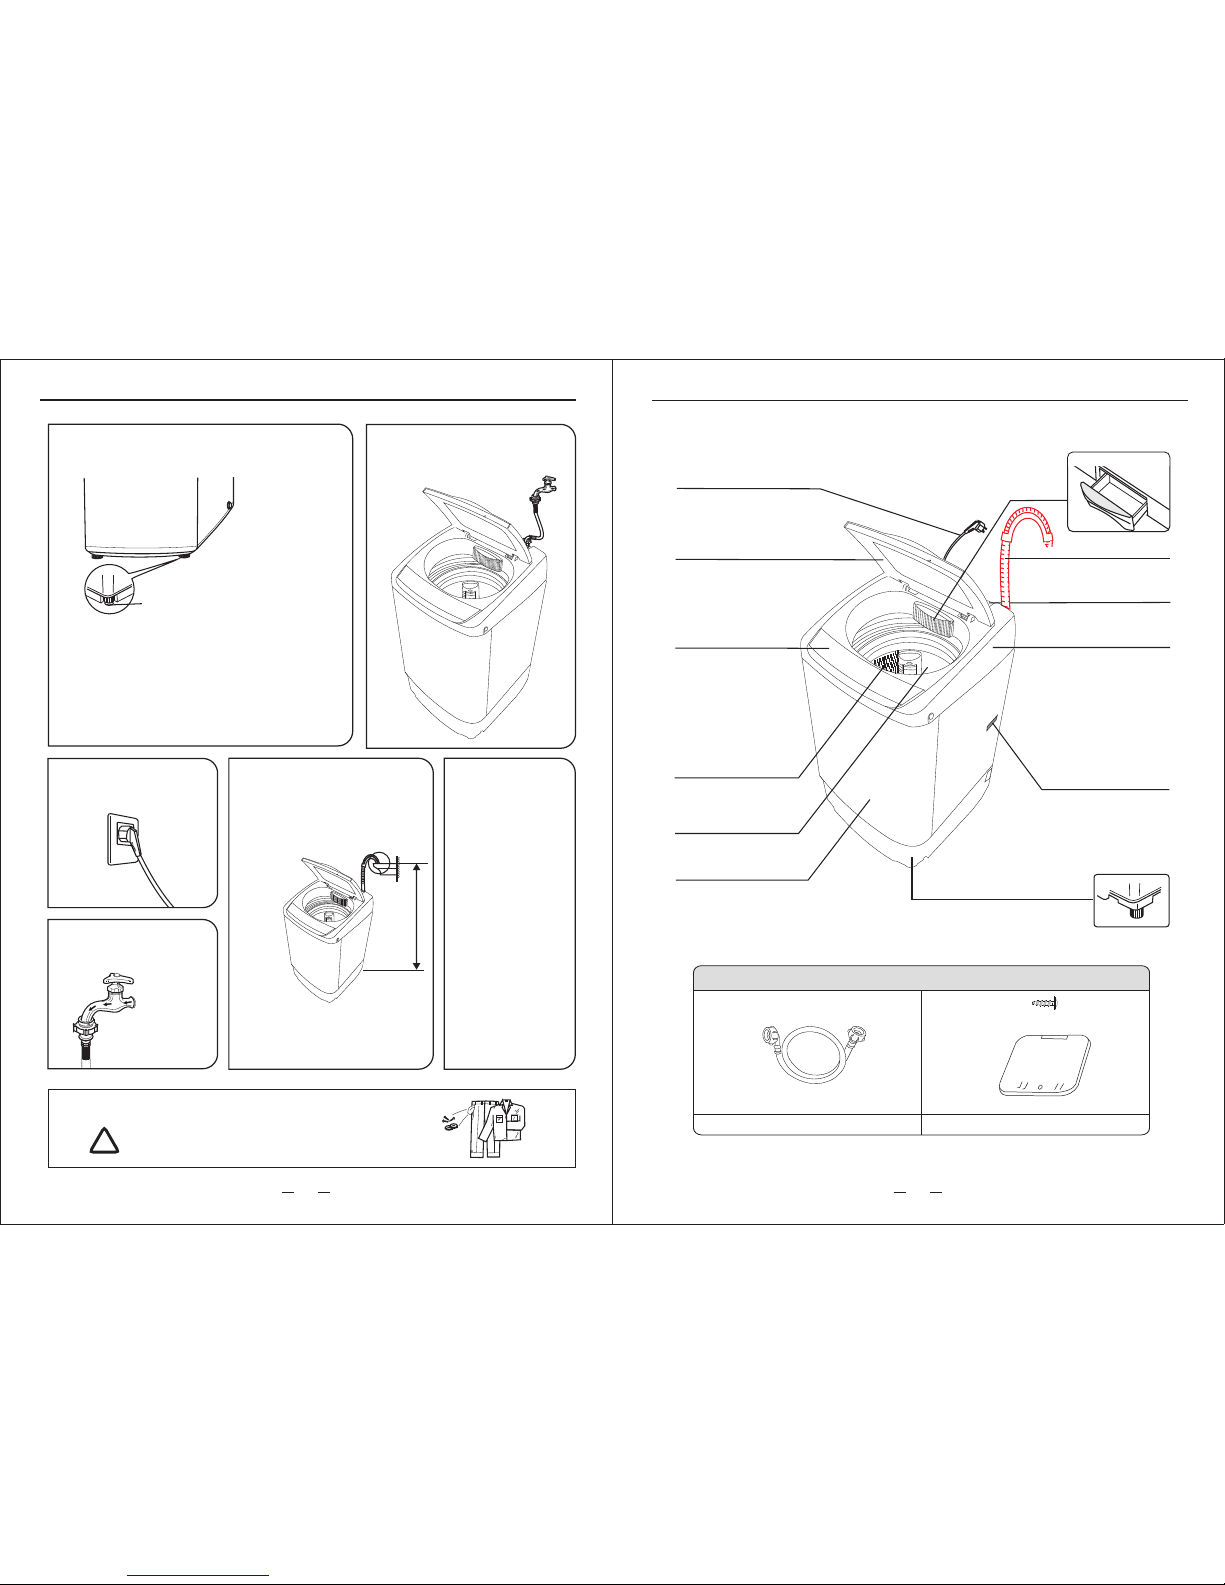
Parts identification of the washer
Upper drain hose
(for upper drain only)
Power line
Impeller
Cabinet
Adjustable foot knob
Handle
Control panel
Water inlet valve
Door
Wash Spin barrel
Warning lable
Washing powder box
6
Before washing, please do take out coins,
keys and other hard goods, and pull to close
the zip fastener to prevent clothes and
barrel from damage.
Preparation before washing
!
NOTICE
Adjust the adjustable foot making
the washer be placed stable.
1
Adjustable foot (extend when
clockwise rotating and shorten
when counterclockwise rotating)
(Slightly incline the washer first and loosen the
adjustable foot knob. Adjust the adjustable foot so
as to ensure four corners of washer be steadily
contacted with the ground. Then tighten the
adjustable foot knob and lock it. If the ground is
obviously not flat, correction should be made on
the ground surface, otherwise the washer barrel
will incline and knock the cabinet)
Install the water
inlet hose.
2
Connect with
power source.
3
4
Open the
water tap.
+
+
Put down the drain
hose.
5
Upper drain
Note:
The water
will overflow
when the
height of
the drain
hose under
860mm.
>860mm
Put in
clothes
and
suitable
amount of
washing
powder.
6
+
+
Note: Water temperature
should not be higher than
30 degree.
Accessories
Water inlet hose assembly
Base cover
Self-tapping screw
Only f or mode ls incl uding b ase cov er
Only f or mode l with do uble
scre w threa d water i nlet pi pe
Please refer to the real material as the attachment
8
9
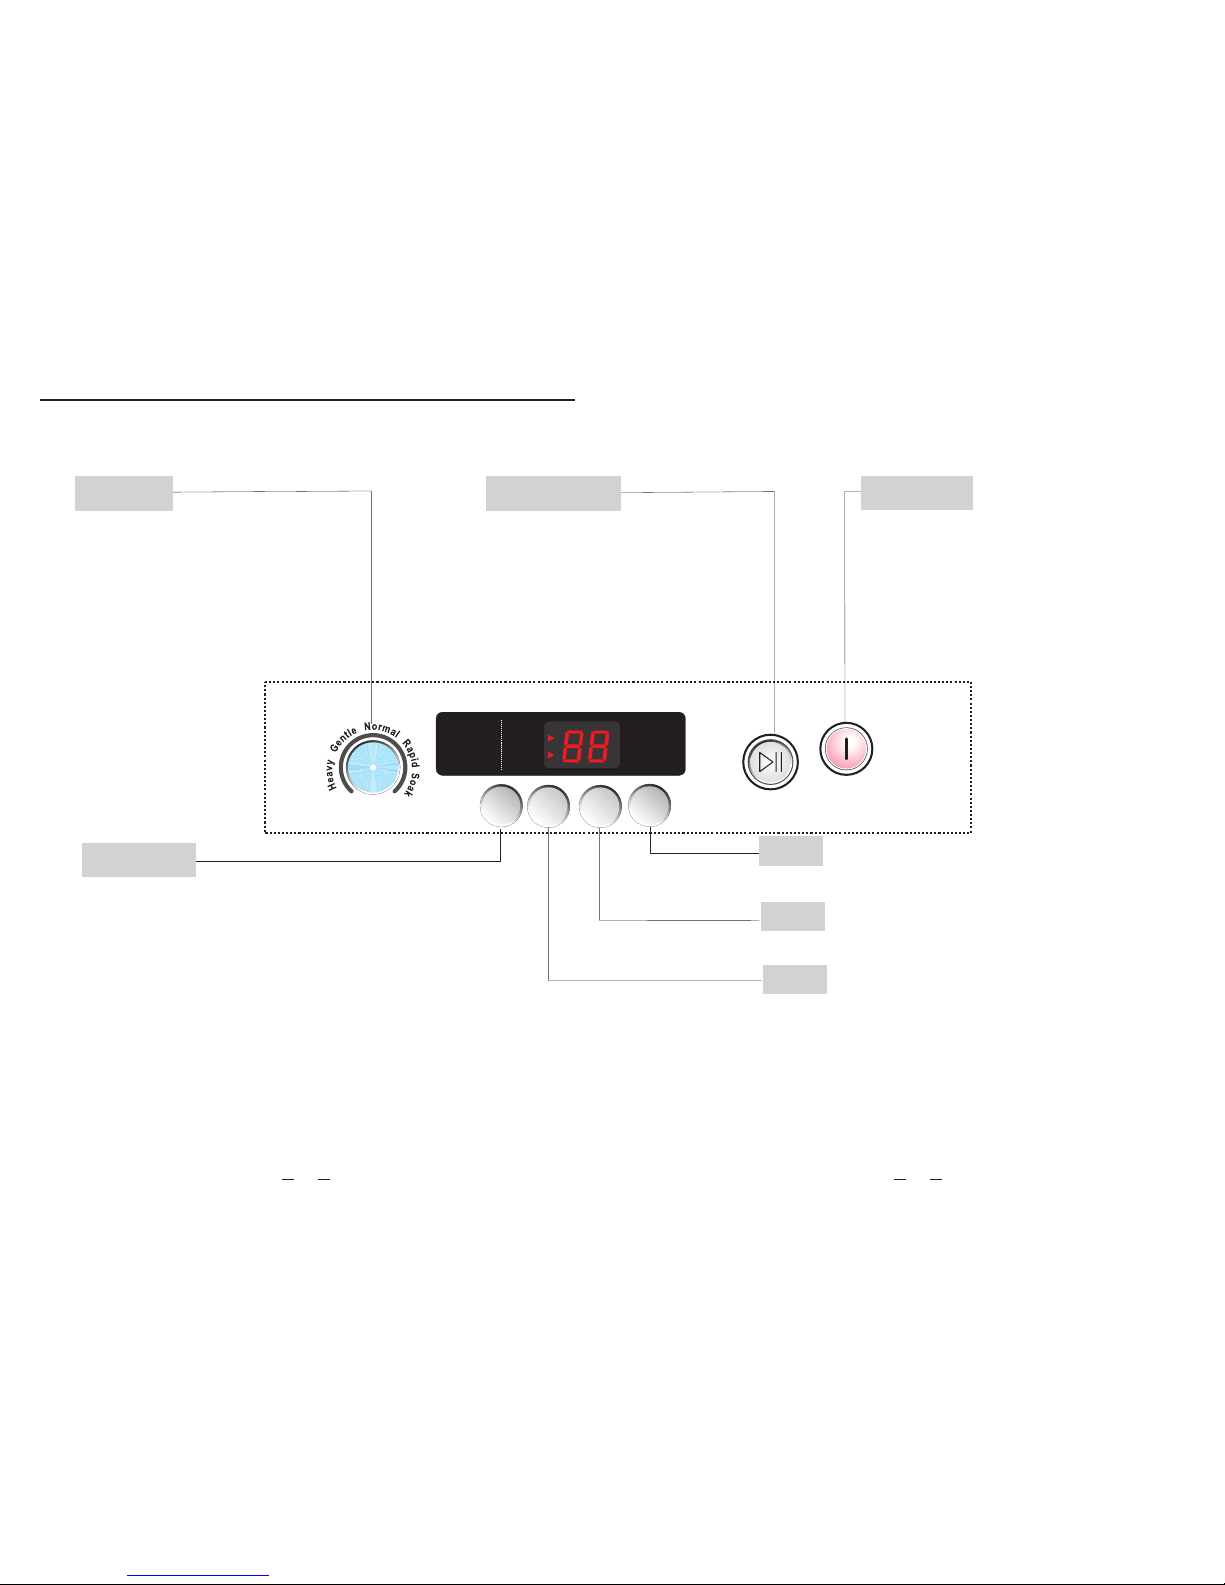
Instruction of the washer operation panel
*
If drawing is changed, no inform any more.
ON/OFF
After p rogram
selec tion,
press t he button
Press t he bu tto n to pause
in the co urs e of op eration,
press t he bu tto n again the
progr am co nti nues till th e
progr am is f ini shed.
to star t.
Progr am
P
ress th e b
ut
t
o
n to selec
t
corre
s
pond
ing pr
o
gram
.
Wash
Rin se
Spi n
Sta rt/Pa use
ON/ OFF
min /time s
Press “Load size” button,the user can set freely.load size
Press the button to select the times of rinse
Press the button to select the washing time
Press the button to select the time of spin
Start /Pa use
Pro gram
Load Size
Load Size
“Heav y”、 “ 、 、
、
Gentl e” “ Norma l”
“ Rapid ” “Soak”
pre set
Rema in
(min )
1--- -smal l
2--- -medium
3--- -larg e
LED display :“1”(small)、“2”(medium)、“3”(large)
Press the ON/OFF
button once to turn ON
the power to the washer.
press it again to turn the
power OFF
Spin
Rinse
Was h
 Loading...