

Page 1

尺寸:210*145MM
80克书纸
黑白印刷
Page 2
MODEL NO. RPJ119
MULTIMEDIA PROJECTOR
PLEASE READ BEFORE OPERATING THIS EQUIPMENT
This product is manufactured and sold by Curtis International Ltd.
RCA, the RCA logo, the two dogs (Nipper and Chipper) logo, are registered
trademarks or trademarks of RCA TrademarkManagement and are used
under license by Curtis International Ltd. Any other product, service,
company, trade or product name and logo referenced herein are neither
endorsed nor sponsored by RCA Trademark Management or its affiliates.
Page 3

Important Safety Instrucons
1. Read these Instrucons.
2. Keep these Instrucons.
3. Heed all Warnings.
4. Follow all instrucons.
5. Do not use this apparatus near water.
6. Clean only with a dry cloth.
7. Do not block any venlaon openings. Install in accordance with the
manufacturer’s instrucons.
8. Do not install near any heat sources such as radiators, heat registers, stoves, or
other apparatus (including amplifier) that product heat.
9. Protect the power cord from being walked on or pinched parcularly at plugs,
convenience receptacles, and the point where they exit from the apparatus.
10. Only use aachments/accessories specified by the manufacturer.
11. Unplug this apparatus during lightning storms or when unused for long periods
of me.
12. Refer all servicing to qualified service personnel. Servicing is required when the
apparatus has been damaged in any way, such as power-supply cord or plug is
damaged, liquid has been spilled or objects have fallen into the apparatus, the
apparatus has been exposed to rain or moisture, does not operate normally, or
has been dropped.
13. Use only with a cart, stand, tripod, bracket, or table specified by
the manufacturer or sold with the apparatus. When a cart is
used, use cauon when moving the cart/ apparatus combinaon
to avoid injury from p-over.
1
Page 4

Addional Warnings and Precauons
1. Do not look directly into the projector light.
2. Don’t touch the project lens
3. Mains adapter is used as disconnect device and it should remain readily
operable during intended use. In order to disconnect the apparatus from
the mains completely, the mains plug should be disconnected from the
mains socket outlet completely.
4. CAUTION: Use of controls or adjustments or performance of procedures
other than those specified may result in hazardous radiation exposure.
5. WARNING: Changes or modified to this unit not expressly approved by
the party responsible for compliance could void the user’s authority to
operate the equipment.
6. WARNING: Use of this unit near fluorescent lighting may cause
interference regarding use of the remote. If the unit is displaying erratic
behavior move away from any fluorescent lighting, as it may be the
cause.
7. WARNING: Shock hazard - Do Not Open.
8. Caution and marking information is located at the rear or bottom of the
apparatus.
9. WARNING: To reduce the risk of fire or electric shock, do not expose this
apparatus to rain, moisture, dripping, or splashing.
10. Objects filled with liquids, such as vases, shall not be placed on the
apparatus.
2
Page 5
FCC Warning
FCC ID: LCS180515064AE
This device complies with Part 15 of the FCC rules. Operation is subject to the
following two conditions: (1) this device may not cause harmful interference,
and (2) this device must accept any interference received, including
interference that may cause undesired operation.
NOTE: This equipment has been tested and found to comply with the limits for
a Class B digital device, pursuant to Part 15 of the FCC Rules. These limits are
designed to provide reasonable protection against harmful interference in a
residential installation. This equipment generates, uses, and can radiate radio
frequency energy and, if not installed and used in accordance with the
instructions, may cause harmful interference to radio communications.
However, there is no guarantee that interference will not occur in a particular
installation. If this equipment does cause harmful interference to radio or
television reception, which can be determined by turning the equipment off and
on, the user is encouraged to try to correct the interference by one or more of
the following measures:
• Reorient or relocate the receiving antenna.
• Increase the separation between the equipment and receiver.
• Connect the equipment into an outlet on a circuit different from
that to
which the receiver is connected.
• Consult the dealer or an experienced radio/TV technician for help.
In The Box
x
RECALL
FAV/
Remote
3
Main unit
Lens Cover User ManualAC Power Adapter
RPJ119
Page 6

Table of Contents
Important Safety Instructions - - - - - - - - - - - - - - - - - - - - - - - - - - - - P1
Additional Warnings and Precautions - - - - - - - - - - - - - - - - - - - - - - P2
FCC Warning - - - - - - - - - - - - - - - - - - - - - - - - - - - - - - - - - - - - - - - - - P3
In The Box - - - - - - - - - - - - - - - - - - - - - - - - - - - - - - - - - - - - - - - - - P3
Table of Contents - - - - - - - - - - - - - - - - - - - - - - - - - - - - - - - - - - - - P4
Remove & Close the Lens Cover - - -
Placing Your Projector - - - - - - - - - - - - - - - - - - - - - - - - - - - - - - - - P5
To Reduce Image Distortion - - - - - - - - - - - - - - - - - - - - - - - - - - - - P6
Distance Between The Projector And Screen - - - - - - - - - - - - - - - - P6
Placing Your Projector On Ceiling - - - - - - - - - - - - - - - - - - - - - - - - P6
Adjust the Vertical Location - - - - - - - - - - - - - - - - - - - - - - - - - - - - P7
Adjust the Focus and Keystone - - - - - - - - - - - - - - - - - - - - - - - P7
Controls of Remote - - - - - - - - - - - - - - - - - - - - - - - - - - - - - - - - - - - P8
Install / Remove Battery Of Remote - - - - - - - - - - - - - - - - - - - - - - - P8
Controls of Projector - - - - - - - - - - - - - - - - - - - - - - - - - - - - - - - - - P9
Install Power Adapter - - - - - - - - - - - - - - - - - - - - - - - - - - - - - - - - - P10
Main Operation - - - - - - - - - - - - - - - - - - - - - -- - - - - - - - - - - - - - - -
Connect HDMI show the Image On Projector Screen - - - - - - - - - P11
Connect AV Show The Image On Projector Screen - - - - - - - - - - - - P11
Connect VGA Show The Image On Projector Screen - - - - - - - - - - - P12
Connect Audio Output (Aux Out / Line Out / Earphones) - - - - - - - - P13
Install USB Device And Micro Sd Card “TF” - - - - - - - - - - - - - - - - - P13
Using TF Card and USB Playback - - - - - - - - - - - - - - - - - - - - - - - - P14
Using Projector Menu 1.0 - - - - - - - - - - - - - - - - - - - - - - - - - - - - - - - P15
Using Projector Menu 2.0 - - - - - - - - - - - - - - - - - - - - - - - - - - - - - - - P16
Using Projector Menu 3.0 -
Using Projector Menu 4.0 - - - - - - - - - - - - - - - - - - - - - - - - - - - - - - - P18
Using Projector Menu 5.0 - - - - - - - - - - - - - - - - - - - - - - - - - - - - - - - P18
Specifications - - - - - - - - - - - - - - - - - - - - - - - - - - - - - - - - - - - - - - - - P19
Troubleshooting - - - - - - - - - - - - - - - - - - - - - - - - - - - - - - - - - - - - - - P20
- - - - - - - - - - - - - - - - - - - - - - - - - - - - - - P17
- - - - - - - - - - - - - - - - - - - - - - P5
- - P10
4
Page 7
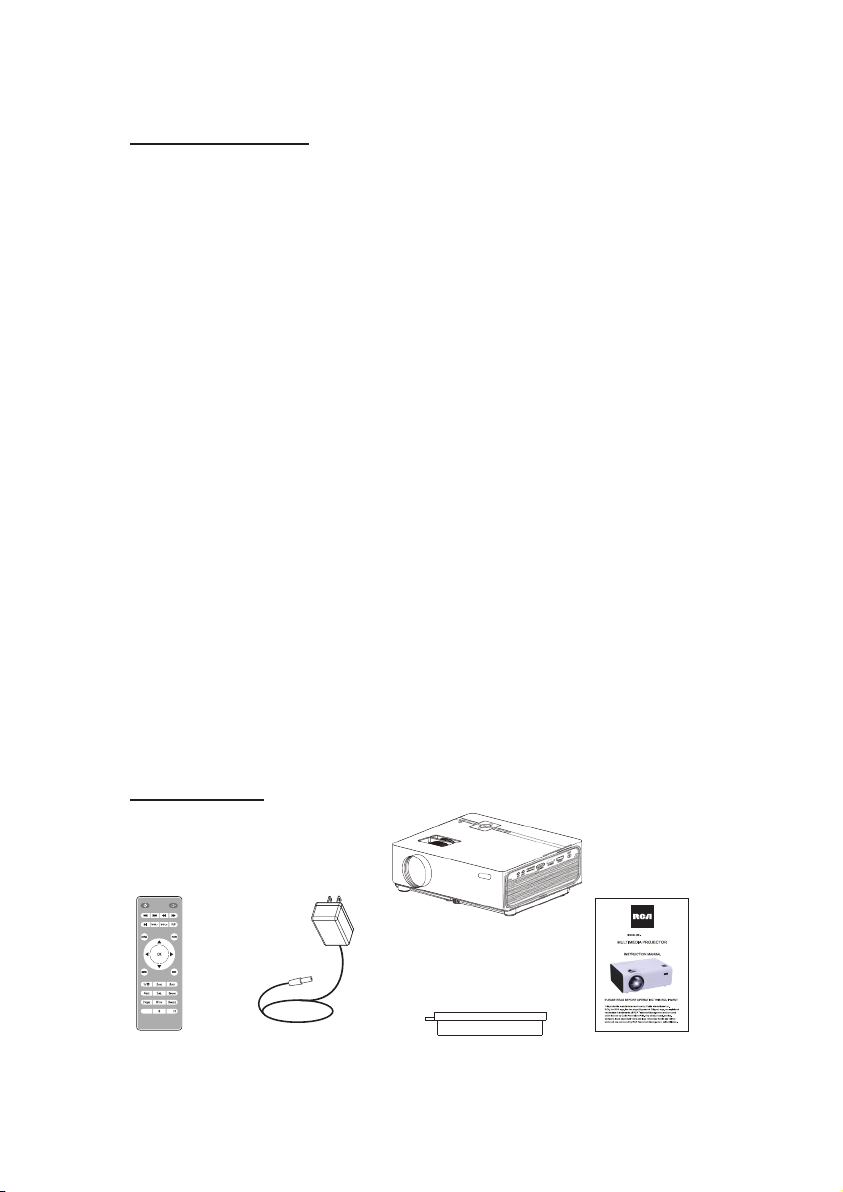
Remove & Close The Lens Cover
Remove the lens cover before using
REMOVE
LENS COVER
Close the lens cover when unit not using
LENS COVER
CLOSE
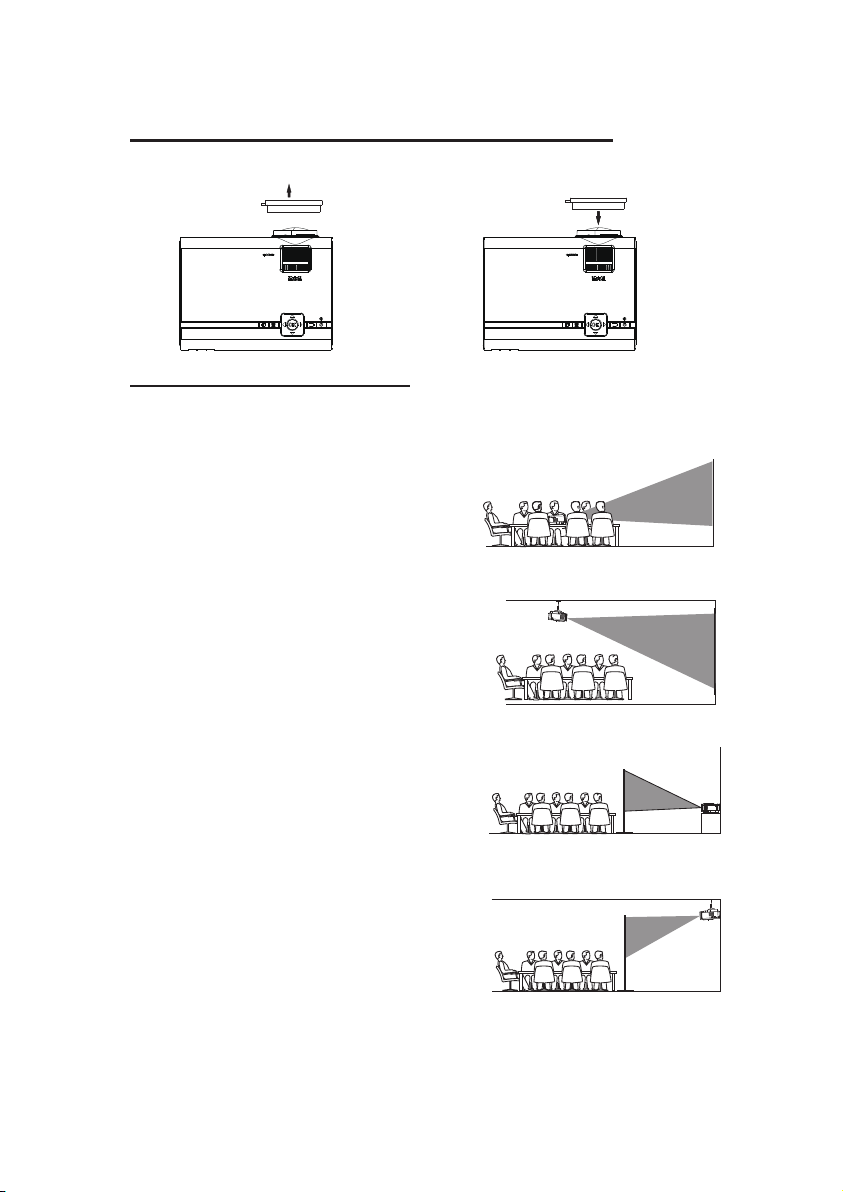
Placing Your Projector
Your projector can be installed in four different configurations ( see picture
below):
Front Table:
Select this location with the projector placed
near the floor in front of the screen. This is the
most common way to position the projector
for quick setup and portability.
Front Ceiling:
Select this location with the projector
suspended upside-down from the ceiling in
front of the screen.
NOTE: A projector mount is required to install
the projector in a ceiling.
FRONT TABLE
FRONT CEILING
Rear Table:
Select this location with the projector placed
near the floor behind the screen.
NOTE: That a special rear projection screen
is required.
Rear Ceiling:
Select this location with the projector
suspended upside-down from the ceiling
behind the screen.
NOTE:
A projector mount is required to install the
projector in a ceiling.
A special rear projection screen is required.
5
REAR TABLE
REAR CEILING
Page 8

Square /Rectangle
It is recommended to move the projector as close to
center of screen.
Distance Between The Projector And Screen
Measure the distance between the projector and where you want to
position the screen. This is the projection distance.
72
THE CENTER OF LENS
"
60
"
50
"
45
"
37
"
SCREEN
Placing Your Projector On Ceiling
When installing the projector in the ceiling, please purchase a projector mount
recommended by an installation professional and follow the instructions that
come with the mount.
Before installing the projector in the ceiling, please check to make sure the
ceiling structure can support the weight of the projector and the mount. If in
doubt, please ask the advice from an installation professorial.
NOTE: Projector mount and screw(s) not included
CEILING
FIXED HANGER HOLE
HANGER
6
Page 9

Follow below picture to adjust the vertical location.
SCREEN
VERTICA L
DIMENSIO N
PROJECT OR
SCREEN
VERTICA L
DIMENSIO N
SCREEN
VERTICA L
DIMENSIO N
Adjust this knob ( ANGLE ADJ. knob)
to fine- tune the display angle to higher.
Adjust The Focus And Keystone
Follow below picture to adjust the focus and trapezoidal screen.
FOC US ADJ. KNOB
Adjust the focus by turning the knob while
observing the image pixels near the center of the
screen. Optimal focus is obtained when the
pixels are clearly visible. Depending on the
projected screen size, the focus near the screen
edges may be less sharp than the screen center.
Then sh arpen the i mage
by rotat ing focus k nob.
PROJECT OR
PROJECT OR
Keystone image is created when the projector
beam is projected to the screen in an angle.
Keystone correction will restore the distorted
image to a rectangular or square shape.
7
TRAPEZOIDAL ADJ. KNO B
Page 10

Controls Of Remote
M
S
FLIP
SEARCH
MUTE
IR
SKIP
PLAY /PAUSE
ZOOM
NETVIGATOR
MENU
SOURCE
VOLUME
EXIT
Install / Remove Baery Of Remote
AAA / UM4
AAA / UM4
OPTIONAL
T
EN
TM
Y
R
ATT E
B
COMPAR
BATTERY DOOR
Remove the battery compartment cover on the back of your remote by
carefully sliding to open. The battery cover can then be lifted away. Fit the
correct batteries (not included), referring to the polarity markings. Finally,
replace the cover.
NOTES:
• Batteries shall not be exposed to excessive heat such as sunshine, fire
• Be sure that the batteries are installed polarity correctly.
• Do not mix old and new batteries.
• Only same or equivalent type batteries as recommend are to be used.
• Do not dispose of batteries in fire, battery may explode or leak. Do not try
to recharge a battery
8
Page 11

17
Controls Of Projector
1 3 4 5
2
6
7
8
16
910 1211
13 14 15
18
VGA
IR
19 20
2.
3.
4.
5.
TRAPEZOIDAL ADJ. Knob
6.
FOCUS ADJ. Knob
LENS
EAR PHONE Jack
AV OUT Jack
11.
HDMI Port 1
12.
HDMI Port 2
OK
13.
USB Port
14.
DC IN jack
15.
VGA Port
16.
POWER on Indicator
17.
IR Window ( Rear Side)
18.
19.
IR Window ( Front Side)
20.
ANGEL ADJ. Knob
9
Micro SD Card
Page 12

Install Power Adapter
Follow below picture to connect power adapter
Connect small end of adapter FIRST. Plug the adapter body to power outlet.
- Press the button to turn on unit, press again to turn off.
/ SOURCE - Press the button to select input source.
/ MENU - Press the button to enter projector menu.
OK
- Press the buttons to select screen item of projector menu.
/ EXIT - Press the button to exit the projector menu.
- Press the buttons to fast search forward and rewind on USB / TF.
- Press the buttons to search next or previous file on USB / TF.
VOL+ / VOL - Press the buttons to select correct sound.
- Press the button to play/pause the connect USB / TF card.
FLIP – Press the button to rotate / mirror projector screen
ZOOM - Press the button to select image scale.
- Press to muting the audio sound of your projector.Press again to resume.
10
Page 13

Connect HDMI Show The Image On Projector Screen
Follow below picture to connect HDMI cable and device.
1. Turn off the unit before connect HDMI cable.
light GREEN
3. Press the / SOURCE
device will show on projector screen. There are 2 HDMI input, HDMI1 interface
corresponds to HDMI 1 in SOURCE mode , and HDMI2 interface corresponds to
HDMI 2 in SOURCE mode.
4. Press the button to turn off unit power.
HDMI hd signal input : this interface can be input with HD player
HDM I CABLE
CAB LE NOT IN CLUDE
In rare cases, if the projector’s speaker has
no sound when playing a DVD movie in a
player connecting to the HDMI input, please
check the player’s digital audio settings and
make sure it is set to “Auto” mode or “PCM”
mode.
Connect AV Show The Image On Projector Screen
Follow below picture to connect AV cable and device.
1. Turn off the unit before connect AV cable.
2. Use AV cable to connect follow below figure
3. After connect, press the button to turn on unit and power indicator will
light GREEN
4. Press the / SOURCE button to AV mode and the video of AV device
will show on projector screen
5. Press the button to turn off unit power.
CAB LE NOT IN CLUDE
VID EO CABL E
VID EO PLAYER
LEF T CHANN EL
RIG HT CHAN NEL
VID EO CABL E : YEL LOW
AUD IO LEFT C HANNE L : WHI TE
AUD IO RIGH T CHANN EL : RE D
11
Page 14

Connect VGA Show The Image On Projector Screen
Follow below picture to connect HDMI cable and device.
1. Turn off the unit before connect VGA cable.
2. Press the button to turn off power of your projector before connection.
light GREEN
4. Press the / SOURCE
will show on projector screen.
5. Press the button to turn off unit power.
IRVGA
To VGA PORT
C OMPUTER CABLE
CABLE NO T INCLUDE
NOTE BO OK
Please refer to the following table to adjust the output signal from computer
OR
C OMPUTER CABLE
DECK TO P
PC
VGA 640x480
SVGA 800x600
XGA 1024x768
31.5 60
34.7 70
37.9 72
37.5 75
31.4 50
35.1 56
37.9 60
46.6 70
48.1 72
46.9 75
40.3 50
48.4 60
56.5 70
12
Page 15

Connect Audio Output ( Aux Out / Line Out / Earphones)
Follow below picture to connect audio cable and device.
1. Press the button to turn off power of your projector before connection.
2. Use audio cable to connect follow below figure.
3. After connect and turn on both units. Your projector sound from external
device now.
4. After using , turn off both unit
Station Amplifier
CABLE N OT INCLUDE
Audio cable
Install USB Device And Micro Sd Card “TF”
Follow below picture to install USB and TF card
Turn off the unit before install USB / TF card.
13
MICRO SD
Page 16

Using TF Card And USB Playback (Media Player)
Install USB / TF device:
1. Turn off the unit before install USB / TF card.
2. Install the USB device into USB port.
GREEN.
4. Press the / SOURCE
search the MEDIAPLAYER mode.
OK
OK
remote to start playback.
OK
the button to
8. Press
NOTE FIRST.
Sub-Menu on Photo screen
1. When photo playback, press the
screen show on lower (figure 1).
2. Use the button to select
icon and press
Pause
Rotate
Prev.
Rotate
Next
+
Zo...
Figure 1.
Stop
Re...
-
Zo...
PL...
M...
Sub-Menu on Music screen
3. When music playback, press the
screen show on lower (figure 2 ).
4. Use the button to select
icon and press
Pau se
MUT E
FB
PL...
FF
Info
i
Figure 2
Next
Pre v.
Go...
Sto p
Sub-Menu on Movie screen
5. When movie playback, press the
screen show on lower (figure 3).
6. Use the button to select
Pau se
AB
Set A
FB
PL...
FF
i
Info
Figure 3
Pre v.
Next
St. ..
Sl...
Sto p
Go...
icon and press
AS...
Re...
Info
Re...
i
AB
Set A
14
Page 17

Using Projector Menu 1.0
Press button to enter projector menu. Press again to previous status.
Picture M ode Standard
Contrast 5 0
Brithness 5 0
Color 50
Sharpness 5 0
Color Tem perature Medium
Aspect Ra tio Auto
Noise Reducti on Mi ddle
Screen
USE
TO SE LECT
Picture Mode Standard
USE
TO SE LECT
PRE SS OK
Use to select different picture effect to
Soft / Standard / Vivid / User. Use or
Sharpness digit If chose User item.
Use to select different color temperature
Color Temper...
USE
TO SE LECT
Aspect Rati o
USE
TO SE LECT
Noise Red uction
USE
TO SE LECT
Screen
PRE SS OK
PRE SS OK
PRE SSOK
PRE SS OK
to Cool / Medium / Warm
Use buttons to select screen ratio 4:3 or
16:9. Follow below figure.
Use buttons to select Off / Low / Middle /
High / Default.
Optional
OK
Use buttons to select manual page.
This manual showed on right upper of view
screen.
to select Contrast / Brightness / Color /
. Follow below figure.
Color temper… (temperature)
Customer define Parameter
red 0-100
blue 0-100
green 0-100
Aspect Ratio
4:3 The signal in a 4:3 aspect ratio projection image
16:9 The signal in a 16:9 aspect ratio projection image
15
Page 18

Using Projector Menu 2.0
Press button to enter projector menu. Press again to previous status.
Sound Mode Standard
Treble 50
Bass 50
Balance 0
Auto Volume Off
Surround Sound Off
USE
TO SELEC T
Sound Mode Standard
USE
TO SELEC T
PRESS OK
OK
Use buttons to select manual page.
This manual showed on right upper of view
screen.
Use to select different sound effect
Standard / Movie / Music / Sports / User. If select
User, follow below figure to set digit.
Balance 0
USE
TO SELEC T
Auto Volume Off
USE
TO SELEC T
PRESS OK
PRESS OK
Use to select Balance level to 0-50.
To select Off / On.
Use to select different sound effect to Off /
Surround Sound Off
PRESS OK
Surround.
Sound Mode - User Parameter
001-0 elberT
001-0 ssaB
16
Page 19

Using Projector Menu 3.0
Press button to enter projector menu. Press again to previous status.
OSD Lang uage En glish
Res tore Facto ry Defau lt
Pan el Ro tate 0
Inf o
USE
TO SEL ECT
OSD L angua ge
USE
TO SEL ECT
Res tore Fa ctory D efaul t
USE
TO SEL ECT
Panel Flip Rota te 0
USE
TO SEL ECT
PRES S OK
PRES S OK
PRE SS OK
Use
language. Follow below figure.
Use buttons to select Y or N. If choose “Y”
that your unit will go to factory default setting.
Use to select rotate 0 / rotate 1 / rotate 2 /
rotate 3 to set screen angle.
OK
Use buttons to select manual page.
This manual showed on right upper of viewing
screen.
OK
button to select different
INFO
PRE SS OK
Model: FDX-A01
SN:RPJ119
RCA
SW Ver: V7.0
LOGO: RCA
FL040CT_30
English Hrvatski Nederlands Chinese
Franais Deutech Slovenina Slovak
Espanol Italiano Norsk
Portugues Magyar Srpski
Esky Polski Svenska
Dansk Romnete Suomi
17
Page 20

Using Projector Menu 4.0
Press button to enter projector menu. Press again to previous status.
Clock - - - -
Off Timer Off
On Ti mer Off
Sleep Timer Of f
Auto Sleep Nev er
USE
TO SELECT
Clock - - - -
USE
TO SELECT
Off Timer Off
USE
TO SELECT
On Ti mer Off
USE
TO SELECT
Sleep Timer Of f
USE
TO SELECT
Auto Sleep Nev er
PRESS O K
PRESS O K
PRESS O K
PRESS O K
PRESS O K
OK
Use buttons to select manual page.
This manual showed on right upper of viewing
screen.
Use / to select clock to Day /
Month / Year / Hour / Minutes.
Use / to select timer turn off to Day
/ Hour / Minutes.
Use / to select timer turn on to Day
/ Hour / Minutes.
To select sleep timer turn to Off / 10min / 20min /
30min / 60min / 90min /120min /180min / 240min.
To select auto sleep function to turn Never / 4 hour
/ 6 Hour / 8 hour.
18
Page 21

Specifications
Light Source Type
Brightness Output
Display Native Resolution
HDMI Input Supported
Video Resolution.
Power Consumption
Power Input
Connect Included Adapter
Included Adapter
Connect DC input of unit
Display Color
Projection Size 30-100 inch
Signal Port
USB Port Support USB device up to 32GB
SD Card Support SD card up to 32GB
16.7K
Video / VGA / HDMI
LED
2000 lumens
800 x 480
1080p , 1080i , 720p, 576i , 480p, and 480i
Operating 36W; Standby 0.8W
DC 12V , 3.5A
Input AC100-240V,50/60Hz
Output DC12V , 3.5 A
Su
pport format mpeg1, Mpeg2 ,mpeg4, mp3 , Jpeg
Support format mpeg1, Mpeg2 ,mpeg4, mp3 , Jpeg
Weight 0.9 KG
Dimension 203 x 150 x 82 mm
19
Page 22

TROUBLESHOOTING
Before resorting the maintenance service, please kindly check by yourself with
the following chart.
1.Power light is on. If it is not on, check the
projector is plugged into the mains, that the
socket is switched on, and then press the power
button on the projector.
No Image is Projected or
a "No Signal" message is
displayed
The Lamp (Bulb) switches
off after a period of time
The Image is wider at
the top/bottom of the
screen
Spots on the screen
The image brightness
has faded
2.Check the lens cover has been removed.
3.Check the cables are securely attached and
installed as per the User Manual.
4.The image source may not be set correctly.
Press the Source button on the Control Panel or
the Remote, to select the correct setting.
5.Check in the Menu section under Video input
signal to make sure that has been set correctly.
Is the warning light indicator red? If so, the
projector is overheating which turns the light
off automatically.
1.Leave the projector to cool for a few moments.
2.Once cooled, check nothing is blocking the
ventilation vents.
3.Check the air filter is clean and clean if
necessary.
4.Turn on the projector.
If the issue persists please contact your support
provider for further assistance.
This is called keystone and is due to the projection
angle not being perpendicular to the screen. To
correct use the projectors inbuilt keystone function
to adjust the image.
Using a vacuum cleaner to clean the lens. If
cleaning doesn’t resolve things, please contact
your support provider for further assistance.
This could possible be caused by the ambient
light in the room. If not ,the chances are that you
need to replace the lamp (bulb).
20
Page 23

 Loading...