

Page 1
USER‘S
GUIDE
RP-9380
AUDIO SYSTEM
Page 2
FCC Information
This device complies with Part 15 of the FCC Rules. Operation is subject to the following two conditions: (1) This
device may not cause harmful interference, and (2) this device must accept any interference received, including
interference that may cause undesired operation.
In accordance with FCC requirements, changes or modifications not expressly approved by Thomson Consumer
Electronics could void the user’s authority to operate this product.
This product complies with DHHS Rules 21 CFR Subchapter J. Applicable at the date of manufacture.
This device generates and uses radio frequency (RF) energy, and if not installed and used properly, this equipment
may cause interference to radio and television reception.
This equipment has been type tested and found to comply with the limits for a Class B Computing Device in
accordance with the specifications of FCC Rules. These rules are designed to provide reasonable protection against
radio and television interference in a residential installation. However, there is no guarantee that interference will
not occur in a particular installation.
If this equipment does cause interference to radio or television reception (which you can determine by turning the
equipment off and on), try to correct the interference by one or more of the following measures:
• Reorient the receiving antenna (that is, the antenna for the radio or television that is “receiving” the
interference).
• Change the position of the unit with respect to the radio or television equipment that is receiving interference.
• Move the unit away from the equipment that is receiving interference.
• Plug the unit into a different wall outlet so that the unit and the equipment receiving interference are on
different branch circuits.
If these measures do not eliminate the interference, please consult your dealer or an experienced radio/television
technician for additional suggestions. Also, the Federal Communications Commission has prepared a helpful booklet,
“How To Identify and Resolve Radio TV Interference Problems.” This booklet is available from the U.S. Government
Printing Office, Washington, DC 20402. Please specify stock number 004-000-00345-4 when ordering copies.
Safety Precautions
• Never open the cabinet under any circumstances. Any repairs or internal adjustments should be made only by a
trained technician.
• Warning: Never operate this product with the cabinet removed.
• Do not touch the player with wet hands. If any liquid enters the player cabinet, take the player to a trained
technician for inspection.
• This compact disc player uses a laser to read the music on the disc. The laser mechanism corresponds to the
cartridge and stylus of a record player. Although this product incorporates a laser pick-up lens, it is completely
safe when operated according to directions.
• Discs rotate at high speed inside the player. Do not use damaged, warped, or cracked discs.
For Your Safety
The AC power plug is polarized (one blade is wider than the other) and only fits into AC power outlets
one way. If the plug won’t go into the outlet completely, turn the plug over and try to insert it the other
way. If it still won’t fit, contact a qualified electrician to change the outlet, or use a different one. Do not attempt
to bypass this safety feature.
Service Information
This product should be serviced only by those specially trained in appropriate servicing techniques. For instructions
on how to obtain service, refer to the warranty included in this Guide.
For Your Records
According to some state laws, and in the event that service should be required, you may need both the model
number and the serial number. In the space below, record the date and place of purchase, and the serial number:
Model No. RP-9380
CAUTION
Remote Control No. CRK67A
Date of Purchase ________________
Place of Purchase _______________
Serial No. _______________________
WARNING:
OR ELECTRICAL SHOCK HAZARD,
DO NOT EXPOSE THIS PRODUCT
TO RAIN OR MOISTURE.
TO PREVENT FIRE
THE LIGHTNING
FLASH AND ARROWHEAD WITHIN THE
TRIANGLE IS A
WARNING SIGN
ALERTING YOU OF
"DANGEROUS
VOLTAGE" INSIDE
THE PRODUCT.
RISK OF ELECTRIC SHOCK
DO NOT OPEN
CAUTION: TO REDUCE THE
RISK OF ELECTRIC SHOCK,
DO NOT REMOVE COVER
(OR BACK). NO USERSERVICEABLE PARTS INSIDE. REFER SERVICING
TO QUALIFIED SERVICE
PERSONNEL.
SEE MARKING ON BOTTOM / BACK OF PRODUCT
THE EXCLAMATION
POINT WITHIN THE
TRIANGLE IS A
WARNING SIGN
ALERTING YOU OF
IMPORTANT
INSTRUCTIONS
ACCOMPANYING
THE PRODUCT.
Page 3

Table of Contents
FIRST THINGS FIRST ...................................................... 2
Unpack the System ............................................................................ 2
Check for Moisture .......................................................................... 2
Choose a Location ............................................................................ 2
SETTING UP THE SYSTEM ............................................. 3
Connecting, placing and balancing the speakers ........ 3
connecting the antennas .......................................................... 5
connecting auxiliary components ....................................... 6
connecting for power ................................................................... 6
using headphones ............................................................................. 6
tuner controls and operations ...................... 7
General Controls .............................................................................. 7
Display Messages ................................................................................. 9
Choosing a Radio Station ............................................................ 9
Programming PRESETS ...................................................................... 10
cd controls and operations .............................. 11
General Controls .............................................................................. 11
Display Messages ................................................................................. 12
LOADING DISCS ........................................................................................ 13
Playing Discs ......................................................................................... 13
Skipping Discs ........................................................................................ 13
cassette deck controls and operations ....... 14
General Controls .............................................................................. 14
Playing CASSETTE Tapes ..................................................................... 14
Recording FROM THE RADIO ........................................................... 15
RECORDING FROM THE CD PLAYER ................................................... 15
RECORDING FROM TAPE TO Tape ...................................................... 15
recording from the TV, VCR or video..................................... 16
USING THE universal REMOTE control............. 17
Battery Installation ....................................................................... 17
General Controls .............................................................................. 17
programming the universal remote .................................... 21
troubleshooting tips ............................................ 23
Appendix a: universal remote TV codes......... 24
appendix b: universal remote VCR codes ....... 25
appendix c: universal remote cable codes ... 26
care and maintenance ......................................... 27
INDEX .............................................................................. 29
limited warranty .................................................... 30
Page 4
FIRST THINGS FIRST
SIMULTANEOUS PLAY AND LOADING SYSTEM
SEARCH
PROGRAMREPEAT
STAND BY TUNING
PRESETS
BAND
PLAY / REC
TAPE
PLAY BACK
TAPE
FM MODE
CENTER LEVEL TEST TONE
CD
CUSTOM REMOTE SENSOR
ROCK
CLASSIC
POP
PRO LOGIC
3 STEREO VOLUME
HALL
SIMULATED
BYPASS
NORMAL
PHANTOM
WIDE
TUNER TAPE TV VCR 1 VIDEO
EQ MODE REAR LEVEL BALANCE BASS TREBLE
UP
DOWN
UP
DOWN
SURROUND MODE
CENTER MODE
PAUSESTOPPLAYDUBPAUSESTOPWIND
WINDPLAYRECORD HIGH SPEED DUB
MEMORY
PHONES
PUSH OPEN
PUSH OPEN
MIC
POWER
RANDOM
PAUSE STOP
PLAYDISC SKIP TRACK
OPEN/CLOSE
UNPACK THE SYSTEM
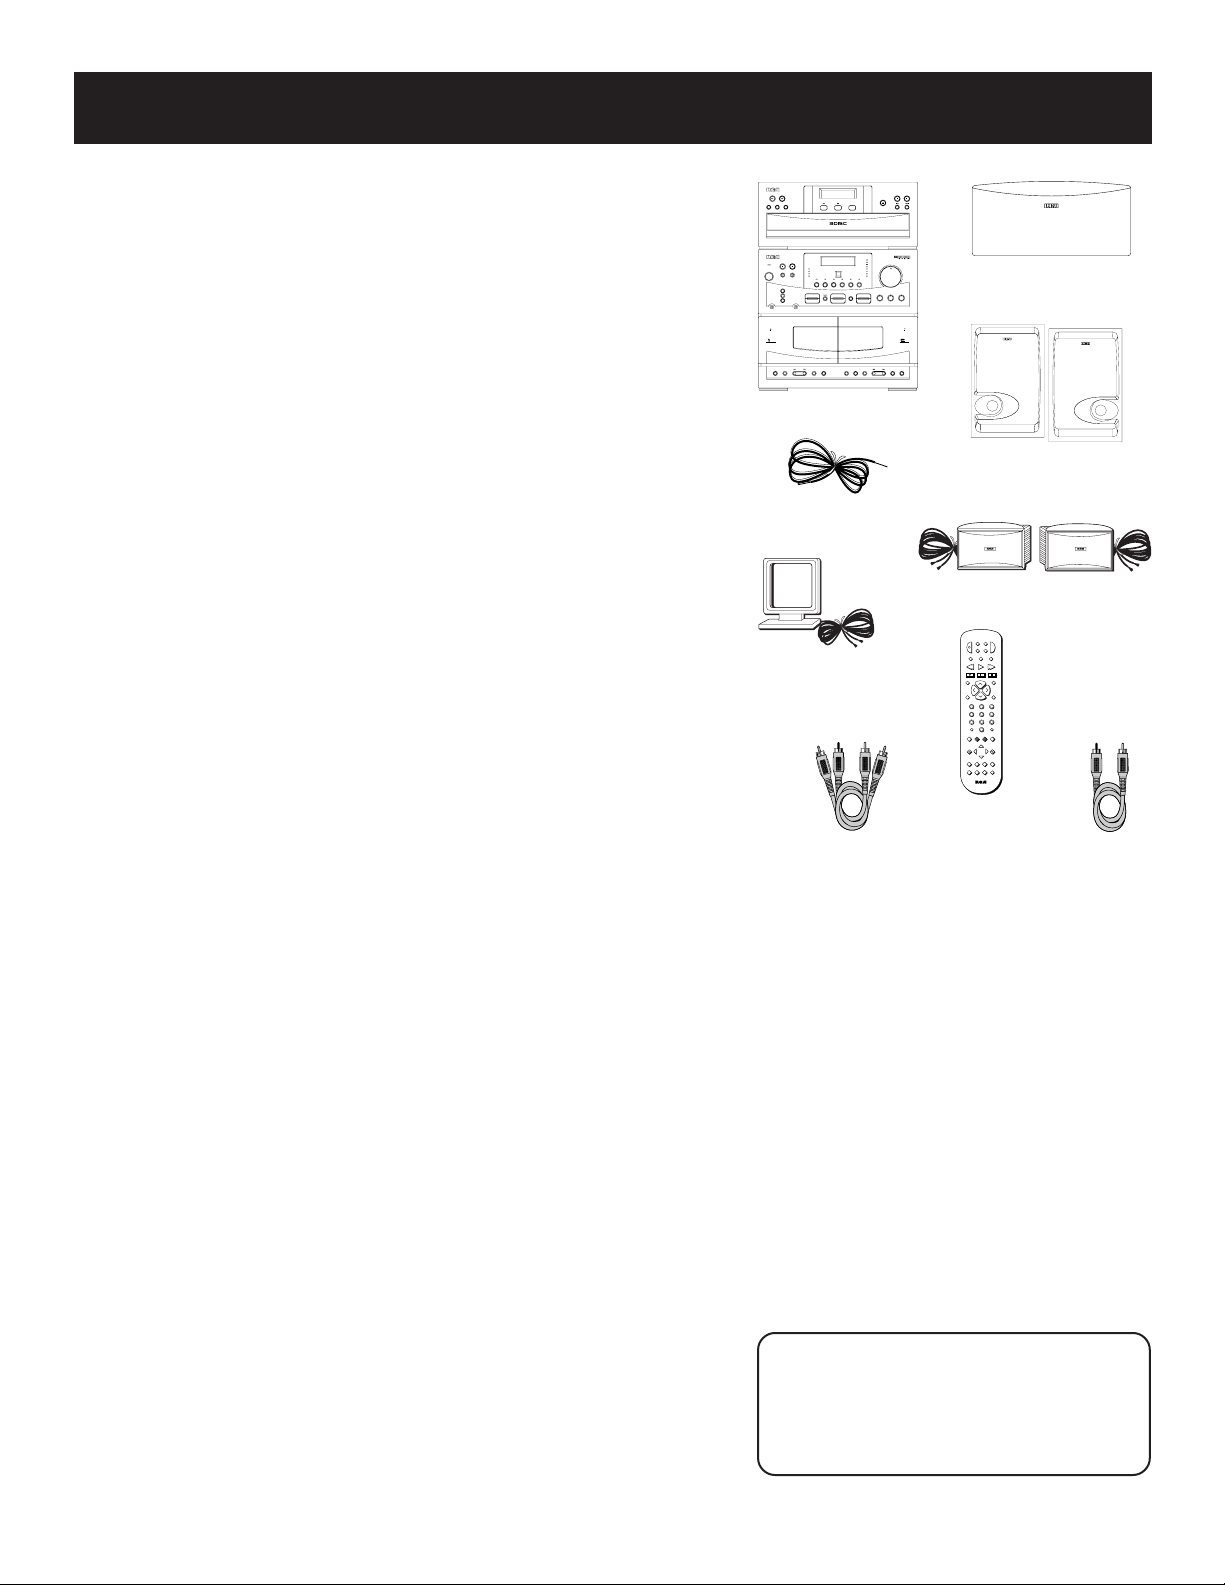
Unpack the system and locate all the accessories. You
should have:
• the central unit, consisting of a three disc CD player, receiver
and dual cassette decks;
• five speakers:
two main, with approximately 4 ft. of wire;
two surround, with approximately 20 ft. or wire;
one center, with approximately 5 ft. of wire;
• the RCA Universal remote control (CRK67A);
• an FM wire antenna;
• an AM loop antenna;
• one video cable (single wire) with RCA connector;
• one audio cable (two wires) with RCA connector;
• and Important Safeguards literature.
CHECK FOR MOISTURE
Just as moisture can form on the inside of windows on a cold day, it
can also form on the inside of your system, causing it to
malfunction.
If moisture has formed inside your system, simply disconnect it from
all power sources and let it stand for approximately 30 minutes.
central unit
FM antenna
AM antenna
Audio cable
center speaker
main speakers
surround speakers
D
S
S
1
R
C
C
A
V
B
L
E
R
•
E
T
V
W
O
P
CD
VCR
2
LD
•
FM TAPE AUX
AM
•
PLAYREW FF
REC PAUSE
STOP
A
SKIP
N
H
RDM
GUIDE
C
•
V
L
O
O
L
V
DISC
MUTE PREV CH
C
H
N
A
•
remote
1
2
3
4
5
6
7
8
9
INPUT•SEEK
ANTENNA
0
RESET•REPDISPLAY
CLEAR
DELAY
CH CTRL
TV MENUMENU
MOVE
PROGRAM
PIP SWAP PIP
–
+
CTR MODE
CTR
•
REAR
S
D
U
R
N
R
U
O
BY-PASS SWAP
LEVEL
AUDIO
u
l
a
n
s
i
r
v
e
Video cable
Choose a Locale
The following guidelines should be helpful in setting up your new
audio system:
• Choose level, solid surfaces for all components of
your system. Do not place on surfaces such as carpet or foam
rubber.
• Choose a location away from direct sunlight, air ducts, radiators
and other sources of heat.
• Avoid locations subject to moisture, mechanical
vibrations, shock or excessive heat.
• Choose a location with adequate air circulation. Good
ventilation is essential to protect the system from internal heat
build up.
2
Be a Pack Rat
It is a good idea to keep the box and all
of the packing materials your system
came with in case you need to store,
move or ship the unit at a later date.
Page 5
Setting up the system
Connecting, Placing and balancing The speakers
Connecting the wires
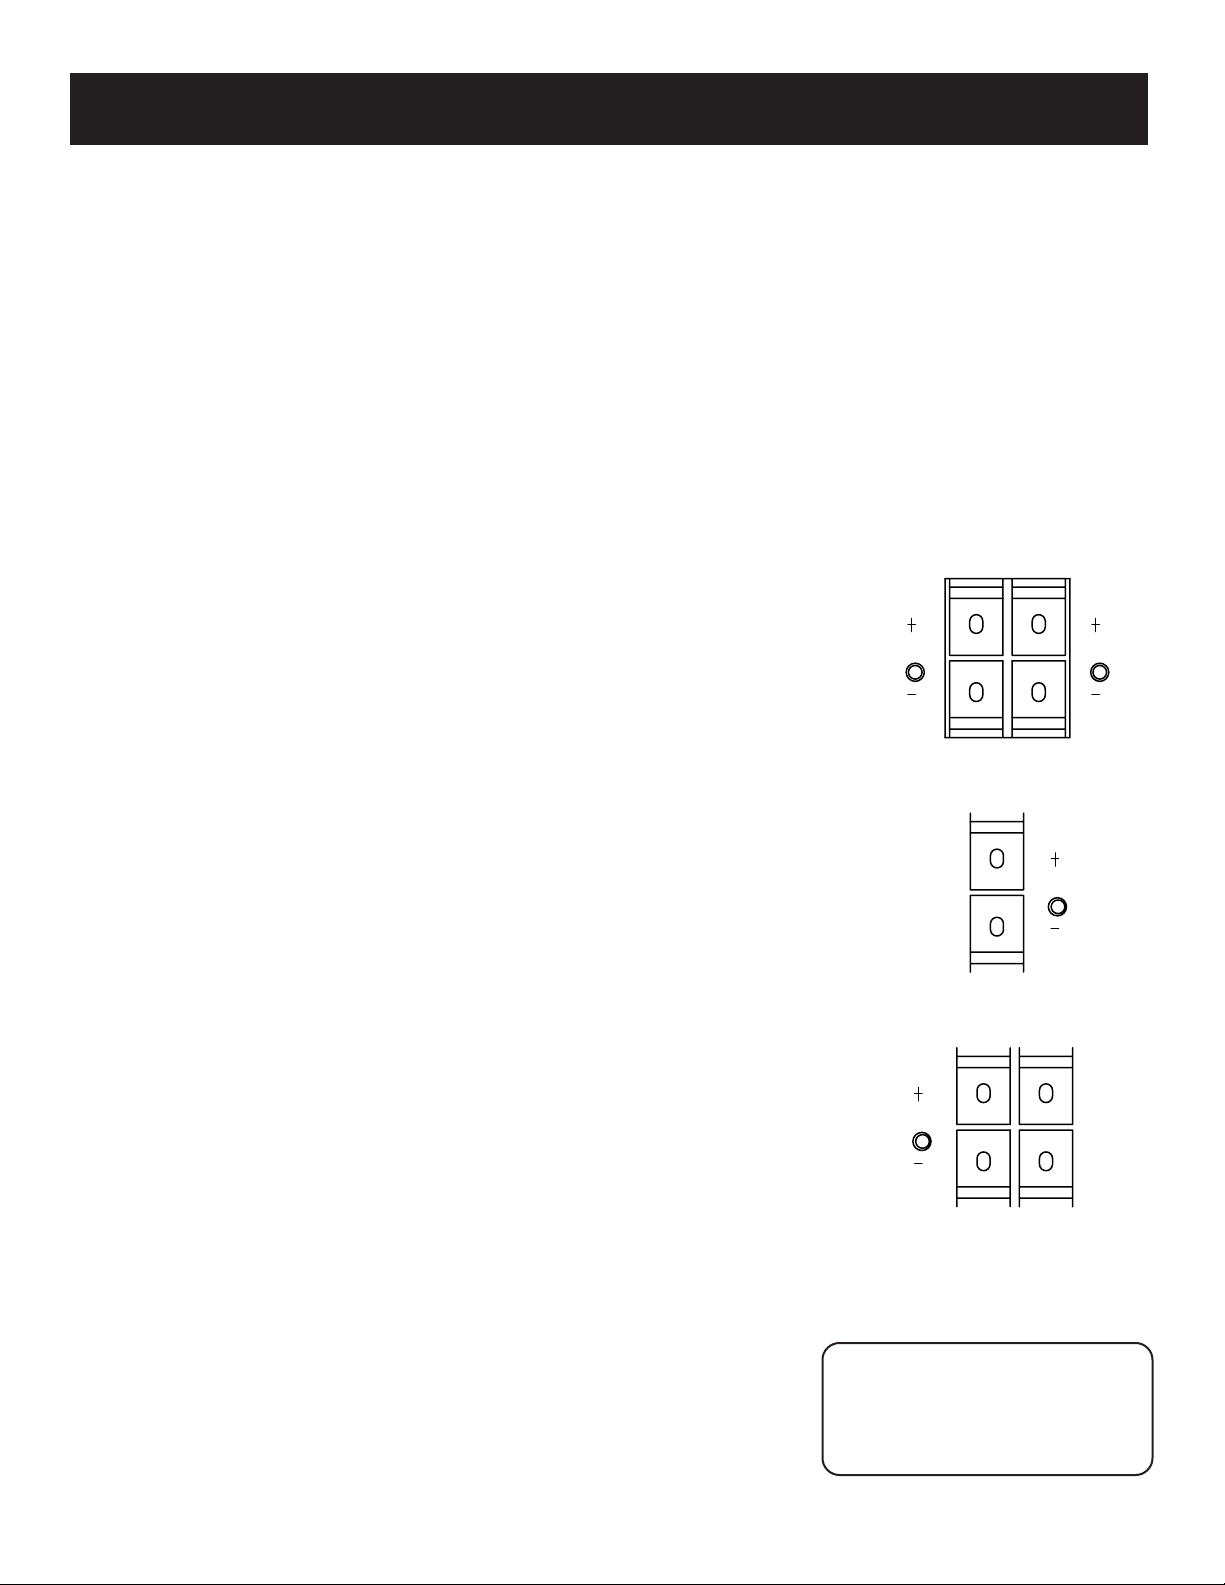
Each speaker - the two main, two surround and one central - has a designated
set of terminals on the back panel of the central unit.
Uncoil the speaker wires and locate the bare ends. Press down on the tab to
open the red terminal and insert the red (+) wire. Snap the tab closed. Now
press down on the black terminal tab and insert the black (-) wire. Snap the
tab closed.
WARNING: Be sure to follow these instructions carefully. The system
can be damaged if speakers are improperly connected.
SETTING UP FOR SURROUND SOUND
THE main SPEAKERS
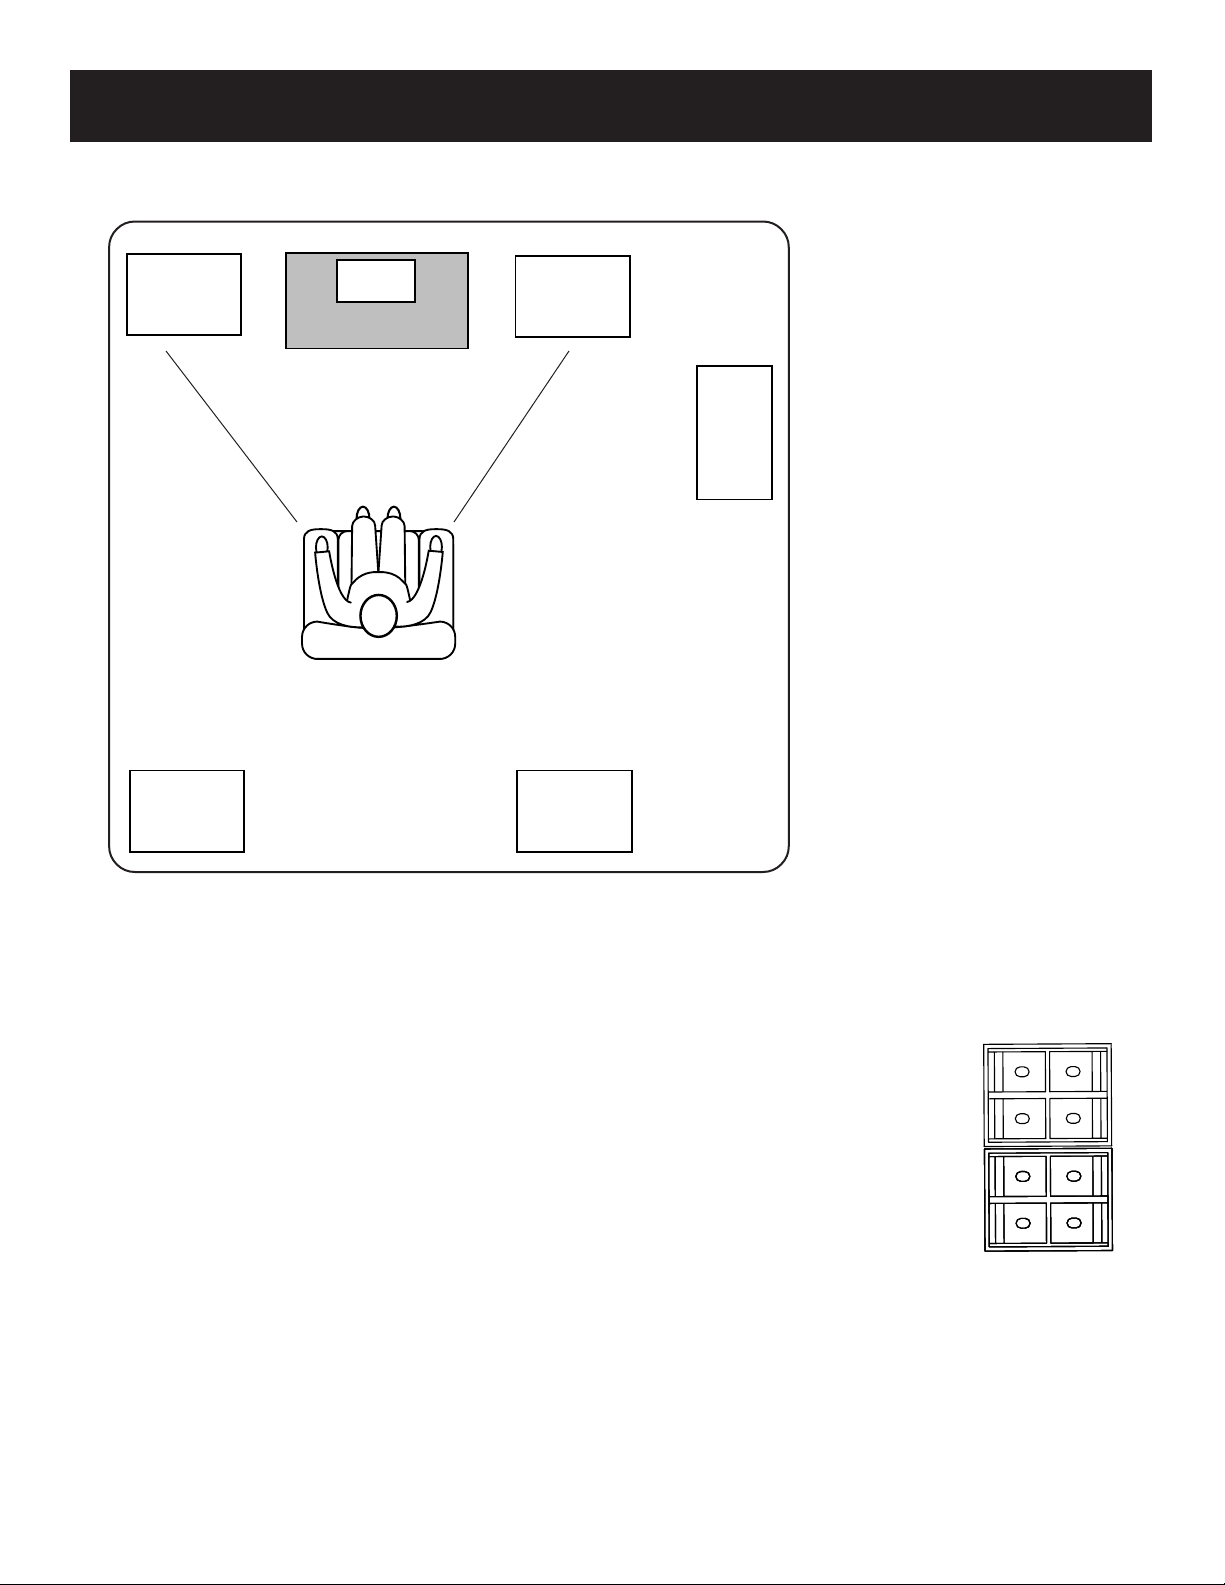
The two main speakers should be set between six and 10 feet apart. Putting
the speakers any closer or any farther apart may result in distorted sound.
The speakers should also form a 45 degree angle to the central listening
point in the room, creating a triangle of listening enjoyment.
NOTE: You may need to place the main speakers closer together when
not utilizing the center speaker. Do not place them so close, however,
that their magnetic fields affect the TV’s reception.
RL
THE CENTER SPEAKER
For optimal performance, you should try to place the center speaker as close
as possible to the same height as the left and right main speakers. You
should also try to align all three speakers, or set the center speaker slightly
behind the left and right mains. Placing the center speaker forward of the
left and right mains is not an option, as this will distort the sound for those
listeners not seated in the center of the room.
THE surround speakers
Placement of the surround speakers for optimal performance is truly subject
to the size and type of room in which the system is to be placed.
The following are a few position suggestions.
1. Set the speakers on the side walls, facing each other,
approximately two to three feet above the listeners’ head.
2. Aim the speakers directly at the two main speakers, matching
height to height. If the room is sparsely decorated, it may be
necessary to slightly tilt the speakers down to increase sound
quality. If the room is densely decorated, it may be necessary to
face the speakers toward the rear wall or at the ceiling.
3. Mount the speakers up on the ceiling. Set them a few feet wide
of the listeners and facing one another, not the floor.
Obviously there are many more possible positions, so it may be necessary to
simply experiment to find the right balance for your situation.
Don’t Go Solo
You must connect both surround
sound speakers for the surround
sound speakers to work.
C
RL
3
Page 6
Setting up the system
SUBWOOFERS
If you choose to add a subwoofer to your system, it is not necessary to
concern yourself so much with its placement. For the most part, a subwoofer
can be hidden behind furniture or draperies without affecting its
performance.
However, you do need to pay attention to how it responds to low bass
frequencies in certain positions. It may be necessary to move the subwoofer
around the room until you are satisfied with its output.
Balancing your speakers
Your system is equipped with
reproduce sound effects as they were intended. But to do so, the speakers
must be correctly balanced.
To balance the speakers using the Test Tone, all speakers must be connected
to your receiver and your receiver must be in the Dolby Pro Logic Surround
Mode.
1. Press the TEST TONE button on the receiver front panel. The Test
Tone LED on the front panel will light. The receiver will
generate a “pink noise” and apply it automatically at threesecond intervals to the left main channel, center channel,
right main channel and left and right rear channels
(simultaneously), in that order.
2. As the pink noise is generated, go to the spot in the room
where you are most likely to be when listening to your
system. The rear surround and center speakers should
be adjusted to equal the level of output from the left and
right main speakers.
3. Make adjustments by pressing the REAR•CTR button, and
then the +/- button on your remote control. The output from
the selected speaker(s) is adjusted accordingly.
Each time you press the + or - button on your remote control
to adjust a channel, the receiver provides you with two more
seconds of pink noise to that channel before moving on to
the next.
4. Press the TEST TONE button again to end the test.
You may not need to check or adjust these levels again unless you move
your system, rearrange the speakers, or change your preferred seating
location in the room.
*
, which enables you to
SUBWOOFER
OUTPUT
Sit Back and Listen ...
Fine tuning is best
performed with the remote
control so that adjustments
can be made from the
viewing or listening area.
4
*
Manufactured under license from Dolby Laboratories Licensing
Corporation. “Dolby,” the double-D symbol (
are trademarks of Dolby Laboratories Licensing Corporation.
) and “Pro Logic”
Page 7
Setting up the system
300 (ohm)
FM ANTENNA
GND
AM
A SAMPLE SET UP FOR SURROUND SOUND ENJOYMENT
Main
Left
Rear
Left
Center
TV
(45 degree angle)
< surround speakers >
Main
Right
Subwoofer
Opt.
Rear
Right
Connecting the antennas
The AM and FM antennas connect to the AM and FM terminals on the
system’s back panel. They must be hooked up for you to receive clear
reception. Follow the same connection procedures as those for your
speakers.
After connecting the antennas, extend them to their full length and adjust
their positioning for better radio station reception.
Antenna Hookup
5
Page 8
Setting up the system
TV
AUDIO
L /
MONO
RIGHT
VIDEO
INPUT
OUT
VIDEO
IN
AUDIO IN
R L
VCR 1
MONITOR
OUT
TV
COMPLIMENTARY
COMPONENT
LRVIDEO
AUDIO
OUT
VIDEO
IN
AUDIO IN
R L
VCR 1
VCR 2/
LD
MONITOR
OUT
TV
Connecting AUXILIARY
components
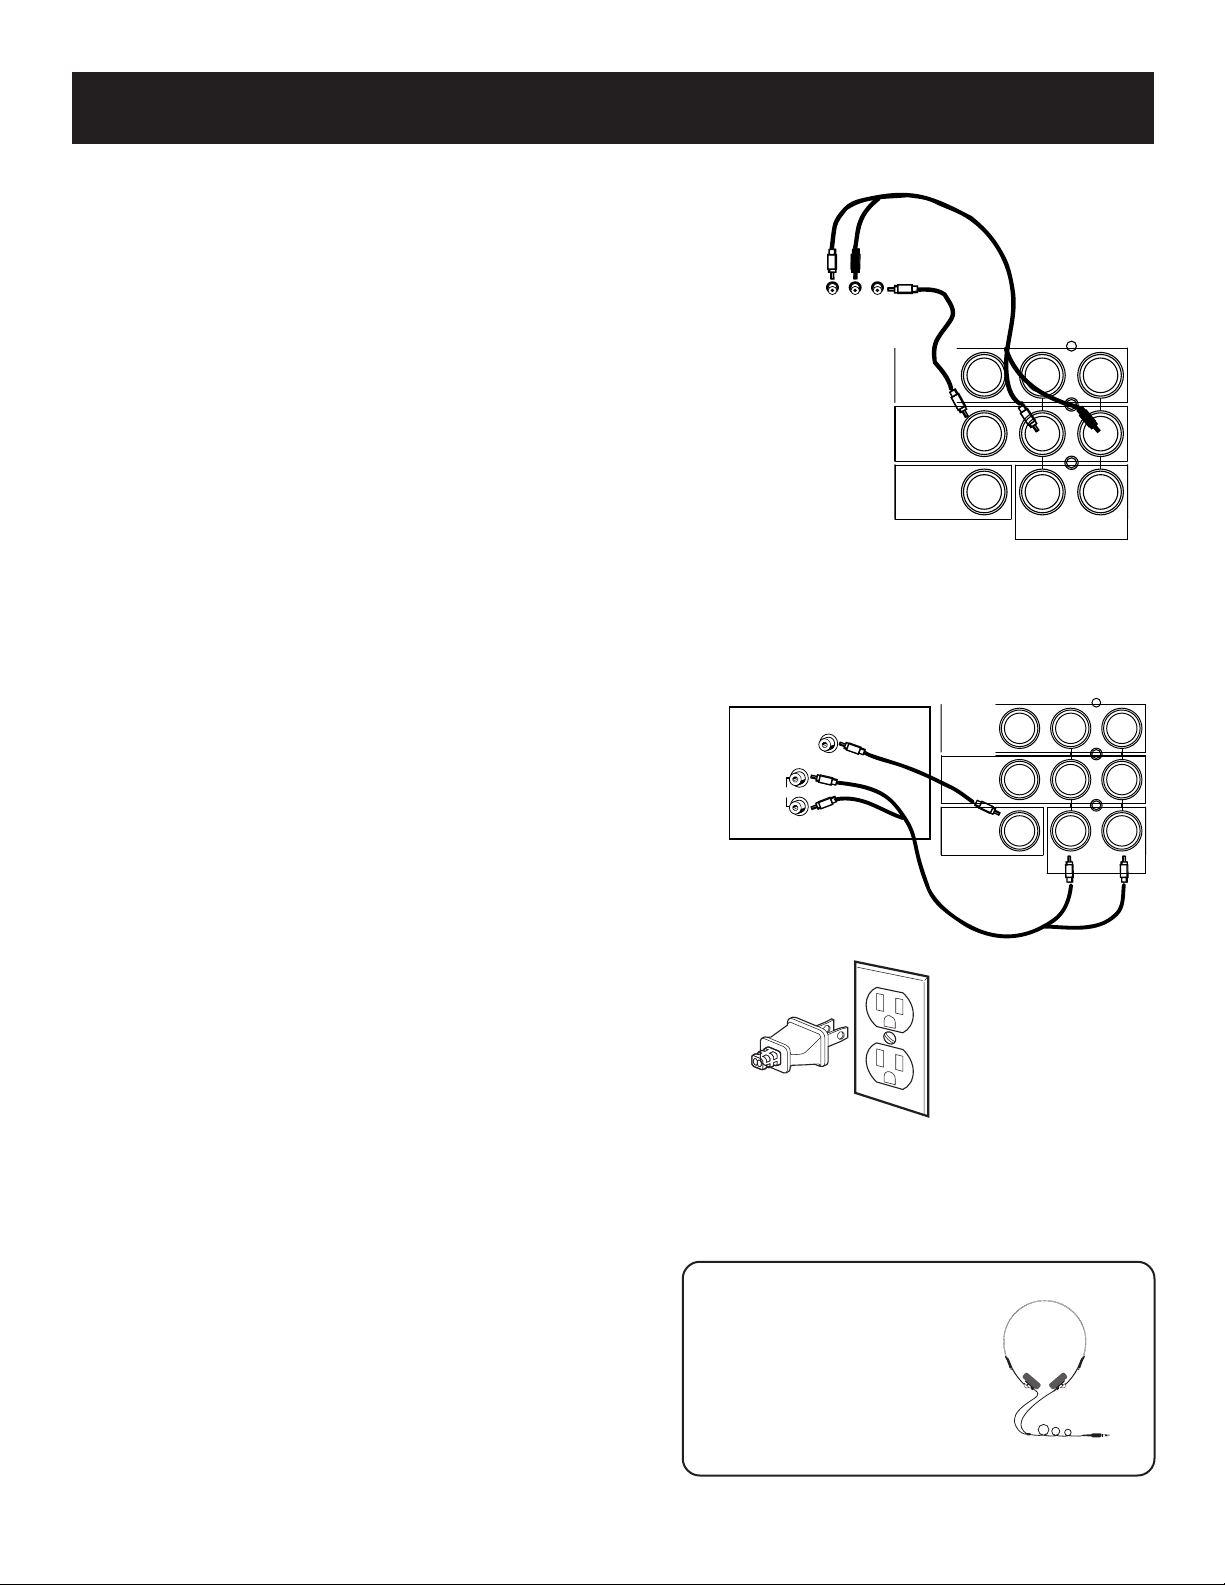
You can connect a laserdisc player, second VCR or camcorder/
video recorder to the VIDEO connection.
Using a paired (red/white) stereo cable and a single (yellow)
video cable, connect your new audio system to the
complimentary component as shown to the right.
To play laserdiscs or videos, press the VCR2•LD and then play.
NOTES: When using this connection for a second VCR,
the recording option is not available.
If your camcorder or video camera does not have an
RCA-type terminal for audio/video, you can purchase an
adapter from an RCA dealer or electronic parts store.
If the video connection is being used when you try to
hook up your video recorder or camcorder, connect the
component through any other available video output.
Connecting your system
6
to your TV
Using audio cables, connect the left and right “OUT” audio
jacks on the back of your TV to the TV audio jacks on the
back of your audio system. Then use a video cable to connect
the VIDEO OUTPUT jack on the back of your TV to connect to
the MONITOR OUT jack on the back of your audio system.
Connecting for power
Plug the power cord into an AC power outlet that accepts the
polarized plug — one blade wider than the other.
NOTE: The STAND BY indicator light will come on to let
you know the system is plugged in and ready to use. This
light will stay on as long as the stereo is plugged in so
you can use the remote control to turn on and operate
the system.
Using headphones
To listen privately to your favorite CDs, tapes or radio station,
your system has been equipped with a PHONES jack on the
front panel.
Using a Mic
Recording the MIC input with all signals from the functions
such as CD, TUNER, VCR1, and VIDEO.
Have a Blast –
Just Not in Your Ears
Make sure you turn down the
stereo before you put on the
headphones. Increase the
volume to the desired level
after headphones are in place.
Page 9

Tuner controls and operations
PRO LOGIC
STAND BY TUNING
POWER
PRESETS
CUSTOM REMOTE SENSOR
ROCK
CLASSIC
POP
TUNER TAPE TV MIN MAXVCR 1 VCR 2 LD
CD
3 STEREO VOLUME
HALL
SIMULATED
BYPASS
NORMAL
PHANTOM
WIDE
BAND
FM MODE
PHONES MIC
MEMORY
CENTER LEVEL
CENTER LEVEL
TEST TONE
SURROUND MODE
CENTER MODE
EQ MODE
REAR LEVEL
REAR LEVEL
BALANCE BASS TREBLE
GENERAL CONTROLS
STAND BY
The STAND BY indicator light stays on as long as the system is plugged in and the power is turned on and off by the
remote control. When you activate/deactivate the system via the POWER button on the unit, the light automatically
goes off.
POWER ON/OFF
The POWER button on the unit or on the remote activates the system. The system will default to the last mode it was
in before power was removed.
IRS
In the middle of the LCD is the Infrared Remote Sensor. This feature enables use of the remote control to operate
the system. The remote control will not work if the IRS is blocked or covered in any way.
FUNCTION BUTTONS
The function buttons are located just below the IRS. They are CD, TUNER, TAPE, TV, VCR 1 and VCR2•LD, which
corresponds to the VCR2•LD on the remote.
VOLUME
The VOLUME dial regulates the level of audio output. To increase output, rotate the dial to the right. To decrease
output, rotate the dial to the left.
TUNING
The TUNING UP (+) and DOWN (-) buttons allow you to find the radio station of your choice.
PRESET
The PRESET UP ( ) and DOWN ( ) buttons allow you easy access for up to 24 preset radio stations.
BAND
The BAND button switches between AM and FM frequencies.
FM MODE
The FM mode improves FM reception by switching between Stereo and Mono.
NOTE: A radio station must be broadcast in stereo for you to receive it in stereo.
7
Page 10

Tuner controls and operations
Memory
The MEMORY button allows you to store 24 preset radio stations.
CENTER LEVEL
The CENTER LEVEL UP ( ) and DOWN ( ) buttons control the volume of the center speaker only when the system is
in Dolby Pro Logic or Dolby 3 Stereo modes.
TEST TONE
The TEST TONE button can only be used in the Dolby Pro Logic mode. This feature allows you to balance your
speakers as they emit a sound, called the “pink noise,” in the left, center, right and surround channels sequentially
for three seconds each.
NOTE: This process is explained more in-depth in “Balancing Your Speakers,” page 4.
SURROUND MODE
The SURROUND MODE button lets you select the Pro Logic, 3 Stereo, Hall, Simulated or Bypass modes.
PRO LOGIC — The Pro Logic mode uses all five speakers so the sound envelopes the room.
3 STEREO — The 3 Stereo mode uses the two main and one center speaker.
HALL — The Hall mode recreates the effect of listening to a concert or watching a play from inside a music hall.
It utilizes the main and surround speakers.
SIMULATED —The Simulated mode tries to recreate the feeling of being where the sound is coming from,
whether you are watching a movie or listening to a CD. It utilizes the main and surround speakers.
BYPASS —The Bypass mode utilizes just the main speakers.
CENTER mode
The CENTER MODE button lets you select the Normal, Phantom or Wide mode. These modes are only available when
Dolby Pro Logic or Dolby 3 Stereo are active.
NORMAL — The NORMAL mode can be active in Dolby Pro Logic and Dolby 3 Stereo modes. The Normal mode
takes the low bass frequencies from the center channel and distributes it to the main speakers to maintain the
program’s original integrity.
PHANTOM — The PHANTOM button is only active in Dolby Pro Logic mode and uses the two main and two
surround speakers. The center speaker is off and the sound that usually comes from it is distributed through the
left and right main speakers. Do not use the Phantom mode to balance your speakers.
WIDE — The WIDE mode can be active in Dolby Pro Logic and Dolby 3 Stereo modes. This mode utilizes the three
front speakers - left, right and center - with all audio delivered through the center speaker. The center speaker
reproduces the same bass levels as the left and right main speakers.
8
Page 11
Tuner controls and operations
EQ MODE
The EQ button scrolls between the four preset electronic equalizer frequencies - Custom, Rock, Classic or Pop.
In CUSTOM mode you can adjust the sound effect by using the BASS and TREBLE knobs on the front of the unit.
REAR LEVEL
The REAR LEVEL UP ( ) and DOWN ( ) buttons control the volume of the surround speakers only when the system is in
Dolby Pro Logic, Hall or Simulated modes.
BALANCE/BASS/TREBLE
You can manually set the level of balance, bass and treble on your system only when it is in the Custom Preset mode.
Otherwise, the levels are automatically adjusted based on the active Preset mode.
Display messages
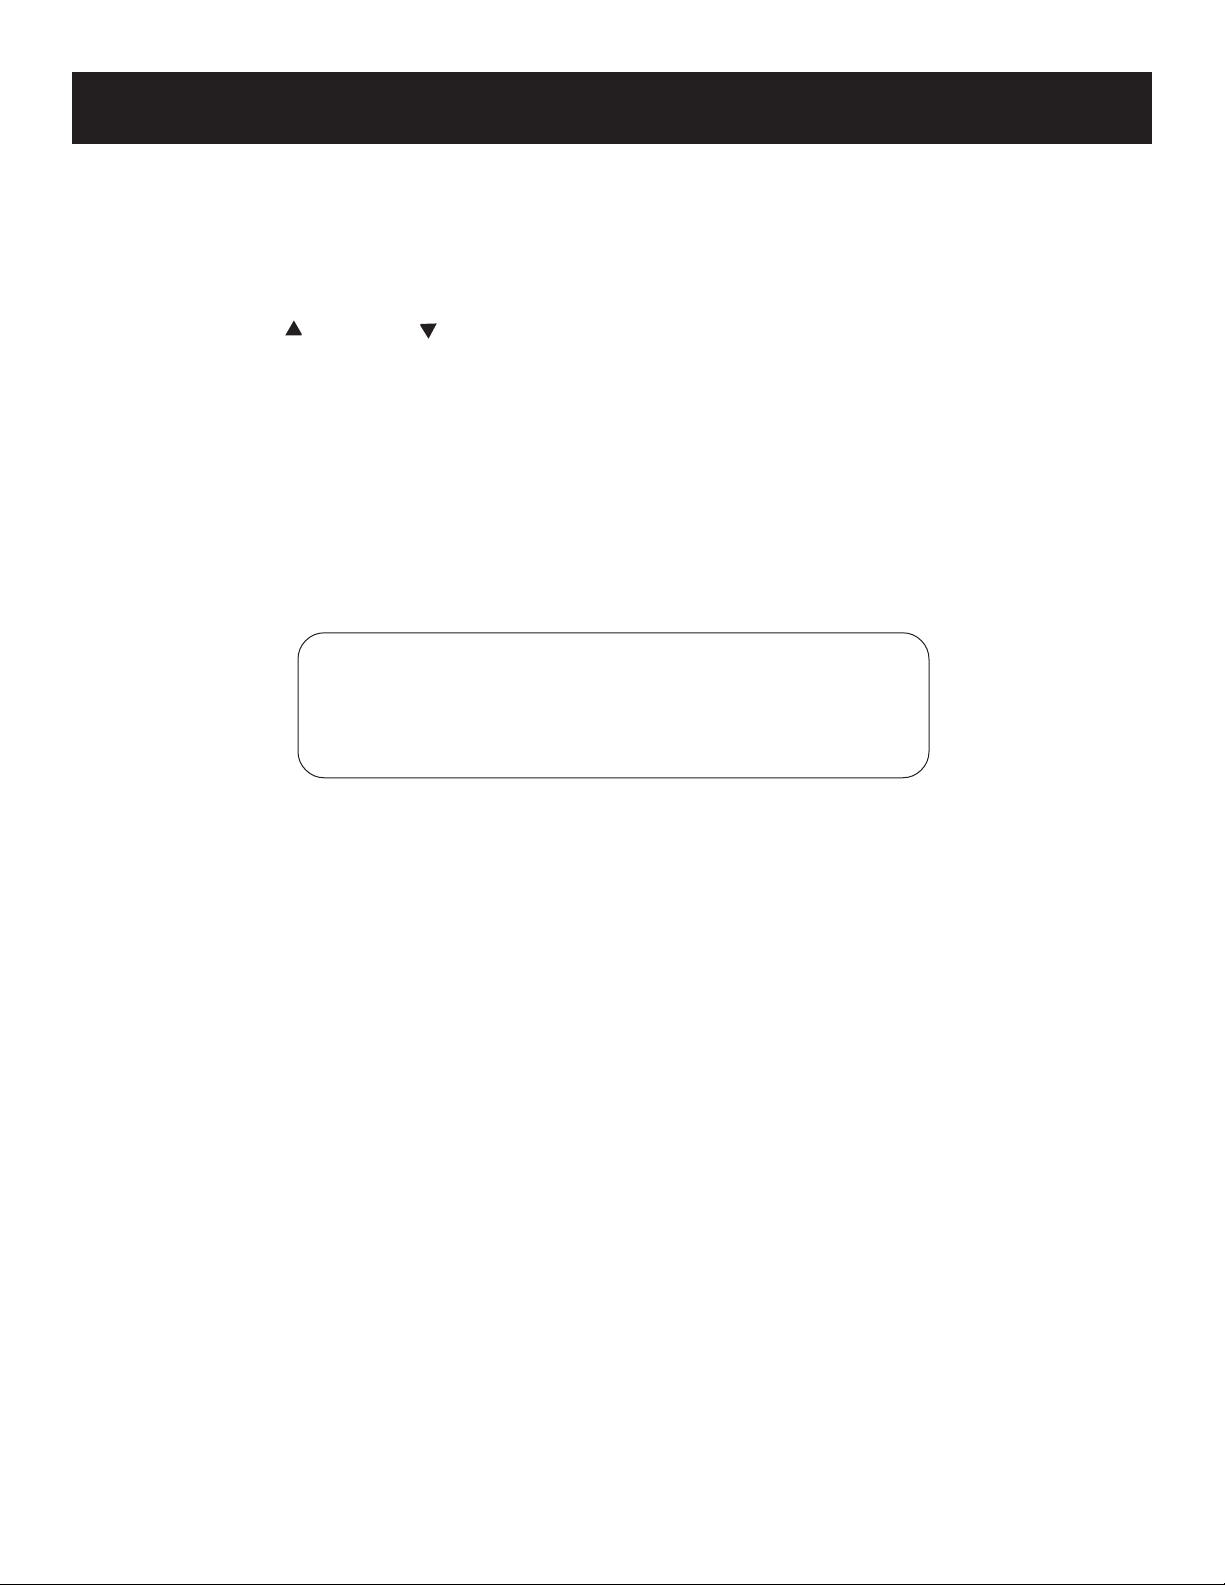
The following is an example of all the display messages you may encounter while using your tuner. Specific messages
are explained within the section(s) they apply.
AUTO MEMO STEREO
FM
AM
1
2
100.88
MHz
KHz
MEMORY
28
CH
9
Page 12

Tuner controls and operations
Choosing A Radio Station
1. Choose the Tuner function. The system will default to the last station the tuner was set to before power was
removed.
2. Use the BAND button to choose AM, FM 1 or 2.
3. Use the TUNING UP (+) or DOWN (-) button to select the radio station you want to hear.
• Pressing the +/- button once will move the tuner incrementally.
• Pressing and holding the +/- button will cause the tuner to automatically search for the next frequency
broadcasting clearly. “AUTO” will appear in the display.
4. Press the FM MODE button to switch between FM Stereo and FM Mono for better reception of FM stations. Be
aware, however, that you can only receive FM stations in stereo if they are being broadcast in stereo.
1
Programming presets
Your system is capable of holding up to 24 preset radio stations in memory (8 from FM1, 8 from FM 2 and 8 from AM)
for as long as the unit is plugged in, and up to two weeks after AC power has been removed.
1. Choose the radio station and band you wish to store.
2. Press the MEMORY button to activate the Preset mode.
3. Select a preset number by using the PRESET UP ( ) or DOWN ( ) buttons to select the preset channel you want
to hear.
4. Press MEMORY again to lock in your choice.
After you have finished programming your selections into the system’s memory, you need only use the PRESET UP or
DOWN buttons on the unit to search for the desired frequency. On the remote, use the number pad to select the
number of the preset channel you want to hear.
4
10
Page 13
CD controls and operations
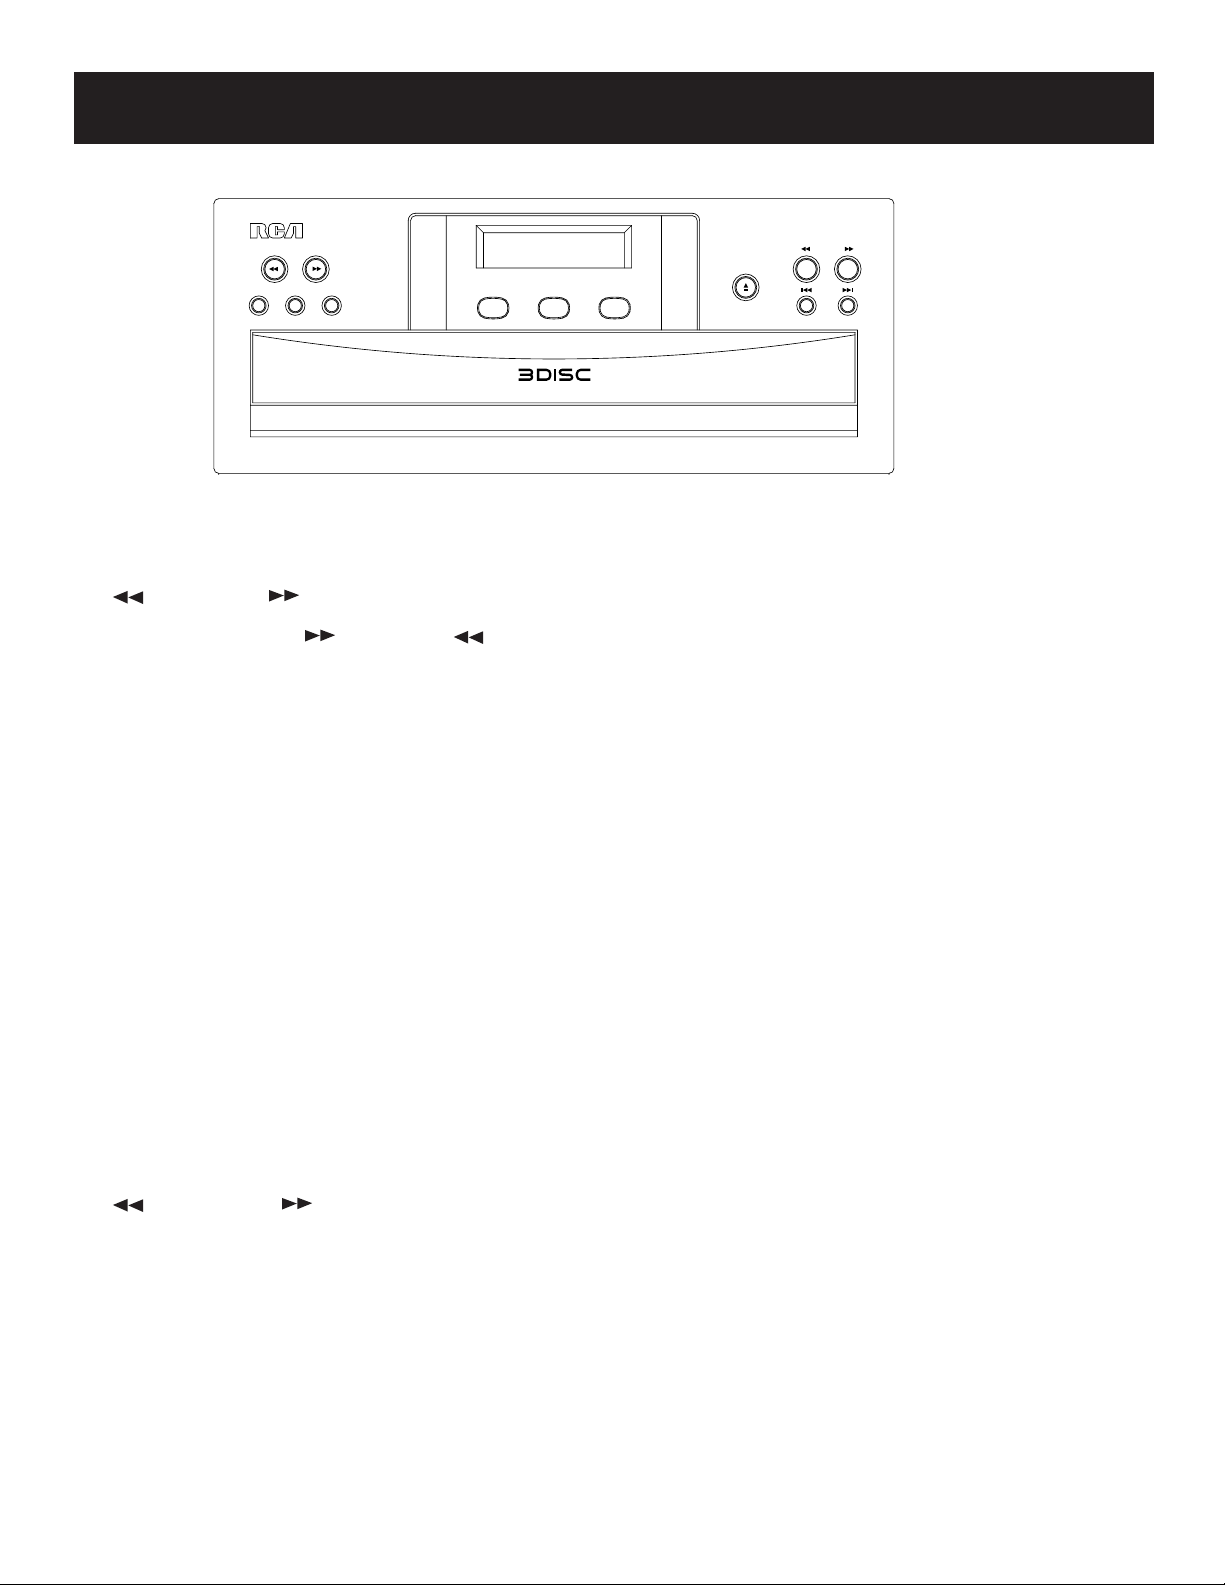
SEARCH
OPEN/CLOSE
PROGRAMREPEAT RANDOM PAUSE STOP PLAY
SIMULTANEOUS PLAY AND LOADING SYSTEM
DISC SKIP
TRACK
GENERAL CONTROLS
search
The SEARCH forward and reverse buttons allow you to search two different ways:
• Search the current track while disc is playing.
• Search the current track while the Repeat mode is active for that track.
The Search mode works in two different speeds - normal and fast. To activate normal speed, simply press the
SEARCH button and release. To initiate a faster search, hold the SEARCH button down for two seconds.
Repeat
The REPEAT button allows you to repeat the current track, the whole disc or the entire programmed play sequence.
The Repeat mode can be combined with Play, Program or Random modes. REPEAT will show in the display if your
choice is to repeat the current track. REPEAT will flash in the display if your choice is to repeat the whole disc or the
entire programmed play sequence.
Program
Only one disc at a time can utilize the Program mode, but up to 20 tracks can be programmed to play in whatever
sequence you choose.
RANDOM
The RANDOM button allows you to play all the tracks on the current disc in a random sequence. RANDOM will show
in the display.
NOTE: Your system cannot play random tracks from more than one disc in the tray. Instead, when it has finished
the tracks on the current disc, it will attempt to randomly play tracks on the next disc, etc.
disc skip
The DISC SKIP button allows you to rotate to the next disc - provided there is more than one disc in the tray - while
in the Play or Stop mode. If no disc is present, the display will show no disc followed by a steady “-------------”.
11
Page 14
CD controls and operations
play
The PLAY button can be activated when the system is in the Normal, Random, Repeat or Stop mode. If in the Normal
mode, the system will attempt to play the next disc in the tray when it has finished all the tracks on the current disc.
When a disc is playing, the display will show the number of the running track, its remaining time and flash the
number of the disc selected for play.
When play is paused, the number of the paused disc will also flash in the display. To resume play, press PLAY.
NOTE: The unit is capable of playing a 3 inch compact disc without the use of adapters or inserts in the Disc 1
position only.
Open/close
The OPEN/CLOSE button can be activated only in the CD function.
Pause
The PAUSE button temporarily suspends CD play. If PAUSE is pressed while the system is in the Play mode, the disc
will continue spin. To start the disc playing from where it was paused, press the PLAY or PAUSE button.
Stop
The STOP button immediately ends disc activity. You may stop a disc when it is in Play or Pause mode.
Track
The TRACK forward and reverse buttons allow you to scroll through the tracks on a disc or a program list and
chose the one you want to hear. If in the Play, Pause or Stop mode and pressed once, it will forward or reverse to the
next track; if held, the track numbers will increment automatically until you let go. If used while the system is in the
Program mode, you can select the tracks to be programmed.
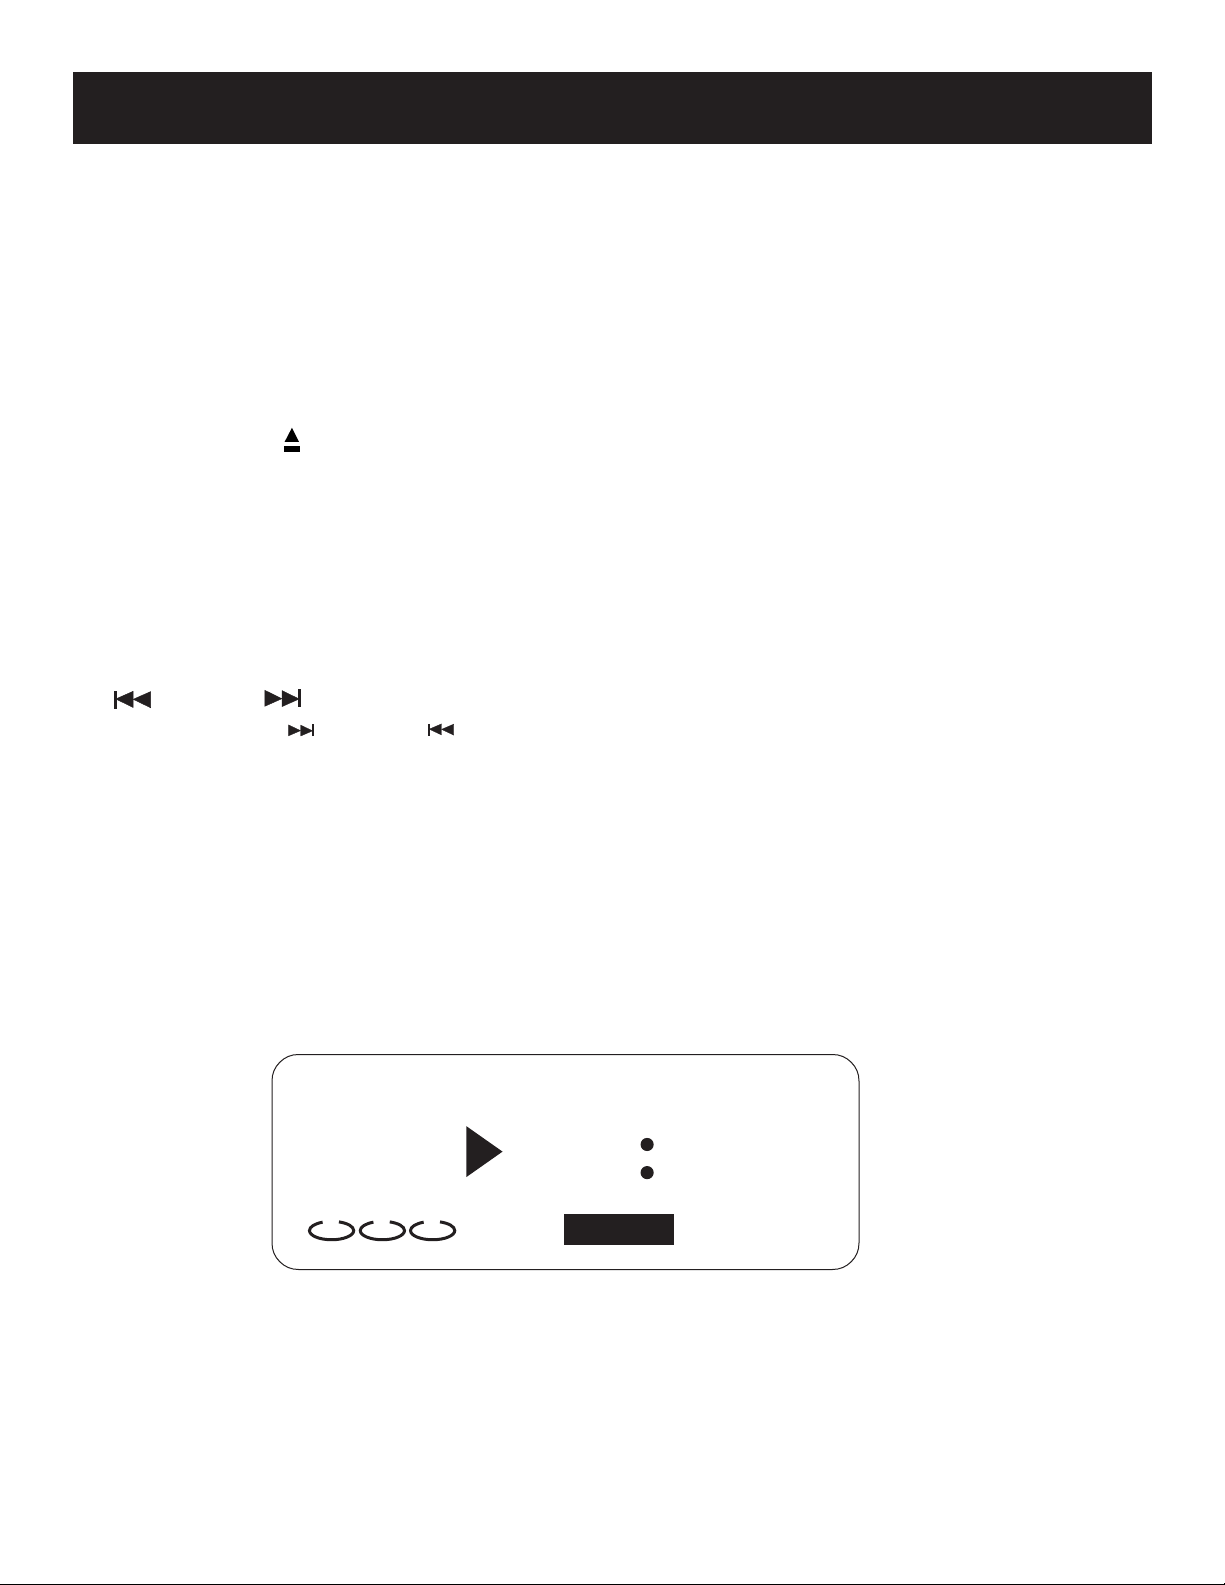
DISPLAY MESSAGES
When the CD player has been activated, the display will show the disc number, the track number, and running time
of the CD in the playing position.
The following is an example of all the messages you will encounter while using your CD player. Specific messages are
explained within the section(s) they pertain.
TRACK MIN
88
2 3
1
REPEAT
88
RANDOM
SEC
88
PROGRAM
12
Page 15

cd controls and operations
LOADING DISCS
1. Press the OPEN/CLOSE button to open the CD compartment door.
2. Place a CD in an open spot in the tray.
3. Press DISC SKIP to rotate the tray to the next open spot. Place disc. Repeat as necessary.
4. Press the OPEN/CLOSE button again to close the CD compartment door.
PLAYING DISCS
After loading the discs, press the DISC SKIP button to choose the CD you want to hear. Push the PLAY button. To stop
play, push the STOP button. To pause play, push the PAUSE button. To restart after stopping or pausing, push PLAY.
RANDOM PLAY
When you choose the Random mode, the system plays all the tracks of the current disc in a random sequence. When
it finished with the current disc, it will restart the RANDOM function at the current disc again in random order
unless you select another mode.
REPEAT PLAY
Your system is capable of repeating the current track, all the tracks on the current disc or an active program list.
Press the REPEAT button while the system is in the mode you desire - Play, Program or Random - to activate your
choice.
Simultaneous playing and loading
While a CD is playing, you can press the OPEN/CLOSE button and load/change/remove idle CDs.
PROGRAMMING LISTS
You must be in Stop mode to program your play order.
1. Press the DISC SKIP button to choose the desired disc.
2. Press the PROGRAM button. PROGRAM will show in the display. O1 will appear beneath TRACK to indicate this
is the first programmed track. The display will also show the running time of the track.
3. Press TRACK forward or reverse to choose a track.
4. Press PROGRAM to save the track in the program memory.
5. Repeat steps 3 and 4 above to program up to 20 tracks.
FULL will appear in the display when the program is full.
6. Press PLAY to begin the program.
7. To repeat the program, press the REPEAT button twice after it begins to play. To exit the program, press STOP or
RANDOM. To clear the program memory, press STOP while in the Stop mode.
SKIPPING DISCS
When you load more than one disc in the tray, it is possible to choose which disc you want to hear by pressing DISC
SKIP.
13
Page 16
Cassette deck controls and operations
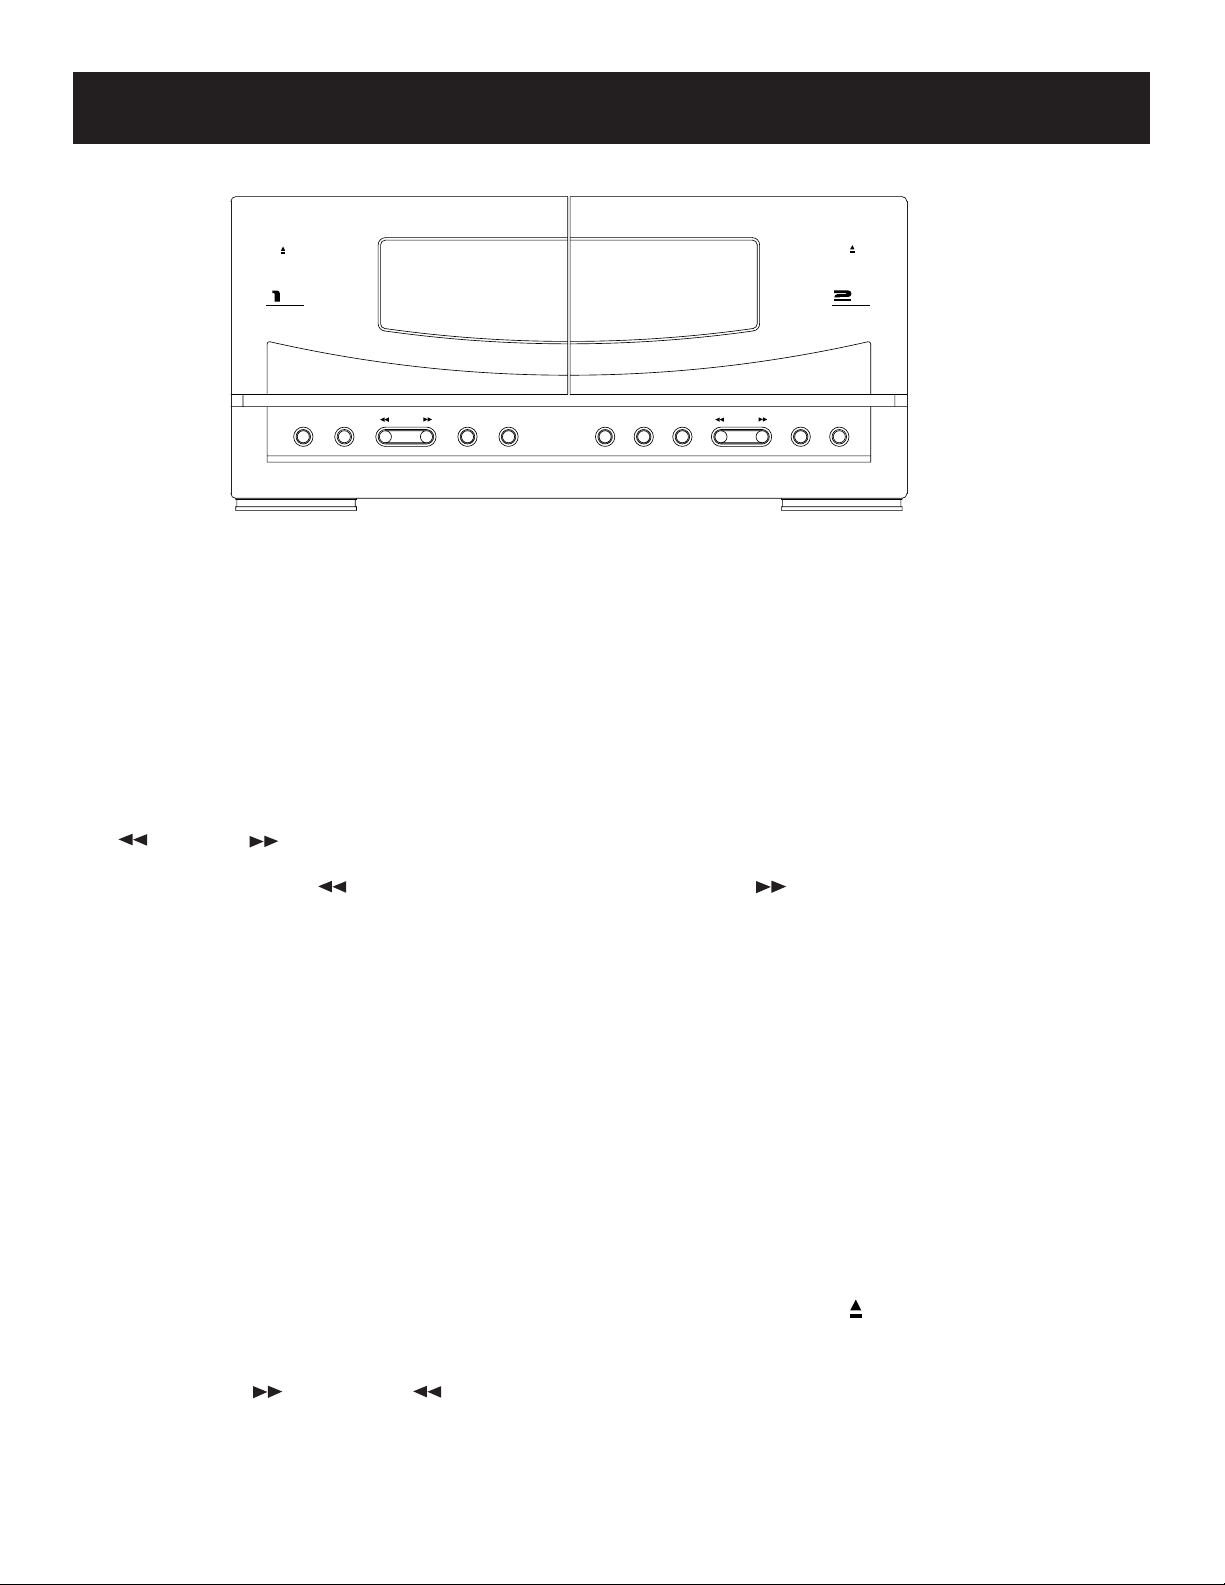
PUSH OPEN
PLAY / REC
TAPE
WINDPLAYRECORD HIGH SPEED DUB
PUSH OPEN
PLAY BACK
PAUSESTOPPLAYDUBPAUSESTOPWIND
TAPE
General controls
RECORD
Press to enter Record mode from the radio, CD, TV, VCR 1 or VCR2•LD, and then press PLAY to start
recording. You can only record on Deck 1.
PLAY
Press to play a tape.
NOTE: If no cassette is detected in a deck, the button will not work.
WIND
From stop mode, press to rewind the tape toward the beginning or to advance the tape
toward the end.
STOP
Press to stop current tape activity.
NOTE: This system has an Automatic Stop Feature. When the tape deck is operating in any mode
and reaches the end of the tape, it automatically shuts itself off.
PAUSE
Press to interrupt the Play or Record mode. Press PLAY to resume activity. If a deck is paused for
more than three minutes it will automatically shut itself off.
Playing Cassette Tapes
You can play cassettes from either of the two tape deck
1. Press the Tape function button to activate the cassette deck. The Tape LED will light.
2. On the cassette compartment door, press and release where it says PUSH OPEN to
open.
3. Insert a tape - exposed side down - into the compartment door and close it securely.
4. Press WIND (forward) or (reverse) to move tape to the desired starting point.
5. Press PLAY to begin playing the tape.
NOTE: Remote will only control tapes in deck 1.
14
Page 17

Cassette deck controls and operations
Recording from the Radio
1. Insert a cassette tape into Deck 1.
2. Choose the Tuner function. Press the BAND button to chose a
frequency. Use the TUNING UP (+) or DOWN (-) buttons to
select a station.
3. Press RECORD to ready deck and then PLAY to begin
recording.
4. Press STOP to end recording.
Recording from the CD Player
1. Insert a cassette tape into Deck 1.
2. Choose the CD function.
3. Insert the disc(s) to be recorded. You can start with any track
on a disc or you can create a program to record.
4. When ready to begin taping, press RECORD and then PLAY
on the Tape deck. The system will automatically signal the CD
to simultaneously begin the CD playing and the tape
recording.
Recording from tape to tape
1. Insert the prerecorded tape you want to record into Deck 2.
2. Insert a blank tape into Deck 1.
NOTE: The system will enter Dubbing or High Speed Dubbing
mode only if both tape decks are occupied. However, the system
will not enter either mode if the erase protection cap of the
cassette in Deck 1 has been removed.
3. Press the DUB (dubbing) button.
4. Press only one of the flashing PLAY buttons on either deck to
begin recording.
5. Press STOP at any time to stop recording.
NOTE: Pressing PAUSE will change the DUB function to the normal
recording function.
HIGH SPEED DUBBING
1. Follow steps 1 and 2 from above.
2. Press the HIGH SPEED DUB button.
3. Press only one of the flashing PLAY buttons on either deck to
begin recording at almost twice the normal speed.
4. Press STOP at any time to stop recording.
NOTE: PAUSE will not work during High Speed Dubbing.
DON’T INFRINGE!
This product, used for the purposes
for which it is sold - i.e.,
entertainment, violates no copyright
law. Any attempts to use this
product for that which it was not
intended is unlawful and therefore
not condoned by Thomson
Consumer Electronics.
15
Page 18
Cassette deck controls and operations
A
A
A
60
A
RECORDING FROM the TV,
VCR or VIDEO
1
Your system is capable of recording audio from a TV program, VCR tape or
videotape.
1. Insert a cassette into Deck 1.
2. Choose the function - TV, VCR or Video.
3. Choose the TV program or segment of VCR or videotape you
want to record.
4. Press RECORD on the tape deck to ready it and then PAUSE
on the tape deck.
5. Press PLAY to release the tape whenever you are ready to begin
recording.
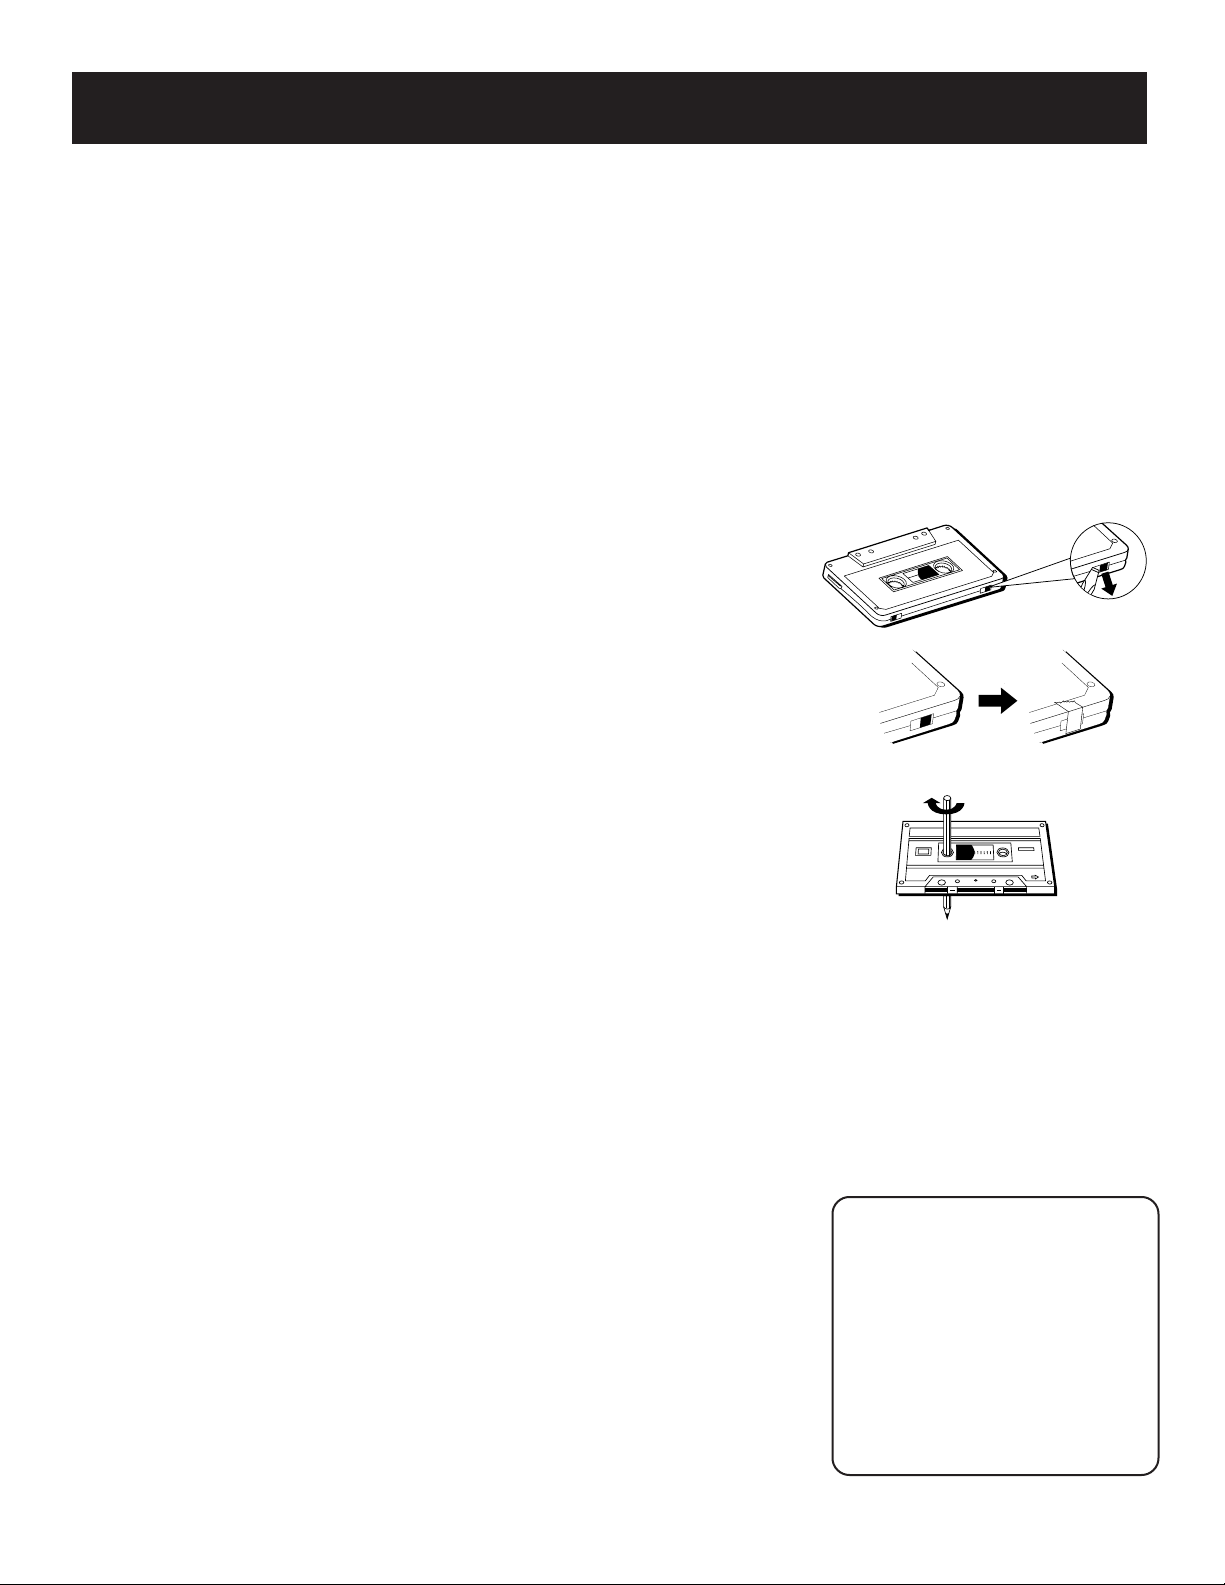
Erase Protection
When you record new material, the cassette deck records over whatever is on
a tape. To protect a tape from accidental erasure, break off one or both
plastic tabs - one for each tape side - on the top of the cassette tape. If you
decide later to record on the tape, seal the hole with a piece of cellophane
tape.
2
4
Quit Slacking
A little bit of slack in your tapes can cause scratches on the tape, or worse
yet, the tape could break. If you notice some slack in the tape, use a pencil
to tighten it up before you insert it.
A
We’re on the Level
The built-in Automatic Level
Control automatically sets the
input level for optimum
recording sound. You can
listen to and even adjust the
volume setting of the radio
without affecting the quality
of the recording - just don’t
change the station.
16
Page 19
Using the universal REMOTE control
VCR
2
•
LD
AM
•
FM TAPE AUX
CD
P
O
W
E
R
V
C
R
1
D
S
S
•
C
A
B
L
E
T
V
SKIP
GUIDE
•
RDM
MUTE PREV CH
•
DISC
REC PAUSE
PLAYREW FF
STOP
C
H
A
N
C
H
A
N
V
O
L
V
O
L
INPUT•SEEK
RESET•REPDISPLAY
TV MENUMENU
PROGRAM
DELAY
CH CTRL
MOVE
1
4
7
2
5
8
0
ANTENNA
3
6
9
CLEAR
PIP SWAP PIP
CTR MODE
BY-PASS SWAP
AUDIO
LEVEL
S
U
R
R
O
U
N
D
REAR
CTR
•
–
+
u
n
i
v
e
r
s
a
l
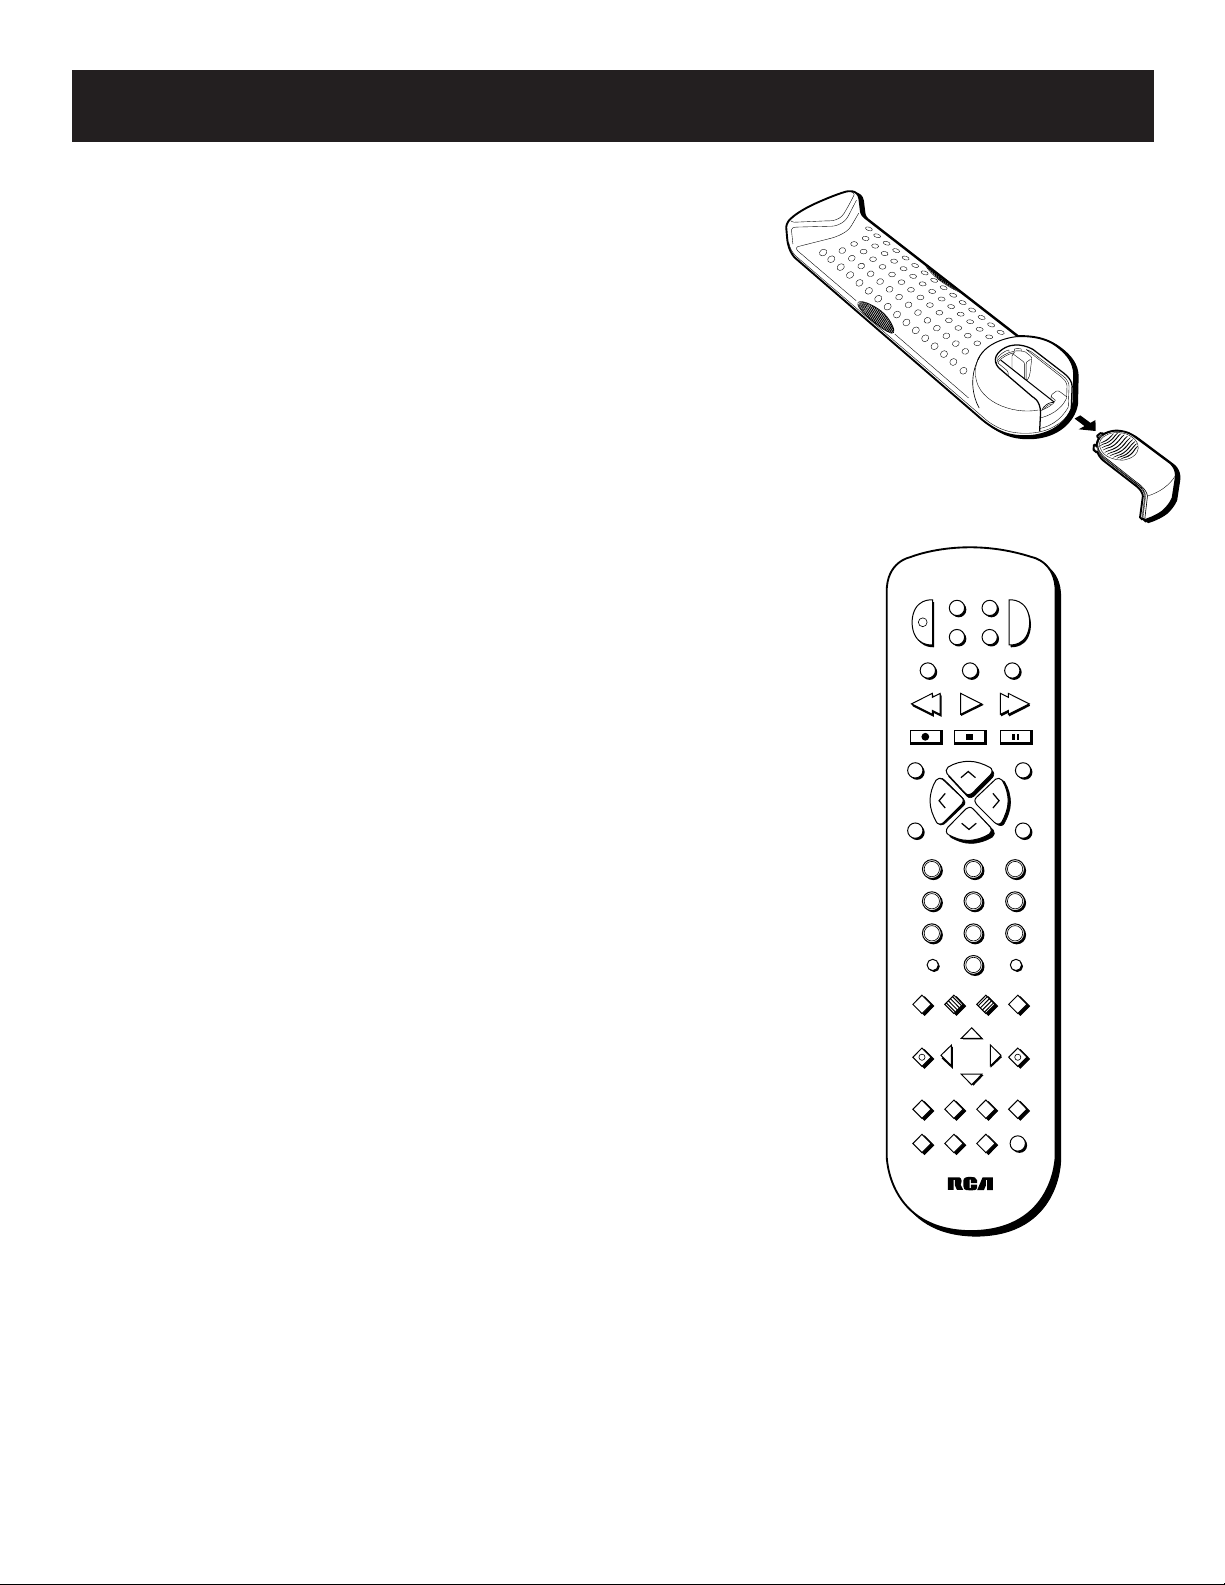
Battery Installation
1. Open the battery compartment door.
2. Insert 4 AAA-size batteries as indicated on the back of the
remote control.
3. Close the battery compartment door.
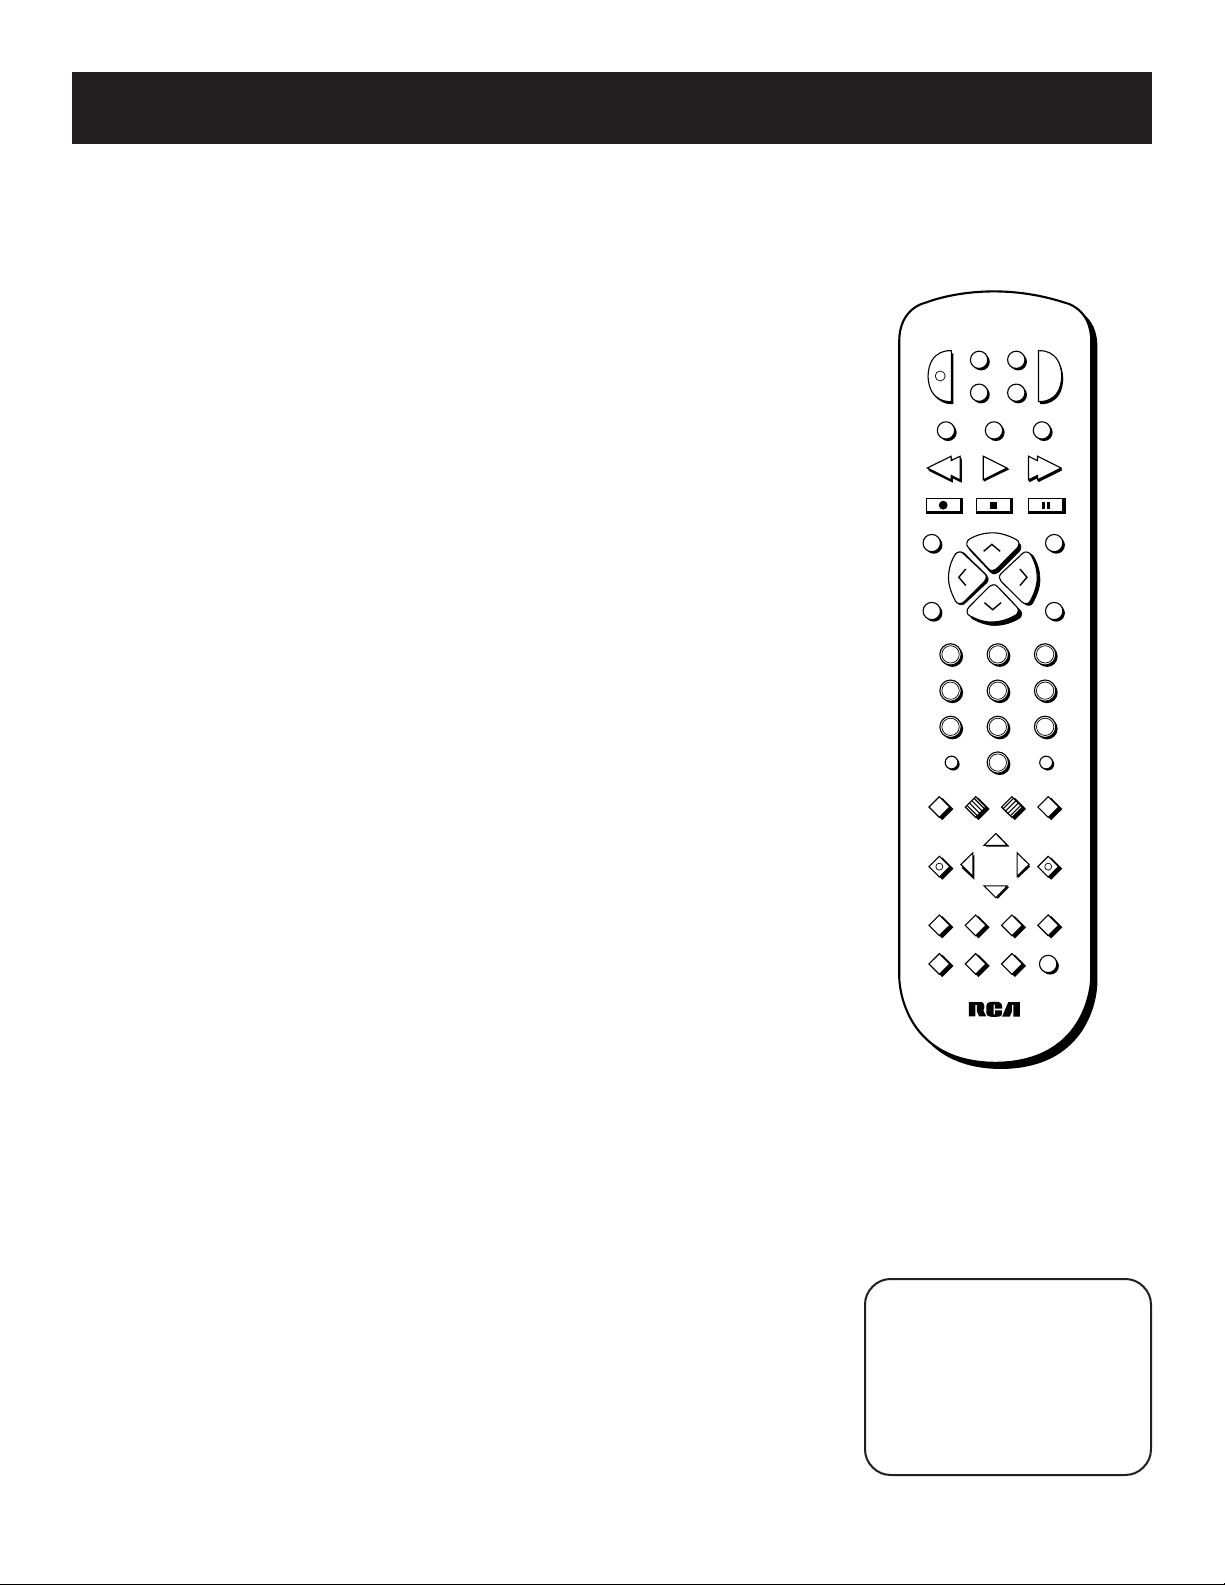
General Controls
Your RCA Remote Control is capable of operating most RCA audio and video equipment.
To use the remote control effectively, always aim it directly at your receiver.
The following is a general description of all the buttons and their possible
functions. Depending on what audio and video components you own, not all
buttons and functions will apply.
MUTE — Turns off the receiver’s sound. Press again to restore the sound.
POWER — Turns the AM/FM receiver off with two presses. If you have multiple
components turned on and not the AM/FM receiver, pressing POWER once turns off
the last component turned on. Pressing POWER again turns off all components.
VOL up (>) and down (<) — Increases or decreases the volume.
AUX — If programmed, turns on an audio or video component brand other than RCA.
TV Controls
+ — On some RCA TV models, used to adjust menu controls.
– — On some RCA TV models, used to adjust menu controls.
ANTENNA — Changes the antenna input.
DELAY/CH CTRL — In some RCA TV models, lets you control the channel that
appears in the PIP window.
CHAN up (∧) and down (∨) — Tunes the TV channel up and down.
CLEAR — Removes any menu from the screen.
DISPLAY — Displays channel information.
GUIDE•RDM — For some models, brings up 12 small pictures (previews of the next
12 channels in the channel list). Press again to turn off channel guide.
INPUT•SEEK — For some TV models, toggles through the available input sources.
MENU/PROGRAM — For some models, stores channels in the TV’s memory.
MOVE arrows — In some models, when using PIP, moves the small picture to
another corner of the screen. Also, used for menu navigation in some TV models.
Number Buttons — Let you enter channel numbers and time settings when needed.
PIP — Turns on and off picture-in-picture on most RCA TV models with PIP.
POWER — Turns the TV off.
PREV CH•DISC — Returns to the previous channel.
RESET•REP — Returns picture quality controls to their original settings.
SKIP — Press once before changing channels and the TV waits 30 seconds before
returning to the original channel. Press repeatedly to increase the time.
SWAP PIP — Swaps the main picture in the PIP window.
TV — Turns on the TV and puts the remote in TV mode.
TV MENU — Displays the TV’s on-screen menus.
17
Page 20
Using the universal remote control
VCR Controls
CHAN up (∧) and down (∨) — Tunes to the next or previous channel when
watching TV through the VCR.
CLEAR — Resets the tape counter and corrects entries when programming the
menus.
DISPLAY — Displays channel, time and counter information on the screen.
FF — Fast forwards a tape. Also, searches forward while a tape is playing.
INPUT•SEEK — For some VCR models, selects line input or tuner.
MENU/PROGRAM — Displays the on-screen programming menus.
Number Buttons — Let you enter numbers when needed.
PAUSE — Pauses a tape.
PLAY — Plays a tape.
POWER — Turns the VCR off.
PREV CH•DISC — Returns to the previous channel.
REC — Records a tape.
REW — Rewinds a tape. Also, searches backward while a tape is playing.
SKIP — Press once before changing channels and the TV waits 30 seconds
before returning to the original channel. Press repeatedly to increase the time.
STOP — Stops a tape.
VCR1 — Turns on the VCR and puts the remote in VCR1 mode.
VCR2•LD — For some VCR models, if programmed, turns on a second VCR and
puts the remote in VCR2 mode.
Laserdisc Player Controls
CHAN up (∧) and down (v) — Changes to the next higher or lower track on
the laserdisc.
FF — Scans forward on the laserdisc.
Number Buttons — Let you change to a specific track.
PAUSE — Pauses the laserdisc.
PLAY — Plays a laserdisc.
POWER — Turns the laserdisc player off.
REW — Scans backward on the laserdisc.
STOP — Stops the laserdisc.
VCR2• LD — For some laserdisc models, if programmed, turns on the laserdisc
player and puts the remote in laserdisc mode.
P
AM
GUIDE
•
MUTE PREV CH
1
4
7
INPUT•SEEK
PROGRAM
BY-PASS SWAP
D
S
1
R
C
V
R
E
W
O
VCR
2
LD
•
FM TAPE AUX
•
PLAYREW FF
REC PAUSE
STOP
A
N
H
RDM
C
L
O
V
C
H
N
A
2
5
8
0
RESET•REPDISPLAY
CLEAR
MOVE
PIP SWAP PIP
–
REAR
AUDIO
u
n
i
r
v
e
S
LEVEL
s
•
+
•
C
A
CD
CTR
l
a
B
L
E
V
O
L
3
6
9
ANTENNA
DELAY
CH CTRL
TV MENUMENU
CTR MODE
S
U
R
R
T
V
SKIP
DISC
•
D
N
U
O
18
LASERDISC
PLAYER CODES
Pioneer.................033, 037
ProScan................033, 037
RCA......................033, 037
Page 21
Using the universal remote control
VCR
2
•
LD
AM
•
FM TAPE AUX
CD
P
O
W
E
R
V
C
R
1
D
S
S
•
C
A
B
L
E
T
V
SKIP
GUIDE
•
RDM
MUTE PREV CH
•
DISC
REC PAUSE
PLAYREW FF
STOP
C
H
A
N
C
H
A
N
V
O
L
V
O
L
INPUT•SEEK
RESET•REPDISPLAY
TV MENUMENU
PROGRAM
DELAY
CH CTRL
MOVE
1
4
7
2
5
8
0
ANTENNA
3
6
9
CLEAR
PIP SWAP PIP
CTR MODE
BY-PASS SWAP
AUDIO
LEVEL
S
U
R
R
O
U
N
D
REAR
CTR
•
–
+
u
n
i
v
e
r
s
a
l
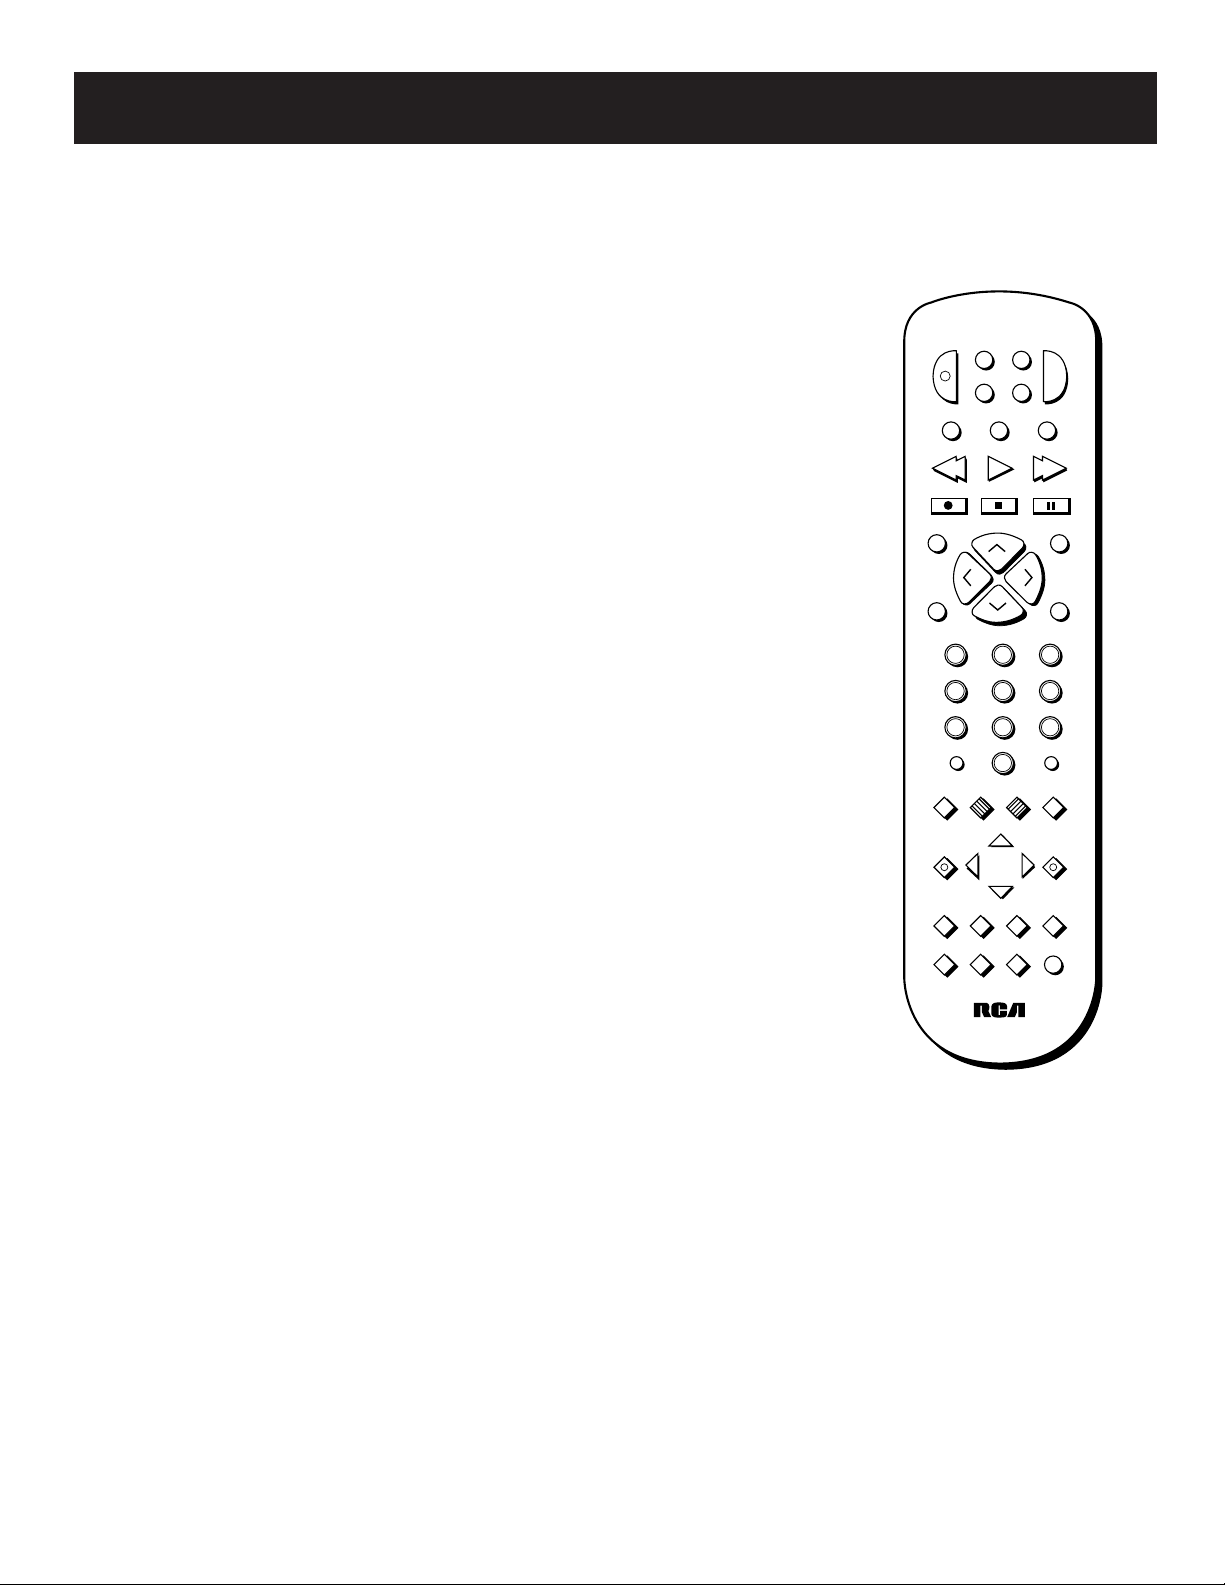
CD Player Controls
CD — Puts the remote in CD mode. Press twice to go to the next disc.
FF — Allows you to search up.
PROGRAM — Programs the CD changer to play up to 20 tracks in any order you choose.
PAUSE — Pauses the CD.
PLAY — Plays the CD.
REW — Allows you to search down.
STOP — Stops the CD from playing.
CHAN up (∧) and down (∨) — Allows you to advance to the next track or
reverse to the previous track.
Cassette Deck Controls
TAPE — Turns on another tape deck brand and toggles between TAPE 1 and TAPE 2.
FF — Fast forwards the tape.
PAUSE — Pauses the tape.
PLAY — Plays the tape.
REW — Rewinds the tape.
STOP — Stops the tape from playing.
To use a cassette
1. Press the TAPE button to select the cassette deck.
2. Press the TAPE button again to select TAPE 1 or TAPE 2.
3. Use the corresponding buttons to control the cassette deck.
To record from the tuner to TAPE DECK 1
• Press RECORD and then PLAY to begin recording.
To record from the Tape deck 2 to TAPE DECK 1
1. Insert the prerecorded tape you want to record from into deck 2.
2. Insert a blank tape into deck 1.
3. Using the TAPE button to select deck 2.
4. Press RECORD to ready the decks.
6. Press the TAPE button to select deck 1 and press PLAY.
7. Quickly press the TAPE button again to select deck 2 and then press PLAY to
start recording .
NOTE: HIGH/NORMAL speed dubbing will not work from the remote.
Satellite Receiver Controls
DSS•CABLE — Turns on satellite receiver mode.
CHAN up (∧) and down (∨) — Tunes to the next or previous channel when
watching TV through the satellite receiver.
Number Buttons — Let you enter numbers when needed.
POWER — Turns the satellite receiver off.
19
Page 22
Using the universal remote control
VCR
2
•
LD
AM
•
FM TAPE AUX
CD
P
O
W
E
R
V
C
R
1
D
S
S
•
C
A
B
L
E
T
V
SKIP
GUIDE
•
RDM
MUTE PREV CH
•
DISC
REC PAUSE
PLAYREW FF
STOP
C
H
A
N
C
H
A
N
V
O
L
V
O
L
INPUT•SEEK
RESET•REPDISPLAY
TV MENUMENU
PROGRAM
DELAY
CH CTRL
MOVE
1
4
7
2
5
8
0
ANTENNA
3
6
9
CLEAR
PIP SWAP PIP
CTR MODE
BY-PASS SWAP
AUDIO
LEVEL
S
U
R
R
O
U
N
D
REAR
CTR
•
–
+
u
n
i
v
e
r
s
a
l
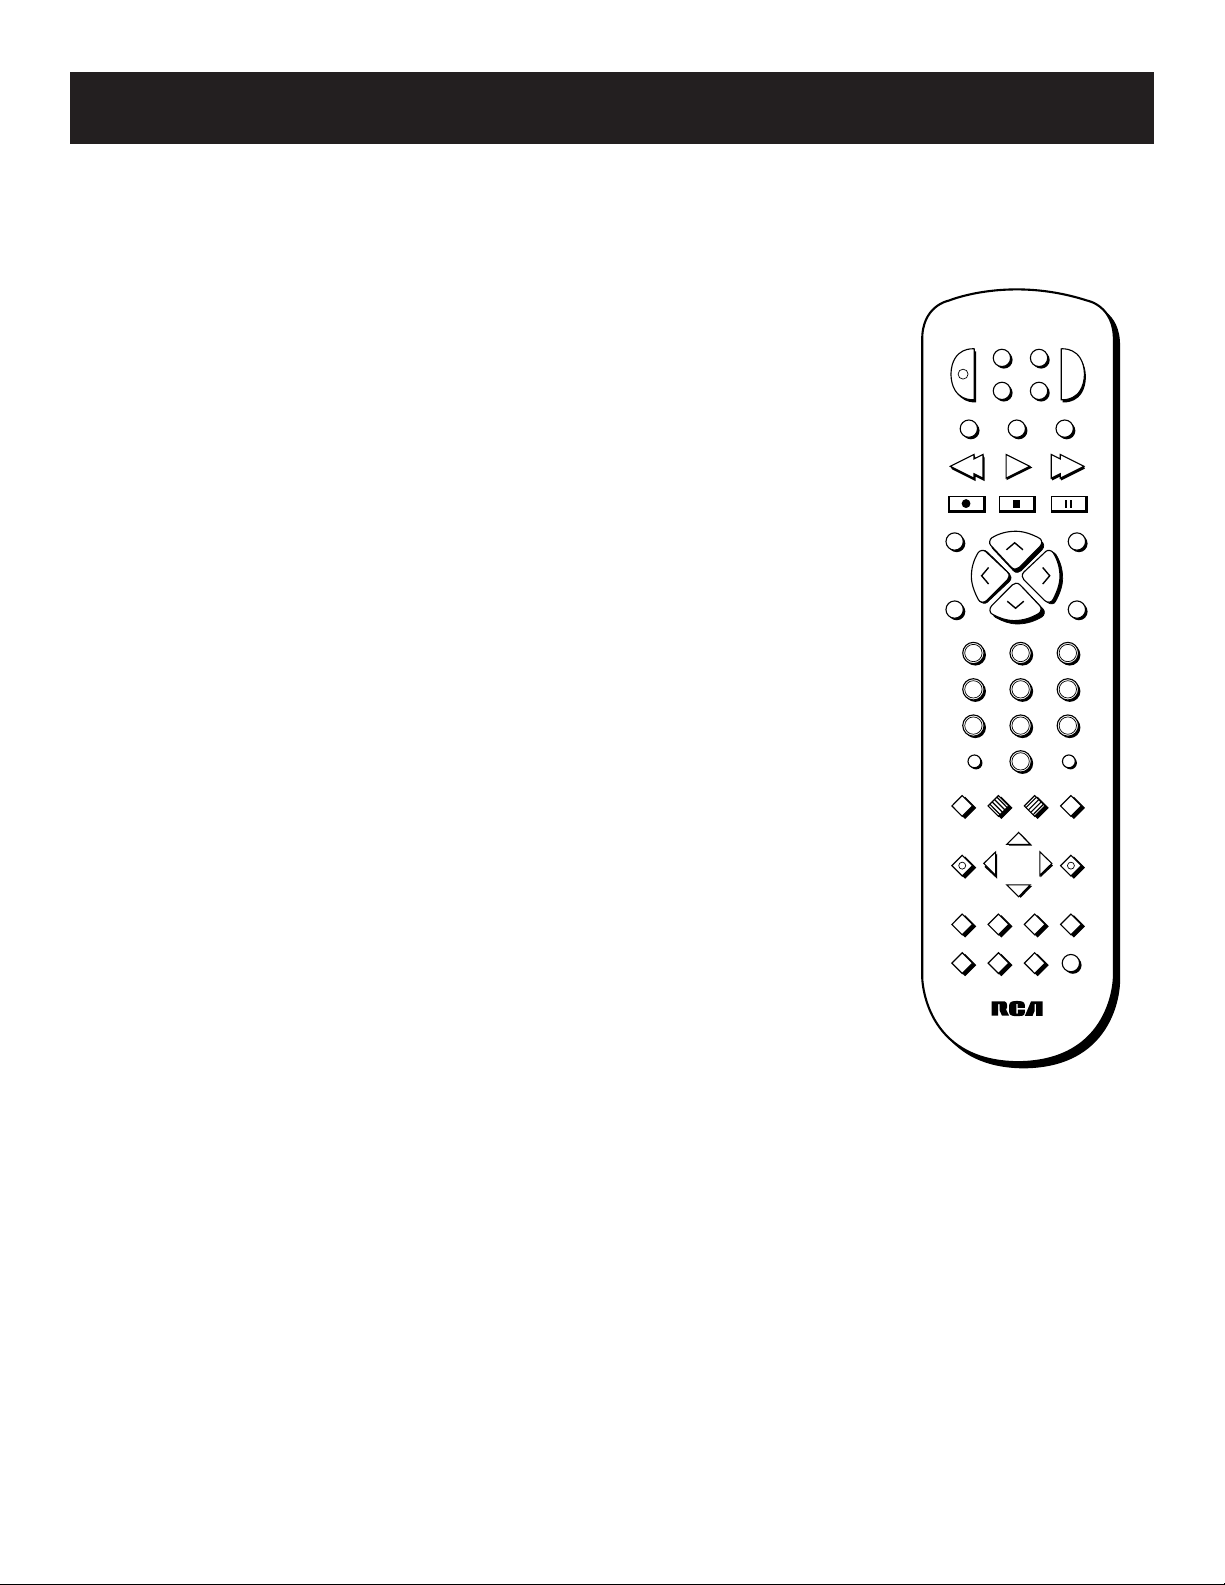
Receiver Controls
AM•FM — Activates the tuner and toggles between the AM band and the FM bands.
CTR MODE — Changes the Center mode when using Dolby
Dolby 3 Stereo surround modes. Press to change the mode.
SURROUND — Lets you select a Surround Mode: Dolby Pro Logic Surround, Dolby
3— Stereo, Simulate, Bypass, or Hall. Press to change the mode.
CHAN up (∧) and down (v) — Tunes the receiver to the next or previous preset
station stored in the receiver’s memory.
FF — Lets you manually move up the AM/FM band.
PROGRAM — Stores the selected station in the receiver’s memory. Use the same as
the MEMORY button on the unit.
REW — Lets you manually move down the AM/FM band.
Surround Sound Levels and Controls
+ — Increases the volume in rear and center speakers.
– — Decreases the volume in rear and center speaker.
BYPASS — Turns on Bypass mode, which cancels all Surround sound modes. Sound
is generated without effects using just the main speakers..
REAR•CTR LEVEL — Adjusts the balance of the rear and center speakers in
conjunction with the +/- buttons.
Pro-Logic Surround or
To access preset stations
1. Press the AM/FM button to select the tuner.
2. Press the AM/FM button again to select FM1/FM2/AM.
3. To access your preset choices, press CHAN up (∧) and down (v).
To Manually tune stations
Use the FF button for tuning up and the REW button for tuning down.
Use the PROGRAM button the same way as the MEMORY button on the unit.. The
procedure to store is the same as on the main unit:.
1. Choose a band and a radio station you want to store.
2. Press the PROGRAM button on the remote to select preset mode.
3. Choose a preset number using CHAN up (∧) and down (v).
4. Press PROGRAM button again to store your station in the selected preset
location.
20
Page 23
Using the universal remote control
Programming
the Universal Remote
You can program the universal remote to control most brands of remote
controllable TVs, VCRs and cable boxes. If you have an RCA, GE or ProScan VCR,
you may not need to program the remote at all. Other manufacturer’s brands
need to be programmed.
Programming for use with Your TV/VCR
To determine whether you need to program the universal remote, turn on the
TV or VCR, point the remote at the TV/VCR’s remote sensor and press TV/VCR.
Then, press the POWER or CHAN up (^) or down (v) button to see if the TV/VCR
responds to the remote commands. If not, you need to program the remote.
Follow these steps to program your universal remote to control your TV/VCR:
1. Turn on the TV/ VCR.
2. Look up your TV/VCR brand and code number(s) in the code list in
appendices or on the code sheet packed with your remote.
3. Press and hold the TV/VCR 1 button on the remote.
4. Enter the three-digit code from the code list.
5. Release the TV/VCR 1 button, then press POWER to see if the TV/VCR
responds to the remote commands. If not, try pressing TV/VCR 1
then POWER.
6. Repeat steps 3 through 5 using the next code listed for your TV/VCR
brand until the TV/VCR responds to the remote commands.
Receiver Remote
DISPLAY
PREV CH
ANTENNA
CLEAR
MENU
MOVE ARROWS
works like
RCA brand Digital
Satellite System Remote
SELECT/DISPLAY
PREV CH
TV/DSS
CLEAR
MENU
ARROWS
This remote may not
operate all models of the
brands shown.
If a battery is removed from
the battery compartment of
the remote control, all
control key functions will
return to the original mode.
Programming for use
with your cable Box/satellite receiver
1. Turn on the cable box/satellite receiver.
2. For your cable box, look up the brand and its code number(s) in the
code list in appendices or on the code sheet packed with the
remote. For your satellite receiver, look up the brand and
corresponding code number(s) in the list to the right.
3. Press and hold the DSS•CABLE button on the remote.
4. Enter the three-digit code from the code list.
5. Release the DSS•CABLE button, then press POWER or CHAN up (^)
or down (v) to see if the cable box/receiver responds to the remote
commands. If not, try pressing DSS•CABLE, then POWER again to see if the
cable box/receiver responds.
6. Repeat steps 3 through 5 using the next code listed for the brand of
your cable box/receiver until it responds to the remote commands.
NOTE: Your remote is preprogrammed to control the RCA brand Digital
Satellite Receiver. A few of the remote buttons used with the RCA brand
Digital Satellite Receiver are shown to the right. You may want to
experiment with other buttons to see if they work with your receiver.
SATELLITE
RECEIVER CODES
Chaparral.....................080,081
Cheyenne.............................081
Drake............................082,083
RCA brand Digital Satellite
System........................000
General Instruments
....................092,093,094
RCA.....................................000
Realistic...............................084
Sierra I,II,III....................081
STS1.....................................085
STS2.....................................086
STS3.....................................087
STS4.....................................088
Toshiba................................089
Uniden.................................090
Video Cipher II..............091
21
Page 24
Using the universal remote control
Programming for use with A LASER DISC PLAYER
You may be able to program your remote to control a laserdisc
player. Use the codes shown to the right or on the sheet packed
with your remote.
Follow these steps to program your universal remote to control
your laserdisc player:
1. Turn on the laserdisc player.
2. Look up the brand and its code number(s) in the code list.
3. Press and hold the VCR2•LD button on the remote.
4. Enter the three-digit code from the code list.
5. Release the VCR2•LD button, then press POWER to see if the laserdisc
player responds to the remote commands.
If it doesn’t, try pressing VCR2•LD, then POWER again.
6. Repeat steps 3 through 5 using the next code listed for
your brand until the laserdisc player responds to the remote
commands.
Programming the AUX button
You can program the AUX button on the remote to control another
component. The AUX button can be used to control other brands of audio
components, TVs, cable boxes, satellite receivers and VCRs.
To program the AUX button, follow these steps:
1. Turn on the component and find the brand and corresponding
code number(s) in one of the code lists in the appendices.
2. Press and hold the AUX button on the remote. Then, press the
other component button— AM/FM, TAPE, CD, DSS•CABLE, etc.
3. Release the component button, but not the AUX button.
4. Enter the three-digit code from the code list.
5. Release the AUX button, then press POWER or CHAN up (^)
or (v) to see if the component responds to the remote
commands. If it doesn’t, press AUX, then POWER again.
6. Repeat steps 3 through 6 using the next code listed for the
brand of your component until the component responds to
the remote commands.
LASERDISC
PLAYER CODES
Pioneer.................033, 037
ProScan................033, 037
RCA......................033, 037
22
Page 25
Troubleshooting tips
Problem Solution
System doesn’t turn on • Make sure power cord is securely plugged into the AC power outlet.
• Unplug the unit for a moment, and then plug it back in.
• Check the outlet by plugging in another device.
No sound • Adjust volume setting.
• Check for proper connection of speaker wires.
• Make sure you’ve selected the correct function: TUNER, CD, TAPE.
• Make sure volume is not muted. To deactivate, press MUTE on the remote.
Poor radio reception • Make sure FM antenna is connected and properly oriented.
• Rotate external AM loop antenna to achieve better AM reception.
• Try turning off electrical appliances near the unit, such as hair dryers,
vacuum cleaners, and fluorescent lights.
CD doesn’t play • Make sure the tray contains a disc.
• Make sure that discs’ labels are facing up.
• Make sure that Pause mode is not activated.
• Make sure CD function is selected.
CD sound skips • Clean the disc (as explained in “Care and Maintenance”).
• Check disc for warping, scratches, or other damage.
• Check for vibration or shock that may affect the CD player. Move system if
necessary.
Distorted or noisy recordings • Inspect the recording head and clean it if necessary.
• Demagnetize recording head (as explained in “Care and Maintenance”).
Remote control doesn’t work • Make sure the audio system is plugged into a working AC outlet.
• Make sure that the batteries are correctly installed in the remote control.
• Make sure batteries in the remote are okay. Replace weak batteries.
• Point the remote directly at the front of the unit while pressing the
buttons.
• Move closer to the unit with the remote control.
• Make sure that there are no obstacles between the remote and the unit.
23
Page 26
Appendix A: universal remote TV codes
Admiral ........................................ 005
Amtron......................................... 064
Akai ......................................002, 103
A-Mark ......................................... 102
Anam .................................... 104, 105
Anam National.................... 038, 106
AOC .................... 011, 019, 027, 088,
107
Bell & Howell .............................. 005
Candle ......................... 011, 027, 033
Citizen ................. 011, 027, 033, 064
Colortyme ................... 011, 027, 084
Concerto ..............................011, 027
Contec/Cony ......036, 037, 040, 042,
064
Craig ............................................. 064
Curtis Mathes ............ 000, 011, 015,
027, 037
CXC ............................................... 064
Daewoo................ 011, 019, 027,112
Daytron ................................ 011, 027
Dimensia ...................................... 000
Electrohome ...... 006, 011, 014, 027,
038, 061, 068
Emerson .............011, 026, 027, 028,
029, 030, 031, 032, 037, 042,
053, 064, 065, 067, 075, 076,
078, 079, 094, 095, 096
Envision................................ 011, 027
Fisher ................... 017, 021, 039, 041
Funai............................................. 064
GE ....................... 000, 008, 009, 011,
012, 027, 038, 068, 086, 089, 091
Goldstar .............003, 004, 006, 011,
019, 027, 037, 050
Hallmark ..............................011, 027
Hitachi................ 009, 011, 027, 036,
037, 040, 047, 048, 063, 080,
094, 097, 098
Infinity ......................................... 013
JBL ................................................. 013
JC Penney........... 000, 008, 011, 019,
027, 040, 068, 077, 086, 088
Jensen .................................. 011, 027
JVC ...................... 012, 024, 036, 037,
040, 048, 051, 074
Kawasho ..................... 002, 011, 027
Kenwood ............ 006, 011, 014, 027
Kloss Novabeam ................. 035, 043
KTV ............................................... 078
Loewe........................................... 013
Luxman ................................ 011, 027
LXI .......................000, 013, 018, 021,
023, 054
Magnavox .......... 006, 007, 010, 011,
013, 016, 027, 033, 035, 043,
049, 066, 087, 089
Marants........................................ 013
Marantz .............. 011, 013, 027, 069
Memorex...................................... 005
MGA ................... 006, 011, 014, 019,
022, 027, 041, 056, 061, 068
Mitsubishi .......... 006, 011, 014, 019,
022, 027, 041, 055, 056, 061, 068
MTC ............................. 011, 019, 027
Multivision................................... 081
NAD ...................................... 018, 023
NEC ..................... 011, 014, 019, 027,
038, 084
Panasonic... 012, 013, 038, 086, 111
Philco.................. 006, 007, 010, 011,
013, 016, 019, 027, 033, 035,
037, 038, 043, 087, 089
Philips................. 002, 006, 007, 010,
011, 013, 016, 033, 035, 037,
038, 043, 066, 073
Pioneer............... 011, 027, 045, 062,
093
Portland .............. 011, 019, 027, 037
ProScan ........................................ 000
Proton ................. 011, 027, 037, 072
Quasar ......................... 012, 038, 092
Radio Shack ....... 000, 021, 025, 036,
037, 059, 064, 078
RCA ..................... 000, 006, 011, 019,
027, 034, 038, 044, 046, 088,
100, 101, 109
Realistic........................................ 021
Sampo .................................. 011, 027
Samsung............. 006, 011, 014, 015,
019, 027, 036, 037, 077, 110
Sanyo.. 017, 021, 039, 056, 057, 058
Scott ............................ 028, 037, 064
Sears ...................000, 006, 011, 014,
017, 018, 021, 023, 027, 039,
040, 041, 051, 071, 083, 095
Sharp ..................011, 020, 025, 027,
037, 052, 053, 059, 060, 108
Signature .............................005, 094
Sony .............................................. 002
Soundesign ................. 011, 027, 033
Sylvania .............. 006, 007, 010, 011,
013, 016, 027, 033, 035, 043,
049, 066, 087, 089
Symphonic ...........................064, 076
Tatung .......................................... 038
Technics ........................................ 012
Techwood ............................ 011, 027
Teknika............... 011, 019, 027, 033,
036, 037, 040, 066
Telecaption .................................. 090
TMK ...................................... 011, 027
Toshiba ............... 018, 021, 023, 040,
071, 077, 085, 090
Universal .............................. 008, 009
Victor............................................ 051
Vidtech................................. 019, 027
Wards ................. 000, 005, 006, 007,
008, 009, 010, 011, 013, 019,
025, 027, 028, 035, 043, 059,
066, 076, 082, 089
Yamaha ...............006, 014, 019, 027
Zenith ...................................001, 099
24
Page 27
Appendix B: universal remote VCR codes
Admiral ....................................... 006
Aiwa ............................................ 015
Akai .................. 003, 017, 022, 023,
063, 066
Audio Dynamics .................014, 016
Bell & Howell ............................. 002
Broksonic .................................... 010
Candle .............. 007, 009, 013, 044,
045, 046, 052
Canon ..................................008, 053
Capehart ..................................... 001
Citizen .............. 007, 009, 013, 044,
045, 046, 052
Colortyme ................................... 014
Craig ....................................007, 012
Curtis Mathes .. 000, 007, 008, 014,
015, 044, 046, 053, 064, 067
Daewoo..............013, 045, 052, 076
dbx .......................................014, 016
Dimensia ..................................... 000
Dynatech..................................... 015
Electrohome ............................... 027
Emerson ........... 008, 009, 010, 013,
015, 020, 023, 027, 034, 041,
042, 047, 049, 057, 062, 065,
067, 068, 070
Fisher ................ 002, 012, 018, 019,
043, 048, 058
Funai............................................ 015
GE ..................... 000, 007, 008, 032,
037, 053
Goldstar .............009, 014, 046, 060
Harman Kardon ......................... 014
Hitachi................ 005, 015, 035, 036
Instant Replay ............................ 008
JCL ................................................ 008
JC Penney......... 002, 005, 007, 008,
014, 016, 030, 035, 051, 053
JVC .................... 002, 014, 016, 030,
046, 074
Kenwood ......... 002, 014, 016, 030,
044, 046
KLH .............................................. 073
Lloyd’s ......................................... 015
Logik............................................ 031
Magnavox ..........008, 029, 053, 056
Marantz ........... 002, 008, 014, 016,
029, 030, 044, 046, 061
Marta........................................... 009
MEI ............................................... 008
Memorex............008, 009, 012, 015
MGA ....................................004, 027
Midland....................................... 032
Minolta ...............................005, 035
Mitsubishi ........ 004, 005, 027, 035,
040
Montgomery Ward.................... 006
MTC .....................................007, 015
Multitech ...........007, 015, 031, 032
NEC ................... 002, 014, 016, 030,
044, 046, 059, 061, 064
Panasonic........... 008, 053, 075, 077
Pentax ........................ 005, 035, 044
Pentex Research + ..................... 046
Philco..................008, 029, 053, 056
Philips.................................. 008, 029
Pioneer....................... 005, 016, 050
Portland ..................... 044, 045, 052
ProScan ....................................... 000
Quartz ......................................... 002
Quasar .................................008, 053
RCA ................... 000, 005, 007, 008,
028, 035, 037, 054, 069
Radio Shack/Realistic ...... 002, 006,
008, 009, 012, 015, 019, 027,
043, 053
Samsung........... 007, 013, 022, 032,
042
Sansui .................................. 016, 071
Sanyo................................... 002, 012
Scott ................. 004, 013, 041, 049,
068
Sears ................. 002, 005, 009, 012,
018, 019, 035, 043, 048
Sharp ................ 006, 024, 027, 039,
045
Shintom..............017, 026, 031, 055
Signature .................................... 015
Sony ............................ 017, 026, 038
Sylvania ............ 008, 015, 029, 053,
056
Symphonic .................................. 015
Tandy ...................................002, 015
Tashiko ........................................ 009
Tatung ......................................... 030
Teac ............................ 015, 030, 069
Technics ....................................... 008
Teknika............... 008, 009, 015, 021
TMK ............................................. 067
Toshiba ............. 005, 013, 019, 048,
049
Totevision ...........................007, 009
Unitech........................................ 007
Vector Research ........ 014, 016, 044
Victor........................................... 016
Video Concepts ......... 014, 016, 044
Videosonic .................................. 007
Wards ............... 005, 006, 007, 008,
009, 012, 013, 015, 025, 027, 031,
035
Yamaha ............ 002, 014, 016, 030,
046
Zenith .................011, 017, 026, 072
25
Page 28
APPENDIX C: UNIVERSAL REMOTE CABLE CODES
ABC ...................... 022, 046, 053, 054
Anvision ............................... 007, 008
Cablestar.............................. 007, 008
Diamond ...................................... 056
Eagle..................................... 007, 008
Eastern International................. 002
General Instrument .................... 046
GI 400 .................004, 005, 015, 023,
024, 025, 030, 036
Hamlin........ 003, 012, 013, 034, 048
Hitachi......................... 037, 043, 046
Jerrold ................ 004, 005, 015, 023,
024, 025, 030, 036, 045, 046, 047,
062, 065
Macom ................................. 037, 043
Magnavox .......... 007, 008, 019, 021,
026, 028, 029, 032, 033, 040, 041
NSC ............................................... 009
Oak .............................. 001, 016, 038
Oak Sigma ................................... 016
Panasonic............ 003, 027, 039, 061
Philips................. 007, 008, 019, 021,
026, 028, 029, 032, 033, 040, 041
Pioneer........................ 018, 020, 044
Randtek................................ 007, 008
RCA ....................................... 000, 027
Regal ........................... 003, 012, 013
Regency................................ 002, 033
Samsung....................................... 044
Scientific Atlanta ...... 003, 022, 035,
063, 064
Signature ..................................... 046
Sprucer ......................................... 027
Starcom ........................................ 046
Stargate 2000.............................. 058
Sylvania ................................ 011, 059
Teknika......................................... 006
Texscan ........................ 010, 011, 059
Tocom ......... 017, 021, 049, 050, 055
Unika ........................... 031, 032, 041
Universal ..................... 051, 052, 060
Viewstar ............. 007, 008, 019, 021,
026, 028, 029, 032, 033, 040, 041
Warner Amex .............................. 044
Zenith .................. 014, 042, 057, 061
26
Page 29
Care and maintenance
Cleaning the Exterior
• Disconnect the system from AC power before cleaning the exterior of
the system with a soft dust cloth.
Handling Compact Discs
• Do not touch their signal surfaces. Hold by the edges, or by
one edge and the hole.
• Do not affix labels or adhesive tape to the label surfaces. Also, do not
scratch or damage the label.
• Discs rotate at high speeds inside the player. Do not use damaged
(cracked or warped) discs.
Cleaning Compact Discs
• Dirty discs can cause poor sound quality. Always keep discs clean by
wiping them gently with a soft cloth from the inner edge toward the
outer perimeter.
• If a disc becomes very dirty, wet a soft cloth in water, wring it out well,
wipe the dirt away gently, and then remove any water drops with a dry
cloth.
• Do not use record cleaning sprays or antistatic agents on discs. Also,
never clean the discs with benzene, thinner, or other volatile solvents
which may cause damage to the disc surface.
Tape Care
• Do not expose tapes to sunlight or store in hot places. High
temperatures may warp the shell or damage the tape itself.
• Keep cassettes in their boxes when not in use.
• Cassette tapes can be erased by magnetic fields produced by magnets,
electric motors, electrical transformers, and other devices. Keep tapes
away from magnets and magnetic fields.
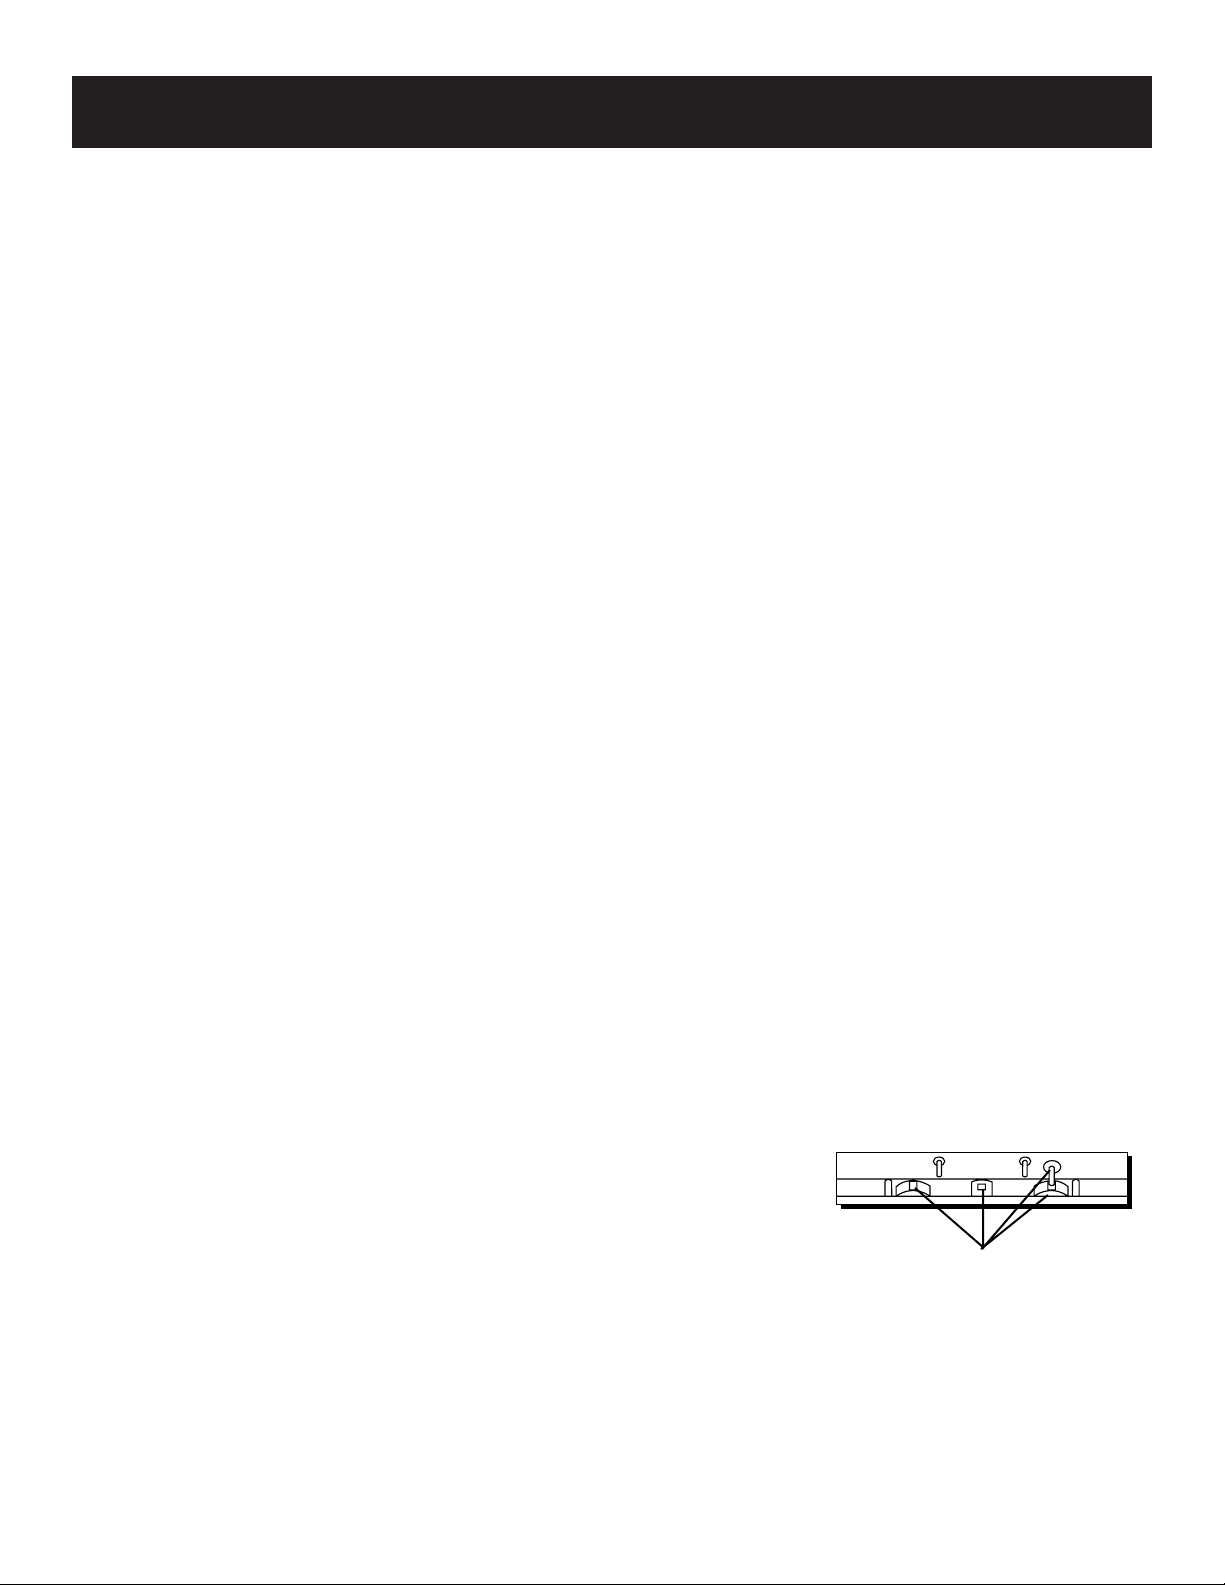
Cleaning the Tape Heads
Iron oxide particles from the magnetic tape can build up on the parts that
come in contact with the tape. These deposits can cause incomplete erasure,
muffled playback sound, and might prevent automatic stop.
Open the compartment door, push the PLAY button and gently clean the
heads, capstan, and pinch wheel with a head cleaner.
Always unplug the power cord before cleaning, and allow 30 minutes drying
time when using a liquid cleaner.
Clean heads after every 25 hours of use.
• Demagnetize the head occasionally with a head demagnetizing cassette
(available from many audio equipment stores).
• Never use any metal objects on or near the tape heads.
Do not allow any cleaning material to fall into the tape assembly.
Clean These Parts
27
Page 30

Index
A
Antennas 5
Appendix A: Remote TV codes 24
Appendix B: Remote VCR codes 24
Appendix C: Remote cable codes 26
Auxiliary components 6
B
Balancing the speakers 4
BALANCE/BASS/TREBLE 9
BAND 7
Battery installation 17
Bypass 8
c
Cable codes 26
Care and maintenance 30
Cassette Deck Controls and Operations 14
Cassette deck controls (remote) 19
CENTER LEVEL 8
Center speakers 3
CD Controls and Operations 11
CD display messages 12
CD player 11
CD player controls (remote) 19
Choosing a radio station 9
Cleaning compact discs 29
Cleaning tape heads 29
Cleaning the exterior 29
Connecting antennas 5
Connecting auxiliary components 6
Connecting for power 6
Connecting the speakers 3
connecting the wires
Connecting for power 6
Component connection 6
Controls
tuner 7
CD 11
cassette deck 14
D
DISC SKIP 11
Display messages (tuner) 9
Display messages (CD) 12
E
EQ MODE 9
F
FM MODE 7
First things first 2
Front panel display 9
FUNCTION BUTTONS 7
G
General controls (cassette) 14
General controls (CD) 11
General controls (remote) 17
General controls (tuner) 7
H
Hall 8
Handling compact discs 29
Headphones 6
High speed dubbing 15
I
IRS 7
L
Laserdisc controls (remote) 18
Limited warranty Back cover
Loading discs 13
Location choice 2
M
Main (front) speakers 3
MEMORY 8
Moisture control 2
N
Normal 8
O
OPEN/CLOSE 12
28
Page 31

INDEX
P
PAUSE (CD) 12
PAUSE (cassette) 14
Phantom 8
Placing the speakers 3
setting up for surround sound
PLAY (CD) 12
PLAY (cassette) 14
Playing cassette tapes 14
Playing discs 13
Power 6
POWER ON/OFF 7
Preset programming 10
PRESETS 7
PROGRAM 11
Programming lists 13
Programming presets 10
Programming the AUX button (remote) 22
Programming the universal remote 21
for use with your TV/VCR
for use with your cable box
for use with other components
laserdisc
RCA brand Digital Satellite Receiver
Pro Logic 8
surround speakers
subwoofers
Setting up the system 3
Simultaneous playing and loading (CD) 13
Simulated 8
Skipping discs 13
Speakers 3
STANDBY 7
STOP (CD) 12
STOP (cassette) 14
Subwoofers 4
SURROUND MODE 8
Surround sound level controls (remote) 20
Surround speakers 3
System location 2
T
Tape care 29
TEST TONE 8
TRACK 12
Troubleshooting tips 23
Tuner Controls and Operations 7
TUNING 7
TV codes (remote) 24
TV controls (remote) 17
R
RANDOM 11
Random play 13
REAR LEVEL 9
Receiver controls (remote) 20
Receiver/tuner controls (remote) 20
RECORD 14
Recording from the CD player 15
Recording from the radio 15
Recording from tape to tape 15
Recording from TV, VCR, video 16
Remote cable codes 26
Remote control use 17
Remote TV codes 24
REPEAT 11
Repeat play 13
s
Sample set up for surround sound 5
Satellite receiver controls (remote) 20
SEARCH 11
Setting up for surround sound 3
main (front) speakers
center speakers
U
Using headphones 6
V
VCR codes (remote) 25
VCR controls (remote) 18
VOLUME 7
W
Wide 8
WIND 14
29
Page 32

Limited Warranty
What your warranty covers:
• Any defect in materials or workmanship.
For how long after your purchase:
• One year. (The warranty period for rental units begins with the first rental or 45 days from date of shipment to
the rental firm, whichever comes first.)
What we will do:
• Provide you with a new or, at our option, a refurbished unit.
• The exchange unit is under warranty for the remainder of the original product’s warranty period.
How to make a warranty claim:
• Properly pack your unit. Include any cables, etc., which were originally provided with the product. We
recommend using the original carton and packing materials.
• Include in the package evidence of purchase date such as the bill of sale. Also print your name and address and a
description of the defect. Send standard UPS or its equivalent to:
Thomson Consumer Electronics, Inc.
Product Exchange Center
32 Spur Drive
El Paso, Texas 79906
• Pay any charges billed to you by the Exchange Center for service not covered by the warranty.
• Insure your shipment in case of loss or damage. Thomson accepts no liability in case of damage or loss.
• A new or refurbished unit will be shipped to you prepaid freight.
What your warranty does not cover:
• Customer instruction. (Your Owner’s Manual provides information regarding operating instructions and user
controls. For additional information, ask your dealer.)
• Installation and set-up service adjustments.
• Batteries.
• Damage from misuse or neglect.
• Products which have been modified or incorporated into other products.
• Products purchased or serviced outside the USA.
• Acts of God, such as but not limited to lightning damage.
Product Registration:
• Please complete and mail the Product Registration Card packed with your unit. It will make it easier to contact
you should it ever be necessary. The return of the card is not required for warranty coverage.
How state law relates to this warranty:
• This warranty gives you specific legal rights, and you may have other rights which vary from state to state.
If you purchased your product outside the USA:
• This warranty does not apply. Contact your dealer for warranty information.
Model RP-9380
20731350
97-10
Printed in China
P.O. Box 1976, Indianapolis, IN 46206
© 1997 Thomson Consumer Electronics, Inc.
Trademark(s) ® Registered
Marca(s) Registras
 Loading...