

Page 1

USER'S
GUIDE
RP-8623
BECEIVED SEP3 0 1997_
COMPACT STEREO
Page 2
Owning an RCA compact audio system is like having a
component stereo system, except you don't have the hassle of
hooking up a bunch of wires.
LOOKING FOR A GOOD READ?
You won't find this instruction book on the best seller list, but
it does contain a lot of information that you should know
before using your RCA stereo system.
I know that you want to use your stereo, not read about it, but
you really need to read the first section, "First Things First," to
learn how to hook it up; then, asyou have time, you can read
about all of the great features of this stereo.
DON'T FORGETTHE NOTES
Don't forget to read the notes in the margins too. They give
you extra information that can help you get the most from
your stereo.
If you have any questions, be sure to check
the Troubleshooting Tips section, the Index, or the Table of
Contents to help you find the answer.
FIRSTTHINGS FIRST ................................................... 2
INSTALLATION AND SET UP .................................................. 3
GENERAL C,ONTROLS ............................................................... 4
USING THE TUNER ..................................................... 6
USING THE CD PLAYER .............................................. 7
PLAYING DISC,S .......................................................................... 8
PROGRAMMING PLAY ORDER .............................................. 9
UN DE RSTAN DI NG TH E/v\USlc, C,ALEN DAR .................... 10
USING ATS (AUTO TRACK SKIP) ........................................... 11
USING THE CASSETTE DECK .................................... 12
PLAYI NG C_ASSE'I-I-E TAPES ..................................................... 12
REC,ORDI NG ON CASSE-I-T'E TAPES ....................................... 12
USING TH E REMOTE CONTROL .............................. 14
CARE AND MAINTENANCE .................................... 15
TROUBLESHOOTING TIPS ....................................... 16
INDEX ......................................................................... 17
1
Page 3
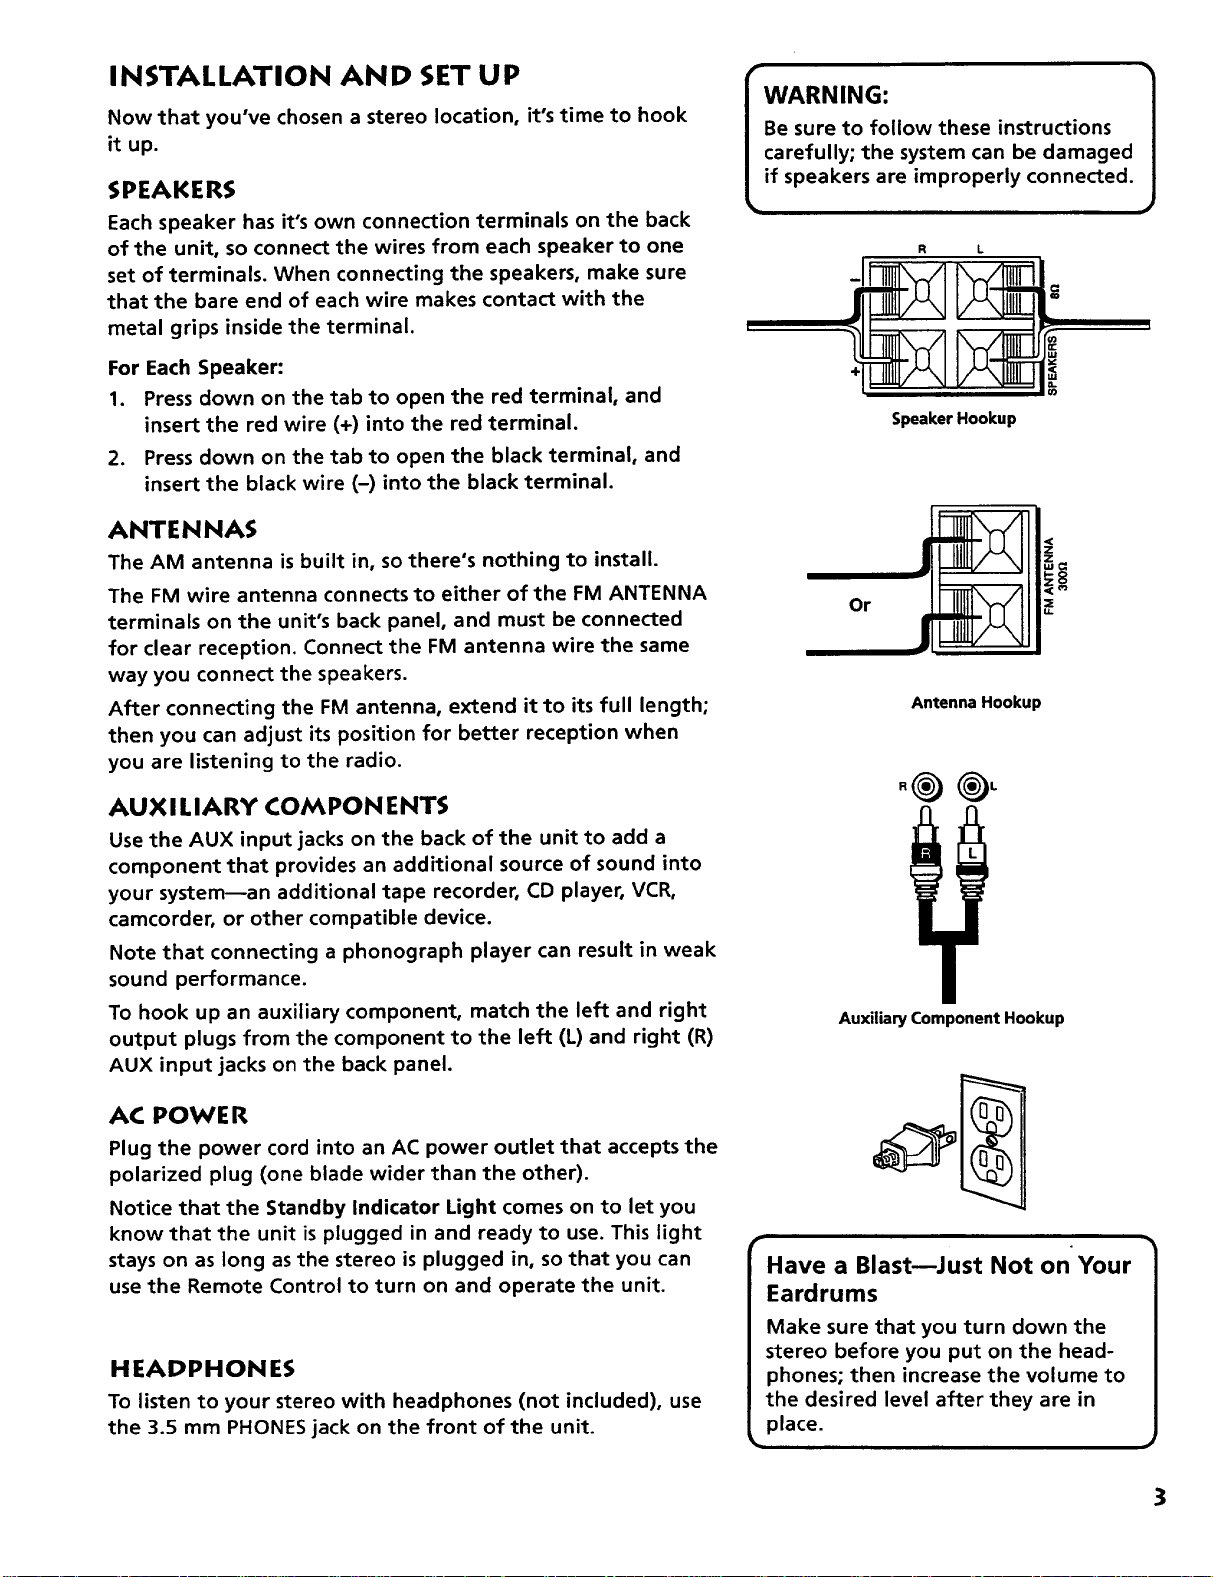
INSTALLATION AND SET UP
Now that you've chosen a stereo location, it's time to hook
it up.
SPEAKERS
Each speaker has it's own connection terminals on the back
of the unit, so connect the wires from each speaker to one
set of terminals. When connecting the speakers, make sure
that the bare end of each wire makes contact with the
metal grips inside the terminal.
For Each Speaker:
1. Press down on the tab to open the red terminal, and
insert the red wire (+) into the red terminal.
2. Press down on the tab to open the black terminal, and
insert the black wire (-) into the black terminal.
ANTENNAS
The AM antenna is built in, so there's nothing to install.
The FM wire antenna connects to either of the FM ANTENNA
terminals on the unit's back panel, and must be connected
for clear reception. Connect the FM antenna wire the same
way you connect the speakers.
After connecting the FM antenna, extend it to its full length;
then you can adjust its position for better reception when
you are listening to the radio.
Be sure to follow these instructions
carefully; the system can be damaged
IWARNING: 1
if speakers are improperly connected.
R L
Speaker Hookup
z_
Z
Or
Antenna Hookup
,,=
AUX I LIA RY COM PO N ENTS
Use the AUX input jacks on the back of the unit to add a
component that provides an additional source of sound into
your system--an additional tape recorder, CD player, VCR,
camcorder, or other compatible device.
Note that connecting a phonograph player can result in weak
sound performance.
To hook up an auxiliary component, match the left and right
output plugs from the component to the left (L) and right (R)
AUX input jacks on the back panel.
AC POWER
Plug the power cord into an AC power outlet that accepts the
polarized plug (one blade wider than the other).
Notice that the Standby Indicator Light comes on to let you
know that the unit is plugged in and ready to use. This light
stays on as long asthe stereo is plugged in, so that you can
use the Remote Control to turn on and operate the unit.
HEADPHONES
To listen to your stereo with headphones (not included), use
the 3.5 mm PHONES jack on the front of the unit.
Auxiliary Component Hookup
Have a Blast--Just Not on Your
Eardrums
Make sure that you turn down the
stereo before you put on the head-
phones; then increase the volume to
the desired level after they are in
place.
3
Page 4

STANDBY MODE
When the power is off, the system remains in standby mode so
that you can use the remote control to turn it on. The Standby
Indicator Light (next to the POWER button) comes on when the
unit is in standby mode.
POWER
Pressthe POWER button to turn on the unit. The LCD lights
and the system begins operating from the last sound source
used--the tuner, the tape deck, or the CD player. The Standby
Indicator Light turns off.
REMOTE SENSOR
Next to the POWER button is the Infrared Remote Control
sensor. Make sure that this is not covered up or blocked, or the
remote control won't work.
/@0
I
Standby Indicator Ught Infrared Remote
Control Sensor
VOLUME
Turn the volume dial to increase or decrease the volume. The
volume level is displayed numerically in the LCD (from 1 to 32).
VISEQ PRESETS
The VisEQ PRESET button controls the visual electronic
equalizer. Pressthis button to choose one of the preset
electronic equalizer frequencies. The first time you press the
VisEQ PRESET button, the LCD shows the current setting.
Continue pressing the button until the setting you want
(FLAT, ROCK, POP, JAZZ, or CLASSICAL) appears in the display.
VARIABLE BASS BOOST
Use the Bass Boost feature to enhance the quality of bass
frequencies; however, note that applying Bass Boost at
higher volumes can cause some sound distortion.
Press the VARIABLE BASS BOOST button to scroll through
the variable settings until the setting you want is reflected
in the LCD.
VOLUME
VARIABLE
BASS BOOST
FUNCTION BUTFONS
Use the function buttons (TAPE, TUNER, CD, AUX) to choose
which stereo component function you want to use.
Page 5

Combinedwith featuressuchasShuffle,Repeat,and
Programmedplay,the three CDchanger gives you lots
of options for playing CDs.
KNOWING YOUR BUTFONS
Disc Indicator OPEN/CLOSE
Ughts button
The following buttons are used for basic CD operation:
CD (function button) B Pressthe CD function button to
choose the CD player.
Track/Search Backward I_1_1<_] and Forward D{>l_lbl
• In Stop mode--- Moves you to the beginning of the
preceding or following track.
• In Play mode-- Press and release to move to the begin-
ning of the preceding or following track. Press and hold
to search.
Stop •- Stops play.
Play/Pause I_ -- This button works as a toggle switch: press
to begin play and to pause play.
LCD MESSAGES
The following LCD messages tell you what the CD player
is doing:
Message Meaning
cd CD function is active
m, Ii ,=_"-_"-_ 11_5 I
Seeing Is Believing
Whenever you close the disc drawer,
the CD player assumes that you put
a disc in each of the three trays so
that it doesn't have to waste time
checking. That's why all of the Disc
Indicator Lights come on when you
close the drawer. When the CD player
discovers an empty tray, it turns out
that tray's Disc Indicator Light.
dr I n CD drawer is in.
dr ou/_ CD drawer is out.
Remain time is unavailable. (Displayed
when the track number is beyond 32.)
no
nP
n_
PF
,-ERd
dlSE
There are no discs in the CD drawer.
No tracks are programmed (applies to
both Program and ATS modes).
No tracks are available in program play
mode or ATS mode.
Program is full (applies to both Program
and ATS modes).
Reading disc's table of contents (how
many tracks it has and the total time for
the disc). This information is displayed in
Stop mode.
You can play 3" and 5"
compact discs that have
Look for this Logo
this logo.
DIGITAL AUDIO
7
Page 6

REPEATING ONLY PART OF A SINGLE TRACK
Repeat one section of a track by using the A-B button to
mark a star_ing and stopping point within the track.
1. Pressthe A~B button at the point in the track you want
begin repeating (A~B flashes in the display).
2. Press A~B again at the point you want the repeating to
stop (A~B stops flashing and remains in the display).
The section of the track you marked repeats until you
press • (Stop), or until you press I_1_1<:_] or [_>IIHI_I to
move to another track.
REPEATING A PROGRAM
When you program tracks into memory, you can repeat the
program by pressing the REPEAT button after the program
begins playing.
CHOOSING DISCS FOR PLAY
When you load three discs at one time, you can choose
which disc you want to play by pressing the DISC SKIP button
until the tray number containing that disc lights up.
After the current disc finishes playing, the unit moves on to
the next disc. If you want to listen to only one of the three
loaded discs, use the 1/3 DISC button.
AU DISCS TRACK TIME / I
A-8
I-I I-I I-I -I.1-11-1
I_1i-i I_1I-"1_1-i
A~B flashes in the display
when you are choosing part
of a track to repeat
I_1I-"1_1_1
Playing all discs
1/3 DISC BUTTON
Pressthe 1/3 DISC button to listen only to the current disc.
You can use this feature while in Shuffle or Repeat mode,
but if you press the 1/3 DISC button during programmed
play, the program feature is turned off.
PROGRAMMING PLAY ORDER
You must be in Stop mode in order to program play order.
1. Pressthe PROGRAM button.
* PROGRAM blinks in the LCD.
• -- appears in the LCD beneath the TRACK indicator.
• Pr 01 appears in the LCD indicating that this isfirst
programmed track.
2. Pressthe DISC SKIP button to choose a disc.
3. Pressl_l_l<:_ or _ to choose a track.
4. Press PROGRAM to save the track in the program
memory.
5. Repeat steps 2-4 above to program up to 32 tracks.
• PF appears in the LCD when the program is full.
6. Press I_ (Play/Pause) to begin programmed play.
- I-I I-I -I.1-1 I-I
II_...._ r REPEAT ALl. 1
Playing current disc only
I_Ii-i I_I I_'I_I _I
TRACK
I-I I-I I
I_1 I I I_1I
I I
Track number Program number
(04 indicates that (01 indicates first
track 4 on current disc
has been selected)
programmed track)
9
Page 7

USING ATS (AUTO TRACK SKIP)
ATS (Auto Track Skip) is the opposite of programmed play:
instead of programming the tracks you want to hear, you
indicate which tracks you don't want to hear.
You can choose as many as 16 tracks to be automatically
skipped. The process for creating and editing an ATS
program is nearly identical to that of programming disc play.
CREATING AN ATS PROGRAM
1. Press the ATS button (AUTO TRACK SKIP blinks in
the display).
2. PressI_l_l<_ or [>{_>JHIblto choose the first track to
be skipped (the track number and Pr 01 appears in
the display).
3. Press PROGRAM to add the selected track to the ATS
program.
4. Repeat the preceding steps to add more tracks to the ATS
program.
5. Press I_1 (Play/Pause) to begin playing the ATS program.
RECALLING AND EDITING THE ATS PROGRAM
Editing the ATS program is a lot like editing a regular
program.
1. Press the ATS button to go to Auto Track Skip mode.
2. Press PROGRAM to move to the next program number
until you get to the programmed track you want to
change.
3. Press DISC SKIP to choose the disc, and then press
141_ or [>_>lH_l to choose a replacement track.
4. Press the PROGRAM button to change the current
skipped track to the one you just selected.
1 I_=xA_T_=_=p
- I-I I-I
l_li-i I- I-
I _ \ I /
Track 08 is the first track selected in the ATS
program (Pr 01).
TRACKAUTOTRACK$KIP 1
I-I I I-I1-1.1-11
I
i ;: j
I \I / 1
I_11 I_11_1"1_1I
I
Track 01 Track 08 is the only track
begins in the ATS program, and
playing, has been removed from
T_ACKA_,T.CK,.p
I-I I-I I-I I
I_I i-i I- I_1I
The first ATS program number (Pr 01) contains
track 08.
AUTOTRACKSKIP
TRACK
I-I Ii [_J I-I I
I_1LI I- I_11
Track 6 is selected to replace track 8 as the first
programmed track to be skipped.
the Music Calendar.
i
J
CLEARING THE ATS PROGRAM
Clearing the ATS program is also a lot like clearing a regular
program. You can unplug the unit, or you can:
1. Press the ATS button.
2. Press PROGRAM to select the first program number you
want to clear.
3. Press I_1_1<_}<_or D{>_I_I until you get to track number 00.
4. Press PROGRAM to clear all tracks to the end of the
program.
TRACK AUTO TRACKSKIP I
I-I I I-II-I.I-I I
I_I I I_II_I'I_I I
I
Notice that when play begins, track 6 isdoes not
appear in the Music Calendar, and will he skipped.
J
11
Page 8

RECORDING FROM COMPACT DISCS
1. Insert a cassette tape into Deck 1.
2. Choose the CD function.
3. Insert the disc(s) to be recorded. You can start with any
track on a disc or you can create a program to record.
4. Press I_1 (Play/Pause) on the CD player twice (to begin
and pause disc play).
5. Press the RECORD button on the cassette deck to begin
recording.
HIGH SPEED DUBBING OF COMPACT DISCS
Use the High Speed Dubbing feature to speed up the CD
recording process.
1. Insert a cassette tape into Deck 1.
2. Choose the CD function.
3. Insert the disc(s) to be recorded. You can start with any
track on a disc, or you can create a program to record.
4. Press I_1 (Play/Pause) on the CD player twice (to begin
and pause disc play). Wait until the unit displays a
"blinking" track number and track time.
5. Press the CD SPEED DUBBING button.
6. Press the RECORD button on the Deck 1.
We're on the Level
The built-in Automatic Level Control
automatically sets the input level for
optimum recording sound. You can
listen to, and even adjust the volume
setting of the radio without affecting
the quality of the recording--just
don't change the station.
"" ff _ tlo_o I
__ _ _ _J
CD Speed Dubbing button
and indicator light
RECORDING FROM A CASSETFE
Two speed options are available for recording cassette tapes.
(Note that you must activate the tape component function
before you can begin taping.
Use the TAPE SPEED DUBBING button (located beside the
phones jack on the Tuner component) to activate high speed
dubbing of tapes. The indicator light beside the button
comes on when high speed dubbing is active.
1. Insert the pre-recorded tape you want to record into the
Deck 2.
2. Insert the blank tape you're recording to into Deck 1.
3. Press the PAUSE button and then the RECORD button on
Deck 1.
4. Press the PLAY button on Deck 2. (Playback and
recording begin simultaneously.)
RECORDING FROM AN AUXILIARY COMPONENT
1. Insert a cassette tape into the tape deck (preferably a blank
cassette).
2. Make sure that the auxiliary device is connected correctly,
then choose the AUX function.
TAPE SPEED
DUBBING button
...........
W
3. Press the RECORD button on the cassette deck to begin
recording, and then start playback on the auxiliary unit.
13
Page 9

CLEANING THE EXTERIOR
• Disconnect the system from AC power before cleaning the
exterior of the unit with a soft dust cloth.
HANDLING COMPACT DISCS
• Do not touch their signal surfaces. Hold by the edges, or by
one edge and the hole.
• Do not affix labels or adhesive tape to the label surfaces.
Also, do not scratch or damage the label.
• Discs rotate at high speeds inside the player. Do not use
damaged (cracked or warped) discs.
CLEAN I NG COMPACT DISCS
• Dirty discs can cause poor sound quality. Always keep discs
clean by wiping them gently with a soft cloth from the
inner edge toward the outer perimeter.
• If a disc becomes very dirty, wet a soft cloth in water, wring
it out well, wipe the dirt away gently, and then remove
any water drops with a dry cloth.
• Do not use record cleaning sprays or anti-static agents on
discs. Also, never clean the discswith benzene, thinner, or
other volatile solvents which may cause damage to the disc
surface.
TAPE CARE
• Don't expose tapes to sunlight or store in hot places. High
temperatures may warp the shell or damage the tape itself.
• Keep cassettes in their boxes when not in use.
• Cassette tapes can be erased by magnetic fields produced by
magnets, electric motors, electrical transformers, and other
devices. Keep tapes away from magnets and magnetic fields.
CLEANING THE TAPE HEADS
Iron oxide particles from the magnetic tape can build up onthe
parts that come in contact with the tape. These deposits can
cause incomplete erasure, muffled playback sound, and might
prevent automatic stop.
Open the compartment door, push the PLAY button and gently
clean the heads, capstan, and pinch wheel with a head cleaner.
Always unplug the power cord before cleaning, and allow 30
minutes drying time when using a liquid cleaner.
Clean heads after every 25 hours of use.
• Demagnetize the head occasionally with a head
demagnetizing cassette (available from many audio
equipment stores).
• Never use any metal objects on or near the tape heads.
Do not allow any cleaning material to fall into the tape
assembly.
Quit Slacking
A little bit of slack in
your tapes can cause
scratches on the tape,
or worse yet, the tape could break.
If you notice some slack in the
tape, use a pencil to tighten it up
before you insert it.
? .-"
Clean these parts
15
Page 10

Symbols
1/3 DISC button 9
A
A-B button 9
AC Power 3
Antenna, AM radio 3
Antenna, FM radio 3
connecting 3
ATS (Auto Track Skip) Button 11
ATS Program 11
clearing 11
creating 11
recalling and editing 11
AUX input jacks 3
B
Bass Boost Indicator 4
C
Cassette deck buttons
FAST FORWARD 12
PAUSE 12
PLAY 12
RECORD 12
REWIND 12
STOP/EJECT 12
CD button 7
CD indicator lights 7
CD playing time 8
REMAIN TIME 8
CD Remain time indicator 4
CD SPEED DUBBING button 13
compact discs
3" and 5" 7
cleaning 15
handling 15
high speed dubbing 13
recording from 13
copyright infringement 13
D
DISC SKIP button 8
Dual cassette deck 12
E
ELECTRONIC EQUALIZER button 5
Erase protection 12
F
Function buttons
TAPE, TUNER, CD, AUX 5
H
Headphones 3
safety 3
High speed dubbing of
Compact discs 13
L
LCD indicators
CD Playing time 4
Number indicator 4
Radio band 4
VisEQ display 4
LCD Messages 7
Liquid crystal display (LCD) 4
Loading CDs 8
loading and playing at the same
time 8
Location
speaker 2
unit 2
M
MEMORY button 6
Mode indicators 4
Moisture condensation 2
Music Calendar 4, 10
O
OPEN/CLOSE button 8
P
POWER button 5
PRESET buttons 6
PRESET indicator 6
PROGRAM button 10
Programming play order 9
R
Radio Band Indicator 4
Recalling and editing
the Program 10
RECORD button 12
Recording on cassette tapes 12
from a CD 13
from an auxiliary device 14
from another cassette 13
from the radio 13
Remote control 14
AUX button 14
battery installation 14
CD button 14
MUTE button 14
POWER button 14
PRESET buttons 14
SEEK buttons 14
TAPE button 14
TRACK buttons 14
TUNER button 14
VOL button 14
REPEAT button 8
Repeat mode indicator 8
Repeating play order 8
S
SHUFFLE button 8
Shuffling play order 8
Speakers
connecting 3
installation 3
placement 2
standby indicator light 3, 5
Standby mode 5
Storing radio stations in memory
T
Tape Care 15
TAPE function button 12
Troubleshooting 16
TUNER function button 6
Tuning in radio stations 6
changing radio bands 6
tuning in stations 6
V
VARIABLE BASS BOOST button 5
VisEQ display 4
VisEQ electronic equalizer 5
VisEQ settings
Flat, Rock, Pop, Jazz, Classical 5
volume dial 5
17
 Loading...