

Page 1
1
Problem
System will not
turn on
No sound
Poor radio
reception
CD does not
play
CD sound skips
Solution
Check power cord for a secure
connection.
Unplug the unit for a moment, and
then plug into power source again.
Check the outlet by plugging in
another device.
Increase the volume setting.
Check connection to speakers.
Check that you have selected the
appropriate function: CD, TAPE,
TUNER.
Move antenna.
Turn off nearby electrical appliances,
such as hair dryer, vacuum cleaner,
microwave, fluorescent lights.
Check that CD is in the tray.
Check that CD label is facing up.
Check that PAUSE mode is not on.
Check that CD function is selected.
Clean the disc.
Check disc for warping, scratches, or
other damage.
Check if something is causing the
system to vibrate. If so, move the
system.
Problem
CD button will
not respond, or
does not change
discs when you
press DISC SKIP
Distorted or
noisy tape
recordings
Remote control
does not work
Solution
Switch to another function (TAPE,
TUNER) and then back to CD.
Inspect the tape heads and clean
and demagnetize.
Check that the batteries are
properly installed.
Replace weak batteries.
Check the system is plugged in to
power source.
Point the remote directly at the
system’s front panel.
Move closer to the system.
Remove any obstacles between the
remote and the system.
Fitting the batteries
TROUBLESHOOTING TIPS
RP7994 Cover 7/12/00, 5:22 PM1
Page 2
THOMSON CONSUMER ELECTRONICS
10330 N. meridian St.
Indianapolis, IN 46290
©2000 Thomson Consumer Electronics, Inc.
Trademark(s) ©Registered
Marca(s) ©Registrada(s)
Marque(s) ©Deposée(s)
55020360 Rev.1 (EN/F/E)
www.rca.com
PORTABLE
CDPLAYER /2 B
R
E
P
E
STOP
RP7994 Cover 7/12/00, 5:22 PM2
Page 3
u s e r m a n u a l
RP7994
RP7994GR
RP7994BL
RP7994SL
PORTABLE
CDPLAYER /2 BANDRAD
IO/ STE
REOCASSETTE R
ECORDER
PLAY/
PAUSE
M
I
X
R
E
P
E
A
T
STOP
RP 7994
RP7994 Cover 7/12/00, 5:22 PM3
Page 4
WARNING : TO PREVENT
FIRE OR ELECTRICAL
SHOCK HAZARD, DO NOT
EXPOSE THIS PRODUCT TO
RAIN OR MOISTURE.
CAUTION
RISK OFELECTRIC SHOCK
DO NOTOPEN
THE LIGHTNING FLASH
ANDARROW HEADWITHIN
THE TRIANGLE IS A
WARNINGSIGN ALERTING
YOU OF "DANGEROUS
VOLTAGE" INSIDE THE
PRODUCT.
CAUTION: TO REDUCE THE RISK OF
ELECTRIC SHOCK, DO NOT REMOVE
COVER (OR BACK). NO USER
SERVICEABLE PARTS INSIDE.REFER
SERVICING TO QUALIFIED SERVICE
PERSONNEL.
THE EXCLAMATION POINT
WITHINTHE TRIANGLEIS A
WARNINGSIGN ALERTING
YOU OF IMPORTANT
INSTRUCTIONS
ACCOMPANYING THE
PRODUCT.
SEE MARKING ON BOTTOM/BACKOF PRODUCT
This device complies with Part 15 of the FCC
Rules. Operation is subject to the following two
conditions: (1) This device may not cause
harmful interference, and (2) This device must
accept any interference received, including
interference that may cause undesired
operation.
In accordance with FCC requirements, changes
or modifications not expressly approved by
Thomson Consumer Electronics could void the
user’s authority to operate this product.
This product complies with DHHS Rules 21 CFR
Subchapter J. Applicable at the date of
manufacture.
If this equipment does cause interference to
radio or television reception
(which you can determine by turning the
equipment off and on), try to correct the
interference by one or more of the following
measures:
• Reorient the receiving antenna (that is, the
antenna for the radio or television that is
“receiving” the interference).
• Change the position of the unit with respect
to the radio or television equipment that is
receiving interference.
• Move the unit away from the equipment
that is receiving interference.
• Plug the unit into a different wall outlet so
that the unit and the equipment receiving
interference are on different branch circuits.
If these measures do not eliminate the
interference, please consult your dealer or an
experienced radio/television technician for
additional suggestions.
Headset Safety
• Do not play your headset at a high volume.
Hearing experts advise against continuous
extended play.
• If you experience a ringing in your ears,
reduce volume or discontinue use.
• You should use extreme caution or
temporarily discontinue use in potentially
hazardous situations.
• Even if your headset is an open-air type
designed to let you hear outside sounds,
don't turn up the volume so high that you
can't hear what's around you.
Precautions
• Never open the cabinet under any
circumstances. Never operate this product
with the cabinet removed. Any repairs or
internal adjustments should be made only by
a trained service technician.
• Do not touch the player with wet hands. If
any liquid enters the player cabinet, take the
player to a trained service technician for
inspection.
• This Compact Disc Player uses a laser to read
the music on the disc. The laser mechanism
corresponds to the cartridge and stylus of a
traditional record player. Although this
product incorporates a laser pick-up lens, it
is completely safe when operated according
to directions.
Important Battery Information
• If you’re not going to use your unit for a
month or more, be sure to remove batteries
because they can leak and cause damage.
• Dispose of batteries in the proper manner,
according to federal, state, and local
regulations.
• Any battery may leak electrolyte if mixed
with a different battery type, if inserted
incorrectly, if all batteries are not replaced
at the same time, if disposed of in fire, or if
an attempt is made to charge a battery not
intended to be recharged.
• Discard leaky batteries immediately. Leaking
batteries can cause skin burns or other
personal injury.
Service Information
This product should be serviced only by those
specially trained in appropriate servicing
techniques.
For Your Records
In the event that service should be required,
you may need both the model number and the
serial number. In the space below, record the
date and place of purchase, and the serial
number:
Model No. RP-7994
Date of Purchase:
Place of Purchase:
Serial number:
EN
FCC Information
RP7994 EngIB 7/12/00, 5:23 PM1
Page 5
Before You Begin
EN
1
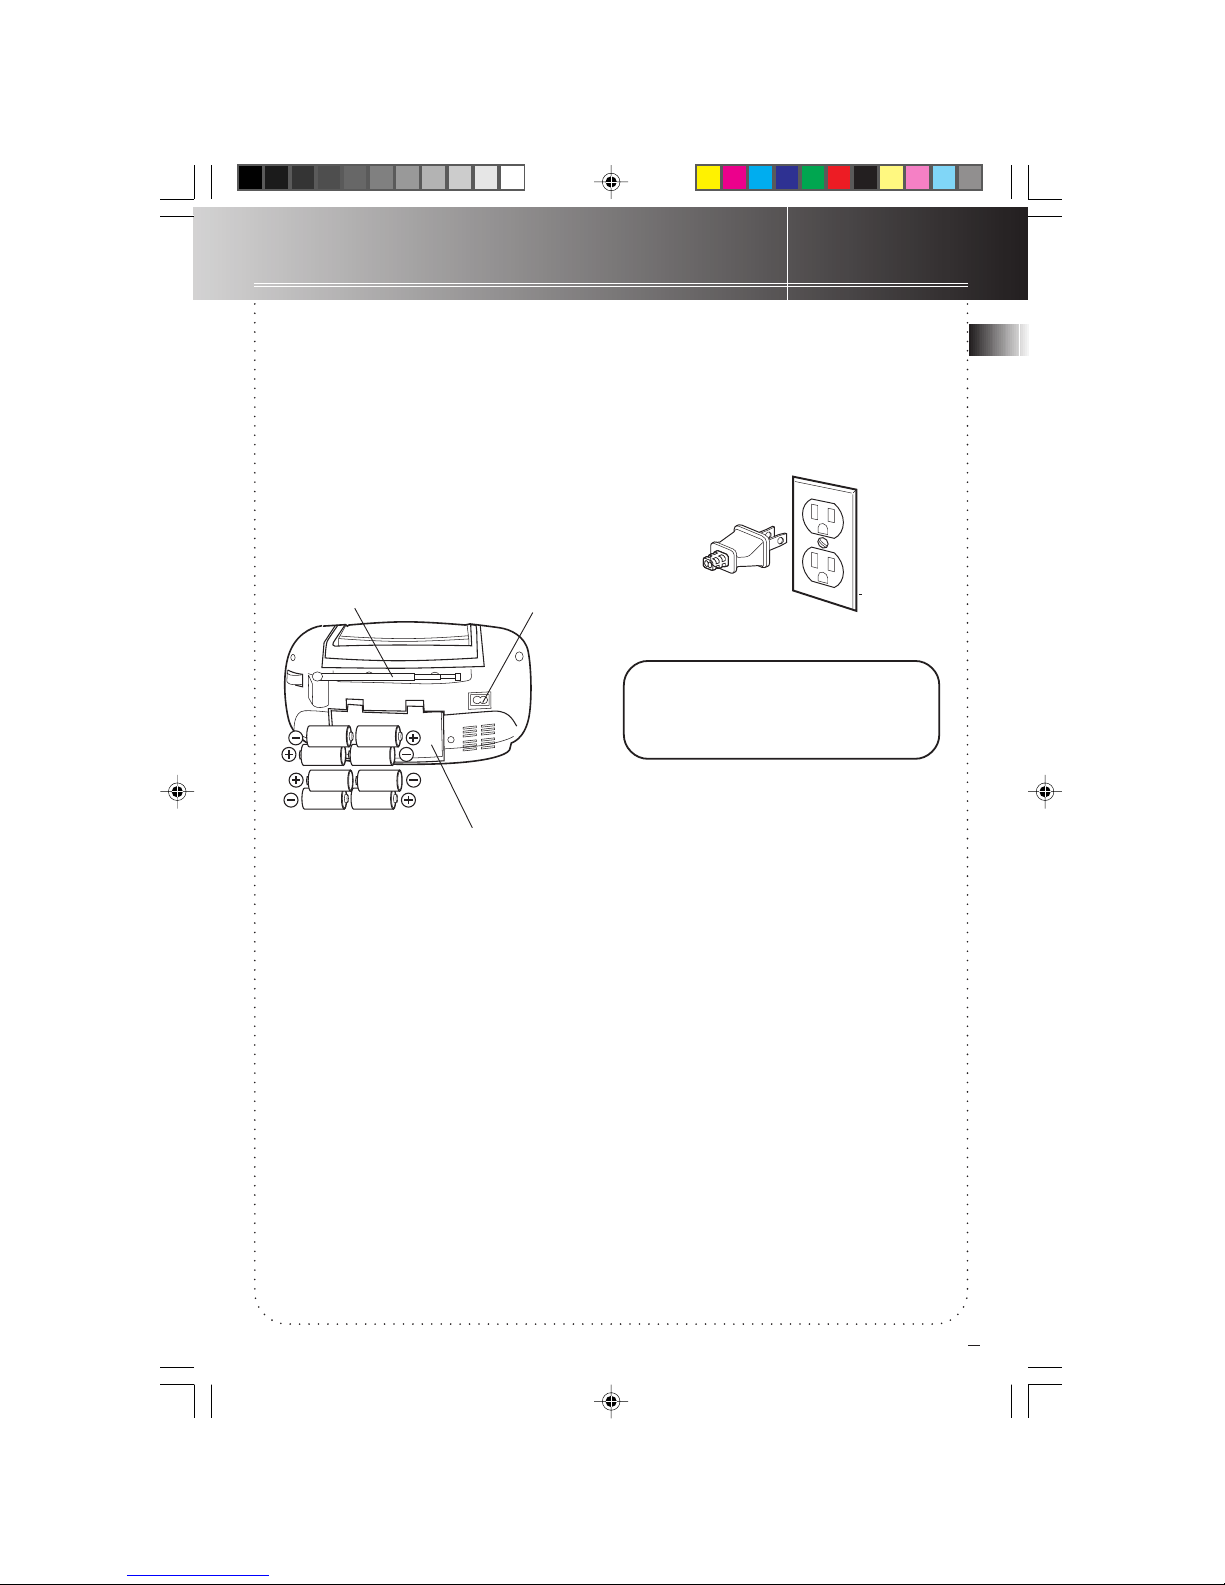
Powering Up
This portable stereo operates on battery
or AC power.
Battery Power
Insert 8 C-sized alkaline batteries (not
supplied) and you can take your stereo
just about anywhere. Open the battery
compartment door on the back of the
unit by pressing down on the two tabs
and pulling out the cover. Insert batteries
as shown on the back of the unit.
Antennas
The AM antenna is built in, so adjusting
the position of the unit may help AM
reception.
The FM whip antenna on the back of the
unit can be extended and rotated for
better FM reception.
Can't find the AC power cord? Look
in the battery compartment on the
back of the unit.
For Your Safety
The AC power plug is polarized (one blade
is wider than the other) and only fits into
AC power outlets one way. If the plug
won’t go into the outlet completely, turn
the plug over and try to insert it the other
way. If it still won’t fit, contact a qualified
electrician to change the outlet, or use a
different one. Do not attempt to bypass
this safety feature.
Important Battery Information
IMPORTANT: Be sure to remove batteries
when storing the set for more than 30
days. Leaky batteries can badly damage
the radio/tape recorder. Always return
tape operation buttons to their off
position before storing. This will relieve
pressure on certain parts in the tape
recorder that might deform after long
periods of time. Be sure to dispose of
leaky, weak or dead batteries properly
according to Federal, State, and Local
regulations.
AC Power
Plug the power supply cord into the AC
power jack on the back of the unit, and
into an AC power outlet that accepts the
polarized plug (one blade wider than the
other).
FM Antenna
AC power jack
Battery Compartment
RP7994 EngIB 7/12/00, 5:23 PM2
Page 6
General Controls
2
EN
3
Function
Switch
DBBS
Button
Volume
Knob
AM/FM
Selector
FM Stereo
Indicator
Tuning Wheel
Knob
Phones
Jack
PHONES JACK-Use the stereo headphone
jack to listen privately to your favorite
radio station, tapes, or CDs.
FUNCTION Switch – Move the switch to
select which part of the portable stereo
you want to use; RADIO, TAPE, or CD.
POWER OFF – Move the function switch to
tape position with no cassette button
pressed, to turn unit off.
DYNAMIC BASS BOOST SYSTEM (DBBS) –
Turn on DBBS by pressing button down
for enhanced bass effect. Turn off DBBS
(up position) for normal bass sound.
VOLUME KNOB – Turn the volume knob to
increase or decrease volume to desired
level.
AM/FM SELECTOR – To select AM or FM
band.
STEREO INDICATOR – Reception is in stereo
when the indicator lights.
TUNING WHEEL KNOB – Tune in desired
radio station.
Tuning In Radio Stations
Move the FUNCTION switch to RADIO to
turn the radio on.
• Set BAND to AM or FM.
• Tune in desired station by turning the
tuning wheel knob.
• To turn off the radio, move FUNCTION
switch to TAPE.
• The Stereo Indicator will glow when it
receive a FM stereo broadcasting.
RECORD — Press to record from the
radio or CD player.
PLAY — Press to play cassettes.
REW — From stop mode, press to
rewind the tape toward the beginning.
F.FWD — From stop mode, press to
advance the tape toward the end.
STOP/EJECT — Press to stop current tape
activity, or to open the cassette
compartment door when no buttons are
active.
PAUSE — Press to interrupt tape play or
record mode. Press a second time to
resume tape play or tape record mode.
PAUSE STOP/EJ F.FWD REW PLAY RECORD
Using The Radio
Using The Tape Player
RP7994 EngIB 7/12/00, 5:23 PM3
Page 7

Using The Tape Player
.
EN
3
Playing a Cassette Tape
1. Move the FUNCTION switch to TAPE.
2. Press STOP/EJECT to open the cassette
compartment door.
3. Insert cassette tape into the
compartment with the open edge facing
up and the full reel on the right.
4. Close the door securely.
5. Press REW or F.FWD to move tape to the
desired starting point.
6. Press PLAY to begin playing the tape.
The cassette tape plays until it reaches
the end of the side, then it
automatically stops.
Recording on Cassette Tapes
You can record from the radio or the CD
player.
For best recording, use normal bias tape.
Erase Protection
When you record new material, the
cassette deck records over whatever is on
a tape. To protect a tape from accidental
erasure, break off one or both plastic
tabs (one for each tape side) on the top
of the cassette tape. If you decide later to
record on the tape, seal the hole with a
piece of cellophane tape.
A
60
A
A
A
Quit Slacking
A little bit of slack in your tapes can
cause scratches on the tape, or worse
yet, the tape could break. If you
notice some slack in the tape, use a
pencil to tighten it up before you
insert it.
A
Recording from the Radio
1. Insert a cassette tape into the tape deck
and close door.
2. Move the FUNCTION switch to RADIO
and select a radio station.
3. Press RECORD to begin recording.
RECORD and PLAY lock down.
4. Press STOP/EJECT to end recording.
5. To turn off radio, move the FUNCTION
switch to TAPE.
Radio Recording TIPS
• To temporarily pause the recording,
press PAUSE on the cassette deck. Press
Pause again to resume recording.
Recording from CDS
1. Insert a cassette tape into the tape deck
and close the door.
2. Press RECORD and PAUSE at the same
time.
3. Move the FUNCTION switch to CD.
4. Insert the CD you want to record into
CD compartment.
5. To begin recording at track 1 - or press
SKIP or to choose the track
you want to record - press the PLAY/
PAUSE button near the Display, then
immediately release the PAUSE button
on the tape deck.
Pause for a Moment
Using the PAUSE button on the cassette
deck instead of the STOP button to
momentarily interrupt recording gives you
a much cleaner sounding recording.
RP7994 EngIB 7/12/00, 5:23 PM4
Page 8
Using The CD Player
EN
4
Stop
Button
SKIP forward
Button
Shuffle Play
Button
SKIP backward
Button
Display
PUSH OPEN
Button
Repeat 1/All
Button
Play/Pause
Button
Loading A CD
1. Move the FUNCTION switch to CD; “ “
& “ “ appears alternately in the
display if no CD is loaded.
2. Press PUSH OPEN to open the CD door.
3. Place a CD into the tray with the label
facing up.
4. Close the CD door. “– ” flashes in the
CD display, then the total number of
tracks appears.
5. To remove the CD, press PUSH OPEN,
grasp the CD by its edges, and carefully
pull it out.
Playing a CD
1. Press (PLAY/PAUSE) to play all the
tracks in order starting with Track 1. The
current track number appears in the
display.
Note: Press (PLAY/PAUSE) to
temporarily stop the CD. The current
track number flashes in the display.
Press (PLAY/PAUSE) again to
resume playing the CD.
2. Adjust VOLUME to a comfortable level.
3. Press STOP to stop playing the CD
before all tracks have played. Wait a
few seconds for the CD to stop turning,
then press PUSH OPEN to open the CD
compartment door and remove the CD.
Automatic Search
Automatic search lets you quickly
locate the beginning of any track on
the CD, including the track currently
playing.
If the CD is playing:
• Press SKIP BACKWARD
to
return to the beginning of the
previous track.
• Press SKIP FORWARD
to skip to
the beginning of the next track.
If the CD is stopped, repeatedly press
SKIP FORWARD
or SKIP
BACKWARD until the display shows
the number of the track you want to
play, then press
(PLAY/PAUSE).
The CD player starts playing the
selected track.
Track Search
• In PLAY or PAUSE mode, press and
hold SKIP FORWARD
to move
forward through a track at high
speed,
• In PLAY or PAUSE mode, press and
hold SKIP BACKWARD
to move
backward through a track at high
speed.
CD-R Ready
This unit is compatible with Cd-R disc
forplayback
RP7994 EngIB 7/12/00, 5:23 PM5
Page 9
Using The CD Player
EN
5
Shuffle Play
If pressing this key the track of a CD will
be played in random order. If SHUFFLE is
pressed during stop mode it will start play
in SHUFFLE mode. The LCD will light the
SHUFFLE segment of the display. The
SHUFFLE mode can be switched off by
pressing the SHUFFLE or STOP key. It will
also be switched off by opening the flap.
Repeat
The REPEAT button allows you to repeat
one track or all tracks. To scroll through
the choices, continually press and release
the REPEAT button and check the display
to see which choice you've selected. The
following chart illustrates how REPEAT
works in various modes.
Play Mode:
• Repeat 1 replays current track
• Repeat All replays entire CD
Shuffle Mode:
• Repeat 1 replays current track
• Repeat All replays entire CD in a different
shuffle sequence
Using The Radio
Cleaning the Exterior
• Disconnect the system from AC power
before cleaning the exterior of the unit
with a soft dust cloth.
Handling CDs
• Do not touch the signal surfaces. Hold
by the edges, or by one edge and the
hole.
• Do not affix labels or adhesive tape to
the label surfaces. Also, do not scratch
or damage the label.
• Discs rotate at high speeds inside the
player. Do not use damaged (cracked or
warped) discs.
Cleaning CDs
• Dirty discs can cause poor sound quality.
Always keep discs clean by wiping them
gently with a soft cloth from the inner
edge toward the outer perimeter.
• If a disc becomes dirty, wet a soft cloth
in water, wring it out well, wipe the dirt
away gently, and then remove any
water drops with a dry cloth.
• Do not use record cleaning sprays or
antistatic agents on discs. Also, never
clean discs with benzene, thinner, or
other volatile solvents which may cause
damage to the disc surface.
Tape Care
• Don’t expose tapes to sunlight or store
in hot places. High temperatures may
warp the shell or damage the tape
itself.
• Keep cassettes in their boxes when not
in use.
• Cassette tapes can be erased by
magnetic fields produced by magnets,
electric motors, electrical transformers,
and other devices. Keep tapes away
from magnets and magnetic fields.
Cleaning the Tape Heads
Iron oxide particles from the magnetic
tape can build up on the parts that come
in contact with the tape. These deposits
can cause incomplete erasure, muffled
playback sound, and might prevent
automatic stop.
To clean a cassette deck, open the
compartment door, push the PLAY button
and gently clean the heads, capstan, and
pinch wheel with a head cleaner.
Always unplug the power cord before
cleaning, and allow 30 minutes drying
time when using a liquid cleaner.
Clean heads after every 25 hours of use.
• Demagnetize the head occasionally with
a head demagnetizing cassette
(available from many audio equipment
stores).
• Never use any metal objects on or near
the tape heads.
Do not allow any cleaning material to
fall into the tape assembly.
RP7994 EngIB 7/12/00, 5:23 PM6
Page 10

Troubleshooting Tips
EN
6
Problem Solution
System doesn’t turn on • Make sure power cord is securely
plugged into the AC power outlet (or
that the batteries are fresh).
• Unplug the unit for a moment, and then
plug it back in.
• Check the outlet by plugging in another
device.
No sound • Adjust volume setting.
• Make sure you’ve selected the correct
function: CD, TAPE, or RADIO
Poor radio reception • Adjust the FM whip antenna for better
FM reception.
• Rotate the unit to achieve better AM
reception.
• Try turning off electrical appliances near
the unit, such as hair dryers, vacuum
cleaners, or fluorescent lights.
CD doesn’t play • Make sure the tray contains a CD.
• Make sure that CD’s label is facing up.
• Make sure that Pause mode is not
activated.
• Make sure CD function is selected.
CD sound skips • Clean the CD (as explained in “Care and
Maintenance”).
• Check CD for warping, scratches, or
other damage.
• Check for vibration or shock that may
affect the unit; move system if necessary.
Distorted or noisy recordings • Inspect the recording head and clean it
if necessary.
• Demagnetize recording head
(as explained in “Care and
Maintenance”).
NOTES ON CD-R/RW DISC
• CD-R/RW discs that are recorded using personal computers or other CD-R/RW
recorders can not be played on this unit due to the difference in recording platforms.
• Do not affix any type of labels to either side (recordable or labeled side) of a
CD-R/RW disc as this may result in the disc malfunctioning.
• To avoid damages to the CD-R/RW disc, do not open the disc compartment door
while the disc is being read. This may take more then 30 seconds.
• Do not load an unrecorded CD-R/RW disc into the unit.
RP7994 EngIB 7/12/00, 5:23 PM7
Page 11

US Warranty
EN
7
What your warranty covers:
• Any defect in materials or workmanship.
For how long after your purchase:
• One year.
(The warranty period for rental units begins with the first rental or 45 days from date
of shipment to the rental firm, whichever comes first.)
What we will do:
• Provide you with a new, or at our option, a refurbished unit.
• The exchange unit is under warranty for the remainder of the original product’s
warranty period.
How to make a warranty claim:
• Properly pack your unit. Include any cables, etc., which were originally provided with
the product. We recommend using the original carton and packing materials.
• Include in the package evidence of purchase date such as the bill of sale. Also print
your name and address and a description of the defect. Send standard UPS or its
equivalent to:
Product Exchange Centre
11721 B Alameda Ave,
Socorro, TX 79927
• Pay any charges billed to you by the Exchange Center for service not covered by the
warranty.
• Insure your shipment in case of loss of damage. Thomson accepts no liability in case of
damage or loss.
• A new or refurbished unit will be shipped to you prepaid freight.
What your warranty does not cover:
• Customer instruction. (Your Owner’s Manual provides information regarding operating
instructions and user controls. For additional information, ask your dealer.)
• Installation and set-up service adjustments.
• Batteries.
• Damage from misuse or neglect.
• Products which have been modified or incorporated into other products.
• Products purchased or serviced outside the USA.
• Acts of God, such as but not limited to lightning damage.
Product Registration:
• Please complete and mail the Product Registration Card packed with your unit. It will
make it easier to contact you should it ever be necessary. The return of the card is not
required for warranty coverage.
How state law relates to this warranty:
• This warranty gives you specific legal rights, and you may have other rights which vary
from state to state.
If you purchased your product outside the USA:
• This warranty does not apply. Contact your dealer for warranty information.
RP7994 EngIB 7/12/00, 5:23 PM8
Page 12

Canadian Warranty
EN
8
Thomson Consumer Electronics Canada, Inc. warrants to the purchaser or gift recipient
that if any manufacturing defect becomes apparent in this product within 1 year from
the original date of purchase, it will be replaced free of charge, including return
transportation.
This warranty does not include damage to the product resulting from accidents, misuse
or leaking batteries.
Should your product not perform properly during the warranty period, either:
1. Return it to the selling dealer with proof of purchase for replacement,
OR
2. Remove the batteries (where applicable), and pack product complete with accessories
in the original carton (or equivalent).
Mail prepaid (with proof of purchase) and insured to:
Thomson Consumer Electronics Canada, Inc.
6200 Edwards Blvd
Mississauga, Ontario
L5T 2V7
The provisions of this written warranty are in addition to and not a modification of or
subtraction from the statutory warranties and other rights and remedies contained in
any applicable legislation, and to the extent that any such provisions purport to disclaim,
exclude or limit any such statutory warranties and other rights and remedies, such
provisions shall be deemed to be amended to the extent necessary to comply therewith.
If you are unable to find a qualified servicer for out of warranty service, you may write
to:
Thomson Consumer Electronics Canada, Inc.
P.O. Box 0944
Indianapolis, Indiana, U.S.A., 46206-0944
Attach your sales receipt to this booklet for future reference. This information is required
if service is needed during the warranty period.
PURCHASE DATE ____________________________________________________________
NAME OF STORE ____________________________________________________________
RP7994 EngIB 7/12/00, 5:23 PM9
Page 13

Cet appareil est conforme à la Section 15 des
Réglementations FCC. Le fonctionnement est soumis
aux deux conditions suivantes : (1) Cet appareil ne doit
provoquer aucune interférence nuisible, et (2) Cet
appareil doit supporter toute interférence reçue, y
compris celle qui pourrait provoquer un
fonctionnement indésirable.
Conformément aux exigences de la FCC, tout
changement ou modification non approuvé
expressément par Thomson Consumer Electronics
pourrait entraîner l’annulation de l’autorisation
accordé à l’utilisateur de faire fonctionner ce produit.
Ce produit est conforme aux Réglementations DHHS 21
CFR Paragraphe J, applicable à la date de fabrication.
Si ce matériel provoque une interférence au niveau de
la réception radio ou de télévision (ce que vous pouvez
vérifier en allumant et éteignant l’appareil), essayez
de neutraliser cette interférence par un des moyens
suivants :
• Réorientez l’antenne réceptrice (c’est à dire
l’antenne radio ou de télévision qui ‘capte’
l’interférence).
• Changez l’appareil de position par rapport à la radio
ou le téléviseur qui reçoit l’interférence.
• Eloignez l’appareil de la radio ou du téléviseur qui
reçoit l’interférence.
• Branchez l’appareil à une prise murale différente
afin que l’appareil et le matériel subissant
l’interférence soient branchés sur des circuit
électriques séparés.
Si ces mesures ne suppriment pas l’interférence,
consultez votre revendeur ou un technicien audiovisuel
afin d’obtenir de plus amples suggestions.
CONSIGNES DE SECURITE CONCERNANT
LE CASQUE
• Ne pas utiliser votre casque à des niveaux de volume
élevés. Les experts de l’audition en déconseillent
une utilisation prolongée.
• Si vous éprouvez un bourdonnement dans les
oreilles, baissez le niveau du volume ou cessez
l’utilisation.
• Dans des cas potentiellement dangereux, soyez
extrêmement prudent ou cessez l’utilisation.
• Même si votre casque est d’un type qui vous permet
d’entendre les bruits extérieurs, ne l’utilisez jamais à
des niveaux de volumes si élevés que vous
n’entendez plus ce qui se passe autour de vous.
PRECAUTIONS
• Ne jamais ouvrir le boîtier, quelque soit la
circonstance. Ne jamais faire fonctionner l’appareil
sans son boîtier. Toute réparation ou modification
interne doit être confiée à un technicien compétent.
• Ne jamais toucher l’appareil avec les mains
mouillées. En cas d’infiltration de liquide à
l’intérieur du boîtier, faites inspecter l’appareil par
un technicien compétent.
• Ce lecteur de disque compacte est muni d’un laser.
Ce laser remplace la cartouche et le saphir sur un
tourne-disque classique. Bien que ce produit soit
équipé d’une lentille de captage laser, il ne présente
aucun danger s’il est utilisé conformément aux
instructions.
INFORMATIONS IMPORTANTES
CONCERNANT LES PILES
• Si vous ne vous servez pas de votre radiocassette
pendant plusieurs semaines, vérifiez à retirer les
piles car celles-ci peuvent fuir et provoquer des
dégâts.
• Jetez les piles dans un endroit propice et en
respectant les réglementations fédérales, d’état et
locales.
• Toute pile peut subir une fuite d’électrolyte si elle
est :
- mélangée avec une pile de type différente,
- insérée incorrectement,
- jetée dans le feu,
- mise en charge alors qu’elle est d’un type nonrechargeable, ou
si toutes les piles ne sont pas remplacées
simultanément.
• Jetez immédiatement toute pile montrant des
signes de fuite. Une pile qui fuit peut provoquer des
brûlures de la peau ou autres blessures.
REPARATIONS ET ENTRETIEN
Toute réparation et intervention d’entretien sur ce
produit doit être confiée à un technicien formé dans
les techniques appropriées.
POUR VOS FICHIERS
En cas de réparation ou intervention, vous aurez peut-
être besoin des numéros de modèle et de série. Notez
ci-après la date et lieu d’achat ainsi que le numéro de
série :
Modèle No. RP - 7994
Date d’achat.............................................
Lieu d’achat..............................................
Numéro de série........................................
F
Information FCC
ATTENTION
RISQUE DE DECHARGE NE
PAS OUVRIR
LA MARQUE D’UN ECLAIR
FLECHE CONTENU DANS
UN TRIANGLE EST UN
AVERTISSEMENT QU’UN
VOLTAGE DANGEREUX
EST PRESENT A
L’INTERIEURDU PRODUIT.
ATTENTION:AFIN DE REDUIRELE RISQUE
DE DECHARGE, NE PAS OUVRIR LE
COUVERCLE (OU LE BOITIER). NE
CONTIENT AUCUN COMPOSANT
SUSCEPTIBLE D’ ETRE REPARE PAR
L’UTILISATEUR.TOUTE REPARATION DOIT
ETRE CONFIE A UN TECHNICIEN
COMPETENT.
LE POINT D’EXCLAMATION
CONTENUDANS UN TRIANGLE
ESTUN AVERTISSEMENT QUE
DES INSTRUCTIONS
IMPORTANTES
ACCOMPAGNENTLE PRODUIT.
AVERTISSEMENT : AFIN DE
PREVENIR CONTRE TOUT
RISQUE D’INCENDIE OU DE
DECHARGE, NE PAS
EXPOSER CE PRODUIT A LA
PLUIE OU A L’HUMIDITE.
VOIR LE MARQUAGE SUR LE FOND OU AU DOS DU PRODUIT
RP7994 FrenchIB 7/12/00, 5:23 PM1
Page 14

F
1
MISE SOUS TENSION
Cette radiocassette portable fonctionne à
piles ou sur secteur AC.
ALIMENTATION A PILES
Insérez 8 piles de type C dans l’appareil
(piles non-fournies) et vous pourrez
l’emporter où vous voudrez. Ouvrez le
couvercle du compartiment à piles situé à
l’arrière de l’appareil en appuyant sur les
deux pattes. Retirez le couvercle. Insérez
les piles comme indiqué à l’arrière de
l’appareil.
ANTENNES
L’antenne AM est incorporée donc la
réception AM peut être améliorée en
changeant la position de l’appareil.
L’antenne FM télescopique située à
l’arrière de l’appareil peut être rallongée
et orientée afin d’obtenir une réception
FM optimale.
Vous ne trouvez pas le cordon
d’alimentation ? Regardez dans le
compartiment à piles située à l’arrière
de l’appareil.
POUR VOTRE SECURITE
La fiche d’alimentation AC est de type
polarisé (une de ses lames est plus large
que l’autre) et ne peut être insérée dans la
prise murale que dans un sens. Si la fiche
ne rentre pas complètement dans la prise
murale, tournez-la puis essayez de
nouveau. Si elle ne rentre toujours pas,
contactez un électricien compétent afin de
faire changer la prise. Sinon, utilisez une
autre prise. Ne jamais essayer de
contourner ce dispositif de sécurité.
INFORMATIONS IMPORTANTES
CONCERNANT LES PILES
• Si vous ne vous servez pas de votre
radiocassette pendant plusieurs
semaines, vérifiez à retirer les piles car
celles-ci peuvent fuir et provoquer des
dégâts.
• Jetez les piles dans un endroit propice
et en respectant les réglementations
fédérales, d’état et locales.
• Toute pile peut subir une fuite
d’électrolyte si elle est :
- mélangée avec une pile de type
différente,
- insérée incorrectement,
- jetée dans le feu,
- mise en charge alors qu’elle est d’un
type non-rechargeable, ou
si toutes les piles ne sont pas
remplacées simultanément.
• Jetez immédiatement toute pile
montrant des signes de fuite. Une pile
qui fuit peut provoquer des brûlures de
la peau ou autres blessures.
ALIMENTATION AC
Branchez le cordon d’alimentation dans la
prise AC située à l’arrière de l’appareil,
puis dans une prise murale AC pouvant
accueillir des fiches polarisées (ayant une
lame plus large que l’autre).
Antenne FM
Prise
d’alimentation AC
Compartiment à piles
Avant De Commencer
RP7994 FrenchIB 7/12/00, 5:23 PM2
Page 15

Commandes De Base
2
F
3
DBBS
Button
DYNAMIC BASS BOOST SYSTEM (DBBS) - Actionnez le
DBBS en enfonçant la touche afin de renforcer les
graves. Enlevez le DBBS (position haute) pour retrouver
une sonorité normale.
BOUTON DE REGLAGE DU VOLUME - Tournez le bouton
afin de régler le volume au niveau désiré.
SELECTEUR AM/FM - Sélection des bandes AM ou FM.
TEMOIN STEREO - Indique une réception en stéréo
lorsque le voyant est allumé.
BOUTON DE BALAYAGE DES FREQUENCES - Recherchez la
station désirée.
SYNTONISA TION
Allumez la radio en mettant le commutateur de
fonctions (FUNCTION) en position RADIO.
• Sélectionnez la gamme de fréquences AM ou FM.
• Réglez la fréquence à la station désirée à l’aide du
bouton de balayage des fréquences.
• Pour éteindre la radio, mettez le commutateur de
fonctions (FUNCTION) en position TAPE (cassette).
• l’indicateur stéréo s’allumera lorsqu’il reÿoit une
diffusion FM stéréo.
RECORD (ENREGISTREMENT) — Appuyez sur cette
touche afin d’enregistrer à partir de la radio ou d’un
CD.
PLAY (LECTURE) — Appuyez sur cette touche afin
d’écouter une cassette.
REW (REMBOBINAGE RAPIDE) — A partir de la
position d’arrêt, appuyez sur cette touche afin de
rembobiner la bande vers son commencement.
F.FWD (AVANCE RAPIDE) — A partir de la position
d’arrêt, appuyez sur cette touche afin d’avancer
rapidement la bande vers sa fin.
STOP/EJECT (ARRET/EJECTION) — Appuyez sur cette
touche afin d’arrêter toute activité en cours du lecteur
cassette ou pour ouvrir la porte du compartiment à
cassette lorsqu’aucune touche n’est enfoncée.
PAUSE — Appuyez sur cette touche pour interrompre
la lecture ou l’enregistrement d’une cassette. Appuyer à
nouveau sur la touche afin de reprendre la lecture ou
l’enregistrement.
PAUSE STOP/EJ F.FWD REW PLAY RECORD
Utilisation De La Radio
Utilisation Du Lecteur Cassette
Commutateur
de Fonctions
Bouton de réglage
du Volume
Sélecteur
AM/FM
Témoin FM
Stéréo
Bouton de
balayage des
Fréquences
Prise d’entrée
Casque
PRISE D’ENTREE CASQUE - Utilisez la prise d’entrée
casque stéréo pour écouter vos stations de radio,
cassettes ou CD préférés en toute intimité.
Commutateur de FONCTIONS - Basculez le commutateur
pour sélectionner la fonction désirée: RADIO, TAPE
(Lecteur Cassette) ou CD.
MISE HORS TENSION - Mettez le commutateur de
fonctions en position TAPE sans qu’aucun bouton du
lecteur cassette ne soit enfoncé afin de mettre
l’appareil hors tension.
RP7994 FrenchIB 7/12/00, 5:23 PM3
Page 16

Utilisation Du Lecteur Cassette
.
F
3
LECTURE D’UNE CASSETTE
1. Mettez le commutateur de Fonctions (FUNCTION) en
position TAPE .
2. Appuyez sur la touche STOP/EJECT pour ouvrir la
porte du compartiment à cassette.
3. Insérez la cassette dans le compartiment avec la face
ouverte vers le haut et la bobine pleine vers la droite.
4. Bien refermer la porte du compartiment.
5. Appuyez sur la touche REW (Rembobinage) ou F.FWD
(Avance Rapide) pour positionner la bande au point
de départ de lecture.
6. Appuyez sur la touche PLAY pour commencer la
lecture. La lecture de la cassette continue jusqu’à la
fin de la face, puis s’arrête automatiquement.
ENREGISTREMENT SUR CASSETTE
Vous pouvez enregistrer à partir de la radio ou du
lecteur CD.
Pour un enregistrement optimal, utilisez des cassettes
de Type 1, position Normal.
PROTECTION DE
L’ENREGISTREMENT
Lorsque vous enregistrez un nouveau morceau
quelconque, le lecteur cassette enregistre par-dessus
l’enregistrement se trouvant déjà sur la bande. Afin de
protéger une cassette contre tout effacement
d’enregistrement accidentel, ôtez la patte (ou les
pattes) qui se trouve sur le dessus de la cassette
(chaque patte correspond à une face de la bande). Si
vous décidez ultérieurement d’enregistrer sur la bande,
masquez le trou à l’aide d’un morceau de ruban
adhésif.
A
60
A
A
A
Ne soyez pas Mou
Un peu de mou dans la bande peut l’endommager
ou pire, provoquer sa cassure. Si vous constatez
du mou dans la bande, resserrez-la à l’aide d’un
crayon avant de l’insérer dans le compartiment à
cassette.
A
ENREGISTREMENT A PARTIR DE LA
RADIO
1. Insérez une cassette dans le compartiment à cassette,
puis refermez la porte.
2. Mettez le commutateur de Fonctions (FUNCTION) en
position RADIO, puis sélectionnez une station.
3. Appuyez sur la touche RECORD (Enregistrement)
pour commencer l’enregistrement. Les touches
RECORD et PLAY s’enfoncent simultanément.
4. Appuyez sur la touche STOP/EJECT pour arrêter
l’enregistrement.
5. Pour éteindre la radio, mettez le commutateur en
position TAPE.
ASTUCES
• Vous pouvez faire une pause pendant
l’enregistrement en appuyant sur la touche PAUSE du
lecteur cassette. Appuyez à nouveau sur cette touche
afin de reprendre l’enregistrement.
ENREGISTREMENT A PARTIR D’UN
CD
1. Insérez une cassette dans le compartiment à cassette,
puis refermez la porte.
2. Appuyez simultanément sur les touches RECORD
(Enregistrement) et PAUSE.
3. Mettez le commutateur de Fonctions (FUNCTION) en
position CD.
4. Insérez le CD que vous souhaitez enregistrer dans le
compartiment à CD.
5. Commencez l’enregistrement à partir de la première
plage -ou appuyez sur SKIP ou
(Omission) pour sélectionner la plage à enregistrer en appuyant sur la touche PLAY/PAUSE située à
proximité de l’écran, puis en relâchant
immédiatement la touche PAUSE du lecteur cassette.
Prenez une petite Pause
Afin d’obtenir une qualité d’enregistrement optimale,
utilisez la touche PAUSE du lecteur cassette plutôt
que la touche STOP pour interrompre momentanément
l’enregistrement.
RP7994 FrenchIB 7/12/00, 5:23 PM4
Page 17

Utilisation De Lecteur CD
F
4
CHARGEMENT D’UN CD
1. Mettez le commutateur de Fonctions (FUNCTION) en
position CD; si aucun CD n’est chargé,
“ “ et “ “ apparaissent en alternance à l’écran.
2. Appuyez sur la touche PUSH OPEN (Ouverture) pour
ouvrir le compartiment à CD.
3. Placez un CD dans le compartiment, la face imprimée
vers le haut.
4. Refermez le compartiment. “– ” clignote à l’écran,
suivi du nombre total de plages.
5. Pour retirer le CD, appuyez sur la touche PUSH OPEN,
puis retirez le CD en le tenant soigneusement par le
bord extérieur.
LECTURE D’UN CD
1. Pour écouter toutes les plages dans l’ordre en
commençant par la première, appuyez sur la touche
(PLAY/PAUSE). La plage en lecture est affichée
à l’écran.
Remarque: Appuyez sur la touche (PLAY/
PAUSE) pour arrêter momentanément le CD. Le
numéro de plage en lecture clignote à l’écran.
Appuyez à nouveau sur la touche (PLAY/
PAUSE) pour continuer la lecture.
2. Réglez le VOLUME à un niveau confortable.
3. Pour arrêter la lecture avant la fin du CD appuyez sur
la touche STOP . Attendez quelques secondes
l’arrêt complet du CD, appuyez sur la touche PUSH
OPEN pour ouvrir le compartiment à CD, puis retirez
le CD.
RECHERCHE AUTOMATIQUE D’UNE
PLAGE
Cette fonction vous permet de localiser rapidement le
commencement d’une plage quelconque du CD, y
compris celle en lecture.
Lorsque le CD est en lecture:
• Appuyez sur la touche SKIP BACKWARD
(Omission Arrière) pour revenir au commencement de
la plage précédente.
• Appuyez sur la touche SKIP FORWARD
(Omission Avant) pour avancer au commencement de
la plage suivante.
Lorsque le CD est à l’arrêt, appuyez à plusieurs reprises
sur la touche SKIP FORWARD ou SKIP
BACKWARD (Omission Arrière ou Omission Avant)
jusqu’à ce que le numéro de la plage désirée soit affiché
à l’écran, puis appuyez sur la touche (PLAY/
PAUSE). La lecture de la plage sélectionnée commence
alors.
RECHERCHE DANS UNE PLAGE
• En mode PLAY ou PAUSE, appuyez longuement sur la
touche SKIP FORWARD afin d’avancer
rapidement à travers une plage.
• En mode PLAY ou PAUSE, appuyez longuement sur la
touche SKIP BACKWARD afin de revenir
rapidement en arrière à travers une plage.
CD-R Compatible
Cet appareil peut lire des disques CD-R.
Touche
d’Arrêt
Touche d’Omission de
Plage (Avant)
Touche de Lecture
Aléatoire
Touche d’Omission de
Plage (Arrière)
Ecran
Touch
d’ouverture du
compartiment
(PUSH OPEN)
Touche de Répétition
de Plage (Une/Toutes)
Touche de
Lecture/
Pause
RP7994 FrenchIB 7/12/00, 5:23 PM5
Page 18

Utilisation Du Lecteur CD
F
5
LECTURE ALEATOIRE (SHUFFLE)
En appuyant sur cette touche, l’ordre de lecture des
plages d’un CD sera aléatoire. Si l’on appuie sur la
touche SHUFFLE en mode arrêt, la lecture aléatoire
commencera. Le témoin LCD de lecture aléatoire
s’affichera à l’écran. La lecture aléatoire peut être
annulée en appuyant sur la touche SHUFFLE ou STOP.
Elle sera également annulée si le compartiment est
ouvert.
REPETITION DE LECTURE
La touche REPEAT (Répétition) vous permet de répéter
l’une ou l’ensemble des plages. Pour parcourir les
différentes options, appuyez sur la touche REPEAT à
plusieurs reprises, l’option choisie étant affichée à
l’écran. Le schéma suivant explique le fonctionnement
de la répétition dans les différents modes:
Mode Lecture:
• ‘Repeat 1’ répète la plage en lecture
• ‘Repeat All’ répète le CD entier
Mode Lecture Aléatoire:
‘Repeat 1’ répète la plage en lecture
‘Repeat All’ répète toutes les plage
Entretien
NETTOYAGE DU BOITIER
• Débranchez l’appareil de la prise murale avant de
nettoyer l’extérieur du boîtier à l’aide d’un chiffon
doux.
MANIEMENT DES CD
• Ne touchez pas les surfaces enregistrées. Tenez les
par le bord extérieur ou par le trou et le bord
extérieur.
• N’attachez aucune étiquette ou ruban adhésif à la
surface imprimée. Ne pas rayer ou endommager la
surface imprimée.
• Les disques compactes tournent à grande vitesse à
l’intérieur du compartiment. N’utilisez jamais de
disques endommagés (fendus ou déformés).
ENTRETIEN DES CD
• Un disque sale peut dégrader la qualité du son.
Gardez les disques propres en les nettoyant
soigneusement de l’intérieur vers le bord extérieur à
l’aide d’un chiffon doux.
• Si le disque est sale, mouillez un chiffon doux,
tordez-le bien pour enlever l’excès d’eau, passez le
chiffon soigneusement sur le disque pour enlever la
saleté, puis enlevez toute trace d’humidité à l’aide
d’un chiffon sec.
• N’utilisez aucun produit nettoyant ou agent
antistatique sur les disques. De même, ne nettoyez
jamais les disques à l’aide de benzène, diluants ou
autres solvants volatiles qui pourraient endommager
la surface du disque.
ENTRETIEN DES CASSETTES
• Gardez les cassettes à l’abri du soleil et à l’écart des
sources de chaleur. Les températures élevées peuvent
déformer le boîtier ou endommager la bande.
• Rangez les cassettes dans leurs boîtes de rangement
lorsqu’elles ne sont pas utilisées.
• Les bandes peuvent être effacées par des champs
magnétiques tels que ceux émis par les aimants,
moteurs électriques, transformateurs et autres
appareils. Gardez les cassettes à l’écart des aimants et
des champs magnétiques.
NETTOYAGE DES TETES
Des particules d’oxyde de fer provenant des bandes
peuvent se déposer sur les parties du mécanisme
rentrant en contact avec la bande. Ces dépôts peuvent
provoquer un effacement incomplet, un son assourdi à
la lecture et même entraver le fonctionnement de l’arrêt
automatique.
Pour nettoyer le lecteur cassette, ouvrez le
compartiment à cassette. Appuyez sur la touche PLAY
(Lecture), puis nettoyez soigneusement les têtes, le
cabestan et galets presseurs à l’aide d’un nettoyant à
têtes.
Débranchez toujours le cordon d’alimentation avant de
procéder au nettoyage. Lorsque vous utilisez un
nettoyant liquide, prévoyez un temps de séchage d’au
moins 30 minutes.
Nettoyez les têtes toutes les 25 heures d’utilisation.
• Démagnétisez occasionnellement la tête à l’aide
d’une cassette démagnétisante (disponible dans les
magasins d’appareils audiovisuels).
• Ne jamais placer un objet métallique à proximité des
têtes.
Ne laissez aucun matériel de nettoyage tomber à
l’intérieur du mécanisme d’entraînement de la bande.
RP7994 FrenchIB 7/12/00, 5:23 PM6
Page 19

F
6
Problème Solution
L’appareil ne se met pas sous tension • Assurez-vous que le cordon est bien
enfoncé dans la prise murale (ou que les
piles sont neuves)
• Débranchez l’appareil momentanément,
puis la rebrancher.
• Vérifiez la prise murale en branchant un
appareil différent.
Absence de son • Réglez le niveau du volume.
• Vérifiez que le commutateur de
fonctions est à la bonne position: CD,
TAPE ou RADIO.
Mauvaise réception radio • Orientez l’antenne télescopique afin
d’obtenir une réception FM optimale.
• Tournez l’appareil afin d’obtenir une
réception AM optimale.
• Eteignez tout autre appareil
électronique à proximité tel que sèchecheveux, aspirateur ou néon.
Le CD ne passe pas • Assurez vous de la présence d’un CD
dans le compartiment.
• Assurez vous que la face imprimée du
CD est orienté vers le haut.
• Assurez vous que la touche PAUSE n’est
pas enclenchée.
• Assurez vous que le commutateur de
fonctions est en position CD.
Le son du CD sautille • Nettoyez le CD (voir la rubrique
‘Entretien’)
• Vérifiez le CD pour tout signe de
déformation, rayage ou autre
dommages.
• Vérifiez que l’appareil ne subisse aucun
choc ou vibration qui pourrait le
perturber. Déplacez l’appareil si
nécessaire.
L’enregistrement est déformé ou parasité • Inspectez la tête d’enregistrement et la
nettoyer si nécessaire.
• Démagnétisez la tête d’enregistrement
(voir la rubrique ‘Entretien).
Depistage Des Pannes
NOTES CONCERNANT LES DISQUES CD-R/RW:
• Les disques CD-R/RW enregistrés à l’aide de miniordinateurs ou de lecteursenregistreurs CD-R/RW ne peuvent être lus sur cette unité parce que sa plateforme
d’enregistrement est différente.
• Éviter d’apposer des étiquettes sur l’un ou l’autre côté (côté enregistrement ou
côté étiquette) d’un disque CD-R/RW car ceci risque d’en perturber le fonctionnement.
• Pour éviter d’endommager le disque CD-R/RW, ne pas ouvrir la porte du
compartiment pendant la lecture du disque. Ceci peut prendre quelques 30 secondes.
• Éviter de placer un disque CD-R/RW non enregistré dans l’unité.
RP7994 FrenchIB 7/12/00, 5:23 PM7
Page 20

Garantie Pour Le Canada
F
7
Thomson Consumer Electronics Canada, Inc. garantit à l’acheteur ou au propriétaire
de l’appareil que s’il présente un défaut de fabrication dans l’année qui suit la date
d’achat originale, cet appareil sera remplacé gratuitement, frais de transport inclus.
La présente garantie n’inclut pas les dommages attribuables à des accidents, à une
mauvaise utilisation ou à des piles qui fuient.
Si l’appareil ne fontionne pas correctement durant la période de garantie:
1. Le retourner au détaillant, avec la preuve d’achat, pour obtenir un appareil en
remplacement,
OU
2. Retirer les piles (s’il y a lieu) et emballer l’appareil, accessoires inclus, dans la boîte
originale (ou l’équivalent).
L’envoyer par la poste, port payé (avec preuve d’achat) et assuré à:
Thomson Consumer Electronics Canada, Inc.
Centre de Distribution
6200 Edwards Blvd
Mississauga, Ontario, L5T 2V7
Les dispositions de la présente garantie s’ajoutent aux garanties statutaires et autres
droits et recours prévus par les lois applicables, sans les modifier ou les supprimer, et
dans la mesure où ces dispositions prétendent exclure ou restreindre de telles garanties
statutaires et autres droits et recours, ces dispositions seront jugées amendées de
manière à être conformes.
S’il est impossible de trouver un réparateur compétent pour effectuer les réparations
hors garantie, écrire à:
Thomson Consumer Electronics Canada, Inc.
C.P. Box 0944
Indianapolis, Indiana, États-Unis, 46206-0944
Joindre le coupon de caisse au livret pour référence ultérieure. Cette information est
nécessaire pour les réparations durant la période de garantie.
DATE D’ACHAT
LIEN DE L’ACHAT
NO DE MODÈLE
RP7994 FrenchIB 7/12/00, 5:23 PM8
Page 21

Información FCC
WARNING : TO PREVENT
FIRE OR ELECTRICAL
SHOCK HAZARD, DO NOT
EXPOSE THIS PRODUCT TO
RAIN OR MOISTURE.
CAUTION
RISK OF ELECTRIC SHOCK
DO NOT OPEN
THE LIGHTNING FLASH
ANDARROW HEADWITHIN
THE TRIANGLE IS A
WARNINGSIGN ALERTING
YOU OF "DANGEROUS
VOLTAGE" INSIDE THE
PRODUCT.
CAUTION: TO REDUCE THE RISK OF
ELECTRIC SHOCK, DO NOT REMOVE
COVER (OR BACK). NO USER
SERVICEABLE PARTS INSIDE. REFER
SERVICING TO QUALIFIED SERVICE
PERSONNEL.
THE EXCLAMATION POINT
WITHINTHE TRIANGLEIS A
WARNINGSIGN ALERTING
YOU OF IMPORTANT
INSTRUCTIONS
ACCOMPANYING THE
PRODUCT.
SEE MARKING ON BOTTOM/BACK OF PRODUCT
E
Este aparato cumple con la Parte 15 de las
Normas de la FCC. Su funcionamiento está
sujeto a las dos condiciones siguientes: (1) Este
aparato no puede causar interferencia
perjudicial, y (2) Este aparato debe aceptar
cualquier interferencia que reciba, incluso
aquellas que puedan originar un
funcionamiento inadecuado.
De acuerdo con los requisitos de la FCC, todo
cambio o modificación no expresamente
autorizado por Thomson Consumer Electronics
puede invalidar la facultad del usuario de
utilizar el producto.
Este producto cumple con las normas 21 CFR
DHHS, subcapítulo J aplicables a la fecha de
fabricación.
Si este equipo provoca efectivamente
interferencias en la recepción de radio o
televisión (cosa que se podrá verificar
encendiendo y apagando el equipo), trate de
corregir la interferencia mediante una o más de
las medidas siguientes:
• Vuelva a orientar la antena receptora (es
decir la antena de radio o televisión que está
sufriendo la interferencia).
• Cambio la posición de la unidad con relación
al equipo de radio o TV que está sufriendo la
interferencia.
• Aleje la unidad del equipo que está
recibiendo la interferencia
• Enchufe la unidad en un tomacorriente de
pared distinto al que alimenta a la unidad
que está sufriendo la interferencia, para que
se encuentren en distintas derivaciones
eléctricas.
Si estas medidas no eliminan las interferencias
debe consultar a su distribuidor o a un técnico
de radio/televisión experimentado para que le
hagan otras sugerencias.
PRECAUCIONES PARA EL USO DE
LOS AURICULARES
Advertencias.
• No utilice los auriculares con alto volumen.
Los expertos en audición aconsejan no
escuchar durante largo tiempo y
continuamente mediante auriculares.
• Si nota que los oídos le zumban, reduzca el
volumen de los auriculares o deje de
utilizarlos.
• Debería extremar la precaución o no utilizar
temporalmente los auriculares en condiciones
potencialmente peligrosas.
• Aún si sus auriculares son del tipo que
permite escuchar los sonidos exteriores, no
aumente el volumen tan alto que le impida
escuchar lo que sucede a su alrededor.
Advertencias.
• No abra nunca la cubierta de la unidad, bajo
ninguna circunstancia. No haga funcionar el
aparato sin la cubierta. Cualesquiera
reparaciones o ajustes internos deberían ser
realizadas sólo por técnicos especializados.
• No toque la pletina con las manos húmedas.
Si entrase líquido en la pletina deberá llevar
el aparato a un técnico especializado para
que lo revise.
• Este reproductor de CDs utiliza un láser para
reproducir la música impresa en el disco. El
mecanismo láser se corresponde con el
cartucho y el estilo de un reproductor de
discos tradicional. Aunque este producto
incorpora una lente de lectura láser, es
completamente seguro cuando se utiliza
siguiendo las instrucciones.
INFORMACIÓN IMPORTANTE SOBRE
LAS PILAS
• Si el aparato no va a ser utilizado durante un
mes o más, no deje de retirar las pilas
porque pueden tener pérdidas y ocasionar
daños.
• Disponga de las pilas de la forma apropiada,
de conformidad con las normas generales,
estatales y locales.
• Cualquier pila puede perder electrolito si se
mezcla con un tipo de pila diferente, si se
coloca incorrectamente, si todas las pilas no
son reemplazadas al mismo tiempo, si se
arrojan al fuego, o si se intenta cargar una
pila que no es recargable.
• Deseche las pilas que tengan pérdidas
inmediatamente. Las pilas con pérdida de
electrolito pueden ocasionar quemaduras en
la piel o heridas.
INFORMACIÓN SOBRE EL SERVICIO
TÉCNICO
Este producto debe ser atendido sólo por
técnicos especializados.
DATOS IMPORTANTES?
En caso de que necesite servicio técnico, deberá
mencionar el número de modelo y el número
de serie.
Indique en los espacios que aparecen debajo, la
fecha y lugar de compra y el número de serie
Modelo Nº RP-7994C
Fecha de compra
Lugar de compra
Número de serie
RP7994 SpanIB 7/12/00, 5:23 PM1
Page 22

E
1
Alimentación
Este estéreo portátil funciona con pilas o
corriente alterna.
Alimentación con pilas
Coloque ocho pilas alcalinas “C” (no provistas)
para poder escuchar el aparato donde quiera.
Abra la puerta del compartimiento de pilas,
situado en la parte posterior del aparato,
oprimiendo las dos lengüetas y tirando la
puerta hacia afuera. Coloque las pilas como
indica el diagrama del compartimiento.
Antes De Usar
Antena FM
Entrada de CA
Compartimiento de pilas
Información importante sobre las
pilas
• Si no piensa utilizar el aparato durante más
de 30 días, sáquele las pilas ya que pueden
tener pérdidas y dañar el aparato.
• Deseche las pilas conforme a las
reglamentaciones federales, estatales y
municipales.
• Cualquier pila puede tener pérdidas de
electrólito, si se mezcla con otro tipo de pila,
si está colocada incorrectamente, si todas las
pilas no se cambian al mismo tiempo, si se
tira al fuego o si se intenta cargar una pila
que no es recargable.
• Deseche inmediatamente las pilas que
tengan pérdidas para evitar posibles
quemaduras de la piel u otras lesiones
personales.
Alimentación con corriente alterna
Enchufe el cable de alimentación en el jack AC
situado en la parte posterior del aparato y en una
toma de corriente alterna que sea para clavijas
polarizadas (una clavija más ancha que la otra).
Para su seguridad
La clavija para tomacorriente de CA es polarizada
(una clavija más ancha que la otra) y entra en el
tomacorriente sólo en una posición. Si la clavija no
encaja completamente, colóquela en la posición
inversa. Si sigue sin encajar como corresponde,
llame a un electricista profesional para que cambie
el tomacorriente o utilice otro. No anule esta
característica de seguridad.
¿No puede encontrar el cable de
alimentación? Búsquelo en el
compartimiento de las pilas, en la parte
posterior del aparato.
Antenas
La antena para AM viene integrada. Por lo
tanto, al cambiar la posición del aparato es
posible mejorar la recepción en esa banda.
La antena de varilla flexible para FM, situada
en la parte posterior del aparato, puede
estirarse y girarse para mejorar la recepción en
esa banda.
RP7994 SpanIB 7/12/00, 5:23 PM2
Page 23

Controles Generales
2
E
3
PAUSE STOP/EJ F.FWD REW PLAY RECORD
Funcionamiento De La Radio
Conmutador
de funciones
Tecla DBBS
Perilla de
volumen
Selector de
AM/FM
Indicador de
FM en estéreo
Ruedita de
sintonía
Jack para
audífonos
JACK PARA AUDÍFONOS - Utilice el jack para
audífonos cuando desea escuchar sus emisoras,
cintas o discos compactos preferidos en privado.
CONMUTADOR DE FUNCIONES - Mueva el
conmutador para seleccionar la función del
estéreo portátil que desea utilizar: radio,
grabador o lector de discos.
APAGADO - Para apagar el aparato, coloque el
selector de funciones en TAPE, asegurándose de
que no está oprimida ninguna tecla del
grabador.
TECLA DBBS (Reforzador de graves) - Oprima la
tecla DBBS para intensificar el
efecto de los sonidos graves. Para volver a los
sonidos graves corrientes, suba la tecla DBBS.
PERILLA DE VOLUMEN - Gire la perilla para subir
o bajar el volumen a su nivel preferido.
SELECTOR DE AM/FM - Para seleccionar la banda
AM o FM.
INDICADOR DE FM EN ESTÉREO - El indicador se
ilumina cuando el aparato recibe emisiones en
estéreo.
RUEDITA DE SINTONÍA - Para sintonizar la
emisora deseada.
Sintonía de las estaciones de radio
Para encender la radio, coloque el selector
de funciones en la posición RADIO.
• Coloque la tecla BAND en la banda AM
o FM.
• Sintonice la estación deseada con la
ruedita de sintonía.
Funcionamiento Del Grabador
• Para apagar la radio, coloque el selector
de funciones en TAPE.
• El indicador “Stereo” se encenderá
cuando reciba una emisión estéreo.
RECORD (grabar) — oprima para grabar
desde la radio o el lector de discos.
PLAY (reproducir)
— oprima para escuchar
casetes.
REW (rebobinar) — a partir del modo de
parada, oprima para volver al comienzo de la
cinta.
F.FWD (avance rápido)
— a partir del modo
de parada, oprima para avanzar hacia el final
de la cinta.
STOP/EJ (parada/eyección)
— oprima para
detener la cinta o para abrir la puerta
portacasete cuando no hay ninguna tecla
oprimida.
PAUSE (pausa)
— oprima para detener la
reproducción o la grabación de una cinta.
Oprima una segunda vez para reanudar la
reproducción o la grabación.
RP7994 SpanIB 7/12/00, 5:23 PM3
Page 24

Funcionamiento Del Grabador
.
E
3
A
60
A
A
A
A
Reproducción de casetes
1. Coloque el selector de funciones en TAPE
(grabador).
2. Oprima STOP/EJECT para abrir la puerta
portacasete.
3. Coloque el casete en el compartimiento con
la cinta expuesta hacia arriba y el carrete
lleno a la derecha.
4. Cierre bien la puerta.
5. Oprima REW o F.FWD para mover la cinta al
punto deseado.
6. Oprima PLAY para empezar a reproducir la
cinta. Cuando llegue al final de la primera
cara del casete, el aparato se detendrá
automáticamente.
Grabación en casetes
Es posible grabar desde la radio o el lector de
discos.
Para obtener los mejores resultados, utilice
cintas para polarización normal.
Protección contra borrado
Cuando usted registra material nuevo, el
aparato graba sobre lo que ya está grabado en
la cinta. Para proteger una cinta contra el
borrado accidental, rompa una o ambas
lengüetas plásticas (una para cada lado de la
cinta) situadas en la parte superior del casete. Si
posteriormente decidiera grabar sobre la cinta,
cierre el agujero con un pedacito de cinta
adhesiva.
Eliminación de flojedad
Una pequeña flojedad en sus cintas
puede hacer que se rayen, o peor aún,
se rompan. Si nota la cinta algo floja,
use un lápiz para apretarla antes de
colocarla en el grabador.
Grabaciones desde la radio
1. Coloque un casete virgen en el
compartimiento de casetes y cierre la puerta.
2. Coloque el selector de funciones en RADIO y
elija una emisora.
3. Para empezar a grabar oprima RECORD y la
tecla PLAY se activará (bajará)
automáticamente.
4. Oprima STOP/EJECT para terminar la
grabación.
5. Para apagar la radio, coloque el selector de
funciones en TAPE.
Consejos para la grabación desde la
radio
• Para detener temporariamente la grabación,
oprima la tecla PAUSE del grabador; vuelva a
oprimir PAUSE para reanudar la grabación.
Grabaciones desde el lector de
discos compactos
1. Coloque un casete virgen en el
compartimiento de casetes y cierre la puerta.
2. Oprima RECORD y PAUSE simultáneamente.
3. Coloque el selector de funciones en CD
(lector de discos).
4. Coloque el disco que desea grabar en la
bandeja del lector.
5. Oprima PLAY/PAUSE para empezar a grabar
la pista 1 — u oprima primero SKIP para
empezar a grabar otra pista
y
luego suelte inmediatamente la tecla PAUSE
del grabador de casetes.
Haga una pausa
Si utiliza la tecla PAUSE del grabador
en lugar de STOP para interrumpir
temporariamente la grabación, el sonido
resultante es mucho más nítido.
RP7994 SpanIB 7/12/00, 5:24 PM4
Page 25

Funcionamiento Del Lector De Dicos
E
4
Tecla de reproducción
aleatoria
Tecla para “saltar”
pistas hacia atrás
Tecla de
parada
Tecla para “saltar”
pistas hacia adelante
Visor
Tecla para abrir la
puerta
Tecla para repetir
una/todas las pistas
Tecla de
reproducción/pausa
Cómo colocar un disco
1. Coloque el selector de funciones en CD; si la
bandeja no tiene disco, en el visor aparecerá
“ ” “ “ .
2. Oprima la tecla PUSH OPEN para abrir la
puerta del compartimiento de disco.
3. Coloque un disco en la bandeja con la
etiqueta hacia arriba.
4. Cierre la puerta. En el visor destellará “–” y
luego aparecerá el número total de pistas.
5. Para sacar el disco, oprima PUSH OPEN,
sostenga el disco por los bordes y retírelo
cuidadosamente.
Reproducción de discos compactos
1. Oprima PLAY/PAUSE para reproducir
todas las pistas en secuencia, empezando con
la pista 1. El número de la pista que se
reproduce aparecerá en el visor.
Observación: oprima
PLAY/PAUSE para
detener temporariamente la reproducción.
En el visor aparecerá el número de la pista
detenida. Oprima
PLAY/PAUSE
nuevamente para reanudar la reproducción.
2. Ajuste el volumen a su nivel preferido.
3. Oprima STOP
para detener el lector antes
de que se hayan reproducido todas las pistas.
Espere unos segundos para que el disco deje
de girar; luego oprima PUSH OPEN para abrir
la puerta del compartimiento y sacar el disco.
Búsqueda automática
Esta función le permite encontrar rápidamente
el comienzo de cualquier pista del disco,
inclusive de la pista que se está reproduciendo.
Si se está reproduciendo un disco:
•
Oprima SKIP BACKWARD (saltar hacia
atrás) para volver al comienzo de la pista
anterior.
•
Oprima SKIP FORWARD (saltar hacia
adelante) para avanzar al comienzo de la pista
siguiente.
Si el lector de discos está parado, oprima
repetidamente SKIP FORWARD
o
SKIP BACKWARD, hasta que en el visor aparezca
el número de la pista que desea escuchar; luego
oprima PLAY/PAUSE para que el lector
empiece a reproducir la pista seleccionada.
Observe que si está al comienzo del disco, sólo
puede buscar hacia adelante, y si está al final,
sólo puede buscar hacia atrás.
Búsqueda dentro de una pista
• En el modo de reproducción o de pausa,
mantenga oprimida la tecla SKIP FORWARD
para avanzar rápidamente dentro de
una pista.
• En el modo de reproducción o de pausa,
mantenga oprimida la tecla SKIP BACKWARD
para retroceder rápidamente dentro de
una pista.
CD-R Listo
Esta unidad es compatible con disco de CD-R
para su ejecución.
RP7994 SpanIB 7/12/00, 5:24 PM5
Page 26

Funcionamiento Del Lector De Discos
E
5
Cuidados Y Mantenimiento
Reproducción aleatoria
Oprima esta tecla para que el disco se
reproduzca en una secuencia aleatoria. Si la
tecla SHUFFLE se oprime en el modo de parada,
el disco empezará a reproducirse en este modo y
en el visor se iluminará el segmento SHUFFLE.
Para desactivar este modo, oprima la tecla
SHUFFLE o la tecla STOP. Se desactivará asimismo
si se abre la puerta.
Reproducción repetida
La tecla REPEAT le permite repetir una pista o
todas las pistas. Para seleccionar una de las
opciones, oprima y suelte repetidamente la tecla
REPEAT hasta que en el visor aparezca la opción
deseada. A continuación se muestra cómo
REPEAT funciona en los diferentes modos:
Modo de reproducción:
• Repeat 1 repite la pista en curso
• Repeat All repite el disco entero
Modo de reproducción aleatoria:
• Repeat 1 repite la pista en curso
• Repeat All repite el disco entero en una
secuencia aleatoria diferente
Limpieza exterior
• Desconecte el aparato de la toma de corriente
alterna antes de limpiar sus partes exteriores
con un paño suave.
Manejo de los discos compactos
• No toque la superficie donde están grabadas
las señales. Sostenga el disco por los bordes o
por el borde exterior e interior.
• No coloque etiquetas o cinta adhesiva en la
superficie de la etiqueta. No raye ni dañe la
etiqueta.
• Los discos giran a alta velocidad dentro del
tocadiscos. No utilice discos dañados (rajados
o arqueados).
Limpieza de los discos compactos
• Los discos sucios pueden producir un sonido
de baja calidad. Mantenga siempre limpios los
discos frotándolos suavemente con un paño
desde el borde interior hasta el perímetro
externo.
• Si un disco se ensucia mucho, límpielo
cuidadosamente con un paño suave y
humedecido con agua; luego retire cualquier
excedente de agua con un paño seco.
• No utilice aerosoles limpiadores o agentes
antiestáticos en los discos. Nunca limpie los
discos con bencina, diluyente o cualquier otro
tipo de solvente volátil, ya que pueden dañar
su superficie.
• Guarde los casetes en sus cajas cuando no los
utilice.
• Los campos magnéticos producidos por
imanes, motores eléctricos, transformadores
eléctricos y otros mecanismos pueden borrar
la cinta del casete. Mantenga las cintas
alejadas de los imanes y campos magnéticos.
Limpieza de los cabezales de
grabación
Las partículas de óxido de hierro de la cinta
magnética pueden acumularse en las piezas
que están en contacto con la cinta. Estos
depósitos pueden ocasionar un borrado
incompleto, un sonido de reproducción
amortiguado, y hasta podrían afectar la
función de parada automática.
Para limpiar el grabador, abra la puerta,
oprima la tecla PLAY y limpie suavemente
los cabezales, el eje motor y la ruedita de
apretamiento con un limpiacabezales.
Siempre desenchufe el aparato cuando va a
hacer la limpieza. Cuando utilice un
limpiador líquido, déjelo secar 30 minutos.
Limpie los cabezales después de cada 25
horas de uso.
• Desmagnetice los cabezales
ocasionalmente con un casete
desmagnetizante de cabezales (disponible
en cualquier tienda de equipos de audio).
• No aproxime ningún objeto de metal a los
cabezales.
No permita que entre cualquier material
de limpieza en el mecanismo de
grabación.
Cuidado de las cintas
• No exponga las cintas a la luz solar ni las
guarde en lugares calientes. Las temperaturas
altas pueden deformar el casete o dañar la
cinta misma.
RP7994 SpanIB 7/12/00, 5:24 PM6
Page 27

Detección De Fallas
E
6
Problema Solución
El sistema no se enciende • Asegúrese de que el cable de
alimentación esté bien enchufado en la
toma de corriente CA (o que las pilas
son buenas).
• Desenchufe el aparato durante un
momento, y luego vuelva a enchufarlo.
• Verifique el tomacorriente enchufando
otro aparato.
Ningún sonido • Ajuste el volumen.
• Asegúrese de que ha seleccionado la
función correcta: CD, TAPE o RADIO.
Mala recepción de la radio • Ajuste la antena flexible de FM para
una mejor recepción en esa banda.
• Haga girar el aparato para lograr una
mejor recepción en AM.
• Trate de apagar los aparatos eléctricos
que funcionan a poca distancia, tales
como secadores de cabello, aspiradoras
o tubos fluorescentes.
El tocadiscos no suena • Asegúrese de que la bandeja tiene un
disco.
• Asegúrese de que la etiqueta del disco
compacto está colocada hacia arriba.
• Asegúrese de que el aparato no está en
Pausa.
• Asegúrese de que se ha seleccionado el
modo de tocadiscos, CD.
El disco compacto salta • Limpie el disco (siguiendo las
instrucciones que aparecen en
“Cuidados y mantenimiento”).
• Verifique que el disco no esté arqueado,
rayado o tenga algún otro daño.
• Fíjese que no haya vibraciones o
impactos que puedan afectar el aparato;
mueva de lugar el sistema, si es
necesario.
Grabaciones distorsionadas o con ruidos • Verifique el estado del cabezal de
grabación y límpielo, si es necesario.
• Desmagnetice el cabezal de grabación
(siguiendo las instrucciones que
aparecen en “Cuidados y
mantenimiento”).
INFORMACIÓN SOBRE EL DISCO CD-R/RW
• Los discos CD-R/RW que se hayan grabado utilizando PCs u otros grabadores de
CD-R/RW no pueden tocarse en esta unidad debido a que hay diferencia en las
plataformas de grabación.
• No pegue ningún tipo de etiquetas en ninguno de los dos lados (el que contiene
las imágenes o el que se puede grabar) de un disco CD-R/RW porque puede
provocar un mal funcionamiento del disco.
• Para evitar daños en el disco CD-R/RW, no abra la tapa del compartimento del
disco mientras esté leyendo. Esto puede tardar más de 30 segundos.
• No coloque en la unidad un disco CD-R/RW sin grabar.
RP7994 SpanIB 7/12/00, 5:24 PM7
Page 28

Garantía Para EE.UU.
E
7
Cobertura de la garantía:
• Todo defecto de materiales o mano de obra.
Vigencia de la garantía:
• Un año.
(La garantía para aparatos de alquiler empieza desde la fecha en que se alquilan por
primera vez o a los 45 días de la fecha de envío, lo que se dé primero).
Responsabilidad de la compañía:
• Brindarle un aparato nuevo o, a nuestro criterio, uno reacondicionado.
• El aparato entregado está cubierto hasta que se termine la garantía del aparato original.
Reclamo por garantía:
• Embale el aparato como corresponde, incluyendo los cables y otros accesorios.
Recomendamos usar la caja y el material de embalaje originales.
• Coloque en el paquete un comprobante de la fecha de compra, como la factura. Escriba
en letra de imprenta también el nombre y la dirección del remitente y una descripción de
la falla. Mándelo por UPS corriente, o un servicio equivalente, a:
Thomson Consumer Electronics, Inc.
Product Exchange Center
11721 B Alameda Ave,
Socorro, TX 79927
• Asegure el envío por pérdidas o daños, porque Thomson no acepta ninguna
responsabildiad en ninguno de estos dos casos.
• Pague todos los cargos que le cobre el Centro de Canjes por los servicios no cubiertos por
la garantía.
• Se le enviará un aparato nuevo o reacondicionado con porte pagado.
Aspectos no cubiertos por la garantía:
• Instrucción a los clientes. (Su Manual de Instrucciones le brinda información sobre el
aparato. Para más detalles, póngase en contacto con su distribuidor.)
• Instalación y ajustes de configuración.
• Pilas.
• Daños debidos al abuso o descuido.
• Productos que han sido modificados o incorporados en otros productos.
• Productos adquiridos o reparados fuera de los EE.UU.
• Casos fortuitos, como daños por descargas eléctricas, etc.
Registro del producto:
• Liene y envíela tarjeta de registro del producto, que viene con su aparato. El registro
facilitará el contacto, si fuera necesario. Para aplicar la garantía no se necesita devolver la
tarjeta.
Leyes estatales que se aplican a esta garantía:
• Esta garantía le da derechos legales específicos, pero es posible que usted tenga otros
derechos, que varían según el estado.
En caso de comprar el producto fuera de EE.UU.:
• Esta garantía no se aplica. Solicite a su distribuidor información sobre la garantía.
RP7994 SpanIB 7/12/00, 5:24 PM8
 Loading...