

Page 1

RCil
RGil
RCil
A i_i a
MODEL RP-1820
USE AND CARE GUIDE
PERSONAL
AM/FM STEREO RADIO/
CASSETTE PLAYER
Page 2
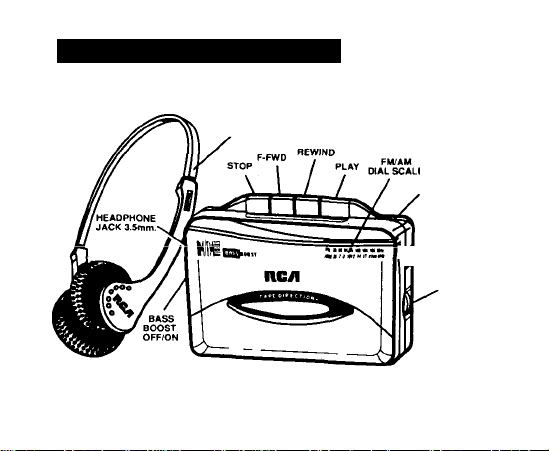
CONTROLS AND FEATURES
STEReO
HEADPHONES
FUNCTION
>FM
____
^ *AM
I W jr -TAPE (RADIO OFF)
Page 3

BATTERY INSTALLATION
1. Push on Battery Door in the direction of the arrow, slide door down and
pivot upward.
2. Insert 2 “AA” size alkaline batteries (not included). Be sure the “ + ”. or
cap end, of each battery is installed as shown on the battery diagram.
3. Close the Battery Door.
IMPORTANT SAFETY INFORMATION: Always remove batteries if the unit is
not going to be used for a month or more. Batteries left in the unit may leak
and cause damage. Always adhere to the following precautions:
A. Any battery may leak If mixed with a different battery type, inserted
incorrectly, or if all batteries are not replaced at the same time.
B. Any battery may leak or explode If disposed of in fire or if an attempt
is made to charge a battery not intended to be recharged.
C. Discard leaky batteries immediately. Leaking batteries can cause skin
burns or other personal injury.
When discarding batteries, be sure to dispose of them in the proper manner,
according to your state and local regulations.
Always return tape operation buttons to their off position before storing. This will
relieve pressure on certain parts in the tape player that might deform after long
periods of time.
Page 4

RADIO OPERATION
1 Set VOLUME to a minimum level,
• Increase VOLUME only after headphone is in place for listening.
2. Plug HEADPHONE (included) into stereo headphone jack.
3. Slide FUNCTION switch to FM or AM Band.
4. Use the TUNING knob to select your desired station. When FM is selected,
stereo broadcasts will be receiv^ in stereo. All other FM broadcasts will be
received in balanced mono.
5. Adjust VOLUME to the loudness you prefer.
6. To turn the radio off, slide FUNCTION switch to TAPE (RADIO OFF)
position.
BASS BOOST SWITCH
When operating your unit at a low-volume level, switch the BASS BOOST control
to ON to bring out the bass frequencies and enhance your low-volume listening en
joyment.
ANTENNAS
AM Antenna — The built-in antenna is somewhat directional. For best AM recep
tion, the unit should be horizontal (buttons up) and it may be necessary to rotate
the unit slightly for best reception on weak stations.
FM Antenna — The headphone cord is also used as your FM antenna. The anten
na is directional and, therefore, some repositioning of the headphone cord may be
required to improve reception. ^
Page 5

TAPE OPERATION
TO INSERT OR REMOVE CASSETTE
1. Press STOP button to ensure tape mechanism is not engaged.
2. Lift open Cassette Carry Door.
3. Insert cassette gently, sliding it into the Cassette Carry Door with expos
ed tape upward, and the full reel of tape to the right (toward the tuning
knob).
4. Close the door.
TAPE PLAY
1. Set VOLUME to minimum.
2. Plug headphone into jack on cabinet side, insert cassette, and then
press PLAY.
3. Adjust VOLUME. Increase only alter headphone is in place for listening.
4. To turn unit off, press STOP.
5. To skip over a portion of the tape, press F-FWD. Use STOP after you
have advanced to the desired point on the tape.
6. To run the tape backwards, press REWIND. Press STOP after you have
rewound to the desired point.
AUTOMATIC STOP
When the end of the tape is reached in PLAY mode, the unit will automatically
shut itself off and return the button to the "off" position.
Page 6

BELT CUP
A detachable Belt Clip is provided as a convenient means for transporting the
radio/tape player
To attach the Belt Clip, slide it up into the mounting rails on the cabinet back.
When a definite "click” is heard, the Clip is secure.
To detach, gently lift up on the center tab section of the Clip to clear the cabinet
catch and slide the Clip down and off the mounting rails.
TAPE CARE
Do not expose your cassettes to direct sunlight or store them in hot places. High
temperatures may warp the cassette shell or damage the tape Itself. Keep your
cassettes in their boxes when they are not in the cassette player. This keeps dust
from entering the cassette shells.
If a tape is accidentally pulled from a cassette, insert the tapered end of a large
pencil or similar object Into the center of the tape hub and gently wind the tape
back into the cassette. Be careful not to twist or wrinkle the tape. Care should
be taken that all excess tape Is wound into the cassette and is taut. If slack is
allowed to exist, it can cause the tape to become twisted around the pinch roller
and capstan which could result in a damaged cassette.
6
Page 7

CLEANING THE HEADS
^on oxide particles from the magnetic tape will, in time, build up on the parts
hat come Into direct contact with the tape. These deposits will reduce the playback
eveis resulting in a muffled sound. They may also prevent automatic stop.
Vith the cassette door open, the parts indicated can be cleaned (gently) with a
iquid head cleaner
PINCH CAPSTAN
WHEEL
Another convenient method is to use a cassette head cleaning tape. Follow the
manufacturer’s directions regarding its use.
Page 8

SERVICE
This product should be serviced only by those specially trained in appropriate
servicing techniques. For instructions on how to obtain service, refer to the war
ranty included in this Guide.
Attach your sales receipt to the booklet for future reference or jot down the date
this product was purchased or received as a gift. This information will be valuable
If service should be required during the warranty period.
Purchase date.
Name of store.
FCC INFORMATION
This device complies with Part 15 of the FCC Rules. Operation is subject to the
following two conditions: (1) This device may not cause harmful interference, and
(2) This device must accept any interference received, including interference that
may cause undesired operation.
In accordance with FCC requirements, changes or modifications not expressly
approved by Thomson Consumer Electronics could void the user’s authority to
operate this product.
Page 9

ONE-YEAR LIMITED WARRANTY
What does your warranty cover?
• Any defect in material or workmanship.
For how long after the original purchase?
• One year.
• The warranty for rental units begins with the first rental.
What will we do?
• Provide you with a new, or at our option, a refurbished unit.
• The exchange unit is warranted for the remainder of your product's original oneyear warranty period.
How do you make a warranty claim?
• Properly pack your unit. Include any cables, etc., which were originally provided
with the product. We recommend using the original carton and packing
materials.
• Include in the package a copy of the sales receipt or other evidence of date of
original purchase. If the unit was a gift, provide a statement specifying the date
received. Also print your name and address and a description of the defect.
• Ship the unit standard UPS or equivalent to:
Thomson Consumer Electronics, Inc.
Product Exchange Center
32 Spur Drive
El Paso, Texas 79906
• Pay any charges billed to you by the Exchange Center for service not covered by
the warranty.
• A new or refurbished unit will be shipped to you prepaid freight.
Page 10

What does your warranty not cover?
• Customer instruction. Your Owner’s Manual provides information regarding
operating instructions and user controls. For additional information, ask your
dealer.
• Installation and set-up service adjustments.
• Batteries.
• Damage from misuse or neglect.
• Products which have been modified or incorporated into other products.
• Product purchased or serviced outside the USA.
How does state law relate to this warranty?
• This warranty gives you specific legal rights, and you may also have other rights
which vary from state to state.
What if you purchased your product outside the United States?
• See your dealer for details.
Thomson Consumer Electronics, Inc.
Model RP’1820A
347A7732’A001 (Rev. 0)
94-79
©Thomson Consumer Electronics Inc.
Printed in Hong Kong
Page 11

ItCiI
A LJ o I o
MODELO RP-1820
GUIA DE USO Y CUIDADOS
RADIO EN ESTERO
AM/FM/TOCACINTAS
Page 12

CONTROLES Y CARACTERISTICAS
Page 13

INSTALACION DE LAS PILAS
1. Para abrir el compartimiento de las pilas, empuje la PUERTA DE LAS PILAS,
siguiendo la dirección de la flecha, deslícela hacia abajo y levante la puerta.
2. Coloque 2 pilas' AA” (no se incluyen) dentro del compartimiento. Asegúrese de
que el signo (+) o el casquillo de las pilas va colocado como se indica en el
diagrama.
3. Cierre la puerta.
INFORMACION DE SEGURIDAD IMPORTANTE: Siempre remueva las pilas si no
va a usar la unidad por un mes o más. Las pilas que quedan en el producto
pueden desramar líquidos y causar daños a la unidad. Siempre siga las precau'
clones siguientes:
A. Cualquier pila puede desramar líquidos si ha sido mezclada con otro tipo de
pila, si ha sido colocada incorrectamente, o si todas las pilas no son
reemplazadas al mismo tiempo.
B. Cualquier pila puede desramar líquidos o expiotarse si fuera desechada al
fuego o si Ud. trata de recargar una pila no hecha para ser recargada.
C. Deseche la pila que desrama líquidos inmediatemente. Las piias que
desraman líquidos pueden quemarle la piel o pueden causar otros daños
personales.
Cuartdo deseche las baterías, asegúrese de deshacerse de ellas en una manera
apropiada, de acuerdo con las regulaciones locales o del estado.
Antes de guardar el aparato, ponga siempre las teclas del tocacintas en la posición
desactivada. De esta manera ciertas piezas no correrán el riesgo de deformarse
por la presión ejercida durante largo tiempo.
Page 14

FUNCIONAMIENTO DE LA RADIO__________________
1. Cotoque el VOLUMEN en el nivel mínimo.
• Levante el VOLUMEN sólo después de haberse colocado los audífonos.
2. Enchufe los AUDIFONOS (incluidos) en la entrada correspondiente.
3. Coloque el conmutador de FUNCIONES en la banda FM o AM.
4. Utilice la perilla de SINTONIA para elegir la emisora que desee escuchar. Cuan
do se ha elegido FM, las radiodifusiones en estéreo se recibirán en estéreo.
Todas las otras radiodifusiones en FM se recibirán en mono con equilibrio tonal.
5. Coloque el VOLUMEN a su nivel preferido.
6. Para apagar la radio, deslice el conmutador de FUNCIONES a TOCACINTAS
(RADIO APAGADA).
CONMUTADOR DEL REFORZADOR DE GRAVES
Cuando haga funcionar la unidad a bajo volumen, active el control del REFOR
ZADOR DE GRAVES para hacer resaltar las frecuencias graves y mejorar la
reproducción a dicho volumen.
ANTENAS
Antena de AM — Dado que la antena integrada de AM es parcialmente direccional,
para mejorar la recepción en AM. el aparato debería estar en posición horizontal
(con las teclas arriba) y es posible que deba girar levemente la radio para escuchar
las señales débiles.
Antena de FM — El cable de los audífonos sirve también como antena de FM. Dado
que esta antena es direccional, es posible mejorar la recepción cambiando la posi
ción del cable.
4
Page 15

FUNCIONAMIENTO DEL TOCACINTAS
PARA COLOCAR O SACAR UNA CASETE
1. Oprima la tecla de PARADA, para asegurarse de que no haya otra tecla
oprimida.
2. Abra la puerta donde va la casete.
3. Coloque con cuidado la casete en el compartimiento, deslizándola en el por
tácasete de la puerta, con la cinta expuesta hacia el exterior y el carrete
rebobinado completamente hacia la derecha (hacia la perilla de sintonía).
4. Luego, cierre la puerta.
_____________
REPRODUCCION DE CINTAS
1. Coloque el VOLUMEN en el nivel nnínimo.
2. Enchufe los audífonos en el receptáculo que está en el costádo del aparato,
coloque la casete y luego oprima la tecla de REPRODUCCION.
3. Ajuste el VOLUMEN sólo después de haberse colocado los audífonos y póngalo
en el nivel preferido.
4. Para apagar el aparato, oprima la tecla de PARADA.
5. Para saltar una sección de la cinta, oprima AVANCE RAPIDO. Una vez llegado
al punto que desea, oprima la tecla de PARADA.
6. Para hacer retroceder la cinta, oprima la tecla de REBOBINADO. Una vez que
haya llegado a la posición deseada, oprima el botón de PARADA.
PARADA AUTOMATICA
En el mòdo de REPRODUCCION (PLAY), cuando la cinta llega al final, el aparato
se detiene automáticamente y las teclas vuelven a la posición desactivada.
Page 16

MESILLA PARA EL CINTURON
a transportar el aparato, utilice la presilla desmontable para cinturón que viene
I el aparato.
a fijarla, deslice la presilla por las ranuras de la parte posterior del aparato,
a que la presilla esté sujeta, deberá escuchar claramente un “clic",
a quitarla, levante suavemente la sección central de la lengüeta de la presilla
a sacarla del soporte, y deslícela hacia abajo y hacia afuera para que salga
las ranuras de montaje.
MESILLA PARA EL CINTURON
exponga sus cintas cassette a la luz directa del sol o guarde éstas en lugares
lentes. Altas temperaturas podrían deformar el estuche o malograr la cinta
ima.
jna cinta accidentalmente fuera jalada del cassette, coloque la punta de un
iz o un objeto similar dentro del eje central del cassette y cuidadosamente
piece a enrollar de nuevo la cinta dentro del cassette. Tenga cuidado de no
jtar o arrugar la cinta. Deberá tener cuidado de que toda la cinta sea enrollada
itrol del cassette en forma tirante. No permita que la cinta esté floja. Esto podría
jsar que ésta se enredará en el mecanismo, lo cual daría como resultado que
malogrará el cassette.
Page 17

LIMPIEZA DE LAS CABECERAS
Partículas de oxido de hierro de las cintas magnetofónicas con el tiempo se van
acumulando en las partes que están en contacto directo con la cinta. Estos
depósitos pueden causar borraduras incompletas, pueden impedir un Paro
Automático.
Con la puertecitla del cassette abierta y el botón TOCAR (PLAY) presionado, las
partes indicadas pueden limpiarse suavemente con un limpiador de cabeceras
líquido.
RUEDA CABRESTANTE CABEZAL PARA
DE FRICCION TOCAR
Otro método conveniente es usar una cinta que limpia las cabeceras. Siga tas
instrucciones del fabricante para el uso.
Page 18

SERVICIO DE REPARACIONES
Este producto deberá ser reparado solamente por aquellas personas entrenadas
especialmente en la técnica de su funcionamiento. Para instrucciones en como
obtener servicio, refiérase a la Garantía en esta Guía
Adjunte el recibo de venta a este manual para una referencia futura, o anote la
fecha en que este producto fue comprado o recibido como regalo. Esta informa
ción es importante si alguna reparación fuera necesaria durante el plazo de la
garantía.
Fecha de Compra. Nombre de la Tienda.
INFORMACION DE LA FCC
Este aparato cumple con la Parte 15 del Reglamento de la FCC. Su funciona
miento está sujeto a fas dos condiciones siguientes; (1) Este aparato no deberá
causar daños de interferencia, y (2) Este aparato deberá aceptar cualquier in
terferencia recibida, incluyendo inteiíerencias que pudieran causar funciones no
deseadas.
De acuerdo con los requerimientos de la FCC, cambios o modificaciones no
aprobados expresamente por Thomson Consumer Electronics podrían anular la
autoridad del usuario para operar este producto.
8
Page 19

3ARANTIA LIMITADA DE UN ANO
-.Qué le cubre la garantía?
• Cualquier defecto de mano de obra o material.
¿,Por cuánto tiempo después de la compra original?
• Un año,
• La garantía para unidades rentadas empieza con la primera renta.
c,Qué vamos a hacer nosotros?
• Proveerle a Ud. con una nueva o, a nuestro criterio, una unidad reacondi
cionada.
• La unidad cambiada estará garantizada por el tiempo restante del año de garan
tía de la unidad original que Ud. compró.
¿Cómo hacer un reclamo de la garantía?
• Empaquete la unidada correctamente. Incluya cualquier cable, etc., que haya
sido originalmente proveídos con el producto. Nosotros recomendamos usar las
cajas originales y materiales de empaquetar.
• lr>cluya en el paquete una copia del recibo de compra o otra evidencia con la
fecha de compra. Si la unidad fue un regalo, provea un documento especifican
do la fecha recibida. También escriba su nombre y dirección y una descripción
del defecto.
• Envié la unidad por UPS (United Parcel Service) o su equivalente a:
Thomson Consumer Electronics. Inc.
Product Exchange Center
32 Spur Drive
El Paso. Texas 79906
Page 20

• Pague cualquier recibo enviado por la Exchange Center por servicios no cubier
tos por la garantía.
• Una unidad nueva o reacondícíonada le será enviada a Ud. con el envió pagado
por la compañía.
¿Qué no le cubre la garantía?
• Instrucciones del consumidor El Manual del Propietario le provee a Ud. con in
formación relacionada a instrucciones de operación y controles del usuario. Para
información adicional, consulte con su concesionario.
• Instalaciones y ajustes de la unidad.
• Pilas.
• Desperfectos por mal uso o negligencia.
• Productos que hayan sido modificados o incorporados dentro de otros productos.
• Productos comprados o reparados fuera de los Estados Unidos.
¿Cómo las leyes del estado están relacionadas a esta garantía?
• Esta garantía le da a Ud. derechos legales específicos. Ud tal vez tenga otros
derechos, los cuales varían de estado a estado.
¿Si este producto ha sido adquirido fuera de los Estados Unidos?
• Consulte al distribuidor para cualquier informaciórx necesaria.
Thomson Consumer Electronics, Inc.
Mode/ RP’1820A
347A7732‘A001 (Rev. 0)
94-19
©Thomson Consumer Electronics Inc.
Printed in Hong Kong
 Loading...