


MSN®TV SERVICE
USER
GUIDE
Printed in Mexico

Microsoft, KidFriendly, MSN, the MSN TV logo, and the Passport logo are either registered
trademarks or trademarks of Microsoft Corporation in the United States of America and/or in
other countries. Other company or product names mentioned herein may be trademarks of
their respective owners.
The example companies, organizations, products, domain names, e-mail addresses, logos,
people, places, and events depicted herein are fictitious. No association with any real company,
organization, product, domain name, e-mail address, logo, person, place, or event is intended
or inferred.
© 2002 Microsoft Corporation. All rights reserved.
900-01065-100; TOCOM 15912070

TABLE OF CONTENTS
>
MSN TV service in 20 minutes or less . . . . . . . . . . . . . . . . . . . . . . . . . . .5
Turning on the Internet Receiver . . . . . . . . . . . . . . . . . . . . . . . . . . . . . . . .7
Basics . . . . . . . . . . . . . . . . . . . . . . . . . . . . . . . . . . . . . . . . . . . . . . . .8
Getting around using select-and-OK . . . . . . . . . . . . . . . . . . . . . . . . . . . . .8
The Back button: Getting back where you were . . . . . . . . . . . . . . . . . . . . .9
The Home button: Getting Home from anywhere . . . . . . . . . . . . . . . . . . .9
The Home page . . . . . . . . . . . . . . . . . . . . . . . . . . . . . . . . . . . . . . . .10
Home at a glance . . . . . . . . . . . . . . . . . . . . . . . . . . . . . . . . . . . . . . . . . .11
Using Mail . . . . . . . . . . . . . . . . . . . . . . . . . . . . . . . . . . . . . . . . . . . .12
Visiting Web sites . . . . . . . . . . . . . . . . . . . . . . . . . . . . . . . . . . . . . . .15
Search . . . . . . . . . . . . . . . . . . . . . . . . . . . . . . . . . . . . . . . . . . . . . . . . . .15
Going directly to a Web site . . . . . . . . . . . . . . . . . . . . . . . . . . . . . . . . . .17
Getting Help . . . . . . . . . . . . . . . . . . . . . . . . . . . . . . . . . . . . . . . . . .19
>
E-mail — Sending mail on the Internet . . . . . . . . . . . . . . . . . . . . . . . . . .21
E-mail at a glance . . . . . . . . . . . . . . . . . . . . . . . . . . . . . . . . . . . . . . .23
Reading your e-mail . . . . . . . . . . . . . . . . . . . . . . . . . . . . . . . . . . . . . .24
Writing an e-mail message . . . . . . . . . . . . . . . . . . . . . . . . . . . . . . . . .25
E-mail addresses vs. Web addresses . . . . . . . . . . . . . . . . . . . . . . . . . . . . .26
Correcting spelling errors . . . . . . . . . . . . . . . . . . . . . . . . . . . . . . . . . . . .27
Using the Address book . . . . . . . . . . . . . . . . . . . . . . . . . . . . . . . . . . .29
Adding an address to the Address book . . . . . . . . . . . . . . . . . . . . . . . . .30
Addressing a message using the Address book . . . . . . . . . . . . . . . . . . . . .30
Editing your messages: cut, copy, and paste . . . . . . . . . . . . . . . . . . . . . .31
Copying text . . . . . . . . . . . . . . . . . . . . . . . . . . . . . . . . . . . . . . . . . . . . .31
Cutting (removing) text . . . . . . . . . . . . . . . . . . . . . . . . . . . . . . . . . . . . .32
Pasting cut or copied text . . . . . . . . . . . . . . . . . . . . . . . . . . . . . . . . . . .32
1

>
Visiting and creating Web sites . . . . . . . . . . . . . . . . . . . . . . . . . . . . . . .33
The Home page . . . . . . . . . . . . . . . . . . . . . . . . . . . . . . . . . . . . . . . .35
Searching the Web . . . . . . . . . . . . . . . . . . . . . . . . . . . . . . . . . . . . . .36
Search tips . . . . . . . . . . . . . . . . . . . . . . . . . . . . . . . . . . . . . . . . . . . . . . .37
Going directly to a Web site . . . . . . . . . . . . . . . . . . . . . . . . . . . . . . . .38
The Options Panel — shortcuts to MSN TV features . . . . . . . . . . . . . . . .39
Favorites — Creating a collection of your favorite Web sites . . . . . . . . . . . .40
Adding a Web site to your Favorites collection . . . . . . . . . . . . . . . . . . . .40
Visiting a Web site in your Favorites folder . . . . . . . . . . . . . . . . . . . . . . .41
Shopping on the Web . . . . . . . . . . . . . . . . . . . . . . . . . . . . . . . . . . . .42
Passport . . . . . . . . . . . . . . . . . . . . . . . . . . . . . . . . . . . . . . . . . . . . .43
Publishing your own Web page with MSN TV service . . . . . . . . . . . . . . . .44
Creating a Web page . . . . . . . . . . . . . . . . . . . . . . . . . . . . . . . . . . . . . . .44
Editing an existing Web page . . . . . . . . . . . . . . . . . . . . . . . . . . . . . . . . .45
Printing a Web page or e-mail message . . . . . . . . . . . . . . . . . . . . . . . . .46
>
Discussion groups, chat rooms, and MSN Messenger . . . . . . . . . . . . . . . .47
Discussion groups, chat rooms, and Messenger . . . . . . . . . . . . . . . . . . . .49
Discussion groups . . . . . . . . . . . . . . . . . . . . . . . . . . . . . . . . . . . . . . .50
Joining a discussion group . . . . . . . . . . . . . . . . . . . . . . . . . . . . . . . . . . .50
Posting a new topic . . . . . . . . . . . . . . . . . . . . . . . . . . . . . . . . . . . . . . . .52
Posting a response . . . . . . . . . . . . . . . . . . . . . . . . . . . . . . . . . . . . . . . . .52
Chat rooms . . . . . . . . . . . . . . . . . . . . . . . . . . . . . . . . . . . . . . . . . . .53
Joining an existing chat room . . . . . . . . . . . . . . . . . . . . . . . . . . . . . . . . .53
Making side comments: “whispering” . . . . . . . . . . . . . . . . . . . . . . . . . . .54
Creating a new chat room . . . . . . . . . . . . . . . . . . . . . . . . . . . . . . . . . . .55
Messenger . . . . . . . . . . . . . . . . . . . . . . . . . . . . . . . . . . . . . . . . . . . .56
Sending an instant message . . . . . . . . . . . . . . . . . . . . . . . . . . . . . . . . . . .56
Adding a buddy . . . . . . . . . . . . . . . . . . . . . . . . . . . . . . . . . . . . . . . . . . .57
Responding to invitations to become a buddy . . . . . . . . . . . . . . . . . . . . .58
Controlling who can contact you . . . . . . . . . . . . . . . . . . . . . . . . . . . . . .59
Blocking someone from sending you instant messages . . . . . . . . . . . . . . .60
Removing someone from your buddy list . . . . . . . . . . . . . . . . . . . . . . . .61
2

>
Your MSN TV service Account . . . . . . . . . . . . . . . . . . . . . . . . . . . . . . .63
Account options . . . . . . . . . . . . . . . . . . . . . . . . . . . . . . . . . . . . . . . .65
Billing information and payment options . . . . . . . . . . . . . . . . . . . . . . . . . 66
Viewing your billing statements online . . . . . . . . . . . . . . . . . . . . . . . . . .66
Payment options . . . . . . . . . . . . . . . . . . . . . . . . . . . . . . . . . . . . . . . . . . .66
Adding users to your account . . . . . . . . . . . . . . . . . . . . . . . . . . . . . . . .67
Updates — Getting the latest features . . . . . . . . . . . . . . . . . . . . . . . . . . .68
Using an ISP to connect to MSN TV service . . . . . . . . . . . . . . . . . . . . . . .69
>
Index . . . . . . . . . . . . . . . . . . . . . . . . . . . . . . . . . . . . . . . . . . . . . . .71
3

4

MSN®TV SERVICE IN
20MINUTES
OR LESS
· Turning on the Receiver
· Basics
· The Home Page
· Using E-mail
· Visiting Web sites
· Getting Help

In this chapter you’ll find everything you need to
start exploring the MSN
®
TV service. For an
overview of the service’s features, just read the
sections of this chapter in order, try the suggested
steps, and check out all the cool things to see.

TURNING ON THE INTERNET RECEIVER
This guide assumes that you have already set up your Internet Receiver and
signed up for the MSN
®
TV service using the instructions in the Setup Guide. If
you haven’t, do so now. Then return to this guide to start using the service.
You need to use two remote controls to start using your Internet Receiver:
· The Internet Receiver’s remote control (or the wireless keyboard)
· Your television’s remote control
Depending on your setup, you might also need your VCR’s remote control.
NOTE: As your MSN TV service is upgraded, you may see pages that have
changed or you may have access to features that are not documented in
this guide. While future changes may render sections of this guide out of
date, you can always get the latest instructions f r om the o n -screen help
available throughout the MSN TV service. See “Getting Help” on p 19.
>
To start using the Internet Receiver:
1 Turn on your television.
2 Press the MSN TV button on your Internet Receiver’s remote control, then
press the ON-OFF button.
The first time you turn on your Internet Receiver after signing up for the
service, you see a short series of instructional pages. After you finish these
pages, your Home page appears.
This page is your “Home” page.
From here you can access all of the features of the MSN TV service.
7

BASICS
To get from page to page using the MSN TV service, you need to know just
one simple rule: select-and-OK.
Getting around using select-and-OK
The places you can go in the MSN TV service are represented by words and
pictures on your screen. When you see something interesting on your screen,
you tell your Internet Receiver to take you there using the simple select-and-OK
technique:
First you “select” the item. Use the Arrow buttons on your remote control
or the Arrow keys on your wireless keyboard to move the yellow box until it
surrounds the item. (Both the remote control and the keyboard have
Arrows; you can use either.)
Then you press the OK button on your remote control or the Return key if
you are using a wireless keyboard.
>
Now let’s try it:
1 Starting from the Home page, use the Arrow buttons on your remote
control or keyboard to move the yellow box to the word “E-mail” near the
top-left corner of the page.
Placing the yellow box around an item is called “selecting” it.
2 Press the OK button (or the Return key on the keyboard).
That’s it! By pressing the OK button, you told the MSN TV service to take
you to the Mail page. The yellow box turns green for a moment to confirm
your button press.
It takes a few seconds for the page to appear. Also, you might see some
instructional pages before you get to the Mail page. Once you finish these
pages, the Mail page appears.
8

The Back button: Getting back where you were
Now that you know how to use select-and-OK to move from page to page, you
need to know how to get back to where you started. That’s easy; just press the
Back button on your remote control or keyboard.
Pressing Back takes you to the last page you saw.
>
Try it now:
1 Press the Back button on your remote control or keyboard.
The last page you saw appears — in this case, your Home page.
The Home button: Getting Home from anywhere
Like the Back button, you use the Home-Clear button to move around. The
Home-Clear button takes you directly to the Home page from any page. There
is a Home key on the keyboard and a Home-Clear button on the remote control.
The Back and Home buttons make sure you never get lost. You can always go
back one page or go Home with just the press of a button.
9

THE HOME PAGE
The Home page is the starting point for all of your MSN TV service journeys.
Here’s a quick look at the features of the Home page.
>
If you are not already on your Home page, press the Home-Clear button on your
remote control or the Home key on your keyboard
NOTE: If you stay on one page for a while, you might have to reconnect to the
MSN TV service before you can move to another page. When this
happens, this message appears on your screen. To continue, press OK or
Return. Then wait while your Internet Receiver reconnects to the MSN
TV service.
10

Home at a glance
Search the Web
by category.
Send or receive
e-mail
Go to TV listings for
your local channels and
cable or satellite
providers.
Go to featured
links.
Collect your
favorite Web sites.
Switch to
another user.
Go to information
centers on a
variety of topics.
Join chat groups.
Change your
password, add
users, and change
other settings.
Exchange instant online
messages with your friends.
Search the Web
or go directly
to a Web site.
View or
change
account
information.
Go to detailed
instructions on
all MSN TV
service features.
11

USING MAIL
Now that you’ve taken a quick look at the Home page, let’s dig a little deeper.
One of the most popular and powerful features of the Internet is e-mail. The
MSN TV service provides an e-mail program that lets you exchange
messages on the Internet with anyone who has an e-mail address.
>
Let’s take a look at the features of the Mail page.
1 If you’re not already there, go to the Home page.
If you’re not sure how to get to the Home page, see page 9.
Select E-mail, then press OK or
Return when you want to write
an e-mail message.
12

2 Select E-mail from the top of the page, then press the OK button or
Return key.
The first time you access E-mail, you see a few instructional pages about th e
features of E-mail. When you finish these pages, the Mail list page appears.
This page is your starting point for all E-mail activities, such as reading
your mail, writing a new message, or managing your Address book.
Use Write when you want
to compose a message.
Use Clean up to save
or get rid of old
messages.
Use Addresses to go to your
Address book — a place to
store e-mail addresses so you
don’t have to memorize them.
Use Settings to personalize
the way your Mail service
looks and works.
This is your Mail list —
the list of e-mail messages
sent to you.
Use Help for a
beginner’s overview,
detailed instructions,
and frequently asked
questions about E-mail.
13

>
Now let’s read your e-mail.
New subscribers receive a greeting e-mail. Let’s take a look at it.
1 Move the yellow box to select the welcome message from your Mail list.
Then press OK or Return.
The selected message appears.
Go ahead and look through the message. You don’t need to read it all now.
It will stay in your Mail list until you discard it, so you can always go back
to it later.
When you get to the bottom of the screen, use the Scroll Down button on
your remote control or keyboard to see the text hidden off the bottom of
the screen.
2 When you decide to stop reading, select Mail list from the left side of the
page, then press OK or Return.
You return to the main E-mail page. From there you could select another
message to read, write a new message, or use any of the other E-mail
features. For now, let’s move on. There’s much more to see!
3 Press the Home button on your remote control or keyboard.
You return to the the Home page.
The Home button always takes you back to the Home page. If you ever feel
lost, just press Home.
You’ve seen the Home page and you’ve taken a quick look at Mail. Now let’s
venture out onto the Web.
14

VISITING WEB SITES
The Web is a collection of pages put on the Internet by individuals,
corporations, governments, and organizations of all kinds from every part of
the world. You can find Web pages dedicated to almost every topic imaginable,
and you can find places to purchase products of almost every kind.
>
There are two main ways to find Web pages:
· You can use Search, a tool that finds Web pages about topics that you specify.
· You can go directly to a Web page if you know its address (the
www.address.com style address).
Search
>
Let’s try it. We’ll start by searching for a Web site:
1 If you’re not already there, go to the Home page.
2 Make sure the yellow selection box is on the text box labeled “Type search
words or a Web address.” Using your wireless keyboard, type the phrase
antique auto show, then press Return.
Type a word, phrase,
or question here.
When you go to the Home page, the yellow selection box is around
this text box. A text box is a place for you to type. In this case, you
can type a word or phrase for the Search tool to look up.
15

NOTE: If you don’t have your wireless keyboard handy, you can type in the
text box using the on-screen keyboard. To display the on-screen
keyboard, press the OK button on your remote control anytime the
yellow box is around a text box. Once the keyboard appears, use the
Arrow and OK buttons on your remote control to choose letters one at a
time until you have completed your entry. Then select continue from the
top of the on-screen keyboard and press the OK button on your remote.
If you need to type more than a few words, you should use the wireless
keyboard instead of the on-screen keyboard.
After you type a phrase and press Return, you see a list of all the sites the
Search tool found on the topic you entered. This list is called the “search
results.”
3 Look through the search results. Scroll down if necessary to see the rest of
the search results page. If there is more than one page of results for your
search, you’ll see a next button on the right-hand side of the page. Select this
button and press Return to see the next page of results.
Select any site from the list that looks interesting, then press Return.
The Web site you selected appears.
From there you can use the Back button to return to the search results list
and try another site, or you can use the Home button to return to the Home
page. For now, let’s go Home.
4 Press Home on your remote control or keyboard.
The Home page appears.
TIP: To find exactly what you’re looking for, be sure to type specific search
phrases. For example, if you’re looking for a place to stay in Atlanta, you
should search for lodging in Atlanta. If you just typed Atlanta or lodging,
your results would be too broad and general to be useful. If your first
search doesn’t succeed, try another phrase (for example, Atlanta hotels).
>
To search by category:
1 Select Search near the top left corner of the Home page, then press OK or
Return (or simply press the Search button on your keyboard).
The Search page appears.
2 Choose a search category from the list on the Search page.
16

Going directly to a Web site
You’ve used the Search tool to find Web sites on a topic. Now let’s go directly
to a Web site by entering its Web address.
Web addresses (which look like this: www.msn.com or www.msnbc.com)
are the addresses the Web uses to locate specific Web sites.
You’ll often hear Web addresses (also known as URLs, or Uniform Resource
Locators) in TV and radio programs, and you’ll find them in many advertisements. When you hear about an interesting Web site, you can go directly to
that site (without having to search for it) by entering its address.
>
To enter a Web site’s address from the Home page:
1 If you’re not already there, go to the Home page.
2 Make sure the yellow selection box is on the text box labeled “Type search
words or a Web address.” Using your wireless keyboard, type the address of
a Web site you wish to visit (for this example, type www.msnbc.com to go
to the MSNBC Web site), then press Return.
After a short time, the Web site you requested appears.
If you’re not at the Home page, you can use the Options panel to enter a Web
site’s address.
>
To enter a Web site’s address using the Options panel:
1 Press the Menu-Options button on your remote control or the Options button
on your keyboard.
The Options panel pops up from the bottom of the screen.
2 Select the on-screen go to button from the Options panel, then press
OK or Return.
The go to button
17

A box appears where you can type the address for the Web site you
wish to visit. (To save time, you can go directly to this box by pressing the
Go To button on your keyboard.) We’ll visit the MSNBC Web site at the
address www.msnbc.com.
4 Type www.msnbc.com
Note that the first part of the address (http://) is already filled in for you.
Just type the part of the address that starts with “www.” You can use the
wireless keyboard or the on-screen keyboard to type this text.
5 Press Return (or select continue and press OK if you are using the
on-screen keyboard).
After a few moments, you’ll see MSNBC’s Web site at the address
www.msnbc.com. You can use the go to button on the Options panel
to go to any Web address.
From the MSNBC Web page, as from any Web page, you can use the Back
button on your remote control or keyboard to return to the page you just
left or use the Home-Clear button to go to the Home page.
You’ve looked at the Home page, e-mail, and some Web pages. Now let’s take
a look at the Help feature of your MSN TV service.
18

GETTING HELP
You’ve seen the Home page, e-mail, and Web sites. That’s a good star t, but as
you might guess, there’s a lot more to see.
>
To find out more about the MSN TV service:
· Skim, browse, or read the rest of this guide to see all the features in more
detail.
· Take advantage of the on-screen instructions in the Help options on the
Home page and most of the other pages in the MSN TV service. Help provides
comprehensive guides that offer beginner’s tours, detailed step-by-step
instructions, and answers to frequently asked questions.
Help provides
everything you need
to know about the
MSN TV service. In
fact, useful Help is
available from
almost every page in
the service.
· Or, you can simply start exploring. You know how to select an item and press
OK or Return. You know how to use the Home-Clear button and the Back
button. So you really can’t get lost!
Have fun!
19

20

E-MAIL
SENDING MAIL ON THE INTERNET
· E-mail at a glance
· Reading your e-mail
· Writing an e-mail
message
· Using the Address
book
· Editing messages:
cut, copy, and paste

E-mail is the Internet equivalent of the post office.
When you send e-mail, you write messages,
check your spelling, and send them to anyone
who has an e-mail address. People can send you
messages at your e-mail address from any place
at any time, too.
22

E-MAIL AT A GLANCE
The MSN TV service offers an e-mail program that makes writing,
sending, and receiving e-mail messages fast, easy, and fun. To star t using
E-mail, go to the Home page, select E-mail, then press OK or Return.
>
Here’s a look at the features of E-mail.
Open your Address book,
send a message to someone
in your Address book, or add
a new address.
Write a new message.
Discard or save
messages.
Customize the way your Email system works and set
up folders where you can
store messages.
Your message list.
Provides links to Web sites that
let you use e-mail to receive
faxes, send greeting cards, etc.
See a basic overview, detailed
step-by-step instructions, and
answers to frequently asked
questions about E-mail.
23

READING YOUR E-MAIL
You can tell when you have new mail by checking the Message light on the
front of your Internet Receiver. When the red light is on, you have mail.
>
To read your mail:
1 From your Home page, select E-mail, then press OK or Return.
The Mail list page appears.
2 Select the message you want to read, then press OK or Return.
The message opens.
To read a long message, you can use the Scroll buttons on your remote
control or keyboard to move up and down the message.
Once you’ve finished reading the message, you have a number of options
presented to the left of the message.
Return to the Mail list
(leaving the message
you’re reading in your
Mail list).
Go to the next or
previous message in
your Mail list (if
you have more
than one message).
Throw away this
message now.
Save this message
now.
Write a response
to this message.
Send this message to
another person.
24
Who the message is from.
See detailed instructions
on using e-mail.

WRITING AN E-MAIL MESSAGE
You can send an e-mail message to anyone whose e-mail address you know.
>
To send an e-mail:
1 From your Home page, select E-mail, then press OK or Return.
2 Select Write from the left side of the page, then press OK or Return.
A new, blank message appears.
Return to the Mail list.
Go to your
Address book.
Delete the
message
you’re
writing
without
sending it.
Check your
spelling before
you send the
message.
Your e-mail
address.
The address of
the person you’re
writing to.
Get detailed
instructions
on writing a
message.
Give your
message
a title.
Type your
message here.
When you’re
finished typing
your message,
select Send,
then press Return.
NOTE: Although you can use your remote control to type using an on-screen
keyboard (see page 16), it’s much easier to type using your wireless
keyboard. The instructions in this section assume you’re typing on a
wireless keyboard.
25

3 Do one of the following to complete the To line:
· To add an address from your Address book (see pages 29–30 for more
information), select To: then press Return.
· Type the recipient’s address, then press Return.
To send the message to more than one person, separate the addresses with a
comma.
4 Press Return until the blinking cursor is in the Subject line, then type a title
for your message and press Return again.
5 Type your message in the space below the Subject line.
As you type, you don’t need to press Return at the end of each line. The
text will move down automatically.
When you’re finished typing your message, select Send (lower-right corner
of the page), then press Return. (You may have to scroll down to see the
Send button.)
E-mail addresses versus Web addresses:
When you send e-mail, you send it to someone’s e-mail address; for example,
someone@microsoft.com.
Web sites have similar addresses known as URLs (Uniform Resource Locators);
for example, www.msnbc.com.
While e-mail addresses and Web addresses may look similar, they work very
differently. You cannot send e-mail to someone at a Web address, and you
cannot view a Web site by going to an e-mail address.
26

Correcting spelling errors
The MSN TV service provides a tool for checking your e-mail messages for
spelling and typing errors before you send them.
> To find and correct spelling errors:
1 Select Spelling (left side of the page), then press Return.
The Check your spelling page appears.
If there are words in
your e-mail that are
misspelled, they
appear one at a time
at the top of the page.
2 For each misspelled word, use the keyboard’s Arrow keys to scroll through
the list of Suggested Corrections. If you see the correct spelling
of the word, select it from the list, then press Return.
3 If there are no suggested corrections for a misspelled word, or if none of
the suggestions is correct, type your own correction in the area labeled
Possible Misspelling, select the Change button (right side of the page), then
press Return. You automatically move to the next possible misspelling.
4 If the spelling tool highlights a word that you know is spelled correctly,
select Skip Word on the right side of the page, then press Return. You
automatically move to the next possible misspelling.
27

5 If the spelling tool highlights a word that is spelled correctly, and you want
the tool to remember that word so that it will not highlight again, select
Add Word (right side of the page), then press Return.
You automatically move to the next possible misspelling.
6 If you skip a word and then realize that you have misspelled it, select Previous,
then press Return to go back to the last questionable word.
7 When you finish checking for spelling errors, a message indicates that the
spell-check is complete. Select Done, then press Return. You automatically
return to your e-mail message. You can now send the message.
28

USING THE ADDRESS BOOK
E-mail addresses can be long, complicated, and impossible to remember.
Fortunately, you don’t have to remember them. You can store and retrieve
e-mail addresses using your Address book.
> To open the Address book:
1 Select Address from the left side of the Mail list page.
Your Address book appears.
Return to the
Mail list.
Look up e-mail addresses
(directory assistance for
e-mail).
Add a new address to
the Address book.
Write and send a new
message to this address.
Edit this address.
See detailed instructions
for using your Address
book.
29

Adding an address to the Address book
Writing e-mail messages is easier if your recipient’s address is in your Address
book.
>
To add an address:
1 From the Home page, select E-mail, then press Return.
2 Select Addresses from the left side of the page, then press Return.
3 Select Add, then press OK or Return.
4 Type a person’s name and e-mail address.
5 Select Add again, then press Return.
A screen asks you if you’d like to be able to send instant messages to this
person using MSN
6 For now, select Continue and press Return.
The person is added to your Address book.
TIP: If you get mail from someone you want to add to your Address book,
select the name of the sender (shown in blue) in the From line of a message,
then press OK or Return. The sender’s name and address are added to your
Address book.
®
Messenger. (See p 56 for information on Messenger.)
Addressing a message using the Address book
>
To use the Address book to address a message:
1 From the Home page, select E-mail, then press Return.
2 Select Write on the left side of the page, then press Return to begin writing
your message.
3 Instead of typing the address, select the word To:, then press Return.
A panel appears, listing the names in your Address book.
4 Select the name of the person you’re writing to. (If you want to send the
message to more than one person, select additional names from the list.)
A red checkmark appears next to that person’s name.
5 Select Continue and press Return.
The address is automatically added to your message.
30

EDITING YOUR MESSAGES: CUT, COPY, AND PASTE
Using a wireless keyboard, you can edit the e-mail messages you write by
using the cut, copy, and paste features.
· To copy means to duplicate some text and leave the original text intact.
· To cut means to remove some text from its current location.
· To paste means to place cut or copied text in a new location.
You can cut, copy, and paste text anywhere you can type.
Copying text
You can’t change a Web page or e-mail message that was sent to you, but you
can copy all or part of the text and paste it into an e-mail message that you’re
writing and then edit the text.
>
To copy all of the text from a Web page or e-mail message:
1 Using the wireless keyboard, select all of the text from the message or Web
page by holding the Cmd key while pressing the A key.
Pressing Cmd+A selects all the text on a page.
2 To copy the selected text, hold the Cmd key while pressing the C key.
Pressing Cmd+C copies the selected text.
3 To paste the copied text, follow the instructions on page 32 for “Pasting cut
or copied text.”
>
To copy one or more words from a Web page or e-mail message:
1 Using the Arrow keys on your keyboard, position the typing cursor before
the start of the first word you want to select.
2 Hold down the shift key as you press one of the Arrow keys to select the
text you want to copy.
3 To copy the selected text, hold the Cmd key while pressing the C key.
Pressing Cmd+C copies the selected text.
4 To paste the copied text, follow the instructions on page 32 for “Pasting cut
or copied text.”
31

Cutting (removing) text
You can cut text only in e-mail messages that you are writing (not messages
that you have received). When you cut text it’s not gone forever; you can paste
it into another location in your message.
> To cut text:
1 Using the Arrow keys on the keyboard, position the typing cursor before the
start of the first word you want to remove.
2 Hold down the Shift key while you press one of the Arrow keys to select the
text you want to remove.
3 To remove the selected text from your message, hold the Cmd key while
pressing the X key.
Pressing Cmd+X removes the text from your message.
Pasting cut or copied text
Once you’ve copied or cut a chunk of text, you can paste it anywhere in an
e-mail message that you’re writing.
>
To insert text into an e-mail message that you’re writing:
1 Using the Arrow keys on the keyboard, position the typing cursor where you
want to insert the text that you just copied or cut.
2 To paste the text, hold the Cmd key while pressing the V key.
Pressing Cmd+V pastes the text into your message.
32

VISITING & CREATING
WEBSITES
· The Home page
· Searching the Web
· Going directly to
a Web site
· Favorites
· Shopping on the Web
· Microsoft Passport
· Publishing your
own Web page
· Printing

The Internet is a vast collection of computers,
all linked together so that they can “talk” to each
other. E-mail, chat rooms, discussion groups,
instant messaging, and Web sites are all made
possible by the Internet.
By using the MSN TV service to visit Web sites,
you can find out about almost any topic you can
think of, you can purchase products from sources
around the world, and you can get up-to-theminute news, weather, spor ts, stock quotes, or
just about any kind of information you need.
In this chapter, we’ll look at the Web on the MSN
TV service.

THE HOME PAGE
The Home page is the starting point for all of your Web activities. You can get
to the Home page anytime by pressing the Home-Clear button on your remote
control or the Home button on your keyboard.
>
Here’s a look at the features available on the Home page.
Takes you to
your Mail list.
A rotating list
of popular
links.
Collect your
favorite Web
sites.
Go to the Search
page to search for a
topic by category.
Search for a
specific Web site
or for information
on a particular
topic.
Join a chat
room.
Find basic tours,
detailed instructions,
and answers to
popular questions.
Exchange instant
online messages
with your friends.
Find information
on a variety of
topics.
See headlines and hot
tips. Select them and
press OK or Return to
see details.
Shows when a
page is being
loaded.
35

SEARCHING THE WEB
Given the vast amount of information on the Web, you can be fairly cer tain
that there’s a Web site that has the information you need. The trick is finding
exactly what you want in such a huge universe of Web sites.
To make it easier to find Web sites, the MSN TV service provides Search, a
tool designed to help you find what you’re looking for on the Web.
>
To find a Web site:
1 Go to the Home page.
2 Make sure the yellow selection box is on the text box labeled “Type search
words or a Web address.” Using your wireless keyboard, type a word or
phrase to search for, then press Return.
Type a word, phrase, or question here.
After you type a phrase and press Return, you see a list of all the sites the
Search tool found on the topic you entered. This list is called the “search
results.”
3 Look through the search results. Scroll down if necessary to see the rest of
the search results page. If there is more than one page of results for your
search, you’ll see a next button on the right-hand side of the page. Select this
button and press Return to see the next page of results.
36

4 Select any site from the list that looks interesting, then press Return.
The Web site you selected appears.
5 To look at additional sites, press the Back button to return to the search
results page.
If you don’t see the result you’re looking for, try another search using a
different word or phrase. For example, if antique autos doesn’t produce the
results you want, you might try classic autos or classic cars.
If you wish, you can search the Web by category.
>
To search by category:
1 Select Search from the top of the Home page, then press Return. (Or press
the Search button on your keyboard.)
The Search page appears.
2 Select a category (Hobbies or Sports, for example) and press Return.
3 Complete your search on the page that appears. (For example, you might
search for baseball Web sites in the Sports category.)
Search tips
Finding what you want on the Web is a matter of learning to search for the
right words. Here are a few tips:
· Be specific. General terms will return too many results. For example, use
pizza delivery in San Francisco, not pizza.
· You can use up to 150 characters in the search box. The more specific you
are, the more likely you’ll be to find useful matches.
· Make sure your spelling is correct; if you find that your search results are
inaccurate or not useful, it’s possible that your spelling is wrong.
37

GOING DIRECTLY TO A WEB SITE
If you know the address of a Web site, you don’t need to search for the Web
site to find it. You can simply type in the address and go there.
>
To go directly to a Web site:
1 Go to the Home page.
2 Make sure the yellow selection box is on the text box labeled “Type
search words or a Web address.” Type a Web address (for example,
www.MSNBC.com), then press OK or Return.
Or...
1 Press Menu-Options on your remote control or Options on your keyboard.
The Options panel appears.
The go to button
2 Select go to from the Options panel, then press OK or Return.
The Address panel appears.
3 Type the address of the Web site you want to visit.
Notice that the http:// part of the address is already filled in for you. Just
type the part of the address that starts with “www.”
4 Select Go to Page, then press OK or Return.
The Web page for the address you entered appears.
38

TIP: The wireless keyboard has a Go To key that displays the address panel.
You can use this shortcut instead of the Options panel to go directly to a
Web site.
The Options panel — shortcuts to MSN TV features
The Options panel provides shortcut buttons to many of the Web features of
your service. Here’s a quick overview.
To display the Options panel, press the Menu-Options button on your remote
control or Options on your keyboard.
Lets you look for a specific
word or phrase on the page
you’re viewing.
Displays information about
the Web page you’re viewing
(including the Web address
and when the page was last
updated).
Send an instant
message to a friend
(see page 56).
Disconnect from the
service and free up your
phone line.
Know the address of a Web
site you want to visit? Use
this button to get there.
Save the Web page
you’re viewing in your
Favorites folder (see
page 40).
Display the latest version of
the Web page you’re viewing
(beneficial on pages that change
frequently — sports tickers and
stock quotes, for example).
Print the page you’re
viewing (works for e-mail
messages and Web pages;
see page 46).
E-mail the address
of the Web page
you’re viewing to
someone else.
39

FAVORITES — CREATING A COLLECTION OF YOUR
FAVORITE WEB SITES
When you visit a Web site that you like and will want to see again, you can
save that Web site as a favorite.
Once you’ve saved a Web site as a favorite, you can return to that site by
choosing it from your Favorites folder. There is no need to search for it or type
its Web address.
Adding a Web site to your Favorites collection
> To add a Web site to your Favorites collection:
1 Go to one of your favorite Web sites.
2 Press the Options button on your remote control or keyboard.
The Options panel appears.
3 Select the save button from the Options panel, then press OK or Return.
A panel appears in which you can choose a folder to hold the saved
Web site.
Select a folder to hold your shortcut.
4 Select a folder, then press OK or Return.
A checkmark appears, marking the folder you chose.
5 Select Save Page, then press OK or Return.
This Web site is now stored in your Favorites folder. The next time you
want to visit this site, you can simply go to your Favorites collection and
select it (see page 41 for details).
40

Visiting a Web site in your Favorites folder
Once you’ve saved a shortcut to a Web site in one of your Favorites folders, it’s
easy to get back to that site.
> To display a page in your Favorites collection:
1 Go to the Home page.
2 Select Favorites from the top of the page, then press the OK button or
Return key.
The Favorites page appears.
Add a new folder for your saved
favorites. Create your own organizing
scheme by creating and naming
folders for your favorites.
Remove a folder and
all of the favorites in it.
Collect favorite Web
sites in these folders.
Rename a folder.
Get introductory information, detailed
step-by-step instructions, and answers
to frequently asked questions about
Favorites.
3 Select the folder that contains the shortcut to the Web site you want to
visit, then press OK or Return.
4 Select the Web site, then press OK or Return.
As your collection of favorite Web sites grows, you might want to create new
folders to organize your collection. See the Help available from the Favorites page
for detailed instructions on creating and arranging folders.
41

SHOPPING ON THE WEB
Shopping on the Web is fast and convenient. You can find online sources for just
about any product you need — from books and music, to toys, gardening
equipment, clothes, outdoor gear, financial services, anything!
Shopping on the Web is like shopping anywhere; most of the people you
deal with are trustworthy and reputable, but there are exceptions. One
reasonably secure way to shop is to use the merchants featured in the
Shopping center. For more information on shopping safely online, see the Help
available on the Home page.
>
To make shopping online as safe as possible:
· Stick with well-known online retailers.
· Look for Web sites that advertise themselves as secure and offer a guarantee
for safe credit card transactions over the Internet.
· Never give personal or financial information to anyone you do not know.
The MSN TV service provides a reasonably secure environment for Internet
shopping or personal banking with Web sites that provide secure transactions.
But the same level of security may not exist on all Web sites outside the MSN
TV service. Even though the MSN TV service environment is reasonably secure,
your information will not be protected if you send it to a Web site that is not
secure. Make sure the Web sites you do business with provide secure Internet
transactions before you proceed.
Or, better yet, do your Internet shopping through the MSN TV Shopping center —
all of those Web sites have been chosen for their safety and ease of use.
Safe shopping is available here.
42

PASSPORT
Microsoft®Passport is a feature that lets you create one user name and
password to use with a number of participating Web sites. Once you sign
in to one site that supports Passport, you can sign in to others in just one step,
without having to enter your name and password again.
A Microsoft Passport Wallet is part of Passport. With a Wallet, you can store
credit card information and shipping addresses to make purchasing things
online easier and quicker.
When you want to make a purchase at a Web site that suppor ts Passport
Wallet, you can simply choose the Passport Express Purchase symbol. Your
billing information will be filled in automatically.
To create a Passport:
1 From the Home page, choose Settings.
2 On the Settings page, choose Passport & Wallet.
3 Follow the instructions for setting up a Passport, then set up an optional
Wallet if you wish.
Using Passport
When you choose the Passport sign-in logo, you’ll be asked for your name and
password.
Once you’ve signed in to one Web site, you’ll automatically be signed in to
other sites that use Passport.
Note that the sites you visit using your Passport are not part of the MSN TV
service. Therefore, the MSN TV service Statement of Privacy does not apply to
these sites. Go to www.passport.com for additional information.
Using Passport Wallet
You can use your Wallet at a number of online stores, including many featured
in the Shopping center on the Home page.
To use your Wallet, look for the Express Purchase symbol. When you
choose the Express Purchase symbol and sign in, your billing information will
be filled in automatically, and you’ll be able to check out quickly.
If you opt to receive a Passport or Passport Wallet, your use of your Passport,
the Passport web site, and the Passport services are governed by the Terms of
Use, conditions, and guidelines found on the Passport web site. For more
information, see http://www.passport.com/Consumer/PrivacyPolicy.asp.
43
PUBLISHING YOUR OWN WEB PAGE
The MSN TV service not only lets you visit Web sites (also called Web pages),
it also lets you create and publish your own Web page using Page Builder.
Keep your friends and family posted about what’s new in your life. Post information
about your pets, your hobbies, your school or church groups, your children or
grandchildren — it’s entirely up to you.
Each page you create has its own Web address that you can give to people so
they can visit your Web page.
Creating and publishing a Web page with Page Builder doesn’t require any
special skills, knowledge, or training. You just make a few choices from Page
Builder’s set of options, add text and images, and publish.
Creating a Web page
To create a Web page, you use Page Builder’s tools. Page Builder explains the
process of creating a Web page step by step. There are also detailed instructions
available from the Help option on the Page Builder page.
>
Here’s an overview of the steps:
1 From the Home page, select Page Builder, then press OK or Return.
(You might first have to choose More Links... under Popular Links.)
If this is the first time you’ve tried Page Builder, you see a page of
instructions and then the Page Builder license agreement. Read the
instructions and the agreement.
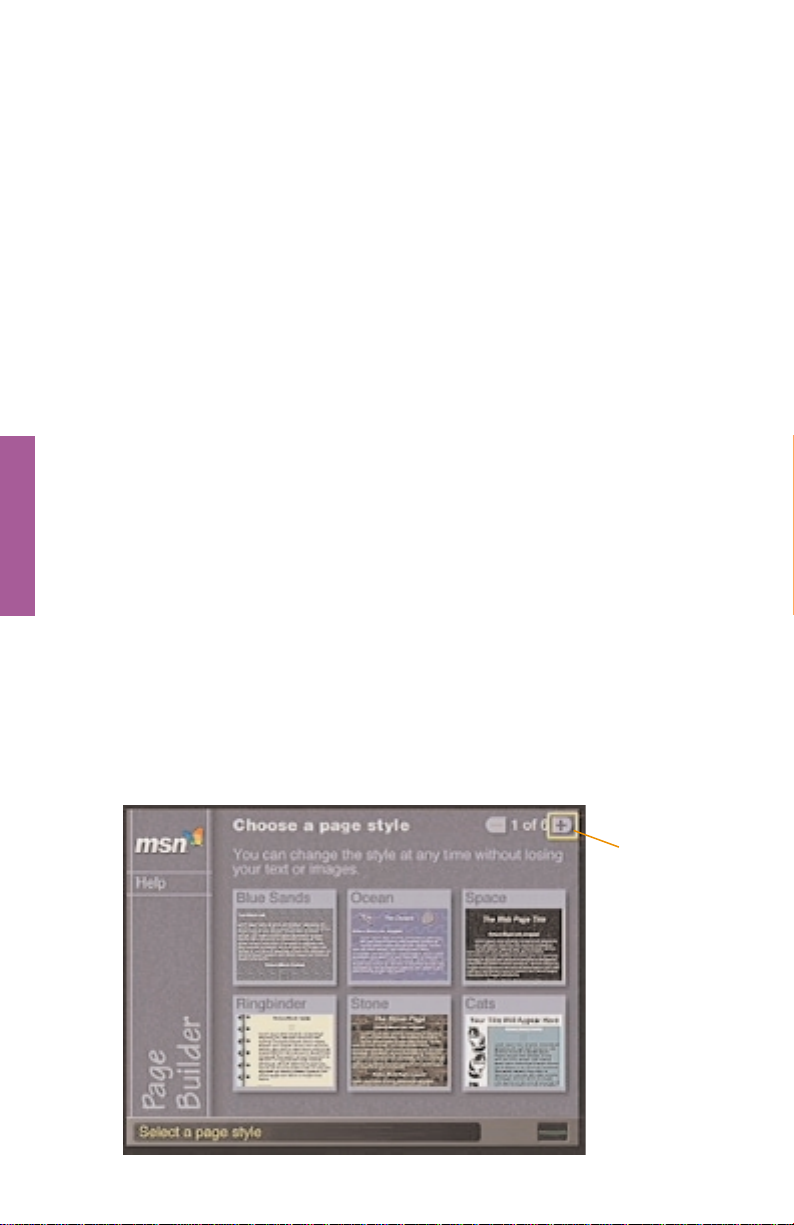
After you accept the agreement, the first Page Builder page appears:
44
Use this
button to
see more
page styles.

2 Select a style for your Web page (there are several pages of styles to choose
from), then press OK or Return.
3 Follow the on-screen instructions to add pictures, video captures, a title,
and text to your Web page.
4 When you’re satisfied with your Web page, select Preview from the left side
of the page, then press OK or Return.
Use the Back button on your remote control or keyboard to return from the
preview page.
5 To post your Web page to the Web, select Publish from the left side of the
page, then press OK or Return.
Your Web page is now on the World Wide Web.
TIP: Once you’ve published your Web page, a page appears that tells you your
Web page’s address. Write down this address so you can give it to people
who want to visit your Web page. It’s a good idea to save your Web page
as a Favorite (see page 40) so that you can get back to it easily.
Editing an existing Web page
You can use Page Builder to edit any Web page you have created on the MSN
TV service.
>
To edit a Web page:
1 From the Home page, select Page Builder, then press OK or Return.
2 Select the Web page you want to edit, then press OK or Return.
3 Select the part of your page that you want to edit, then press OK or Return.
4 Follow the on-screen instructions to edit your page.
45

PRINTING A WEB PAGE OR E-MAIL MESSAGE
If you purchased and connected a printer that’s compatible with your Internet
Receiver, you can print Web pages or e-mail messages. For instructions on how to
connect a printer, see the Internet Receiver’s Setup Guide, or the materials that
came with your printer.
> To print a Web page or an e-mail message:
1 From the Web page or e-mail message you want to print, press Menu-
Options on your remote control or Options on your keyboard.
The Options panel appears.
2 Select Print, then press OK or Return.
The Print panel appears with the Print button selected.
3 To print all of the current Web page or e-mail message, press OK or Return.
To print only the image on your TV screen, select Print Screen, then press
OK or Return.
To customize your printing, select Printing Options, then press OK or Return.
46

DISCUSSION GROUPS, CHAT ROOMS, &
MSN MESSENGER
· Joining discussion
groups
· Using chat rooms
· Exchanging instant
messages

The MSN TV service provides several popular options
for communicating with people on the Internet. In
addition to e-mail, which you use to exchange
letters over the Internet, you can communicate using:
• Discussion groups
• Chat rooms
• MSN Messenger
In this chapter we’ll explore each of these options.

DISCUSSION GROUPS, CHAT ROOMS, AND
MESSENGER
While discussion groups, chat rooms, and MSN Messenger are all ways to use
the Internet to contact people, they are different in important ways.
>
Here’s an explanation of each tool:
Discussion groups are public Internet forums where people post messages about
a specific topic.
Discussion groups are like bulletin boards on which you post messages for
people to read and respond to at their convenience. Anyone on the Internet can
join a discussion group, read the postings, and leave a response. Discussion
groups are good places to go if you have a question about a product, a hobby,
or anything you need help with. Just find a discussion group about your topic,
post a question, and check back a little later to see if anyone has posted an
answer for you.
Chat rooms are public places on the Internet where groups of people type
messages to each other.
Chat rooms and discussion groups are alike in that they are public forums where
people exchange messages about specific topics. Unlike discussion groups, chat
rooms are “live.” That is, people who are online at the same time read and
respond to each other’s messages immediately.
MSN Messenger is a private instant-messaging tool.
Use MSN Messenger to have one-on-one conversations with friends online.
Messaging is like a chat room in that you exchange messages “live.” But
Messenger is not a public forum — you pick who you exchange messages with.
Think of it as instant e-mail — use it to quickly shoot notes back and forth
with a friend. Messenger tells you when your friends are online, so you know
when it’s a good time to start a conversation.
49

DISCUSSION GROUPS
Discussion groups are Internet bulletin boards where people post and respond
to messages about specific topics. Discussion groups are public forums —
anyone can read and respond to the posted message.
You can join discussion groups on almost any topic imaginable — from airplane
safety to vacations in Yosemite National Park.
When you visit a discussion group, you can either contribute something by
posting your own message or just read what other people are saying.
NOTE: While it’s possible to use the on-screen keyboard to type messages for
discussion groups, it’s much easier to use your wireless keyboard. The
instructions in this section assume you’re using a wireless keyboard.
Joining a discussion group
Before you can read or post messages in a discussion group, you have to join the
group.
>
To join a discussion group:
1 From the Home page, select Discuss, then press Return. (You may have to
choose More Links... to see the Discuss link.)
50
Select Discuss
from the list
of Popular
Links. If you
don’t see
Discuss here,
choose More
Links.
The first time you use Discuss, you see an introduction to using discussion
groups. When you finish reading the introduction, the Discuss page appears.

2 To join a discussion group, do one of the following:
· Select one of the Featured discussions, then press Return.
· Select All Groups to see the complete list of discussions, then press Return.
· Use the Look for box at the bottom of the page to search for a group on
any topic.
See some of the
most popular
discussion groups.
Search for a discussion group on
a particular topic.
See a complete
list of available
discussion groups.
Get complete instructions
(and a few tips on discussion group etiquette).
51

Posting a new topic
>
To post a new topic:
1 Join a discussion group using the instructions on page 50.
2 Select Post from the left side of the page, then press Return.
A page appears where you can write your message.
3 Type a topic in the Subject line, then press Return.
4 Type your message.
5 When you’re finished, select Send from the bottom of the page, then
press Return.
Remember that your message can be read by anyone who visits this
discussion group.
Posting a response
>
To post a response:
1 Join a discussion group using the instructions on page 50.
2 Select a posting to read, then press Return.
3 Select Respond from the left side of the page, then press Return.
Notice that the subject line is already filled in for you because you are
responding to the current subject.
4 Type your message.
5 When you’re finished, select Send from the bottom of the page, then press
Return.
Remember that your message can be read by anyone who visits this
discussion group.
52

CHAT ROOMS
Chat rooms are forums for “live” discussions. Messages you send to a chat
room can be read immediately by everyone in that room. The MSN TV ser vice
lets you join existing chat rooms or create your own chat rooms.
NOTE: While it’s possible to use the on-screen keyboard for chat rooms, you
will find that the pace of exchanges in chat rooms makes it much more
practical to use a wireless keyboard.
Joining an existing chat room
>
To join a chat room:
1 From the Home page, select Chat from the top of the page, then press
Return.
The first time you enter Chat,
you see an introduction to Chat.
When you complete the
introduction, you see the Chat
page.
The Chat page lets you choose
from some popular rooms or
search for a room that interests
you.
2 Find a chat room you’d like to
enter, then press Return.
You can look through lists of
rooms organized by category, use
words or phrases to search for a
room, join a room whose name
you already know, or browse a
list of all rooms currently
available in Chat.
53

Once you’re in a chat room, you see an ongoing discussion. Comments appear
at the bottom of the discussion as people type them. The text automatically
scrolls as people enter more comments. To move up and down the list of
comments, use the Scroll keys on your keyboard.
Type your
message
here.
4 To enter a comment of your own, type your message, then press Return.
Making side comments: “whispering”
Once you’re in a chat room, if you’d like to send a comment to one person
without letting anyone else in the room see your comment, you can “whisper”
to that person.
>
To whisper to someone:
1 Starting from inside a chat room, select Whisper from the left side of the page,
then press Return.
A list of the people in the chat room appears on the left side of the page.
2 Select the person you want to whisper to.
3 Type your message in the box to the right.
4 Select Whisper message, then press Return.
You can tell when someone whispers to you because that person’s comment
starts with the words “to you.”
54

Creating a new chat room
If you can’t find a chat room set up to discuss a topic you’re interested in, or if
you want to have a private conversation with a group of friends or family, you
can create your own chat room.
>
To create your own chat room:
1 From the Home page, select Chat, then press Return.
2 On the main Chat page, use the Scroll Down button on your remote control
or keyboard to move down the page to the section labeled Join a Chat.
3 Select Create a new chat room, then press Return
A panel appears, asking you to type a name and topic for your new chat room
and to choose a category for the room.
Create a new
chat room.
4 To choose a category, select the Category menu and press Return
Type a name for the room you want to create, then press the Down Arrow
on your keyboard and type a description of your topic.
5 If you’d like your room to be unlisted (so that only people you inform know
about it), select Make this room unlisted, then press Return.
6 Select Create Room, then press Return.
Your new chat room is created. If it is a listed room, it is available to
anyone looking for your topic. If it is unlisted, you need to give the exact
name of the room to the people you invite to join you.
55

MESSENGER
Using MSN Messenger, you can exchange private, instant messages with
anyone who uses Messenger and is connected to the Internet at the same
time you are.
NOTE: While it is possible to use the on-screen keyboard for sending instant
messages, the pace of instant message exchanges makes it more
practical to use a wireless keyboard.
Sending an instant message
You can send instant messages to people only when they are online.
>
To send an instant message:
1 From the Home page, select Messenger, then press Return.
2 Select Use MSN Messenger Now, then press Return.
You can also get to the Messenger panel from any page in the Web world
by pressing Options on your keyboard, then selecting messenger and
pressing Return, or simply by pressing Cmd+Y on the keyboard.
The Messenger panel appears.
This tab tells
you that you
are viewing
your buddy
list.
See which of your buddies is currently
connected and available for a conversation.
Get detailed
instructions on
using Messenger.
Start a conversation
with someone who is
not on your buddy list.
Open your Address
book (to add a new
buddy, for example).
Control who can
contact you. See other
Messenger settings.
3 To send a message to one of the people on your buddy list (see page 57 for
more information), select a buddy from the list, then press Return.
To send a message to someone who is not on your buddy list, select Contact,
then press Return. Then type that person’s name and e-mail address.
4 Type your message in the box at the bottom of the Messenger panel.
5 To send the message, select Send, then press Return.
56

Adding a buddy
The easiest way to send people an instant message is to add them to your
buddy list. Once they’re on your buddy list, you don’t have to type their
e-mail addresses each time you send them an instant message.
>
To add someone to your Address book and buddy list:
1 If you’re not already using Messenger, press the Options key on your
keyboard.
The Options panel appears.
2 Select messenger, then press Return.
The Messenger panel appears.
3 Select Edit Addresses, then press Return.
Your Address book appears.
4 Select Add, then press Return.
5 Type your friend’s name and e-mail address, select Add, then press Return.
You can send instant messages to other MSN TV service members, or to
computer users with certain e-mail accounts. The accounts that MSN
Messenger recognizes include msn.com, webtv.net, and hotmail.com. If the
address is for someone you can contact with MSN Messenger, an Instant
Message Settings page appears.
6 Select (friend) is your buddy, select Continue, then press Return
A page appears, telling you that the person has been added to your buddy list.
7 Select Continue, then press Return.
Your Address book reappears, with the name and address you just entered.
8 Select Messenger, then press Return to return to MSN Messenger.
>
To add someone already in your Address book to your buddy list:
1 Choose Messenger from the Home page, then choose Address Book.
2 Go to the address of the person you want to add, then choose Change.
3 Choose Instant message settings, then follow steps 6–8 above.
When you add people to your buddy list, MSN Messenger sends them a buddy
request, asking if they would like to exchange messages with you. Your buddy
list shows them as Not Connected until they accept your buddy request.
However, you can still contact them with MSN Messenger even though they
don’t appear to be connected.
57

Responding to invitations to become a buddy
Just as you can invite other people to become your buddies, they can invite
you to be on their buddy lists. When you are on someone’s buddy list, that
person can see when you are online and can send you instant messages. When
you are invited to become a person’s buddy, you can choose to accept or reject
the invitation.
>
To respond to an invitation to become a buddy:
1 When someone adds you to their buddy list, a message appears on the
bottom of your screen. To respond to the invitation, press the Options
button on your keyboard.
The Options panel appears.
2 Select messenger, then press OK or Return.
The Messenger panel appears.
3 Select the tab labeled Buddy Request and press OK or Return.
4 To accept the invitation, select Allow, then press OK or Return.
You are added to the person’s buddy list and they will be able to tell
when you are connected to the MSN TV service.
Or, to decline the invitation, select Don’t allow, then press OK or Return.
If you decline, you will not be added to that person’s buddy list.
Another panel appears.
5 To put the sender on your buddy list, select Make Buddy and press OK or
Return.
Or, if you don’t want that person on your buddy list but still would like
them to be able to send you messages, select Don’t Make and press OK
or Return.
58

Controlling who can contact you
Just as you can send a message to anyone whose address you know, anyone
who knows your address can send a message to you.
There are several ways to control who can send you an instant message:
· You can set it so everyone can send you messages.
· You can set it so only people in your buddy list can send you messages.
· You can prohibit specific individuals from contacting you.
· You can turn MSN Messenger off to stop all Messenger activity.
>
To control who can contact you using Messenger:
1 Press Options on your remote control or keyboard.
The Options panel appears.
2 Select messenger, then press OK or Return.
The Messenger panel appears.
3 Select Settings, then press OK or Return.
The Messenger Settings page appears.
4 Select one of the options from the right side of the page, then press OK
or Return.
· To stop all Messenger activity, select Turn MSN Messenger Off, then press
OK or Return.
· To choose whether you can be contacted by just your buddies or by anyone,
select Change how available you are, then press OK or Return. Make your
choice from the page that appears, select Continue, then press OK or Return.
· To see who you have blocked from sending you messages (see the next
section), select See people you’ve blocked, then press OK or Return.
To prevent specific people from contacting you using MSN Messenger, you’ll
need to block them. The nex t section tells you how to do this.
59

Blocking someone from sending you instant messages
If you receive a message from someone and you want to prevent that person
from sending you more messages, you can do so by blocking them.
You cannot block someone who is on your buddy list. To prevent a buddy from
sending you an instant message, you first have to remove him or her from your
buddy list. See page 61.
>
To block someone from sending you instant messages:
1 When you receive a message from someone, you’ll see a notice scroll across
the bottom of the screen. Press Options on your keyboard.
2 Select messenger, then press OK or Return.
A page appears, displaying the message being sent to you.
3 Select Block from the Messenger panel, then press OK or Return.
A page appears allowing you to block the sender of the message being sent
to you.
4 Select Block, then press OK or Return.
The person you blocked is no longer able to send you instant messages.
60

Removing someone from your buddy list
To remove someone from your buddy list, you use the Address book.
>
To remove someone from your buddy list:
1 Press the Menu-Options button on your remote control or the Options button
on your keyboard.
The Options panel appears.
2 Select messenger, then press OK or Return.
The Messenger panel appears.
3 Select Edit Addresses, then press OK or Return.
Your Address book appears.
4 In the listing for the person you want to remove, select Change, then press
OK or Return.
A Change Entry page appears.
5 Select Instant message settings, then press OK or Return.
6 Select (friend) is your Buddy and press OK or Return to remove the
checkmark, then select Continue and press OK or Return.
A page appears telling you that the person you entered has been removed
from your buddy list.
7 Select Done, then press OK or Return. Select Done again on the next screen.
Your Address book appears again.
Once you have removed a person from your buddy list, you can block her or
him from sending you instant messages as described on page 60.
61

62

YOUR MSN TV SERVICE
ACCOUNT
· Account options
· Billing information and
payment options
· Adding users to your
account
· Getting feature updates
· Using an ISP

For your convenience, the MSN TV service provides
tools for managing your account right from the
Home page.

ACCOUNT OPTIONS
The Account option on your Home page gives you a way to get detailed
information about the MSN TV service, your billing options, and your account.
This is a convenient on-screen way to check when you are billed,
how much you owe on your account, and so on.
>
To view your account details or make changes to your payment method or your
account information (address, phone number, etc.):
1 From the Home page, select Account, then press OK or Return.
The Your account page appears:
2 The available options are described. To go to one of the options, select it,
then press OK or Return.
65

BILLING INFORMATION AND PAYMENT OPTIONS
The monthly service charge covers your use of the MSN TV ser vice. It does not
cover the cost of anything you purchase online or charges for toll phone calls
made to connect to the MSN TV service.
MSN TV ser vice is available as a local call in most areas. In some areas, long
distance telephone charges may apply. To check local access, call 1-800-469-
3288.
Viewing your billing statements online
You can see your current account status, recent charges, and payments online
by going to the Billing Statement page from the Your account page.
>
To see your billing statement:
1 From the Home page, select Account, then press OK or Return.
2 Select Billing statement, then press OK or Return.
Payment options
>
You have a choice of three payment methods. You can pay by using:
· a credit card
VISA, MasterCard, Discover, and American Express cards are accepted.
· a debit card (also known as a bank card, ATM card, or check card)
VISA and MasterCard debit cards are accepted.
· an automatic check payment
This option automatically withdraws the charge from your checking account
each month. A small monthly fee is added for processing the automatic
payment.
You cannot pay for the MSN TV service by mailing monthly checks.
>
To change your current payment method:
1 From the Home page, select Account, then press OK or Return.
2 Select How you pay, then press OK or Return.
3 Make a choice from the options presented.
66

ADDING USERS TO YOUR ACCOUNT
You can have up to six users on each account at no extra charge. This includes
the user who signed up for service initially — known as the primary user — plus
five additional secondary users.
Each secondary user can have his or her own e-mail address, password, a
separate list of Favorites, a separate name to use in chat rooms, and other
personal settings.
TIP: The primary user can set up a child as a secondary user. By setting up a
secondary account and password protecting the primary account, a parent
can use SurfWatch™ and KidFriendly
designed to make the Web a safer place for children.
>
To add a new user to your account:
1 From the Home page, select Switch User from the options near the top of
the page, then press OK or Return.
If this is the first time you have selected Switch User, a page appears, telling
you about adding users to your account. Select Add Users Now, then press
OK or Return.
2 From the Users page, select Add User, then press OK or Return.
3 Type the new user’s first and last name, select Continue, then press OK
or Return.
4 Follow the on-screen instructions to choose a user name, and set up the
account (including the child-protection settings, if you wish) for this new
user.
®
technology child-protection features
67

UPDATES — GETTING THE LATEST FEATURES
We are always improving the MSN TV ser vice. From time to time, free
software updates are offered to you when you connect to the service. You may
be also be offered an update the first time you turn on your Internet Receiver.
There may be a charge if you decide to purchase new, additional services that
become available through a software update.
>
To get the latest features:
1 Select Update Now or Go Ahead when you see one of these notices, then
press OK or Return.
68
NOTE: As your MSN TV service is updated, you may see pages that have
changed or you may have access to features that are not documented in
this guide. While future improvements may render sections of this guide
out of date, you can always get the latest instructions f r om the o n -screen
help available throughout the MSN TV service. See “Getting Help” on
page 19.

USING AN ISP TO CONNECT TO MSN TV SERVICE
Most people can connect to the MSN TV service using a local phone number.
In some areas, however, local access phone numbers are not available and
your Internet Receiver must dial a long-distance number to connect to the
service. This results in charges to your phone bill each time
your Internet Receiver connects to the MSN TV service. To check local access,
call 1-800-469-3288.
If this is the case for your area, you see a message on your screen indicating that
your Internet Receiver is about to make a toll call when you connect to the
MSN TV service. If your Internet Receiver dials a long-distance (“toll”) number
to connect to the service, you might be able to save money by using a local
Internet Service Provider (ISP) to connect.
>
To view detailed on-screen help for using an ISP:
1 From the Home page, select Account, then press OK or Return.
2 Select Use an ISP, then press OK or Return.
3 Make a choice from the options presented.
Detailed help for signing up with an ISP appears on these pages.
When you use an ISP, your Internet Receiver calls the ISP’s number instead
of the MSN TV service number each time you connect. You get the same MSN
TV service experience; the only differences are:
· The Internet Receiver dials a different (local) phone number.
· You are billed for both the MSN TV service and the ISP service.
If you use an ISP, you receive two bills each month — one from your ISP and one
from us (which is discounted to compensate for the fact that you are dialing the
service through your own ISP rather than using the MSN TV service’s dial-up
feature). You are responsible for both bills in order to maintain your MSN TV
service account. Despite the fact that you will need to pay both the MSN TV
service and the ISP service charges, it may cost you less than the long distance
phone charges you would have to pay for dialing the MSN TV service directly.
You can find an ISP by looking in your local Yellow Pages under Internet services,
computer on-line services, or similar listings. Or, once you have signed up for
the MSN TV service, you can visit Web sites that list ISPs. If you haven’t signed
up for the MSN TV service yet, first go ahead and complete the sign-up
process. During the sign-up process, the Internet Receiver uses a toll-free
number.
69

>
When calling an ISP, make sure it is compatible with the MSN TV service.
To be compatible with the MSN TV service, the ISP must:
· Provide at least one local phone number for connecting to their service from
your calling area with a modem speed of at least 28.8 Kbps with V.34.
· Support both “PPP” and “PAP.”
· Offer a fixed-cost service.
· Offer technical support for connecting.
· Support the V.90 modem standard.
When setting up an account with an ISP, get the following information:
· The name of the ISP.
· The user name to use with your ISP (this may be different from your MSN
TV service user name).
· Your ISP password (this may be different from your MSN TV service
password).
· A local dial-up access phone number. A second, alternate dial-up number is
also helpful in case the first number is ever busy.
70

INDEX

account options . . . . . . . . . . . . . . . . . 65
adding a buddy to Messenger . . . . . . . 57
adding users to your account . . . . . . . 67
Address book . . . . . . . . . . . . . . . .29
addressing e-mail . . . . . . . 25–26, 29–30
automatic check payment . . . . . . . . . . 66
Back button . . . . . . . . . . . . . . . . . . . . . 9
billing information . . . . . . . . . . . . . . . 66
blocking Messenger contacts . . . . . . . . 60
buddies
adding to Messenger . . . . . . . . . . . . 57
removing from Messenger . . . . . . . . 61
responding to invitations . . . . . . . . . 58
changing payment options . . . . . . . . . 66
chat rooms . . . . . . . . . . . . . . .49, 53
creating . . . . . . . . . . . . . . . . . . . . . . 55
joining . . . . . . . . . . . . . . . . . . . . . . . 53
whispering . . . . . . . . . . . . . . . . . . . . 54
copying e-mail text (copy and paste) . . . 31
cutting e-mail text . . . . . . . . . . . . . . . .32
creating a chat room . . . . . . . . . . . . . 55
creating a Web page . . . . . . . . . . . 44
credit card payments . . . . . . . . . . . . . 66
Debit card payments . . . . . . . . . . . . . 66
Discussion groups . . . . . . . . . .49, 50
Joining . . . . . . . . . . . . . . . . . . . . . . 50
Posting a response . . . . . . . . . . . . . . 52
Posting a topic . . . . . . . . . . . . . . . . . 52
editing a Web page . . . . . . . . . . . . . . . 45
editing e-mail (cut, copy, paste) . . . 31–32
e-mail
addresses . . . . . . . . . . . . . . . . . . . . . 26
correcting spelling . . . . . . . . . . . 27–28
displaying . . . . . . . . . . . . . . . . . . . . 12
editing (cut, copy, paste) . . . . . . . 31–32
features . . . . . . . . . . . . . . . . 12–14, 23
printing . . . . . . . . . . . . . . . . . . . . . . 46
reading . . . . . . . . . . . . . . . . . . . 14, 24
writing . . . . . . . . . . . . . . . . . . . . 25
–30
–55
–45
–52
–26
Favorites
adding to . . . . . . . . . . . . . . . . . . . . . 40
visiting . . . . . . . . . . . . . . . . . . . . . . 41
Help . . . . . . . . . . . . . . . . . . . . . . . . . 19
Home-Clear button . . . . . . . . . . . . . . . 9
Home page
displaying . . . . . . . . . . . . . . . . . . . . . 7
features . . . . . . . . . . . . . . . . . . . 11, 35
using . . . . . . . . . . . . . . . . . . . . . . . . 10
instant messages . . . . . . . . . . . . . . . . .56
Internet Service Provider (see ISP)
Internet Receiver
turning on . . . . . . . . . . . . . . . . . . . . . 7
reconnecting to MSN TV service . . . 10
ISP, using to connect to MSN TV service .
. . . . . . . . . . . . . . . . . . . . . . .69-70
joining a chat room . . . . . . . . . . . . . . 53
joining a discussion group . . . . . . . . . 50
mail (see e-mail)
messages, instant . . . . . . . . . . . . . 56
Messenger . . . . . . . . . . . . . . . .49, 56–61
adding a buddy . . . . . . . . . . . . . . . . 57
blocking contacts . . . . . . . . . . . . . . . 60
controlling contacts . . . . . . . . . . . . . 59
removing a buddy . . . . . . . . . . . . . . 61
responding to buddy invitations . . . . 58
sending a message . . . . . . . . . . . . . . 56
Microsoft Passport . . . . . . . . . . . . . . .43
moving e-mail text (cut and paste) . . . 32
MSN Messenger (see Messenger)
MSN TV service updates . . . . . . . . . . .68
OK button . . . . . . . . . . . . . . . . . . . . . .8
Options panel . . . . . . . . . . . . . . . . . . .39
Passport . . . . . . . . . . . . . . . . . . . . . . . 43
payment method, changing . . . . . . . . . 66
posting a discussion group response . . 52
posting a discussion group topic . . . . . 52
printing a Web page . . . . . . . . . . . . . . 46
printing e-mail . . . . . . . . . . . . . . . . . . 46
publishing a Web page . . . . . . . . . 44–45
–61
72

reading e-mail . . . . . . . . . . . . . . . . . . 24
reconnect message . . . . . . . . . . . . . . . 10
remote control . . . . . . . . . . . . . . . . . . . 7
Back button . . . . . . . . . . . . . . . . . . . .9
OK button . . . . . . . . . . . . . . . . . . . . .8
removing a Messenger buddy . . . . . . . 61
removing e-mail text (cut) . . . . . . . . . . 32
responding to buddy invitations
on Messenger . . . . . . . . . . . . . . . . . . 58
searching . . . . . . . . . . . . . . 15-16, 36
Select-and-OK . . . . . . . . . . . . . . . . . . . 8
shopping on the Web . . . . . . . . . . . . . 42
shortcuts to MSN TV service features . 39
spell checking e-mail . . . . . . . . . . . 27
–37
–28
updates . . . . . . . . . . . . . . . . . . . . . . . .68
Wallet . . . . . . . . . . . . . . . . . . . . . . . . .43
Web sites
accessing directly . . . . . . . . . . . . . . . 39
creating . . . . . . . . . . . . . . . . . . . 44
editing . . . . . . . . . . . . . . . . . . . . . . . 45
searching . . . . . . . . . . . . . 15-16, 36–37
Favorites . . . . . . . . . . . . . . . . . . 40
printing . . . . . . . . . . . . . . . . . . . . . . 46
publishing . . . . . . . . . . . . . . . . . 44–45
shopping . . . . . . . . . . . . . . . . . . . . . 42
whispering in chat rooms . . . . . . . . . . 54
writing e-mail . . . . . . . . . . . . . . . . . . 25
–45
–41
73

74
 Loading...