

Page 1
22” LED Television TV with DVD
MODEL: RLEDV2238A-B
Page 2

Page 3
Contents
Contents
Caution
Safety Information
Unit and Accessories
Introduction
1. Front View
2. Rear View
3. Instruction for Wall Mount
4. Remote Control
Basic Operation
OSD Menu
1. Picture menu
2. Audio menu
3. Time menu
4. Setup menu
5. Lock menu
6. Channel menu
2
3
4
5-9
5
6
7
8-10
11
12-18
12
13
14
15
16
17-18
DVD Operation 19-26
Simple Troubleshooting
27
28
1
Page 4

Caution
Caution
is intended to alert the user to the presence of un-insulated "dangerous
to constitute a risk of electric shock to the persons.
The exclamation point within an equilateral triangle is intend to alert the
user to the presence of important operating and maintenance (servicing)
instructions in the literature accompanying the appliance.
Correct disposal of this Product
(Waste Electrical & Electronic Equipment (WEEE)
Your product is designed and manufactured with high quality materials and
components which can be recycled and reused.
This symbol means that electrical and electronic equipment, at their endof-life should be disposed of separately from your household waste.
Please dispose of this equipment at your local community waste collection/
recycling centre.
In the USA there are separate collection systems for used electrical and
electronic products. Please help us to conserve the environment we live
in!
This unit complies with America Safety directives.
3124140
CERTIFIED TO CSA STD. C22.2 No.60065
This unit complies with FCC directives.
ENERGY
PERFORMANCE
D
I
E
F
VERIFIED
RENDEMENT
ENERGETIQUE
VERIFIE
V
E
R
I
lntertek
EP 4005700
This unit complies with Canada Energy efficiency directives.
2
Page 5
Safety Information
Electrical safety
power
Safety Information
Physical safety
3
Page 6
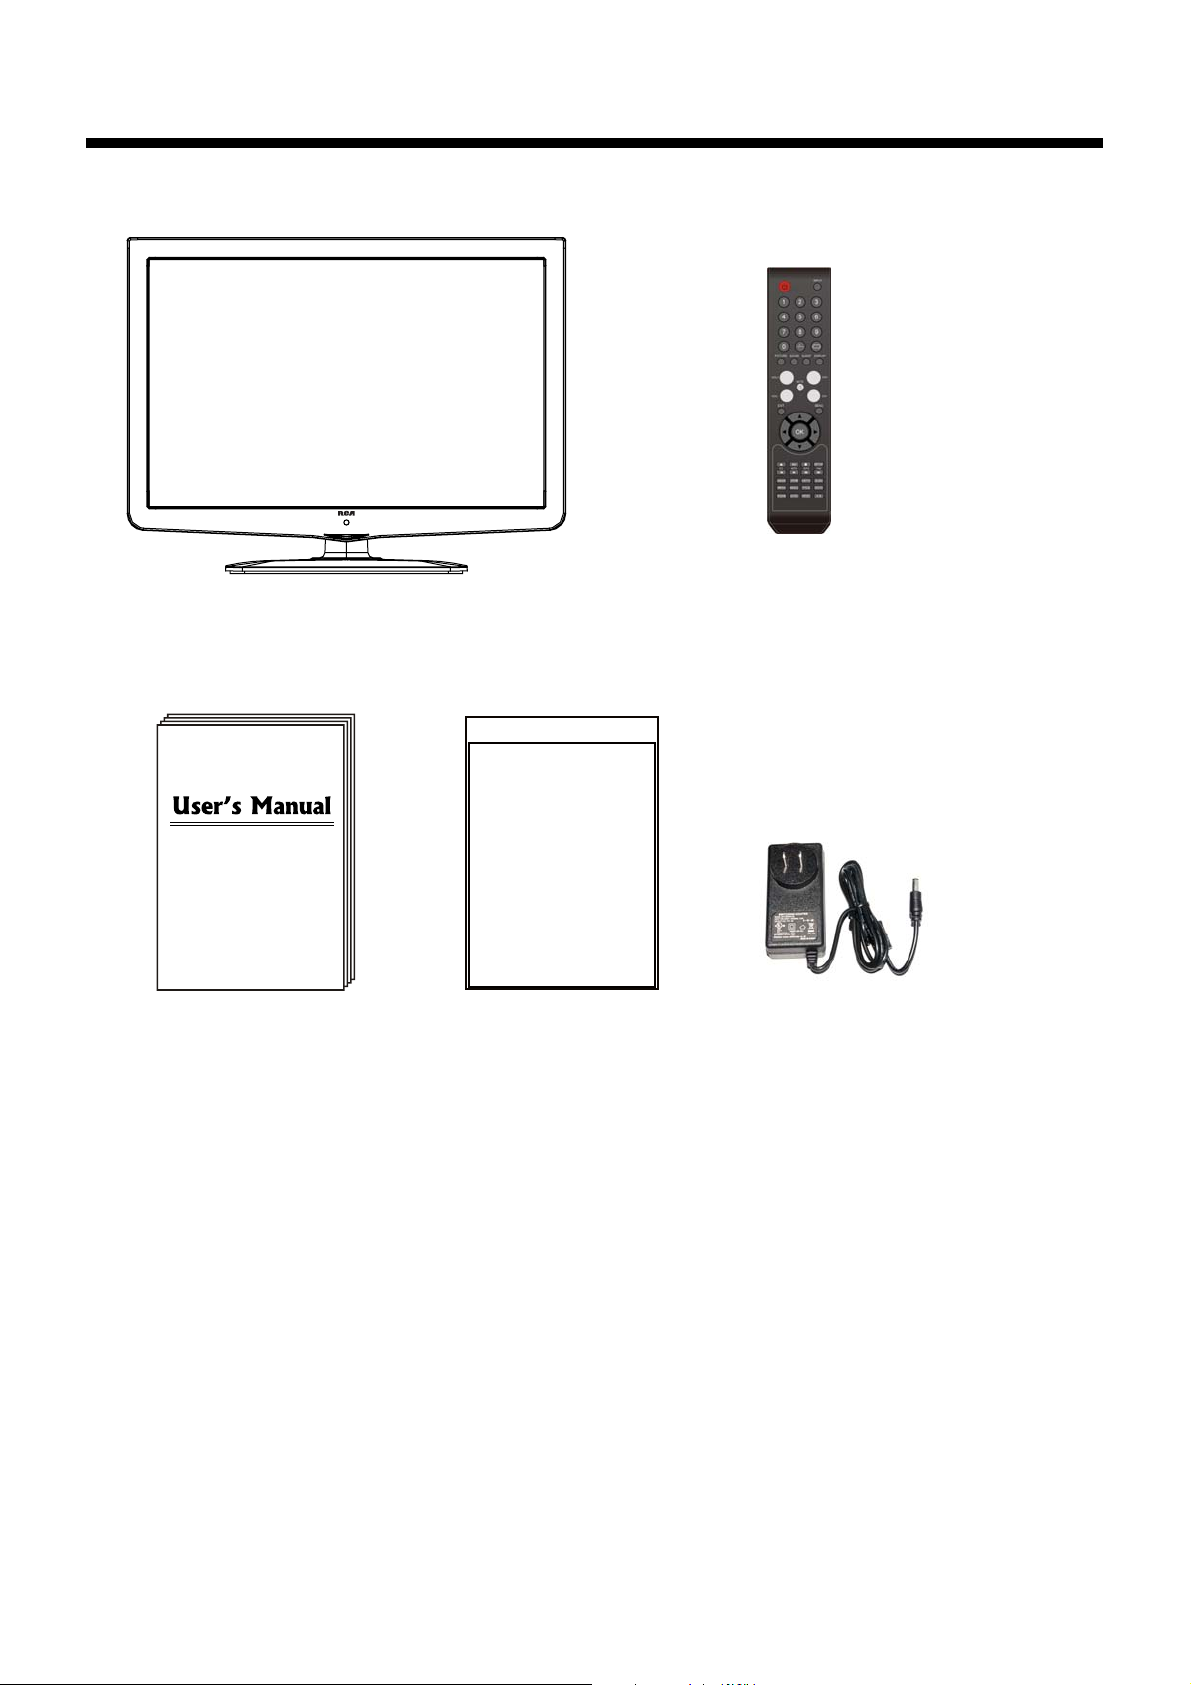
Unit and Accessories
Unit and
Accessories
TV set
Remote control
Batteries: 2xAAA
Instructions for fixing stand
User's manual
Instructions for
fixing stand
AC Cord
4
Page 7

Introduction
Introduction
Please insert a 12cm disc
according to the silk
1. Front View
INPUT MENU CH+ CH- VOL+ VOL- PLAY EJECT POWER
Power Indicator
Remote Control window
(Keep clear)
1). (IR) Infrared Receiver: Receives IR signals from the remote control.
(Power on/Standby)LED Indicator: Press POWER to turn on and off.
Indicator on(Red) Standby mode
Indicator on(Green) Power on mode
The effective receiving range for the signal is 5-8 metres from the front of the remote
control window, and 30
0
to the left or right side and 200 above or below the remote control
window.
2). The functions of the buttons:
INPUT: Press to display the input source menu.
MENU: Press to display the OSD menu,
press again to exit the menu.
CH+/-: Press to scan through channels.
VOL+/-: Press to adjust the volume.
TV
AV
Component
DVD
HDMI1
HDMI2
VGA
PLAY: Play/pause the disc playing.
EJECT: Eject the disc.
POWER:
Turn on/standby the TV set.
Press INPUT button on the TV set or remote control to
display the input source menu, and use CH+/- button on
the TV set or
/ button on remote control to select the
input source, press OK button on the remote control to
enter.
Note: Before you select the input source, make sure the
connections are prepared.
5
Page 8
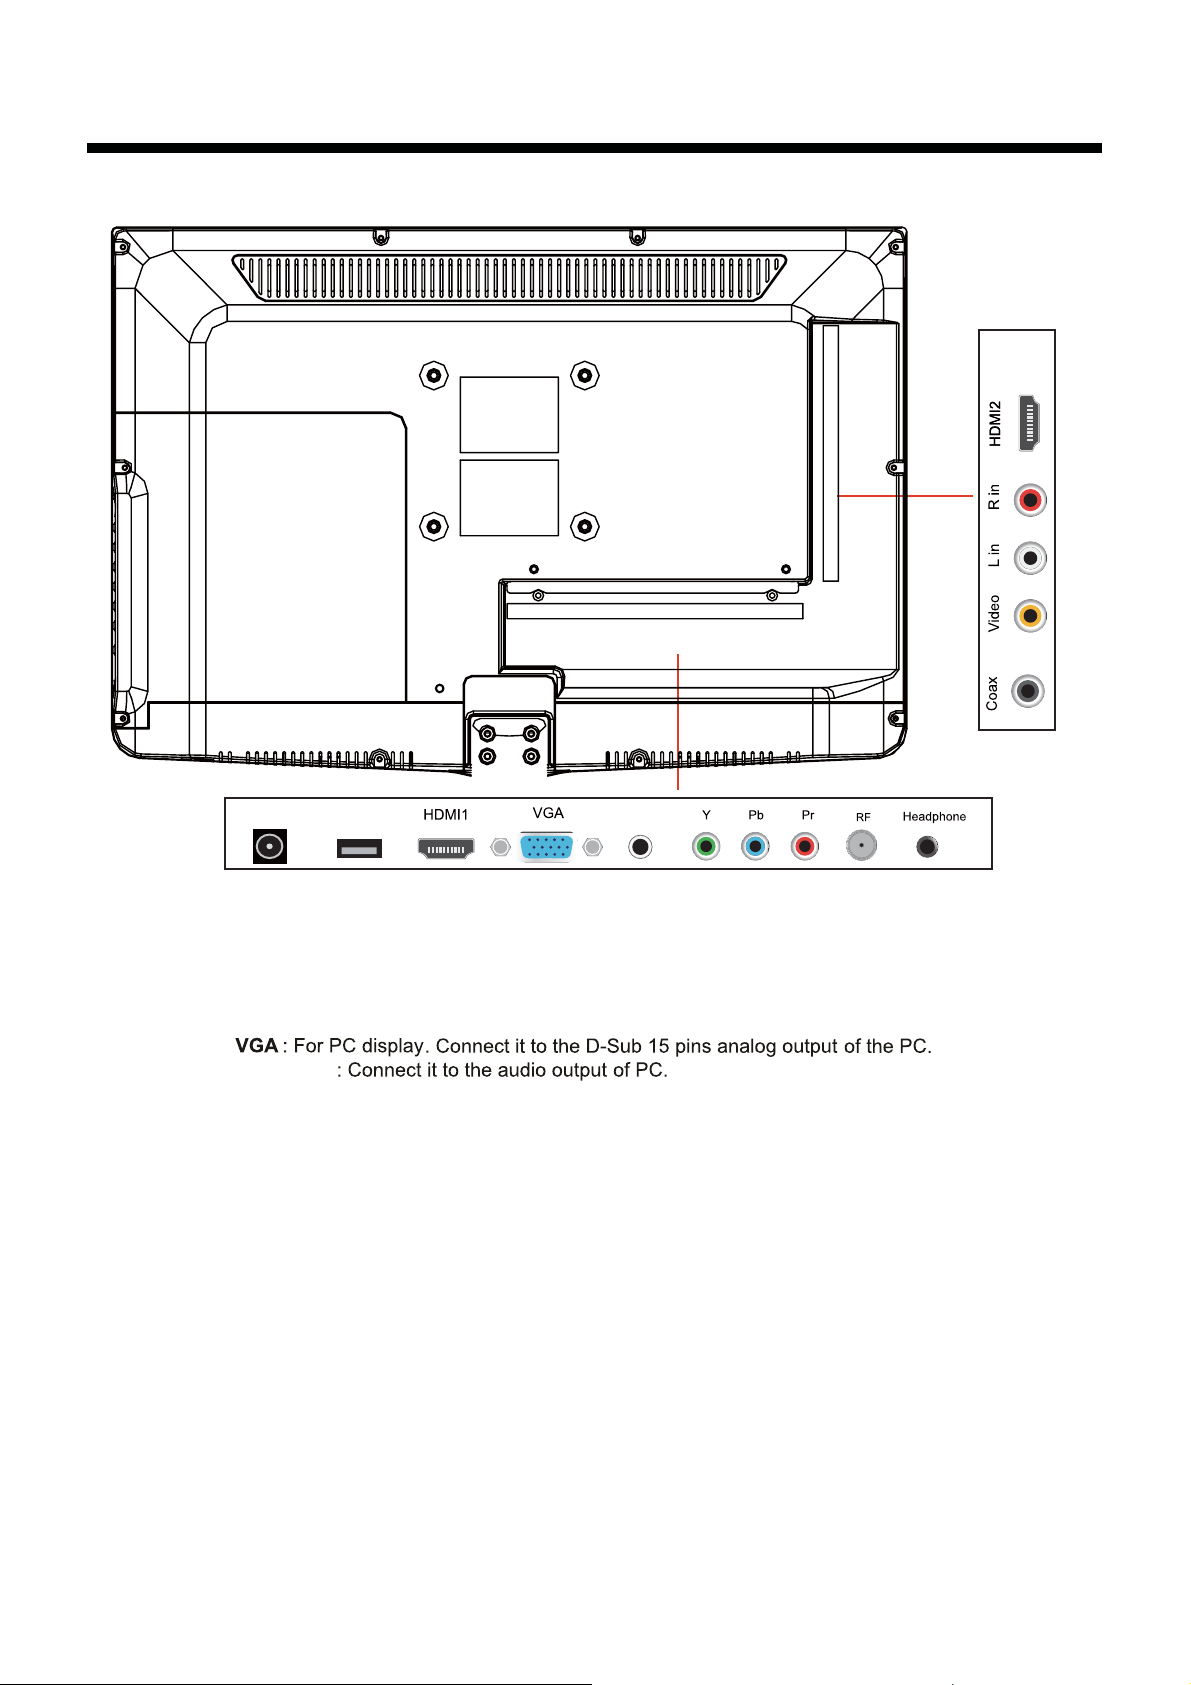
2. Rear View
Introduction
POWER
POWER:
USB for Service
HDMI1/2
PC AUDIO
YPbPr
RF: Connect antenna or cable 75 Ohm coaxial to receive TV signal.
Headphone out
COAX : Digital audio output.
VIDEO : Connect it to video output of video device.
L/R in
USB
(for Service)
PC AUDIO
Connect the supplied AC adapter.
: For service use only.
: Connect it to the HDMI output of video device.
: Connect them to theYPbPr video output terminal of the external devices.
: Connect it to your headphone or audio equipments
:
Connect them to the audio output terminal of the external devices.
(shared with YPbPr)
6
Page 9
Introduction
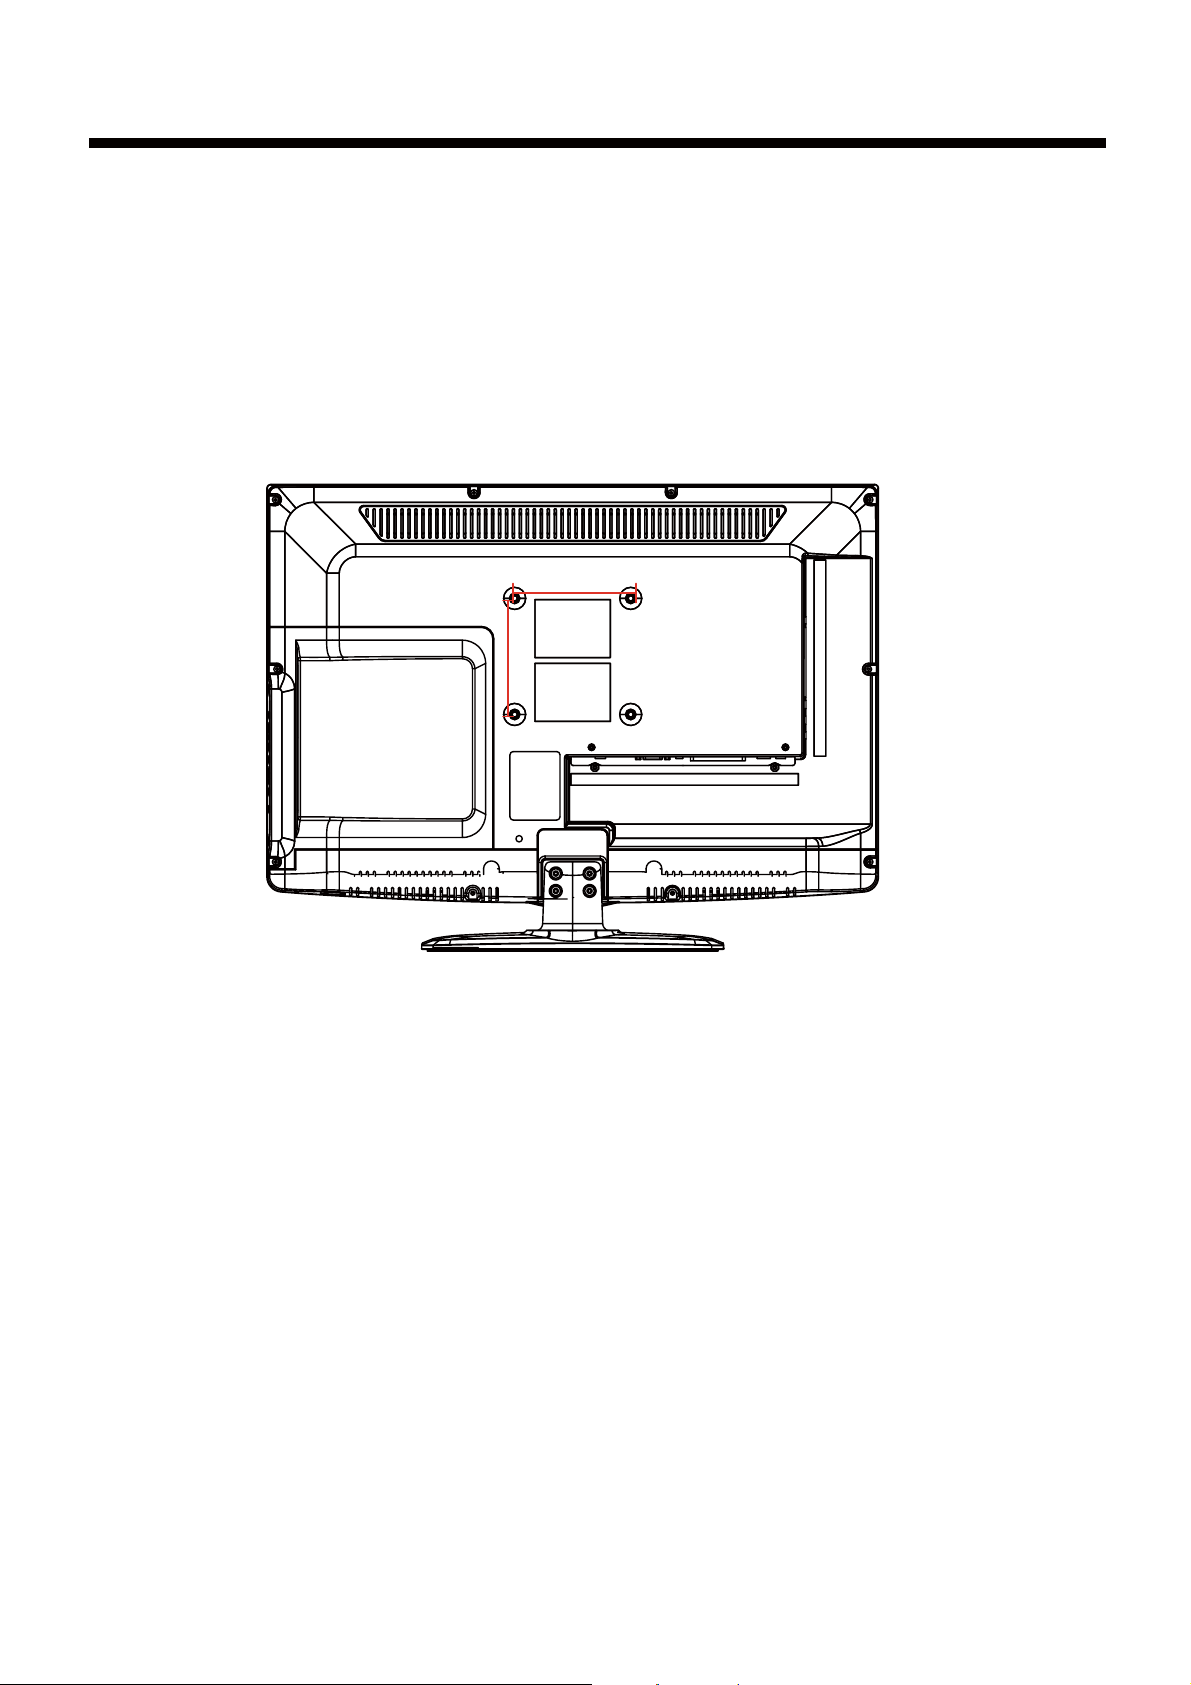
3. Instruction for Wall Mount
The wall mount kit (not included) with your purchase allows you to mount your
RCA TV on the wall. For detailed information on installing the wall mount, refer
to the instructions provided by the wall mount manufacturer. It is strongly
recommended to contact a technician for professional assistance for wall mount
installation. RCA is not responsible for any damage to the product or injury to
yourself or others resulting from the wall-mounting.
Dimensions for Mounting Hole Pattern
100mm
100mm
-
This RCA TV is compatible with a 100mm x 100mm mounting hole pattern.
- 4 pcs of type M4 screws are required for installing the wall mount bracket to
your RCA TV. Do not use screws that are longer than 10 mm. Screws that
are too long may cause damage to the inside of the TV set.
- Do not fasten the screws too tight for this may damage the TV or cause the
TV to fall, resulting in personal injury. RCA is not liable for these kinds of
incidents
- Do not mount your RCA TV at more than a 15 degree tilt.
- Always use two people to mount the TV to a wall.
- Do not install your Wall Mount Kit while your TV is turned on. It may result in
personal injury due to electric shock.
7
Page 10
Introduction
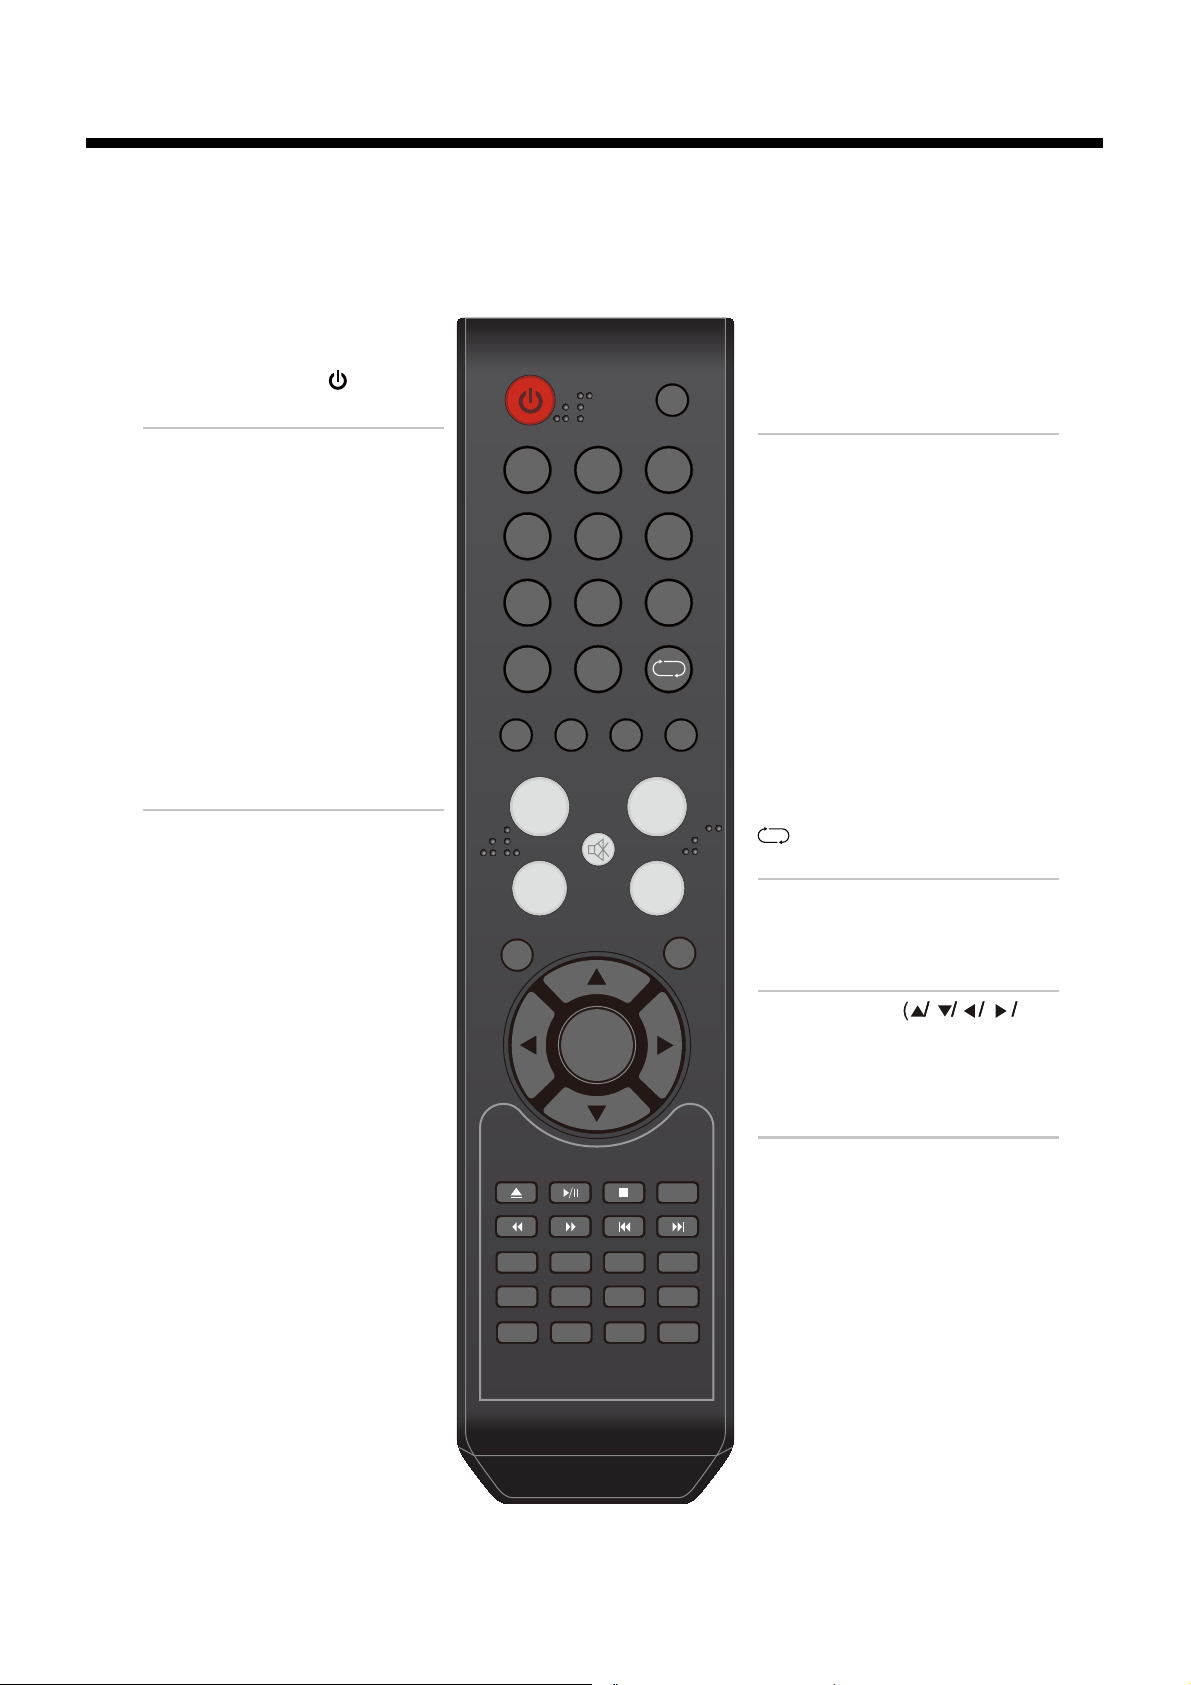
4. Remote Control
The remote control is using Infra-Red(IR). Point it towards the front of the LED TV. The remote
control may not work correctly if it is operated out of range or out of angle.
POWER
Press to turn the TV on/standby
PICTURE
Press repeatedly to cycle
through the available video
picture modes.
SOUND
Press to cycle through the
different sound settings.
SLEEP
Press to setup the sleep time
DISPLAY
Press to enter the EPG menu
directly.
CH+/-
Channel/Program +/-
VOL+/-
Volume +/-
MENU
Press to display the OSD menu.
EXIT
Press to exit form the OSD menu.
INPUT
123
456
789
0
PICTURE SOUND SLEEP DISPLAY
VOL+
VOL-
EXIT
MUTE
MENU
OK
CH+
CH-
INPUT
Press to display the input source
menu
NUMBER BUTTONS
To select the program directly.
e.g.:
Select channel 5,
press “5” button.
Select channel 62
press “6” button, and press “2”
button in 2 seconds.
Select channel 152
press “1” button, and press “5”
button, then press “2” button
in 2 seconds.
select channel “5-1”,
press “5” then “-/--” and “1”.
Return to the previous channel viewed.
MUTE
Press to mute the sound.
Press again or press VOL+ to
unmute.
THUMBSTICK
Allows you to navigate the
on-screen menus and adjust the
system settings to your
preference.
OK )
Universal Remote Code:11359
Universal Remote Control not included.
CC MTS EPG FAV
ZOOM
LANGUAGE
PROGRAM
SUBTITLE
TITLE
ANGLE
REPEAT
INTRO A-B
8
SETUP
SLOW
GOTOMENU
CC
Press to display the closed caption.
MTS
Press to select the audio channels.
EPG
Press to enter the EPG menu
directly.
FAV
Press to display teh favorite
channels list.
Page 11

Introduction
INPUT
123
456
789
Number buttons for DVD.
Pressing “-/--”button to display
“SELECT 10+”, and press a
number button to play the program.
DISPLAY( In DVD)
Press to display the current mode’s
information.
DVD eject.
Play/Pause DVD program.
Stop DVD program.
SETUP
DVD system setup.
DVD fast reverse.
DVD fast forward.
DVD previous chapter.
DVD next chapter.
0
PICTURE SOUND SLEEP DISPLAY
VOL+
VOL-
EXIT
MUTE
MENU
OK
SUBTITLE
TITLE
REPEAT
SETUP
SLOW
GOTOMENU
CC MTS EPG FAV
ZOOM
LANGUAGE
ANGLE
INTRO A-B
PROGRAM
CH+
CH-
LANGUAGE
Select DVD disc language.
ZOOM
Adjust picture size in DVD mode.
SUBTITLE
Select DVD disc subtitle.
SLOW
Play DVD programs at slow speed.
MENU
DVD play list/Disc menu
ANGLE
Select DVD picture angle.
TITLE
DVD title.
GOTO
Play your favorite title/chapter/track.
PROGRAM
Select DVD picture program.
INTRO
If you play CD,it will scan program
with 15 S.
REPEAT
Repeat playing the title or chapter.
A-B
Select and play the preferable
paragraph of DVD program by
pressing this key twice at the
beginning and end of it.
9
Page 12

Introduction
Installing Batteries
1. Open the battery compartment cover on the back of the remote control.
2. Insert two 1.5V AAA size batteries observing the polarity markings inside the battery
compartment. Don’t mix different types or used batteries with new ones.
3. Close the cover.
- The remote control should be operated within 30 feet(7m) and 30
IR receive at the front of the LED TV.
- Used batteries should be disposed properly.
0
to the left and right of the
10
Page 13

Basic Operation
Power on/off
1. -To turn on the Switch
Press POWER button on the TV or remote control.
-To turn off the TV
Press POWER button on the TV or remote control.
Input Source select
Press INPUT button on the TV set or remote control to display input
source menu, and use CH+/- button on the TV set or Ĥ0ĥ!button
on remote control to select the input source, press OK button on the
remote control to enter.
Note: Before you select the input source, make sure the
connections are prepared.
Basic OSD Menu operation
Press MENU button to display the OSD menu as below:
TV
AV
Component
DVD
HDMI1
HDMI2
VGA
Main menu
Picture
Audio
Time
Setup
Lock
Channel
Hint---you should operate the OSD menu according to the hint.
Use /
In the submenu, use /
or press button to enter the submenu.
button to select the main menu, and press button to enter the submenu.
ĥ
Ĥ
Ĥĥ
button to select the function item, press button to adjust/setup,
ĥ
* (Press MENU button to return to the upper menu.)
* (Press EXIT button to exit the menu display.)
ĥ
/
Ĥ
Submenu
(Setup menu
for example)
ĥ
Note1: Only when you input the suitable signal, the relevant items can be activated
Note2: Please operate the OSD menu according to hint on the bottom of the banner.
11
Page 14

OSD Menu
1. Picture menu
Description
OSD Menu
Picture mode: Select between Standard, Dynamic, Mild, SportsˈUser and Power Saving.
You may select the picture mode directly by pressing the PICTURE button on the remote
control.
Note: when select the "Power Saving", the machine is in energy-saving status.
Contrast: Control the difference between the bright and dark regions of the screen picture.
Brightness: Adjust brightness of the picture.
Color: Adjust color of the picture.
Tint: Control the fresh tones to make them appear natural.
Sharpness: Set the amount of fine detail in the picture.
Color Temp.: Select between Normal, Cool and Warm.
12
Page 15

2. Audio menu
Picture Audio
OSD Menu
12
6
Time Channel
Setup
Lock
MoveSelect
Flat
Off
PCM
English
MENU
50
50
50
Exit
Sound Mode
Bass
Treble
Balance
Surround
SPDIF Type
Audio Language
Description
Sound Mode: Select your desired picture mode as follow: Flat, Music, Movie, Sports and User
You may select the sound mode directly by pressing the SOUND button on the remote control.
Bass: Low frequency intensity.
Treble: High frequency intensity.
Balance: Left and right stereo audio channels balance.
Surround: Activate or deactivate the Surround function.
SPDIF Type: Allows you to select between PCM and RAW.
Audio Language: Select audio language.
13
Page 16

3. Time menu
Description
OSD Menu
Sleep timer: You may set the automatic shutdown timer choosing from 5 to 240 minutes, or
deactivate this function.
Time zone: Select between Pacific, Alaska, Hawaii, Eastern, Central and Mountain.
Daylight Saving Time: Select between On and Off.
Clock: User can not change time manually during DTV mode, for time is from signal source
directly.
14
Page 17

OSD Menu
4. Setup menu
Description
Menu Language: Select OSD menu language.
Transparency: Turn on or off the transparency menu function.
Zoom Mode: Select the zoom mode between 16:9, 16:9 zoom, 4:3, 4:3 zoom just scan.
Noise reduction: Select the noise reduction mode between Strong, Off, Weak and Middle.
PC SETUP: If the video input signal comes from your
PC, you may adjust the V-Position, H-Position, Clock,
Phase or even perform an Auto adjustment.
Closed Caption:
CC Mode: Allow you to select the CC Mode among: On, Off and CC on Mute.
Basic Selection: Allow you to select the basic selection among: CC1, CC2, CC3, CC4,
Text1, Text2, Text3 and Text4.
Advanced Selection: Allow you to select the advanced selection among: Service1, Service2,
Service3 Service4, Service 5 and Service 6.
Option: Use thumbstick buttons to operating in option menu as your desire.
XVS: Activate/deactivate the automatic dynamic brightness function.
Restore Default: Restore all settings in SETUP menu to factory settings.
15
Page 18

OSD Menu
5. Lock menu
You must enter the password to gain access to the Lock menu. The default password is 0000.
You may modify the following options:
Description
Change password: Change the password, you must enter the new password twice to confirm it.
Note: Do not forget the password.
System Lock: Allow you to turn on or off the system lock. If deactivated, the functions described below
don’t work.
This option menu allows you to lock any TV channel or adjust the Movie rating filter.
US:
Canada:
TV: Use buttons to select the desired rating
and press button to block or unblock rating.
Ĥ0ĥ
ĥ
MPAA: The Movie rating (MPAA) is used for original
movies rated by the Motion Picture Association of
America (MPAA) as broadcasted on cable TV and not
edited for television.
Use button to select N/A, G, PG, PG-13, R,
Ĥ0ĥ
NC-17 or X.
G: General Audiences. Movie is appropriate for all ages.
PG: Parental Guideance Suggested. May contain material not
suited for younger viewers.
PG-13: Contains content that may not be appropriate for viewers
under the age of 13.
R: Restricted. Contains adult content, no one under 17 admitted
without parent.
NC-17: No one 17 and under admintted.
X: Adults only.
Canada English: Select among: E, C, C8+, G, PG,
14+ and 18+.
Canada French: Select among: E, G, 8ans+, 13ans+,
16ans+ and 18ans+.
Reset RRT: Allow you to reset the RRT setting.
16
Page 19

OSD Menu
6. Channel menu
Description
Air/Cable: Allow you to select antenna between Air and Cable.
If you selet “Cable”, the following items(Favorite, Show/Hide, Channel NO, Channel Label and
DTV Signal) are unable to use.
Auto Scan: Enter the Auto Scan menu to start auto scan.
µ
If you select “Cable” as input signal in Antenna item, allows
you to select Cable System among: Auto, STD, IRC and HRC.
ĥ
Use button to highlight the “Start to Scan”, then press
button to search the channels automatically.
The receivable channels will be stored automatically.
When searching channels, press MENU to stop.
µ
If you select “Air” as input signal in Antenna item, you
can press button to search the channels automatically.
ĥ
The receivable channels will be stored automatically.
When searching channels, press MENU to stop.
NOTE: It will take a while to auto scan in NTSC or ATSC
mode, please wait patiently.
Favorite: Allow you to add these channels which you desired
as the favorite channels.
ĥ
Use / button to highlight the desired item, then press
ĥ
OK button to add or remove the highlighted channel as
favorite.
ĥ
17
Page 20

OSD Menu
Show/Hide: Allow you to show or hide the channels.
ĥ
Use / button to highlight the desired item, then press
ĥ
OK button to show or hide the highlighted channel.
Channel No.: Show and select the channel.
Channel Label: Allow you to setup a label for the channel.
Press / button to select the position of the table, and press / button to select the
ĥ
ĥ
ĥ
ĥ
words.
DTV Signal: Show the quality of digital signal: good, Normal, Bad.
18
Page 21

DVD Operation
DVD Operation
Press the Power button on the TV or the remote control, then press the INPUT button to select DVD mode.
If there is no disc in the DVD player the screen will show "NO DISC".
Insert Disc according to picture next to disc slot.
Do not touch the playing surface.
Hold the disc around the outside with your fingers and place the disc into the slot. The player will
automatically draw the disc into the player.
To "Eject" the disc, press the EJECT button on the TV or the " " button on the remote control.
Audio
Using the DVD player
Most DVDs and your TV/DVD combo have region codes that help control illegal distribution of DVDs.
The region code for your TV/DVD combo is 1. You can only play DVDs with a region code of 1 or ALL.
The region code for a DVD is printed on the DVD or the DVD packaging.
4:3 pan scan
4:3 Letter Box
Wide
19
Page 22

DVD Operation
DVD Operation
20
Page 23

DVD Operation
DVD Operation
21
Page 24

DVD Operation
DVD Operation
22
Page 25

DVD Operation
DVD Operation
or NO disc
23
Page 26

DVD Operation
DVD Operation
24
Page 27

DVD Operation
DVD Operation
25
Page 28

OSD Menu
OSD Menu
26
Page 29

Simple Troubleshooting
Simple Troubleshooting
If the display fails or performance dramatically deteriorates check the Display in accordance
with the following instructions.Remember to check the peripherals topinpiont the source of the
failure.
If the display still fails to perform as expected,connect your helpline for assistance.
No power
- Check all connections to the TV.
- Press either the power button or the Standby button on the Remote control.
No picture or sound
- Ensure that the TV is plugged in and the power is on.
- Ensure that the aerial is connected.
- Try a different programme.
Poor picture quality
- Check the aerial connections.
- Check that the channel is tuned in properly.
- Adjust the picture settings:brightness,colour,sharpness,contrast,hue.
- Make sure that the TV is not located close to electrical appliances that may emit radio
frequency interference.
No colour
- Adjust the colour setting.
- Check that the programme is broadcast in colour.
- Check that the cannel is tuned properly.
TV does not respond to remote control
- Check that there are no obstructions between the remote control and the unit.
- Check that the remote control is within range of the unit.
- Check that the batteries in the remote control and not weak or exhausted.
This LCD TV is for household use and registered as harmless on electromagnetic waves.
Therefore,you can use it in every location as well as residential areas.
27
Page 30

LCD
Viewing Picture Size (diagonal)
Resolution
Aspect Ratio
Brightness
Contrast ratio
Response time
View angle
TV
Technical Specifications
22”(Diagonal)
1680 x1050
16:10
16.7MDisplay colours
250 cd/m
1000:1
5ms
170
Digital TV: ATSCTV system
Analog TV: NTSC
2
0
(H)/1600(V)
ATSC decode
NTSC
Terminals
USB (Service port)
HDMI Input
VGA Input
PC Audio IN
Coax
Video
Audio (L/R)
Y PbPr
Headphone out
Audio out
Others
Input Power Voltage
Power consumption
Video System MPEG-2MP@HL
Sound System AC-3
Video System NTSC
Sound System
M
MTS
1
2
1
1
1
1
1
1
1
1
12V 3A
36 W
2 x 8WAudio Output Power (THD İ7%)
* Product specifications and appearance are subject to change without notice.
HDMI, the HDMI Logo, and High-Definition Multimedia Interface are trademarks or
registered trademarks of HDMI Licensing LLC in the United States and other countries.
28
Page 31

LIMITED PRODUCT WARRANTY
RCA CANADA TV
EXCEPT TO THE EXTENT PROHIBITED BY APPLICABLE LAW, THIS WARRANTY
DOES NOT COVER, AND AS DESCRIBED BELOW CURTIS INTERNATIONAL LTD EXPRESSLY DISCLAIMS, ALL ACTUAL AND
IMPLIED WARRANTIES AND CONDITIONS WITH RESPECT TO ANY PRODUCT USED FOR INSTITUTIONAL OR OTHER
COMMERCIAL PURPOSES (INCLUDING BUT NOT LIMITED TO RENTAL PURPOSES).
What your warranty covers:
v Defects in materials or workmanship to the original purchaser.
For how long after purchase:
v One year parts and labor.
What Curtis International Ltd. will do:
v At Curtis’s discretion, pay an Authorized Curtis Service Centre for both labor charges and parts to repair your television, or replace your
television with a new or refurbished/remanufactured unit. See “How to get service”
How to get service:
v Call 1-800-968-9853. Please have your unit’s date of purchase and model/serial number ready. The model/serial number information can be
found on the back of your unit.
v A representative will troubleshoot your problem over the phone.
v If it is determined that your unit requires service, the service location will be at the sole discretion of Curtis based upon the Curtis Limited
Warranty statement.
v At the sole discretion of Curtis, T
new or refurbished/remanufactured unit.
v Proof of purchase in the form of an original bill of sale or receipted invoice from an Authorized Dealer which is evidence that the product is
within the warranty period must be presented to obtain warranty service.
elevisions are either consumer carry-in to an Authorized Curtis Service Centre or directly exchanged for a
Your warranty does not cover damages which are caused by:
v Fire, accident, lightening, flood and/or other acts of God;
v Faulty installation, set-up adjustments, improper antenna, inadequate signal reception, adjustment of consumer controls and/or improper
maintenance; and/or
v Failure which results from misuse, abuse, neglect, mishandling, misapplication, and/or alteration.
What your warranty does not cover:
v Customer instruction (Your Owner’s Manual describes how to install, adjust, and operate your unit. Any additional information should be
obtained from your dealer);
v Transportation cost to and fr
whereby he undertakes this responsibility);
v Installation and set-up service adjustments;
v Products connected otherwise than as outlined in the Owner’s Manual;
v Products on which the serial number has been altered or removed;
v External antenna or cable systems;
v Remote control & batteries;
v A television that has been modified or incorporated into other products or is used for institutional or other commercial purposes (including but
not limited to rental purposes);
v A unit purchased or serviced outside Canada;
v Special, incidental or consequential damages; and/or
v Normal wear or cosmetic damage.
If you purchased your unit outside of Canada:
v This warranty does not apply. Contact your dealer for warranty information.
©Curtis International Ltd.
315 Attwell Drive, Toronto, Ontario M9W 5C1
www.cu
rtisint.com
om the Service Centre (Unless you have made other arrangements with your dealer at the time of purchase
“RCA”, “NIPPER & CHIPPER” ARE TRADEMARKS OF RCA TRADEMARK MANAGEMENT USED UNDER LICENSE TO:
CURTIS INTERNATIONAL LTD.
 Loading...