

Page 1
RLED4843-UHD
48
Page 2

TV Base Stand assemble
17
17
17
18
19
18
30
31
33
3.2. Audio/Video Source Selection
3.1. Initial Installation
3.3. DTV Mode Operations
SETTINGS
PC Mode
Initial Setup
4.1.Customizing the PICTURE Settings
4.2.Customizing the SOUND Settings
4.3.Customizing theTIME Settings
4.4.Customizing the SETUP Settings
4.5.Customizing the LOCK Settings
4.6.Customizing the CHANNEL Settings
20
21
24
27
Page 3
Page 4
Page 5
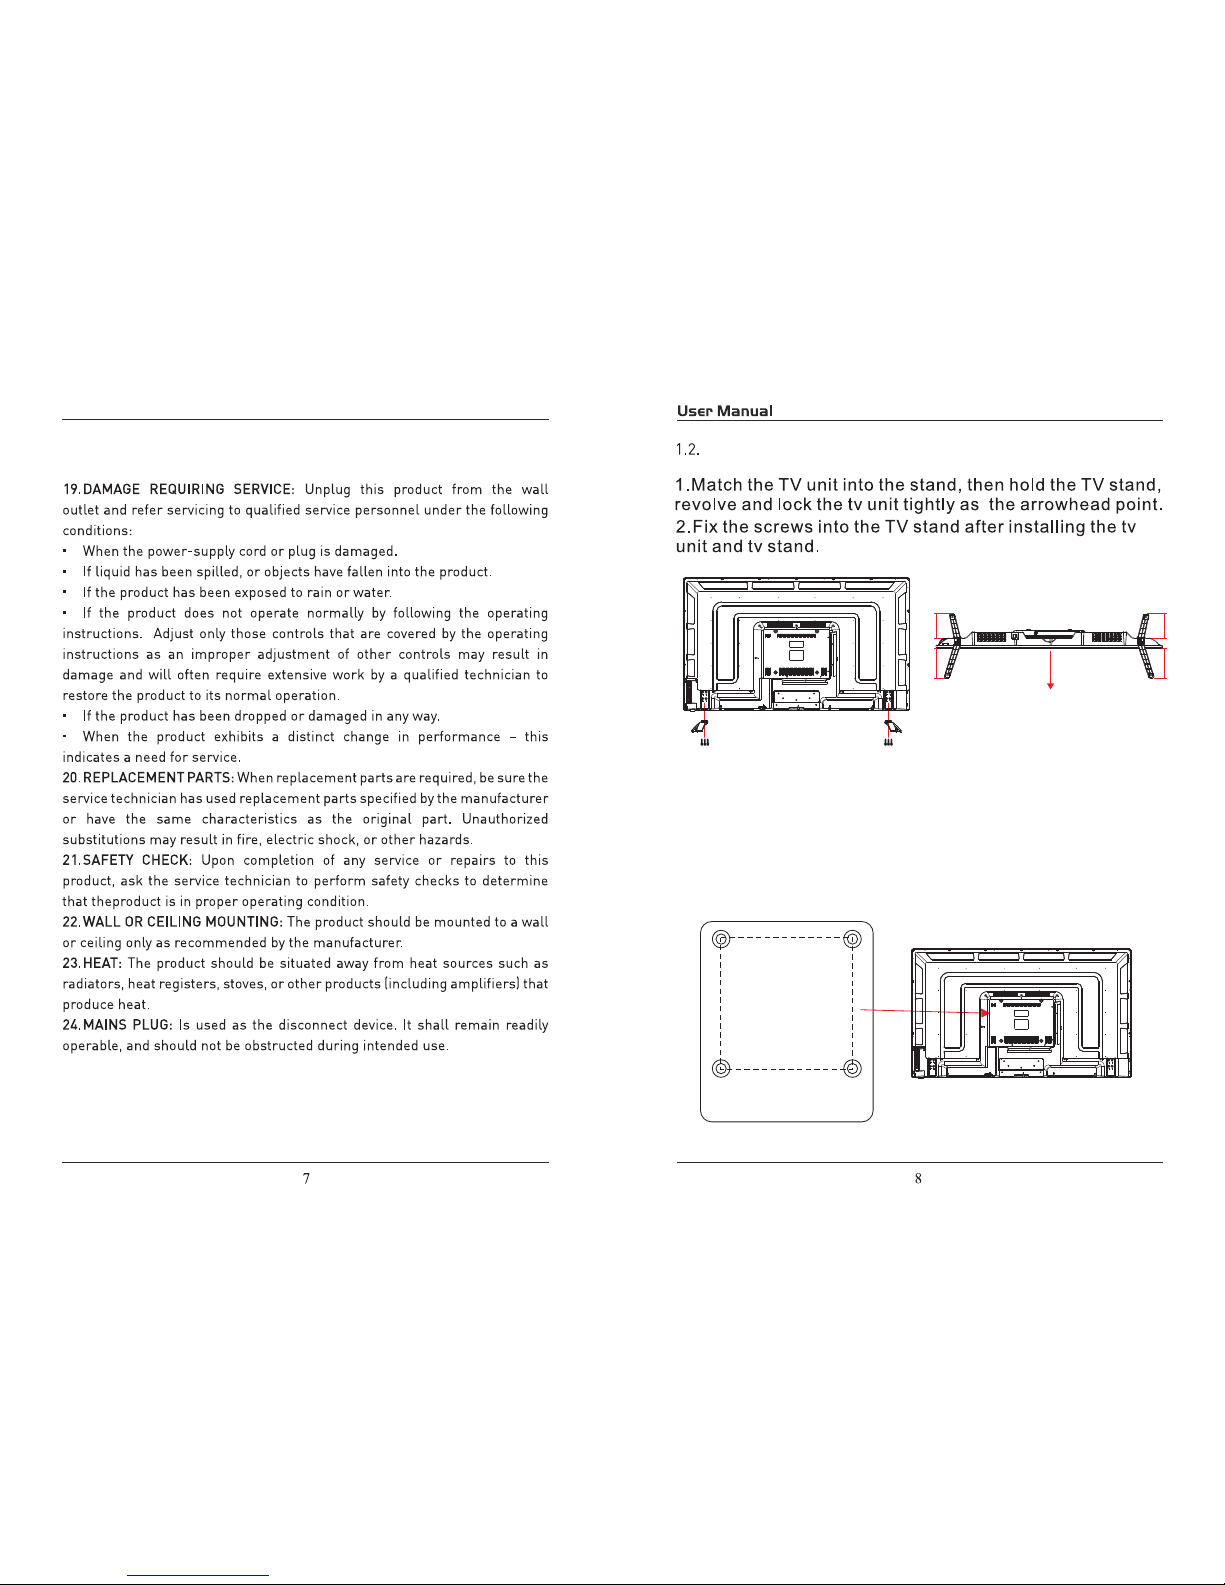
TV Base Stand assemble
3.Mounting on the wall
This unit is VESA-complian,and is designed to be wall-mounted
with a VESA-compliant 7.87"x7.87"(200mmx200mm)mounting kit
designde for flat-panel TVs(not supplied).Mount this unit according
to the instructions included in the monting kit. Length of screw should
not exceed 11mm
NOTE
Remove the base stand before mounting the unit on the wall.
Four mounting holes
(size M6 screw)
7.87”
7.87”
Panel side
Long Long
Short Short
R L
4*18BMH
Screws(3)
4*18BMH
Screws(3)
Page 6
AUDIO OUT: Output
Audio L / R (left / right)
1. USB (For Service)
HDMI1VIDEO/YRL AUDIO Pb PrCOAXIALHeadphone
HDMI2 HDMI3 VGA RFPC AUDIO AUDIO OUT USB(For Service)
5V 0.5A
AC 100-120V~60Hz
Page 7
Universal Remote Code:20DF
(Universal Rmote Control is not included)
18.
1.
sound from speakers
2.
7.
9.
20.
21.
23.
22.
10.
12.
5.
3.
ASPECT: Selects the screen size4.
13. PC: Press to switch to VGA signal source
14. HDMI: Press to switch to HDMI signal
15. TV: Press to switch to TV signal source
16. AV: Press to switch to AV signal source
19.
11.
17.
8.
6.
directly.
source directly.
directly.
directly.
24.
25.
27.
26.
28.
P.MODE
SOURCEINFO
HDMI AVTV PC
MENU
EPG
EXIT
SLEEP
S.MODE ASPECT
V
V
CH+
CH-
CH.LIST
OK
FREEZE
FAV FAV+FAV-
CC
MTS
1
3
5
7
8
10
11
13
15
17
19
20
22
23
26
27
28
25
24
21
18
16
14
12
9
6
4
2
Page 8

adapt or
HDMI2 HDMI3 VGA RFPC AUDIO AUDIO OUT USB(For Service)
5V 0.5A
HDMI1VIDEO/YRL AUDIO Pb PrCOAXIALHeadphone
AC 100-120V~60Hz
HDMI1VIDEO/YRL AUDIO Pb PrCOAXIALHeadphone
AC 100-120V~60Hz
Page 9
HDMI1VIDEO/YRL AUDIO Pb PrCOAXIALHeadphone
AC 100-120V~60Hz
Note:Coaxial output
HDMI2 HDMI3 VGA RFPC AUDIO AUDIO OUT USB(For Service)
5V 0.5A
HDMI2 HDMI3 VGA RFPC AUDIO AUDIO OUT USB(For Service)
5V 0.5A
HDMI1VIDEO/YRL AUDIO Pb PrCOAXIALHeadphone
AC 100-120V~60Hz
HDMI1VIDEO/YRL AUDIO Pb PrCOAXIALHeadphone
AC 100-120V~60Hz
Page 10
17
18
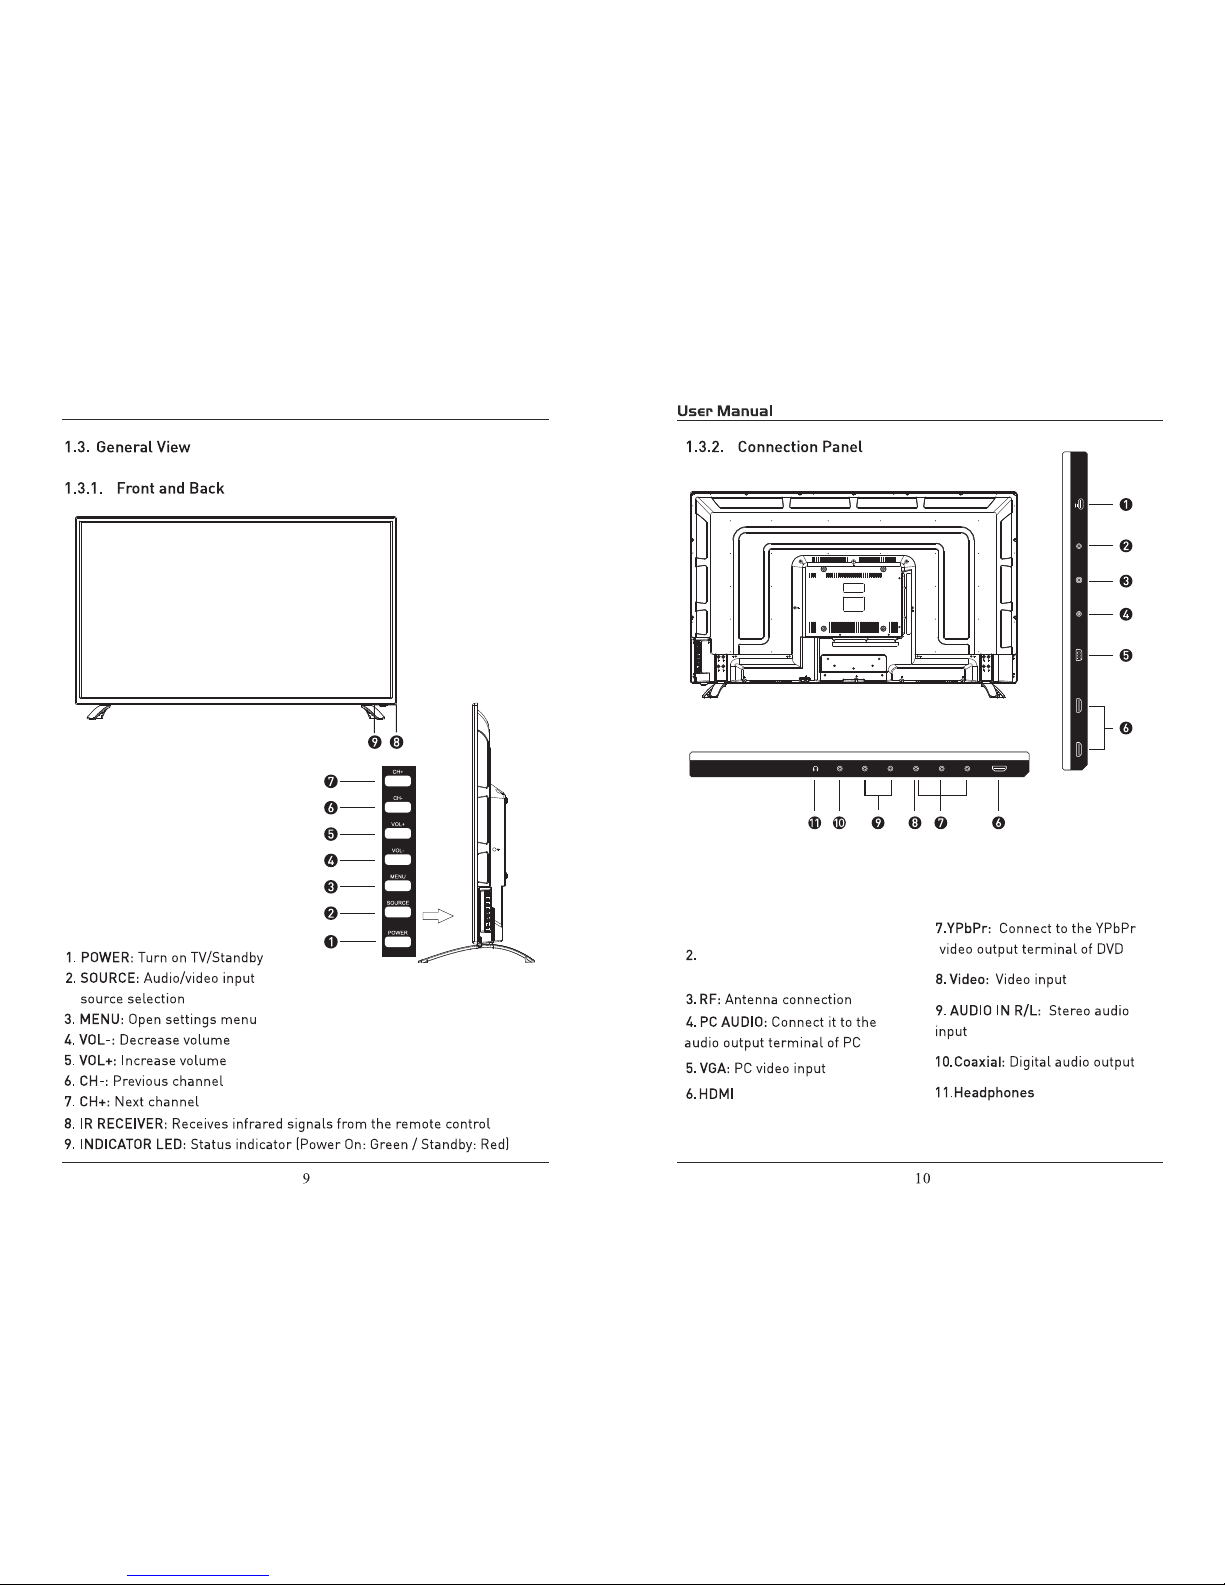
3.1. Initial Installation
The first time the unit is turned on or anytime the system is restored to
the defaulted settings, the Initial Installation wizard will be displayed on the
screen.
Conect the antenna cable to the RF connector at the connections panel
and follow the steps displayed on the screen to set up the system basic
settings (Language, Cable, etc.) and start an auto search of TV channels.
Turn on the TV by pressing the POWER button on TV
or on the remote control, press SOURCE and use the
direction buttons
/ to select the desired source
depending on the equipment you have connected (AV,
HDMI, PC) or choose TV to enter these mode.
Use MTS button to select the audio language broadcasting, CC button to
show or hide subtitles on screen and FAV button to see a list of your favorite
channels.
3.2. Audio/Video Source Selection
3.3. DTV Mode Operations
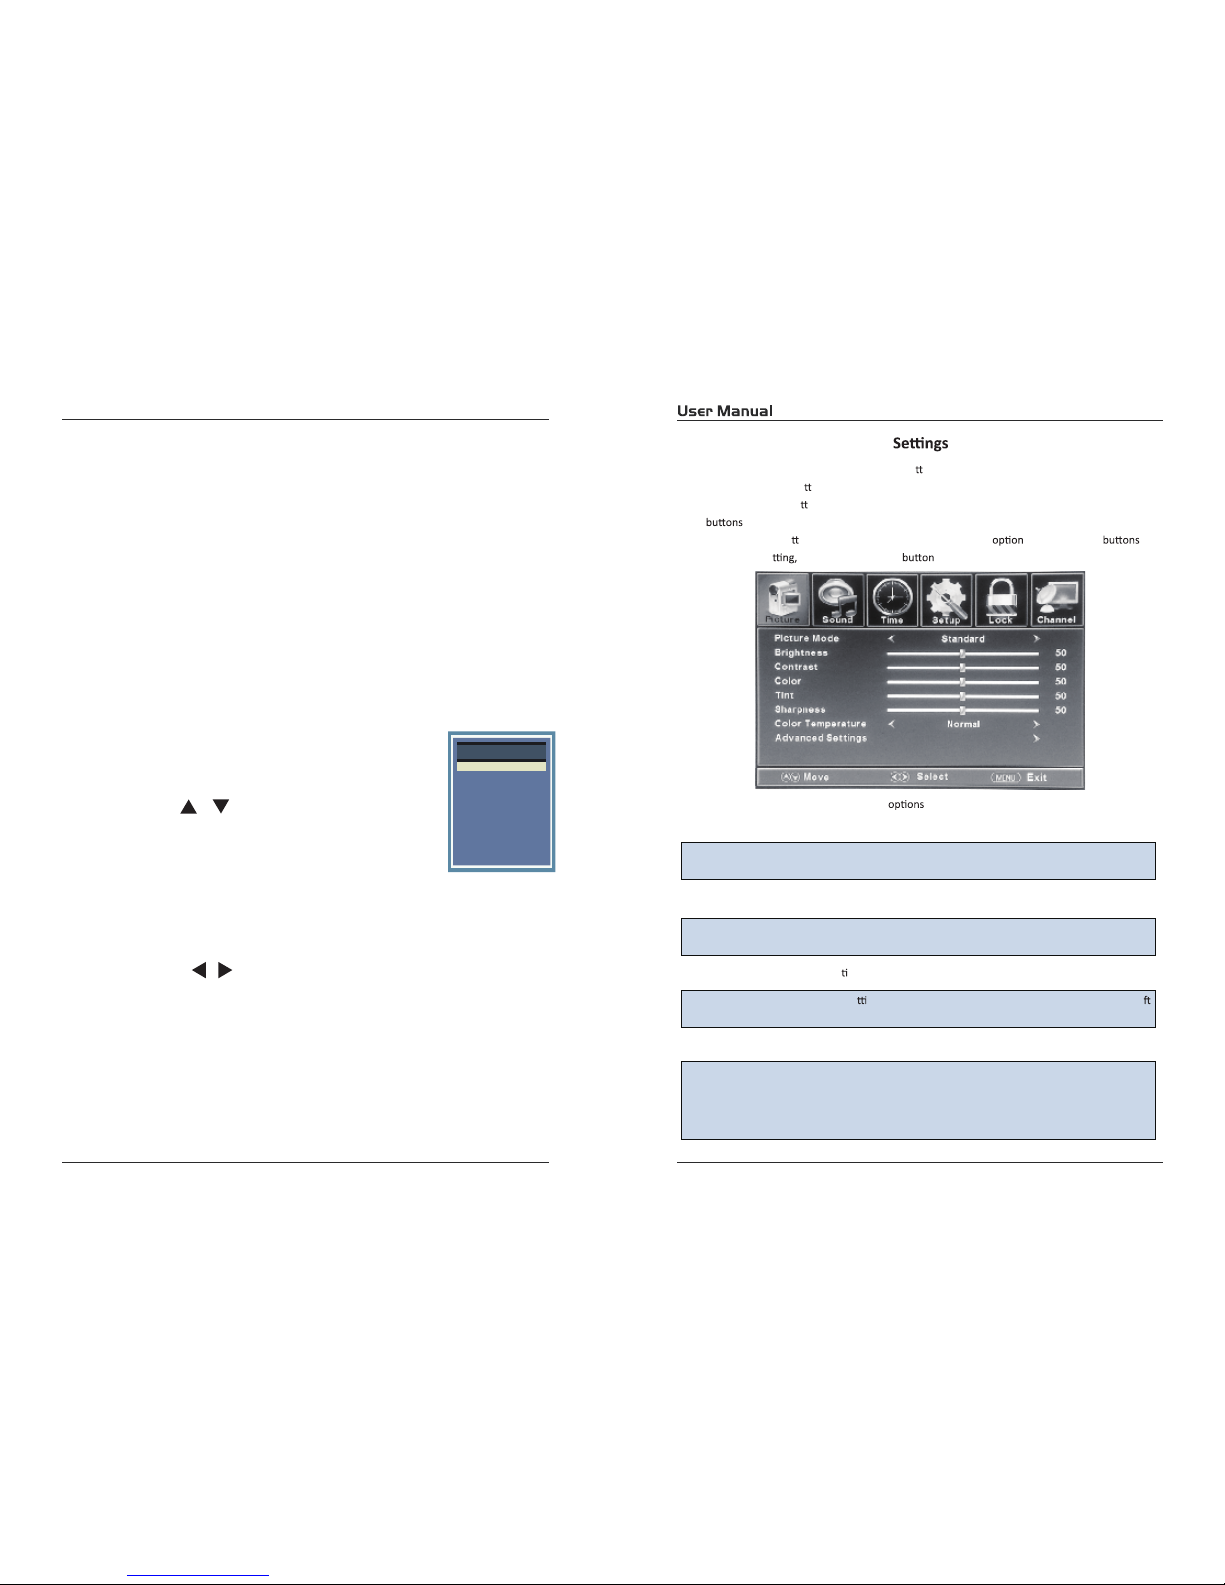
3. Initial Setup
Customizing the PICTURE
4. SETTINGS
4.1.
Select TV source for example. (Press SOURCE bu on to select TV mode)
1. Press the POWER bu
on to turn the LED TV on.
2. Press the MENU bu
on on the remote control to display the Main menu, and use the ◄/►
to select the PICTURE.
3. Use the ▲/▼ bu
ons to highlight an individual PICTURE , use the ◄/► to
change the se
and press the MENU to exit the menu.
The PICTURE menu includes the following
:
Picture Mode
Contrast
Control the difference between the brightness and darkest regions of the
picture.
Brightness Control the overall brightness of the picture.
Color Control the color.
Tint Controls the
nt.
Sharpness
In
1)ASPECT RATIO This feature changes the various aspects of the TV’s video.
(Aspects include wide, zoom, cinema, normal).
2)NOISE REDUCTION This feature reduces general pixilaon by blurring them.
3)DYNAMIC CONTRAST This feature allows the TV to automacally adjust the
contrast of the TV depending on the picture you are viewing.
crease this se
ng to see crisp edges in the picture; decrease it for so
edges.
Color
Advanced
Sengs
Temp. Cycles among color modes: Normal, Cool. Warm,
Cycle among picture display modes: Standard, Dynamic, So, user.
Use CH+ or CH- buttons to tune the desired channel, or enter the channel
number directly using the numeric keypad. Press OK to display on screen the
list of TV (press the
/ buttons to sort by group and show only the DTV,
the analog TV channels, etc.).
TV
AV
YPbPr
HDMI1
HDMI2
HDMI4
HDMI3
PC
Source Select
Page 11
19
20
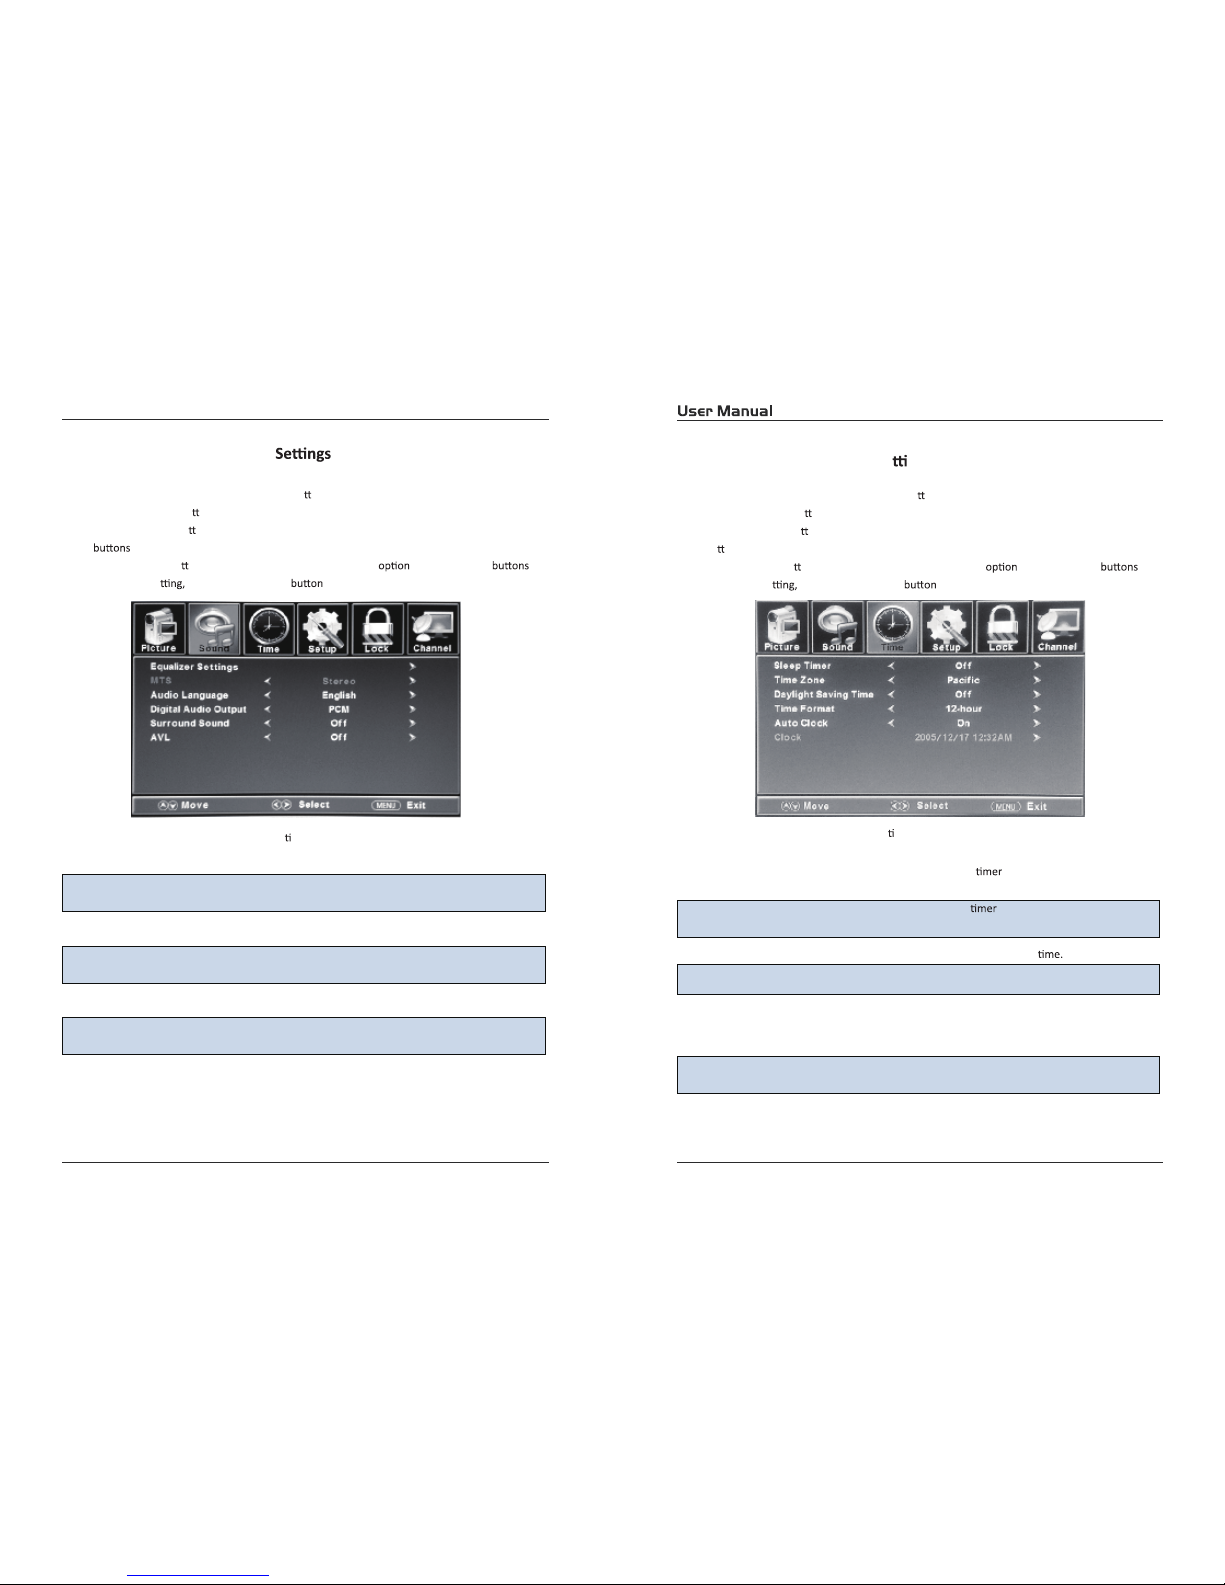
Customizing the SOUND
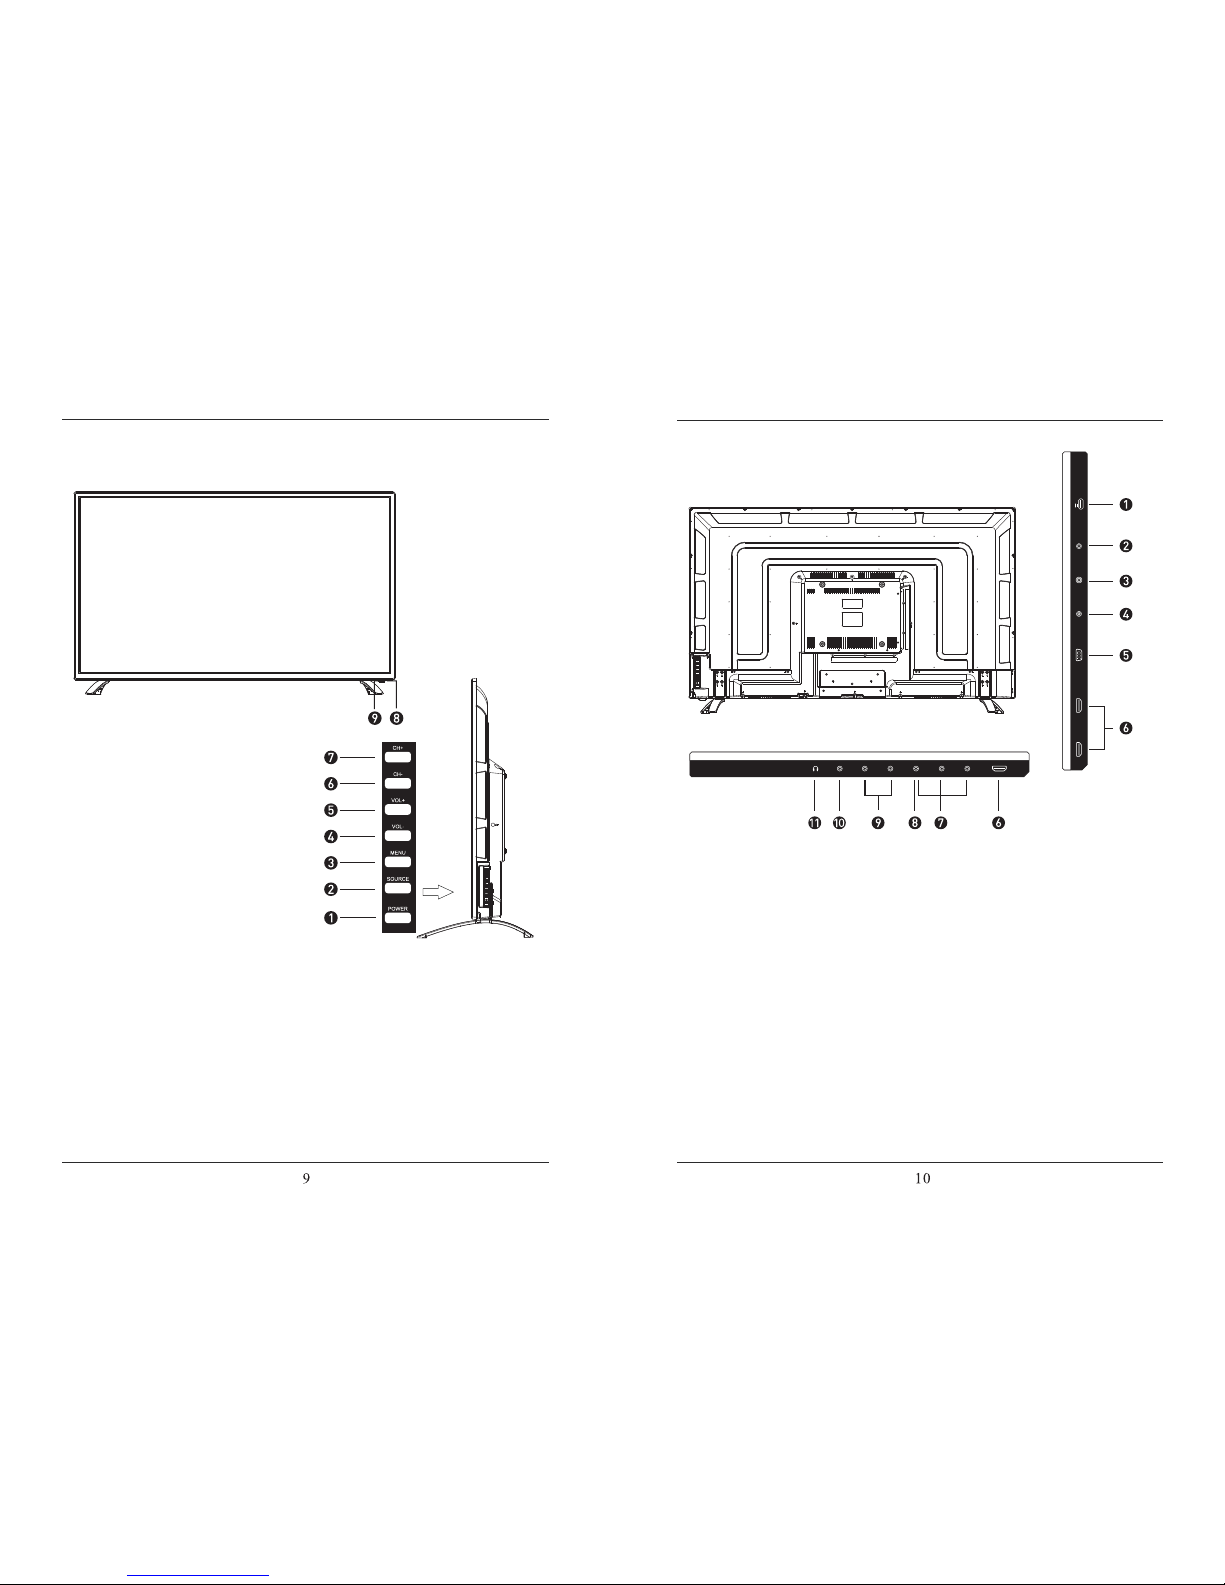
Customizing the TIME Se ngs
Select TV source for example. (Press SOURCE bu on to select TV mode)
1. Press the POWER bu
on to turn the LED TV on.
2. Press the MENU bu
on on the remote control to display the Main menu, and use the ◄/►
bu
ons to select the TIME.
3. Use the ▲/▼ bu
ons to highlight an individual TIME , use the ◄/► to
change the se
and press the MENU to exit.
The TIME menu includes the following op
ons:
Sleep
Time Format
Auto Clock
Clock
Timer
All
This opon adjusts the display format for the me.
This opon adjusts the me and date of the TV. You need to disable
AUTO CLOCK in order to use this funcon.
Please Note:
The TIME funcon will only keep accurate me if the TV is plugged into
a power source. If the TV is unplugged or the power strip is turned off.
the TV’s me will not be accurate.
This opon enables the TV to sync me with the antenna.
(Put it on AUTO if you have an antenna aached to the TV. If you have
CABLE or SATELLITE of anything else please use make sure AUTO CLOCK
is turned off.
ow you to set up the sleep
among: 5min, 10min, 15min,
30min, 60min, 90min, 120min, 180min, 240min and off.
Time Zone
Allow you to set up the sleep
among: Pacific, Alaska, Hawaii,
Eastern, Samoa, Atlanc, Newfoundland, Central and Mountain.
Daylight Saving Time Allow you to turn on or off the daylight saving
4.2.
4.3.
Select TV source for example. (Press SOURCE bu on to select TV mode)
1. Press the POWER bu
on to turn the LED TV on.
2. Press the MENU bu
on on the remote control to display the Main menu, and use the ◄/►
to select the SOUND.
3. Use the ▲/▼ bu
ons to highlight an individual SOUND , use the ◄/► to
change the se
and press the MENU to exit the menu.
The SOUND menu includes the following op
ons:
Equalizer Sengs
MTS
AVL
Allow you to select among: Standard, Music, Movie, Sports and User.
Surround Allow you to select between Off and On.
This feature adjusts the auto volume leveler enabling volume protecon
from overly loud commercials.
This feature adjusts the second audio programming in analog channels.
Digital Audio
Output
Allow you to select between PCM, RAW and OFF.
Audio Language Allow you to select audio language among: English, French and Spanish.
Page 12

21
22
Select TV source for example. (Press SOUCE bu on to select TV mode)
1. Press the POWER bu
on to turn the LED TV on.
2. Press the MENU bu
on on the remote control to display the Main menu, and use the ◄/►
bu
ons to select the SETUP.
3. Use the ▲/▼ bu ons to highlight an individual SETUP , use the ◄/► to
change the se
and press the MENU to exit.
The SETUP menu includes the following op
ons:
Menu Language Allow you to select menu language among: English, Français and Español.
Transparent
OSD Timeout
Other Sengs
This opon changes the me which the TV’s OSD menu automacally goes off.
Input PC signal first, then press SOURCE bu on to select PC mode, press ►
bu
on to confirm.
H-Posi on Allow you to use the ◄/► bu ons to adjust the H Posi on.
V-Posi on Allow you to use the ◄/► bu ons to adjust the V Posi on.
Clock Allow you to prolong the image.
Phase Allow you to adjust the de
Auto Select “Auto” and press the ► bu on, the unit will
automa adjust all items to achieve a best effect.
Close Cap on
Use the ▼ bu on to highlight the Close n item, then press the ►
bu on to enter into the following menu.
CC Mode Allow you to select the CC Mode among: On Off, and CC
on Mute.
Analog CC Allow you to select the basic sel on among: CC1, CC2,
CC3, CC4, Text1, Text2, Text3 and Text4.
Digital CC
Allow you to select the advanced sel on among:
Service1, Service2, Service3, Service4, Service 5 and
Service6.
Op Use the ▼ bu on to highlight the “Op on” item, then
press the ► bu on to enter into the following menu.
Customizing the SETUP Se ngs
4.4.
Exit
Input Label This opon changes the source names to your personal preference
This opon changes the transparency of the menu allowing background TV
images to show through.
Exit
Page 13

23
24
Customizing the LOCK Se ngs
Select TV source for example. (Press SOURCE bu on to select TV mode)
1. Press the POWER bu
on to turn the LED TV on.
2. Press the MENU bu
on on the remote control to display the Main menu, and use the ◄/►
bu
ons to select the LOCK.
3. Use the ▼ bu
on to highlight “Enter Password” item, use the numeric keys to input 4-digital
password. A
er you that, the screen will display the junior menu. A er ngs, press menu
to exit.
NOTE: The factory password is 0000. The supervision password is 8899.
4-digital password
Input
The LOCK menu includes the following op
ons:
Change Password
Use the ▼ bu on to select the “Change Password” item, then press the
► bu
on to enter into the following menu.
Input the new 4-digital password and input it again to confirm.
System Lock
Allow you to turn on or off the system lock.
If you turn off the system lock, then the following items (US, Canada, RRT
Se ng and Reset RRT) will unable to use.
4.5.
Exit
Use the ▲/▼ bu ons to highlight the desired item, and
use the ◄/► bu
ons to select.
Restore Default Restore all se ngs in SETUP menu to factory se ngs.
Exit
Setup Wizard This opon enables the TV to show you the setup wizard of the TV again.
Please Note:
Closed captioning is only available under AV and TV ports.
Closed captioning depends on your TV program’s support. Sometimes due to the
TV channel or the signal, Closed captioning will not be available.
Exit
Page 14

2
22526
US Rang
Use the ▼ buon to highlight the “US Rang” item, then press the ► buon
enter into the following menu.
TV Use the ▼ bu on to highlight the “TV” item, then press
► bu on to enter into the following menu.
Use the ▲/▼ bu ons to select the desired ra ng and
press the ► bu on to block or unblock ra ng.
MPAA The Movie ra ng (MPAA) is used for original movies rated
by the Mo Picture Associa on (MPAA) as broadcasted
on cable TV and not edited for television.
Use the ▲/▼ bu ons to select N/A, G, PG, PG-13, R,
NC-17 or X.
RATING DESCRIPTION
G
General Audiences. Movie is appropriate for
all ages.
PG
Parental Guidance Suggested. May contain
material not suited for younger viewers
PG-13
Contains content that may not be
appropriate for viewers under the age of 13.
R
Restricted. Contains adult content, no one
under 17 admi d without parent.
NC-17 No one 17 and under admi
X Adults only.
Canada Rang
Use the ▼ buon to highlight the “Canada R ang” item, then press ►
buon enter into the following menu.
Canada English Use the ◄/► bu ons to select among: OFF, C, C8+, G,
PG, 14+ and 18+.
Canada French Use the ◄/► bu ons to select among: OFF, G, 8ans+,
13ans+, 16ans+ and 18ans+.
RRT Se
ng
Reset RRT Al
This feature is a downloadable rating filter based on TV broadcasts.
With the transition of TV broadcasts to digital, future changes, and
enhancements in how TV shows are rated for content are possible.
low you to reset the RRT se ng.
Exit
Exit
Page 15

27
28
Customizing the CHANNEL Se ngs
Select TV source for example. (Press SOUCE bu on to select TV mode)
1. Press the POWER bu
on to turn the LED TV on.
2. Press the MENU bu
on on the remote control to display the Main menu, and use the ◄/►
bu
ons to select the CHANNEL.
3. Use the ▲/▼ bu
ons to highlight an individual CHANNEL , use the ◄/► to
change the se
and press the MENU to exit.
The CHANNEL menu includes the following
:
Auto Scan
If you select “Air” as input signal in Antenna item, you can press the ►
bu on to search the channels automa cally.
The receivable channels will be stored automa cally.
When searching channels, press MENU to stop.
Use the ▼ bu
on to highlight the “Auto Scan”, then press the ►
bu
on to search the channels automa cally.
The receivable channels will be stored automa
cally.
When searching channels, press MENU to stop.
Favorite
Channel list
Allow you t add these channels which you desired as the favorite
channels. Use the ▲/▼ bu ons to highlight the “Favorite” item, then
press the ► bu on to enter into the following menu.
Use the ▲/▼ bu ons to highlight the desired item, then press OK
bu
on to add or remove the highlighted channel as favorite.
This feature shows the list of stored channels.
Show/Hide
Allow you to show or hide the channels.
Use the ▲/▼ bu ons to highlight the “Show/Hide” item, then press the
► bu on to enter into the following menu.
4.6.
Exit
Exit
Use the▼ button to highlight the ”Auto Scan” item,then press ►
button to enter into the following menu.
Air/Cable
Allows you to select antenna between Air and Cable.
If you select “Cable”, the following items (Favorite, Channel List, Show/
Hide, Channel NO. and Channel Lable) are unable to use.
Page 16

922
Use the ▲/▼ bu ons to highlight the desired item, then press OK
bu on to show or hide the highlighted channel.
Channel No. Display the number of current channel.
Channel Label Display the lable of current channel.
5. PC Mode
Se ng up your PC so ware (based on Windows XP)
The Windows display-se ngs for a typical computer are shown below. But the actual screen on
your PC will p robably be different, depending upon your par
cular version of W indows and your
par cular video card. But even if your actual screen looks different, t he same, basic set-up
informa
on will apply in almost all cases.
1. First, click on “Control Panel” on the Windows start menu.
2. When the control panel window appears, click on “Appearance and Themes” and a display
dialog-box will appear.
3. When the control panel window appears, click on “Display” and a display dialog-box will
appear.
4. Navigate to the “Se
ng” tab on the display dialog-box. The correct size se ng (res
Op 1360×768.
If a ver
cal-frequency on exists on your display se ngs dialog box, the correct value is “60Hz”.
Otherwise, just click “Enter” and exit the dialog bo
x.
Res n
Horizontal
Frequency (KHz)
Frequency (Hz)
Standard Mode
720x400 31.47 70 DOS
640x480 37.9 60 VGA
800x600 37.9 60 SVGA
1024x768 48.4 60 XVGA
1366x768 64 60 SXVGA
1920x1080 64 60 SXVGA
Exit
Page 17

TV
TV
TV
6
Page 18

and
RLED4843-UHD
Optical
300
5000:1
8.5ms
3840x2160
120W
AC 100-120V~ 60Hz
USB(For service)
7
7
Page 19

MANUEL UTILISATEUR TV
Ecran large numérique TV LED 48"
RLED4843-UHD
Page 20

Index
1. INTRODUCTION.......................................................
1.1 Informations de sécurité..........................................
1.2 Montage de Support de base TV.............................
1.3 Vue générale...........................................................
1.3.1. Avant et arrière....................................................
1.3.2. Panneau de connexion........................................
1.3.3. Télécommande....................................................
2. INSTALLATION.........................................................
2.1. Raccordement de l'alimentation..............................
2.2. Raccordement d'antenne RF..................................
2.3. Connexion via Composite Vidéo.............................
2.4. Connexion via Composant Vidéo...........................
2.5. Connecter à l'amplificateur audio numérique.........
2.6. Connexion via HDMI...............................................
2.7. Connexion à un PC.................................................
2.8. Branchement du casque.........................................
3. Configuration initiale...............................................
3.1. Installation initiale...................................................
3.2. Sélection de la source Audio / vidéo......................
3.3. Fonctionnement du mode TNT..............................
4. Paramètres..............................................................
4.1. Personnalisation des paramètres d'image.............
4.2. Personnaliser les paramètres audio.......................
3
3
8
9
9
10
11
13
13
13
14
14
15
15
16
16
17
17
17
17
18
18
19
4.3. Personnalisation des paramètres de la
Minuterie......................................................
4.4. Personnalisation des paramètres de
configuration................................................
4.5. Personnalisation des paramètres de
verrouillage..................................................
6. DEPANNAGE.................................................
7. SPÉCIFICATIONS..........................................
20
21
24
4.6. Personnalisation des paramètres de
chaines........................................................ 27
5. PC MODE....................................................... 30
31
33
Manuel utilisateur
Page 21

1. INTRODUCTION
1.1. Informations de sécurité
Pour assurer un fonctionnement fiable et sûr de cet appareil, veillez lire
attentivement toutes les instructions de ce guide, en particulier les
consignes de sécurité ci-dessous.
ATTENTION: POUR REDUIRE LE RISQUE DE CHOC ÉLECTRIQUE,
NE PAS ENLEVER LE COUVERCLE (OU) AUCUNE PIÈCE À
L'INTÉRIEUR EST POUR L’ENTRETIEN PAR UTILISATEUR.
CONFIEZ L’ENTRETIEN A UN PERSONNEL QUALIFIE.
AVERTISSEMENT: POUR REDUIRE LE RISQUE D'INCENDIE OU DE
CHOC ÉLECTRIQUE, NE PAS EXPOSER CET APPAREIL À LA PLUIE
OU DANS L’EAU.
L'éclair avec une pointe de flèche dans un triangle
équilatéral est destiné à alerter l'utilisateur de la
présence de "tension dangereuse" non isolée qui
peuvent être d'une ampleur suffisante pour
constituer un risque d'électrocution pour les gens.
Le point d'exclamation dans un triangle équilatéral
est destiné à alerter l'utilisateur de la présence
d’importantes exploitations et de maintenance
(entretien) dans la documentation accompagnant
l'appareil.
Attention
Risque d'électrocution
Ne pas ouvrir
Manuel utilisateur
ATTENTION: L'utilisation de commandes ou de réglages ou de
procédures autres que celles spécifiées ici peut entraîner une
exposition à des rayonnements dangereux.
Veillez étudier soigneusement ce manuel et le conservez toujours à
disposition. Cependant, il y a quelques précautions d'installation et
d'exploitation dont vous devriez être au courant:
1. LIRE LES INSTRUCTIONS: Toutes les consignes de sécurité et de
fonctionnement doivent être lues avant que le produit est exploité.
2. CONSERVEZ LES INSTRUCTIONS: Les instructions de sécurité et
de fonctionnement doivent être conservées pour référence future.
3. TENEZ COMPTE DES AVERTISSEMENTS: Tous les avertissements
sur le produit et les instructions de fonctionnement doivent être respectées.
4. SUIVEZ LES INSTRUCTIONS: Toutes les instructions de fonctionnement
et d'utilisation doivent être suivies.
5. NETTOYAGE: Débranchez ce produit de la prise murale avant le
nettoyage. Ne pas utiliser de nettoyants liquides ou en aérosol. Utilisez
un chiffon humide pour nettoyer.
6. CORDON: Ne pas utiliser d'accessoires non recommandés par le
fabricant du produit car ils peuvent être dangereux.
7. EAU ET HUMIDITÉ: Ne pas utiliser ce produit près de l'eau, par
exemple, près d'une baignoire, un lavabo, un évier ou un bac à linge
dans une cave humide ou près d'une piscine et ainsi de suite.
8. ACCESSOIRES: Ne placez pas cet appareil sur un chariot, un
support, un trépied ou une table non stable. Le produit peut tomber,
causer des blessures graves à un enfant ou des dommages graves à
l'adulte et le produit. Utilisez uniquement un chariot, stand,
trépied, support ou table recommandé par le fabricant
ou vendu avec le produit. Quant au montage du
produit, il faut respecter les instructions du fabricant
et utiliser les accessoires de montage recommandé
par le fabricant. Un produit et une combinaison chariot
doit être déplacé avec précaution: les mouvements brusques, une force
excessive et des surfaces inégales peuvent causer l’appareil et la
combinaison chariot renverser.
Page 22

9. VENTILATION: Les fentes et les ouvertures du boîtier sont prévues pour
la ventilation et pour assurer un fonctionnement fiable du produit et pour le
protéger de la surchauffe, ces ouvertures ne doivent pas être bloquées ni
couvertes.
Les ouvertures ne doivent jamais être obstruées, ne pas placez l'appareil
sur un lit, un canapé, un tapis ou autre surface similaire. Ce produit ne doit
pas être placé dans une installation intégrée comme une bibliothèque ou
une étagère à moins qu'une ventilation adéquate soit prévue ou les
instructions du fabricant ont été respectées.
10. SOURCES D'ALIMENTATION: Ce produit doit être utilisé qu'avec le
type de source d'alimentation indiqué sur l'étiquette. Si vous n'êtes pas
sûr du type d'alimentation chez vous, consultez votre revendeur ou la
compagnie d'électricité locale. Pour les produits destinés à fonctionner à
batterie, ou d'autres sources, reportez-vous à la notice d'utilisation.
11. MISE A TERRE OU POLARISATION: Ce produit peut être équipé
d'une fiche polarisée de courant alternatif (une fiche ayant une lame plus
large que l'autre) Cette fiche n’entre pas dans la prise électrique qu’une
seule façon.. C'est à cause de sécurité, si vous n'arrivez pas à insérer
complètement la fiche dans la prise, essayez d'inverser la prise. Si la fiche
n'entre toujours pas bien, demandez à votre électricien pour remplacer la
prise obsolète. Ne supprimez jamais la sécurité de la fiche polarisée.
12. PROTECTION DU CORDON D'ALIMENTATION: Les cordons
d'alimentation doivent être acheminés de sorte qu'ils ne sont pas d'être
piétinés ou pincés par des objets, en prêtant une attention particulière aux
cordons au niveau des fiches, des prises, et le point où ils sortent de
l’appareil.
13. MISE A TERRE DE L'ANTENNE EXTERIEURE: Si une antenne
extérieure ou un système de câble est connecté, assurez-vous que
l'antenne ou le câble est mise a terre afin de fournir une protection contre
les surtensions et l'accumulation d'électricité statique. L'article 810 du
National Electrical Code, ANSI / NFPA 70, fournit des renseignements à
l'égard du mât et la structure de support de la mise a terre correcte, le du
fil conducteur à une unité de décharge d'antenne, la taille des conducteurs,
l'emplacement de l'antenne-décharge l'unité, la connexion aux électrodes
et les exigences pour l'électrode de mise a terre.
14. FOUDRE: Pour une protection supplémentaire pour ce produit
pendant un orage, ou lorsqu'il est laissé sans surveillance et inutilisé
pendant de longues périodes, veillez le débrancher de la prise murale
et déconnectez l'antenne ou le câble. Cela permettra d'éviter
d'endommager le produit à cause de la foudre et les surtensions.
15. LIGNES ELECTRIQUES: Une antenne extérieure ne doit pas être
situé à proximité de lignes électriques aériennes ou de lampe électrique
ou des circuits de alimentation, où il peut tomber sur ces lignes ou
circuits électriques. Lors de l'installation d'une antenne extérieure, un
soin extrême doit être pris à ne pas toucher ces lignes ou circuits comme
le contact avec ceux-ci pourrait être fatal.
16. SURCHARGE: Ne surchargez pas les prises murales, les rallonges
ou les prises multiples car cela peut entraîner un risque d'incendie ou de
choc électrique.
17. INSTRODUCTION D’OBJET ET DE LIQUIDE: N'insérez jamais
d'objet dans ce produit à travers les ouvertures car ils pourraient toucher
des points de tension dangereux ou court-circuit qui pourrait entraîner
un incendie ou d'électrocution. Ne renversez jamais de liquide d'aucune
sorte sur le produit.
18. ENTRETIEN: Ne pas tenter de réparer ce produit vous-même car
l'ouverture ou le retrait des capots peut vous exposer à des tensions
dangereuses ou autres dangers.
Confiez toutes les réparations à un personnel qualifié.
EXEMPLE DE MISE A TERRE DE L’ANTENNE
COMME PER NATIONAL ELECTRIC CODE
PRISE DE MISE A
TERRE
EQUIPEMENT
DE SERVICE
ELECTRIQUE
CABLE DE
L’ANTENNE
UNITE DE
DECHARGEMENT
D’ANTENNE (NEC
SECTION 810-20)
PRISE DE MISE A TERRE
SYSTEME ELECTRODE DE MISE
A TERRE D’ALIMENTATION (NEC
ART 250, PART H)
N
EC – NATIONAL ELECTRIC CODE
CONDUCTEUR DE MISE A
TERRE
(NEC SECTION 810-21)
Manuel utilisateur
Page 23

19. Dommage nécessitant une réparation: Débranchez ce produit de la
prise murale et confiez la réparation à un personnel qualifié dans les
conditions suivantes:
● Lorsque le cordon d'alimentation ou la fiche est endommagé
● Si le liquide a été renversé ou des objets sont insérés sur le produit
● Si le produit a été exposé à la pluie ou l'eau.
● Si le produit ne fonctionne pas normalement en suivant les instructions
de fonctionnement. Réglez uniquement les commandes qui sont couvertes
par les instructions car un mauvais réglage des autres commandes
pourrait endommager l'appareil et nécessite souvent l'intervention d'un
technicien qualifié pour restaurer le fonctionnement normal.
● Si le produit est tombé ou endommagé de quelque façon.
● Lorsque le produit montre un changement notable dans les
performances, cela indique le besoin de service.
20 PIÈCES DE RECHANGE: Lorsque des pièces de rechange sont
nécessaires, assurez-vous que le technicien a utilisé des pièces de
rechange spécifiées par le fabricant ou de mêmes caractéristiques que
la pièce originale. Des substitutions non autorisées peuvent causer un
incendie, un choc électrique ou d'autres dangers.
21. CONTRÔLE DE SÉCURITÉ: À la fin de tout service ou réparation
de cet appareil, demandez au technicien d'effectuer les contrôles de
sécurité pour déterminer que le produit est en bon état de fonctionnement.
22. Mur ou au plafond: Le produit doit être monté au mur ou au plafond,
tel que recommandé par le fabricant.
23. CHALEUR: Le produit devrait être situé loin des sources de chaleur
telles que radiateurs, bouches de chaleur, ou d'autres produits (y compris
l amplificateurs qui produit de la chaleur.)
24. PRISE SECTEUR: qui est utilisé comme dispositif de déconnexion. Il
doit rester facilement accessible, et ne doit pas être obstrué lors de
l'utilisation prévue.
1.2 Montage de Support de base TV
1. Correspondre à l'unité de télévision dans le stand et verrouiller l'unité
TV puis maintenez le stand TV en suivant la pointe de la flèche.
2. Fixer les vis dans le stand TV après avoir installé l'appareil TV et
stand TV
3. Montage sur le mur
Cette unité est compatible à VESA, et conçu pour être fixé au mur avec un
kit de montage compatible VESA 7.87"x7.87" (200mmx200mm) conçu pour
téléviseurs à écran plat (non fournie). Montez cet appareil selon les
instructions incluses dans le kit de montage. Longueur de vis ne doit pas
dépasser 11mm
NOTA :
Retirez le support de base avant de monter l'appareil sur le mur.
Manuel utilisateur
Quatre trous de
montage (taille vis M6)
7.87”
7.87”
Le panneau latéral
Secrétaire général Secrétaire général
Court Court
R L
4*18BMH
Screws(3)
4*18BMH
Screws(3)
Page 24
1.3 Vue générale
1.3.1. Avant et arrière
1. Power: allumez la TV / Veille
2. SOURCE: audio / vidéo de sélection de la source d'entrée audio / vidéo
3. MENU: Ouvrir le menu des paramètres k.
4. Diminuer le volume: VOL-
5. VOL +: Augmenter le volume
6. CH-: Chaîne précédente
7. CH +: Chaine Suivante
8. RECEPTEUR IRInfrarouge: Reçoit les signaux infrarouges de la
télécommande
9. Indicateur LED: indicateur d'état (Marche: vert / Veille: Rouge)
Manuel utilisateur
1.3.2. Panneau de connexion
3. RF: connexion de l'antenne
5. VGA: entrée vidéo PC
6. HDMI
1. Port hôte USB
4. AUDIO PC: Connectez-le au terminal de sortie audio du PC
7. YPbPr: Connectez-le au terminal de sortie YPbPr vidéo du DVD
8. Entrée vidéo: Vidéo
9. Entrée audio stéréo. AUDIO IN R / L:
10. Coaxial: Sortie audio numérique
2. Sortie audio
11. Casque
HDMI2 HDMI3 VGA RFPC AUDIO AUDIO OUT USB(For Service)
5V 0.5A
HDMI1VIDEO/YRL AUDIO Pb PrCOAXIALHeadphone
AC 100-120V~60Hz
Page 25

P.MODE
SOURCEINFO
HDMI AVTV PC
MENU
EPG
EXIT
SLEEP
S.MODE ASPECT
V
V
CH+
CH-
CH.LIST
OK
FREEZE
FAV FAV+FAV-
CC
MTS
Manuel utilisateur
Installation des piles
Précaution de l'utilisation de la batterie
Si la télécommande ne parvient pas à opérer les fonctions TV, remplacer
les piles dans la télécommande
1. Ouvrez le couvercle de la batterie.
2. Insérez deux piles AAA taille (Placez les piles en faisant correspondre
leurs bornes du (+) et (-). Indicateurs dans le compartiment à piles)
3. Remettez le couvercle
L'utilisation incorrecte des piles peut entraîner une fuite de produits
chimiques et / ou d'explosion. Soyez sûr de suivre les instructions
ci-dessous.
* Placez les piles avec leurs terminaux correspondant (+) et (-).
* Différents types de piles ont des caractéristiques différentes. Ne pas
mélanger des piles de types différents.
* Ne pas mélanger piles neuves et usées, sinon il peut raccourcir la durée
de vie de piles neuves et / ou provoquer fuite des piles.
* Enlevez les piles dès qu'elles sont non opérables. Les produits chimiques
fuites d'une pile peuvent provoquer une éruption cutanée. Si une fuite
chimique est trouvée, l'essuyez avec un chiffon.
* Si la télécommande n'est pas utilisée pour une période de temps
prolongée, retirez les piles de la télécommande.
* Les batteries (piles installées) ne doivent pas être exposés à une chaleur
excessive comme le soleil, le feu, etc.
Code Télécommande Universel: 20DF
(Télécommande Universel non inclus)
1.3.3. Télécommande
6. SOMMEIL: Minuterie Auto OFF
OPÉRATIONS DE BASE
1. ALIMENTATION: Mise en TV / Veille
18. SOURCE: Afficher l'entrée du menu
de la source
2. Mute: Mise en silence des haut
parleurs
7. Touches numériques: Changer le
canal directement
8. -: Sélection du canal avec deux
chiffres
9. Retour à la chaîne précédente
20. MENU: Afficher le menu
17. INFO: Affiche des infos sur le
programme actuel
11. EPG: Voir le Guide Electronique
des programmes
21. EXIT: Quitter le menu
19. touches NAVIGATION (Haut,
Bas, Gauche, Droite, OK): Pour se
déplacer dans les menus et valider
les réglages
22. MTS: sélection de la langue audio
10. FREEZE: Gel de l'image
12. CH.LIST: Affiche les listes de canal
13. PC: Appuyez sur pour passer à la
14. HDMI: Appuyez sur pour passer à la
15. TV: Appuyez sur pour passer à la
16. AV: Appuyez sur pour passer à la
source de signal AV directement.
source de signal TV directement.
source de signal HDMI directement.
source de signal VGA directement.
sur l'écran
5. P. MODE: mode d'image de sortie
4. ASPECT: Sélection de la taille de l'écran
3. S. MODE: Configuration des options audio
1
3
5
7
8
10
11
13
15
17
19
20
22
23
26
27
28
25
24
21
18
16
14
12
9
6
4
2
27. FAV: Affiche la liste de chaînes favorites
26. FAV-: chaîne favorite Précédent
28. FAV +: chaîne favorite Suivant
23. VOL: Augmentation et diminution du volume
24. CH: Canal Suivant et Précédent
25. CC: mode CC
Page 26

2. INSTALLATION
2.1. Raccordement de l'alimentation
2.2. Raccordement d'antenne RF
Raccordez l’adaptateur d’alimentation à la prise de la maison.
2.3. Connexion via Composite Vidéo
2.4. Connexion via Component Vidéo
Connectez votre lecteur vidéo, décodeur, DVD ou similaire avec les
tricolore câble RCA correspondants de la sortie AV (audio / vidéo) de
votre équipement vidéo à l'entrée vidéo et audio à votre téléviseur par
le câble comme indiqué dans la figure.
Connectez votre lecteur vidéo, décodeur, DVD ou similaire avec un câble
RCA de la sortie vidéo YUV de l'appareil à l'entrée vidéo de votre
téléviseur par le câble comme indiqué dans la figure. A l’aide de cette
entrée, vous pouvez obtenir la vidéo HD. Utilisez un deuxième câble RCA
pour connecter l'audio à AUDIO IN R / L.
Connectez l'antenne, comme indiqué dans la figure de recevoir le signal
TV analogique ou numérique (TNT).
Manuel utilisateur
HDMI2 HDMI3 VGA RFPC AUDIO AUDIO OUT USB(For Service)
5V 0.5A
HDMI1VIDEO/YRL AUDIO Pb PrCOAXIALHeadphone
AC 100-120V~60Hz
HDMI1VIDEO/YRL AUDIO Pb PrCOAXIALHeadphone
AC 100-120V~60Hz
Page 27

HDMI1VIDEO/YRL AUDIO Pb PrCOAXIALHeadphone
AC 100-120V~60Hz
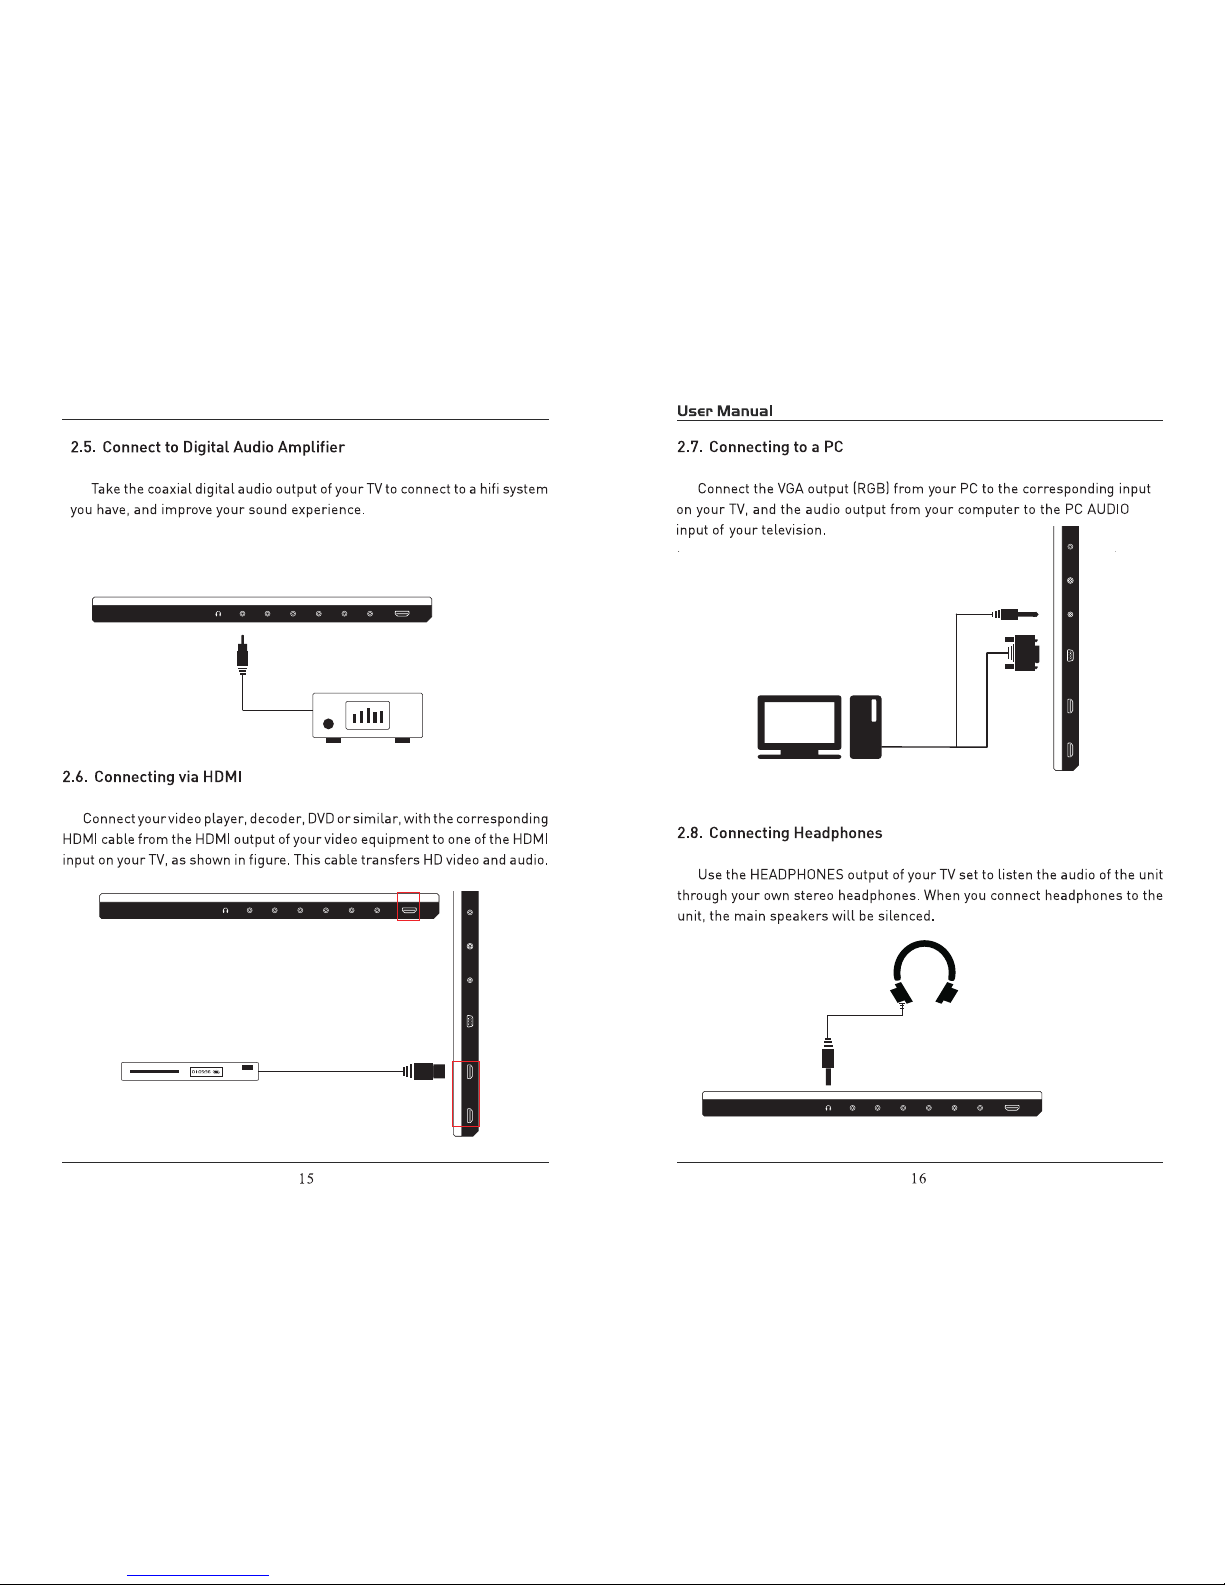
2.5. Connecter à l'amplificateur Audio Numérique 2.7. Connexion à un PC
2.6. Connexion via HDMI
Connectez la sortie audio numérique coaxiale de votre téléviseur à un
système HIFI, pour améliorer l’expérience sonore.
Note : Sortie coaxiale
Connectez la sortie VGA (RVB) à partir de votre PC à l'entrée
correspondante sur votre TV, et la sortie audio de votre ordinateur à
l'entrée audio de votre PC à la télévision.
2.8. Branchement du casque
Utilisez la sortie casque de votre téléviseur pour écouter l'audio de l'unité
à travers vos écouteurs stéréo. Lorsque vous branchez un casque à
l'appareil, les principaux écouteurs seront réduits au silence.
Connectez votre lecteur vidéo, décodeur, DVD ou similaire, avec le câble
HDMI à partir de la sortie HDMI correspondants de votre équipement
vidéo à l'entrée HDMI de votre téléviseur, comme indiqué dans la figure.
Ce câble transferts vidéo et audio HD.
Manuel utilisateur
HDMI2 HDMI3 VGA RFPC AUDIO AUDIO OUT USB(For Service)
5V 0.5A
HDMI2 HDMI3 VGA RFPC AUDIO AUDIO OUT USB(For Service)
5V 0.5A
HDMI1VIDEO/YRL AUDIO Pb PrCOAXIALHeadphone
AC 100-120V~60Hz
HDMI1VIDEO/YRL AUDIO Pb PrCOAXIALHeadphone
AC 100-120V~60Hz
Page 28

17
18
3. Configuration initiale
4. Paramètres
3.1 Installation initiale
4.1 Personnalisation des paramètres d'image
3.2 Sélection de la source Audio / vidéo
3.3 Fonctionnement du mode TNT
Lors de la première mise en marche de l'appareil ou n’importe quand où le système
est réinitialisé, l'assistant d'installation initiale sera affiché sur l'écran.
Branchez le câble d'antenne aux connecteurs RF situés sur le panneau de
connexions et suivez les instructions qui s'affichent à l'écran pour configurer les
paramètres du système de base (langues, câble, etc.) et lancer une recherche
automatique de chaînes de télévision
Sélectionnez la source TV par exemple. (Appuyez sur le bouton SOURCE pour
sélectionner le mode TV)
1. Appuyez sur le bouton POWER pour allumer le téléviseur LED.
2. Appuyez sur le bouton MENU de la télécommande pour afficher le menu principal,
et utiliser les touches ◄ / ► pour sélectionner l'image.
3. Utilisez les touches ▲ / ▼ pour sélectionner une option image individuelle, utilisez
les touches ◄ / ► pour changer le réglage, puis appuyez sur la touche MENU pour
quitter le menu.
Le menu IMAGE comprend les options suivantes:
Mode de l'image Basculage entre les différents types d'affichage: Standard, Dynamique,
Doux et l'utilisateur
Contraste Contrôle la différence entre les régions brillantes et sombres de l'image.
Luminosité Contrôle la luminosité globale de l'image.
Couleur Contrôle l'intensité des couleurs.
Teinte Contrôle la teint
Acuité Augmenter ce paramètre pour voir la netteté des contours dans l'image;
la diminuer pour les bords mous
Temperature
de couleur
Bascule entre les de couleur: Normal, Chaud, cool.
Allumez le téléviseur en appuyant sur le bouton POWER sur le poste téléviseur ou sur
la télécommande, appuyez sur SOURCE et utilisez les touches de direction ▲ / ▼
pour sélectionner la source souhaitée ceci en connexion avec l'équipement que vous
avez connecté (AV, HDMI, PC) ou choisir TV pour entrer dans le mode.
Utilisez les touches CH + ou CH- pour capter la chaine désirée, ou entrez le numéro
de chaine directement en utilisant le pavé numérique. Appuyez sur OK pour faire
afficher à l'écran, la liste des chaînes de télévision de même que celle de radio
(appuyez sur les touches ◄ / ► pour trier par groupe et ne montrer que la télévision
numérique, les chaînes de télévision analogiques, etc.)
Utilisez le bouton MTS pour sélectionner la langue de radiodiffusion le bouton CC
pour afficher ou masquer les sous-titres sur l'écran et le bouton FAV pour voir la
liste de vos chaînes préférées.
Manuel utilisateur
1) Aspect Ratio Cette fonction permet de modifier les différents aspects de
la vidéo de la TV.(Aspects comprennent large, zoom, cinéma, normal).
2) RÉDUCTION DE BRUIT Cette fonction réduit pixilation général par leur
flou.
3) Dynamic Contrast Cette fonction permet au téléviseur d'ajuster
automatiquement la contraste du téléviseur en fonction de l'image que
vous regardez.
Avancé
TV
AV
YPbPr
HDMI1
HDMI2
HDMI4
HDMI3
PC
Source Select
Page 29

19
20
4.2 Personnaliser les paramètres Sound 4.3 Personnalisation des paramètres de la Minuterie
Le menu SOUND contient les options suivantes:
Vous permet de sélectionner parmi les différents modes:
Standard, Musique, Film et de l'utilisateur.
Cette fonction ajuste la deuxième programmation audio
à canaux analogiques.
Vous permet de sélectionner la langue audio parmi: anglais,
français et espagnol.
Vous permet de sélectionner entre les modes PCM, RAW
et OFF.
Vous permet de sélectionner entre Off et On.
Cette fonction permet d'ajuster le niveleur automatique du
volume qui permet de protéger de volume de publicités
excessivement bruyants.
Paramètres de
l'égaliseur
MTS
Langue audio
Type de sortir SPDIF
Ambiance
AVL
Sélectionnez la source TV par exemple. (Appuyez sur le bouton SOURCE pour
sélectionner le mode TV)
1. Appuyez sur le bouton POWER pour allumer le téléviseur LED.
2. Appuyez sur le bouton MENU de la télécommande pour afficher le menu principal,
et utiliser les touches ◄ / ► pour sélectionner le mode
SOUND.
3. Utilisez les touches ▲ / ▼ pour sélectionner une option individuelle
SOUND,
utilisez les touches ◄ / ► pour changer le réglage, et appuyez sur le bouton MENU
pour quitter le menu.
Sélectionnez la source TV par exemple. (Appuyez sur le bouton SOURCE pour
sélectionner le mode TV)
1. Appuyez sur le bouton POWER pour allumer le téléviseur LED.
2. Appuyez sur le bouton MENU de la télécommande pour afficher le menu principal,
et utiliser les touches ◄ / ► pour sélectionner la minuterie.
3. Utilisez les touches ▲ / ▼ pour sélectionner une option temporisation individuelle,
utilisez les touches ◄ / ► pour changer le réglage, et appuyez sur le bouton MENU
pour quitter
Le menu MINUTERIE comprend les options suivantes:
Mise en veille
Fuseau horaire
Heure d'été
Format de l'heure
horloge Auto
horloge
Permet de régler la minuterie d’arrêt sur le temps: 5min,
10min, 15min, 30min, 60min, 90min, 120min, 180min,
240min et hors tension.
Permet de régler la minuterie d’arrêt sur les zones: Pacifique,
Alaska, Hawaii, Afrique orientale, Samoa, de l'Atlantique,
Terre-Neuve,centrale et de la Montagne.
Vous permet d'activer ou de désactiver l'heure d'été.
Cette option permet de régler le format d'affichage de l'heure.
Cette option permet au téléviseur de synchroniser le temps
avec l'antenne.(Mettez-le sur AUTO si vous avez une antenne
fixée sur le téléviseur. Si vous avez Câble ou le satellite de
n'importe quoi d'autre copiez s'assurer HORLOGE AUTO
est éteint.
Cette option permet de régler la date et l'heure de la TV. Vous
devez désactiver HORLOGE AUTO pour utiliser cette fonction.
S'il vous plaît noter:
La fonction TIME seulement conserver une heure précise si le
téléviseur est branché sur une source d'alimentation. Si le
téléviseur est débranché ou le boîtier d'alimentation est éteint.
le temps de la TV ne sera pas précis.
Manuel utilisateur
Page 30

21
22
4.4 Personnalisation des paramètres de CONFIGURATION
Sélectionnez la source TV par exemple. (Source presse pour sélectionner le
mode TV)
1. Appuyez sur le bouton POWER pour allumer le téléviseur LED.
2. Appuyez sur le bouton MENU de la télécommande pour afficher le menu principal,
et utiliser les touches ◄ / ► pour sélectionner CONFIGURATION.
3. Utilisez les touches ▲ / ▼ pour sélectionner une option SETUP individuelle,
utilisez les touches ◄ / ► pour changer le réglage, et appuyez sur le bouton MENU
pour quitter
Le menu CONFIGURATION comprend les options suivantes:
Langue du menu
Transparent
Timeout OSD
Étiquette d'entrée
Autres paramètres
Vous permet de sélectionner la langue du menu parmi:
Anglais, Français et Espagnol.
Cette option modifie la transparence du menu permettant
TV de fondimages de montrer.
Cette option change le temps qui menu OSD du
téléviseur se met automatiquement hors tension.
Cette option modifie les noms de source de vos
préférences personnelles.
entrée le signal PC d'abord, puis appuyez sur le bouton
SOURCE pour sélectionner le mode PC, appuyez sur
la touche ► pour confirmer
Position H
Position V
Horloge
Phase
Auto
Sous-titrage
Mode CC
Sélection de Base
Avancée
Sélection
Option
Vous permet de sélectionner le mode CC parmi: Off, On
et CC ou Mute.
Vous permet de sélectionner le mode CC parmi: CC l, CC 2,
CC 3, CC 4, Texte l, Texte 2, Texte 3 etTexte 4.
Vous permet d’opérer des réglages avancés parmi:
Service l, Service 2, Service 3, Service 4, service5 et
service 6.
Utilisez le bouton ▼ pour mettre en évidence l '«Option»,
puis appuyez sur la touche ► pour entrer dans le menu
ci-dessous.
Utilisez le bouton T ▼ pour sélectionner l'option sous-titrage, puis
appuyez sur la touche ► pour entrer dans le menu ci-dessous.
Vous permet d'utiliser les touches ◄ / ► pour régler la Position H.
Vous permet d'utiliser les touches ◄ / ► pour régler le Position V.
Permet de prolonger l'image.
Vous permet de régler la définition.
Sélectionnez Auto" et appuyez sur la touche ►, l'appareil ajuste
automatiquement tous les articles pour atteindre un meilleur effet.
Manuel utilisateur
Exit
Exit
Page 31

23
24
Utilisez les touches ▲ / ▼ pour sélectionner l'élément souhaité, puis utilisez les
boutons ◄ / ► pour sélectionner.
4.5 Personnalisation des paramètres de verrouillage
Sélectionnez la source TV par exemple. (Appuyez sur le bouton SOURCE pour
sélectionner le mode TV)
Le menu de verrouillage comprend les options suivantes:
Système de verrouillage Vous permet d'activer ou de désactiver le verrouillage du
système.
Si vous désactivez le système de verrouillage, alors les
éléments suivants (Etats-Unis, le Canada, Cadre de RRT
et Reset RRT) ne pourront plus être utilisés.
Changer le mot de passe Utilisez le bouton ▼ pour sélectionner l'élément
"Changer le mot de passe" , puis appuyez sur la
touche ► pour entrer dans le menu ci-dessous.
Entrée
mot de passe à 4 chiffres
1. Appuyez sur le bouton POWER pour allumer le téléviseur LED.
2. Appuyez sur le bouton MENU de la télécommande pour afficher le menu principal,
et utiliser les touches ◄ / ► pour sélectionner la position Verrouiller.
3. Utilisez le bouton ▼ pour sélectionner "Entrer le mot de passe ", utilisez les
touches numériques pour entrer le mot de passe à 4 chiffres. Une fois le mot de
passe entré, l'écran affichera le menu junior. Une fois les paramètres, appuyez sur
le bouton menu pour quitter.
REMARQUE: Le mot de passe par défaut est 0000. Le mot de passe de supervision
est 8899.
Restaurer les
valeurs par Défaut
Restaurer tous les réglages dans le menu
CONFIGURATION pour retrouver les paramètres d'usine.
Manuel utilisateur
Exit
Exit
Exit
Page 32

2
22526
US Utilisez le bouton ▼ pour sélectionner l'élément "US”, puis appuyez sur la
touche ► pour entrer dans le menu ci-dessous.
Canada Utilisez le bouton ▼ pour faire afficher l'élément «Canada» , puis
appuyez sur le bouton ► pour entrer dans le menu ci-dessous.
Anglais Canadien Utiliser la touche ◄ / ► pour sélectionner et faire afficher
les différents modes parmi: OFF, C, C8, G, PG, 14 + et
18 +.
Français Canadien Utiliser la touche ◄ / ► pour sélectionner et faire afficher
les différents modes parmi: OFF, G, 8ans +, 13ans+,
16ans + et 18ans+.
Réglage RRT Cette fonction est un filtre de cotes téléchargeables sur la
base des émissions de télévision. Avec le passage des
émissions de télévision à l'avenir, les changements
numériques, et améliorations dans la façon dont les
émissions de télévision sont conçus pour contenus sont
possibles.
Réinitialiser RRT Vous permet de rétablir le réglage RRT d’usine.
TV Utilisez le bouton ▼ pour faire afficher l’élément "TV", puis appuyez sur le
bouton ► pour entrer dans le menu ci-dessous.
Utilisez les touches ▲ / ▼ pour sélectionner la évaluation souhaitée et utilisez les
boutons ► pour bloquer ou débloquer cette fonction.
La classification du film (MPAA) est utilisée pour les films originaux notés
par [l’association de cinéma] la Motion Picture Association (MPAA) tel
diffusé sur la télévision par câble et non édité Utilisez les touches ▲ / ▼
pour sélectionner N / A, G, PG, PG-13, R, NC-17 ou X.
MPAA
téléspectateurs
PG-13 Conent un contenu qui peut ne pas être approprié pour les téléspectateurs de
moins de 13 ans.
R limité. Conent un contenu pour adultes, interdit au moins de 17 sans présence
parentale.
NC-17 Interdit au moins de 17 ans
X Adultes seulement.
Evaluaon DESCRIPTION
G Grand Public. Film approprié pour téléspectateurs de tous les âges.
PG Guide parental Suggéré. Peut contenir du matériel non adapté pour les jeunes
Manuel utilisateur
Exit
Exit
Page 33

27
28
4.6 Personnalisation des paramètres de chaines:
Sélectionnez la source TV par exemple. (Source presse pour sélectionner le
mode TV)
1. Appuyez sur le bouton POWER pour allumer le téléviseur LED.
2. Appuyez sur le bouton MENU de la télécommande pour afficher le menu principal,
et utiliser les touches ◄ / ► pour sélectionner la chaine
3. Utilisez les touches ▲ / ▼ pour sélectionner une option de CHAINE individuelle,
utilisez les touches ◄ / ► pour changer le réglage, et appuyez sur le bouton MENU
pour quitter
Les chaines susceptibles d’être captées seront mémorisées automatiquement.
Lors de la recherche des chaines, appuyez sur MENU pour arrêter.
Utilisez le bouton ▼ pour sélectionner le bouton “Auto Scan", puis appuyez sur
la touche ► pour rechercher les chaînes automatiquement. Les canaux
susceptibles d’être captées seront mémorisées automatiquement
Utilisez les touches ▲ / ▼ pour faire afficher l'élément désiré, puis appuyez sur le
bouton OK pour ajouter ou supprimer la chaine en surbrillance comme favori.
Permet d'afficher ou de masquer les canaux. Utilisez les touches ▲/▼
pour faire afficher l’élément "Afficher / Masquer" , puis appuyez sur la
touche ► pour entrer dans le menu ci-dessous.
Cette fonctionnalité vous montre la liste des chaînes mémorisées.
Lors de la recherche des canaux, appuyez sur MENU pour arrêter.
Vous permet d'ajouter les chaines que vous souhaités ajouter comme
chaînes favorites ou préférées. Utilisez les touches ▲ / ▼ pour faire
afficher l’élément "Favori", puis appuyez sur la touche ► pour entrer
dans le menu ci-dessous.
Favori
Afficher /
Masquer
Liste des
chaînes
Le menu CHAINE comprend les options suivantes:
Si vous sélectionnez "Air" comme signal d'entrée pour l'antenne, vous pouvez
appuyer sur la touche ► pour rechercher automatiquement les chaines.
Air / câble
Scannage automatique
Vous permet de sélectionner l'antenne entre l'air et câble.
Si vous sélectionnez «Câble», les éléments suivants
(Favorite, Afficher / ou Masquer le numéro de la chaine,
l'étiquette de la chaine et le liste des canaux) ne seront pas être
utilisables.
Utilisez le bouton ▼ pour sélectionner l'élément "Auto Scan" ,
puis appuyez sur le bouton ► pour entrer dans le menu
ci-dessous.
Manuel utilisateur
Exit
Exit
Page 34

922
Utilisez les touches ▲ / ▼ pour faire afficher l'élément désiré, puis appuyez sur le
bouton OK pour afficher ou masquer la chaine en surbrillance.
5. Mode PC
Configuration de votre logiciel PC (basée sur Windows XP)
Les fenêtres d'affichage des paramètres pour un ordinateur type sont ci-dessous
indiquées. Maisa l'écran actuel sur votre PC sera probablement différent, en fonction
de votre version de Windows et de votre carte vidéo. Mais même si votre écran
actuel est différent, la même, configuration de base s'applique dans presque tous
les cas.
1. Premièrement, cliquez sur le "Panneau de configuration" dans le menu Démarrer
de Windows.
2. Lorsque la fenêtre du panneau de commande apparaît, cliquez sur "Apparence et
thèmes" et une boîte de dialogue apparaîtra.
3. Lorsque la fenêtre du panneau de commande apparaît, cliquez sur "Affichage" et
une boîte de dialogue apparaîtra.
4. Accédez à l'onglet "Paramètres" sur l'écran de la boîte de dialogue. Taille correcte
(résolution) Optimum: 1360x768.
Si une option de fréquence verticale existe sur les Paramètres de la boîte de dialogue
votre écran, sa valeur correcte est "60Hz". Sinon, cliquez simplement sur "Entrer" et
quitter la boîte de dialogue
Affiche le numéro de la chaîne en cours.
Affichage de l'étiquette de la chaîne actuelle.
N ° de chaine
Étiquette de chaine
Résoluon Fréquence horizontale (KHz) Fréquence Vercale(Hz) Mode Standard
720x400 31.47 70 DOS
640x480 37.9 60 VGA
800x600 37.9 60 SVGA
1024x768 48.4 60 XVGA
1366x768 64 60 SXVGA
1920x1080 64 60 SXVGA
Manuel utilisateur
Exit
Page 35

6. DÉPANNAGE
En cas de défaillance, vérifiez si le problème détecté est dans le tableau suivant. Si votre
appareil ne fonctionne toujours pas, contactez le service client.
ATTENTION: Ne laissez pas votre appareil afficher la même image pendant une longue
période, veillez regler une procédure de protection écran. Si une image de contraste élevé
reste pendant une longue période, cette image va apporter un "shadow (ombre) restant"
sur l'écran. Habituellement, le "shadow resttant" disparaît progressivement lorsque vous
éteignez la machine. Cependant, ce problème ne peut pas être réparé, ce qui n'est pas à
portée de la garantie.
Pas d’affichage
d’ TV, et il indique
Pas d’entrée de signal,
Indicateur LED rouge
clignotantes
Le câble de signal est lâche
ou se détache.
Vérifier si le câble de signal
n’est pas détaché,
reconnectez-le à nouveau.
ou
La distance de la
Télécommande est courte,
hors de contrôle
- La fenêtre de la réception
télécommande a été
couverte par des objets.
- L'énergie de la batterie de
la télécommande est trop
faible.
- Enlevez les objets
obstruant la fenêtre du
récepteur de la
télécommande.
- Changer la batterie
Affichage de l' TV est
faible - Le réglage est incorrect.
- Mode d'affichage est
incorrecte
- Utilisez la fonction de
réglage automatique.
- Utilisez le mode
recommandé.
Image à l'écran d' TV
ne remplit pas l'écran
- Le réglage est incorrect.
- Mode d'affichage est
incorrecte.
- Utilisez la fonction de
réglage automatique.
- Entrez IMAGE pour ajuster
la position horizontale ou
verticale.
- Utilisez le mode
recommandé.
Impossible de faire
fonctionner cet appareil
- L'influence extérieure, tel
que la foudre, l'électricité
statique etc., qui est peut
perturber le fonctionnement
normal de cet appareil.
- Appuyez sur le bouton
pour éteindre la source
électrique, puis appuyez sur
le bouton pour allumer
la TV à nouveau après 1-2
minutes.
Flocon de neige
et le bruit sonore
- Connecteur du câble
d'antenne est lâche, le
câble est endommagé.
- Le type de câble
d'antenne n'est pas bien
assorti.
- Le sens ou la position
de l'antenne est
incorrecte.
- Le signal est faible.
- Vérifiez le connecteur du câble
d'antenne, si le câble est bien fait,
- Vérifier le type de câble d'antenne
(VHF / UHF).
- Ajuster la direction ou la position de
l'antenne.
- Tenter d'utiliser un amplificateur de
signal
Image TV est
bien, mais avec
Bruit
- Connecteur du câble
d'antenne est lâche, le
câble est endommagé
- Vérifier le câble d'antenne
le connecteur, vérifier l'état du câble
Aucune image.
Pas de son
- La fiche d'alimentation
est lâche, le cordon
d'alimentation se
connecte mal.
- Vérifier si le cordon d'alimentation
se connecte bien.
- Appuyez sur POWER sur le
panneau ou la télécommande.
- Vérifiez si le bouton
est sur
ON.
Image TV a des
rayures
- Le signal est exposé à
des interférences, tel que
voitures, néons,
ventilateur électrique, etc
- Ne pas utiliser le souffleur
électrique autour, réglez la direction
du câble d'antenne pour réduire les
interférences.
Image TV a des
ombres
- Le signal TV est
reflétée par une vallée ou
d’un bâtiment.
- Sens de l'antenne est
incorrecte.
- Utilisez des antennes
directionnelles,
- Ajuster la direction de l'antenne.
pas de son TV - Le réglage du volume
est trop faible,
- Le son est coupé.
- Réglez le volume à la valeur
correcte.
- Appuyez sur MUTE pour éliminer
mute
Manuel utilisateur
Page 36

7. SPÉCIFICATIONS
Ecran
Télécommande
Modèle
RLED4843-UHD
Système TV
ATSC/NTSC
Résolution maximale
3840x2160
Luminosité
300 cd/m²
Contraste statique
5000:1
Temps de réponse
8.5ms
Consommation
<120W
Alimentation
AC 100-120V~ 60Hz
Connectivité
Entrée Vidéo Composite
Entrée Vidéo Composant YPbPr
Entrée vidéo PC (VGA)
Entrée audio PC
Entrée HDMI
Entrée antenne RF
Sortie audio Casque
Sortie audio numérique Optical
Interface de données USB(For service)
Des fichiers système pris en
charge
FAT32 et FAT 16
Panneau Type A
Type de signal
Distance de commande
Angle de commande
Alimentation
infrarouge
7 mètres
30° (Horizontal)
AAA 1.5Vx2
 Loading...