

RCA RLED4843-B-UHD Instruction Manual

Model:RLED4843-B-UHD

CONTENTS
14
15
16
17
18
19
1
2
2
3
3
6
7
3
4
8
9
7
8
9
4
5
5
6
11
12
12
12
SAFETY
PRECAUTION
IMPORTANT
SAFETY
INSTRUCTION
ACCESSORIES
GETTING
STARTED
5
CONTROL
REFERENCE
GUIDE
WALL MOUNT
INSTALLATION
INITIAL SETUP
TV SETUP
CONNECTIONS
Remote Control
Front View
Back View
Back View
Antenna Connection
AV Connection
YPbPr Connection
HDMI Connection
Power Cord Connection
Optical(SPDIF) Connection
Putting The Unit On A Proper Place
Source Selection
Turning The Unit On For The First Time
Home mode selection
Retail mode selection
TV(CHANNEL) Menu
Picture Menu
Audio Menu
Time Menu
Setup Menu
LOCK(Parental) Menu
1
English
10
7
9
13
13

CONTENTS
20
10
21
11
12
22
DISPLAY
MODE
SPECIFICATION
TROUBLESHOOTING
GUIDE
Video Formats
TV Symptom
*
SAFETY PRECAUTION
CAUTION
•
•
•
WARNING:
PLACEMENT INFORMATION
SAFETY INFORMATION
RATING PLATE LOC ATION
FCC STATEMENTS
WARNING:
1
CAUTI ON MA RKING WAS LOCAT ED AT T HE REAR
OF THE AP PAR ATUS.
WARNING: TO REDUCE THE RISK OF ELECTRIC
SHOCK,DO NOT REMOVE COVER(OR BACK)
NO USER SERVICEABLE PARTS INSIDE.
REFER SERVICING TO QUALIFIED SERVICE
PERSONNEL.
The lightning flash with arrowhead symbol,
within an equilateral triangle,is intended to
alert the user to the presence of uninsulated
“dangerous voltage”within the product's enclosure
that may beof sufficient magnitude to constitute a
risk of electric shock to persons.
The exclamation point within an equilateral
Triangle is intended to alert the user to
The presence of important operating and
maintenance (servicing) instructions in the literature
accompanying the appliance.
DANGE R OF EX PLOSION IF BATTERY I S
INCOR REC TLY REPLACED. R EPL ACE ONLY
WITH TH E SAM E OR EQUIVALENT TYPE .
USE OF CO NTR OLS OR ADJUSTME NTS O R
PERFO RMA NCE OF PROCEDUR ES OT HER
THAN TH OSE S PECIFIED MAY RE SUL T IN
HAZAR DOU S RADIATION EXP OSU RE.
•
•
TO REDU CE TH E RISK OF FIRE OR ELECTR IC
SHOCK , DO NO T EXPOSE THIS APPLIA NCE T O
RAIN OR M OIS TURE.
TO REVE NT FI RE OR SHOCK HAZAR D, DO N OT
EXPOS E THI S UNIT TO RAIN OR MOISTU RE. D O
NOT PLA CE OB JECTS FILLED WI TH LI QUI DS ON
OR NEAR T HIS U NIT.
SHOUL D ANY T ROUBLE OCCUR, D ISC ONNECT
THE AC PO WER C ORD AND REFER SER VIC ING
TO A QUAL IFI ED TECHNICIAN .
Do not us e thi s unit in places th at ar e extremely
hot, co ld, d usty or humid.
Do not re str ict the airflow o f thi s unit by placing it
somew her e with poor airfl ow, b y covering it with
a cloth , by pl acing it on beddi ng or c arpeting.
When co nne cting or discon nec ting the AC power
cord, g rip t he plug and not the c ord i tself. Pulling
the cor d may d amage it and crea te a ha zard.
When yo u are n ot going to use the u nit f or a long
perio d of ti me, disconnec t the A C power cord.
The rat ing p late is located o n the r ear of the unit.
NOTE: T his u nit has been test ed an d found to comply
with th e lim its for a Class B dig ita l device, pursuant
to Part 1 5 of th e FCC Rules. Thes e lim its are designed
to prov ide r easonable pro tec tion against ha rmf ul
inter fer ence in a residen tia l installatio n.
This un it ge nerates, uses a nd ca n radiate radio
frequ enc y energy and, if no t ins talled and used i n
accor dan ce with the instr uct ions, may cause harm ful
inter fer ence to radio com mun ication. Howe ver , the re
is no gua ran tee that interf ere nce will not occur in a
parti cul ar installati on. I f this unit does cause h arm ful
inter fer ence to radio or te lev ision recepti on, w hich
can be de ter mined by turnin g the u nit off and on, the
user is e nco uraged to try to co rre ct the interferenc e
by one or m ore o f the following m eas ures:
- Reori ent o r relocate the re cei ving antenna.
- Incre ase t he separation b etw een the unit and
recei ver .
-Conn ect t he unit into an out let o n a circuit differen t
from th at to w hich the receiv er is c onnected.
- Consu lt th e dealer or an expe rie nced radio/TV
techn ici an for help.
Chang es or modifi cations to t his
unit no t expressl y approved b y the party re sponsibl e
for com pliance co uld void the u ser author ity
to oper ate the unit .
•
•
•
•
“HDMI, the HDMI logo and High-Definition Multimedia
Interface are trademarks or registered trademarks of
HDMI Licensing LLC.”

IMPORTANT SAFETY INSTRUCTIONS
2
1)Read t hes e instruction s.
2)Keep t hes e instruction s.
3)Heed a ll wa rnings.
4)Foll ow al l instruction s.
5)Do not u se th is apparatus ne ar wa ter.
6)Clea n onl y with a dry cloth.
7)Do not b loc k any ventilati on op enings.
Insta ll in a ccordance wit h the
manuf act urer's instru cti ons.
8)Do not i nst all near any heat s our ces such
as radi ato rs, heat regist ers , stoves, or
other a ppa ratus (Includ ing a mplifiers) th at
produ ce he at.
9)Do not d efe ct the safety pur pos e of the
polar ize d or grounding- typ e plug.
A polar ize d plug has two blad es wi th one
wider t han t he other.
A groun din gtype plug has tw o bla des
and a thi rd gr ounding prong .
The wid e bla de or the third pro ng is
provi ded f or your safety.
If the pr ovi ded plug does not f it in to your
wall ou tle t, consult an ele ctr ician for
repla cem ent of the obsole te ou tlet.
10)Pro tec t the power cord fr om be ing walked on
or pinc hed p articularly a t plu gs, convenien ce
recep tac les, and the poin t whe re they exit
from th e app aratus.
11)Onl y use a ttachments / ac ces sories specif ied
by the ma nuf acturer.
12)Use o nly w ith the cart, sta nd,
tripo d, br acket, or table
speci fie d by the manufact ure r,
or sold w ith t he apparatus.
When a ca rt is u sed, use cautio n whe n
movin g the c art / apparatus c omb ination to
avoid i nju ry from tip-ove r.
13)Unp lug t his apparatus d uri ng lightning
Storm s or wh en unused for lon g per iods of
time.
14)Ref er al l servicing to qu ali fied service
perso nne l. Servicing is r equ ired when the
appar atu shas been damag ed in a ny way,
such as t he po wer cord or plug is d ama ged,
liqui d has b een spilled or ob jec ts have fallen
into th e app aratus, the app ara tus has been
expos ed to r ain or moisture , doe s not operate
norma lly , or has been dropp ed.
15)To pr eve nt electric sho ck, e nsure the groun din g
pin on th e AC co rd power plug is se cur ely
conne cte d.

ACCESSORIES
Pleas e check and identify the supplied accessories.
..... ..... ... ..... ........ ........ ........ ........ ..... ... ..... ........ ........ ........ ........ ........ ..... ... .
..... ..... ... ..... ........ ........ ........ ........ ..... ... ..... ........ ........ ........ ........ ........ ....
GETTING STARTED
USING THE REMOT E CONTROL
BATTERY REPLACEMENT
CAUTION
: Da nger of ex plosi on if batter y is i nco rrectly repla ced.
NOT ES
WARNING :
3
x 2
x 1
x 1
x 1
Remot e con trol ........... ... .............. ... .............. ... .............. ... .............. ... .............. ... ..............
Remot e con trol
Batte ry( AAA)
Warra nty C ard
Instr uct ion Manual
·Point t he re mote control at t he re mote sensor loc ate d on the unit.
·When th ere i s a strong ambien t lig ht source, the pe rformance of the inf rared remote se nso r
·may be de gra ded, causing un rel iable oper ati on.
·The rec omm ended effecti ve di stance for remo te operation is a bou t 16 feet (5 meters ).
When th e bat teries become w eak, the operat ing d istance of the re mot e control is grea tly
reduc ed an d you will need to re place the batte rie s.
·If the re mot e control is not go ing t o be used for a long ti me, remove the ba tte ries to avoid
damag e cau sed by battery le akage corrosi on.
·Do not mi x old a nd new batterie s. Do not mix ALKAL INE , standard (CAR BON -ZINC) or
recha rge able (NICKEL- CADMIUM) batt eri es.
·Alway s rem ove batteries a s soon as they beco me we ak.
·Weak ba tte ries can leak and s everely damag e the r emote control .
Do not di spo se batteries in a f ire . Batteries may e xplode or leak.
Batte rie s shall not be expo sed t o excessive hea t such as sunshin e, fi re or the like.
2Base stands and 4 screwsbase stand
..... ..... ... ..... ........ ........ ........ ........ ..... ... ..... ........ .......
x 1
..... ... .............. ... .............. ... .............. ... .............. ... .............. ... .............. ... .....
Mini Li ne Ou t Cable
x 1
..... ..... ... ..... ........ ........ ........ ........ ..... ... ..... ........ ........ ........ ........ ........ ...
C
C
FAV
FAV+
FAV-
ENT ER
EPG
AU
T
O
CH
.LI
S
T
ADD /DEL
CONTROL REFERENCE GUIDE
4
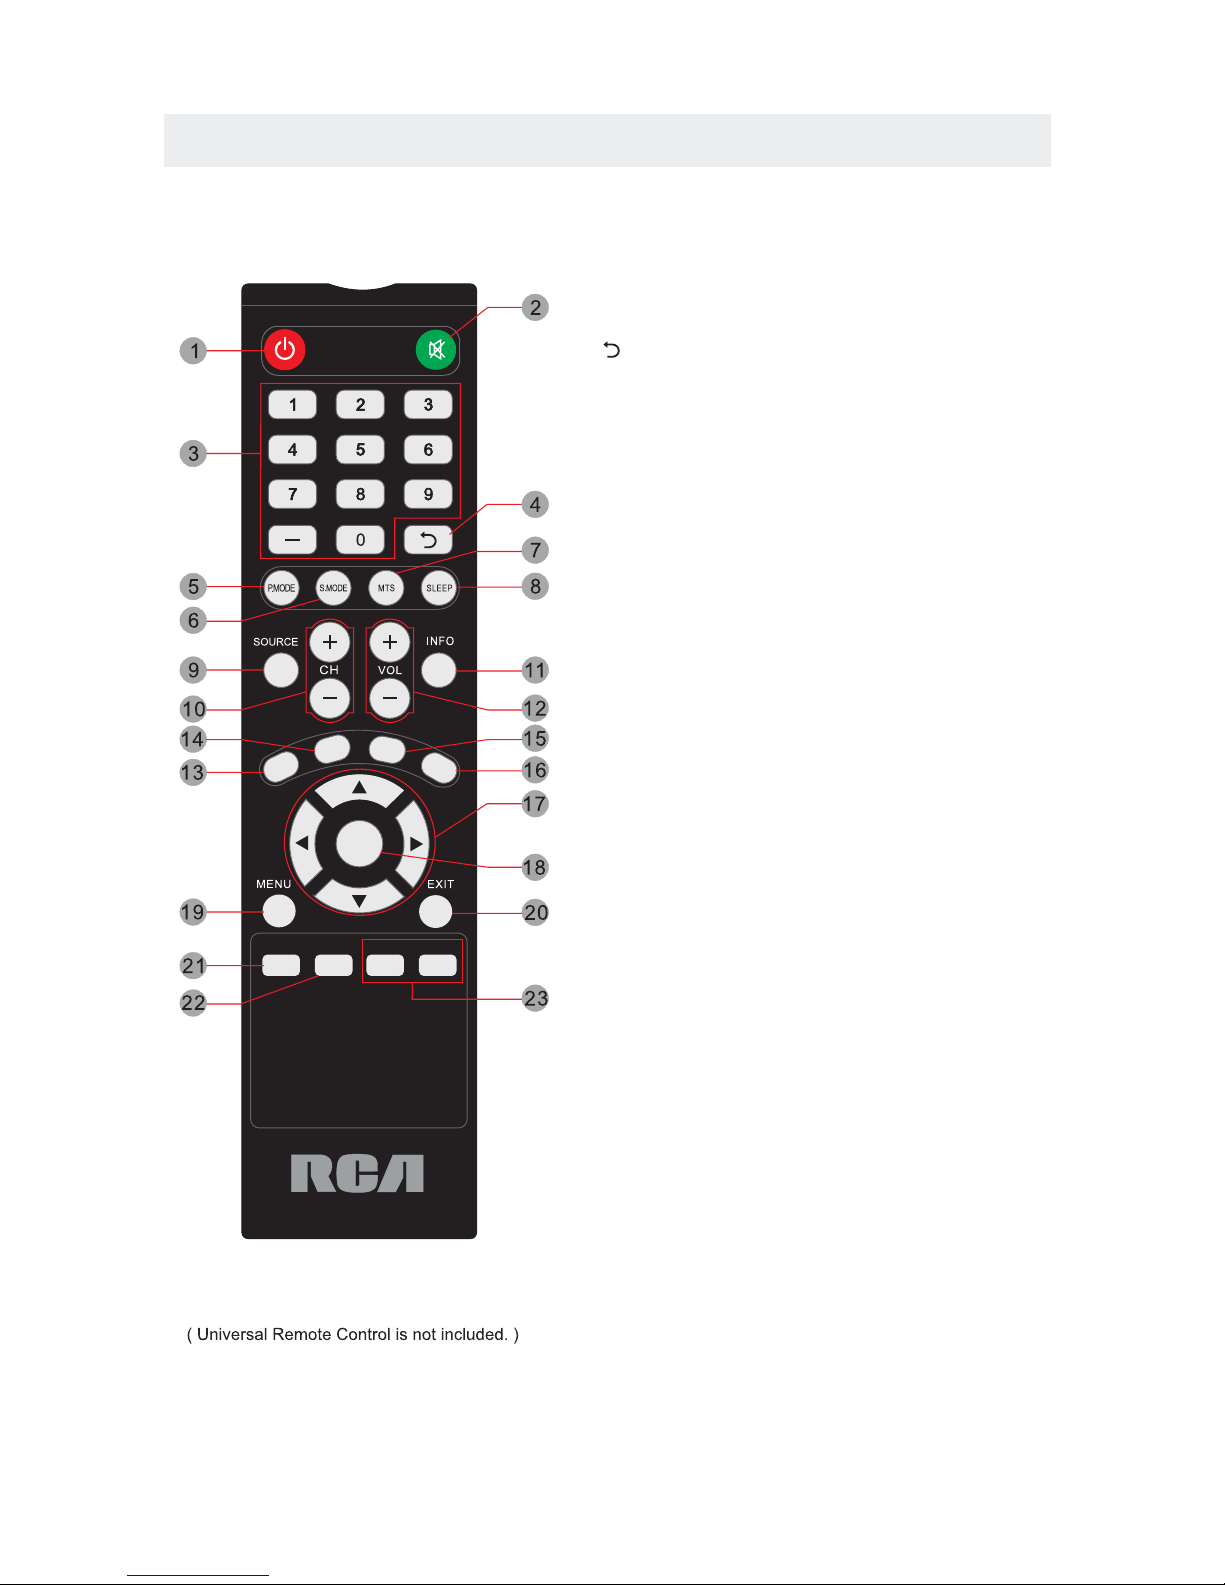
REMOTE CONTROL
Universal Remote Code: 1218
1.STANDBY
To switch on the TV or make the TV into
standby mode.
2.MUTE
Press this button to mute or restore sound.
3.0-9
Allows you to change the channel of the TV.
4.
Switches back and forth between the current and
previous channels.
5.P.MODE
Press this button to select a picture mode for different
picture qualities.
6.S.MODE
Press this button to select sound setting for different
sound effects.
7.MTS
To change among STEREO, MONO and SAP. If there is no
second language available for the signal received, LED
Display audio will output to mono.
8.SLEEP
To select the amount of time before your TV turns
Off automatically.
9.SOURCE
Press this button to select an input source.
10.CH+/CHSkips to the next/previous channel on TV mode.
11.INFO
Show the information of the program you are watching.
12.VOL+/VOLIncreases/Decreases the Volume control.
13.CC
Press the button to enter into the CC mode.
14.EPG
15.CH.LIST
Press this button to display the channel list.
16.AUTO
This model the AUTO has no function.
17.UP/DOWN/LEFT/RIGHT
Moves the cursor upward/downward/to the left/to the right
when making a selection.
18.ENTER
Press to confirm selections on a menu screen.
MENU
Displays the OSD Menu of the TV.
Exit
Press this button to exit the on screen display.
21.ADD/DEL
Press to increase/decrease your favourtite program.
22.
Press this button to select the electronic programme
guide in DTV mode.
19.
20.
FAV
Press this button to show the favourite list.
23. FAV+/FAVPress this button to go through the FAV channel list.
*
CONTROL REFERENCE GUIDE
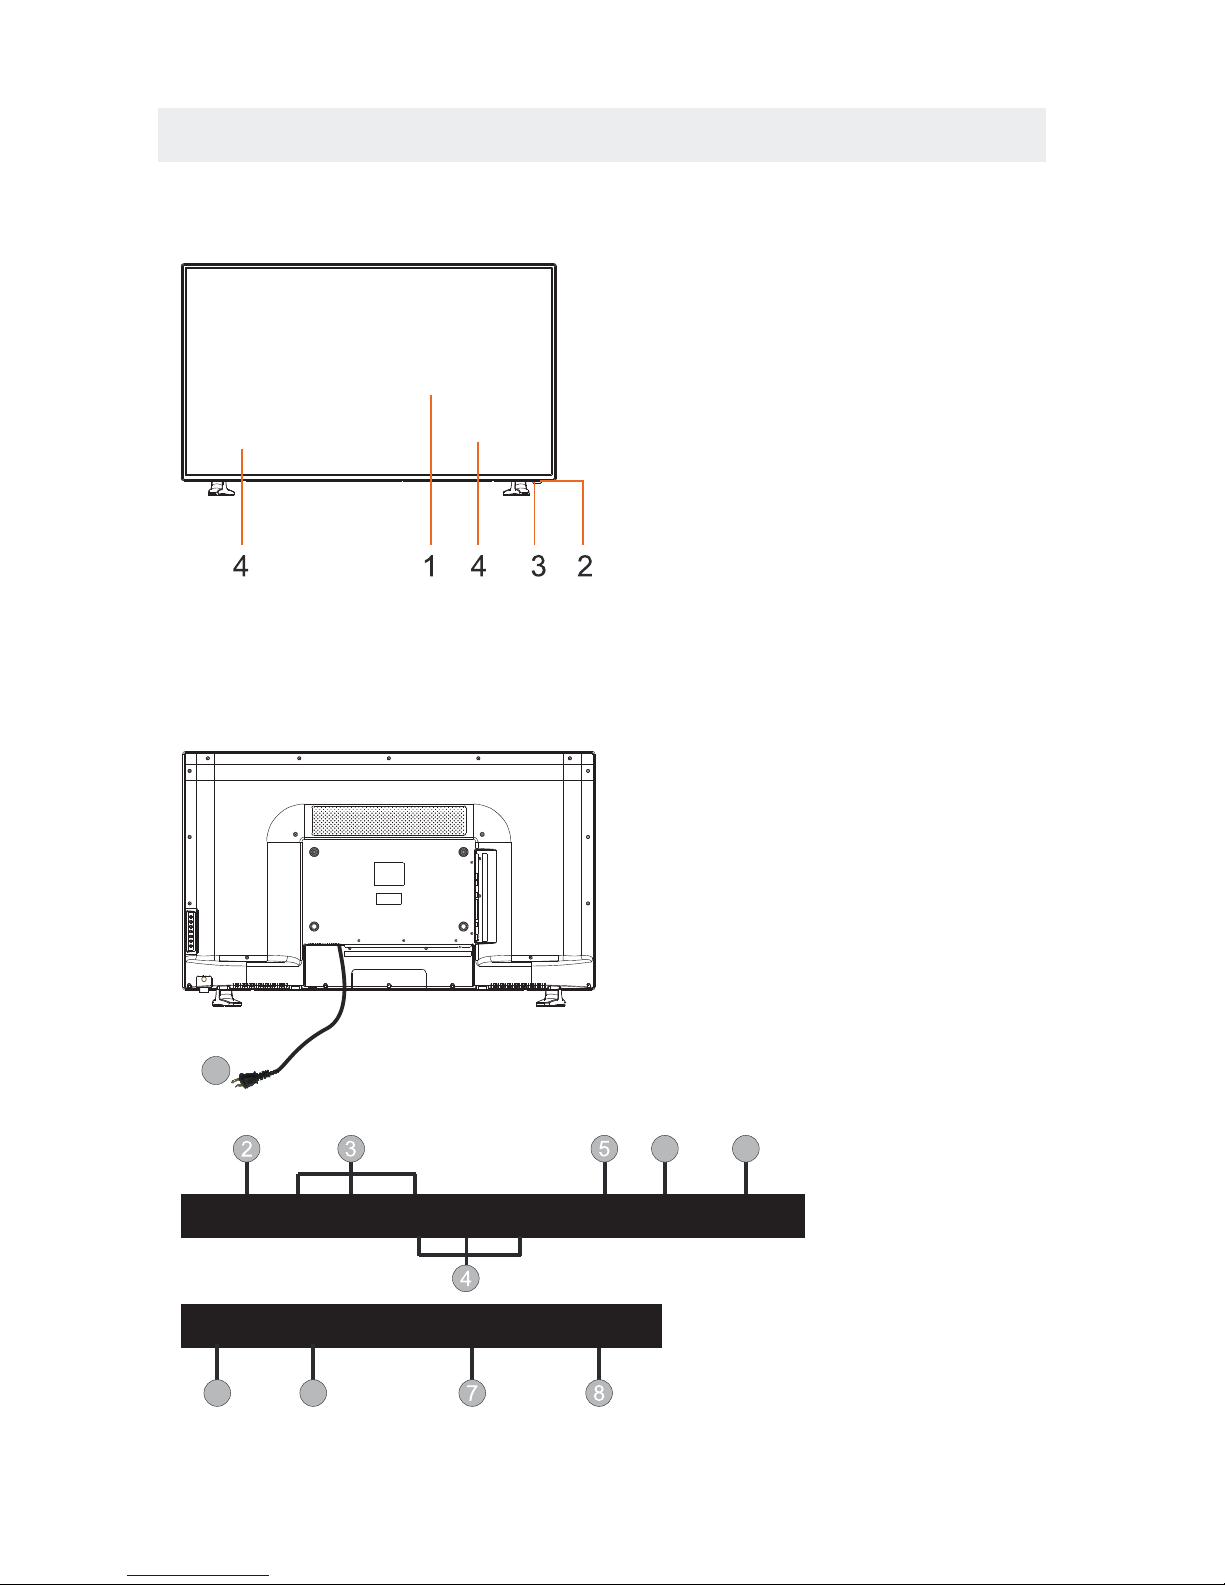
FRONT VIEW
5
BACK VIEW
1.Color Screen
2.Remote Sensor
Do not block this sensor or the
remote control will not work.
3.Standby Indicator
Indicates whether the unit is ON
or in STANDBY (OFF) mode.
Light in red: The unit is in STANDBY.
Light in blue:The unit is turned ON.
4. Speakers
6
1.Power Cor
2.Optical Out Jack
3.AV INJack
4.COMPONENT IN Jack
5.Line Out Jack
6.HDMI IN Jacks
7.TV ANTENNA Terminal
8.Service Port
d
1
Optica l
Out
L R
Y(V IDEO)
Pb
Pr
Lin e Out
HDM I1 HD MI2
HDM I3
HDM I4 RF
Ser vice
Por t
6
6 6
 Loading...