

Page 1
LED TV
RLED2969A
OPERATION MANUAL
Please read this manual carefully before operation.
Page 2

Table of Contents
Warning 1
Safety Instructions 3
Main Unit Control 5
Front Panel 5
Rear & Sides Panel 6
Remote Control 7
Getting Started 8
Using the Remote Control 8
Installing Batteries in the Remote Control 8
Battery Replacement 8
Connection and Setup 9
Connecting the Power Cord 9
Connecting Antenna and Other Devices 9
Cable Installation 10
Basic Operation 11
Turning on and off the TV 11
Programme Selection 11
Volume Adjustment 11
Changing the Input Source 11
Menu Operation 12
QUICK START GUIDE 12
How to Navigate Menus 12
Configuring the Channel Menu 13
Configuring the Picture Menu 13
Configuring the Audio Menu 14
Configuring the Time Menu 15
Configuring the Setup Menu 15
Configuring the Lock Menu 16
Troubleshooting Guide 18
Troubleshooting 18
Maintenance 19
Wallmounting Instruction 20
Specifications 21
Page 3
Warning
REGULATORY INFORMATION
This equipment generates uses and can radiate radio frequency energy and, if not
installed and used in accordance with the instructions, may cause harmful
interference to radio communication. However, there is no guarantee that
interference will not occur in a particular installation. If this equipment does cause
harmful interference to radio or television reception, which can be determined by
turning the equipment off and on, the user is encouraged to try to correct the
interference by one or more of the following measures:
-Relocate the receiving antenna.
-Increase the separation between the
equipment and receiver.
-Connect the equipment into an outlet on a circuit different from that to which the
receiver is connected.
-Consult the dealer or experienced radio/TV technician for help.
Any changes or modifications not expressly approved by the party responsible for
compliance could void the user's authority to operate the equipment.
CAUTION
DO not attempt to modify this product in any way without written authorization from
supplier. U
nauthorized modification could void the user's authority to operate this
product.
It is not recommended to keep a certain still i
mage displayed on the screen for a long
time as well as displaying extremely bright images on screen.
Figures and illustrations in this User Manual are provided for reference only and
may differ from actual product appearance. Product design and specifications
may be changed without notice.
The lightning flash with arrowhead symbol, within an equilateral triangle,
is intended to alert the user to the presence of uninsulated "dangerous
voltage" within the products enclosure that may be of sufficient
magnitude to constitute a risk of electric shock to persons.
The exclamation point within an equilateral triangle is intended to alert the
user to the presence of
important operating and maintenance (servicing)
instructions in the literature accompanying the appliance.
WARNING:
TO REDUCE THE RISK OF ELECTRIC SHOCK DO NOT REMOVE COVER
(OR BAC
K). NO USER SERVICEABLE PARTS INSIDE. REFER TO
QUALIFIED SERVICE PERSONNEL.
RISK OF ELECTRIC SHOCK
DO NOTOPEN
RISK OF ELECTRIC SHOCK
DO NOTOPEN
CAUTION/PRUDENCE
RISQUE DE CHOC ELECTRIQUE
NE PAS OVURIR
RISQUE DE CHOC ELECTRIQUE
NE PAS OVURIR
1
Page 4

Warning
WARNING
To Reduce The Risk Of Fire Or Electric Shock, Do Not Expose This Apparatus To
Rain Or Moisture.
The ventilation should not be impeded by covering the ventilation openings with
items, such as newspapers, table-cloths, curtains, etc.
The Apparatus shall not be exposed to dripping or splashing and that no objects
filled with
liquids, such as vases, shall be placed on the apparatus.
Attention should be drawn to the environmental aspects of battery disposal. Don’t
throw used batteries in dustbin. Please contact your retailer in order to protect the
environment.
Keep minimum distances (5cm) around the apparatus for sufficient ventilation;
(Minimum distance around the apparatus for sufficient ventilation.)
No naked flame sources, such as lighted ca
ndles, should be placed on the
apparatus;
To prevent the spread of fire, keep candles or other open flames away from this
product at all times.
The device may be malfunction when under electrostatic discharge. It can be
manually resumed by power off and power on again.
CAUTION connecting the Power Cord
Most appliances recommend they be placed upon a dedicated circuit; that is, a
sin
gle outlet circuit which powers only that appliance and has no additional outlets or
branch circuits.
Do not overload wall outlets. Overloaded wall ou
tlets, loose or damaged wall outlets,
extension cords, frayed power cords, or damaged or cracked wire insulation are
dangerous. Any of these conditions could result in electric shock or fire. Periodically
examine the cord of your appliance, and its if appearance indicates damage or
deterioration, unplug it, discontinue use of the appliance, and have the cord replaced
with an exact replacement part by an authorized servicer. Protect the power cord
from physical or mechanical abuse, such as being twisted, kinked, pinched, closed
in a door, or walked upon. Pay particular attention to plugs, wall outlets, and the
point where the cord exits the appliance.
The MAINS plug is used as the disconnect de
vice, and the disconnect device shall
remain readily operable.
2
Page 5
Safety instructions
IMPORTANT SAFETY INSTRUCTIONS
1. Read these instructions.
2. Keep these instructions.
3. Heed all warnings.
4. Follow all instructions.
7. Do not block any of the ventilation
openings. Instal
l in accordance with the
manufacturer's instructions.
5. Do not use this apparatus near water.
8. Do not install near any heat source such
as radiators, he
at registers, stoves, or
other apparatus (including amplifiers)
that produce heat.
6. Clean only with a dry cloth.
9. Do not defeat the safety purpose of th
e
polarized or grounding type plug. A
polarized plug has two blades with one
wider than other. A grounding type plug
has two blades and a third grounding
prong. The wide blade or the third
prong is provided for your safety. When
the provided plug does not fit into your
outlet, consult an electrician for
replacement of the obsolete outlet.
3
Page 6

Safety instructions
10. Protect the power cord from being
walked on or pinched particularly at
plugs, convenience receptacles, and
the point where they exit from the
apparatus.
13. Unplug this apparatus during
lig
htning storms or when unused for
long periods of time.
11. Only use the attachments/
accessories specified by the
manufacturer.
12. Use only with a cart, stand, tripod,
bracket, or table specified by the
manufacturer, or sold with the
apparatus. When a cart is used, use
caution when moving the cart/
apparatus combination to avoid
injury from tip-over.
14. Refer all servicing to qualified service
personnel. Servicing is requ
ired when
the apparatus has been damaged in
any way, such as power supply cord
or plug is damaged, liquid has been
spilled or objects have fallen into the
apparatus, the apparatus has been
exposed to rain or moisture, does not
operate normally, or has been
dropped.
ON DISPOSAL
-The fluorescent lamp used in this product contain a sma
ll amount of mercury.
-Do not dispose of this product with general household waste.
-Disposal of this product must be carried out
in accordance to the regulations of your
local authority.
NOTE
-If the TV feel cold to the touch, there may be a small "flicker" when it is turned on.
This is normal, there is nothing wrong with TV.
-Some minute dot defects may be visible on the screen, appearing as tiny red,
green, or blue spots. However there have no adverse effect on the monitor's
performance.
-Avoid touching the screen or holding your finger(s) against it for long periods of time.
Doin
g
so may produce some temporary distortion effect on the screen.
4
Page 7
Main Unit Control
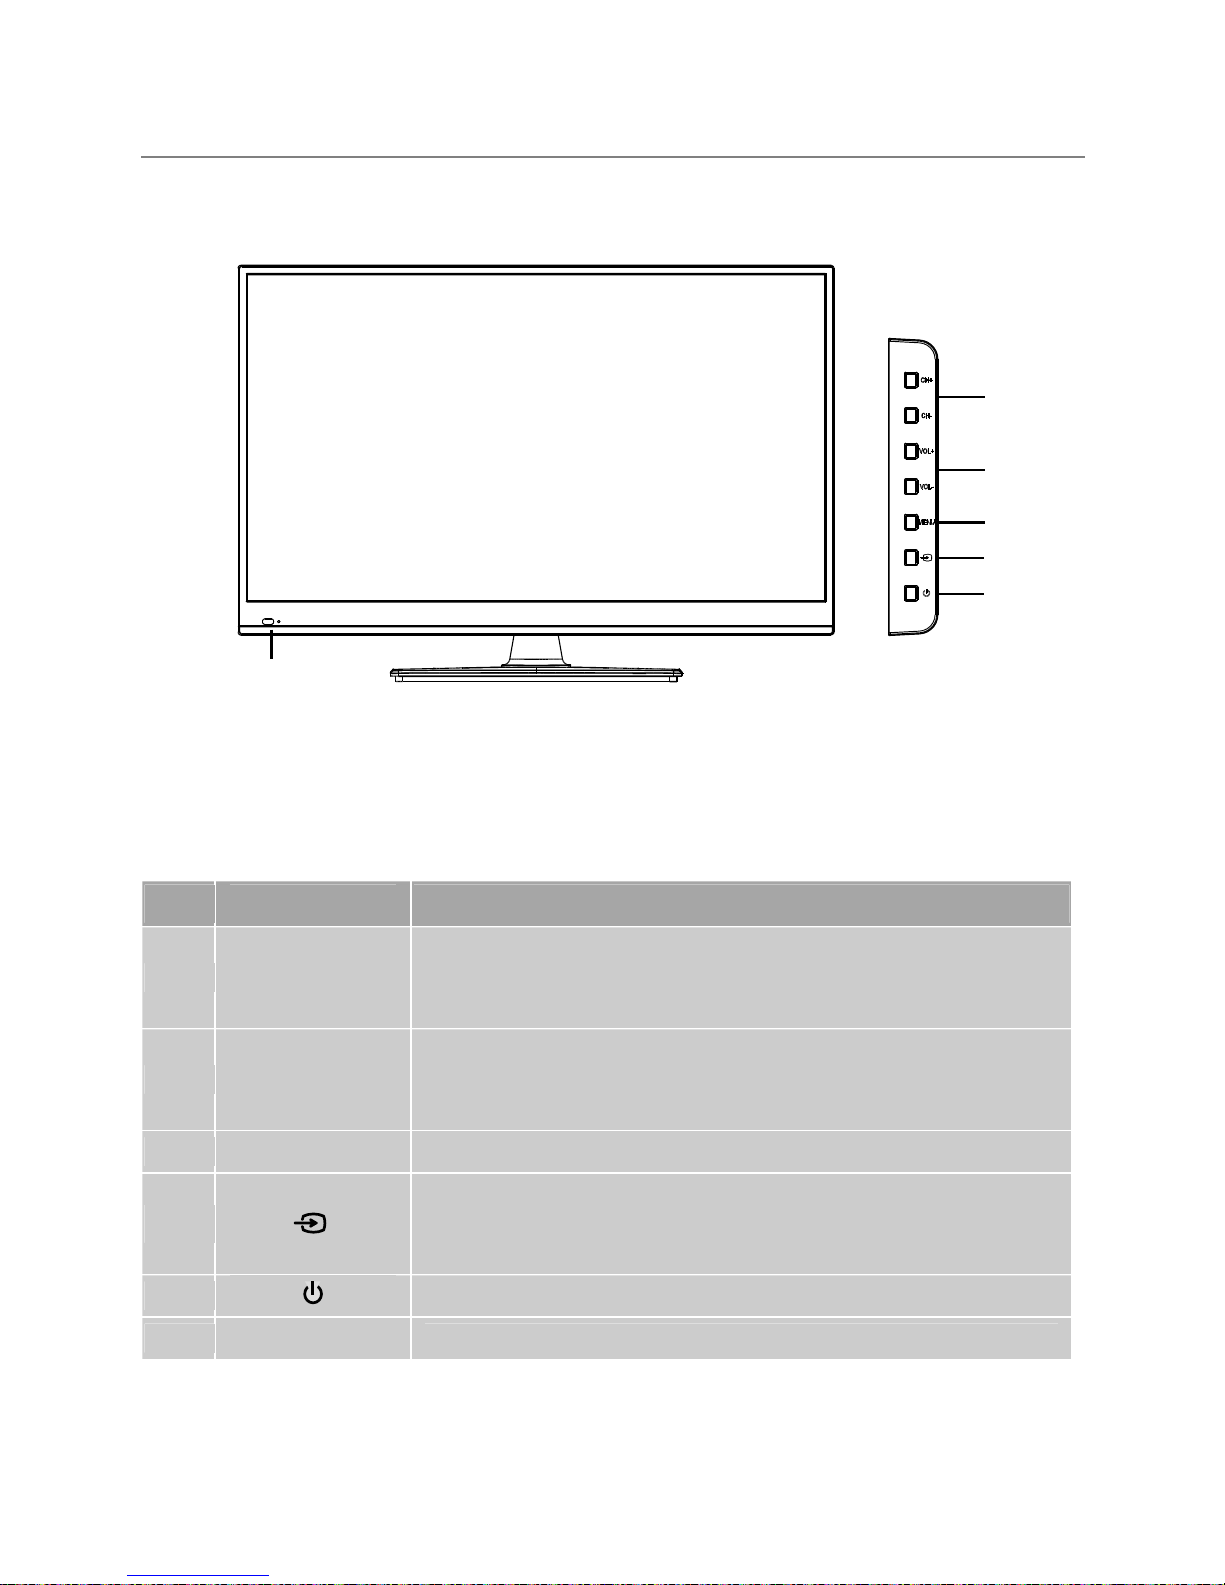
Front Panel
1
2
5
3
4
6
No. Name Description
1 CH+/CH-
Changes the channels. In the on-screen menu, use the
CH+/CH- buttons as you would use the ▲/▼ buttons on
the remote control.
2 VOL+/VOL-
Adjusts the volume. In the on-screen menu, use the
VOL+/VOL- buttons as you would use the ►/◄ buttons on
the remote control.
3 MENU Open the menu.
4
To switch the signal source. In the on-screen menu, use this
button as you would use the ENTER button on the remote
control.
5
Turns the unit on and off.
6
Power&Sensor
Power Indicator and Infrared sensor.
5
Page 8
Main Unit Control
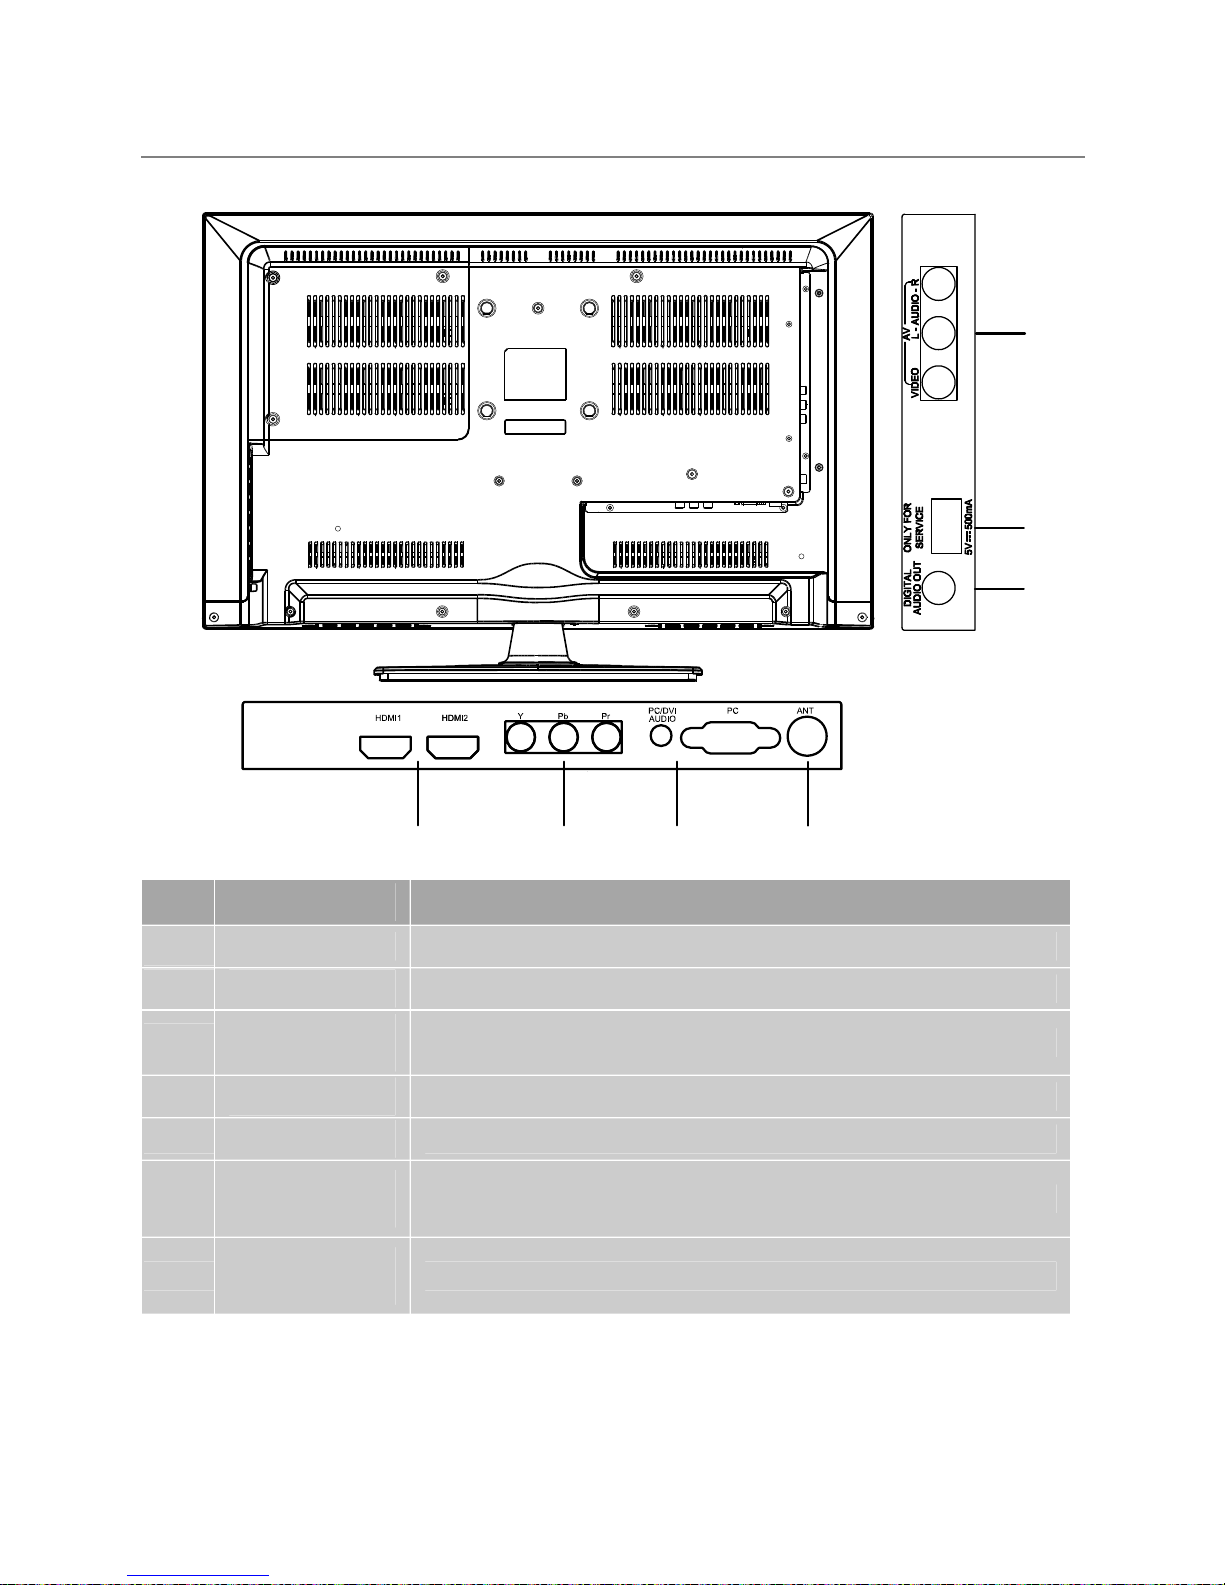
Rear & Sides Panel
13
12
11
10
9
8
7
No. Name Description
7
HDMI HDMI input
8 YPbPr
YPbPr input
9
PC / PC/DVI
AUDIO
PC input
10
ANT
Antenna input
11
AV
AV audio/video signal input
12
ONLY FOR
SERVICE
Only for service
13
DIGITAL AUDIO
OUT
Digital audio output (COAXIAL output)
6
Page 9
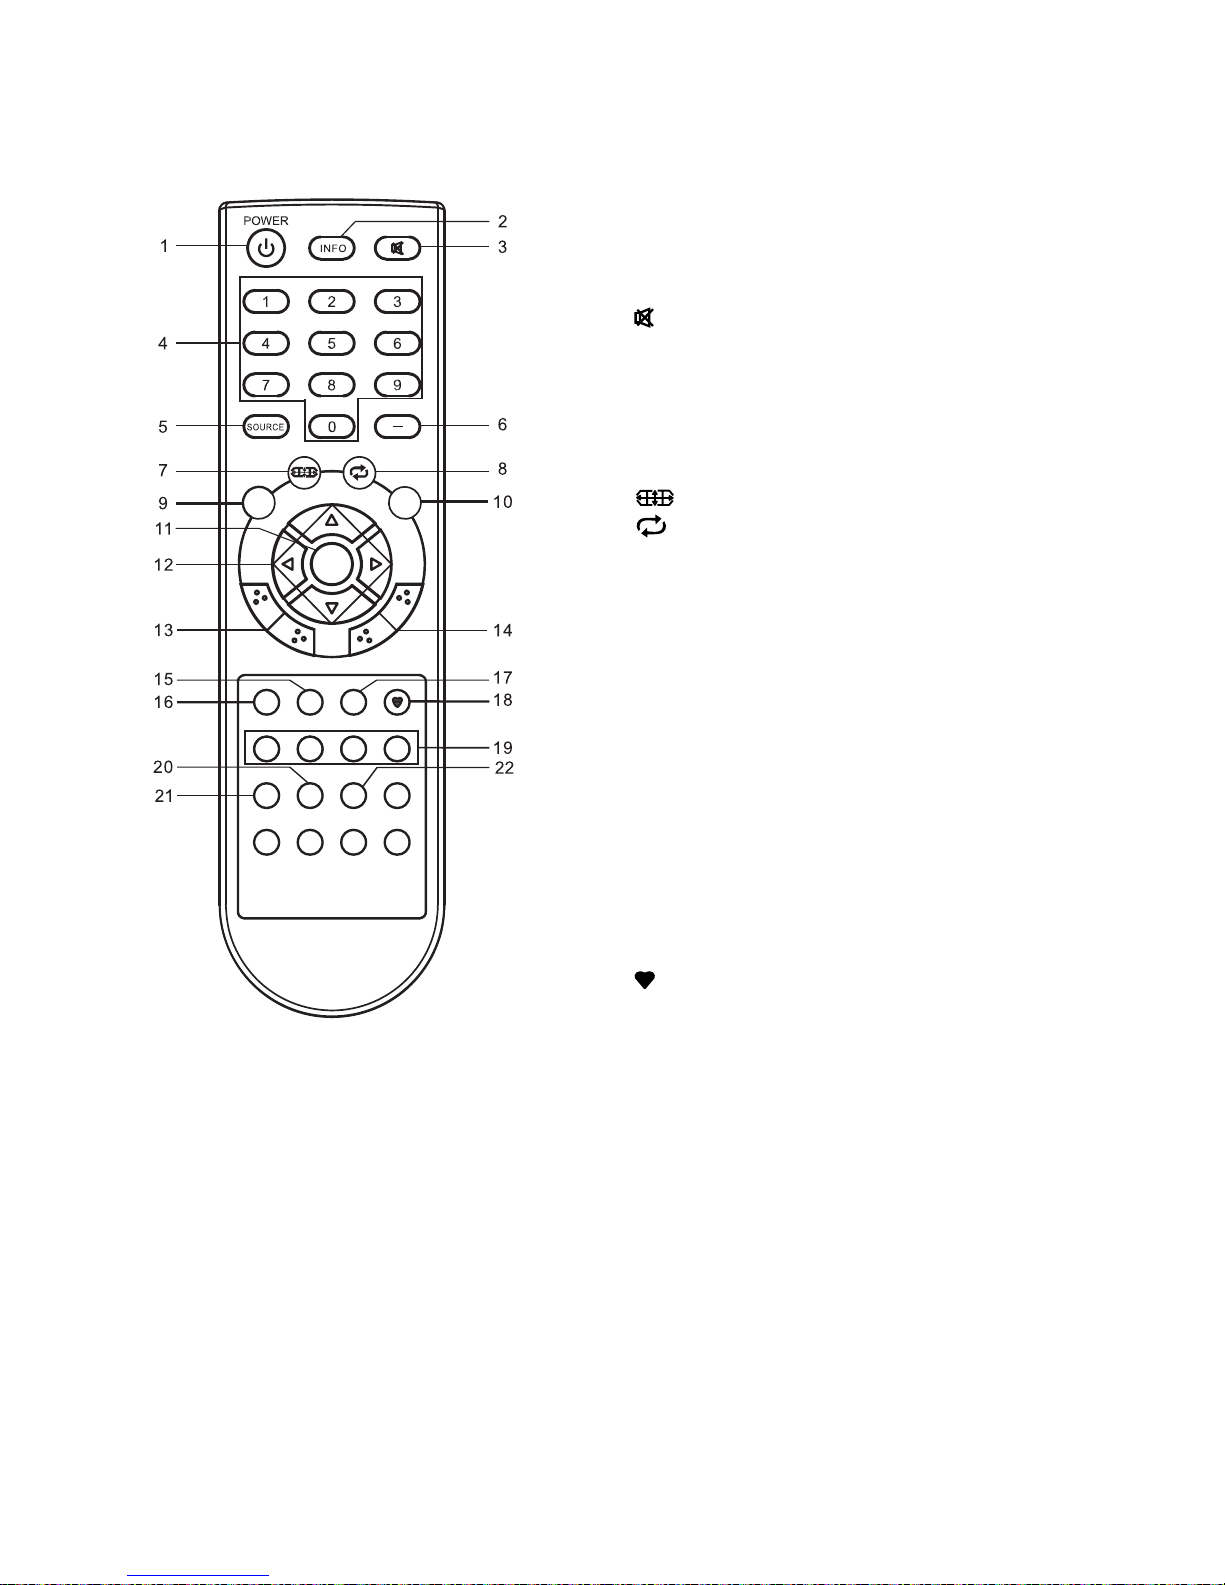
Remote Control
The buttons of the original remote control are as following:
Definition of the buttons on remote control:
1. POWER: E
nter or quit the standby mode.
2. INFO:
Press to display the current program
information on the screen.
3.
: Mute or restore sound.
4. NUMBER BUTTONS: Choose channels or
password importation.
5. SOURCE: Sele
ct signal source.
6.
-: In DTV mode, press number buttons and key to select channel.
7.
: Press to select different images sizes.
8.
: Return to last viewed program.
9. MENU: Press to display/disappear the on
screen menus or to quit some operations.
10. EXIT: Quit the current interface.
11. ENTER: Select or confirm menu item.
12. ▲/
▼/◄/►: Select direction.
13. VOL+/VOL-:
Increase/Decrease audio
volume.
14. CH+/CH-: Scroll to next/previous
channel.
15. SLEEP: Set the sleep timer.
16. LIST: Press to call up the channel list.
Press again to exit it.
17. GUIDE: Electronic Program Guide, use in the
DTV mode.
18. : Press to display the Favourites
program in TV mode.(You should setup
your favourite channels in Favorite menu)
19. COLOR BUTTONS:
Red/green/yellow/blue key navigation link.
20. STILL: Freeze or activate the current
picture.
21. CC: Press to select the closed caption.
22. MTS: The button can be used to switch
between Mono/STEREO/SAP in ATV mode.
AUDIO: Switch
Audio language in DTV
mode.
NOTE:
• All pictures i
n this manual are
examples, only for reference,
actual product may differ from the
pictures.
• Th
e buttons not mentioned here
are not used.
GUIDE
CC
MTS
STILL
AUDIO
SLEEP
CH+
VOL+
CH-
VOL-
EXIT
MENU
ENTER
LIST
7
Page 10
Getting Started
Using the Remote Control
When using the remote control, aim it at remote sen
sor on the television. If there is an
object between the remote control and the remote sensor on the unit, the unit may no
operate.
• Poin
t the remote control at the REMOTE SENSOR located on the television.
• Wh
en using this television in a very brightly lit area, the infrared REMOTE CONTROL
SENSOR may not work properly.
• The recomme
nded effective distance for using the remote control is about 7 metres.
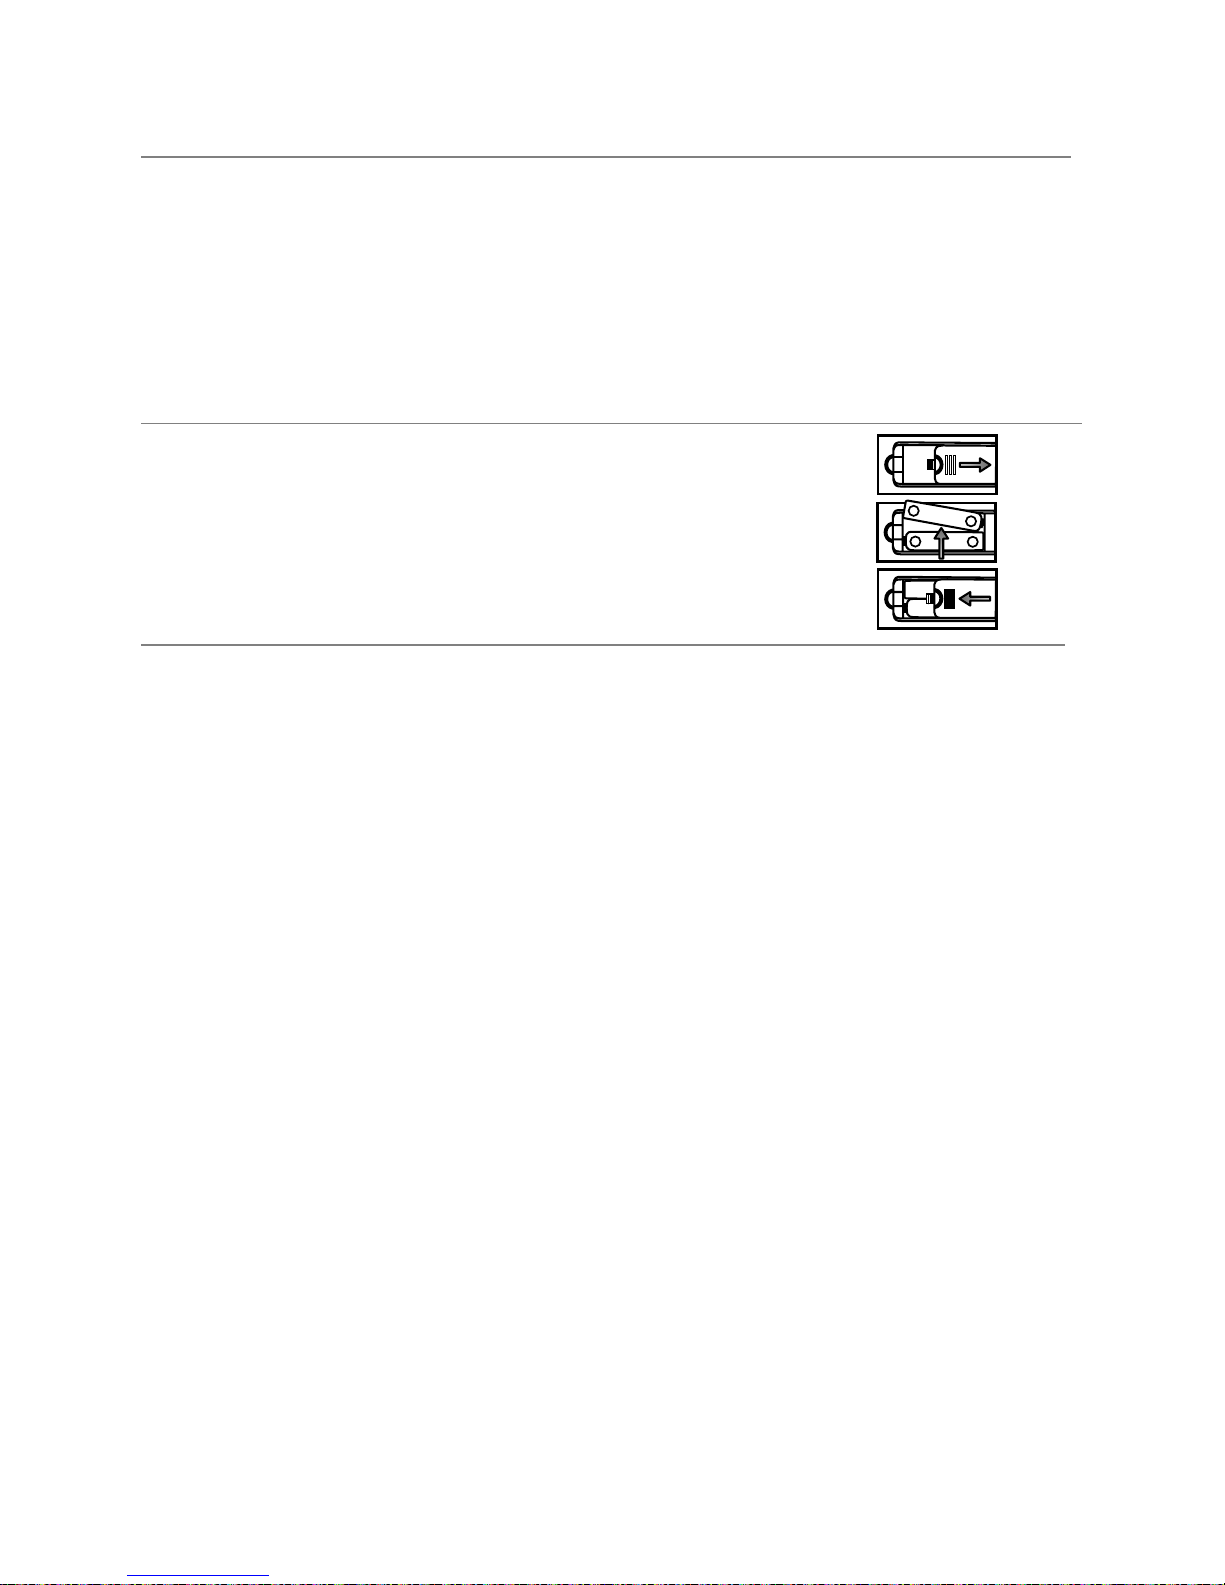
Installing Batteries in the Remote Control
1. Open the cover at the back of the remote control.
2. Install two AAA size batteries. Make sure to match
the “+” and “-” ends of the batteries with the
diagram inside the compartment.
3. Replace the cover.
Battery Replacement
You will need to install the batteries into the remote control to make it operate following
the instruction below.
When the batteries become weak, the operating distance of the remote control will be
greatly reduced and you will need to replace the batteries.
Notes on Using Batteries:
The use of the wrong type of batteries may cause chemical
leakage and/or explosion.
Please note the following:
• Always en
sure that the batteries are inserted with the + and - terminals in the correct
direction as shown in the battery compartment.
• Different types of batteries have different characteristics. Do not mix different types.
• Do not mix ol
d and new batteries. Mixing old and new batteries will shorten battery life
and/or cause chemical leakage.
• Replace batte
ries as soon as they do not work.
• Chem
icals which leak from batteries may cause skin irritation. If any chemical matter
seeps out of the batteries, wipe it up immediately with a dry cloth.
• The batteries
may have a shorter life expectancy due to storage conditions. Remove the
batteries whenever you anticipate that the remote control will not be used for an
extended period.
• Th
e batteries (battery pack or batteries installed) shall not be exposed to excessive heat
such as sunshine, fire or the like.
CAUTION:
• It may result i
n an explosion if batteries are replaced incorrectly.
• Only replace
batteries with the same or equivalent type.
+
-
+
-
8
Page 11
Connection and Setup
Connecting the Power Cord
Connect the power cable with 100-240V power supply.
NOTE:
• Th
e power input for the TV is 100-240V, 50/60Hz.
• Be sure the
power cord is disconnected and the TV is switched on before making
connections.
• To be completely disconnected from the supply mains, the mains plug of the television
should be disconnected from the mains socket outlet completely.
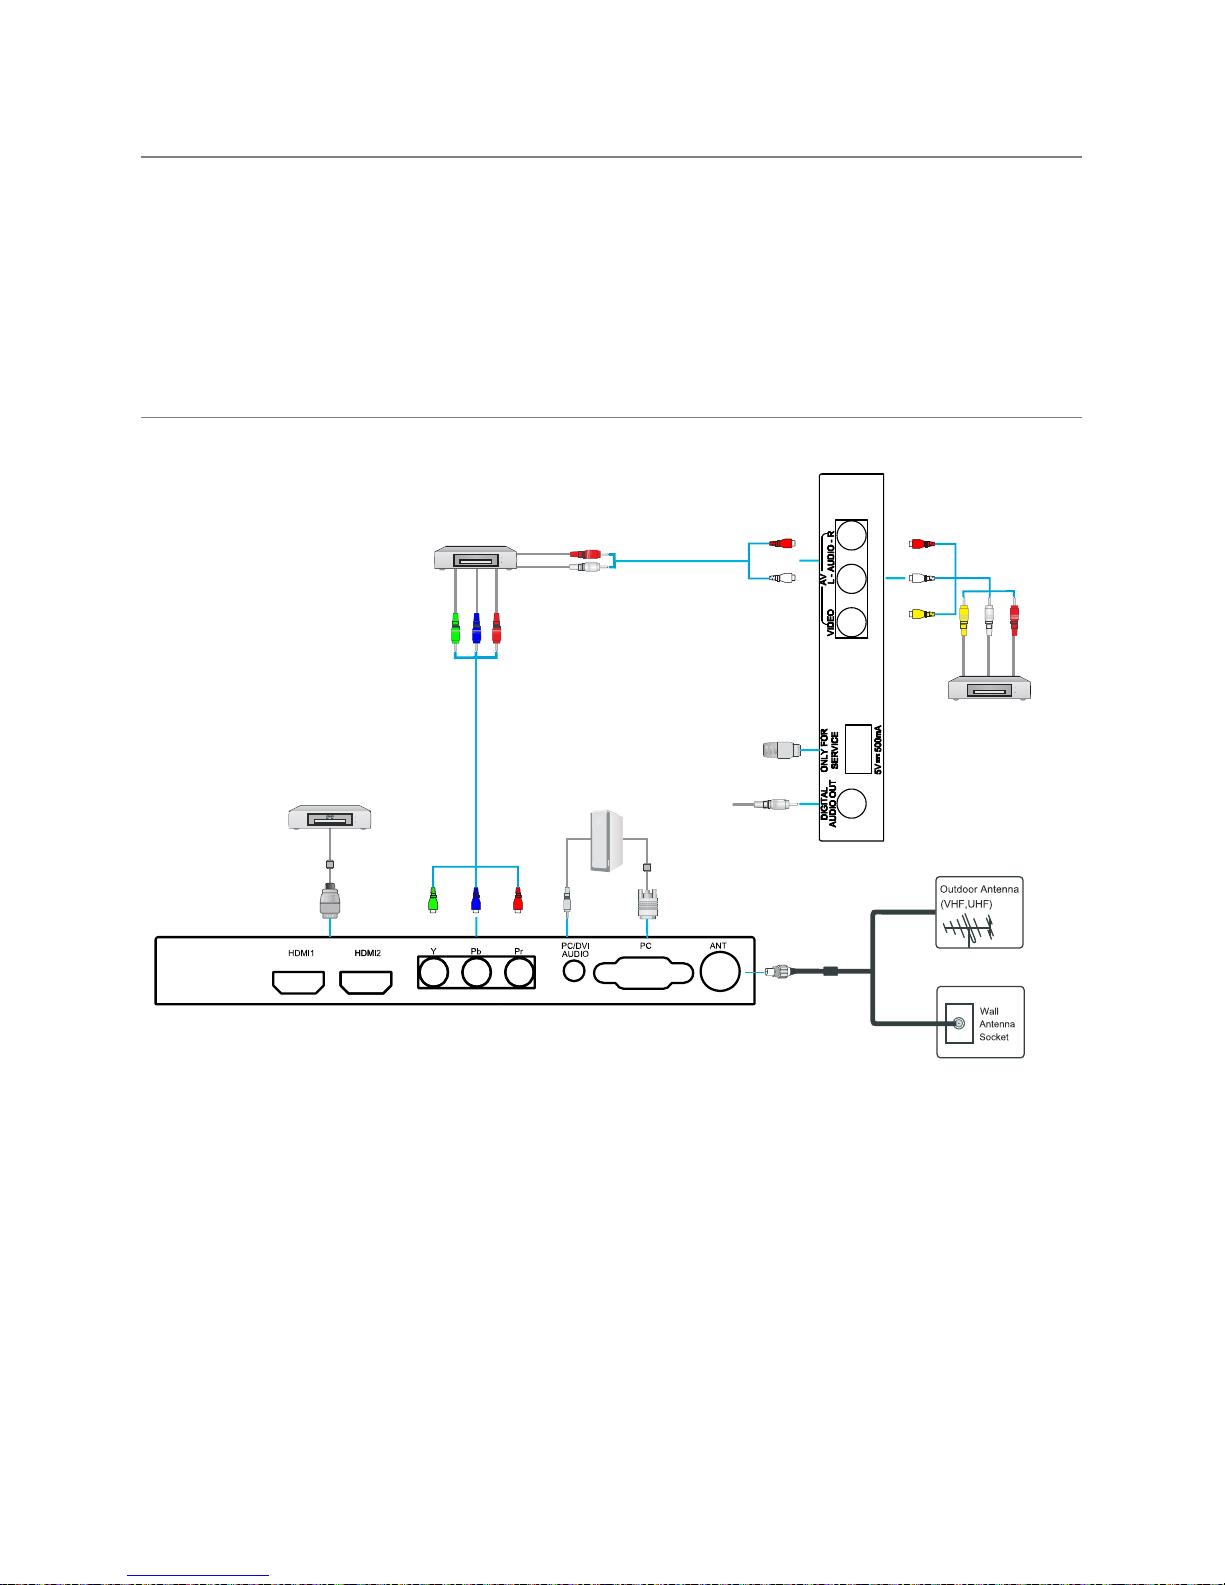
Connecting Antenna and Other Devices
NOTE:
• Make sure that all the components are connected correctly.
• For receiving
free to air TV broadcasts, we recommend that you use an external fixed
antenna. Should you require the use of a temporary antenna, please ensure that you
purchase an antenna with sufficient ability to receive in weak signal areas. Only when
you are in close proximity to a transmitter will a temporary antenna reproduce a signal as
strongly as a fixed antenna. A digital antenna on the roof is recommended.
•
YPbPr and AV can not be used at same time for they share of one audio channel.
RF Coaxial
Wire(75 ohm)
The equipment with
HDMI output function
Computer
The equipment with AV output
function (such as VCR, DVD,
set-top boxes, etc.).
Video
Audio L
Audio R
Yellow
White
Red
USB Drive(only for service)
COAXIAL
The equipment with
Component output function
White
Red
Red
Audio L
Audio R
Blue
Green
Pr/Cr
Pb/C
b
Y
9
Page 12

Connection and Setup
Cable Installation
Before the installation and use, please read car
efully the relevant content in “Warning and
Safety instructions”.
1. Take the TV
from the wrapping package and put it in a drafty and flat place.
NOTE:
• When you plug or unplug the TV, computer or oth
er equipments, you must make sure
that the AC power has been already shut down;
• When unplugging the power cable or signal cable, please hold the plug (the insulated
part), do not draw the body of the cable.
2. The RF output terminal can be connected with the RF input port of the TV.
3. Th
e output AV terminal of DVD can be connected with the AV input port of the TV
through AV cable.
NOTE:
• YPbPr and AV can not be used at same time for they
share of one audio channel.
4. The output COMPONENT(YPbPr) terminal of DVD can be connected with the
COMPONENT(YPbPr) input port of the TV through AV cable.
5. C
onnect one end of the VGA cable with the VGA port on computer, connect the other
end of the VGA cable with the VGA port on the TV, and tighten the bolts clockwise on
the each end of VGA cable.
NOTE:
• While connecting the 15-pin VGA, please do not insert the p
lug overexertedly, for fear
the pin might be broken.
6. Connect one end of the HDMI cable with HDMI output port, connect the other end of
the HDMI cable with the HDMI port on the TV.
NOTE:
• While connecting the HDMI, please aim at carefully, do
not insert overexertedly, for fear
the pin might be broken.
7. Sending the TV's audio signal to external audio equipment via the Digital Audio
Output port.
8. Check
and make sure that all AV cables are connected with the corresponding ports
correctly.
9. Connect the AC power cable with 100-240V AC power supply.
NOTE:
• The range of power input for the TV is 100-240V, 50/60Hz, do not connect the TV
power in
put port with the AC power out of the above range.
• Please hold the insulated part of the plug when you are unplugging the power cable, do
not touch directly the metallic part of the cable.
10
Page 13
Basic Operation
Turning on and off the TV
■ T
urn on the TV
Connect the AC input cable. At this time the TV will enter standby mode. Press the
button on remote control can turn on TV from standby mode.
■ Turn off the TV
Press the button on the remote control to enter standby mode.
Do not leave your set in standby mode for lon
g periods of time. It is best to unplug the
set from the mains and aerial.
When there is an accident power off, it is recommended to unplug the power cable
from the power socket.
■ No signal
There is No Signal menu on screen when there is no input signal. In ATV/DTV mode, if
there is no signal in 5 minutes, the TV will turn off automatically. In PC mode, the TV
set will automatically turn off in 1 minutes if no input signal. When VGA cable is
connected, the TV turns on automatically.
Programme Selection
■ Using the CH+/CH- on the panel of TV or on the remote control.
Press CH+ to increase channel number.
Press CH - to decrease channel number.
You can select the channel number by pressing 0 to 9. (In ATV mode)
In DTV mode, press number buttons and – button to select channel.
■ Example
To select - channel (e.g. Channel 1): Press 1.
To select -- channel (e.g. Channel 20): Press 2 and 0 in a short time.
To select --.- channel (e.g. Channel 20.1): Press 2, 0, – an
d 1 in a short time.
Volume Adjustment
■ Press the VOL+/- bu
tton to adjust the volume.
■ If y
ou want to switch the sound OFF, press the .
■ You can release mute by pressing the or increase the volume.
Changing the Input Source
1. You ca
n select the input source by pressing the SOURCE button on the remote
control.
2. Press the▲/▼button to cycle through the input source, and press the ENTER button
to confirm your choice.
11
■ Using 0- 9 digital buttons and button.
–
Page 14

Menu Operation
QUICK START GUIDE
■ Connection
Connecting the mains and antenna.
■ Initial Setup
When the TV is initially powered on, a sequence of on-screen prompts will assist in
co
nfiguring basic settings.
Menu Language: Press ◄/► button to select the desired menu Language.
Time Zone: Press ◄/
► button to select your time zone.
DST: Switches Daylight Saving Time on or off.
Signal Type: Press ◄/
► button to select the desired signal type.
When done, the TV will begin memorizing all of the available channels.
How to Navigate Menus
Before using the TV follow the steps below to learn how to navigate the menu in order to
select and adjust different functions. The access step may differ depending on the
selected menu.
1. Press the MENU
button to display the main menu.
2. Press the◄/►button to cycle through the main menu.
3. Press the▲/
▼button to select the desired sub item.
4. Press the ENTER button to access the submenu.
5. Press the ▲/
▼/◄/► button to select the desired value. The adjustment in the OSD
may differ depending on the selected menu.
6. Press the MENU button to return to the previous menu.
7. Press the EXIT
button exit from the menu.
NOTE: When an item in MENU is displayed gray, it means
that the item is not available
or cannot be adjusted.
Some items in the menus may be hidden depending on modes or signal sources used.
Buttons on the TV have the same function as corresponding buttons on the remote
co
ntrol. If your remote control is lost or couldn’t work, you may use the buttons on the
TV to select menus. This manual focuses on operation of the remote control.
12
Page 15
Menu Operation
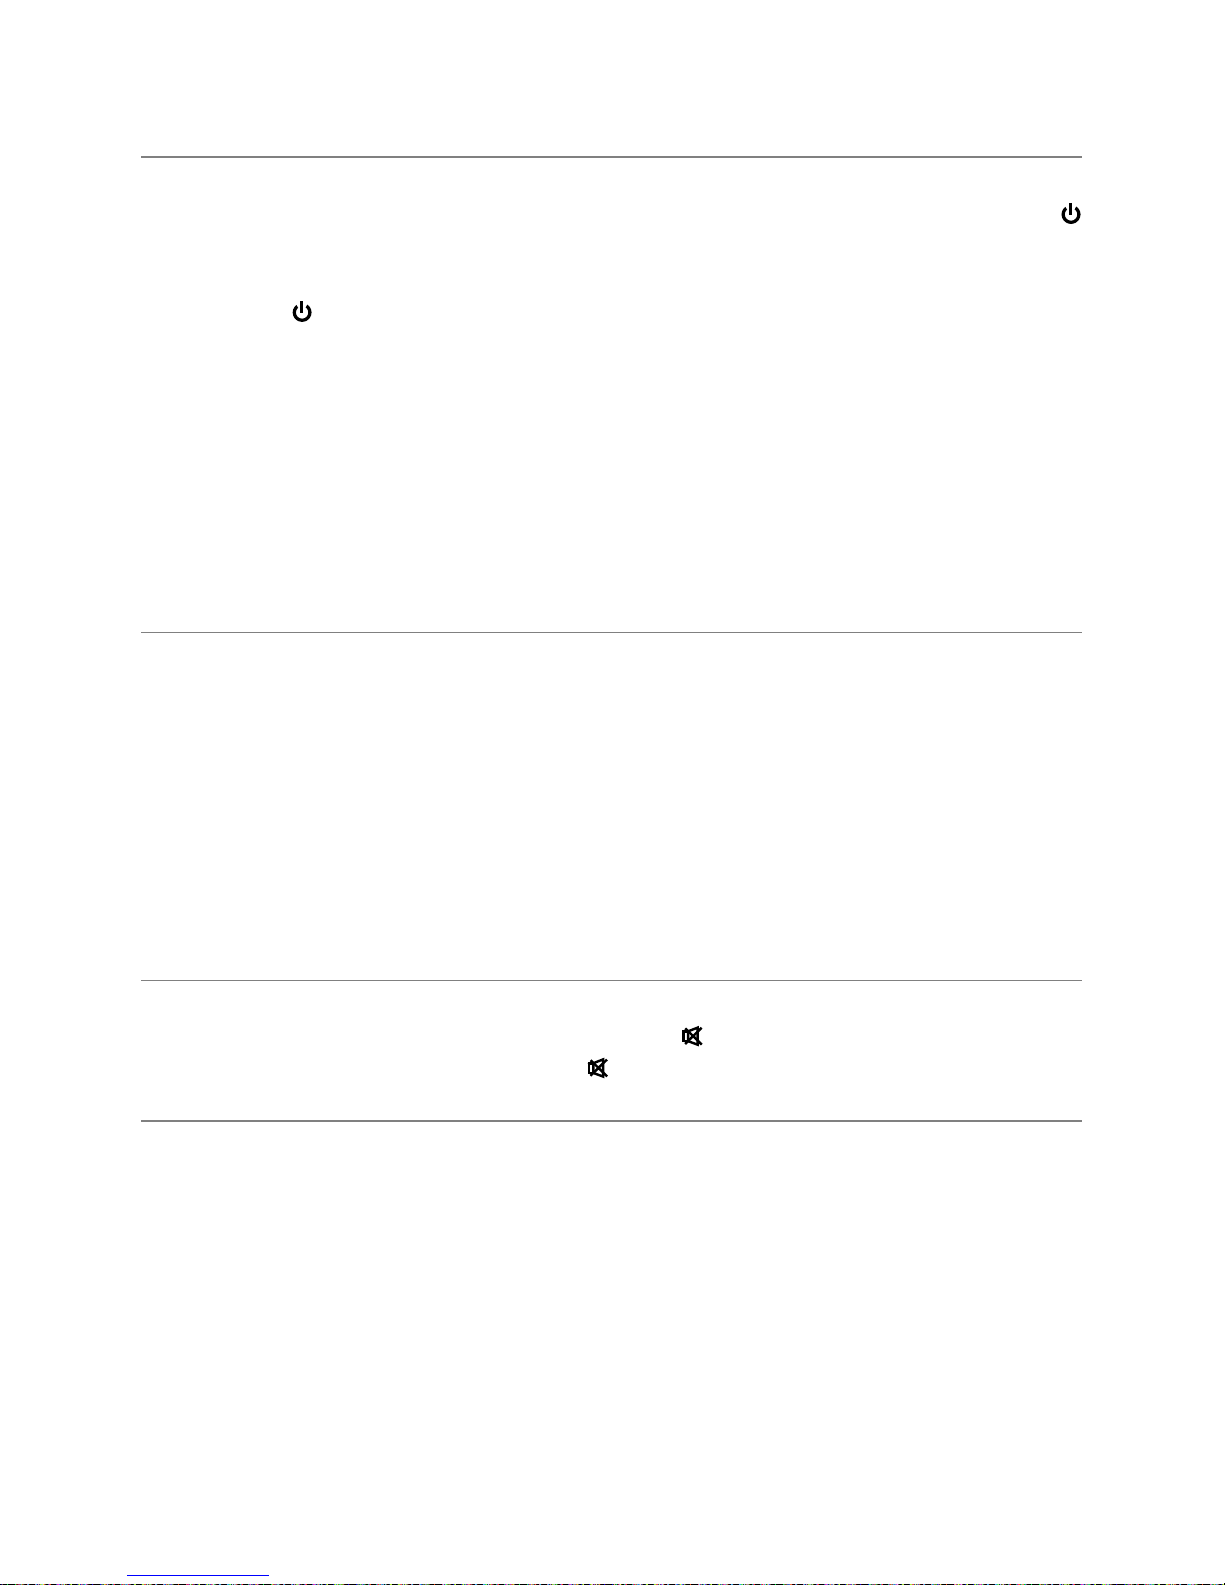
Configuring the Channel Menu
■ S
ignal Type: Select the signal type for
channels.
■ A
uto Scan: Press the ENTER button to
start Auto Scan which automatically
scan and store all available
programmes.
Before execute auto scan, please
co
nfirm your antenna type is Air or
Cable. Wrong setting of Signal Type
maybe cause finding no channel. Found numbers do not include encryption programs.
■ Favorite: Set the channel to your favorite list. Press the ▲/▼ button to select the
channel you want to set, and press the ENTER button to set or cancel.
■ Channel List:
Press the ▲/▼ button to select the channel you want to skip, and press
the ENTER button to set or cancel.
■ DTV Signal (digital channels only): Displays the current signal strength.
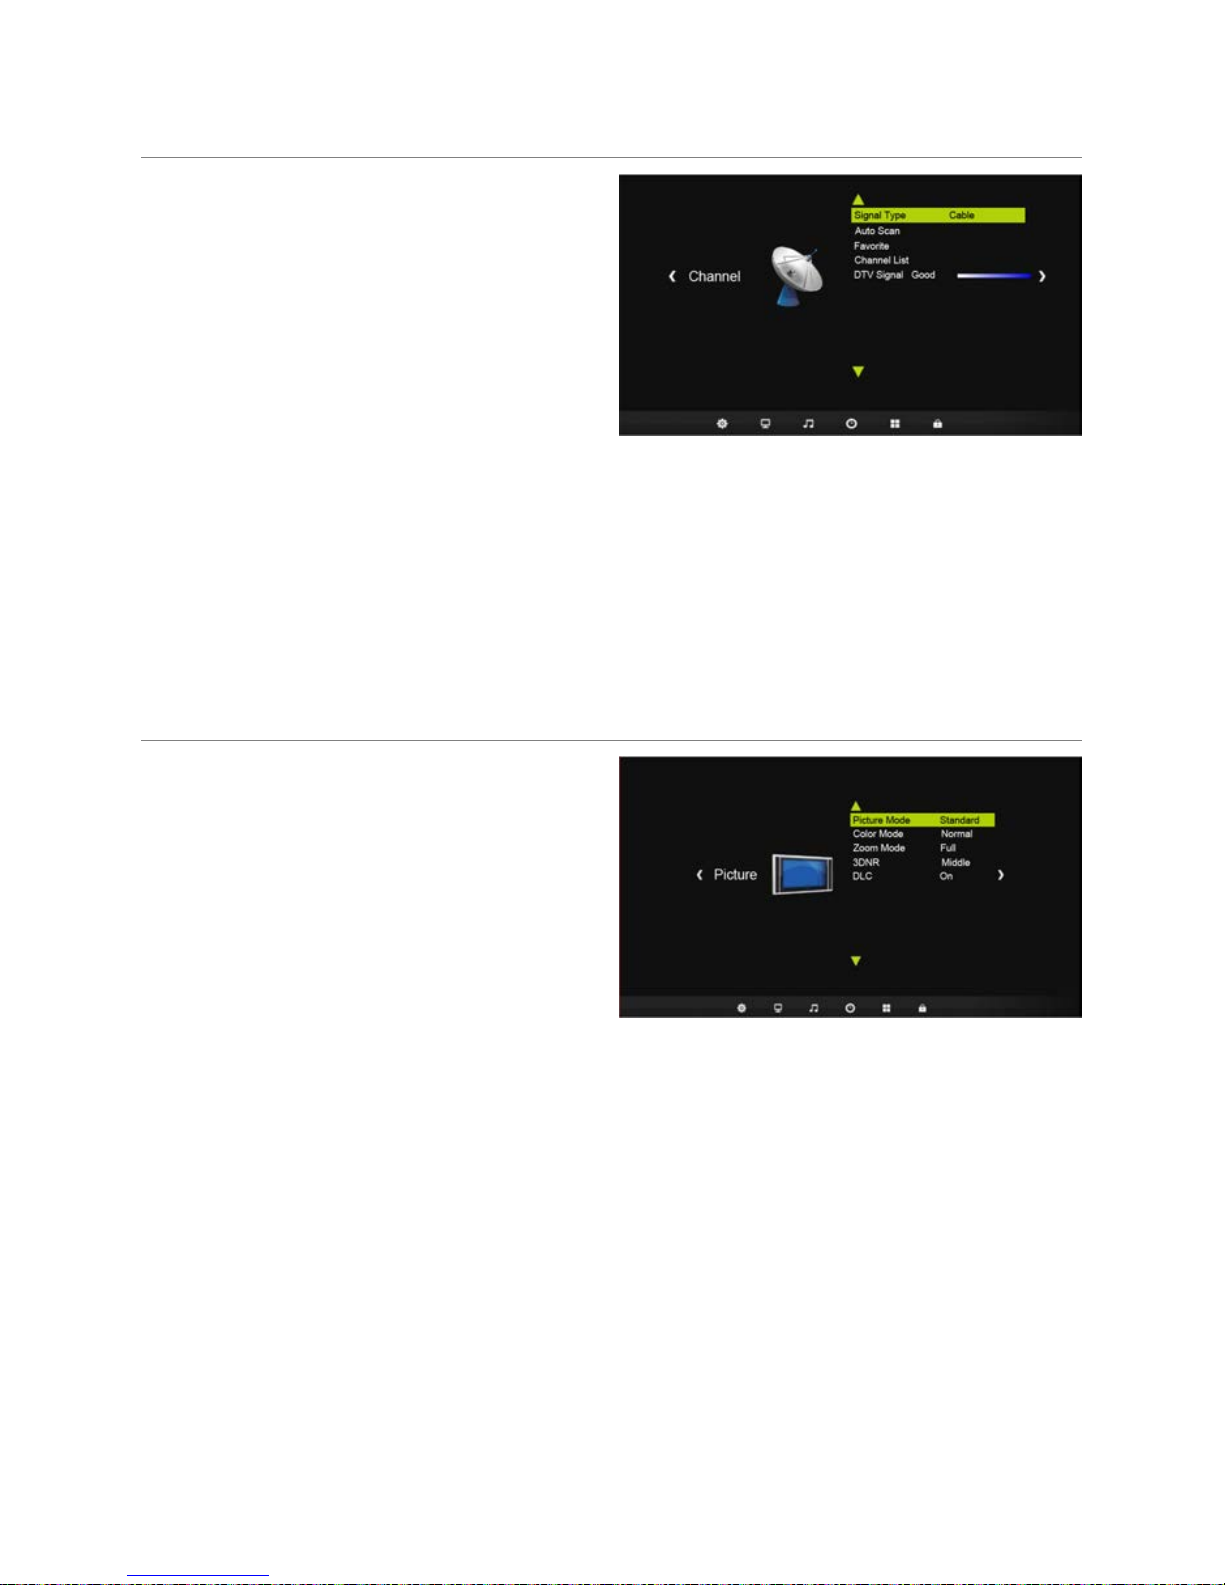
Configuring the Picture Menu
■ Picture Mode: You can sel
ect the type
of picture which best corresponds to
your viewing requirements.
Standard: Suitable for a normal
environment.
Dynamic: Suitable for a bright room.
Soft: Suitable for watching movies in a
dark room.
Personal: You can change the value of
Contrast, Brightness, sharp
ness, Tint (Only in the NTSC mode) and Color when the
picture is in Personal mode.
Contrast: To adjust the picture’s contrast.
Brightness: To adjust the picture’s brightness.
Sharpness: To
adjust the picture’s sharpness.
Tint (Only in the NTSC mode): T
o adjust the tint of the picture.
Color: Adju
sts intensity of all colours.
■ Color Mode: Selec
t your preferred color mode.
Normal: B
asically will be accepted by most people.
Warm: M
eans a low color temperature that will feel warm.
Cool: M
eans a high color temperature that will feel cool.
13
Page 16

Menu Operation
■ Advanced (In PC mode)
H-Pos:
Centre the image by moving it left or right.
V-Pos: Ce
ntre the image by moving it up or down.
Clock: Adjust the DB15 pictur
e signal
sampling clock rate.
Phase: Adj
ust when characters have low contrast or when the image flickers.
Auto: Adjust the image a
utomatically.
■ Zoom Mode: You c
an select the picture size which best corresponds to your viewing
requirements.
■ 3DNR: Red
uces screen noise without compromising video quality.
■ DLC: D
ynamic Luminance Control.
Configuring the Audio Menu
■ Equalizer:
To adjust the sound
parameters.
Press the ◄/
► button to select a sound
mode to suit your personal preferences.
Only in Personal mode, the follow items
can be adjusted.
Based on your favorites about which
frequency band need to be adjusted,
make small adjustment with certain
frequency band at a time. Suggest NOT making too large changes.
■ MTS: Switch between Mono/STEREO/SAP.
■ Audio Language: Select your preferred audio language.
(Available for digital channels
if multiple audio languages are broadcasted.)
■ SPDIF Type: Press ▲/
▼ button to select SPDIF Type, then press ENTER button to
select PCM, RAW or Off.
■ Surround Sound: T
o switch the surround sound.
■ Audio Only: If yo
u have selected On, the backlight will turn off after 5 seconds. Then press
any key to wake it up.
■ AVC: AVC automa
tically remains on the same level of volume if you change
programmes. Because each broadcasting station has its own signal conditions,
volume adjustment may be needed every time when the channel is changed. This
feature allows users to enjoy stable volume levels by making automatic adjustments for
each program.
14
Page 17

Menu Operation
Configuring the Time Menu
■ Sleep Timer: Select th
e time to turn the
TV to standby mode automatically.
■ Time Zone: Select your time zone.
■ DST: When Auto Sync set to ON, this
item is available to enable daylight
saving option or not.
■ Auto Sync: If set it to ON
, the TV will
sync the local clock according to the
DTV broadcasting time automatically.
Otherwise you can set the time manually.
■ Clock: Set the System Time. You must set the time correctly before using Wake Up
function.
■ Wake Up: Set the time for your TV to turn on.
Configuring the Setup Menu
■ Menu Language: Select your preferred
Menu Lang
uage.
■ Transparent: Menu transparency
selection, you can select menu
transparency according to the different
background picture.
■ Closed Caption: You can select C
Caption, if available, to be displaye
screen.
losed
d on
- CC Mode
Press the ◄/
► button to select CC mode.
- Basic Selection
Select from below closed-caption
modes for analog programs.
CC1,2,3,4 Displays corresponding caption
channel of a analog program. (Usually
be set to CC1 for most programs.)
Text1,2,3,4 Displays corresponding text service channel of a analog program.
- Advanced Selection
Applies only to digital channels
with closed caption.
Service1,2,3,4,5,6 These are different service data channels.
- Option
Default/Font 0~7Font Style:
Font Size:
Default/ Normal/ Large/ Small
15
Mode: Default/Custom.
Page 18

Menu Operation
Font Edge Style: Default/ None/ Raised/ Depressed/ Uniform/ Left Shadow/ Right
Shadow
Font Edge Color: Default/ Black/ White/ Red/
Green/ Blue/ Yellow/ Magenta/ Cyan
FG Color: Default/ White/ Red/ Green/ Bl
ue/ Yellow/ Magenta/ Cyan
BG Color: Default/ Black/ Red/ Green/ Bl
ue/ Yellow/ Magenta/ Cyan
FG Opacity: Default/ Solid/ Flashing/ Translucent/ Transparent
BG Opacity: Default/ Solid/ Flashing/ Transl
ucent/ Transparent
■ Restore Default: Restore the system settings to the factory default.
■ Setup Wizard: Th
is is a guide to help you to setup the TV.
Configuring the Lock Menu
Press your password (it is 0 0 0 0 at first), Then you will go the sub-menu as following.
If you forget, the super password of 98
98 still valid.
■ Change Password: Yo
u can set your
private password. Press the number
buttons on the remote control to set
the new password. When the new
password has been input twice, the
setting is finished successfully.
■ System Lock: Set the system lock ON
or OFF.
■ In
put Block: Press ▲/▼button to
select input channel, Press◄/►button
to lock or unlock.
■ US: To select the TV/MPAA Rating you want to lock or not.
TV
Age Define
TV-Y General audience
TV-Y7 Parental guidance
suggested
TV-G Parents strongly cautioned
TV-PG Retricted
TV-14 No one 17 and under
admitted
TV-MA Adult audience only
Content Define
FV Fantasy violence
D Suggestive dialogue
L Strong language
S Sexual situations
V Violence
16
Page 19

Menu Operation
MPAA
Rating Define
G General audience. All ages admitted.
PG Parental guidance suggested. Some material may not be suitable for
children.
PG-13 Parents strongly cautioned. Some material may be inappropriate for
children under 13.
R Restricted. Children under 17 require accompanying parent or adult
guardian.
NC-17 No one 17 and under admitted.
X Adult audience only.
N/A MPAA rating of “N/A”
■ Canada: To select the Canada Eng/Canada Fre Rating you want to lock or not.
Canada Eng: These ratings are for programs which are using English rating system.
Rating Defined as
C Children
C8+ Children 8 years and older
G General programming
PG Parental guidance
14+ Viewers 14 and older
18+ Adult programming
EXEMPT Unblock
Canada Fre: The ratings are for programs which are using French rating system.
Rating Defined as
G General
8 ans+ Not recommended for younger children
13 ans+ Not recommended for childrenunder age 13
16 ans+ Not recommended for ages under 16
18 ans+ This program is restricted to adults
EXEMPT Unblock
■ RRT Setting: Press ENTER button to set RRT rating.
■ Reset RRT: Press ENTER button to reset RRT information.
NOTE: RRT setting and Reset RRT can be selected when the
TV signal is RRT.
■ Block Unrated Show: Control whether lock the program that have not any valid rating
flag.
17
Page 20

Troubleshooting Guide
Troubleshooting
Before contact the service technicia
n, perform the following simple checks. If any program
still persists, unplug the TV and calling for serving.
Symptoms Possible Reason Solutions
No picture, no sound,
and no indicator light on
1.The power cord is not plugged in
2.The power is off
1.Plug the power cord in
2.Turn the power on
Picture and sound with
abnormity
1.Contrast, sharpness, and color are
set
improperly
2.Color system is set improperly
3.Sound system is set improperly
1.Adjust the value of
Contras
t, sharpness, and
color
2.Set the Color system to the
cou
ntry broadcasting
standard
3.Set the Sound system to
the country broad
casting
standard
Picture is spotted or with
snow
Signal source is low-grade or the
signal cord is in a lower quality
Use the qualified signal cord
Volume is in the minimum value or
TV is in mute mode.
Adjust the value of volume
No picture, no sound and
indicator light is
green/blue
The signal cable is not correctly
connected.
Connect the signal cable
correctly
Blue screen, AV or
S-VIDEO is displayed
There is no signal input or the video
cable is no
t connected or incorrectly
connected
Connect the video cable
correctly
Picture is unclear or
shaking or with black
horizontal strips (in PC
mode)
PC picture is not
centered
PC picture is not correctly adjusted.
Enter into Screen menu,
select Auto A
djust item to
perform automatic calibration
and adjust Phase to solve
the problem
No sound
There is no audio signal input or
audio c
able is not connected
correctly
Connect the audio cable
correctly
PC picture display with
improper color
The color temp is adjusted
incorrectly by user
Readjust the color temp, or
select the original color
setti
ng
HDMI source, with snow The source generate is not standard Plug the HDMI cable again
18
Page 21

Troubleshooting Guide
pixel of full screen
The remote control does
not work
Batteries are improperly installed or
exhausted
1. Make sure the positive and
the
negative polarities are
correct.
2.Check if there is a loose
contact betwe
en the
batteries and the springs
3.Replace the batteries
Maintenance
Early malfunctions can be prevented. Careful and reg
ular cleaning can extend the amount
of time you will have your new TV. Be sure to turn the power off and unplug the power
cord before you begin any cleaning.
Cleaning the screen
1. Here’s a great way to keep the dust off your screen for a w
hile. Wet a soft cloth in a
mixture of lukewarm water and a little fabric softener or dish washing detergent. Wring the
cloth until it’s almost dry, and then used it to wipe the screen.
2. Make sure the excess water is off the screen, and then
let it air-dry before you turn on
your TV.
Cleaning the cabinet
To remove dirt or dust, wipe the cabinet with a
soft, dry, lint-free cloth. Please be sure not
to use a wet cloth.
Extended Absence
If you expect to leave your TV dormant for a long time (such
as a vacation), it’s a
good idea to unplug the power cord to protect against possible damage from
lightning or power surges.
Disposal of old electrical appliances
The European directive 2002/96/EC on Waste Electrical an
d Electronic
Equipment (WEEE), requires that old household electrical appliances must not
be disposed of in the normal unsorted municipal waste stream. Old appliances
must be collected separately in order to optimize the recovery and recycling of
the materials they contain, and reduce the impact on human health and the
environment.
The crossed out “wheeled bin” symbol on the product reminds you of your
obligation, that when you dispo
se of the appliance, it must be separately
collected.
Consumers should contact their local authority or retailer for information
concerning the correct disposal of their old appliance.
19
Page 22

Wallmounting Instruction
TV
top
bottom
Wall
Wall
1
2 3 A
B C
1pc
2pcs 2pcs 3pcs
½
M4 40mm 2pcs½M4 60mm 2pcs½M6 65mm 3pcs
20
Page 23

Display panel
Item Illustration
Active Area / Screen Size Diagonal 29 inches
Aspect Ratio Widescreen 16:9
Sub-Pixel Pitch
0.154(H)×0.62(V)mm
Max. of Pixels (Resolution)
Peak Luminace 300cd/m2
Contrast 2500:1
Viewing Angle
Lamp Life of Backlight
TV DISPLAY
Dimension(mm)
654×64×406 (without stand)
654×165×458 (with stand)
Weight(kg / lbs)
4.7(without stand)
5 (with stand)
Power input AC 100 – 240V, 50/60 Hz
Function
(1)Video
De-interlace 3D
Noise reducing core technology 3D
Aspect ratio Full / Normal / Zoom1 / Zoom2
Picture mode
(2)Audio
Sound Mode
Auto Volume Control Yes
Tone Balance
Speakers 5 watt per channel
(3) General
Hybrid TV Tuner NTSC / ATSC
Channel auto scan Yes
Sleep timer Off / 5min / 10min / 15min / 30min /60min /
90min / 120min / 180min / 240min
Standby power Under 0.5W
HDMI/COMPONENT support-Video 480i / 480p / 720p / 1080i / 1080p
PC timing
1360*768@60 Hz (NATIVE)
1024*768@60
800*600@60
640*480@60
720x400@70
(4)NTSC/ATSC
Sound: Mono / STEREO / SAP
Favorite Channel
V-chip
NTSC
Closed caption (CC1-CC4, Text 1-Text 4)
150°( V ), 160°(H)
30,000hrs
Standard / Dynamic / Personal / Soft
Standard / Sports / Personal / Music / Movie
Specifications
21
1366 x 768 pixels (resolution)
Page 24

Specifications
*The product’s specifications may change without notice or obligation.
**This manual’s pictures and words are for references only and are subject to change
with
out notice or obligation.
Favorite Channel
V-chip
Video input format: MPEG-2MP@HL
ATSC
Analog closed caption: (CC1-CC4, Text 1-Text
4)
Digital closed caption: (Service 1-Service 6)
(5)I/O
1 input x TV Tuner (NTSC/ATSC),
1 input x AV,
1 input x YPbPr(audio shared with AV),
2 inputs x HDMI/HDCP,
1 input x VGA,
1 input x VGA Audio In,
1 input x USB(Only for service)
1 output x DIGITAL AUDIO OUT
22
Page 25

Table des matières
Avertissement 1
Consignes de sécurité 3
Commandes du téléviseur 5
Panneau Face AV 5
Panneaux Face AR et côté 6
Télécommande 7
Mise en route 8
Utiliser la télécommande 8
Installer les piles de la télécommande 8
Remplacement des piles 8
Connexion et installation 9
Raccordement du cordon d'alimentation 9
Connexion de l'antenne et des autres
périphériques 9
Installation des câbles 10
Utilisation de base 11
Allumer et éteindre le téléviseur 11
Sélection des programmes 11
Réglage du volume 11
Modifier la source d'entrée 11
Utilisation des menus 12
GUIDE DE DÉMARRAGE RAPIDE 12
Comment naviguer dans les menus 12
Configuration du menu Canal 13
Configuration du menu Image 13
Configuration du menu Sonner 14
Configuration du menu Temps 15
Configuration du menu Option 15
Configuration du menu Serrure 16
Guide de dépannage 18
Dépannage 18
Entretien 19
Instruction montage mural 20
Spécifications 21
Page 26

RISK OF ELECTRIC SHOCK
DO NOTOPEN
RISK OF ELECTRIC SHOCK
DO NOTOPEN
CAUTION/PRUDENCE
RISQUE DE CHOC ELECTRIQUE
NE PAS OVURIR
RISQUE DE CHOC ELECTRIQUE
NE PAS OVURIR
Avertissement
AVERTISSEMENT:
POUR RÉDUIRE TOUT RISQUE DE CHOC ÉLECTRIQUE NE PAS RETIRER LE
COUVERCLE (OU LE PANNEAU ARRIERE). AUCUNE PIÈCE NE DOIT ÊTRE RÉPARÉE
PAR L'UTILISATEUR. CONSULTER UN PERSONNEL QUALIFIE.
Le voyant clignotant avec le symbole en forme de flèche à l'intérieur d'un
triangle équilatéral est destiné à alerter l'utilisateur de la présence d'une
« tension dangereuse » dans l'enceinte des produits qui peut être d'une
ampleur suffisante pour constituer un risque d'électrocution pour les
personnes.
Le point d'exclamation à l'intérieur un triangle équilatéral est destiné à alerter
l'utilisateur de la présence de consignes d'utilisation et de maintenance
(
entretien) importantes dans le document fourni avec l'appareil.
INFORMATION SUR LA RÉGLEMENTATION
Cet équipement génère, utilise et peut émettre de l'énergie radioélectrique et, s'il
n'est pas installé et utilisé conformément aux instructions, il peut provoquer des
interférences sur les communications radio. Cependant, il n'existe aucune garantie
contre les interférences dans une installation particulière. Si cet équipement
provoque des interférences nuisibles à la réception radio ou télévision, ce qui peut
être déterminé en allumant et en éteignant l'équipement, l'utilisateur est invité à
essayer de corriger l'interférence grâce à une ou plusieurs des mesures suivantes :
-Déplacer l'antenne de réception.
-Éloigner l'équipement du récepteur.
-Brancher l'équipement dans une prise située sur un circuit différent de celui sur
lequel est branché le récepteur.
-Consulter le revendeur ou un technicien radio/TV expérimenté pour toute assistance.
Tout changement ou modification non expressément approuvé(e) par l'autorité
responsable de la conformité de l'appareil pourrait annuler toute autorisation de
l'utilisateur à utiliser l'équipement.
ATTENTION
NE PAS essayer de modifier ce produit de quelque façon que ce soit sans
l'autorisation écrite du fournisseur. Toute modification non autorisée peut annuler
l'autorisation de l'utilisateur à utiliser ce produit.
Il n'est pas recommandé de maintenir une image fixe sur l'écran pendant une longue
période ainsi que d'afficher des images extrêmement lumineuses sur l'écran.
Les figures et illustrations de ce Manuel de l'utilisateur sont fournies à titre
indicatif et peuvent être différentes de l'apparence réel du produit. La
conception et les spécifications du produit peuvent être modifiées sans préavis.
1
Page 27

Avertissement
Afin de réduire les risques d'incendie ou de choc électrique, ne pas exposer cet
appareil à la pluie ou à l'humidité.
La ventilation ne doit pas être bloquée par l'obturation des orifices d'aération avec
des objets tels que des journaux, nappes, rideaux, etc.
Le appareil ne doit pas être exposé à des suintements ou des éclaboussures et
aucun objet rempli de liquide, tel que des vases, ne doit être placé sur l'appareil.
Une attention particulière doit être portée sur les aspects environnementaux relatifs à
l'élimination des piles. Ne pas jeter les piles usagées à la poubelle. Veuillez contacter
votre revendeur afin de protéger l'environnement.
Maintenez les distances minimales (5cm) autour de l'appareil pour une aération
suffisante ; (Distance minimale autour de l'appareil pour une aération suffisante.)
Aucune source de flamme nue, telle que des bougies allumées, ne doit pas être
placée sur l'appareil ;
Afin d'éviter la propagation du feu, toujours maintenir les bougies ou autres flammes
nues éloignées de ce produit.
Il est possible que l'appareil rencontre des problèmes lorsqu'il est soumis à une
décharge électrostatique. Il peut être remis en marche manuellement en l'éteignant
puis en le rallumant.
ATTENTION en raccordant le cordon d'alimentation
Il est conseillé de placer la plupart des appareils sur un circuit dédié, c'est-à-dire un
circuit avec une seule prise qui alimente uniquement cet appareil et qui n'a pas
d'autres prises ou circuits de dérivation.
Ne pas surcharger les prises murales. Les prises murales surchargées, les prises
murales desserrées ou endommagées, les rallonges, les cordons d'alimentation
effilochés, les gaines craquelées ou endommagées sont dangereuses. Chacune de
ces conditions peut entraîner un choc électrique ou un incendie. Vérifiez régulièrement
le cordon de votre appareil, et s'il semble endommagé ou détérioré, débranchez-le,
arrêtez d'utiliser l'appareil, et faites remplacer le cordon par une pièce de rechange
identique par un technicien agréé. Protégez le cordon d'alimentation de toute
contrainte physique ou mécanique, en évitant de le tordre, de l'entortiller, de le pincer,
de le coincer dans une porte ou de marcher dessus. Portez une attention particulière
aux fiches, aux prises murales et à l'endroit où le cordon sort de l'appareil.
La prise SECTEUR est utilisée comme interrupteur général, et celui-ci doit rester
facilement accessible.
A
VERTISSEMENT
2
Page 28

Consignes de sécurité
CONSIGNES DE SÉCURITÉ IMPORTANTES
1. Lisez attentivement ces instructions.
2. Conservez ces instructions.
3. Respectez tous les avertissements.
4. Suivez toutes les instructions.
7. N'obstruez pas les orifices de
ventilation. Installez-le conformément
aux instructions du fabricant.
5. N'utilisez pas cet appareil près de l'eau.
8. Ne l'installez pas près d'une source de
chaleur telle que des radiateurs,
chauffages, poêles ou autres appareils
(y compris des amplificateurs)
produisant de la chaleur.
6. Nettoyez-le uniquement avec un chiffon
sec.
9. Ne retirez en aucun cas le dispositif de
sécurité de la fiche polarisée ou de terre.
Une fiche polarisée possède deux
bornes dont l'une est plus large que
l'autre. Une fiche de terre comporte deux
bornes et une troisième broche de mise
à la terre. La borne large ou la troisième
broche assure votre sécurité. Si la fiche
fournie ne rentre pas dans votre prise,
consultez un électricien pour remplacer
la prise obsolète.
3
Page 29

Consignes de sécurité
10. Protégez le cordon d'alimentation
contre tout piétinement ou pincement,
particulièrement au niveau des fiches,
des prises, et à l'endroit où il sort de
l'appareil.
13. Débranchez cet appareil pendant les
orages ou lorsqu'il n'est pas utilisé
pendant de longues périodes.
11. N'utilisez que les accessoires
spécifiés par le fabricant.
12. N'utilisez qu'un chariot, un pied, un
trépied, un support ou une table
spécifié(e) par le fabricant ou
vendu(e) avec l'appareil. Lorsque
vous utilisez un chariot, soyez
prudent lorsque vous déplacez
l'ensemble chariot/appareil afin
d'éviter toute blessure en cas de
chute.
14. Confiez toute réparation à un
personnel qualifié. Une réparation est
nécessaire lorsque l'appareil a été
endommagé de quelque façon que
ce soit : si le cordon d'alimentation
ou la fiche a été endommagé(e), si du
liquide a été renversé ou si des objets
sont tombés à l'intérieur de l'appareil,
si l'appareil a été exposé à la pluie ou
à l'humidité, s'il ne fonctionne pas
normalement ou s'il est tombé.
À PROPOS DE L'ÉLIMINATION
-La lampe fluorescente utilisée dans ce produit contient une petite quantité de
mercure.
-Ne pas jeter ce produit avec les ordures ménagères
-L'élimination de ce produit doit être effectuée conformément aux règlementations
des autorités locales.
NOTE
-Si le téléviseur semble froid au toucher, il peut y avoir un léger « papillotement »
lorsqu'il est allumé. Cela est normal, la télévision fonctionne correctement.
-Quelques défauts minuscules peuvent être visibles sur l'écran, sous forme de points
rouges, verts ou bleus. Cependant, ils n'ont aucun effet négatif sur les
performances du moniteur.
-Évitez de toucher l'écran ou de garder votre(vos) doigt(s) appuyés dessus
longtemps. Cela peut entraîner un effet de distorsion temporaire sur l'écran.
4
Page 30

Commandes du téléviseur
Panneau Face AV
6
1 CH+/CH-
2 VOL+/VOL-
3 MENU
4
5
6
N° Bouton Description
Accès au menu général.
Réglage de volume sonore.
Changement des chaînes.
Dans le menu à l'écran, utilisez les
boutons CH+/CH- de la même façon que les boutons ▲/▼
de la télécommande.
Dans le menu à l'écran, utilisez
les boutons VOL+/VOL- de la même façon que les boutons
►/◄de la télécommande.
Voyant de sous tension et capteur IF télécommande.
Permutation sour
ce signal.
Bouton Marche / Arrêt.
Dans le menu à l'écran, utilisez ce
bouton de la même façon que le bouton ENTER de la
télécommande.
Power&Sensor
5
1
2
5
3
4
Page 31

Commandes du téléviseur
Panneaux Face AR et côté
7
HDMI
8 YPbPr
9
PC / PC/DVI
AUDIO
10
ANT
11
AV
12
ONLY FOR
SERVICE
13
DIGITAL AUDIO
OUT
N° Bouton Description
Entrée antenne
Monitor PC
Uniquement pour le service
Entrées HDMI
Entrée de signal vidéo/audio AV
Entrée YPbPr
Sortie audio numérique (Sortie COAXIAL)
13
12
11
10
9
8
7
6
Page 32

Télécommande
Les boutons de la télécommande d'origine sont :
Définition des boutons de la télécommande :
1. POWER : entrer ou quitter la mise en veille.
2. INFO :
appuyer sur ce bouton pour afficher sur
l'écran les informations du programme en
cours.
3.
: Couper ou rétablir le son.
4. BOUTONS NUMÉRIQUES : choisir les
chaînes ou l'importation du mot de passe.
5. SOURCE : sélectionner la source du signal.
6.
-: En mode DTV, appuyez sur les boutons
numériques et la touche - pour sélectionner
une chaîne.
7.
: appuyer sur ce bouton pour sélectionner
différentes tailles d'image.
8.
: revenir au dernier programme visionné.
9. MENU : appuyer sur ce bouton pour
afficher/masquer les menus à l'écran ou
quitter certaines opérations.
10. EXIT : quitter l'interface actuelle.
11. ENTER : sélectionner ou confirmer l'élément
du menu.
12. ▲/▼/◄/►: sélectionne la direction.
13. VOL+/VOL- : augmenter/diminuer le volume.
14. CH+/CH- : parcourir les chaînes.
15. SLEEP : définir le temps de veille.
16. LIST : appuyer sur ce bouton pour appeler la
liste des chaînes. Appuyer à nouveau sur ce
bouton pour en sortir.
17.
GUIDE : Electronic Program Guide, à utiliser en
mode DTV.
navigation rouge/ verte / jaune / bleue.
touches de
18.
: appuyez pour afficher le programme
Favoris en mode TV (il est nécessaire de
configurer des canaux en favoris dans le
19.
STILL : geler ou ractiver l'image actuelle.
20.
CC : appuyez sur ce bouton pour afficher les
sous-titres.
21.
MTS : appuyez sur ce bouton pour choisir
AUDIO : changer de langue en mode DTV.
NOTE :
• T
outes les images contenues
dans ce manuel sont des
exemples, seulement pour
référence, le produit réel peut
être différent des images.
• Les boutons non mentionnés ici
ne sont pas utilisés.
menu Favoris).
GUIDE
CC
MTS
STILL
AUDIO
SLEEP
CH+
VOL+
CH-
VOL-
EXIT
MENU
ENTER
LIST
22.
TOUCHES COLOREES:
entre Mono, et SAP en mode ATV.
S
TÈRÈO
7
Page 33

Mise en route
Utiliser la télécommande
Lorsque vous utilisez la télécommande, dirigez-la vers le télécapteur du téléviseur. Si un
objet se trouve entre la télécommande et le télécapteur de l'appareil, celui-ce risque de ne
pas fonctionner.
• Dirigez la télécommande vers le TÉLÉCAPTEUR situé sur le téléviseur.
• Lorsque vous utilisez ce téléviseur dans un endroit très éclairé, le TÉLÉCAPTEUR
infrarouge risque de ne pas fonctionner correctement.
• La distance effective recommandée pour utiliser la télécommande est d'environ 7
mètres.
Installer les piles de la télécommande
1. Ouvrez le couvercle au dos de la télécommande.
2. Installez deux piles de type AAA. Veillez à faire
correspondre les extrémités « + » et « - » des piles
avec le schéma à l'intérieur du compartiment.
3. Replacez le
couvercle.
Remplacement des piles
Vous devrez installer les piles dans la télécommande selon les instructions ci-dessous
pour que celle-ci fonctionne.
Lorsque les piles deviennent faibles, la distance de fonctionnement de la télécommande
est considérablement réduite et il vous faudra remplacer les piles.
Notes concernant l'utilisation des piles :
L'utilisation d'un mauvais type de piles peut provoquer des fuites de produits chimiques
et/ou une explosion. Veuillez noter les points suivants :
• Veillez toujours à ce que les piles soient insérées avec les bornes + et - dans la bonne
direction, comme indiqué dans le compartiment à piles.
• Les différents types de piles ont des caractéristiques diverses. Ne mélangez pas
plusieurs types.
• Ne mélangez pas des piles neuves et usagées. Mélanger des piles neuves et usagées
peut réduire la durée de vie des piles et/ou provoquer des fuites.
• Remplacez les piles dès qu'elles ne fonctionnent plus.
• Les produits chimiques qui fuient des piles peuvent provoquer une irritation cutanée. Si
une matière chimique suinte des piles, essuyez-la immédiatement avec un chiffon sec.
• La durée de vie des piles peut réduite en raison des conditions de stockage. Retirez les
piles lorsque vous pensez que la télécommande ne sera pas utilisée pendant une
période prolongée.
• Les piles (bloc-piles ou piles installées) ne doivent pas être exposées à une chaleur
excessive comme le soleil, le feu, etc.
ATTENTION :
• Le remplacement incorrect des piles peut provoquer une explosion.
• Ne remplacez les piles que par des piles du même type ou équivalentes.
+
-
+
-
8
Page 34

Connexion et installation
Raccordement du cordon d'alimentation
Branchez le câble d'alimentation à une source d'alimentation de 100-240V.
NOTE :
• Assurez-vous que le câble d'alimentation soit déconnecté et que le téléviseur soit allumé
avant tout branchement.
• Le téléviseur doit être débranché de la prise de courant pour être totalement déconnecté
du réseau d'alimentation.
Connexion de l'antenne et des autres périphériques
• La puissance d'entrée du téléviseur est de .
100-240V, 50/60Hz
COAXIAL
blanc
Audio L
Audio R
NOTE :
• Assurez-vous que tous les composants soient bien connectés.
• Nous recommandons d'utiliser une antenne externe fixe pour capter les chaînes
gratuites. Si vous êtes contraint d'utiliser une antenne provisioire, assurez-vous de vous
en procurer une suffisamment puissante pour recevoir depuis les zones de faible
réception. Une antenne provisoire ne pourra être aussi efficace qu'une antenne fixe que
si vous vous situez à toute proximité d'un transmetteur. Il est recommandé d'installer
une antenne numérique sur le toit.
• Il est impossible d'utiliser les sorties YPbPr et AV en même temps car elles utilisent le
même canal audio.
9
Équipement avec
sortie composante
Pr/Cr
Pb/C
b
Y
vert
bleu
rouge
rouge
Audio L
Audio R
Équipement avec sortie
AV (VCR, DVD, boîtiers
décodeurs, etc.).
jaune
blanc
rouge
vidéo
Clé USB (pour service uniquement)
ordinateur
Équipement avec
sortie HDMI
Antenne extérieure
(VHF, UHF)
Prise
d'antenne
murale
Câble coaxial
RF (75 ohm)
Page 35

Connexion et installation
Installation des câbles
Avant toute installation et utilisation, veuillez lire attentivement le contenu approprié dans la
section « A
vertissement et consignes de sécurité ».
1. Retir
ez le téléviseur de l'emballage et placez-le dans un endroit aéré et sur une surface
plane.
NOTE :
• Lorsque vous branchez ou débran
chez le téléviseur, ordinateur ou autres équipements,
vous devez vous assurer que l'alimentation CA a déjà été coupée ;
• Lorsque vous débranchez le câble d'alimentation ou le câble de signal, prenez la fiche
(la partie isolée), ne tirez pas tirer sur le câble.
2. La borne de sortie RF peut être reliée au port d'entrée RF du téléviseur.
3. La bor
ne de sortie AV de DVD peut être connectée au port d'entrée AV du téléviseur
grâce au câble AV.
NOTE :
• Il est impossible d'utiliser les sorties YPbPr et AV en même temps car elles utilisent
le
même canal audio.
4. Le bor
ne de sortie COMPONENT(YPbPr) de DVD peut être connectée avec le port
d'entrée COMPONENT(YPbPr) du téléviseur grâce au câble AV.
5. Branchez une extr
émité du câble VGA au port VGA de l'ordinateur et l'autre extrémité
du câble VGA au port VGA sur le téléviseur, puis serrer les boulons dans le sens
horaire à chaque extrémité de câble VGA.
NOTE :
• Lors du branchement de la prise VGA à 15 broches, ne pous
sez pas la fiche trop fort, au
risque de casser la broche.
6. Branchez une extrémité du câble HDMI au port de sortie HDMI et l'autre extrémité du
câble HDMI au port HDMI sur le téléviseur.
NOTE :
• Lors du branchement de la prise HDMI, insérez-la soigneusement, ne la poussez pas
tr
op fort, au risque de casser la broche.
8. V
érifiez et assurez-vous que tous les câbles AV sont correctement reliés aux ports
correspondants.
9. Branchez le câble d'alimentation CA à une source d'alimentation de 100-240V.
NOTE :
pas le port d'entrée d'alimentation du téléviseur su
r une prise d'alimentation CA en
dehors de la plage ci-dessus.
• Prenez la partie isolée de la fiche lorsque vous débranchez le câble d'alimentation, ne
touchez pas directement la partie métallique du câble.
• La plage de puissance d'entrée du téléviseur est de 100-240V, 50/60Hz, ne branchez
Sortie Audio Numérique.
Emission du signal audio de la télévision à un équipement audio externe via le port de
7.
10
Page 36

Utilisation de base
Allumer et éteindre le téléviseur
Connectez le câble d'entrée AC. Le téléviseur se mettra alors en veille. Appuyez sur le
bouton de la télécommande pour sortir le téleviseur de veille.
Appuyez sur le bouton de la télécommande pour le mettre en mode veille.
Ne laissez pas le téléviseur en mode veille pendant de longues périodes. Il est préférable
de débrancher le téléviseur du secteur et de l'antenne.
Sélection des programmes
télécommande.
Appuyez sur CH+ pour augmenter le numéro de la chaîne.
Appuyez sur CH - pour diminuer le numéro de la chaîne.
Vous pouvez sélectionner le numéro de la chaîne en appuyant sur les boutons 0 à 9. (En
mode ATV)
En mode DTV, appuyez sur les boutons numériques et le bouton - pour sélectionner un
chaîne.
Pour sélectionner la chaîne - (ex. chaîne 1) : appuyez sur 1.
Pour sélectionner la chaîne -- (ex. chaîne 20) : appuyez sur 2 et 0 rapidement.
Pour sélectionner la chaîne --.- channel (ex. chaîne 20.1) : Appuyez sur 2, 0, – et 1
rapidement.
Réglage du volume
Appuyez sur le bouton VOL+/- pour régler le volume.
Si vous voulez couper le son, appuyez sur le bouton
.
Vous pouvez réactiver le son en appuyant sur le bouton
ou augmenter le volume.
Modifier la source d'entrée
Vous pouvez sélectionner la source d'entrée en appuyant sur le bouton SOURCE sur la
télécommande.
Appuyez sur le bouton ▲/▼ pour faire défiler les sources d'entrée, puis appuyez sur le
bouton ENTER pour confirmer votre choix.
Le menu Pas de signal s’affichera sur l’écran s’il n’y a aucun signal d’entrée. En mode
ATV/DTV, la TV s’éteindra automatiquement dans 5 minutes s’il n’y a pas de signal. En
mode PC, le TV s’éteindra automatiquement dans 1 minutes s’il n’y a pas de signal.
En cas de câble VGA connecté, le TV s’allumera automatiquement.
Pas de signal
Éteindre le téléviseur
11
Allumer le téléviseur
À l'aide des boutons CH+/CH- sur le panneau du téléviseur ou sur la
À l'aide des chiffres 0 à 9 et le bouton –.
Exemple
■
■
■
■
■
■
■
■
■
Page 37

Utilisation des menus
GUIDE DE DÉMARRAGE RAPIDE
■ Connexion
Connexion des prises secteur et antenne.
■ Configuration initia
le
Lorsque la télévision est mise sous tension pour la première fois, une séquence de
messages s'af
fiche à l'écran, afin de faciliter les réglages de base.
Langue: pressez les boutons◄/►pour sélectionner la langue dans laquelle
s'afficheront les menus.
Fuseau Horaire: pr
essez les boutons◄/►pour sélectionner votre fuseau horaire.
Eté / hiver auto: active/désactive la prise en compte de l'heure d'été.
Source signal: pr
essez les boutons◄/►pour sélectionner le type de signal souhaité.
Une fois ces opérations effectuées, la télévision commencera à mémoriser toutes les
chaînes disponibles.
Comment naviguer dans les menus
Avant de commencer à utiliser la télévision, veuillez suivr
e les étapes ci-dessous pour vous
familiariser avec la navigation dans les menus ; ceux-ci vous permettront de sélectionner
et d'ajuster différentes fonctions. Veuillez noter que l'accès peut varier suivant le menu
sélectionné.
1. Pr
essez le bouton MENU pour afficher le menu principal.
2. Pressez ensuite les boutons◄/►pour vous déplacer au sein de ce menu.
3. Pr
essez les boutons▲/▼pour sélectionner l'élément souhaité.
4. Pressez le bouton ENTER pour accéder à un sous-menu.
5. Pr
essez les boutons ▲/▼/◄/► pour sélectionner la valeur souhaitée. Le réglage
dans l'affichage écran peut dépendre du menu sélectionné.
6. Pressez le bouton MENU pour revenir au menu précédent.
7. Pr
essez le bouton EXIT pour sortir du menu.
NOTES :
Lorsqu'un élément apparaît en gris dans le menu, cela signifie qu'il n'est pas
disponible ou qu'il ne peut pas être réglé.
Certains éléments des menus peuvent être masqués, suivant le mode ou la source de
signal d'entrée utilisés.
Les boutons de la télévision ont la même fonction que les boutons correspondants sur
la télécommande. En cas de perte ou de mauvais fonctionnement de la télécommande,
vous avez la possibilité d'utiliser les boutons de la télévision pour naviguer dans les
menus. Le présent manuel se concentre toutefois sur l'utilisation de la télécommande.
12
Page 38

Utilisation des menus
Configuration du menu Canal
■ Source signal: permet de sélectionner
le type de signal utilisé pour les chaînes.
■ In
stallation Automatique: pressez le
bouton ENTER pour lancer un balay
automatique, qui cherchera et placera
en mémoire tous les program
disponibles de façon automatique.
Avant de lance
age
m
es
r le balayage
surez que
pas
automatique, veuillez vous as
votr
e type d'antenne est bien "Antenne"
ou "Câble". En cas de réglage erroné du type de signal, il est possible qu'aucune
chaîne ne soit détectée. Veuillez noter que les chaînes détectées ne comprendront
les programmes cryptés.
■ Favoris: place la chaîne dans votre liste de favoris. Pressez les boutons ▲/▼ pour
sélectionner la chaîne que vous souhaitez ajouter, puis pressez le bouton ENTER pour
effectuer l'ajout ou l'annuler.
■ Organiseur:
pressez les boutons ▲/▼ pour sélectionner la chaîne que vous souhaitez
sauter, puis pressez le bouton ENTER pour effectuer l'opération ou l'annuler.
■ Qualité Signal (chaî
nes numériques uniquement): affiche la puissance actuelle du
signal.
Configuration du menu Image
■ Mode Image: sélectionnez le type d
qui convient le mieux aux condition
lesquelles vous regardez la télévision.
Standard: po
'imag
s dans
ur les environnements
: pour les pièces lumineuses.
hoisissant ce mode
difier la valeur des paramètres Contraste, Lumière,
de régler la teinte de l'image.
■ nt.
e une impression de chaleur.
e
normaux.
Dy
namique
Doux: pour regarder des films dans une
pièce sombre.
Personnel: en c
d'image Personnel, vous pouvez mo
F
inesse, Teinte (uniquement en mode NTSC) et Saturation.
Contraste: permet de régler le contraste de l'image.
Lumière: permet de régler la luminosité de l'image.
Finesse: permet de r
égler la netteté de l'image.
Teinte (uniquement en mode NTSC) : p
ermet
Saturation: P
ermet de régler l'intensité de toutes les couleurs.
Mode Coule
ur: Sélectionnez le mode couleur qui vous convie
Neutre:
conviendra à la plupart des utilisateurs.
Chaud: tem
pérature de couleur basse, qui donn
Froid: te
mpérature de couleur élevée, qui donne une impression de fraîcheur.
13
Page 39

Utilisation des menus
■
la déplaçant à gauche ou à droite.
age DB15.
aible ou
mage automatiquement.
■ onvient.
qualité vidéo.
A
vancée (en mode PC)
H-Pos: ce
ntrez l'image en
V-Pos: ce
ntrez l'image en la déplaçant vers le haut ou le bas.
Horloge: r
églez le taux d'échantillonnage de l'horloge signal im
Phase: r
églez ce paramètre lorsque les caractères présentent un contraste f
que l'image tremble.
A
utomatique: règle l'i
Format: sélectionnez la taille d'image qui vous c
■ 3DN
R: permet de réduire le bruit à l'image sans nuire à la
■ DLC
: contrôle de luminance dynamique.
Configuration du menu Sonner
s boutons ◄/► pour
convient
ts peuvent être réglés
nces
us vous conseillons de ne PAS procéder à des
t pour les plages audio
urs
■ Pressez les boutons ▲/▼ pour sélectionner le mode SPDIF, puis pressez
■ Surround.
-éclairage s'éteindra après 5
■ lorsque vous changez de
e
■ Equalizer: permet de régler les paramètres
sonores.
Pr
essez le
sélectionner un mode sonore qui
à vos pr
éférences.
Les éléments suivan
en mode Personnel uniquement.
Selon vos pr
éférences, ajustez
légèrement les plages de fréque
souhaitées, une plage après l'autre. No
changements trop importants.
■ Audio Language: sélectionnez la langue qui vous convien
(disponible uniquement pour les chaînes numériques, en cas de diffusion en plusie
lang
ues).
SPDIF Type:
ENTER pour choisir PCM, RAW ou Off.
Son Surround: activer/désactiver le son
■ Audio Only: si vous sélectionnez l'option "On", le rétro
secondes. Pressez n'importe quelle bouton pour le réactiver.
AV
C: l'AVC vous permet de rester au même niveau de volume
programme. En effet, chaque station d'émission pr
ésente des conditions de signal
uniques : un réglage de volume peut donc être nécessaire à chaque changement d
chaîne. La fonction AVC vous permet de profiter d'un niveau de volume stable, en
procédant à des ajustements automatiques pour chaque programme.
■ MTS: permet de basculer entre Mono, STÈRÈO, et SAP.
14
Page 40

Utilisation des menus
.
■
■ : lorsque l'option Auto
■ e, la
ment avec l'heure locale, selon l'heure diffusée
■
■ à laquelle votre télévision se mettra en marche.
■ Horloge sommeil: fixez
une heure à
laquelle votre télévision passera
automatiquement en mode veille
Fuseau Horaire: sélectionnez votre
fuseau horaire.
Eté / hiver a
uto
Sync est en mode ON, cet élément est
disponible ;
il vous permet d'activer ou
de désactiver le mode heure d'été.
Auto Sync: si cette option est activé
télévision se synchronisera automatique
en DTV
. Vous avez également la possibilité de régler l'heure manuellement.
Horloge: permet de régler l'heure système. Vous devez procéder à ce réglage avant
d'utiliser la fonction Réveil.
W
ake Up: fixez une heure
Configuration du menu Option
■ nce du
■ ous pouvez choisir
'ils
boutons◄/►pour choisir le mode de sous-titrage.
des de sous-titrage ci-dessous, pour programmes
affiche la chaîne de sous-titres correspondante du programme
ogramme
- vancée
t aux chaînes numériques proposant des sous-titres.
-
■ Langue: sél
ectionnez la langue dans
laquelle s'afficheront les menus.
Transparent: option de transpare
menu, qui vous permet de choisir sa
transpar
ence par rapport à l'image
d'arrière-plan.
Sous-titrage: v
d'afficher des sous-titres à l'écran, s
sont disponibles.
- Mode CC
Pressez les
Séle. Fondamentale
Sélection parmi les mo
analogiques.
CC1,2,3,4
analogique (CC1 pour la plupart des programmes).
T
ext1,2,3,4 affiche la chaîne de service texte correspondante du pr
analogique.
Sél
ection Ad
S'applique uniquemen
Service1,2,3,4,5,6 corr
espondent à différentes chaînes de données.
Options
onfiguration du menu Temps
C
15
Mode:
Défaut /coutume.
Page 41

Utilisation des menus
Défaut/
Caractères 0 à 7Font Style:
Font Size:
Défaut/ Normal/ Large/ Petit
Font Edge Style: Défaut / Rien/ Raised/ Depr
essed/ Uniforme/ Left Shadow/ Right
Shadow
Font Edge Color: Défaut/ Noir/
Blanc/ Rouge/ Vert/ Bleu/ Jaune/ Magenta/ Cyan
Couleur Texte: Défaut/ Blanc/ Rouge/ Vert/ Bleu/ Jaune/ Magenta/ Cyan
Couleur Fond: Défaut/ Noir/ Rouge/ V
ert/ Bleu/ Jaune/ Magenta/ Cyan
Opacité Texte: Défaut/
Fixe/ Clignote/ Translucent/ Transparent
Opacité Fond: Défaut/
Fixe/ Clignote/ Translucent/ Transparent
■ Rétablir: rétablit les réglages système d'usine.
■ Assistant de configuration:
il s'agit d'un guide qui vous aidera à régler la télévision.
Configuration du menu Serrure
Saisissez votre mot de passe (fixé à 0 0 0 0 à la première utilisation). Vous accéderez ainsi
au sous-menu décrit ci-dessous.
Si vous oubliez votre mot de passe, notez que le "super-mot de passe" 9898 reste
utilisable.
■ Changer mot de passe: fixez votre mot
de passe personnalisé, en pressant les
boutons chiffrés correspondants sur la
télécommande. Saisissez le nouveau
mot de passe deux fois pour terminer
l'opération.
■ V
errouillage: active/désactive le
verrouillage système.
■ In
put Block: pressez les boutons
▲/▼pour sélectionner la chaîne
d'entrée, puis pressez les boutons◄/►pour activer ou désactiver le verrouillage.
■ USA: sélection des classements TV/MPAA que vous souhaitez bloquer ou non.
TV
Âge Définition
TV-Y Tous publics
TV-Y7 Accord parental souhaitable
TV-G
Accord parental fortement
r
ecommandé
TV-PG
Les mineurs doivent être
accompagnés d'un adulte
TV-14 Interdit aux moins de 17 ans
TV-MA Réservé aux adultes
Contenu Définition
FV
Violence dans un cadre
imaginair
e
D Propos suggestifs
L
Propos potentiellement
cho
quants
S
Situations à caractère
sexuel
V Violence
16
Page 42

MPAA
Classification Définition
G Tous publics. Tous âges.
PG
Accord parental souhaitable. Certaines scènes peuvent heurter
les enfa
nts.
PG-13
Accord parental fortement recommandé. Certaines
scènes
peuvent heurter les enfants de moins de 13 ans.
R
Les mineurs de moins de 17 ans doivent être accompagnés
d'un adult
e.
NC-17 Interdit aux moins de 17 ans.
X Réservé aux adultes.
N/A Classification MPAA "N/A"
■ Canada: sélection des classements Anglais Canadien/ Francais Canadien que vous
souhaitez bloquer ou non.
Anglais Canadien: s'applique aux programmes qui utilisent le système de classification
anglais.
Classification Définition
C Enfants
C8+ Enfants de 8 ans ou plus
G Programme général
PG Contrôle parental
14+ Public âgé de 14 ans ou plus
18+ Programme pour adultes
EXEMPT Débloquer
Francais Canadien: s'applique aux programmes qui utilisent le système de classification
français.
Classification Définition
G Général
8ans+ Déconseillé aux jeunes enfants
13ans+
Déconseillé aux enfants de moins
de 13 an
s
16ans+ Déconseillé aux moins de 16 ans
18ans+ Programme réservé aux adultes
EXEMPT Débloquer
■ RRT Paramétres: pressez le bouton ENTER pour régler la classification RRT.
■ Reset RRT: pressez le bouton ENTER pour réinitialiser les informations RRT.
NOTE : les option
s RRT Paramétres et Reset RRT peuvent être sélectionnées quand le
signal de la télévision est de type RRT.
■ Block Unrated Show: permet de bloquer ou non les programmes ne disposant pas
d'une classification valide.
Utilisation des menus
17
Page 43

Guide de dépannage
Avant de contacter le dé
persiste, débranchez le t
panneur, procédez aux vérifications suivantes. Si un programme
annage. éléviseur et contacte
z le service dép
PROBLÈME SOLUTION POSSIBLE
P
- Vérifiez le contraste de l'image et les paramètres de
luminosité
as de son ni d'image
ER
(ALIMENTATION) sur l'avant du téléviseur.
- Vérifiez si la fiche principale est connectée à une prise
murale.
- V
érifiez que vous avez appuyé sur le bouton POW
Im
s tre chaîne, le problème peut venir de la
- Les câbles audio sont-ils installés correctement ?
age normale mais pas de
on
- Vérifiez le volume.
- Son coupé ? Appuyez sur le bouton MUTE
(COUPURE DU SON).
- Essayez une au
diffusion.
La télécommande ne
e pas
es piles sont-elles installées en respectant la polarité
(+ sur +, - sur -) ?
- Installez des piles neuves
fonctionn
- Vérifiez qu'il n'y ait aucun objet qui pourrait faire
obstruction entr
e le produit et la télécommande.
- L
- Corrigez le mode de fonctionnement à distance : TV,
magnétoscope, etc. ?
L
b
- Vérifiez les paramètres d'alimentation. Panne de courant.
auto.
'alimentation se coupe
rutalement
- La minuterie de mise en veille est-elle activée ?
- Pas de diffusion sur la station réglée avec le mode
L
a
t
cinq minutes.
'image apparaît doucemen
près la mise sous tension
le processus de démarrage du produit. Contactez
votre centre d'entretien si l'image n'apparaît pas
t
- Ceci est normal, l'image est mis en sommeil pendan
après
P rs
cres
ut venir de la
diffusion.
staurer la luminosité de
as de couleur ou couleu
- Réglez la couleur de le menu Options.
- Laissez une distance suffisante entre le produit et le
magnétoscope.
- Essayez une autre chaîne, le problème pe
et image médio
- Les câbles VIDEO sont-ils installés correctement ?
-
Activez une fonction pour re
l'image.
B
h
tr
électrique.
arres
orizontales/verticales ou
emblement de l'image
- Vérifiez qu'il n'y aucune source d'interférences locale
comme un appareil électrique ou un outil
Mauvaise r
sez à une
on est faible, réorientez l'antenne
éception sur
autre station.
certaines chaînes
- Le signal
de la stati
- Problèmes de station ou de câbles. Pas
pour recevoir une station plus
faible.
- Vérifiez les sources d'interférences éventuelles.
Li
images
- Vérifiez l'antenne (changez la direction de l'antenne).
gnes ou stries sur les
Pas de son sur l'un des
haut-parleurs
- Réglez la balance dans le menu Options.
Dépannage
18
Page 44

Guide de dépannage
NOTE :
Il y a un problème en mode VGA (seul le mode VGA est appliqué).
PROBLÈME SOLUTION POSSIBLE
Le signa ortée.
rizontale ou la
fréquence ve
- source d'entrée.
- Réglez la résolution, la fréquence ho
rticale.
l est hors de p
- Vérifiez si le câble du signal e
st bien ou mal branché.
Vérifiez la
Barre ou rayure verticale
horizontale sur l'arrière p
et
lan
Bruit et position incorrecte.
- Lancez la configuration
automatique ou réglez
l'horloge, la phase ou la position H/V.
La couleur de l'écran est
instable ou il n'y a qu'une
seule couleur.
signal.
- Vérifiez la câble de
- Réinstallez la carte vidéo du PC.
L sfonctionnements prémat
prolonger la durée de vie de votr reil
hors tension et de débrancher le
opération de nettoyage.
es dy urés peuvent être évités. Un nettoyage régulier peut
e nouveau téléviseur
. N'oubliez pas de mettre l'appa
cordon d'alimen
tation avant de commencer toute
N
1 élo e votre écran pendant un certain
t un chiffon dou t
ou de liquide vaisselle. Essorez le oit presque sec, puis essuyez
l'écran avec.
2 levé l' 'air avant
d
ettoyer l' écran
. Voici une excellente façon d'
emps. Humidifiez
igner la pous
sière d
x dans un mél
ange d'eau tiède et un peu d'assouplissan
chiffon jusqu'à ce qu'il s
. Assurez-vous d'avoir en
'allumer votre téléviseur.
excès d'eau de l'écran, puis laissez-le sécher à l
N
Pour enlever la s
p er
ettoyer le boîtier
saleté ou la pou
elucheux.
Veillez à ne pas utilis
sière, essuyez le boîtier avec un chiffon doux, sec, non
de chiffon humide.
A
Si vous prévoyez de ne p ue période
(comme des vacances), c
d'alimentation pour le pro
É reils électriques usagés
La directive européen
électriques et électron s
ne soient pas jetés dan res municipales normales non triées. Les
doiv
recy e
anté et l'e
Le symbole « Poubell
tez l'app oit être collecté séparément.
teurs r
nformation areil usagé.
bsence prolongée
as utiliser votre téléviseur pendant une long
'est une bonne idée de débrancher le cordon
tége
r des dommages éventuels dus à la foudre ou aux
surtensions.
limination des appa
ne 2002/96/CE sur les déchets d'équipements
iques (DEEE) exige que les appareils ménagers usagé
s les ordu
appareils usagés
r
écupération et le
l'impact sur la s
ent être collectés séparément afin d'optimiser la
clage des matériaux qu'ils contiennent et afin de réduir
nvironnement.
e » barré sur le pr
oduit vous rappelle votre obligation :
areil, celui-ci dlorsque vous je
Les consomma
pour plus d'i
doivent contacter leurs autorités locales ou leur r
evendeu
s concernant l'élimination de leur app
Entretien
19
Page 45

Instruction montage mural
TV
haut
fond
mur
mur
1
2 3 A
B C
1pc
2pcs 2pcs 3pcs
½
M4 40mm 2pcs½M4 60mm 2pcs½M6 65mm 3pcs
20
Page 46

Affichage
Élément Caractéristique
Zone active / taille de l'écran
Rapport d'image Écran large 16:9
Sous-Pixellisation
Résolution maximale 1366 x 768 pixels
Luminosité maximale 300cd/m
2
Angle de vision
Durée de vie du rétroéclairage 30,000 heures
ÉCRAN
Dimensions (mm)
(avec support)
Poids (kg / lbs)
Puissance d'entrée
Fonction
(1)Vidéo
Désentrelacement 3D
Technologie de réduction de bruit 3D
Rapport d'image
Mode Image
(2)Audio
Mode Son
Contrôle de volume auto. Oui
Tonalité Basses
Enceintes 5 watts par chaîne
(3)Général
Tuner TV Hybride NTSC / ATSC
Analyse des chaînes auto. Oui
Minuterie de mise en veille
Consommation en veille Inférieure à 0.5 W
Formats vidéos
HDMI/COMPOSANTE pris en
charge
480i / 480p / 720p / 1080i / 1080p
Résolutions prises en charge
1360*768@60 Hz (NATIVE)
1024*768@60
800*600@60
640*480@60
720x400@70
(4)NTSC/ATSC
Chaîne préférée
NTSC
V-chip
Spécifications
Diagonale de 29 pouces
AC 100 – 240V, 60/50 Hz
Contraste 2500:1
654×64×406
654×165×458
4.7
5
(sans support)
(sans support)
(avec support)
0.154(H)×0.62(V)mm
Full / Normal / Zoom1 / Zoom2
Standard / Dynamique / Personnel / Doux
Standard / Sports / Personnel / Musique / Film
Off / 5min / 10min / 15min / 30min /60min /
90min / 120min / 180min / 240min
Son : Mono / / SAP
STÈRÈO
150°( V ), 160°(H)
21
Page 47

Spécifications
Sous-titres (CC1-CC4, Text 1 -Text 4)
Chaîne préférée
V-chip
ATSC
Sous-titres analogiques : (CC1-CC4, Text
1-Text 4)
Sous-titres numériques :
(Service 1-Service 6)
(5)E/S
1 entrée x tuner TV (NTSC/ATSC),
1 entrée x AV,
1 entrée x YPbPr (audio partagé avec AV),
2 entrées x HDMI/HDCP,
1 entrée x VGA,
1 entrée x entrée audio VGA,
1 entrée x clé USB (pour service uniquement),
1 sortie x DIGITAL AUDIO OUT
*Les spécifications du produit peuvent faire l'objet de modifications sans notification ni
obligation.
**Le texte et les images du manuel ne sont là que pour référence et peuvent faire l'objet de
modifications sans notification ni obligation.
Format d'entrée vidéo :
MPEG-2MP@HL
22
Page 48

 Loading...