

Page 1

USER’S MANUAL
24"
RLED2431A-B
Page 2

Contents
z Introduction
z Warning
z Caution
z Important Information
z Attaching or Removing the Stand
z Installing Batteries to the Remote Control
z Identifying Front and Rear Panel
z Connection Suggestion
z Main Unit Description
z Remote Control
z OSD Basic Adjustment
z How Do I Clean The TV
z Troubleshooting
z Specifications
z FCC Compliance Statement
Page 3

Introduction
Thank you very much for purchasing your LED TV. It serves as a normal colour TV
and a PC monitor. To enjoy your set fully from the very beginning, read this manual
carefully and keep it handy for future reference.
INSTALLATION
Locate the receiver in the room where direct light does not strike the screen. Total
darkness or a reflection on the picture screen can cause eyestrain. Soft and indirect
lighting is recommended for comfortable viewing.
Allow enough space between the receiver and the wall to permit ventilation.
Avoid excessively warm locations to prevent possible damage to the cabinet or
premature component failure.
This TV can be connected to AC 100-240V~ 50/60Hz.
Do not install the TV in a location near heat sources such as radiators, air ducts,
direct sunlight, or in closed compartments and closed areas. Do not cover the
ventilation openings when using the TV.
The indicator light will last for about 30 seconds after the power has been turned
off.
Wait until the indicator light goes out before repowering the TV.
6
User manual x1
Warranty card x1
Power cable x1
Remote control x1
Battery (pair, AAA) x1
Accessories list for this TV set:
x
x
x
x
x
Page 4
Warning
Thissym
bol
is intended to alert the user to avoid the risk
of electric shock. This equipment may only be disassembled
by qualified service personnel.
This symbol is intended to alert the user to the presence
of important operation and maintenance instructions in
the literature accompanying the equipment.
CAUTION: TO AVOID THE RISK OF ELECTRIC SHOCK.
DO NOT REMOVE COVER (OR BACK).
NO USER- SERVICEABLE PARTS INSIDE.
REFER SERVICING TO QUALIFIED SERVICE PERSONNEL
.
CAUTION
RISK OF ELECTRIC SHOCK
DO NOT OPEN
Class I structures of equipment should be connected to the grid
power output with a protective earth connection on the socket.
Power plug as a broken applianceˈ
broken installations should
be easy to operate.
Page 5
Caution
Caution
High voltages are used in the ope
ration of this product.
- Do not open the product's casing. Refer servicing
to qualified service personnel .
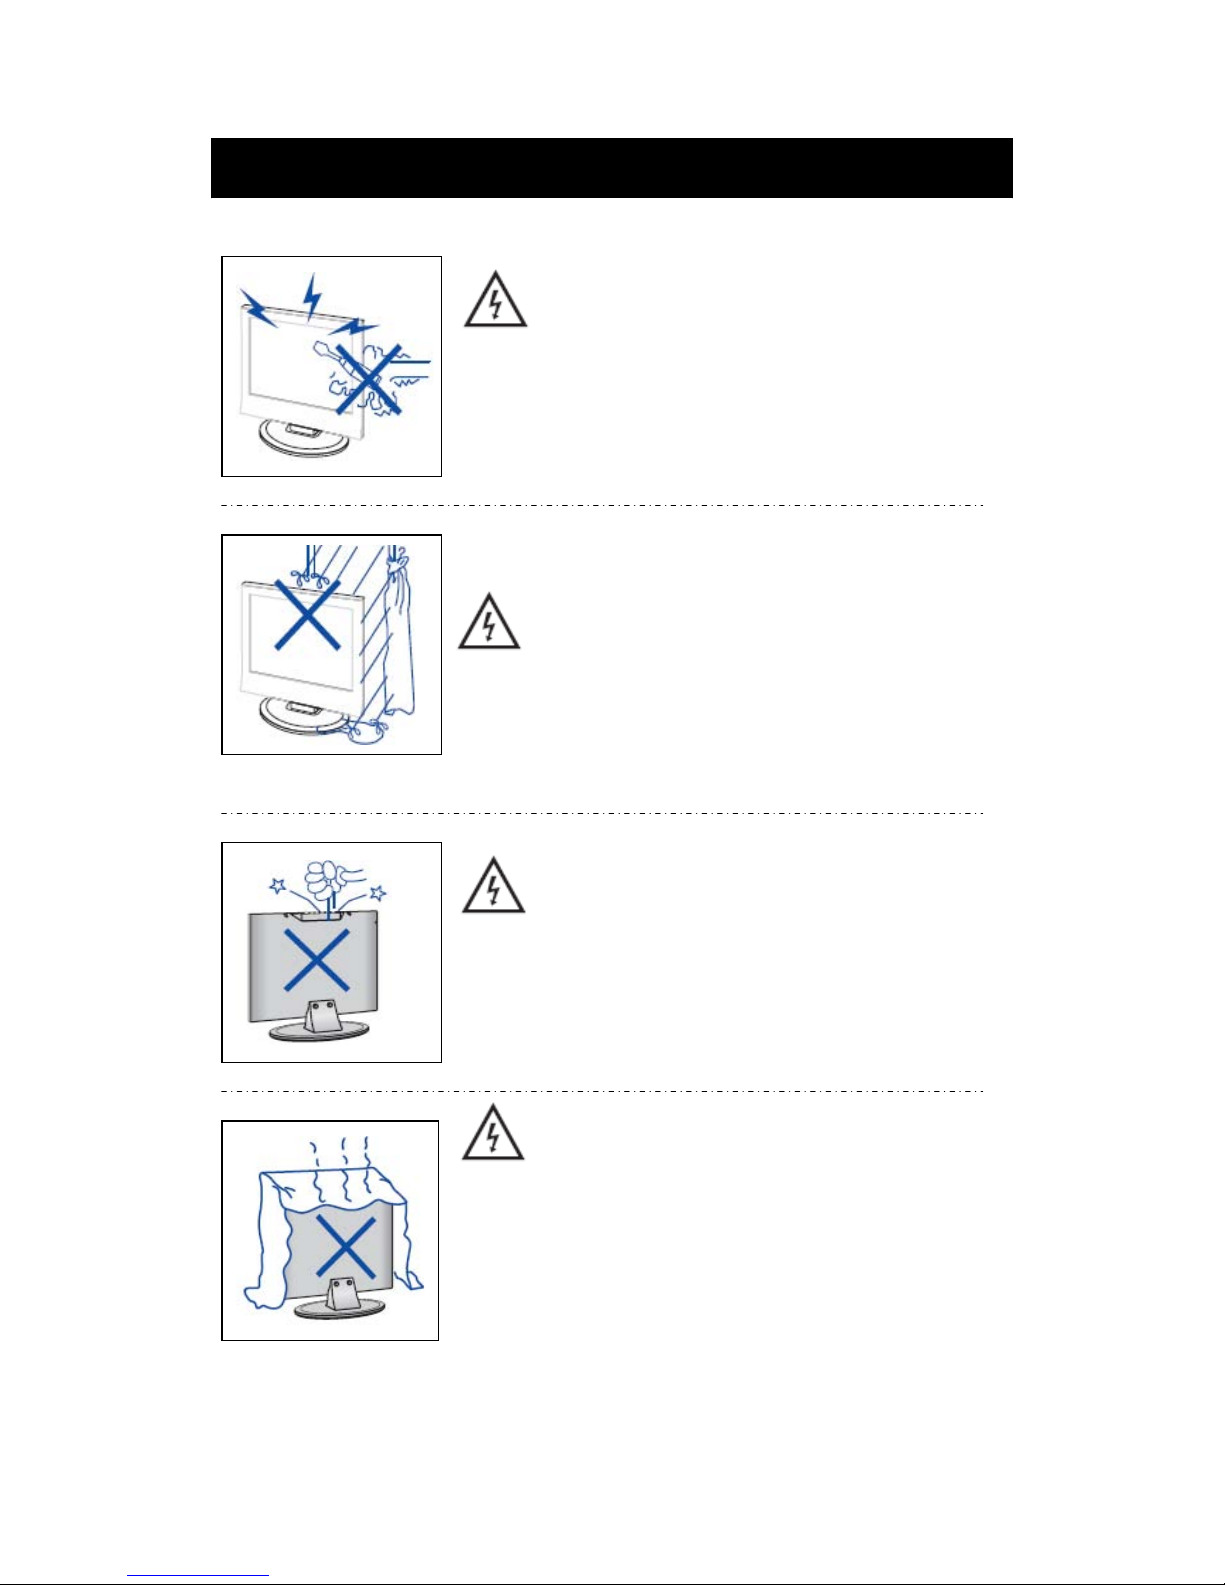
Caution
To prevent fire or electrical shock hazard, do not expose
the main unit to rain or moisture do not place objects
ˈ
Caution
Do
not drop or push objects into the television cabinet
slots or openings. Never spill any kind of liquid on the
television receiver.
Caution
Avoid exposing the main unit to direct sunlight and other
sources of heat. Do not stand the television receiver
directly on other products which give off heat: e. g. video
cassette players and audio amplifiers. Do not block the
ventilation holes in the back cover. Ventilation is essential
to prevent failure of electrical components. Do not squash
the power supply cord under the main unit or other heavy
objects.
filled with liquids, such as vases, on the apparaturs.
Page 6
Caution
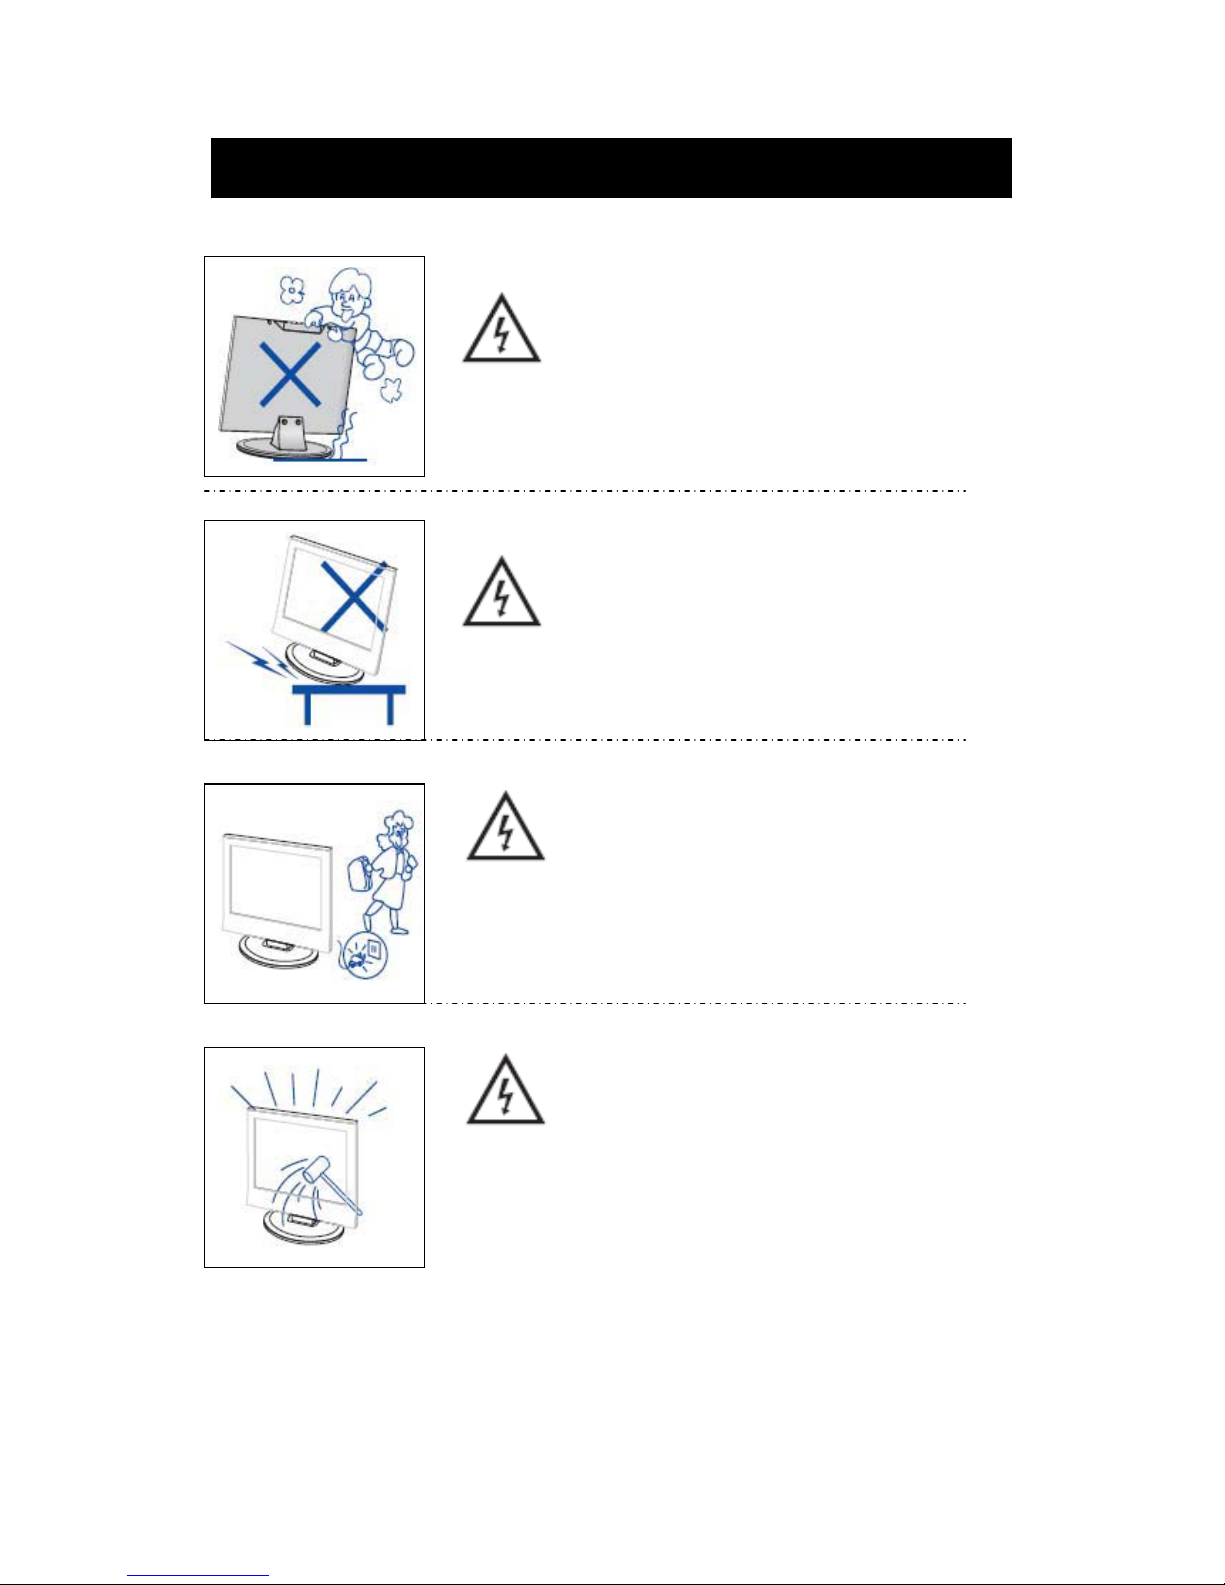
Caution
Never stand on, lean on or suddenly push the product
or its stand. You should pay special attention to
children.
Caution
Do not place the main unit on an unstable cart stand,
shelf or table. Serious injury to an individual and
damage to the television may result if it should fall.
Caution
When the product is not used for an extended period
of time, it is advisable to disconnect the AC power
from the AC outlet.
Caution
The LED panel used in this product is made of glass and
is therefore breakable. This product must not be dropped
or banged. If the LED Panel breaks be careful of being
injured by broken glass.
Page 7

Television Antenna Connection Protection
Important Information
External Television Antenna Grounding
If an outside antenna or cable system is to be connected to the TV, make sure that the antenna or
cable system is electrically grounded to provide some protection against voltage surges and
static charges. Article 810 of the National Electrical Code, ANSI/NFPSA 70, provides
information with regard to proper grounding of the mast and supporting structure, grounding of
the lead-in wire to an antenna discharge unit, size of the grounding conductors, location of
antenna discharge unit, connection to grounding electrodes, and requirements of the grounding
electrode.
Lightning Protection
For added protection of the TV during a lightning storm or when it is left unattended or unused
for long periods of time, unplug the TV from the wall outlet and disconnect the antenna or cable
system.
Power Lines
Do not locate the antenna near overhead light or power circuits, or where it could fall into such
power lines or circuits.
Page 8
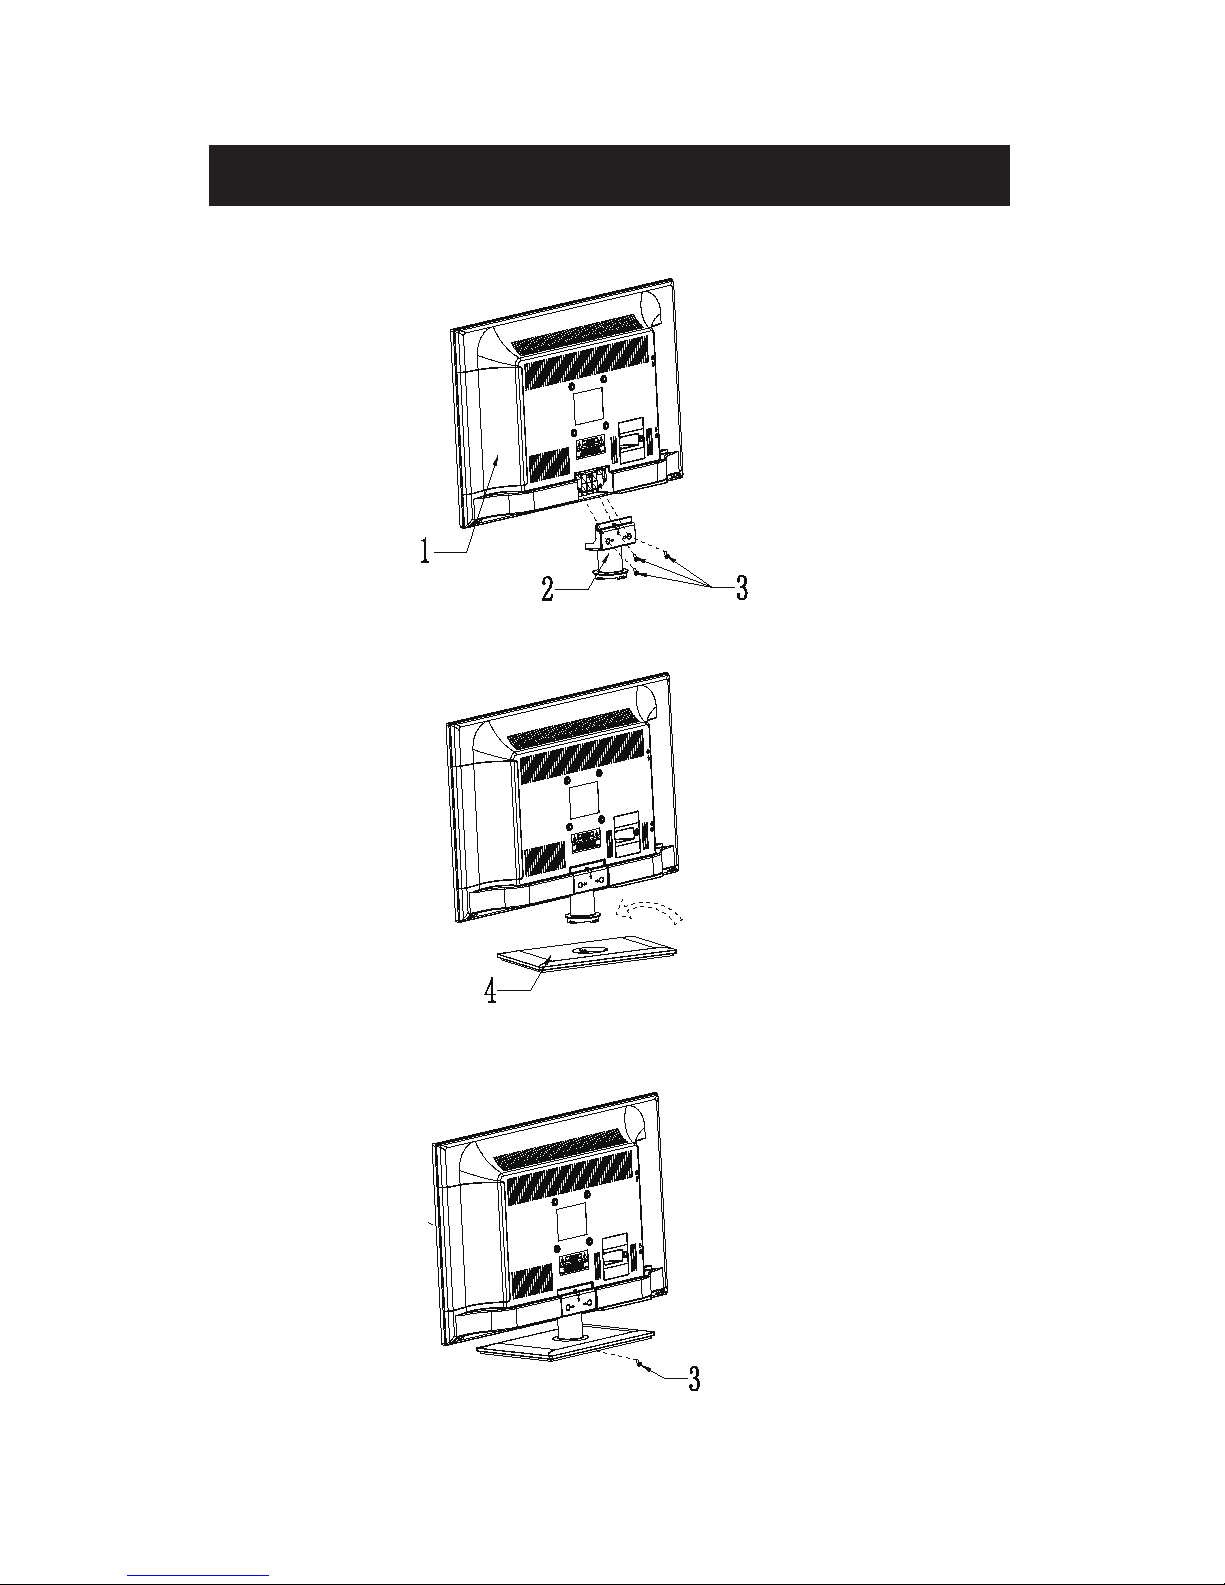
1. Attach stand bracket to backside of cabinet, fasten with 3 screws(4*12mm).
2. Put bottom of bracket into stand, press tight and turn right first, then turn left, fasten well
once hear sound 'KA'.
3. Fasten stand to bracket with 1 screw(4*12mm) from bottom of stand, then finished.
Attacthing or Removing the Stand
7
Page 9
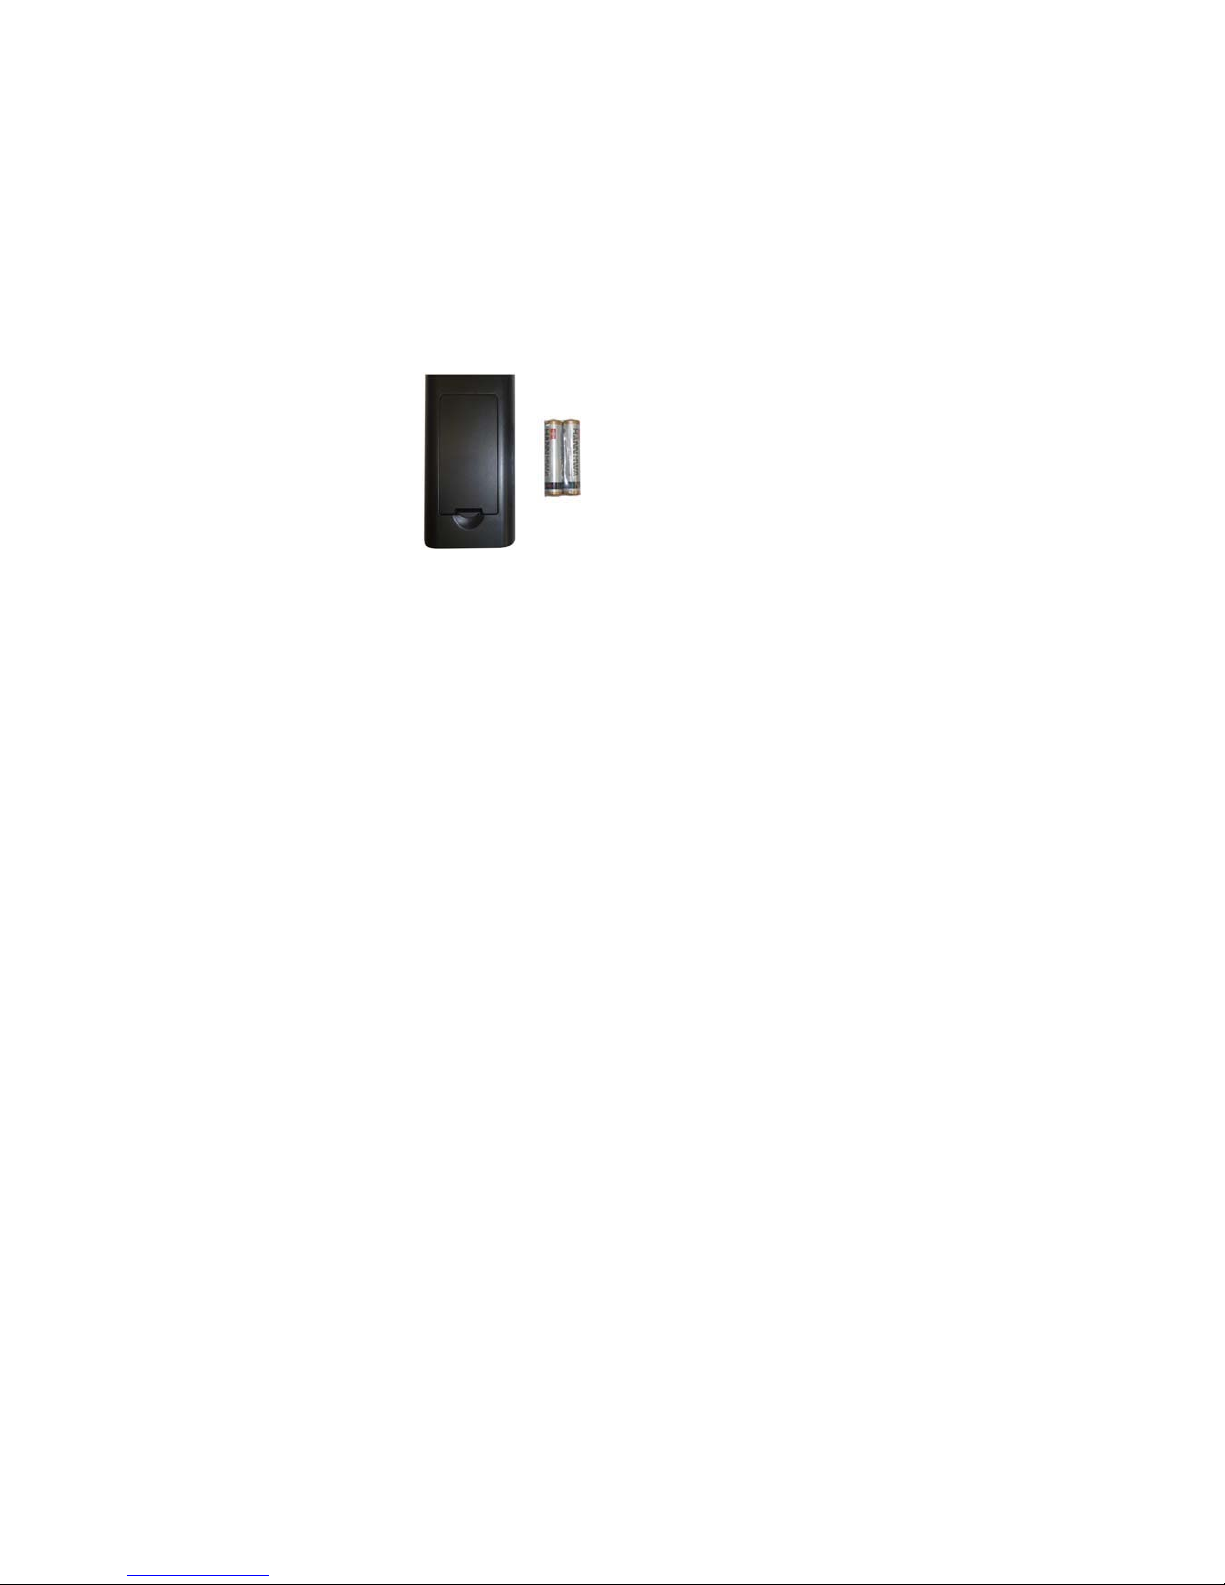
Installing Batteries to the Remote Control
Please insert
two AAA batteries into the remote control. Make sure that you match the (+)
and (-) symbols on the batteries with the (+) and (-) symbols inside the battery compartment.
Afterwards, re-attach the battery cover.
Please note:
Only use AAA batteries.
Do not mix new and old batteries. This may result in cracking or leakage that may pose a
fire risk or lead to personal injury.
Inserting the batteries incorrectly may also result in cracking or leakage that may pose a
fire risk or lead to personal injury.
Dispose the batteries in accordance with local laws and regulations.
Keep the batteries away from children and pets.
If the remote control is not used for a long time, remove the batteries.
Keep the remote control away from moisture, sunlight, and high temperatures.
Page 10

Front View
Rear View Mounting Pattern
Identifying Front and Rear Panel
INDICATOR LIGHT – The light is red when power is plugged in but the TV is not turned on.
The light turns blue when the TV is turned on. Because of the LED in the panel, the TV
might take 10 – 12 seconds to power on.
REMOTE SENSOR – The remote sensor receives all the commands from the remote control.
Mounting Specification : 75mm x 75mm using screw size M4. Length of screw should not
exceed 6mm. Please Note : The 6mm length of screw refers to how deep the screw can go
inside the mounting holes. When you’re buying screws, you should add the original 8mm to
the thickness of your mounting plate in order to get the total screw length.
9
Page 11
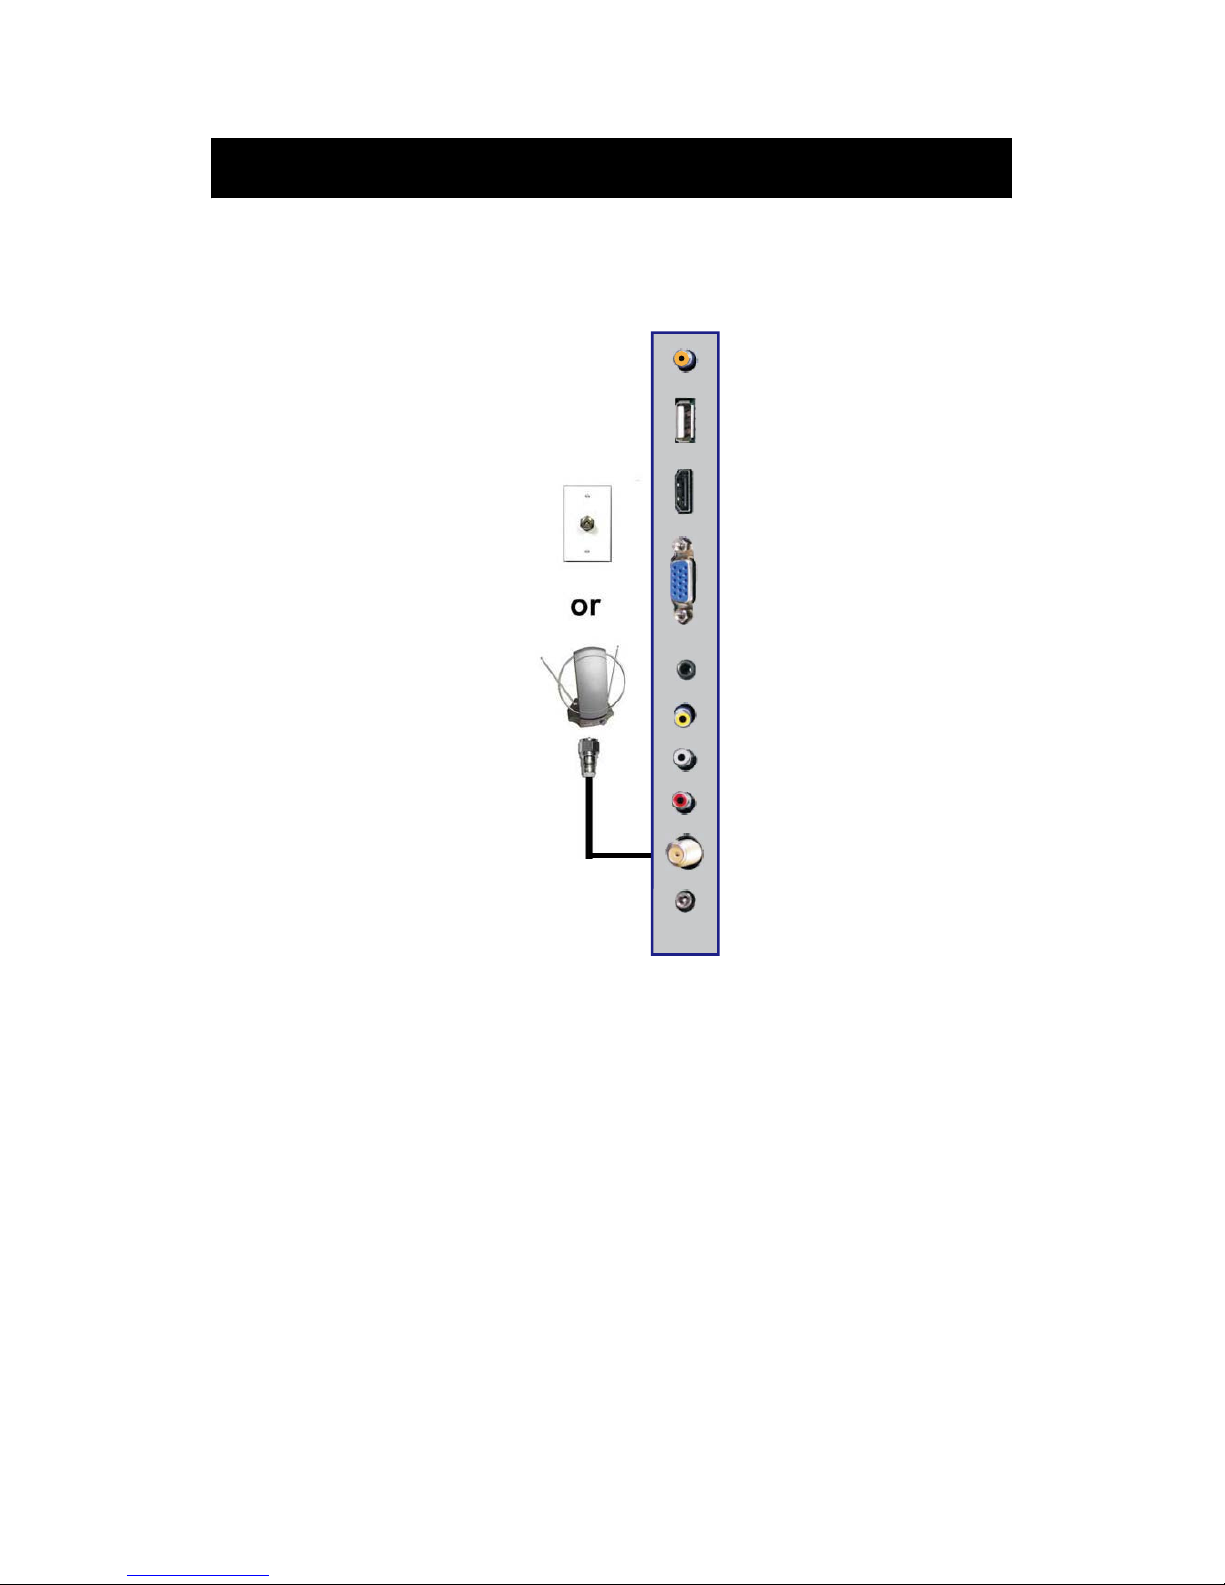
If You Have Digital Cable without Cable Box or Antenna…
Connection Suggestions
1. Make sure the power of HDTV is turned off.
2. Connect the RF cable from your antenna or digital cable to the TV port on the
back of your HDTV.
3.
Turn on the HDTV.
4. Follow the first time on screen instructions.
Not all broadcasts are in High Definition (HD). Please refer to your local
broadcasting stations for more information.
The HDTV’s tuner is designed for HDTV therefore requires a stronger signal than
normal TVs. If you cannot achieve that signal level with your antenna or cable, your
HDTV might lose picture or sound.
Please Note:
10
Page 12
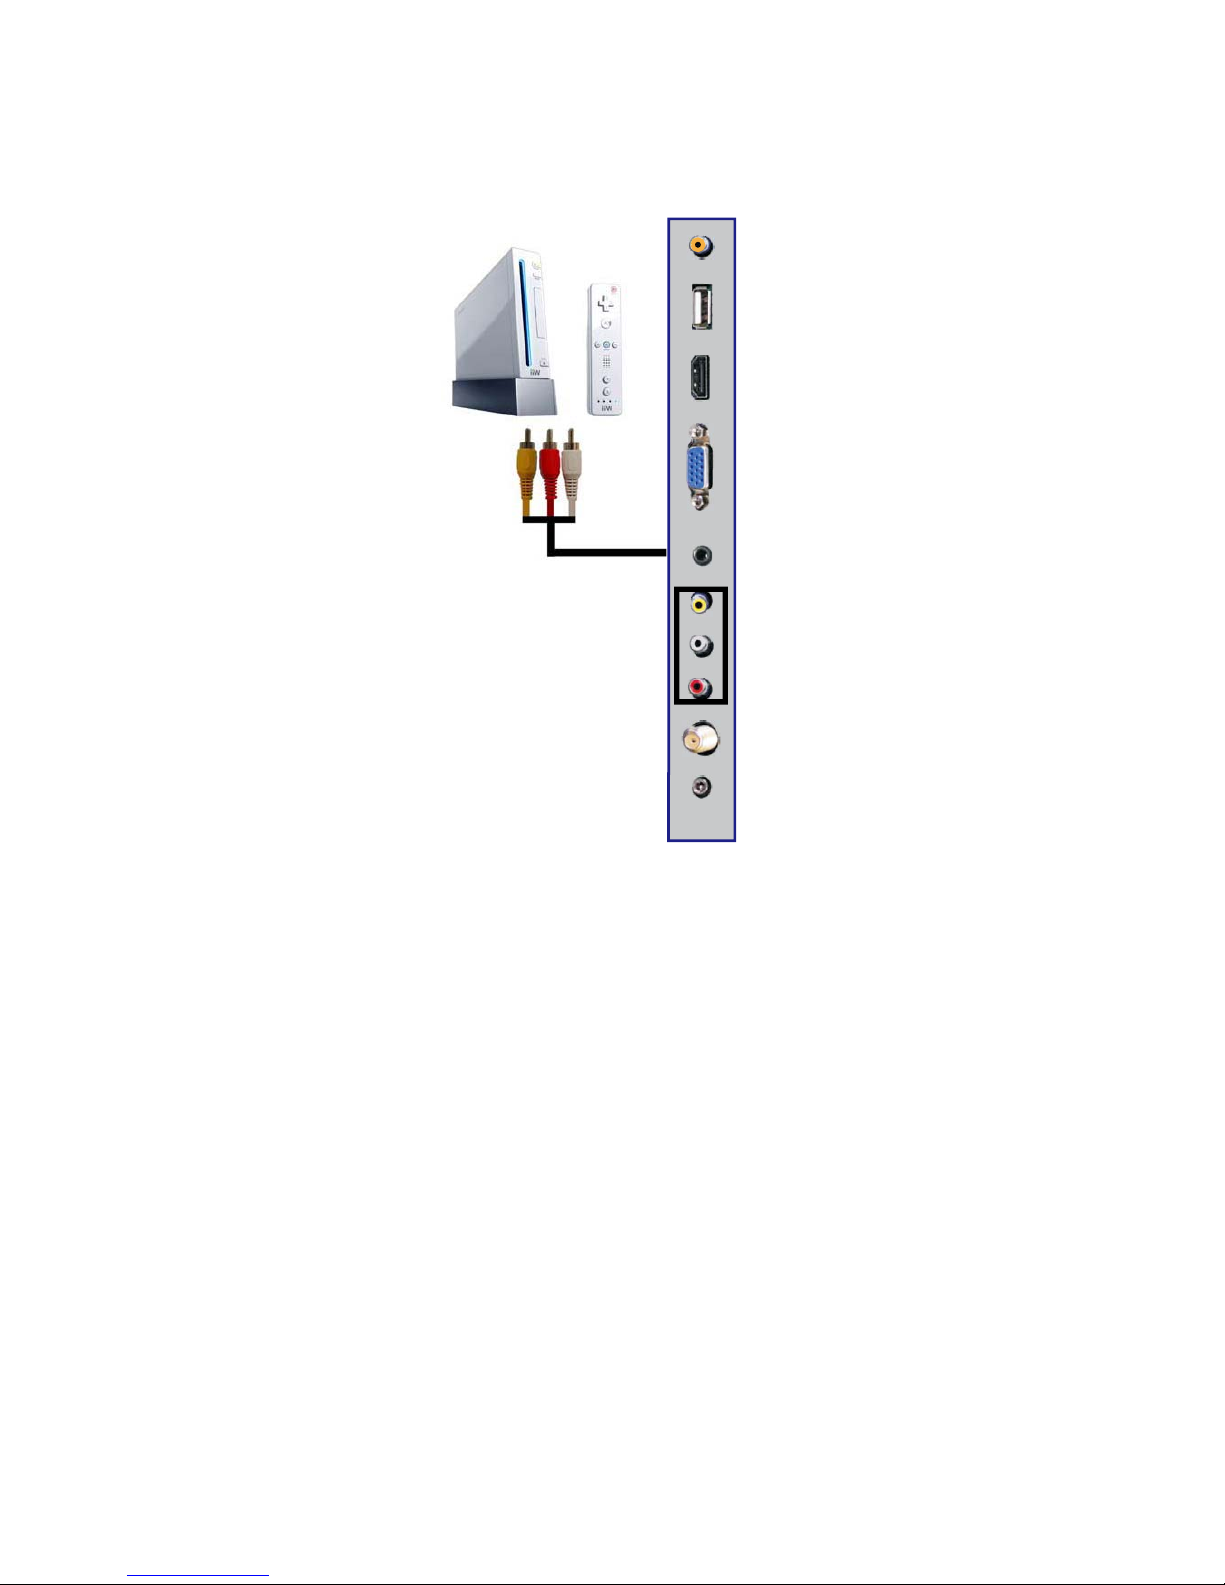
Connecti
ng Wii™ with Composite…
1
.
Make sure the power of HDTV and y
our Wii™ is turned off.
2.
Obtain a
Yellow Video Cable. Connect the Yellow Video connector to both your Wii™
and AV’s Yellow Video connector port on the back side of your HDTV.
3. Obtain a RCA
Audio Cable. Connect the white color connector to both your Wii™
and AV’s white connector port on the back side of your HDTV.
4.
Connect the red color con
nector to both your Wii™ and AV’s red connector port on the
back side of your HDTV.
5. Tu
rn on the HDTV
and your Wii™.
6.
Use the
re
mote control’s source button or the source button on the TV to switch to AV.
Please Note:
Make sure to read your Wii™ installation guide for further information.
Page 13
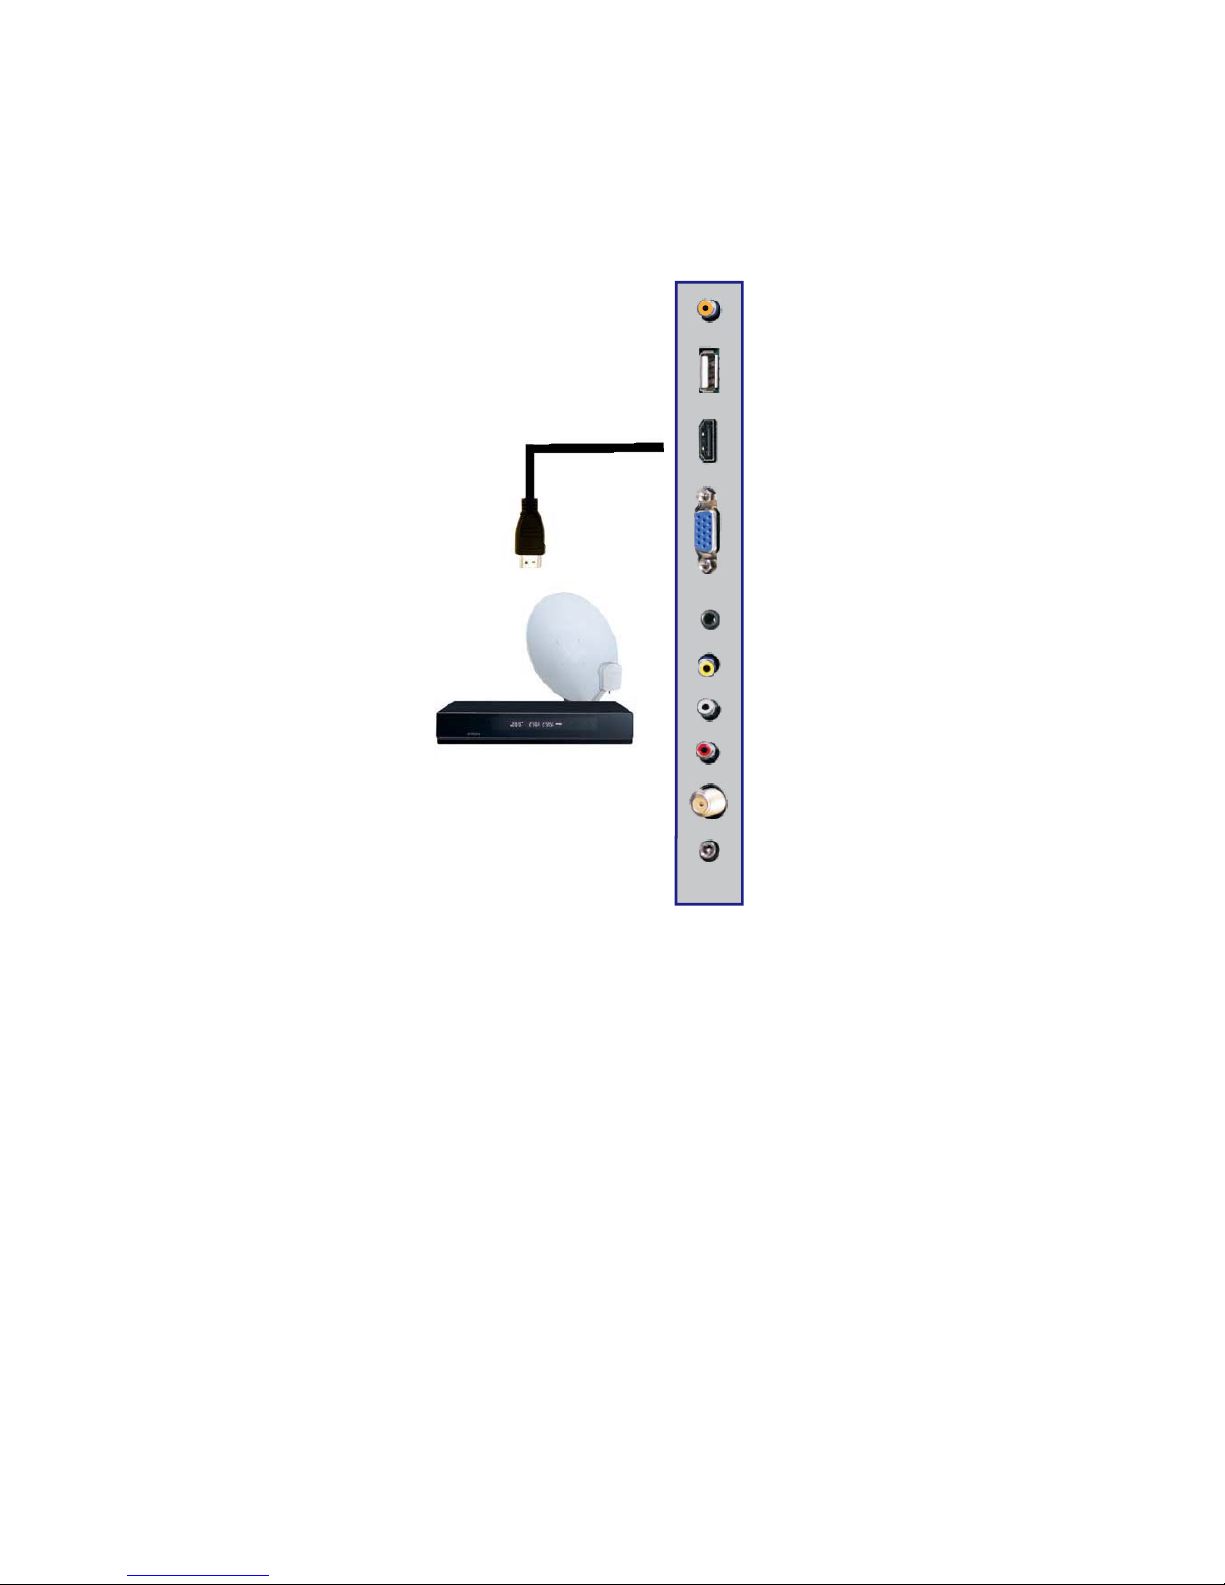
Connecting Cable or Satellite boxes with HDMI…
1. Make sure the power of HDTV
and your set-top box is turned off.
2. Connect a HDMI cable to the HDMI output of your set-top box and the other end to
the HDMI port on the back of your HDTV.
3. Turn on the HDTV and your set-top box.
4. Use the remote control’s source button or the source button on the TV to switch to
HDMI.
Please Note:
Please reference the set-top box’s manual, to make sure the set-top box is
configured to output correctly to the TV.
HDTV supports NEC’s universal remote code. Please look up NEC’s
codes in your universal remote’s hand book.
Page 14
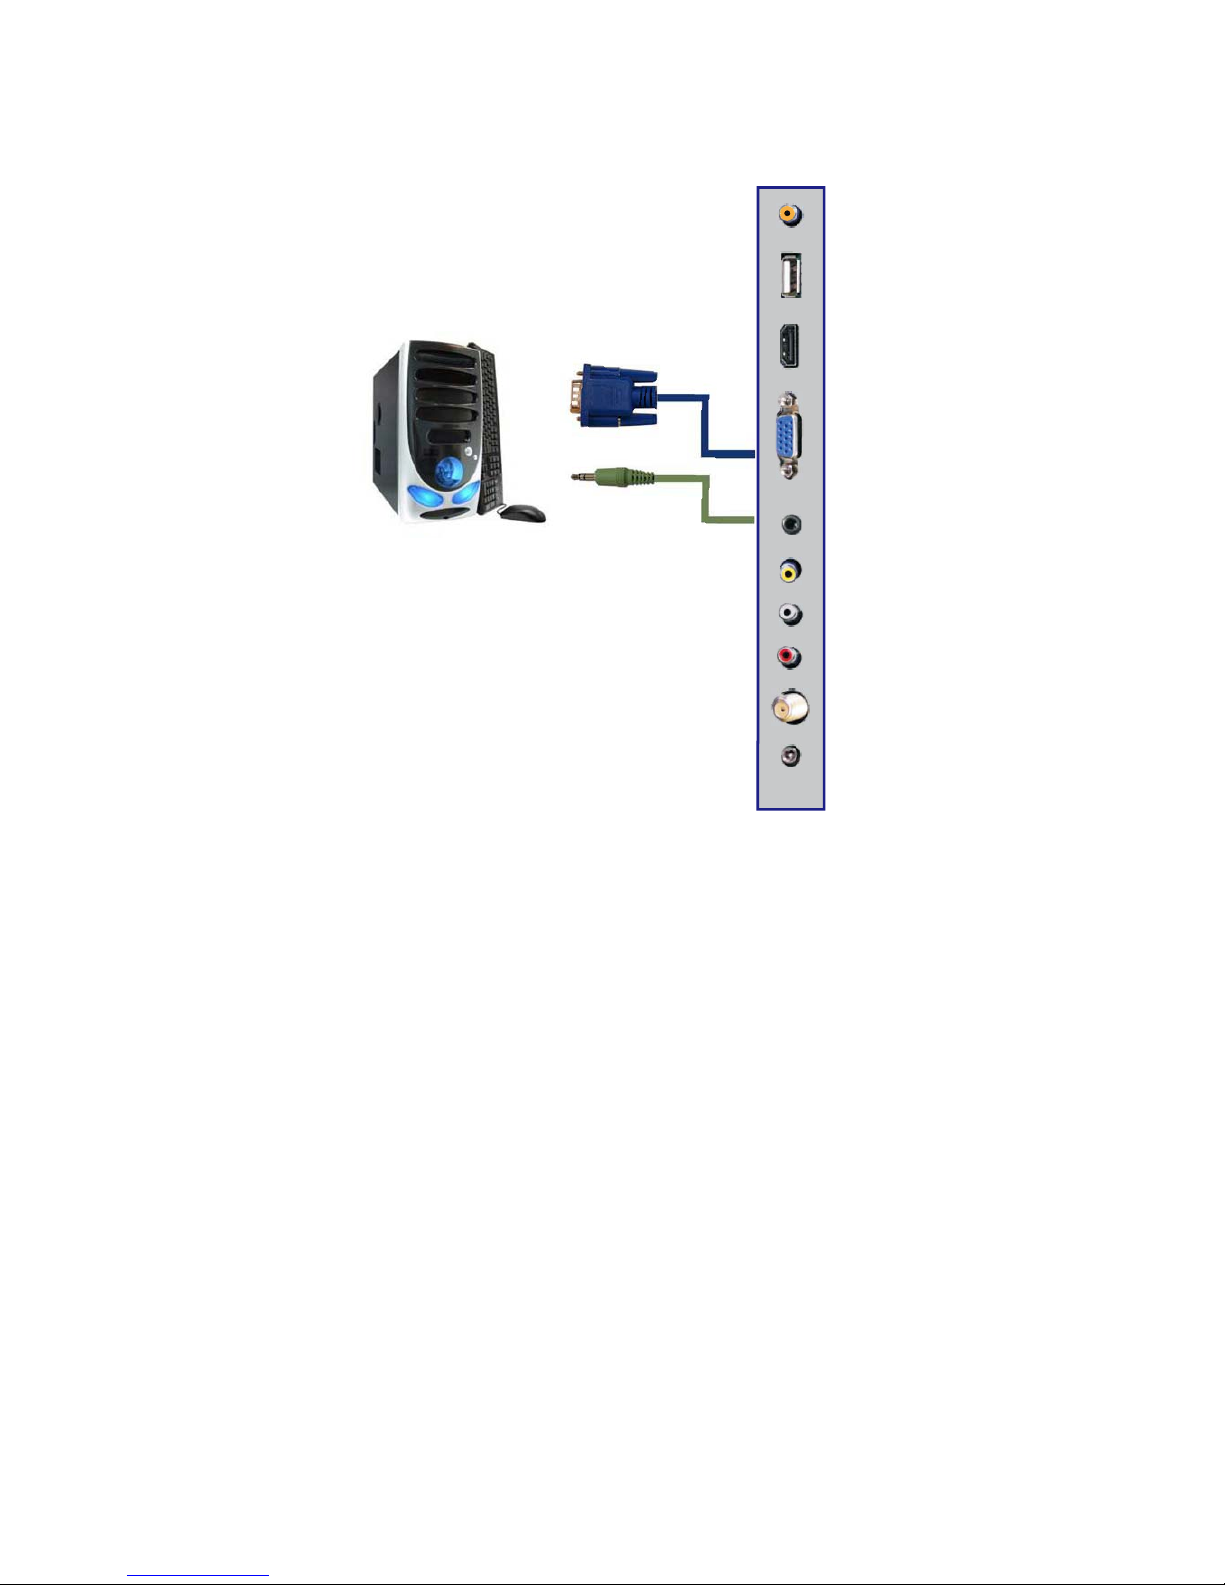
Connecting to a PC with VGA and 3.5 mm minijack …
1. Make sure the power of HDTV and your PC is turned off.
2. Obtain a 15-pin D-Sub VGA cable; connect to the VGA output of your PC and the other
end to the VGA port on the back of your HDTV.
3. Obtain a 3.5 mm Mini-jack, connect to the audio out of your PC and the other end to the
VGA Stereo Input port.
4. Turn on the power of the HDTV and your PC.
5. Use the remote control’s source button or the source button on the TV to switch to PC.
6. Change your PC resolution to 1360x768 at 60hz refresh rate.
7. Press MENU to use the OSD’s PICTURE option.
8. Under the PICTURE option select PC Settings.
9. Under PC Settings use AUTO ADJUST to adjust the screen.
Please Note:
For the best results, please set your PC resolution to 1360x768 at 60 Hz. Please
refer to the PC or graphic card’s manual for further instructions on how to set your
resolution and refresh rate.
Please refer to your PC manual for video output requirements of the video card.
The VGA port of the TV features a power saving mode which will automatically
turn off the TV, if there’s no signal provided for more than 5 minutes.
Page 15
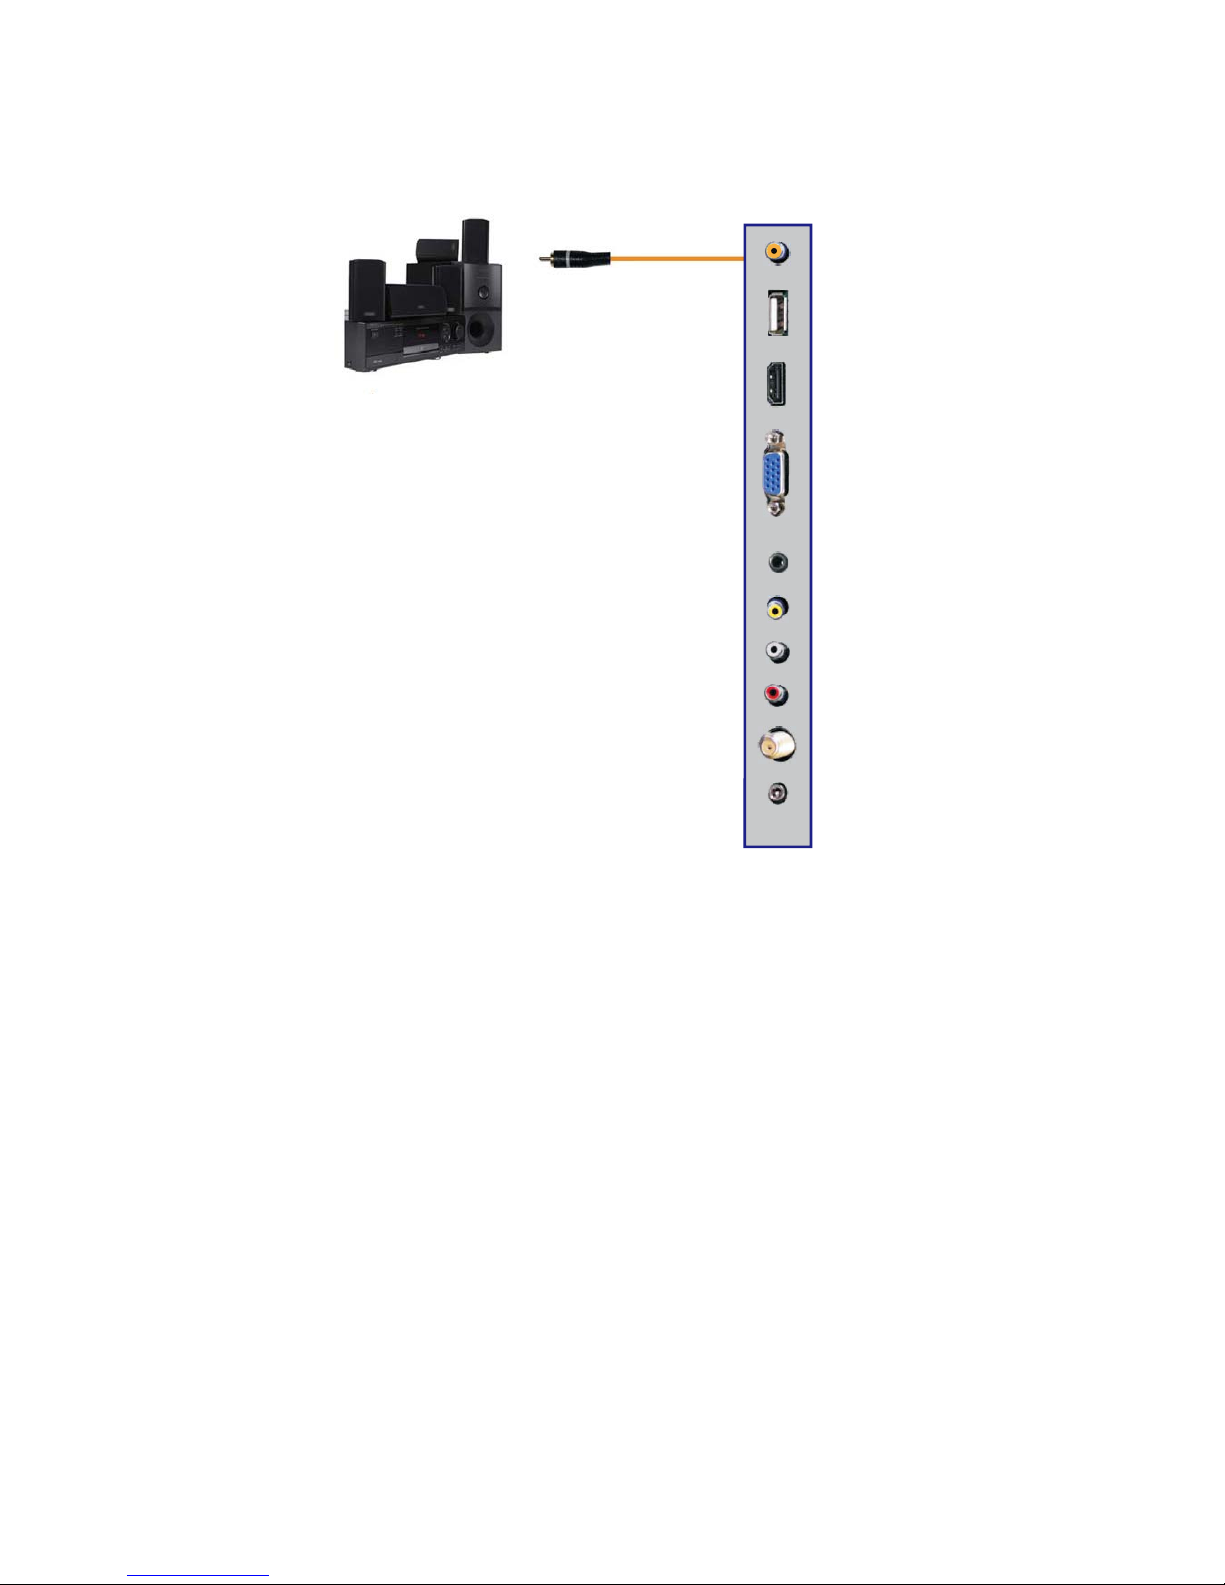
Connecting a Digital Audio Receiver with Coaxial...
1. Make sure the power of HDTV and your receiver is turned off.
2.
Obtain a COAXIAL cable, connect it to your receiver’s COAXIAL digital
input and the COAXIAL connection on the LINE OUT port on the back of the
HDTV.
3. Turn on the HDTV and your receiver.
Please Note:
If you want pure digital stream for your receiver to decode, you must also
configure the TV’s OSD Sound->Digital Audio Out function. Make sure the
option is on 5.1CH.
If your receiver is making static noises when receiving 5.1CH, you must use
the PCM option instead.
Please reference the receiver’s manual as well, to make sure the receiver is
configured to receive signals correctly from the TV.
The TV’s COAXIAL out for 5.1CH is ONLY used for antenna/cable
connection. Any other incoming aud
io signal will be passed out of
COAXIAL in PCM format.
14
Page 16
Main unit description
Contr
ol Panel Button Function
VOL+ :
Increase volume; if OSD is active, functions as right in the menu;
in SOURCE menu, functions as ENTER.
VOL- :
Decrease volume; if OSD is active, functions as left in the menu.
CH+
:
Change channel up; if OSD is active, functions as up in the menu
CH-
:
MENU : Press to select the main menu.
SOURCE : Select the input signal.
TV
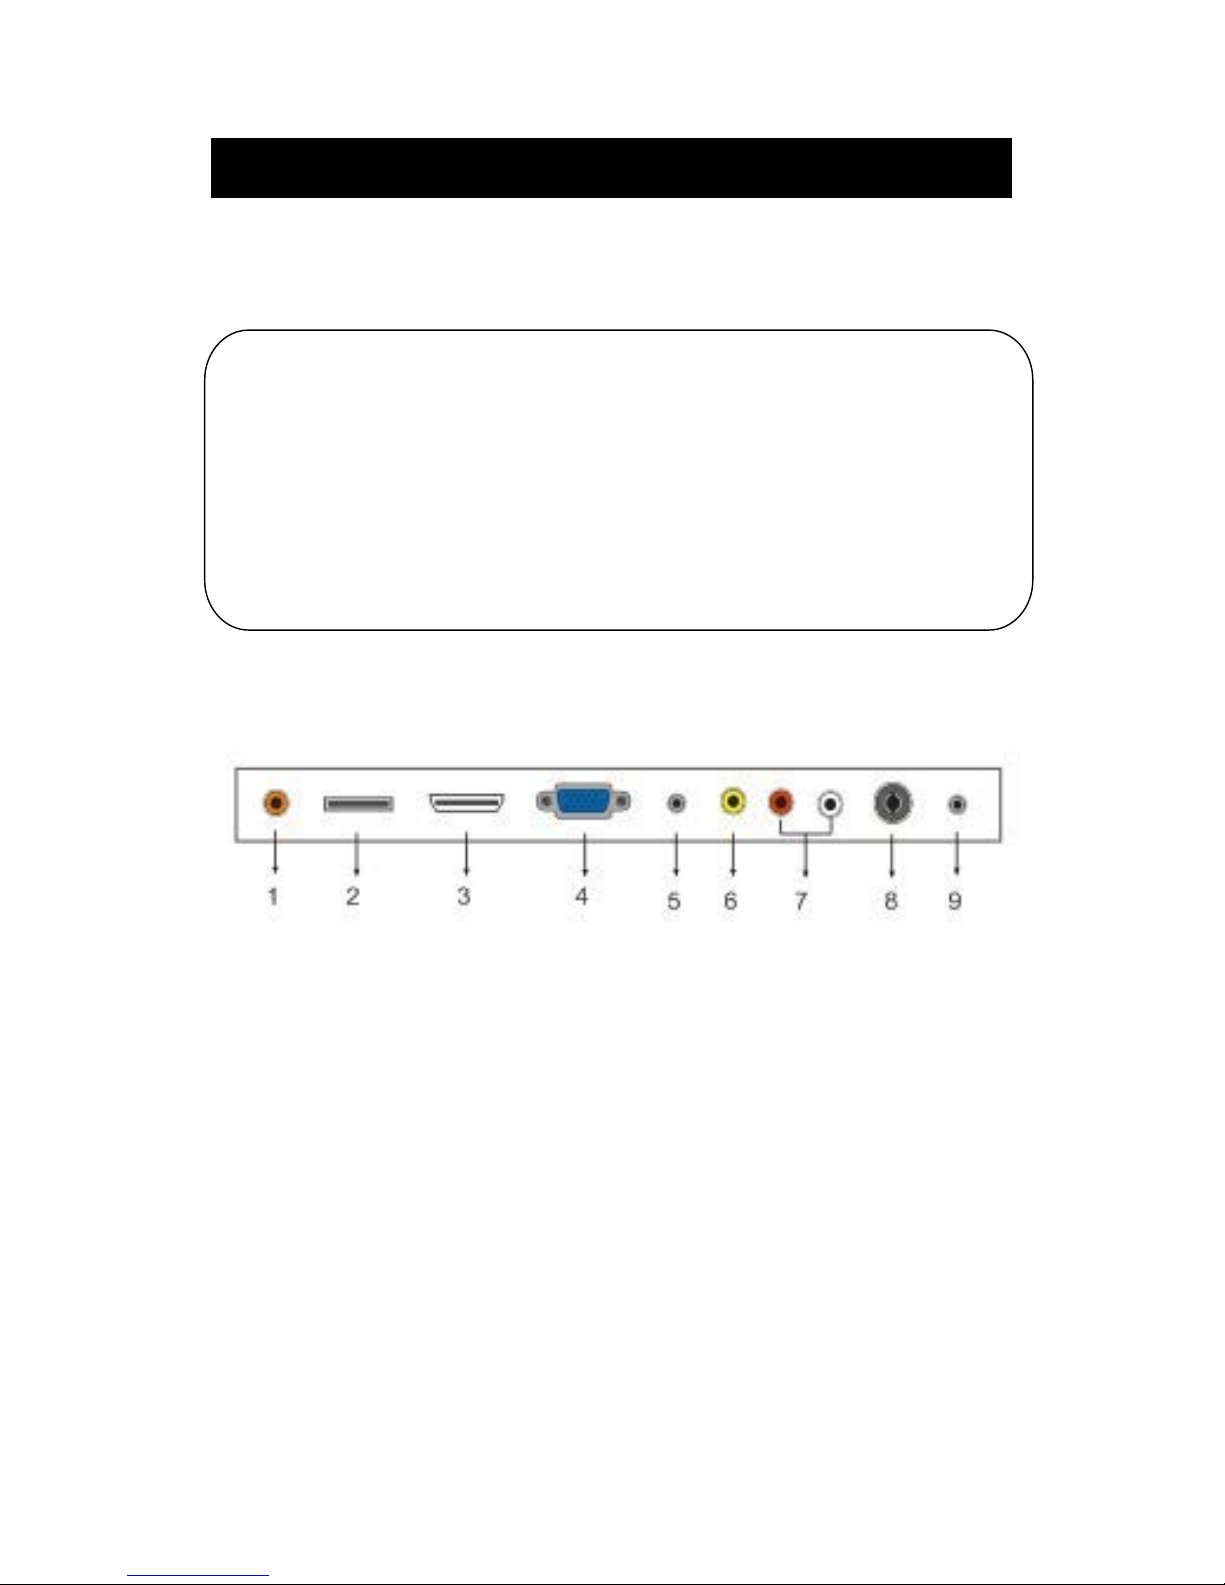
Terminal Connections
2. USB input term
inal˄Only for service
˅.
1. Coaxial out terminal
3. HDMI input term
inal.
4. VGA input terminal of simulation signal of PC.
5. PC AUDIO input terminal.
6. VIDEO input terminal.
7. AUDIO input terminal.
8. RF antenna.
9. HEADPHONE out terminal.
15
POWER : Switch on when at standby
mode or enter the standby mode.
Change channel down; if OSD is active, functions as down in
the menu.
Page 17

Remote control
POWER: Powe
r on/
off b
utton, press once to turn the TV on and press
again to turn the TV off.
MUTE: Press this button to mute or restore sound.
MTS/AUDIO: When stereo program is received, press this key to
switch sound system between mono and stereo.
When SAP program is received, press this button to switch sound
system between mono and SAP
When stereo and SAP program is received, press this key to switch
among mono, stereo and SAP.
Press this key to show the list of audio languages available for the
current channel in ATSC.
ASPECT: Press to
adjust picture ratio.
PMODE: Select picture mode.
SMODE: Select sound mode.
0-9: Select and switch to a channel using 0 - 9.
-/--:
Switch the program digit.
: Switch back and front between the current and previous channels.
DISPLAY: Display TV information.
EPG˖Enter electronic program guide
AUTO: Adjust the picture automatically in pc mode.
RED, GREEN, YELLOW, CYAN:
This button is not available.
SLEEP: Se
t the sleep timer.
SOURCE: Press to change signal source.
ENTER: Enter the selected option or perform the selected operation.
MENU: Press this button to enter the main menu.
EXIT: Exit the OSD (On-screen display).
CH+/CH-: Change the channel.
CC: Press this key to select the CC ,ON or OFF mode and CC on Mute .
INFO: Display some information of current program in TV mode.
VOL+/VOL-: Adjust the volume.
FAV: Switch between custom set "Favorite List"
F.LIST: Press this key to display the Favorite List mode.
C.LIST: Press this key to display the channel list mode.
Page 18
Installation Guide
Press MENU button to display the MAIN OSD MENU; Press Ż / Źbutton to select the
MENU you want; Press ENTER button to enter the sub menu; Press ź / Ÿ button to select the
option andthen press Ż / Ź to adjust the valuein the sub menu; You canpress MENU button to
go backto the upper menu or EXIT button toclose the OSD.
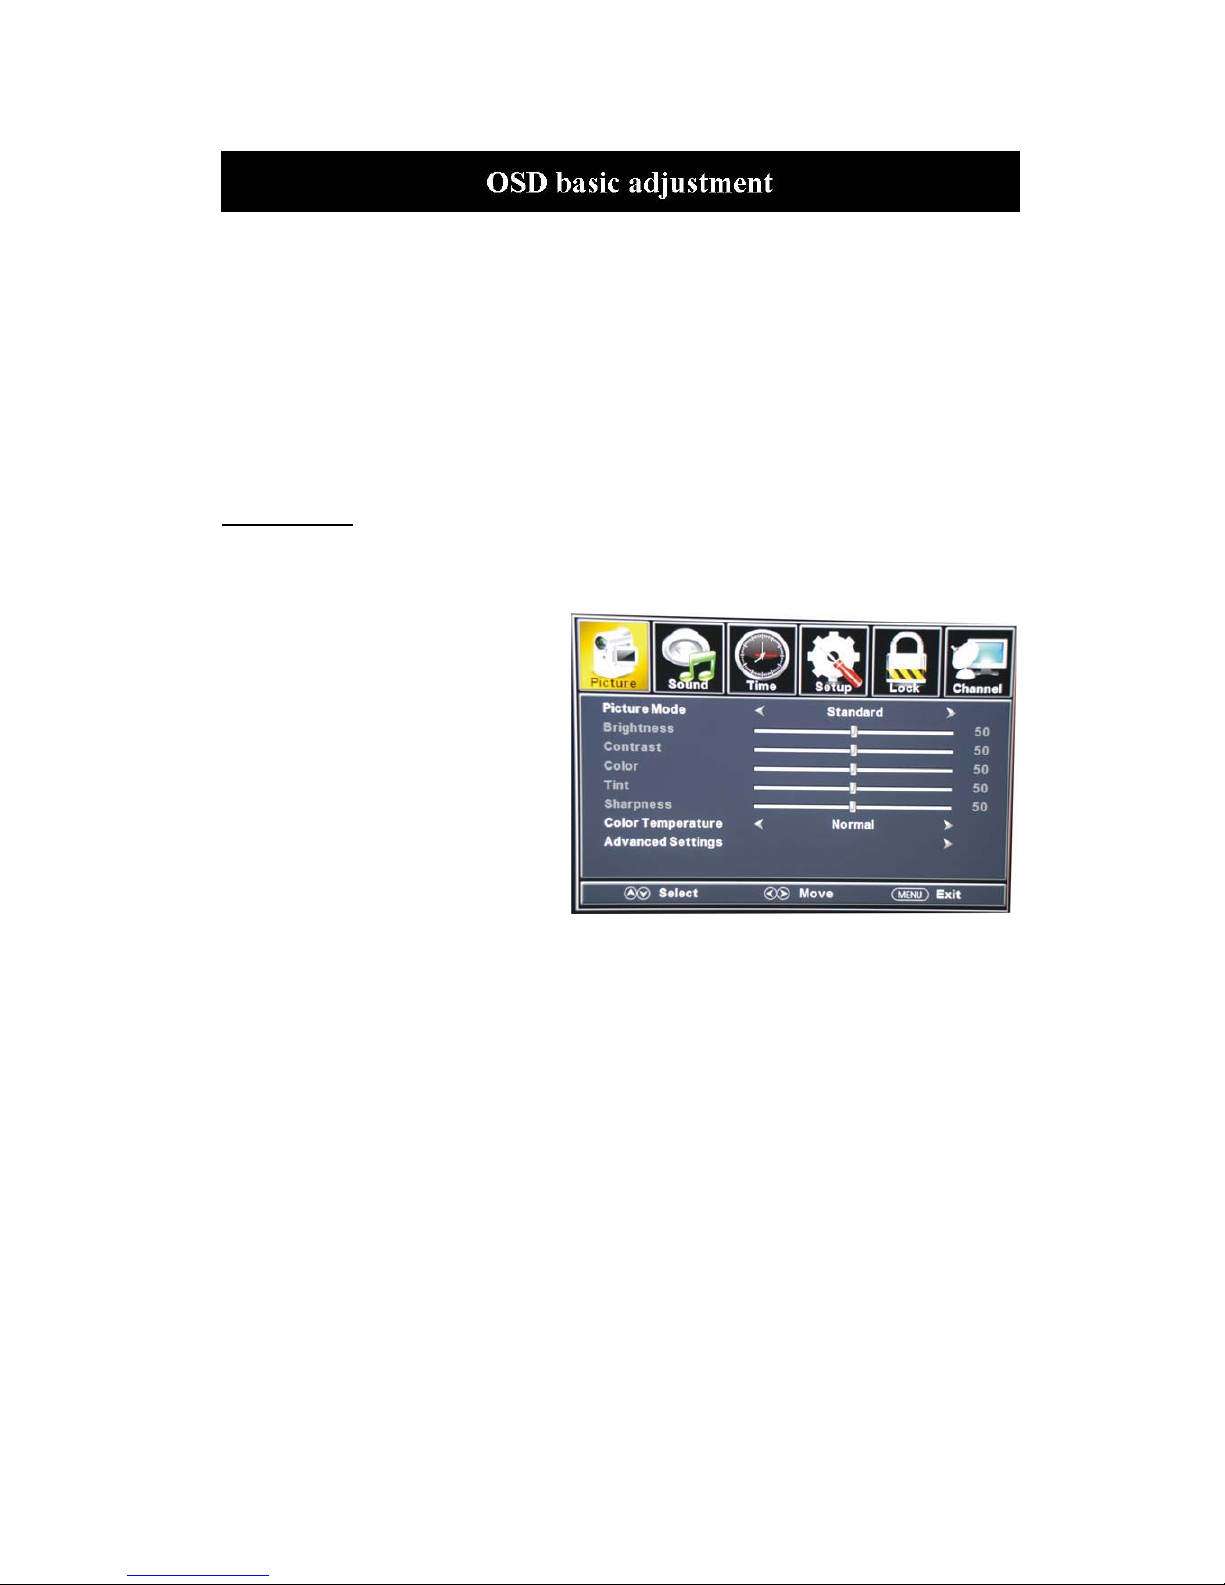
PICTURE
You can select the type of picture, which best corresponds to your viewing. Press the “MENU”
button to enter the OSD menu .Then
press “e/f” button to select the
“PICTURE” menu.
1. Press “d” button to select “Picture
Mode”, press “
e/f” button to select.
2. Press “c/d” button to select
“Brightness” andpress the “e/f”
button to enter brightness adjustment
menu toadjust brightness.
3. Press “c/d” button to select
“Contrast” and press the “e/f” button
to enter contrast adjustment menuto
adjust contrast.
4. Press “c/d” button to select “Color” and press the “e/f” button to enter color adjustment
menu toadjust color.
5. Press “c/d” button to select “Tint” and press the“e/f” button to enter hue adjustment menu
to adjusttint.
Note:
The 'Tint' item is used in NTSC mode only.
6. Press “c/d” button to select “Sharpness” and press the“e/f” button to enter sharpness
adjustment menuto adjust sharpness.
7. Press “c/d” button to select “Color Temperature” and press the“e/f” button to select.
8. Press “c/d” button to select “AdvancedSetting” and press the “ENTER/f” button to enter
sub-menu.
Page 19
a. Press “c/d”buttonto
“Aspect Ratio”and
“ e/f” button to
select.
b. Press “c/d” button to
“Noise Reduction”
and pressthe
button to select.
c. Press “c/d”buttonto
“Dynamic Contrast”
and pressthe
button to select “On” or
“Off”.
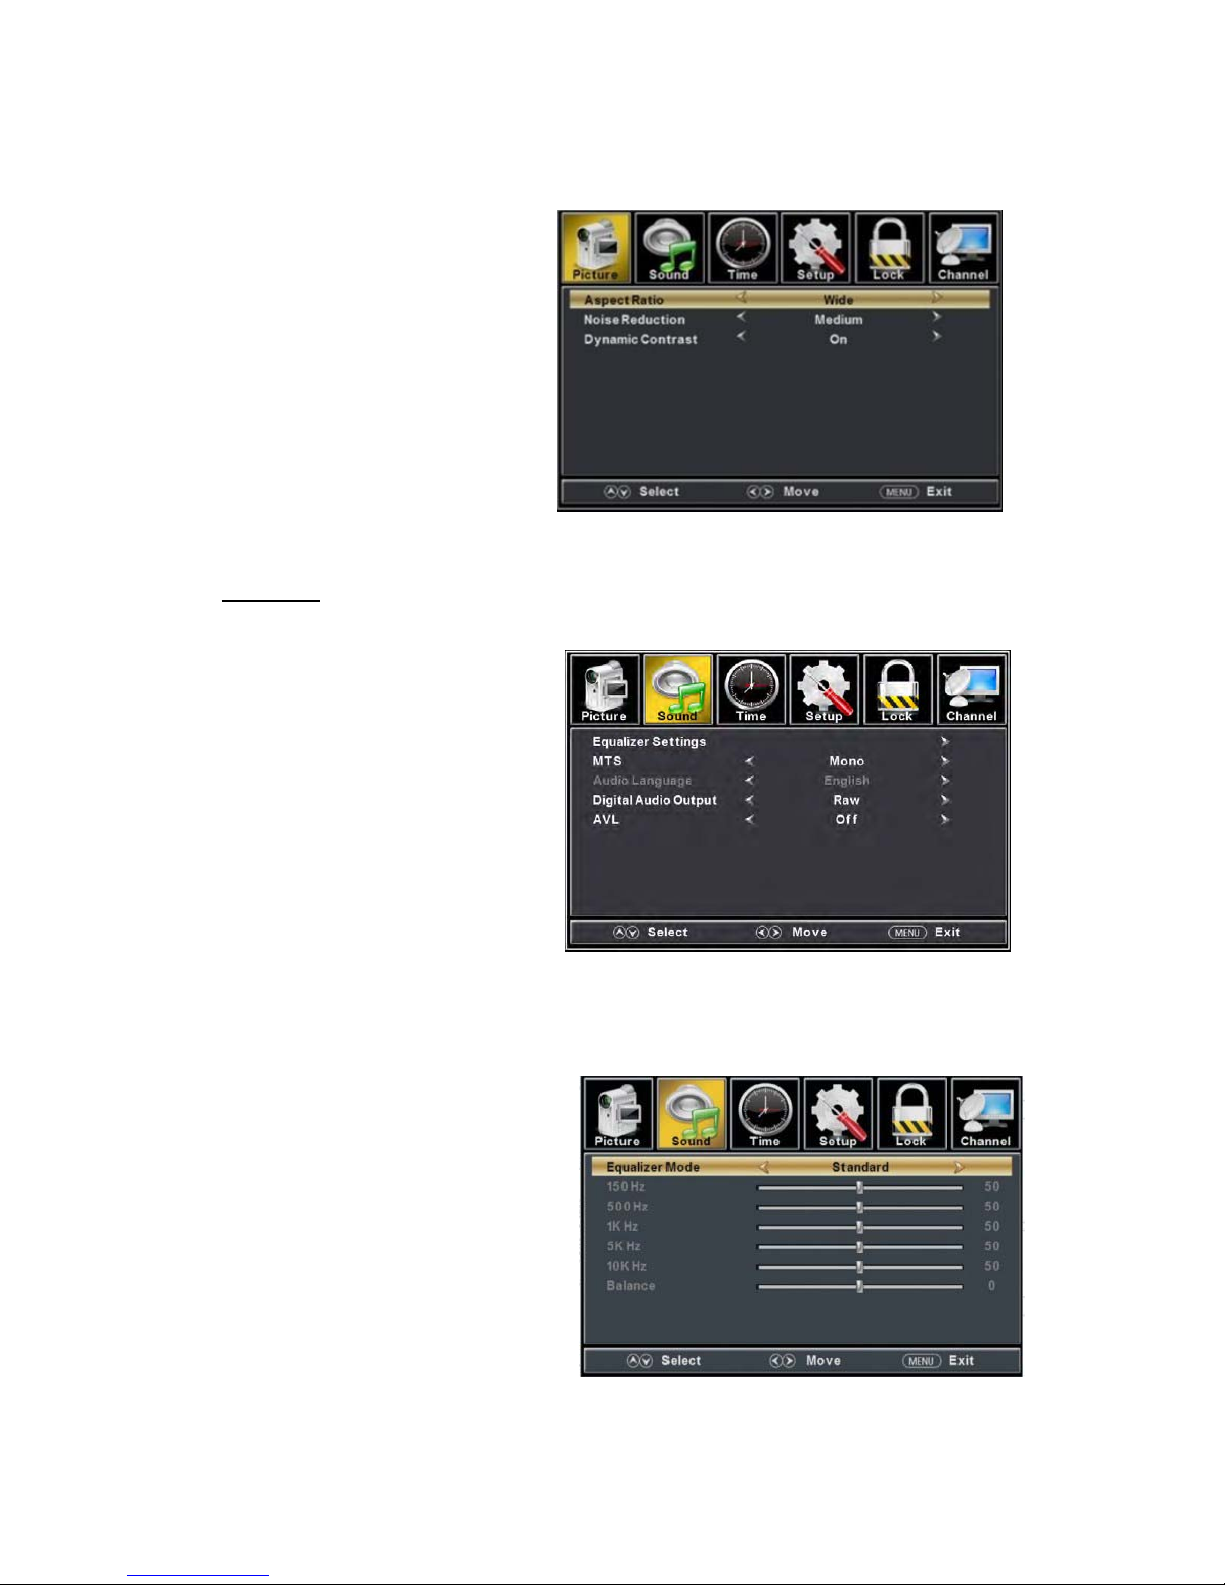
SOUND
You can select the type of sound, which best corresponds to your listening.
Press the
“MENU” button
to enter the OSD
menu .Then
press “e/f”
button to select
the “SOUND”
menu.
1. Press “d”
button to
select
“Equalizer
Settings”
and press
the
“ENTER/f” button to enter sub-menu.
a. Press “c/d” button to select “Equalizer Mode”. Press “e/f” button to select.
b. Press “c/d” button to select “150Hz”. Press “e/f” button to select.
c. Press “c/d” button to select “500 Hz”. Press “e/f” button to select.
d. Press “c/d” button to select “1K Hz”. Press
“e/f” buttonto select.
e. Press “c/d” button to select“5K Hz”.
Press“e/f” button to select.
f. Press “c/d” button to select“10K Hz”.
Press “e/f” button to select
g. Press “c/d”
button to select “Balance”.
Press “e/f” button to select
select
press the
select
“e/f”
select
“ e/f”
Page 20
Note: Theb
ǃcǃdǃeǃfǃg functionit is onlyavailable in USER mode.
2. Press “c/d” button to select “MTS” and press the “e/f” button to adjust.
Note: Itis only availablein ATV.
3. Press “c/d” button to select “Audio Language”and press the “e/f” button to adjust.
Note: Itis only availablein DTV.
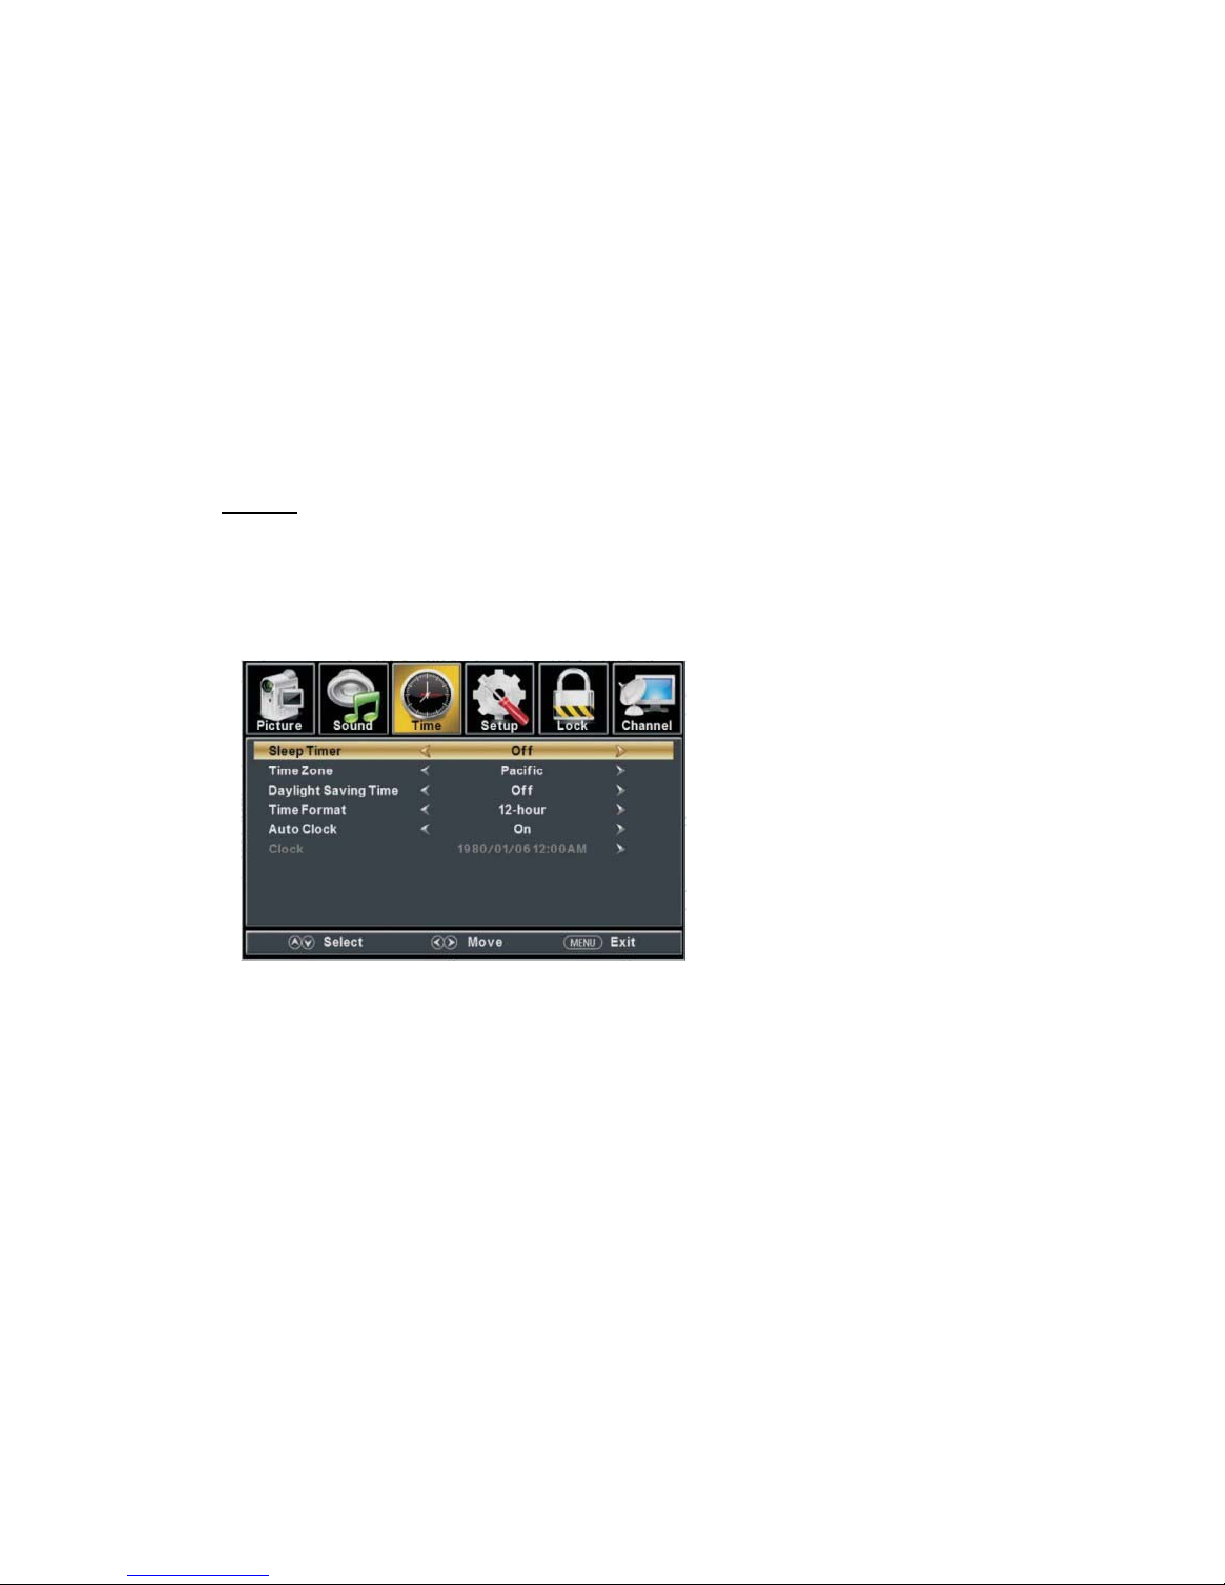
TIME
Press the “MENU” button to enter the OSD menu .Then press “
e/f
” button to
select the “TIME” menu.
1. Press “d” button to select “Sleep Timer” and press the “e/f” button to enter sleep timer
adjustment menu to adjustsleep timer.
2. Press “c/d” button to select “Time Zone” and press the “e/f” button to enter time zone
adjustment menuto select the local time zone.
3. Press “c/d” button to select “Daylight Saving Time” and press the “e/f” button to select
“On” or “Off”.
4. Press “c/d” button to select “Time Format” and press the “e/f” buttonto select “12-hour”
or “24-hour”.
5. Press “c/d” button to select “Auto Clock” and press the “e/f” button to select “On” or
“Off”.
6. Press “c/d” button to select “Clock” and press the “ENTER/f” button to adjust.
4. Press “c/d” button to select “DigitalAudio Output” and press the “e/f” button to adjust.
5. Press “c/d” button to select “AVL” and press the “e/f” button to select “On” or “Off”.
Page 21

1. Press “d” buttonto select “OSDLanguage” and press the “e/f” button to select the OSD
language which you
desire.
2. Press “c/d” button to elect
“Transparency” and press
the “e/f”
button to select.
3. Press “c/d” button to select
“OSD Timeout” the
button to
adjust OSD timeout.
4. Press “c/d” button to select
“Closed
Caption” andpress the
“ENTER/f” button to enter
a. Press “c/d” button to select “CC Mode” the “e/f” button to adjust.
b. Press “c/d” button to select “AnalogCC ” the “e/f” button to adjust.
c. Press “c/d” button to select“Digital CC” the “e/f”buttontoadjust.
d. Press “c/d” button to select “Option”the “ENTER/f” button to enter sub-menu.
Note: The cǃd function it is only available in DTV.
Note: The option is adjust the digitalclosed captioning setting.
SETUP
Press the “MENU” button to enter the OSD menu .Then press “e/f” button to select
the “Setup” menu.
“e/f”
sub-m
enu.
Page 22
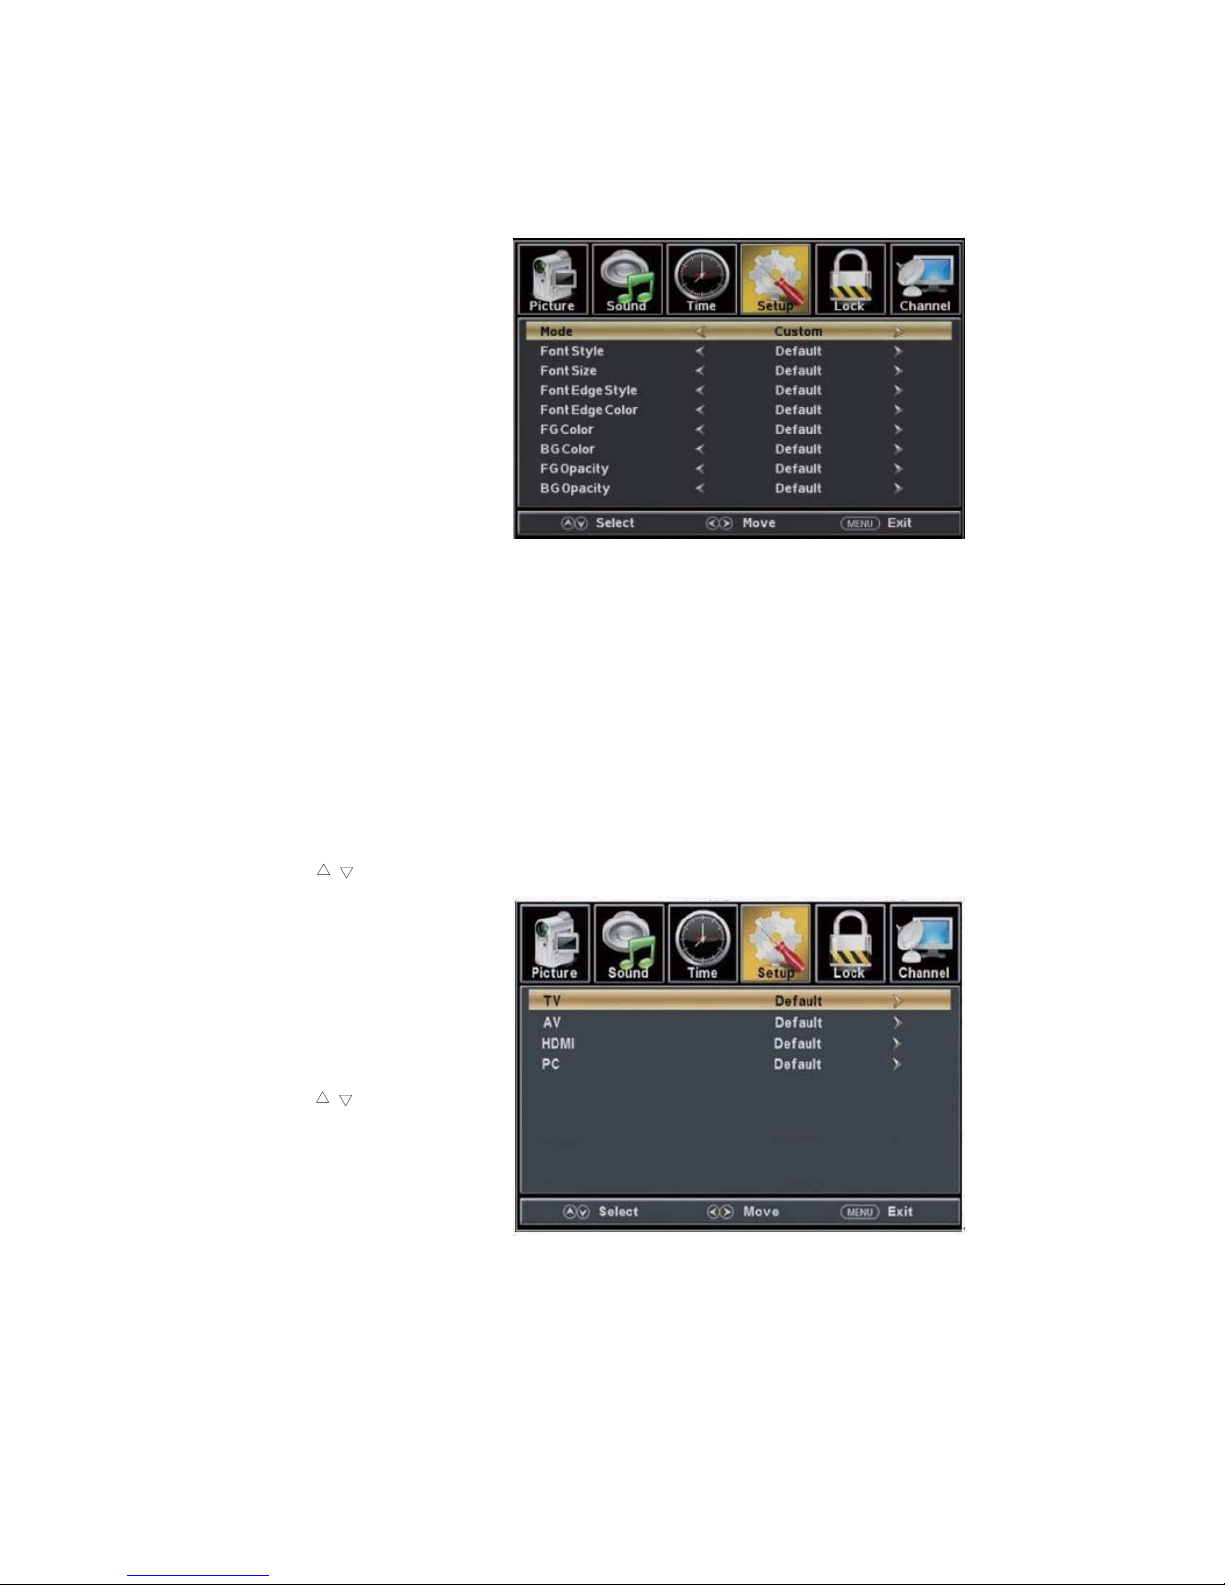
(a). Press “c/d” button to select “Mode” the “e/f” button to adjust.
(b). Press “c/d” button to select “Font Style” the “e/f” button to adjust.
(c). Press “c/d” button to select “Font Size” the “e/f” button to adjust.
(d). Press “c/d” button to select “Font Edge Style” the “e/f” button to adjust.
(e). Press “c/d” button to select “Font Edge Color” the “e/f” button to adjust.
(f). Press “c/d” button to select “FG Color” the “e/f” button to adjust.
(g). Press “c/d” button to select “BG Color” the “e/f” button to adjust.
(h). Press “c/d” button to select “FG Opacity” the “e/f” button to adjust.
(i). Press “c/d” button to select “BG Opacity” the “e/f” button to adjust.
Note: All the option it is not available in Custom.
5. Press “c
/d” button to select “Input Label” and press the “ENTER/f” button to enter
sub-menu.
Note: The
source label is
Create labels
for the
devices
connected to
your TV.
6. Press
“c
/d”
button to select
“Other
Settings”
and press
the “ENTER/f” button to enter
sub-menu.
Page 23

7. Pr
ess “c/d” button to select “Restore Default” and pressthe “ENTER/f”, Press “e/f”
button selecting“Yes” to restore all settingto default setting
default.
8. Press “c/d” button to select “Setup wizard” and press the
“ENTER” buttonto enter sub-menu.
a. Pr
ess “c/d” button to select “Menu Language” and press the “e/f” button to select
language.
b. Press “c/d” button to select “Go to next step” andpress the “ENTER/f” button to enter
next step.
a. Press “/” button to select “Audio Only” the “/” button to select “On” or “Off”.
b. Press “/” button to select “Blue Screen” the “/” button to select “On” or “Off”.
When select “On”, only listen sound and the screen is black; When select “Off”,watch
TV normally.
Page 24

c. Press “c/d” button to select “Time Zone” and press the “e/f” button to select time zone.
d. Press “
c/d
” button to select “Daylight Saving Time” and press the “e/f” button to select
“On” or “Off”.
e. Press “
c/d
” button to select “Time Format” and press the “e/f” button to select“12-hour”
or “24-hour”.
f. Press “
c/d
” button to select “Go to next step” and press the “ENTER/f” button to enter next
step.
g. Press “c/d”
button to select
“Air/C
able”
and press the “e/f” button to select “Air” or
“Cable”.
h. Press “
c/d
” button to select “Go to next step” and press the “ENTER/f” button to start auto
scan.
Note: Searching platform will take a long time. Please be patient!
Page 25

LOCK
Press the “MENU” button to enter the OSD menu .Then press “e/f” button
to select the “Lock” menu.
1. Press “d” buttonto select “EnterPassword” and press select digital button to enter.
Note: The default password is “0000”
2.
Press ź / Ÿ buttonto select “Change Password”, thenpress
“ENTER/f”
buttontoadjust
the value.
If the password is changed, all of the passwords in the menu will be changed atthe same time.
Note: If you forget y
our
password, youcan use “1470”
to enter any menu locked.
3.
Press “c/d” button
to select “System Lock”
and press the “e/f”
button to select “On” or
“Off”.
4. Press ź / Ÿ buttonto
select “InputLock”, then press
“ENTER/f” button to enter
sub-menu.
a.
Press “c/d” button to select “TV” and press the “e/f” button to select “Block”
or “Unblock”.
b.
Press “c/d” button to select “AV” and press the “e/f” button to select “Block”
or “Unblock”.
Page 26

c. Press “c/d” button to select
“HDMI” and press the “e/f”
button to select “Block” or
“Unblock”.
d.
Press “c/d” button to select
“PC” and press the “e/f”
button to select “Block” or
“Unblock”.
5.
Press “c/d” button to select “US Rating” and press “ENTER/f” button to enter sub-menu.
a. Press “c/d” button to select “TV” and press “ENTER/f” button to enter sub-menu.
Press “c
/d” button to select and press “
ENTER”to block or unblock.
b. Press “c
/d” button to select “MPAA” and press the “e/f” button to select
“Off/G/PG/PG-13/R/NC-17/X”.
6. Press “c/d” button to select “Canada Rating” and press “ENTER/f” button to enter sub-menu.
a. Press “c
/d” button to select “Canada English” and press the “e/f” button to select
“Off/C/C8+/G/PG/14+/18+”.
b. Press “c
/d” button to select “Canada French” and press the “e/f” button to select
“Off/G/8ans+/13ans+/16ans+/18ans+”.
7. Press “c/d” button to select “RRT Setting” and press “ENTER/f” button to enter sub-menu.
Page 27

Note: The item is available only when current stream has downloadable rating data.
8. Press “c/d” button to select “Reset RRT” and press “ENTER/f” button to reset.
Channel
Press the “MENU” button to enter the OSD menu .Then press “e/f” button to
select the “Channel” menu.
1.
Press “d” buttonto select
“AIR/CLABLE”
and press the
“e/f”button to select
Cable orAIR.
2. Press “c/d” button to
selec
t “Auto Scan” and press
the “
ENTER/f” button
e/f
“
ENTER” to do auto scan.
3. Press “c/d” button to
select “Favorite”and press
the “
ENTER/f”buttontoenter.
4. Press “c/d” button to select “Channellist” and press the “
ENTER/f
”buttontoenter.
5. Press “c/d” button to select “Show/Hide” and press the “
ENTER/f
”buttonto enter.
6. Press “c/d” button to select “Channel Number” and press the “
e/f” buttonto adjust.
7. Press “c/d” button toselect “Channel Label” and press the “
ENTER/f” buttonto enter.
enter then press" " button
button to select "YES" and press
Page 28

1. Press “c/d” button to select “H-Pos” and press the “
e/f
” button to adjust.
2. Press “c/d” button to select “V-Pos” and press the “
e/f” button to adjust.
3. Press “c/d” button to select “Clock” and press the “
e/f” button to adjust.
4. Press “c/d” button toselect “Phase” and press the “
e/f” button to adjust.
5. Press “c/d” button to select “Auto” and press the “
ENTER/f
” button to do autoadjust.
Note: The pictures in regard to function are provided for reference purposes only.
PC Setting
Press the “MENU” button to enter the OSD menu .Then press “e/f” button to select
the “Setup” menu.And then press
“d”buttonto select “PC Setting” and press the
“
ENTER/f
”buttontoenter sub-menu.
Page 29

How do I Clean the TV?
IMPORTANT
1. The power cable has to be removed from the socket before cleaning the TV.
2. Do not use volatile solvent (alcohol, rosin,and toluene) to clean the TV. These
types of chemicals might damagethe housing and the LED glass.
Cleaning the bezel and remote control
1. Use a 100% cotton cloth or micro-fiber cloth for cleaning.
2. If the remote control or bezel is dirty to the point where you cannot simply dry
wipe it, please lightly dampen the wiping material (the wiping material cannot
be dripping wet, because if water drips into the panel it will cause
malfunction and possible permanent damage to the panelwhich will not be
covered underthe warranty) with clean water and wipe again. Wipe the
display with a dry micro-fiber cloth or100% cotton cloth afterwards.
Please Note :
x Make sure you wring the water out of the cloth before cleaning the
bezel or remote in order to prevent water from penetrating into the
electronics.
Cleaning the Screen
1. Use a 100% cotton cloth or micro-fiber cloth for cleaning.
2. The LED screen glass is extremelyfragile. Do not scrape it with any material.
Do not press or tap the screen to avoid cracking. When the screen is dirty to the
point where you cannot simply dry wipe it, please lightly dampen the wiping
material with clean water and wipe again. Wipe the display with a dry
micro-fiber cloth or 100% cotton cloth afterwards.
Page 30

Troubleshooting
Problems Solutions
NO PICTURE
Connect power cord correctly.
Turnon power.
Connect video cable correctly.
Select the input signal source with propercable connection with the source button.
ABNORMAL
COLORS
Match the colors on the cables to the ports off the back of the television. I.E. red cable to red colored
port.
PICTUR
EISTOO
DARK
Adjust your contrast, brightness and lamp settings fromthe OSD Menu. For adjust controls
AUDIO ONLYNO
PICTURE
Make sure you have connected both your videoand audio cables.
The TV’stuner signal must not be lower than 65%.
PICTURE ONLYNO
AUDIO
Make sure the audio cable is connected.
Readjust your volume via the remote control.
The TV’stuner signal must not be lower than 65%.
REMOTE C
ONTROL
DOES NOT WORK
Turn off the TV, unplug it from the socket. Remove the batteries out of the remote for 30 minutes.
Press the remote buttons and the power button randomly for a good 2 seconds, and then reinstall the
batteries. Try the remote to see if it works. For battery removal instructions.
The TV’s remote sensor is also housed in the same place as the power indicator light. Please make
sure there is line of sightfrom the remote control’s front sensor to the remote sensor oftheTV.
CANNOT RECEIVE
SUFFICIENT
CHANNELS
THROUGH THE
ATSC/NTSC TUNER
The TV’s tuner signal must not belower than 65 %. Change the direction of your antenna and rescan
your channels. If you have cable call up your cable company and ask about signal strength of your
local cable.
NO COLOR
Please adjust your picture setup and make sure the saturation and the RGB are not turned all the way
down. For adjustment controls.
The TV’stunersignal must not be lower than 65 %. Check your signal.
WEAK SIGNAL OR
NO PROGRAM
SYMBOL ON
SCREEN
The TV’s tuner signal must not belower than 65 %. Change the direction of your antenna and rescan
your channels. If you have cable call up your cable company and ask about signal strength of your
local cable.
TV’S UNIVERSAL
REMOTE CODE
This television follows NEC’s universal remote code. To find the actual code you must read
through your own universal remote’ s guide book .
Troubleshooting
The following table contains the common problems and the solutions to these problems.Please check this list before
you contact the technicians.
Page 31

TV CHANNELS ARE
BLOCKED
Check your auto lock function’s settings inside the OSD. You may have locked up some channels but forgot
about them.
UNIVERS
AL REMOTE
CODE
This TV follows
NEC’s universal remote code. Please check your hand book for NEC’s codes then apply
them.
THE TV TURNS ON OR
OFF SLOWLY AND THE
SCREEN SHOWS UP
SLOWLY
This TV is a High Definition liquid crystal display panel TV. It requires a few more seconds than normal TVs
to power up and show the picture.
NO SOUND ON PC Make sure you have a 3.5 mm mini-jack cable connected from your pc’s sound output to the TV’s VGA
STEREO INPUT.
HDCP VIDEO SAYS NO
HDCP SUPPORT
Reboot your HDCP video device but turning them off and unplugging the power cord. Wait up to 8 minutes
to plug the power back in to see if it works or not.
HDCP
VIDEO H
AS NO
AUDIO
Make sure you have a 3.5 mm mini-jack cable connected from your HDCP video device’s sound output to the
TV’s VGA STEREO INPUT. If your HDCP video device uses RCA AUDIO jacks, you’ll need to obtain a
RCA audio converted into 3.5 mm mini-jack cable.
CANNOT GET 1360X768
ON PC VGA
Make sure the TV is recognized as plug and play monitor. Try updating your video card’s drivers as well. If
that does not help, most likely you’ll need to upgrade your video card to a newer one.
PICTURE IS
DISTORTED OR HAS
ABNORMAL SOUND
This might be from interference from large electrical appliances, cars, motorcycles, or fluorescent lights. If
the TV is close to the wall, try moving the TV to another room in your house to see if the problem still occurs.
PICTUR
E DOES NOT
COVER THE ENTIRE
SCREEN
If you’re using HDMI or a TV digital channel make sure you use the ASPECT button to switch to 16:9 format.
If you are using VGA, use the AUTO ADJUST function to adjust to the screen. Please Note : If you are using
regular analog TV, AV, or component in 480i resolution, use the ASPECT button to switch to 16:9 in order to
fill up the screen. Please Note : This note this feature will distort the picture.
PICTURE QUALITY IS
HORRIBLE!!
For best image quality, view HD widescreen programs where possible. If HD content is not available view
“Standard Definition” from a digital source. Standard, analog TV will always be noticeable inferior to HD
because your TV has video that is many times better than old TV’s and so you can see interference and
deficiencies you did not KNOW you had.
PICTURE HAS PIXELS
THAT ARE ALWAYS
DISPLAYING THE
SAME COLOR
Your TV is manufactured using an extremely high level of precision technology, however, sometimes some
pixels of your TV may not display. Pixels defects within industry specifications are inherent to this type of
product and do not constitute a defective product.
I CANNOT CHANGE
THE TIME MANUALLY
Your TV syncs time automatically according to your local TV channel. This function only works while the
TV’s tuner is connected to an ANTENNA.
BIG BLACK BOX IN
THE MIDDLE OF
SCREEN
You have turned on closed captioning and are using TEXT1 – TEXT4. Change the setting to CC1 or turn off
closed captioning and the box will disappear.
Problems Solutions
Page 32

SWITCHING A
CHANNEL OR
SOURCE CHANGES
THE VOLUME
Different channels and inputs will sometimes have this effect because the channel signal’s own volume
is already loud. There is no way remove this completely. The TV has an AUTO VOLUME LEVEL
function that can combat this type of effect. Please make sure that function is turned on.
THERE IS NOISE OR
TRASH PIXELS ON
THE SCREEN
When your TV’s resolution is higher than the digital channel’s broadcast resolution, the signal is
up-converted to match your TV’s resolution. Up-converting can cause this type of effect.
TIPS FOR HIGH
DEFINITION USERS
The TV is an ideal platform for viewing High Definition Content. The best image quality can be
achieved by HDMI, YPbPr (Component), then VGA. However, due to variances in broadcast
practices, it is possible some image distortions can occur.
TIPS FOR LETTERBOX
CONTENT USERS
Letterboxed (Widescreen) versions of DVD movies are most commonly formatted for standard 4:3 TVs.
The TV has the capability of expanding this content so the entire screen is filled at the expense of the
image proportion. To use this function press the aspect button on the remote control and cycle among
the available options.
I CANNOT FIND THE
VOLUME AND
CHANNEL CHANGING
BUTTONS
The buttons are represented by the ŸźŻŹ buttons located on the remote control. Ÿź changes the
channels and ŻŹ changes the volume.
TV TURNS OFF
AUTOMATICALLY
AFTER 5 MINUTES
The TV features a power saving mode which will automatically turn off the TV, if there’s no signal
provided for more than 5 minutes.
MY TV PICTURE IS
VERY DIM
Check to see if you are under POWER SAVING mode for your picture mode. Keep pressing the
PICTURE button on the remote control to cycle out of POWER SAVING.
Problems Solutions
Page 33

Page 34

Sound Mode Music/Standard/ Movie/User/Sport
150Hz/500Hz/1KHz/5KHz/10KHz/Balance
Speakers 3 watt per channel
(3) General
Sleep timer
PC timing
1360*768@60 Hz (NATIVE)
1024*768@60
800*600@60
640*480@60
720x400@70
(4)NTSC/ATSC
NTSC
Sound: Mono / Stereo / SAP
Favorite Channel
V-c h ip
Closed caption
(CC1-CC4, Text 1-Text 4)
ATSC
Favorite Channel
V-c h ip
Video input format: 1080i, 720p, 480p, 480i
Analog closed caption:
(CC1-CC4, Text 1-Text 4)
Digital closed caption:
(Service 1-Service 6)
(5)I/O
1 input x TV Tuner (NTSC/ATSC),
1 input x AV,
1 inputs x HDMI/HDCP (optional, HDCP audio shared with VGA Audio In),
1 input x VGA,
1 input x VGA Audio In,
1 output x Headphone out,
*The product’s specifications may change without notice or obligation.
**This manual’s pictures and words are for references only and are subject to change without notice or obligation.
(2)Audio
Off/5mins/10mins/15mins/30mins/60mins/90mins/120mins/180mins/240mins
33
1 input x R/L Audio In (RCA interface)
1 intput x USB In (only for servise)
seY lortnoC emuloV otuA
enoT
)ydaeR elbaC latigiD( MAQ / CSTA / CSTN renuT VT dirbyH
seY nacs otua lennahC
W1 rednU rewop ybdnatS
p0801 / i0801 / p027 / p084 / i084 oediV-troppus gnimiT
1 output x Coaxial
Page 35

FCC Compliance Statement
This device complies with Part 15 of the FCC Rules.
Operation is subject to the following conditions:
This device may not cause harmful interference
This device must accept any interference received, including interference that my cause
undesired operation.
Please Note: This equipment has been tested and found to comply with the limits for a Class B
digital device, pursuant to part 15 of the FCC Rules. These limits are designed to provide
reasonable protection against harmful interference in a residential installation. This equipment
generates uses and can radiate radio frequency energy and, if not installed and used in
accordance with the instructions, may cause harmful interference to radio communications.
However, there is no guarantee that interference will not occur in a particular installation. If
this equipment does cause harmful interference to radio or television reception, which can be
determined by turning the equipment off and on, the user is encouraged to try to correct the
interference by one or more of the following measures:
x Reorient or relocate the receiving antenna.
x Increase the separation between the equipment and thereceiver.
x Connect the equipmentinto an outlet on a circuit different from that to which
the receiver is connected.
Caution: To comply with the limits for an FCC Class B computing device, always use the
signal cord and power cord supplied with this unit.
The Federal communications Commission warns that changes or modifications to the unit not
expressly approved by the party responsible for compliance could void the user’s authority to
operate the equipment.
European Notice
Products with the CE marking comply with both the EMC Directive (89/336/EEC),
(93/68/EEC) and the Low Voltage Directive (72/23/EEC) issued by the Commission of the
European Community.
Page 36

MANUEL D’UTILISATION
24"
RLED2431A-B
Page 37

z Introduction
z Avertissement
z Attention
z Informations importantes
z Fixation ou enlèvement du support
z Installation des piles dans la télécommande
z Identification des panneaux avant et arrière
z Suggestion de connexion
z Description de l'unité principale
z Télécommande
z Réglage de base de l’écran
z Comment nettoyer le téléviseur
z Dépannage
z Spécifications
z Déclaration de conformité FCC
Dépannage
Table des matières
Page 38

1. Introduction
Nous vous
remercions d’avoir fait l’acquisition de ce TV LED. Il fait à la fois office d’un TV
couleur classique et d’un moniteur PC. Pour bénéficier pleinement de votre TV dès le début,
lisez attentivement ce manuel et conservez-le à proximité pour vous y référer ultérieurement.
1.1 INST
ALLATION
x Mettez la
TV dans un endroit où la lumière directe ne frappe pas l’écran. L’obscurité
totale ou un reflet sur l’écran d’image peut causer une fatigue oculaire. La lumière douce
et indirecte est recommandée pour visualiser de manière confortable.
x Laissez de
l’espace suffisant entre le récepteur TV et le mur pour laisser passer la ventilation.
x Evitez les endroits excessivement chauds pour éviter tout risque d’endommager le châssis ou
une défaillanceprématuré d’un composant.
x Cette TV peutêtre connectée sur secteurAC100-240V50/60Hz.
x Ne pas installer la TV dans un endroit près de sources de la chaleur telles que le radiateur, la
conduite d’air, la lumière solaire directe, ou dans des endroits fermés. Ne pas couvrir les
ouvertures deventilation quand vous utilisez laTV.
x Le voyant LED du TV sur le panneau avant dure environ 30 secondes après la coupure
l’électricité, durant cette période, vous ne pouvez pas rallumer le TV jusqu’à ce que le voyant
LED s’éteigne, merci beaucoup pour votre attention!
Manuel D'utilisation x1
Carte de garantie x1
Câble d'alimentation x1
Télécommande x1
Batterie (piles, AAA) x1
Liste des accessoires pour téléviseur
x
x
x
x
x
x
Page 39

1.2A
VERTISSEMENTS
Ce symbole est destiné à avertir l’utilisateur de risque de choc
électrique, ne pas démonter cet appareil, excepté par un technicien
de maintenance qualifié.
Ce
symbole est destiné à avertir l’utilisateur de la présence
d’instructions importantes quant au fonctionnement et l’entretien
dans la documentation accompagnant cet appareil.
PRECAUTION: POUR EVITER LE RISQUE DE CHOC ELECTRIQUE.
NE PAS ENLEVEZ LE COUVERCLE (OU DOS).
AUCUNE PARTIE UTILISATEUR SERVICEABLE A L’INTERIEUR.
REFERENCEZ LA MAINTENANCE AU PERSONNEL DE
MAINTENANCE QUALIFIE.
PRECAUTION
RISQUE DE CHOC ELECTRIQUE
NE PAS OUVRIR
Les struct
ures de classe I doivent être reliées auréseau électrique
par une prise munie d'une connexion à la terre de protection.
Alimenter à la prise comme un appareil à disjoncteur, les
installations àdisjoncteur devraient être faciles à utiliser.
Page 40

1.3 PRECAUTIONS
Précaution
Des
hautes tensions dangereuses existent à l'intérieur de cet appareil.
Ne pas retirer l'arrière du boîtier de votre appareil. Pour toute
réparation, veuillezfaire appel à un technicien qualifié.
Précaution
Précaution
N'
introduisez pas d'objets dans les fentes des panneaux du téléviseur.
Ne renversez jamais de liquidesur le téléviseur.
Précaution
Evit
ez l’exposition de l’appareil à la lumière solaire et autres sources
de chaleur. Ne posez pas directement le téléviseur sur d’autres
appareils qui dégagent de la chaleur. Tels que les magnétoscopes, les
amplificateurs audio. Ne pas bloquez les ouvertures d’aération à
l’arrière de l’appareil. La ventilation est essentielle pour éviter une
défaillance des composants électriques. Ne pas écraser le cordon
d’alimentation sous le téléviseur ou sous d’autres objets lourds
.
Pour
éviter tout incendie ou choc électrique, n'exposez pas l'unité
l'humidité
, ni ne placez pas d'objets remplis
de liquides, tels que des vases, sur l'appareil.
principale à la pluie ou à
Page 41

1.4 Précautions
Précaution
Ne montezjamais sur le téléviseur, nevous appuyez pas dessus et
ne le poussez pas brusquementde son socle. Prêtez
particulièrement attention aux enfants.
Précaution
Ne placezpas le téléviseur sur un chariot,une étagère, ou une table
instable. Le téléviseur risque detomber et peut provoquer des
blessures graveset des dommagesmatériels importants.
Précaution
Lorsque le téléviseur n’est pasutilisé pour longtemps,il est
conseillé de déconnecter le cordon d’alimentation de la prise
secteur.
Précaution
Le panneau LED utilisé dans ce produit est fait de verre. Par
conséquent, il peut se casser si le téléviseur tombe ou reçoit des
impacts. Faites attention à ne pas vous blesser avec des morceaux
de verre au cas où le panneau LED se brise.
Page 42

Protection de la connexion de l’antenne de télévision
Mise à la terre de l'antenne externe de télévision
En cas de connexion de l'appareil à une antenne extérieure ou un système de télévision par
câble, assurez-vous que ces derniers sont mis à la terre afin de les protéger des surtensions
électriques ou des accumulations d'électricité statique. L'article 810 Code national de
l'électricité (National Electrical Code), ANSI/NFPA N° 70, fournit des informations
concernant la mise à la terre adéquate du mât et de la structure de support, la mise à la terre du
câble d'entrée vers une unité de décharge d'antenne, la taille des conducteurs de mise à la terre,
l'emplacement de l’unité de décharge de l'antenne, la connexion aux électrodes de mise à la
terre et les exigences concernant les électrodes de mise à la terre..
Protection contre la foudre
Pour une meilleure protection de cet équipement durant un orage ou lorsque il est inutilisé
pendant une longue période, débranchez-le de la prise murale et déconnectez l'antenne ou le
système de télévision par câble.
Lignes électriques
Un système d'antenne extérieure ne devrait pas être installé près de lignes électriques aériennes
afin d'éviter qu'il ne tombe sur ces lignes ou sur des circuits électriques.
Collier de mise à la terre
Câble d'entrée d'antenne
Conducteurs de mise à la
terre (section NEC
Unité de décharge à la
terre (section NEC
Collier de mise à la terre
Service d'alimentation du système prise
de terre (ART 250, Partie H du NEC)
Équipement électrique
Informations Importantes
Dépannage
Informations Importantes
Page 43

Fixation ou enlèvement du support
Informations Importantes
Dépannage
Fixation ou enlèvement du support
7
1.
2.
3.
Fixez se con
sole à dos de cabinet, fixer avec 3 vis.
Mettez le bas du support dans le support, appuyez fermement et tourner à droite en premier,
puis tournez à gauche, attachez bien une fois entendre le son 'KA';
Fixer le su
pport de fixation avec 1 vis (4*12mm) du fond du support, puis fini.
Page 44

Vue avant
LAMPE TÉ
MOIN - La lumière est rouge lorsque l'appareil est branché, mais le téléviseur
n'est pas allumé. La lumière s'allume en bleu lorsque le téléviseur est allumé. En raison de
l'écran LED dans le panneau, le téléviseur peut prendre de 10 à 12 secondes pour
s'allumer.
TÉLÉ-CAPTEUR - Le télé-capteur reçoit toutes les commandes de la télécommande.
Vue arrière du schéma de montage
Spécification de m
ontage : 75mm x 75 mm en utilisant une vis M4. La longueur de la vis ne
doit pas dépasser 6mm. Veuillez noter : La longueur de 6mmde la vis se réfère à la profondeur
de la vis dans les trous de montage. Lorsque vous achetez des vis, vous devez ajouter les 8mm
initiaux à l'épaisseur de votre plaque de montage afin d'obtenir la longueur totale de la vis.
Installation des piles dans la télécommande
Identification des panneaux avant et arrière
Fixation ou enlèvement du support
Informations Importantes
Identification des panneaux avant et arrière
8
Page 45

Veuillez insérer deux piles AAA dans la télécommande. Assurez-vous que vous faites
correspondre les symboles (+) et (-) sur les piles avec les symboles (+) et (-) à l'intérieur du
compartiment des piles. Ensuite, remettez en place le couvercle du compartiment des piles.
Veuillez noter :
x Utilisez seulement des piles AAA.
x Ne combinez pas des piles neuves avec des piles usagées. Celapeut provoquer des fissures
ou des fuites qui pourraient poser un risque d'incendie ou entraîner des blessures.
x L’insertion incorrecte des piles pourrait aussi entraîner des fissures ou des fuites qui
pourraient poser un risque d'incendie ou d'entraîner des blessures.
x Éliminez les piles conformément aux lois et règlements locaux.
x Gardez les piles hors de portée des enfants et des animaux domestiques.
x Si la télécommande n'est pas utilisée pendant une longue période, retirez les piles.
x Gardez la télécommande à l'écart de l'humidité, de la lumière du soleil et des températures
élevées.
Page 46

Pour la câblodistribution numérique sans boîte de jonction ou antenne ...
1. Assurez-vous que l’alimentation du téléviseur HD est coupée.
2.
Branchez le câble RF à partir de votre antenne ou câble numérique au port TV à
l’arrière de votre téléviseur HD.
3. Allumez le téléviseur HD.
4. La première fois, suivez les instructions à l'écran.
Veuillez noter :
Toutes les émissions ne sont en Haute Définition (HD). Veuillez vous renseigner
auprès de vos stations de d’émission locales pour plus d'informations.
Suggestions
de connexion
Le syntoniseur du téléviseur HD est conçu pour un téléviseur HD, donc il nécessite un
signal plus fort que les téléviseurs normaux. Si vous ne pouvez pas atteindre ce niveau
de signal avec votre antenne ou câble, votre téléviseur HD pourrait perdre l’image ou le
son.
Identification des panneaux avant et arrière
Fixation ou enlèvement du support
Informations Importantes
Suggestions
de connexion
ou
Page 47

Connexion
Wii™ avec composite…
1. Assurez-vous que l’alimentation du téléviseur HD et votre Wii™ est éteinte.
2. Procurez-vous un câble vidéo jaune. Branchez le connecteur vidéo jaune à la fois à
votre Wii™ et au port du connecteur vidéo jaune de l’AV à l’arrière de votre téléviseur
HD.
3. Procurez un câble audio RCA. Branchez le connecteur de couleur blanche à la fois à
votre Wii™ et au port du connecteur blanc de l’AV à l’arrière de votre téléviseur HD.
4.
Branchez le connecteur de couleur rouge à la fois à votre Wii™ et au port du
connecteur rouge de l’AV à l’arrière de votre téléviseur HD.
5.
Allumez le téléviseur HD et votre console Wii™.
6. Utilisez le bouton source de la télécommande ou le bouton source de la TV pour passer
à l'AV.
Veuillez noter :
Assurez-vous de lire votre guide d'installation Wii™ pour plus d'informations.
Page 48

Connexion du récepteur câble/satellite avec HDMI ...
1. Assurez-vous que l’alimentation du téléviseur HD et de votre boîtier décodeur est
coupée.
2. Branchez un câble HDMI à la sortie HDMI de votre boîtier décodeur et l'autre
extrémité au port HDMI à l’arrière de votre téléviseur HD.
3. Allumez le téléviseur HD et votre boîtier décodeur.
4. Utilisez le bouton source de la télécommande ou le bouton source de la TV pour passer
à HDMI.
Veuillez noter :
Consultez le manuel de référence du boîtier décodeur pour s'assurer que le
boîtier décodeur est lié correctement à la sortie du téléviseur.
HDTV prend en charge le code de la télécommande universelle NEC.
Veuillez consulter les codes NEC dans le guide de votre télécommande
universelle.
Page 49

Connexion à un ordinateur avec VGA et mini-prise de 3,5 mm...
1. Assurez-vous que l’alimentation du téléviseur HD et de votre ordinateur est coupée.
2. Procurez-vous un câble VGA D-Sub à 15 broches ; connectez-le à la sortie VGA de votre
ordinateur et l'autre extrémité au port VGA à l’arrière de votre téléviseur HD.
3. Procurez-vous une mini-prise de 3,5 mm, connectez-la à la sortie audio de votre ordinateur
et l'autre extrémité au port d'entrée stéréo VGA.
4. Allumez le téléviseur HD et l’ordinateur.
5. Utilisez le bouton source de la télécommande ou le bouton source de la TV pour passer à
l’ordinateur.
6. Changez la résolution de votre ordinateur à 1360x768 à un taux de rafraîchissement de 60
Hz.
7. Appuyez sur MENU pour utiliser l'option IMAGE de l'écran.
8. Sous l'option IMAGE sélectionnez Réglages ordinateur.
9. Sous Réglages ordinateur, utilisez le RÉGLAGE AUTOMATIQUE pour régler l'écran.
Veuillez noter :
Pour les meilleurs résultats, veuillez régler la résolution de votre ordinateur à
1360x768 à 60 Hz. Veuillez consulter le manuel de l'ordinateur ou le manuel de la
carte graphique pour obtenir des instructions sur la façon de régler la résolution et
le taux de rafraîchissement.
Veuillez consulter le manuel de votre ordinateur pour les exigences de sortie vidéo
de la carte vidéo.
Le port VGA du téléviseur dispose d'un mode d'économie d'énergie qui éteint
automatiquement le téléviseur s'il n'y a pas de signal fourni pendant plus de 5
minutes.
Page 50

Connecter
un récepteur audio numérique avec un coaxial ...
1.
Assurez-vous que l’alimentation du téléviseur HD et de votre récepteur est coupée.
2.
Procurez-vous un câble coaxial , connectez-le à l'entrée numérique
récepteur et la liaison coaxiale au le port de SORTIE à
l’arrière de le téléviseur HD.
3.
Allumez le téléviseur HD et votre récepteur.
Veuillez noter :
Si vous voulez que votre récepteur décode un flux numérique pur, vous devez
également configurer la fonction audio OSD du téléviseur -> Sortie audio
numérique. Assurez-vous que l'option est activée à 5.1CH.
Si votre récepteur fait des bruits statiques lors de la réception du 5.1CH, vous
devez plutôt utiliser l'option PCM.
Veuillez consulter le manuel du récepteur aussi, pour s'assurer que le récepteur
est configuré pour recevoir correctement les signaux de la télévision.
La sortie COAXIAL du téléviseur pour 5.1CH est utilisée uniquement pour la
connexion antenne/câble. Tout autre signal audio entrant sera transmis
de COAXIAL sous format PCM.
coaxiale de votre
Page 51

2.2 Vue générale
2.3.1. Panneau avant
1211
1. VOL- :Pour baisser le volume
2. VOL+ : Pour augmenter le volume
3. CH- : Permet d’accéder à la chaîne précédente
4. CH+ : Permet d’accéder à la chaîne suivante
5. MENU : Permet d’afficher le Menu principal des réglages
6. SOURCE : Permet de sélectionner la source d’entrée
2.3.2. Panneau arrière des connections
ÉC
OUTEURS
3. Borne d'entrée HDMI .
4. Borne d'entrée VGA.
5. Borne d'entrée AUDIO PC.
8. Antenne de télévision.
6. Borne d'entrée vidéo.
7. Borne d'entrée AUDIO.
2. Borne d'entrée USB. (Utilisée seulement pour la mise à niveau)
1. Borne de sortie coaxiale.
15
7. POWER : Appuyez pour mettre en marche et éteindre la TV ou mettre en veille.
VOL+/VOL-/CH+/CH-:fonctionne comme déplacer le curseur droite / gauche
/ haut / bas dans le menu.
VOL+
travaux que confirmer «source» du menu.
ruop eitros ed enroB .9.
Page 52

POWER (MARCHE/ARRÊT) : Appuyezleboutondemiseen
marche/arrêt une fois pour allumer le téléviseur et appuyez de nouveau
pour l'éteindre.
MUTE (SOURDINE) : Appuyez sur ce bouton pour mettre en sourdine
ou réactiver le son.
MTS/AUDIO (MTS/AUDIO) : Lorsque le programme stéréo est reçu,
appuyez sur cette touche pour commuter le système sonore entre les
modes monoet stéréo.
Lorsque le programme SAP est reçu, appuyez sur ce bouton pour
commuter le système sonoreentre les modes mono et SAP
Lorsque le programme stéréo et SAP est reçu, appuyez sur cette touche
pour commuterparmi les modes mono, stéréoet SAP.
Appuyez sur cette touche pour afficher la liste des langues audio
disponibles pour la chaîne actuelleen ATSC1.
ASPECT (FORMAT DE L'IMAGE) : Appuyez pour
ajuster le format
de l’image.
PMODE (MODE IMAGE) : Sélectionnezle mode image.
SMODE (MODE SONORE) : Sélectionnez le mode sonore.
0-9 : Sélectionnezet commutez à une chaîne de 0 à 9.
-/-- :
Entrez les chiffres du programme.
:Al
ternezentre les
chaînes actuelleset antérieures.
DISPLAY (AFFICHAGE) : Affichagedes informations télé.
EPG (GEP) ˖Accédez au gui
de él
ectronique
des
programmes
AUTO : Réglez automatiquement l'imageen mode PC.
RED, GREEN, YELLOW, CYAN (ROUGE, VERT, JAUNE,
CYAN) :
Ce bouton n'est pas disponible.
SLEEP (VEILLE) : Réglez laminuterie deveille.
SOURCE (SOURCE) : Appuyez pour changer la source du signal.
ENTER (ENTRÉE) : Saisissez l'option choisie ou effectuez l'opération
sélectionnée.
MENU (MENU) : Appuyez sur ce bouton pour accéder au menu principal.
EXIT (QUITTER) : Quittez le menu OSD (affichage à l'écran).
CH+/CH- : Changezla chaîne.
CC (SOUS-TITRE CODÉ) : Appuyez sur cette touche pour sélectionner
ou OFF(ARRÊT) et CC surMute (Sourdine).
INFO (INFORMATIONS) : Affichage des informations du programme en
cours en mode TV.
VOL+/VOL- : Réglez le volume.
FAV (FAVORIS) : Commuter entre les sélections personnalisées « Favorite
F.LIST (LISTE DES FAVORIS) : Appuyez sur cette touche pour afficher
(Liste des favoris).
C.LIST (LISTE DES CHAÎNES) : Appuyez sur cette touche pour afficher
(Liste des chaînes).
Télécommande
CC, mode ON (MARCHE)
List » (« Liste des favoris).
le mode Favorite List
le mode Channel List
Page 53

Guide d’installation
Appuyez sur le bouton MENU pourafficher leMENU OSD PRINCIPAL ; Appuyez sur le
bouton Ż / Ź pour sélectionner le MENU désiré ; Appuyez sur le bouton ENTER (ENTRÉE)
pour accéder au sous-menu ; Appuyez sur le bouton ź / Ÿ pour sélectionner l'option puis
appuyezsur Ż /Ź pour ajusterla valeur dansle sous-menu ;Vous pouvez appuyersurle bouton
MENU pourrevenir au menusupérieur ou surlebouton EXIT (QUITTER) pourquitterle menu
OSD (affichage à l’écran).
PICTURE (IMAGE)
Vous pouvez sélectionner le type d'image qui correspond le mieux à votre visionnage. Appuyez sur
le bouton « MENU » pour accéder au menu OSD. Ensuite, appuyez sur le bouton « e/f »pour
sélectionner le menu « PICTURE »
(« IMAGE »).
1. Appuyez sur le bouton « d »pour
sélectionner « Picture Mode » (mode
Image), puis appuyez sur le bouton
«
e/f
» poursélectionner.
2. Appuyez sur le bouton « c/d »pour
sélectionner «Brightness »
(Luminosité), puis appuyez sur le
bouton « e/f » pour accéder au menu
de réglage de laluminosité pour réglerla
luminosité.
3. Appuyez sur le bouton « c/d » pour sélectionner « Contrast » (« Contraste ») puis appuyez sur
le bouton « e/f » pour accéder au menu de réglage du contraste pour régler le contraste.
4. Appuyez sur le bouton «c/d » pour sélectionner « Color » (« Couleur »), puis appuyez sur le
bouton « e/f » pour accéder au menude réglage de la couleur pour régler la couleur.
5. Appuyez sur le bouton « c/d » pour sélectionner « Tint » (« Teinte »), puis appuyez sur le
bouton « e/f » pour accéder au menude réglage de la teinte pour régler lateinte.
Remarque: L’élément « Tint » (« Teinte ») est utilisé en mode NTSC uniquement.
6. Appuyez surlebouton « c/d » poursélectionner« Sharpness» (« Netteté »),puis appuyez sur
le bouton « e/f » pour accéder aumenu de réglage de la netteté pour régler la netteté.
7. Appuyez sur le bouton « c/d » pour sélectionner « Color Temperature» (« Température des
couleurs »), puis appuyez sur le bouton « e/f » pour sélectionner.
8. Appuyez sur le bouton « c/d » pour sélectionner « AdvancedSetting » («Paramètres
avancés »),puis appuyez surle bouton « ENTER/f » (« ENTRÉE/f ») pour accéder au
sous-menu.
Réglage de base de l’écran
Page 54

a.Ap
puyez sur le bouton
pour sélectionner
(« Format
appuyez
sur le bouton « e/f »
sélectionner.
b.Appuyez sur le bouton
pour sélectionner
« NoiseReduction »
(« Réductionde bruit »),
sur lebouton
sélectionner.
c.Appuyez sur le bouton
sélectionner « Dynamic Contrast » (« Contraste dynamique »), puisappuyez sur le
pour sélectionner« On » (activer) or « Off » (désactiver).
SOUND (AUDIO)
Vous pouvez sélectionner
le type de son qui correspond le mieux à votre écoute.
Appuyez sur le
bouton
«MENU»pour
accéder au menu OSD . Ensuite,
appuyez surle
bouton « e/f »
pour sélectionner
le menu
« SOUND »
(«AUDIO »).
1. Appuyez
sur le bouton
« d » pour
sélectionner
(« Paramètres del'égaliseur »), puis appuyezsur lebouton «ENTER/
f
pour accéderau sous-menu.
a. Appuyez sur le bouton « c/d » pour sélectionner « Equalizer Mode » (« Mode Égaliseur »).
Appuyez sur le bouton « c/d » pour sélectionner.
b. Appuyez sur le bouton « c/d » pour sélectionner« 150Hz ».Appuyez sur lebouton « e/f »
pour sélectionner.
c. Appuyez surle bouton «c/d » pour sélectionner « 500Hz ». Appuyez sur lebouton « e/f »
pour sélectionner.
d. Appuyez sur le bouton « c/d »pour
sélectionner «1K Hz ».Appuyez sur le
bouton « e/f » pour sélectionner.
« c/d »
« Aspect Ratio »
de l'image »), puis
pour
« c/d »
puis appuyez
« e/f » pour
« e/f » pour
bouton « e/f »
« EqualizerSettings »
» (« ENTRÉE/f »)
Page 55

e. Appuyez sur le bouton «c/d » pour sélectionner « 5K Hz ». Appuyez sur le bouton « e/f »
pour sélectionner.
f. Appuyezsur lebouton« c/d » poursélectionner « 10K Hz ». Appuyez surle bouton « e/f »
pour sélectionner
g. Appuyez sur le bouton « c/d » pour sélectionner « Balance » (« Balance »). Appuyez sur le
bouton « e/f » pour sélectionner
Remarque : La fonction bǃcǃdǃeǃfǃg n'est disponiblequ'en mode USER (UTILISATEUR).
2. Appuyezsur le bouton « c/d » pour sélectionner « MTS », puis appuyezsur lebouton « e/f
» pour régler.
Remarque : Cela n'est disponible qu'en modeATV.
3. Appuyez sur le bouton « c/d » pour sélectionner «Audio Language » (« Langue audio »),
puis appuyezsur le bouton « e/f » pour régler.
Remarque : Cela n'est disponible qu'en modeDTV.
TIME (MINUTERIE)
Appuye
z sur le bouton « MENU » pour accéder au menu OSD . Ensuite, appuyez sur le
bouton «
e/f
» pour sélectionner le menu « TIME » (« MINUTERIE »).
1. Appuyez sur le bouton « d » pour sélectionner « Sleep Timer » (« Minuterie de veille »), puis
appuyez sur le bouton« e/f » pour accéderau menude réglagede la minuterie deveille pour
régler la minuterie de veille.
2. Appuyez sur le bouton « c/d » pour sélectionner « Time Zone » (« Fuseau horaire »), puis
appuyez sur le bouton « e/f » pour accéder au menu de réglage du fuseau horaire pour
sélectionner lefuseau horaire local.
4. Appuyez sur le bouton « c/d » pour sélectionner « Digital Audio Output » (« Sortie audio
numérique »), puis appuyez sur le bouton « e/f » pour régler.
5. Appuyez sur le bouton c/d pour sélectionner « AVL », puis appuyez sur le bouton « e/f »
pour sélectionner « On » (activer) or « Off » (désactiver).
Page 56

3. Appuyez sur le bouton « c/d » pour sélectionner « Daylight Saving Time » (« Heure
avancée »), puis appuyez sur le bouton « e/f » pour sélectionner « On » (activer) or « Off »
(désactiver).
4. Appuyez sur le bouton « c/d » pour sélectionner « Time Format» (« Format de l’heure »),
puis appuyezsur le bouton « e/f » pour sélectionner « 12-hour » (« 12 heures ») ou
« 24-hour » (« 24 heures »).
5. Appuyez sur le bouton « c/d » pour sélectionner « Auto Clock » (« Horloge automatique »),
puis appuyezsur le bouton « e/f » pour sélectionner « On » (activer) or « Off » (désactiver).
6. Appuyez sur le bouton « c/d » pour sélectionner« Clock » (« Horloge»), puis appuyez surle
bouton « ENTER/f » (« ENTRÉE/f ») pour régler.
SETUP (CONFIGURATION)
Appuyez sur le bouton « MENU » pour accéder au menu OSD. Ensuite, appuyez sur le bouton
«
e/f
» pour sélectionner le menu« Setup »(« Configuration »).
1. Appuyez surle bouton« d » pour sélectionner « OSDLanguage »(« LangueOSD »),puis sur
le bouton « e/f »
pour sélectionner la
langue OSD que vous
souhaitez.
2. Appuyez sur le bouton
« c/d »pour
sélectionner « Transparency »
(« Transparence »),
puis appuyezsur le
bouton « e/f »pour
sélectionner.
3. Appuyez sur le bouton
sélectionner « OSD Timeout»
l'interruption OSD.
4. Appuyez sur le bouton « c/d »pour
le bouton« ENTER/f »
« c/d »pour
(« InterruptionOSD »),puis appuyez
sur le
bouton « e/f » pour régler
sélectionner « Closed Caption»
le bouton« ENTER/f » (« ENTRÉE/
(« Sous-titrage »), puis
appuyez sur
appuyez sur
f ») pour accéder au sous-menu.
Page 57

a. Appuyez sur le bouton «c/d » pour sélectionner « CC Mode » (« Mode de sous-titrage »),
puis appuyezsur le bouton « e/f » pour régler.
b. Appuyez sur lebouton« c/d » pour sélectionner «AnalogCC » (« Sous-titrage analogique »),
puis appuyezsur le bouton « e/f » pour régler.
c. Appuyez sur lebouton « c/d »pour sélectionner« DigitalCC » (« Sous-titrage numérique »),
puis appuyezsur le bouton « e/f » pour régler.
d. Appuyez sur le bouton «c/d » pour sélectionner « Option » (« Option »), puis appuyez sur le
bouton « ENTER/f » (« ENTRÉE/f ») pour accéder au sous-menu.
Remarque : La fonction cǃd n'est disponiblequ'en modeDTV.
Remarque : L'option est d'ajusterle réglage de sous-titrage numérique.
(a).Appuyez sur le bouton « c/d » pour sélectionner « Mode » (« Mode »), puis appuyez sur le
bouton « e/f » pour régler.
(b).Appuyez sur le bouton « c/d » pour sélectionner « Font Style » (« Style depolice »), puis
appuyez sur le bouton « e/f » pour régler.
(c).Appuyez sur le bouton « c/d »poursélectionner«FontSize»(«Tailledelapolice»),puis
appuyez sur le bouton « e/f » pour régler.
(d).Appuyez sur le bouton « c/d » pour sélectionner « FontEdge Style » (« Style de bordure de
police »), puis appuyez surle bouton « e/f » pour régler.
(e).Appuyez sur le bouton « c/d » pour sélectionner « Font Edge Color » (« Couleur de bordure
de police»), puis appuyez sur le bouton« e/f »pour régler.
(f).Appuyez sur le bouton « c/d » pour sélectionner« FGColor » (« Couleur FG »),puis appuyez
sur le bouton « e/f » pour régler.
(g).Appuyez sur le bouton « c/d » pour sélectionner « BGColor » («Couleur BG »), puis
appuyez sur le bouton « e/f » pour régler.
(h).Appuyez sur le bouton « c/d » pour sélectionner « FG Opacity » (« Opacité FG »),puis
appuyez sur le bouton « e/f » pour régler.
(i).Appuyez sur le bouton « c/d » pour sélectionner « BG Opacity » (« Opacité BG »), puis
appuyez sur le bouton « e/f » pour régler.
Remarque : Toutesles options ne sont pasdisponibles dans Custom(Personnalisé).
5. Appuyez sur le bouton « c/d » pour
sélectionner « Input Label » (« Étiquette d'entrée »),
puis appuyezsur le bouton « ENTER/f » (« ENTRÉE/f »)pour accéder au sous-menu.
Page 58

Remar
que:
L'étiquette
source est Créer
des étiquettes
pour les appareils
connectés à votre téléviseur.
6. Appuyez sur le bouton
« c
/d »
pour
sélectionner
Settings »
(« Autres réglages »),
pour accéder au sous-menu.
a. Appuyez sur le bouton « c/d » pour sélectionner « Audio Only » (« Audio uniquement »),
puis appuyez sur le bouton « e/f » pour sélectionner « On » (activer) or « Off »
(désactiver).
b. Appuyez sur le bouton « c/d » pour sélectionner « Blue Screen » (« Écran bleu »), puis
appuyez sur le bouton « e/f » pour sélectionner « On » (activer) or « Off » (désactiver).
7. Appuyez sur le bouton « c/d » pour sélectionner « Restore Default » (« Restaurer la
configuration par défaut »), puis sur « ENTER/f »
et sélectionnez
par défaut.
8. Appuyez sur le bouton « c/d » pour sélectionner « Setup
wizard
» (« Assistant de configuration »), puis appuyez sur le bouton « ENTER » (« ENTRÉE »)
pour accéder au sous-menu.
« Other
puis appuyez sur le
bouton
f »
« ENTER/
(« ENTRÉE/f »)
« Oui » pour rétablir tous les réglages .
(« ENTRÉE/f ») et sur le bouton « e/f »
Quand sélectionner "On", seulement écouter le son et l'écran est noir; Quand sélectionner
"Off", regarder la télévision normalement.
Page 59

a.Appuyez sur le b
outon « c/d » pour sélectionner « Menu Language » (« Languedu menu »),
puis appuyezsur le bouton « e/f » pour sélectionner la langue.
b. Appuyez sur le bouton « c/d » pour sélectionner « Go to next step »(« Passer à l'étape
suivante »), puis appuyez sur le bouton « ENTER/f » (« ENTRÉE/f »)pour accéder àl'étape
suivante.
c. Appuyez sur le b
outon « c/d » pour sélectionner « Time Zone » (« Fuseauhoraire »), puis
appuyez sur le bouton « e/f » pour sélectionner.
d. Appuyez sur le bouton « c/d » pour sélectionner « Daylight Saving Time » (« Heure
avancée »),puis appuyez surle bouton «e/f » pour sélectionner « On » (activer) or « Off »
(désactiver).
e. Appuyez sur le bouton « c/d » pour sélectionner « Time Format »(« Formatde l’heure »),
puis appuyezsur le bouton « c/d » pour sélectionner « 12-hour » (« 12 heures ») ou « 24-hour »
(« 24 heures »).
f. Appuyez sur le bouton « c/d » pour sélectionner « Go to next step » (« Passer à l'étape
suivante »), puis appuyez sur le bouton « ENTER/f » (« ENTRÉE/f »)pour accéder àl'étape
suivante.
Page 60

g. Appuyez sur le bouton « c/d » pour sélectionner « Air/Cable » («Antenne/Câble »), puis
appuyez sur le bouton « e/f » pour sélectionner «Air » (« Antenne ») ou « Cable » (« Câble »).
h. Appuyez sur le bouton « c/d » pour sélectionner « Go to next step »(« Passer à l'étape
suivante »), puis appuyez sur le bouton
« ENTER/f » (« ENTRÉE/f ») pourlancer la
recherche automatique.
Remarque : La recherche prendra une longue période de temps. Veuillezpatienter !
LOCK (VERROUILLAGE)
Appuyez sur le bouton « MENU » pour accéder au menu OSD . Ensuite, appuyez sur le
bouton «
e/f
» pour sélectionner le menu « Lock » (« Verrouillage »).
1. Appuyez sur le bouton « d » pour sélectionner « Enter Password » (« Saisir mot de passe »),
puis appuyezsur le bouton numérique desélection pour saisir.
Remarque: Le mot de passe par défaut est « 0000 »
Page 61

2. A
ppuyez sur le bouton ź / Ÿ pour sélectionner « Change Password » (« Changer mot de
passe »), puis appuyez sur le bouton « ENTER/
f
» (« ENTRÉE/f ») pour régler la valeur.
Si le mot de passe est changé, tous les mots de passe dans le menu changeront en même temps.
Remarque : Si vous oubliez
votre mot de passe, vous
pouvez utiliser « 1470 » pour
accéder à n'importe quel
menu verrouillé.
3. Appuyez sur le bouton
«
c/d
» pour sélectionner
« System Lock »
(« Verrouillage du
système »), puis appuyez sur
le bouton «
e/f » pour
sélectionner « On » (activer)
or « Off » (désactiver).
4. Appuyez sur le bouton
c/d pour sélectionner « Input Lock » (« Verrouillages d'entrée »), puis
appuyez sur le bouton « ENTER/
f
» (« ENTRÉE/f ») pour accéder au sous-menu.
a. Appuyez sur le bouton «
c/d » pour sélectionner « TV » (« Téléviseur »), puis appuyez sur
le bouton «
e/f » pour sélectionner « Block » (Bloquer) or « Unblock » (Débloquer).
b. Appuyez sur le bouton «
c/d » pour sélectionner « AV » (« AV »), puis appuyez sur le
bouton «
e/f
» pour sélectionner « Block » (Bloquer) or « Unblock » (Débloquer).
c. Appuyez sur le bouton «
c/d
»
pour sélectionner « HDMI »
(« HDMI »), puis appuyez sur le
bouton «
e/f
» pour sélectionner «
Block » (Bloquer) or « Unblock »
(Débloquer).
d. Appuyez sur le bouton «
c/d
»
Page 62

pour sélectionner « PC » (« Ordinateur »), puis appuyez sur le bouton « e/f »pour sélectionner
« Block » (Bloquer) or « Unblock » (Débloquer).
5. Appuyez surle bouton«
c/d
» pour sélectionner« USRating » (« Classifications États-Unis »),
puis appuyezsur le bouton « ENTER/f » (« ENTRÉE/f »)pour accéder au sous-menu.
a.Appuyez sur le bouton «
c/d
» pour sélectionner « TV » (« Téléviseur »), puis appuyez sur le
bouton « ENTER/f » (« ENTRÉE/f ») pour accéder au sous-menu.
A
ppuyezsur lebouton «
c/d
» pour sélectionner, puis appuyez sur « ENTER » (« ENTRÉE »)
pour bloquerou débloquer.
b. Appuyez sur le bouton «
c/d
» pour sélectionner « MPAA »(« MPAA »), puisappuyez sur le
bouton « e/f » pour sélectionner « Off/G/PG/PG-13/R/NC-17/X ».
6.Appuyez sur le bouton «
c/d
» pour sélectionner « Canada Rating » (« Classifications
Canada »), puis appuyez surle bouton « ENTER/f » (« ENTRÉE/f ») pour accéder au
sous-menu.
a. Appuyez sur le bouton «
c/d
» pour sélectionner « Canada English » (« Anglais du
Canada »), puis appuyez sur le bouton « e/f » pour sélectionner « Off/C/C8+/G/PG/14+/18+ ».
b. Appuyez sur le bouton «
c/d
» pour sélectionner « Canada French » (« Français du
Canada »), puis appuyez sur le bouton « e/f » pour sélectionner «
Off/G/8ans+/13ans+/16ans+/18ans+ ».
7.Appuyez sur le bouton «
c/d
» pour sélectionner « RRT Setting » (« Réglage RRT »), puis
appuyez sur le bouton « ENTER/f » (« ENTRÉE/f ») pour accéder au sous-menu.
Page 63

Remarque : L'élément est disponible uniquement lorsquele flux actuelpossède des données de
classification téléchargeables.
8.Appuyez sur le bouton « c/d » pour sélectionner « Reset RRT » (« Réinitialiser RRT»), puis
appuyez sur le bouton « ENTER/f » (« ENTRÉE/f ») pour réinitialiser.
Channel (Chaîne)
Appuyez sur le bouton « MENU » pour accéder au menu OSD . Ensuite, appuyez sur le bouton
«
e/f » pour sélectionner le menu « Channel » (« Chaîne »).
1.Appuyez sur le bouton
«
d » pour sélectionner
«AIR/CLABLE »
(«ANTENNE/CÂBLE »),
puis appuyez sur le bouton
«
e/f
» pour
sélectionner Cable (Câble)
ouAir (Antenne)
2. Appuyez sur le bouton
« c/d » pour sélectionner
« Balayage automatique »,
puis appuyez sur le bouton
« ENTER/
f »
« ENTRÉE/
f»
lebouton «
e/f »po
u
rsélectionner « YES» (« OUI »)puis sur «ENTER »
pour effectuer larecherche automatique.
3. Appuyez sur le bouton « c/d » pour sélectionner « Favorite » (« Favori »), puis appuyez sur le
bouton « ENTER/
f » (« ENTRÉE/f ») pour y accéder.
4.Appuyez sur le bouton « c/d » pour sélectionner « Channel list » (« Liste des chaînes »), puis
appuyez sur le bouton « ENTER/
f
» (« ENTRÉE/f») pour y accéder.
5.Appuyez sur le bouton «c/d » pour sélectionner « Show/Hide » (« Afficher/Masquer »), puis
appuyez sur le bouton « ENTER/
f
» (« ENTRÉE/f») pour y accéder.
6.Appuyez sur le bouton « c/d » pour sélectionner « ChannelNumber » (« Numéro de chaîne »),
puis appuyezsur le bouton «
e/f »pour régler.
7.Appuyez sur le bouton « c/d » pour sélectionner « ChannelLabel » (« Étiquette de chaîne »),
poury accéder;appuyez sur
(« ENTRÉE »)
puis appuyezsur le bouton « ENTER/
f
» (« ENTRÉE/f») pour y accéder.
Page 64

Paramètr
es d'ordinateur
Appuyez sur le b
outon «MENU » pour accéder au menu OSD . Ensuite, appuyez sur le bouton
«
e/f » pour sélectionner lemenu « Setup » (« Configuration »).Appuyez sur le bouton « d »
pour sélectionner « PC Setting » (« Paramètres d'ordinateur »), puis appuyez sur le bouton
« ENTER/
f » (« ENTRÉE/f »
)
pouraccéder
au sous-menu.
1.Ap
puyez sur le bouton « c/d » pour sélectionner « H-Pos » (« Position horizontale »), puis
appuyez sur le bouton «
e/f
» pour régler.
2.Appuyez sur le bouton « c/d » pour sélectionner « V-Pos » (« Position verticale »), puis
appuyez sur le bouton «
e/f »pour régler.
3.Appuyez sur le bouton « c/d » pour sélectionner « Clock » (« Horloge »), puis appuyez sur le
bouton «
e/f »
pour régler
.
4.Appuyez sur le bouton « c/d » pour sélectionner « Phase » (« Phase »), puis appuyez sur le
bouton «
e/f
» pour régler.
5.Appuyez sur lebouton«c/d » poursélectionner«Auto »(«Automatique »), puisappuyezsur le
bouton « ENTER/
f » (« ENTRÉE/f ») pour le réglage automatique.
Remarque: Les images illustrant la fonction sont fournies à titre de référence seulement.
Page 65

IMPOR
TANT
1. Débranchez l'appareil de la prise murale avant de procéder au nettoyage.
2. Do not use volatile solvent (alcohol, rosin,and toluene) to clean the TV. These
types of chemicals might damage the housing and the LED glass.
Nettoyage du cadran et de la télécommande
1. Utilisez un chiffon en microfibres ou 100 % coton pour le nettoyage.
2. Si la télécommande ou le cadran est sale au point où vous ne pouvez pas tout
simplement l'essuyer avec un chiffon sec, veuillez humecter le chiffon (le chiffon
ne doit pas être mouillé, parce que si de l’eau s’écoule dans le panneau, cela
provoquera un dysfonctionnement et possiblement des dommages
permanents au panneau qui n’est pas sous garantie) avec de l'eau propre et
essuyez de nouveau. Essuyez ensuitel'écran avec unchiffon enmicrofibresou 100
% coton sec.
Veuillez noter :
x Assurez-vous que vous vous tordez le chiffon avantde nettoyer le
cadran ou la télécommande afin d'empêcher l'eau de pénétrer dans le
circuit électronique.
Nettoyage de l'écran
1. Utilisez un chiffon en microfibres ou 100 % coton pour le nettoyage.
2. La vitre de l'écran ACL est extrêmement fragile. Ne la rayez pas avec rien.
N’appuyez pas sur l'écran, ni ne le tapotez pas, pour qu’il ne se fissure pas.
Lorsque l'écran estsale aupoint oùvous nepouvez pas tout simplement lenettoyer
avec un chiffon sec, humectez le chiffon à l'eau claire et essuyez à nouveau.
Essuyez ensuite l'écran avec un chiffon en microfibres ou 100 % coton sec.
Dépannage
Nettoyage du téléviseur
Page 66

Le tableau suivant contient les problèmes communs et les solutions à ces problèmes. Veuillez
consulter cette liste avant de contacter les techniciens.
Problèmes Solutions
PAS D'IMAGE
Branchez le cordon d'alimentation correctement.
Mettez sous tension.
Branchez le câble vidéo correctement.
Sélectionnez la source du signal d'entrée avec le câble de raccordement
approprié à l’aide du bouton source.
COULEURS
ANORMALES
Faites correspondre les couleurs des câbles aux ports à l’arrière de du
téléviseur. Exemple : câble rouge au port de couleur rouge.
L’IMAGE EST
TROP
OBSCURE
Réglez les paramètres de contraste, de luminosité et la lampe dans le menu
OSD. Pour le réglage des commandes.
SEULEMENT
SON, SANS
IMAGE
Assurez-vous que vous avez connecté à la fois les câbles audio et vidéo.
Le signal du syntoniseur de la TVne doit pas être inférieur à 65 %.
SEULEMENT
IMAGE SANS
SON
Assurez-vous que le câble audio est connecté.
Réajustez le volume à l’aide de la télécommande.
Le signal du syntoniseur de la TVne doit pas être inférieur à 65 %.
LA
TÉLÉCOMMAN
DE NE
FONCTIONNE
PAS
Éteignez le téléviseur, puis débranchez-le de la prise. Sortez les piles de la
télécommande pendant 30 minutes. Appuyez sur les boutons de la
télécommande etsur le bouton de marche/arrêt au hasard pendant 2
secondes, puis réinsérez les piles. Faitesla probe de la télécommande pour
voir si elle fonctionne. Pour des instructions de retrait des piles.
Le télé-capteur du téléviseur est également situé dans le même endroit que
la lampe témoin. Veuillez vous assurer qu'il existe une connexion directe
entre le télé-capteur avant de la télécommande et le télé-capteur du
téléviseur.
INCAPABLE
DE RECEVOIR
UN NOMBRE
INSUFFISS
ANT
DE CHAÎNES
par le
SYNTONISEUR
ATSC/NTSC
Le signal du syntoniseur de la TVne doit pas être inférieur à 65 %.
Changez l’orientation de votre antenne et balayer de nouveau vos chaînes.
Si vousavez de la télévision parcâble, appelez votrecompagnie de câble et
renseignez-vous sur la force du signal de votre fournisseur local.
PAS DE
COULEUR
Veuillez ajuster votre configuration d'image et assurez-vous que la
saturation et le RVB ne sont pas diminuéscomplètement. Pour les
commandes de réglage.
Le signal dusyntoniseur de la TV nedoit pasêtre inféri
eur à 65%. Vérifiez
votre signal.
Signal faible ou
pas DE
SYMBOLE DE
PROGRAMME
À L'ÉCRAN
Le signal du syntoniseur de la TVne doit pas être inférieur à 65 %.
Changez l’orientation de votre antenne et balayer de nouveau vos chaînes.
Si vousavez de la télévision parcâble, appelez votrecompagnie de câble et
renseignez-vous sur la force du signal de votre fournisseur local.
CODE POUR
TÉLÉCOMMA
NDE
UNIVERSELL
E DU
TÉLÉVISEUR
Ce téléviseur fonctionne d’après le code pour télécommande
universelle NEC. Pour trouver le code réel vous devez parcourir le
guide de votre télécommande universelle.
Dépannage
Dépannage
Page 67

Problèmes Solutions
LES CHAÎNES de
TÉLÉVISION sont
BLOQUÉES
Vérifiez les paramètresde votrefonction deverrouillage automatique dansl'OSD.
Vous avez peut-être verrouillé quelques chaînes, mais en avez oublié.
CODE POUR
TÉLÉCOMMAND
E UNIVERSELLE
Ce téléviseur fonctionned’après le code pour télécommande universelle NEC.
Veuillez consulter votre guide pour les codes NEC, puis les appliquer.
LE TÉLÉVISEUR
S’ALLUME OU
S’ÉTEINT
LENTEMENT ET
L'ÉCRAN
S’AFFICHE
LENTEMENT
Ce téléviseur estun téléviseur haute définition à panneau d’affichage de cristaux
liquides. Il nécessite quelques secondes plus que les téléviseurs normaux pour
s’allumer et montrerl'image.
PAS DE SON SUR
L’ORDINATEUR
Assurez-vous que vous disposez d'un câble mini-prisede 3,5 mm connectéde la
sortie audio de votre ordinateur à l'entréeVGA STÉRÉO du téléviseur.
HDCP VIDÉO
INDIQUE QUE
HDCP N’EST PAS
PRIS EN
CHARGE
Redémarrez votre appareil vidéo HDCP, en l’éteignant, puis en débranchant le
cordon d'alimentation. Attenez jusqu'à 8 minutes pour brancher l'appareil sous
tension pour voir s’il fonctionne ou non.
HDCP VIDÉO
N’A PAS DE SON
Assurez-vous que vous disposez d'un câble mini-prisede 3,5 mm connectéde la
sortie audiode l’appareil vidéoHDCP à l'entréeVGA STÉRÉO du téléviseur. Si
votre appareil vidéo HDCP utilise des prises RCA audio, vous devrez obtenir un
RCA audio converti en câble mini-prise de 3,5 mm.
NE PEUX PAS
OBTENIR
1360X768 S
UR
VGA
ORDINATEUR
Assurez-vous que le téléviseur est reconnu comme moniteur ‘plug and play’.
Essayezde mettreà jour lespilotesde votrecartevidéo aussi. Si celan'aidepas, le
plus probablevous devez remplacervotre carte vidéoavec une carteplus récente.
L’IMAGE EST
DÉFORMÉE OU
EST
ACCOMPAGNÉE
D’UN SON
ANORMAL
Cela pourrait être le résultat de l’interférence de grands appareils électriques,
voitures, motos, ou les lampes fluorescentes. Sile téléviseur est proche du mur,
essayez de le déplacer dans une autre pièce de votre maison pour voir si le
problème persiste.
L’IMAGE NE
COUVRE PA
S
TOUT L'ÉCRAN
Si vous utilisez HDMI ou une chaîne de télévision numérique assurez-vous que
vous utilisez le bouton ASPECT pour passerau format 16:9. Sivous utilisez
VGA, utilisez la fonction de rÉglage automatique pour adapter l’image à l'écran.
Veuillez noter : Si vous utilisezrégulièrement latélévision analogique,AV, ou un
composant ayant la résolution 480i, utilisez lebouton ASPECT pour passer au
format 16:9 afin de remplir l'écran. Veuilleznoter : Veuillez noter que cette
fonction déformera l'image.
LA QUALITÉ DE
L’IMAGE EST
HORRIBLE !
Pour unemeilleure qualité de l'image, regarder des programmes HD à écran large
où possible. Si le contenu HD n'est pas disponible, voir « Définition standard »à
partir d'une sourcenumérique. En standard, la télévision analogique sera toujours
sensiblement inférieure à la HD parce que votre téléviseur est doté du vidéo qui
est beaucoup mieux que l'ancien téléviseur, donc vous pouvez voir les
interférences et les carences que vous ne saviez pas que vous aviez.
L’IMAGE A DES
PIXELS QUI
AFFICHENT
TOUJOURS LA
MÊMECOULEUR
Votre téléviseur est fabriqué en utilisant un niveau extrêmement élevé de
technologie de précision, cependant, il est possible que certains pixels ne
s’allument pas sur votre téléviseur. C’est une propriété structurale de la
technologie de l’affichage à cristaux liquides, et n’est pas un signe dedéfaut de
fonctionnement.
JE NE PEUX PAS
CHANGER
L’HEURE
MANUELLEMEN
T
Votre téléviseur synchronise l'heure automatiquement en fonction devotre chaîne
de télévision locale. Cette fonction fonctionne seulement lorsque le syntoniseur
du téléviseur est relié à une antenne.
Page 68

Problèmes Solutions
LA
COMMUTATIO
N D’UNE
CHAINE OU
D’
UNE SOURCE
CHANGE LE
VOLUME
De différenteschaînes et entrées auront parfoiscet effet parceque le volume
propre du signal de la chaîne est déjà fort. Il n'existe aucun moyen de le
supprimer complètement. La télévision a une fonction de niveau
automatique du volume qui peut lutter contrece type d'effet. Veuillez vous
assurer que cette fonction est activée.
ILYADU
BRUIT ET DES
PARASITES SUR
L'ÉCRAN
Lorsque la résolution de votre téléviseur est plus élevée que la résolution de
diffusion de la chaîne numérique, le signalest converti (augmenté) pour
correspondre à la résolution de votre téléviseur. L’augmentation peut
provoquer ce type d'effet.
CONSEILS
POUR LES
UTILISATEURS
DE LA HAUTE
DÉFINITION
La TV est une plateforme idéale pour la visualisation du contenu Haute
Définition. La meilleure qualité d'image peut être obtenue par la prise
HDMI, YPbPr (Composante), puis VGA. Toutefois, en raison des écarts
dans les pratiques de diffusion, il est possible que certaines distorsions de
l'image se produisent.
CONSEILS
POUR LES
UTILISATEURS
DU CONTENU
DE L’ÉCRAN
LARGE
Les versions de films sur DVD Letterbox (écran large) sont le plus souvent
formatées pour les téléviseurs 4:3 standards. Latélévision a la possibilité
d'étendre ce contenu de sorte que tout l'écran soit rempli, au détriment de la
proportion de l'image. Pour utiliser cette fonction, appuyez sur le bouton
aspect de la télécommande et testez les options disponibles.
JE NE PEUX PAS
TROUVE
R LES
VOLUMES DE
VOLUME ET DE
CHANGEMENT
DES CHAINES
Ces boutons sontreprésentés parles boutons Ÿź ŻŹ dela télécommande.
Les Ÿźchangent les chaînes et les ŻŹ changent le volume.
LE TELEVISEUR
S’ETEINT
AUTOMATIQUE
MENT APRES 5
MINUTES
Le téléviseur dispose d'un mode d'économie d'énergie qui l’éteint
automatiquement s'il n'y a pas de signal fourni pendant plus de 5 minutes.
L’IMAGE TV
EST TRES
FAIBLE
Vérifiez si vous êtes en moded’Économie d'Énergie quantau mode d'image.
Continuez à appuyer sur le bouton IMAGE de télécommande pour faire
désactiver l’Économie d'Énergie.
GRANDE BOITE
NOIRE AU
MILIEU D
EL’ECRAN
Vous avezactivé le sous-titrage et vous utilisez TEXTE1 - TEXTE4. Changez le
réglage à CC1 ou désactivez le sous-titrage et la boîte disparaîtra.
Page 69

Panneau d'affichage
Point
Illustration
Taille de la z
one active / de
l'écran
Diagonale de 24 pouces
Form
at Écran large 16:9
Distance entre
pixels 0,3818 (H) x RVB x 0,3818 (V) um par une triade
Ma
x. de pixels (résolution) Résolution HD (1366 x 768 pixels)
Lu
minosité 200 nits (typique)
Contraste ˖1 (typique) avec augmentation automatique du contraste
Durée de réponse
8ms
(gris à gris)
Angle de vision
Typiqueme
nt 170/170 degrés
(Horizontal /Vertical)
Durée de vie du projecteur de
fond
> 30,000 h
AFFICHAGE TV
Dimension
22.13 po x 12.97 po x 2.09 po (sans support)
22.13 po x 15.33 po x 6.95 po (avec support)
Poids
Entrée d’alimentation 100 CA – 240 V, 60/50 H
z, 3 A (max.)
Fonction
(1) Vidéo
Non-entrelacement 3D
Rétablissement cadre 3:2
Technologie de base pour
réduire le bruit
3D
Format Large, Normal, Ciném
a , Zoom
Ga
mma
Ga
mma
fixe
Réglage lampe Oui
Mode image
Réglage vidéo Lum
i
nosité / Contraste / Couleur / Teinte / Netteté
Spécifications
Dépannage
Spécifications
Standard /
Doux / Économie d'énergie / Utilisateur / Dynamique
1000
9.2 Ib
Page 70

Mode audio
Contrôle automatique du
volume
Oui
Tonne
Haut-parleurs 3 watts par chaîne
(3) Général
Tuner TV hybride NTSC / ATSC / QAM (Câble Numérique Prêt)
Balayage automatique des
chaînes
Oui
Minuteur de mise en veille
Arrêté / 5 minutes/10 minutes/15 minutes/30 minutes/60 minutes/
Énergie en mode veille Sous 1 W
Aide synchronisation vidéo 480i / 480p / 720p / 1080i / 1080p
Calendrier ordinateur
1360*768 à 60 Hz (natIF)
1024*768 à 60
800*600 à 60
640*480 à 60
720x400 à 70
(4) NTSC/ATSC
NTSC
Son : Mono / Stéréo / SAP
Chaîne
favorite
puce antiviolence
Sous-titrage codé
(CC1-CC4, Texte 1-Texte 4)
ATSC
Chaîne favorite
puce antiviolence
Format d'entrée vidéo : 1080i, 720p, 480p, 480i
Sous-titrage analogique :
(CC1-CC4, Texte 1-Texte 4)
Sous-titrage numérique :
(Service 1-Service 6)
(5) E/S
1 entrée x Syntoniseur TV (NTSC/ATSC),
1 entrée x AV,
1 entrées x HDMI / HDCP (en option, HDCP audio partagée avec l’entrée
audio VGA),
1 entrée x VGA,
1 entrée x entrée audio VGA,
1 entrée x sortie casque,
*Les spécifications du produit peuvent changer sans préavis ni obligation.
**Les images et mots de ce manuel sont pour référence uniquement et sont sujettes à
modification sans préavis ni obligation.
(2) Audio
90 minutes/120 minutes/180 minutes/240 minutes
Musique / Standard / Cinéma / Utilisateur / Sport
150 Hz / 500 Hz /1 KHz / 5 KHz/ 10 KHz /Balance
34
1 entrée x R / L audio (RCA interface)
1 Entrée USB x En (uniquement pour servise)
1 entrée x sortie SPDIF (audio numérique)
Page 71

Ce
dispositif est conforme à la partie 15 de la réglementation FCC.
Le fonctionnement est soumis aux conditions suivantes :
Cet appareil ne doit pas générer d'interférences nuisibles
Cet appareilaccepte toute interférence reçue, y comprisles interférences qui peuvent perturber
son fonctionnemen.
Veuillez noter :Ce matériela été mis à l'essaiet respecteles limitesconcernant leséquipements
numériques de classe B, conformément à la partie 15 de la réglementation FCC. Ces limites
sont conçues pour offrir une protection raisonnable contre le brouillage nuisible dans une
résidence. Cet appareil génère, utilise et peut émettre des signaux radioélectriques. Enoutre,
s’il n’est pas installé et utilisé conformément aux instructions, il peut provoquer des
interférences génantes pourles communicationsradio. Toutefois iln'existe aucunegarantie que
ces interférences n'interviendront pas dans une installation particulière. Si cet équipement
provoque effectivement des interférences préjudiciables à la réception radiophonique ou
télévisuelle, ce que l'on peut vérifier en éteignant et en rallumant l'appareil, l'utilisateur est
invité à essayer de les corriger en suivant l'une des procédures ci-dessous :
x Réorienter ou déplacer l'antenne de réception.
x Augmenter la distance entre l'équipement et le récepteur.
x Connecter l'équipement dans une prise d'un circuit d'alimentation différent de
celui auquel le récepteur est connecté.
ATTENTION : Pour respecter limites d’un appareil informatique FCC de classe B,
utilisez toujours le câble de signal et le cordon d'alimentation fournis avec cet appareil.
La Commission des communications fédérales avertit que les changements ou modifications
apportées à l'unité n'étant pas expressément approuvés par la partie responsable de la
conformité pourrait annuler l'autorité de l'utilisateur de faire fonctionner l'équipement.
Déclaration de conformité FCC
Dépannage
Déclaration de conformité FCC
 Loading...