

Page 1
Universal Remote Control
Thank you for choosing an RCA Universal Remote Control.
You have selected a fine product designed to provide years
of performance. Before attempting to use your Remote
Control, please remove all parts from the box and read the
installation and use instructions carefully.
Limited 90 Day Warranty RCU600RS
Page 2

Thank you for purchasing this RCAUniversal Remote Control.
This product is designed to provide years of service operating a
wide variety of video and audio components.
Please retain this guide for future reference.
Table of Contents
Installing The Batteries..........................................................................2
Button Description............................................................................3-4
Programming For TV............................................................................5
Code List For TV................................................................................5-6
Programming VCR ..............................................................................7
Code List For VCR............................................................................7-8
Programming For DVD and Code List..............................................9
Programming For DBS System and Code List................................10
Programming For Cable and Code List............................................11
Programming For Audio....................................................................12
Code List For Audio............................................................................13
Operating Audio Functions................................................................14
Sleep Function......................................................................................15
Menu Function....................................................................................15
Programming With Codes Search....................................................16
Identifying Codes From Your Remote..............................................16
Trouble Shooting..................................................................................17
This Universal Remote Control is already programmed for most
RCA, GE and ProScan TVs, VCRs, DBS Systems, DVD Players, and
Audio Video Receivers.
Note: For users of RCA, GE and ProScan DBS Products, older DBS
models require that the INFO Button on this remote be used to
make program selections. Use the SELECT button for making
program selections on newer RCA, GE and ProScan DBS models.
This RCAUniversal Remote Is Compatible With Most Models Of
The Following Brands(Of Infrared Remote Controlled
Components manufactured after 1990):
Battery Installation
Your Universal Remote requires 2 new AAAalkaline batteries.
To install the batteries:
1.Turn the remote over and push down on the cover and slide it
off.
2.Insert the batteries, matching the batteries to the (+) and (-)
marks inside the battery case.
3.Slide the battery cover back into place.
Note: Reprogramming may be required after batteries are
removed.
2
Page 3
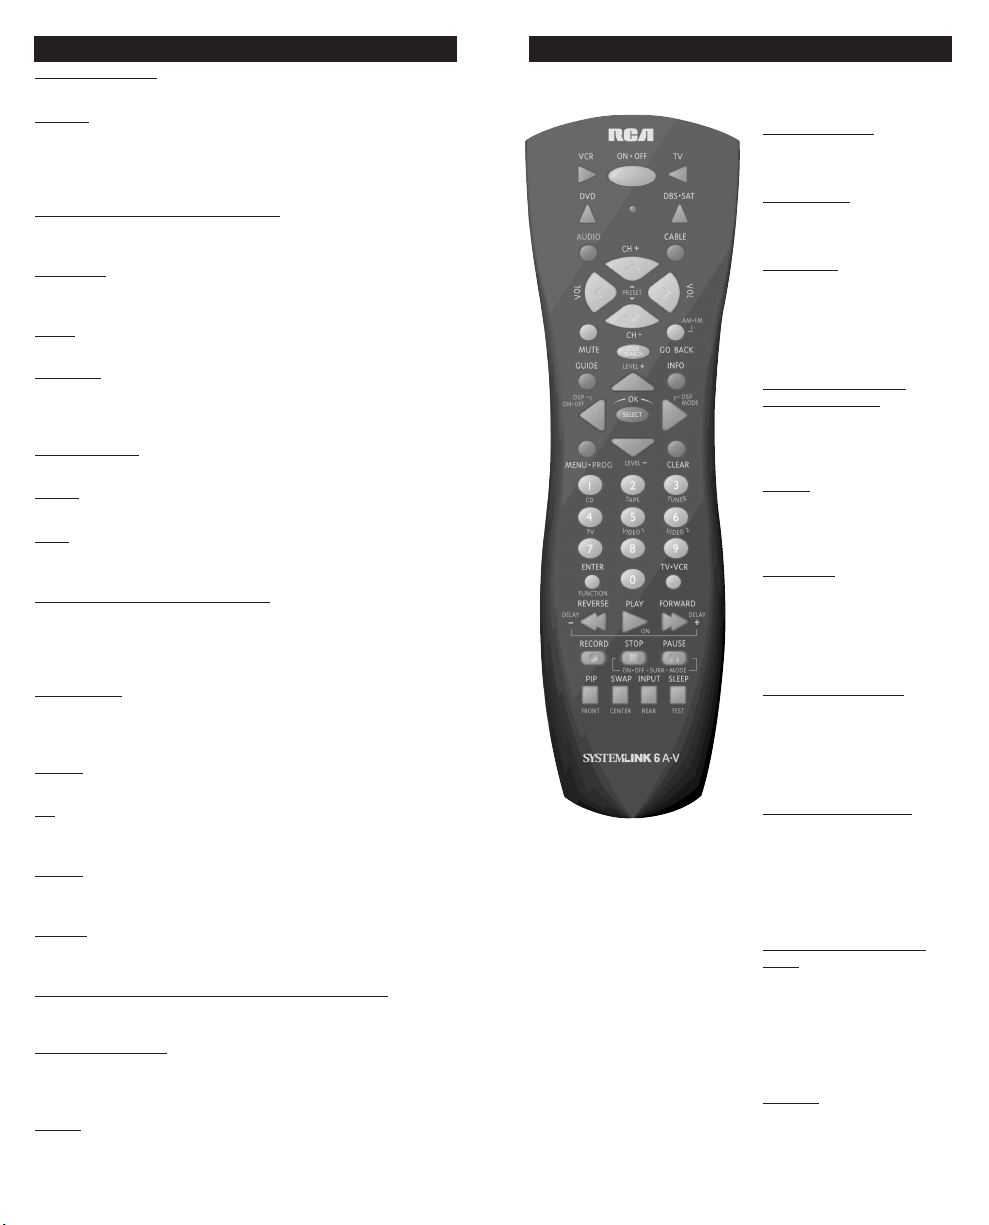
Button Description For Video Operation
INDICATOR LIGHT
The Indicator Light flashes to show that the remote is working.
ON•OFF
The ON•OFF button operates the same as your original remote
Note: Some RCA, GE and ProScan models require you to press the
device button to turn the device on and the ON•OFF button to
turn the device off.
,VCR, DVD, DBS•SAT, AUDIO , CABLE
TV
The TV, VCR, DVD, DBS•SAT, AUDIO, and CABLE buttons are
used to select the device you want to control.
OL & CH
V
The VOL (Volume) and CH (Channel) buttons increase or decrease
the channel numbers or volume.
MUTE
Mutes volume on the TV.
ACK
GO B
The GO BACK button allows you to go to the previous channel
you selected. Operates the same as Last Channel, Previous
Channel, or Recall button on your original remote.
CODE SEARCH
Used to program the remote or to search through codes.
GUIDE
Brings up the on-screen TV program guide if your TV has that feature.
INFO
Shows the date and the time if your TV or VCR has that feature.
Functions the same as a Display button.
VIGATION BUTTONS & SELECT
NA
Used to move through on screen menuing and guides. With some
DBS models the INFO button should be used to select the hig
lighted item. Use the navigation buttons to move the highlighted
choice up, down, left, or right.
MENU•PR
Brings up the Main Menu. If you are already in the menu system,
press SELECT to select a highlighted choice. Use the arrow buttons
to move through the Menu Selections.
CLEAR
Removes the on screen display to return to normal viewing.
0-9
The number buttons operate the same as on your original remote,
and are used for entering device codes.
ENTER
The ENTER button is used to complete channel selection for some
brands of TV. It is also used to complete the code entry process.
TV•VCR
In VCR mode, the TV•VCR button operates the TV•VCR function
of your VCR.
REVERSE,
These buttons operate the same as on your original VCR or DVD
remote. You must press the REC button twice to begin recording.
PIP
PIP (Picture-in-Picture) and SWAP operate your Television’s Picture
in-Picture features. INPUT selects the video inputs of your TV if
equipped with this feature.
SLEEP
The SLEEP button allows you to set a time for you to turn off your
TV automatically.
3
OG
PLAY, FORWARD, RECORD, STOP, PAUSE
, SWAP, & INPUT
Button Description For Audio Operation
AUDIO OPERATION (Rose Colored Graphics)
Press AUDIO button to enable the AUDIO mode
LEVEL+/LEVEL-
Sets the level of the speakers
during test tone mode.
DSP ON•OFF
Enables the receiver’s Digital
Signal Processing mode.
DSP MODE
When the DSP mode is
enabled, pressing this button
allows the user to cycle
through the various DSP
modes.
CD
,TAPE,TUNER, TV,
VIDEO 1,VIDEO 2
For new RCA brands, these
buttons will turn the selected
device on.
AM•FM
The AM•FM button allows
you to select the AM•FM
band on you audio receiver.
FUNCTION
Selects the different audio
input devices. The number
buttons also select the function labeled below the buttons when in AUDIO mode.
DELAY-, ON, DELAY+
Increases or decreases the
delay between the surround
and main speakers when the
receiver is in the surround
sound mode.
ON•OFF
, SURR, MODE
ON•OFF SURR toggles the
surround modes on and off.
SURR MODE cycles through
the receiver’s various
surround sound mode
settings.
FRONT, CENTER, REAR,
TEST
Adjust the levels of the front,
center, and rear speakers
respectively used with Level
+ / Level - . The test tone
must be enabled first by
pressing the TEST button.
PRESET
Used to operate preset
channels while in Audio
Mode.
4
Page 4
Programming For TV
TV
CODE
SEARCH
ON OFF
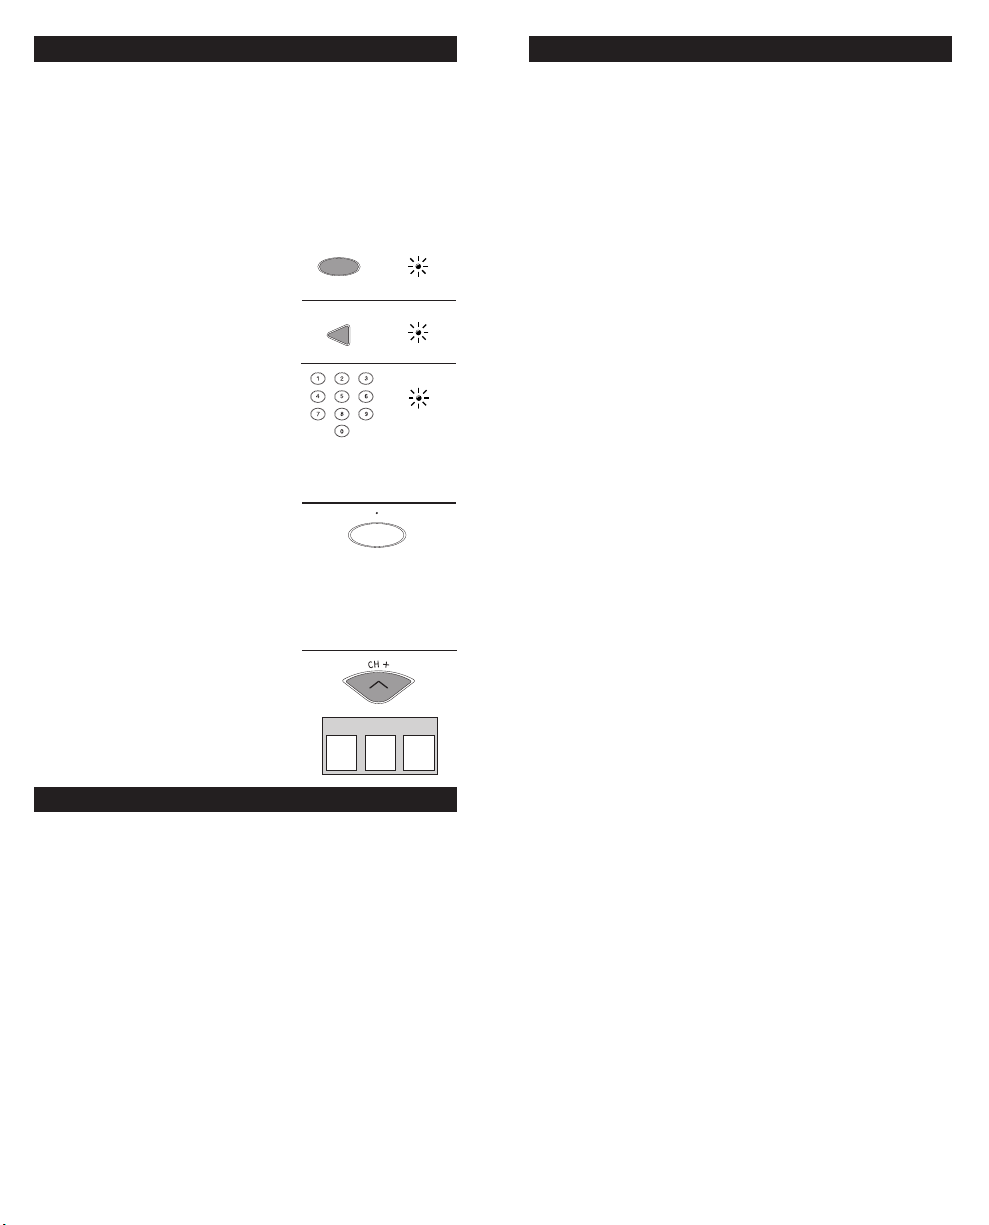
Most RCA, GE and ProScan TVs will not require programming.
Check to see if your TV responds to the remote before you begin
programming.
1. Manually turn on the TV.
Find the three digit code for your TV in
the code list below.
2. Press and hold the CODE SEARCH
button until the INDICATOR LIGHT
lights, then release the CODE SEARCH
button.
3. Press and release the TV button (The
INDICATOR LIGHT will blink then
remain lit).
4. Enter the code using the Number
Buttons.
After your code is entered, the
INDICATOR LIGHT will turn off. If the
code is not valid, the INDICATOR
LIGHT will blink. Check the code list
and repeat process.
5. Aim the remote at your TV and press
the ON•OFF button. Your TV should
turn off.
Note: If your TV does not respond, try all the
codes for your brand. If the codes do not
work, or your brand is not listed, try the Code
Search method on page 16.
6. With your TV on, press CH+ (CHANNEL UP) If the TV responds, no further
programming is required.
TV CODE
7. Enter your code here for easy reference.
TV Code List
Abex ........................................172
Admiral ..................001, 173, 211
Adventura ..............................174
Aiko ........................................016
Akai..........................................002
Alleron ....................................046
Amtron....................................038
Anam National ......003, 038, 192
..........................................193, 194
AOC 004, 005, 006, 007, 195, 196
Audiovox ................................038
Belcor ......................................004
Bell & Howell ........001, 083, 162
Bradford ..................................038
Brokwood................................004
Candle ....004, 006, 008, 174, 196
Celebrity..................................002
Citizen ....004, 006, 008, 016, 038
..................105, 171, 174, 177, 196
Colortyme004, 006, 010, 196, 200
Concerto..................004, 006, 196
Contec/Cony..........012, 013, 038
Craig ........................................038
Crown..............................038, 171
5
Curtis Mathes ........000, 004, 006
..........015, 105, 162, 171, 196, 212
CXC..........................................038
Daewoo ..004, 005, 006, 016, 017
..................127, 171, 190, 196, 202
Daytron ..........004, 006, 171, 196
Dimensia ................................000
Dumont ..........................004, 151
Electroband ............................002
Electrohome ..003, 004, 006, 019
..................................020, 022, 196
Emerson ..........004, 006, 012, 023
..........024, 025, 026, 027, 028, 029
..........030, 031, 032, 033, 034, 035
..........036, 037, 038, 039, 041, 042
..........043, 044, 046, 047, 123, 124
162, 171, 177, 179, 191, 196, 208
Envision ..................004, 006, 196
Fisher ......048, 049, 051, 162, 180
Fujitsu......................................046
Funai................................038, 046
Futuretec ................................038
GE ............000, 054, 003, 004, 006
..................022, 052, 055, 087, 164
INDICATOR
LIGHT
(BLINK)
(OFF)
TV Code List Continued
..................165, 166, 167, 168, 181
..........................................196, 213
Gibralter..........................004, 151
..................012, 019, 056, 057, 058
..................................155, 171, 196
Grundy....................038, 046, 171
Hallmark ................004, 006, 196
Harvard ..................................038
Hitachi ............004, 006, 012, 013
059, 060, 061, 135, 136, 137, 138
139, 140, 141, 142, 143, 144, 145
146, 148, 150, 179, 196, 198, 199
IMA..........................................038
Infinity ....................................062
Janeil ........................................174
JBL............................................062
JCB ..........................................002
JC Penney ......000, 004, 005, 006
..........008, 022, 052, 054, 058, 063
..........064, 072, 087, 105, 171, 172
..........................181, 196, 201, 207
Jensen ......................004, 006, 196
JVC ..013, 012, 054, 060, 065, 066
..........067, 123, 157, 158, 159, 182
Kawasho ........002, 004, 006, 196
Kenwood ........004, 006, 019, 196
Kloss Novabeam............068, 069
..........................................174, 183
KTV ................038, 070, 171, 177
LG (Goldstar) ........004, 005, 006
..........................................156, 172
Loewe ......................................062
Logik........................................083
Luxman ..................004, 006, 196
LXI ..........000, 006, 049, 062, 071
..........072, 073, 162, 181, 196, 207
Magnavox ......004, 006, 008, 019
..........062, 068, 069, 075, 076, 077
..........088, 130, 131, 132, 133, 134
..........................183, 196, 219, 235
Majestic ..................................083
Marantz ..004, 006, 062, 078, 196
Megatron ................006, 059, 196
Memorex ................001, 006, 082
..................................083, 162, 196
MGA........004, 005, 006, 019, 022
..................051, 079, 080, 082, 196
Midland ..054, 151, 171, 172, 181
Minutz ....................................052
Mitsubishi ......004, 005, 006, 019
..........................022, 051, 079, 080
..........................081, 082, 125, 196
Montgomery Ward ................083
Motorola..........................003, 173
MTC ........004, 005, 006, 105, 196
Multitech ................................038
Multivision ............................084
NAD 006, 071, 072, 185, 196, 207
NEC ........................003, 004, 005
..................................006, 196, 200
Nikko ......................006, 016, 196
NTC ........................................016
Onwa ......................................038
Optimus ..................................185
Optonica..........................095, 173
Orion ......................035, 191, 208
Panasonic003, 054, 062, 170, 214
Philco ......003, 004, 005, 006, 008
..................012, 019, 062, 068, 069
..........................075, 077, 183, 196
Philips ....003, 004, 008, 012, 019
..................062, 068, 069, 075, 076
..................................086, 087, 088
Pilot..................................004, 171
Pioneer ............004, 006, 090, 091
..........................092, 179, 185, 196
Portland ..................004, 005, 006
..................................016, 171, 196
Price Club ..............................105
Prism........................................054
ProScan............................000, 181
Proton......004, 006, 012, 093, 196
Pulsar ..............................004, 151
Quasar ............003, 054, 070, 214
Radio Shack / Realistic ...... 000
..........................004, 006, 012, 038
..................049, 095, 162, 171, 196
RCA ........000, 100, 005, 003, 004
..................006, 007, 019, 096, 098
..................099, 101, 102, 103, 129
..................179, 181, 188, 190, 196
..........................202, 203, 215, 233
Runco ......................................151
Sampo ....004, 006, 171, 172, 196
Samsung 004, 005, 006, 012, 015
..................017, 019, 104, 105, 106
..................171, 172, 196, 201, 204
Sansui ..............................191, 208
Sanyo ..............004, 048, 049, 080
..........................107, 162, 169, 180
Scotch ..............................006, 196
Scott ................004, 006, 012, 024
..........................035, 038, 046, 196
Sears 000, 004, 006, 013, 019, 046
048, 049, 051, 066, 071, 072, 109
..110, 162, 180, 181, 189, 196, 207
Sharp ......173, 095, 171, 004, 006
..012, 029, 111, 112, 113, 122, 196
Shogun ....................................004
Signature ........................001, 083
Simpson ..................................008
Sony ................002, 205, 216, 218
Soundesign ............004, 006, 008
..................................038, 046 196
Squareview ............................189
SSS....................................004, 038
Starlite......................................038
Supre-Macy ............................174
Supreme ..................................002
Sylvania ..........004, 006, 008, 019
..................062, 068, 069, 075, 076
..........077, 088, 116, 161, 183, 196
Symphonic..............033, 038, 189
Tandy ......................................173
Tatung......................................003
Technics ..................................054
Techwood ......004, 006, 054, 196
Teknika....004, 005, 006, 008, 012
..................013, 016, 038, 046, 076
..........082, 083, 105, 170, 171, 214
Telecaption..............................117
Tera..........................004, 012, 093
TMK ........................004, 006, 196
Toshiba....049, 071, 072, 105, 109
..........117, 118, 160, 162, 201, 207
Totevision................................171
Universal ........................052, 087
Victor ..............................066, 182
Vidtech............004, 005, 006, 196
Viking ......................................174
Wards ......000, 001, 004, 005, 006
..................019, 024, 033, 046, 052
..........062, 068, 069, 075, 076, 083
..........087, 088, 095, 119, 120, 196
Yamaha ..004, 005, 006, 019, 196
Zenith ..............004, 051, 083, 152
..........................153, 154, 210, 217
6
Page 5

Programming For VCR
ON OFF
VCR
CODE
SEARCH
Most RCA, GE and ProScan VCRs will not require programming.
Check to see if your VCR responds to the remote before you begin
programming.
1. Manually turn on the VCR.
Find the three digit code for your VCR
in the code list starting below.
2. Press and hold the CODE SEARCH
button until the INDICATOR LIGHT
lights, then release the CODE SEARCH
button.
3. Press and release the VCR button (The
INDICATOR LIGHT will blink then
remain lit).
4. Enter the code using the Number
Buttons.
After your code is entered the INDICA-
TOR LIGHT will turn off. If the code is
not valid, the INDICATOR LIGHT will
blink. Check the code list and repeat
process.
5. Aim the remote at your VCR and press
the ON•OFF button. Your VCR should
turn off.
Note: If your VCR does not respond, try all the
codes for your brand. If the codes do not work,
or your brand is not listed, try the Code Search
method on page 16.
6. With your VCR on, press CH+ (CHANNEL UP). If the VCR responds, no further programming is required.
7. Enter your code here for easy reference.
VCR CODE
VCR Code List
Admiral ..................................001
Adventura ..............................026
Aiko ........................................027
Aiwa ........................................026
Akai ........................003, 005, 007
..........................008, 111, 112, 113
American High ......................021
Asha ........................................013
Audio Dynamics............009, 010
Audiovox ................................014
Bell & Howell ........................011
Beaumark................................013
Broksonic ................012, 025, 031
Calix ........................................014
Candle ............013, 014, 015, 016
..................................017, 018, 019
Canon ..............................021, 022
Capehart..........................020, 110
Carver......................................062
CCE..................................027, 061
Citizen ............013, 014, 015, 016
..........................017, 018, 019, 027
Colortyme ..............................009
Colt ..........................................061
Craig................013, 014, 023, 061
Curtis-Mathes ........000, 009, 013
..........016, 018, 021, 022, 024, 115
Cybernex ................................013
Daewoo ..........015, 017, 019, 025
..........................026, 027, 028, 110
Daytron....................................110
DBX..................................009, 010
Dimensia ................................000
Dynatech ................................026
Electrohome....................014, 029
Electrophonic..........................014
Emerson..012, 014, 015, 021, 024
025, 026, 029, 030, 031, 032, 033
, 034, 036, 037, 038, 039, 040, 041
042, 044, 045, 046, 047, 065, 105
..........................113, 116, 117, 130
Fisher ..............011, 023, 052, 048
..........................049, 050, 051, 118
Fuji ..................................021, 119
Funai........................................026
Garrard....................................026
INDICATOR
LIGHT
(BLINK)
(OFF)
VCR Code List Continued
GE ............................000, 013, 021
..........................022, 053, 115, 120
Grandiente ..............................026
Harley Davidson....................026
Harman Kardon ....................009
Harwood ................................061
Headquarter............................011
Hitachi ............055, 056, 057, 107
........................................ 111, 120
HI-Q ........................................023
Instant Replay ........................021
JCL ..........................................021
JC Penney........009, 010, 011, 013
..........014, 021, 022, 060, 107, 118
Jensen ......................055, 056, 111
JVC ..009, 010, 011, 018, 111, 123
Kenwood ........009, 010, 011, 016
..................................018, 111, 123
KLH ........................................061
Kodak ..............................014, 021
LG (Goldstar) 009, 014, 018, 054
Lloyd........................................026
Logik........................................061
LXI............................................014
Magnavox ..............021, 022, 062
..........................063, 104, 108, 124
Magnin ....................................013
Marantz ..062, 011, 010, 016, 009
..........................018, 021, 022, 064
Marta ......................................014
Matsushita ..............................021
MEI ..........................................021
Memorex ........001, 011, 013, 014
..................021, 022, 023, 026, 104
MGA ...................... 029, 065, 113
MGN Tech...............................013
Midland ..................................053
Minolta....................055, 056, 107
Mitsubishi...... 029, 055, 056, 065
..........066, 067, 068, 069, 070, 071
..........073, 072, 074, 106, 113, 123
Montgomery Ward ........001, 075
Motorola..........................001, 021
MTC ................................013, 026
Multitech 013, 016, 026, 053, 061
NEC ........009, 010, 011, 018, 064
..................076, 078, 079, 111, 123
Nikko ......................................014
Noblex ....................................013
Olympus..................................021
Optimus ..........................001, 014
Optonica..................................096
Orion........................................031
Panasonic................021, 022, 109
..................................125, 126, 127
Pentax......016, 055, 056, 107, 120
Pentax Research ....................018
Philco ..............021, 022, 062, 063
Philips ....021, 022, 062, 096, 124
Pilot..........................................014
Pioneer ....010, 055, 080, 081, 123
Portland ..........016, 017, 019, 110
ProScan....................................000
Protec ......................................061
Pulsar ......................................104
Quarter ....................................011
Quartz......................................011
Quasar ....................021, 022, 125
RCA ........000, 003, 013, 021, 022
..................055, 056, 082, 083, 084
................ 085, 086, 087, 088, 089
..........090, 091, 107, 115, 120, 125
Radio Shack / Realistic ........001
..........011, 013, 014, 021, 022, 023
..................026, 029, 049, 050, 096
Radix........................................014
Randex ....................................014
Ricoh........................................128
Runco ......................................104
Samsung..................013, 015, 053
..................................055, 033, 112
Sanky ..............................001, 104
Sansui ..............010, 092, 111, 123
Sanyo ......................011, 013, 023
Scott ................012, 015, 025, 032
..................................038, 065, 116
Sears ........011, 014, 021, 023, 028
..........................048, 049, 050, 051
..........................055, 056, 107, 118
Sharp ........001, 017,029, 094, 095
..........................................096, 097
Shintom ..................056, 061, 098
Shogun ....................................013
Signature ................................001
Singer ......................021, 061, 128
Sony ........................098, 099, 119
STS ..................................021, 107
Sylvania..................021, 022, 026,
..........................062, 063, 065, 124
Symphonic ..............................026
Tandy ......................................011
Tashiko ....................................014
Tatung......................................111
Teac ..........................026, 085, 111
Technics ..........................021, 109
Teknika .. 014, 021, 022, 026, 100
..................................................129
Toshiba....015, 049, 051, 055, 065
..................................................116
Totevision........................013, 014
TMK ........................013, 024, 047
Unitech ....................................013
Vector Research......009, 010, 015
................................................ 016
Victor ......................................010
Video Concepts......009, 010, 015
..........................................016, 113
Videosonic ..............................013
Wards ......001, 013, 014, 015, 021
..022, 023, 026,029, 055, 056, 061
..........096, 101, 102,103, 107, 116
XR-1000 ..................021, 026, 061
Yamaha....009, 010, 011, 018, 111
Zenith ..............098, 104, 119, 128
Page 6

Programming For DVD
ON OFF
DVD
CODE
SEARCH
ON OFF
DBS•SAT
CODE
SEARCH
Most RCA, GE and ProScan DVD systems will not require
programming. Check to see if your DVD System responds
to the remote before you begin programming.
Programming For DBS System
Most RCA, GE and ProScan Satellite systems will not require
programming. Check to see if your DBS Satellite System
responds to the remote before you begin programming.
1. Manually turn on the DVD System.
Find the three digit code for your DVD
System in the code list below.
2. Press and hold the CODE SEARCH
button until the INDICATOR LIGHT
lights, then release the CODE SEARCH
button.
3. Press and release the DVD button
(The INDICATOR LIGHT will blink
then remain lit).
4. Enter the code using the Number
Buttons.
After your code is entered, the
INDICATOR LIGHT will turn off. If
the code is not valid, the INDICATOR
LIGHT will blink. Check the code list
and repeat process.
5. Aim the remote at your DVD System
and press the ON•OFF button. Your
DVD System should turn off.
6. If the DVD System responds, no further
programming is required.
Note: If your DVD does not respond, try all the
codes for your brand. If the codes do not work,
or your brand is not listed, try the Code Search
method on page 16.
7. Enter your code here for easy reference.
DVD CODE
INDICATOR
LIGHT
(BLINK)
(OFF)
1. Manually turn on DBS System.
Find the three digit code for your DBS
System in the code list below.
2. Press and hold the CODE SEARCH
button until the INDICATOR LIGHT
lights, then release the CODE
SEARCH button.
3. Press and release the DBS•SAT button
(The INDICATOR LIGHT will blink then
remain lit).
4. Enter the code using the Number
Buttons.
After your code is entered, the
INDICATOR LIGHT will turn off. If
the code is not valid, the INDICATOR
LIGHT will blink. Check the code list
and repeat process.
5. Aim the remote at your DBS System
and press the ON•OFF button. Your
DBS System should turn off.
Note: If your DBS System does not respond,
try all the codes for your brand. If the codes do
not work, or your brand is not listed, try the
Code Search method on page 16.
6. With your DBS System on, press CH+
(CHANNEL UP). If the satellite system
responds, no further programming is
required.
7. Enter your code here for easy reference.
INDICATOR
LIGHT
(BLINK)
SATELLITE CODE
(OFF)
DVD Codes
Aiwa ........................................350
Hitachi......................................351
JVC....................................161, 352
Konka ..............................353, 354
Magnavox................162, 356, 357
Mitsubishi ................................163
Panasonic ................................355
Philips ......................162, 356, 357
Pioneer......................................165
ProScan ....................................160
RCA ..........................................160
Sanyo ........................................359
Sony..........................166, 360, 361
Toshiba ....................167, 362, 363
Zenith ......................................364
9
Satellite Codes
Alphastar..................................079
Echostar (Dish System) ..........089
Echosphere (Dish Net) ..........079
GE..............................071, 080, 081
Hitachi SYS I............................084
Hitachi SYS II ..........................083
Hughes ............................077, 090
Magnavox ................................085
JVC ............................................082
Panasonic ................................075
Philips ......................................085
Primestar ..................................076
Proscan ....................071, 080, 081
RCA ..........................071, 080, 081
Sony ..........................................072
Toshiba......................................073
Uniden......................................086
10
Page 7

ON OFF
AUDIO
CODE
SEARCH
Programming For Cable
ON OFF
CABLE
CODE
SEARCH
1. Manually turn on the Cable Box.
Find the three digit code for your Cable
Box in the code list below
2. Press and hold the CODE SEARCH
button until the INDICATOR LIGHT
lights, then release the CODE
SEARCH button.
3. Press and release the CABLE button
(The INDICATOR LIGHT will blink
then remain lit)
4. Enter the code using the Number
Buttons.
After your code is entered, the
INDICATOR LIGHT will turn off. If
the code is not valid, the INDICATOR
LIGHT will blink. Check the code list
and repeat process.
5. Aim the remote at your Cable Box and
press the ON•OFF button. Your Cable
Box should turn off.
Note: If your Cable Box does not respond, try
all the codes for your brand. If the codes do
not work, or your brand is not listed, try the
Code Search method on page 16.
INDICATOR
LIGHT
(BLINK)
(OFF)
Programming For Audio
This remote control will operate many features found in audio/video
receivers and mini-systems. The remote control is already programmed
to operate most RCA and ProScan brand A/V receivers. Other brands
of receivers and mini-systems need to be set up under the AUDIO
button prior to using the device. See page 13 for the list of AUDIO
codes.
1. Manually turn on the device you wish
to control.
Find the three digit code for your
AUDIO system in the code list on the
next page.
2. Press and hold the CODE SEARCH
button until the INDICATOR LIGHT
lights, then release the CODE
SEARCH button.
3. Press and release the AUDIO button
(The INDICATOR LIGHT will blink
then remain lit).
4. Enter the code using the Number
Buttons.
After your code is entered, the
INDICATOR LIGHT will turn off. If
the code is not valid, the INDICATOR
LIGHT will blink. Check the code list
and repeat process.
INDICATOR
LIGHT
(BLINK)
(OFF)
6. With your Cable Box on, press CH+
(CHANNEL UP). If the Cable Box
responds, no further programming
is required.
7. Enter your code here for easy reference.
Cable Box Code List
ABC ..001, 003, 004, 005, 006, 007
Antronix ..........................008, 009
Archer ..............008, 009, 010, 011
Cabletenna ..............................008
Cableview ................................008
Century ....................................011
Citizen ......................................011
Colour Voice ....................012, 013
Comtronics ..............................015
Contec ......................................016
Eastern......................................017
Garrard ....................................011
GC Electronics ........................009
Gemini..............................018, 019
General Instru. ........................003
Hamlin ............020, 021, 022, 035
Hitachi ......................................003
Jasco ..........................................011
Jerrold ......001, 003, 005, 007, 018
..................................023, 024, 046
Magnavox ................................025
Movie Time......................027, 028
NSC ..................................027, 028
OAK..................................029, 016
Panasonic ........................000, 048
Philips ......011, 012, 013, 019, 025
..................................030, 031, 032
11
CABLE BOX CODE
Pioneer..............................034, 033
RCA ..........................000, 047, 049
Realistic ....................................009
Regal ................................022, 035
Regency ....................................017
Rembrandt ..............................003
Samsung ..................................034
Scientific Atlanta ....006, 036, 037
..................................................038
Signal ........................................018
Signature ..................................003
Sprucer ....................................000
Standard Components ..........039
Starcom ....................001, 007, 018
Stargate ....................................018
Starquest ..................................018
Tocom ..............................004, 023
Tusa ..........................................018
TV86..........................................027
Unika ........................008, 009, 011
United Cable............................001
Universal..........008, 009, 010, 011
Video Way................................044
View Star..........015, 016, 025, 027
Zenith ..............................050, 051
5. Aim the remote at the device you wish
to control and press the ON•OFF button.
The device should turn off.
Note: If your device does not respond, try all
the codes for your brand. If the codes do not
work, or your brand is not listed, try the Code
Search method on page 16.
6. With your device on, press VOL+
(VOLUME UP). If it responds, no
further programming is required.
7. Enter your code and the type of device
you programmed here for easy
reference.
Note: The CD codes need to be programmed
using the DVD key.
AUDIO CODE
CD RCVR LD
✓
12
Page 8

Audio Component Code List
CD
Aiwa ................................175, 203
ADC..........................................200
ADO..........................................201
Akai ..........................................205
Denon ......................................208
Dynatech..................................177
Emerson ..................................178
Fisher........................179, 212, 213
GE ............................................216
Hitachi......................................180
Inkel..........................................220
JVC....................................181, 221
Kenwood ................183, 222, 224
Luxman ....................................225
NEC ..........................................184
Marantz............................185, 226
MCS ..........................................228
Mitsubishi........................229, 230
Nakamichi ......................232, 233
Onkyo ......................186, 234, 235
Optimus ..................237, 238, 239
Panasonic ................................188
Pioneer ............................189, 240
RCA ..................................190, 211
Sanyo ........................................250
Sears..........................................207
Sherwood ................................243
Sony..........................195, 209, 244
Teac ..........................245, 246, 247
Technics....................................197
Toshiba ....................................231
Yamaha ....................198, 199, 248
13
AUDIO RECEIVER
Aiwa ................250, 251, 252, 253
..........................254, 255, 256, 257
JVC............................................258
Kenwood..................................258
RCA ..........................................259
Sony..........................260, 261, 262
Yamaha ....................................263
LASER DISC
RCA ..........................................133
Operating Audio Functions
Note: Not all functions work for all brands. See page 13 for the
Audio code list to operate your brand of equipment.
TURNING ON
Point the remote control at the receiver and press the AUDIO button.
The receiver should turn on. In some cases, it may require pressing the
AUDIO button and then the ON•OFFbutton to turn the system on.
SELECTING A DEVICE INPUT
Device inputs such as CD Player or Tape Deck may be selected
depending on the features of your receiver or mini-system. Input
selection may be made either by pressing the labeled digit button, or
by pressing the FUNCTION button to toggle through the inputs
available on your system.
Note: You may need to experiment with your system since
manufacturers products do not all work the same way.
USING
To select a device, press the number button
(1-6) that corresponds with the device you
want to operate (CD, TAPE, TUNER, TV,
VIDEO 1, & VIDEO 2).
USING
CHANGE AUDIO DEVICES
To select a device, press the FUNCTION
button until the input you want to operate
appears on your system.
OPERA
DECK
Use the Play, Forward, Reverse, Record, Stop,
and Pause buttons for CD players and tape
decks. In some cases, the Preset buttons
(CH+/CH-) may work in changing tracks
on CD players.
OPERA
1. Press the AUDIObutton
2. Press the TUNER (3) button
3. Press the AM/FM button to toggle between
AM and FM
4. Use the Preset (CH+/CH-) buttons to
move up and down channel presets.
OPERA
SURROUND SOUND SYSTEM
With RCA receivers, a second press of the TV
button should turn the receiver on.
1. Turn the TV on.
2. Press the AUDIObutton.
3. Select the Audio input either by using the labeled number
buttons or the FUNCTION button
4. Press the VOL+or VOL- buttons to control volume
Note: The Volume buttons may operate both TV and receiver
volume at the same time. If this presents a problem, it may be resolved by disabling the TV speakers by going into the TV menu.
CONTROLLING THE SURROUND SOUND FEATURE
The Surround Sound feature may be turned ON/OFF by pressing the
SURR ON•OFF button.
1. Press the SURR MODE button until the desired mode is found.
2. Press DELAY+ or DELAY- to achieve the desired delay effect.
3. Press the DSP ON•OFF button to turn DSP (Digital Signal
Processor) ON or OFF.
4. Press the DSP button until the desired effect is achieved.
5. Press the TEST button to listen to speaker levels.
6. Press FRONT, CENTER, or REAR buttons to select speakers.
7. Press the LEVEL+ or LEVEL- buttons to adjust speaker levels.
THE RECEIVER OR MINI-SYSTEM
THE NUMBER BUTTONS TO CHANGE AUDIO INPUTS
THE FUNCTION BUTTON TO
TING A CD PLAYER OR TAPE
TING THE AM/FM TUNER
TING A HOME THEATER
14
Page 9

ON OFF TV
DBS•SAT
VCR
DVD
CABLE
AUDIO
ON OFF TV
DBS•SAT
VCR
DVD
CABLE
AUDIO
ON OFF
ENTER
CODE
SEARCH
CODE
SEARCH
CODE
SEARCH
Sleep Function
TV
The Sleep Function will turn off your TV automatically after the user
programs the time interval from one (1) to ninety-nine (99) minutes.
INDICATOR
1. Press and hold the SLEEP button. The
INDICATOR LIGHT will stay lit. Release
the SLEEP button.
2. Enter time in minutes using the
numerical key pad. Indicator light
will go off.
(Min: 1 minute/keypad entry 0-1)
(Max: 99 minutes/keypad entry 9-9)
3. Leave remote aimed at television.
IMPORTANT: Sleep Feature will not
work unless remote is left aimed at
television.
To Turn Off The Sleep Timer:
1. Sleep timer program will be cancelled
and reset to zero by either of the
following:
Press and hold SLEEP button until
INDICATOR LIGHT blinks or press
ON•OFF button, turning TV OFF.
LIGHT
…
ON OFF
(BLINK)
Programming With Code Search
If your TV, VCR, DBS Satellite System, DVD Player, Cable Box or
Audio System does not respond after you have tried all the codes for
your brand, or if your brand is not listed, try searching for your code
by following the steps below.
1. Manually turn on the device you wish to
program.
2. Press and hold CODE SEARCH until the
INDICATOR LIGHT lights, then release
CODE SEARCH.
3. Press and release the device button for the
device you are programming. The
INDICATOR LIGHT will blink once,
then remain lit.
4. Press and release ON•OFF until your
device turns off.
Important: You may have to press
ON•OFF up to 200 times.
5. When your device turns off, press
ENTER, the INDICATOR LIGHT will
turn off.
(BLINK)
INDICATOR
LIGHT
(OFF)
Menu Function
The Menu Function is used to make changes in the selected settings such
as setting color, channels, timer, etc. The MENU button invokes TV, DVD
and DBS•SAT Modes. Each menu will vary from brand to brand.
Entering the Menu Mode:
1. Push the device button on the remote
for the desired menu screen.
2. Push the Menu button. This allows you
to view the menu of the device chosen.
The menu should now be visible on
your television.
3. While in Menu Mode these buttons will
function as follows:
Navigation Left/Right buttons will
operate as cursor right and left.
Navigation UP/DOWN buttons will
operate as cursor up and down.
MENU button applies the highlighted
menu item.
SELECT button may also be used to
select the menu item, especially in
DVD.
Not all functions in competitive models
and brands of televisions may be fully
supported.
EXITING THE MENU MODE
Push the CLEAR key to return to
normal operation.
15
(BLINK)
DBS•SAT
Identifying Codes From Your Universal Remote
If you need to find the three-digit code for your TV, VCR, DBS
System, Cable Box or Audio System after your device is set-up
use this procedure.
DVD
1. Press and hold CODE SEARCH until the
INDICATOR LIGHT lights, then release
CODE SEARCH.
2. Press and release the device button for
the code you are retrieving. The
Indicator Light will blink once.
3. Press and release CODE SEARCH. The
INDICATOR LIGHT will turn off.
4. Starting with 0 on the keypad, press the
number buttons in order (0-9) until the
INDICATOR LIGHT blinks.
5. The number which causes the indicator
light to blink is the first digit of your
code.
6. Repeat step 4 until you have retrieved all
three numbers in the code.
…
(BLINK)
INDICATOR
LIGHT
(OFF)
16
Page 10

Trouble Shooting
PROBLEM
Red light not blinking when you
press any key
The remote does not operate
your video devices
Not performing commands
properly
Problems programming a
TV/VCR Combo Unit
VCR not recording
SOLUTION
A) Replace the batteries with 2
new AAA alkaline batteries.
B) Check if batteries are properly
installed.
A) Try all the codes listed for
your brand.
B) Try the Code Search method
on page 16.
Start Code Search over again to
locate the proper code for full
compatibility.
Try the VCR code for your
brand. Some combo units,
however, may require both
a TV and a VCR code for full
operation.
As a safety feature on your
remote, you must press the REC
button twice.
Limited 90 Day Warranty
Thomson multimedia Inc. warrants that for 90 days from date of
purchase, it will replace this product if found to be defective in
materials or workmanship. Return it postage prepaid to the
Product Exchange Center address for prompt, no charge
replacement with a current equivalent. This replacement is
Thomson multimedia Inc.’s sole obligation under this warranty.
Thomson multimedia Inc. will not be responsible for any incidental or consequential damages or for any loss arising in connection with the use or inability to use this product. Some states
do not allow the exclusion or limitation of incidental or consequential damages, so the above limitation or exclusion may not
apply to you. This warranty excludes defects or damage due to
misuse, abuse, or neglect. This warranty gives you specific legal
rights, and you may also have other rights, which vary from
state to state.
© 2001 Thomson multimedia Inc.
Product Exchange Center
11721 Alameda Ave.
Socorro, TX 79927
PRCU600RS Rev0401
Trademark(s) ® Registered
Marca(s) Registrada(s)
Made In Indonesia
www.rca.com
Problems changing channels
If your original remote required
ENTER after a channel, press
ENTER after you select a
channel.
No response after pressing a key
A) Make sure you have new
batteries and you are aiming
your remote at your devices.
B) Check that batteries are
properly installed. See page 2.
SELECT button not responding
Try using the MENU or INFO
button to make the selection
while in the Program Guide.
Flashing Indicator Light
Invalid Code for the device.
Check the Code list and
reprogram the Remote
Control.
Note: Reprogramming may be required after batteries are removed.
For Customer Service, contact the RCA Help Center at: www.rca.com
17
18
Page 11

Postage
Required
First Class
Thomson multimdedia Inc.
2000 Clements Bridge Road
Deptford, NJ 08096-2011
Attn: Remote Control
Purchase Registration
Page 12

RCU600RS Product Registration Card
Please complete and return this Purchase Registration Card
right away. This information will help us get to know and
service our customers better.
1.❏ Mr. ❏ Mrs. ❏ Ms. Name:_______________________________
Address:_________________________________________________
________________________________________________________
2. Model: RCU600RS
3.Date of Purchase/Receipt as Gift:________4.Price: $_________
5.Age of Purchaser/Gift Recipient:
❏ 16-25 ❏ 26-35 ❏ 36-45 ❏ 46-55 ❏ 56+
6.What specific need did the Universal Remote help you resolve?
❏ A.Replacing ALost Remote ❏ B.Replacing ABroken Remote
❏ C.Consolidating Remotes ❏ D.Adding an Extra Remote
7.Where will this remote primarily be used?
and with what brand? TV: ______________
VCR: ___________________________Cable Box: ______________
Satellite Receiver: ____________ Audio System: ______________
❏ A.Kitchen ❏ B.Bedroom________________
❏ C.Family Room/Living Room ❏ D.Other_________________
8.How did you become aware of this remote?
❏ A.Advertisement ❏ B.Salesperson ❏ C.Store Display
❏ D.Received as a Gift❏ E.Friend or Relative _________________
❏ F.Other_________________________________________________
9.What other brands did you consider buying?
❏A.None
❏ B.GE ❏ C.One For All ❏ D.Zenith
❏ E.Gemini ❏ F.Sony ❏ G.Other_________
10.What factors most influenced this purchase? (Check up to 3)
❏ A.Brand ❏ B.Features ❏ C.Recommendation
❏ D.Price ❏ E.Received as a Gift ❏ F.Other___________
Thank you for filling out this card. This information will help us better serve
you and others who purchase RCAConsumer Electronics Products. We will
not share your information with any other companies.
 Loading...