

Page 1
RCR4283 / RCR4383
Universal Remote Control Owner's Manual
Manual del Propietario (parte posterior)
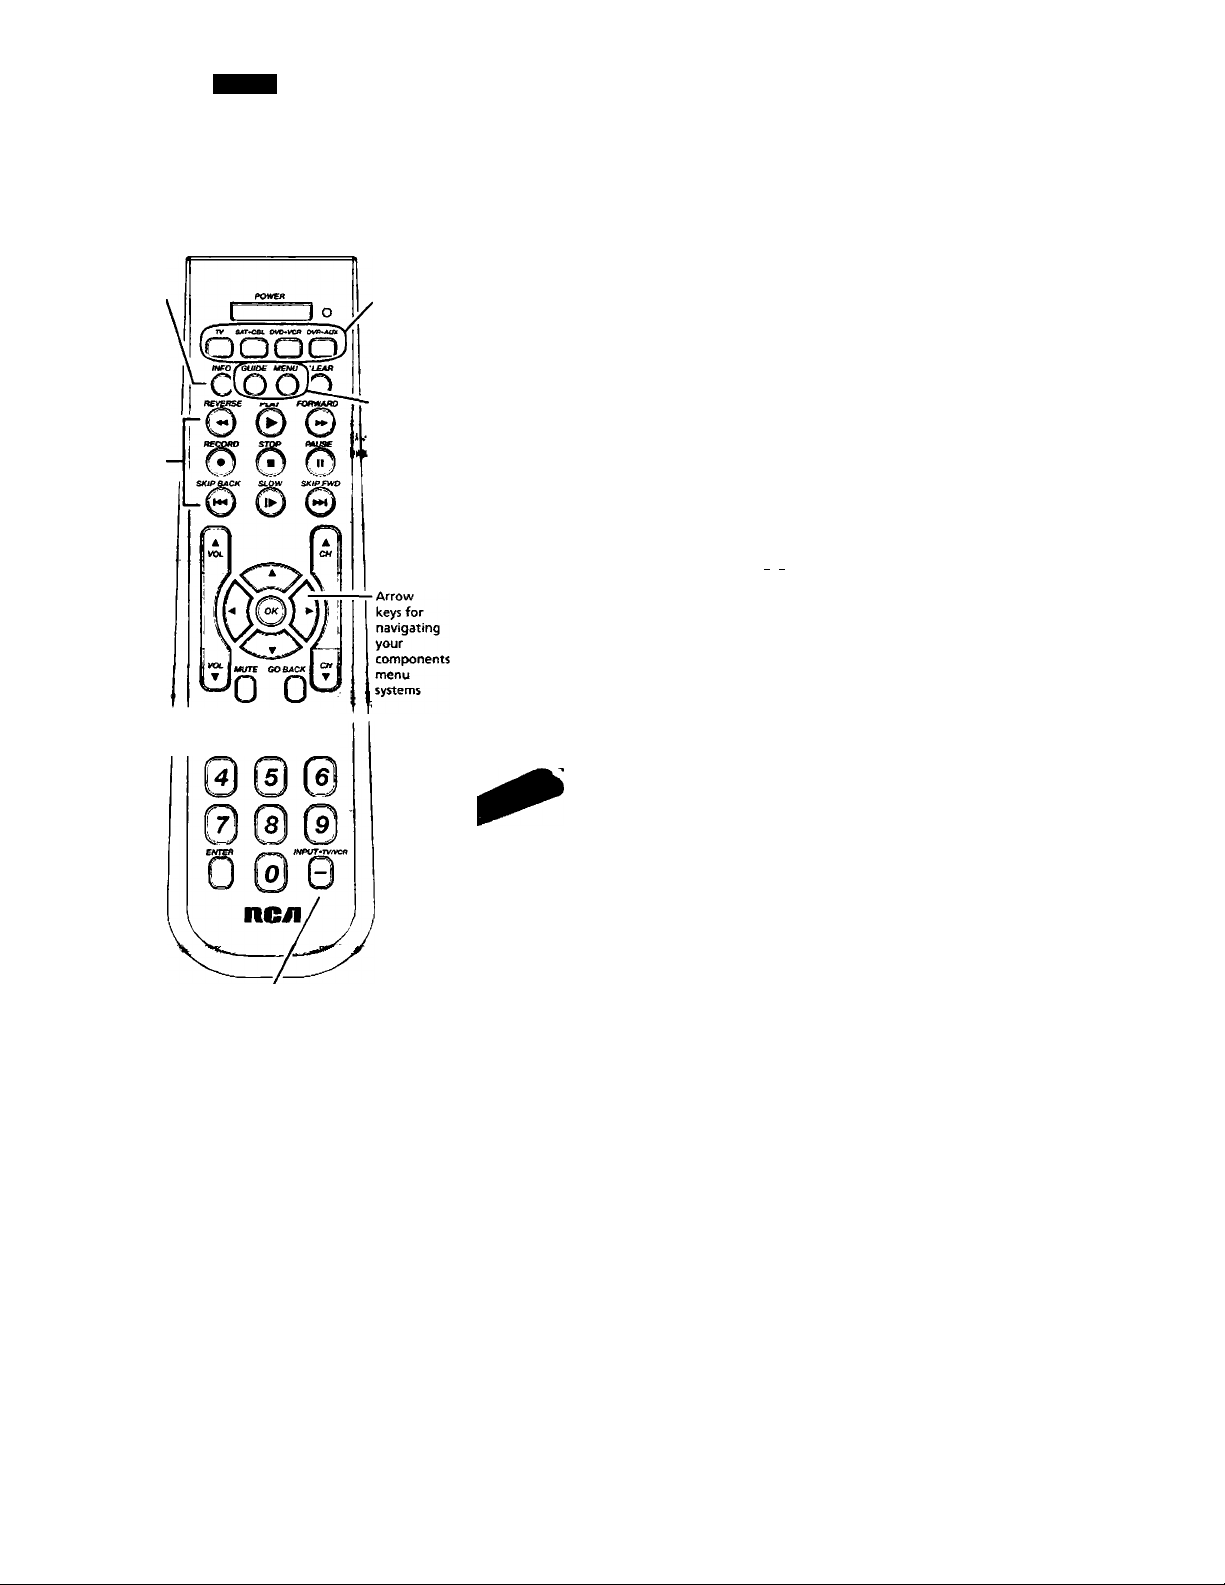
INFO key
displays
information
for the
component
you’re
controlling
Transport
keys,
including
SKIP and
SLOW, give
you better
DVD/DVR
control
0 0®
Actual
mode/ may
vary from
picture
shown
The INPUT and — (dash) key has three
funaions: (1) it toggles through all the video
sources connected to your TV; (2) when the
remote is in VCR mode, this button toggles
between VCR and the TV Input; (3) when
you're entering digital channel numbers
directly, this button lets you separate the main
channel number from the subchannel number
Care and Maintenance
• Keep the remote dry. if it gets wet. wipe it dry Immediately.
• Use and store the remote only in normal tenrtperature
environments.
• Handle the remote gently arwl carefully. Don't drop it
• Keep the rentóte away from dust and dirt.
• Wipe the remote with a damp cloth occasionally to keep it
locking new.
• Modifying or tampering with the remote's irrternal components
can cause malfunction and invalidate its warranty.
Component
keys (TV.
SAT*CBL,
DVD-VCR.
DVR-AUX)
Dedicated MENU and
GUIDE
keys let
you access
advanced
component
functicKis
Four-Component Universal Remote
Cbngraiuüúons on youx purchase of this four-component
universal remote. This tmiscnal remote controls up to lour
electronic compfmmts and makes fugglmg, remote controls
a chmg of the past. Your remote ts guaranteed to work with
all brands of components. This remote is unusoaOy versatile
because ir has a DVR«AUX key that you can piognm to conooi
any \*idco component. The four-compODent onivenal temóte is
easy TO use, easy to program and gives you control at the touch
of your fingertips,
SAVE THIS MANUAL AND THECODE LISTS!
Rfmair comtroh can umeitMUS lou tbeir proffommin^ wbotyou
dbaitff dk kattents, <VLiLr suxtycu ¡utf the manual and code lists in
a ud'e place so that you can reprogram the remote ^'ytm need to.
Tip: The four-component universal remote is alrea^ programnud
to operate most RCA, GE tvtd PROSCAN branded T\>% VCRs,
DVD players and satellite receivers, just press the corresponding
kjy-DVD*VCRjor a DVD player, TV jin a television, SAT*CBL
for a satellite receiver. DVR»AUXfor a DVft
Battery Installation and Information
Your universal remote requires two A\A alkaline batteries
(batteries may or may not be included, depending on model).
1b install the batteries:
1. Press and push the battery
oHnpaitment cover to remove it.
2. Insert the batteries matching die
batteries to the (4-) and (-) marks
inside the battery compartment
3. I\ish the battery cover back into place.
Note: Ij'you are replacing batteries, tjy not to press any buttons efier
you’ve taken the old halteries out. Pressing buttons while replacing
batteries causes the remote to lose the devices you Vv programmed. You
will need to program the remote again.
Battery Prccautíons:
• Do not mix .aid and new oaUerm,
• Do not mix alkaline, standard(carhon-r.hic) orreSargahk (niekel-
cadmium) batteries.
• Always remente old, weak or worn-out batteries prompt^ and ruyde or
dispose of them in accordance with Local and National Regulations.
Battery Saver
Your universal remote control saves battery power by
aulomaiically turning off if any key is pressed for more than
60 seconds. This saves your battery lire should your remote
gel stuck in a place where the keys remain depressed, such as
between sofa cushions.
Programming Your Remote
Your universal remote can operate a vaneiy oi brands ot
components. In order for your universal remote to control your
components, you need to program the remote with the codes
that match the components (See Code Lists enclosed or go to
rca.com/codcfinder). These code^s enable the remote to
communicate with your components. Each brand and each
component has its own “language,” and, by programming the
correct codes into your remote, you ttU the remote to “speak the
same language' as your components.
Page 2

The RCA Easy Interactive Code Finder
The online intcficiiv« axle finder at wwwjci-coni/codcfirtder nukes it
easier to find exaeth’ the nghr cx?dcs tixyour components, 'llte code finder
takes yr>u ri}dtt to the best uxM») ior >x»ur component-no need to go
through long code lists!
There are four methods you can use to program your remote
control to operate yourcomponeius:
• Brand Code Search and Hmry
• Direct Code Entry
• Manual Code Search and Entry
• Auto Code Search and Entr>'
Most components can be programmed in one of these four
ways. Try them in the order listed.
In order to control combo TVA^CR or TV/DVD units, you
must program both the TV key and the DVD*VCR key. Once
programmed successfully, the TV key controls the TV ilmetions
on your unit, and the OVD'VCR key controls the DVD or
VCR functions. There is a specific section in the Code Lists
for combo units. The codes in this section should be tried first,
using Direct Code Entry on the TV and DVD-VCR keys. If this
IS uusuccessriiL follow the normal programming methods tor
both the TV and the DVT>VCR keys.
DVD*VCR Key
Important: Tlie DVD'VCR key defaults to program a DVD
player. Tf’you want the D\T)*VCR key to control a VCR, you
must preprogram the DVD»VCR key. See the section entitled
“Programming the DVD-VCR Key To Control a VCR" on
page 3.
DVR-AUX Key
Important: The DVTl*AUX key defaults to program a DVR.
If you w'ant the DVR-AUX key to control a component
uiliei titan a DVR (an additional TV^ or DVD. for example),
you inu.st preprogram the DVR-AUX key. See tlie section
entitled "Programming the DVR*AUX Key To Control Other
Components” on page 4.
Brand Code Search and Entry
It your brand i.s listed in the Brand Code List (See Code Li.sts
enclosed), you may be able to program your universal remote
by searching througli only the Code Lists for that specificmanufacturer. Brand Code Search and Entr>' can be the
quickest method to program your remote, if your component is
one of those brands listed.
If your brand is not listed in the Brand Code List, use one of
the other programming metliods that follow.
Follow Uiese instructions to program your remote using the
Brand Code Search and Entry method.
CLEAR
TIP: To exit •without saving at any point in the Brand
Code Search, press and release the CLEAR key.
1. Manually turn on the component you want the remote to
control (TV, VCR, DVD, DVR, satellite receiver, or cable
box).
2. Locate the Brand C^des in Uie Clode Lists and keep it handy.
Note: If you press an im’oJid key during the Brand Code Search,
the remote does not respond. If you do not press a valid Brand Code
Search key (TV, SATCBL D VD*VCR, DVR*AUX, POWER,
CLEAR, and number kns 0-9), (he search times out after two
minutes. WIsen the search times out, the LED blinks four times and
turns off. The last programmed code under that component key is
retained.
Note»:
• To proj^am the DVD*VCR key to control a VCR. see piej^e 3.
• lu program the DVR*A UX key to control a component other than
a DVR, see page 4.
3. Press and hold the component
key (TV. SAT-CBL. DVD-VCR,
DVR-AUX) you wish to program.
r
i o o o o
4. While holding the component ke>' down, press and hold the
POWER key. Tlie LED turns off. y\fter holding both keys
down for three seconds, the LED turns back on.
5. Release both keys. The LED remains on.
6. Refer to the Brand Codes in the enclosed Code Lists. Use
die number keys to enter the number for your brand. The
T.ED blinks once.
TIP: Throughout the programming ofead) key, be sure to keep the
remote pointed at the IR sensor of the component you are current^
programming the remote to control.
1. I^ess and release the POWER key repeatedly until your
component turns off. Each time you press the POWER key,
the LED blinks and the next code is sent. The Brand Code
Search begins with die first code in :he chosen brand list for
that component and cycles through all the codes for that
brand.
If your component turns off, you have found die correct
code. If the remote cycles through and die LED blinks four
times and turns off^ all codes in the chosen brand lists have
been searched and another programming method should be
tried. Die Brand Code Search mode is exited.
8. Once you have found the correct code, you must
save that code by pressing and releasing the STOP
key. Die LED turns off
IMPORTANT: You must press the STOP key to save the code or the
correct code will not he stored!
The I.ED turns on and remains
on. Keep holding down llie
component key.
Testing the Code for Maximum Functionality
Different remote control codes can provide different levels
of funciionalit>-. To confirm that the component key is
programmed with the correct code for maximum fimoionality,
follow the steps below.
1. Attempt to control a variety of the component’s functions
wnfh the remote. If some features of your components do
not work, go to step 2 to try a different code.
2. Repeat the Brand Code Search and Entry Method from
step 1. When the component turns eff for the first time,
do not press die ST OP key, which would store the code.
Instead, with the unit now off, conrinue to press the
POWER key repeatedly until the unit turns back on.
3. Once the unit turns back on, you have found another code
diat operates the component. Press the STOP key.
4. Test the key’s functionality again by attempting to control
a variety of the component’s functions. If the code dial
has been stored controls die majority of the component’s
functions, programming is complete. If the code stored docs
nor give maximum functionality, try another code.
5. Repeat the Brand Code Search and Entry Method from
.step 1. Each time a code turns the component on or off you
have found a code that operatc.s the component and needs
to be tested for maximum iunctional:ty. Continue through
the code lists, cycling throujdi the codes you have already
tried, until you find one that ofTers rraximum functionality.
Page 3

Direct Code Entry
To use the direct code entry method to program your universal
remote to control your compt)ncnts, ibllow the steps below.
1. Manually turn on the component you want the remote to
control (TV. VC^R, DVD, DVR, satellite receiver, or cable box).
2. Locate the enclosed Code Lists. Find the list for the
component you wish to program. l*ind your component’s
brand. You will see a listing of four-digit codes for each
brand. If your brand isn’t listed, use one of the Code Search
methods to program the remote control. (Refer to pages 3-5
for Manual and Auto Code Search methods.)
Note: y^u can also use the online code finder at
Terww.rca.com/codefinder to find the best codefor your component.
LED
3. Press and hold the component
key (TV, SAT-CRT.. DVD-VCR.
DVR-AUX) you wish to program.
The LTD turns on and remains on.
Keep holding down die component
key. If you relca.se the component
Code Entry procedure, the I.ED blinks four limes, and
the process is exiled. Tlie last programmed code under the
component key is retained.
Notes:
• lb pTOff'am the DVD* VCR key to control a VCR, see paff 3.
• To program the DVR*AUX to control a componetit other than
a DVR, seepage 4.
4. While holding down the component key, consult the
Code Lists for die four-digit code that corresponds to your
component’s brand and use the number keys (0-9) to enter
it. After you press the first number, the LED turns off. After
the ft)urth number is entered, the LED turns on.
TIP: Throughout the programming of each key, be sure to keep the
remote pointed at the IR sensor of the component you are currently
programming the remote to control.
5. Release the component key. If the LED turns off, you
have entered a valid code and have followed the correct
procedure for Direct Code Entry. Proceed to die next step.
If the LED blinks four times, you have cither entered a code
number that is not in the code lists or missed a step in the
code entry procedure. Repeal the Direct Code Entry process
from step 3 and try the next code listed.
6. To confrrm that the component key is programmed with the
correct code for maximum functionality, test die component.
Attempt to control a variety of die component's functions
widi die remote. If some features of your componenrs do not
work, try pro^mming the remote vidth a different code in the
list until you find the code that allows the remote to control
die majority of your component’s fimcdons. Different codes
can provide different levels of functionality.
IMPORTANT: Remember to enter the codeforfuture reference in
the box prmnded in the Code Retrirval section of this manual. (See
key any lime during the Direct
Manual Code Search and Entry
If your component’s brand isn’t listed in the Code Lists, or if
you have tried all of the codes for your brand and the remote
docs not operate your component, try one of the 0>dc Search
methods below-Manual Code Search or Auto Code Seardi.
Both Code Search inediods cycle through all of the codes in
the Code Lists in the event that your component’s code is
listed under another brand.
Note: The Manual Code Search method mery take a long time
because the remote searches through all of the codes in its memoryfor
the code that operates your component. Therefore, if your brand is
listed in the Brand Codes or the Code Lists, first try the Brand Code
Search or the Direct Code Entry method described on pages 2-3.
CLEAR TIP: To exit without saving at ary point in the Manual
1. Manually turn on the component you want the remote to
4. Release both keys. Tlie LED remains on.
5. Press and release the POWER key repeatedly until your
STOP 6. Once you have found the conecT code, you must save
7. Be sure to retrieve the code your remote programmed by
Code Search, press and release tht CLEAR key.
control (TV, VC.R, DVD, DVR, satellite receiver, or cable box).
Notes:
• Tbproff-am the DVD*VCR to control a VCR, see paged.
• To program the DVR* A UX key to control i component other than
a DVR. see page 4.
Press and hold die component
key (TV, SATCBL, DVD-VCR,
DVR-AUX) you wish to program. Tlie
r~
-----
rr »и-ал ем»м4Д1
lo
oooo
key. The IJID turns off. After holding down both keys for
three seconds, the LED turns back on.
Note: If you press an invalid key during Manual Code Semeb, tlic
remote does not respond and the search times out after two minutes.
When the search times out, the LED blinks Jour times and turns off.
The last programmed code under that component key is retained.
TIP: Ihrougfout the programming ofeach key, be sure to keep the
remote pointed at the IR sensor ofthe component you are current^
programming the remote to control.
component turns off. Eacli lime you press the POWER key,
the LED blinks, and the next code in the list is sent. Tliis
process continues until all of the codes in the Code Li.srs
have been tried. If your component turns off, you have
found the correct code. (If it cycles through and the LED
blinks four times and turns off, all codes have been searched.
The Manual Code St^ch. meiiiod is exited.)
TIP: Because there are so many codes, you may bazHt to press the
POWER key many times—possibly hundreds of times.
the new code by pressing and releasing die STOP key.
The I.ED turns off You must press the STOP kc7 to
save the code or the cottcci code will not be stored!
When you press die STOP kc>', die code i.s stored.
finishing the Code Retrieval process found on page 5.
I£D turns on and remains on. Keep
holding down the component key.
While holding the component key
down, press and hold the POWER
Programming the DVD*VCR Key to Control a VCR
The DVD-VCR key defaults to control a DVD player. If you want the DVD-VCR key to control a VCR, you must preprogram
thcDVD-VCRkey.
1. Press and hold the DVD-VCR key. The LED turns on. Keep holding down the DVD-VCR key.
2. While holding down the DVD*VCR key, press and release the number 2 key on the keypad. The LED turns off.
3. Release the DVD-VCR key. The LED blinks four times and then turns off. The DVD-VCR key i.s now “set" to control a VCR.
4. Next, program the DVD-VCR key to control the brand of VCRyou have. Remember to consult the VCR code list.
Page 4

Testing the Code for Maximum FunctionalHy
DilTerem remote control codes can provide different levels
of functionality. To confirm that the component key is
programmed witli the correct code for maximum functionality,
follow the steps below.
1. Attempt to control a variety of the component’s functions
witli tile remote. If some features of your components do
not work, go to step 2 to try a different code.
2. Repeat the Manual Code Search and Entry Method from
step 1, ^"hen the component turns off for the first nmc.
do not press the STOP key, which would store the code.
Instead, with the unit now off, continue to press the
POWER key repeatedly until tlie unit turns back on.
3. Once tlie unit turns back on, you have found another code
that operates the component. Press the STOP key.
4. Test the key’s functionality again by attempting to control
a variety of the component’s functions. If tlie code dial
has been stored controls the majoriry of the component’s
functions, programming is complete. If the code stored does
not give maximum fimctionality, try anotlier code.
5. Repeat the Manual Code Search and Entry Method from
step 1. Each time a code turns the component on or off, you
have found a code that operates the remote and needs to be
tested for maximum funcuonahty. Conunuc ihrougli die
code lists, cycling through the code.s you have already tried,
until you find one that offers maximum functionality.
Auto Code Search and Entry
Tlie Auto Code Search and Hntiy Method enables the remote
to automatically search througli all the codes in die Code Lists
for the one that operates your componenr.
Note: The Auto Code Search metJjod may take a lon^ time because
the remote searches through all oj the codes in Us memory for the code
that operates your component. Therf^re, if your brand is listed in the
Brand Codes or the Code Lists, frst try the Brand Code Search or the
Direct Code Entry method described on pages 2 3.
CL£Afi
TIP: lb exit mthout saving at any point in the Auto Code
Search, press and release the CLEAR key.
1. Manually turn on die component you want the remote to
control (TV, VCR, DVD. DVR, satellite receiver, or cable box).
Notes:
• To pro^am the DVD*VCR key to control a VCR, see page J.
• To program the DVR*AUX to control a component other than
a DVR, see page 4.
LED
2, Press and hold the component
key (TV, SAT-CBL, DVD-VCR,
r
oooo
11
DVR»AUX) you wish to program.
Ihe LED turns on and rcmain.s on.
Keep holding down the component
ko'.
3. While holding the component key down, press and hold the
POWER key. The LED turns off. After holding down both
ke>'s for three seconds, the LED turns back on.
4. Release both keys. The LED remains on.
Note: If you press an invalid key during Auto Code Search, the
remote does not respond and the search times out after two minutes.
Wl)en the search times out, the LED blinks four times and turns off.
The last programmed code under that component key is retained.
TIP: Throughout the programmingoftadi key, be sure to keep the
remote pointed at the IR sensor of the component you are currently
programming the remote to control.
5. Press and release the PI.AY key, then wait five
seconds to sec if your component turns off. If
your component does not respond, continue to
press the PIAY key cvciy five seconds until your
component turns off.
Each time you press the PI AY key, the LED blinks several
times and a block of 10 codes are sent to your component.
Tliis process continues until all of the codc.s in the Qidc Lists
have been .searched. If your component has not turned off
after all codes have been searched, rhe LED blinks tour times
and turns off. ihe Auto Code Search Emr>* method is exited.
REVERSE
Note: If you accidentally press the REVERSE key afieryour
component responds, press and release the bOKVCAKD key. I hen,
tc^iit rtpo seconds to see if your component turns offagain.
IMPORTANT: You must press the STOPkey to stm the code or the
correct code will not he stored!
I. To confirm that die component key is programmed with
Wlien your component turrs off, you know the
correct code is in the last block of 10 codes sent.
Press and relca.se the REVER.SE key. Wait two
seconds to see if your component turns on again.
If your component docs not respond, continue to press the
REVERSE key ever>' two seconds until your component
rums on again. This will Isolate the correct code in the last
block of codes sent. Each time tlie REVERSE key is pressed,
the LED blinks.
Onc-c your component turns on, you have found
the correct code. You must save the new code by
prcs.sing and releasing the .STOP key. The I.ED
turns off. Wlien you press die STOP key, die code
is stored.
the correct code for maximum functionality, it is necessary
to test die component. If some of the features of your
component do not work, different codes in the list can
be tried until you find die code diat allows the remote
to control the majority of your component’s functions.
.Sec rhe section entitled “Testing the Code for Maximum
Functionality’' on the next page for more information.
Programming the DVR«AUX Key To Control Other Components
The DVR-AUX key defaults to control a DVR. If you want the DVR-AUX key to control a different component (an additional
TV, DVD, .satellite or cable box, for example), you must preprogram the DVR-AUX key.
DVR*AUX KEY CONTROLS:
Additional TV
VCR Of DVR
Additional DVD
Additional satellite or cable box
4. Next, program the DVR*AUX key to control the brand of component you have. Remember to consult the appropriate
component code list. For instance, if you have programmed the DVR-AUX key to control an addidonal DVD, consult the
DVD Code List. Program the key to control your component with the Code I.ist enclosed.
press 1
press 2
press 3
press S
1. Press and hold the D\Ti.*AUX key. ‘fhe LED tum.-i on.
2. While holding dowTi the DVR*AUX key, press and release
the number key on the keypad for die component you wish
to control (see the chart on the left). The LED turns off
3. Release the DVR'AUX key. The LED blinks four times
and then turns off. The DVR*AUX key is now “set" to
control whichever component you selected.
Page 5

lesting the Code for Meudmum Functionality
Diifcrcni remote control codes can provide difierent levels of
functionality. lb confirm that the component key is programmed
with the correct code for maximum ftinclionality, follow llie
steps below.
1. Attempt to control a variety of the component’s functions
with die remote. If some features of your components do not
work, go to step 2 to try a different code.
2. Repeat ilie Auto Code Seanii Method from step 1. When
you’ve found liie code tirai tum.s your component back
on, do not pre-v. the STOP key, which would store the
code. Instead, with the unit now on, continue to press the
REVERSE ke>' repeatedly until tlie unit turns back off.
Note: [fyou avtnot finá anolber coiif in this block lhat works, press the
PI^Y button to continue searclnng throug/j (be code blocks. When the
component turns offagain, press the REVERSE key tofind the code in
lhat Mock that makes your component turn back on.
3. Once die unit turns baeJe on, you have found another code
that operates the component. Press the .STOP key.
4. Test the ke)"’s funcdonalit)' again by attempting to control
a variety of the component’s hincdons. If the code that
has been stored controls the majority of the component’s
hmetions, progranuning is complete. If the code stored does
not give maximum functionality, try another code.
5. Repeat the Auto C3ode Search Method from step 1. Each time
a code turns the component on or off, you have found a code
that operates the remote and needs to tested for maximum
functionality. Continue through the code lists, cycling
through the codes you have already tried, until you find one
that often, maximum functionality.
Code Retrieval
Once you’ve programmed the remote to control your
components, you may want to record the codes for future
reference. If you used the Direct Code Entry method, this
is easy, fust find the codes you catered and make a note of
them in the boxes below. If you used one of the Code .Search
methods to program your remote or if you used the Direct
Entrj’ method bur don’t remember the code, you will need to
retrieve each component’s four-digit code. Rcineving die actual
code and writing it down will save you time if you ever need
to program the remote again (e.g., if programming is lost when
you change the batteries). If the codes arc recorded, you can use
the Direct Entry method to reprogram your remote to control
your components, which is quick and easy.
ISD
1. Press and hold die component
key (TV, SAT-CBL. DVD'VCR,
DVR*AUX) whose code you wish
to retrieve, llie I.F.D turns on.
Keep pressing die component key.
2. While holding the component key down, press and hold
the INFO key. The LED turns off. After holding down both
keys for diree seconds, the LED turns back on.
3. Release both keys. The LED remains on.
4. Starting with the number 1 key, press and release each
number key on the keypad in die following order (1-9, then
0). The number that causes die T.ED to blink is the first
number of the code. As you find each number of die code,
write it down for future reference.
Note: AB TV codes Mgin with the number 1; aU VCR and DVR
codes begiin with the number 2; all DVDs, the number J; and all
satellite receivers and cable boxes, dte number 5.
5. Repeat step 4 until you have retrieved all four numbers in
the code. After the fourth number is retrieved, the LED
blinks briefly, then turns oft’.
TIP: To exit the Code Retrieval Mode, press and release the
CLEAR kty' at any time.
Note: if you press an invalid during the Code Retrievalprocess,
tlje remote will not respond. If you do not press a valid Code
Retrieval key OX SADCBL DVD-VCR, DVR*AUX, /A7-0,
CLEAR), Code Retrieval times out ffter IS seconds. The LED
blinks four times, and then turns off.
TV CODE
SAT-CBL CODE
[
5
DVD*VCR CODE
□ds«>- Dvcr
OVR*AUX CODE
UíwfíícrDw« DtvI
Using the Remote to Control Your Components
Because diis remote controls more than one component, you
must first “tell” the remote which component you wish to operate.
'Iliaf means, if you wish to operate your TV, you must first press
the TV key to put the remote in the TV Mode,
llie remote stays in the chosen component mode (such as TV
Mcxlc) until you change it. If your remote is in TV Mode, you
must change die mode m order to operate your DVT), VCR, DVR,
acuiliary component, satellite receiver, or cable box.'For example,
if you are in DVD Mode, and you wish to turn off your TV, you
must press the TV key first before pressing the POWER key.
Accessing Component Menus
and Guides
’Ibday's advanced components use on-scrcen menus and guides
to help you navigate through all their features and programming.
W'hile this remote may not access every menu or guide system
of every component model, it docs offer some menu and guide
functionality.
To use a component’s on-screen menu or guide system, you first
have to put the remote in Menu or Guide Mode.
1. Make sure your components are turned on and your 'IV is set
to a component input (Use the INPUT key to toggle through
inputs when in TV Mode.)
2. Press the component key wdiose
IÍD
oooo
MFO oucr MSMU C«AM
OOOO
Ihe LED times out after 20 seconds. If this happens, just press the
AtENU key again, and then retjyyour selection.
Exiting a Menu Mode
Tlie remote automatically times out of Menu Mode after 20
seconds of inactivity (no keys being pressed). At that time, the
remote clears the displayed menu ftom the 'TV.
If you want to exit the Menu Mode yourselfi press the
corresponding component key on the remote (TV, SAT*CBI-,
DVD-VC:R, DVR*AUX). llie LED lu.Tis off.
menu you want to access.
3. To access menus, pre.vs the MENU
key. To access guides, press the
GUIDE key. The LED blinks,
indicating you are in Menu or
Guide Mode.
kJ^e the arrow keys to navigate
through the on-scrccn menu system
or guide, lb select the highlighted
item, press the MENU or OK key.
rewofr doesn ’/ respond, check
to see lhat d>e ¡.ED is stiU blinking.
Page 6

Troubleshooting
Problem: The remote does not operate your component
• Y:)u must put the remote in the correct mode by pressing the
соггс5рюп(1й1й component key CrV. SAT*CBL, DVD*VCR,
DVR»AUX) so the remote blows wliicli component you want
to* operate.
• Remove any obstacles between the remote and the
component. Make sure to aim the remote at the IR sensor on
the component.
• Make sure the batteries are fresh and are properly installed.
(See Battery Installation on page I.) Replace tlie batteries with
two new AAA batteries, if necessary. Reprogramming may be
required.
• Reset the remote. Remove die batteries, then press and liold
the number 1 ke)' on the remote for several seconds to reset
the microprocessor inside the remote. Release the number 1
key, reinstall the batteries, and press the POWER key. If the
LED lights up, reprogram die remote and try again. If die
I.ED doesn’t light up. replace the batteries with new ones.
Problem: The remote can't be programmed to operate
your component
• Tfyou are testing die remote after you have entered die code, you
may be too far away riuin the component or at a >^Tong angle.
This remote uses IR (inhared) technology to communicate with
corapoiienis. Ihe remote sends the ctxlc, and the component's
IR sensor reads the code. Tlierefore, there must be an
unobstructed path between the remote and the IR sensor on the
component. Move closer and make sure >'ou point the remote
at the component (DVD player or VCR when programming the
DVI>VC'R ke>'; TV when programming the TV ke>% satellite
or Cid>le box when programming the SAT*CRL key, DVR or
auxiliary component v^en programming the DVR»AUX key).
• If you’ve used the Direct Entry programming mediods
to enter the codes for your brand and the unit is still not
funedoning properly, tr>' one of the Q>dc Search methods.
(Sec pages 3-5.)
• To control combo units, like TV/VCRs or TV.-'DVDs, you
must program die individual corresponding component keys
to control each part of the combo unit. Once programmed
successfully, the TV key controls the TV fimetions, and the
DVD'VCR key controls the VC^ or DVD functions. There
is a specific section m the Code Lists for combo units. Ibe
codes in this section should be tried first using Direct Code
Entry on the TV and DVD*VCR keys. If this i.s unsuccessful,
follow the normal programming mediods for both the 'fV
and the DVD'VCR ke>'s.
• Make sure the batteries are fresh and are propeily installed.
Problem: The remote doesn't perform commands properly.
• You must put the remote in the correct mode by pressing the
conesponding component key flV, SAT*CBL, DVD*VCR,
DVR*AUX) so the remote knows which component you want
to operate.
• Make sure component is “ready” (e.g,, DVD player has disc
loaded; VCR has tape loaded, etc.).
• You may have pressed an invalid key for die ftkxIc the remote is in.
• If you’re trying to turn on an RCA, GH, or PROSCAN
component, press the component key (TV, SAT'CBL,
DVD*VCR, DVR*AUX) instead of the POWER key.
• If you’re ir>'ing to enter a channel number directly, tr>'
pressing the ENTER key after entering die diannel number as
this is a requirement of certain modcK and brands.
• ’1Ъеге is a possibility that a programmed code may only
be able to control some of your component features (e.g.,
only turns a component on and off). To confirm that the
component key is programmed with the correct code for
maximum frmctionality, test die component. Attempt to
control a variety of the component’s functions widi the
renrote. If some of the features of your components do not
work, try programming the remote widi a different code in the
list using the Direct Code Entry Method, until you find the
code that allows the remote to control the majority of your
component’s functions. Different codes can provide different
levels of functionality.
Problem: The LED does not light when you press a key.
• You may liave pressed an invalid key for the mode the
remote is in. Y?u must put the remote in the correct mode by
pressing the corresponding component key (TV, SAT*CBL,
DVD*VCR, DVR'AUX) so the remote icnows which
component you want to operate.
• Make sure the bartcric.s are fresh and arc properiy installed.
(See Batter>' In.stallation on page i.) Replace die batteries with
two new AAA batteries, if necessary. Reprogramming may be
required.
Problem: The VCR won't record.
• Make sure the remote is in DVD*VCR Mode.
• Make sure the tape is properly loaded in the VC-R.
• Make sure the tape is not writc-protected. If the safety tab is
removed the tape is write-protected, and you camiot record
onto that tape.
Problem: The remote will not change channels on
component
• You must put die remote in die correct mode by pressing the
corresponding component key (TV, SAT'CBL. DVD*VCR,
DVR*AUX) so the remote knows which component you want
to operate.
• Press die EN TER key al’ier you enter a channel number.
• Remove any obstacles between the remote and the
component Make sure to aim die remcie at the IR sensor on
the component.
Problem: The component's menu does not appear on the
TV screen.
• Make sure you have connected your component to your
TV properiy and selected the correct input. (Sec your
components* Owner’s Manuals for proper connection
prcKcdures.)
• You must put the remote in the correct mode by pressing die
corresponding component key fTV, SAT'CBI.. DVD*VCR,
DVR’AUX) so the remote knows which component you want
to operate.
• Menu access isn’t supported for all brands. If that’.s the case,
you’ll need to use your original remote control to access
menu functions for diese components.
For more information, please visit wv/w.rca.com
Limited Lifetime Warranty
Our company (in die U.S., THOMSON INC. / In Canada,
Tliomson mullimedia Ltd.) will replace this product, rcgardlc.ss
of how long you, the original purchaser, cwn it if found to be
defective in materials or workmanship. For a prompt, no cliarge
replacement of equivalent product, return the defective product
postage prepaid to the appropriate address.
In the US:
Product Exchange Center
11721 Alameda Avenue
Socorro, TX 79927
This replacement is the company’s sole obligation under this
warranty. THOMSON INC. / Thomson multimedia Ltd.
will not be responsible for any incidental or consequential
damages or for any loss arising in connection with the use or
inability to use diis product. Some states/provinces do not
allow die exclusion or limitation of incidental or consequential
damages, so the above limitation or exclurion may not apply to
you. This warranty excludes delects or damage due to misuse,
abuse, or neglect. Tliis warranty gives you specific legal rights,
and you may also have other rights, which vary from state to
statc/province to province.
Audiovox Electronics Corporation
150 Marcus Blvd.
Hauppauge, N.Y. 11788
© 2007 Audiovox Electronics Corporation
Trademark(s) <S Registered
In Canada:
Thomson multimedia Ltd.
6200 Edwards Boulevard
Mississauga, Ontario
Canada i^T 2V7
RCR4283 US 01
RCR4383 US 01
 Loading...