

Page 1
universal
See back
for most
popular brands.
Liste complète
au-verso.
Para obtener
una lista más
extensa, vea
el reverso.
Compatible with today’s
most popular brands.
Compatible avec les marques
les plus populaires actuelles.
Compatible con las-más
populares marcas de
la actualidad.
Consolidates
up to 4 remotes
Dedicated
MENU key-for
DVD navigation
Consolide
jusqu’à
4 télécommandes
Touche MENU
dédiée pour la
navigation DVD
Agrupa hasta 4
controles remotos
La tecla dedicada
del MENU soporta
la navegación
del DVD
remote
télécommande
control remoto
Remote
Télécommande
Control Remoto
ou CÂBLE
SÁTELITE o CABLE
SATELLITE
or CABLE
Multi-Brand Use
Utilisation multimarque
Funciona con muchas marcas
RCR430S
U N I V E R S A L
C
O
N
T
R
O
L
S
•
C
O
M
M
A
N
D
E
•
C
O
N
T
R
O
L
C
O
M
P
O
N
E
N
T
S
•
C
O
M
P
O
S
A
N
T
S
•
C
O
M
P
O
N
E
N
T
E
S
�
Page 2
05-16-2005
Thomson Restricted
Scale 100%
Adobe Illustrator
ON•OFF
SA
T•CBL
AUX
TV
DVD
•VCR
0
GO BACK INPUT
2
4
5
6
7
8
9
3
1
SLEEP
INFO
OKMENU
PLA
Y
REVERSE
FOR
WARD
STOP
PAUSE
RECORD
VOL
+
VOL
-
M
U
T
E
M
U
T
E
RCR 430S
4 Device
CH +
CH -
Universal Remote
Congratulations on your purchase of this universal remote.
This universal remote makes juggling remote controls a thing
of the past. You can program your RCA brand universal remote
to operate most models of most brands of infrared, remotecontrolled components manufactured after 1990.
(See the enclosed Code Lists for a complete list of brands.)
This universal remote is easy to use, easy to program and gives
you control at the touch of your fingertips.
The universal remote is already programmed to
operate most RCA, GE and PROSCAN branded TVs, DVD
players and satellite receivers. Just press the corresponding key
— DVD•VCR for a DVD player; TV for a television; SAT•CBL
for a satellite receiver.
Battery Installation
and Information
Your universal remote requires two AA Alkaline batteries
(batteries may or may not be included, depending on model).
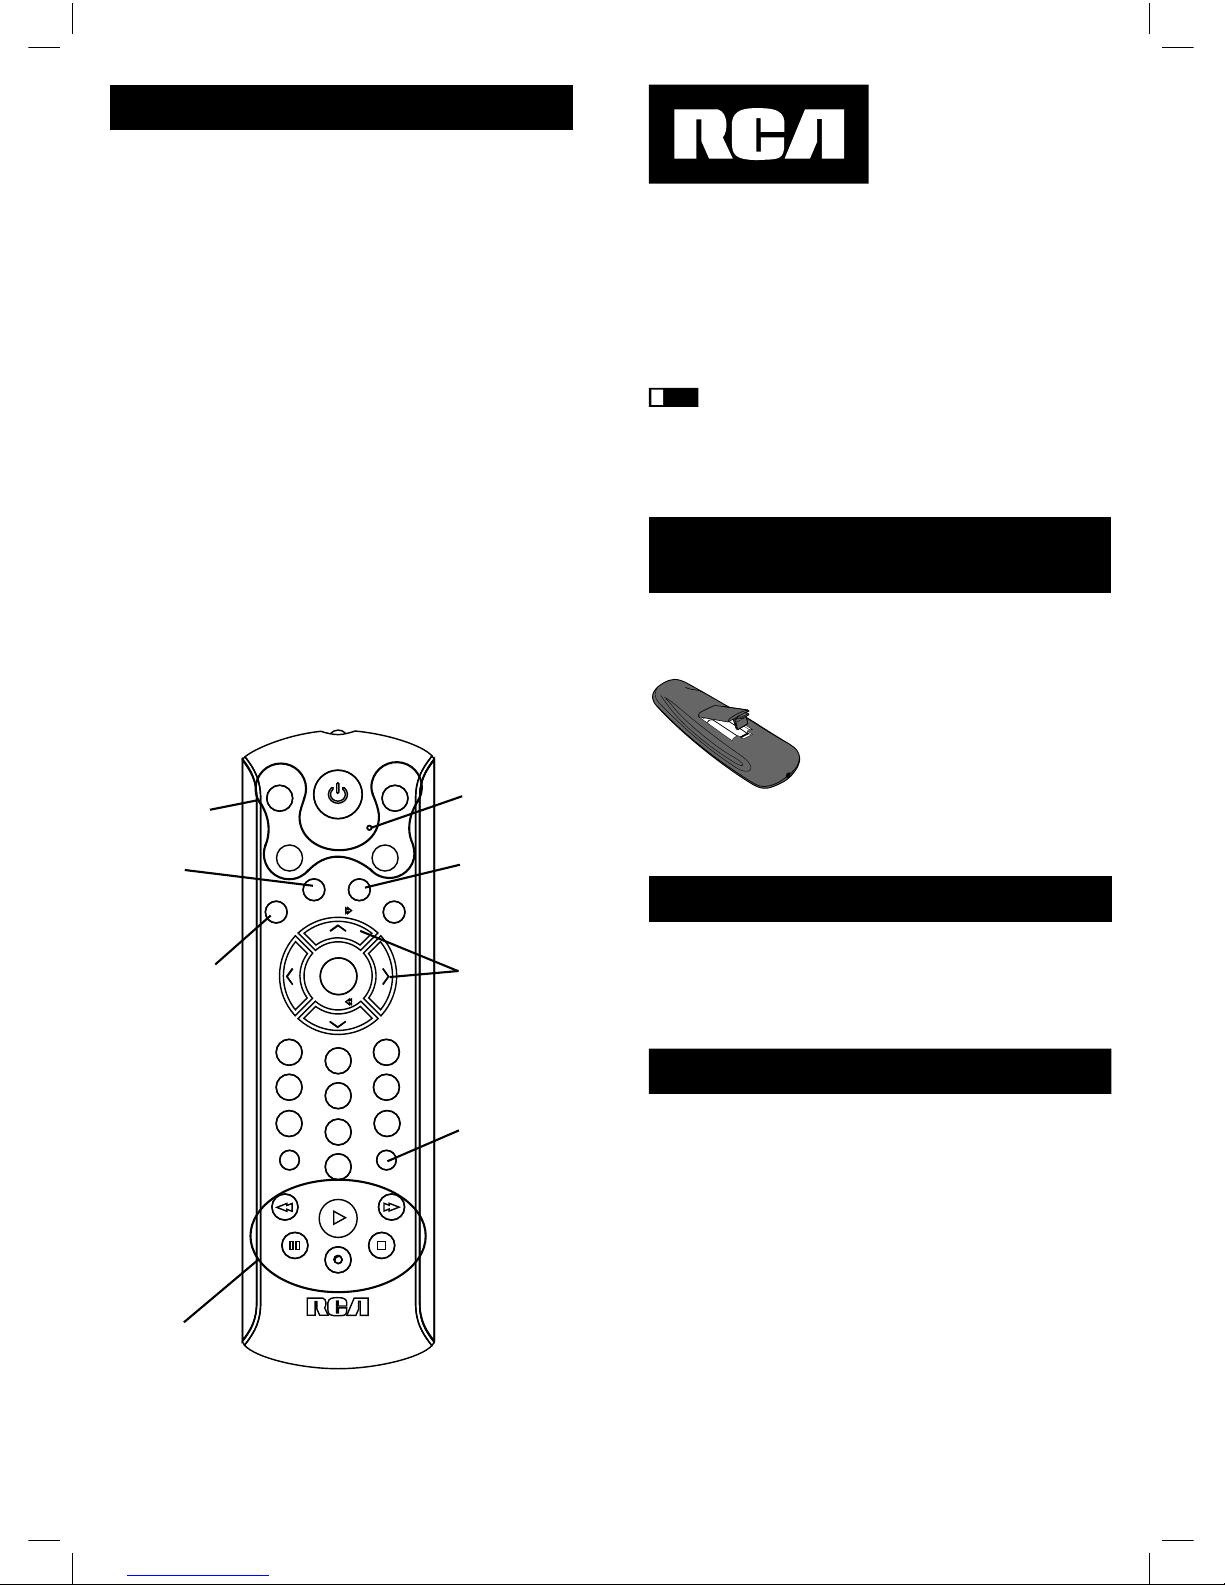
To install the batteries:
1. Remove the battery compartment cover.
2. Insert the batteries, matching the
batteries to the (+) and (-) marks inside
the battery compartment.
3. Press and push the battery cover back
into place.
Note: Reprogramming may be
required after batteries are replaced.
Your universal remote control saves battery power by automatically
turning off if any key is pressed for more than 60 seconds. This
saves your batteries should your remote get stuck in a place
where the keys remain depressed, such as between sofa cushions.
Table of Contents
Product Diagram. . . . . . . . . . . . . . . . . . . . . . . . . . . . . . . . . . . . . . 2
Introduction . . . . . . . . . . . . . . . . . . . . . . . . . . . . . . . . . . . . . . . . . . 3
Battery Installation and Information . . . . . . . . . . . . . . . . . . . . . 3
Battery Saver . . . . . . . . . . . . . . . . . . . . . . . . . . . . . . . . . . . . . . . . . 3
LED Indicator Light . . . . . . . . . . . . . . . . . . . . . . . . . . . . . . . . . . . 3
Programming the Remote . . . . . . . . . . . . . . . . . . . . . . . . . . . . . . 4
Programming Methods . . . . . . . . . . . . . . . . . . . . . . . . . . . . . . . . 4
Brand Code Search and Entry . . . . . . . . . . . . . . . . . . . . . 4
Direct Code Entry. . . . . . . . . . . . . . . . . . . . . . . . . . . . . . . . 5
Manual Code Search and Entry . . . . . . . . . . . . . . . . . . . . 6
Auto Code Search and Entry . . . . . . . . . . . . . . . . . . . . . . 8
Code Retrieval . . . . . . . . . . . . . . . . . . . . . . . . . . . . . . . . . . . . . . . . 9
Using the Remote to Control Your Components . . . . . . . . . . 10
On-screen Menus . . . . . . . . . . . . . . . . . . . . . . . . . . . . . . . . . . . . 10
Accessing and Selecting Menu Items . . . . . . . . . . . . . . 10
Exiting a Menu Mode . . . . . . . . . . . . . . . . . . . . . . . . . . . 11
Sleep Timer . . . . . . . . . . . . . . . . . . . . . . . . . . . . . . . . . . . . . . . . . 11
Programming the Sleep Timer . . . . . . . . . . . . . . . . . . . . 11
Canceling the Sleep Timer . . . . . . . . . . . . . . . . . . . . . . . 11
Troubleshooting. . . . . . . . . . . . . . . . . . . . . . . . . . . . . . . . . . . . . . 12
Battery Saver
32
Component keys.
(
TV, DVD•VCR
,
SAT•CBL
)
CH
and
VOL
keys have dual
functions. They act
as navigation keys
(UP, DN, RT, LT
ARROW keys) in
menu systems.
INPUT
key – On
some remotes, this
is called the TV/VCR
key. It toggles through
all the video sources
connected to your TV.
Dedicated
MENU
key for DVD disc
menus, satellite
receivers and
some TVs.
SLEEP
key – Allows
you to set a time
to turn off your TV
automatically.
INFO
key –
Displays information
pertaining to the
component you are
currently controlling.
Actual model may vary from picture shown
Transport keys –
REVERSE, PLAY,
FORWARD, RECORD,
STOP
and
PAUSE
keys.
! T
IP:
The
LED INDICATOR
will light up to provide feedback for
various functions. When a valid key is pressed, the
LED
INDICAT
OR
remains lit as long as the key is pressed and turns
off when the key is released. The
LED INDICAT
OR
also blinks
in Programming Mode or in Menu Mode to provide feedback.
LED Indicator
LED INDICATOR
LIGHT
Page 3
To exit without saving at any point in
the Brand Code Search, press and release the
GO BACK key.
1. Manually turn on the component you want the remote to
control (TV, VCR, DVD, satellite receiver or cable box).
2. Locate the Brand Codes in the Code Lists and keep it handy.
Note: If you press an invalid key during the Brand Code
Search, the remote does not respond and the search times
out after two minutes. When the search times out, the
LED INDICATOR blinks four times and turns off. The last
programmed code under that component key is retained.
3. If you are programming the remote to control your TV,
satellite receiver or cable box, go directly to step 5.
4. To program the remote to control a VCR or DVD. The
DVD•VCR key can control only one component, either your
VCR or your DVD. To program your remote to control either
your DVD or your VCR, you must first put the remote in
the proper programming mode. Follow these directions
before proceeding to step 5.
a. Press and hold the DVD•VCR key. The LED
INDICATOR turns on.
b. While holding down the DVD•VCR key, press and
release the number 2 key on the keypad to control a
VCR or the number 3 key to control a DVD. The LED
INDICATOR turns off.
c. Release the DVD•VCR key. The LED INDICATOR
blinks four times and then turns off. Your remote
is now either in VCR or DVD Programming Mode,
depending on which you chose. Proceed to step 5.
5. Press and hold the component key (TV, DVD•VCR,
SAT•CBL) you wish to program. The LED INDICATOR
turns on and remains on.
6. While holding the component key down, press and hold the
ON•OFF key. The LED INDICATOR turns off.
7. After holding both keys down for three seconds, the LED
INDICATOR turns back on.
8. Release both keys. The LED INDICATOR remains on.
9. Refer to the Brand Codes in the enclosed Code Lists. Press
and release the appropriate brand code key, using the
number keys on the keypad. The LED INDICATOR
blinks once.
Throughout the programming of each key, be sure to
keep the remote pointed at the IR sensor of the component you
are currently programming the remote to control.
10. Press and release the ON•OFF key repeatedly until your
component turns off. Wait 4 seconds between each key press.
Each time you press the ON•OFF key, the LED INDICATOR
blinks, and the next code is sent. The Brand Code Search
begins with the first code in the chosen brand list for that
component and cycles through all the codes for that brand. If
your component turns off, you have found the correct code.
(If it cycles through and the LED INDICATOR blinks four
times and turns off, all codes in the chosen brand lists have
been searched. The Brand Code Search mode is exited.)
11. Once you have found the correct code, you must save that
code by pressing and releasing the STOP key. The LED
INDICATOR turns off. You must press the STOP key to
save the code or the correct code will not be stored!
12. To confirm that the component key is programmed with the
correct code for maximum functionality, test the component.
Attempt to control a variety of the component’s functions
with the remote. If some of the features of your component
do not work, try programming the remote using the direct
code entry method.
Direct Code Entry
To program your universal remote to control your components
using the Direct Code Entry Method, follow the steps below.
1 Manually turn on the component you want the remote
to control.
Brand Code Search and Entry
If your brand is listed in the Brand Code List (See Code Lists
enclosed), you may be able to program your universal remote
by searching through only the Code Lists for that specific
manufacturer. Brand Code Search and Entry can be the quickest
method to program your remote, if your component (TV, VCR
and/or DVD, satellite receiver and/or cable box) is one of
those brands listed.
If your brand is not listed in the Brand Code List, use one of
the other programming methods: Direct Code Entry, Manual
Code Search and Entry or Auto Code Search and Entry.
Follow these instructions to program your remote using
the Brand Code Search and Entry method.
Programming the Remote
Your universal remote can operate a variety of brands of
components. In order for your universal remote to control
your components, you need to program the remote with the
codes that match the components (See Code Lists enclosed).
These codes enable the remote to communicate with your
components. Each brand and each component has its own
“language,” and, by programming the correct codes into
your remote, you tell the remote to “speak the same language”
as your components.
There are four methods you can use to program your remote
to operate your components: Brand Code Search and Entry,
Direct Code Entry, Manual Code Search and Entry, and
Auto Code Search and Entry. Most components can be
programmed in one of these four ways. Try them in the
order listed.
In order to control combo units, like TV/VCRs or TV/
DVDs, you must program the individual corresponding
component keys to control each part of the combo unit.
Once programmed successfully, the TV key controls the TV
functions on your unit, and the DVD•VCR and/or AUX key
controls the VCR or DVD functions, respectively. There is a
specific section in the Code Lists for combo units. The codes
in this section should be tried first, using Direct Code Entry
on the TV and DVD•VCR keys. If this is unsuccessful, follow
the normal programming methods for both the TV and the
DVD•VCR or AUX keys.
Programming Methods
5
4
! TIP:
! TIP:
1. Press and hold the AUX key. The LED INDICATOR turns on.
2. While holding down the AUX key, press and release the
number key on the keypad for the component you wish to
control. (See the chart below.) The LED INDICATOR turns off.
3. Release the AUX key. The LED INDICATOR blinks four
times and then turns off. The AUX key is now “set” to
control whichever component you selected.
4. Next, program the AUX key to control the brand of
component you have. Remember to consult the appropriate
component code list. For instance, if you have programmed
the AUX key to control an additional DVD, consult the
DVD Code List. Program the key to control your component
with the Code List enclosed.
Programming The AUX Key To Control
A Component Other Than A VCR
The AUX key defaults to control a VCR. If you want the AUX
key to control a different component (an additional TV, DVD,
satellite or cable box, for example), it is necessary for you to
preprogram the AUX key.
Additional TV press 1
VCR press 2
Additional DVD press 3
Additional satellite or cable box press 5
AUX KEY CONTROLS:
GO BACK
Page 4

2. Locate the enclosed Code Lists. Find the list for the
component you wish to program. Find your component’s
brand. You will see a listing of four-digit codes for each
brand. If your brand isn’t listed, use one of the Code Search
methods to program the remote control. (Refer to pages 6
and 7 for Manual and Auto Code Search methods.)
3. Press and hold the component key (TV, DVD•VCR, AUX,
SAT•CBL) you wish to program. The LED INDICATOR
turns on and remains on. If you release the component key
at any time during the Direct Code Entry procedure, the
LED INDICATOR blinks four times, and the process
is exited.
4. While holding down the component key, consult the Code
Lists for the four-digit code that corresponds to your
component’s brand and use the number keys (0-9) on the
keypad to enter it. While you are pressing the numbers, the
LED INDICATOR turns off.
5. After the fourth number is entered, the LED INDICATOR
turns on. At this time, release the component key. If the LED
INDICATOR turns off, you have entered a valid code and
have followed the correct procedure for Direct Code Entry.
If you enter a code number that is not in the Code Lists or
you do not follow all of the steps for Direct Code Entry, the
LED INDICATOR blinks four times when the component
key is released. This is an indication that a programming
error has occurred. In that case, repeat the Direct Code
Entry process from step 3.
Throughout the programming of each key, be sure to
keep the remote pointed at the IR sensor of the component you
are currently programming the remote to control.
6. To confirm that the component key is programmed with the
correct code for maximum functionality, test the component.
Attempt to control a variety of the component’s functions
with the remote. If some of the features of your components
do not work, try programming the remote with a different
code in the list until you find the code that allows the
remote to control the majority of your component’s
functions. Different codes can provide different levels of
functionality.
7. Remember to enter the code for future reference in the box
provided in the Code Retrieval section of this manual.
Manual Code Search and Entry
If your component’s brand isn’t listed in the Code Lists, or if
you have tried all of the codes for your brand and the remote
does not operate your component, try one of the Code Search
methods below—Manual Code Search or Auto Code Search.
Both Code Search methods cycle through all of the codes in the
Code Lists in the event that your component’s code is listed
under another brand.
The Manual and Auto Code Search methods may take a long
time because the remote searches through all of the codes in its
memory for the code that operates your component. Therefore,
if your brand is listed in the Brand Codes or the Code Lists,
first try the Brand Code Search or the Direct Code Entry
methods described on pages 4 and 5.
To exit without saving at any point in the Manual Code
Search, press and release the GO BACK key.
1. Manually turn on the component you want the remote
to control.
Note: If you press an invalid key during the Manual Code
Search, the remote does not respond and the search times
out after two minutes. When the search times out, the
LED INDICATOR blinks four times and turns off. The last
programmed code under that component key is retained.
2. If you are programming the remote to control your TV,
satellite receiver or cable box, go directly to step 4.
3. To program the remote to control a VCR or DVD. The
DVD•VCR key can control only one component, either
your VCR or your DVD. To program your remote to control
either your DVD or your VCR, you must first put the
remote in the proper programming mode. Follow these
directions before proceeding to step 4.
a. Press and hold the DVD•VCR key. The LED
INDICATOR turns on.
b. While holding down the DVD•VCR key, press and
release the number 2 key on the keypad to control
a VCR or the number 3 key to control a DVD. The
LED INDICATOR turns off.
c. Release the DVD•VCR key. The LED INDICATOR
blinks four times and then turns off. Your remote
is now either in VCR or DVD Programming Mode,
depending on which you chose. Proceed to step 4.
4. Press and hold the component key (TV, DVD•VCR, AUX,
SAT•CBL) you wish to program. The LED INDICATOR
turns on and remains on.
5. While holding the component key down, press and hold the
ON•OFF key. The LED INDICATOR turns off.
6. After holding down both keys for three seconds, the LED
INDICATOR turns back on.
7. Release both keys. The LED INDICATOR remains on.
Throughout the programming of each key, be sure to
keep the remote pointed at the IR sensor of the component you
are currently programming the remote to control.
8. Press and release the ON•OFF key repeatedly, waiting 4
seconds between each key press, until your component
turns off. Each time you press the ON•OFF key, the LED
INDICATOR blinks, and the next code is sent. This process
continues until all of the codes in the Code Lists have been
searched. If your component turns off, you have found the
correct code. (If it cycles through and the LED INDICATOR
blinks four times and turns off, all codes have been
searched. The Manual Code Search method is exited.)
9. Once your component turns off, you have found the correct
code. You must save the new code by pressing and releasing
the STOP key. The LED INDICATOR turns off. You must
press the STOP key to save the code or the correct code will
not be stored!
Testing the Code for
Maximum-Functionality
To confirm that the component key is programmed with the
correct code for maximum functionality, it is necessary to test
the component. If some of the features of your component
do not work, different codes in the list can be tried until you
find the code that allows the remote to control the majority of
your component’s functions. Different codes can provide
different levels of functionality. Follow these steps to test for
maximum functionality.
1. Once the code has been stored use the remote to attempt to
control a variety of the component’s functions. If the code
that has been stored controls the majority of the component’s
functions, programming is complete. If the code stored does
not give maximum functionality, you will want to try
another code.
2. In that case, repeat the Manual Code Search and Entry
Method from step 1. When the component turns off for the
first time, do not press the STOP key, which would store the
code. Instead, wait 4 seconds, with the unit now off, continue
to press the ON•OFF key repeatedly until the unit turns back
on. Once the unit turns back on, you have found another
code that operates the component. Press the STOP key.
3. Test the functionality again by attempting to control a variety
of the component’s functions. If the code that has been
Programming Methods (continued)
76
! TIP:
! TIP:
! TIP:
Page 5

not respond, continue to press the PLAY key
every five seconds until your component
turns off. Each time you press the PLAY key,
the LED INDICATOR blinks and a block of
10 codes are sent to your component. This
process continues until all of the codes in
the Code Lists have been searched. (If your
component has not turned off after all codes
have been searched, the LED INDICATOR
blinks four times and turns off. The Auto
Code Search Entry method is exited.)
9. When your component turns off, you know
the correct code is in the last block of 10 codes
sent. Press and release the REVERSE key.
Wait two seconds to see if your component
turns on again. If your component does not
respond, continue to press the REVERSE
key every two seconds until your component
turns on again. This will isolate the correct
code in the last block of codes sent. Each
time the REVERSE key is pressed, the LED
INDICATOR blinks.
Note: If you accidentally press the REVERSE
key after your component responds, press and
release the FORWARD key. Then, wait two
seconds to see if your component turns
off again.
10. Once your component turns off, you have
found the correct code. You must save the
new code by pressing and releasing the STOP
key. The LED INDICATOR turns off. You
must press the STOP key to save the code or
the correct code will not be stored!
11. To confirm that the component key is
programmed with the correct code for
maximum functionality, test the component.
Attempt to control a variety of the
component’s functions with the remote. If
some of the features of your components
do not work, different codes in the list can
be tried until you find the code that allows
the remote to control the majority of your
component’s functions. See the section entitled
“Testing the Code for Maximum Functionality”
on page 7 for more information.
stored controls the majority of the component’s functions,
programming is complete. If the code stored does not give
maximum functionality, you will want to try another code.
4. Repeat the Manual Code Search and Entry Method from
step 1. Each time a code turns the component on or off, you
have found a code that operates the remote and needs to
be tested for maximum functionality. Continue through the
code lists, cycling through the codes you have already tried,
until you find one that offers maximum functionality.
Auto Code Search and Entry
The Auto Code Search and Entry Method enables the remote
to automatically search through all the codes in the Code
Lists for the one that operates your component.
Note: The Manual and Auto Code Search methods may take
a long time because the remote searches through all of the
codes in its memory for the code that operates your component.
Therefore, if your brand is listed in the Brand Codes or the
Code Lists, first try the Brand Code Search or the Direct Code
Entry methods described on pages 4 and 6.
To exit without saving at any point in the Auto Code
Search, press and release the GO BACK key.
1. Manually turn on the component you want the remote to
control (TV, VCR, DVD, satellite receiver or cable box).
Note: If you press an invalid key during the Auto Code
Search, the remote does not respond. If you do not press
a valid Auto Code Search key (TV, DVD•VCR, SAT•CBL,
AUX, ON•OFF, GO BACK, PLAY, REVERSE, FORWARD,
STOP), the search times out after two minutes. When
the search times out, the LED INDICATOR blinks four
times and turns off. The last programmed code under that
component key is retained.
2. If you are programming the remote to control your TV,
satellite receiver or cable box go directly to step 4.
3. To program the remote to control a VCR or DVD. The
DVD•VCR key can control only one component, either your
VCR or your DVD. To program your remote to control
either your DVD or your VCR, you must first put the
remote in the proper programming mode.
Follow these directions before proceeding to step 4.
a. Press and hold the DVD•VCR key. The LED
INDICATOR turns on.
b. While holding down the DVD•VCR key, press and
release the number 2 key on the keypad to control
a VCR or the number 3 key to control a DVD. The
LED INDICATOR turns off.
c. Release the DVD•VCR key. The LED INDICATOR
blinks four times and then turns off. Your remote
is now either in VCR or DVD Programming Mode,
depending on which you chose. Proceed to step 4.
4. Press and hold the component key (TV, DVD•VCR, AUX,
SAT•CBL) you wish to program. The LED INDICATOR
turns on and remains on.
5. While holding the component key down, press and hold the
ON•OFF key. The LED INDICATOR turns off.
6. After holding down both keys for three seconds, the LED
INDICATOR turns back on.
7. Release both keys. The LED INDICATOR remains on.
Throughout the programming of each key, be sure to
keep the remote pointed at the IR sensor of the component you
are currently programming the remote to control.
8. Press and release the PLAY key, then wait five seconds to
see if your component turns off. If your component does
Programming Methods (continued)
98
! TIP:
PLAY
REVERSE
FORWARD
STOP
TIP:
Code Retrieval
Once you’ve programmed the remote to control your
components, you may want to record the codes for future
reference. If you used the Direct Code Entry method, this is
easy. Just find the codes you programmed in and make a note
of them in the boxes on the next page. If you used one of the
Code Search methods to program your remote, you will need
to retrieve each component’s four-digit code. Retrieving the
actual code and writing it down will save you time if you
ever need to program the remote again (e.g., if programming
is lost when you change the batteries). If the codes are recorded,
you can use the Direct Entry method to reprogram your
remote to control your components, which is quick and easy.
1. Press and hold the component key (TV, DVD•VCR, AUX,
SAT•CBL) whose code you wish to retrieve. The LED
INDICATOR turns on.
2. While holding the component key down, press and hold the
INFO key. The LED INDICATOR turns off.
3. After holding down both keys for three seconds, the LED
INDICATOR turns back on.
4. Release both keys. The LED INDICATOR remains on.
! TIP:
Page 6
Because this remote controls more than one component, you
must first “tell” the remote which component you wish to
operate. That means, if you wish to operate your TV, you
must first press the TV key to put the remote in the TV Mode.
The remote stays in the chosen component mode (such as TV
Mode) until you change it. If your remote is in TV Mode, you
must change the mode in order to operate your DVD or VCR,
satellite receiver or cable box. For example, if you are in VCR
Mode, and you wish to turn off your TV, you must press the
TV key first before pressing the ON•OFF key.
Using the Remote to
Control Your Components
1110
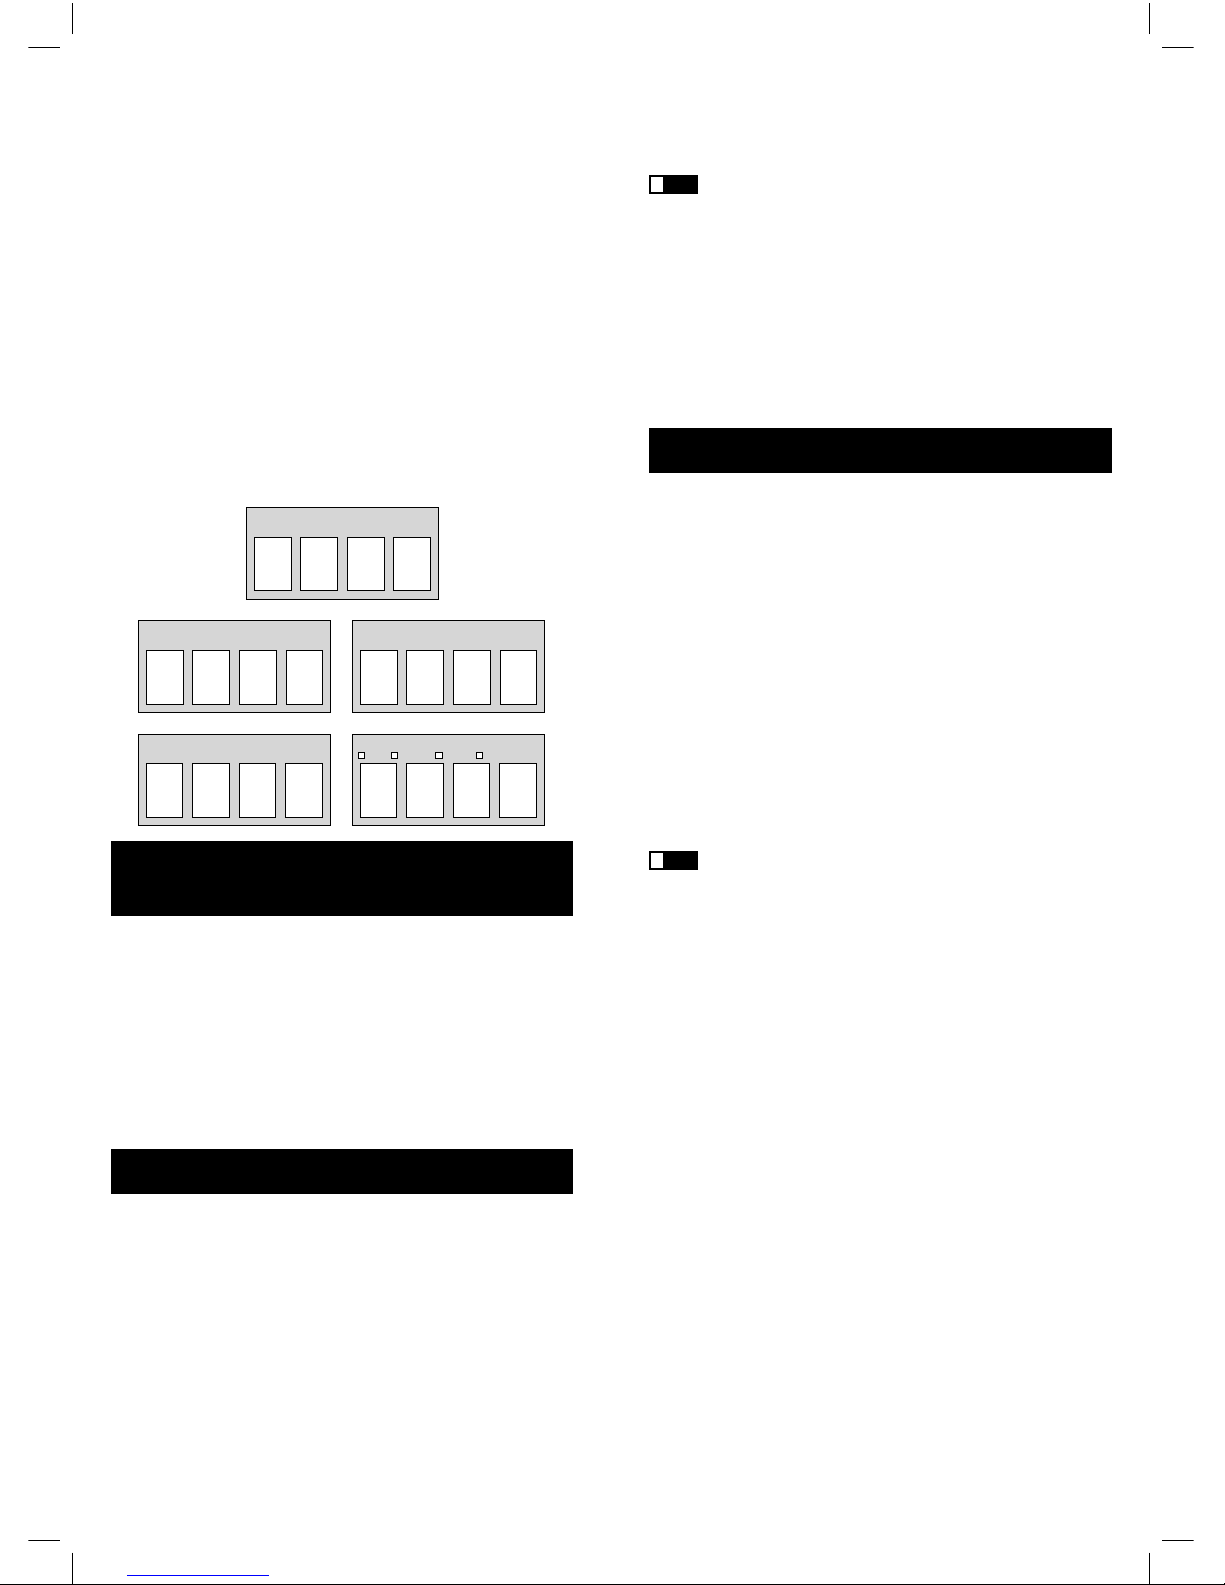
5. Starting with the number 1 key, press and release each
number key on the keypad in the following order (1-9, then
0). The number that causes the LED INDICATOR to blink
is the first number of the code. As you find each number
of the code, refer to the code boxes below and write them
down for future reference.
Note: All TV codes begin with the number 1; all VCR codes
begin with the number 2; all DVDs, the number 3; and all
satellite receivers and cable boxes, the number 5.
6. Repeat step 5 until you have retrieved all four numbers in
the code.
7. After the fourth number is retrieved, the LED INDICATOR
blinks briefly, then turns off.
8. To exit the Code Retrieval Mode, press and release the GO
BACK key at any time.
9. If you press an invalid key during the Code Retrieval
process, the remote will not respond. If you do not press
a valid Code Retrieval key (TV, DVD•VCR, SAT•CBL,
AUX, INFO, GO BACK), Code Retrieval times out after 15
seconds. The LED INDICATOR blinks four times, and then
turns off.
TV CODE
1
SAT·CBL CODE
5
VCR CODE
AUX
TV VCR DVD SAT·CBL
DVD CODE
Accessing and Selecting Menu Items
Today’s advanced components use on-screen menus to
help you navigate through all their features and functions.
While this remote cannot access every menu system of every
component model, it does offer some menu functionality.
To use a component’s on-screen menu system, you first have
to put the remote in Menu Mode.
1. Make sure your components are turned on and your TV
is set to the component’s input. (Use the INPUT key to
toggle through video sources when in TV mode.)
2. Press the component key whose menu you want to access.
3. Press the MENU key. The LED INDICATOR blinks, indicating
you are in the Menu Mode.
On-screen Menus
4. Use the VOL+/- and/or CH+/- keys to navigate through the
on-screen menu system.
5. To make a selection from the on-screen menu, press
the MENU or OK key to select the highlighted item.
If the remote doesn’t respond, check to see that the
LED INDICATOR is still blinking. Note: it times out after 20
seconds. If this happens, just press the MENU key again, and
then retry your selection.
Exiting a Menu Mode
The remote automatically times out of Menu Mode after
20-seconds of inactivity (no keys being pressed). At that
time, the remote clears the displayed menu from the TV.
If you want to exit the Menu Mode yourself, press the
corresponding component key on the remote (TV, DVD•VCR,
SAT•CBL). The LED INDICATOR turns off.
Sleep Timer (Select Models Only)
This feature automatically turns off your TV at a duration
you choose from 1 to 99 minutes. The Sleep Timer only works
if you have found a code that controls your TV. The timing
mechanism for the Sleep Timer is built into your universal
remote control. To program the Sleep Timer, follow these steps.
Programming the Sleep Timer
1. Press and release the TV key.
2. Press and hold the SLEEP key for three seconds. The LED
INDICATOR turns on.
3. Release the SLEEP key.
4. Using the number keys, enter the desired time in minutes
(from 1-99 minutes). To set the timer to a number under 10
minutes, first press 0 and then the desired number (e.g.,
05 for five minutes). The LED INDICATOR blinks with
each keypress.
5. Once the second number is entered, the LED INDICATOR
turns off.
Any keypress other than the number keys is ignored.
If you don’t enter the sleep time within 10 seconds after
pressing the SLEEP key, you must start over at step 1. The
LED INDICATOR blinks four times and then turns off,
indicating your attempt to program the Sleep Timer has been
unsuccessful.
6. The Sleep Timer is now set.
7. Leave remote aimed at the TV. Once the Sleep Timer is set,
you can continue to use the remote without affecting the
Sleep Timer. However, because the timing mechanism for
the Sleep Timer is built into the remote itself, the remote
must be in TV Mode and pointed at the TV to activate the
Sleep Timer.
Canceling the Sleep Timer
The Sleep Timer program will be canceled and reset to zero by
pressing and releasing the ON•OFF key.
! TIP:
! TIP:
Page 7

13
1312
Troubleshooting
Problem: The remote does not operate your component.
• You must put the remote in the correct mode by
pressing the corresponding component key (TV, DVD•VCR,
AUX, SAT•CBL) so the remote knows which component
you want to operate.
• Remove any obstacles between the remote and the
component. Make sure to aim the remote at the IR
sensor on the component.
• Make sure the batteries are fresh and are properly installed.
Replace the batteries with two new AA batteries,
if necessary. Reprogramming may be required.
• Reset the remote. Remove the batteries, then press and
hold the number 1 key on the remote for several seconds
to reset the microprocessor inside the remote. Release the
number 1 key, reinstall the batteries, and press the ON•OFF
key. If the LED INDICATOR lights up, reprogram the
remote and try again. If it doesn’t light up, replace the
batteries with new ones.
Problem: The remote can’t be programmed to operate
your component.
• If you are testing the remote after you have entered the
code, you may be too far away from the component or at a
wrong angle. This remote uses IR (infrared) technology to
communicate with components. The remote sends the code,
and the component’s IR sensor reads the code. Therefore,
there must be an unobstructed path between the remote
and the IR sensor on the component. Move closer and make
sure you point the remote at the component (VCR or DVD
player when programming the DVD•VCR key; TV when
programming the TV key; cable box or satellite receiver
when you’re programming the SAT•CBL key).
• If you’ve used the Direct Entry programming methods
to enter the codes for your brand and the unit is still not
functioning properly, try one of the Code Search methods.
• To control combo TV/VCR or TV/DVD units, you must
program both the TV key and the DVD•VCR key. Once
programmed successfully, the TV key controls the TV
functions on your unit, and the DVD•VCR key controls
the VCR or DVD functions. There is a specific section in
the Code Lists for combo units. The codes in this section
should be tried first using Direct Code Entry on the TV
and DVD•VCR keys. If this is unsuccessful, follow the
normal programming methods for both the TV and the
DVD•VCR keys.
• Make sure the batteries are fresh and are properly installed.
Problem: The remote is not performing commands properly.
• You must put the remote in the correct mode by pressing
the corresponding component key (TV, DVD•VCR, AUX,
SAT•CBL) so the remote knows which component you
want to operate.
• Make sure component is “ready” (e.g., DVD player
has disc loaded; VCR has tape loaded, etc.).
• You may have pressed an invalid key for the mode
the remote is in.
• If you’re trying to turn on an RCA, GE or PROSCAN
branded component, press the component key (TV,
DVD•VCR, SAT•CBL) instead of the ON•OFF key.
• If you’re trying to change channels, try pressing the
OK key after entering the channel number, as this is
a requirement of certain models and brands.
• There is a possibility that a programmed code may only
be able to control some of your component features (e.g.,
only turns a component on and off). See “Testing the Code
for Maximum Functionality” for more information.
Problem: The LED INDICATOR does not light when
you press a key.
• You must put the remote in the correct mode by
pressing the corresponding component key (TV, DVD•VCR,
SAT•CBL) so the remote knows which component you
want to operate.
• You may have pressed an invalid key for the mode
the remote is in.
• Make sure the batteries are fresh and are properly installed.
Replace the batteries with two new AA batteries,
if necessary. Reprogramming may be required.
Problem: The VCR won’t record.
• Make sure the remote is in VCR Mode.
• Make sure the tape is properly loaded in the VCR.
• Make sure the tape is not write-protected. If the safety
tab is removed, the tape is write-protected, and you cannot
record onto that tape.
Problem: The remote will not change channels
on your component.
• You must put the remote in the correct mode by pressing
the corresponding component key (TV, DVD•VCR,
SAT•CBL) so the remote knows which component you
want to operate.
• Press the OK key after you enter a channel number.
• Remove any obstacles between the remote and the
component. Make sure to aim the remote at the IR
sensor on the component.
Problem: The component’s menu doesn’t appear
on the TV screen.
• Make sure you have connected your component to your
TV properly and selected the correct Input.
(See your components’ Owner’s Manuals for proper
connection procedures.)
• You must put the remote in the correct mode by pressing
the corresponding component key (TV, DVD•VCR,
SAT•CBL) so the remote knows which component you
want to operate.
• Menu access isn’t supported for all brands. If that’s the
case, you’ll need to use your original remote control to
access menu functions for these components.
For more information, please visit www.rca.com.
Page 8

05-16-2005
Thomson Restricted
Scale 100%
Adobe Illustrator
ON•OFF
SA
T•CBL
AUX
TV
DVD
•VCR
0
GO BACK INPUT
2
4
5
6
7
8
9
3
1
SLEEP
INFO
OKMENU
PLA
Y
REVERSE
FOR
WARD
STOP
PAUSE
RECORD
VOL
+
VOL
-
M
U
T
E
M
U
T
E
RCR 430S
4 Device
CH +
CH -
Télécommande universelle
Nous vous félicitons d’avoir acheté cette télécommande
universelle. Cette télécommande universelle élimine les
nombreuses télécommandes ennuyeuses. Vous pouvez
programmer cette télécommande universelle de marque RCA
pour commander la plupart des modèles de la plupart des
marques d’appareils à télécommande infrarouge fabriqués après
1990. (Voir les listes de codes ci-jointes pour connaître toutes les
marques). Cette télécommande universelle est facile à utiliser,
facile à programmer et vous donne le plein contrôle, au bout des
doigts.
La télécommande universelle est déjà programmée
pour commander la plupart des téléviseurs, lecteurs DVD et
récepteurs de satellite de marques RCA, GE et PROSCAN. Il
suffit d’appuyer sur la touche correspondante — DVD•VCR
pour un lecteur DVD ; TV pour un téléviseur ; SAT•CBL pour
un récepteur de satellite.
Installation des piles et information
Cette télécommande universelle est alimentée par deux
piles alcalines AA (comprises ou non selon le modèle). Pour
installer les piles:
1. Retirez la porte du logement à piles.
2. Insérez les piles, en faisant
correspondre les marques (+) et (-) à
l’intérieur du logement à piles.
3. Enfoncez et glissez le couvercle du
logement à piles en place.
Remarque: Vous devrez peut-être
reprogrammer la télécommande après
le remplacement des piles.
La télécommande universelle économise l’énergie des piles en
s’éteignant automatiquement si aucune touche n’est enfoncée
pendant plus de 60 secondes. De cette façon, l’énergie de vos piles
est sauvegardée si la télécommande est coincée dans un endroit où
les touches restent enfoncées, comme entre des coussins de fauteuil.
Table des matières
Schéma du produit . . . . . . . . . . . . . . . . . . . . . . . . . . . . . . . . . . . 14
Introduction . . . . . . . . . . . . . . . . . . . . . . . . . . . . . . . . . . . . . . . . . 15
Installation des piles et information . . . . . . . . . . . . . . . . . . . . 15
Économiseur de piles . . . . . . . . . . . . . . . . . . . . . . . . . . . . . . . . . 15
Voyant DÉL . . . . . . . . . . . . . . . . . . . . . . . . . . . . . . . . . . . . . . . . . 15
Programmation de la télécommande. . . . . . . . . . . . . . . . . . . . 16
Méthodes de programmation . . . . . . . . . . . . . . . . . . . . . . . . . . 16
Recherche et entrée de code de marque . . . . . . . . . . . . 16
Entrée directe de code . . . . . . . . . . . . . . . . . . . . . . . . . . . 18
Recherche et entrée manuelles de code . . . . . . . . . . . . 19
Recherche et entrée de code automatiques . . . . . . . . . 20
Récupération de code . . . . . . . . . . . . . . . . . . . . . . . . . . . . . . . . . 22
Utilisation de la télécommande avec vos appareils . . . . . . . 23
Menus à l’écran . . . . . . . . . . . . . . . . . . . . . . . . . . . . . . . . . . . . . . 23
Accès et sélection d’éléments de menu. . . . . . . . . . . . . 23
Quitter un mode Menu . . . . . . . . . . . . . . . . . . . . . . . . . . 24
Minuterie-sommeil . . . . . . . . . . . . . . . . . . . . . . . . . . . . . . . . . . . 24
Programmation de la minuterie-sommeil . . . . . . . . . . 24
Annulation de la minuterie-sommeil . . . . . . . . . . . . . . 24
Dépannage . . . . . . . . . . . . . . . . . . . . . . . . . . . . . . . . . . . . . . . . . . 25
Économiseur de piles
1514
Touches d’appareil.
(
TV, DVD•VCR
,
SAT•CBL
)
Les Touches
CH
et
VOL
ont deux
fonctions. Elles
agissent comme
des touches de
navigation (touches
à flèche HAUT, BAS,
DROITE, GAUCHE)
des systèmes de
menus.
Touche
INPUT
–
Sur certaines
télécommandes,
cette touche est
appelée TV/VCR. Elle
permet de parcourir
toutes les sources
vidéo raccordées au
téléviseur.
Touche
MENU
dédiée pour les
menus de disques
DVD, récepteurs de
satellite et certains
téléviseurs.
Touches
SLEEP
– Permet de
programmer
l’heure à laquelle le
téléviseur s’éteint
automatiquement.
Touches
INFO
–
Affiche l’information
sur l’appareil que
vous commandez.
Le modèle réel peut varier par rapport à l’illustration
Touches de transport –
REVERSE, PLAY,
FORWARD, RECORD,
STOP
and
PAUSE
keys.
Le
VOYANT DÉL
s’allume pour confirmer les différentes
fonctions. Lorsqu’une touche valide est enfoncée, le
VOYANT
DÉL reste allumé aussi longtemps que la touche est enfoncée
et s’éteint quand la touche est relâchée. Le
VOYANT DÉL
clignote aussi en mode Programmation ou en mode Menu
pour signaler les fonctions.
Indicateur DÉL
VOYANT DÉL
!
CO NS EIL
Page 9

Pour quitter sans sauvegarder à tout
moment de la Recherche de code de marque,
appuyez sur la touche GO BACK.
1. Allumez manuellement l’appareil à télécommander
(téléviseur, magnétoscope, lecteur DVD, récepteur de
satellite ou câblosélecteur).
2. Repérez les codes de marque dans les Listes de codes et
ayez-les à portée de la main.
Remarque: Si vous appuyez sur une touche invalide
pendant la Recherche de code de marque, la télécommande
ne répond pas et la recherche dépasse son temps imparti
après deux minutes. À la fin du temps imparti, le VOYANT
DÉL clignote quatre fois puis s’éteint. Le dernier code
programmé à cette touche d’appareil est conservé.
3. Passez directement à l’étape 5 si vous programmez la
télécommande pour commander votre téléviseur, récepteur
de satellite ou câblosélecteur.
4. Pour programmer la télécommande pour commander un
magnétoscope ou un lecteur DVD. La touche DVD•VCR
peut commander un seul appareil, soit le magnétoscope
ou le lecteur DVD. Pour programmer la télécommande
pour commander le lecteur DVD ou le magnétoscope, vous
devez d’abord placer la télécommande dans le mode de
programmation approprié. Suivez ces instructions avant de
passer à l’étape 5.
a. Maintenez la touche DVD•VCR enfoncée. Le
VOYANT DÉL s’éteint.
b. Maintenez la touche DVD•VCR enfoncée et
appuyez sur la touche numérique 2 au clavier
pour commander un magnétoscope ou la touche
numérique 3 pour commander un lecteur DVD. Le
VOYANT DÉL s’éteint.
c. Relâchez la touche DVD•VCR. Le VOYANT DÉL
clignote quatre fois, puis s’éteint. La télécommande
est désormais en mode de programmation de
magnétoscope ou de lecteur DVD, selon votre
choix. Passez à l’étape 5.
5. Maintenez enfoncée la touche d’appareil (TV, DVD•VCR,
SAT•CBL) que vous souhaitez programmer. Le VOYANT
DÉL s’allume et reste allumé.
6. Maintenez la touche d’appareil enfoncée ainsi que la touche
ON•OFF. Le VOYANT DÉL s’éteint.
7. Après avoir maintenu les deux touches enfoncées pendant
trois secondes, le VOYANT DÉL se rallume.
8. Relâchez les deux touches. Le VOYANT DÉL reste allumé.
9. Reportez-vous aux codes de marque des Listes de codes ci-
jointes. Appuyez sur la touche de code de marque appropriée
en utilisant les touches numériques du clavier. Le VOYANT
DÉL clignote une fois.
Tout au long de la programmation de chaque
touche, assurez-vous que la télécommande est pointée en
direction du capteur IR de l’appareil que vous programmez.
10. Appuyez plusieurs fois sur la touche ON•OFF jusqu’à
ce que l’appareil s’éteigne. Attendez 4 secondes entre
chaque pression de touche. À chaque pression de la touche
ON•OFF, le VOYANT DÉL clignote et le code suivant est
acheminé. La Recherche de code de marque commence
par le premier code de la liste des codes choisie pour cet
appareil et parcourt tous les codes de cette marque. Si
Recherche et entrée de code de marque
Si votre marque figure dans la Liste des codes de marque (voir
Listes de codes ci-jointe), vous pourrez peut-être programmer
votre télécommande universelle
en parcourant seulement les Listes de codes du fabricant en
question. La recherche et l’entrée de code de marque peut être
la méthode la plus rapide de programmer la télécommande si
Programmation de la télécommande
Votre télécommande universelle peut commander diverses
marques d’appareils. Pour que la télécommande universelle
commande vos appareils, vous devez programmer les
codes correspondant aux appareils (voir les Listes de codes
ci-jointes). Ces codes permettent à la télécommande de
communiquer avec vos appareils. Chaque marque et chaque
appareil dispose de son propre “langage” et en programmant
les codes exacts dans la télécommande, vous lui indiquez de
“parler la même langue” que vos appareils.
Il existe quatre méthodes de programmation de la
télécommande pour commander vos appareils : Recherche et
entrée de code de marque, Entrée directe de code, Recherche
et entrée de code manuelle et Recherche et entrée de code
automatique. La plupart des appareils peuvent être
programmés par l’une de ces quatre méthodes. Essayez-les
dans l’ordre indiqué.
Pour commander des appareils combinés, comme des
combinés téléviseur/magnétoscope ou téléviseur/lecteur
DVD, vous devez programmer les touches d’appareil
correspondantes individuelles pour commander chaque partie
du combiné. Une fois correctement programmée, la touche
TV commande les fonctions de téléviseur à votre appareil, et
la touche DVD•VCR et/ou AUX commande les fonctions du
VCR ou du lecteur DVD, respectivement. Les listes de codes
comprennent une section spéciale sur les appareils combinés.
On recommande d’essayer d’abord les codes contenus
dans cette section, à l’aide de la méthode Entrée directe de
code avec les touches TV et DVD•VCR. Si cette méthode ne
fonctionne pas, suivez les étapes normales de programmation
pour les touches TV et DVD•VCR ou AUX.
Programmation de la touche AUX pour commander un
appareil autre qu’un magnétoscope
Méthodes de programmation
17
16
La touche AUX commande un magnétoscope par défaut.
Pour que la touche AUX commande un autre appareil (un
autre téléviseur, lecteur DVD, récepteur de satellite ou
câblosélecteur, par exemple), vous devez préprogrammer la
touche AUX.
1. Maintenez la touche AUX enfoncée. Le VOYANT DÉL
s’éteint.
2. Maintenez la touche AUX enfoncée et appuyez sur la
touche numérique au clavier correspondant à l’appareil que
vous souhaitez commander. (Voir le tableau ci-dessous.) Le
VOYANT DÉL s’éteint.
3. Relâchez la touche AUX. Le VOYANT DÉL clignote
quatre fois, puis s’éteint. La touche AUX est désormais
“programmée” pour commander l’appareil choisi.
4. Programmez ensuite la touche AUX pour commander
la marque de votre appareil. N’oubliez pas de consulter
la liste de codes d’appareils appropriée. Par exemple, si
vous avez programmé la touche AUX pour commander
un autre lecteur DVD, consultez la Liste de codes DVD.
Programmez la touche pour commander votre appareil
avec la Liste de codes jointe.
Additional TV touche 1
VCR touche 2
Additional DVD touche 3
Additional satellite or cable box touche 5
AUX KEY CONTROLS:
votre appareil (téléviseur, magnétoscope et/ou lecteur DVD,
récepteur de satellite et/ou câblosélecteur) correspond aux
marques indiquées.
Si votre marque ne figure pas dans la liste des codes de
marque, utilisez l’une des autres méthodes de programmation:
Entrée directe de code, Recherche et entrée de code manuelle
ou Recherche et entrée de code automatique. Suivez ces
instructions pour programmer la télécommande à l’aide de la
méthode Recherche et entrée de code de marque.
! CO NS EIL
GO BACK
! CO NS EIL
Page 10

l’appareil s’éteint, vous avez trouvé le bon code. (Si un cycle
est effectué et que le VOYANT DÉL clignote quatre fois, puis
s’éteint, tous les codes des listes de marques choisies ont
été recherchés. Le mode Recherche de code de marque est
annulé.)
11. Une fois le bon code trouvé, vous devez le sauvegarder
en appuyant sur la touche STOP. Le VOYANT DÉL
s’éteint. Vous devez appuyer sur la touche STOP pour
sauvegarder le code, sans quoi le code exact ne sera pas
mémorisé !
12. Testez l’appareil pour confirmer que le bon code est
programmé à la touche d’appareil pour assurer une
fonctionnalité maximale. Essayez de commander diverses
fonctions de l’appareil avec la télécommande. Si certaines
des caractéristiques de votre appareil ne fonctionnent pas,
essayez de programmer la télécommande en utilisant la
méthode d’entrée de code directe.
Entrée directe de code
Suivez les étapes ci-dessous pour programmer la
télécommande universelle pour commander vos appareils par
la méthode Entrée directe de code.
1. Allumez manuellement l’appareil que la télécommande doit
commander.
2. Repérez les listes de codes ci-jointes. Trouvez la liste de
l’appareil que vous souhaitez programmer. Trouvez la
marque de votre appareil. Vous verrez une liste de codes
à quatre chiffres pour chaque marque. Si votre marque
ne figure pas dans la liste, utilisez l’une des méthodes de
recherche de code pour programmer la télécommande. (Voir
les pages 6 et 7 pour les méthodes de recherche de code
manuelle et automatique.)
3. Maintenez enfoncée la touche d’appareil (TV, DVD•VCR,
SAT•CBL) que vous souhaitez programmer. Le VOYANT
DÉL s’allume et reste allumé. Si vous relâchez la touche
d’appareil en tout temps durant l’Entrée directe de code, le
VOYANT DÉL clignote quatre fois et l’entrée est annulée.
4. Maintenez la touche d’appareil enfoncée et consultez les
Listes de codes pour trouver le code à quatre chiffres qui
correspond à la marque de votre appareil et utilisez les
touches numériques (0 à 9) du clavier pour l’entrer. Le
VOYANT DÉL s’éteint pendant que vous appuyez sur les
chiffres.
5. Le VOYANT DÉL s’allume quand le quatrième chiffre est
entré. À ce moment, relâchez la touche d’appareil. Si le
VOYANT DÉL s’éteint, vous avez entré un code valide et
suivi la bonne procédure d’entrée directe de code.
Si vous entrez un code ne figurant pas dans les Listes de
codes ou ne suivez pas toutes les étapes de la méthode Entrée
directe de code, le VOYANT DÉL clignote quatre fois quand la
touche d’appareil est relâchée. Ce clignotement indique qu’une
erreur de programmation est survenue. Dans ce cas, répétez la
méthode d’entrée de code directe à partir de l’étape 3.
Tout au long de la programmation de chaque
touche, assurez-vous que la télécommande est pointée en
direction du capteur IR de l’appareil que vous programmez.
6. Testez l’appareil pour confirmer que le bon code est
programmé à la touche d’appareil pour assurer une
fonctionnalité maximale. Essayez de commander diverses
fonctions de l’appareil avec la télécommande. Si certaines
des fonctions de vos appareils ne fonctionnent pas,
essayez de programmer un autre code de la liste dans
la télécommande jusqu’à ce que vous trouviez le code
qui permet à la télécommande de commander la plupart
des fonctions de votre appareil. Différents codes peuvent
procurer différents niveaux de fonctionnalité.
7. N’oubliez pas d’inscrire le code pour référence ultérieure
dans la case prévue dans la section Récupération de code de
ce guide.
Recherche et entrée manuelles de code
Si la marque de votre appareil ne figure pas dans la liste
de codes ou si vous avez essayé tous les codes de votre
marque et que la télécommande ne commande pas votre
appareil, utilisez l’une des méthodes de recherche de code
ci-dessous—Recherche de code manuelle ou Recherche de
code automatique. Les deux méthodes de recherche de code
parcourent tous les codes des Listes de codes pour le cas où le
code de votre appareil soit inscrit sous une autre marque.
La méthode de recherche de code manuelle peut demander
beaucoup de temps car la télécommande recherche tous les
codes en mémoire pour trouver le code qui commande votre
appareil. Par conséquent, si votre marque figure dans les
Codes de marque ou les Listes de codes, essayez d’abord la
méthode Recherche de code de marque ou Entrée directe de
code décrite aux pages 4 et 5.
Pour quitter sans sauvegarder à tout moment de la
Recherche de code manuelle, appuyez sur la touche GO BACK.
1. Allumez manuellement l’appareil que la télécommande
doit commander.
Note : Si vous appuyez sur une touche invalide pendant la
Recherche de code manuelle, la télécommande ne répond
pas et la recherche dépasse son temps imparti après deux
minutes. À la fin du temps imparti, le VOYANT DÉL voyant
DÉL clignote quatre fois puis s’éteint. Le dernier code
programmé à cette touche d’appareil est conservé.
2. Passez directement à l’étape 4 si vous programmez la
télécommande pour commander votre téléviseur, récepteur
de satellite ou câblosélecteur.
3. Pour programmer la télécommande pour commander un
magnétoscope ou un lecteur DVD. La touche DVD•VCR
peut commander un seul appareil, soit le magnétoscope
ou le lecteur DVD. Pour programmer la télécommande
pour commander le lecteur DVD ou le magnétoscope, vous
devez d’abord placer la télécommande dans le mode de
programmation approprié. Suivez ces instructions avant de
passer à l’étape
a. Maintenez la touche DVD•VCR enfoncée.
Le VOYANT DÉL s’éteint.
b. Maintenez la touche DVD•VCR enfoncée et
appuyez sur la touche numérique 2 au clavier
pour commander un magnétoscope ou la touche
numérique 3 pour commander un lecteur DVD. Le
VOYANT DÉL s’éteint.
c. Relâchez la touche DVD•VCR. Le VOYANT DÉL
clignote quatre fois, puis s’éteint. La télécommande
est désormais en mode de programmation de
magnétoscope ou de lecteur DVD, selon votre choix.
Passez à l’étape 4.
4. Maintenez enfoncée la touche d’appareil (TV, DVD•VCR,
AUX, SAT•CBL) que vous souhaitez programmer. Le
VOYANT DÉL s’allume et reste allumé.
5. Maintenez la touche d’appareil enfoncée ainsi que la touche
ON•OFF. Le VOYANT DÉL s’éteint.
6. Après avoir maintenu les deux touches enfoncées pendant
trois secondes, le VOYANT DÉL se rallume.
7. Relâchez les deux touches. Le VOYANT DÉL reste allumé.
Tout au long de la programmation de chaque
touche, assurez-vous que la télécommande est pointée en
direction du capteur IR de l’appareil que vous programmez.
8. Appuyez plusieurs fois sur la touche ON•OFF et attendez
4 secondes entre chaque pression, jusqu’à ce que l’appareil
s’éteigne. À chaque pression de la touche ON•OFF, le
Méthodes de programmation (suite)
1918
! CO NS EIL
! CO NS EIL
! CO NS EIL
Page 11

Pour quitter sans sauvegarder à tout moment de
la Recherche de code automatique, appuyez sur la touche
GO BACK.
1. Allumez manuellement l’appareil à télécommander
(téléviseur, magnétoscope, lecteur DVD, récepteur de satellite
ou câblosélecteur).
Note : Si vous appuyez sur une touche invalide pendant la
recherche de code automatique, la télécommande ne répond
pas. Si vous n’appuyez pas sur une touche de Recherche de
code automatique valide (TV, DVD•VCR, SAT•CBL, AUX,
ON•OFF, GO BACK, PLAY, REVERSE, FORWARD, STOP),
la recherche dépasse son temps imparti après deux minutes. À
la fin du temps imparti, le VOYANT DÉL voyant DÉL clignote
quatre fois puis s’éteint. Le dernier code programmé à cette
touche d’appareil est conservé.
2. Passez directement à l’étape 4 si vous programmez la
télécommande pour commander votre téléviseur, récepteur
de satellite ou câblosélecteur.
3. Pour programmer la télécommande pour commander un
magnétoscope ou un lecteur DVD. La touche DVD•VCR
peut commander un seul appareil, soit le magnétoscope
ou le lecteur DVD. Pour programmer la télécommande
pour commander le lecteur DVD ou le magnétoscope, vous
devez d’abord placer la télécommande dans le mode de
programmation approprié.
Suivez ces instructions avant de passer à l’étape 4.
a. Maintenez la touche DVD•VCR enfoncée. Le
VOYANT DÉL s’allume.
b. Maintenez la touche DVD•VCR enfoncée et
appuyez sur la touche numérique 2 au clavier
pour commander un magnétoscope ou la touche
numérique 3 pour commander un lecteur DVD. Le
VOYANT DÉL s’éteint.
c. Relâchez la touche DVD•VCR. Le VOYANT DÉL
clignote quatre fois, puis s’éteint. La télécommande
est désormais en mode de programmation de
magnétoscope ou de lecteur DVD, selon votre choix.
Passez à l’étape 4.
4. Maintenez enfoncée la touche d’appareil (TV, DVD•VCR,
AUX, SAT•CBL) que vous souhaitez programmer. Le
VOYANT DÉL s’allume et reste allumé.
5. Maintenez la touche d’appareil enfoncée ainsi que la touche
ON•OFF. Le VOYANT DÉL s’éteint.
6. Après avoir maintenu les deux touches enfoncées pendant
trois secondes, le VOYANT DÉL se rallume.
7. Relâchez les deux touches. Le VOYANT DÉL reste allumé.
Tout au long de la programmation de chaque
touche, assurez-vous que la télécommande est pointée en
direction du capteur IR de l’appareil que vous programmez.
VOYANT DÉL, clignote et le code suivant est acheminé.
Ce processus continue jusqu’à ce que tous les codes des
Listes de codes aient été explorés. Si l’appareil s’éteint,
vous avez trouvé le bon code. (Si un cycle est effectué et
que le VOYANT DÉL clignote quatre fois, puis s’éteint, tous
les codes ont été recherchés. Le mode Recherche de code
manuelle est annulé.)
9. Quand votre appareil s’éteint, vous avez trouvé le bon code.
Vous devez sauvegarder le nouveau code en appuyant sur
la touche STOP. Le VOYANT DÉL s’éteint. Vous devez
appuyer sur la touche STOP pour sauvegarder le code, sans
quoi le code exact ne sera pas mémorisé !
Essai de code pour une
fonctionnalité maximale
Testez l’appareil pour confirmer que le bon code est
programmé à la touche d’appareil pour assurer une
fonctionnalité maximale. Si certaines des fonctions de votre
appareil ne fonctionnent pas, essayez différents codes de
la liste jusqu’à ce que vous trouviez le code permettant à la
télécommande de commander la plupart des fonctions de
votre appareil. Différents codes peuvent procurer différents
niveaux de fonctionnalité. Suivez ces étapes pour tester la
fonctionnalité maximale.
1. Une fois le code mémorisé, utilisez la télécommande pour
tenter de commander diverses fonctions de l’appareil.
Si le code mémorisé commande la plupart des fonctions
de l’appareil, la programmation est terminée. Si le code
mémorisé ne procure pas un maximum de fonctions, on
recommande d’essayer un autre code.
2. Dans ce cas, répétez la méthode Recherche et entrée de
code manuelle à l’étape 1. Lorsque l’appareil s’éteint pour
la première fois, n’appuyez pas sur la touche STOP, car
cette opération mémoriserait le code. Attendez 4 secondes
et continuez plutôt d’appuyer plusieurs fois sur la touche
ON•OFF jusqu’à ce que l’appareil se rallume. Quand
l’appareil se rallume, vous avez trouvé un autre code qui
commande l’appareil. Appuyez sur la touche STOP.
3. Testez de nouveau les fonctions en tentant de commander
diverses fonctions de l’appareil. Si le code mémorisé
commande la plupart des fonctions de l’appareil, la
programmation est terminée. Si le code mémorisé ne
procure pas un maximum de fonctions, on recommande
d’essayer un autre code.
4. Répétez la méthode Recherche et entrée manuelles de
code à l’étape 1. À chaque fois qu’un code allume ou
éteint l’appareil, vous avez trouvé un code qui commande
la télécommande et doit être testé pour en déterminer la
fonctionnalité maximale. Continuez de parcourir les listes
de codes, parmi les codes que vous avez déjà essayés,
jusqu’à ce que vous trouviez celui qui procure la plus
grande fonctionnalité.
Recherche et entrée de
code automatiques
La méthode Recherche et entrée de code automatique
permet à la télécommande de parcourir automatiquement
tous les codes des Listes de codes à la recherche du code
correspondant à votre appareil.
Remarque: Les méthodes de recherche de code manuelle et
automatique peuvent demander beaucoup de temps car la
télécommande recherche tous les codes en mémoire pour
trouver celui qui commande votre appareil. Par conséquent,
si votre marque figure dans les Codes de marque ou les Listes
de codes, essayez d’abord les méthodes Recherche de code de
marque ou Entrée directe de code décrites aux pages 4 et 6.
Méthodes de programmation (suite)
2120
! CO NS EIL
! CO NS EIL
8. Appuyez sur la touche PLAY, puis attendez
cinq secondes pour voir si l’appareil s’éteint. Si
l’appareil ne répond pas, continuez d’appuyez
sur la touche PLAY aux cinq secondes, jusqu’à
ce que l’appareil s’éteigne. À chaque pression
de la touche PLAY, le VOYANT DÉL clignote
et un bloc de 10 codes est acheminé à votre
appareil. Ce processus continue jusqu’à ce que
tous les codes des Listes de codes aient été
explorés. (Si votre appareil ne s’est pas éteint
une fois tous les codes explorés, le VOYANT
DÉL clignote quatre fois, puis s’éteint. La
méthode Recherche de code automatique est
maintenant terminée.)
PLAY
Page 12

Étant donné que cette télécommande commande plus d’un
appareil, vous devez d’abord lui “dire” quel appareil vous
souhaitez commander. Ainsi, si vous souhaitez commander
votre téléviseur, vous devez d’abord appuyez sur la touche TV
pour mettre la télécommande en mode téléviseur.
La télécommande reste dans le mode choisi (comme le mode TV)
jusqu’à ce que vous le changiez. Si la télécommande est en mode
téléviseur, vous devez changer de mode pour commander votre
lecteur DVD, votre magnétoscope, votre récepteur de satellite ou
votre câblosélecteur. Par exemple, si la télécommande est en mode
magnétoscope, et que vous souhaitez éteindre le téléviseur, vous
devez appuyer sur la touche TV avant d’appuyer sur la touche
ON•OFF.
Utilisation de la télécommande
avec vos appareils
2322
Une fois la télécommande programmée pour commander vos
appareils, on recommande d’inscrire les codes pour référence
ultérieure. Cette opération est simple si vous avez utilisé la
méthode Entrée directe de code. Il suffit de trouver les codes
que vous avez programmés et de les inscrire dans les cases
à la page suivante. Si vous avez utilisé l’une des méthodes
de recherche de code pour programmer la télécommande,
vous devrez récupérer le code à quatre chiffres de chaque
appareil. Trouvez le bon code et inscrivez-le pour économiser
du temps si vous devez reprogrammer la télécommande (ex.
: si la programmation est perdue quand vous remplacez les
piles). Si les codes sont inscrits, vous pouvez utiliser la méthode
Entrée directe pour reprogrammer rapidement et facilement la
télécommande pour commander vos appareils.
1. Maintenez enfoncée la touche d’appareil (TV, DVD•VCR,
AUX, SAT•CBL) dont vous souhaitez récupérer le code. Le
VOYANT DÉL s’allume.
2. Maintenez la touche d’appareil enfoncée ainsi que la
touche INFO. Le VOYANT DÉL s’éteint.
3. Après avoir maintenu les deux touches enfoncées pendant
trois secondes, le VOYANT DÉL se rallume.
4. Relâchez les deux touches. Le VOYANT DÉL reste allumé.
5. En commençant par la touche numérique 1, appuyez sur
chaque touche numérique du clavier, dans l’ordre suivant
(1 à 9, puis 0). Le chiffre qui fait clignoter le VOYANT DÉL
est le premier chiffre du code. Inscrivez chacun des chiffres
du code, à mesure que vous les trouvez, dans les cases cidessous pour référence ultérieure.
TV CODE
1
SAT·CBL CODE
5
VCR CODE
AUX
TV VCR DVD SAT·CBL
DVD CODE
Accès et sélection d’éléments de menu
Les appareils avancés modernes utilisent des menus à l’écran
pour aider à naviguer dans toutes les caractéristiques et
fonctions. Cette télécommande ne peut accéder à tous les
systèmes de menus de tous les modèles d’appareil, mais elle
comporte certaines fonctions de menu.
Pour utiliser le système de menus à l’écran d’un appareil,
vous devez d’abord mettre la télécommande en mode Menu.
1. Assurez-vous que vos appareils sont allumés et que votre
téléviseur est réglé à l’entrée de l’appareil. (Utilisez la
touche INPUT pour parcourir les sources vidéo en mode
TV.)
2. Appuyez sur la touche d’appareil duquel vous souhaitez
accéder au menu.
3. Appuyez sur la touche MENU. Le VOYANT DÉL clignote
pour indiquer que vous êtes en mode Menu.
Menus à l’écran
Récupération de code
Remarque : Tous les codes de téléviseur commencent par le
chiffre 1 ; tous les codes de magnétoscope commencent par
le chiffre 2 ; tous les codes de lecteur DVD commencent par
le chiffre 3, et tous les codes de récepteur de satellite et de
câblosélecteur commencent par le chiffre 5.
6. Répétez l’étape 5 jusqu’à ce que vous ayez récupéré les
quatre chiffres du code.
7. Une fois le quatrième chiffre récupéré, le VOYANT DÉL
clignote brièvement, puis s’éteint.
8. Pour quitter le mode Récupération de code, appuyez sur la
touche GO BACK à tout moment.
9. Si vous appuyez sur une touche invalide pendant la
récupération de code, la télécommande ne répond pas.
Si vous n’appuyez pas sur une touche de récupération
de code valide (TV, DVD•VCR, SAT•CBL, AUX, INFO,
GO BACK), la fonction Récupération de code dépasse
son temps imparti après 15 secondes. Le VOYANT DÉL
clignote quatre fois, puis s’éteint.
9. Lorsque l’appareil s’éteint, vous savez que le
bon code se trouve dans le bloc de 10 codes
acheminé. Appuyez sur la touche REVERSE.
Attendez deux secondes pour voir si votre
appareil se rallume. Si votre appareil ne
répond pas, continuez d’appuyez sur la touche
REVERSE aux deux secondes, jusqu’à ce qu’il
s’éteigne. Vous isolerez ainsi le code exact dans
le dernier bloc de codes acheminé. À chaque
pression de la touche REVERSE, le VOYANT
DÉL clignote.
Remarque: Si vous appuyez accidentellement
sur la touche REVERSE après que l’appareil a
répondu, appuyez sur la touche FORWARD.
Attendez ensuite deux secondes pour voir si votre
appareil s’éteint de nouveau.
10. Quand votre appareil s’éteint, vous avez
trouvé le bon code. Vous devez sauvegarder
le nouveau code en appuyant sur la touche
STOP. Le VOYANT DÉL s’éteint. Vous
devez appuyer sur la touche STOP pour
sauvegarder le code, sans quoi le code exact
ne sera pas mémorisé !
11. Testez l’appareil pour confirmer que le bon
code est programmé à la touche d’appareil
pour assurer une fonctionnalité maximale.
Essayez de commander diverses fonctions de
l’appareil avec la télécommande. Si certaines
des fonctions de vos appareils ne fonctionnent
pas, essayez différents codes de la liste jusqu’à
ce que vous trouviez le code permettant à
la télécommande de commander la plupart
des fonctions de votre appareil. Voir la
section “Tester le code pour la fonctionnalité
maximale” à la page 7 pour en savoir plus.
REVERSE
FORWARD
STOP
Page 13

25
2524
Dépannage
Problème : La télécommande ne commande pas votre appareil.
• Vous devez mettre la télécommande dans le bon mode en
appuyant sur la touche d’appareil correspondante (TV,
DVD•VCR, AUX, SAT•CBL) afin que la télécommande
sache quel appareil commander.
• Éliminez les obstacles entre la télécommande et l’appareil.
Pointez bien la télécommande en direction du capteur IR
de l’appareil.
• Assurez-vous que les piles sont neuves et correctement
installées. Remplacez les piles par deux piles alcalines AA
neuves, au besoin. Il peut être nécessaire de reprogrammer
la télécommande.
• Rétablissez la télécommande. Retirez les piles, puis
maintenez la touche numérique 1 de la télécommande
enfoncée pendant plusieurs secondes pour rétablir le
microprocesseur à l’intérieur de la télécommande. Relâchez
la touche numérique 1, réinstallez les piles et appuyez
sur la touche ON•OFF. Si le VOYANT DÉL s’allume,
reprogrammez la télécommande et essayez de nouveau.
S’il ne s’allume pas, remplacez les piles par des
piles neuves.
Problème : Impossible de programmer la télécommande pour
commander votre appareil.
• Si vous testez la télécommande après avoir entré le code,
il se peut que vous soyez trop éloigné de l’appareil ou
que l’angle soit mauvais. Cette télécommande utilise la
technologie IR (infrarouge) pour communiquer avec les
appareils. La télécommande envoie le code et le capteur
IR de l’appareil lit le code. Par conséquent, la voie entre
la télécommande et le capteur IR de l’appareil doit être
libre. Rapprochez-vous et pointez bien la télécommande
en direction de l’appareil (magnétoscope ou lecteur
DVD quand vous programmez la touche VCR•DVD ; TV
quand vous programmez la touche TV ; câblosélecteur ou
récepteur de satellite quand vous programmez la touche
SAT•CBL).
• Si vous avez utilisé les méthodes de programmation
Entrée directe pour entrer les codes de votre marque et
que l’appareil ne fonctionne toujours pas correctement,
essayez l’une des méthodes de recherche de code.
• Pour commander les appareils combinés télé/
magnétoscope ou télé/lecteur DVD, vous devez
programmer la touche TV et la touche DVD•VCR. Une
fois correctement programmée, la touche TV commande
les fonctions du téléviseur à votre appareil, et la touche
DVD•VCR commande les fonctions
du magnétoscope ou du lecteur DVD. Les listes de
codes comprennent une section spéciale sur les appareils
combinés. On recommande d’essayer les codes dans
cette section avant d’utiliser la méthode Entrée directe
de code pour les touches TV et DVD•VCR. Si cette
méthode ne fonctionne pas, suivez les étapes normales de
programmation pour les touches TV et VCR•DVD.
• Assurez-vous que les piles sont neuves et correctement
installées.
Problème : La télécommande n’exécute pas correctement les
commandes.
• Vous devez mettre la télécommande dans le bon mode en
appuyant sur la touche d’appareil correspondante (TV,
DVD•VCR, AUX, SAT•CBL) afin que la télécommande
sache quel appareil commander.
• Assurez-vous que l’appareil est “prêt” (ex. : lecteur DVD
avec disque en place ; magnétoscope avec cassette en
place, etc.).
• Vous avez peut-être appuyé sur une touche invalide pour
le mode de la télécommande.
4. Utilisez les touches VOL+/- et/ou CH+/- pour naviguer
dans le système de menus à l’écran.
5. Pour choisir un élément en surbrillance dans le menu à
l’écran, appuyez sur la touche MENU ou OK.
Si la télécommande ne répond pas, vérifiez si le
VOYANT DÉL clignote toujours. Note : Le temps imparti est
de 20 secondes. Si ce délai est dépassé, appuyez simplement de
nouveau sur la touche MENU, puis ressayez votre choix.
Quitter un mode Menu
La télécommande quitte automatiquement le mode Menu
après 20-secondes d’inactivité (aucune touche enfoncée). À ce
moment, la télécommande efface le menu affiché de l’écran
du téléviseur.
Pour quitter le mode Menu vous-même, appuyez sur la touche
d’appareil correspondante de la télécommande (TV, DVD•VCR,
SAT•CBL). Le VOYANT DÉL s’éteint.
Minuterie-sommeil
(certains modèles seulement)
Cette fonction éteint automatiquement le téléviseur à
l’heure choisie, de 1 à 99 minutes. La minuterie-sommeil ne
fonctionne que si vous avez trouvé un code qui commande
votre téléviseur. Le mécanisme de chronométrage de la
minuterie-sommeil est intégré à la télécommande universelle.
Suivez ces étapes pour programmer la minuterie-sommeil.
Programmation de la minuterie-sommeil
1. Appuyez sur la touche TV.
2. Maintenez la touche SLEEP enfoncée pendant trois
secondes. Le VOYANT DÉL s’allume.
3. Relâchez la touche SLEEP.
4. À l’aide des touches numériques, entrez le temps désiré
en minutes (de 1 à 99 minutes). Pour programmer la
minuterie à un nombre inférieur à 10 minutes, appuyez
d’abord sur la touche 0, puis sur le chiffre désiré (c.-à-d. 05
pour cinq minutes). Le VOYANT DÉL clignote à chaque
enfoncement de touche.
5. Une fois le deuxième chiffre entré, le VOYANT DÉL
s’éteint.
Tout enfoncement de touche autre que les touches
numériques est ignoré. Si vous n’accédez pas à la minuteriesommeil dans les 10 secondes suivant l’enfoncement de la
touche SLEEP, vous devez recommencer à l’étape 1. Le
VOYANT DÉL clignote quatre fois et s’éteint pour indiquer que
votre tentative de programmer la minuterie-sommeil a échoué.
6. La minuterie-sommeil est maintenant programmée.
7. Laissez la télécommande pointée en direction du
téléviseur. Une fois la minuterie-sommeil programmée,
vous pouvez continuer d’utiliser la télécommander sans
nuire à la minuterie-sommeil. Toutefois, étant que le
mécanisme de chronométrage de la minuterie-sommeil
est intégré à la télécommande, cette dernière doit être
en mode téléviseur et être pointée en direction du
téléviseur pour activer la minuterie-sommeil.
Annulation de la minuterie-sommeil
La programmation de la minuterie-sommeil est annulée et remise à
zéro quand vous appuyez sur la touche ON•OFF.
! CO NS EIL
! CO NS EIL
Page 14

26
27
• Si vous tentez d’allumer un appareil de marque RCA,
GE ou PROSCAN, appuyez sur la touche d’appareil (TV,
DVD•VCR, SAT•CBL) au lieu de la touche ON•OFF.
• Si vous tentez de changer les canaux, appuyez sur la
touche OK après avoir entré le numéro de canal, car
certains modèles et marques exigent cette façon de
procéder.
• Il se peut qu’un code programmé ne
permette de commander que certaines des fonctions
de votre appareil (ex. : allume et éteint seulement un
appareil). Consultez la section “Tester le code pour la
fonctionnalité maximale” pour en savoir plus.
Problème : Le VOYANT DÉL ne s’allume pas quand vous
appuyez sur une touche.
• Vous devez mettre la télécommande dans le bon mode en
appuyant sur la touche d’appareil correspondante (TV,
DVD•VCR, SAT•CBL) afin que la télécommande sache
quel appareil commander.
• Vous avez peut-être appuyé sur une touche invalide pour
le mode de la télécommande.
• Assurez-vous que les piles sont neuves et correctement
installées. Remplacez les piles par deux piles alcalines
AA neuves, au besoin. Il peut être nécessaire de
reprogrammer la télécommande.
Problème : Le magnétoscope n’enregistre pas.
• Assurez-vous que l’appareil est en mode magnétoscope.
• Assurez-vous qu’il y a une cassette dans le
magnétoscope.
• Assurez-vous que la cassette n’est pas protégée contre
l’écriture. Si la languette de sécurité est brisée, la
cassette est protégée contre l’écriture et vous ne pouvez
enregistrer sur cette cassette.
Problème : La télécommande ne change pas les canaux de
votre appareil.
• Vous devez mettre la télécommande dans le bon mode en
appuyant sur la touche d’appareil correspondante (TV,
DVD•VCR, SAT•CBL) afin que la télécommande sache
quel appareil commander.
• Appuyez sur la touche OK après avoir entré un numéro
du canal.
• Éliminez les obstacles entre la télécommande et l’appareil.
Pointez bien la télécommande en direction du capteur IR
de l’appareil.
Problème : Le menu de l’appareil n’apparaît pas à l’écran
du téléviseur.
• Assurez-vous que votre appareil est correctement
raccordé au téléviseur et que la bonne entrée a été
sélectionnée. (Voir les Guides de l’utilisateur de vos
appareils pour connaître les méthodes de raccordement
appropriées.)
• Vous devez mettre la télécommande dans le bon mode en
appuyant sur la touche d’appareil correspondante (TV,
DVD•VCR, SAT•CBL) afin que la télécommande sache
quel appareil commander.
• Toutes les marques ne permettent pas l’accès aux menus.
Dans un tel cas, vous devez utiliser la télécommande
originale pour accéder aux fonctions de menu de ces
appareils.
Pour en savoir plus, visitez le site www.rca.com
05-16-2005
Thomson Restricted
Scale 100%
Adobe Illustrator
ON•OFF
SA
T•CBL
AUX
TV
DVD
•VCR
0
GO BACK INPUT
2
4
5
6
7
8
9
3
1
SLEEP
INFO
OKMENU
PLA
Y
REVERSE
FOR
WARD
STOP
PAUSE
RECORD
VOL
+
VOL
-
M
U
T
E
M
U
T
E
RCR 430S
4 Device
CH +
CH -
Indice
Diagrama del Producto . . . . . . . . . . . . . . . . . . . . . . . . . . . . . . . 27
Introducción. . . . . . . . . . . . . . . . . . . . . . . . . . . . . . . . . . . . . . . . . 28
Instalación e Información sobre las Baterías. . . . . . . . . . . . . . 28
Ahorrador de Baterías . . . . . . . . . . . . . . . . . . . . . . . . . . . . . . . . 28
Indicador Luminoso LED . . . . . . . . . . . . . . . . . . . . . . . . . . . . . 28
Programación del Control Remoto . . . . . . . . . . . . . . . . . . . . . 29
Métodos de Programación. . . . . . . . . . . . . . . . . . . . . . . . . . . . . 29
Búsqueda e Inscripción de Códigos por Marcas. . . . . 30
Entrada Directa del Código . . . . . . . . . . . . . . . . . . . . . . 31
Búsqueda e Inscripción Manual de Códigos . . . . . . . 31
Búsqueda e Inscripción Automática de Códigos . . . . 33
Recuperación de Códigos . . . . . . . . . . . . . . . . . . . . . . . . . . . . . 34
Uso del Control Remoto para Controlar sus Componentes 35
Menús en la Pantalla . . . . . . . . . . . . . . . . . . . . . . . . . . . . . . . . . 36
Acceso y Selección de Puntos del Menú. . . . . . . . . . . . 36
Para Salir de la Modalidad de Menú . . . . . . . . . . . . . . 36
Temporizador para Dormir . . . . . . . . . . . . . . . . . . . . . . . . . . . . 36
Programación del Temporizador para Dormir . . . . . . 36
Cancelación del Temporizador para Dormir . . . . . . . . 37
Solución de Problemas . . . . . . . . . . . . . . . . . . . . . . . . . . . . . . . . 37
Teclas de los
Componentes
(
TV, DVD•VCR
,
SAT•CBL
)
Tecla para canal y
volumen (
CH, VOL
)
Estas teclas tienen
una función doble.
Actúan como teclas
de navegación:
flechas hacia arriba,
abajo, derecha e
izquierda (UP, DN, RT
LT) en los sistemas de
menú.
Tecla de Entrada
(
INPUT
)- En algunas
unidades de control
remoto, esta tecla se
llama tecla TV/ VCR.
Alterna entre todos
los aparatos que
estén conectados a
su televisor.
Tecla dedicada al
menú (
“MENU”
)
de discos para
DVDs, recibidores
de satélite y algunos
televisores.
Tecla para dormir
(
SLEEP
)- Le
permite programar
una hora para
que su televisor
se apague
automáticame
Tecla de información
(“INFO”)
– Muestra
información acerca
del componente que
usted está controlando
actualmente
El modelo mismo puede variar con respecto al modelo mostrado en el dibujo.
Teclas de transporte: reversa,
reproducir, adelantar, detener
y pausa (
REVERSE, PLAY,
FORWARD, RECORD,
STOP
and
PAUSE
)
INDICADOR
LUMINOSO LED
Page 15

28
29
Control Remoto Universal
Felicitaciones por su compra de este control remoto universal.
Este control remoto universal hace que el manejar varios
controles sea una cosa del pasado. Usted puede programar su
control remoto universal RCA para operar la mayoría de los
modelos de la mayor parte de marcas de componentes que
hayan sido fabricados después de 1990, controlados a base
de un control infrarojo (Vea la Lista de Códigos para una lista
completa de marcas). El control remoto universal es fácil de usar,
fácil de programar y le ofrece control al alcance de sus manos.
El control universal ya está programado
para operar la mayoría de televisores, tocadiscos de DVD
y recibidores de señal de satélite RCA, GE y PROSCAN.
Únicamente oprima la tecla correspondiente (DVD•VCR
para tocadiscos de DVD, TV para televisores, SAT•CBL para
recibidor de señal de satélite.
Instalación e Información sobre
las Baterías
Su control remoto universal requiere 2 baterías alcalinas AA
(las baterías pueden o no estar incluidas, dependiendo del
modelo). Para instalar las baterías:
1. Quite la cubierta del compartimiento de
las baterías.
2. Introduzca las baterías, haciendo que
coincida la batería con los diagramas
(+) o (-) dentro del compartimiento.
3. Oprima y empuje la cubierta del
compartimiento hasta que entre en su
sitio.
Nota: Puede ser necesario cambiar las
baterías al volver a programar.
Su control remoto universal le ahorra corriente en las batería
apagándose automáticamente si cualquier tecla es oprimida
durante más de 60 segundos. Esto le ahorra baterías en caso
de que su control remoto quede atorado en algún sitio donde
las teclas permanezcan oprimidas, como por ejemplo, entre los
cojines del sofá.
Ahorrador de Baterías
El indicador luminoso (LED INDICATOR) se iluminará para
indicar diferentes funciones. Cuando se oprime una tecla válida,
el indicador luminoso permanece iluminado en tanto y la tecla
permanezca oprimida y se apaga cuando la tecla se suelta. El
indicador luminoso también parpadea en la Modalidad de
Programación o de Menú para indicar estas funciones.
Indicador Luminoso LED
! CONSEJO:
1. Oprima y sostenga la tecla AUX. El indicador luminoso
LED se ilumina.
2. Mientras oprime la tecla AUX, oprima y suelte la tecla numérica
en el teclado correspondiente al componente que usted quiera
controlar. (Vea la tabla abajo). El indicador luminoso se apaga.
3. Suelte la tecla AUX. El indicador luminoso parpadea cuatro
veces y después se apaga. La tecla AUX está ahora lista
para controlar cualquier componente que usted seleccione.
4. Después, programe la tecla AUX para controlar la marca
de aparato que usted tiene. Acuérdese de consultar la lista
de códigos de los componentes. Por ejemplo, si usted ha
programado la tecla AUX para controlar un DVD adicional,
consulte la lista de códigos de DVDs. Programe la tecla
para controlar su componente con la Lista de Códigos adjunta.
Programación de la Tecla AUX para Controlar
un Componente que no sea una VCR
La tecla AUX automáticamente control la VCR. Si usted
quiere que la tecla AUX controle otro componente (por
ejemplo, un televisor adicional, una DVD, caja de satélite o
cable), es necesario volver a programar la tecla AUX.
Búsqueda e Inscripción de
Códigos por Marcas
Si su marca está enlistada en la Lista de Códigos de Marcas
(Vea la Lista de Códigos Adjunta), usted podrá programar
su control remoto universal buscando únicamente en la
Lista de Códigos de ese fabricante específico. La Búsqueda e
Inscripción de Códigos por Marcas puede ser el método más
rápido para programar si su componente (Televisor, VCR y/ o
DVD, recibidor de satélite y/ o caja de cable) es de una de las
marcas en la lista.
Programación del Control Remoto
Su control remoto universal puede operar una variedad de
marcas de componentes. Para que su control remoto pueda
controlar sus componentes, usted necesita operar el control
remoto con los códigos que corresponden a los componentes
(Vea la Lista de Códigos adjunta). Estos códigos le permiten
a su control comunicarse con sus componentes. Cada marca
y cada componente tiene su propio “idioma,” y al programa
los códigos correctos en su control remoto, usted le pide al
control “hablar el mismo idioma” que su componente.
Hay cuatro métodos que usted puede usar para programar su
control remoto para operar sus componentes: Búsqueda e Inscripción
de Códigos por Marcas, Entrada Directa de Código, Búsqueda e
Inscripción Manual de Códigos y Búsqueda e Inscripción Automática
de Códigos. La mayoría de los componentes pueden ser programados
en uno de estos métodos. Inténtelos en el mismo orden.
Para poder controlar aparatos combinados como TV/ VCRs o TV/
DVDs, usted debe programar las teclas del componente individual
correspondiente para controlar cada parte del aparato por separado.
Una vez programada exitosamente, la tecla TV controla las funciones
del televisor en su aparato y la tecla DVD•VCR y / o AUX controla
las funciones del DVD o VCR respectivamente. Hay una sección
específica en la Lista de Códigos para aparatos combinados. Debe
intentar usar primero los códigos en esta sección, utilizando la
modalidad de Entrada Directa de Código en las teclas de TV y
DVD• VCR. Si esto no resulta, siga los métodos de programación
normales con las teclas de TV o DVD•VCR o AUX
Métodos de Programación
Additional TV press 1
VCR press 2
Additional DVD press 3
Additional satellite or cable box press 5
AUX KEY CONTROLS:
Page 16

30
31
Para salir de la Búsqueda de Código
por Marca sin salvar en ningún momento, oprima
y suelte la tecla GO BACK.
1. Manualmente, encienda el componente que usted quiera que
el control remoto controle (TV; VCR, DVD, recibidor de
satélite o caja de cable).
2. Localice los Códigos de Marca en la Lista de Códigos y
manténgala a la mano.
Nota:
Si usted oprime una tecla inválida durante la Búsqueda de Códigos
por Marca, el control remoto no responde y la búsqueda se suspende
después de dos minutos. Cuando la búsqueda se suspende, el indicador
luminoso
LED
parpadea cuatro veces y se apaga. El código programado
al último bajo la tecla de ese componente es el código que se retiene.
3. Si usted está programando el control para manejar su
televisor, el recibidor de satélite o la caja de cable, vaya
directamente al paso 5.
4. Para programar el control para manejar una VCR o
DVD. La tecla
VCR•DVD puede controlar únicamente
un componente, ya sea su VCR o su DVD. Para programar
el control para manejar la VCR o DVD, usted debe primero
poner el control remoto en la modalidad adecuada para
programación. Siga las instrucciones a continuación antes
de proceder al paso 5.
a. Oprima y sostenga la tecla
DVD•VCR
. El
indicador luminoso se ilumina.
b. Mientras sostiene la tecla de
DVD•VCR, oprima y
suelte la tecla del número 2 en el teclado para
controlar una VCR o el 3 para controlar un DVD. El
indicador luminoso se apaga.
c. Suelte la tecla DVD•VCR
. El indicador luminoso
parpadea cuatro veces y se apaga. Su control remoto
está ahora en Modalidad para programar la VCR o
DVD, dependiendo de su selección. Proceda al paso 5.
5. Oprima y sostenga la tecla del componente (
TV, DVD•
VCR, SAT•CBL
) que usted desee programar. El indicador
luminoso se enciende y permacenece iluminado.
6. Mientras se mantiene oprimida la tecla del componente,
oprima y sostemga la tecla de encendido/ apagado
(ON•OFF). El indicador luminoso se apaga.
7. Después de oprimir y sostener ambas teclas durante tres
segundos, el indicador luminoso se vuelve a encender..
8. Suelte ambas teclas. El indicador luminoso permanece
encendido.
9. Refiérase a los Códigos de Marcas en la Lista de Códigos
adjunta. Oprima y suelte la tecla del código de marca
adecuada, utilizando las teclas numéricas en el teclado. El
indicador luminoso parpadea una vez.
Durante la programación de cada tecla, asegúrese
de mantener el control remoto apuntando hacia el sensor de IR
del componente que usted está programando actualmente en el
control remoto.
10 Oprima y suelte la tecla de encendido/ apagado (
ON•OFF
)
repetidamente hasta que su componente se apague. Espere
4 segundos antes de oprimir cada vez. Cada vez que usted
oprime la tecla de encendido/ apagado (
ON•OFF
), el
indicador luminoso parpadea y el siguiente código es
enviado. La Búsqueda de Código por Marca empieza con
el primer código en la lista de la marca seleccionada para ese
componente y forma un ciclo a través de todos los códigos
para esa marca. Si su componente se apaga, usted ha
encontrado el código correcto. (Si se completa el ciclo y el
indicador luminoso parpadea cuatro veces y se apaga, quiere
decir que todos los códigos en la lista de la marca
seleccionada se han intentado. El aparato sale de la
modalidad de Búsqueda por Marca).
11.Una vez que usted ha encontrado el código correcto,
almacene el código oprimiendo y soltando la tecla
“STOP.”
El indicador luminoso se apaga.
¡Usted debe oprimir el botón
“STOP” para salvar el código correcto o no será amacenado!
12. Para confirmar que la tecla del componente ha sido programada
con el código correcto para una máxima funcionalidad, pruebe
el componente. Intente controlar una variedad de funciones con
el control remoto. Si algunas de las funciones en su componente
no funcionan, intente programar el control remoto con el
método de entrada directa de código.
GO BACK
!
CONSEJO:
! CONSEJO:
Entrada Directa del Código
Para programar que su control remoto universal controle su
componente utilizando el Método de Entrada Directa del
Código, siga los pasos a continuación:
1 Manualmente encienda el componente que usted quiera
controlar a control remoto.
2. Localice la Lista de Códigos. Encuentre la lista para el
componente que usted quiera controlar. Encuentre la
marca de su componente. Usted verá una lista de códigos
de cuatro dígitos para cada marca. Si su marca no aparece
en la lista, utilice uno de los métodos de búsqueda para
programar el control remoto. (Refiérase a las páginas 6 y 7
para los métodos de búsqueda Manual y Automática).
3. Oprima y sostenga la tecla del componente (TV, DVD•VCR,
AUX, SAT•CBL) que usted quiera programar. El indicador
luminoso se ilumina y permanece iluminado. Si usted suelta
la tecla del componente en cualquier momento durante el
procedimiento de Entrada Directa de Código, el indicador
luminoso parpadea cuatro veces, y el proceso se da por
terminado.
4. While holding down the component key, consult the Code
Lists for the four-digit code that corresponds to your
component’s brand and use the number keys (0-9) on the
keypad to enter it. While you are pressing the numbers, the
LED INDICATO
R
turns off.
5. Después de que se inscribe el cuarto número, el indicador
luminoso se enciende. En este momento, suelte la tecla del
componente. Si el indicador luminoso se apaga, usted ha
inscrito un código válido y ha seguido el procedimiento
correcto para la Entrada Directa del Código.
Si usted ha inscrito un número de código que no está en
la Lista de Códigos o usted no sigue todos los pasos para
la Entrada Directa del Código, el indicador luminoso
parpadea cuatro veces cuando la tecla del componente se
suelta. Esto es una indicación de que ha ocurrido un error
de programación. En este caso, repita el proceso de Entrada
Directa del Código desde el paso 3.
A través del proceso de programación de cada
tecla, mantenga el control remoto apuntando al sensor IR del
componente que usted está programando actualmente para
controlar con el control remoto.
6. Para confirmar que la tecla del componente ha sido
programada con el código correcto para una máxima
funcionalidad, pruebe el componente. Intente controlar una
variedad de funciones con el control remoto. Si algunas
de las funciones en su componente no funcionan, vuelva
a programar el control con un código diferente de la lista
hasta que usted encuentre el código que le permita al control
remoto controlar la mayoría de las funciones del componente.
Diferentes códigos pueden proveer diferentes niveles de
funcionalidad.
7. Acuérdese de inscribir el código para referencia futura en la
caja provista en la sección de Recuperación Del Código de este
manual.
Búsqueda y Entrada Manual de Códigos
Si la marca de su componente no está enlistada en la Lista de
Códigos, o si usted ha intentado todos los códigos para su
marca y el control remoto no opera su componente, intente uno
de los métodos de Búsqueda de Códigos que se indican abajo:
Búsqueda de Códigos Manual o Automática. Ambos métodos de
Búsqueda de Códigos recorren todos los códigos en la Lista de
Códigos en caso de que el código de su componente haya sido
enlistado bajo otra marca.
Los métodos de Búsqueda Manual o Automática pueden tomar
mucho tiempo porque el control remoto busca a través de
todos los códigos en su memoria. Por lo tanto, si su marca está
enlistada en los Códigos de Marca o en las Listas de Códigos,
primero intente la Búsqueda de Códigos por Marca o el Método
de Entrada Directa de Códigos descrito en las páginas 4 y 5.
Para salir sin salvar en ningún punto de la
Búsqueda Manual de Códigos, oprima y suelte la tecla “GO BACK.”
Métodos de Programación (continuación)
! CONSEJO:
! CONSEJO:
Page 17

32
33
1. Manualmente encienda el componente que usted quiera
controlar a control remoto.
Nota: Si usted oprime una tecla inválida durante la Búsqueda de
Códigos por Marca, el control remoto no responde y la búsqueda se
suspende después de dos minutos. Cuando la búsqueda se suspende,
el indicador luminoso LED parpadea cuatro veces y se apaga. El
código programado al último bajo la tecla de ese componente es el
código quie se retiene.
2. Si usted está programando el control para manejar su televisor, el
recibidor de satélite o la caja de cable, vaya directamente al paso 4.
3. Para programar el control para manejar una VCR o DVD. La
tecla VCR•DVD puede controlar únicamente un componente,
ya sea su VCR o su DVD. Para programar el control para
manejar la VCR o DVD, usted debe primero poner el control
remoto en la modalidad adecuada para programación. Siga las
instrucciones a continuación antes de proceder al paso 4.
a. Oprima y sostenga la tecla DVD•VCR. El indicador
luminoso se ilumina.
b. Mientras sostiene oprimida la tecla de DVD•VCR,
oprima y suelte la tecla del número 2 en el teclado
para controlar una VCR o el 3 para controlar un DVD.
El indicador luminoso se apaga.
c. Suelte la tecla DVD•VCR. El indicador luminoso
parpadea cuatro veces y se apaga. Su control remoto
está ahora en Modalidad para Programar la VCR o
DVD, dependiendo de su selección. Proceda al paso 4.
4. Oprima y sostenga la tecla del componente (TV, DVD•VCR,
AUX, SAT•CBL) que usted desee programar. El indicador
luminoso se enciende y permacenece iluminado.
5. Mientras se mantiene oprimida la tecla del componente,
oprima y sostemga la tecla de encendido/ apagado
(ON•OFF). El indicador luminoso se apaga.
6. Después de oprimir y sostener ambas teclas durante tres
segundos, el indicador luminoso se vuelve a encender.
7. Suelte ambas teclas. El indicador luminoso permanece
encendido.
Durante la programación de cada tecla,
asegúrese de mantener el control remoto apuntando hacia el
sensor de IR del componente que usted está programando
actualmente en el control remoto.
8. Oprima y suelte la tecla de encendido/ apagado (ON•OFF)
repetidamente hasta que su componente se apague. Espere
4 segundos antes de oprimir cada vez. Cada vez que
usted oprime la tecla de encendido/ apagado (ON•OFF),
el indicador luminoso parpadea y el siguiente código es
enviado. Este proceso continúa hasta que que todos los
códigos en la Lista de Códigos han sido revisados. Si su
componente se apaga, usted ha encontrado el código
correcto. (Si se complete el ciclo y el indicador luminoso
parpadea cuatro veces y se apaga, quiere decir que todos los
códigos en la lista de la marca seleccionada se han intentado.
El aparato sale de la modalidad de Búsqueda por Marca).
9. Una vez que su componente se apaga, usted ha encontrado
el código correcto, debe almacenar el código nuevo
oprimiendo y soltando la tecla “STOP.” El indicador luminoso
se apaga. ¡Usted debe oprimir el botón “STOP” para salvar el
código correcto o no será amacenado!
Para Comprobar que el Código le
Ofrezca Máxima Funcionalidad
Para confirmar que la tecla del componente está programada con
el código que ofrece máxima funcionalidad, es necesario probar
el componente. Si algunas de las funciones en su componente no
funcionan, intente diferentes códigos en la lista hasta hasta que
usted encuentre el código que le permita al control remoto controlar
la mayoría de las funciones de su componente. Diferentes códigos
le ofrecen diferentes niveles de funcionalidad. Siga estos pasos para
comprobar que usted está recibiendo máxima funcionalidad:
1. Una vez que el código ha sido almacenado, utilice el control
remoto para intentar controlar una variedad de funciones del
componente. Si el código almacenado controla la mayoría de
las funciones del componente, se ha completado el proceso de
programación. Si el código almacenado no le ofrece máxima
funcionalidad, intente otro código.
! CONSEJO:
2. En ese caso, repita los pasos del Método de Búsqueda y
Entrada Manual de Códigos explicado en el paso 1. Cuando
el componente se apaga por primera vez, no oprima la tecla
“STOP,” porque eso haría que se almacenara el código. En
lugar de eso, espere 4 segundos, con el aparato apagado,
continúe oprimiendo la tecla “ON•OFF” repetidamente hasta
que el aparato vuelva a encenderse. Una vez que el aparato
se vuelve a encender, usted ha encontrado otro código que
opera el componente. Oprima la tecla “STOP.”
3. Vuelva a comprobar la funcionalidad otra vez intentando
controlar una variedad de funciones del componente. Si el
código almacenado controla la mayoría de las funciones del
componente, se ha completado el proceso de programación.
Si el código almacenado no le ofrece máxima funcionalidad,
usted querrá intentar otro código.
4. Repita el Método de Búsqueda y Entrada Manual de Código
desde el paso 1. Cada vez que un código enciende o apaga
un componente, usted ha encontrado un código que opera el
control remoto y necesita ser probado para asegurar máxima
funcionalidad. Continúe recorriendo las listas de códigos, a
través de los códigos que usted ya ha intentado, hasta que
encuentre alguno que le ofrezca la máxima funcionalidad.
Búsqueda e Inscripción
Automática de Códigos
El Método de Búsqueda e Inscripción Automática de Códigos
le permite al control remoto buscar automáticamente a través
de todos los Códigos en la Lista de Códigos y encontrar aquel
que opere su componente.
Nota: El método de Búsqueda e Inscripción Automática de Códigos
puede tomar mucho tiempo porque el control remoto busca a través
de todos los códigos en su memoria para encontrar el código que
pueda operar su componente. Por lo tanto, si su marca está enlistada
en los Códigos de Marca o en las Listas de Códigos, primero intente
la Búsqueda de Códigos por Marca o el Método de Entrada Directa de
Códigos explicado en las páginas 4 y 6.
Para de la Auto Búsqueda de Códigos salir sin
salvar en ningún punto, oprima y suelte la tecla “GO BACK.”
1. Manualmente encienda el componente que usted quiera
controlar con el control remoto.
Nota: Si usted oprime una tecla inválida durante la Búsqueda de
Códigos Automática, el control remoto no responde. Si usted no
oprime una tecla válida de Búsqueda de Códigos Automática (TV,
DVD•VCR, SAT•CBL, AUX, ON•OFF, GO BACK, PLAY,
REVERSE, FORWARD, STOP). la búsqueda se suspende
después de dos minutos. Cuando la búsqueda se suspende, el
indicador luminoso LED parpadea cuatro veces y se apaga. El código
programado al último bajo la tecla de ese componente es el código
quie se retiene.
2. Si usted está programando el control para manejar su
televisor, el recibidor de satélite o la caja de cable, vaya
directamente al paso 4.
3. Para programar el control para manejar una VCR o DVD: La
tecla VCR•DVD puede controlar únicamente un componente,
ya sea su VCR o su DVD. Para programar el control para
manejar la VCR o DVD, usted debe primero poner el control
remoto en la modalidad adecuada para programación.
Siga las instrucciones a continuación antes de proceder al paso 4.
a. Oprima y sostenga la tecla DVD•VCR. El
indicadorluminoso se ilumina.
b. Mientras sostiene la tecla de DVD•VCR, oprima y
suelte la tecla del número 2 en el teclado para
controlar una VCR o el 3 para controlar un DVD.
El indicador luminoso se apaga.
c. Suelte la tecla DVD•VCR. El indicador luminoso
parpadea cuatro veces y se apaga. Su control remoto
está ahora en Modalidad para programar la VCR o
DVD, dependiendo de su selección. Proceda al paso 4.
4. Oprima y sostenga la tecla del componente (TV, DVD•VCR,
AUX, SAT•CBL) que usted desee programar. El indicador
luminoso se enciende y permacenece iluminado.
Métodos de Programación continuación)
! CONSEJO:
Page 18

34
35
5. Mientras se mantiene oprimida la tecla del componente,
oprima y sostenga la tecla de encendido/ apagado
(ON•OFF). El indicador luminoso se apaga.
6. Después de oprimir y sostener ambas teclas durante tres
segundos, el indicador luminoso se vuelve a encender.
7. Suelte ambas teclas. El indicador luminoso permanece encendido.
Durante la programación de cada tecla,
asegúrese de mantener el control remoto apuntando hacia el
sensor de IR del componente que usted está programando
actualmente en el control remoto.
8. Oprima y suelte la tecla para reproducir
(PLAY) y espere cinco segundos para ver si su
componente se apaga. Si su componente no
responde, continúe oprimiendo la tecla PLAY
cada cinco segundos hasta que su componente
se apague. Cada vez que usted oprime la
tecla PLAY, el indicador luminoso parpadea
y un bloque de 10 códigos son enviados a su
componente. Este proceso continua hasta que
que todos los códigos en la Lista de Códigos han
sido revisados. (Si su componente no se apaga
después de haber revisado todos los códigos,
el indicador luminoso parpadea cuatro veces
y se apaga. El aparato sale de la modalidad de
Búsqueda por Marca Automática).
9. Cuando su componente se apaga, usted sabe
que el código correcto está en el último bloque
de 10 códigos enviados. Oprima y suelte
el botón “REVERSE.” Espere dos segunos
para ver si su componente se enciende
nuevamente. Eso ayudará a aislar el código
correcto a partir del último bloque de códigos
enviados. Cada vez que se oprime la tecla
“REVERSE,” el indicador luminoso parpadea.
Nota: Si usted oprime la tecla “REVERSE”
accidentalmente después de que su componente
responde, oprima y suelte el botón para adelantar
(“FORWARD”) y después espere dos segundos
para ver si su componente se apaga nuevamente.
10. Una vez que su componente se apaga, usted
ha encontrado el código correcto. Salve el
código nuevo oprimiendo y soltando la tecla
“STOP.” El indicador luminoso se apaga.
¡Usted debe oprimir la tecla “STOP” para
salvar el código o el código correcto no será
almacenado!
11. Para confirmar que la tecla del componente ha
sido programada con el código correcto para la
mayor funcionalidad, pruebe el componente.
Intente controlar una variedad de funciones del
componente con el control remoto. Si algunas
de las funciones del componente no funcionan,
usted debe intentar diferentes códigos en
la lista hasta que usted encuentre el código
que le permita al control remoto controlar la
mayoría de las funciones de su componente.
Vea la sección titulada “Probar el Código para
una Mayor Funcionalidad” en la página 7 para
mayor información.
PLAY
REVERSE
FORWARD
STOP
Recuperación de Código
Una vez que usted ha programado el control remoto para
controlar sus componentes, anote los códigos para futura
referencia. Si usted utilizó el Método de Entrada Directa de
Códigos, es fácil. Simplemente anote los códigos que usted
programó en las cajas a continuación. Si usted utilizó uno de
los Métods de Búsqueda para programar su control remoto,
usted necesitará recuperar el código de cuatro dígitos de
cada componente. El anotar cada código le ahorrará tiempo
si usted necesita alguna vez volver a programar el control
remoto (por ejemplo, si la programación se pierde al cambiar
las baterías). Si los códigos han sido anotados, usted puede
utilizar el Método de Entrada Directa de Códigos para volver
a programar su control remoto, que es rápido y fácil.
! CONSEJO:
Debido a que el control remoto controla más de un
componente, usted debe “decirle” al control remoto cuál
componente usted desea operar. Esto quiere decir, que si
usted quiere operar su televisor, usted debe primero oprimir
la tecla “TV” para que su control remoto pase a la modalidad
de TV.
El control remoto se queda en la modalidad elegida (como
por ejemplo modalidad de TV) hasta que usted lo cambie.
Si su control remoto está en la modalidad de TV, usted debe
cambiar la modalidad para poder operar su DVD, VCR,
recibidor de satélite o caja de cable. Por ejemplo, si usted
está en modalidad de VCR y usted desea apagar su televisor,
usted debe oprimir la tecla “TV” primero, antes de oprimir la
tecla “ON•OFF.”
Uso del Control Remoto para Controlar
sus Componentes
1. Oprima y sostenga la tecla del componente (TV, DVD•VCR,
AUX, SAT•CBL) cuyo código usted desee recuperar.
El indicador luminoso se enciende.
2. Mientras sostiene oprimida la tecla del componente, oprima
y sostenga la tecla “INFO.” El indicador se apaga.
3. Después de sostener oprimidas las dos teclas durante tres
segundos, el indicador luminoso se vuelve a encender.
4. Suelte ambas teclas. El indicador luminoso permanece
iluminado.
5. Empezando con la tecla del 1, oprima y suelte cada tecla
numérica en el siguiente orden (1-9 y después 0). El número
que hace que el indicador luminoso parpadee, es el primer
número del código. Conforme usted va encontrando cada
número del código, vaya escribiéndolos para futura referencia.
Nota: Todos los código de televisores empiezan con el número 1;
todos los códigos de VCRs empiezan con el número 2; todos los DVDs
empiezan con el número 3; todos los recibidores de satélite y cajas de
cable empiezan con el 5.
6. Repita el paso 5 hasta que usted haya recuperado los cuatro
números del código.
7. Después de que el cuarto número haya sido recuperado, el
indicador luminoso parpadea y se apaga.
8. Para salir de la modalidad de Recuperación de Código en
cualquier momento, oprima y suelte a tecla “GO BACK.”
9. Si usted oprime una tecla inválida durante el proceso de
Recuperación de Códigos, el control remoto no responderá.
Si usted no oprime una tecla válida de Recuperación de
Código (TV, DVD•VCR, SAT•CBL, INFO, GO BACK), esta
modalidad de Recuperación de Códigos se vence después
de 15 segundos. El indicador luminoso parpadea cuatro
veces y después se apaga.
TV CODE
1
SAT·CBL CODE
5
VCR CODE
AUX
TV VCR DVD SAT·CBL
DVD CODE
Page 19

36
37
Acceso y Selección de Funciones en el Menú
Hoy en día los componentes utilizan menús en la pantalla
para ayudarle a navegar por sus características y funciones. A
pesar de que el control remoto no puede tener acceso a cada
sistema de menú de todos los modelos de componentes, ofrece
funcionalidad para operar el menú. Para utilizar el sistema de
menú, usted debe poner el control remoto en modalidad de
Menú.
1. Asegúrese de que sus componentes estén encendidos y su
televisión esté programada a la entrada del componente.
(Utilice la tecla de entrada del componente “INPUT” para
alternar entre las fuentes de video cuando el aparato está en
modalidad de TV).
2. Oprima la tecla del componente a cuyo menú usted quiere
tener acceso.
3. Oprima la tecla MENU. El indicador luminoso parpadea,
indicando que usted está en Modalidad de Menú.
4. Utilice las teclas VOL +/- y CH +/- para navegar por el
sistema de menús en la pantalla.
5. Para hacer una selección en el menú de la pantalla, oprima
la tecla MENU o la tecla OK para seleccionar la función
indicada.
Si el control remoto no responde, verifique que
el indicador luminoso siga parpadeando. Nota: Después de 20
segundos se vence esta función. Si esto sucede, simplemente
oprima otra vez la tecla MENU, y vuelva a hacer su selección.
Para Salir de la Modalidad de Menú
El control remoto automáticamente cancela la modalidad de menú
después de 20 segundos de inactividad (cuando no se oprime
ninguna tecla). En ese momento, el control remoto elimina el menú
mostrado en la pantalla.
Si usted quiere salir dela Modalidad de Menú por usted mismo,
oprima la tecla del componente correspondiente en el control remoto
(TV, DVD•VCR, SAT•CBL). El indicador luminoso se apaga.
Menús en la Pantalla
Temporizador para Volver a Dormir
(Únicamente en Modelos Selectos)
Esta función automáticamente apaga su televisor en un lapso
que usted elije entre 1 y 99 minutos. El Temporizador para
Volver a Dormir únicamente funciona si usted ha encontrado
un código que controla su TV. El mecanismo del Temporizador
para Volver a Dormir está integrado en su control remoto
universal. Para programar el Temporizador para Volver a
Dormir siga los pasos a continuación.
Programación del Temporizador
para Volver a Dormir
1. Oprima y suelte la tecla de TV.
2. Oprima y suelte la tecla “SLEEP” durante tres segundos. El
indicador luminoso se ilumina.
3. Suelte la tecla “SLEEP.”
4. Utilizando las teclas numéricas, inscriba el tiempo deseado
en minutos (desde 1-99 minutos). Para programar el
temporizador a un número menor a 10 minutos, primero
oprima el 0 y después el número deseado (por ejemplo, 05
para cinco minutos). El indicador luminoso parpadea cada
vez que se oprime una tecla.
5. Una vez que el segundo número se ha inscrito, el indicador
luminoso se apaga.
! CONSEJO:
Todas las veces que se oprimen teclas que
no sean las teclas numéricas, serán ignoradas. Si el tiempo
para volver a dormir no se inscribe dentro de los primeros
10 segundos después de oprimir el botón “SLEEP,” usted
debe volver a empezar en el paso 1. El indicador luminoso
parpadea cuatro veces y después se apaga, indicando que el
intento de programar el Temporizador para Volver a Dormir
no ha tenido éxito.
6. El Temporizador para Dormir ha quedado programado.
7. Deje el control remoto apuntado hacia la televisión. Una
vez que el Temporizador para Volver a Dormir ha sido
programado, usted puede seguir usando el control remtoto
sin que el Temporizador para Volver a Dormir sea afectado.
Sin embargo, el control remoto debe volver a ponerse en la
modalidad de TV y sea apuntado a la televisión para activar
la programación de Temporizador para Volver a Dormir.
Cancelación del Temporizador
para Dormir
El Temporizador para Volver a Dormir queda cancelado y
vuelve al cero cuando usted oprime y suelta la tecla ON•OFF.
Solución de Problemas
Problema: El control remoto no opera su componente
• Usted debe poner el control remoto en la modalidad correcta
oprimiendo la tecla del componente correspondiente (TV,
DVD•VCR, AUX, SAT•CBL) para que el control remoto sepa
cuál componente usted quiere operar.
• Quite cualquier obstáculo entre el control remoto y el
componente. Asegúrese de apuntar el control remoto hacia el
sensor IR del componente.
• Asegúrese que las baterías sean nuevas y estén instaladas
adecuadamente. Reemplace las baterías con otras dos baterías
AA nuevas, si fuera necesario. Puede ser necesario volver a
programar.
• Vuelva a programar el control remoto. Quite las baterías, y
después oprima y sostenga la tecla del 1 en el control remoto
durante varios segundos para volver a programar el micro
procesador dentro del control remoto. Suelte la tecla del 1,
vuelva a instalar las baterías y oprima la tecla “ON•OFF.” Si el
indicador se enciende, vuelva a programar el control e intente de
nuevo. Si no se enciende, cambie las baterías por otras nuevas.
Problema: El control remoto no puede ser programado para
operar su componente
• Si usted está probando el control remoto después de que
usted ha inscrito el código, usted puede estar demasiado
lejos del componente o en el ángulo equivocado. Este control
remoto utiliza tecnología IR (infrarrojo) para comunicarse
con los componentes. El control remoto manda el código y el
sensor infrarrojo del componente lee el código. Debe haber
un sendero sin obstrucciones entre el control remoto y el
sensor IR en el componente para que funcione. Acérquese y
asegúrese de que usted está apuntando el contro remoto hacia
el componente (VCR o tocadiscos de DVD cuando usted está
programando la tecla DVD•VCR; la televisión cuando usted
está programando la tecla TV; caja de cable o recibidor de
satélite cuando usted programe la tecla SAT•CBL).
• Si usted ha utilizado el método de Entrada Directa de
Códigos para inscribir códigos para su marca y el aparato
sigue sin funcionar adecuadamente, intente uno de los
métodos de Búsqueda de Códigos.
Temporizador para Volver a Dormir
(Únicamente en Modelos Selectos)
! CONSEJO:
Page 20

38
39
• Para poder controlar aparatos combinados, como TV•VCRs
o TV•DVDs, usted debe programa tanto la tecla TV como
DVD•VCR. Una vez que los haya programado exitosamente,
la tecla TV controlará su televisor, y la tecla DVD•VCR
controlará las funciones en su DVD•VCR. Los códigos en la
sección de aparatos combinados deben intentarse primero,
utilizando el método de Entrada Directa de Códigos en las
teclas “TV” y “DVD” o “VCR.” Si esto no se puede logar
exitosamente, utilice el método normal de programación con
las teclas TV y VCR•DVD.
• Asegúrese que las baterías sean nuevas y estén instaladas
adecuadamente.
Problema: El control remoto no está llevando a cabo las
órdenes adecuadamente.
• Usted debe poner el control remoto en la modalidad correcta
oprimiendo las teclas del componente adecuado (TV,
DVD•VCR, AUX, SAT•CBL) para que el control remoto sepa
qué componente usted quiere operar.
• Asegúrese que el componente esté “listo” (por ejemplo, que
el DVD tenga el disco cargado; o que la VCR tenga el cassette
cargado, etc.)
• Usted puede haber oprimido una tecla inválida para la
modalidad en la que está el control remoto.
• Si usted está intentando encender un componente RCA, GE
o PROSCAN, oprima la tecla del componente (TV, DVD•VCR,
AUX, SAT•CBL) en lugar de la tecla “ON•OFF.”
• Si usted está intentando cambiar los canales, oprima la tecla
“OK” después de haber inscrito el número de canal como se
requiere en algunos modelos y marcas.
• Existe la posibilidad de que un código programado
pueda únicamente controlar algunas de las funciones de su
componente (por ejemplo, que únicamente encienda y apague
el componente). Vea la sección Para Comprobar que el Código
le Ofrezca Máxima Funcionalidad
Problema: El indicador luminoso no se ilumina cuando usted
oprime una tecla
• Usted debe poner el control remoto en la modalidad correcta
oprimiendo la tecla del componente correspondiente (TV,
DVD•VCR, AUX, SAT•CBL) para que el control sepa qué
componente usted está tratando de operar.
• Usted puede haber oprimido una tecla inválida para la
modalidad en la que está el control remoto.
• Asegúrese que las baterías sean nuevas y estén instaladas
adecuadamente. Reemplace las baterías con dos baterías AA
nuevas, si fuera necesario. Es posible que tenga que volver a
programar.
Problema: La VCR no graba
• Asegúrese que el control remoto esté en modalidad de VCR.
• Asegúrese que el cassette esté cargado adecuadamente en la VCR.
• Asegúrese que el videocassette no esté protegido contra
escritura. Si se le ha quitado la etiqueta de seguridad, el
cassette está protegido contra esritura y usted no puede
grabar en ese cassette.
Problema: El control remoto no cambia canales en su
componente.
• Usted debe poner el control remoto en la modalidad correcta
oprimiendo la tecla del componente correspondiente (TV,
DVD•VCR, AUX, SAT•CBL) para que el control remoto sepa
qué componente usted está tratando de operar.
• Oprima la tecla “OK” después de que usted inscribe un
número de canal.
• Quite cualquier obstáculo entre el control remoto y el
componente. Asegúrese de apuntar el control remoto hacia el
sensor IR del componente.
Problema: El menú del componente no aparece en la pantalla
de la televisión
• Asegúrese de que usted haya conectado adecuadamente
su componente a su televisor y ha seleccionado la entrada
correcta. (Vea el Manual de Instrucciones de su componente
para ver los procedimientos para conectarlo adecuadamente).
• Ponga el control remoto en la modalidad correcta
oprimiendo las teclas del componente adecuado
(TV, DVD•VCR, AUX, SAT•CBL) para que el control remoto
sepa qué componente usted está tratando de operar.
• El acceso al menú no está apoyado por todas las marcas.
Si ese es el caso, utilice el control remoto original para tener
acceso a las funciones del menú para esos componentes.
Para mayor información, por favor visítenos en www.rca.com.
Page 21

Replaces up to 4 remote controls.
Operates up to four components:
• TV • DVD • VCR • Satellite receiver or Cable box
Dedicated Menu key
Compatible with today’s most popular brands!
Your RCA universal remote control is compatible with most brands of
infrared-remote-controlled components manufactured after 1990.
Complete-Code Lists included.
Operates most RCA, GE and PROSCAN
branded products-without-any programming!
Consolide cinq télécommandes en-une-seule!
Commande jusqu’à trois appareils:
• Télé • DVD • Magnétoscope • Récepteur de Satellite ou Câblosélecteur
Touche MENU dédiée
Compatible avec les marques les
plus-populaires-actuelles!
Cette télécommande universelle RCA est compatible avec la plupart des marques
d’appareils à télécommande infrarouge fabriqués après 1990. Listes de code
complètes incluses.
Commande la plupart des produits de marques RCA,
GE et PROSCAN sans aucune programmation !
¡Agrupa hasta cuatro controles remoto en uno!
Opera hasta tres componente:
• TV • DVD • VHS • Receptor de Satélite o Caja para el Cable
Tecla dedicada del MENU
¡Compatible con las más populares marcas
de-la-actualidad!
Su remoto control universal RCA es compatible con la mayoría de las marcas
de componentes de control remoto infrarrojo fabricados después de 1990.
Se incluyen listas completas de códigos.
¡Hace funcionar la mayoría de los
productos de marca RCA, GE y PROSCAN sin necesidad de programarlo!
Requires 2 AA batteries (sold separately).
2 piles AA requises
(vendues séparément).
Necesita 2 baterías AA (se venden por separado).
©2005 THOMSON INC.
10330 N. Meridian Street
Indianapolis, IN 46290
Made in Indonesia
Fabriqué en Indonésie
Hecho en
Indonesia
RCR430S NA CAW/IB REV
A
Trademark(s) ® Registered.
Marque(s) déposée(s).
Marca(s) registrada(s).
www.rca.com
See inside for details.
Détails à l’intérieur.
Para mayor información, vea adentro.
DVD/VCR
COMBOS
COMBINÉS LECTEUR
DVD/MAGNÉTOSCOPE
COMBOS DE
DVD/VCR
SET-UP
INSTRUCTIONS
INSIDE
À-L’INTÉRIEUR
INSTRUCCIONES
PARA LA INSTALACIÓN
ADENTRO
SATELLITE
SATÉLITE
TV/TÉLÉ
Apex
Audiovox
Broksonic
Citizen
Curtis Mathes
Daewoo
Emerson
GE
Hisense
Hitachi
JC Penney
JVC
Kenwood
LG (Goldstar)
LXI
Magnavox
Mitsubishi
Montgomery
Ward
NEC
Orion
Panasonic
Philco
Philips
Pioneer
Prima
PROSCAN
Quasar
RadioShack/
Realistic
RCA
Samsung
Sanyo
Sears
Sharp
Sony
Sylvania
Tandy
Teknika
Toshiba
Victor
Wards
Yamaha
Zenith
Aiwa
Apex
Broksonic
Cyberhome
Daewoo
Emerson
Funai
GE
Go-Video
Hitachi
JVC
Kenwood
Konka
Koss
Lasonic
Magnavox
Memorex
Mintek
Mitsubishi
NAD
Onkyo
Orition
Panasonic
Philips
Pioneer
PROSCAN
Polaroid
Qwestar
RCA
Samsung
Sansui
Sanyo
Sharp
Sony
Sylvania
Toshiba
Zenith
Go Video
JVC
Philips
RCA
Samsung
Sanyo
Zenith
Canon
Curtis Mathes
Daewoo
Emerson
GE
Go-Video
Hitachi
JC Penney
JVC
Kenwood
LG (Goldstar)
LXI
Magnavox
Matsushita
Mitsubishi
Montgomery
Ward
NEC
Panasonic
Philco
Philips
Pioneer
PROSCAN
Quasar
RadioShack/
Realistic
RCA
Samsung
Sanyo
Sears
Sharp
Sony
Sylvania
Tandy
Teknika
Toshiba
Victor
Wards
Yamaha
Zenith
CABLE/
CABLOSÉLECTEUR
ABC
Archer
Cableview
Citizen
Garrard
GC Electronics
GE
General
Instruments
Jerrold
Motorola
Philips
Pioneer
RCA
Scientific
Atlanta
United Cable
Universal
View Star
Zenith
Alphastar
Dish Network
Echostar
Express Vu
GE
Hitachi
Hughes
JVC
Magnavox
Motorola
Panasonic
Philips
Primestar
PROSCAN
RCA
Sony
Star Choice
Toshiba
Uniden
DVD
VCR/
MAGNÉTOSCOPE
 Loading...