

Page 1

Features
First-Time Operation
MnflAI.q" PS271_i7_ PS3h1_7_ P.hi_L_lj]j_
Detailed Operating Instructions
4-7 Remote Control (TV Functions)
8 Freeze and Zoom
8 Channel Guide
9 Front Panel Controls
10 Video Menu
11 Audio Menu
12-13 Graphic Equalizer
14 Stereo Broadcasts and SAP
15 Expanded Stereo
16-17 Adjusting for Best Surround Audio
18 Setup Menu
Optional Accessories
34-35 Accessory Cables
35-36 Accessory Order Form
37 Optional Speakers and Stands
Monitor Panel and Connections
38-39 Monitor Panel
40 Tips to Read Before Connecting Components
41 Home Antenna Connections
42-43 Cable-TV Connections
44 Programming Remote to Control Cable Box
45 Cable-TV Information and Channel Chart
19 Using Closed Captioning
20 Sleep Timer
21 Alarm
22 Labeling Channels
23 Parental Control
24 Programming Channel Memory
25 Changing Antenna Input
26 Setting up VCR Channels
27 Setting up Cable Box Channel
28-29 Operating Picture-in-Picture
30-31 Programming Remote to Control VCRs
32-33 Programming Remote to Control Audio Equip.
46-47 VCRConnections
48-49 Camcorder Connections
50-51 Amplifier or CassetteTape Deck
52-53 ExternalorSurround Speakers
Reference Section
54-55 Trouble Checks
55 Warranty
56 Design Specifications
56 Cleaning and Care
57 Index (Alphabetical)
58-59 Quick-Reference Guide (Inside Back Cover)
Page 2
If you suspect that liquid has entered the TV, unplug it imme-
diLatelyand have it inspected by an Authorized TV
Servicenter. Turning it off is not enough - your TV has power
applied to some circuits even when the TV is turned off.
_!ilii!iiii
Mail YourRegistrationCardToday
i_ii[iiii!i:
A Product Registration Card is packed with your set. Please
i:r{i}:iiiii
fill out the card and return it immediately.
:rii!iiii..i
Your prompt submission of this card allows us to contact you
if needed.
RISK OF ELECTRIC SHOCK
DO NOT OPEN
The lighting Dash
and arrowhead
within the triangle is
a warning sign
alerting you of
"dangerous vokage"
inside the product
that presents a risk
of electric shock.
CAUTION: TO REDUCE THE RISK
OF ELECTRICAL SHOCK, DO NOT
REMOVE COVER (OR BACK). NO
USER-SERVICEABLE PARTS
INSIDE. REFER SERVICING TO
QUALIFIED SERVICE PERSONNEL.
The exclamation
point within the
_angle is a warning
sign alerting you of
important
ins1_c_ons
accompanying the
product.
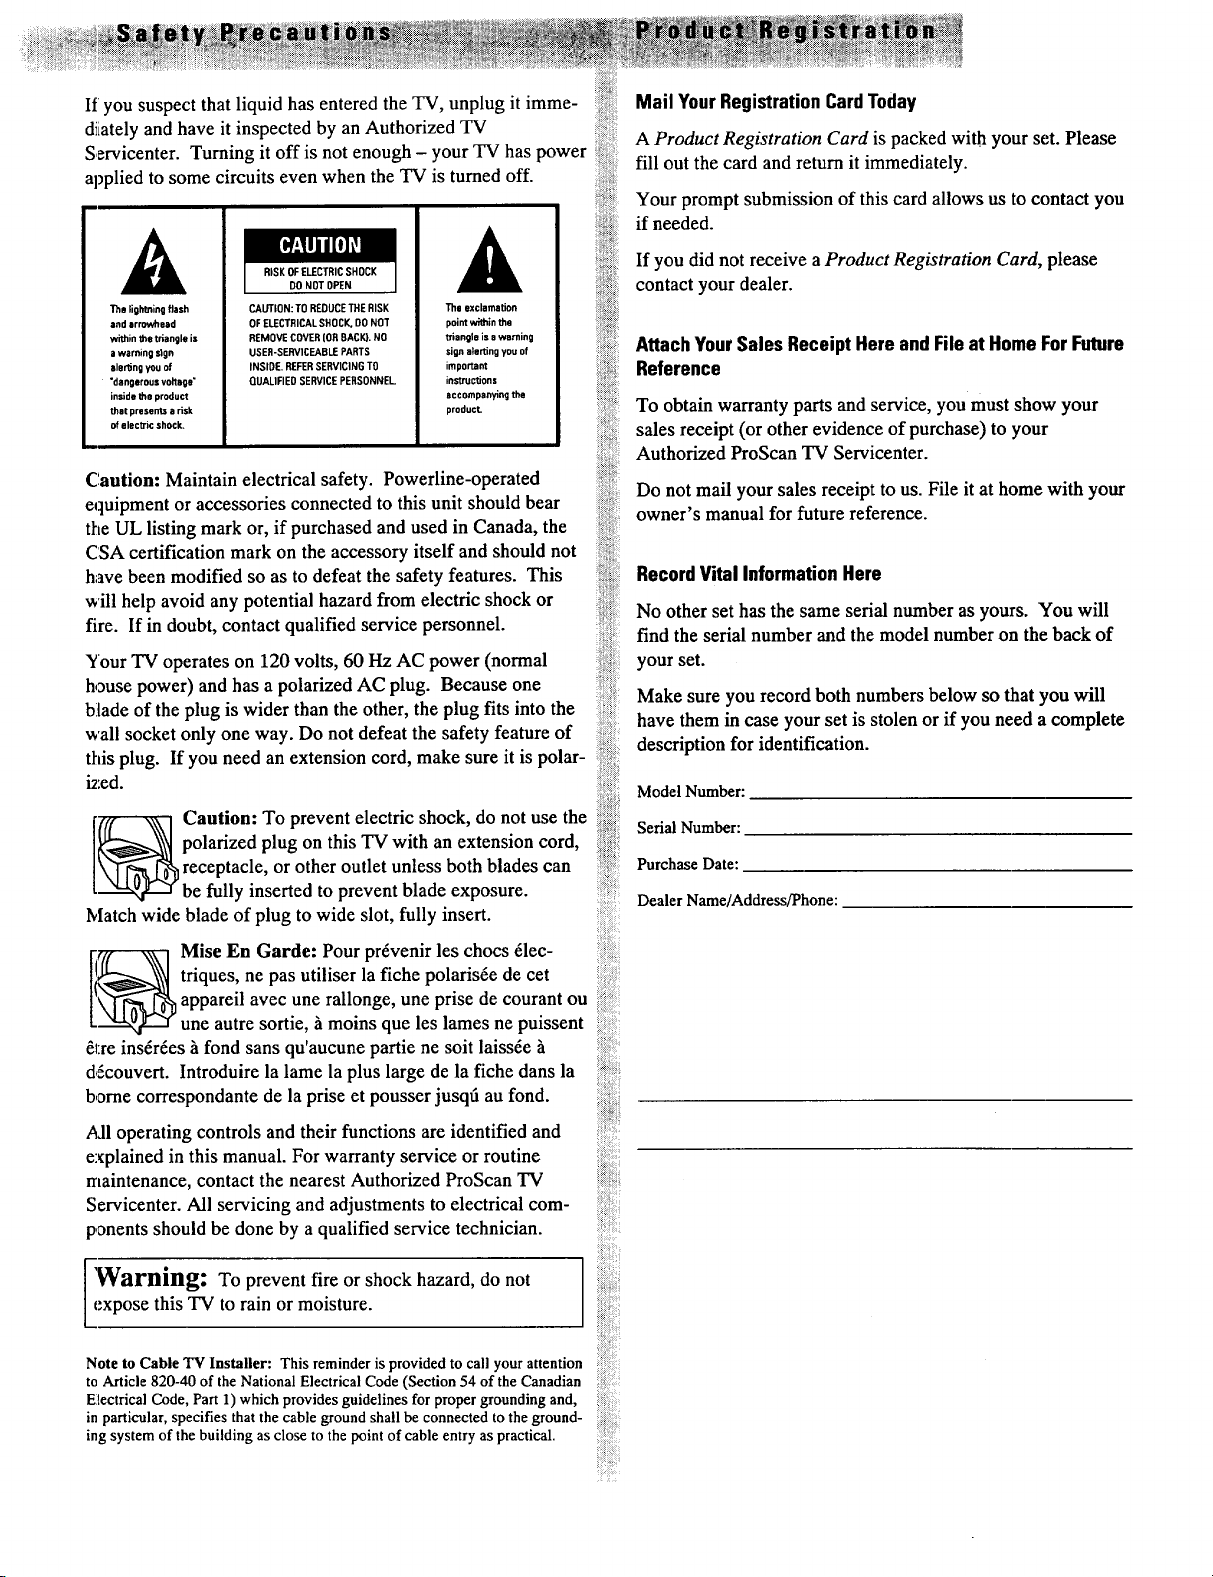
Caution: Maintain electrical safety. Powerline-operated
equipment or accessories connected to this unit should bear
the UL listing mark or, if purchased and used in Canada, the
CSA certification mark on the accessory itself and should not
have been modified so as to defeat the safety features. This
will help avoid any potential hazard from electric shock or
fire. If in doubt, contact qualified service personnel.
Your TV operates on 120 volts, 60 Hz AC power (normal
house power) and has a polarized AC plug. Because one
blade of the plug is wider than the other, the plug fits into the
wall socket only one way. Do not defeat the safety feature of
this plug. If you need an extension cord, make sure it is polar-
ized.
Caution: To prevent electric shock, do not use the
polarized plug on this TV with an extension cord,
or other outlet unless both blades can
y inserted to prevent blade exposure.
Match wide blade of plug to wide slot, fully insert.
Mise En Garde: Pour prrvenir les chocs 61ec-
triques, ne pas utiliser la fiche polarisre de cet
appareil avec une rallonge, une prise de courant ou
une autre sortie, _ moins que les lames ne puissent
61:reinsrrres h fond sans qu'aucune partie ne soit laissre
d,Scouvert. Introduire la lame la plus large de la fiche dans la
borne correspondante de la prise et pousser jusqtl au fond.
i_dl operating controls and their functions are identified and
explained in this manual. For warranty service or routine
rrtaintenance, contact the nearest Authorized ProScan TV
Servicenter. All servicing and adjustments to electrical com-
panents should be done by a qualified service technician.
If you did not receive a Product Registration Card, please
contact your dealer.
iiiliiii
AttachYourSales Receipt Here andFile at HomeForFuture
i;i!ii}{ii{i:i
Reference
:ii:ii!-:
To obtain warranty parts and service, you must show your
iiiii!ii_
sales receipt (or other evidence of purchase) to your
Authorized ProScan TV Servicenter.
Do not mail your sales receipt to us. File it at home with your
iiiiiiiii_i_il
owner's manual for future reference.
!i!%i_
RecordVital InformationHere
No other set has the same serial number as yours. You will
iii!_;ii_;
find the serial number and the model number on the back of
ii:i!:i_il
iiiiii{}!ii
!i_ii!i_:iii
your set.
Make sure you record both numbers below so that you will
iii:i}ii
have them in case your set is stolen or if you need a complete
description for identification.
Model Number:
Serial Number:
Purchase Date:
)}::
r_r
Dealer Name/Address/Phone:
}:
r
i:
)r
iN
iiiiiii!iii:i!:
:?
?:
'Warning: To prevent fire or shock hazard, do notexpose this TV to rain or moisture.
Note to Cable "IV Installer: This reminder is provided to call your attention
to Article 820-40 of the National Electrical Code (Section 54 of the Canadian
Electrical Code, Part 1) which provides guidelines for proper grounding and,
in particular, specifies that the cable ground shall be connected to the ground-
ing system of the building as close to the point of cable entry as practical.
r
r:
Page 3
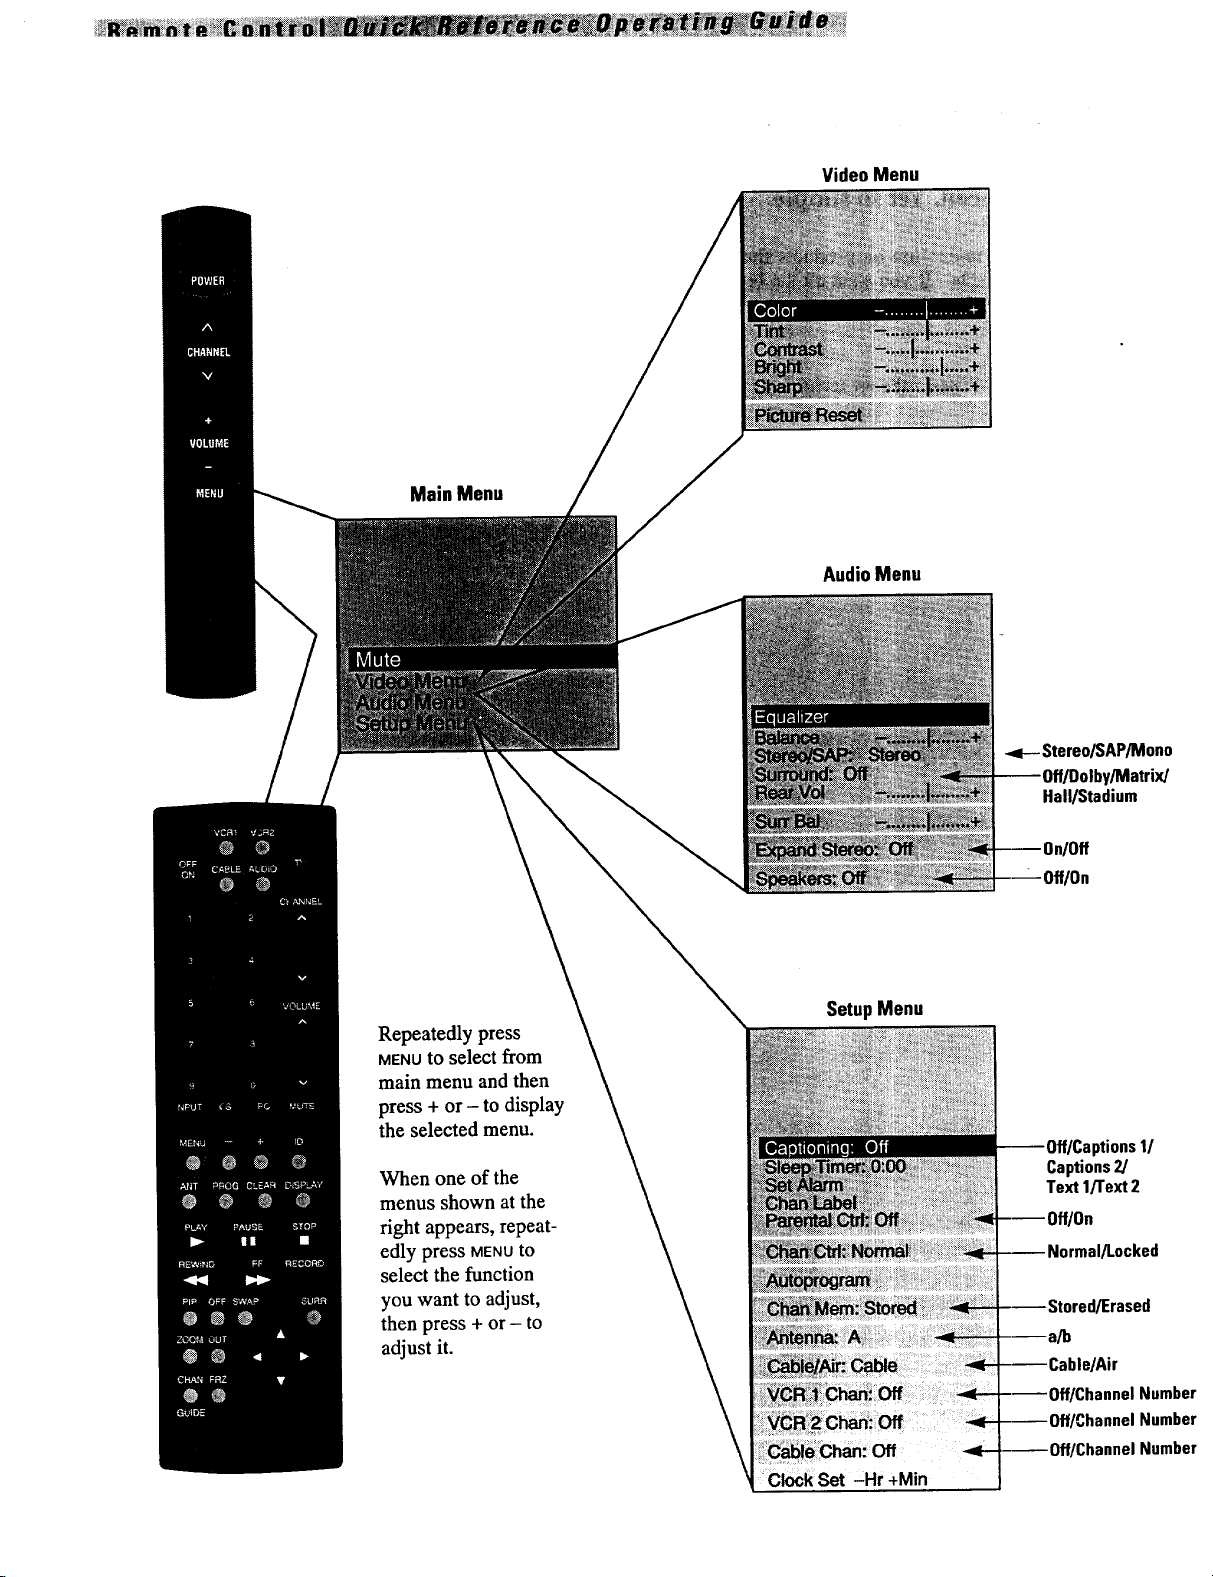
Main Menu
VideoMenu
AudioMenu
-=1-- Stereo/SAP/Mono
Repeatedly press
MENUto select from
main menu and then
press + or - to display
the selected menu.
When one of the
menus shown at the
right appears, repeat-
edly press MENUto
select the function
you want to adjust,
then press + or - to
adjust it.
Hall/Stadium
SetupMenu
ptions1/
Captions2]
Text 1/'rext2
I]Erased
C_k Set -Hr +Min
;hannel Number
Page 4

PROSCAN°
So advanced. Yet so simple. _
We're building our reputation on products that are so
advanced, they're simple. If you want all the benefits of
the latest technology, without the complexity, we have a
very simple solution.
It's called ProScan. State-of-the-art technology that real
people can use.
Thank you for choosing ProScan. And welcome to our
company-wide commitment to your complete satisfaction
and viewing enjoyment.
Page 5
Your ProScan television is more than state-of-the-art
technology. It's technology tailored to you. Features
designed to deliver viewing and listening enjoyment
beyond expectations. Innovation and simplicity of
operation become one-ProScan.
ImprovingYourImage
• ABrighter Picture: Theadvancedlnvaralloy maintains excellent
color purityunder thebrightest power conditionsto allow formore
light outputthan conventionaltubes.
• No Glare" Picture: Anti-Glare Lithium Silicate Faeeplate
reducesglarewhileenhancing contrast.
• A Cleaner Picture: The DigitalComb Filterreducesdistortion
and'extends resolution.
• Greater Contrast: DynamicGammaCorrection automatically
extendsthe dynamic rangeof the luminance signal, producing
blacker blacksand whiterwhites.
• Increased Clarity: Scan VelocityModulation anda wide band
video amplifier enhance imageedges, and with DynamicBeam
Focus,provide crisp cleandetails-with at least560 lines of
horizontal resolution,surpassing the capabilitiesofall available
consumer signal sources.
• A Cleaner Picture Tube: The Anti-Static Faceplatereducesthe
staticthatattractsdust.
Sound Thinking
• Dolby* Surround Sound recreates the audio experience of a
movie theater by decoding the surround sound signal on most pre-
recorded VHS/hi-fi tapes (with optional speakers). For details, see
pages 16-17.
• Acoustic Suspension Speaker System sealed enclosures and high
compliance speakers provide higher fidelity and extended bass
response.
• On-Screen Graphic Equalizer permits precise adjustment of
seven frequency bands to complement your room's acoustics.
For details, see pages 12-13.
• 10 Watts Per Channel **
• dbx*** Noise Reduction
• Second Audio Program (SAP) For details, see page 14.
* Dolby is a registeredtrademark of Dolby LaboratoriesLicensing Corp.
** RMS rating, into 8ohms, 50 to 20,000 Hz ±3db, with less than
1% THD.
***dbx is a registered trademark of Carillon Electronics Corp.
Creative Entertainment
• Advanced Color Picture-in-Picture lets you watch two programs
at once (with VCR).
SWAP, MOVE, FREEZE - for viewing convenience.
CHANNELGUIDE- displays a still picture of 12 channels at one time
for a quick review of available programs.
PtXZOOM- enlarges any desired video image for a closer look.
PIXPAN- lets you move across the enlarged video image to select
any portion for viewing.
For details, see pages 8 and 28-29.
• Channel Captioning lets you label channel numbers with up to
4-letter names (NBC, VH-1, ESPN). For details, see page 22.
• 181 Channel capability in U.S.A. - Cable Compatible* For
details, see page 45.
• Commercial Skip For details, see page 6.
• Sleep Timer For details, see page 20.
• Alarm Timer For details, see page 21.
• Parental Control For details, see page 23.
• Previous Channel Control For details, see page 7.
*Check your cable company's compatibility requirements.
Channels 95, 96, and 97 are not applicable in Canada, so the total chan-
nel count for Canada is 178.
OneMinute Manual
• On-Screen Menus for simple operation of picture, sound, and
set-up functions by remote control. For details, see pages 10, 11,
and 18.
.* AutoProgramming automatically searches for and stores all
active channels. Eliminates the need for manual set-up. For
details, see page 24.
• Frequency Synthesis Tuning automatically and accurately tunes
each channel.
• Automatte VCR Setup with the push of a button, your TV is
ready for VCR play: both "IV and VCR turn on and TV tunes to
correct channel/input. For details, see page 26.
• Automatic Cable Box Setup offers convenience when cable com-
pany requires you to use cable box. For details, seepage 2Z
• On-Screen Clock/Channel Display For details, see page 3.
• Picture Reset For details, see page 10.
Networking
Gold Plated Phono Jacks for Superior Performance:
• Two Sets of Audio/Video Inputs for VCR, Laser Disc player,
Camcorder etc. For details, see pages 46-48.
• One Set of Audio/Video Outputs for video dubbing. For details,
see pages 47 and 49.
• One Set of Volume-Controlled Audio Outputs (141-FI)to retain
remote volume when connected to an external amplifier. For
details, seepage 50.
• One Set of Volume-Controned SURRAuto Outputs to connect
the surround sound to an external amplifier. For details, see
page 51.
Other Connections to ExpandYour System:
• S-Video input connector for direct Y/C input toyour S-VHS
VCR,Camcorder, etc. For details, seepages 47 and 48.
• Four Speaker Jacks to allow hook up of optionalexternal or
surround sound speakers. For details, see pages 52-53.
• Dual RF Inputs to allow direct connection of up to two basic
cable, cable box, or other RF sources. For details, see pages 41-
43.
• Front-Mounted Stereo Headphone Jack for private listening
with optional headphones. For details, see page 9.
At YourCommand
Your ProScan television includes two remote controls.
• The ProScan Universal Remote is preprogrammed so there's no
need to teach additional or new codes. Operation is as easy as
entering a channel. It operates all major ProScan TV and VCR
functions. Operates the basic functions of 60 different VCR
brands and 28 different brands of cable boxes, eliminating the need
for additional remotes.
• The ProScan Simple Remote-6 buttons control everyday 'IV
functions for the ultimate in simplicity.
AtYourService
Our Human Touch policy offers all these valuable
benefits:
• 1-800-PROSCAN Call at any timeour 24-hour-a-day, 7-day-a-
week information service.
• Nationwide Independent ServiceCenters
• ProScan Limited WarrantyforU.S.A. In-homeserviceof all
partsand labor foroneyear,picturetube fortwo years. For
details, seepage 55. A separatewarrantyforCanadaisenclosed
with alltelevisionssold inCanada.
__._!
Page 6
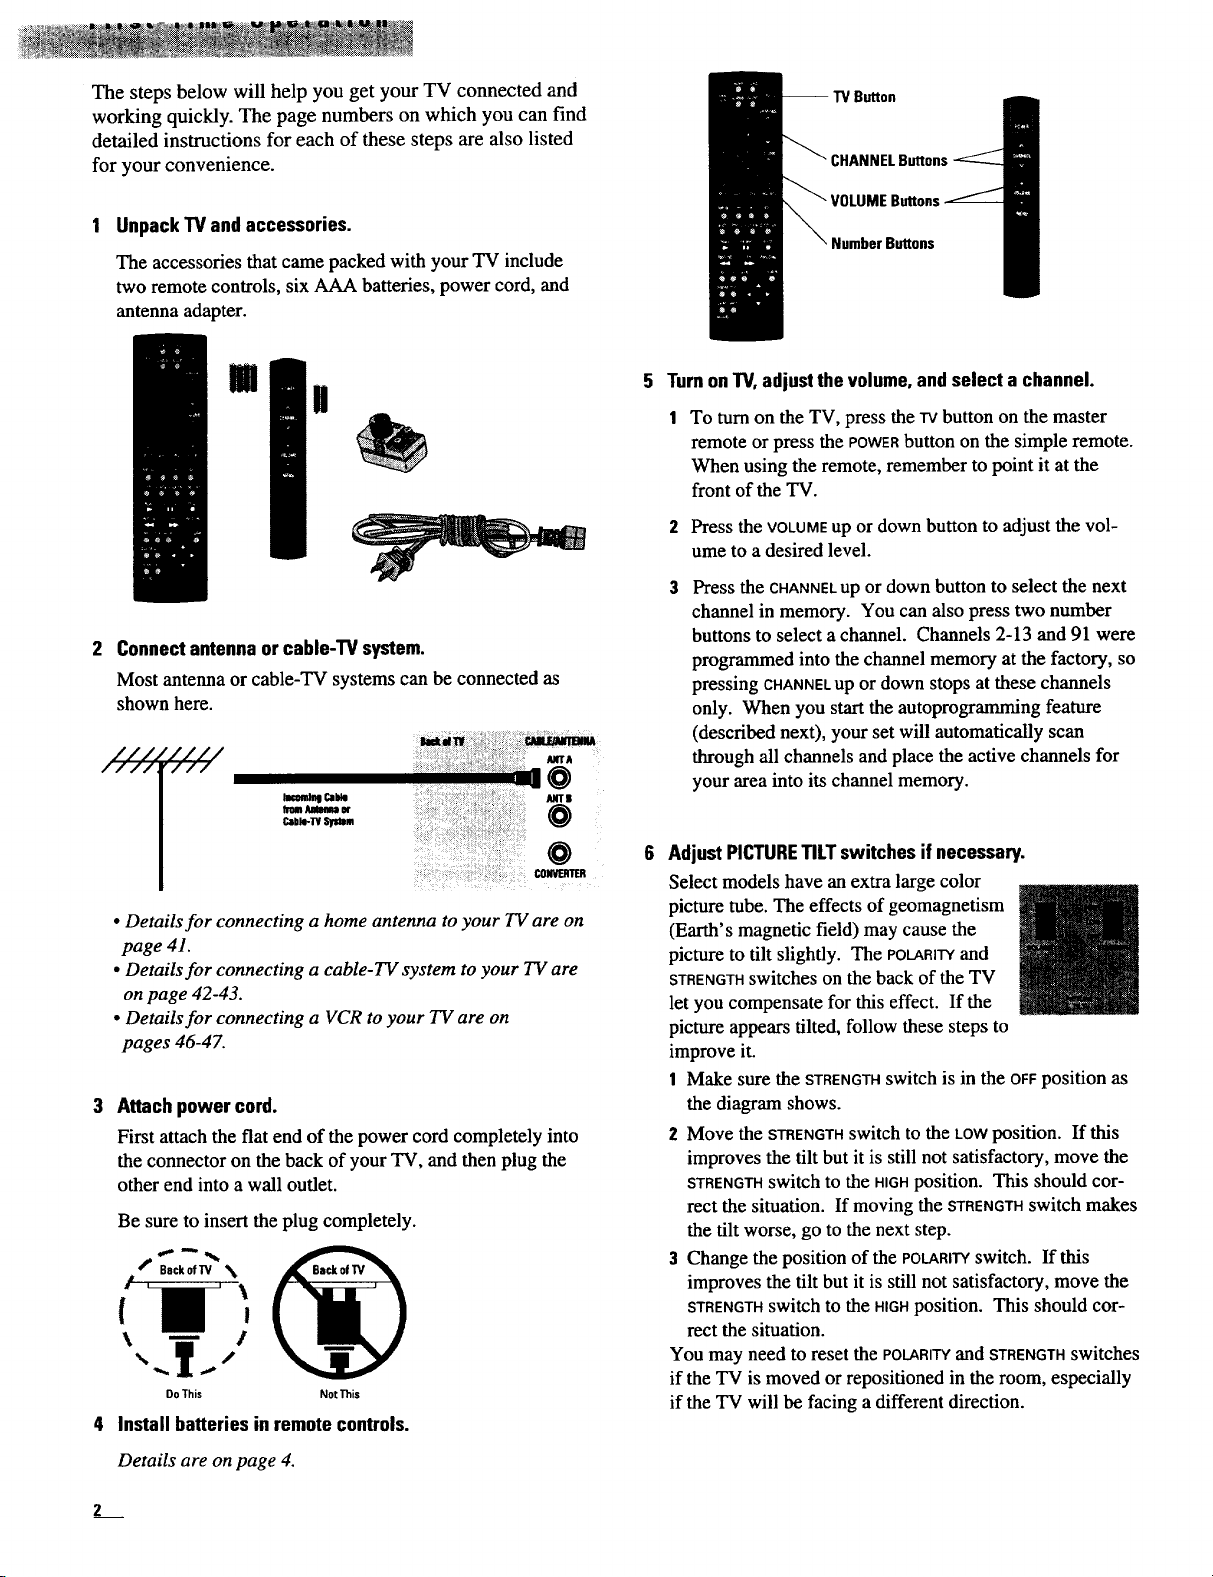
The steps below will help you get your TV connected and
working quickly. The page numbers on which you can find
detailed instructions for each of these steps are also listed
for your convenience.
UnpackTV and accessories.
The accessories that came packed with your TV include
two remote controls, six AAA batteries, power cord, and
antenna adapter.
-- TV Button
B,NNELButtons
Buttons
m
i
2 Connectantenna orcable-TV system.
Most antenna or cable-TV systems can be connected as
shown here.
///.
////
4 Install batteries in remotecontrols.
'////
"///
lacond_lCai4e
h'omAMmumor
Cable-W SYstem
• Details for connecting a home antenna to your TV are on
page 41.
• Details for connecting a cable-TV system to your TV are
on page 42-43.
• Details for connecting a VCR to your TV are on
pages 46-47.
Attach power cord.
First attach the flat end of the power cord completely into
the connector on the back of your TV, and then plug the
other end into a wall outlet.
Be sure to insert the plug completely.
DoThis NotThis
_dw , cMe.J_VnnnlA
•=',:_i/:,:];:__.'- _trA
O
O
5 TurnonTV,adjustthe volume,and select achannel.
To turn on the TV, press the TVbutton on the master
remote or press the POWERbutton on the simple remote.
When using the remote, remember to point it at the
front of the TV.
2 Press the VOLUMEup or down button to adjust the vol-
ume to a desired level.
Press the CHANNELup or down button to select the next
channel in memory. You can also press two number
buttons to select a channel. Channels 2-13 and 91 were
programmed into the channel memory at the factory, so
pressing CHANNELup or down stops at these channels
only. When you start the autoprogramming feature
(described next), your set will automatically scan
through all channels and place the active channels for
your area into its channel memory.
AdjustPICTURETILTswitches ifnecessary.
Select models have an extra large color
picture tube. The effects of geomagnetism
(Earth's magnetic field) may cause the
picture to tilt slightly. The POLARITYand
STRENGTHswitches on the back of the TV
let you compensate for this effect. If the
picture appears tilted, follow these steps to
improve it.
1
Make sure the STRENGTHswitch is in the OFFposition as
the diagram shows.
2 Move the STRENGTHswitch to the LOWposition. If this
improves the tilt but it is still not satisfactory, move the
STRENGTHswitch to the HIGHposition. This should cor-
rect the situation. If moving the STRENGTHswitch makes
the tilt worse, go to the next step.
3 Change the position of the POLARITYswitch. If this
improves the tilt but it is still not satisfactory, move the
STRENGTHswitch to the HIGHposition. This should cor-
rect the situation.
You may need to reset the POLARITYand STRENGTHswitches
if the TV is moved or repositioned in the room, especially
if the TV will be facing a different direction.
il
Details are on page 4.
Page 7
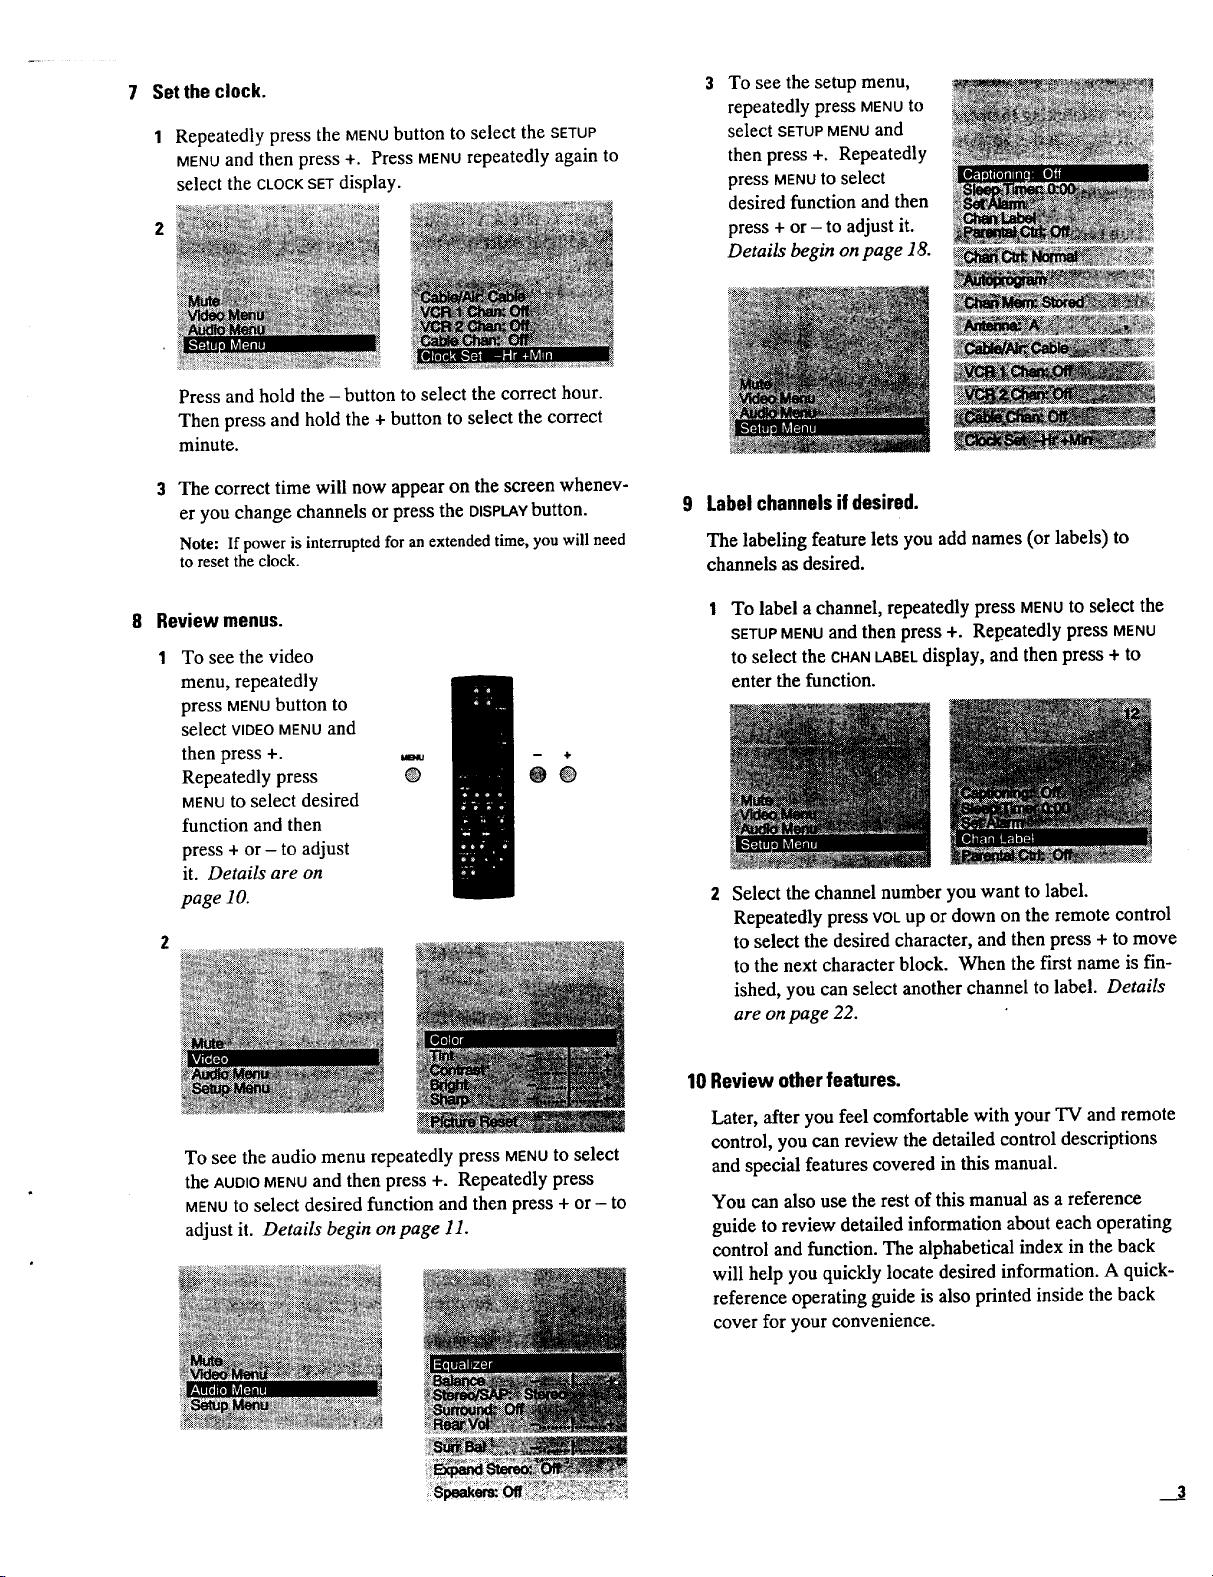
Setthe clock.
7
1 Repeatedly press the MENUbutton to select the SETUP
MENUand then press +. Press MENUrepeatedly again to
select the CLOCKSETdisplay.
Press and hold the - button to select the correct hour.
Then press and hold the + button to select the correct
minute.
To see the setup menu,
repeatedly press MENU to
select SETUP MENU and
then press +. Repeatedly
press MENUto select
desired function and then
press + or - to adjust it.
Details begin on page 18.
The correct time will now appear on the screen whenev-
er you change channels or press the DISPLAYbutton.
Note: If power is interrupted for an extended time, you will need
to reset the clock.
8 Review menus.
To see the video
menu, repeatedly
press MENUbutton to
select VIDEO MENU and
then press +.
Repeatedly press
@
MENUto select desired
function and then
press + or - to adjust
it. Details are on
page 10.
Labelchannelsif desired.
The labeling feature lets you add names (or labels) to
channels as desired.
To label a channel, repeatedly press MENUto select the
SETUPMENUand then press +. Repeatedly press MENU
to select the CHANLABELdisplay, and then press + to
enter the function.
-- ÷
00
2 Select the channel number you want to label.
Repeatedly press VOLup or down on the remote control
to select the desired character, and then press + to move
to the next character block. When the first name is fin-
ished, you can select another channel to label. Details
are on page 22.
To see the audio menu repeatedly press MENUto select
the AUDIOMENUand then press +. Repeatedly press
MENUto select desired function and then press + or - to
adjust it. Details begin on page 11.
10 Review otherfeatures.
Later, after you feel comfortable with your TV and remote
control, you can review the detailed control descriptions
and special features covered in this manual.
You can also use the rest of this manual as a reference
guide to review detailed information about each operating
control and function. The alphabetical index in the back
will help you quickly locate desired information. A quick-
reference operating guide is also printed inside the back
cover for your convenience.
Page 8
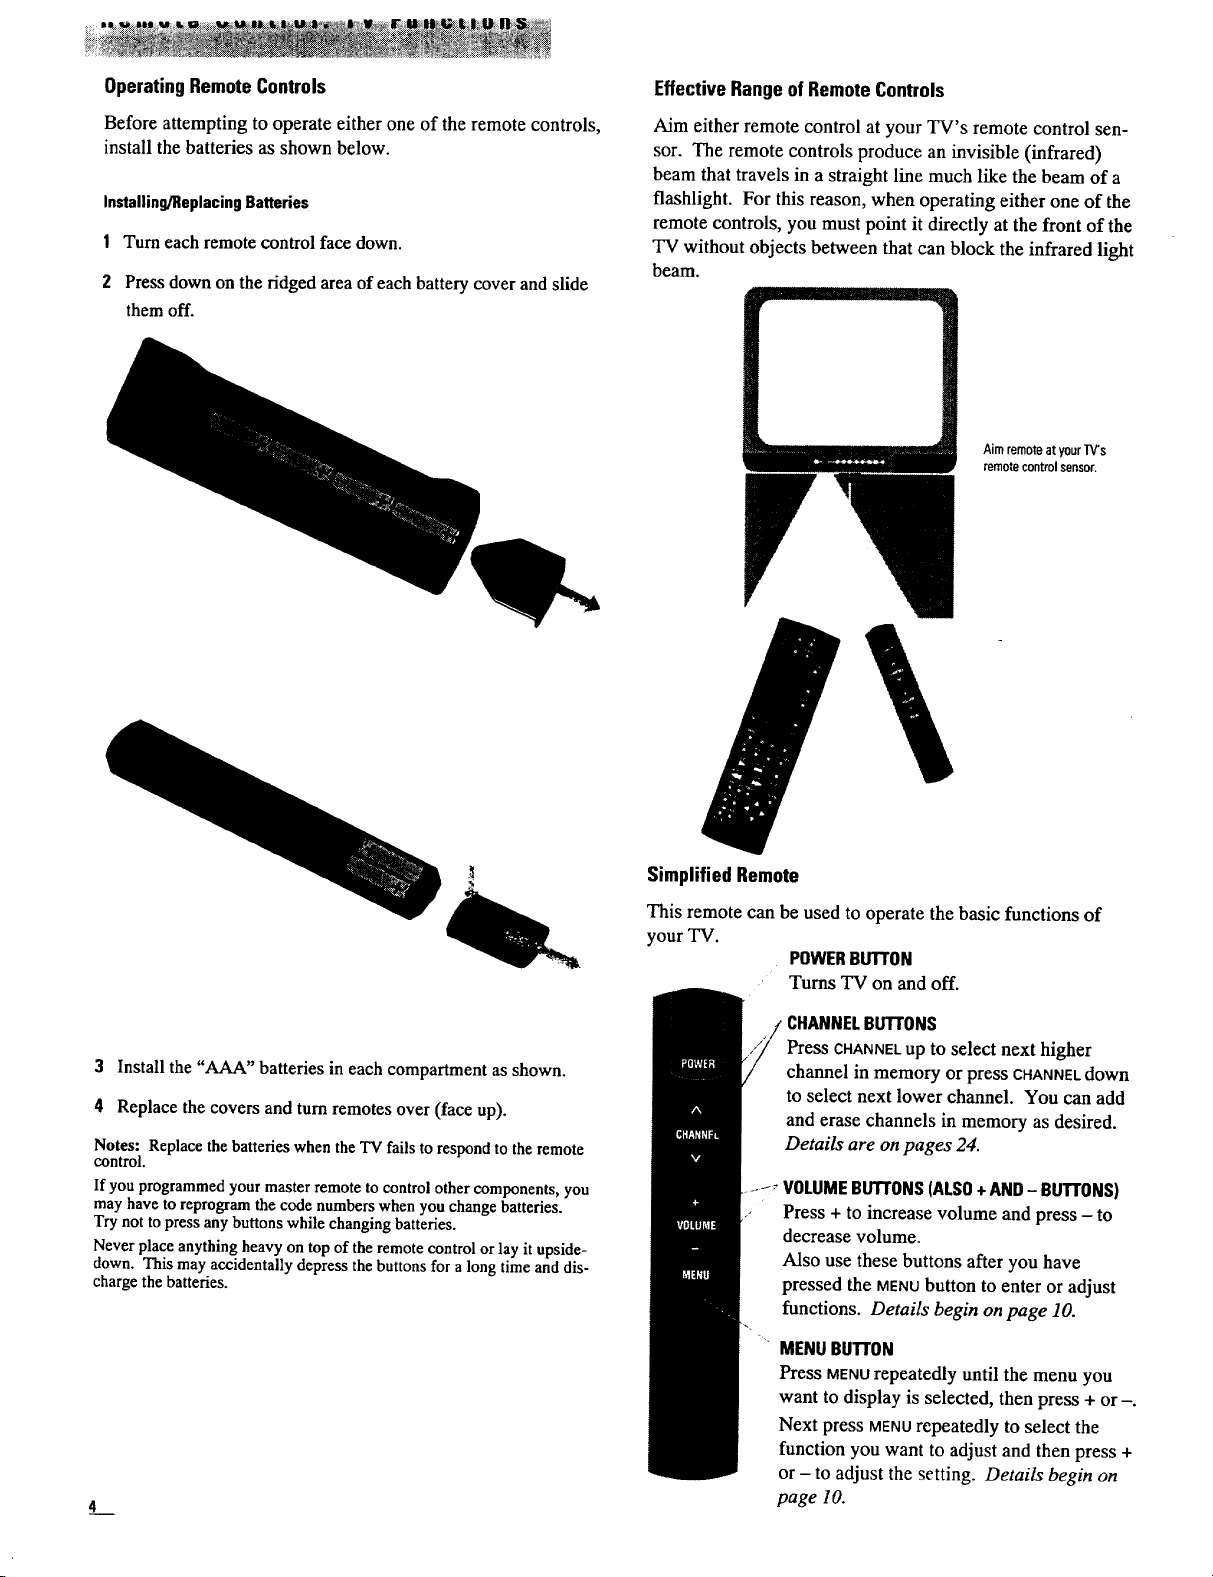
OperatingRemoteControls
EffectiveRangeof RemoteControls
Before attempting to operate either one of the remote controls,
install the batteries as shown below.
Installing/ReplacingBatteries
1 Turn each remote control face down.
2 Press down on the ridged area of each battery cover and slide
them off.
Aim either remote control at your TV's remote control sen-
sor. The remote controls produce an invisible (infrared)
beam that travels in a straight line much like the beam of a
flashlight. For this reason, when operating either one of the
remote controls, you must point it directly at the front of the
TV without objects between that can block the infrared light
beam.
Aimremoteatyour]V's
remotecontrolsensor.
3 Install the "AAA" batteries in each compartment as shown.
4 Replace the covers and turn remotes over (face up).
Notes: Replace the batteries when the TV fails to respond to the remote
control.
If you programmed your master remote to control other components, you
may have to reprogram the code numbers when you change batteries.
Try not to press any buttons while changing batteries.
Never place anything heavy on top of the remote control or lay it upside-
down. This may accidentally depress the buttons for a long time and dis-
charge the batteries.
L
SimplifiedRemote
This remote can be used to operate the basic functions of
your TV.
POWERBUTrON
• Turns TV on and off.
CHANNELBUTTONS
Press CHANNELup to select next higher
channel in memory or press CHANNEl.down
to select next lower channel. You can add
and erase channels in memory as desired.
Details are on pages 24.
..... VOLUMEBUTTONS(ALSO+AND- BUTTONS)
Press+ toincreasevolume and press- to
decrease volume.
Also use these buttons after you have
pressed the MENUbutton to enter or adjust
functions. Details begin on page 10.
MENUBUll'ON
Press MENUrepeatedly until the menu you
want to display is selected, then press + or-.
Next press MENUrepeatedly to select the
function you want to adjust and then press +
or - to adjust the setting. Details begin on
page 10.
Page 9
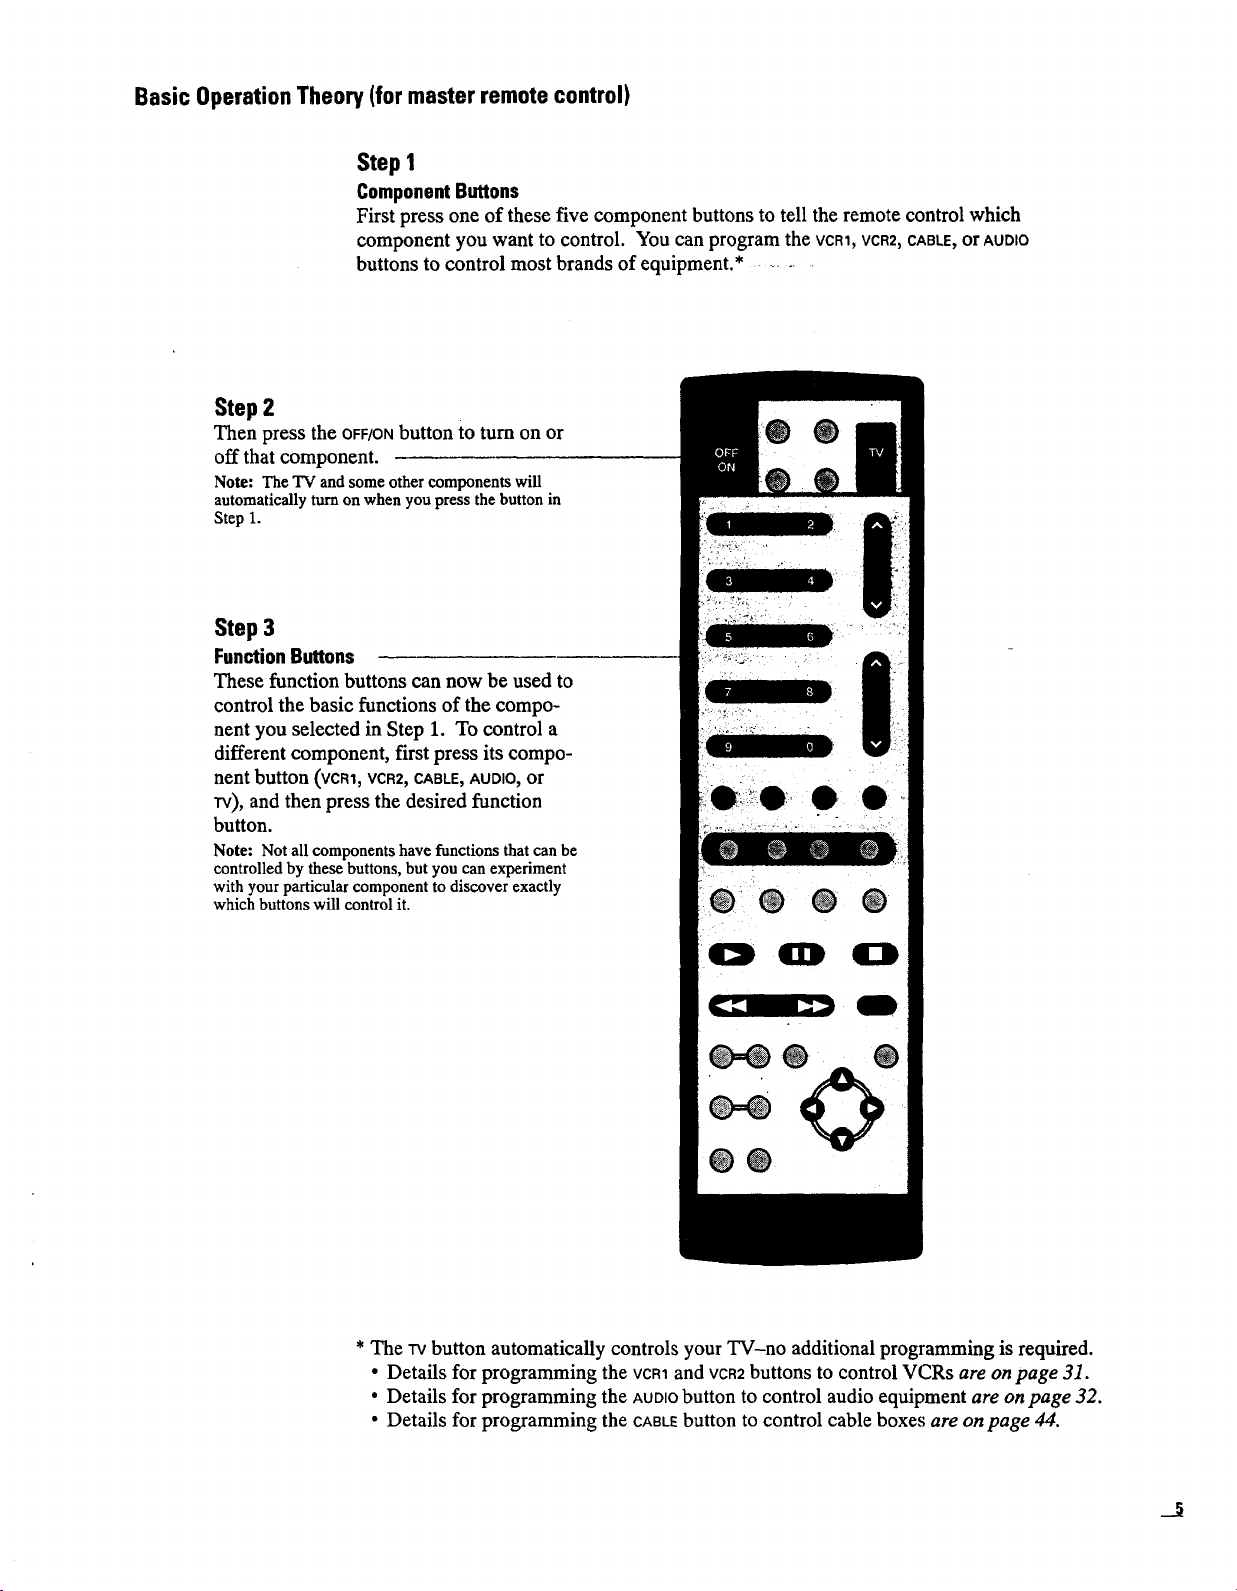
Basic Operation Theory (for master remote control)
Step 1
ComponentButtons
First press one of these five component buttons to tell the remote control which
component you want to control. You can program the VCR1,VCR2,CABLE,or AUDIO
buttons to control most brands of equipment.* .....
Step 2
Then press the OFF/ONbutton to turn on or
off that component.
Note: The TV and some other components will
automatically turn on when you press the button in
Step 1.
Step 3
FunctionButtons
These function buttons can now be used to
control the basic functions of the compo-
nent you selected in Step 1. To control a
different component, first press its compo-
nent button (VCR1, VCR2, CABLE, AUDIO, or
rv), and then press the desired function
button.
Note: Not all components have functions that can be
controlled by these buttons, but you can experiment
with your particular component to discover exactly
which buttons will control it.
0. 0 • •
0
* The rv button automatically controls your TV-no additional programming is required.
• Details for programming the VCR1and vca2 buttons to control VCRs are on page 31.
• Details for programming the AUDIObutton to control audio equipment are on page 32.
• Details for programming the CABLEbutton to control cable boxes are on page 44.
J
Page 10
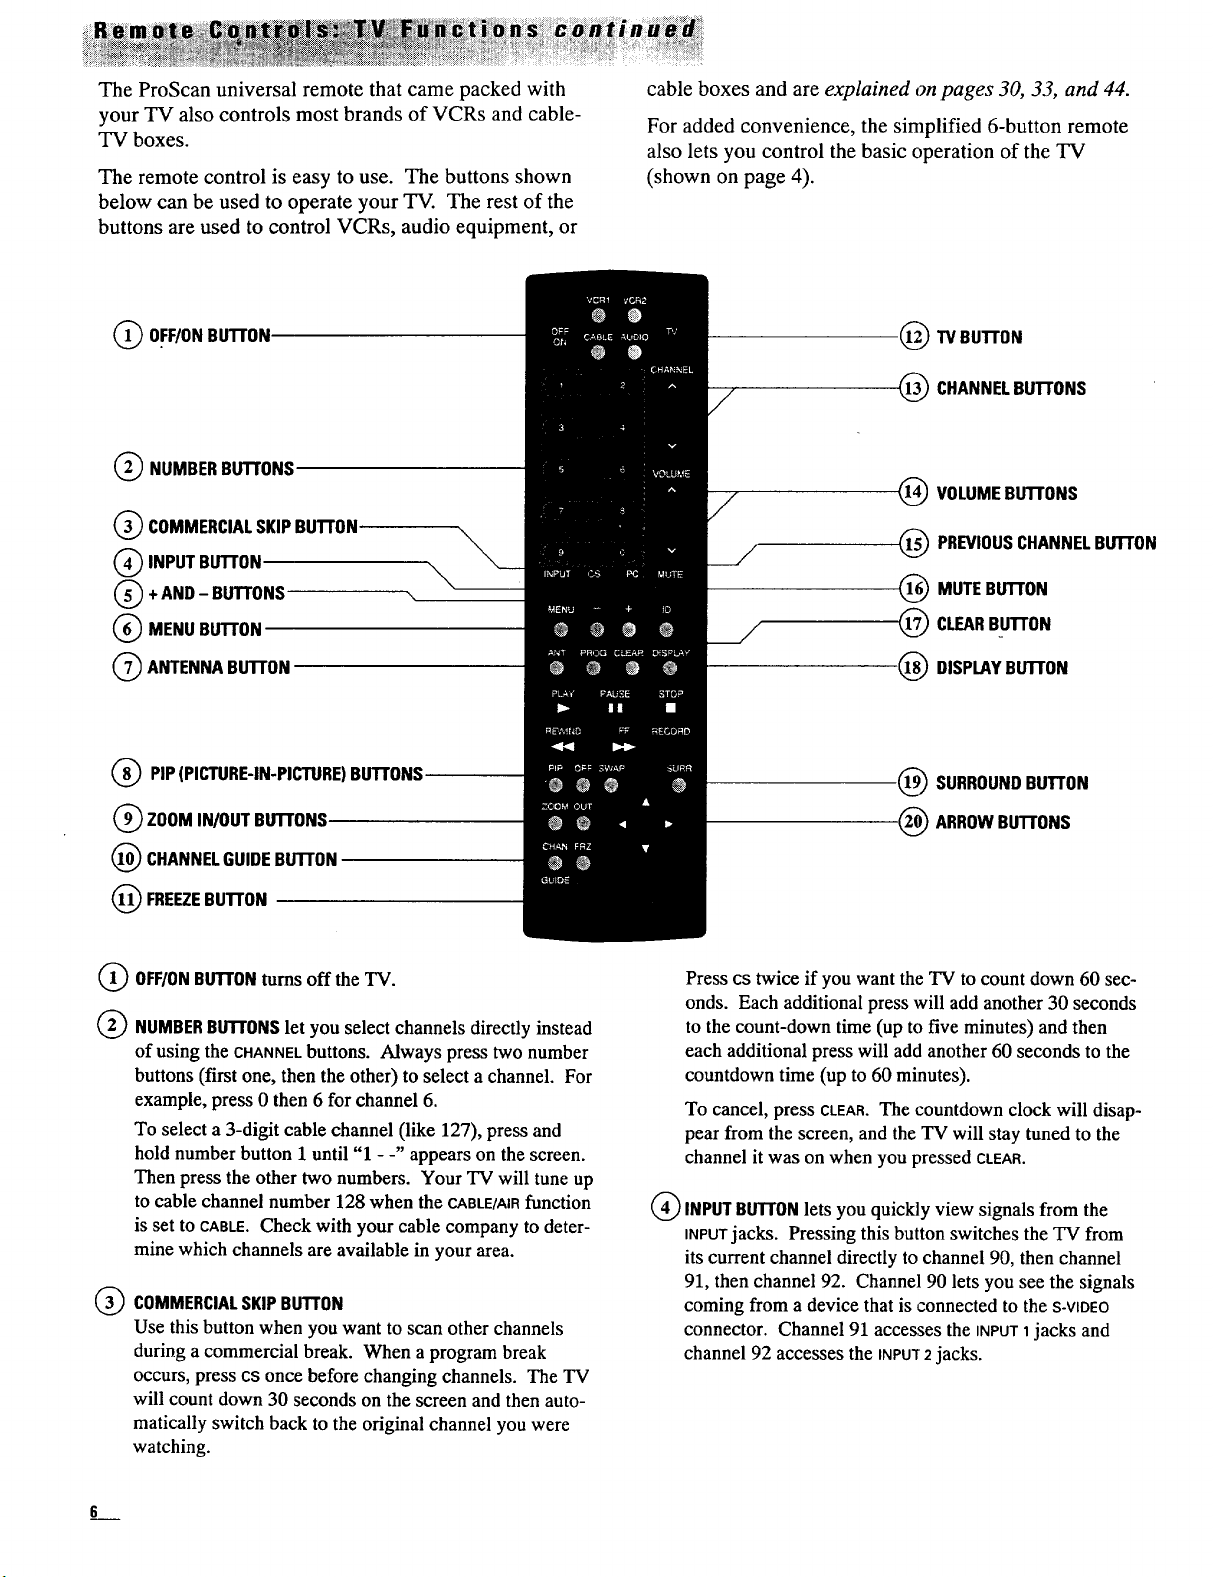
The ProScan universal remote that came packed with
your TV also controls most brands of VCRs and cable-
TV boxes.
The remote control is easy to use. The buttons shown
below can be used to operate your TV. The rest of the
buttons are used to control VCRs, audio equipment, or
cable boxes and are explained on pages 30, 33, and 44.
For added convenience, the simplified 6-button remote
also lets you control the basic operation of the TV
(shown on page 4).
(_) OFF/ONBUTrON
(_) NUMBERBUTrONS
Q COMMERCIALSKIPBU'I'FON
(_ INPUTBUTFON
+AND - BU'rFONS
(_) MENU BU'I'rON
Q ANTENNA BUII'ON
Q PIP(PICTURE-IN-PICTURE)BU'I'FONS
(_ Z00M IN/OUT BU'I'rONS
CHANNELGUIDEBUTTON
(_) FREEZEBUTrON
_TV BU'I-rON
1_ CHANNELBUTTONS
(_) VOLUMEBUTFONS
(_) PREVIOUSCHANNELBU'I'rON
MUTEBUII'ON
_--_) CLEARBUII'ON
1_) DISPLAYBU'i'I'ON
1_ SURROUNDBu'rr0N
(_ ARROWBUTr0NS
OFF/ONBU'I'rONturns off the TV.
NUMBERBuTroNslet you select channels directly instead
of using the CHANNELbuttons. Always press two number
buttons (first one, then the other) to select a channel. For
example, press 0 then 6 for channel 6.
To select a 3-digit cable channel (like 127), press and
hold number button 1 until "1 - -" appears on the screen.
Then press the other two numbers. Your TV will tune up
to cable channel number 128 when the CABLE/AIRfunction
is set to CABLE.Check with your cable company to deter-
mine which channels are available in your area.
COMMERCIALSKIPBUTTON
®
Use this button when you want to scan other channels
during a commercial break. When a program break
occurs, press cs once before changing channels. The TV
will count down 30 seconds on the screen and then auto-
matically switch back to the original channel you were
watching.
Press cs twice if you want the TV to count down 60 sec-
onds. Each additional press will add another 30 seconds
to the count-down time (up to five minutes) and then
each additional press will add another 60 seconds to the
countdown time (up to 60 minutes).
To cancel, press CLEAR.The countdown clock will disap-
pear from the screen, and the TV will stay tuned to the
channel it was on when you pressed CLEAR.
(_) INPUTBUTr0Nlets you quickly view signals from the
iNPUTjacks. Pressing this button switches the TV from
its current channel directly to channel 90, then channel
91, then channel 92. Channel 90 lets you see the signals
coming from a device that is connected to the S-VIDEO
connector. Channel 91 accesses the iNPUT1jacks and
channel 92 accesses the INPU'r2 jacks.
Page 11

(_)+ AND BUTTONS
Use these buttons afteryou have pressed the MENU button
to enter or adjust functions.
(_) MENUBUTTON
Press MENUrepeatedly until the menu you want to display
is selected, then press + or-. Next press MENUrepeated-
ly to select the function you want to adjust and then press
+ or- to adjust the setting. Details about using each
function begin on page 10.
ANTENNABUTTON
Because your "IV has two different antenna inputs on the
back (labeled ANTA and ANTa) yOUcan connect more
than one antenna or signal source. Press the ANTENNA
button to switch from one input to the other.
The color of the channel number on the screen indicates
which antenna input you are watching. The channel
numbers are blue for Am"Aand yellow for ANTe. If the
channel numbers are blue, you are watching whatever is
connected tothe ANTA input on the back of the TV. If
the channel numbers are yellow, you are watching what-
ever is connected to the ANTe input on the back of the
TV. Details are on page 25.
)PIP (PICTURE-IN-PICTURE)CONTROLBUTTONSare used to
display two pictures on the TV screen at once. The little
picture can be moved, frozen, or switched with the big
picture. Details are on pages 28-29.
ZOOMIN/0ur BUTTONSlet you make the picture bigger.
Details are on page 8.
CHANNELGUIDEBUTTONlets you display several channels
at the same time. Details are on page 8.
®
CHANNELBUTTONS
Press CHANNELup to see tile next higher channel in
memory, or press CHANNELdown to see the next lower
channel in memory. Channels 2 through 13 and 91 were
programmed into the channel memory for you at the
factory.
Your TV will automatically program active channels for
your area into memory when you start the AutoProgram
feature described onpage 24. If desired, you can also
add or erase individual channels as described on
page 24.
VOLUMEBUTTONS
®
Press VOLUME up to increase volume, or pressVOLUME
downto decreasevolume. The volume displaywill auto-
matically appear on the screen when you press the VOL-
UMEbuttons.
®
PREVIOUSCHANNELBUTTON
Pressing the PCbutton causes the TV to change back to
the last-tuned channel, q_is is useful should you want to
monitor two channels.
To operate, select the first channel you want to watch.
Then select the other channel by pressing two number
buttons. The TV will now change back and forth
between the two channel:s each time you press the PC
button.
®
MUTEBu'rroN
Press MUTEtOquickly reduce sound to its minimum
level without affecting the picture. This is very useful
during telephone calls or other interruptions. When
sound is muted, the word MUTEwill appear on the
screen. To restore sound, press MUTEagain, or press
VOLUME up.
FREEZEBuTroN lets you freeze the picture. Press again to
return to an action picture. Details are onpages 8
and 29.
TVBUTTONturns on TV and puts remote in "TV Mode"
so thatthe other remote buttons will control the TV.
Also displays time (if clock has been set) and channel
number on the TV screen.
Important Note: Most buttons on the remote control will not con-
trol the TV unless the remote is in the "'IV Mode". If another com-
ponent button (such asVCR1, VCR2,or AUDIO) is pressed, the
remote will no longer be in the "TV Mode". To get back into the
"TV Mode", simply press the button labeled rv. The remote will
go back into the "TV Mode" and will control the "IV again.
CLEARBUTTON
@
Pressing CLEARquickly clears the screen of all on-screen
display messages (except mute and parental control). It
is also used to cancel the Commercial Skip count-down
clock and to erase channel labels.
®
DISPLAYBUTTONdisplays time (if clock has been set)
and channel number on the "IV screen. Also quickly
removes menus and dislplays from the screen.
®
SURROUNDBUTTONcha:ages the SURROUNDfunction
between ON and OFF. Details are on pages 16-1Z
@
ARROWBUTTONSlet yoga move around picture when it is
zoomed in. Also let you move small picture around the
screen during picture-in-picture.
__2
Page 12
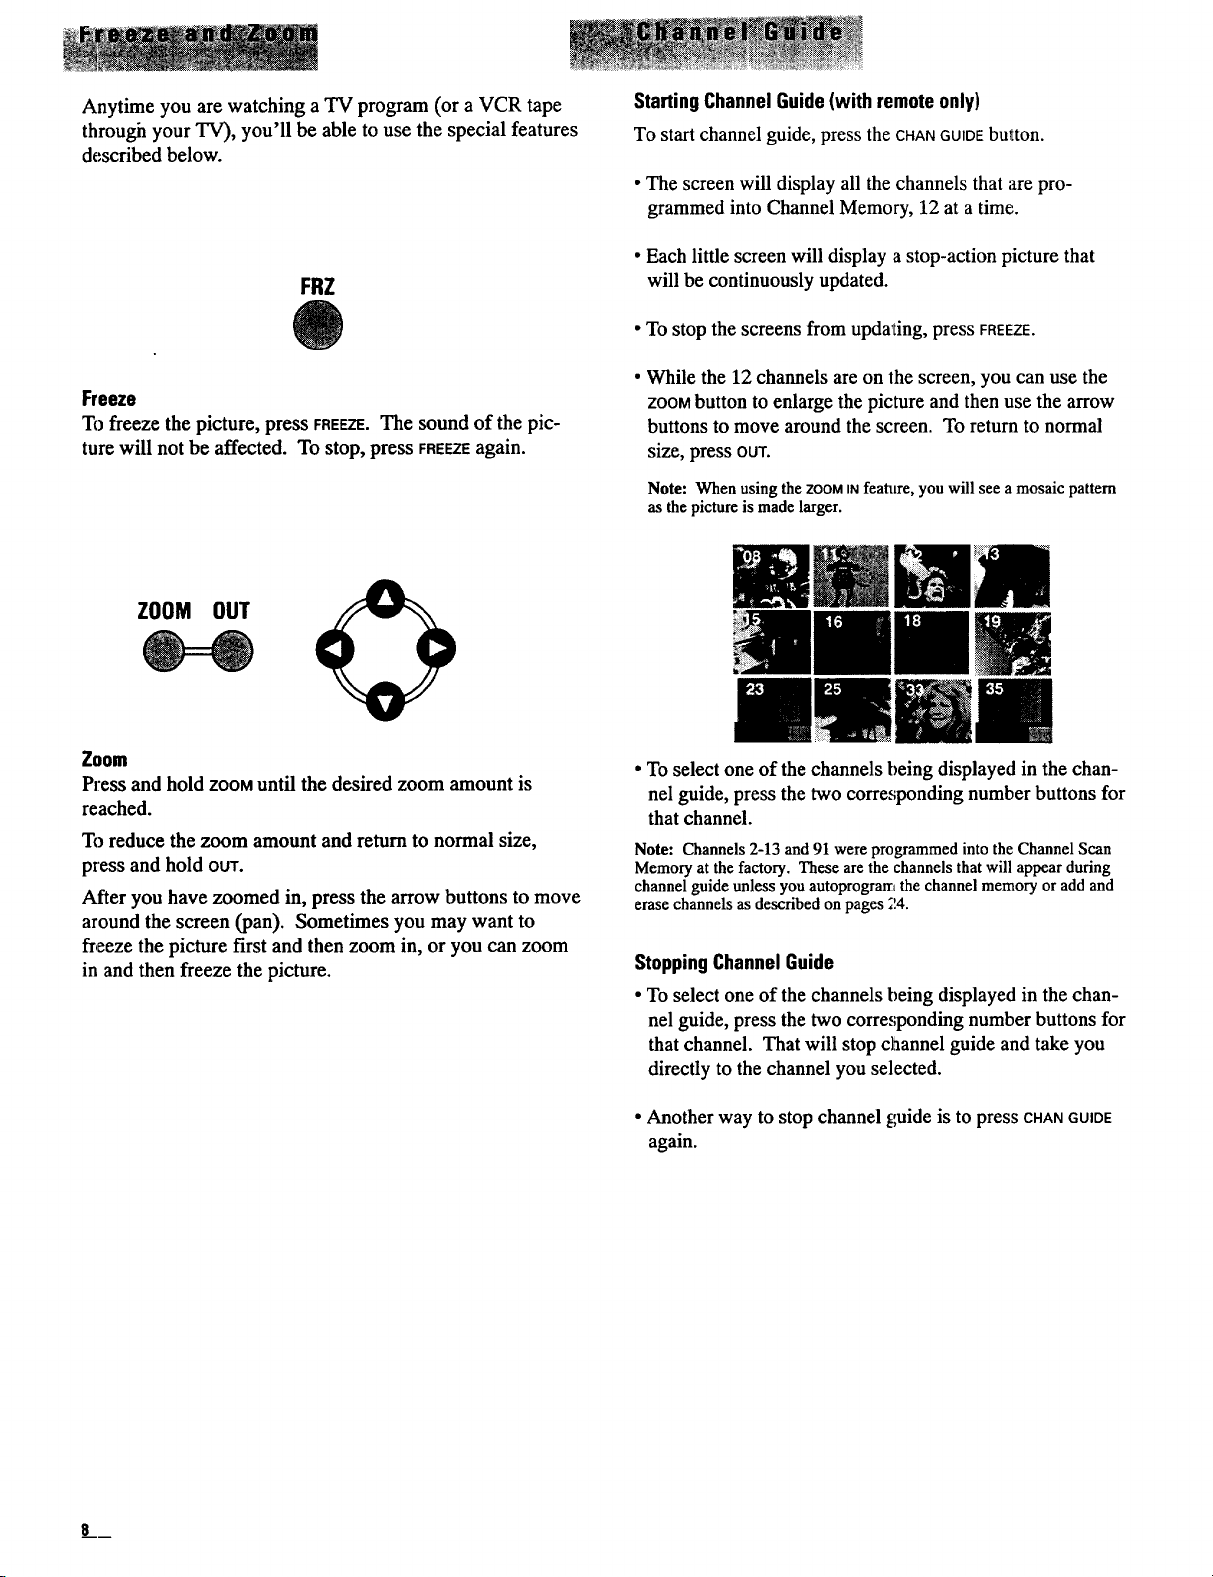
Anytime you are watching a TV program (or a VCR tape
through your TV), you'll be able to use the special features
described below.
FRZ
StartingChannelGuide(with remote only)
To start channel guide, press the CHANGUIDEbutton.
• The screen will display all the channels that are pro-
grammed into Channel Memory, 12 at a time.
• Each little screen will display a stop-action picture that
will be continuously updated.
• To stop the screens from upda'ting, press FREEZE.
Freeze
To freeze the picture, press FREEZE.The sound of the pic-
ture will not be affected. To stop, press FREEZEagain.
ZOOM OUT
Zoom
Press and hold ZOOMuntil the desired zoom amount is
reached.
To reduce the zoom amount and return to normal size,
press and hold OUT.
After you have zoomed in, press the arrow buttons to move
around the screen (pan). Sometimes you may want to
freeze the picture first and then zoom in, or you can zoom
in and then freeze the picture.
• While the 12 channels are on the screen, you can use the
ZOOMbutton to enlarge the picture and then use the arrow
buttons to move around the screen. To return to normal
size, press OUT.
Note: When using the ZOOMINfeature, you will see a mosaic pattern
as the picture is made larger.
• To select one of the channels being displayed in the chan-
nel guide, press the two corresponding number buttons for
that channel.
Note: Channels 2-13 and 91 were programmed into the Channel Scan
Memory at the factory. These are the channels that will appear during
channel guide unless you autoprogram the channel memory or add and
erase channels as described on pages ;!4.
StoppingChannelGuide
• To select one of the channels being displayed in the chan-
nel guide, press the two corresponding number buttons for
that channel. That will stop channel guide and take you
directly to the channel you selected.
• Another way to stop channel guide is to press CHANGUIDE
again.
Page 13
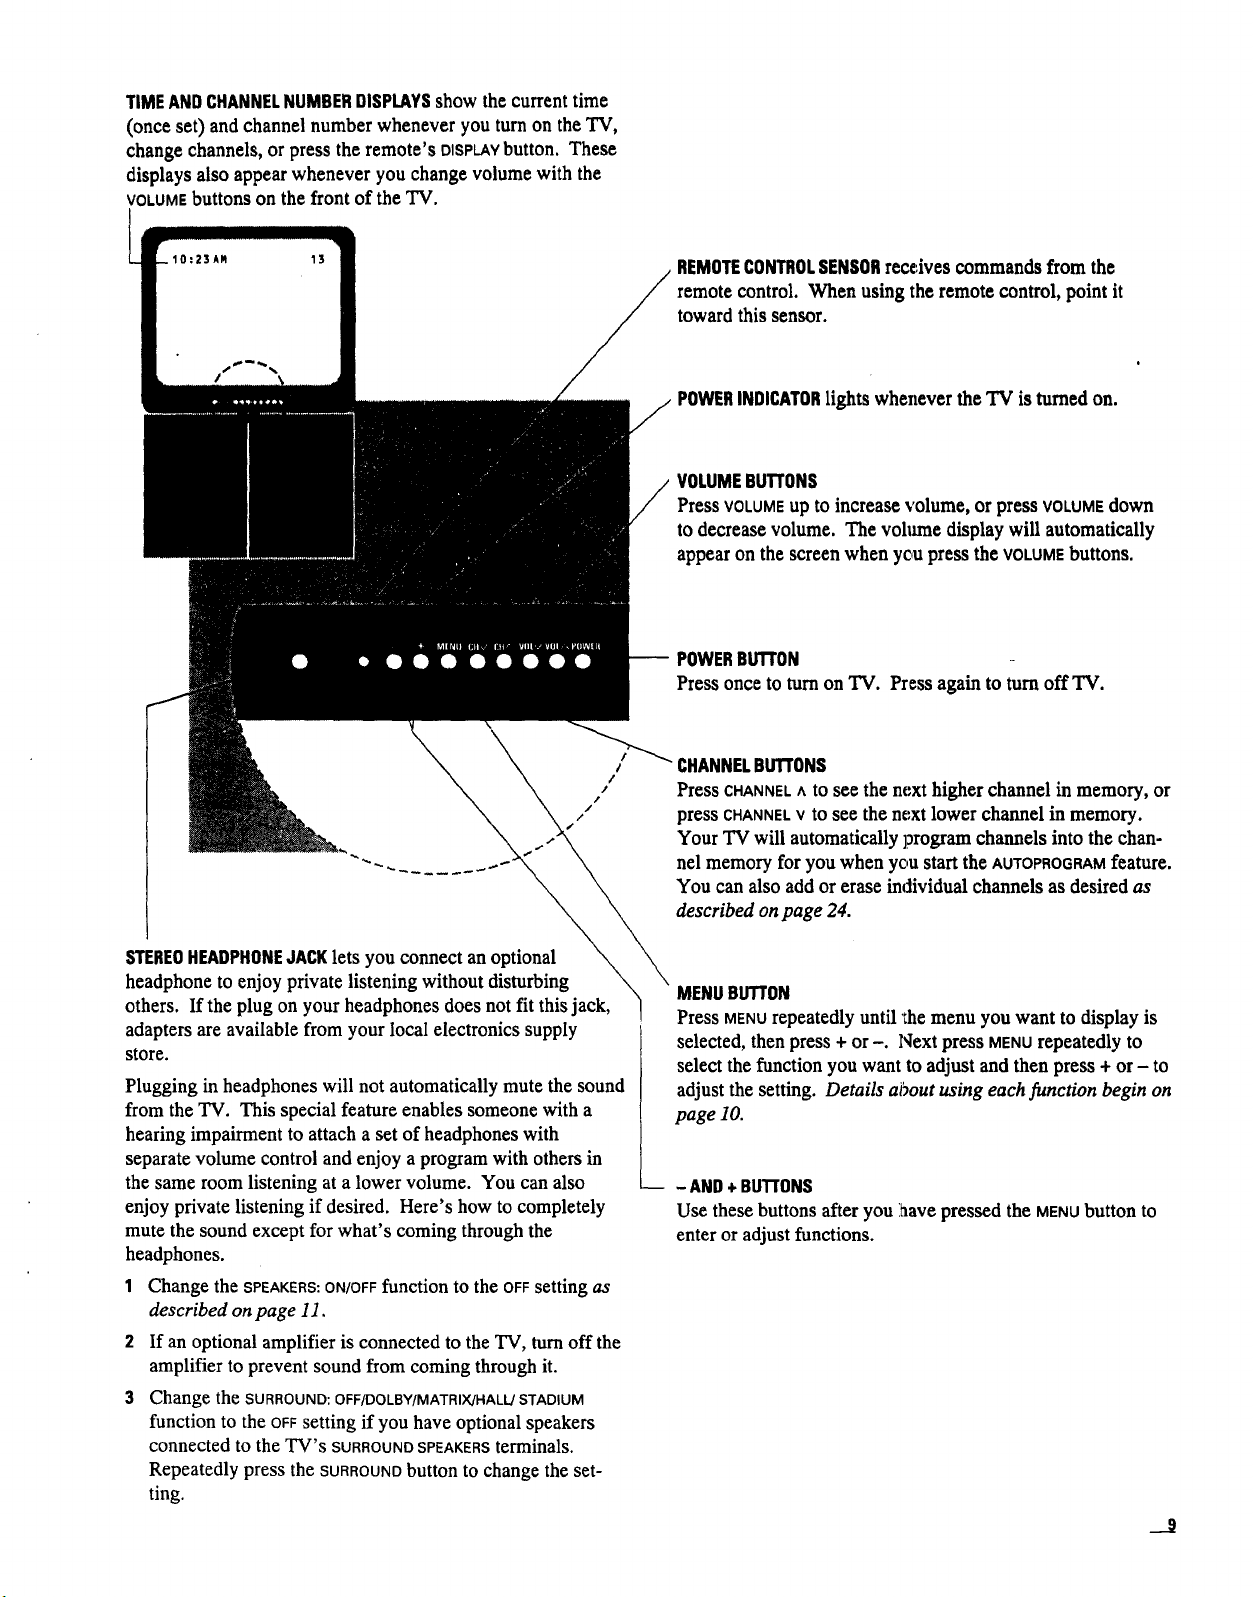
TIMEANDCHANNELNUMBERDISPLAYSshow the current time
(once set) and channel number whenever you turn on the TV,
change channels, or press the remote's OISPL.AYbutton. These
displays also appearwhenever you change volume with the
VOLUMEbuttons on the front of the TV.
10:23Am 13
/
REMOTECONTROLSENSORreceivescommandsfrom the
remote control. When using the remote control, point it
toward this sensor.
POWERINDICATORlights whenever the TV is turned on.
VOLUMEBUTTONS
PressVOLUMEup tOincreasevolume, or pressVOLUMEdown
to decrease volume. The vohmae display will automatically
appear on the screen when yc,upress the VOLUMEbuttons.
POWERBUTTON
Pressonce toturnon "IV. Pressagainto turnoff TV.
I
/
/
/
/
/
/
CHANNELBUTTONS
PressCHANNEL ^ tOSeethenext higher channelin memory,or
press CHANNELVtOsee the next lower channel in memory.
Your TV will automatically program channels into the chan-
nel memory for you when you start the AUTOPROGRAMfeature.
You can also add or erase individual channels as desired as
described on page 24.
STEREOHEADPHONEJACKlets you connect an optional
headphone to enjoy private listening without disturbing
others. If the plug on your headphones does not fit this jack,
adapters are available from your local electronics supply
store.
Plugging in headphones will not automatically mute the sound
from the TV. This special feature enables someone with a
hearing impairment to attach a set of headphones with
separate volume control and enjoy a program with others in
the same room listening at a lower volume. You can also
enjoy private listening if desired. Here's how to completely
mute the sound except for what's coming through the
headphones.
1 Change the SPEAKERS:ON/OFFfunction tOthe OFF setting as
described on page I1.
2 If an optional amplifier is connected to the TV, turn off the
amplifier to prevent sound from coming through it.
3 Change the SURROUND:OFF/DOLBY/MATRIX/HALLJSTADIUM
function to the OFFsetting if you have optional speakers
connected to the TV's SURROUNDSPEAKERSterminals.
Repeatedly press the SURROUNDbutton to change the set-
ting.
MENUBUTTON
Press MENU repeatedly until 'Ihe menu you want to display is
selected, then press + or -. Next press MENUrepeatedly to
select the function you want to adjust and then press + or - to
adjust the setting. Details about using each function begin on
page 10.
-- - AND+BuTr0NS
Use these buttons after you iaave pressed the MENUbutton to
enter or adjust functions.
J
Page 14
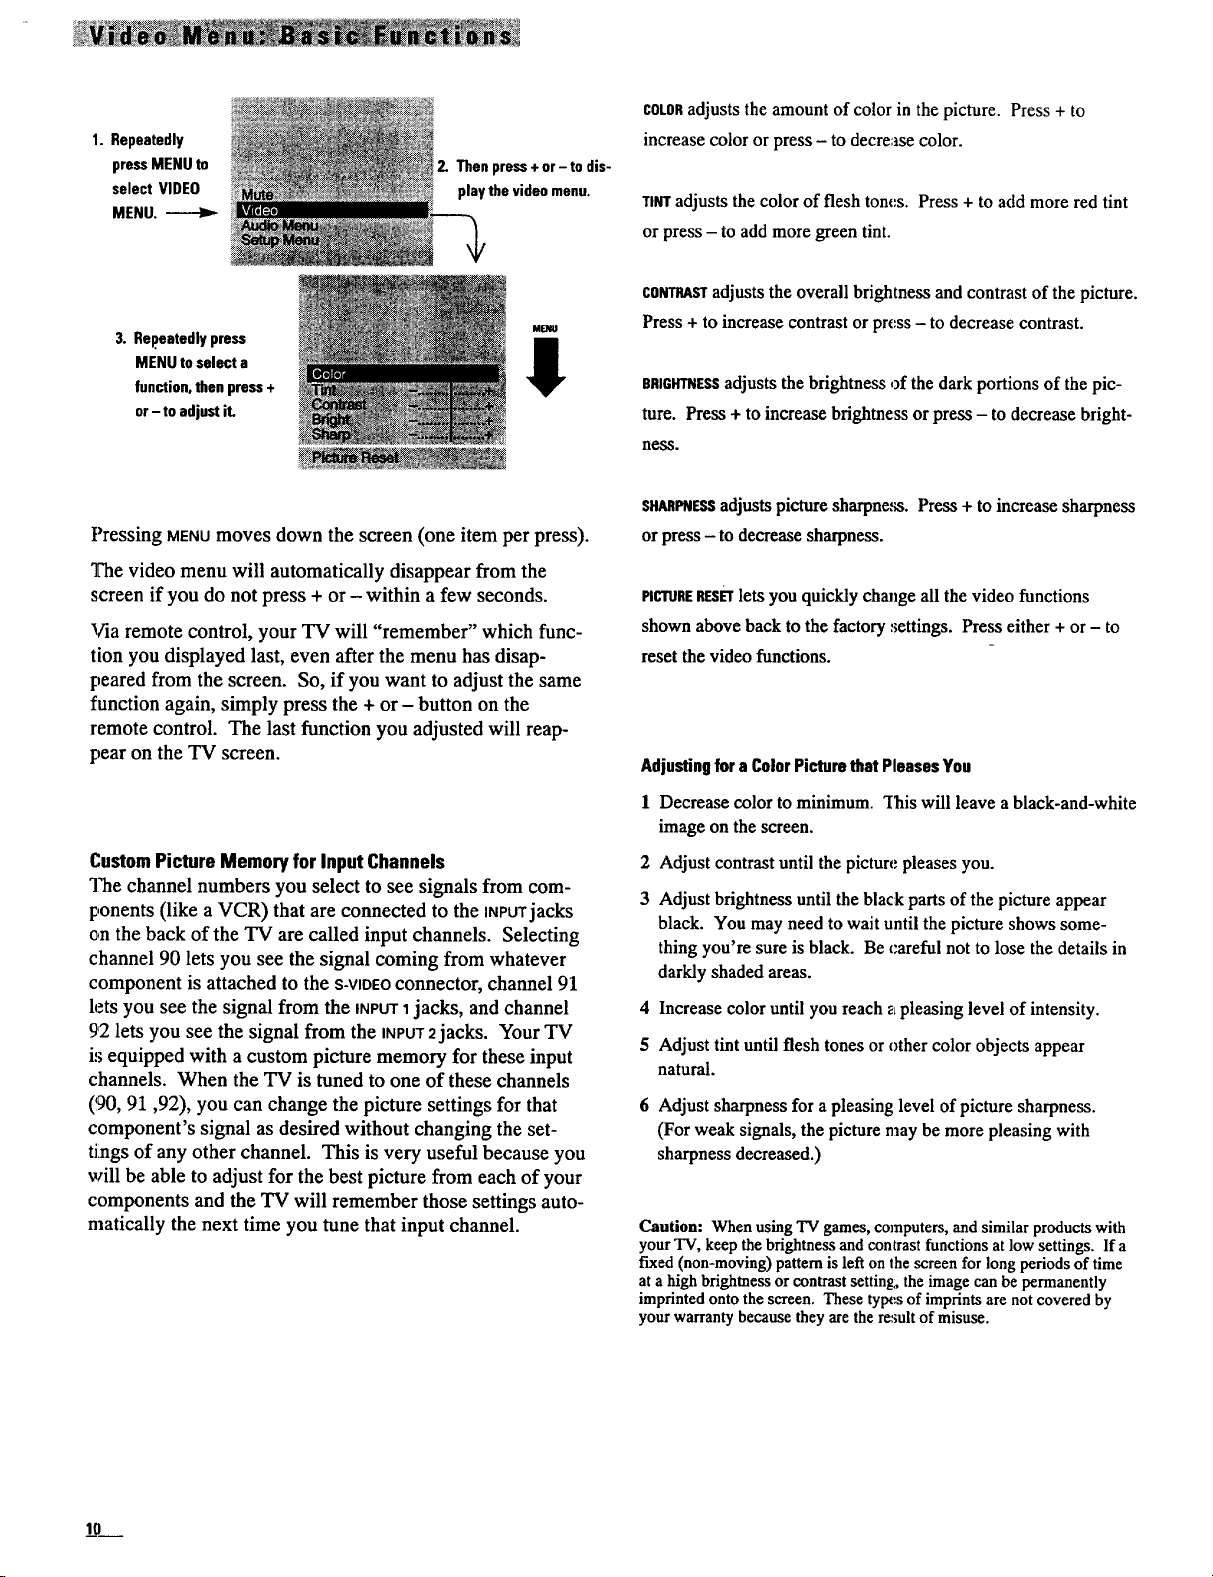
1. Repeatedly
pressMENU to
select VIDEO
MENU. ------Iz-
3. Repeatedlypress
MENU to select a
function,then press+
or-to adjustit.
2. Then press+ or- todis-
playthe video menu.
ME/Ill
I
Pressing MENUmoves down the screen (one item per press).
The video menu will automatically disappear from the
screen if you do not press + or - within a few seconds.
Via remote control, your TV will "remember" which func-
tion you displayed last, even after the menu has disap-
peared from the screen. So, if you want to adjust the same
function again, simply press the + or - button on the
remote control. The last function you adjusted will reap-
pear on the TV screen.
COLORadjusts the amount of color in the picture. Press + to
increase color or press - to decrease color.
TINTadjusts the color of flesh tom:s. Press + to add more red tint
or press - to add more green tint.
CONTRASTadjusts the overall brightness and contrast of the picture.
Press + to increase contrast or pre,ss - to decrease contrast.
BRIGHTNESSadjusts the brightness of the dark portions of the pic-
ture. Press + to increase brightness or press - to decrease bright-
ness.
s_p_ESs adjusts picturesharpness. Press+ toincrease sharpness
orpress- to decreasesharpness.
PICTURERESETlets you quickly chmzgeall the video functions
shown above back to the factorysettings. Press either + or - to
reset the video functions.
Adjustingfora ColorPicturethat PleasesYou
1 Decrease color to minimum. "[lais will leave a black-and-white
image on the screen.
CustomPictureMemoryfor Input Channels
The channel numbers you select to seesignals from com-
ponents (like a VCR) that are connected to the INPUTjacks
on the back of the TV are called input channels. Selecting
channel 90 lets you see the signal coming from whatever
component is attached to the S-VIDEOconnector, channel 91
lets you see the signal from the INPUT1jacks, and channel
92 lets you see the signal from the INPUT2jacks. Your TV
is equipped with a custom picture memory for these input
channels. When the TV is tuned to one of these channels
(!90, 91,92), you can change the picture settings for that
component's signal as desired without changing the set-
tings of any other channel. This is very useful because you
will be able to adjust for the best picture from each of your
components and the TV will remember those settings auto-
matically the next time you tune that input channel.
2 Adjust contrast until the picture pleases you.
3 Adjust brightness until the black parts of the picture appear
black. You may need to wait until the picture shows some-
thing you're sure is black. Be careful not to lose the details in
darkly shaded areas.
4 Increase color until you reach z pleasing level of intensity.
5 Adjust tint until flesh tones or other color objects appear
natural.
6 Adjust sharpness for a pleasing level of picture sharpness.
(For weak signals, the picture may be more pleasing with
sharpness decreased.)
Caution: When using TV games, computers, and similar products with
your "IV, keep the brightness and contrast functions at low settings. If a
fixed (non-moving) pattern is left on the screen for long periods of time
at a high brightness or contrast setting, the image can be permanently
imprinted onto the screen. These ty[x.s of imprints are not covered by
your warranty because they are the result of misuse.
10
Page 15

1. Repeatedly
pren MENU to
selectAUDIO
MENU.
2. Thenpreu+or- to
displaythe audiomenu.
3. Repeatedlypreu
MENUtoselecta
function,thenpren +
MlaW
or- to ediustiL
Pressing MENUmoves down the screen (one item per press).
The audio menu will automatically disappear from the
screen if you do not press + or - within a few seconds.
Via remote control, your TV will "remember" which func-
tion you displayed last, even after the menu has disap-
peared from the screen. So, if you want to adjust the same
function again, simply press the + or - button on the
remote control. The last function you adjusted will reap-
pear on the TV screen.
The EQUALIZERfunction lets you display an on-screen graphic equal-
izer so you can remotely adjust audio bandwidths for different
environments or individual tastes. Press + to display graph, then
press MENUtOselect bandwidth. Press + to increase or press - to
decrease setting. Details are on pages I2-13.
The BALANCEfunction adjusts the leR/Hght balance of sound from
the speakers. When adjusting the balance, sit in your normal
viewing seat while pressing the - or + button until the sound
seems to originate from a point haJ,fway between the speakers..
The STEREO/SAP function lets you choose either monaural or stereo
audio and SAP (Second Audio Program) audio when it is available
by pressing the + or - button. Nolmally, you can leave this func-
tion set to stereo, and your TV will automatically produce either
monaural or stereo audio-whichever is broadcast. Details about
stereo and SAP are on page I4.
The SURROUNDfunction lets you choose one of five types of sur-
round soundmodes: OFF) DOLBY, MATRIX) HALL, or STADIUM.
Details are on pages 16-17.
The REARVOLUMEdisplay lets you adjust the volume level of exter-
nal surround speakers that are cozmected to the SURROUNDSPEAK-
ERjacks on the back of the TV. It also controls the level of vol-
ume coming out of the SURROUTjacks when connected to an
amplifier. Details are on pages 16-17 and 51.
The SURROUNDBALANCEdisplay allows you to optimize the surround
out audio to compensate for program sources with unbalanced
right and left audio. When adjusting this function, the internal
speakers (or the speakers connected to the EXTERNALSPEAKERSter-
minals) will be muted so that you only hear the surround sound
audio. Details are on pages 16-J!7.
The EXPANDEDSTEREOfeature can be turned on or off by pressing +
or -. This feature adds greater depth and dimension to stereo
broadcasts. Details about expanded stereo are on page 15.
The SPEAKERSOI_OFF function lets you turn off the TV's speakers by
pressing + or-. You will probably want to leave the TV's speak-
ers turned on unless you desire private listening through the head-
phone jack or unless you connect an amplifier (with its own set of
speakers) to the appropriate jacks on the back of the 'IV as
described on page 50. Turning this function off, turns off not only
the TV's internal speakers but also any external speakers connect-
ed to the TV's EXTERNALSPEAKERSterminals. Sound will then
only come through the speakers connected to the amplifier and any
speakers connected to the TV's SURROUNDSPEAKERSterminals.
Details are on page 52.
__!_!
Page 16
The EQUALIZERfunction lets you display an on-screen
graphic equalizer so you can remotely adjust audio
bandwidths for different environments or individual tastes.
Adjusting the graphic equalizer is primarily a matter of
personal taste. The adjustments can be thought of as more
precise tone controls that allow certain characteristics of
the audio to be changed without affecting others. For
example, if someone enjoys sharp, clean horns (brass),
increasing the 4.5 kHz control can bring them out. Using a
conven.tional treble control would also increase vocals and
high-frequency noise, which might be an undesirable
side-effect.
The equalizer also gives control of the center range that
bass and treble controls do not affect. Since vocal
frequencies are in these center ranges, tone controls have
little effect on them. The center bands not only give
control of vocals, but allow selective vocal ranges to be
controlled. For example, reducing the 400 Hz and 1 kHz
bands can soften a strident male vocalist, and increasing
the 2 kHz and 4.5 kHz controls can bring a subtle female
voice forward. Adjusting the 1 kHz and 2 kHz bands can
add intelligibility to a speaker or singer under certain
circumstances.
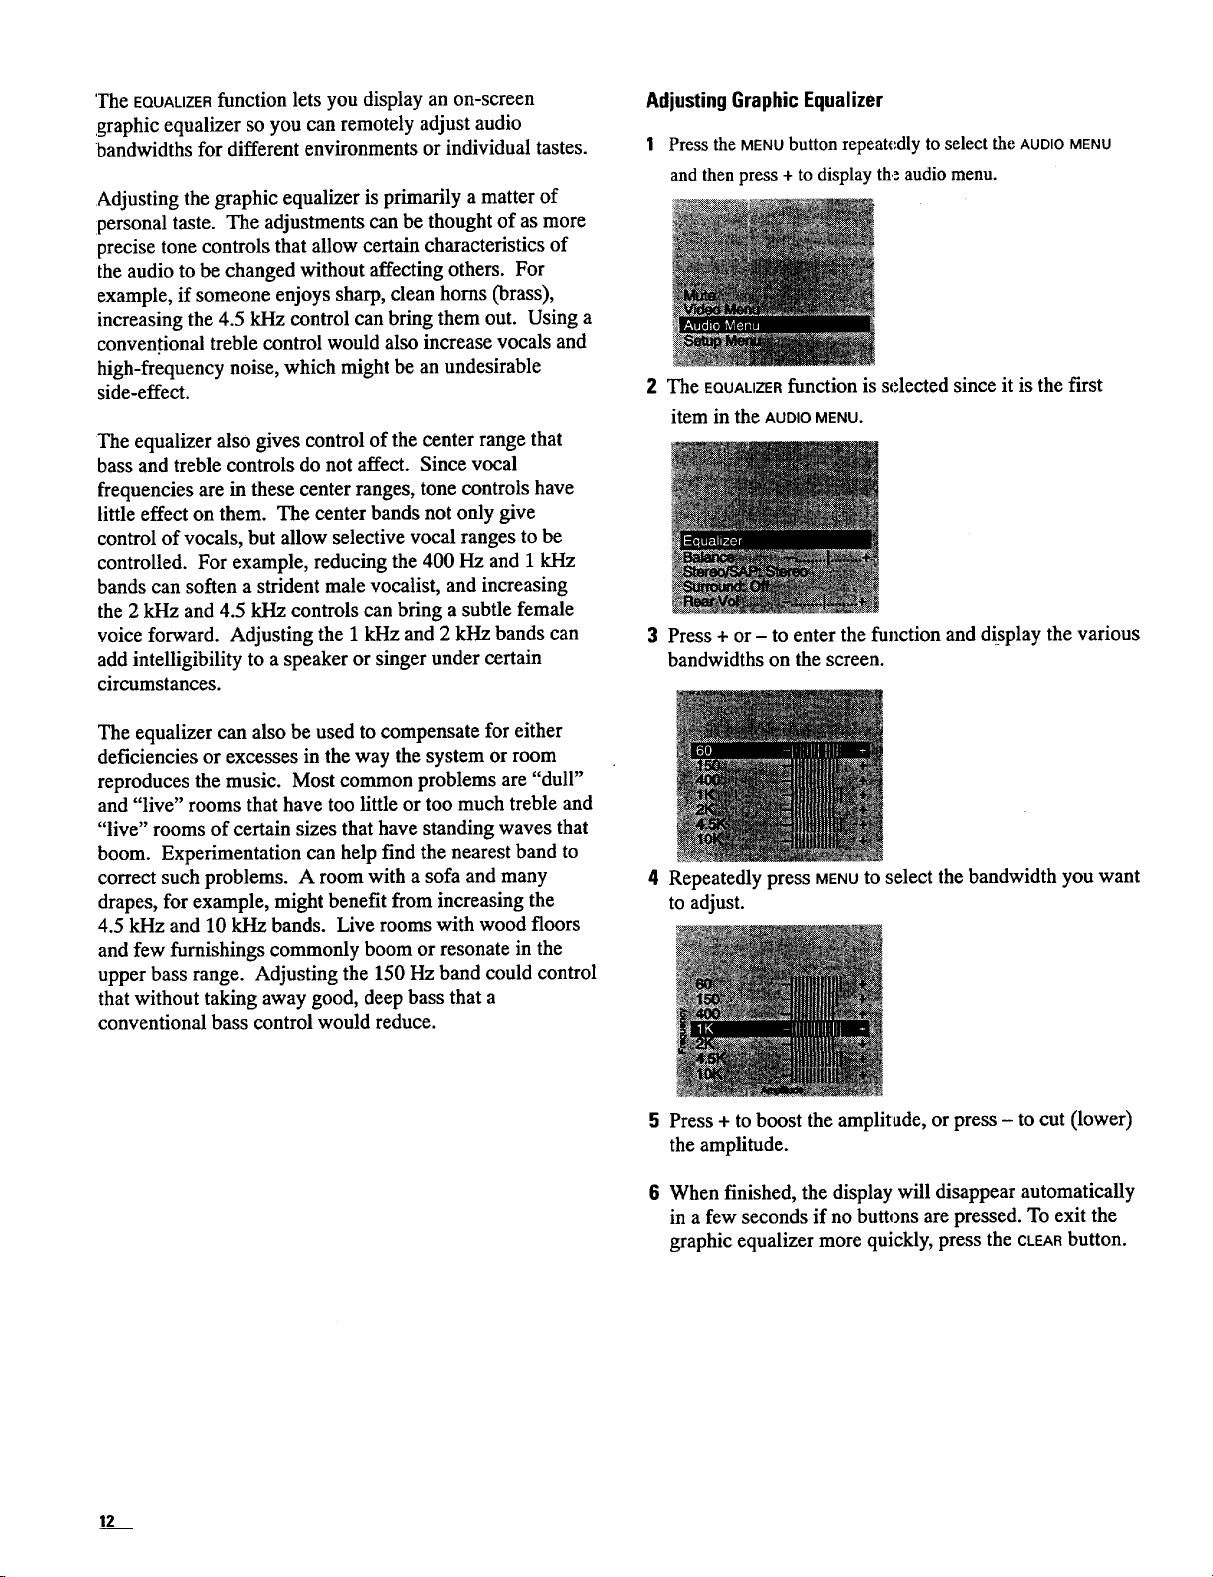
Adjusting Graphic Equalizer
1 Press the MENU button repeatedly to select the AUDIO MENU
and then press + to display the audio menu.
2 The EQUALIZERfunction is selected since it is the first
item in the AUDIOMENU.
3 Press + or - to enter the function and display the various
bandwidths on the screen.
The equalizer can also be used to compensate for either
deficiencies or excesses in the way the system or room
reproduces the music. Most common problems are "dull"
and "live" rooms that have too little or too much treble and
"live" rooms of certain sizes that have standing waves that
boom. Experimentation can help find the nearest band to
correct such problems. A room with a sofa and many
drapes, for example, might benefit from increasing the
4.5 kHz and 10 kHz bands. Live rooms with wood floors
and few furnishings commonly boom or resonate in the
upper bass range. Adjusting the 150 Hz band could control
that without taking away good, deep bass that a
conventional bass control would reduce.
4 Repeatedly press MENUto select the bandwidth you want
to adjust.
5 Press + to boost the amplitude, or press - to cut (lower)
the amplitude.
6 When finished, the display will disappear automatically
in a few seconds if no buttons are pressed. To exit the
graphic equalizer more quickly, press the CLEARbutton.
12
Page 17
N
12..ff._2
60 Hz
150 Hz
400 Hz
lkHz
2 kHz
4.5 kHz
10 kHz
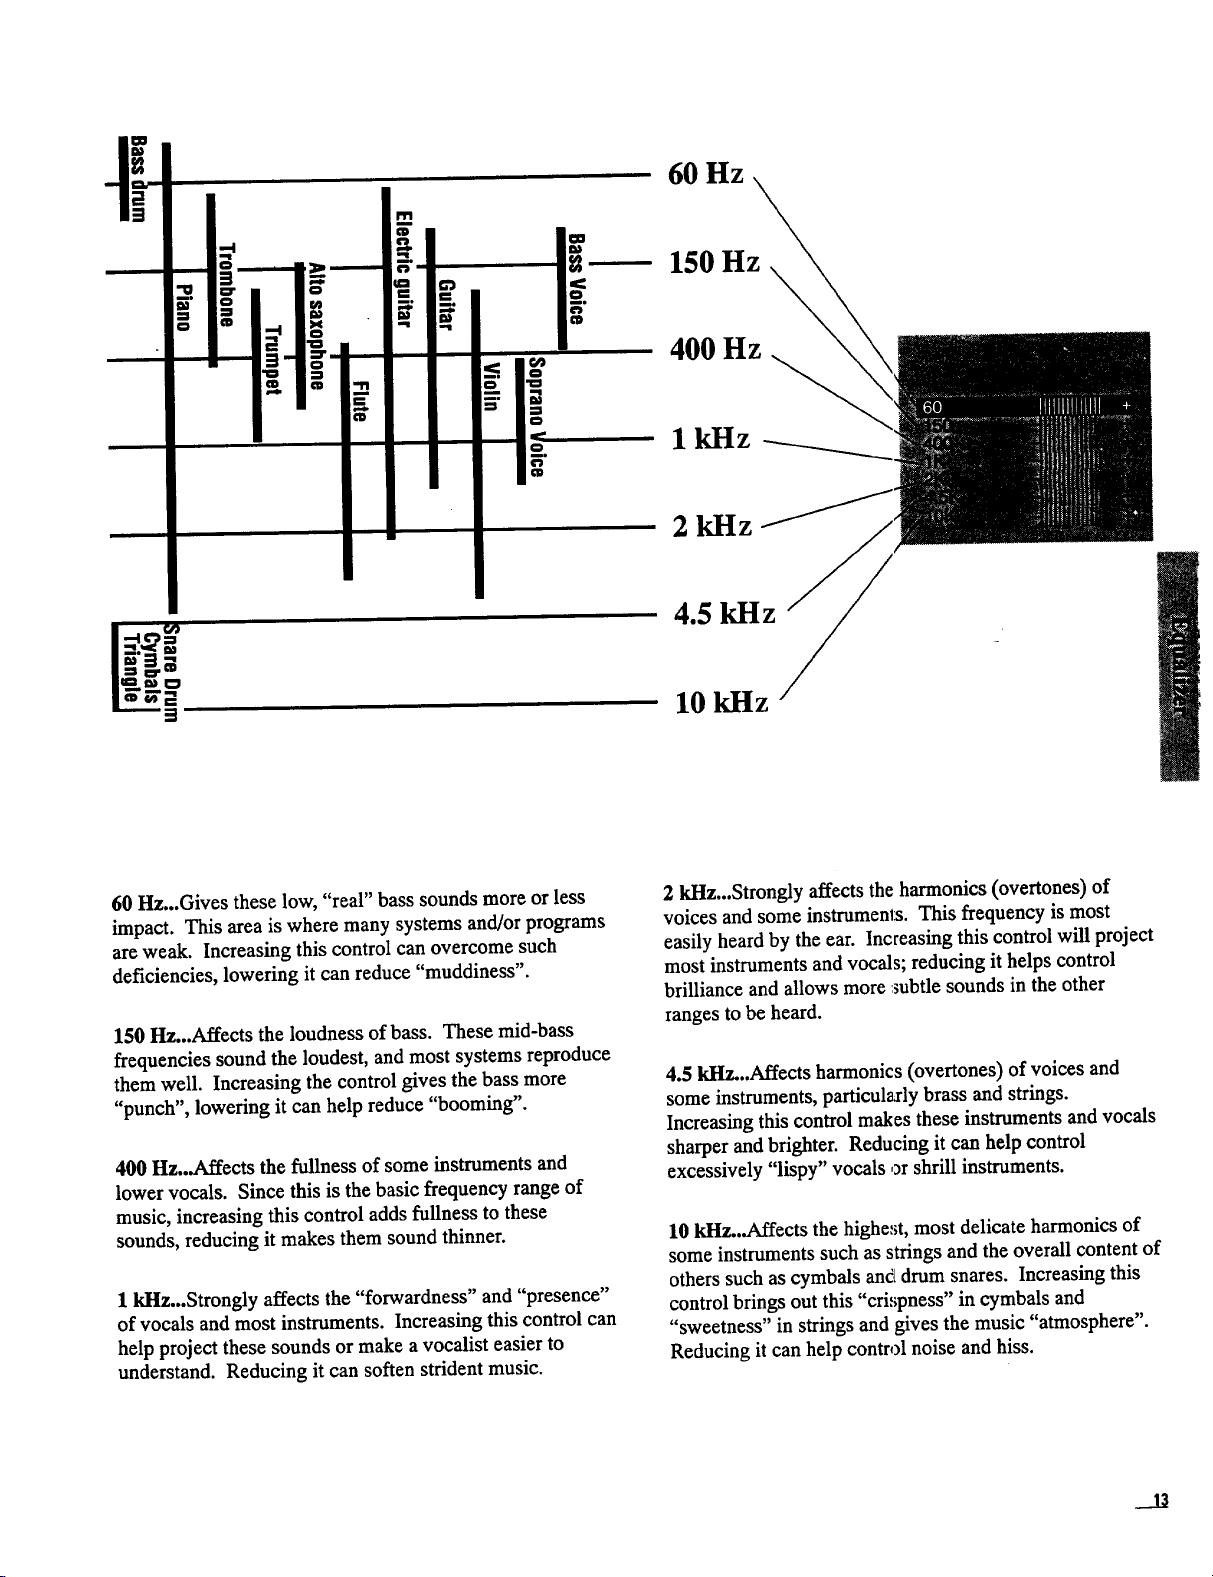
60 Hz...Gives these low, "real" bass sounds more or less
impact. This area is where many systems and/or programs
are weak. Increasing this control can overcome such
deficiencies, lowering it can reduce "muddiness".
150 Hz...Affects the loudness of bass. These mid-bass
frequencies sound the loudest, and most systems reproduce
them well. Increasing the control gives the bass more
"punch", lowering it can help reduce "booming".
400 I-Iz...Affects the fullness of some instruments and
lower vocals. Since this is the basic frequency range of
music, increasing this control adds fullness to these
sounds, reducing it makes them sound thinner.
1 kHz...Strongly affects the "forwardness" and "presence"
of vocals and most instruments. Increasing this control can
help project these sounds or make a vocalist easier to
understand. Reducing it can soften strident music.
2 kHz...Strongly affects the harmonics (overtones) of
voices and some instruments. This frequency is most
easily heard by the ear. Increasing this control will project
most instruments and vocals; reducing it helps control
brilliance and allows more :subtle sounds in the other
ranges to be heard.
4.5 kI-Iz...Affects harmonics (overtones) of voices and
some instruments, particularly brass and strings.
Increasing this control makes these instruments and vocals
sharper and brighter. Reducing it can help control
excessively "lispy" vocals or shrill instruments.
10 kI-Iz...Affects the highest, most delicate harmonics of
some instruments such as strings and the overall content of
others such as cymbals and drum snares. Increasing this
control brings out this "cri,;pness" in cymbals and
"sweetness" in strings and gives the music "atmosphere".
Reducing it can help control noise and hiss.
Page 18
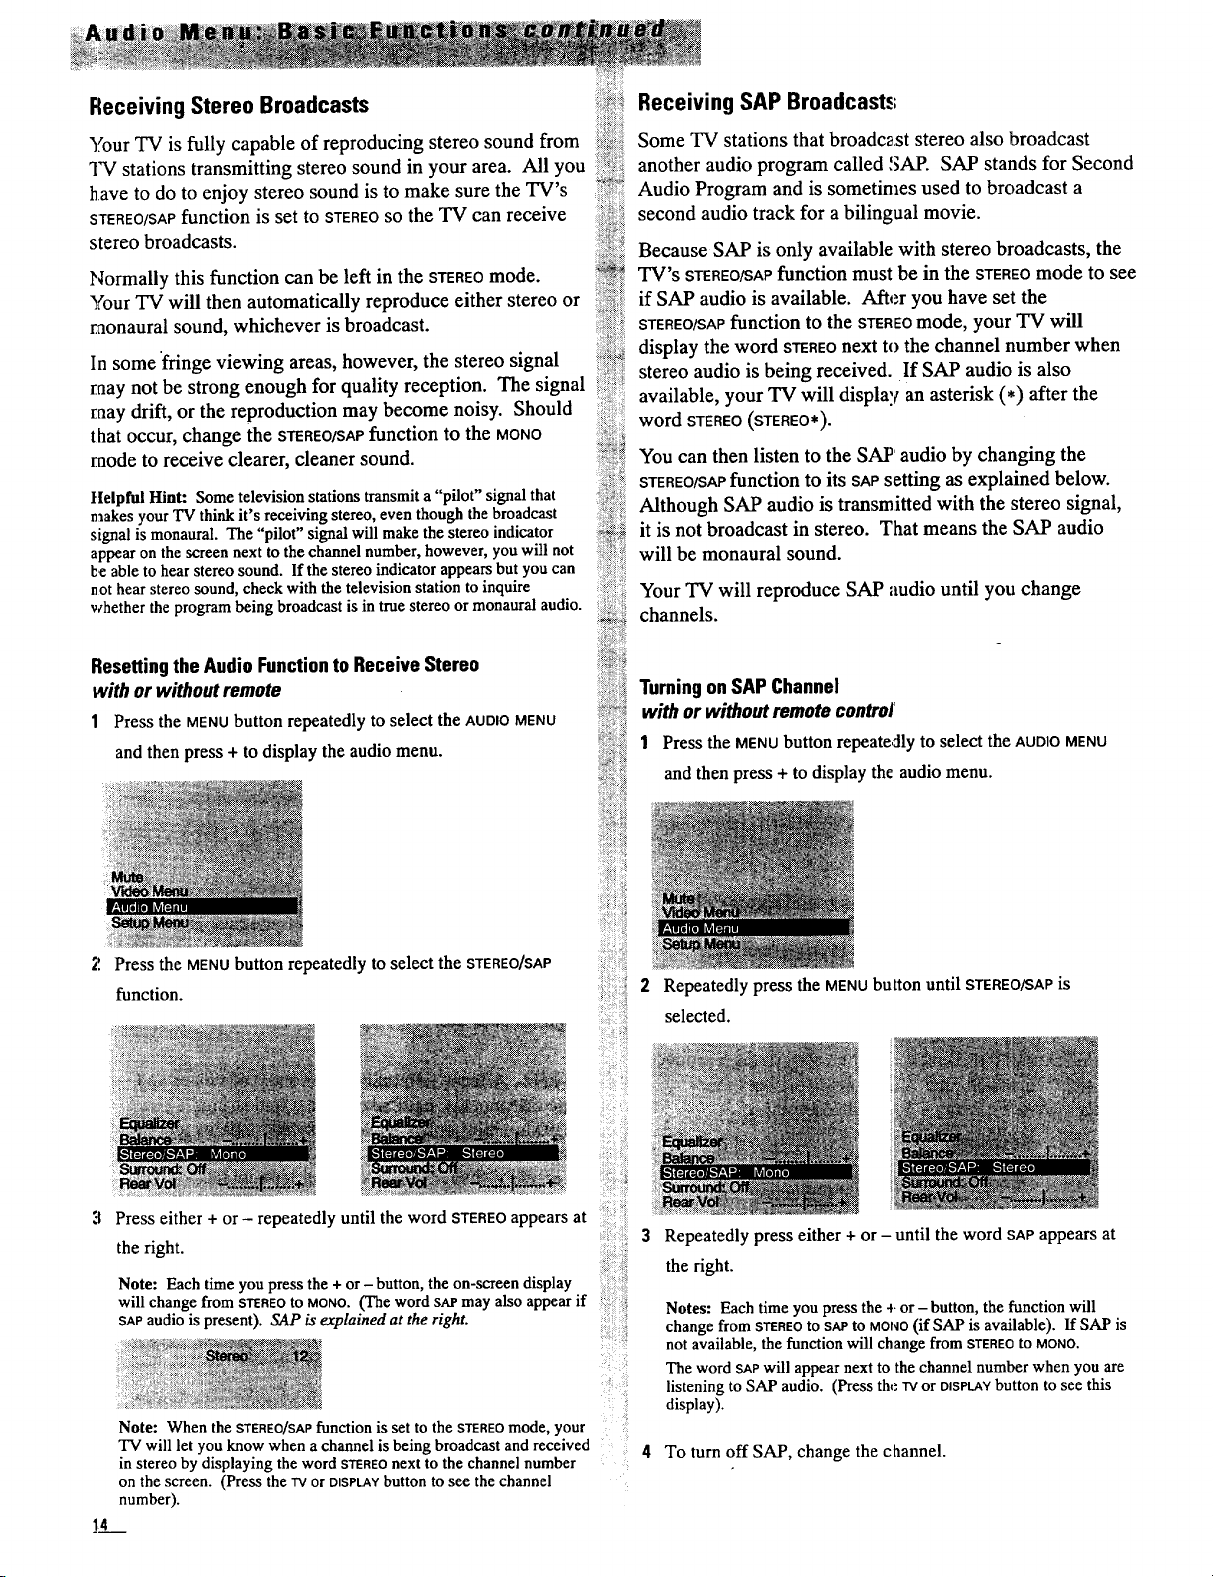
Receiving Stereo Broadcasts
ili:_i!ii_!,,ii!iii_
Your TV is fully capable of reproducing stereo sound from
TV stations transmitting stereo sound in your area. All you
have to do to enjoy stereo sound is to make sure the TV's
STEREO/SAPfunction is set to STEREOSOthe TV can receive
stereo broadcasts :_:_:_,_.-.-
Normally this function can be left in the STEREOmode.
Your TV will then automatically reproduce either stereo or
raonaural sound, whichever is broadcast.
In some fringe viewing areas, however, the stereo signal ',_..s_:
raay not be strong enough for quality reception. The signal
may drift, or the reproduction may become noisy. Should
that occur, change the S_REO/SAPfunction to the MONO
raode to receive clearer, cleaner sound.
Ilelpful Hint: Some television stations transmit a "pilot" signal that
makes your TV think it's receiving stereo, even though the broadcast
signal is monaural. The "pilot" signal will make the stereo indicator
appear on the screen next to the channel number, however, you will not
be able to hear stereo sound. If the stereo indicator appears but you can
not hear stereo sound, check with the television station to inquire
whether the program being broadcast is in true stereo or monaural audio.
i!ii! ii!i
_i%!%
_t_._ You can then listen to the SAP audio by changing the
_;5_ it is not broadcast in stereo. That means the SAP audio
.....__ will be monaural sound.
:z_ ¸_
Receiving SAP Broadcasts
Some TV stations that broadcast stereo also broadcast
another audio program called SAP. SAP stands for Second
Audio Program and is sometimes used to broadcast a
second audio track for a bilingual movie.
Because SAP is only available with stereo broadcasts, the
TV's STEREO/SAPfunction must be in the STEREOmode to see
if SAP audio is available. After you have set the
STEREO/SAPfunction to the STEREOmode, your TV will
display the word STEREOnext to the channel number when
stereo audio is being received• If SAP audio is also
available, your TV will display an asterisk (*) after the
word STEREO (STEREO*).
STEREO/SAPfunction tO its SAPsetting as explained below.
Although SAP audio is transmitted with the stereo signal,
Your TVwillreproduce SApaudio until you change
channels.
Resettingthe Audio Functionto ReceiveStereo
with or withoutremote
1 Press the MENU button repeatedly to select the AUDIO MENU
and then press + to display the audio menu.
2 Press the MENU button repeatedly to select the STEREO/SAP
function.
Press either + or - repeatedly until the word STEREOappears at
the right.
Note: Each time you press the + or - button, the on-screen display
will change from STEREOto MONO.(The word sAP may also appear if
SAPaudio is present). SAP is explained at the right.
Note: When the STEREO/SAPfunction is set to the STEREOmode, your
"IV will let you know when achannel isbeing broadcast and received
in stereo by displaying the word STEREOnext to the channel number
on the screen. (Press the TVor DISPLAYbutton to see the channel
number).
14
:i:i!_iii:i!i_
Turningon SAPChannel
i:'}iii{,_
with or withoutremote controJ'
:;gi)_iiiiiiiii_
1 Press the MENUbutton repeate,zllyto select the AUDIOMENU
;_'i?!i}
i!!_!!iiiii_iiii_
i{;;i:il}iri_
{iiii?ilii!
_!i!;ii!;iii::_
;ii:ili;iiiiii!i_!
!_i;iii!;i;i!_
i;ili!ii:i_:i_
i:ill ii!i
iii!;iiiii{iiii:,
i!i!i::i:i:*
:ii::!:_i!i';;iil
ii:i::!ii!::?ii;
i)!ii:; !i:
and then press + to display the audio menu.
2 Repeatedly press the MENUbutton until STEREO/SAPis
selected.
i
:ii
!!i?!i
i!i
iiiiiiiii!::!;!ii
!!:i:.iii:!!.i
i_iiil:!il
_iii_iii2i}i
i_!!i;:ili!
i;ilili_ili!!
Repeatedly press either + or - until the word SAPappears at
the right.
Notes: Each time you press the + or - button, the function will
change from STEREOto SAP to MONO(if SAP is available). If SAP is
not available, the function will change from STEREOto MONO.
The word SAPwill appear next to the channel number when you are
listening to SAP audio. (Press the TVor DISPLAYbutton to see this
display).
4 To turn off SAP, change the channel.
Page 19
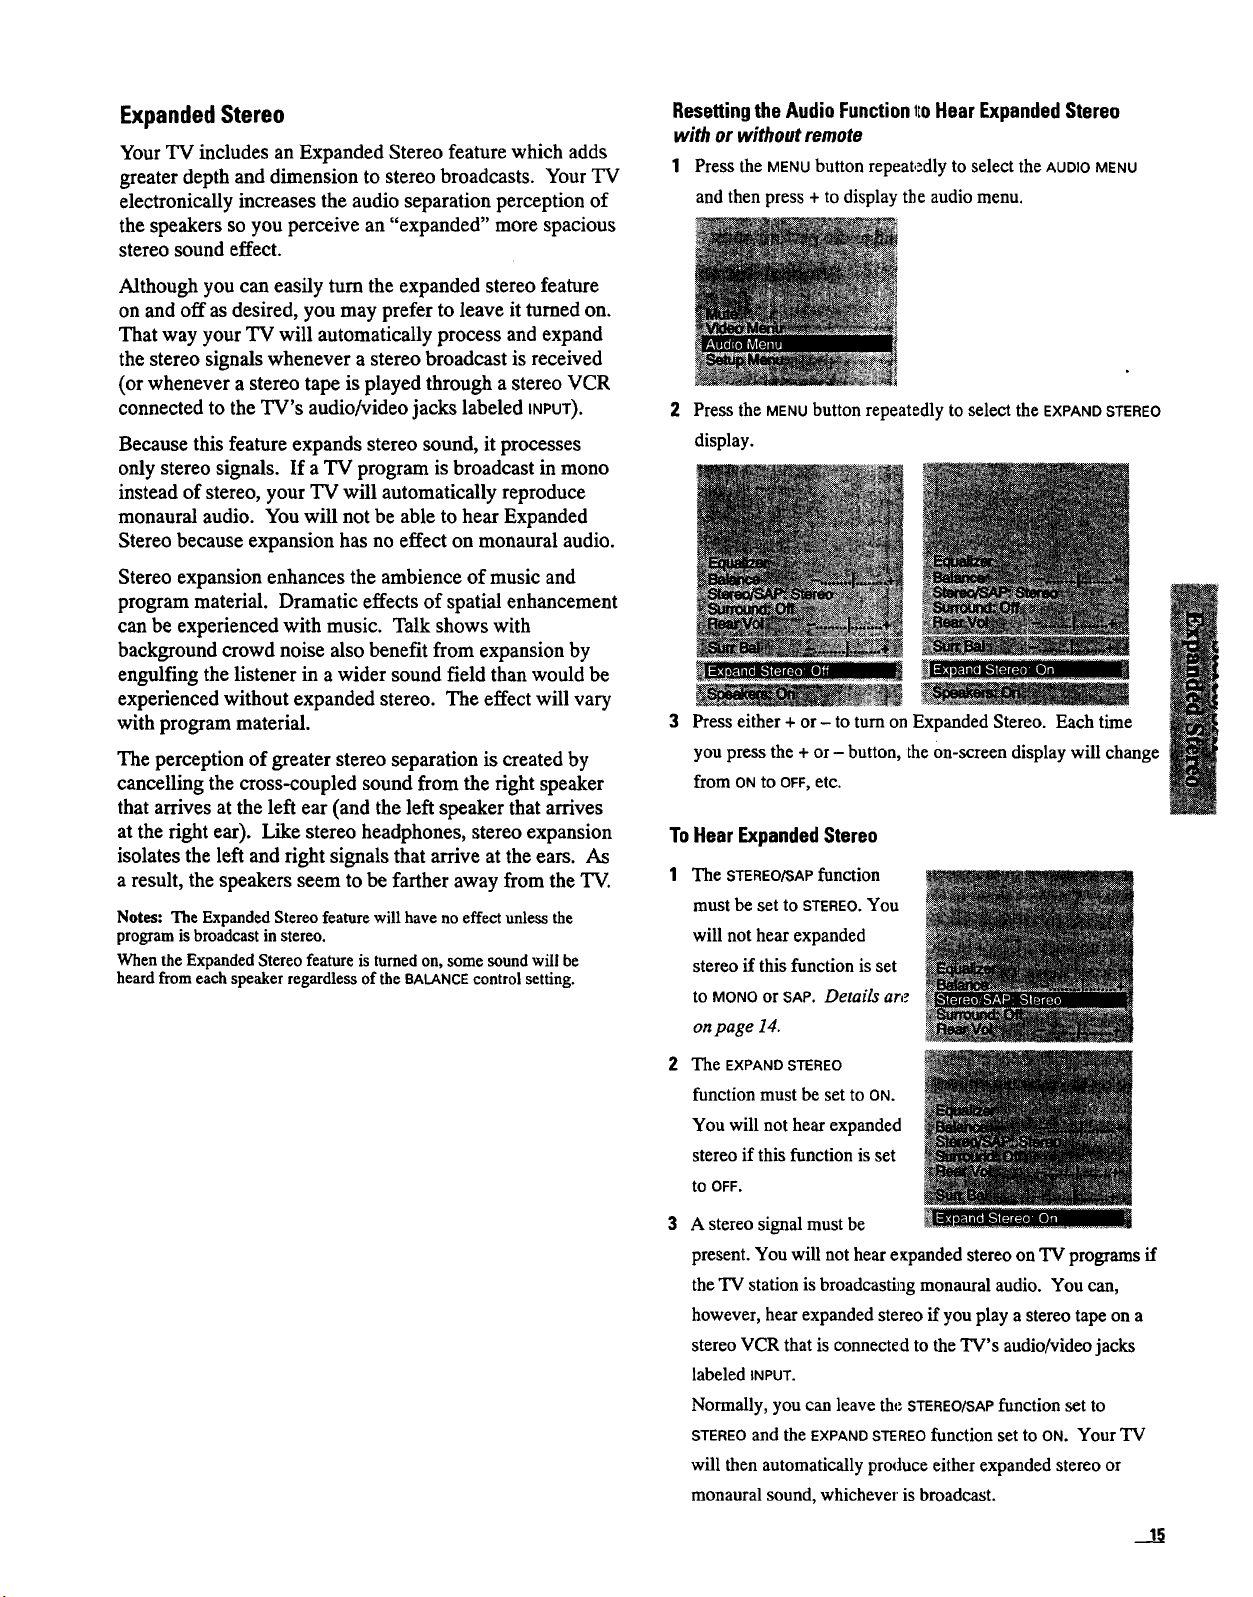
Expanded Stereo
Your TV includes an Expanded Stereo feature which adds
greater depth and dimension to stereo broadcasts. Your TV
electronically increases the audio separation perception of
the speakers so you perceive an "expanded" more spacious
stereo sound effect.
Although you can easily turn the expanded stereo feature
on and off as desired, you may prefer to leave it turned on.
That way your TV will automatically process and expand
the stereo signals whenever a stereo broadcast is received
(or whenever a stereo tape is played through a stereo VCR
connected to the TV's audio/video jacks labeled INPUT).
Because this feature expands stereo sound, it processes
only stereo signals. If a TV program is broadcast in mono
instead of stereo, your TV will automatically reproduce
monaural audio. You will not be able to hear Expanded
Stereo because expansion has no effect on monaural audio.
Stereo expansion enhances the ambience of music and
program material. Dramatic effects of spatial enhancement
can be experienced with music. Talk shows with
background crowd noise also benefit from expansion by
engulfing the listener in a wider sound field than would be
experienced without expanded stereo. The effect will vary
with program material.
The perception of greater stereo separation is created by
cancelling the cross-coupled sound from the right speaker
that arrives at the left ear (and the left speaker that arrives
at the fight ear). Like stereo headphones, stereo expansion
isolates the left and right signals that arrive at the ears. As
a result, the speakers seem to be farther away from the TV.
Notes: The Expanded Stereo featurewill have no effect unless the
program is broadcast in stereo.
When the Expanded Stereo feature is turned on, some sound will be
heard from each speaker regardless of the BALANCEcontrol setting.
ResettingtheAudioFunctionlloHear ExpandedStereo
with or without remote
1 Press the MENUbutton repeatedly to select the AUDIOMENU
and then press + to display the audio menu.
2 Press the MENU button repeatedly to select the EXPAND STEREO
display.
Press either + or- to turn on Expanded Stereo. Each time
you press the + or- button, the 0n-screen display will change
from ON to OFF, etc.
ToHear ExpandedStereo
1 The STEREO/SAP function
must be set to STEREO.You
will not hear expanded
stereo if this function is set
to MONOorSAP. Details are
onpage 14.
2 The EXPAND STEREO
function must be set to ON.
You will not hear expanded
stereo if this function is set
to OFF.
3 A stereo signal must be
present. You will not hear expanded stereo on TV programs if
the TV station is broadcasting monaural audio. You can,
however, hear expanded stereo if you play a stereo tape on a
stereo VCR that is connected to the TV's audio/video jacks
labeled INPUT.
Normally, you can leave the STEREO/SAPfunction set to
STEREOand the EXPANDSTEREOfunction set to ON. Your TV
will then automatically produce either expanded stereo or
monaural sound, whichever is broadcast.
?:4!m=:t:_...... --_-:=:;
Page 20
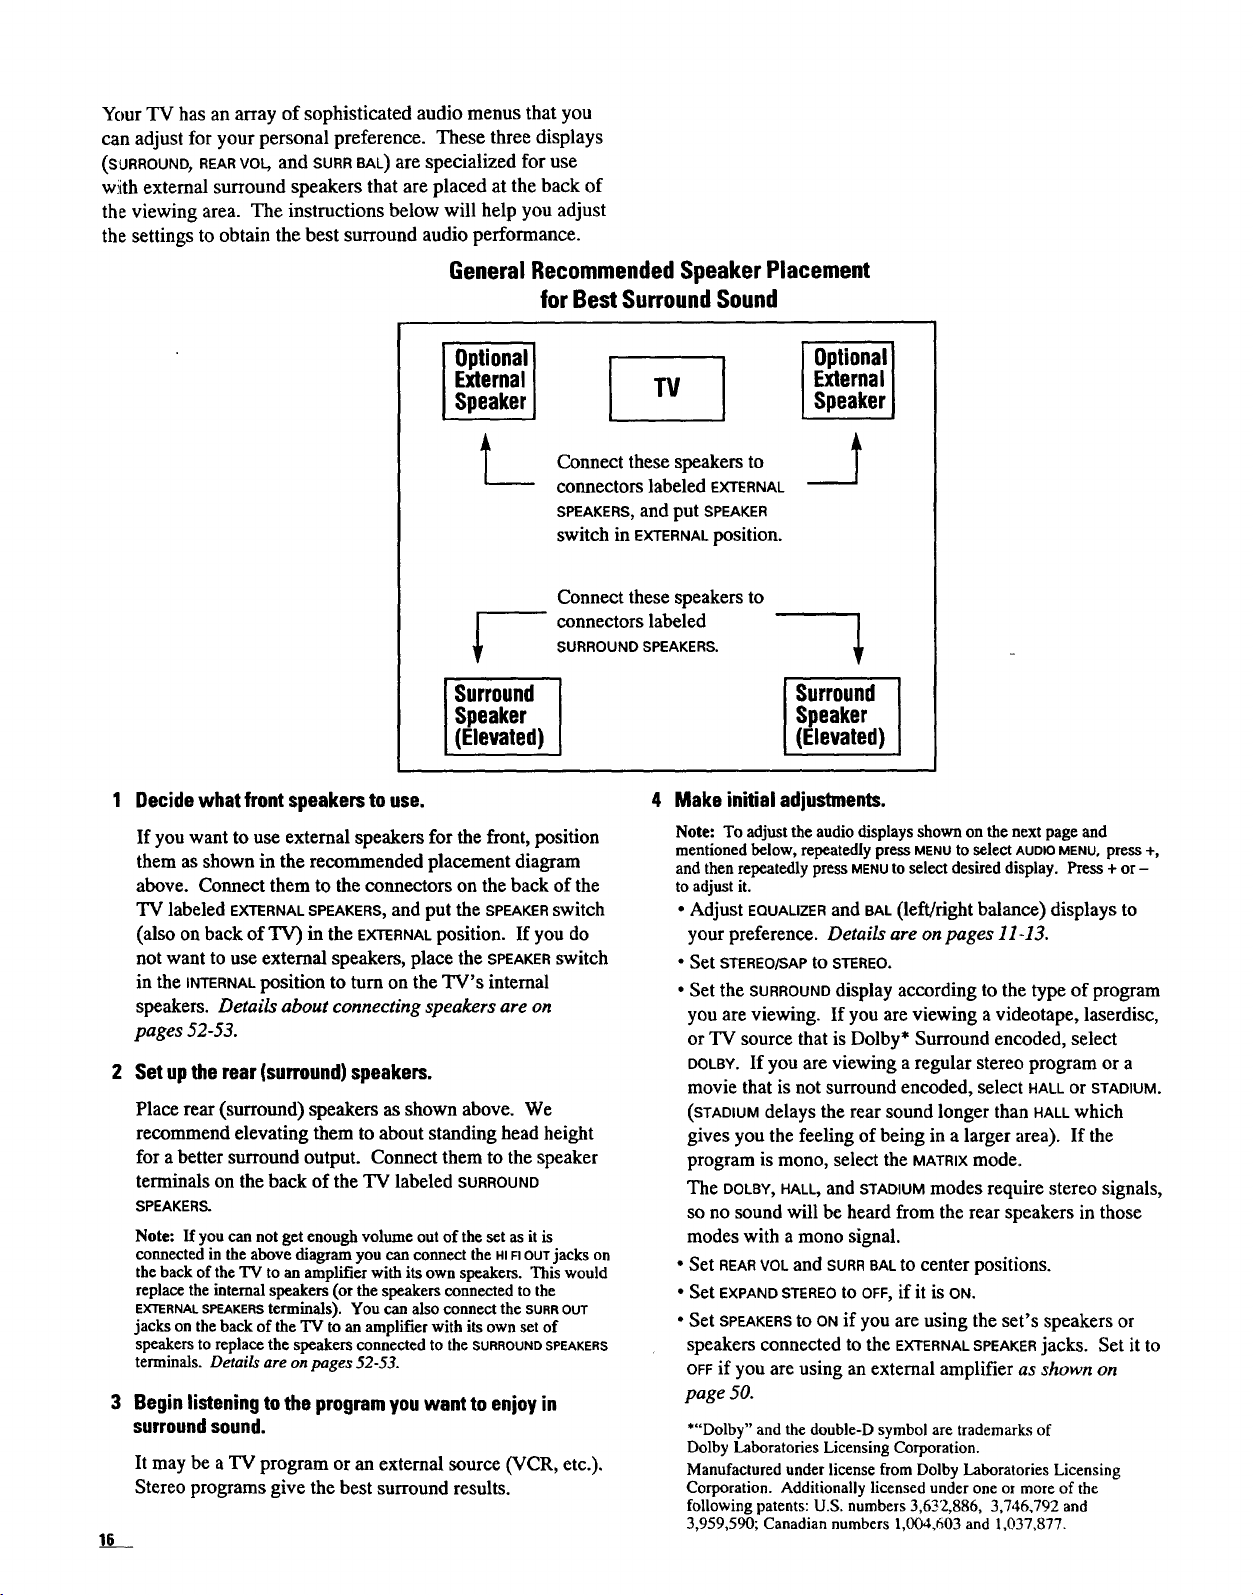
Your TV has an array of sophisticated audio menus that you
can adjust for your personal preference. These three displays
(SURROUND, REAR VO_ andSORR BAt.) are specialized for use
w!ith external surround speakers that are placed at the back of
the viewing area. The instructions below will help you adjust
the settings to obtain the best surround audio performance.
General Recommended Speaker Placement
for Best SurroundSound
Optionall
ExternalI
SpeakerJ
I TV [ External
I Optional
Speaker
t_
Speaker
I urround I
(Elevated)
1 Decide what frontspeakersto use.
If you want to use external speakers for the front, position
them as shown in the recommended placement diagram
above. Connect them to the connectors on the back of the
TV labeled EXTERNALSPEAKERS,and put the SPEAKERswitch
(also on back of 'IV) in the EXTERNALposition. If you do
not want to use external speakers, place the SPEAKERswitch
in the iNTERNALposition to turn on the TV's internal
speakers. Details about connecting speakers are on
pages 52-53.
2 Set upthe rear (surround)speakers.
Place rear (surround) speakers as shown above. We
recommend elevating them to about standing head height
for a better surround output. Connect them to the speaker
terminals on the back of the TV labeled SURROUND
SPEAKERS.
Note: If you can not get enough volume out of the set as it is
connected in the above diagram you can connect the HIFIOUTjacks on
the back of the TV to an amplifier with its own speakers. This would
replace the internal speakers (or the speakers connected to the
EXTERNALSPEAKERSterminals). You can also connect the SURROUT
jacks on the back of the TV to an amplifier with its own setof
speakersto replace the speakers connectedto the SURROUNDSPEAKERS
terminals. Details are on pages 52-53.
Beginlisteningto theprogramyouwant to enjoy in
surroundsound.
It may be a TV program or an external source (VCR, etc.).
Stereo programs give the best surround results.
16
Connect thesespeakersto
connectorslabeled EXTERNAL
SPEAKERS,and put SPEAKER
switchin EXTERNAL position.
Connect these speakers to
connectors labeled
SURROUND SPEAKERS.
I urr°un 1
Make initial adjustments.
Note: To adjust the audio displays shown on the next page and
mentioned below, repeatedly press MENUto select AUDIOMENU,press +,
and then repeatedly press MENUto select desired display. Press + or -
to adjust it.
• Adjust EOUAUZERand BAL(left/right balance) displays to
your preference. Details are on pages 11-13.
• Set STEREO/SAPto STEREO.
• Setthe SURROUNDdisplayaccordingtothetypeof program
you are viewing. If you are viewing a videotape, laserdisc,
or TV source that is Dolby* Surround encoded, select
DOLBY.If yOUare viewing a regular stereo program or a
movie that is not surround encoded, select HALLor STADIUM.
(STADIUMdelays the rearsound longer thanHALLwhich
gives you the feeling of being in a larger area). If the
program is mono, select the MATRIXmode.
The DOLBY,HALL,and STADIUMmodes require stereo signals,
so no sound will be heard from the rearspeakers in those
modes with a mono signal.
• Set REARVOLand SURRBALto center positions.
• Set EXPANDSTEREOto OFF,if it is ON.
• Set SPEAKERSto ONif yOUare using the set's speakers or
speakers connected to the EXTERNALSPEAKERjacks. Set it to
OFFif you are using an external amplifier as shown on
page 50.
*"Dolby" and the double-D symbol are trademarks of
Dolby Laboratories Licensing Corporation.
Manufactured under license from Dolby Laboratories Licensing
Corporation. Additionally licensed under one ot more of the
following patents: U.S. numbers 3,632,886, 3,746,792 and
3,959,590; Canadian numbers 1,004,603 and 1,037,877.
Speaker
(Elevated)
Page 21

AudioDisplays
RepeatedlypresstheMENUbutton to selectAUDIOMENU
andthenpress+ todisplaytheaudiomenu.
RepeatedlypressMENUtOselectdesiredfunction,and
thenpress+ or- to adjustit.
STEREO/SAP/MONO
0FF/DOLBY/MATRIX/HALUSTADIUM
, ON/OFF
" ..... ON/0FF
The SURROUNDfunction canalso beturnedon and offby
pressingtheSURROUNDbuttononthe remotecontrol.
5 Adjustthe SURRBALDisplay.
The SURRBAL(surround balance) is used to balance the left
and right audio signals coming into the set for optimum
surround sound performance. Most of the time you will
want to leave this at mid scale. If the sound coming from
your surround speakers has a lot of voices (instead of
mostly background ambiance) you may want to adjust the
SURRBALto minimize the voices. To adjust the surround
balance select SURRBALin the audio menu. Press + or - to
adjust it. Try to minimize the actor's voice (dialog). If
you are viewing a concert or other program that is
predominantly music, try to minimize the singer's voice
and make the rear sound as "distant" and "echo-y" as
possible.
Note: Thefirsttimethe + or- buttonis pressed, thefrontsoundwill
temporarilygooffso thattherear soundcan be heardbetter.
6 Make final adjustmentsto suityour personaltaste.
Adjust the REARVOLdisplay to your preference-it should be
more of a fill-in sound than noticeably loud. Changing the
master volume will cause all volumes to track together.
7 If desired,youcanturn onthe EXPANDSTEREOdisplay.
Try this function both on and off to determine which
setting you prefer.
Note: If your front speakers are located close together, the EXPAND
STEREOfunction may improve the sound. However, if your speaker_
are located farther apart, the surround sound imaging will probably
be best with the EXPANDSTEREOfunction turned off.
17
Page 22

% Repeatedly
pressMENU to
selectSETUP
MENU.
3. Repeatedlypress
MENU to select a
function,then press+
or-to adjust iL
2. Thenpress+ or-to
displaythe setupmenu.
MENU
The PARENTALCONTROLfeature lets you lock out any channels that
you don't want your children to watch. Pressing + or - switches
this function from OFF to ON. When this function is set to ON,
channels that have been locked out with the CHANCTRLfunction
cannot be viewed. When this function is set to OFF,all channels
can be viewed. Details are on page 23.
The CHANNELCONTROLfunction works hand-in-hand with the
PARENTALCONTROLfunction. It lets you select the channels you
want to lock out. First select the channel number you want to
lock out and then press + or - to change this function from
NORMAL to LOCKED. When the PARENTAL CONTROL function is set
to ON, the channels you locked with this function cannot be
viewed. Details are on page 23.
AUTOPROGRAMcommands the TV to automatically cycle through all
channels and place only active channels for your area in its
channel memory. Pressing the CHANNELup or down buttons will
then only stop on active channels. Details are on page 24.
CHANNELMEMORYis the list of channels the TV will stop on when
you press the CHANNELup or down button. This display lets you
add or erase channels as desired. Details are on page 24.
Pressing MENUmoves down the screen (one item per
press). The setup menu will automatically disappear from
the screen if you do not press + or - within a few seconds.
Via remote control, your TV will "remember" which
function you displayed last, even after the menu has
disappeared from the screen. So, if you want to adjust the
same function again, simply press the + or - button on the
remote control. The last function you adjusted will
reappear on the TV screen.
The CAPTIONINGfeature lets you display the sound of a program as
words on the TV screen. This is useful to the hearing impaired
or anyone who wants to watch a program without the sound.
Four types of closed captioning are available. Select CAPTIONS1
for full translation of the primary language in your area; select
CAPTIONS2 for secondary language translation or alternate
service, such as simplified English. Two Text modes are also
supported. Details are on page 19.
SLEEPTIMERlets you program your TV to turn itself off after a
certain period of time. This is useful whenever you want to
watch TV for an hour or so before going to sleep. Press the +
or - button to select the length of time you want the TV to stay
on. Details are on page 20.
The ALARMfunction lets you program your TV to turn on and/or
off at the time you choose. Details are on page 21.
ANTENNA A]B - Because your TV has two separate antenna inputs
on the back labeled ANTAand ANTB, you can connect two
different signal sources, if desired. By pressing + to change this
display, you can switch back and forth between the two signal
sources. Each time you press +, the antenna input will change.
Details are on page 25.
The CABLE]AIR function tells your TV whether you have a cable-TV
system or a home antenna connected to the "IV. Your TV is so
automatic that you will probably never need to change this
function. When your TV autoprograms, it automatically adjusts
the CABLE/AIRsetting for you. If you should ever need to override
the automatic setting, press + or - to change it.
The VCR 1 CHANNEl.function lets you program to which channel the
TV will automatically tune when you press the VCRabutton on the
remote. Details are on page 26.
The VCR2CHANNELfunction lets you program to which channel the
TV will automatically tune when you press the VCR2button on the
remote. Details are on page 26.
The CABLECHANNELfunction lets you program to which channel the
TV will automatically tune when you press the CABLE button on
the remote. Details are on page 27.
CLOCKSETallows you to set the clock so you'll be able to see the
on-screen time display whenever you change channels or press
the iv or DISPLAY button on the remote control. To set the clock,
first press and hold the - button until the correct hour appears.
Then press and hold the + button until the correct minute appears.
CHANNEL LABELING lets you program names (or labels) for the
channel numbers. The names you select will then appear on the
screen whenever the channel number is displayed. Details are
le
Page 23

Using Closed Captioning
The CAPTIONINGfeature lets you display the audio portion of
a program as text on the TV screen. This is useful to the
hearing impaired or anyone who wants to watch a program
without listening to the sound.
Four types of dosed captioning are available: CAPTIONS1,
CAPTIONS 2, TEXT 1 AND TEXT 2. Select CAPTIONS 1 for full
translation of the primary language in your area; select
CAPTtONS2for secondary language translation or alternate
service, such as simplified English.
The two TEXTmodes display on-screen boxes containing
general information not necessarily related to the program
being watched
Note: Closed Captioning (CC) is not available on all channels at all times. If
CAPTIONS 1 is available for a specific program, the word "Captioned" appears when
you change channels or press the 'IV or Display buttons on the remote. The word
"Captioned" does not appear to tell you if CAPTIONS 2 oreither TEXT mode is
available.
Setting ClosedCaptioning
with or without remote
1 Repeatedly press the MENU button to select SETUP MENU and
then press + to display the setup functions. CAPTIONINGis
highlighted since it is the first function in the setup menu.
2 Press the + or -button to select the captioning mode: Off,
Captions 1, Captions 2, Text 1 orText 2.
When finished, the display automatically disappears from the
screen in a few seconds. Press the CLEARbutton to make the
display disappear more quickly.
3 The screen begins to display the TV program's audio as text
written on the screen.
Turning OffClosed Captioning
To turnoff the captions off, enter the CAPTIONINGfunction
and press the + or - button until the screen shows "Off".
.___!!
Page 24

Setting the Sleep Timer
With the Sleep Timer, you can program your TV to turn
itself off after a period of up to four hours. This is useful
when you want to watch TV for an hour or so before going
to sleep.
SettingSleepl_mer
with or withoutremote
1 Repeatedly press the MENUbutton to select SETUPMENUand
then press + to display the setup functions.
The SLEEPTIMERshould be selected. If not, repeatedly press
the MENU button to select it.
The Sleep Timer will begin to count down to zero. The word
SLEEPwill appear on the screen whenever you change
channels or press the TVbutton to let you "know the Sleep
Timer is activated.
The amount of time remaining before the TV shuts itself off
will appear in the SLEEPTIMERmenu whenever you press the
1hourend
28minutes
remaining
Press the + or- button to select the length of time (upto four
hours) you want the TV to stayon. Each press of the button
increases the time 30 minutes (up to four hours). Then the
time display will start over with 0:00.
1 hourand
30minutes
The display will automatically disappear from the screen in a
few seconds. It will disappear more quickly if the DISPLAYor
CLEARbutton is pressed.
MENUbutton to select the SETUPMENUand then press +.
When the Sleep Timer counts down to 0:00, the SLEEPTIMER
display will appear on the screen for a few seconds. Then the
TV will turn itself off. If you want the TV to stay on when
this display appears, press the TVbutton on the universal
remote. The Sleep Timer will be cancelled. To add more
time to the Sleep Timer when this display appears, press the +
button on either remote.
Clearing Sleep ]imer
To cancel the sleep timer, enter the Sleep Timer function and
then press the + or - button until the screen shows 0:00.
20
Page 25

Setting the Alarm
By setting the alarm, you can program the TV to turn on
and/or off by itself. After the ONTIMEis set and the ALARM
ON/OFFfunction is set to ON,the TV will automatically turn
on each day at the time you selected and remain on until
the OFFTIMEis reached. If no OFFTIMEhas been
programmed, the "IV will remain on until you turn it off.
The ALARMON/OFFfunction lets you easily deactivate or
reactivate the alarm without having to reset the ONTIMEand
OFF:TIME.
When the alarm time is reached, the set will turn on at
whatever volume you left it when you last turned it off. So
if you want the TV to come on loudly at the ONTIME,be
sure the TV is playing loudly when you turn off the TV for
the last time.
W]aen the ALARMON/OFFfunction displays SETCLOCK_you
will need to set the clock time before you will be able to
turn on the alarm function. Details for setting the clock are
on page 3.
Note: Duringextended power failures the alarm function will be
disabled. The alarmONTIMEandOFFTIMEwill stay setbut theALARM
ON/OFF function will reset to OFF and will displaySET CLOCK to inform
you thatthe clock must be reset to thecorrect time. Once the clock has
been reset,you can reactivatetheALARMfunction by changing theALARM
fur_tctionto ON.
Setting the Alarm
1 Repeatedly press the MENUbutton to select SETUPMENUand
then press + to display the setup functions.
3 When the first ALARMfunction
is selected, pressing + or- will
switch the setting between ON
and OFF. Set this function to ON
if you want to activate the
alarm. When this function is
set to OFF,the alarm is deactivated and the TV will not turn on
or off by itself.
Note: IfSETCLOCKis displayed next to ALARM,you will need to set
the clock time before you will be able to turnon the alarm function,
Details for setting the clock are on page 3.
4 Press MENUto select the next
function called ON TIME.If you
want the TV to turn on by itself,
enter the desired time by
pressing - to select the hour
(including AM and PM) and
then pressing + to select the minutes. If you only want the TV
to turn off by itself and not turn on, you can disable the ON
TIMEby pressing - until the word DISABLEDappears.
Note: Remember to check theAM/PM setting. Midnight is
12:00 AM and noon is 12:00 PM.
Press MENUto select the next
function called OFFTIME. If you
want the TV to turn off by itself,
enter the desired time by
pressing - to select the hour
(including AM and PM) and
then pressing + to select the minutes. If you only want the TV
to turn on by itself and not turn off, you can disable the OFF
TIMEby pressing - until the word D|SABLEDappears.
Repeatedly press the MENUbutton to select the SETALARM
function, Then press + or - todisplay the alarm settings.
Press MENUto select the next
function called CHANNELThis
function lets you program which
channel the TV will tune when
it turns on at the ON TIME.Press
CHANNEL up or down to select
the channel, and then press + or - to enter it into the CHANNEL
function.
Note: The TV will change tothe channel thatyou select. This will
help you toconfh'm thatit is indeed the channelyou want the TV to
turn on to.
__!!
Page 26

Labeling Channels
The labeling feature lets you program names (or labels) for
the channel numbers. The name you programmed will then
appear on the screen below the channel number whenever the
channel number is displayed. Each name can contain up to
four characters, and you'll be able to assign up to 64 names.
Listed below are the letters and characters from which you'll
be able to choose when programming the channel labels:
ABCDEFGHIJKLM
NOPQRSTUVWXYZ
(blank space) ! " #$ 5 &' ( ),5 +,-/.
0123456789
:;<=>?@
Labeling Channels
with or without remote
1 Repeatedly press the MENU button to select SETUP MENU and
then press + to display the setup functions.
Select the channel number you want to label by pressing the
CHANNELup or down button (or by pressing two :number
buttons).
Press and hold the VOLUMEup or down button on the remote
control until the letter or character you want appears on the
screen. Pressing VOLUMEup sequences through the characters
in alphabetical order. Pressing VOLUMEdown sequences the
letters in reverse order.
2 Repeatedly press the MENUbutton to select CHAN LABEL.
Press + to enter the CHANLABELfunction. Four blank letter
frames will appear under the channel number.
6 Then press + to move to the next letter frame. Pressing -
moves you back to the previous letter frame.
Repeat steps 5 and 6 until the name is complete. You can now
label another channel, if desired, by selecting the channel
number and repeating steps 5 and 6.
When finished, the display will automatically disappear from
the screen in a few seconds. Your labels will remain in
memory until you erase them.
ErasingChannelLabels
with or withoutremote
To erase a channel label, first follow steps 1-4 and then press
CLEARon the remote control.
22
Page 27

Parental Control
"l_le PARENTAL CTRL and CHAN CTRL functions let you lock out
any channels you choose so they cannot be viewed by your
children.
Channels that have been locked out can be viewed only
when the PARENTALCTRLfurlction is set to OFF.This can
ottly be done with the remote control-it can not be changed
wiLththe buttons on the front of the TV. Therefore, after
you turn on PARENTALCTRL,yOUsimply hide the remote
control sQthat your children can not watch the locked-out
channels.
The locked-out channels will remain unviewable even if
the TV is unplugged or the channels are autoprogrammed
again. The only way to view locked-out channels is to use
the remote control to set the PARENTALCTRLfunction to OFF.
Note: Channels above 99 cannotbe locked.
Activating Parental Control
with remote only
The PARENTAL CTRL and the CHAN CTRL fllnctiollS work hand-
in-hand. The instructions below will first tell you how to
tttm parental control on or off with the PARENTALCrRL
function and then how to lock out desired channels with
the CHANCTRLfunction.
1 Repeatedly press the MENUbutton to select SETUPMENUand
then press + to display the setup functions.
3 To lock out channels, press the MENU button to ,,;elect the CHAN
CTRL function.
Select a channel you want to lock out by pressing CHANNELup
or down. Then press + or -. The CHANCTRLsetting will
change from NORMALtO LOCKEDwhen that channel is locked-
out.
Repeat step 3 for each channel you want to lock out.
If the PARENTALCTRLfunction is set to ONwhile you are
locking out channels, each channel will go blank as you lock
it out.
_,Vhenthe PARENTAL CTRL function is set to ON and a channel
which has been locked out is tuned, the TV will display the
words PARENTALCONTROLtO let your kids know you have
locked it out.
2 Repeatedly press MENUto selectthe PARENTALCTRLfunction.
Pressing + or - changes this function between ON and OFF.
• When this function is set to ON, PARENTAL CTRLis activated
and any channels you locked out with the CHANCTRL
function will not be viewable.
• When this function is set to OFF,PARENTALCTRLis
deactivated and all channels are viewable.
Note: You may want to lock out the same channels in both ANTENNAA
andANTENNABmodes. This prevents someone from moving the cable
to the ANTBinput to watch channels locked out in the ANTENNAAmode.
Page 28

Programming Channel Memory
The Channel Memory is the list of channel numbers your
TV will stop on when you press the CHANNELup or down
button. You can program any list of channels into the
Channel Memory.
The quickest way to program the Channel Memory is to
use the AUTOPROGRAMfunction. Your TV will automatically
cycle through all channels and place active channels into
the Channel Memory. Follow the instructions below to
autoprogram channels, and then add or erase individual
channels as desired.
AutoprogrammingChannelsinto ChannelMemory
with or without remote
1 Connect home antenna(s) or cable-TV to your set.
2 Repeatedly press the MENUbutton to select SETUPMENUand
then press + to display the setup functions.
3 Repeatedly press the MENU button until theAUTOPROGRAM
menu is selected.
Press either + or- to begin programming. The TV will cycle
thru available channels in your area and place active channels
into memory.
The TV will program all channels for BOTHANTAand ANTa
inputs, even if you only have one antenna input connected,
You can check to see what channels are in memoryby
pressing the CHANNEL up or down button. Your set will stop
on each of the channels in memory.
Erasing/AddingChannelsin ChannelMemory
with or withoutremote
1 Repeatedly press the MENU button to select SETUP MENU
and then press + to display the setup functions.
2
Repeatedly press the MENUbutton until CHANMEMis
selected.
3 To erase a channel, first press the CHANNELup or down
button until the channel number you want to erase appears
on the screen. Then press -.
To add a channel, first enter two number buttons for the
channel you want to add. For example, press "0" then "6"
for Channel 6. (If the remote is not handy, you can press the
CHANNELup or down button on the TV to select the channel
you want to add). Then press +.
4 Repeat step 3 for each channel you want to erase or add.
Note: The menu will automatically disappear from thescreen a few
seconds after you have finished erasing or adding channels. You can
make it disappear more quickly by pressing the CLEARbutton on the
remotecontrol.
YourTV remembers which channelsare in memory untilyou
erase them or until you autoprogram channels again. Extended
power failures have no effect on the channel memory.
Notes: The AutoProgramming feature will place into memory active
channels that have a valid signal at the time you autoprogram your TV.
An active channel may be missed occasionally if its signal is very weak
or if the channel happens to be "off the air" when the "IV is
autoprogrammed. An inactive channel may be included in the channel
memory if there happens to be some sort of "noise" or "stray signal" on
the channel when the TV is autoprogrammed.
Signals from sources connected to the INPUTjacks can not be
autoprogrammed. Channel 91 (which accesses INPUT I jacks) was added
to the Channel Memory at the factory and will remain in the Channel
Memory until you erase it. Channel 92 (INPUT 2) and Channel 90
(S-VIDEO connector) can be added to Channel Memory if desired.
Details are on page 24. Because of memory limitations, channels above
99 can not be stored in channel memory.
24
Adding Video Input Channels to Channel Memory
with or without remote
As an added convenience, you can also add video input
channels (90, 91, and 92) to memory. If you have a video
device such as a VCR, camcorder, laser disc player, etc.)
connected to the S-VIDEOor INPUTjacks on the back of the TV,
you can view its signal either by directly selecting Channel 90
(for S-VIDEOconnector), Channel 91 (for INPUT1), or Channel
92 (for INPUT2) with the number buttons or by adding those
channels to the Channel Memory.
Adding Channels 90, 91, and 92 to the Channel Memory
allows access to the video inputs at the TV by pressing the
CHANNELup or down buttons as well as by using the remote
control.
Page 29

Changing Antenna Input
_bur TV has two separate antenna inputs on the back
(labeled ANTAand ANTB)that allow you to connect two
different signal sources if desired. For example, you can
connect a cable-TV system to one input and a home
antenna to the other input.
By pressing the ANTENNAbutton on the remote control, you
can switch back and forth between the two signal sources.
Listed below are some other common uses of the two
antenna inputs:
1 Connecting a cable-TV system (or antenna) to one input and a
VCR to the other.
Connecting a cable-TV system (or antenna) to one input and a
video game to the other.
3
Connecting adouble-trunkcable system to both inputs.
4
Connecting a cable-TV converter/decoder box that scrambles
only premium channels and cannot be controlled by remote
control. Connection details are on pages 42-43.
The Channel Memory is the list of channel numbers your
TV will stop on when you press the CHANNELup or down
buttons. Your TV provides two separate channel memories
(one for ANTA input and one for ANTBinput). This allows
you to add or delete channels into each channel memory as
desired.
ChangingAntenna Input
without remote
1 Repeatedly press the MENUbutton to select SETUPMENUand
then press + to display the setup functions.
Repeatedly press the MENU button to select ANTENNA: A/B.
blue for ANTA
Press the + or- button to change the setting.The screen
display will change from AtOato let you know you are now
watching whatever signal is connected to the ANTBconnector
on the back of the TV.
When you use the AUTOPROGRAMfunction, the 'IV
automatically checks both inputs and sets up a separate
channel memory for each.
ChangingAntennaInput
with remote
11 Press the ANTENNA button on the remote controlto switch
from ANTA input to ANTBinput. The color of the channel
numbers will change from blue to yellow to let you know you
are now watching whatever signal is connected to the ANTB
connector on the back of the TV.
blue for ANTA
yellow for ANT B
Press the ANTENNAbutton again to switch back to ANTA. The
color of the channel numbers will change back to blue to let
you know you are now watching whatever signal source is
connected to the ANTA connector.
yellow for ANTB
Press the + or - button again to switch back to ANTA. The
screen display will change to ANTENNA:A to let you know you
are now watching whatever signal source is connected to the
ANTAconnector on the back of the TV.
blue for ANTA
Page 30

VCRChannel Setup
The vCR1CHANfunction lets you program to which channel
the TV will automatically tune when you press the vcm
button on the remote. This is handy if you connect a VCR
to your TV. You will no longer have to remember to which
input jacks the VCR is connected because the TV will
remember for you.
For example, if you connect a VCR's AUDIONIDEO ouTjacks
to the TV's INPUTOjacks (as shown on page 46), you will
no longer have to remember to sdect channel 91 on the TV
to see what the VCR is playing. By entering channel 91
next to the VCR1CHANfunction, the TV will automatically
tune to channel 91 each time you press the vcal button on
the remote.
This function is especially convenient if you have a
compatible VCR that can be operated by the VCR1button on
the remote. Pressing vcm will then not only turn on the
VCR but also automatically tune the TV to the proper
channel for viewing the picture from the VCR. You can
program most brands of remote-controllable VCRs to
respond to the vcal button as described on page 31.
The VCR2CHANfunction works the same way. It lets you
program to which channel the TV will automatically tune
when you press the VCR2button on the remote. You can
program most brands of remote-controllable VCRs to
respond to the VCR2button as described on page 31.
Pressing the VCR2button will then not only turn on the
VCR but also automatically tune the TV to the proper
channel for viewing the picture from the VCR.
SettingUpVCRChannels
with or withoutremote
1 Repeatedly press the MENUbutton to select SETUP MENUand
then press + to display the setup functions.
Enter the channel number you
want to program by pressing
two number buttons on the
remote control. (The channel
number you enter is the channel
to which the TV will tune
automatically when you later press the VCR1button on the
remote.) See the notes below if you are not sure about which
channel number to enter.
Press the + button to program
the channel number you selected
into the TV's memory.
Note: Pressing the - button here
will turn offthis feature and display
VCR 1 CHAN: OFF again.
If you have another VCR
connected to the TV, press MENU
to select the VCR 2 CHAN function.
6
Enter the channel number you
want to program by pressing two
number buttons on the remote
control. (This is the channel
number to which the TV will tune
automatically when you later
press the VCR2button on the remote). See the notes below if
you are not sure about which channel number to enter.
-,<F---
2 Repeatedly press MENUto select the VCR1 CHANfunction.
26
Press the + button to program
the channel number you
selected into the VCR2CHAN
function memory.
Note: Pressing the - button here
will turn off this feature and display
VCR 2 CHAN: OFF again.
Notes about Entering Channel Number:
• Enter channel 91 if your VCR is connected to the TV's audio and video
INPUT 1jacks.
• Enter channel 92 if your VCR is connected to the TV's audio and video
_NPUT2jacks.
• Enter channel 90 if you have a Super-VHS VCR that is connected to
the TV's S-VIDEOconnector and INPUT t audio jacks (labeled Land
R/MONO).
• Enter channel 03 (or 04) if you did not use any audio/video cables and
connected the VCR to the TV's round antenna connector labeled
CABLE/ANTENNA.Enter the same channel number (03 or 04) as the
position of the VCRs CH3/CH4switch. This is the channel to which you
must tune your TV for viewing signals from your VCR.
, Refer to pages 46-47 if you want to review details about connecting
your VCR to your TV.
Page 31

Cable Box Channel Setup
The CABLECHANfunction lets you program to which channel
the TV will automatically tune when you press the CABLE
button on the remote. This is handy if you have to connect
a ,:able box to your TV. You will no longer have to
remember the output channel of the cable box because the
TV will remember for you.
For example, ff you connect a cable box to the TV's
CABLE/ANTENNAconnector (as shown on page 42), you will
no longer have to remember to select channel 2, 3, or 4 on
tee TV to see what's coming from the cable box. By
entering the cable box's output channel (usually 02, 03, or
04) next to the CABLECHANfunction, the TV will
automatically tune to that channel each time you press the
_BLE button on the remote.
This function is especially convenient if you have a
re,mote-controllable cable box that can be operated by the
CABLEbutton on the remote as described on page 44.
Pressing the CABLEbutton will then not only switch the
remote to cable mode but will also automatically tune the
TV to the proper channel for viewing the picture from the
cablebox.
Setting Up Cable Box Channel
with or withoutremote
1 Repeatedly press the MENU button to select SETUP MENU and
thenpress+ todisplaythesetupfunctions.
2 Repeatedly press MENUto select the CABLECHANfunction.
Enterthe channelnumber you want toprogramby pressing
two digit buttons on the remote control. (The channel
number you enter is the channel to which the TV will tune
automatically when you later press the CABLEbutton on the
remote). The TV will change to the channel you select. This
will help you to confirm that it is indeed the channel you
want the TV to automatically tune. Most cable boxes output
their signals on either channel 02, 03, or 04.
4 Press the + button to program the channel number you
selected into the CABLECHANfunction memory.
Note: Pressing the - button here will turn off this feature and
display CABLECHAN:OFF again. '
27
Page 32

After you connect another video source (like a VCR) to your
TV, you'll be able to display two different programs on the
TV at the same time. For example, two different football
games as shown below. You can also connect a video camera
or camcorder to use as a surveillance system for a baby's
room.
Two FootballGames
SurveillanceSystem
Starting Picture-in-Picture (PIP)
1 Connect another video source (such as a VCR or
camcorder) to _NPUTS1or INPUTS2on your TV (as shown
on pages 46-48).
2 Turn on TV and select the TV channel you want to watch.
• If the other source is connected to the TV's INPUT1jacks,
select TV channel 91 to see the signal. If you have
programmed the vcnt (or VCR2)button to automatically
select channel 91 as described on page :?6,press vcm (or
VCR2).
• Select channel 92 if the other source is connected to the
TV's iNPUT2jacks. If you have progranlmed the vcm (or
vcnz) button to automatically select channel 92 as
described on page 26, press vcm (or VCR2).
• Select channel 90 if the other source is connected to the
TV's S-VIDEOconnector. (Remember to also connect the
regular video cable to the VIDEOINPUT1jack for picture-
in-picture viewing.). The TV automaticaUy minimizes
any annoying differences in tint between the Small and
large picture by electronically coupling the S-VIDEOinput
to the INPUT1input. If you have programmed the vcm
(or VCR2) button to automatically select channel 90 as
described on page 26, press vcal (or vca2).
ChangingChannels (PIP)
To change channels on the picture from the TV, press the rv
button on the remote, and then press either the CHANNELup or
down button or two number buttons.
3
Press the PIPbutton on the remote. A little picture will
appear on the screen. The little picture and the big picture
will be the same.
Note: The remote must be in the "TV mode" when you press the PIP
button. To put remote in "TV mode", press the lv button.
To get a picture from the other source (VCR, camcorder,
etc.), first turn on the other source, and then select TV
channel 90, 91, or 92 (explained at top of next column).
The picture from the other source will appear in the little
picture.
PicturefromTV
PicturefromTV
To change channels on the picture coming from the VCR,
press the vcm or VCR2button (if you've programmed one of
these buttons to control the VCR as described on page 31)
and then press either the CHANup or down button or two
number buttons. You can also change the VCR's picture by
pressing the CHANNELbuttons on the front of the VCR.
PicturefromVCR
Additional Features (PIP)
Whenever the picture-in-picture feature is activated, the small
picture can be moved, frozen, or switched with the main
picture as desired. Details are on the next page.
Caution: When using TV games, computers, and similar products with
your TV, keep the brightness and contrast functions at low settings. If a
PicturefromVCR
28
fixed (non-moving) pattern is left on the screen for long periods of time
at a high brightness or contrast setting, the image can be permanently
imprinted onto the screen. These types of imprints are not covered by
your warranty because they are the result of misuse.
Page 33

Whenever you have the picture-
in-picture (PIP) feature activated
as described on the previous page,
you can move, enlarge, reduce,
freeze, or switch the big and little
pictures as desired.
]%te: The remote must be in the "TV
mode" to operate the special features
.,;hownbelow. Pressing the xv button
lmts the remote in the "TV mode."
PIPON/OFFBUTrONS
i
SWAPBUTI'ON
ARROWBUTrONS
.... FREEZEBUTTON
ZOOMBUTrONS
ZOOM OUT
SWAP
FRZ
Press and hold one of the four arrow keys to
move the small picture in that direction. You
can move the small picture anywhere on the
screen by pressing and holding the arrow
buttons (one at a time).
Repeatedly press zoom to enlarge the small
picture. Five sizes are available.
Repeatedly press our to reduce the size of the
small picture back to the smallest size.
Press SWAPto switch the small picture with the
main picture.
Press FREEZEto freeze the small picture.
Press FREEZEagain to return to an action picture.
PIP OFF
Pressing the PIPbutton starts picture-in-picture.
Pressing the OFFbutton next to PIPcancels
picture-in-picture and removes the little picture
from the screen.
29
Page 34

The advanced ProScan universal remote controls your TV
and up to two compatible ProScan brand VCRs. The VCR2
button can also control a compatible ProScan laserdisc
player.
To control a compatible ProScan VCR, first press the VCR1
or VCR2button to put the remote in the "VCR mode". The
buttons shown below will then control the VCR.
Selected models of VCRs have a switch that lets you determine which
VCR will be controlled by the VCR1button, and which VCR by the VCR2
Remote Buttons That Control ProScan VCRs
OFF/ONBUTrONPress to turn off VCR.
NUMBERBIJTrONSPress two numbers to select --
VCR channel. Press a "0" before a single-
digit channel number.
button. Othermodels have an on-screen menu that lets you determine if
it will be controlled by VCR1or VCa2.Some older VCRs have a
NORM/UNIFIEDswitch that can also respond to either the VCR1or VCR2
button on the remote. Place this switch in the UNJFmD]position for the
VCR to respond to the VCR1button or in the NORMposition for the VCR2
button. In the NORMposition, you must program the VCRZbutton to
respond to code number 05.
The buttons shown below do not operate all functions on all
VCRs. You may only be able to control your VCR's basic
functions.
VCR1AND VCR2BLrI'rONS Press to turn on
VCR and put remote in "VCR Mode" so
other buttons will control the VCR. Press
the iv button to put remote back into "TV
Mode".
CHANNEL UP ORDOWN BUTTONS' PreSS to select
next higher or lower channel in VCR's
channel memory.
PROGRAMBUTTONis used when setting the
clock and programming the timer.
ANTENNABUTrONPress to change TY/YCR
switch on VCR to otherposition.
PLAYBUTTONPress to start tape playing.
REWINDBUTrONPress while VCR is
to rewind tape. Press while VCR is playing
to search backward.
IDBUTrON is used when programming
remote to control otherbrands of VCRs.
CLEARBUTTONis used when setting the
VCR's clock and programming its timer.
DISPLAYBUTrONPress to display VCR's on-
screen messages.
-- PAUSE BIJTrON Press to pause PLAY or
RECORDmode. Press again to release
pause.
STOPBUTFONPress to stop whatever VCR
is doing: playing, recording, rewinding,
or fast forwarding.
RECORDSUTTONPress to record. It is not
necessary to press PLAYand RECORD.
FASTFORWARDBU1XONPress while VCR is
stopped to fast forward tape. Press while
VCR is playing to search forward.
30
Page 35

"Ib program the remote to control another brand of VCR,
just press VCRt(or Yea2), then Io, then the two-digit code
number for your brand of VCR. Depending on the age,
brand, model, and type of VCR, some models may not be
able to respond to the remote control.
4 PRESSOFF/ON
AND THENVCR1
(ORVCR2)TO
TEST.
3 PRESSTWO
NUMBER
BUTrONS.
Programming Remote To Control Other Brands ol VCRs
-- 2 PRESSID.
1 PRESSVCR1
(ORVCR2),
:Referto the chart at the right to find the code number that
corresponds to the brand name of your VCR. Keep this
:numberin mind. If more than one number is listed, you
:mayneed to try each one separately until you find the one
that works.
1 Press VCR1or VCR2button on remote (depending on which
button you want to program for that VCR). You can
program each button to control a different VCR.
2 Press IDbutton on remote.
Press two number buttons (first one, then the other) to
enter the code number for your brand of VCR. You must
press the two number buttons within three seconds of
pressing ID.
Point the remote at the VCR and press the OFF/ONbutton to
test the code number. If nothing happens, try pressing vcaa
or yea2 (whichever button you are programming). If the
right number was entered, the VCR should turn on. If the
VCR does not react to the remote, repeat steps 1 thru 4
with another code number.
Note: Some older VCRs do not have an OFF/ONswitch on their
remote controls and cannot be turned on and off remotely. If you
have this type of VCR, you can test the code number by pressing the
CHANNELbutton instead of the OFF/ONbutton. Make sure the VCR is
already turned on when you test the code number.
Operating Notes: After the remote is programmed, it will turn on the
VCR whenever you press VCR1(or vca2) and then OFF/ON.Some VCRs
turn on automatically when you press Yen1 or VCR2. You'll be able to
control the VCR whenever the remote is in the "VCR mode". To put the
remote in the "VCR mode", press the VCR1or VCR2button (depending on
which button you programmed). The other VCR buttons (such as pLAY,
PAUSE,STOP,REWIND,FF,and RECORD) will control the VCR when the
remote is in the "VCR mode". To turn offthe VCR, press VCR1(or
VCR2),then OFF/ON. To change channels on the VCR, press VCR1(or
VCR2),then CHANNELup or down. This remote will control the basic
functions of compatible VCRs. It will not be able to control the
advanced functions of all brands of VCRs. You may have to reprogram
your remote if you change its batteries.
Notes About Controlling Two VCRs
This remote can control two VCRs independently as long as each VCR
operates on a different remote transmitting code.
If neither of your VCRs have switchable code capabilities, you still may
be able to use the vcavvca2 feature to control two VCRs of the same
brand since many older VCRs use remote codes that are different than
newer VCRs. You may want to experiment to see what works with your
particular VCRs.
Aiwa .............................................................................. 15
Akai .................................................................. 03, 22, 23
Audio Dynamics .................................................... 14, 16
Broksonic ..................................................................... 10
Canon ........................................................................... 08
Capehart ....................................................................... 01
Citizen .......................................................................... 09
Craig ...................................................................... 07, 12
Curtis Mathes ................................................... 00, 08, 15
Daewoo ........................................................................ 13
dbx ......................................................................... 14, 16
Dimensia ...................................................................... 00
Dynatech ...................................................................... 15
Emerson ......................... 9, 10, 13, 15, 20, 23, 24, 34, 41
Fisher ................................................... 02, 12, 18, 19, 43
Funai ............................................................................. 15
GE .............................................................. 00, 07, 08, 32
Goidstar ........................................................................ 09
Harmon Kardon ........................................................... :14
Hitachi ........................................................ 05, 15, 35, 36
Instant Replay .............................................................. 08
ICL ............................................................................... 08
JCPenney ........................... 02, 05, 07, 08, 14, 16, 30, 35
IVC ............................................................ 02, 14, 16, 30
Kenwood .................................................... 02, 14, 16, 30
Lloyd ............................................................................ 15
Magnavox .............................................................. 08, 29
Marantz .......................................... 02, 08, 14,16, 29, 30
Maria ............................................................................. 09
MEI ............................................................................... 08
Memorex .................................................... 08, 09, 12, 15
MGA ...................................................................... 04, 27
Minolta ................................................................... 05, 35
Mitsubishi .............................................................. 04, 27
Montgomery Ward ....................................................... 06
MTC ....................................................................... 07, 15
Multitech .................................................... 07, 15, 31, 32
NEC ........................................................... 02, 14, 16, 30
Panasonic ..................................................................... 08
Pentax .................................................................... 05, 35
Philco ...................................................................... 08, 29
Philips ..................................................................... 08, 29
Pioneer ............................................................. 05, 16, 33
ProSean ......................................................................... 00
Quartz ........................................................................... 02
Quasar .......................................................................... 08
RCA ......................................... 00, 05, 07, 08, 28, 35, 37
Realistic ............................. 02, 06, 08, 09, 12, 15, 19, 43
Samsung ............................................... 07, 13, 22, 32, 42
Sansui ........................................................................... 16
Sanyo ......................................... ;........................... 02, 12
Scott ................................................................. 04, 13, 41
Sears ................................... 02, 05, 09, 12, 18, 19, 35, 43
Sharp ................................................................ 06, 24, 39
Shintom ............................................... :............ 17, 26, 31
Sony .............................................. :.................. 17, 26, 38
Sylvania ........................................................... 08, 15, 29
Symphonic ....................................... ...................... 02, 15
Tashiko ........................................................................ 09
Tatung .......................................................................... 30
Teac ........................................................................ 15, 30
Technics ....................................................................... 08
Teknika ...................................................... 08, 09, 15, 21
Toshiba ............................................................ 1)5, 13, 19
Vector Research ..................................................... 14, 16
Victor ...................................................... ;..................... 16
Videosonic .............................................................. 14, 16
Videosonic .................................................................... 07
Wards ..................... 05, 06, 07, 08, 12, 13, 15, :25,31, 35
Yamaha ...................................................... 02, 14, 16, 30
Zenith ..................................................................... 11, 17
31
Page 36

The digital remote control that came packed with your TV
iLsalso capable of controlling a compatible audio
component.
To program the remote just press the AUDIObutton, then
]pressthe tDbutton, then enter the two-digit code number
for your brand of audio equipment from the chart below.
Refer to the chart below to find the code number that
corresponds to the brand name of your audio equipment.
If more than one number is listed, you may need to try
each one separately to find the one that works.
2
Press the AUDIO button on remote.
3
Press IObutton on remote.
4
Press two number buttons (first one, then the other) to
enter the code number for your brand of audio
equipment.
Note: You must press the two number buttons within three seconds
of pressing the IObutton.
5
Point the remote at the audio equipment and press the
OFF/ONbutton to test the code number.
• If the right number was entered, the audio equipment
will turn on.
• If the audio equipment does not react to the remote,
repeat steps 1 thru 5 with another code number.
Operating Notes:
After the AUDIObutton is programmed, the buttons described on the
next page will operate the basic functions of most audio equipment.
Depending on the age, brand, model, and type of audio equipment,
some models may not be able to respond to all the function buttons
listed. You will want to experiment with each button to determine
the exact function for your component.
AMP
ads
Akai
Dimensia
Dynamic Bass
Fisher
JVC
Kenwood
Kyocera
Marantz
Mitsubishi
Nakamichi
Panasonic
Pioneer
RCA
Sansui
Sherwood
Sony
Teac
Technics
Yamaha
Note: Refer to the information sheet packed with your remote control
for the latest list of brand names and code numbers. Because this list of
brand names is continually growing, the information sheet packed with
your remote control may be a later version of this list and contain
additional brands and/or code numbers.
01
02,08
23
16
17
09
22
15
20
12
14
24
11,13
21
10
18,19
03
29
30,35
38
42
03
49
52
CD
07
25
32
36
39
07,43,44
45
46
5O
TAPE
06
26,27
33,34
37
40,41
06
48,53
51
PHONO
05
28
05
47
AUX
O4
31
04,54
Page 37

After the AUDIObutton is programmed, the buttons described
below will operate the basic functions of most audio
equipment. Depending on the age, brand, model, and type of
audio equipment, some models may not be able to respond to
all the function buttons listed. You will want to experiment
with each button to determine the exact function for your
component.
0FF/0N: Press to turn on
component. Press again to
turnoff. Some components
will turn on automatically
when yon press the AUDIO
button.
NumberButtons:Press two
numbers to directly select a
channel.
Remote Buttons That
Control
Audio
Equipment
AUDIO:Press this button to turn on
the audio component and put
remote in "Audio Mode" so other
buttons will control the audio
component. Press the rv button to
put remote back into "TV mode".
CHANNEL:Press to select the next
higher or lower channel in the
component's channel memory.
VOLUME:Press to change volume
level.
ANTENNA: Performs various
functions depending on the
type of equipment.
Experiment with this button.
PLAY:Press to start
component playing.
REWIND:Press while
component is stopped to
rewind tape.
PAUSE:Press to pause play or
record. To release pause, press
again.
/
//
STOP:Press to stop whatever the
component is doing: playing,
recording, rewinding, etc.
//
RECORD:Press to start recording.
FF(FastForward): Press while
component is stopped to fast
forward tape.
33
Page 38

General CableInformation
Antenna (or cable-TV) connections are made with either
coaxial antenna cable or twin-lead cable. Coaxial cables
are shielded so they are less susceptible to hum or
interference from adjacent cables.
The following accessories are available from most ProScan
dealers and electronics supply stores in case you want to
position your components farther apart or need additional
cables.
AntennaCables
Slip-on End
_1 Screw-on End
Round75-ohmcoaxialcable
Flat30Q-ohmtwin-lead cable
Most audio/video connections between components can be
made with shielded audio and video cables that have RCA-
type phone connectors.
StandardAudio/VideoCablewith
RCA-typephoneplugs
(suchasNo. AH069G)
Color-CodedJacks
The jacks on the "IV's monitor panel are color-coded for
ease of use. The VIDEOjacks are yellow, the right AUDIO
jiacks are red, and the left AUDIOjacks are white. When
connecting components to each other, be sure that you
always connect left outputs to left inputs and right outputs
_Ioright inputs. If a component has only one output
(menu), connect it to the R/MONOINPUTjack.
To connect S-VHS (Super-V/IS) components, an S-VHS
video cable is required.
S-VHS Cable(such asNo. 186008)
Gold-PlatedJacks andGold-lipped Cables
AH0_7(340
Gold-'l_ppedCables
AHO65G16-ft)
AHO6eGItO-_I
Audio/VideoCables
Gold-TippedCables
AHOe#G13-_
AHOTOG16-_
Gold-'tippedCables
AH075G(6-It)
Screw-on Cable attaches to
the round antenna connectors
(called 75-ohm F-type) on
the back of your VCR or TV.
The ends screw onto the
connectors for a secure
connection.
Push-on Cable attaches to
the round antenna connectors
(called 75-ohm F-type) on
the back of your VCR or TV.
Ends push on for a quick
connection.
Audio/Video Cable
Shielded cable for
connecting AUDIOand V_DEO
jacks. Has an RCA-type
phone plug on each end.
Monaural VCR Dubbing
Cable
Double cable that lets you
connect the VIDEOand AUDIO
jacks of two VHS VCRs to
duplicate tapes. Can also be
used to connect a VCR to
your TV. Cable is color-
coded and shielded. Has
RCA-type phone plugs on
each end.
Your ProScan monitor panel is equipped with gold-plated
jacks. The gold plating helps prevent oxidation of contacts
which provides much less loss than conventional contacts.
A complete line of gold-tipped cables is available to help
you obtain optimum performance from your equipment.
34
Stereo VCR Dubbing Cable
Triple cable that lets you
connect the WDEOand AUDIO
jacks of stere() components.
AHOr_(6-_
Page 39

AudioJVideo Cables continued
Accessory Order Form For ProScan TV Models
Gt4d-'lippedCable
AHO72G(340
186o08134t)
VAA_O(8-ft)
PSWHI_
Stereo Audio Cable
Double gold-tipped cable
generally used for
connecting stereo audio
components.
S-VHS Video Cable has
multipin connectors on
each end for connecting
S-VHS components to your
TV. When connecting an
S-VHS component to the
S-VIDEOjack on your TV,
remember to also connect
the left and right audio
cables to the iNpUTIjacks
because the S-VHS cable
carries only the picture, not
the sound.
Wireless Headphone
System PSWH100
Uses RF transmission
technology freeing the user
from the limits of
competitive "line-of-sight"
systems. Rechargeable
NiCad batteries provide up
to four hours of continuous
operation and the
convenient stand stores and
recharges the headset.
Volume may be controlled
from the headset and the
RF tuning frequency may
be adjusted for optimum
sound performance. Line
level audio inputs are
compatible with any fixed
audio source. The ProScan
PSWH100 defines the
leading edge in wireless
transmission technology.
Description
Screw-on Antenna Cable (3-ft)
Signal Splitter
Gold-Tipped Antenna Cable (6-ft)
Gold-Tipped Antenna Cable (10-ft)
Gold-Tipped Audio/Video Cable (3-ft)
Gold-Tipped Audio/Video Cable (5-ft)
Gold-Tipped Stereo Audio Cable (3-ft)
Gold-Tipped Dubbing Cable (6-ft)
Gold-Tipped Dubbing Cable (6-ft)
VCR Connection Kit (page 46)
Wireless Headphone System
S-VHS Video Cable (8-ft)
S-VHS Video Cable (3-ft)
Antenna Mixer (page 41)
Antenna Mixer (page 41)
_emote Control (CRK62D)
_emote Control (CRK60A)
AH047 $3.99
AHO65G $6.99
AHO66G $8.99
AHO69G $5.99
AHO70G $7.99
AHO72G $8.99
AHO75G $10.99
AHO77G $14.99
AVH500 $32.95
PSWH100 $199.95
VAA020 $29.95
186008 $27.55
193984 $10.73
197551 $10.95
210827 $67.90
206799 $28.05!
Prices are subjectto change without notice
Total Merchandise ($10 Minimum Order) ......
Sales Tax ................................
We are required by law to collectthe appropriate
salestax for eachindividual state,county, and
locality to which the merchandise is being sent.
Shipping, Handling, and Insurance ...........
Total Amount Enclosed .....................
Use VISA or MasterCard preferably.
Money order or check must be in U.S. currency only,
No COD or CASH.
Total
$
$
$ 5.00
$
w._-$j
210827
I
Remote Controls
These are the remotes that
came packed with your TV.
All accessories are subject to availability.
Where applicable, we will ship a superseding model.
Replacements or spares can
be ordered as needed. O
_D
b
Page 40

Charge your order on your VISA
or MasterCard by
filling in below
To order accessories, contact your local ProScan Dealer.
If a dealer is not nearby, you can also follow the instructions
below to order by telephone.
USE YOUR CREDIT CARD
IMPORTANT: Copy complete account number
from your VISA card
I III ir-l-l-lr-Vl-Illll
Mycaexpi s:I--I--I
IMPORTANT: Copy complete account number
I lll Illlllllllllllll
CopyNumber [ I [ I [
above your
name on
MasterCard
Prices are subject to change without notice.
PLEASE
Marne:
Street:
City:
State:
from your MasterCard
My card _
expires:
AUTHORIZED SIGNATURE
Printor type your name and
address clearly. This will be your
mailing label.
A complete and correct orderwill
save you days of waiting.
Apt:
Zip:
VISA"
United States and Canada Orders
To place your order by phone, have your Visa or MasterCard
ready and call the toll-free number listed below between 8AM
and 8PM Eastern Standard Time. Use this number only to
place an order for accessory items listed on this order form.
1 - 800 - 338 - 0376
Most times your orderwill be shipped UPS within 72 hours of
receipt. If ever it is not possible to ship within 30 days, we will
notify you with an update on your order and an option to cancel.
To place your order by mail, detach and mail the completed
order form with credit card information, money order, or check
in U.S. currency (made payable to Thomson Consumer
Electronics, Inc.) to the following address.
ProScan Video Accessories
P.O. Box 8419
Ronks, PA 17573
For more information on these accessories (or current
prices), write to the following address:
Video Accessories Customer Service
Thomson Consumer Electronics, Inc.
Distributor & Special Products
2000 Clements Bridge Rd
Deptford, NJ 08096-2088
For more information on these accessories, write to the
following address:
ProScan Video Accessories Canada
Thomson Consumer Electronics, Inc.
6540 Tomken Rd
Mississauga, Ontario Canada L5T 2E9
International Orders
This offer is valid only in the 50 United States and Canada. For
international orders, please send your request for quotation (not
anorder) to:
International Customer Service
Thomson Consumer Electronics, Inc.
Distributor & Special Products
2000 Clements Bridge Rd
_/
Deptford, NJ USA 08096-2088
Please make sure that both sides of this form have
been filled out completely.
L
t...,
_D
_D
i
Page 41

Several stands and speakers are available to enhance the
appearance of your system*. The stands and are designed to
match your TV and are available from your local ProScan
dealer. These items are not available by mail order. To
locate your nearest ProScan dealer, call this toll-free number:
1-800-PROSCAN.
Matching Stand (Model BA2707)
* ,Appearance and design of optional stands may vary in Canada.
P
31
Page 42

Q SURROUNDOUTAUDIOJACKS
SELECTEDOUTAUDIOJACKS
_ _ _ mm i mm m wm _ _ _
HI-FI ............. SOUT
AUDIO
JACKS I
I:
I
I
I
INPUT1
AUDIO I
JACKS t
I
I
I
'iNPUT 2
AUDIOJACKS
/
/
/
/
/.
Q S-VIDEOCONNECTOR
EXTERNAL
SPEAKERTERMINALS
SURROUND
SPEAKERTERMINALS
) SPEAKERSWITCH
SELECTOUTVIDEO JACK
'., INPUT2VIDEOJACK
m
@ CABL_ANTENNA CONNECTORS
INPUT1VIDEOJACK
(_) SURROUND JACKSfeed volume-controlled
OUTAUDIO
surround sound audio from whatever is displayed on the
TV screen. Allow connection of audio amplifier in case
you want to drive the surround speakers louder than the
SURROUND SPEAKERSterminals will allow. Surround
sound must be turned on for this function to operate.
Details are on page 51.
38
@@
SELECTOUTJACKSprovide fLxedlevel audio and video
outputfrom whatever is displayed on the TV screen
(except signal from S-ViDEOconnector). Provide standard
audio and video signals suitable for recording. Can be
used for several applications such as:
• VCR editing with two or three VCRs (page 47).
• Recording TV programs onto a camcorder (page 49).
• Recording cable-TV programs onto a VCR that is not
cable ready (page 47).
• Recording audio onto an audio cassette tape recorder
(page 50).
Notes: Remember that the signal coming out of these jacks is
whatever you see (and/or hear) on the TV screen. So, whatever
you want to record must be displayed on the "IV screen during
recording. The small inset picture fromthe picture-in-picture
feature and any menus (video, audio, or setup) or displays such as
clock and channel that are on the screen can not be recorded.
To record from an S-VHS component connected to the S-VIDEO
connector, you must also connect the video cable to the VIDEO
iNPUT1jack and then select channel 91 on the TV screen.
Page 43

(3_ EXTERNALSPEAKERTERMINALSpermit direct connection
of auxiliary speakers. Connection details are on
pages 52-53.
J_ SURROUNDSPEAKERTERMINALSpermit direct connection
of auxiliary speakers for surround-sound effects. Details
are on pages 16-17 and 52-53.
Note: Either 4-ohm or 8-ohm speakers should be used. 8-ohm
spe0kers are preferred.
(_(_ INPUT1JACKSprovide for direct connection of video
devices (like VCRs, camcorders, and laser disc players)
or compatible home computers and "IV games with
video/audio outputs. To see the signals from a device
connected to the INPUT1jacks, select "IV channel 91.
(_) CABLE/ANTENNACONNECTORS used when
ate
attaching
either a home antenna and/or a cable-TV system to your
TV. Connection details are on pages 41-43.
q_ SPEAKERSWITCH
This switch lets you turn offTV's internal speakers so
that sound will instead come through speakers connected
to EXTERNALSPEAKERSterminals.
Details about connecting speakers to the TV are on
pages 52-53.
Important: Always place switch in IWrERNALposition if no
external speakers are used (or if external speakers are ever
disconnected).
@ INPUT2JACKSprovide for direct connection of video
devices 0ike VCRs, camcorders, and laser disc players)
or compatible home computers and TV games with
video/audio outputs. To see the signals from a device
connected to the INPUT2jacks, select TV channel 92.
® S-VIDEOCONNECTORprovides for direct S-VI-IS video
connection from S-VHS VCR or camcorder. Remember
to also connect the S-VHS VCRs orcamcorder's audio
jack(s) to the TV's iNPUT1LEFTand/or rVMONOaudio
jacks. This is necessary because S-Video cables only
carry the super video (picture), not the audio signal.
Connection details are on pages 47-49.
To see the signals from a device connected to the S-VIDEO
jacks, select TV channel 90.
(_) HI-R OUTAUDIOJACKSfeed volume-controlled stereo
audio out from whatever is displayed on the TV screen.
Allows connection of audio amplifier so you can adjust
sound level with TV's remote. Connection details are
onpage 50.
Page 44

CompatibleComponents
PlugginginPower Cords
A wide variety of compatible Video Cassette Recorders
(VCRs), camcorders, laser disc players, and audio
components are available. Check with your dealer for
details.
Other brands of components can also be connected to your
TV. Refer to the component's owner's manual for the
manufacturer's recommended hookup instructions.
PositioningComponentson Shelves
To ensure the best performance from your components,
follow these general guidelines when arranging them on
the shelves of a component compartment.
Amplifiers, receivers, and VCRs generate heat during
operation, so special care should be taken when arranging
these components in the compartment. Do not stack an
amplifier (or receiver) and a VCR directly on top of each
other because each component generates heat and may not
provide the best performance if stacked together. Do not
stack other components directly on top of an amplifier,
receiver, or VCR.
If you include both an amplifier (or receiver) and a VCR,
put the amplifier on the top shelf and put the VCR on the
bottom shelf. Leave at least four inches of clearance above
the amplifier (or receiver) and at least two inches of
clearance above other components.
If you have just a VCR and no amplifier (or receiver),
position the VCR on the bottom shelf. Do not stack
anything else directly on top of the VCR. Leave at least
two inches of clearance between the VCR and the shelf
above it.
Some VCRs may cause interference in TV sets if they are
placed too close to the TV. The ProScan cabinets have a
built-in interference barrier to help eliminate this type of
interference. If you are using another type of cabinet and
interference is present when using your VCR, try placing
the VCR on the bottom shelf or try plugging the TV and
VCR power cords into different wall sockets.
Do not plug any power cord into a wall outlet until you are
finished making connections.
Many components have "convenience outh;ts" on their
back panels so you can plug power cords from other
components into a "convenience outlet" instead of a wall
outlet. Usually these outlets will be labeled either
"switched" or "unswitched".
If the outlet is labeled "switched", that means power to the
outlet will be switched off when the component's power
button is switched off.
If the outlet is labeled "unswitched", that means power will
always be available at that outlet, even when the
component is turned off.
Depending on the size of your system, you may prefer to
use an extension cord or a "multiple adapter" to get enough
outlets for all your components.
The power cords on your ProScan components are
"polarized" (one blade is wider than the other). Be sure
the extension cord or multiple adapter is_also polarized.
The plug should fit in the outlet only one way.
PositionCablesto AvoidHum
The possibility of picking up hum (interference noise) in
the audio/video cables will be reduced if you keep them
away from the back of the TV. Route the cables to the
sides of the TV's back panel instead of straight down the
middle.
All cable plugs should be firmly seated in the jacks where
they connect to the equipment. If a plug is not connected
firmly, audio hum or smeared video may result.
If your antenna cable is fiat twin-lead cable, try to keep it
away from the audio/video cables as much as possible.
Excess flat, twin-lead cable should be cut off instead of
coiled behind the TK. Round, coaxial, antenna cable is
usually shielded and can be coiled or placed next to
audio/video cables without causing interference.
TurnOff Power Before ConnectingComponents
Always turn off power to all components before you
connect or disconnect any cables. This will protect your
components from possible electrical surges that could
damage your equipment.
This is a good practice for all your audio and video
components - TV's, VCRs, audio systems, computers, etc.
PositionSpeakersto AvoidInterference
Placing external speakers with unshielded magnets too
close to the TV may result in the speaker magnets affecting
the quality of the picture. Such speakers should be located
at least eight inches away.
If unshielded speakers are too close to the TV, colored
streaks will appear along the sides of the picture. If this
happens, turn off the TV for several minutes while moving
the speakers farther away. Then turn the TV back on.
The ProScan SPK060 speakers are completely shielded
and can be positioned next to the TV without affecting the
picture.
Page 45

Follow one of the steps below to connect an indoor or outdoor antenna to your TV if you do not have a cable-TV system.
A. if your home antenna cable is a 75-ohm, round, coaxial cable that carries only VHF (channels 2-13),
only UHF (channels 14-69), or VHF and UHF channels, connect it to your set like this:
BackdTV
CABLEI ANTENNA
-0
Incoming Cable __
hum Home
Antenna
CON_RTER
B, Ifyour home antenna cable is a 300-ohm, flat, twin-lead cable that carries only VHF (channels 2-13),
only UHF (channels 14-69), or VHF and UHF channels, connect it to your set like this:
6ackofTV
C_LE IANTENHA
Incoming Cable
hwn Home
Antenna
Push on
ANTA
ANI'B
ANT A
ANTB
jAdapter(supplied)
(suchus_S3ge3)"
CONVERTER
C. If your home antenna cable(s) are a 75-ohm, round, coaxial cable that carries VHF (channels 2-13) and a 300-ohm, flat, twin-
lead cable for UHF (channels 14-69), connect it to your set like this:
SackofTY
Incoming
Cables ITom
Home
Antenna(s)
UflF "--- _ ANTA
and _
VHF _ \ (suches 11975511" _6
CONVERTER
D° if the antenna cables coming from your home antenna(s) are two 300-ohm, flat, twin-lead cables as shown here, connect
them to your set like this:
BackofTV
Incoming
Cablesfrom
Home
Antenna(s)
UHF "_" _ _ Pushon .,a_
and ANTB
VHF
*Optional accessory available from your dealer or electronics supply store.
Mail order form is on page 35.
AntennaMixer CONVERTER
(suchas#193984)*
Note: Be sure to connect the UHF antenna cable to the
UHF screws on the Antenna Mixer and the VHF antenna
cable to the screws marked VHF.
41
Page 46

Follow one of these steps to connect a cable-TV system to your TV instead of a home antenna. Since cable-TV systems
vary, you may wish to consult your local cable-TV company for additional information.
!_k. Follow this diagram if your cable company does not require a converter/decoder box (no scrambled channels)::
Bac,kofW
CABLEI ANTENNA
ANTA
Incoming
Cable
CONVERTER
Be
Follow this diagram if your cable company requires a converter/decoder box that can be controlled by remote control.
Most brands of remote-controllable boxes can be controlled by the remote that came packed with your TV.
Details for programming your TV's remote to also control the converter/decoder box are on page 44.
See diagram D if you want to connect a VCR.
B=dttlW
Incoming
Cable
_ --.... _ CABLEI ANTENNA
_ _ .-.... ANtA
Rememberto tune your"IV to theoutput
channel of the converterbox (usually 2, 3,
or4) when selectingchannels via the
converter box.
CONVERTER/DECODERBOX
C°
Follow this diagram if your cable company requires a converter/decoder box that cannot be controlled by remote control:
CONVERTER
Scrambled Cable-TV Channels
Some cable-TV decoders require that you manually switch from regular to scrambled channels on the decoder
whenever you wish to view the premium pay channels. By connecting the decoder to the ANTAinput and CONVERTER
output on your TV and leaving the decoder box set to the scrambled channel, you can switch between the scrambled
and unscrambled channels by using the TV's remote control.
ANTB
O
O
ANTB
®
Simply press the ANTENNAbutton on the remote control to switch
between the scrambled and nonscrambled channels.
Each time you press the ANTENNAbutton, the channel numbers
will change color on the screen to show which antenna signal
you're watching.
Nonscrambled cable channels will come through the ANTa input
whenever the channel numbers are yellow.
The scrambled channel from the decoder box will come through
the ANTAinput whenever the channel numbers are blue. Be sure
to leave the decoder box set to the scrambled channel, and
remember to tune your TV to the output channel of the converter
box (usually 2, 3, or 4).
*Optional accessory available from your dealer or electronics
supply store. Mail order form is on page 35.
Incoming
Cable
AntennaCables
(suchas AH037*)
CABLEI ANTENNA
ANT A
CONVERTER
¢ONV1EEI1ERI DECODEIIBOX
I
I
I
i
Page 47

])° Follow this diagram if your cable company requires a converter/decoder box for premium channels and you also want to
connect a VCR.
(suchas AH037orAH065G)
(suchas AH047)
Converter/DecoderBox
Remember to tune the VCR to
the output channel of the
converter box (usually 2, 3, or 4).
Most cable companies that require use of a converter/decoder
box only require the box for scrambled premium channels
like HBO or Showtime. All the other cable-TV channels can
usually be viewed without the converter box. Therefore, by
using a signal splitter, you can send the incoming cable-TV
:;ignals directly to the "IV and also thru the converter/decoder
box and VCR as shown above.
You can easily switch between the signals coming into the
ANTAjack and the ANTBjack by pressing the ANTENNAbutton
,anthe remote control. The channel numbers will change
colors to let you know which antenna signals you are
watching. When the numbers are blue, you are seeing the
aNTAsignals. When the numbers are yellow, you are seeing
the ANTesignals.
Coaxial AntennaCables*
Back of VCR
Note: Be sure to also connect the VCR's AUDIOand VIDEOOUTjacks to
the TV's AUDIOand VIDEOINjacks as shown on pages 46-47. The
audio/video connections are necessary for picture-in-picture viewing
and for stereo playback from the VCR. To see the signals from the
VCR that are going into the TV's iNPUTjacks, select'IV channel 91 if
yon connected the VCR to the INPUT 1jacks or select channel 92 if you
connected the VCR to the INPUT2 jacks. Select TV channel 90 if you
have an S-VHS VCR connected to the TV's S-VIDEOconnector.
Back of TY
CABLE/A_ITNNA
ANT A
ANTg
CONVERTER
Remember to tune the TV to the output
channel of the VCR (usually 3 or 4)--the
same channel as the position of the VCR's
CH3/CH4switch.
The cable-TV channels that are not scrambled can then be
seen whenever the TV is receiving the ANTAsignals. The
cable-TV channels that are scrambled can then be seen thru
the converter box and then thru the VCR whenever the TV is
receiving the ANTS signals. Most VCRs will feed the signal
thru their antenna jacks even when the VCR is turned off.
This allows you to watch scrambled channels from the
converter box without having to turn on the VCR.
This connection can be useful because it will let you record a
scrambled channel on the VCR at the same time you are
watching a non-scrambled channel thru the ANTAjack on the
TV.
For picture-in-picture viewing, be sure to also connect the
audio/video cables from the VCR to the TV as shown on
pages 46-47. The VCR must be turned on and tuned to the
output channel of the cable box (usually 2, 3, or 4) for
picture-in-picture viewing.
*Optional accessory available from your dealer or electronics
supply store. Mail order form is on page 35.
43
Page 48

If your cable box has its own remote to change channels,
you will probably be able to program the TV's remote to
control both the TV and the cable box.
The TV's remote is designed to control several brands of
q-ableboxes. To program the remote, just press CABLE,then
Io, then the two-digit code number for your brand of cable
box. Refer to the chart below to find the code number for
'.yourcable box. Press the OFF/ONbutton next to confirm
operation. You may need to try each of the code numbers
listed until you find the one that works.
1 PRESSCABLE
4
TOTEST
3 PRESSTWO
NUMBERBUTTONS
(see list below)
PRESSID
After the TV's remote is programmed, you'l,l be able to
turn on the cable box by pressing CABLEthen OFF/ON.You
can change channels on the cable box by pressing the
CHANNELbuttons whenever the remote is in the "cable"
mode. To put the remote in the "cable mode", press the
CABLEbutton. Press the rv button to put the :remoteback
into the TV mode so the remote buttons will control the
TV again.
ProgrammingRemoteToControlCable Box
with remoteonly
Refer to the chart at the left to find the code number that
corresponds to the brand name of your cable box. Keep
this number in mind. If more than one number is listed,
you may need to try each one separately until you find the
one that works.
1 Press CABLEbutton on remote.
2 Press IDbutton on remote.
Press two numberbuttons (first one, then the other) to enter
the code number for your brand of cable box.
Note: Youmustpress thetwonumberbuttonswithinthreeseconds
of pressingtheIDbutton.
Anvision 07, 08
Cablestar 07,
Eagle
Eastern International
General Instrument 04, 05, 15, 23, 24, 25, 30,
Hamlin 12, 13,
Hitachi
Jerrold
MACOM
Magnavox
NSC
Oak
Oak Sigma
Panasonic
Philips
Pioneer
Randtek
RCA
Regal
Regency
Scientific Atlantia
S_lvania
Teknika
Texscan
Tocom
Unika
Viewstar 07, 08, 19, 26, 28, 29, 32, 33, 40, 41
Zenith 14, 42
Note: Refer to the informationsheet packed with your remote control
for the latest list of brand names and code numbers. Because this list is
constantly growing, the information sheet packed with your remote
control may be a later version of this list and contain additional brands
and/or code numbers.
04, 05, 15, 23, 24, 25, 30,
07, 08, 19, 26, 28, 29, 32, 33, 40,
07, 08, 19, 26, 28, 29, 32, 33, 40, 41
37,
37,
01, 16, 38
27, 39
18,20
07, 08
12, 13
03, 22
10, 11
17, 21
O8
O8
02
36
34
43
36
43
41
O9
16
27
02
11
06
31
Point the remote at the cablebox and press the OFF/ON button
to test the code number.
• If the fight number was entered, the cable box should turn
on. Pressing the CHANNELbuttons should then also change
channels on the cable box.
• If the cable box does not react to the remote (or if the remote
turns on the cable box but does not change channels), repeat
steps 1 thrn 5 with another code number.
Operating Notes: After the remoteis programmed,it will turnon
the cable box whenever you press CABLEand then OFF/ON.
To turnoff the cablebox, press CABLE,then OFF/ON.
Tochangechannelsonthe cablebox, pressCABLEthell CHANNEL
up or down.
Page 49

Your new TV is designed to receive up to 181 channels in
the U.S.A. including 125 non-scrambled cable channels
(see chart at lower right). To use this TV with a cable-TV
system, confirm that the cable-TV system is properly
connected to your TV. Since cable systems vary, you may
wish to consult your local cable-TV company for additional
information.
If your cable-TV company follows EIA/NCTA channel-
identification standards, most of the channels offered by
your cable company will be identified by channel numbers
that are'identical to those on your TV. For example, if your
cable-TV system has programs on cable channel 20, you
can choose this channel by selecting channel 20 on your
'I'V.
]ifyour cable company offers cable channels 90, 91, or 92
you can tune them by selecting the TV channels shown
below.
ScrambledCable-TVChannels
Some cable companies offer "premium-pay" channels in
which the signal is scrambled. Descrambling these signals
for normal viewing requires the use of a descrambler
device (cable box) which is generally provided by the
cable company.
How you connect the cable box to your TV depends upon
whether or not the cable box can be controlled by remote
control. The TV's remote can also control most brands of
cable boxes, so if your cable box is remote controllable,
you will want to connect it as shown in Diagram B on
page 42. Instructions for programming the TV's remote to
control the cable box are on page 44.
If your cable box cannot be controlled by remote control,
you will still be able to remotely switch between a
scrambled channel and unscrambled channels with the
connection shown in Diagram C on page 42 or in
Diagram D on page 43.
The chart below lists the "total" broadcast (off-ai 0 and cable
channel count.
90 126"
91 127"
92 128"
*To tune cable channels 100 through 128, press and hold number button
1 until 1-- appears on the screen. Then enter the other two numbers.
Some cable-TV companies do not follow the EIA/NCTA
standards and instead assign their own channel
identification. For example, some use the standard
broadcast channel numbers (2-13) for channels 2-13, but
identify their other channels with letters. If your cable
company does not follow the EIA/NCTA standards, ask
them for a cross reference that shows to which channels
you should tune your TV to receive their cable-TV
channels.
Not all cable-TV channels will be active on your particular
cable-TV system. Also some cable companies may require
the use of a decoder with their cable-TV system. Consult
your cable company or local dealer for details.
• Low VHF A-8 (Channel 01) - 1
• VHF (Channels 2-13)** 12** 12*"
• UHF (Channels 14-69) 56 -
• Low Midband A-5 thin A-1 (Channels 95-99) .... 5"**
• Midband (Channels 14-22 or A-l) - 9
• Superband (Channels 23-36 or J-W) -" 14
• Hyperband (Channels 37-64 or W+I to W+28) - 28
• Ultraband (Channels 65-94 and 100-125 or - 56
W+29 to W+84)
Total Capability ** 68 125
** VHF is only counted once in total channel count because you can
receive channels 2-13 on both "off-air" and "cable" channels.
Therefore the total channel count for "off-air" and "cable" is 181
channels (68+125-12=181).
*** Channels 95, 96, and 97 are not applicable in Canada. Therefore
the total number of channels for Canada is 178 (68+122-12=178).
45
Page 50

StandardVHSVCR(Not S-VHS)
These connections allow you to record TV programs and play
back tapes. For picture-in-picture viewing, use the preferred
method.
PreferredMethod
EkJdW
2-Way SignalSplitter**
IncomingCable
FromAntenna orCIblI-TV System
Preferred Method
eL ill 1111_
Shown here is the preferred method of connecting a VCR
to your TV if you are in an area with good signal reception.
This method uses a 2-way signal splitter to run separate
signals to the VCR and TV. This way you can view either
TV programs or VCR tapes and not be concerned about the
position of the VCR's rV/VCRswitch. If your cable
company requires a decoder box for premium channels,
refer to page 43.
Note: The audio/video connections from the VCR to the 'IV are
required for picture-in-picture viewing and for you to watch tapes being
played by the VCR.
Operation: If the VCR is connected to INPUT1jacks as
shown, select TV channel 91 to view whatever the VCR is
playing.
CoaxialAntennaCables"
I lsuchas AHO37GorAH065G**)
J _ hck ot VCR
INFROMANT
VIDEO AUDIO
OUT
IlL
** These optional accessories (one AH047-2-way splitter, two AH065G-
antenna cables with push-on ends, and one AH077G-triple audio/video
cable) are available as a kit under number AVH500.
If you connect a second audio/video device to INPUT 2, select
TV channel 92 to view whatever the second device is playing.
Note: You canprogram your TV to automatically select the properVCR
input channel (91 or 92) when you press the VCR1or VCR2button.
Details are on page 26.
SimplifiedMethod
:Shown here is a simplified method of
connecting a VCR to your "IV. This method is
best for areas with poor signal reception. If
your cable company requires a decoder box
for premium channels, refer to page 43.
Note: The audio/video connections from the VCR to the
TV are optional; however, these additional connections
usually produce a better-quality picture during VCR
playback. These connections are required, however, for
picture-in-picture viewing and for stereo playback from
stereo VCRs.
Operation: If the VCR is connected to INPUT1
jacks as shown, select TV channel 91 to view
whatever the VCR is playing.
If you connect a second audio/video device to
INPUT2, select TV channel 92 to view whatever
the second device is playing.
*Optional accessories are available from most dealers and
electronics supply stores. Mail order form is on page 35.
I I I
Incoming Cable
Coaxial Antenna
Cables*
(such as #AN037}
SimplifiedMethod
Back of VCR
6wk OfTV
AUDIO SELECTED
Hi-R
<@ @!<@
S-VIDEO *
®
Audio/Video Cables*
(such asAHO69G)
Page 51

Special RecordingontoVCR
This connection only allows you to record on the VCR
whatever is currently being displayed on the TV screen
except for menus and special effects. This is not a
common application for recording with your VCR, but you
may find it useful in certain situations. You'll also be able
1:orecord signals from another VCR (or similar device) that
iisconnected to the TV's INPUT1 or INPUT2jacks.
The TV must remain turned on during recording. If you
change channels on the TV, the channel change will be
:recorded on the VCR tape unless you pause the VCR
,during recording.
Because your TV is cable-compatible, this application
may be used to record cable-TV programs from the TV
onto a VCR that is not cable-compatible.
You may also want to use this connection to dub or edit
VCR tapes with two or three VCRs. By connecting one
VCR (or camcorder) to the iNPUT1jacks and another VCR
(or camcorder) to the INPUT2 jacks, you'll be able to
selectively edit and record whatever is playing on the TV
screen onto a third VCR (or camcorder) connected as
shown here to the SELECTOUTjacks.
If you connect a surveillance system to your monitor,
you'll be able to record what the camcorder is displaying
on the TV screen by connecting a VCR (or camcorder) to
the SELECTOUTjacks as shown here. To see the signal from
a device connected to the INPUT1jacks, select channel 91.
Select channel 92 to see the signal from a device connected
to the (NPUT2jacks.
Beck of VCR
VIDEOIN r AUOIOIN -7
! !!
Audio INPU_T17
SELECTED /
ANT A
®+ ,o
t IHPUT 21 ANT B
Audio/VideoCables* _}) L ,,_ IN VIDEO
i COl _m'ER
To see the signal from a device connected to the INPUT1
jacks, select channel 91. Select channel 92 to see the
signal from a device connected to the INPUT2jacks.
Note: Signals from the S-VIDEOconnector do not come through the
SELECTOUTjacks. To record from an S-VHS component, remember to
also connect the regular video cable to the viDEo INPtrr 1jack and then
tune to channel 91.
Menus (video, audio, setup), displays like clock and channel, and the
inset picture in picture-in-picture do not come through the SELECTOUT
jacks.
Back ofTV
S-VHS (SuperVHS) VCR
This connection allows you to record TV
programs and play back tapes. If your cable
company requires a decoder box for premium
channels, refer to page 43.
Connect the S-WDEOOUTconnector on the back
of the VCR to the S-WOEOconnector on the
back of your TV using an S-VHS cable.
Remember to connect the audio cables from
Incoming CoMe
the VCR to the INPUT1LEFTand PJMONOjacks on
the back of the TV. The S-VHS cable carries
only video.
Back of VCR !
Operation: If the S-VHS VCR is connected
as shown here, select TV channel 90 to view
whatever the VCR is playing. The word
S-WDEOwill appear on the TV when you select
channel 90. You can program your TV to
automatically select channel 90 when you press the VCR1
or vca2 button. Details are on page 26.
*Optional accessories are available from most dealers and electronics
supply stores. Mail order form is on page 35.
S-VHS Cable* (suchas #186008)
JMJDIO
SELECTED
Bl_k IdTV
,@
@ @i@
INPUTI _ I_
VIDEO AUDIO
our_ our_ -, ,H_I i ANTe
[] [] [] =-,,D=o= =.
___
..... .................. .st:.N:,:.B:,.o:,.,.-""J
Note: Remember to also connect the video cable if you plan to use this
VCR for picture-in-picture viewing or if you want to use the SELECTOUT
jacks for recording. When recording from SELECTOUTjacks, tune the
TV to channel 91 to see the signal from the S-VHS VCR.
I
Audio,_/ideoCables* Coaxial Antenna Cable*
(suchas AH077G) tsuch asAH037 or AH065G)
47
Page 52

I':VV OUTJack
(Audio/VideoOut)
S-VHSorStandardVHSCamcorder
This connection allows you to play back tapes in the
camcorder and watch them on the TV.
An S-VHS or standardcamcorder can be connected directly to
your TV. If you have an S-VHS camcorder, connect the S-VHS
video cable to the S-VIDEOconnector on your TV. If you have a
standardVHS camcorder, connect the video cable to the VIDEO
INPUT1jack on the back of your TV. With either video
connection, attach the audio cable to the INPUT1R/MONOaudio
jack.
Operation: If the camcorder is connected to the VIDEOINPUT1
jack (instead of the S-VIDEOconnector), select TV channel 91 to
view whatever the camcorder is playing. If the camcorder is
connected to the S-VIDEOconnector and iNPUT1AUDIOjack, select
TV channel 90 to view whatever the camcorder is playing.
Notes: When the adapter's S-VHS cable b connected to the s-vtoEo
connector, the Video plug doesnot haveto be connected. However, you
may prefer to plug it in anyway to keep it out of the way. The S-VHS
video will automatically override the wvEo JsPm"1 signal when you select
Channel 90.
Be sure to connect the video cable, however, if you plan to use the
camcorder for picture-in-picture viewing or if you plan to use the SEL_Cr
OUTjack for recording. When recording from the sst_cr otrr jack, tune the
TV to channel 91 to see the signal _rom the camcorder.
48
Page 53

l
Audio/_deo InputCable
AV IN Jack camcorder)
(Audio/Video In)
{UsuallysupplJodwilh
/
Audio
S-VHSorStandardVHSCamcorder
This connection allows you to record onto the camcorder
whatever is currently being displayed on the TV screen.
You'll also be able to record signals from a VCR (or
similar device) that is connected to the TV's INPUT1 or
INPUT 2 jacks.
The TV must remain turned on during recording. If you
change channels on the TV, the channel change will be
recorded on the camcorder tape unless you pause the
(:amcorder during recording.
You may also want to use this connection to dub or edit
'V'CR tapes with two or three camcorders (or VCRs). By
connecting one camcorder (or VCR) to the INPUT1jacks
and another camcorder (or VCR) to the iNPUT2jacks, you'll
be able to selectively edit and record whatever is playing
on the TV screen onto a third camcorder connected as
_;hown here to the SELECTOUTjacks.
I
VIDEO
r_NVERrER 1 2 _
If you connect a surveillance system to your monitor, you'll
be able to record what the camcorder is displaying on the
TV screen by connecting another camcorder (or VCR ) to
the SELECTOUTjacks as shown here.
To see the signal from a device connected to the INPUT1
jacks, select channel 91. Select channel 92 to see the signal
from a device connected to the INPUT2 jacks.
Note: Signals fromthe S-VIDEOconnector do not come thin the SELECT
OUTVIDEOjack. To record from an S-VHScomponent, remember to also
connect its regular video cable to the VIDEOiNPUT1jack and then tune to
channel 91.
The small inset picture from the picture-in-picture feature and any menus
(video, audio, or setup) or displays such as clock and channel that are on
the screen can not be recorded.
49
Page 54

AudioAmplifier
If your amplifier is not part of a "system" that has its own
remote, connect it to the "IV as shown here. (If the amplifier
is partof a system that has its own remote, you may choose
to connect it to the TV as shown below using the SELECTOUT
jacks.)
With the connection shown here, you'll be able to change and
mute volume with the TV's remote control. You'll also be
able to remotely control bass and treble functions.
Connection: Connect the "L" and "R" HIFIOUTjacks to the
corresponding input jacks on the stereo amplifier (such as
AUX,TUNES,or CO).Do not use the PHONOinputs. If your
amplifier is not stereo (mono), connect it to the TV's R/MONO
jack. Consult the amplifier's owner's manual for the
manufacturer's recommended hookup.
Operation: If desired, turn off TV's internal speakers as
described on page 11. Adjust the amplifier for normal
listening. You can also control sound with the VOLOMEand
MUTEbuttons on the TV's remote.
Audio/Video Cables*
(such as AH072GI
AudioCassetteRecorderorAmplifier
If your amplifier is part of a "system" that has its own
remote control, connect it to the SELECTOUTjacks as shown
here.
The "fixed level" audio signal present at these jacks is also
ideal for connecting an audio cassette recorder to record
audio from the TV.
This constant audio signal is not affected by pressing the
volume buttons on the TV's front panel or the TV's
remote control.
Connection: Connect SELECTOUT"1."and "R" to the
corresponding input jacks on the stereo amplifier or audio
cassette recorder (such as AOX,rUNES,or CO). Do not use
the PHONOinputs. If your amplifier is not stereo (mono),
connect it to the TV's R/MONOjack. Consult the
equipment's owner's manual for the manufacturer's
recommended hookup.
Operation: Select a TV channel and turn down the sound
on the TV, or turn offTV's internal speakers as described
onpage 11. Adjust sound with controls on the amplifier
orcassette recorder. If the amplifier or cassette recorder is
part of a"system" thathas its own remote, use the
system's remote to adjust sound.
[k_t dIV
AUDIO
L@@Z -llm
|NPUT 1_
_) i. CABLE/ANTENNA
ANTA
$-_OEO *
CONVERTER
SB-_r
1 a 0_'
*Optional accessories are available from most dealers and
electronics supply stores, Mail order form is on page 35.
50
Page 55

SurroundSoundAudio
Connecting an amplifier to the SURRjacks gives you the
ability to get more surround sound audio volume than the
SU'RROUNOSPEAKERSterminals will allow.
With the connection shown here, you will be able to adjust
the volume of the surround sound audio by using the
REARVOLfunction described on pages 16-17.
BlairOl'IV
AUOIO
HI-R SS_-CI'EO
Connection: Connect SURR"L" and "R" to the corresponding
input jacks on the stereo amplifier (such as AUX,TUNER,or CD).
Do not use the PHONOinputs. If your amplifier is not stereo
(mono), connect it to the TV's R/MONOjack. Consult the
amplifier's owner's manual for the manufacturer's
recommended hookup.
Note: Ifdesired, you can connect one set of surroundspeakerstothe
TV andanother set of surround speakers to anamplifier that is
connected to the TV's SURROUTAUDIOjacks.
Operation: Turn on the surround sound as described on
page 17. If SURROUNDis in the OFFposition, you will get no
audio out of the SURROUTjacks.
Adjust the REARVOLdisplay to mid range (page 17). Adjust
the amplifier so that the surround audio is at a normal
listening level. You will then be able to do a final adjustment
to the surround audio by adjusting the REARVOLdisplay as
described on page 1Z
* Optional accessories are available from most dealers or electronics
supplystores. Mail orderformison page35.
INPUT I1
_ L CAB LI_ANT_N ]%_/_
ANTA
@-,
ANTB
CONVERTER
VIOEO
SELECT
1 2 OUT
Audio/VideoCables*
IsucbasAH0"/2G)
51
Page 56

You can connect up to four additional speakers to the back
of your TV-two to the EXTERNALSPEAKERSterminals and
two more to the SURROUNDSPEAKERSterminals. If you
connect a stereo amplifier or receiver to your TV, you may
prefer to connect two speakers to the amplifier or receiver
instead of the EXTERNALSPEAKERSterminals on the TV. To
obtain the surround-sound effects, connect two speakers to
the SURROUNDSPEAKERSterminals on the back of the TV and
position them at the rear of your viewing area, elevated to
standing head level. You may wish to connect a stereo
amplifier or receiver to the SURRAUDIOjacks to get a
volume level of surround sound audio that is higher than
the SURROUNDSPEAKERSterminals will allow. Details for
obtaining best surround sound are on pages 16-17.
SPEAKER
EXTERNAL _ INTERNAL
When you connect speakers to the EXTERNALSPEAKERS
terminals, be sure to move the SPEAKERswitch (located
directly below the terminals) to the EXTERNALposition.
When the SPEAKERswitch is in the EXTERNALposition, the
TV's internal speakers are turned off and sound will then
come through the external speakers you connected to the
EXTERNALSPEAKERSterminals. Return this switch to the
iNTERNALposition if external speakers are ever disconnected
from the TV.
If you want to connect an amplifier to your TV with its
own set of speakers attached to it, you can turn off the
TV's speakers with the SPEAKERSON/OFFmenu display as
described on page 11. Setting this display to OFFwill turn
off the TV's internal speakers and any speakers connected
to the EXTERNALSPEAKERSterminals. Speakers connected to
the SURROUNDSPEAKERSterminals will remain on, so you'll
be able to create surround sound effects when using the
amplifier.
Caution: Do not connect external speakers to
more than one audio source at a time. You
can connect a set of speakers to either the
TV or the amplifier but not to both at the
same time. If you connect the same
speakers to both the TV and the amplifier
(or to more than one set of terminals), you
will probably damage your equipment.
ConnectingSpeakerstoBack ofAmplifier or Receiver
If you connect an amplifier or receiver to your TV, connect
the speakers to the amplifier/receiver instead of the TV.
Sound from the TV will then come through the
amplifier/receiver. You can also connect additional
surround speakers to the back of the TV, if desired.
The diagram below shows how to connect external
speakers to the speaker terminals on the back of a typical
amplifier/receiver. Check the owner's manual for your
amplifier/receiver if its speaker terminals look different
than those shown below.
Notes: After connecting speaker wire, pull it gently and check that it is
connected securely to its terminals.
Do not allow the wire core to protrude from its terminal or contact other
wires or terminals. If the cores of two wires touch each other, damage to
components could result.
1st Set of Speakers
Connect to A Terminals
SPE/kKERS
"1- RIGHT
' Receiver
(Optional)
2nd Set of Speakers
Connect to B Terminals
Important: When connecting the speaker wire, make sure you connect
the (+) terminal on the amplifier or receiver to the (+) terminal on the
speaker. One side of the speaker wire is usually marked with a white
stripe to help you connect (+) to (+) and (-) to (-). If the (+) and (-)
terminals are not matched properly, the speakers will not be "in phase"
causing reduction in low frequencies (bass).
Page 57

ConnectingSpeakerstoTV
If you connect an Amplifier or Receiver to your TV,
connect the speakers to the Amplifier/Receiver instead of
t]aeTV. You can also connect additional surround speakers
to the TV, if desired.
If you do not connect an Amplifier or Receiver to your TV,
you can connect external speakers to the TV to enhance
sound from the TV.
The diagram at the right shows how to connect external
speakers to the terminals on the back of the TV.
If necessary, remove the
vinyl covering from the
ends of the speaker wire
and twist the wire core.
Press and hold down the
lever of the speaker
terminal while inserting
the wire core into the hole.
Be sure to connect (+) to
(+) and (-) to (-)
(explained at bottom
right).
3 Release the lever.
EXTERNALSPEAKERSTerminals
Moveswitch to
EXTERNAL
SURROUNDSPEAKERSTerminals
SPEAKER
EXTERNAL M INTERNAL
Notes: After releasing the lever, pull gently on the wire and check that it
i:; connected securely to its terminal.
Do not allow the wire core to protrude from its terminal or contact other
wires or terminals. If the cores of two wires touch each other, damage to
components could result.
GeneralRecommendedSpeaker Placement
for BestSurroundSound
(Details are on pages 16-17)
Optional[ Optional
External [ [ External
Speaker TV Speaker
t Connect these speakers to I
-- connectors labeled EXTERNAL
SPEAKERS,and put SPEAKER
switch in EXTERNAL position.
Connect these speakers to
_----- connectors labeled
SPEAKERS. SURROUND -_
Speaker Speaker
Surround I Surround J
(Elevated) (Elevated)
Important: When connecting the speaker wire, make sure you connect
the (+) terminal on the TV to the (+) terminal on the speaker. One side
of the speaker wire is usually marked with a white stripe to help you
connect (+) to (+) and (-) to (-). If the (+) and (-) terminals are not
matched properly, the speakers will not be "in phase" causing reduction
in low frequencies (bass).
53
Page 58

Troubles sometimes are caused by simple "faults" that you
can easily correct without the help of a service technician by
first checking a few basic remedies.
Before you call or take your unit to an Authorized ProScan
TV Servicenter, look below for the type of trouble you are
experiencing. Then perform the simple checks and
adjustments listed for that trouble.
• Electronic protection circuit may have been activated because
of a power surge. Wait 30 seconds and then turn on again. If
this happens frequently, the voltage in your house may be
abnormally high.
• Make sure power cord is fully inserted into back of TV.
TV will not turn on
• Check to make sure it is plugged in.
• Check the wall receptacle (or extension cord) to make sure
it is "live" by plugging in something else.
• Maybe batteries in remote control are "dead".
• Maybe remote control was not aimed at remote sensor.
• Make sure power cord is fully inserted into back of TV.
Controls don't work
• If using remote control, make sure remote is in '"IV Mode"
by first pressing rv button.
• Try unplugging set for two minutes and then turning it on
again.
• Make sure power cord is fully inserted into back of TV.
Intermittent or no remote
Turns on unexpectedly
• ALARMONfunction may have been activated.
ALARM does not turn offTV at correct time
• Check ALARMON/OFFfunction. Must be set to ON.
• Check to make sure CLOCKfunction is set to the correct time.
Blank screen
• Maybe Channel 90, 91, or 92 is selected, but device connected
to those iNPUTjacks is not turned on.
• Try another channel.
No sound, picture okay
• Maybe sound is muted. Trypressing VOLUMEup button to
restore sound.
• Maybe TV's speakers are turned off. Check SPEAKERSON/OFF
function.
• Maybe something was between the remote and the remote
sensor.
• Maybe the remote was not aimed directly at the component
(TV or VCR) you were trying to control.
• Maybe remote is not in "TV Mode". Press the TVbutton so
remote will control TV.
• Maybe batteries in remote are weak or dead. Try replacing
batteries.
• Maybe batteries were installed incorrectly. Try replacing
batteries correctly.
Turns off while playing
• SLEEPTIMERfunction may have been activated.
• ALARMOFFfunction may have been activated.
• If using channel 90 (S-VIDEO input) with an S-VHS component,
remember to also connect the component's Land a AUOIOOUT
jacks to the TV's Land nINPUT1jacks.
• Maybe SPEAKERswitch on back of TV is not in the INTERNAL
position.
Can't select certain channel
• Channel may not be in Channel Memory. Try pressing two
number buttons.
• If using a VCR, check to make sure the "I'VNCRswitch on the
VCR is in the correct position.
• To select cable channels 100 through 128, press number
button I until 1-- appears. Then press the other two number
buttons. The CABLE/AIRfunction must be in CABLEmode to
select channels higher than 69.
Page 59

Noisy stereo reception
• May be a weak station. Use AUDIObutton to change STEREO/SAP
t_lnction to MONO mode instead of STEREO.
Limited Warranty
No picture, no sound but power light is on
• Maybe someone changed CABLE/AIR function to wrong position.
• Maybe a vacant channel is tuned.
• ]ForChannels 90, 91, and 92, make sure the component
connected to those INPUTjacks is turned on in order to see
picture.
• ]Efwatching VCR (connected only through antenna input),
make sure TV is tuned to channel 3 or 4 - same as CHa/CH4
switch on VCR. Also check to make sure'rvNca switch on
VCR is in correct position.
Sound okay, picture poor
• Check antenna connections.
• 'Fry adjusting SHARPNESSfunction to improve weak signals.
Can't get two channels for picture-in-picture
• One channel must come through ANTAor Bconnector andthe
other channel must come through the INPUT1 or 2jacks.
• Ifusing the VCR1orVCR2button, make sure it is programmed to
select the proper video input channel as described onpage 26.
• Check position of rVNCRswitch on VCR.
• If using an S-VHS component, make sure its regular VIDEOcable
is connected to iNPUT1VIDEOjack on TV.
No picture while using picture-in-picture, with S-VHS VCR
oz camcorder
• If you have an S-VHS VCR or camcorder connected, you must
also connect a cable from the VCR's VIDEOOUTjack to the
TV's corresponding WOEOINPUT1jack in addition to the S-VHS
cable.
Small picture does not have color
• The small picture will not have color if the large picture signal
does not have the color burst reference. All color signals and
some black-and-white signals are sent with color burst. Try
changing the channel of the big picture.
Black box appears on screen
What your warranty covers:
• Any defect in material orworkmanship.
For how long after your purchase:
• One year for labor charges.
• One year for parts.
• Two years for picture tube.
What we will do:
• Pay any Authorized ProScan Television Servicenter the
labor charges to repair your television.
• Pay any Authorized ProScan Television Servicenter for
the new or, at our option, rebuilt replacement parts and
picture tube required to repair your television.
How you get service:
• Request in-home service from any Authorized ProScan
Television Servicenter. To identify your nearest
Authorized ProScan Television Servicenter, ask your
dealer or call 1-800-PROSCAN.
• Show the service technician your evidence of purchase
date.
What your warranty does not cover:
• Customer instruction. (Your Owner's Manual clearly
describes how to install, adjust, and operate your
television. Any additional information should be
obtained from your dealer.)
• Installation and related adjustments.
• Signal reception problems not caused by your
television.
• Damage from misuse or neglect.
• Remote control batteries.
• A television that has been modified or incorporated into
other products or is used for institutional or other
commercial purposes.
• A television purchased or serviced outside the USA.
Product Registration:
• Please complete and mail the Product Registration
Card packed with your set. It will make it easier to
contact you should it ever be necessary. The return of
the card is not required for warranty coverage.
How state law relates to this warranty:
• This warranty gives you specific legal rights, and you
also may have other rights that vary from state to state.
• Turn CAPTIONINGfunction off.
If you purchased your television in Canada:
• The Canadian Warranty applies in place of this
Warranty. A separate warranty for Canada is enclosed
with all televisions sold in Canada.
5_55
Page 60

General Specifications
Color Standard: 525 line NTSC Color
Chassis: CTC169, solid state, unitized
PowerRequirements: 120VAC + 10%,60Hz
PowerConsumption: 195W maximum
The ProScan NoGlare TM picture tube has a special lithium
silicate faceplate that reduces glare. It also includes an
anti-static coating to help prevent dust buildup, so the
screen will require much less dusting than conventional
"IV screens.
RemoteControl
Model: CRK62D andCRK60A
Transmissionsystem: Digitallyencodedinfraredlight
Batteries: CRK62D: 4 AAA Size
CRK60A: 2 AAA Size
Battery Life: One Year in Normal Use
Power Cord Type syr 2
RF Specifications
Tuning System Type:
Band Coverage: VI-IF channels 2-6, 7-13
Frequency Coverage: 54-806 MI-Iz
Tuner Type: Solid State
Channel Access: Programmable Scan Up/Down
Channel Indication: On-Screen
Antenna Inputs: Two 75-ohm VHFFUHF combined inputs
Sensitivity: 15ttV VHF, 30_tV UHF
Video Specifications
HorizontalLuminance up to560 Lines(froms-vioeo input)
Resolution: usingwidebandvideosource
BlacktoWhite RiseTime 75ns
Luminance Bandwidth: 8.75Ml-Iz(fromS-V,OEOinput)
Video Input: 1Vp-p;75 ohms;negativesync
Video Output: 1Vp-p; 75 ohms; negativesync
HV @ Zero Beam current: 27.5kV Nominal
Quartz-controlled
Multiband Frequency Synthesis
UHF Channels 14-69
EIA Cable Channels 1-125
Complete chart is on page 45.
Direct Access With Remote
You can clean the TV as required, using a soft cloth or the
dusting attachment for your vacuum cleaner. Be sure to
occasionally vacuum the ventilation slots in the cabinet to
help assure adequate ventilation,
To clean the faceplate (screen) of the picture tube, use a
nonabrasive glass cleaner like Windex brand or Glass Plus
brand, with a soft cloth. Oily foods like peanut butter can
be effectively cleaned from the faceplate with glass
cleaners.
Do not use furniture polish onthe TVcabinetor faceplate
of the picture tube. Because texturedfinishes are porous,
using furniture polish could mar their appearance. They
can be easily cleaned with a damp, soft cloth. Furniture
polish is probably the most difficult material to cleanoff a
picture tubeunder normal conditions. To remove furniture
polish from the TV screen, use 100% isopropyl alcohol (a
componentin most glass cleaners) with-a soft cloth.
While cleaning, do not allow liquid to run down the screen
and inside the instrument. Also avoid placing drinks or
vases with water on top of your TV.
When turning the set on after cleaning the faceplate, there
may be some rainbow effects if the screen is not
completely dry.
Audio Specifications
Frequency Response: 50-20,000 Hz (at rated output)
Stereo System: MTS Stereo with SAP (Second
Stereo/MonoSwitching: Automatic
Expanded Stereo: Switchable
Audio Input: 450 mV RMS typical,1V RMS maximum
Audio Input Greaterthan50 kOhms (Stereo);
Impedance: Greaterthan25 kOhms (Mono)
Audio Power: 10 watts/channelRMS into8 ohms
Audio Output:
Selected Outputs:
Outputs To Hi-Fi:
Audio Program)
withlessthan1% THD
Output level tracks inputs within +l/-2dB
2 V RMS maximum,controlled by
volume, mute, equalizer, andbalance
Output Impedance:
Surroundand Hi-Fi outputs less
than2,500 ohms
Speaker Type:
(2-way)
Speaker Impedance:
Two 21/4" x 5" Mid/High Drivers
Two 130mm Enclosed Woofers
Internal, 8 ohms (nominal)
External,8 ohms
L
Ifeatures and specifications are subject to change without notice.
Page 61

+ and - Buttons ...................................... 4,7,9-11,18
Accessories ..................................................... 34,35
Adding Channels to Memory ............................... 24
Adjusting for Best Picture.................................... 10
ALARMFunction .............................................. 18,21
Amplifier Connections ......................................... 50
ANTA/ANTS Inputs ............................ 7,18,25,42,43
ANTENNAMs Function .................................... 18,25
ANTENNAButton ....................... 7,25,30"31,33,42,43
Antenna Cables .......................................... 34,41,42
Antenna Connections ........................................ 2,41
Antenna Input ....................................................... 25
Arrow Buttons ................................................ 7,8,29
AUDIOMENU................................................. 3,11-17
AUDIOButton ................................................... 32,33
Audio Codes ......................................................... 32
Audio Displays ..................................................... 17
AUTOPROGRAMFunction .............................. 2,18,24
Avoiding Hum ..................................................... 40
BALANCEFunction ........................................... 11,15
Balance, Surround ................................................ 17
Bandwidihs ..................................................... 12,13
Basic Operation Theory (Remote) ......................... 5
Batteries (Remote) ................................................. 4
BRIGHTNESSFunction........................................... 10
CABLE Button ................................................... 27,44
CABLECHANFunction ...................................... 18,27
Cable Box Channel Setup .................................... 27
Cable-TV Box ............................................ 42,43,44
Cable-TV Chart .................................................... 45
Cable-TV Connections ................................. 2,42,43
CABLE/AIR Function .............................................. 28
CABLE/ANTENNA Conln_'tors .......... 2,27,38,39,42,43
Cables (Accessory) ............................... 34,35,38-45
Camcorder Connections .................................. 48,49
Care and Cleaning................................................ 56
Cassette Recorder................................................ .50
Caution (TV Games) ............................................ 10
CHANCTRLFunction ........................................ 18,23
CHANGUIDEButton ............................................. 7,8
CHANLABELFunction ........................................... 22
CHANMEMFunction ........................................ 18,24
CHANNELButtons ....................... 2,4,7,9,28,30,33,44
CHANNELFunction ................................................ 21
Channel Labeling .............................................. 3,22
Channel Memory .......................................... 2,18,24
Channel Number Display ....................................... 9
Channels (Cable Chart) ........................................ 45
Channels 90, 91, 92 .............................. 26,28,45-49
Channels Above 99 .............................................. 45
Cleaning and Care ................................................ 56
CLEARButton ............................................. 6,7,19,30
CLOCKSETFunction .......................................... 3,18
CLOSEDCAenONING function ............................... 19
Codes (Audio Brands) .......................................... 32
Codes (Cable Boxes) ............................................ 44
Codes (VCR Brands) ........................................... 31
COLORFunction .................................................... 10
Color-Coded Jacks ............................................... 34
Commercial Skip Button ........................................ 6
Compatible Components ...................................... 40
Component Buttons ............................................... 5
Connecting Tips ................................................... 40
CONTRASTFunction .............................................. 10
Controls (Front Panel) ............................................ 9
CONVERTEROutput ............................................... 42
CS Button ................................................................ 6
Decoder Box .............................................. 42,43,44
Design Specs ........................................................ 56
OOLSYMode ......................................................... 16
Effective Range of Remote .................................... 4
Enrollment Card ......................... Inside Front Cover
EQUALIZERFunction ................................... 11,12,13
Erasing Channels from Memory .......................... 24
Erasing Labels ...................................................... 22
EXPANDSTEREOFunction ................................ I 1,15
Extended Power Failure .................................. 21,24
EXTERNALSPEAKERS................................... 16,52,53
EXTERNALSPEAKERSTerminals ............. 38,39,52,53
Fast Forward Button .................................. 30,31,33
Features .................................................................. 1
First-Time Operation ............................... r........... 2-3
FREEZEButton ........... ,,............ r.S.............. _........8,29
Front Panel 0,.ontrols .;..: ......................................... 9
Function Buttons .......................................... :.........5 "
Gene/_al Cable Information ............................. 34,35
Goitl-Plated Jacks ....................................... _......... 34
Gold-Tipped Cal_les ............. :................... _...... 34-35
Graphic Equalizer ...................................... 11,12,13
HALLMode ............................................................ 16
Headphone ........................................................ 9,35
HIFIOUTJacks ................ ;........................... 38,39,50
Hum (Avoiding) ................................................... 40
tDButton .................................................... 30-32,44
INPUT1 Jacks .............................. 26,28,38,39,46-49
INPUT2 Jacks .............................. 26,28,38,39,46-49
InstallingBatteries................................................. 4
Labeling Channels ....................................... 3,18,22
Locking OUt Channels ......................................... 23
MATRIXMode ....................................................... 16
MENUButton .................................. 3,4,7,9,10,11,18
Menus ...................................................... 3,10,11,18
Monaural Audio ................................................... 14
Monitor Panel......................... _........................ 38,39
MOVEButton ......................................................... 29
MUTEButton ...................................................... 6,50
NORM/UNIFIED Switch ........................................... 30
Number Buttons .............................. 2,6,22,26,30-33
OFF"riMEFunction ................................................ 21
OFF/ONButton ................................. 5,6,30,31,33,44
ON TfMEFunction ......... ....... .............. :.................. 21
Optional Accessories ...................................... 34-37
Order Form ...................................................... 35,36
Other Brands of VCRs ......................... ................ 31
Owner's Club Card .................... Inside Front Cover
PARENTALCTRLFunction ............................. _...18,23
Parental Control ................................................... 23
PAUSEButton ............................................. 30,31,33
PC Button ................................................................ 7
PICTURERESETFunction ....................................... 10
Picture Memory ................................................... 10
Picture-in-Picture ............................................ 28,29
Picture-in-Picture Buttons ................................... 6,7
Pilot Stereo Signal................................................ 14
Ptp Button .................................................. 6,7,28,29
PipOFFButton ................................................... 7,29
Pix-in-Pix ........................................................ 28,29
PLAYButton ................................................ 30,31,33
Plugging In Power Cords .................................. 2,40
Positioning Cables ............................................... 40
Positioning Speakers .................................. 16,40,53
POWERButton................................................... 2,4,9
Power Cord ............................................................ 2
Power Indicator ...................................................... 9
Precautions (Safety) ................... Inside Front Cover
Previous Channel Button .................................... 6,7
PROGRAMButton .................................................. 30
Programming Channel Memory .................. 2,18,24
Programming Remote ................................ 31.32,44
ProScan Owner's Club .............. Inside Front Cover
Quick Reference Guide ................................... 58,59
REARVOLUMEDisplay ........................... 11,16,17,51
RECORDButton ........................................... 30,31,33
Registration Card ....................... Inside Front Cover
Remote (Theory) .................................................... 5
Remote (VCR Control) ................................... 30,31
Remote Control 0"%' Functions) .............. 4,5,6,7.35
Remote Control Sensor .......................................... 9
Remote, Simplified ................................................ 4
Replacing Batteries ................................................ 4
REWINDButton ........................................... 30,31,33
S-VI-IS Camcorder ............................................... 48
S-VHS VCR ......................................................... 47
S-VIDEOConnector ................................ 38,39,47,48
Safety Precautions ..................... Inside Front Cover
SAPBroadcasts ..................................................... 14
Scrambled Channels ........................................ 42,43
Second Audio Program ........................................ 14
SELECTour VIDEOJack .............................. 38,47,49
SELECTEDOUTAUDIOJacks ................... 38,47,49,50
Sensor (Remote Control) ....................................... 9
SETALARMFunction ............................................. 21
SETCLOCKDisplay ................................................. 3
SETUPMENU.............................................. 2,3,18-27
SHARPNESSFunction ............................................ 10
Simplified Remote ..... ............................................ 4
SLEEPDisplay ....................................................... 20
SLEEPriMERFunction ...................................... 18,20
SPEAKERSwitch ................................ 16,38,39,52,53
SPEAKERSON/OFF Function ........................ 11,16,52
Speakers ................................................ 37,40,52,53
Specifications ....................................................... 56
Stacking Arrangements ........................................ 40
STADIUMMode ..................................................... 16
Stereo Broadcasts ................................................. 14
Stereo Headphone Jack .......................................... 9
STEREO*Display .................................................. 14
STEREO/SAPFunction ................................. 11,14,15
STOPButton ................................................ 30,31,33
SURROUNDButton .................................................. 7
SURROUNDFunction ................................... 11,16,17
SURROUNDSOUNDTerminals .......... 16,38,39,51-53
SURROUNDBALANCEDisplay ..................... 11,16,17
SURROUNDOUTAUDIOJacks ................................ 38
Surround Sound .............................................. 16,17
Surveillance System ........................................ 28,49
SWAPButton......................................................... 29
Switched Outlets ........................ _......................... 40
Table of Contents ................................. Front Cover
Time Display ....................................................... 3,9
nNT Function ....................................................... 10
Tips To Read ........................................................ 40
Trouble Checks ............................................... 54,55
Turning Off Power ............................................... 40
Turning Speakers on/off ................................. 11,52
"rv Button ..................................................... 5,6,7,18
'IV Game Caution ................................................ 10
TV Mode ................................................... 6,7,28,30
lqAtCR Switch (VCR) ........................................... 47
Two VCRs ........................................................... 31
Unpacking TV ........................................................ 2
Unswitched outlets .............................................. 40
VCR1CHANFunction ....................................... 18,26
VCR2 CHANFunction ....................................... 18,26
VCR Channel Setup ............................................. 26
VCR Codes .......................................................... 31
VCR Connections ........................................... 46,47
VCR Mode ...................................................... 30,31
VCR1Button ........................................... 26,28,30,31
VCR2Button ........................................... 26,28,30,31
VIDEOMENU....................................................... 3,10
VOLUMEButtons .......................... 2,4,6,7,9,22,33,50
Warranty .............................................................. 55
Warranty Registration Card ....... Inside Front Cover
ZOOM/IN/OUTButtons ..................................... 7,8,29
S___7
Page 62

VIDEO MENU
2
by repeatedly
pressing MENUtO
move down the
Select function
screen, i
AUDIO MENU
2
Select function
by repeatedly
pressing MENUto
move down the
screen.
Repeatedly press MENUtO
select VIDEOMENUand then
press + to display the
functions in the VIDEOMENU.
3
1 Repeatedly pressMENUtO
select AUDIO MENU and
then press + to display
the functions in the AUDIO
MENU.
Press + to increase
setting or press - to 4
decrease setting.
The PICTURE RESET 5
function will return
video functions to
factory settings. 6
3 Follow instructions below for desired function.
To adjust EQUALIZERsettings, press + to displaybandwidths. Press
MENUto select bandwidth and then press + or- to adjust the setting.
To adjust BALANCEfunction, press + to increase audio to the right
speakers or press - to increase audio to the left speakers.
To preparethe TV to receive stereo, press + to set function to STEREO.
Your TV will automatically reproduce stereo when received.
Details are on page 14.
To select a SURROUNDmode, press + to change among OFF,DDLBV,
MATRIX,HALL,and STADIUM.Derails are on pages 16-17.
To adjust REARVOLUMEof external speakers, press + or-.
Details are on pages 16-1Z
To adjust SURROUNDBALANCE,press+ or -. Details are on pages 16-1Z
Adjusting for a Color Picture that Pleases You
l Decrease color to minimum. This will leave a
black-and-white image on the screen.
2 Adjust contrast until the picture pleases you.
Adjust brighmess until the black parts of the
picture appear black. You may need to wait until
the picture shows something you're sure is black.
Be careful not to lose the details in darkly shaded
areas.
Increase color until you reach a pleasing level of
intensity.
Adjust tint until flesh tones or other color objects
appearnatural.
Adjust sharpness for a pleasing level of picture
sharpness. (For weak signals, the picture may be
more pleasing with sharpness decreased.)
i If you want the TV to automatically expand stereo signals when
ii_5 ._--:. - - Toturn off TV's speakers, press + to change setting to OFF. You will
PicCum-in-Piclum (PIP) For details, see pages 28-29.
1 Connect VCR or camcorder to INPUT 1 or INPUT 2 jacks on back
of'IN.
2 Turn on "IV and select the TV channel you want to watch. Also
turn on VCR (or camcorder).
3 Press the Pip button to turn on PIP.
4 Select channel 91 on remote if VCR is connected to INPUT1jacks,
or select channel 92 if VCR is connected to INPUT2jacks, or
select channel 90 ifVCR is connected to S-VIDEOconnector.
5 Little picture can be enlarged, moved, frozen, or switched with
main picture as desired. Pressing the arrow buttons moves little
picture in that direction. Pressing FRZfreezes little picture.
Pressing SWAPswitches little picture with main picture. Pressing
ZOOMIN/OUTenlarges and reduces size of little picture.
received, press + to set the EXPANDSTEREOfunction to ON. The
STEREO/SAPfunction above must also be set to STEREO.
Details are on page 15.
want to leave the TV's speakers turned ONunless you connect an
amplifier to the TV that has its own set of speakers.
Changing Channels (PIP) For daails, seepage 28
1 To changechannelson thepicture from the TV, first presstheTV
button and then press the CHANNELup ordown button (or pre_
two number buttons).
2 To change channels on the picture from the VCR, first press the
VCR1button (if you programmed the VCR1button to control the
VCR as described on page 31) and then press either the CHANNEL
up or down button or two number buttons. You can also change
the VCR's picture by pressing the CHANNELup or down butlons
on the from of the VCR.
Page 63

SETUP MENU
2 Select function
by repeatedly
pressing MENU
to move down
the screen.
Repeatedly press MENUto
select SETUPMENUand then
press + to display the
functions in the SETUP
MENU.
3 Follow instructions below for desired fimction.
The CAPTIONINGfeatureletsyou displaya program'ssoundas
words on the TV screen. Four types of closed captioning are
available. Select CAPTIONS1for full translation of the primary
language in your area. Select CAPTIONS2or secondary language
translation, simplified English, or nothing at all. Both 'tEXT1and
TEXT2display on-screen boxes containing general information not
related to closed captioning. Details are on page 19,
To set the SLEEPTIMER,repeatedly press + or- to select the length
of time you want the TV to stay on. To cancel, press + or- to ,
change thesetting to0:00.
Details are on page 20
Press+ to displaythe ALARMftmctions.
Turn ALARMONand OFFby pressing+.
EnterONTIMEandOFFTIMEby pressing- to
set the hour and + to set the minutes. Enter
CHANNEL you want TV to tl_e by pressing
CHANNELup or down and then pressing +.
Details are on page 21.
To label channels press +. Four blank letter blocks will appear.
Press and hold VOLUMEup or down button on remote until the
letter you want in the first block appears. Then press + to move to
the next block. Repeat untilname is complete. Details are on
page 22.
literal
To turn on PARENTALCTRL,press +. When this function is set to ON,
all channels that have been LOCKED out with the next function called
CHAN CTRL will not be viewable. To lock out channels, select the
CHAN CTRLfunction. Then press CHANNELup or down to select the
channel and press + to change the setting from NORMALto LOCKED.
Details are on page 23.
To start autoprogramming, press +. The TV will automatically
cycle through all channels and place active channels in memory.
Details are on page 24.
To add or erase individual channels from memory, select the channel
with the number buttons and then press + to add or - to erase.
Details are on page 24.
To switch antenna inputs, press + or-. You will probably not use
this function unless you have something connected to both the
ANTENNA A and ANTENNA B inputs on the back of the "IV. Details
are on page 25.
To change the CABLE/AIRsetting, press +. If you have cable-TV,
this function should be set to CABLE. If you have a home antenna,
this function should be set to AIR.
To set the VCR 1 CHANNELfirst enter the channel number by
pressing two number buttons on the remote and then press +. The
channel you enter here is the channel to which the TV will
automatically tune when you later press the VCR1button on the
\
remote. Details are on page 26.
To set the VCR2 CHANNELfirst enter the channel number by
pressing two number buttons on the remote and then press +. The
channel you enter here is the channel to which the TV will
automatically tune when you later press the VCR2button on the
remote. Details are on page 26.
To set the CABLE CHANNELfirst enter the channel number by
pressing two number buttons on the remote and then press +.
The channel you enter here is the channel to which the TV will
automatically tune when you later press the CABLE button on the
remote. Details are on page 27.
To set the clock, press and hold - to set the hour. Then press and
hold + to set the minutes.
Page 64

PROSCANo
We are committed to your complete satisfaction and viewing enjoyment.
Any time you have a question or want information about your ProScan product,
call our friendly toll-free number listed below. We're always ready to
help you (24 hours a day, 7 days a week).
1-800-ProScan
If you would like a copy of this manual in French, please follow the
instructions below:
Si un livret d'instructions en franqais n'est pas inclus avec votre appareil,
vous pouvez en obtenir un (indiquer I€ num_ro de mod_I¢, votre hem, et
votre adresse) en vous adressant _:
Thomson I_lectronique Grand Pubfic du Canada
Service des donn_es techniques
6540 Tomken Rd
Mississauga, Ontario L5T 2E9
An RCA
Entertainment
Product
Thomson Consumer Electronics
600 N Sherman Dr, PO Box 1976
Indianapolis, IN 46206-1976
©1992ThomsonConsumerElectronics,Inc.
Trademark(s)@Registered
Marca(s)Registrada(s)
PrintedinU.S.A.
Part Number IQ57 346-01A
 Loading...