


camcorder
p
m
user's guide
Pro852/Pro854
Important Safety Information
Be sure to read all the safety information before you begin to use this product.
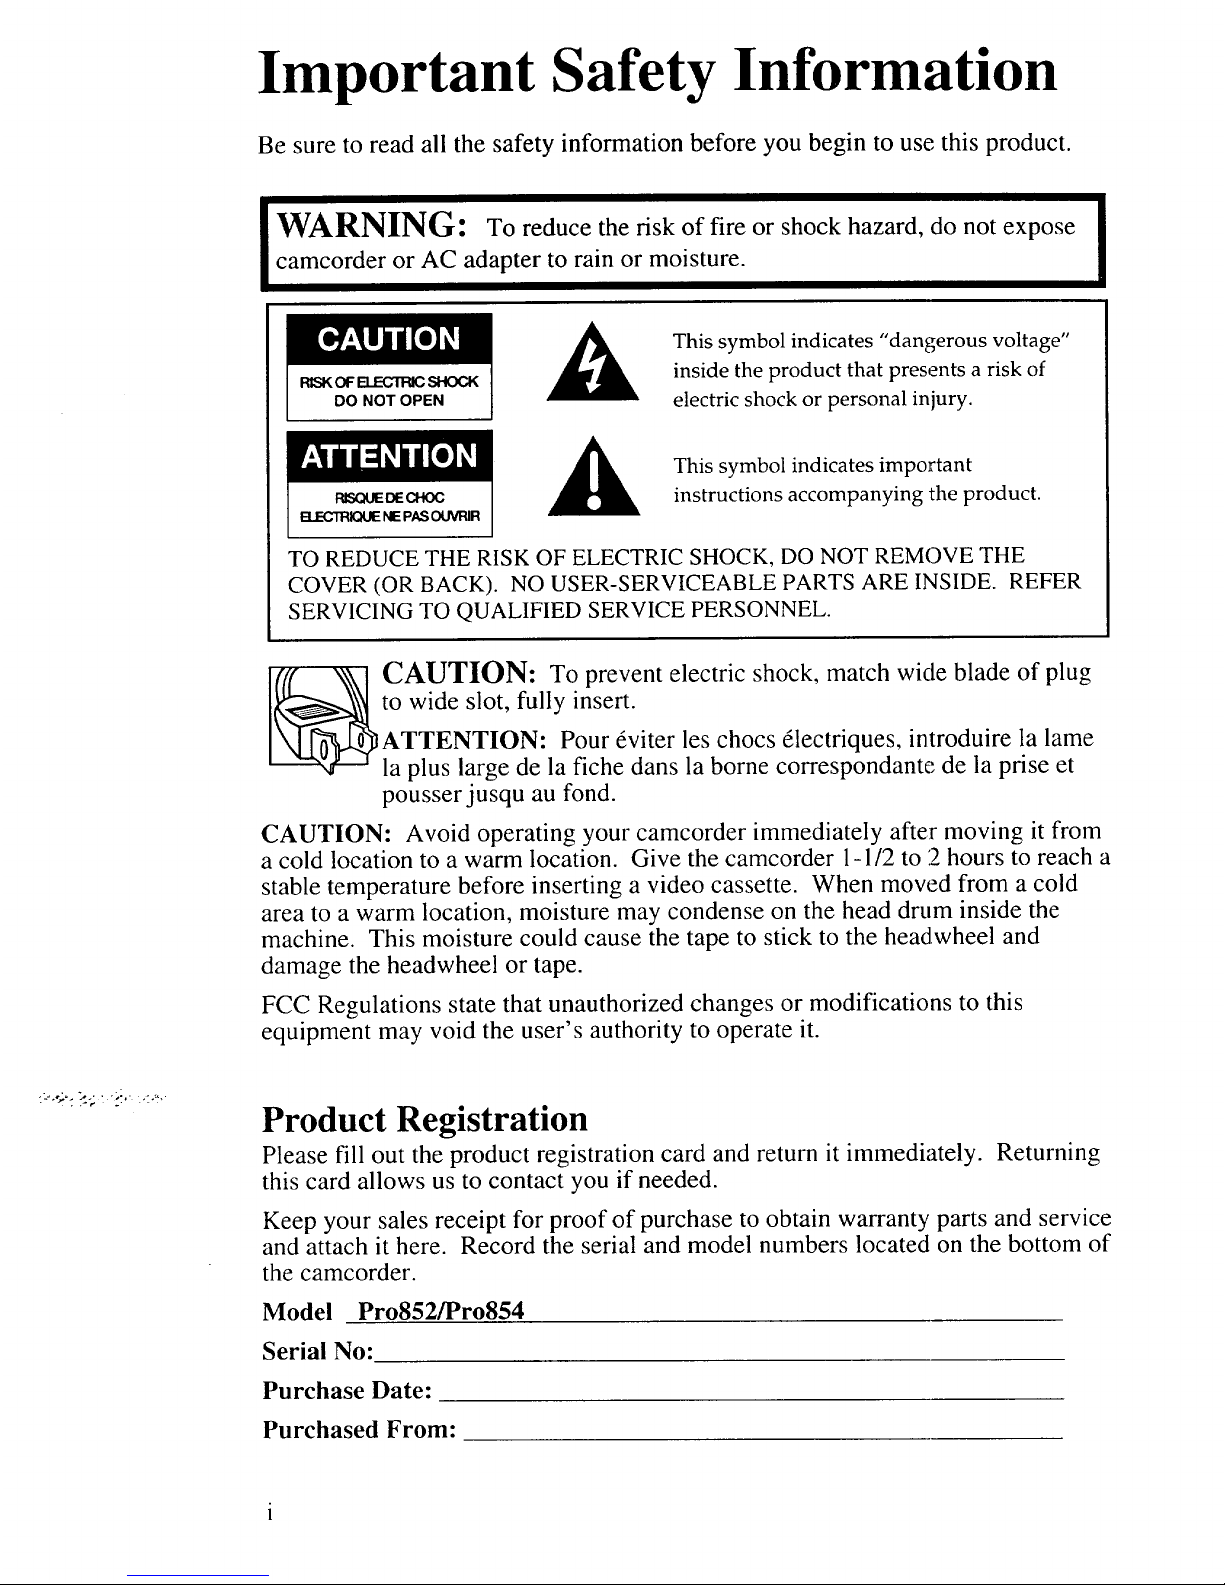
IWARNING: To reduce the risk of fire or shock hazard, do not expose
camcorder or AC adapter to rain or moisture.
RISK_ELECrRICSHOCK
DO NOT OPEN
This symbol indicates "dangerous voltage"
inside the product that presents a risk of
electric shock or personal injury.
RISQUE DE CHOC
ELECTRIQtJE NE PASOLM_IR
This symbol indicates important
instructions accompanying the product.
TO REDUCE THE RISK OF ELECTRIC SHOCK, DO NOT REMOVE THE
COVER (OR BACK). NO USER-SERVICEABLE PARTS ARE INSIDE. REFER
SERVICING TO QUALIFIED SERVICE PERSONNEL.
CAUTION: To prevent electric shock, match wide blade of plug
to wide slot, fully insert.
ATTENTION: Pour 6viter les chocs 61ectriques, introduire la lame
la plus large de la fiche dans la borne correspondante de la prise et
pousserjusqu au fond.
CAUTION: Avoid operating your camcorder immediately after moving it from
a cold location to a warm location. Give the camcorder 1-1/2 to 12hours to reach a
stable temperature before inserting a video cassette. When moved from a cold
area to a warm location, moisture may condense on the head drum inside the
machine. This moisture could cause the tape to stick to the headwheel and
damage the headwheel or tape.
FCC Regulations state that unauthorized changes or modifications to this
equipment may void the user's authority to operate it.
,-,'_ 2,,..- ....
Product Registration
Please fill out the product registration card and return it immediately. Returning
this card allows us to contact you if needed.
Keep your sales receipt for proof of purchase to obtain warranty parts and service
and attach it here. Record the serial and model numbers located on the bottom of
the camcorder.
Model Pro852/Pro854
Serial No:
Purchase Date:
Purchased From:
We want to make sureyou enjoy your new camcorder.If you haveany
questions,call:
Camcorder Exchange Warranty ...... 800-283-6503 (Pages 54-55)
Customer Service ..................................... 800-336-1900 (Page 53)
Accessories ......................................... 800-338-0376 (Pages 38-43)
Safety Information ................................ i
Product Registration ............................. i
First-Time Operation
• Assistance ............................................ 2
• Unpack Camcorder and
Accessories ...................................... 2
• Attach Lens Cap Cord and
Adjust Handstrap ............................. 3
• Attach Shoulder Strap ......................... 3
• Supply Power to the Camcorder ......... 4
• Turn on the Camcorder ....................... 5
• Insert a Cassette .................................. 5
• Adjust Viewfinder Focus .................... 5
• Start and Stop Recording .................... 5
• Play Back what You have Recorded...5
• Turn Off Camcorder ............................ 5
• Review the Camcorder's
Controls ............................................ 6
Powering Your Camcorder
• Using the AC Adapter ......................... 7
• Using the Rechargeable Battery .... 8-10
• Using Optional Alkaline "AA"
Batteries ......................................... 11
• Using the Optional
AC Adapter/Charger ................. 12-13
Remote Control ............................. 14-17
Recording
• Video Cassettes ................................. 18
• Making a Recording .......................... 19
• Viewfinder Displays .................... 20-21
• Recording Features
• Viewfinder ...................................... 22
• Beep Function ................................ 22
• Flying Erase Head .......................... 23
iii
• Microphone .................................... 23
• DISPLAY Button ............................ 23
• White Balance and Iris ................... 23
• Tape Time Remaining Display ...... 23
• Quick Review ................................. 24
• Camera Edit .................................... 24
• Blank Search .................................. 24
• Zooming ......................................... 25
• AE Shutter Control ......................... 25
• Focusing ......................................... 26
• Install Clock Cell ............................ 27
• Date and Time Display ............. 28-29
• Time Counter .................................. 30
• Recording and Traveling Tips ........ 31
Playback
• Playback and Features
• Viewfinder Playback ...................... 32
• Visual Searching ............................. 33
• Tape Positioning .............................. 33
• Stop-Action Pause .......................... 33
• Playback on a TV With
Audio/Video Inputs .................. 34-35
• Playback on a TV Without
Audio/Video Inputs .................. 36-37
Optional Accessories ..................... 38-43
• Accessory Order Form ................. 41-43
References
• Care and Maintenance ................. 44-45
• Trouble Checks ............................ 46-48
• Assistance .......................................... 49
• Limited Warranty ......................... 50-5 t
• Specifications .................................... 52
• Information to User ........................... 53
• Index (Alphabetical) .................... 54-57
This sectiondescribesonly the basicstepsnecessaryto setup your camcorderto
record. Referto theothersectionsfor detailedoperationand featureoptions.
Assistance
The toll-free numbers are available to help you with any problem you may encounter.
Camcorder Exchange Warranty ..... 800-283-6503
Customer Service ................ 800-336-1900
Accessories .................... 800-338-0376
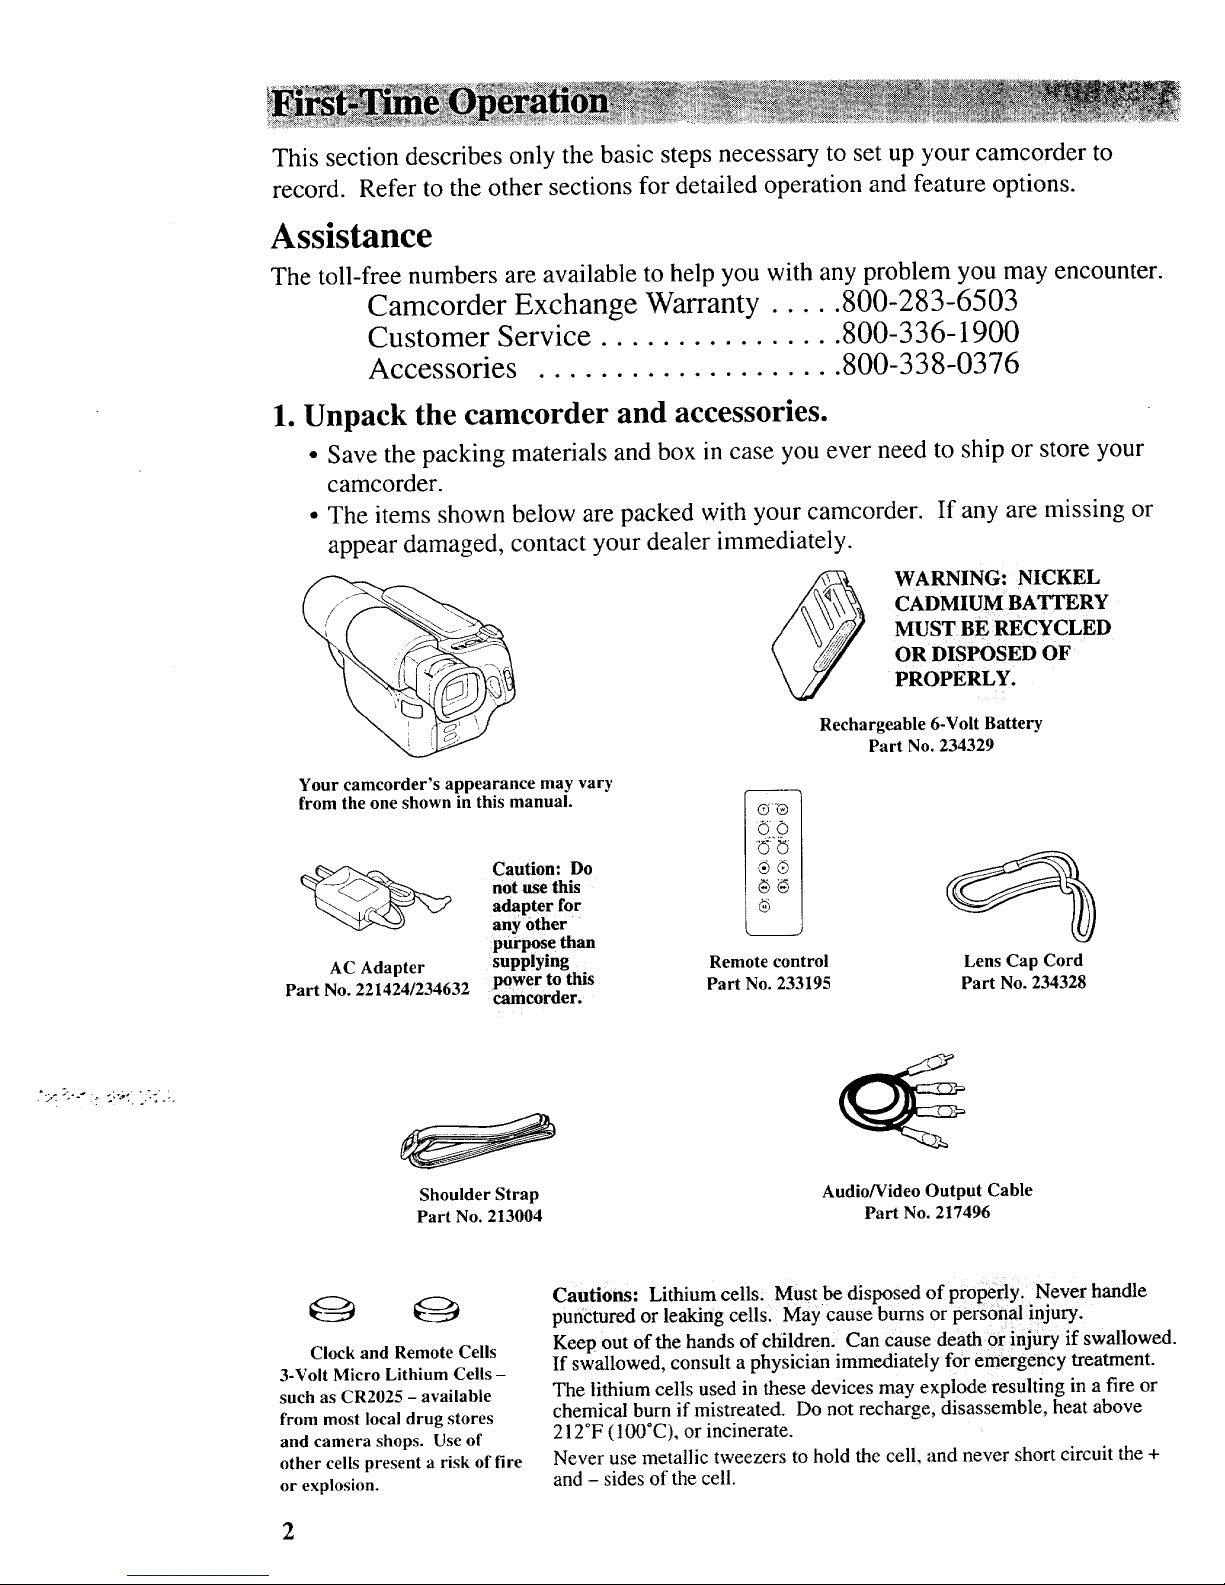
1. Unpack the camcorder and accessories.
• Save the packing materials and box in case you ever need to ship or store your
camcorder.
• The items shown below are packed with your camcorder. If any are missing or
appear damaged, contact your dealer immediately.
WARNING: NICKEL
CADMIUM BATTERY
MUST BE RECYCLED
OR DISPOSED OF
PROPERLY.
Rechargeable 6-Volt Battery
Part No. 234329
Your camcorder's appearance may vary
from the one shown in this manual.
Caution: Do
not use this
adapter for
any other
purpose than
AC Adapter supplying
Part No. 221424/234632 power to this
camcorder.
Remote control
Part No. 233195
Lens Cap Cord
Part No. 234328
Shoulder Strap
Part No. 213004
Audio/Video Output Cable
Part No. 217496
O Q
Clock and Remote Cells
3-Volt Micro Lithium Cells -
such as CR2025 - available
from most local drug stores
and camera shops. Use of
other cells present a risk of fire
or explosion.
Cautions: Lithium cells: Must be disposed of properly, Never handle
punctured or leaking cells. May cause bums or personal injury.
Keep out of the hands of children. Can cause death or injury if swallowed.
If swallowed, consult a physician immediately for emergency treatment.
The lithium cells used in these devices may explode resulting in a fire or
chemical burn if mistreated. Do not recharge, disassemble, heat above
212°F (100°C), or incinerate.
Never use metallic tweezers to hold the cell, and never short circuit the +
and - sides of the cell.
2

.
Attach lens cap cord and
adjust handstrap.
A. Press in on the tabs on both sides of
the lens cap to remove it.
o
Attach shoulder strap.
A. Unfasten one end of the shoulder
strap from the buckle. Make sure
you leave the buckle on the strap.
B. Attach the lens cap cord to the lens
cap.
C. Pull up the flap of the handstrap
and open the strap.
D.
E°
Run the cord from the lens cap
through the A/V terminal cover
and over the end of strap.
Adjust the strap for comfort and
close the flap.
Note Make sure the end of the strap is
positioned securely before closing the
flap.
B° Thread one end of the shoulder
strap through one of the shoulder
strap rings
Shoulder Strap Rings
C.
Thread the strap back into the
buckle as shown below. Pull on
the strap and make sure it is
fastened securely before using it to
support your camcorder.
Cautions: When carrying the camcorder
with the shoulder strap, make sure the
viewfinder is in its down position. This
helps prevent possible damage to the
viewfinder from bumping against your body
as you move.
Make sure the shoulder strap is firmly
attached before using it to carry your
camcorder.
F. Slide the lens cap onto the strap.
3
4. Supply power to the camcorder.
Attach the AC Adapter
Since the battery must be charged before it can be used the first time, attach the
adapter to the camcorder.
To AC 100-
240V, 50/60 Hz
PUSH button - press
here to open and
close the battery Adapter
compartment.
A. Press on the PUSH button to
release the battery compartment
door. Open the compartment
fully.
Bo
Insert the small plug on the AC
adapter in the DC IN jack on the
camcorder.
DC IN Jack
C. Close the battery compartment. Press
the PUSH button to lock the battery
compartment shut.
D. Plug the AC adapter's power cord into
an AC operating outlet.
Install Six Optional "AA" Alkaline Batteries
If you do not want to use the adapter, you may use six "AA" alkaline batteries.
PUSH here to
open battery
compartment.
4
A°
B.
Press on the PUSH button to
release the battery compartment
door. Open the compartment
fully.
Insert the six alkaline batteries
into the compartment matching
the polarities (+ and -) on the batteries
to the battery compartment as shown.
C. Close the battery compartment. Press
the PUSH button to lock the battery
compartment shut.

PLA Y(VCR)/CAM Indicators and Button
REW Button,
PLAY Button,
STOP Butt{
EJECT Butt_
Eyepiece
Focus
Control
POWER Switch
Thumb
Trigger
5. Turn on the camcorder.
Slide the POWER switch upward to
turn the camcorder on.
Notes: The camcorder turns on in the
CAM (camera) mode. If it does not, press
the PLA Y(VCR)/CAM button until the red
CAM indicator beside the
PLA Y(VCR )/CAM button lights.
The green and red indicators lets you
know the mode of the camcorder. The
red indicator lights in the camcorder
mode CAM (camera) mode and the green
indicator lights in the PLAY(VCR) mode.
6. Insert a cassette.
A.Press the EJECT button to open the
cassette compartment.
B.
Insert the cassette so the safety tab
is at the top and the tape window
faces out.
C. Gently close the cassette
compartment by pressing on the
area labeled PUSH until it clicks
into place. The top closes
automatically. Do not press down
on the top as it may damage the
camcorder.
7. Adjust viewfinder focus.
Turn the eyepiece focus control right
or left to obtain the clearest possible
picture.
.
Start and stop recording.
• Press and release the REC START/
STOP button (thumb trigger) to
start recording. REC appears in the
viewfinder.
Press and release the thumb trigger
again to stop recording. The
camcorder is now in the record-
pause mode. PA USE appears in the
viewfinder.
9. Play back what you have
recorded.
• Press the PLA Y(VCR)/CAM button
to light the PLA Y(VCR) indicator.
• Press REW to rewind the tape.
• Press PLAY to play back the tape.
• Press STOP when you are finished
playing back the tape.
10.Turn off the camcorder.
Slide the POWER switch upward to
turn off the camcorder. The
PLA Y(VCR) or CAM indicator will
turn off.
Note: Beeps sound for specific operations.
Details are oll page 22.
5

11.
Review the camcorder's controls.
Lens
A (Audio), V (Video),
and RF Out Jacks
Remote
Zoom Control
"W" - Wide Angle
"T" - Telephoto
Eyepiece
Focus Control
Viewfinder
DC IN 9/6.5V Jack or
DC IN 9V Jack
(Located Inside Battery
Compartment)
Microphone
Shoulder Strap Holde
'y Compartment
Remote Holder
(Located in Battery Compartment)
Model Pro854 Only: B (Bright)
and C (Color) Controls
Model Pr0852 Only: B (Bright)
and F (Focus) Controls
See "Trouble Checks"for details.
Cassette
Compartment
PLA Y(VCR)/CAM Button
and PLA Y(VCR), CAM,
and CHARGE Indicators
• • . . •
Button
Button
Button
STOP
Button
BLANK
Button
DISPLAY BLANK
®
PLAY
STOP PAUSE
EJECT Button
JVER
Switch
Handstrap
REC S TAR T/STOP
Button (Thumb
Trigger)
PUSH Button
Shoulder Strap Holder
FOCUS LOCK Button
DA TE/TIME Button
6
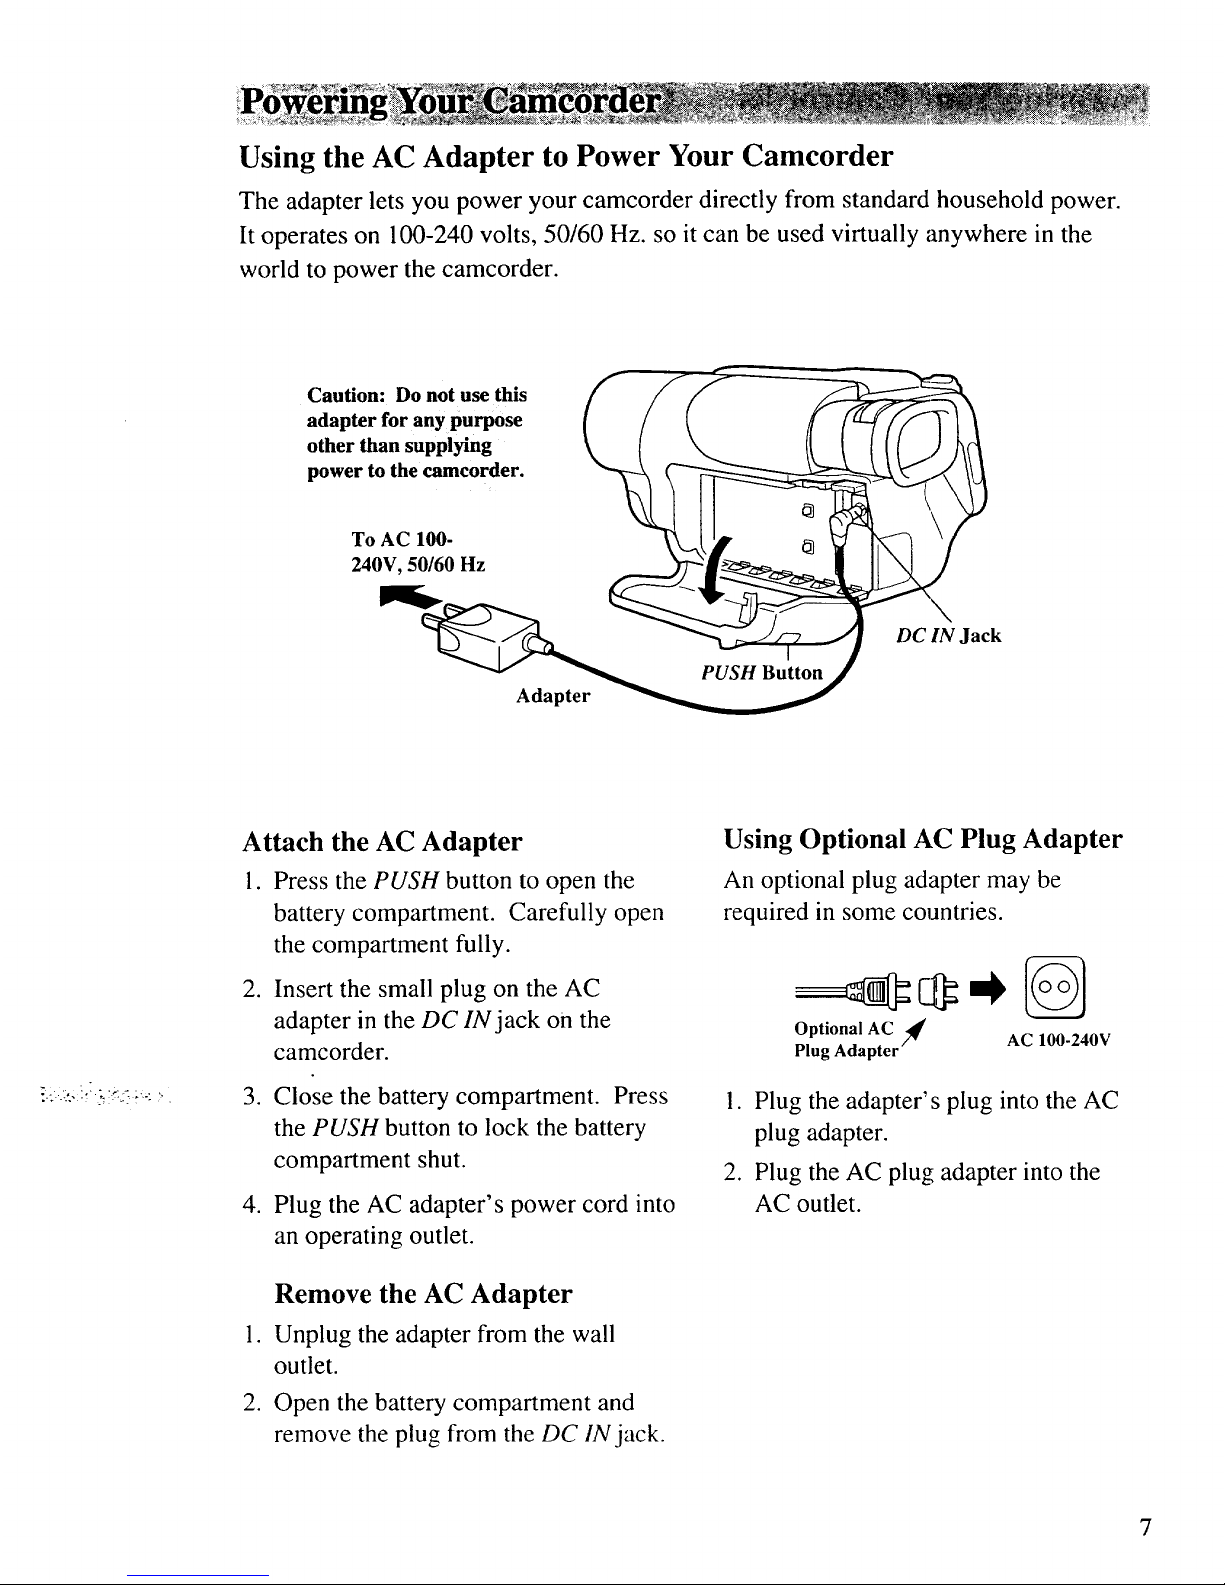
Using the AC Adapter to Power Your Camcorder
The adapter lets you power your camcorder directly from standard household power.
It operates on 100-240 volts, 50/60 Hz. so it can be used virtually anywhere in the
world to power the camcorder.
Caution: Do not use this
adapter for any purpose
other than supplying
power to the camcorder.
To AC 100-
240V, 50/60 Hz
DC IN Jack
Adapter
Attach the AC Adapter
1. Press the PUSH button to open the
battery compartment. Carefully open
the compartment fully.
.
Insert the small plug on the AC
adapter in the DC IN jack on the
camcorder.
.
.
Close the battery compartment. Press
the PUSH button to lock the battery
compartment shut.
Plug the AC adapter's power cord into
an operating outlet.
.
.
Remove the AC Adapter
Unplug the adapter from the wall
outlet.
Open the battery compartment and
remove the plug from the DC IN jack.
Using Optional AC Plug Adapter
An optional plug adapter may be
required in some countries.
Optional
AC
._' AC 100-240V
Plug Adapter--
1. Plug the adapter's plug into the AC
plug adapter.
2. Plug the AC plug adapter into the
AC outlet.
7

Using the Rechargeable Battery to Power Your Camcorder
The battery must be charged as described on the next page before it can be used the
first time. Initial charging will take approximately 12 hours for the battery. When fully
charged, the battery should supply about 60 minutes of operating time (depending on
how much you use zoom and pause and load and unload cassettes).
PUSH Button
Battery Safety
Precautions
Do not short the battery's
terminals.
Do not attempt to
disassemble or modify the
battery. There are no user-
serviceable parts inside.
Use the battery only with
specified adapter/chargers
and camcorders.
Throwing the battery into
a fire or exposing it to
excessive heat - over
149°F (65°C) could be
hazardous.
Install the Battery
1. Press the PUSH button to open the
battery compartment. Carefully open
the compartment fully.
2. Insert the battery sideways as shown
and snap into place.
3. Close the battery compartment. Press
the PUSH button to lock the battery
compartment shut.
Remove the Battery
1. Press the PUSH button to open the
battery compartment. Carefully open
the compartment fully.
2. Slide the battery towards the back of
the camcorder and lift out.
3. Close the battery compartment. Press
the PUSH button to lock the battery
compartment shut.
ATTENTION: The RBRC seal on the battery used in your
Thomson Consumer Electronics product indicates that we
are participating in a program to collect and recycle Nickel
Cadmium batteries throughout the United States. Please call
1-800-8-BATTERY for information or contact your local
recycling center.
Ni-Cd
8
Using the Rechargeable Battery to Power Your Camcorder
The battery must be installed as described on the previous page before it can
be charged.
[C._RGEP'A¥ CAM
To AC 100-
240V, 50/60 Hz
Battery Installed
Adapter
DC IN Jack
Charge the Battery
1. Install the battery as described on the
previous page.
2. Insert the small plug on the AC
adapter in the DC IN jack on the
camcorder.
3. Plug the AC adapter into an operating
AC outlet.
4. Slide the POWER switch down into
the CHARGE position. The CHARGE
indicator will light and the battery will
begin charging.
5. The battery takes approximately 12
hours to charge.
, When the CHARGE indicator starts
flashing, make sure to unplug the
adapter from the wall outlet and the
camcorder.
Notes: After approximately 16 hours, the
CHARGE indicator will begin flashing to
remind you that the battery is charged. Your
battery may be charged before the CHARGE
indicator starts flashing.
The CHARGE indicator will start flashing
approximately 16 hours after the POWER
switch is placed in CHARGE even if no
battery is being charged.
Do not charge other models of batteries with
the camcorder.
9

Battery Level Indicator
The battery level indicator appears in the
viewfinder when approximately half the
battery power is left. This indicator
shows you the amount of power in the
battery.
Battery Level Indicator
in Viewfinder
• As the power is used _, €-----A, and
€----q appear.
• When there is approximately five
minutes of battery power left in the
battery, _ appears in the
viewfinder. The camcorder will turn
off automatically after a few minutes.
Slide the POWER switch upward to
turn off the camcorder before replacing
the battery.
The battery level indicator will not be
recorded on the tape when it appears in
the viewfinder.
Nickel Cadmium Battery Care and Storage
Do not store a battery pack where it can
reach high temperatures.
Remove the battery from the camcorder
when it is not in use to prolong the
battery life.
Recharge the battery just before it is
used. If the battery is recharged and not
used, it will slowly lose its charge.
Make sure to exhaust the charge of the
battery pack completely when recording.
If the battery pack is recharged when the
previous charge is not completely
exhausted, the charge time gradually
decreases.
Charge the battery within a temperature
range of 50°F to 86°F (10°C to 30°C) to
prevent damage.
After repeated chargings and use, the
operation time decreases gradually.
When the operation time becomes too
short to be useful, it is time to replace the
battery.
The operating time of the battery may be
shorter than normal even after a full
charge:
• If it is used for the first time.
The operating time is restored to its
original level after the battery has
been used two or three times
(completely discharged and
recharged).
• If it is used in low temperatures.
• If it is discharged completely and
stored for a long period (more than
three months).
• If it is stored at temperatures above
104°F (40°C).
• If the record-pause mode is used
frequently.
• If excessively loading and unloading
cassettes.
10

Using Optional Alkaline "AA" Batteries
You can power the camcorder with six alkaline dry-cell "AA" batteries.
Install the Alkaline Batteries
1. Press the PUSH button to open the
battery compartment. Carefully open
the compartment fully.
2. Insert six alkaline batteries into the
compartment matching the polarities
(+ and -) on the batteries to the
battery compartment as shown.
3. Close the battery compartment. Press
the PUSH button to lock the battery
compartment shut.
Notes: The camcorder may not operate
properly in cold temperatures below 50°F
(10oc).
The camcorder and battery level indicator
may not operate properly when the batteries
need to be replaced.
Remove the batteries if you will not be using
the camcorder for a long period of time to
extend the useful life of the batteries.
Safety Precautions When Using Alkaline Batteries
Do not short, disassemble, heat, or throw the batteries into a fire.
Do not recharge the batteries or short the battery terminals.
Do not short the battery terminals for the nickel cadmium batter),.
Batteries become warm during and after use. Use caution when removing them.
Use "AA" alkaline batteries only during their recommended lifetime.
Remove at least one battery if you will not be using the camcorder for a long
period of time to extend the useful life of the batteries.
Do not use manganese batteries to power the camcorder.
To reduce the risk of battery leakage or an explosion:
• Make sure battery is inserted with correct polarity.
• Remove the batteries from the camcorder before storing it.
• Do not use old and new batteries at the same time.
• If the batteries leak, remove the batteries and carefully wipe up the fluid.
Q
• Keep the terminals clean. Use a dry cloth to wipe any dirt off the terminals.
11
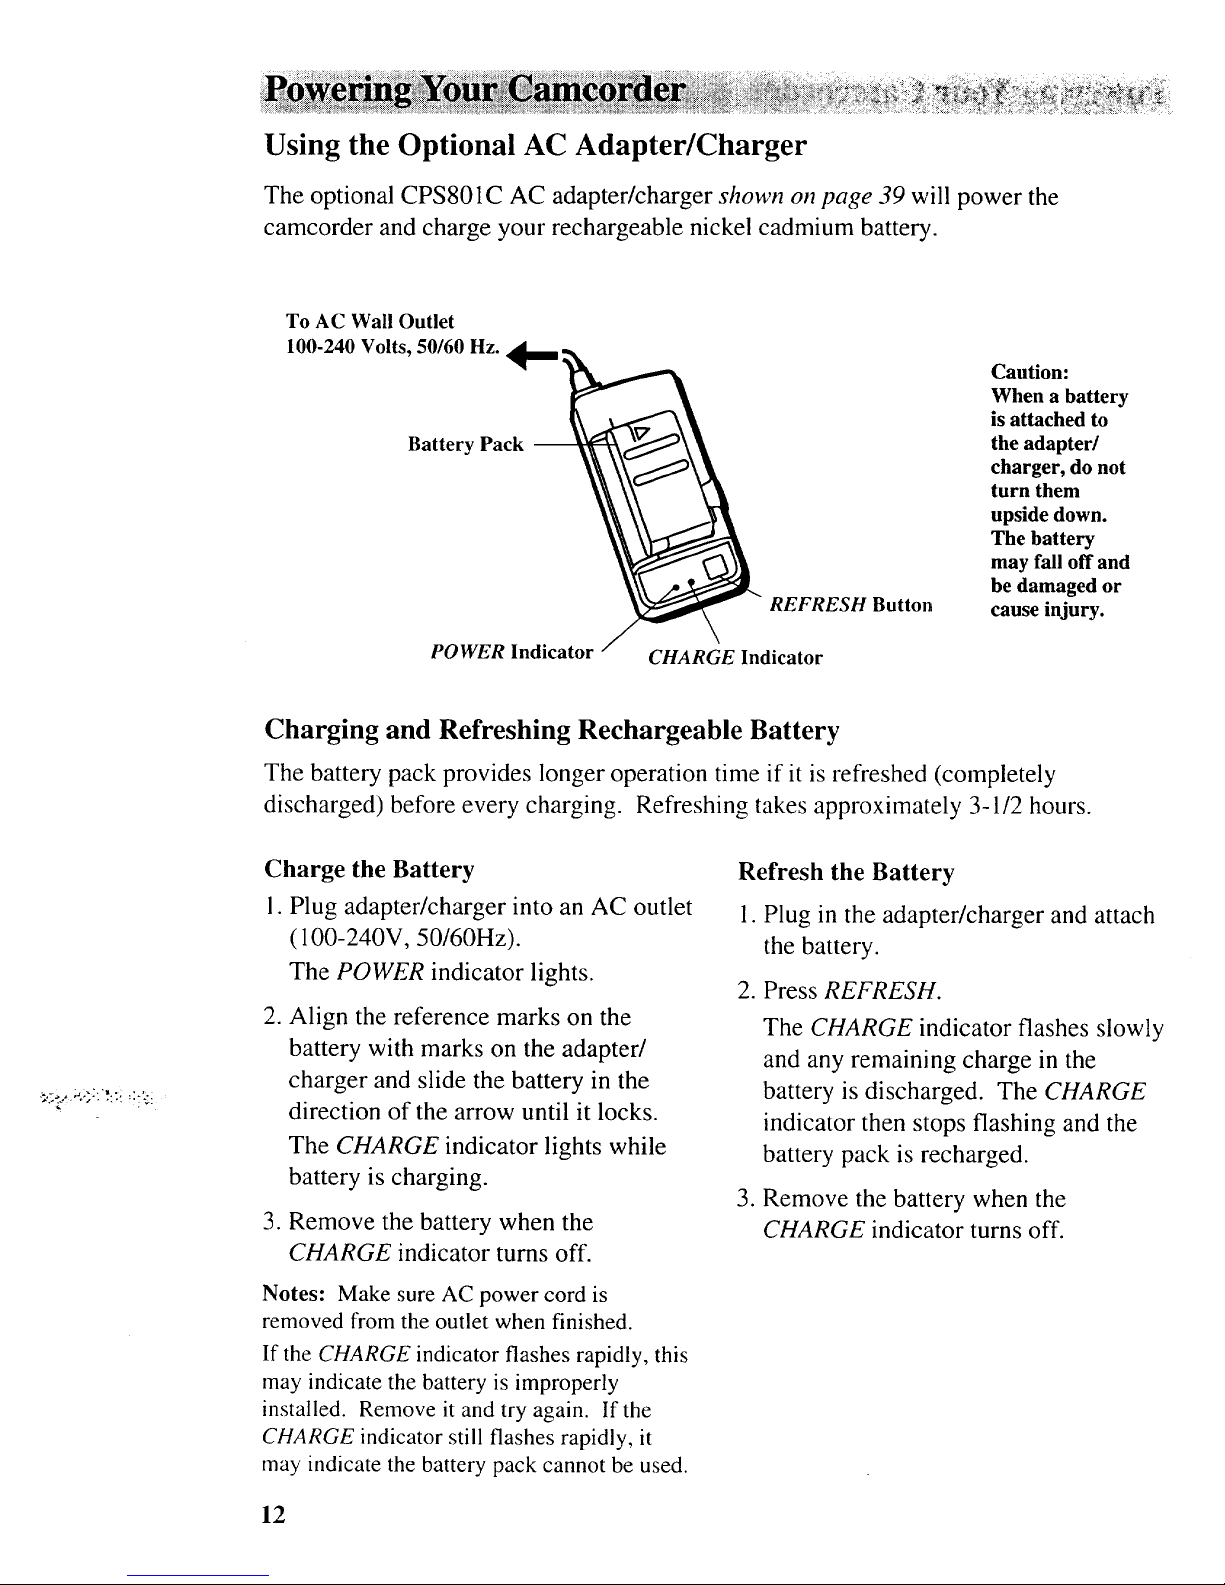
Using the Optional AC Adapter/Charger
The optional CPS801C AC adapter/charger shown ol7page 39 will power the
camcorder and charge your rechargeable nickel cadmium battery.
To AC Wall Outlet
100-240 Volts, 50/60 Hz.
Battery Pack --
POWER Indicator
REFRESH Button
CHARGE Indicator
Caution:
When a battery
is attached to
the adapter/
charger, do not
turn them
upside down.
The battery
may fall off and
be damaged or
cause injury.
Charging and Refreshing Rechargeable Battery
The battery pack provides longer operation time if it is refreshed (completely
discharged) before every charging. Refreshing takes approximately 3-1/2 hours.
Charge the Battery
1. Plug adapter/charger into an AC outlet
( 100-240V, 50/60Hz).
The POWER indicator lights.
.
.
Align the reference marks on the
battery with marks on the adapter/
charger and slide the battery in the
direction of the arrow until it locks.
The CHARGE indicator lights while
battery is charging.
Remove the battery when the
CHARGE indicator turns off.
Notes: Make sure AC power cord is
removed from the outlet when finished.
If the CHARGE indicator flashes rapidly, this
may indicate the battery is improperly
installed. Remove it and try again. If the
CHARGE indicator still flashes rapidly, it
may indicate the battery pack cannot be used.
Refresh the Battery
1. Plug in the adapter/charger and attach
the battery.
. Press REFRESH.
The CHARGE indicator flashes slowly
and any remaining charge in the
battery is discharged. The CHARGE
indicator then stops flashing and the
battery pack is recharged.
3. Remove the battery when the
CHARGE indicator turns off.
12
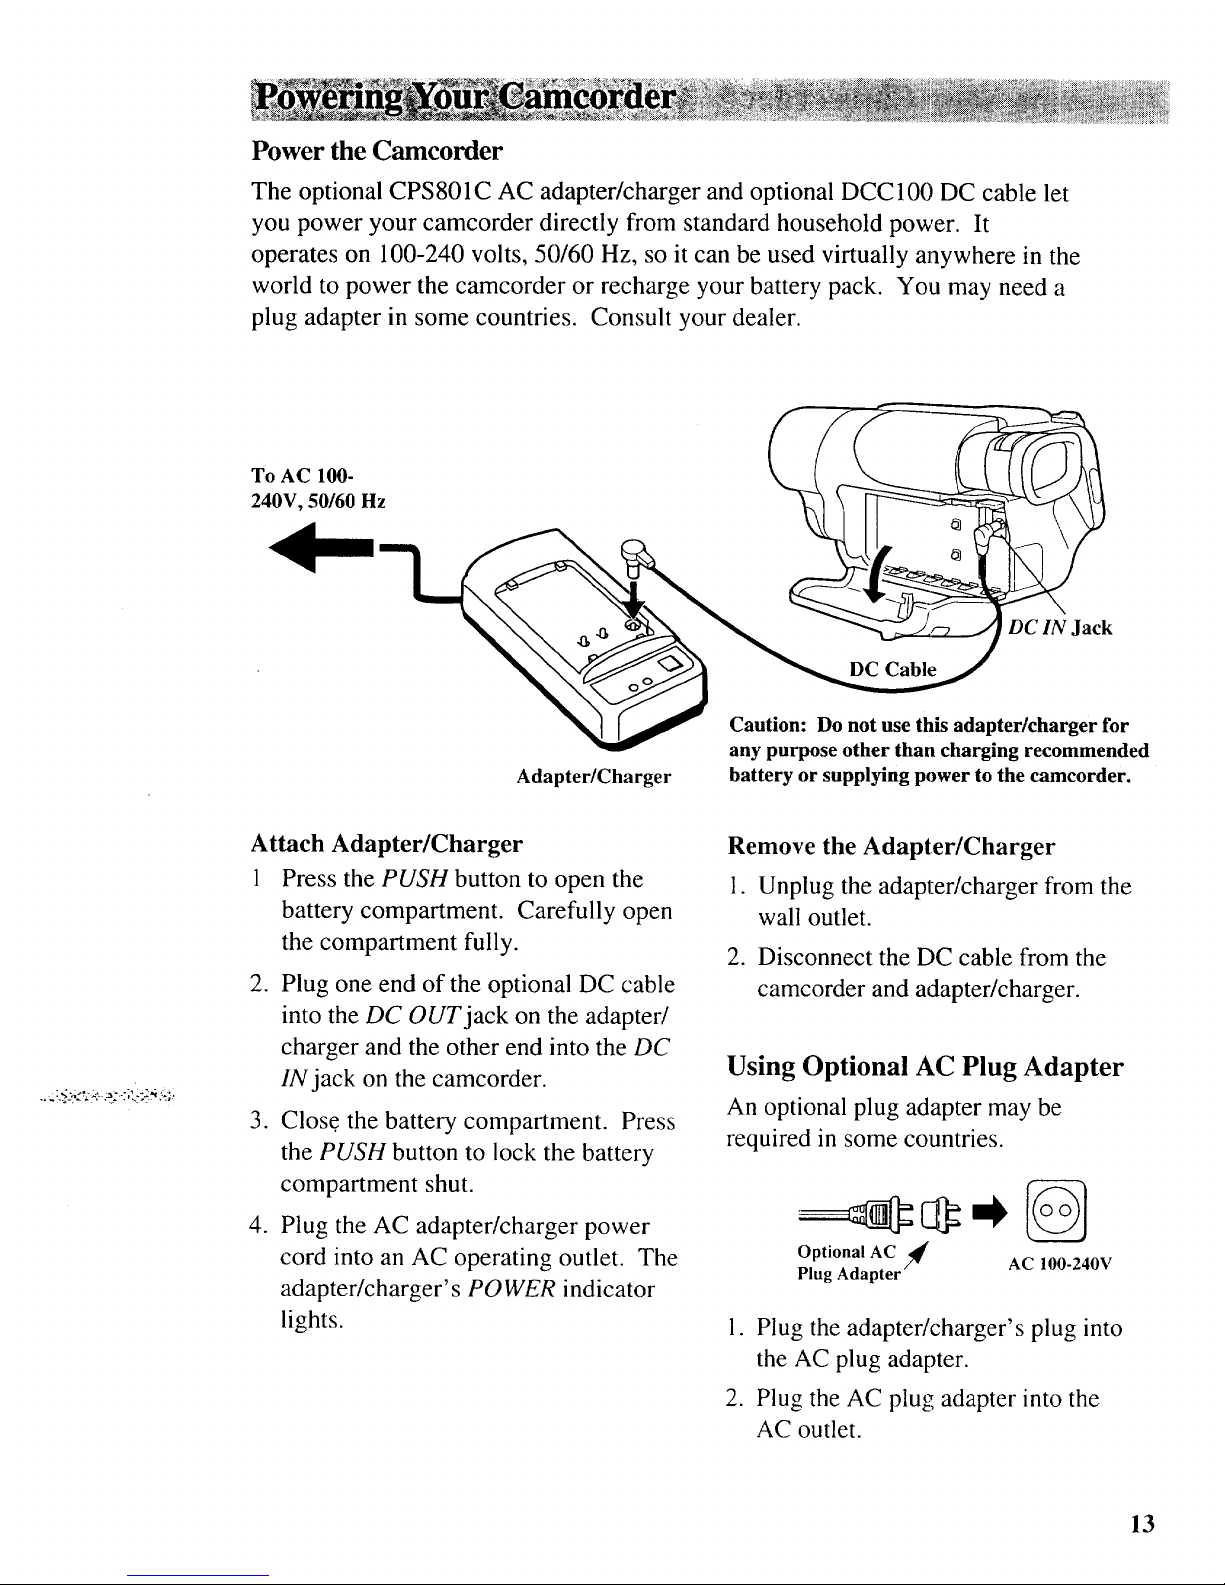
Power the Camcorder
The optional CPS801C AC adapter/charger and optional DCC 100 DC cable let
you power your camcorder directly from standard household power. It
operates on 100-240 volts, 50/60 Hz, so it can be used virtually anywhere in the
world to power the camcorder or recharge your battery pack. You may need a
plug adapter in some countries. Consult your dealer.
To AC 100-
240V, 50/60 Hz
DC IN Jack
Adapter/Charger
Caution: Do not use this adapter/charger for
any purpose other than charging recommended
battery or supplying power to the camcorder.
Attach Adapter/Charger
1 Press the PUSH button to open the
battery compartment. Carefully open
the compartment fully.
2. Plug one end of the optional DC cable
into the DC OUT jack on the adapter/
charger and the other end into the DC
IN jack on the camcorder.
3. Close the battery compartment. Press
the PUSH button to lock the battery
compartment shut.
4. Plug the AC adapter/charger power
cord into an AC operating outlet. The
adapter/charger's POWER indicator
lights.
Remove the Adapter/Charger
1. Unplug the adapter/charger from the
wall outlet.
2. Disconnect the DC cable from the
camcorder and adapter/charger.
Using Optional AC Plug Adapter
An optional plug adapter may be
required in some countries.
Optional
AC
/q AC 100-240V
Plug Adapter
1. Plug the adapter/charger's plug into
the AC plug adapter.
2. Plug the AC plug adapter into the
AC outlet.
13
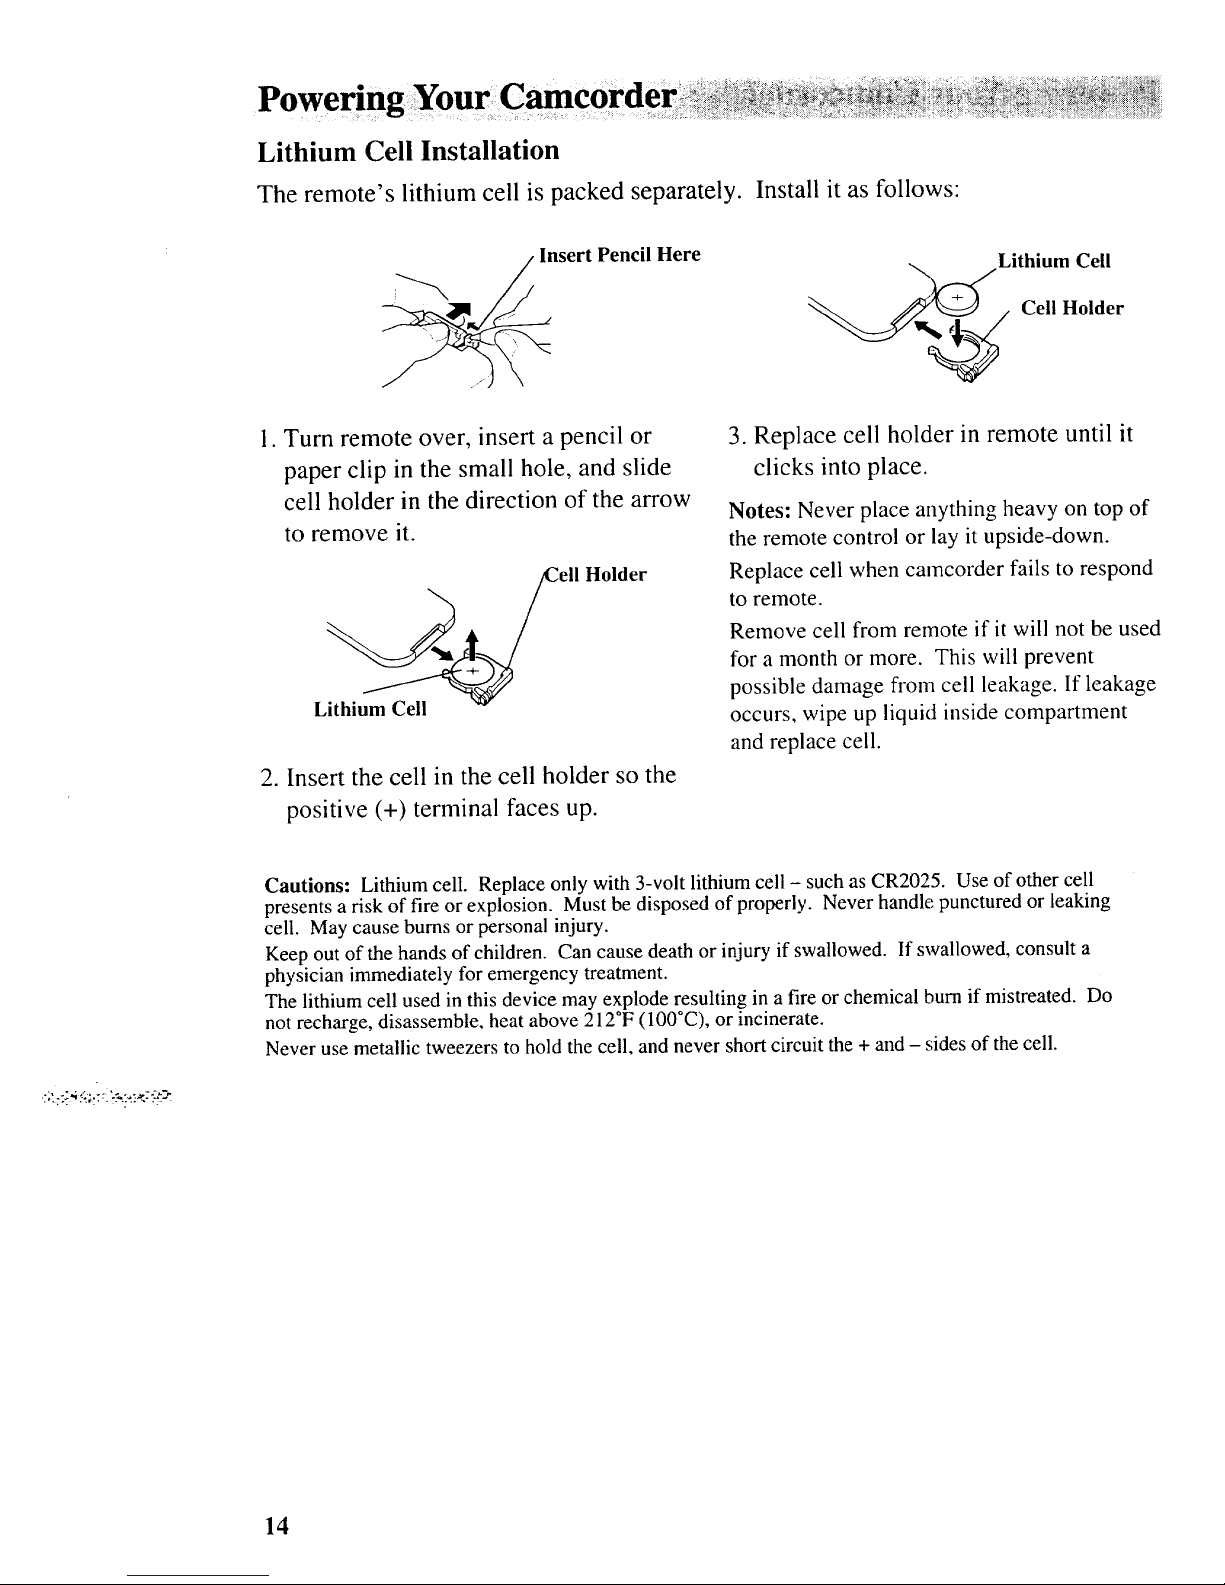
Powering
Lithium Cell Installation
The remote's lithium cell is packed separately.
Install it as follows:
Insert
Pencil Here
Lithium Cell
_ _/ Cell Holder
I. Turn remote over, insert a pencil or
paper clip in the small hole, and slide
cell holder in the direction of the arrow
to remove it.
/Cell
Lithium ___
Holder
2. Insert the cell in the cell holder so the
positive (+) terminal faces up.
3. Replace cell holder in remote until it
clicks into place.
Notes: Never place anything heavy on top of
the remote control or lay it upside-down.
Replace cell when camcorder fails to respond
to remote.
Remove cell from remote if it will not be used
for a month or more. This will prevent
possible damage from cell leakage. If leakage
occurs, wipe up liquid inside compartment
and replace cell.
Cautions: Lithium cell. Replace only with 3-volt lithium cell - such as CR2025. Use of other cell
presents a risk of fire or explosion. Must be disposed of properly. Never handle punctured or leaking
cell. May cause burns or personal injury.
Keep out of the hands of children. Can cause death or injury if swallowed. If swallowed, consult a
physician immediately for emergency treatment.
The lithium cell used in this device may explode resulting in a fire or chemical burn if mistreated. Do
not recharge, disassemble, heat above 2120F (100°C), or incinerate.
Never use metallic tweezers to hold the cell, and never short circuit the + and - sides of the cell.
14
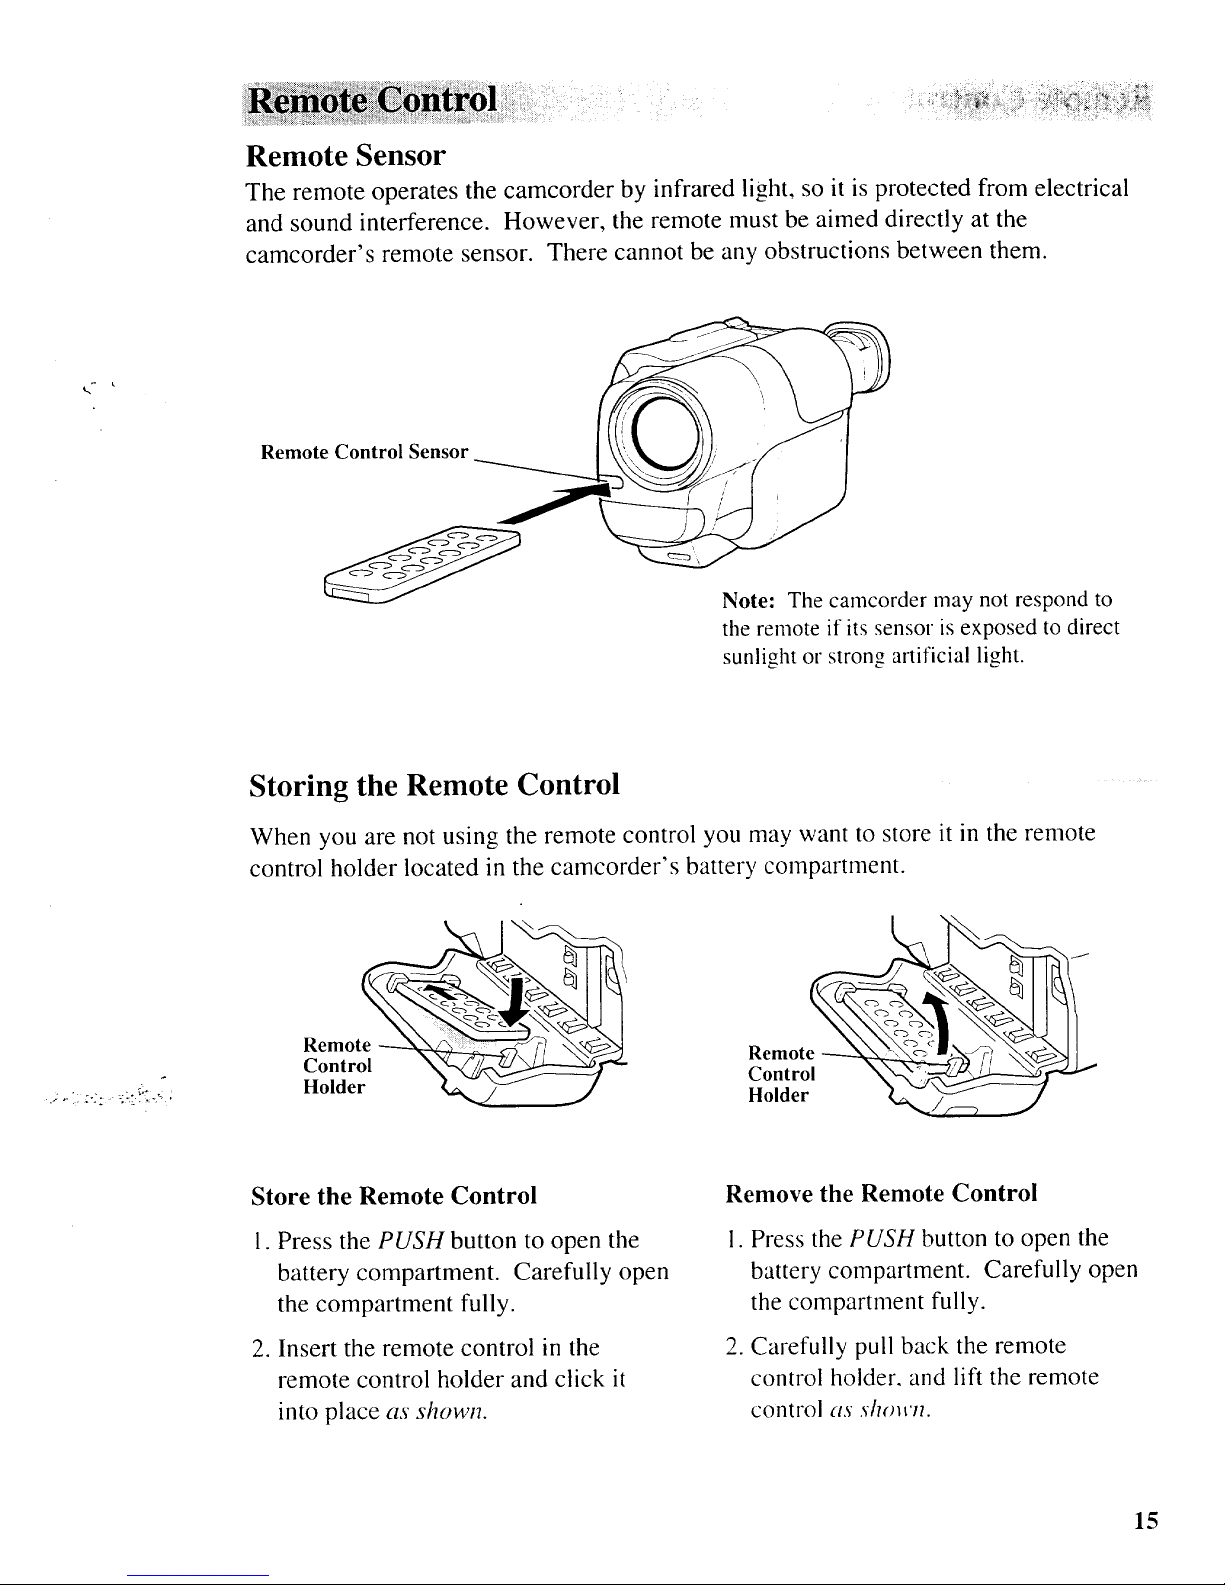
Remote Sensor
The remote operates the camcorder by infrared light, so it is protected from electrical
and sound interference. However, the remote must be aimed directly at the
camcorder's remote sensor. There cannot be any obstructions between them.
Remote Control Sensor
Note: The camcorder may not respond to
the remote if its sensor is exposed to direct
sunlight or strong artificial light.
._o-i::-:: -A'!_I-i '
Storing the Remote Control
When you are not using the remote control you may want to store it in the remote
control holder located in the camcorder's battery compartment.
Remot
Control \
Holder
J
1
Remot _'_
Control _"-_i_
Holder _._ j
Store the Remote Control
1. Press the PUSH button to open the
battery compartment. Carefully open
the compartment fully.
2. Insert the remote control in the
remote control holder and click it
into place as shown.
Remove the Remote Control
I. Press the PUSH button to open the
battery compartment. Carefully open
the compartment fully.
2. Carefully pull back the remote
control holder, and lift the remote
control as .shon'tT.
15
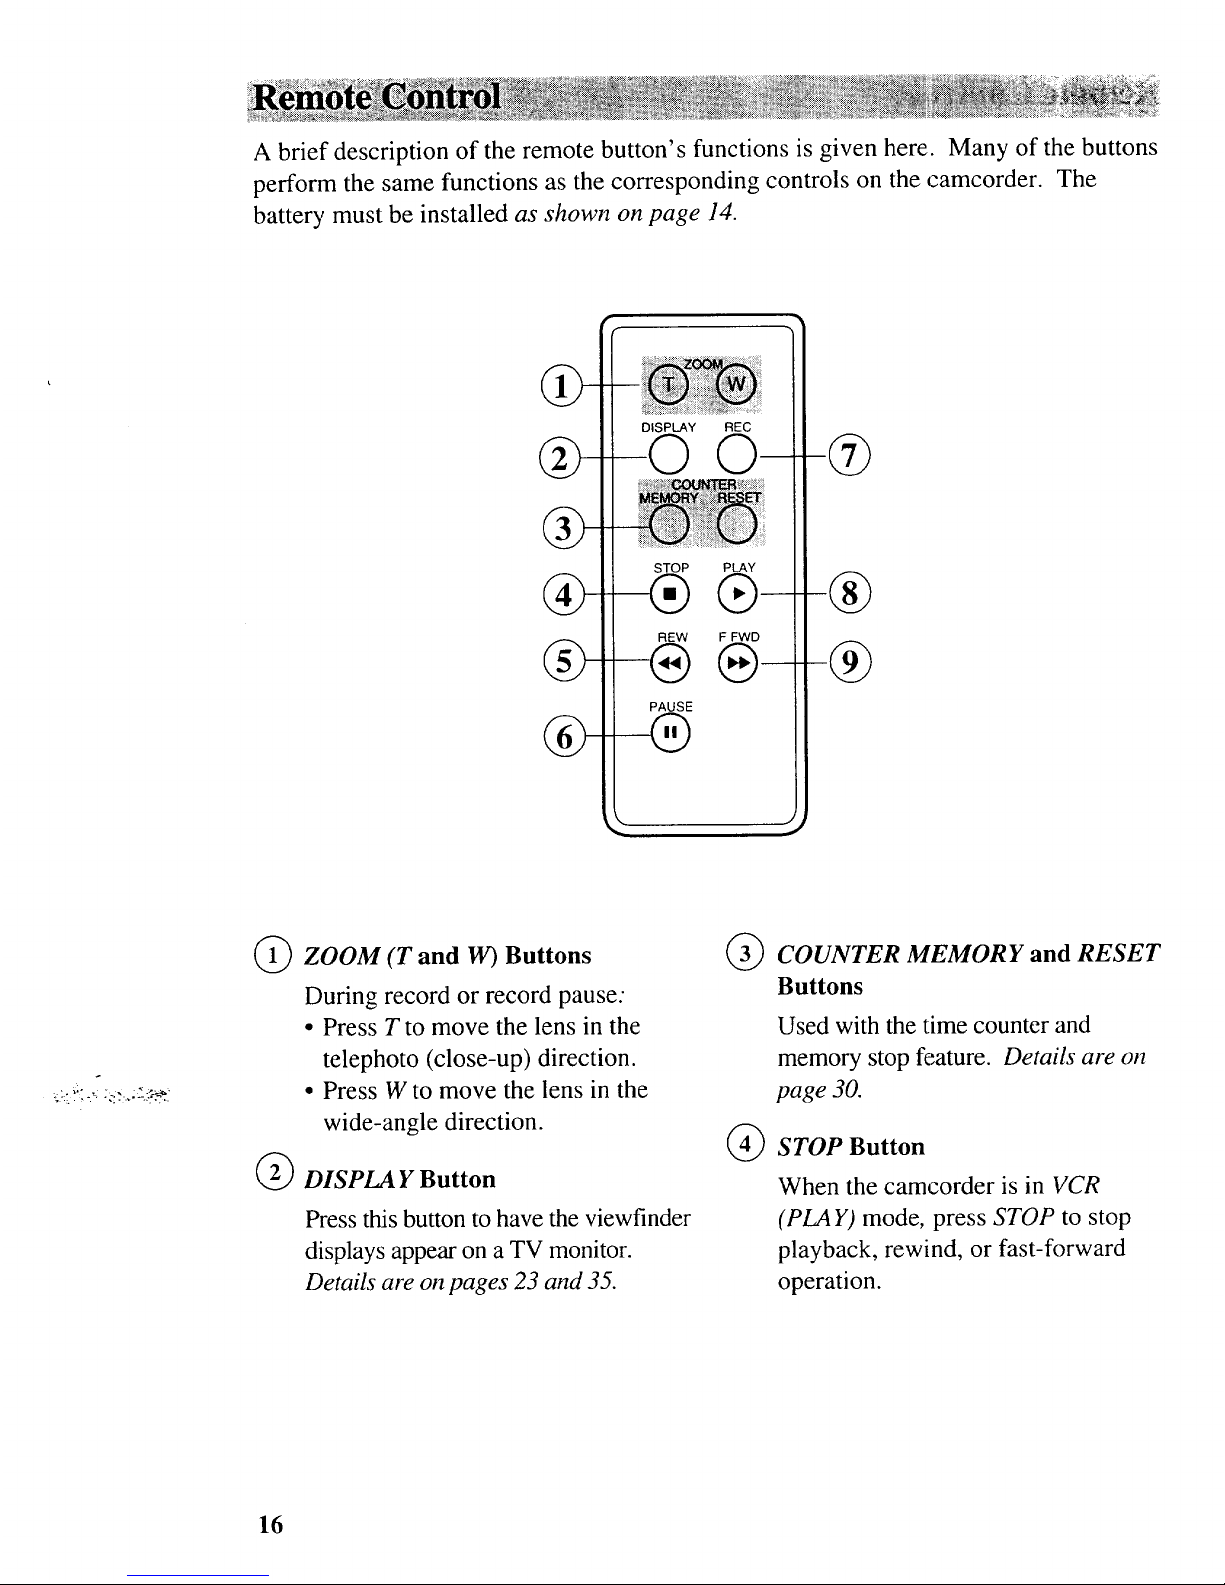
A brief description of the remote button's functions is given here. Many of the buttons
perform the same functions as the corresponding controls on the camcorder. The
battery must be installed as shown on page 14.
DISPLAY REC
O-
STOP PLAY
-Q®-
REW F FWD
-® ®-
_ j
ZOOM (T and I40 Buttons @
During record or record pause:
• Press T to move the lens in the
telephoto (close-up) direction.
• Press W to move the lens in the
wide-angle direction.
@
DISPLAY Button
Press this button to have the viewfinder
displays appear on a TV monitor.
Details are on pages 23 and 35.
COUNTER MEMORY and RESET
Buttons
Used with the time counter and
memory stop feature. Details are on
page 30.
STOP Button
When the camcorder is in VCR
(PLA Y) mode, press STOP to stop
playback, rewind, or fast-forward
operation.
16
 Loading...