

Page 1
21 3 4 5
7
6
Power
on/off ( )/
Hold
Slide the “Power on/off( )/Hold” to the
left and hold
Slide the “Power on/off( )/Hold” to the
right
Press or to go back or advance in the
Home menu and press + or – to scroll up or
down to the desired audio file
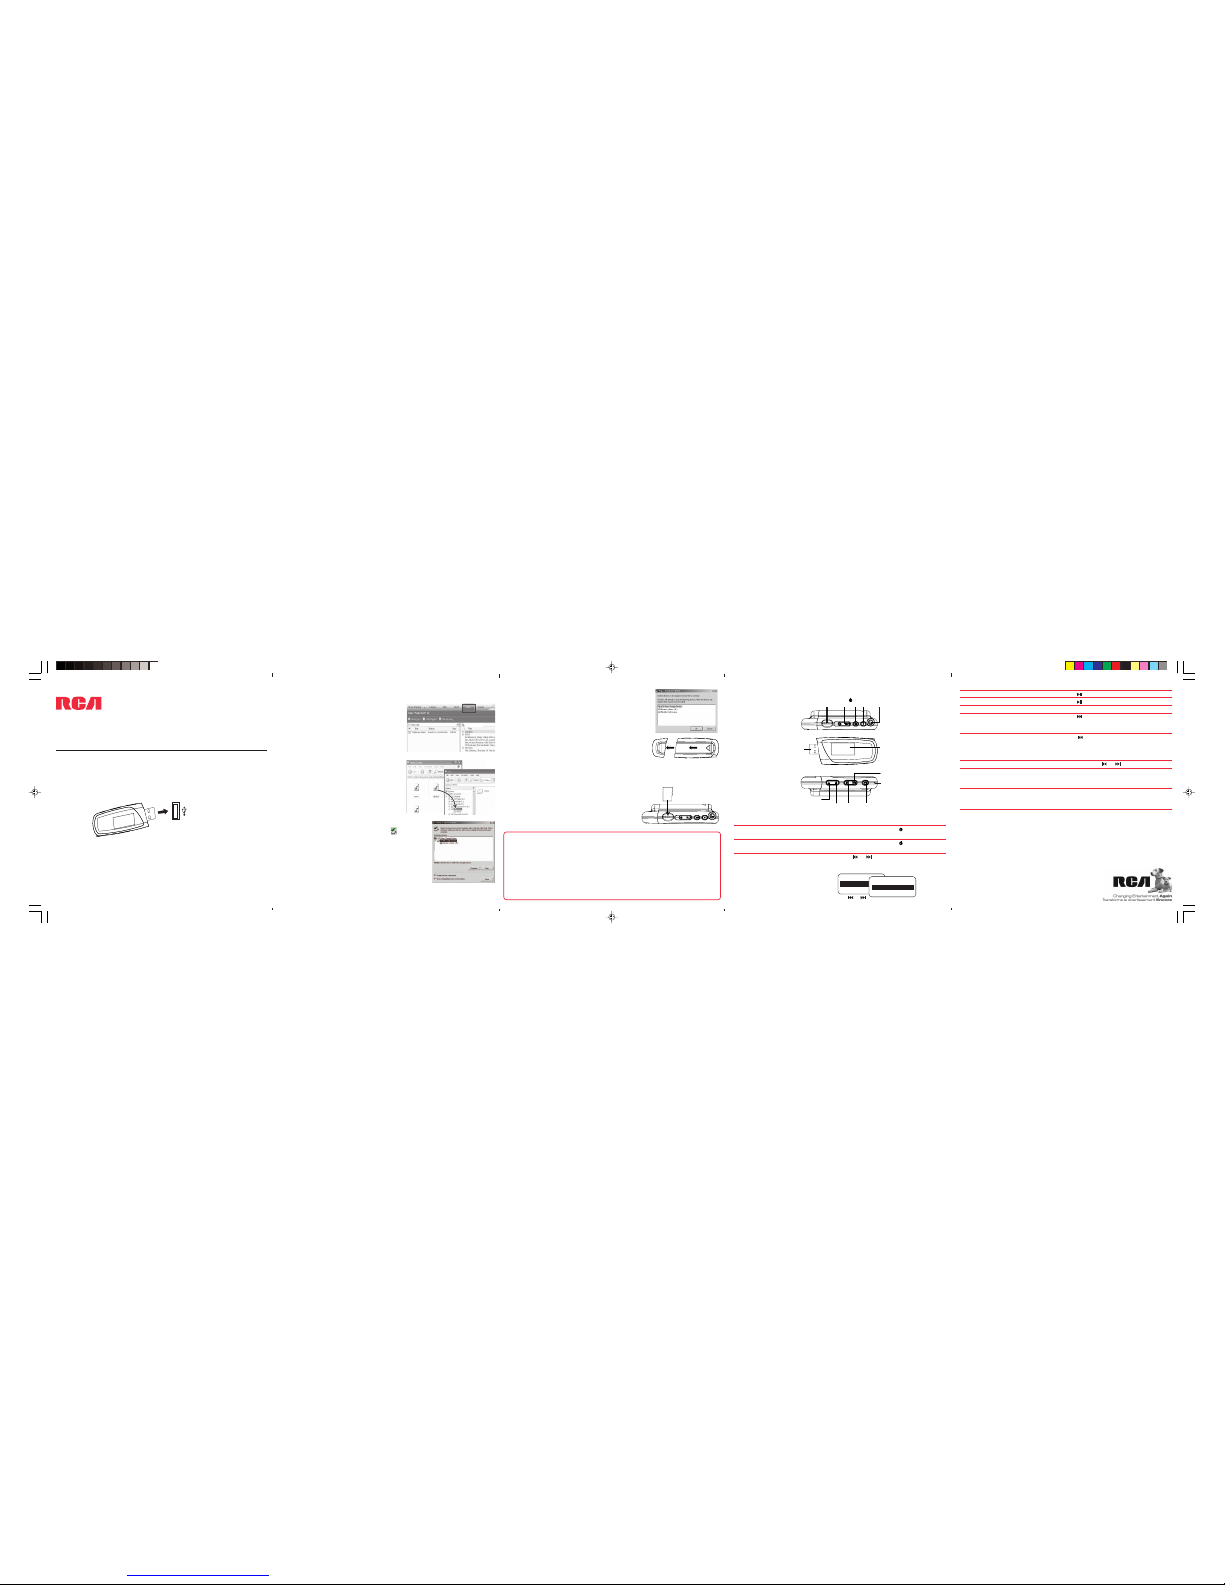
Getting started
1. Install the PC software from the CD* before connecting your player.
2. Remove the cap of the USB jack and connect your player to your computer.
Tocom: 5642 931F (EN/E)
General controls
Thomson Inc.
P.O. Box 1976
Indianapolis, IN 46206-1976
© 2007 Thomson Inc.
Trademark Registered
Marca Registrada
Marque Deposée
www.rcaaudiovideo.com
*accessory supplied
**subscription files WILL NOT play on the TH11 series.
QuickStartGuide
TH11 series
www.rcaaudiovideo.com
Congratulations on purchasing your new RCA Player.
Please read these instructions for quick tips on using the player.
Turn on/off the player
Lock the keys
Browsing for a file
Press
Press , press again to resume
Press + or – during playback
Press
Press within the beginning 4 seconds of
the current audio file
Press and hold or during playback
Press M twice in the playback screen
Press M in the playback screen
Play an audio file
Pause the playback
Adjust the volume
Skip to the next file when
skip-by-file is selected, skip to the next
section when skip-by-section is selected*
Skip to the previous file when
skip-by-file is selected, skip to the
previous section when skip-by-section
is selected*
Rewind or fast forward an audio file
Access the Home menu (to access the
Music, Audiobooks, Voice Recording and
My Selections)
Access the Player's menu (to access the
Shuffle, Repeat, DSP, Skipping, Clear
MySel, Settings and System Info)
*Refer to page 16 of User Manual for details of skipping by file or by section.
For information on new and upcoming products and to register your new player,
visit www.rcaaudiovideo.com.
USB port of
your
computer
The player
OPEN
b) Windows Explorer: drag-and-drop audio
files to the drive letter that is associated with
the player.
• The player is also compatible with most PC
music management softwares (non-DRM
music files).
• For details on file transfer, refer to
Transferring Files to the Player in the user
manual on the CD.
5. To install the battery into the player, remove the
cap of the USB jack of the player.
• Apply thumb pressure to slide the battery door in
the direction of the arrow, then lift the battery
door out and off the cabinet.
• Insert the supplied "AAA" battery following the polarities as displayed in the
battery compartment and close the battery door. Replace the cap of the USB
jack and enjoy music on the go.
6. If you have a micro SD card, insert it into the
card slot as illustrated. Do not force the mirco
SD card into the slot, as it may cause damage to
your card.
Micro SD
card slot
Recording
button
Microphone
The display
Play/
pause
USB jack
M
Earphones jack
Scrolls up/
increases
volume
Scrolls down/decreases
volume
Skips
backwards/
goes back
Skips
forwards/
advances
or
+
or
–
Now Playing
Music
Audiobooks
music 1.MP3
music 2.MP3
music 3.MP3
Learn more about the player
Read the user manual on the CD for more information on the player’s features,
safety and warranty information, and answers to Frequently Asked Questions
(FAQ).
Need more help?
Visit www.rcaaudiovideo.com/downloads for the latest firmware, driver
downloads and FAQ.
Do not return this product to the store.
4. To disconnect the player from the computer, double
click the left mouse button on the icon from the
System Tray, and select "Unplug or Eject hardware"
for Windows® 2000 or "Safely Remove Hardware" for
Windows® XP or Windows VistaTM. Select the drive
corresponding to your player and click STOP.
Windows is a registered trademark of Microsoft Corporation in the United States and other countries.
Windows Media Player 10
PEARL
PEARL
a) Windows Media® Player (installed from the
CD-ROM or pre-installed in your computer):
select Copy to CD or Device (version 9) or Sync
(version 10 or 11) to copy or synchronize the
content to the player. For further help on
using the software, please refer to page 10 of
the User Manual or the Help section of the
program.
3. Transfer audio files to your player using any of the two methods below (in
Windows® 2000 or Windows® XP or Windows VistaTM):
• The "Stop a Hardware player" screen will appear.
Select the player to be stopped again for
confirmation and click OK and disconnect your
player from the computer.
Page 2

4. Para desconectar el reproductor de la computadora,
haga doble clic en el botón izquierdo del ratón sobre
el ícono desde la Bandeja de Sistema, y seleccione
“Desconectar o Expulsar hardware” para Windows®
2000 o "Es Seguro Retirar el Hardware" para
Windows® XP o Windows VistaTM. Seleccione la
unidad correspondiente a su reproductor y haga clic
en DETENER.
21 3 4 5
7
6
Deslice el “interruptor de encendido/
apagado ( ) Retener” ( “Power on/off( )/
Hold” ) a la izquierda y sostenga
Deslice el “interruptor de encendido/
apagado( ) Retener” ( “Power on/off( )/
Hold” ) a la derecha
Presione ó para retroceder o avanzar
en el menú Inicio y presione + ó - para
desplazarse arriba o abajo al archivo de
audio deseado
Para Comenzar
1. Instale el software PC desde el CD* antes de conectar su reproductor.
2. Retire la tapa del receptáculo USB y conecte su reproductor a su computadora.
Controles Generales
Thomson Inc.
P.O. Box 1976
Indianapolis, IN 46206-1976
© 2007 Thomson Inc.
Trademark Registered
Marca Registrada
Marque Deposée
www.rcaaudiovideo.com
*accesorio suministrado
**archivos de suscripción NO se reproducirán en la serie TH11.
Guía de InicioRápido
Serie TH11
www.rcaaudiovideo.com
Felicitaciones por comprar su nuevo reproductor RCA.
Por favor lea estas instrucciones para tips rápidos sobre el uso del reproductor.
Enciende/apaga el reproductor
Bloquea las teclas
Navegando por un archivo
Presione
Presione , presione otra vez para
reanudar
Presione + ó - durante la reproducción
Presione
Presione dentro de los primeros 4
segundos del archivo de audio actual
Presione y sostenga ó durante la
reproducción
Presione M dos veces en la pantalla de
reproducción
Presione M en la pantalla de reproducción
Reproduce un archivo de audio
Pausa la reproducción
Ajusta el volumen
Salte al siguiente archivo cuando
saltar por archivo esté seleccionado,
salte a la siguiente sección cuando
saltar por sección esté seleccionado*
Salte al archivo anterior cuando saltar
por archivo esté seleccionado, salte a la
sección anterior cuando saltar por
sección esté seleccionado*
Regreso o avance rápido en un archivo
de audio
Accesa el menú de Inicio (para accesar
las Música, Audiolibros, Grabación de
Voz y Mis Selecciones)
Accesa el menú del Reproductor (para
accesar Aleatorio, Repetir, DSP, Saltar,
Borrar MisSel, Configuraciones e Info
Sistema)
* Consulte la página 16 del Manual del Usuario para detalles sobre saltar por archivo
o por sección.
Para información sobre productos nuevos y por venir, y para registrar su nuevo
reproductor, visite www.rcaaudiovideo.com.
OPEN
5. Para instalar la batería en el reproductor, retire la
tapa del receptáculo USB del reproductor.
• Aplique la presión del dedo para deslizar la puerta
de la batería en la dirección de la flecha, luego
levante la puerta de la batería hacia afuera del
dispositivo.
• Inserte la batería "AAA/LR03/UM4" suministrada siguiendo las polaridades
correspondientes como se muestra en el compartimiento de la batería, cierre la
puerta de la batería. Vuelva a colocar la tapa del receptáculo USB, y disfrute de
la música.
6. Si usted tiene una tarjeta micro SD, insértela en
la ranura de tarjeta como se ilustra. No force la
tarjeta micro SD en la ranura, ya que puede
dañar su tarjeta.
salta hacia
atrás/
retrocede
se desplaza abajo/baja el volumen
micrófono
ranura de la tarjeta Micro SD
botón de
grabación
M
receptáculo para audífonos
se desplaza arriba/
sube el volumen
salta hacia
adelante/
avanza
reproducir/
pausar
la pantalla
receptáculo USB
Aprenda más sobre el reproductor
Lea el manual del usuario en el CD para más información sobre las
características, seguridad, y la información de garantía del reproductor, así como
respuestas a Preguntas Frecuentes (FAQ).
¿Necesita más ayuda?
Visite www.rcaaudiovideo.com/downloads para el firmware, descargas de
controlador y Preguntas Frecuentes más recientes.
No regrese este producto a la tienda.
ó
AhoraLeyendo
Música
LibrosAudio
+
ó
–
música 1.MP3
música 2.MP3
música 3.MP3
Interruptor de
encendido/
apagado ( )/
Retener
puerto USB
de su
computadora
el reproductor
Tocom: 5642 931F (EN/E)
• La pantalla “Detener un reproductor de hardware”
aparecerá. Seleccione el reproductor a ser detenido
otra vez para confirmación, haga clic en OK y
desconecte su reproductor de la computadora.
b) Explorador de Windows: arrastre y suelte
los archivos de audio a la letra de la unidad
que está asociada con el reproductor.
• El reproductor es compatible también con
la mayoría del software de administración
de música de PC (archivos de música
distintos a los DRM).
• Para detalles sobre transferencia de
archivos, refiérase a Transferencia de
Archivos al Reproductor en el manual del
usuario en el CD.
3. Descargue los archivos de audio a su reproductor usando cualquiera de los dos
métodos a continuación (en Windows® 2000 o Windows® XP o Windows VistaTM):
a) Windows Media® Player (instalado
desde el CD-ROM o preinstalado en su
computadora): seleccione Copiar a CD o
Dispositivo (versión 9) o Sinc (versión 10 ó
11) para copiar o sincronizar el contenido
al reproductor. Para ayuda adicional sobre
el uso del software, por favor consulte la
página 10 del Manual del Usuario o la
sesión de ayuda del programa.
PEARL
PEARL
Windows Media Player 10
 Loading...