

Page 1
,
Page 2
/.
j
:‘. WARNING s
\
To ;ehuce the’ risk of fire or shock :
__
hazard, do not’expose this TV to
I..,: , ~,’ IJ
rain or moisture.
: .,
II.
I
,
j’.
I’,:.. ’
L
TO REDUCE F RISK OF EiECTRIC SHOCK, DO NOT
R@lOVE COVEti (OR BACK). NO‘USER SERVICEABLE
RI&OF ELEbTRlC SHOCK
PARTS IJ’JSIDE., REF$R, SERVICING TO QUALIFIED
CONOTOPEN
SERVICE PERSONNEL. .’
.., ,.
~
This symbol indicates .:
“d&gerous voltage” inside the
A
‘I+ symbol indicates
product that presents a risk of
important instructions
electi+ shock or personal ’
accompanying t$e 1
injury.
product.
/
I
Cautions
I:-,’
’ .
‘F,
/
To prevent electric shock, match wide blade of plug to wide slot, fully
insert. Do not defeat the safety feature.of the plug. The wide blade fits
into the wall socket only one way. If you need and extension cord, make
sure it matches the plug of the TV
.I
1
I
.
Fdr Model l&2732: Operate TV on 120 volts, 60 HzAC power (normal house
,’
power).
;
i :
;_ _
Ensure that the main electrical supply in your house complies with that indicated
1
Jo
on the indentification sticker located at the hack of your appliance.
/
.-
/
FCC kegulations state that unauthorized changes or modifications to this equipment
may void the user’s authority to operate it.
l
A P@.hct Regikrqtion Card
is packed with *your set. Please
l
No other set has the same serialnumber as yours. You will
:I,
‘. fill outthe card and return it irmnediately. ‘. .. : 1 : ’
find the serial number and the model number. on the back of .
,.c .’
.’ ,
‘*.
*‘Y&r prompt submission &this card confbs your right to
your set.. I. 1
:
’ ,
the protection available.under the terms and conditions of the ,
l
. Make sure you record both numbers below so that you will
j
warranty and also allovs us to contact you should it ever
have them in case your set is stolen or if you need a, complete
becoine necessary1
/
description for identification.
.I
l
With your card on file, we can also help you in the event of
.
/
loss or theft by verifying your ownership.
j
l
If you
did not receive
A Product Registration Card,
please
Model: .I
contact your dealer.
\
Serial: .
Attach Your Sales Receipt Here and File at Home for
Purchase Date:
Dealer Name/Add&&Phone:
, ’
Future Rkference ’ __
I
l
To obtain warranty parts and service, you must show your
‘: ‘-
‘,
.
.
i ‘,,
i;, \‘
sales receipt (or evidence of purchase j to your Authorized TV
: ,_ _.. , 5,
,
~~~i&n~~~. ‘:
._..I ,’
i ‘-.
,’ ., 4 ,‘,, .’
,’ / ! ,. ’ ’ ‘.:
I.. ,.I
/-,,.
; ‘.
‘I,
‘; Tape or staple your sales receipt to this manual so you ‘i$ll ’
>,,:. _.i
1 I’ _ . >.’
I, _
‘%
‘;’ I.
1.” ‘:”
._.I
.’
,. ,: ‘,.)‘<
have it handy should service ever be needed. File it at home
. .
: .,
.I ),
,‘; _!.’
; I
‘1,: .,,;!,I’. ,,~~for~~~referencd,~p’notman:your~~~,rec~ipttP us. ,” ,‘. : I’., ‘: ‘:. ,: ,, ,, ‘:‘,_
: :
, ,, .‘,,.< .:.
.c, !
‘.
: ‘.
~ ’
_I ,I , j. ” ’ ‘. S’,
: :
:; : I .,
-. -,-
~, : ,, ; ,.::I~J;~~+$~:~ : ,.,:
I “_.
I
-.
. .
: ‘i : ,‘,. 5 ,.,I.. .,‘, 1
, ‘,’
I L\: ,. ’ , :,,I.
/
..’ ,
,.,
.
,’
I,
.,,’
g
.I i. : 1 : ‘) ‘, ’ L
. ,i“.,
,_ .’
Page 3
Thank’yau for choosing RCA
_
Congratulations on your’purchase of
an RCA TV you’have selected a ” :’
I high-quality, precision-engineered
.instrument designed to give you,
i
- _ years of enjoymenti: ‘, _.
/
j
Abimi This,Mandl, ,
,’ - ,.’
/
To take full advantage of’all the 1
I
features and benefits of this unique
1 TV, be sure, to read this owner’s
manual carefully and then keep it for
.I
future reference. ’
+
1
.,s:
.:j
,
,I
I
-,
‘I ’
-.
/
Table of Co&& ._ ,I : - ’ “‘.
hfety Prechutions .;‘; . . . . ;.‘..I . . . . . . . . . . . . . . . . . . . . . . . . . . . . . . . . . . . . . Inside
Front Cover
,..
, .
‘roduct Registration . . . . . . . . . . . . . . . . . . . . . . . . . . . . . . . . . . . . . . . . . . . . . Inside
Front Cover
$&Time Operation . . . . . . . . . . . . . . . . . . . ;..;..
i
.2-5
. . . . . . . . . . . . . . . . . . . . . . . . . . . . . . . . ..I........._
lperating Ins&u&ions
Front Panel
Controls
..............
.:. ..................................................................
6
TV On-Screen Status
Displays :.
................... . .....
.: .,.
...............................
.; . ..7
Remote Control
l
Installing
Batteries
.................................................................................... g
l
Basic Operation Theory.. .........................................................................
.9
l
TV Functions
..................................................................................... 10-11
Picture-in-Picture .................................................................................
12-13
VIDEO
Menu- General Instructions
......................................................... 14
l
Color Convergence
................................................................................
.15
A UDZO
Menu- General Instructions
........................................................
16
l
Sound Retrieval System-SRS( 0)
..................................................
17
........
SETUP
Menu- General Instructions
......................................................... 18
l
Setting Closed Captioning ......................................................................
,19
l
Setting the Sleep Timer
.;
.........................................................................
2a
l
Setting the Alarm.. ........
?.; ..:.
........
.
...........
.
................ . .............................
.21
l
Labeling Channels
................................................................................
...2 2
l
Parental Control..
....................................................................................
22
l
Channel Memory (Autoprogramming Channels)
-24
...................................
l
Channel Memory (Erasing/Adding Channels)
.......................................
24
l
Changing Antenna Input..
...................................................
. ,2C
...................
l
Setting up VCR.Channels
.....................................................................
.2c
.
l
Setting
up
Cable Box
Channel..
.............................................................
.2?
Detailed Connehiok
.I
Tips to Read Before Connecting Components
..........................................
21
Monitor Panel..
.....
.
.....
.;
..... . ............................. . ... . ..................
.
Antenna and Cable Connections’ ’ ,
.................
..2~!
l
Home Antenna Connections
./_’
............................................. ..i .....
I(
;
..A.........;
CableyTV ~~nne&ions..
.... . ...........
.;
...
. .................
l...~..: i..
....
:.A;
....
ii..31-3:
l
Programming Remote to Control Cable Box; . ..-.
....................................
..3:
Component Connections Y
.. ., .
>.
. Standard VCR..
......... ...
. ..... :.:..;
...
. ...........
l
S-VHS (Super VHS) VCR
i..
.................... . ...................
:.34-i:
......................................................................
l
Remote Buttons That Control RCA VCRs..
................
. ........ -.
........... . ....
.3i
l
Controlling Other Brands of VCRs
...................................
.:........... :. ,3E
........
l
Camcorder .................................. .
..............................................................
35
l
Computers and Other Equipment
...........................................................
4(
l
Audio Amplifier..
:...A 1
...........................
.
...................................................
l
Programming Remote to Control Audio Equipment..
...........................
.4:
f Speaker Connections
...........
.
.................................................................
.4:
‘
_I
Reference Section
.’
Cleaning and Care
. . . . . . . . . . . . . . . . . . . . . . . . . . . . . . . .
. . . . . . . . . . . . . . . . . . . . . . . . . . . . . . . . . . . . . . . . . . . . . . . . . . . . . .
6
-~~T’,ouble Checks . . . . . . . . . . . . . . . . . . r . . . . t . . . . . . . . . . . . . . . . . . . . . . . l.... 1 . . . . . . . . . . . . . . . . i . . . . . +.:....:;.45:4
Index (Alphabetical Subject Reference)
. . . . . . . . . . . . . . . . . . . . . . . . . . ..~.......................
41
.<
,’ .
, / ., I ‘. *s / ;
,.., .I .,.-
.,
/
._ , ,~ .-, , 1 ;.
.’
a: ,.- ; ,’ ’ _;j :‘,:‘.:’
.’
.
1
_, ..’
‘,
Page 4

/
The steps below will help you get your TV connected and
working @rickly.
\
I
\
1
1.
&jack TV a& ahssorib.
! .’
Shown here are the accessories that came packed with your TV
,I ‘,
,- ‘/
. .
j.
2.
. Install batteries in Amotd control.
1 ,’
‘De& are on page 8. ’ . ,,
:
/
I
‘pushing back on the sides of the TV in a swivel pattern.
’
3.
Position TV in room.
A major benefit of a Projection Color Television is its large
viewing screen. To receive full benefit of the expanded screen
size, placement of the TV in the viewing room is important.
The illustrations suggest the “best viewing areas” relating to
the TV’s screen.
You will see the best picture if you sit directly in front of the
TV about -lo- 18 feet from the screen.’ Picture brightness will
: )
decrease if you sit to the extreme left or right of the .TV.
I.
Your Projection TV is designed to provide a watchable p&ire
different placement of the, TV
‘-
CAUTION:
Inadequate or poor ventilation may
cause overheatmg, damage, or me risk of fire hazard.
This projection TV is equipped with ventilation openings in
the cabinet back and bottom to allow heat generated during
./. operation to be released. Jnadeqtate air flow to these openings
may result in failures due to overheating, damage to your TV,
andtheriskoffirehazard. . .
,’ t
.’ ,I.
~’
: : Wheirlocating ,and installing’ your projection television
‘,. receiver, read and carefully follow the instructions contained
.{’ I’
in the “b&allation” section in the enclosed safety pamphlet.
./
I
” .‘..’ ,,
/_ 2
: _,,
; , ,’ )
,, I I_ ”
/ ,, ‘,,’
/ I .
-2.. \ :. - ,,, .:
,’ . .
Four AAA Batteries for
Remote ,
Remote Control
Power Cord
Side View
\
Page 5
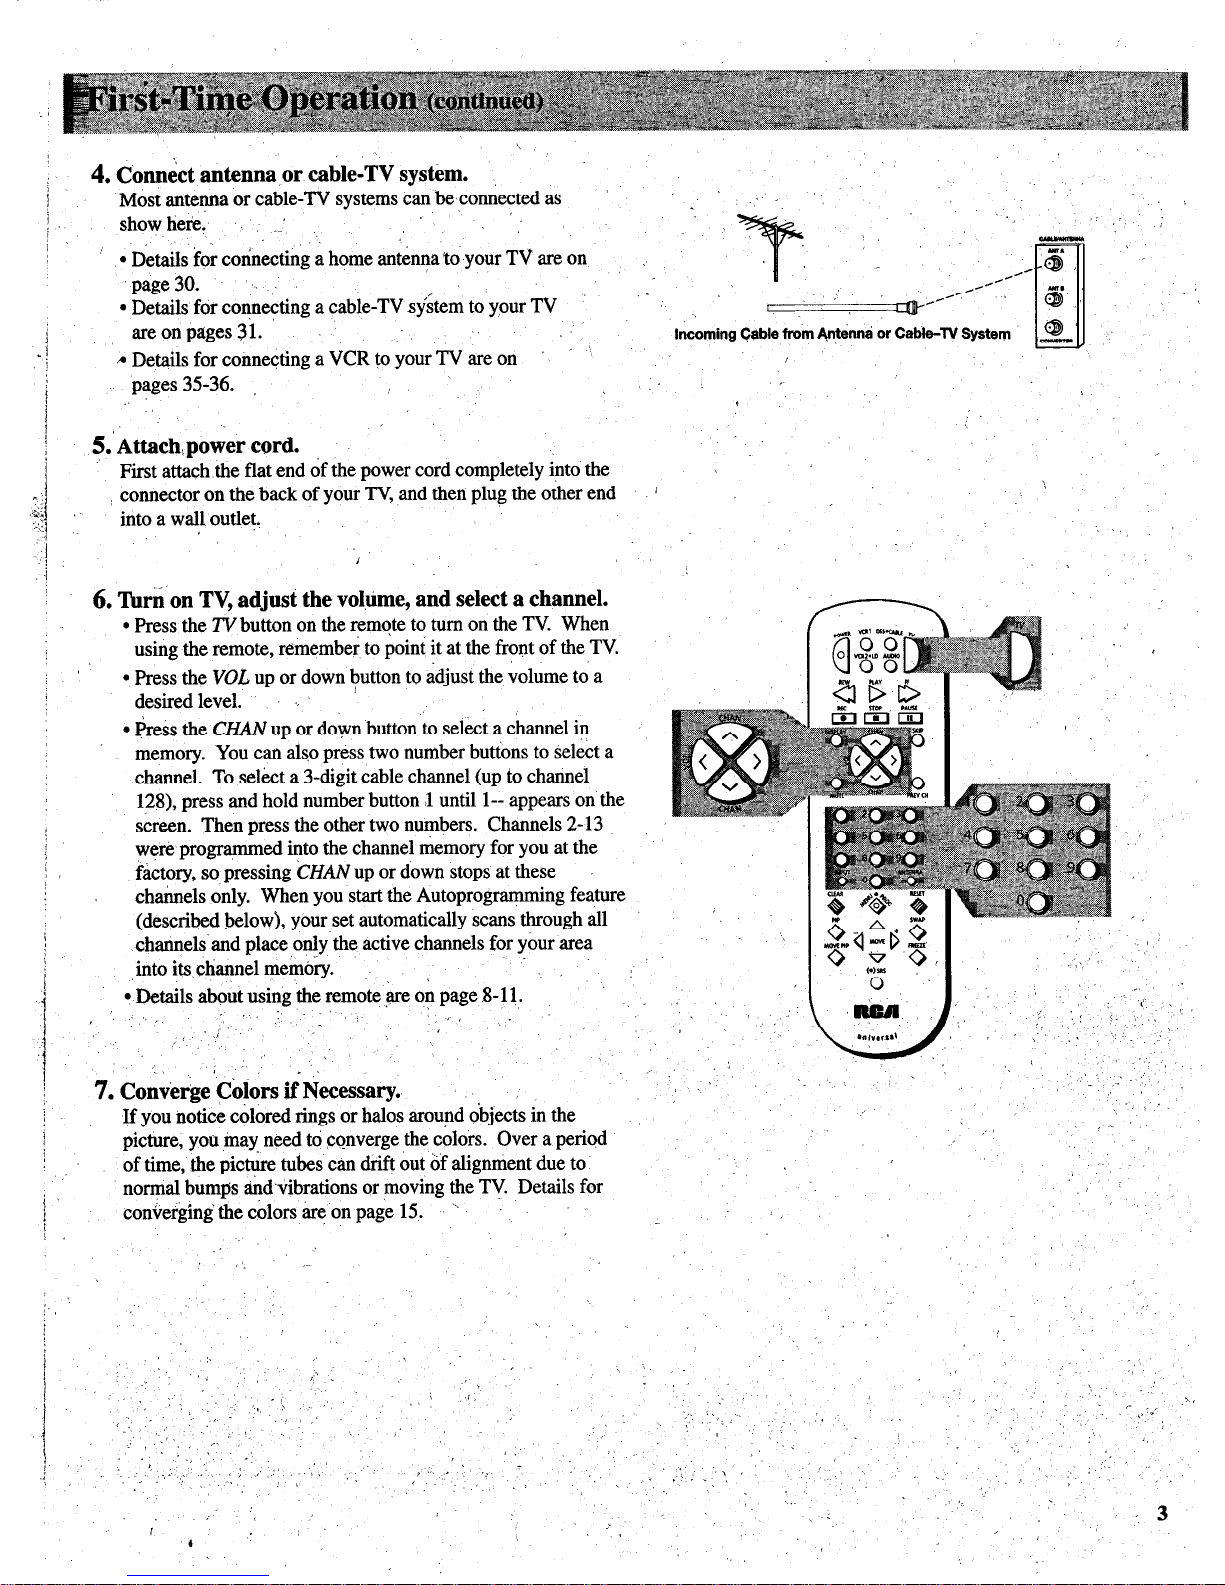
4. Con&t antenna or cable-‘& system.
Most antennaorcable-TV systemscan beconnectedas ’
show here, ..’
l
Details for connecting a home antenna to your TV are on
‘page 30.
l
Details for connecting a cable-TV system to your TV
areonpages3i.
A Details for connecting a VCR to your TV are on ’ ‘I
.
ltkoming Cable from &hwi or Cable-TV System
i
pages 3536.
5. Attach,power cord.
First attach the flat end of the power cord completely into the
i connector on the back of your TV, and then plug the other end
into a wall outlet.
6.
Tin% on TV, adjust the vol,time, and select a channel.
.
l
Press the TV button on the remote to turn on the TV. When
using the remote, remember to point it at the front of the TV
l
Press the
VOL
up or down button to adjust the volume to a
desired level.
l
press the CHAN up or down button to select a channel in
memory. You can also press two number buttons to select a
channel. To select a 3-digit cable channel (up to channel
128), press and hold number button 1 until l-- appears on the
screen. Then press the other two numbers. Channels 2-13
were programmed into the channel memory for you at the
factory, so pressing
CHAN
up or down stops at these
channels only. When you start the Autoprogramming feature
(described below), your set automatically scans through all
’
channels and place only the active channels for your area
/
into its ch~el memory.
l
Details about using the remote :are on page S-1 1.
’ :“.
., 1
f I
f’
,, (
‘j
,‘\
‘,
’
7.
Cokrge COlors ii Necessary.
.
-_“,
If you notice colored rings or halos around objects in the
picture, you may need to converge the colors. Over a period
,’
of time, the picture tubes can drift out of alignment due to
normal bumps andvibrations or moving the TV Details for
,
converging the colors are on page 15. <
:
Page 6
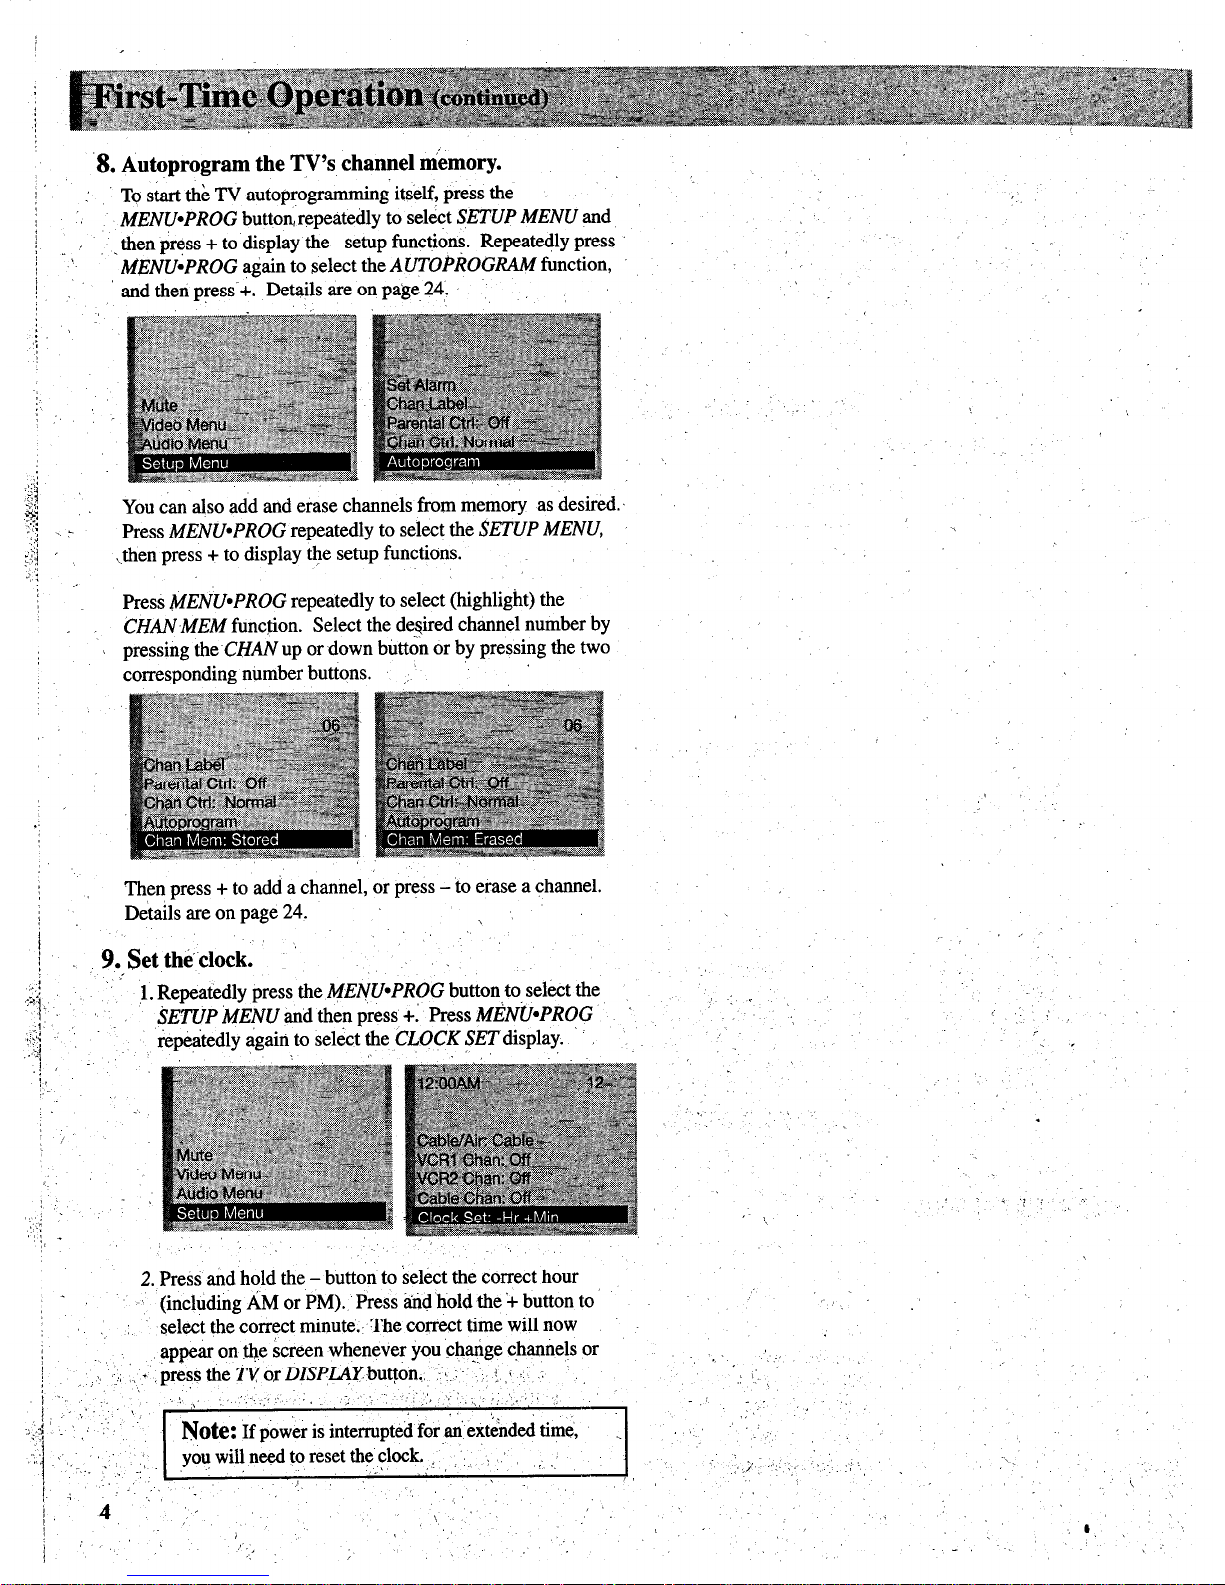
.8. Autoprogram the TV’s channel nikmory.
To s&t thk TV autoprogramming its’df, press the
MENU*PROG
button, repeatedly to select
SETUP MENU
and
then press + to display the setup functions. Repeatedly press
MENU~PROG
again to select the
AUTOPROGRAM
function,
and then press’+. Details are on page. 24.
You can also add and erase channels from memory as desired.
Press MENU-PROG
repeatedly to select
the SETUP MENU,
.then press + to display the setup functions.
Press &fENU*PROG
repeatedly to select (highlight) the
CHANMEM
function. Select the desired channel number by
pressing the
CHAN
up or down button or by pressing the two
corresponding number buttons. ,.
Then press + to add a channel, or press - to erase a channel.
Details are on page 24.
,
9. $et th&-clock.
1. Repeatedly press
the &fENU*PROG
button,,to select the
SETUP iMENU
and then press
+: Press MENbPROG
repeatedly again to select the
CLOCK
SET display.
:
.!/
::
.
I.
!
j .
.:
I,: _
:’
’ /
,.
2. Press and hold the - button to ‘select the correct hour
,-,
:
(including AM or PM). Press and hold the ‘+ button to
: ,. select the correct minute.. The correct time will now
appear on the screen whenever you change channels or
/
‘, ’ :I ,., +
press the W or DIspLAYbutton.,, : 1. : : a : .;
;:;:‘n ‘;i.;,, ;; ‘,., ‘,,’ : ;
N&C!: If power is interrupted for an extended time,
.
youwillneedtoresettheclock. ,.,, 1 , _:
; .(’ .,,/ %. I>
4 ;,
,
/
\ ”
Page 7

;
IO.
Review menus.
:
.
l.‘To’ see the video menu, repeatedly press
MENWPROG
button to select
VZDEQ MENU
And then press +>!
Repeatedly -press’
MENU*PkOG
to select desired
j
function and then press ‘+ or - to adjust it. Details are on
!
page14. ,.,
,I .’
:
I
!
I
!
i
.]
2. To see the audio menu rkpetitedly press
MENU*PROG
to
-select the
AUDIO MENU
and then press +, or - to adjust
it. Details begin on page 16.
repeatedly press
MZ&!J~PROG
to
Page 8
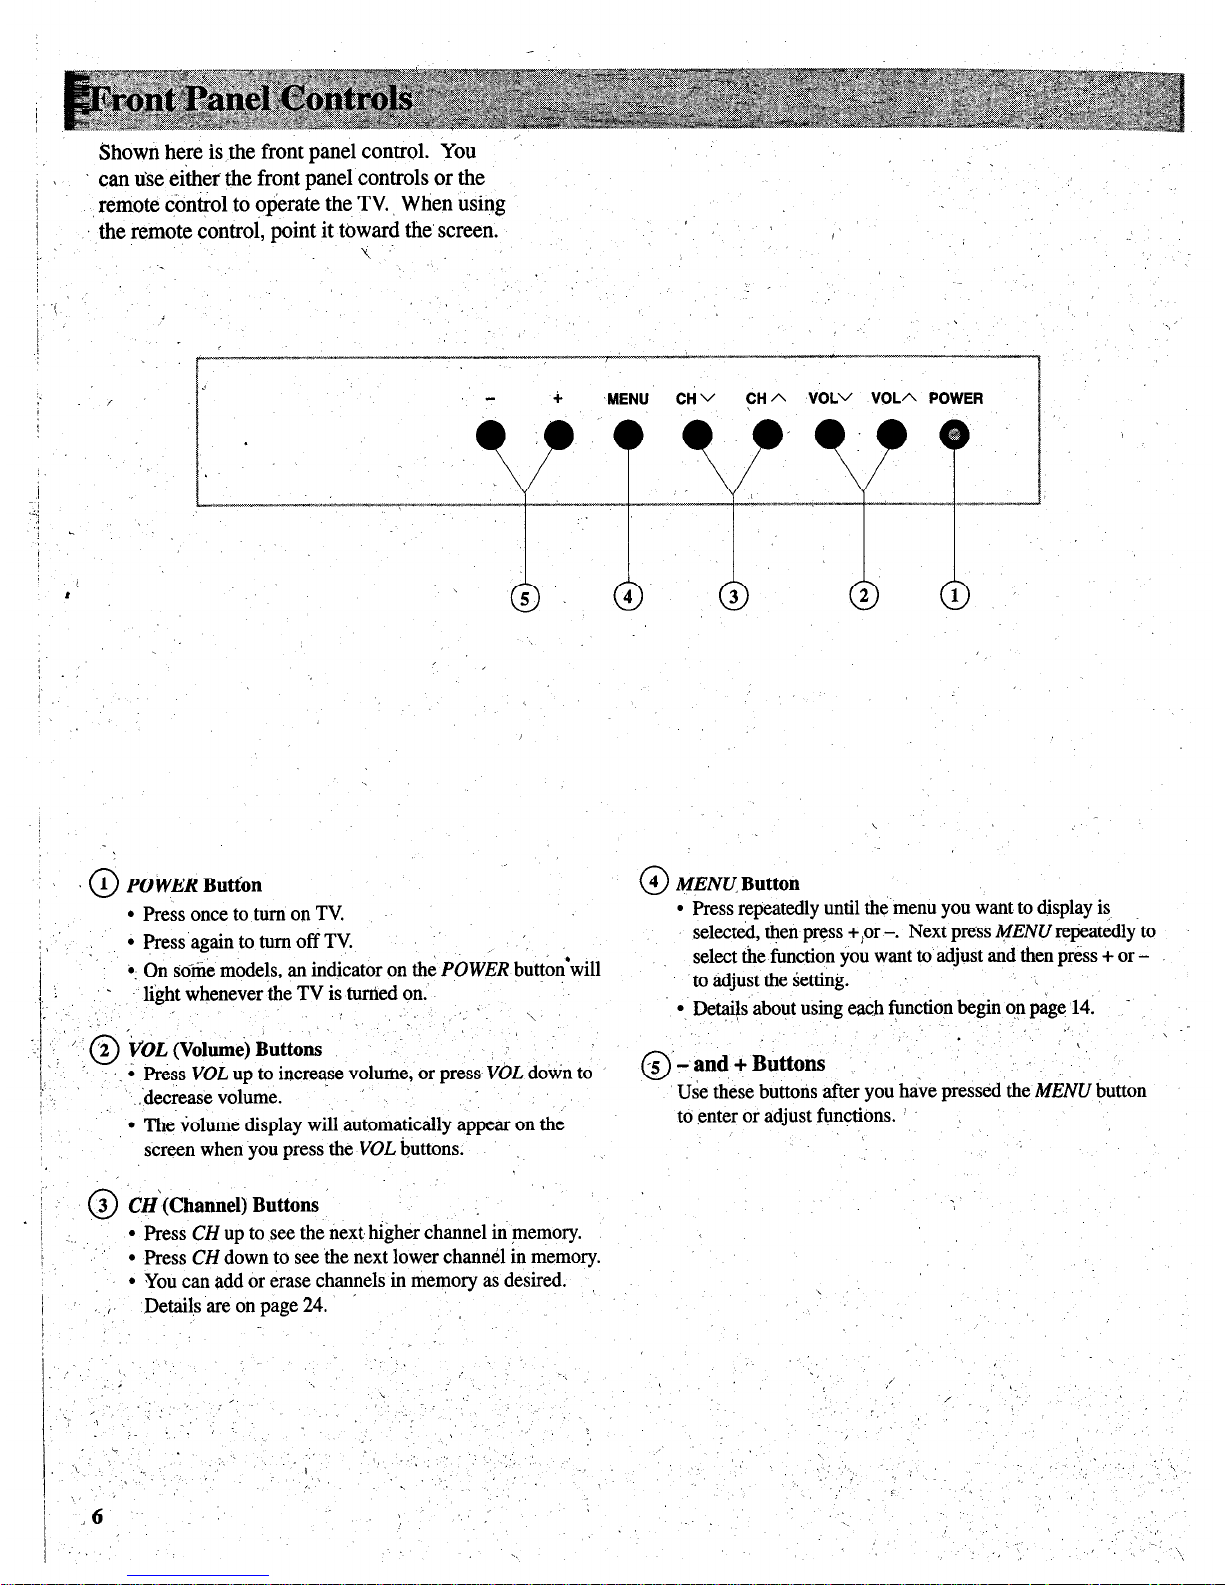
Shown here is the front panel control. You
._
! 1
j
can u&e either the front panel controls or the
/
remote @x&o1 to operate the TV., When using
I
the remote control, point it toward the’ screen.
I
1~
_’
;. Y.’
j
0
1 POWER
Butt&
l
Press once to turn on TV
:,
l
Press’again to turn off TV.
l
On some models an indicator on the POWER button’will
1, : ‘I.. :lightwhenevertheTVisturtiedon.
\ ,’
‘,
\
.
‘I ’ ‘2
‘ifOL
(Volmi) Buttons
: 0
1;’ ,_ ‘.
; Press VOL up to increase volume, or press VOL down to
: :.
.‘decrease volume.
’
l
The volume display will automatically appear on the
screen when you press the VOL buttons.
0
4
MENU,
Button
l
Press repeatedly until the menu you want to display is
selected, then press +,or -. Next press MENU nqkatedly~to
select the function you want to adjust and then press + or to adjust the setting.
,
l
. Det$s about using each function begin on page 14. -
‘. ”
,I
\ --
0
-5 ‘-,
and +Buttons
‘.
Use these buttons after you have pressed the MENU button
to enter or adjust functions. ’ ,
.o
3 CH‘(Channe1) Buttons
/
/ ..,
l
Press CH up to see the next, higher channel in memory.
.,
l
Press CH down to see the next lower channel in memory.
l
You can add or erase channels in memory as desired.
/
Details are on page 24.
’ ,I’
j ,..
,
:
\
,
*,
,’
‘, ‘,
,
:,
Page 9
-
0 \ ,‘,
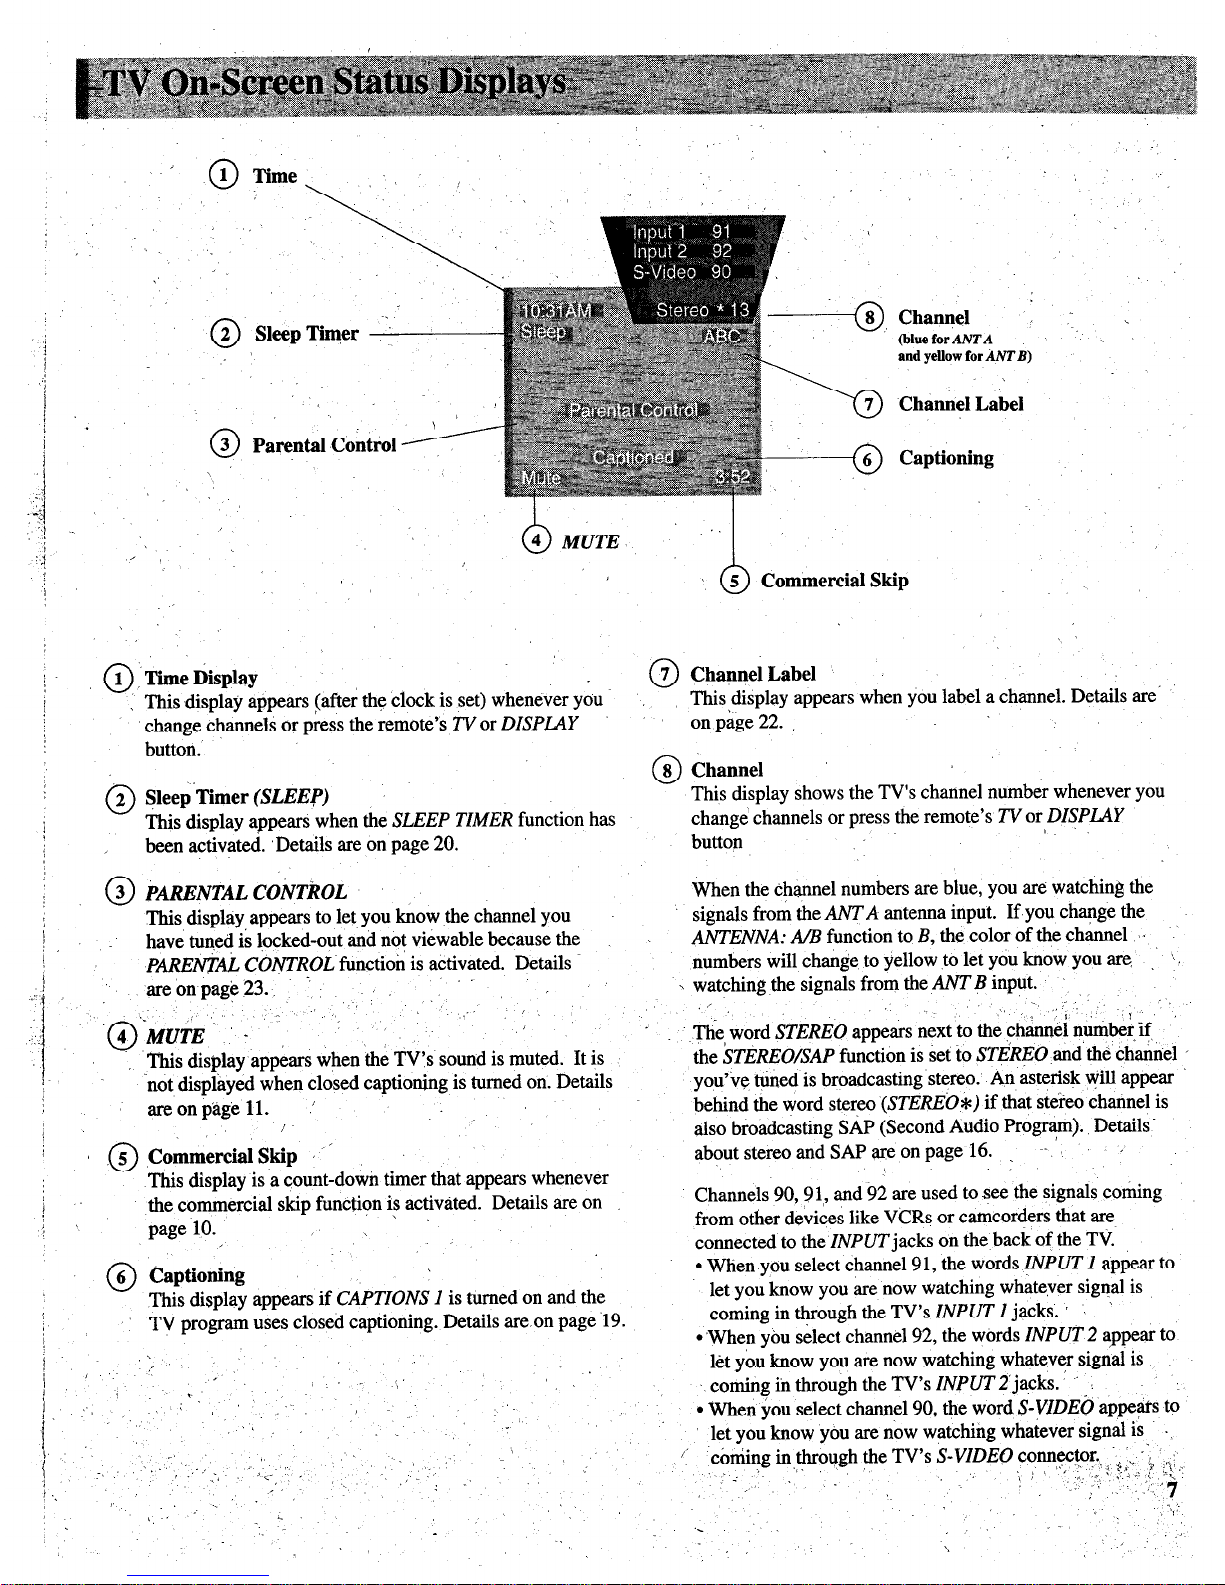
1 Time
0
2 SleepThqer
0
3 Parental Control ----
-@, Channel :, ,
@he for ANTA \
and yellow for
AATB)
\
Channel Label
Captioning
6
5 Commercial Skip
1 Time Display
0
0
7 Channel Label
This display appears (after the clock is set) whenever you.
’ ~ change channels or press the remote’s Z’Vor DISPLAY
This display appears when you label a channel. Details are’
on page 22. ,
button.
0
8 Channel
0
2 Sleep-Timer
(SLEEP)
This display shows the TV’s channel number whenever you
This display appears when the SLEEP TIMER function has
change channels or press the remote’s TV or DZSPLAY
been activated. ,Details are on page 20.
/ ..
button
0
3 PARGNTALCONTR~L
When the channel numbers are blue, you are watching the
This display appears to let you know the channel you
signals from the ANT A antenna input. If you change the
’
I
I
have tuned is locked-out and not viewable because the ~
ANTENNA: AB function to B, the color of the channel I’
1
P~EN$XL CONTROL function is activated. Details
numbers will change to yellow to let you know you are
:
]
are on page 23. ’
’
\ watching the signals from the ANT B input.
. “_
,-
,
.-I.-
./
., This display appears when the TVs sound is muted. It is
in
‘not displayed when closed captioning is turned on. Details
areonpagell. .’
/
/
I,
0
5 Commercial Skip Y’
This display is a count-down timer that appears whenever
The word STEREO appears next to the channel number if,
the kTEREO/SAP function is set to STdRFO and the channel ’
you’ve tuned is broadcasting stereo.’ An asterisk will appear i
behind the word stereo (STEREO*) if that stereo channel is
also broadcasting SAP (Second Audio Program). Details-
about stereo and SAP areonpage 16. _ ~- ’
/
the commercial skip function is activated. Details are on
Channels 90,9 l,, and 92 are used to see the signals coming
’ ,
;
page 10.
from other devices like VCRs or camcorders that are
connected to the INPUT jacks on the back of the TV
0
6 Captioning
l
When you select channel 91, the words !NPUT I appear to
This display appears if CAPTIONS I is turned on and the
let you know you are now watching whatever signal is
TV program uses closed captioning. Details are.on page ‘19.
coming in through the TV’s INPUT 1 jacks. /
l
‘When you select channel 92, the words INPUT 2 appear to
!
j
,-
let you know you are now watching whatever signal is
I,/,
(’
.-
‘. coming in through the TV’s INPUT 2 jqh. ’ ’ :
1.
’ , .““.
/ ~.
i
l
When you select channel 90, the word S-VZDE6 appears to
,‘/
_
let you know you are now watching whatever signal is .
:, 7 ‘:-;, II<. ,
:,:. : :’
coming in through the TV’s
_’
:
. . ._‘.
,’ :
“/ ;
,
j.
.
‘.
,a.
-.
I
Page 10
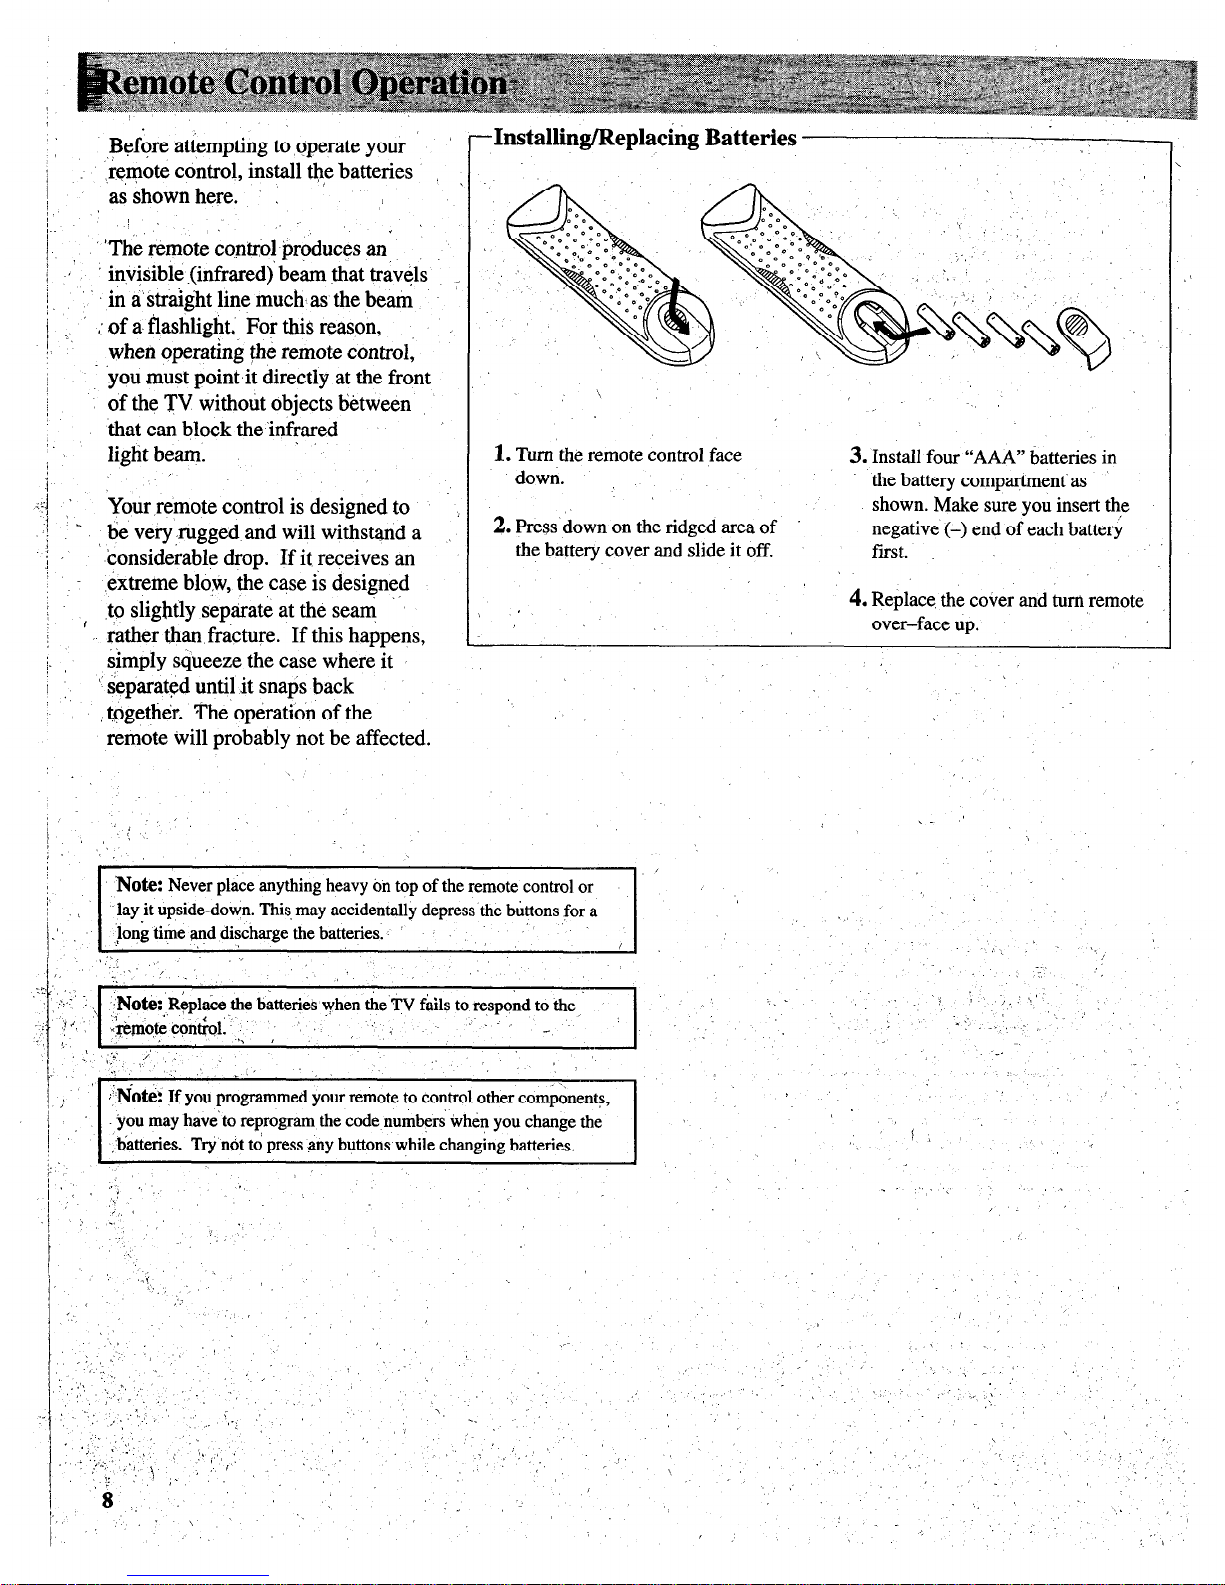
,I&&ore attempting to ,operate your
,re,mote control, install the batteries
as shown here. ,
.
‘The remote control produces an
’ invisible (infrared)‘ beam that travels
’ in a’straight line much, as the beam
;
:,
(I of a. flashlight; For this reason,
when operating the remote control,
‘you must point,it directly at the front
of the TV without objects between
that can block the ‘infrared
’ light beam.
Your remote control is designed to
c be very rugged and will withstand a
’ considerable drop. If it, receives an
extreme blosv, the case is designed
” to slightly separate at the seam
’ rather than fracture. If this happens,
1. Turn the remote control face
3. Install four “AAA” batteries in
down.
the battery compartment-as
2. Press‘down on the ridged area of
shown. Make sure you insert the
negative (-) end of each battery
the battery cover and slide it off.
first. _
\ ’
4. Replace. the cover and turn remote
over-face up.
simply sq‘ueeze the case where it I
I
’ separated until it snaps back
together. The operation of the
remote Will probably not be affected.
j_
Note: Never place anything heavy on top of the remote control or
lay it upside-down. This, may accidentally depress the buttons for a
@ng time and discharge *ha hn++n,~o
.’
‘,
,,‘,
. . . . ,.
I ‘_
‘2,’
I:-
_’
z ., ;~Note:,,Replace the batteries when the TV fails to respond to the,
‘. .
._ ‘: : ,, -.’
&n#eql&ol:‘ j , : 3
. . \’
:
. . ,/
. . !i,.
.-.
:.
5 I
.
.I,.
d
r L ’
.i
,
.
;
:Noti:
If you programmed your remote to control other comRonents,
,.‘. ’
;
you may have’ to reprogram the code numbers khen you change the
/
batteries. Try not to press many buttons while changing batteries.
/\ ,’
-Installing/Replacing Batterles
:,”
\.
t,
‘,.
’
.:
. . .,..~ L
,I ,,’
./
I. ’
/
> .
: (
‘,_
/ :
i
I
\ .,
~,:.,,
, ’
‘:,
. . .
‘,
,‘.. .,_.’
: .‘L 1, ,,
,,’ ‘,
: .,
.I ,,,.I’.
.,
_,
: -*_ I
Page 11
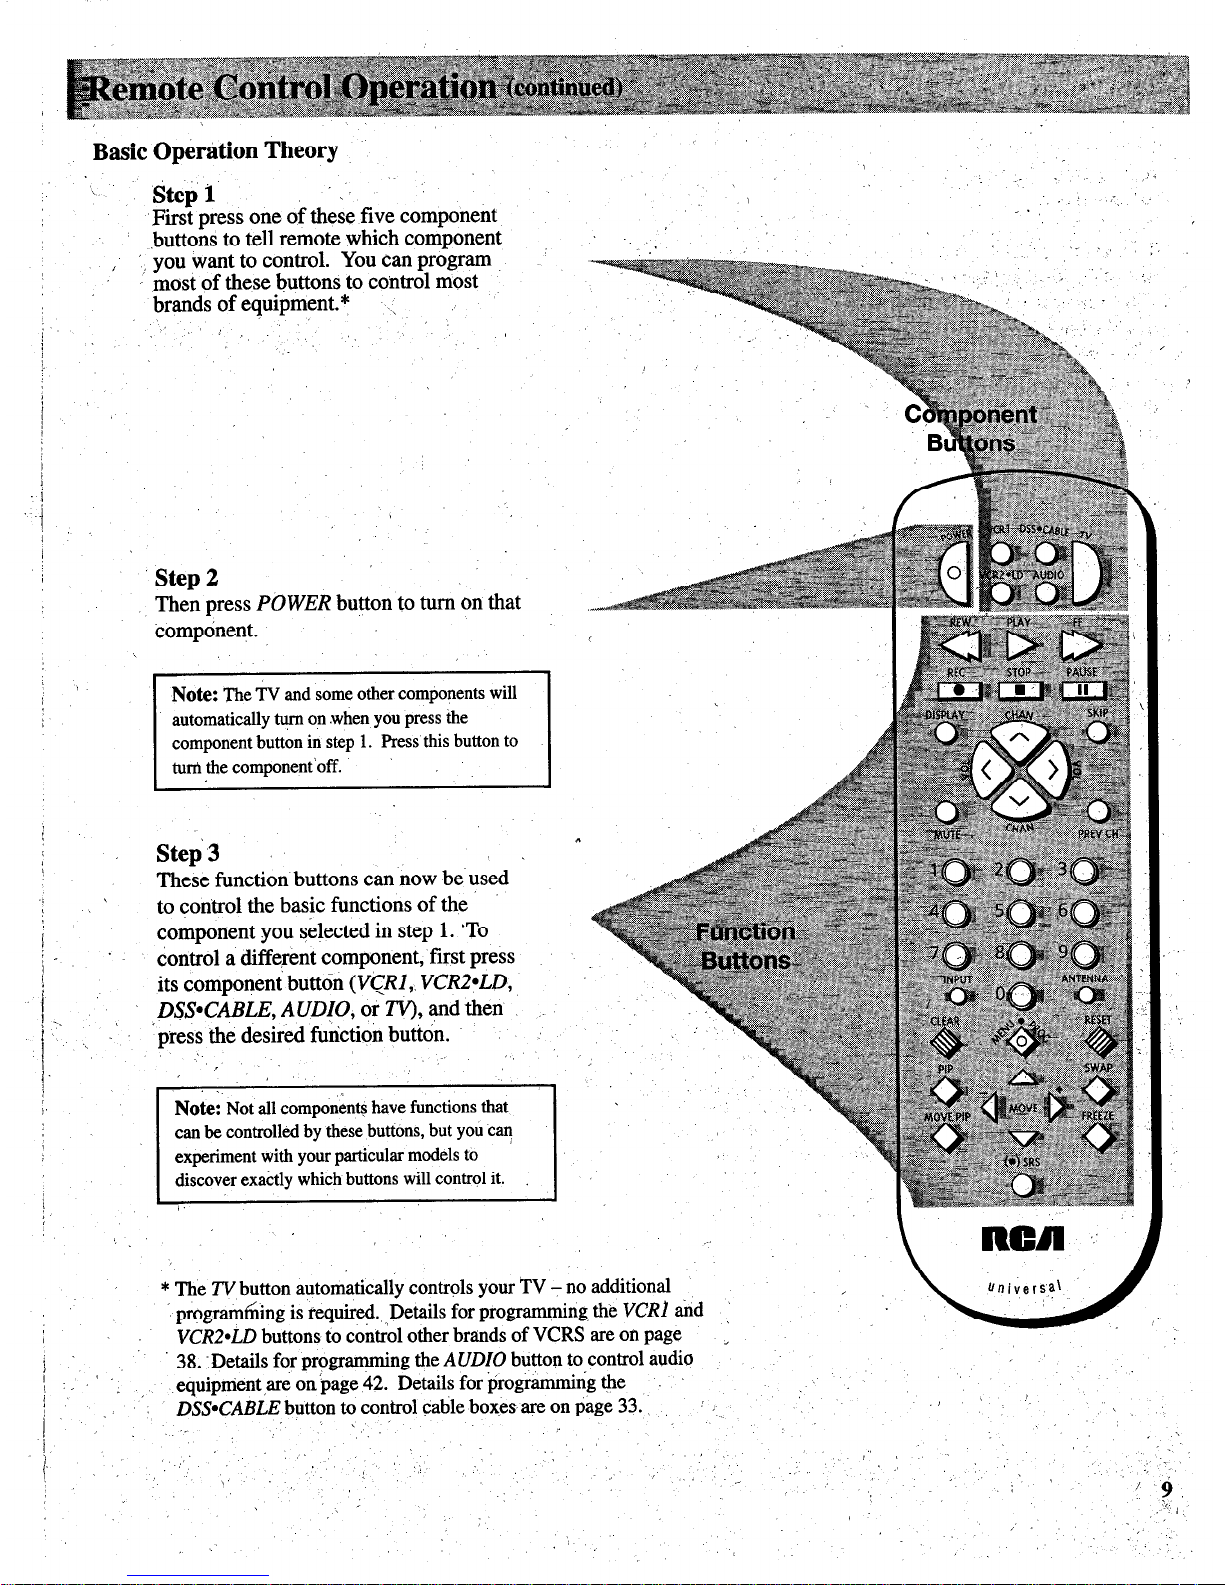
Basic Operation Theory
Step
1
First press one of these five component
.buttons to tell remote svhich component
i
‘! you want to control. You can program
most of these buttons to control most
brands of equipment.*
j
:
Step 2
Then press
POWER
button to turn on that
component.
Note: The TV and some other components will
automatically $m on .when you press the
component button in step 1. Press this button to
tuti the component’off.
Step3
These function buttons can now be used
to control the basic functions of the
component you selected in step 1. ‘To
control a different component, first press
its component button
(VCRI,. VCRZ*LD,
I D$NXBLE, AUDIO,
or TV), and then
~.’ ”
‘s’, [Tdeyr4tincuonbuy.
NOW Not all compon& have functions that
:, :,
can be controlled by these buttons, but you c”
experiment with your particular models to
discover exactly which buttons will control it.
/
* The TV button automatically controls your TV - no additional
prograr&ing is required.
Details for programming the VCR] tid
VCR2*LD buttons to co&o1 other brands of VCRS are on page :
38. -Details for programming the AUDIO button to control audio
I
I
. ,
equipnient ,yk on page 42. Details for ijrogrammitig &e
DSS-CABLE button to control cable boxes are on page 33.
: ,_
.I )
\
‘,
.’
;’
I
, I
:
- /
,.
;
/
Page 12
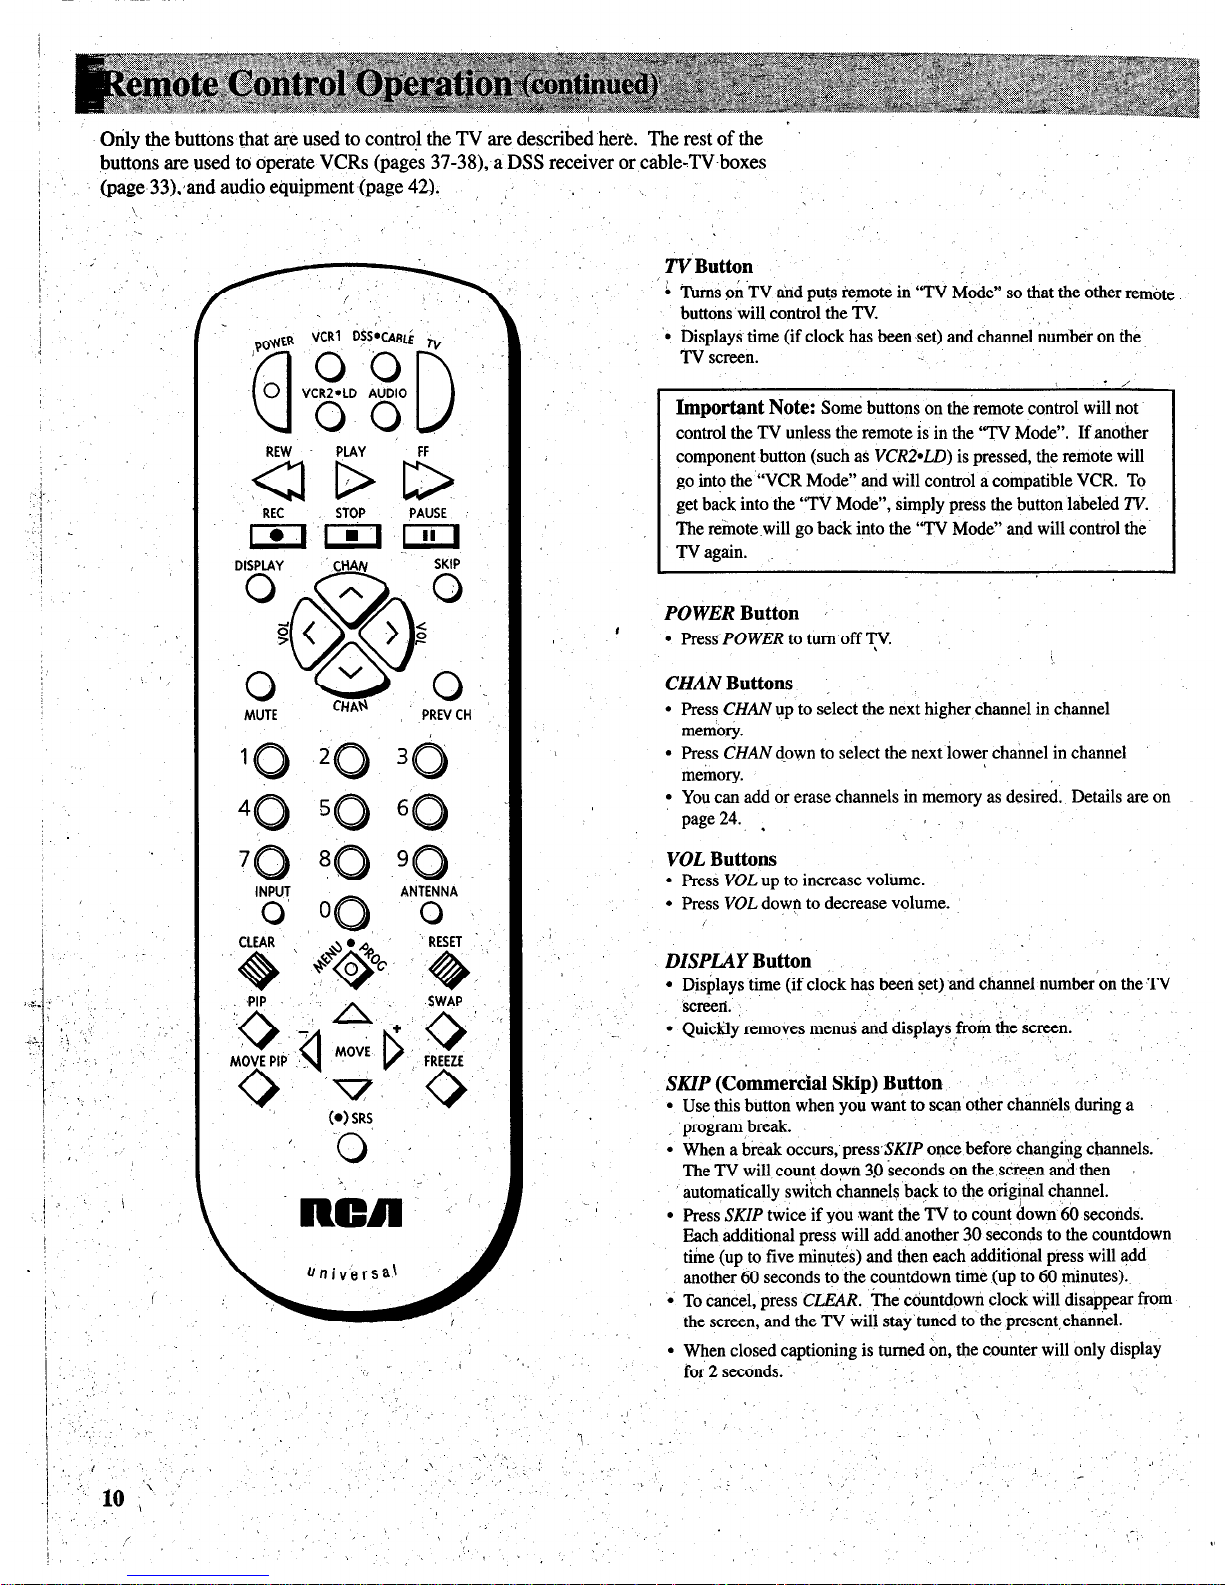
Only the buttons that are used to contra! the TV are described here. The rest of the ’
buttons are used to operate VCRs (pages 37-38), a DSS receiver or Cable-TV-boxes
_
(page 33),,and audie equipment (page 42).
’ , ,
.’ \
‘.
--
’
,
REW PLAY FF
SLIDD,
REC STOP PAUSE
,-
TV Button
’ /
i ‘I&IS o,h’TV and puts remote in “TV Mode” so that the other remote
buttons will control the TV
‘0
‘,
Displays time (if clock has been ,set) and channel number on the
TV screen.
- ,’
Important Note:
Some buttons on the remote control will not
control the TV unless the remote is in the “TV Mode”. If another
component button (such as
VCRZ*LD)
is pressed, the remote will
go into the “VCR Mode” and will control a compatible VCR. To
get back into the “TV Mode”, simply press the button labeled TV.
The remote .will go back into the “TV Mode” and will control the.
TV again. ,.
POWER Button ’
#
l
Press POWER
to turn off TV.
CHAN Buttons ,
l
press
CHAN
up to select the next higher,channel in channel
memory.
l
press
CHAN
down to select the next lower channel in channel
memory.
l
You can add or erase channels in memory as desired. Details are on
page 24. ,
VOL Buttons
l
press
VOL
up to increase volume.
l
press
VOL
down to decrease volume.
DZSPLAY Button
l
Displays time (if clock has been set) and channel number’on the TV
screea.
l . Quickly removes menus and displays from the screen.
, ,-
,
SKIP (Commercial Skip) Button ’
l
Use ,this button when you want to scanother channels during a
, program break.
l
When a break occurs, pressSKIP once before changing channels.
The TV will count down 3.0 seconds on the,screen and then
automatically switch channels back to the original channel.
l
press
SKIP
twice if you want &TV to count down 60 seconds.
Each additional press will add another 30 seconds to the countdown
time (up to five minutes) and then each additional press will add
another 60 seconds to the countdown time (up to 60 minutes).
l
To cancel, press
CLEAR.
The countdown clock will disappear
from
the screen, and the TV will stay’tuned to the present,channel.
l
When closed captioning is turned on, the counter will only
display
for2seconds. ‘,
8.
Page 13
.
,’
.MUTE Button
._’
.
.’ l 1 Press
MLkE
to quickly reduce sound to minimum level without
affecting the picture. This is especially useful during telephone calls
or other interrup,tibns.
,, I
‘_
,..
l
Except when closed captioning is on, when the sound is muted, the
word
MUTE
will be displayed on the screen. ’
l
To restore sound, press
MUTE
again or press
Vdi
up. .
,’
PREV CH (Previoui Channel) Button
l
Pressing the
PREV CH
button causes the TV to change back to the
last tuned channel. This is useful should you want to monitor two
channels. -
l
To operate, select the fist channel you wish to ;katch. Then select
the other channel by pressing two number buttons (for example,
press 0 then 6 for channel 6).
The TV will now change back and
forth between the two channels each time you press the
Z?REV CH
button.
Number ButtonS $9) ,
l
These buttons let ‘you directly access any channel number-even if the
channel is not in the channel memory.
),
l
To select a channel, press two number buttons (first one, then the
.other). For example, press 0 then 6 for channel 6. Press 1 then 3 for
channel 13.
l
To select a 3-digit cable channel (like 127), press and hold number
button 1 until l-- appears on the screen. Then press the other two
numbers.
Note: kour TV will tune up to channel 128. Check with your cable
company to determine which channels are available in your area.
INPUTButton ; . ‘1,
l
I&s you quickly view signals from the
INPUT
jacks. Pressing this
button switches the TV from its current channel directly to channel
.:
!10, then channel 91, then channel 92. ,
:
; Channel W.1et.s you see the signals coming from a device that is
. .
connected
to ‘the
S-VIDEO
connector. ‘Channel.91 accesses the
.ZNPUT 1
jacks and channel
92
accesses the
INPUT 2
jacks.
:,
ANT (Antenna) Button
l
Because your TV has hvo different antenna inputs on the bac,k
(labeled ANT A and ANT
B)
you can connect more than one antenna
or signal source. Press the AhrT button to switch from one input to
theother.
. .x ., I
l
The color of the channel numbers on the screen indicates which
antenna input you are watching: The channel numbers are blue for
ANT A and yellow for ANT
B.
If the channel numbers ‘are blue, you
are watching whatever is connected to the ANT A input on the back
of your TV. If the channel numbers are yellow, you are watching
,’ whatever is connected to the ANT B input on the%back of the, TV.
. Detailsareon page25
:
,/
_’
I’
CLEAR ‘But&
l
Pressing CLEAR clears the screen of all on-screen display messages
except
MUTE
and
PpRENTAL CONTROL:
/
RESE’T Button
l
Press RESET
to return the picture adjustments to the original
settings;
MEibPROG Button and -J+ Buttons
-.
0’ Press MENU*PROG
repeatedly until the menu you want to display is
selected, then press + or
-:
Next press
MENU*PROG
repeatedly to
select the function ‘you want to adjust and then press + or - to adjust
the setting. Details about using each function begin ou page 14.
Arrow Buttons
l
Pressing the arrow -/+ buttons lets you adjust functions in the menu
system.
Picture-in-Picture Buttons
Press PIP
to activate the picture-in-picture feature.
Press
PIP
again to deactivate the picture-in-picture feature.
F%iss FREEZE
to freeze the small picture. _
Qess MOVE PIP
to move the small picture to the next comer.
Press
SWAP
to switch the small picture with the large picture.
Details are on pages 12-13.
SRS (@)* Button
l
Press repeatedly to change settings of
SRS (0)
function (Sound
Retrieval System).
’ -
.
l
Details are on pages 16-17.
1
* SRSi Sound Retrieval System, and the. SRS logo (0) ait registk&~tradem@ of SRS
Labs,Inc:
/’ .\I
.,, .‘,l
\
: .
. /
,/. ,,
‘_
i
. _’
, , ;I
/
‘.
,-_
’
-,. ,I
,:
/.
< ‘.
,’
:
‘,
-.
./
,‘. ,‘/
,I, \
.,, ’ ,I
,li“
,’
Page 14
i
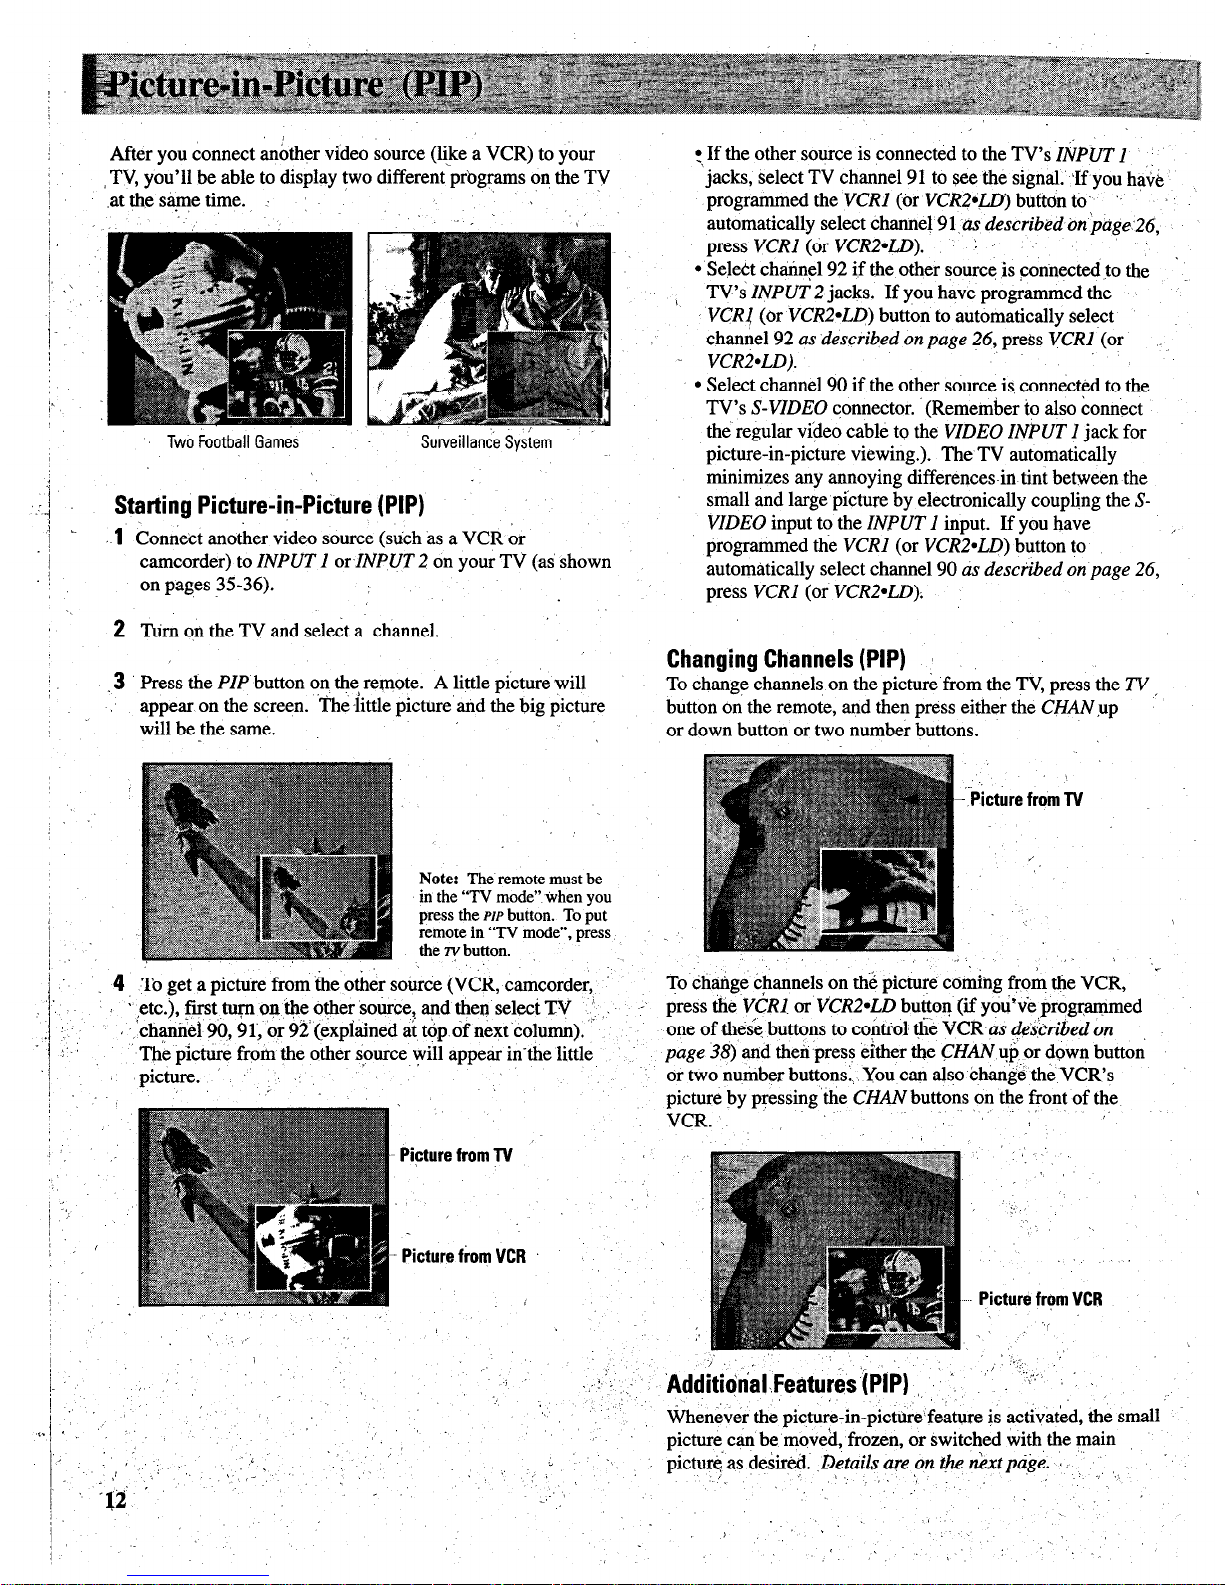
After you connect another video source (like a VCR) to your
TV, you’ll be able to display two different programs on the TV
.atthesame time.
‘, Two Football Games Surveillance Sysiem
Starting Picture-i!-Pi&we (PIP)
1
Connect another video source (such as a VCR or
camcorder) to
INPUT 1 orINPUT 2
on your TV (as shown
on pages 35-36).
2 Turn on the TV and select a channel.
.3 ‘PressthePZPb u tt on on the, remote. A little picture will
appear on the screen. ‘The little picture and the big picture
will be the same.
Note: The remote must be
in the “TV mode” When you
press the PIP button. To put
remote in “TV mode”, press
the “button.
:
4, To get a picture from the other source
(VCR, camcorder,
, - [etc.), fit turn on .me, other source, and then select TV
’
I ‘, channel 90,9 1, or 92’ (explained at top of next ‘column). ”
The picture from the other source will appear in-the little
picture. .’
.”
’ Pipture from TV
Picturefiom VCR
:> If the other source is connected to the TV’s
ZiPUT 1
jacks, select TV channel 91 to see the signal.’ If you have
programmed
the VCR1
(or
VCR2.W)
button to’ ‘.
automatically select channel 91:~
describtd tin pdge.26,
press
VCR1
(or
VCR2aLD). :
l
Select channel 92 if the other source is connectedto the ’
TV’s
INPUT
2 jacks. If you have programmed the
VCR!
(or
VCRZ*LD)
button to automatically select
channel
92 as described
on
page 26,
press
VCR1
(or
VCR24.D).
l
Select channel 90 if the other source is connected to the
TV’s
S-VIDEO
connector. (Remember to also connect
the regular video cable to
the VIDEO INPUT
I jack for
picture-in-picture viewing.). The TV automatically
minimizes any annoying differences-in tint between the
small and large picture by electronically coupling the S-
VIDEO
input to
the INPUT 1
input. If you have ,,
programmed
the VCR1
(or
VCRZ*LD)
button to
automatically select channel 90
as descfibed on page 26,
press
VCR1
(or
VCR2*LD);
Changing Channels (PIP)
To change channels on the picture from the TV, press the TV
button on the remote, and then press either the
CHAN
,up
or down button or two number buttons.
.’ ‘.
- Picture from TV
,.
To change channels on the picture coming from the VCR,
‘r
press
the VCRI. or VCR2*LD
button (if you’ve programmed
one of these buttons to control the VCR-as
~eh-ihed on
page 38)
and then press either the
GHAN
ui;or down button
or two number buttons:,, You can also change the VCR’s
nicture bv uressina’the
CHAN
buttons on the front of the
VCR..--‘, ‘I -,’
.’
’
A
,~
... Picture from VCR
“i
_
Whenever the picture-in-picturefeature is activated, the small
nicture can be moved, frozen, or switched with the main
‘. .,
pictured
as
desrred.
&tails aie on t/z &xt ptije. I ‘,,, ,,,,
:
,_’
j .
.’
c I. ‘: ‘.,
Page 15
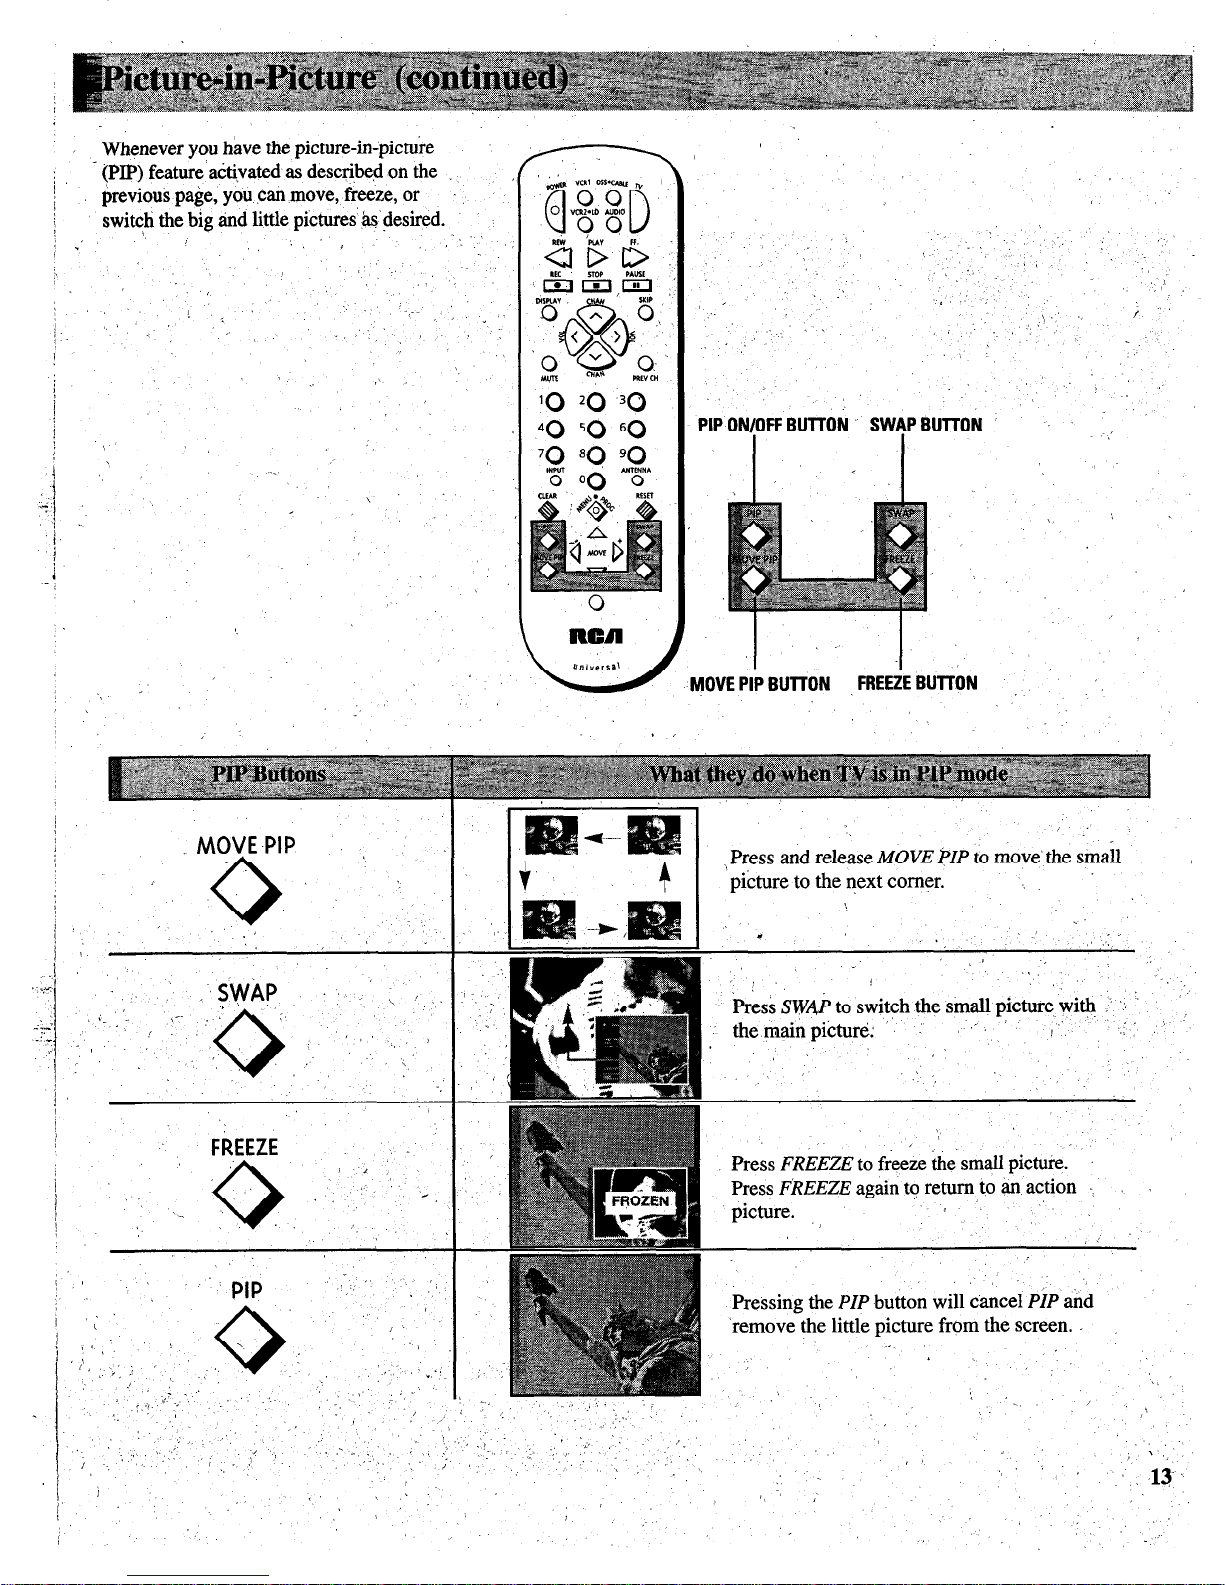
; - (PIP) feature adtivated as described on the
,
I
j
brevious page, you can move, freeze, or
, switch the big tid little pictures &‘+lesired.
.\
; I,
1 ’
,, ‘, 1
,‘.
, Whenever you hive the picture-in-picture
\
0
ncn
BUllON FREEZE BUTTON
(-
, Press and release
MOVE
$YF’ to
move’ the
smail
picture to the next corner. .,
_ MOVE-PIP )
0,
‘SWAP _ ’ / I I-.
FREEZE
PIP
,
/ ’
_
.<
,
Press SWk to switch the small picture wi% ,’ ‘J ’
,- , ” .i ’
Press
FREEZE
to freeze the&all picture.
Press
FkEEZE
again to return to an action
k3ure.
Pressing the
PIP
button will cancel
PIP
and
‘remove the little picture from the screen. .
Page 16

i
1 :. ’
1.
Repeatedly press MENU to select VIDEO MENU and ’
1.
then. press + or - to display the video menu.
,
The COLOR function adjusts the amount of color in the picture.
I, 8.”
..,
I
I’ ,’
Press + to increase color or press - to decrease
c&r.-
, ’
:
,
\.
The ‘TINT function adjusts the color of flesh tones.
Press + to add
more red tint, or press - to add more green tint.
:
press
MENU to
l.’
select
+?Jy. .’
LB
function,
1.
,.“.
then press
+or-to
.adjust it.
_’
The CONTRAST function adjusts the overall brightness and
contrast of the picture. Press + to increase contrast, or press - to _
decrease contrast.
The BRIGHTNESS function adjusts the brightness of the dark
portions of the picture. Press + to increase brightness, or press - to
decrease brightness.
The SHARPNESS function adjusts picture sharpness. Press + to’
increase sharpness, or press - to decrease sharpness.
The PICTURE RESET function lets you quickly change all the
video functions (shown above) back to the factory settings. Press
either + or - to reset the video functions.
The CONVERGENCE function allows you to precisely align the
beams of the three projection picture tubes (red, green, blue) for
optimum picture detail. Press the + button to display the pattern and
VOL
up
or down to align the colors.
See next page for details.
/
1.: .’
Adjusting for a Color Picture that Pleases YQU
1. Decrease color to minimum. This wih’leave a black-and-white
image on the screen.
! j-
2. Adjust contrast until the picture pleases you.
j
3. Adjust brightness until the black parts of the picture appear
’ The video menu will automatically disappear from,me screen if
black. You may need to wait until the picture shows something
1
you do, not press $- or -within a.few seconds.
you’re sure is black to make this adjustment. Be careful not to
lose the details in darkly shaded areas.
.-
,,
.. Via remote control, your TV will ‘?emember” which function
,4. Increase color until you reach a pleasing level, of intensity.
;:,,,
_t . .
’ ‘, n you displayed last-even after the menu has disappeared from
,
.:
* :
.,_ .,
.. the screen. So, if you want to’adjust the same function again,
5: Adjust tint, until flesh tones or other color objects appear natural..
. .-
: simply press the i or - button on the remote control. The last
% j 6. Adjust sharpness for a pleasing level of picture sharpness.
(For weak signals, the picture.may be more pleasing with
..
‘+ function you’adjusted $11 reappear on the TV screen.
sharpness’decreased.)
:
_.
,/.; ,*..
*
Custom Picture Memory for Input channels
~’
I!.. ,
The channel numbers you select to see signals from components
.,
I
/
(like a VCR) that are connected to the INPUT jacks on the back of
.,, _‘.
the TV are called input channels. Selecting channel 90 lets you see
.I.;..: .I.
the signal coming from whatever component is attached to the
S-VIDEO connector, channel 9 1 lets you see the signal from the
INPUT 1 jacks, and ch,annel92 lets you see the signal from the
’
\ INPUT 2 jacks.
Your TV is, equipped with a custom picture
I-
memory for these input channels. When the TV is tuned to one of
:-
.
> !. _
_, / ‘--
these channels (90,9J, 92), you can change the picture settings for
-, .:
,; .’
..;,;.:. ”
that component’s signal as desired without changing the settings of
: ,,.,
’ ..‘,
\’ any other channel. This is very useful because you’ll be able to
”
.-
..-( .“. >_.’ ,,’ -.
.,<,
- :
,:_ .*,’
,, .‘, .: ,I
;
i
. .
.’ :.,.
,_. ,,
.’
adjust for the’best picture from each of your components and the
,,. %’
jl .I I
j. ,’ : r ,! f ;
.*’
’
;;.“<.‘. : ,;;:+..F. ..i,;.:.. ,. (
? .,_
;
‘.,
.., :
TV will remember those settings automat&ally the next time
you
,. .I.~ I,
;,,. ‘,. ;:.
..‘. iii,‘ :::,.:;:..
: .;. ‘.
.‘. , ., :
tune that input channel. ‘, ,’
<‘,.f ’ ~ i,,
:,
‘, ~ . ,
.,
.’
._
/
._, ,.
:
,.
‘.
Page 17

Your broiection TV has three color
, j
projekok tubes-one for red, one for
green, tid one for blue. When mixed
- together in the prdper propo$ion, the’
output of these three color tubes dan ,
produke mahy’colors. To produce
these colors, however, the beanis
must be Ij’ecisely aligned over each \
other so that the colors can be mixed.
The process bf aligning these picture
be,ams is called ;setting the ,,
“convergence”.
Over a period of time, the iicttire ”
tubes can drift but of alignment due
to tiotial bumps and vibratjons or
_ moving the TV. If you move your
. TV or if, after a time, you notice
colored rings or halos around objectk
in the picture, you may want to
converge (align) the colors.
To simplify convergence, an ?n-,
screen menu is provided that allows
yoti to ‘display a test pattern of four
-
lines on the screen. Properly
converged, the liries appear
>
white-which is actually a
1
1
tiombination of the outputs of the
three color,tubesc The position of the
green lines is stationary. The
I
positions of the red and blue lines are
.i
adjustable. When properly adjusted,
the red and blue lines should lie \
directly over the green lines t0 ,I
pioduce..tingle white lines.
:: 4 : ,, _
I
3. Then press the + button’to display
the pattern.
.
,:
m USE VOL
TV f0 EXIT
J
Pressing
VOL
up or
down when
these blue
arrows
aPp&w
moves the
blue lines up
or down.
.
Pressing
VOL
up or
down when
Convkging (Aligning) the ColorS
-(wit@ remote
ody)
1 j Turn on the TV and select a channel
5. Press the + button to select the.arroW
that is
active in yq~ &ea. Allow the color and direction, then press the
TV to operate &t least ten minutes
.before convkging.
VOL
up or down.buttofi,td mdve the
’ lines.
i. -Repeitedly pre>s the
VIDEO
button
until the
COh?VERGENCE
function
is selected.
blue lines
TV TO EXIT
colors in the pattern (red, blue,
and
green) should align-to forin white,
lines,. If you see any red or blue lines
: in the pattern, you can move them to
align with the g&en lines by’pressing
‘the
VOL
UP or down button.
m USE VOL
4. When properly converged, gll three
these red z
arrows
~. ._. _
appear9
fnoves the I
/
r&i lines left :.
L iV TO EXIT
or right.
+-I--
Pressing
VOL
up or
down when
these red c
arrows
aPp*,
moves the \
red lines up
pr down.
N&i:
You can also press the -button
\. .%
.,
~ :
6. When‘ finished, press the TV buttori ta
\, .., ~-‘:.-,~,..
remove the patteni from the..screen.
Page 18

-
-
!
i
I
j’
‘1
I
. :,
I
?J
i
1.
Repeatedly press MENU*PROG to select AUDIO
MENU and then press + or - to display the
,
,.
: .. audio menu. , ,,
2. Repeatedly
press
MENU*
PROG to
select
function,
then press
+or-to
adjust it.
.i
The audio menu will’automatically disappear from me ’
screen if you do not press + or - vAhin a few seconds. j
I Via remote control, your TV will “remember” which
function you displayed last-even after the menu has
I ,$sappeared from the screen So, jf you %ant to.adjust
’ the same funcnon, again, simply press the + or - button
, on the remote’control: .,The last function you adjusted ‘,
., (_
,: .will reappear~on the ,TV screen;‘\ : : ,’ * ,. ,,
.’ _ i
,: ;
j ,_ ‘x
: I
The TREBLE
function adjusts the high, frequency audio. Press’ i- to
” ‘. ,increase treble or press- to decrease treble.
:,
,The
BASS
function adjusts the low frecluency audio. Press + to increase
bass, or press -to decrease bass.
-,
’ The BALANCE
function;adjusts the left/right balance of sound from the
speakers. When adjusting
the BALANCE
function, sit in your normal
viewing seat while pressing the + and - buttons until the sound seems to
originate from a point halfway between the speakers. Press + to increase
sound from the right speaker, or press -to increase sound’ from the left
speaker.
The STEREO/SAP
function lets you choose either
MONO
(monaural),
STEREO,
or SAP audio (if available) by pressing + or -. When a station is
broadcasting stereo and
the STEREO/SAP
function is set to
STEREO, the
stereo indicator
{STEREO)
will appear on the screen before the channel
number. Normally you
can
leave the
STEREO/SAP
function set to
STEREO
and your TV will then automatically reproduce either monaural or
stereo audio-whichever is broadcast. Some TV stations that broadcast
stereo.also broadcast another sound channel called SAP (Second Audio
Program) which is sometimes used to offer the program in another
language. YomTV lets you know when SAP audio is available by
displaying an asterisk (*) on the screen after the stereo indicator like this
(STEREO*).
If you want to listen to the SAP channel when the asterisk,
appears, change
the STEREO/SAP
function to its
SAP
setting. The
SAP
setting will only appear in the functionwhen SAP is available. Your TV
will then reproduce the SAP audio until you change channels or return the
STEREO/SAP
function back
t&STEREO.
Note: Some TV stations transmit a “pilot” signal that makes your TV
think it’s receiving stereo, even though the broadcast signal is monaural.
The pilot signal will make the stereo indicator
(STEPEO)
appear on the
screen next to the channel number, however,
you
will not be able.10 hear
stereo sound. If this happens, check with the TV station to inquire whether
the program being broadcast is in true stereo or monaural audio.
The SFS:
?N/OFF
function lets you add greater depth and dimension to
stereo broadcasts. You can turn this function on and off. as desired ,by
pressing + or - to change the setting between ON and
OFE
You’may
prefer to, leave this function set.to ON. Your TV will then automatically
process thestereo’signals whenever a,stereo broadcast is received.(or
tihenever a stereo, tape is played through a stereo VCR that isconnected to
the TV’s audio/video jacks labeled
INPUT).
Details a&on page 17.
‘>
I
The EXPAND STEREO
function lets you add’greater depth and dimension
to stereo broadcasts. You can turn this function on and off as desired by
pressing + or - to change the setting between ON and
OFE You
may
prefer to leave this function set to ON. Your TV will then automatically
process the,stereo signals whenever a stereo broadcast is received (or
whenever a stereo tape is played through a stereo VCR that is connected to
the TV’s audio/video jacks labeled
INPUT).
The SRS WZDTH
function lets you enhance the perceived audio separation
that occurs when the above SRS function is ON. Pressing + or - changes
the setting between
NOZU4AL.
and
ENHANCE.
Detailsare on page 17.
The SPEAKERIS
function lets you turn off the TV’s internal speakers, by
pressing + or - to change the setting between ON and
OFE
You will
probably want to leave the TV’s, speakers turned on unless you connect an
amplifier (with its own set of speakers) to -the appropriatejackson the back
of the ‘TV as described on page 43.
,
” /
,
‘;
,
’
..
,, .’
,,16’ .
’
_,
I ‘,
,:
I
\
_ ’ .
‘.
I
Page 19

YourTV includes a feature called
SRS (ej* (Sound Retrieval System)
which brings dimensional realism to
a both ,stereo and mono broadcasts.
When the SRS ON/OFF function is set
to ON-and the STEREO/SAP function
is set to STeREd, your TV . .:
electronically increases the audio
separation ofthe speakers so you can
perceive a more spacious stereo sound
effect. If a stereo signal is not ‘present,
ym can set the SRS ON/OFF function
to its SYNTH STEREO setting to
synthesize and process the mono
signal.
When the SRS ON/OFF function is’set
to ON, you can also change the next
menu item called.SRS WIDTH between
N,dRMAL or ENHANCED. When this
. function is set to ENHANCED, the ’
perceived audio separation will be
/
greater. Try both-settings and select
the one you prefer for your room
acoustics.
Note: Some material (audio) will
be more affected than others.
SRS (0) allows you to hear multiple
sound sources. Audio frequencies are 1
processed to’establish directional cues.,
‘&ich gives the impression that .sound ’ s
is coming from all parts of the room. :
External speakers are not required, but
the addition of high quality external
I
speakers optimizes the sound
performance of your TV.
I
* SRS, Sound Retrieval System, and the SRS logo (0) are
registered tmd~marks of SRS Labs, Inc.
‘) -,., ;
I T
.’
1. Repeakdly ‘press the MENUiPROG 3. Press MENU*PROG button to k&t
button to select~MJDI0 MEN,U, press next’menu item’cahed SRS. WIDTY.
-‘+, and then repeatedly press .I .- Pressing + or ‘: will change the
MENVPROG again. to select SRS
setting between NORMAL and
,QN/OFF function. .ENHA&CED. Try both settings and
select, the one, you prefer.
.
Not
’
SRS:ON/OkF
function between ON and
OF)
without going through the menu by
pressing the
SRS
button on the remote.
Z.)Repeatedly press the + button to
change the’setting between OFF,
0N;and SYNTH STEREO.
Note:
After turning SRS or synthetic
stereo on, you may find it desirable to
readjust the
VOLUME. BASS,
and
TREBLE
controls to optimize the sound.
The SR$ effect, ,tonal balance, and
volume level tiill vary from channel to
channel depending on the prodtiction
qualities of the progrq material.
.
.’
/ _‘-
_. ,
‘.
.,
l
If the broadcast you are receiving is
J
stereo audio, select ON. The
:
, STEREO/SAP function must be set
to STEREO before you can hear
SRS (O),sound with this setting.
l
If the broadcast you are receiving is
mono audio, select SYNCH
’
STEREO. !t
l
If you do ,not want SRS (a), select
OFF.
‘,
:
,.
I, . ,,‘?
Page 20

‘.
i
feature lets you display as text on the screen the
audio
portion of certain programs encoded with the Closed Captioning (CC)
of closed captioning are available: Captions 1
and
tions 1 for full translation of the primary
language
s used for an alternate service, such as
secondary
simplified English. ‘I$o:Text modes’@5 also
-: _’ .;:
By setting the
&EEP TZikiER,
-YOU
can program your TV to turn itself
off
after a certain period of time. This’is useful whenever you wantto
watch
for an hour or so before going to sleep. Press the +or - button to
select
the
length of time you want the TV to stay on.
l/or off at the times you You can program your TV to turn on .anc
setting the ALARM function.
choose
by
CHAN.LABEL
lets you program names (or labels) for the channel
numbers.
The names you select will then appear on the screen whenever the
channel
number is dispIayed. .,
’ me PARENTAL CONTZ$QL
feature lets you lock out any channels
between
and 99 that you don’t want your children to watch. Pressing + or -
switches
this function from
OFF
to ON. When this function is set to ON,
channels
that have been locked out with the
CHAN CTRL
function cannot be
viewed.
When this function is set to
OFF:
all channels can be viewed.
The CHAN
CTRL
(Channel Control) function works hand-in-hand with
the
PARENTAL CONTROLfunction.
It lets you select the channels you
want
lock out.
First select the channel number you want to lock out and then
press + to change this function from
NORMAL
to
LOCKED.
When the
PARENTAL CONTROL
function is set to ON, the channels you locked
with
this function cannot be viewed.
function,
then press
\
-+or-to
adjust it.
,.
I,
,.
When you press + or - to
start the AUTOPROGRAM
function, the TV
will
automatically cycle through all channels and place the active channels
for
your area in its channel memory. Pressing
the CHANNEL
up or down
buttons will then allow you to scan only active channels. ’
The CHAN MEM
function allows you to erase and add channels to
channel
memory as desired.
Because your,?;v has two separate antenna inputs on the back labeled’
ANT A and ANT@, you can connect two different signal sources, if
desired.
By pressing + to change the
ANTENNA
function, you,can switch back
and
forth between the two signal sour&S Each time you press +. the
antenna
input will change. ’
k
The setup’ m&u will Gtomatically disappear
frointhe screen if ydu do not press + or within a few seconds.
‘he CABLZYAZR
function tells your TV whether you have a cable-TV
system
or a home antenna connected to the TV Your TV is so automatic that
you
will probably never need to change this function. When your TV
autoprograms, it automatically adjusts
the CABLE/AIR setting
for you.
you should ever need to override the automatic setting, press + or - to
change it.
/
The
VCR 1 CHAN
function lets you program to which channel the TV
will
automatically tune when you press the
VCR
?Z button on the remote.
Via remote control, your TV wjll “rer--- -~~&l&h function you dis&&d last-even after the
.’ . . .F. ** ~~ ~~~ n.
1r -.-.-
nember”
The
VCR 2 CHAN
function lets you program to which channelthe TV
will
/ automatically tune when you press the
VCR
2 button on the remote.
menu nas aisappearea rrom me screen. 30, II you
’ want to idjuSt the same function again, simply ,
.press tht: + or - btitton ofi the remote control.
The la& kinction you’adjusted will appear 6q the
TV screen., ‘I, .,
,_ :.’
\ ,‘. ,,
f,. ‘_-
The
CABLE CHAN
function lets you program to which channel the
TV
automatically tune when you press
&CABLE
button on the remote.
/
,o ,
‘,
After you set the clock, you will’be able to see the on-screen time
display
whenever you change channels or
press: the DZSPLh ?r TV
button on
the’
remote control: To set the,clock when this function is selected, first
press
and hold - to set the.correct hour (including AM and PM).
Then
press
hold + to
set
the
correct
minutes.
’
’
Page 21

!
,
,The CAPT!ONZNG f&ure lets you
,
1
f Setting Closed Captioning (with or without re?ote)
Y------I
.‘display the au&o portion of a program as
; ,text oh the TV SC+% ThiS: is usetilt I,
tlk he&ing ikp$ired or anyone Who
wants to w@h a program without
the sound. ,’ 1 ~
1.
Repeatedly press,MkNU*PROG to 4. The screen will degin to display the
select SETUP MENU, and then press +
or 2 to d&lay ‘s&up functions.
m program’s audio portion as text
,
if the‘program has captioning.
CAPTZONZNG Will be highlighted since
it is .the first function in the setup menu.
Th&e &e’foUr types of closed captioning
tianstissions available: Captions’l,
Captions 2. Text I and Text 2.. Captions
t
1 displays, the full trklation of the
prim@ language in your area. Captions
2 may be used as a second source for
..secondG languages, simplifkd English,
or .otherItrzinslations transmitted in your
.. areal
The Text modes, Text Z ‘and
Text 2, display on-screen boxes
containing the text of general
information not necessarily related to the
program be&g watched.
Note:
Closed
Gaphoning is not
available on all channels oy at all times. j
Only specific programs encoded with
Closqi Captioning information (CC)
are applicable. 1
When Captions 1 is available, the word
“Captio+ed” appears on the screen when you
change channels or press the TV or
DISPLAY
button on the rembte. The word “Captioned”
,’ does not appeal to tell you if Cuptk~ 2 or
either Text mode is available.
.
j,
2.
Press the t or - button to select the type
,of closed captioning: Off, Captions 1,
captions 2, Text i or Text 2.
3. Wheq fmishkd, the display will ’ I
~&.~tomatically disappear from the screen
‘L in a,feti secoxids..
To make it
disappear
., .._
more quickly, press the CLL?AR b&on,
t
’
To turn off the closed captioning
feature, enter the CAPTZONZNG
.’
,_ ,‘_
‘.
‘;.
;_
~*
function and i>;esS the + or i bution :
: :
‘,
.
.,
(,., ; . t
until the screen 4~0~s “Off .‘:
_’
._ ,’
1. ,/ > f
~
; , _; :_ “., ; ._.
‘I
,
.I
.‘. ,( I
,I,
; ,/
/ ..‘> : ., ’
‘. ’ ‘_
.I” I’
I
\
., ‘.’
.., . .
‘.’
._
rlbming Captioning
oii
Page 22

By set$ng the Sle’ep Timer, you
Can program-.lo& TV to tmk itself
, off after a/certain period of tide
(up to four hours). I: ‘.
This is useful whkri&er you want
j
to watch TV foi dn%hqur or so
before going to sleep.
’
Setting Sleep Timer
(with or without &mote)
1.
Repeatedly press
MENkiPRO6 to
4. The sleep timer will begin to count .~
select
SETUP Ml$VU, and
then press
doivn to zero. ‘The word
“SLEl@
+ or - to display setup functions.
will
appear on ‘the screen whenever
Press
MENiJePROG
to select
you change channels or press the I
SLEEP TIMER.
remote’s
TV
or
DZSPLA?
button.‘to
.. > let you know the sleep timer is
activated.
The amount of time remaining
before the TV shuts itself off will
2. Press the + or - button to select the
length of time (up to four hours) you
want the TV to stay on.
appear in the sleep timer menu
whenever you display the
SLEEP
TIMER
function.
Each time you press the,i- or button, the time will increase 30
minutes (up to’4 hours). Then the
time disnlav will start over.
1 hour
and
23 minutes
rem@ng
5. When the sleep timer counts down
to Q:OO, the sleep timer display willappear on me screen for a few’ .seconds. Then the TV will turn ,.
\
i<. ,/l
.’ j
:
,
3. When finished, the display will
- itselfoff. , .,‘.a ,, ,:.
automatically disappear from the
If you want me TV to-stay on when
this display appears, press the + .’
screen in a few seconds. To make it
disappear more quickly, press the
button on the remote to add more
CLEAR
button.
time to the
SLEEP TIMER
display.
\
I
1
! ,’
I
- Clearing Sleep Timer ” ’
/
To cancel the sleep timer, enter the
I
I-
, SLEEP TIME@
function and then press
1
the + or - button until the screen shows
0:oo.
. _‘:.
: ,(
.
,/ ‘,
,
./ ,’ ‘,
_ ,
.
/
” ,,
,, :\
‘,
II”
/
’
\
:
_.-
:
:
‘.
.- I
,, -;,‘,a ‘.. ,.;_: il.. \: -/ /I’ I‘ :,
. . .
.‘.I.
.‘, %‘; ,,.,
_
j.
_, ., ,. ._ , “.., 5
., ‘, \
20
-‘.
/ ‘.
:
..,-
,’
I’
/_
.:
I_ ’
,.
,..\ ,.I-
‘, . .
,I :.
Page 23

;’
‘. I
.“.C
‘I
/ I
By setting the alarm, you can
program the TV to turn on and/or off
by itself. ‘\ ! _
,’ ,
After the ON T&E’is set and the
ALAW ON/OFF function is set to
ON, the TV will automatically turn
on each day at the time you ielected
and remain on until the OFF TIME
is reached. If no OFF TIME has ~
qbeen programmed, the TV will
remain on until you turn it off.
I
I\
The ALARM ON/OFF function lets
you easily deactivate or reactivate
the alarm without having to reset the
ON TIME and OFF TIME.
Setting the.Alarm : I.
1. Repeatedly press MENV*gROG to
select SETUP MENU, ‘and then ‘press ,+ or - to display setup’ functions.
Pk& MENU-PRO;6 tolselect SET
AZARM,ti.mcti&, $d then press + or
‘. 1 to display the alar& settings. ’
to turn off by itself and not turn on,
you can disable the ON TIME by
pressing-until the word .
DISABLE? g@ears. c
Note: Remember to check the AM/PM’
setting. Midnight is 12:Ofl AM and
I
noon is 12:00 PM.
-I
When the alarm time is reached, the
set will turn on at whatever volume
you left it when you last turned it
.off. So if you want the TV to come
on loudly at the ON TIME, be sure
the TV is playing loudly when you
turn off the TV for the last time.
When the ALARM ON/QFF function
displays SET CLOCK, you will need
to set the clock time before you will
be able to turn ou the alarm function.
Details for setting the clock are
onpage4. :
, _I,
I ‘/
I
~MPOIRTANT~~TE:
During,
I
extended power failures the alarm
function will be disabled. The alarm
ON
TIME
and
OioF TIME
will stay set
but the
ALAN ON/OFF
function will
be set to
OFF
and will display SET
CLOCK to inform you that the clock
must be/reset to the correct time. Once
the clock has been reset you can
reactivate the
ALARM
function by
changing the
ALAl?M
function to ON.
2. When tbe first ALARM function is
‘selected, pressing + or - will switch
the setting between ON and OFF Set
this function to ON if you want to
activate tbe alarm. When this
function as set-to OFF: the
alarm is
deactiv,ated and the, TV will not turn
on or off bv itself. ’
Note: If
SET <L.OCK
is displayed next
to
ALARM,
you will need to set the
clock timebefore you will be able to
turn on the alarm function. Details for
setting the clock are on page 3.
4.. Press MENV*PROG to select tbe
next function called OFF TIME.
If
you want the TV to turn off by
itself, enter the desired time by first
pressing - to select the hour
(including AM and PM) and then
pressing + to select tbe minutes. If
you only want tbe TV to turn on by
itself and not turn off, you can
disable the OFF TIME by pressing -
until
the word DISABLED appears.
5. Press MENLJ+ROG
t0
select the ’
. . . .
next function called CHMNEL.
This function lets you program
which channel the TV will tune
when it turns on at the ON TIME.
I. ,
, - ..” ’
3. Press MFNV*rROG to select the next
function called ON TIME. If you
want the TV to turn on by itself, enter
Press CHAN up or down to select
the channel, and then press + or - to
enter it into
the CHANNEL function
tbe,desired time by first pressing -: to
select, tbe‘hour (including AM and
PM) and then pressing i-to select tbc
minut& If you only want tbe.TV ’
,,
.I, --
;
\
Page 24

1.
Repeatedly press
MFNWPROG
td
. 5. Then
press + to move to the
next.
letter frame; Pressing - moves,
you
back to the previous letter frame.
/
The labeling feature -lets you program
names (or labels) for the channel
Labeling Channels
(with
rem+
only) I ,, _ .+
numb,ers. The ‘name you program
select SETUP MENU, and then press
will-then appear on the screen below .
the channel number whe,never the j
+, or - to display setup functions.
’ Repeatedly
press.MENU*PkOG to
’ channel number is .displayed.
select CHAN LABEL function.
,. ’
‘;.
,‘,
Each name can’contain up to four
characters, and you’ll be able to
assign up to 64 names. After 64
names or labels have been entered,
‘.
/:
/-
!:.
the TV will display this message to
let you know ,no more channels can
be labeled:
CHAN LABEL: FULL.
Listed below ,are the letters and
characters from which you’ll be able
2. Press ,+ to enter the CHAN LABEL
function. Four blank letter frames
will appear under the channel number.
/
/.a
to choose when programming the
channel labels:
ABCDEFGHIJKLM
N0PQRSTUVWXY.Z
(blank space) ! ’ # $ % & ’ ( .)
6+,-./0123456789:;
<=>?@
3. Select the channel number you want
You must use your remote control to
to label by pressing the CHAN‘up or
down button (or by pressing two
create or erase labels.
,’
number b,uttons).
6. Repeat steps 4 and 5 until the
name
is complete. ,You can now label
another channel, if desired, by
selecting thechannel number
and
repeating steps 4 and ~5.
7. When finished, the display will
automatically disappear from
the
screen in a few seconds. Your
labels will remain in memory
until
you erase them. They are not
affected by power failures.
Erasing Labels
To erase a channel label, first follow
steps 1,2, and 3 above, and then
press
CLEAR on the remote control.
.
/
4. ‘Press and hold the VbL
up or down
button until the letter or character you
want appears on the screen. Pressing
VOL up sequences through the
characters in alphabetical order.
Pressing VOL down sequences the ’
letters in reverse order.
Note:
Autoprogramming new
‘channels into the channel memory
does
not affect the channel labels ‘that are
already entered.
Page 25

The, PMENTAL CTliL ,and CHAN
: I
CTRL functions let you lock any
i
channels you choose so they cannot
,
be viewed by your children.
: ..-
:
Channels that have been locked can
be viewed only When the
.f , .
/_
., !
PARENTAL CTRL
function’ is set to
.I
OFE. This’can only be done. with the
/ ’
remote control-it can not be changed
w$h the buttons on the front of the
!i
TV. Therefore, after you turn on
1
: :
PARENTAL CTRL, you
simply hide
..:, s
-3
the remote control so that your .
‘. . . !
children can not watch the locked
I
./: ,,
‘:
1
charmels.‘,An optional simplified
remote (shown on page 45) isalso
available that your children can use.
The simplified remote does not allow
: ‘. access to the locked channels.
.
:~
/
The locked-out channels will_ remain
unviewable even if the TV is
unplugged or the channels are
autoprogrammed again. The only
way to view locked channels is to use
the supplied remote control to set the
PARENTAL CTRL
function to
OFF:
Note: Channels above 99 cannot be ‘,
.I
locked.
. . 4
rActiya$ing Parental Control
(with remote bdy) I
The PARENTAL CTRL &d the CHA-N
2: To !ock channels,.press the
CTRL
functions work hand-in-hand.
MENU*PROG button to select the
’
The instructions below Will first tell
CHAN CTRL function. i
you how to turn parental control on or
off with the PARENTAL CTRL function
and then how to lock desired channels
with the CHAN CTRL function.
Repeatedly press MENU*PROG to
select the PARENTAL CTRL
function. ”
1.: Repeatedly press
MENU*pROG to
select SETUP MENU, and then press
+ or - to display setup functions.
will change from NORMAL-to
LOCKED when that char&l is
Select a channel you want tolock b
locked. To return the channel to
NORMAL, press the -.button:
pressing CHAN up or ‘down. Then
press +. The (?HAk CTRL setting ’
l
When this function is set to ON,
PARENTAL CTRL is activated and
any channels you locked with the
CHAN CTRL function will not be
viewable.
!* When this function is set to OFE
PARENTA&. CTRL is deactivated
and all channels are viewable.
Repeat step 2 for each channel you
want to lock.
If the PARENTAL CTRL function is
* set to ON while you are locking out
channels, each channel will go ,.
blank as you lock it. ‘, ’
.\i
When. the &RENTAL QYiL
funCtion:is set to ‘ON and a channel
which has been loqked out is tuned,
the TV will display the words :
PAR&Xl CONTROL to 1,et your
kids know you have locked it.
-
Page 26

,
The channel memory is the list of TV
channel numbers your TV will stop
I
/ ,’
on when .you press. the, CHAN up or
down button. You can program any
j
list of channels into the channel
/
,memory.
.’ i ‘,
/ ’
I.,,: ; ;, .,.
j
‘The quickest way to program your
channel memory is to use the !
i
AUTOPROGRAM functions If you
I
,use the AUTOPR@RAM function,
I
your TV will automatically cycle
through all channels and place active
channels into the channel memory.
..I.- -.’
i
First follow the instructions. to
{
autofirogram channels, and’ then add
1 , or erase individual channels as
I
desired.
I’ ‘_
i
!
/
I
j,
j :
.I.
. I.. .- ..;
._,
:.. ‘.
.
‘I
!’
i
:
\
i
1
I
Not&: The Autoprogram feature will
place into memory active TV channels
that have a valid,signal at the time you
autoprogram your TV.
‘An active channel may be missed
occasionally if its sigiial is very weak or i:
the channel happens to be “off the air’
when the TV is autoprogrammed..
An inactive channel may he included in
the, channel memory if there happens to bc
somesort of %oise”,or ‘rstray signal+,on
thechatinelivhbn’~~TVis., -. :-:., :
autoprogrammeil. !
Signals from othek components c&e&
i.o,the INpp jacks can hothe
autoprOgrammed. Channel 91 (which
accesses IlyPlJT 1 jacks).& added to the
channel memory at the’ factory and,will
remain in the channel memory until you
erase it. Channel 92 (INPUT 2) and
Channel 90 (S-VIDEO connector) can he
added to channel’memory if desired.
Only channels i-99 can be stored’ in
channel memory.
,.
1. Connect home antenna(s) or cableTV to your set. :
:
2. After you have turned on .the TV :
- and adjusted the volume, repeatedly
i piess,MENlJ*PROG to select
SETUP MENU, and then press + or
’ -to display the setup functions.
Repeatedly press MENU*PROG to
select the AUTOPROGRAM
3.
function.
Press either .+ or - to begin
autoprogramming.‘ The TV\Lill first
program all channels, for ANT A
input and tben’program all channels
for ANT B input (even if you only
have one antenna input connected).
1.
Autoprogramining Channels into Channel Memory
-(with or without remote)
FVben the TV is finished cycling,
you can check to see which channels
are in memory by pressing tbe
CHAN up or down button.
‘2, Erasing/Adding ChainelF in, Chanhel Memory
-(with or without remote) _
1. To erase or add a channel,-
2. Then select the desired channel
repeatedly press MENU*PROG to
number by pressing CHAN up or
select SETUP MENU, and then
down (or the two corresponding
press + or - to display the setup
number buttons on’tlxremote).
functions. Repeatedly press
M&NU*PROG to select CHAN
i MEM function.
3. Press ,+ to add the channel to
memory, or press - to erase the
channel from memory. . ’
3. Adding Video Input Channels to Channel Memory.
‘(with remote)
r
If you have a video device connected,to Adding channels 90,91, and 92 to
,’
the S-VIDEO or INPUTjacks on the
channel memory allowsaccess to the
back of the TV, you can view its signal
video inputs at the TV by pressing the
either by directly selecting channel 90
CHAh up and down buttons as well as
‘(for S-VIDEO connector), cbanncl9 1:
by using the remote’control.
~(forJNPUTIjacksj,orchannel92(for’~’, ,. ‘.’ :’ ” I
1 ” .,
INPUT 2 jacks) with the number buttons’ . .
on the remote or by adding those’
, , ‘.
‘.
r
channels totbe channel memory. : i : , .’ ..- i .,
. .
~
; ..-
( , ,,’ ; ’ ‘:
Page 27

,
Your TV has two separate antenna
inputs on the back (!abeled ANT A
and ANTA) that allow you to connect
two -different signal sources if
desired. For example,, you can
.
-
‘- Changing Antenna Input
connect’s cable-TV system to one
input and a home .‘antenna to the
‘. other input. I”” ‘l,,,
By changing thekVTE&NA: A/B
( display’@, the SETUJ’:menu, you can
switch back &l for&betw,een ‘the
two signal so+& .“: ”
Listed below are some.other common
uses of the.two ‘antenna inputs:.
i I
l
connecting a cable-TV system.(or
antenna) to one input and a VCR to the
(with ’ remote) . ’ ”
1
1. Press the ANT (Antenna)
1 1 (without remote) :
,.
,
: .-.
button on 1. Repeatedly press h4ENd0
s&d
the remote control to switch’from the SETUP MENU and then press +
ANfrA input to the AkB input. or- to display setup ftinctions.~ .
The color of the channel numbers Repeatedly .press i&m to select .’
will change from blue to yellow to
‘ANTENNA: A/B function.
let you know you are,now Watching
whatever signal is connected to the
ANT B jack on the back of the TV
other.
l
connecting a cable-TV system (or
antenna) to one input and a video game
to the other.
0’ connecting a double-trunk cable
system to both inputs.
l
connecting a cable-TV ,
converter/decoder box that scrambles
only premium channels. Connection
details sre on pages 3 l-32.
l
connecting a cable-TV system to one
input and an antenna (VHF/UHF) to
the other. This allows you to tune in
local stations that are not included on
’ ,your.cable system. ,Remember to *
change’the CABLE/AI~ function as
described on page 18 if using your set
,-‘!*e\tl&. ;,,.,,. , .:,: ,‘.,I
.,’
_. :: .
_’
. .
,,
‘The Channel Memory is’ the list of
channels your TV will stop on when
you pressthe CHANN& up or down
buttons. Your TV-provides two
separate Channel Memories-one for
’ AZ)VA input and one for ANT B
input.
This allows you to add or
delete,channels into each channel
memory as desired. ‘.
When you use the: A UTOPROGRAM
function, the TV automatically
checks both inputs. and sets ,up a’
:oeparate channel iire&&y for each.
_.
r ‘,,
‘.
, :.
.
’
b .
I-\ I
, ,I ;. ., .
.) , .
,I ;
;,. ‘.
,,’
’
!. Press the ANT button again to switch
back to ANTA. The color of’the
channel numbers will change back to
blue to let you know you are now
watching whatever signal source is
connected to the ANT A jack.
1. Press the - or + button to change
the setting. The screen display
will &range from A to B to let you
know you are now watching
whatever signal is connected to
the ANT B jack on.the back of the
TV. The color of the channel
numbers will change from blue to
yellow.
/ ‘.
I :.
I’ :
:,‘i: ;‘,;..
.j
.
.j .;, . . .
3. Preis tbk, - or +. button again to ‘-5, j
Mitch back tom A. 7@sc+eh
display will change back to
ANTENfld: A, to let you know you
are now watching whatever signal
source is connected to the ANT A
jack on the back of the TV.
r-
Page 28

i
‘,
The VCR 1 CHAN
function lets you
: gkogram to wh@h channel the TV
\ ; wilra$omaticaUy tune when you,
’ p!ess the
VCR1
‘button on the remote.
This is hqdy if you contiect a VCR
: to your TV. Y&I will nq longer have
to; reqember’to which input jacks the
.( : :! ,VCjR is connected because he TV
,I.
will remember for you.
For example, if you connect a VCR’s
AUDIONIbEO OUT
jacks to the
TV’s
INPUT
I jacks (as shown on
page 35), you will no longei have to
’ renibmber to select channel 9 1 on t‘he
c ’ ’ TV to See what the VCR is playing.
,By entering channel 91 next to,the
VCR I CHAN
function, the TV will
automatically tune to channel 91
each time you press the
VCR1
button
on the remote.
This function is especially
convenient if you have a compatible
VCR fiat can be operated by the
VCR1
button on the remote. Pressing
VCR1
will then not only turn on the.
VCR but Also tiutomatically tune the
TV to the proper channel for viewing
the picture from the VCR. You can
program most brands of remote-
1
zontrollable VCRs to respond to the
P
.
VCR1
button as described on ‘.
,_
;,: 7 .’ 1 i.
:.. :. ; The,
VCR 2 GHAN
function works
.:’ :, the same ‘way. It lets’ you pr0gA-n to
:wh$h i+miel the TV will
-automatically tune when you press
the VC+2*LD
button,,on the remote.
y;)~ can program most brands of
remote-controllable VCRs. to respond
to
the VCR?*LD
button as described’
on page 38. Pressing the
VCR2*LD
button will then not only turp on the
VCR but also automatically tune the
TV to the proper channei for viewing
the picture frFm,the VCR.
,’
,
;.
button &es ‘not change between ANT A
Setting Up VCR Channels
(with or without remote)
1. Repeatedly press MENU*PpO,G to 4. If you have anoth&
VCR,conneqted,
select
SETUP MENU,
and then press’ to the TV, press MEvU*PROG io
4 or - tp display the &up functions. select the VCR 2 ;cHAN funqtion.
5.
Enter the chtine! mimber you
want
to program by pressing two digit
buttons on the remote co&A.
(This
is the,channel number to which
the
1. Enter the’channel number you want to TV will tune automaticaliy when
you
program by hressing two digit buttons later press the VCR2*LD,@on
on
on the remote control. (The channel the remote.) See the notes below
nur&ei you enter is @e channel to
you are unsure about which
channel-
which the TV will tune automatically number to enter.
when jrou later press the
Vdl
button
on the remote.)
6. Press the + button to program the
3. Press the + button to program @e
channel number you selected into
VCR 2 CHAN
fu&tion memory.
channel number you selected into the
‘TV’s memory.
Not& about Entering Channel Nuyber:
l
Enter channel 91 if VCR is connected to
the TV’s audio and video
INPUT 1
jacks.
l
Enter channel 92 if VCR is connected to the TV’s audio and video
INPUT 2
jacks.
l
Enter channel 90 if you have a Super-VH$ VCR that is connected to the’TV’s
S-VIDEO
co&ctor and
INPUT 1
audio jaclq (labeled
L an+ RLMC?NO). ,
l
Enter ch&melO3 (or 04) if ydu did not Use any audid/video cables and
connkted
VCR to’@ TV’s round antqnzx jack labeled ANT A or
ANT B.’
Enter the same
chanpel number (d3 br 04)as the.p&ition of the VCR’s
CH3KH4
switch.
This’is
the channel to which you must tune~your TV for viewing signals from your
q?R.
.* Refer to p&g& 35-36 if you &ant to rev& details about ‘conn&cti?g ybu! !?I%
to
,. ‘(
,>
‘.
yourTv. ’
.c
.’
Page 29

The CABLE CHAN function lets you
program
to which channel the TV
‘- will automatically tune when’you
press the DSSGIBLE button on the
remote., This is handy if you want to
\
connect a DSSTy receiver or other
, satellite.receiver, or if your cab!e
company requires you to connect ‘a’
cable box to your TV You will no
longer have to remember the ‘output
channel of the DSS receiver or cable
box because the TV will remember
for you. ’
For example; if you connect a cable
box to the TV’s
CABLWlENNA
connector (as shownon page 31),
you will no longer have to remember
to select channel 2,3, or 4 on the TV
to see what’s coming from the-cabte
box. By, entering the cable box’s ”
output channel (usually 02,03, or 04) ,
next to the
CABLE CHAN
function,
the TV will automatically tune to that
channel each time you press the
DSS*CABLE
button on the remote.
This function is especially convenient
if you have a remote-controllable
cable box that can be operated by the
DSSGIBLE button on the remote (as
described on page 33). Pressing the
DSS$4BLiE button wil! then not
only switch the remote to cable mode
but will also automatically tune the
TV to the proper channel for viewing
the picture from the cable box.
Setting Up Cable B?x Channel
(with or without remote)
1. Repeatedly press
MENU*PROG
to 3. Press the + button to Program the
select the
SETUP MENU,
and then channel number you selected into
press + or - &display the setup the
CABLE CHAN
function memory.
fun@ons. Repeatedly press 1. j
MJZNU*PROG
to select the
CABLE
CHAN
function.
/
.’
:,
Note:
Pressing
the - button here will
turn off this feature and display
CABLE CHAN: OFF
again.
2. Enter the channel’number you want to
program by pressing 6.6 digit buttons
on the remote control. ‘(The channel
number you knter is’the channel to ’
which the TV will t+u$ automatically
when you later’press the
DXWABLE
button on the remote.)
The TV will change to the channel
you select. This will help ybu to
confirm that it is indeed the channel
you want the TV to automatically
tune. Most cable boxes output their
signals on either channel 02,03,
or04.
‘,
.‘.
I
‘.
‘,
,
\
.;
. .
Page 30

I
I
1
Compatible Components
.
The power cords on your RCA components are “polarized” (one
A wide,variety of compatible RCA Video;Cassette Recorders
blade is wider than the other). Be sure the extension cord or
(VCRs), camcorders, and audio. components are available:,
multiple adapter is also polarized. The plug should fit in the
- Checkwitbyour.RCAdealerfordeQils. i ‘. : .j
outlet only one way. ; ’ :
”
~
Other brands of &mponents can also W’Conn’ected to your TV
/ Refer to me component’s ovriner’s manual for the ~ I
mrning O’ff Power Before .Cdnnkcting Co<ponents
”
manufacturer’s recommended hookup instructions. ,.
I,,.,., , .‘( ,~) - _;:y ,,-
_.
Always’turn off power to all components before you co,nnecf or
J
‘I * ‘, “,
,’
i .<. 3’
disconnect any cables. This will protect your components from
;I
- ,b stacking&.&gem&ti ,’
-possible electrical surges that could damage your equipment.
I If you are connecting several components and plan to use a
This is a good practice for all your audio and video
’ component rack, follow these general rules when arranging your
components-TVs, VCRs, audio systems, computers,.etc.
components.
I
l
If the components are arranged horizontally, allow at least an
::
i ’
inch or tw,o of space between’them so air can circulate freely.
Positioning Cables to Avoid Hum ‘,
I c .
This Will also provide some space, between the audio devices
The possibility of picking up hum (interference. noise) in the ,‘_
to minimize interference.
audio/video cables will be reduced if you keep them away from
*If components are arranged vertically on shelves, place the the back ofthe TV Route the cables to the sides of the TV’s
Stereo Amplifier at the top so that heated-air rising from it will back panel instead of straight down the middle.
:j
not pass around the other components.
All cable plugs should be firmly seated in the jackswhere they
l
Do not block the ventilation holes in the components. If connect to the equipment. If a plug is not connected firmly,
components are placed on rugs or deep-pile’mats, the audio hum or smeared video may result. .
i ./
ventilation holes in the bottoms may be bloCkedand If your antenna cable is flat twin-lead cable, try to keep it away
/
overheating could result. from the audio/video cables as much as possible. Excess flat,
l
Some VCRs may cause interference in TVs. When placing a
twin-lead cable should be cut off instead of coiled behind the
VCR under your TV, try to keep at least 18 inches between the
TV. Round, coaxial, antenna cable is usually shielded and can
bottom. of the TV and the top of the, VCR. -If interference is
be coiled or placed next to audio/video cables without causing
I
present when the VCR is used on top.of the.TV or at the
interference.
I
18-inch distance below the set, move the VCR beside the TV
If moving the VCR does not solve ‘the interference problem,
:.
81
try plugging the VCR into a different wall socket.
Positioning Speakers .to Avoid Interference
i ., ‘_ .‘,(.’ I.,. ”
-_
I<
., j..
Placing external speakers with unshielded magnets too close to
I I
q
’ the TV may result in the speaker magnets affecting the quality
_I_ . . . .
Pluqg!nPoyerCords .: ,. , ,
,.
of the picture. Such speakers should be located at least eight
‘/“’ ‘,
$ Do”not,plug any power iord into a iall outlet until~you are. ‘.
‘. j,
inches away. ‘_’ ;, : .,. ..,
.” :,
.
.’
-‘i /finished making conne&ons. ‘. “: ~
L ,
If unshielded speakers are too close to the TV, colored streaks
. .
’ - Many components have ‘“donvenience ‘outlets” on their back
will appear along the sides af the picture. If this happens,’ turn
panels so ‘yo,u can .plug power cords from other components into
off the TV for several minutes while moving the speakers’
; ‘.
a “ConvemenCe outlet” instead of a Wall outlet. Usually these
farther away. Then turn the TV back on.
i .,
outlets will be labeled either “switched”.or “imswitched”.
l
If the outlet is habeled “switched”, that means power to the
i :
outlet will be switched off when the component’s power button
.,
!isswitchedoff ,, ,L,,
. ,(, !
‘4 If the outlet is labeled “unswitched”, that means power will
always be available at that outlet, even, when the component is
~~‘$unedoff. I*, ’ ’ ,
.’
Depending on the size of your system, you may prefer to use an
j ‘1
: extension cord or a, “multiple adapter” to get enough outlets for
.,/.
I., allyourc&npone&.“, ’ ‘, ’ _.‘;I .,, ,, -, _
I ”
;. : ,
”
,I, ., , ;-
‘,, .,
;
,.
i, ., 1.
4
\‘, :,,/,
,,a’.
1’
~
,, ; _
,.
\
‘- “,,!,2.$j ._I:: ;, g ,:. _’ :- ’ ’ ”
.. :‘ ,,’ ,’
;-, ,’ ,,
:
, ,,a:::. ‘/
j I,_ \_)j’ ’
: j , \
Page 31

SELECT Q,UT
Jacks-provide fixed-level audio and vidko, :
output from ‘whatever is displayed on thi TV screen (see notes
below). Provide audio and videq sigh& suitable for ,: :
recording. .’
2 ‘. (
Can be used for several applications such as:
l
VCR editing w&h two or three VCRs (page 36).
: ,,
l
recdrding TV programs onto a camcorder (p?ge 39).
l
recording cable-TV programs onto a VCd that is not cable-
ready (page 36). ’ j
l
recording audio onto an. audio 6Msett.e tap recorder
Note:
_ l Remember that whatever y& want to record must be
displayed bq the TV screen &ring recording.
l
Video iignals from the S-VIDEO connector can not be
recorded from the SELkCT OUT VIDEO jack.’ To
record from an S-VI-IS component conneqed to the
S-VIDEO connector, you must also connect the video
cable td the VIDEO INPUT 1 jack and thep select
channel 91 on the TV screen.
*‘On-screen displays,such as menus and status displays
/ / 1 .
1 cannotberecordedfrom.thisjack. :
l
Specml features such as pzture-m-picture @n not be
0
1
EXTjUtNALSPEAKERS
Terminals-permit
direct
connection of au,xiliary speakers. Connection details are
ori page 41.
INPUT
2 Jacks-provide for direct co&e&on of video devices
(like VCRs) or compatible home computers and TV games
with irideolaudio outputs.
:
.
0
6~
6~ To see the Signals from a device that is connected to the
2 CABLE/ANTENNA
Connectors-used
when attachitig
00
INPUT 2
jacks: tune your TV to channel 92.
c
either a home
antenna or a ‘cable-TV system to your TV.
Con&&on details qe on pages 30-32.
'INPUT Z
Jacks-provide for direct connection of video,devices
(like VCRs) or co$patible home computers and ,?V games
,O
‘I /
3
ShEbiER
Switch&hen LOU connect additional speakers
with video/audio outputs.
to the EXTERNAL SPEAKERS
&ninals oti the TV, this
0
7 To see the signals from a device that is conne&ed JO the ,I :
switch lets you bptimize the sound for thespeaker location
ZNPU?Ij@cs,tune~otiTVtochqumel~l’. .: “‘,‘/r,L: ‘,:
you choose. ’ ‘)
I.
S-VIDEO
Conk&or-provides & direct &VHS ;i&& 1’:
l
If you place the speakers on each side of the TV, put
Con&&on from S-YS VCR or camcorder..
- I’ .:
switch in
EXT
position. If’the left side of the switch is
labeled
EXT,
the internal audio from the
TV’s speakers
Remember to also connect the S:VHS VCRs or &n&$&‘s
will be muted.
audio jack(s) to the TV,s
ZNfuT 1 LEFT
and/or RMONQ
audio jacks. This is necessary because S:.Video cables bnly
l
If you place the speakers behind the viewer (at the back ,
carry the suIjer video (picture), not the audio signal.
of the ropm), put switch in
INT/EXT SURR position. ’
This maintains’ normal voluine level of the TV’;
Connection-details alre on pages 36 and 39. .*’ 1,
Signals from S-VHS devices connected to de TV’S’
‘,
intemai speakers and a surround signal to’rear
speakers. ‘-
S-VIDEO
con&&or and INPUT I audio jack(s) c@ be viewed
by ‘pressing the TV button followed by 9 then 0 09 the rehote
l
/
Details about connecting speakers to t@ TV are on
page43. ,, ‘,,
Not&
If you w&t to use the SELECT OUTjacks,~ren&nb&
to also connect the S-VHS component’s regular video cable
IMPORTANT: Always place &itch in
ZNT/EXT
to ‘the VIDEO INPUT 1 jack, and th&! “?e to channel 9 1..
.,
^.j
SURR Ejosition if no exteinal’sp&ke~ are us&d (or if
external speakers are ever diqcoqntited). ‘, .; ’
0
8 cqntrol-(or, by &aiming & W, chain@ 90 if ybu hq$e, add@
“90” to chwiei memory as Pescribed on page 2&. ‘, ,_ /
.,
,-,
.- \
,’ .I
. .‘,
i,
/
. . ’
/,
:
!.’ . . I; .,.
/” ‘L”:,. ;, _, ,::
.
Lt.‘,.. ‘1
)\ I : :
,’ -:, ..,__,
,.-
‘_ _, ‘,
,’
;’
i, .,
,,I ,
.’
:
: 29
:
‘.
I
, .’
.
. .
Page 32

Follow one.of the steps below to connect an indoor or outdoor antenna to your, TV (only if you do not have a
cable-TV system),
you can connect the antenna to either Fii or TB as explained on page 25.
A’
1
If the antenna cable coming from your home antenna is a.75-ohm,round coaxial cable that carries only VI-II
F (charm
BACK
OF-IV
I
I only UHF (channels 1469), or VHF and UHF channels, connect it to your set like this:
I
!
:ONVERTER
.’
’
~ Incoming
Cabte
From -
! Home
Antenna
.,
VHF& UHFOnly ,
or
VHF/UHF Combination
,-OR-
.
’ B
If the-antenna cable coming from your home-antenna is a 3i)O-ohm flat twin lead that carries only VHF (channels 213),
only UHF (channels 14-69), or VHF and UHF channels, connect it to your set like this:
CABLE/ANTENNA
ANTA
Incoming
ANTE
Cable
------___
From *
Home
---_-----
.Antenna
VHForUHFOnly
or
“’ I
CONVERTER
BACK
OFTV
VHF/UHF Combination (such
as
RCA #193983)
-OR-
j
C
If the antenna cables coming from your home antenna(s) are a 75ohm round coaxial cable that carries VHF (channels 2-13)
and a 300-ohm flat twin-lead cable for UHF (channels 14-69), connect them to your set like this:
---
.’
Incoming
Cables
_----
.-
From -and, ,
Antenna Mixer*
Home’
(such as RCA #197551) i
_ Antenna(s)
,
-OR-
BACK
OFTV
\
. :
.D- ’
If the antenna wires coming from your home antenna(s) are two 300-ohm flat twin-lead cables as shown here, connect them
to your set like this:
/
i I_ .
I
-.
Incoming
-.
---_
Pushon
____---_---.
-.
---_
Cables
“-4 ---_
From __) and
Home
__----
-A
Antenna(s)
VHF
_/--
_/--
Antenna Mixer*
-
(such as RCA #193984)
BACK
OF-I-V
.,‘,
‘_ ,Note: Be sure to connect the Ul-@ antenna cable to the UHF screws on the”
aa
. II
’ ’
I IL
muvcarra
,’ Antenna Mixer &rd the VHF antenna
--. . _ -. . -. .
cable to the screws marked VHF.
‘,
,
, ” .; .
‘:..
‘,
,‘, 1.. ‘.,
;. ,’
*. optional accesscries are available from’ m&t dealers or electrouics sudply stores. ‘,
,,
‘,
_/ ,. ’ ‘. , :
j ” ‘; ._ .:.
._
_’
., L 1
,
1
,’
’
Page 33

&low one 6f these steps to connekt a cable-TV system to your TV instead of a home antenna.
Sitice’cable-TV systems vary, yog may wish to consuit your local cable-TV comp&y for additional Mormatioti.
kou can conn&the cable-TV systemto either wlA or ANTb as explained on page 25. ’
A
Follow thisdiagram if your cable company does not require a converter/decoder box (no scrambled channels):
_ #
’
CAEWANTENNA
*
/, ‘,
(’
,
\‘.. ,’ : /
,.
lnfqomlng
_/--
,1;
Cable .‘.
B
/
.Follow th& diagram if your-cable company requires a converter/decoder box that can’be controlled by remote control.
Most brands of remote-controllable boxes can be controlled by the remote that came packed with your/l%
De&ls for programming your TV’s remote to also control the converter/decoder box are on page 33.
See diagram D if you-want ‘to connect a VCR.
c
:ABLE/ANlENNA
f
CdNVERTEWDECODER BOX
Remember to tune your TV to the
output channel of the converter box
(usually 2,3, or 4) when selecting
channels via the converter box.
BACK
OFN
C
Follow this diagram if your cable company requires a converter/decoder box that cannot be controlled by remote control.
Scrambled Cable-TV’Channels .
--_ ‘\
(Converterfhcoder)
:
Some cable-TV decoders require that you manually switch .j
‘.
‘i, :fr
om.regular to scrambled channels on the decoder
’
Whenever you wish to view the Rremium pay channels.
1,
/
By connecting the decoder to the ANTA input and
CONVERTER output on the TV as shown here, you can
switch between the scrambled ‘and unscrambled channels
using the remote control.
To change the incoming signal from ANT A tb ANT B,
simply press the AiVT (Antenna) button on the remote. Each
time you press the m button,‘the channel numbers will
change color on the screen to show which antenna signal
you are watching.
Incoming
CqbJe
,
I
CAELE/ANTENN
Coaxial Antenna Cables*
.
. j
-.: ).:
Nonscrambled cable channels will, come thru the ANT B input
: ,J.,.
-.whenever the i&&e1 numbers a&yellow. The scrambled
.,i
*.,,;-,,,
) ./ ‘,,
/’
,.,,* I
‘- \
,~ . .
._
chaneei
from the decoder box will come thru the ANT A input
:
,
,: .
‘_.
‘,‘>, : -,
,,
! /j
whenever the chhan&l numbers are blue.
Be sure to-leave the
T@tiOnid
accksibdes a& akilable
from most
RCA
dealers and
’ ‘-5 ,‘.,.:‘: ‘, .: j+p~cs ~upply’~to~~s. ,:\Y ;’ I
_, decoder box set to the scrambled channel, and remember m
;.
>
i ., .I ,,,‘.
(
.’
,t@e your TVto,the output charmed of the converter-box’ I-_
;._
j
’
~
i
_ ‘. I
j,_
:. ,\
“,
, .5(
Page 34

_’
’
_.
/ D
,a,, y_- .,
1 ‘,
Follow this diagram if your cable company requires,,a converter!decoder box for premium chmels and you also want
to --
,
., “_
.’
_ ~_
; .‘; / .’ cony+ a VCR.
I.
,
; y”‘as.y s-w,.I.m..” ““I.“_
_--- _
i
’ (such as VH89)
.:. I
‘.
.’
f=z7n ‘.
‘-.
OUT J
-.
eoNvmtvoE&oER BOX
Remember to
tune
the
VCR
to the output channel
of the converter box
BACK OF VCR
(usually 2, 3, or 4). J
char@ as the position of the
VCR’s CH3EH4 switch.
(usually3 or 4)-the same
only require the box for scrambled premium channels like HBO or
~
Showtime. All the other cable-TV channeks can usually be viewed
&hout the converter box. Therefore, by using a signal splitter, you
can send the incoming cable-TV signals directly to the TV and also
thru the converter/decoder box and VCR as shown above.
You can easily switch between the .signals’ coming into the ANT A
jack and the ANT B jack by pressing the ANT buttonon the remote
control.’ The channel numbers will change color to let you know
which antenna signal you are watching. When the numbers are
blue, you are seeing the ANT A signals.
When the numbers are
.,
Most cable comnanies that reauire use of a converter/decoder box
.
Note:
If you have a stereo VCR, be sure to also connect the
AUDIO and VIDEO OUTjacks on the VCR to the AUDIO and
VIDEO IN jacks on the TV as shown on page 35. These
additional audio/video connections are required for picture-in-
I’
picture operation and for stereo playback from the VCR. To see
the signals from the VCR that are going into the INPUT jacks,
select TV channel 91 if you connected the VCR to the. INPUT I
jacks or select channel 92 if you connectedme VCR to the
INPUT 2 jacks. Select TV channel 90 if you have an S-VHS
VCR connected to the TV’s S-VIDEO connector.
/ yellow, you are seeing theAZWB signals:
., ,.
.:
” .,
,.
.i
’
The cable-TV charm&s that are not scrambled can then be seen ’
. .I
_‘.
_
whenever’me TV is receiving the ANT4 signals. The cable-TV ’
” ,
J I_
:: ’ -“,channels,~~t_t~.$crdmb;led’cad~~n~~~n’~’thecoh~e~rbox” ’ ‘.. ” I.,’ .”
~.
” :: “..
‘L.
. ,
‘_
and then thru the VCR Whenever the TV is receiving the ANT B ,
.~
,signals.: Most VCRs will feed the signal thru their antenna jacks
!. ...
I
even when the-VCR is turned off. This allows you to watch
!
scmmbled charmels from the converter box without having to turn
,
I
j ontheVCR.
;
I.
This connection can be useful because it wili let you record a
scrambled channel on the VCR at the same time you are watching a
non-scrambled channel thru me A@ A jack on the TV.
/ For p#ure-in-picture viewing, be&reto also connect the audio and
.-
video cabies from the VCR to the TV as shown on pages 35-36.
“X
I
The VCR must be turned on and tuned to the output channel of the
,’ &ctronics supply stores.
.
;:
,J
i.‘,.:.. j
‘.
_I ,
,’
*
‘. .J,,’ ,, -’
,.‘_ --.
.,
‘,
1,
I
!, 5”
:
/ ,‘;!,:i -1. ‘, I
I
32’
i
.j
.<
!
., ‘_.
( : :’
’ \
\
Page 35

StandardVHS VCR (Not S-VHS)
’
:
(These c&&i&s allow. y&u to recod TV prograid hnd play b&k tap&;) .
.,
_
\( tiferred M$thqd
‘(
for Areas +fh’ :;
.‘G,
2-Way Signal Splitter**
GoodRe&ptioti,
.z : :’ ,, ,:~ .‘l_: . :. .:
/
(such as. RCA #VH47)
Coaxial Antenna Cgbles**
(such as RCA #VH89)
Back of VCR
I
** These optional accessories
.i
.,
(ok AHM7-2-way splittei, iwo.
AHO65G-gntenoa cables, and one‘
AHO77G-audio/vid& cable) are
avtilable as a kit urider #AVHSOO.
‘shown here is the’preferred method’of connecting a,VCR to
your TV. This method uses a 2-way signal splitter to run
separate signals to the VCR and TV. This way you can view
eith& TV programs or VCR tapes and not be concerned about
; the position of the VCR’s
ZWVCR
switch..
Note: When connected this way, the’audiolvideo connections from the
VCR
to the TV are required in order for you tti watch tapes being
played by the VCR and for picture-in-picture operation.
-_
->
.
.,
: ;
/
Operation:
‘.
l
If the VCR is connected to
INPUT 1
jacks as ihown, select
’
channel 91 on the TV to view whatever the VCR is playing.
l
If you connect a second audio/video device to
INPUT 2,
select
channel 92 on the TV to view whatever the secorid device is
playing.
‘.
., , >.’
_
Note:
you can programyour TV to automatiklly select the proper VCR input cQaqnel(9.1 or,!?) yhen you press the
VCR I
or.
: :
7
I(CR24LJ button. Details v on’page 26.
*:, ,
; . .
,, _; . ‘:, (
.,,
-._ :,.,
,
,_ .,
.,
. ,. j 2 i’:,:,, ‘,
:,
*
.
,, >’
;.; \.’
.
I
.’ ,.,.
.’
i ‘,
Page 36

I
I
,
j
‘,
/
! ,
I
Sim&fied Method
BackoflV
1
Audio/Video Cab1
such as RCA NH40
Coaxial Antenna Cable*
4--
(such as VH89)
l
If the VCR is connected to
ZNPUT Z
jacks as shown, ,select
channel 9 1 on the TV to view whatever the VCR is playing.
* Optional accessories are available from most RCA dealers and
electronics supply stores.
Note:
You can program your TV to automatically select the
proper VCR input channel (91 or 92) when you press the
VCR
I or
VCR2*LB
button. Details are on page 26.
‘j
_
:
i
,-
,
,.T’
Page 37

.’
Sgechl’Recording onto VCR
, \ ‘I
,,-
. ’ (This c,o&ection only allo& you to record on the VCR~
., ,“. .,
whatever is cu&@~ be&g displayed OIJ the TV screen.)
,’
This is n6t a commQti afiplic&ion for
recording with your VCR, l%t you may
Back of VCR
backof TV
’
find it useful in certain &u,ations.. ,J’his
, connection will let you record dnto *e
,
VCR whatever is being displayed or! the
TV screen such as a TV program. You’ll
also be able to record signals from
another VCR (or similar device) that is
connected to the TV’s INPUT’1 or 2
jacks.’ , .
The TV must remain turned on during
recording. If you change channels on the
(such as RCA #VH40)
TV, the channel change will be recorded
on the VCR tape unless you pause the
VCR during recording.
&cause your TV is cable-compatible, this
application may be used to record cable-TV
progqms from the TV pnto a VCR that is not
cable-compatible.
You may also want to use this connection to dub or edit VCR
tapcs wi& two or three VCRs. By co~riectipg one VCR (or
camcorder) to the INPUT I jacks and another VCR (or
’
~camcorder) to the INPUT 2 jacks, yqu’ll be able to selectively
edit and record whatever is playing on the TV screen onto a
third VCR (or camcorder) connected as shown here to the
SELECT OUT jacks.
’
To see the signal from a device connected to the INPUT 1 jacks,
&lect channel 9 1.
Select channel 92 to see the signal from a
device connected to the ZNPUT 2 jacks.
Notes: Signals from the
S-VIDEO
connector do not come thru the’
SELECT OUT
jacks. To record from an S-VHS $oinpo?ent,
remember to also connect the regular video cable to the
VIDEO
INPUT Z
jack and then tune to channel 91.
You will pot be able to record the picture-in-picture inset picture
or any of the menus or status displays.
/
S-VS (Super VHS) VCR
S-Video Cable (such’ as RCA #186008)*
/,
’ (This connection allows you to record
Y
TV programs and play back tapes.)
;.
-, /.
Audio/Video Cables*
/
,-
/ :
(such as RCA
,
’ #AH069G) \
h ‘.
. . .-.,, . . .
Cable
Back of VCR
, \
\
Shown here is one method of connecting your S-VHS VCR to
yak
TV. Connect the S-VIDEO OUT ionnectdr on the back of the VCR to
Note: Reme&er to a@ connect the video cable for picture.
thk S-VIDEO cqnnector on the back of your TV using an S-Video
in-picture viewing or if you plan to use the
SELECT OUT
cable. Remember to connect the audio cables from the VCR to the
jacks for recording. When recording from
SELECT OUT
,ZNPCJT 1 ~L&Z’T and R@ONO jacks qn the back of the TV.
The S-
jaqks, tune the TV to channel 91 to see the signal from the
Vided qal$q car& only video.. :: ,
:, S-VHS VCR. When displaying ,picti&-picture, the TV
Operat)on: If the S-VHS VCR’ is com&ted as shoti above,
autoinatically tinimizes any annoying difference? in tint
between the small and large picture by electronicrilly
‘/,
.tune t& TV to chadnel’90 to tiew ,whatever the VCR
is playing. The
,I
&cl S-VICE0 will atipe&?n’& TV when you select Channel 90. I
-. . ,_
. 3s
i
,
., ,.
/ ‘;
I
“,
. .
,
Page 38

The digital remote control that came packed With your TV
and which VCR by the
VCR2.W.
button. Other models have an
controls your TV and’up to two compatible RCA VCRs.
g. on-screen,menu that lets you determine if it will be controlled
by
j ; To control’a’compatible.RCA VCR, first press the
VCR1
or
*
VCR1
or
VCR2*W.
Additional information about controlling
/ : VCR2.W
button to put the remote in the ‘VCR mode”. The
txiq RCA VCRs is in the note on the next page.,
: j buttons shown’below, will then control.the VCR.
If.you have another brand of VCR you can probably also
I
Selected models of .RCA VCRs have a switch that lets you
program your remote to control it. “Details are on the next page:
; ; determine which VCR will be controlled by the
VCR1
button, _
I ,
1. :.
‘.
a
/
!i’
-\
VCR1 and”VCR2 Buttons
>’ ,
.’
l
Press to turn on VCR and put remote m“‘VCR Mode”.
;.
l
Press the TV button to put remote’ back mto “TV Mode”.
POWER Button
F%ess to turn off VCR.
) Rti
PLAY .FF
REC STOP PAUSE
mElaLl
1 2 3
4 5 6
7 8 9
(.)SRS
.o
REW (Rewind) Button
l
Press while VCR is stopped to rewind tape.
l
Press while VCR is playing to search backward.
-,
x~
CLAY Butt&
Press to start tape playing,
’
FF (Fast Forward) Button
l
Press while V.CR is stopped to fast forward tape.
l
Press while VCR is playing to search forward.
REC (Record) Button
Press to record.
STOP Button
Press to stop whatever VCR is doing: Playing, Recording,
Rev&ding, or Fast Forwarding.
_ ;
PAUSE ]rutton ,, 1
i Press to pause play or,record mode.
\
l
Press again to release pause.
,;,’ _’
1
‘a DISPLAY B&on
:
Press to bring VCR’s displays to TV screen.
.:
.’
CHAN (Channel) Buttons
,
Press to select
the
next higher or lower channel inVCR channel
memory.
Number Buttons
* Press two numbers to select channel.
l
Press a “0” before a single-digit channel number.
\.
Notes:
CLEAR Button
Used when setting the VCR’s clock and timer.
, /
.;
1 ’ ,* , ., , ‘.
‘;
,.
,’
: L
t /
*‘The six VCR,buttons‘grouped together (PLAZ PAUSE, ‘.
STOI: REWIND, Flj; and kECORL)) cant@ the VTC$‘evt?n
if the re%ote is in *e’fW I&de”. ‘,
l
The ANI: MEh@PROG, CLEAR, and DISPLAY bukohs
are for~RCA.VCRs only. , ,
./’
-’
(
,.., ;‘:, .._ .._ .,
,.!
),, ,.,>
I
I
.,,,: ,I., ;. _ ‘:’ )I , .,” _., ;.,; I _
,. , _‘., _. !, .
~MENDPROG Button
Used when setting the clock and programming the
.
,. .-
timer.
ANT(Antenni) Button
Same as
VCR
or
flI?7VCR
button on front of VCR.
. .
,I ..’ : ‘, ../’
<(,? 1; . . ,,-. ,. ::, . ,, ., , j’
.~
Page 39

The digital remote control that came
hogramming Remote To Control Other Brands of VCRs
(. I
packed with yourTV controls your TV
-. ;’ and up to two cornpatible.VCRs,. including
most models the brands listed below.
,’ To program the remote, press and hold
’ VCR1 (or VCR2;LD) and the two-digit .
Not& Some older VCRs do not have an
ROWER
switch on their remote‘conttdls
code number for
your brand
of VCR.
iotes ‘About Controlling Two VCRs
This remote can control two VCRs
independently as long as each VCR operate!
on a different.remote transmitting~cocle.
Some newer VCRs are,capable f working
on either’of two remote codes. These VCRr
have either a switch labeled VCRUVCRZ
or
an on-screen display titled REMOTE
VCRUVCR2. You can
then set your new
VCR to respond to the remote’s VCR2eLD
button and your older VCR to respond to th
VCR1
button.
Some older VCRs’have a
NORM/UNIFIED
switch that can also respond’ to either the
VCR1
or
VCRZ-W
button on the remote.
Place this switch in the
UNIFIED
position
for the VCR to respond to’ the
VCR1
button
or in the NOR&f position for the
VCR2*LD
button. In the yORh4 position, you must ,,
program the
VCR20W
button to respond to
code number, 05.
If neither of your VCRs have switchable
‘code capabilities, you still may be able to
use the
VCRlNCR2
feature to control two
VCRs of the same brand since many older
VCRs use remote codes that are different
thti newer VCRs. ,You may want to
experiment to see what works with your
particular VCRs.
,1. Refer to the chart below to find the :
code number that corresponds to the
brand name of your VCR. Keep,
this number in mind.
If more than
. one number is listed, you may need
to try each one separately until you
find the one that works.
2. Press and hold the VCR1 or
VCRZ*LD button on remote
(depending on which button you
and cannot,be turned on and off remotely.
If you have this type of VCR, you can test,
the code number by pressing the
CHA& :,
button instead of the
POWER
button.
Make sure the VCR is @ready turned on
’ when you test the code rinmber.
want to program for that VCR).
You can program each button to
control a different VCR.
3. Press two number buttons (first one,
then the other) to enter the code
’ number for your brand of VCR.
Note: You must press the two number
buttons while holding the
VCR1
or
VCR2*LLI button
r
I-
Operating Notes: ‘,
After the remote is, programmed, it will turn
‘on the VCR whenever you press
VCR1
(or
VCR29W)
and then
POWER.
Some VCRs
turn on automaticallywhen you press ,
VCR1
or
VCR20W.
You’ll be able to control the VCR whenever
the remote is in the “VCR mode”. To put
the remote in the “VCR mode”, press the
VCR1
or
VCR2.W
button (depending on
which button you programmed),. The other
VCR buttons (such as
PLAY, PAUSE, STOP
REK FE
and @EC)‘will control the VCR
when the remote is in the “VCR mode”.
To turn off the VCR, press
VCR1 (6;
VCRZ*W),
then
POWER.
‘. To change channels on the VCR, press
VCR1
(or
VCRZ*LD),
then
CHAN
up
or down.
. .
--
Aiwa ” ...
.......................................
:&..15
: ;Akai, ,..03.17.22.23.63.6 6 .......................
.. Audio Dynamics
.......................... .14,16;
Broksonic
......................
. ................ --10 .. ...!
Candle.. ....... ;.;. .... .07,09,13,44,45,46,52
Canon ................................. . .......... 08,53 i
Capehart.. ...............
. ..... . .................... .Ol
..
Citizen .... . ~07,09,13,44,45,46,52, .............
Craig.. ............... . ........................... .07,12
Cptis Mathes.;. ...............
.00,07,08,14,1
.....................................
5 44,46,53,64,67 ,
,dbx.. .............................................. .14,16
Electrohome
....................................... 27
Emerson ........ .08,09,10,13,15,20,23,27,
‘34,41,42,47,49,57,62,65,67,68,70 ..........
Fisher ...................
.02.12.18,19.43.48.58.
Funai ......... . ........................................ 15
GE
......... . .... . ................. ..00.07.08.32.5 3 .
Goldstar ...... . .... ........
,.:Hitachi
.: ..,a.. ::...09.14.46.6 0
................. . ..... .‘;.
JCPenney;
...... ..05.15.35?3 6
... . .......
.1........02.OS.O7.08.14 .l
i
.......... . ............... i..
... . ............ 6,30,35,X,53
4. Point the remote at the VCR and
press the POWER button to test the
code number. If nothing happens,
’ try pressing VCR1 or VCR2*LD
(whichever button you are
pwsr~g).
l
If the nght number was entered, ..
the VCR should turn on.
l
If the VCR does not react to the
remote, repeat steps 1 thru 4 with
another code number.
NC .......................... .02,14,16,30,46,74 ,,:
Kenwood
.02,14,16,30,44,46
”
..................
Magnavox .L., ..;. ... . ....... . ... .08,29,53,56 :
Marautz
.... ...02.08.14.16,29,30,44,46,6 1
Marta.. ..................... . ........ . ................
,09. :
Memorex..
” MGA
..................... !. ... .08,09,12,15
.
............................................. 04,27 4,
Minolta ........ .................................. .05,35
Mitsubishi
...................... 04,05,27,35,40 :
Montgomery Ward ............................ .06
Multitech.. .......................... .07,15,31,32
NEC.. .02,14,16,30,44,46,59,61,64 .........
Panasonic ............................... :.08,53,75
Pentax.. .... . ...............................
.05;35,44
Philco ....... . ......................... .08,29,53,56
Philips ........................................... 08,29
Pioneer ........................ . ,.05,16,33 .......... :
Proscall ............ . ........ ..‘....................... 00
,‘.Quasar ” ........................... ................. 08,53 _,
JtCq.. .00,05,07,08,28,35;37,54,69
’
........
Realistic..;..:.: .:. .........
. .
,..~02.06,08.09.12 .l
.......................... ................. ., 5,19,27,43,53
..... .,I ., “: ,, ‘,/
You may need to reprogram the remote
when you change the batteries. Try not to
press any buttons when changing batteries.
,~ -~
Samsung ......................... 07,13,22.32,42
1, Sanyo.. ..................... c .......... .: *.........
02,12
... .$cott...:; . ..I..
............. . ....... @l,q3,41,49,68
2 Sears ....... ..a .. 02,05,09,12,18J9,35,43,48
Sharp.. ..... :...;;:. .......... . ... .06,24,27,39,45
Shintom.. ..... . ...................... _( .17,26,31,55
Sony ........................................ .17,26,38
Sylvania.. ...... . ................ .08,15,29,53,56
Symphonic .................... ‘i.. .................. ;15
‘Tashiko .... , ......................................... .09
Tatung .. . .... ,: ..:. ............ .; .................... ;30
Teac..:...l.;..:: ..:. ..... :., .......... i.. ... .15,30,69
Tecnics
.:.
............................................ 08
Teknika.. ............................. .08,09,15,21
,-Toshiba.. ............ . .... . ...... .05,13,19,48,49
Vector Research ...................... .14,16,44
Video Concepts ...................... ..14.16,44
Wards ........... :..,.:. ... .05,06,07,i)8.09,12,
....................
. ............. ,.13,15,25,27,31,35
-y&ha ‘,,
.................. . $. .......... 02,14,16,30,46
_- Zenith .......................... . ....... .11,17,26,72
.........
...
..
‘.
NO+: ,Refer to the information sheet packed with your remote control for the latest list of brand~narnes ti codenumbqra;, Because this list is cdnstanng growmg, me
information she&packed witi your retnote control tiay be a later ‘version of ihis list ani contain additional brands and/or code numbers. 1 ’ ; ‘, .‘I “’ : 2 *
_
. ‘,
‘J
J
3?
\
1 *
..! I.
Page 40

S-VI@ or Standard VHS Camcorder
;;
(This connection allows $0~ to olav back taoe& in the camcorder ‘and watch,the& on the TV.1
S-Video Cable
(sometimes a separate cable
HvIouTesLEcloul --.
that attaches directly to camcorder)
AVOfJTJack
,A.*rlinn,iAan A
(Usually Supplied
with Camcorder)
i
An S-VHS or standard camcorder can be connected directly to
your TV. If you have an S-VHS camcorder, connect the
S-VIDEO cable to the S-VIDEO comiector on your TV: If you
have a standard VHS camcorder, connect the video cable to the
VIDEO INPUT Z jack ou the back of your TV. With either
video connection, attach the audio cable to the INPUT 1
ZUMONO audio jack. ’ .
‘Operation:
l
If the camcorder, is connected to the VZDEO INPUT 1 jack
(instead of the S-VIDEO connector), select channel 91 on the
TV to view whatever the camcorder is playing.
l
If the camcorder is connected to the S-VIDEO connector and
INPUT Z audio jack, select channel 90 on the TV to view
whatever the camcorder is playing.
Notes: When the adapter’s S-Video Cable is connected to the
S-VIDEO
connector, the
video
plug
does not have to be
connected. .However, you may prefer to plug it.in anyway to
keep it out of the way. The S-VHS video ‘will automatically,
override the VIDEO INPUT 1 signal when you select Channel
90. Be sure to connect the video cable, however, for picturein-pjcture viewing or if you plan to use the SELECT OUT
jacks for recording. When recording from the SELECT OUT
jacks, tune to channel 91 to see the signal from the camcorder.
When displaying picture-in-@rue, the TV automatically
minimizes any annoying differences in tint between the small
and large picture by electronically coupling the S-VIDEO
input to the VIDEO 1 input.
S-VHS or Standard VHS Camcorder
(This connection allows you to record onto the camcorder
whatever is currently being displayed on the TV screen.)
\ ‘.
AV IN Jack
(Audio/Video In) I
This connection will let you record onto the camcorder whatever
is being displayed on the screen such as a TV program. You’ll
also be able to record signals’from a VCR (or similar device)
that is connected to the TV’s INPUT 1 or 2 jacks.
Note: You will not be able to record the picture-in-picture inset
Dictumor any menus or status disdavs.
\
,The TV must remain turned on duringrecording. If you change
channels on the TV, .the channel change will be recorded on the
camcorder tape unless you pause the camcorder during
.
recording.
,
i.
You may also want to use this connection to dub or edit VCR
tapes with two or,three camcorders (or VCRs). By connecting
&, ’ one camcorder (or VCR) to the ZflPUT Z jacks and another I,
camcorder (or VCR)‘to the INPUT 2 jacks, you’ll be able to
“. ”
/
38
,~
selectively edit and record whatever is playing on the TV
screen onto a third camcorder (or VCR) connected as shown
, here to the SELECT OUTjacks, .
If you connect a surveillance system to your monitor, you’ll be
able to record,what the camera is displaying on the TV screen
by connecting a camcorder (or VCR ) to the SELECT OUT,
jacks as shown here.
To see the signal from a device connected to the INPUT 1
jacks, select channel 91. Select channel 92 to see the signal
from a device connected to .thiz INPUT 2 jacks. ,
_’
\ /. ‘.
‘. -
-.
., :
/,-: ;
-,
,.’
., ,.
) _..
Page 41

Computek and Other Equipment with Audio/Video Outputs
\’
@&& ‘,.
HI-R OUT ‘SELECT Qti
@,L.@ : I
Your TV can also be used as a display device for’ many video
games and home computers. If your game or computer has a
normal NTSC (American Standard) VIDEO, output, it can be
connected to them,
the computer to the
connected directly to either the INPUT I or I&PUT 2-jacks
on
the TV ‘as
shown here..
’
If the computer or other device has monaural audio output
(only
one AUDIO OUT jack instead of L’and R), connect it to the
TV’s MONO jack. This will enable the TV to reproduce
the
sound through both the left and right speakers.
To View Signals From Computer
‘* If you connected the computer to the TV’s ZNPUT 1
jacks,
select channel 9 1 on the TV so you can see whatever
signal
coming from the computer.
.
If you connected the computer to the TV’s ZNPUT 2
jacks,
select channel 92 on the TV so you can see whatever
signal
coming from the comt>utrx.
ORTVGAME
\
Audiol\jideo Cables
(such as RCA
#AH069G)
.
/
-.
. .
~ ‘. \
,
Page 42

j .’
. A~lifier or Cz&ette Tape Deck
/ .
\
,”
BackoflV ’
’
;- ’
kydi@id& Cables*
). ,-: ‘..
\ _
(such as RCA AH069G)
_
_”
/
/
~~
If your stereo amplifier is not part of a “system” that has its Connedion:
ovirn remote, connect it to the TV as shown here. Connect the “L” and “R”
HZ FZ OU?jacks to
the-corresponding
input jacks on the stereo amplifier (such as
AUX, TUNER,
or
CD).
Note: If the stereo amplifier is part of a system that has its own
remote, you
may choose to connect it to the TV as shown
below
Do not use the
PHONO
inputs. If your amplifier is not stereo
(mono), connect it to the TV’s R&ON0 jack. Consult the
. using the SELECT OUT jacks.
amplifier’s owner’s manual for the manufacturer’s recommended
With the connection shown here, you’ll be able to change and
hookup.
mute volume with the TV’s remote control. You’ll also be able
Operatiqn:
1
to remotely control bass and treble functions.
If desired, turn off TV’s internal speakers as described on page 11.
. . Adjust the amplifier for normal listening.’ Then control sound with
:
Audio Cassette Recorder or Amplifier
the
VOL
and
MUTE
buttons on the TV’s remote.
,. j
i
./. i \. ,,’
.,.
.,
.j., : ’ ’ ,,
Back of lV
Audio/Video CabksP
(such as RCA’#AHO69G)
I
’ cA’~~~~~!?DER
,crEcx
If your stereo amplifier is part of a “system” that has its own
‘. remote control, connect it to the
SELECT OUT
jacks as shown
If your amplifier is not stereo (mono), connect it to the TV’s
I
here. The “fixedlevel” audio signal present at thesejacks is also
R/MONO jack. Consult the equipment’s owner’s manual for the
: !
I
‘ide’a for connecting an audio cassette recorder to record audio
manufacturer’s recommended hookup.
, from the TV This constant audio signal is not affected.by
:
Operation:
j :
pressing the
V+
buttons on the TV’s front panel or the TV’s
Select a TV channel and turn down the sound on the TV, or turn
I /
I’ remote control.-
/ ,
off TV’s internal speakers as described on page 16. Adjust sound
with controls on the amplifier pr cassette recorder. If the
Connection: ,’
j :s
amplifier or cassette recorder is part of a “system” that ,has its
C+n&t
ffEL.ECf
OUT “X” and ‘%” to the corresponding input
own remote, use the system’s remote to adjust sound.
b
:>I : ,: ‘jacks onthe stereo amplifier or audio cassette recorder.
, ’
i,
‘.
i.:.
.
. .
Page 43

The digital remote control that came
packed with your TVis.also capable of
controlling a compatible audio
component.
To program the remote press and hold
the AUDIO button and then enter the
two-digit code number for your brand
’ of audio equipment.
,Programming Remote to Control Audio Equipment
,.
., ,
1. Refer to the chart below tdfind the Operating Notes:
code number that corresponds to
,, After’tk
AUDIO
button is.programmed,,the
tfie brand name
of your audio
buttons described below will operate the
I
equipment. If more than one
_
basic functions of the audio equipment.
number is listed, you may need to
Depending onthe age, brand, model, and’ :
try each one separately to find the
type of audio equipment, some models may
6ne that works.
. .
not be able to respond to all the function
2. Press and hold the AUDZO button
buttons listed below. You will want to
experiment with each button to,determine the
’ on remote (depending on which
exact function for your component.
button you want to program).
3. Press two number buttons (first
.. one, then the other) to enter the
code
number for your brand of
audio equipment.
l
POWER: Press to turn on component.
Press,again to turh off. Some components
will turn on automatically when you press
this button., ’ _.
l
VOL: Press to change volume level.
l
CHAN: &Press to select the next higher or
lower channel in the component’s channel
memory.
l
Number Buttons: Press two numbers to
directly select a channel.
l
PLAY: Press to start component playing.
4. point the remote at the audio
l
.PAUSE: Press topause play or record. To
equipment,
and press the
POWER
release pause, press again.
., .
button to test the code number.
l
STOP: Press to stop whatever the .’
l
If the right number was entered,
component is doing: playing, recording,~
the audio equipment will turn on.
rewinding, etc.
l
REW (Rewind): Press
while comnonent
:* If the audio equipment does not
react to the remote, repeat steps 1
thru 4 with another code,number.
is stopped to rewind tape.
l
kF (Fast Forward):
Press while
component is stopped to fast forward tape.
l
BEC
(Record):
press to start recording.
l
ANT (Antenna):
Performs various
functions depending on the type of
-equipment. Experiment with this button.,
”
’ :
;
_
,
i:
Dime&a
RCA
03 ‘. 07
‘05
24
,03‘
07,43/M
05
.*’ ,
*
Note: Refer to the information sheet packed with your remote control for me latest list of brand
names and code numbers. Because this list of brand names is continually growing, the
information sheet packed with your remote control may be a later version of this list and contain
additional brands’and/or code numbers.
: :
‘-
. ~
Page 44

CautionDo not connect external spe&ers to more than one audio source at a time. You can connect ,a set of
sped& to either the TV or tie Amplifier but noi to boih at the same time.
to both the TV and the,amplifier, you.will damage your equipment..”
If youconnect the same speakers
, 3
. .
:
ji .‘.
i Connecting &e&e& ‘to Back of TV ‘.
‘-
, .’
* If you connect ti amplifier or receiver to your TV, connect ‘the
/
speakers to the amplifier jreceiver’instead of the TV
i :
Helpful Ehnts:
,” I.
4 External speakers. placed next to the TV will sound better the
higher quality they are.
; *-Very efficient small “bookshelf’ or “compact” sReakers will
give good results for surround-sound use.
l
Surround ,effect ‘can often be improved by experimenting
with rear speaker placement.
l
Surround-encoded movies (broadcast or tape) give the best
surround effect, but regular stereo and mono programs will,
also benefit.
If you do not connect an amplifier-or receiver to your TV,’ you
,,.. ?
can connect external speakers to the TV to enhance the TVs
sound.
,’ i
- \
!
The diagram below shows how to connect external speakers to
./
the speaker terminals on the back of the TV
1. Remove the vinyl covering and twist the wire core. *
/
!
2. Press’ and hold the lever down while inserting the wire core
into the hole. Be sure to connect (+) to (+)and (-) to (-) as
exthined in the note below.
I
3. Release the lever.
contact other wires or terminals.
touch each other, damage to components could result.
1%
1 ../ ; ‘,
” --The speaker $itch ontde back of the TV ‘allotis you to use the
’ .external,speakers two gays: ,.
T
, ,’
‘* To enhance the sound from the TV, place the speakers in the
front of the viewing area (usually beside the TV), and slide
the speaker switch to EXT. This provides full power to the
external speakers for a “fuller” sound. The internal audio
from the TVs speakers will be turned off.
: l To obtain a “surround sound” effect, place the external
’
speakers in the rear of the viewing area, and, slide the
I
speaker switch to ~NTLI?XT SUM. This provides full power
i’
to the TV’s internal speakers for the front sound and a‘
Connecting Speakers,,to Back of Amplifier or
Receiver
If you connect an Amplifier or Receiver to your TV, connect
the speakers to the’ Amplifier/Receiver instead of the TV.
Sound from the TV Will then come through the
Amplifier/Receiver and the TV’s internal speakers. You can
turn off the TV’s internal speakers with the SPEAKERS:
ON/OFF function described on page 16.
The diagram here shows how to connect external speakers to
the speaker terminals on the back of a typical
Amplifier/Receiver. Check the owner’s manual for your
Amplifier/Receiver if its speaker terminals look different than
those shown.
Notes:
l
After connecting speaker wire, pull it gently and’check that it
is connected securely to its terminals.
:
l
Do not allow,the wire core to protrude from its terminal or
contact other wires or terminal. If the cores of two wires
touch each other, damage to components could result.
I
/.
‘.
’ surroundsignal to the rear speakers.
~
:
.,
(‘_ I’
‘\
\!
,.
_‘. j..
,-I ,*. ,:,
,.>
I .., ,. ,,,i.. *.,‘, ,(i ;I .’ ‘1 r’ it ,.,
‘,
. . .
I
A’ .^
1
\ .. ‘,
~,
4i ,:-., ..: *’ / ..,,I :
!’
‘”
i.
\
i
I
_i
.( /* I.
!
Page 45

Troubles sometimes’ are caused by s,@ple “faults” that you can easily correct without the help of a service technician by fust check&
.I
a few basic remedies..
~
!
Before you call or take your unit to au Authorized RCA TV Servicenter, look below for the type of trouble you are expe@encing.
Then perfornr‘the simple checks-and adjustments
listed for that trouble.
.
TV will not turn on.
I,
Controls don’t work
-
:
Intermittent or no remote
Turns off while playing
/
Tbrns on unexpectedly,.
Alarm does not turn off TV at
’ ~
correct time
____
Blank Screen
i
\
,’
I
‘., ,,
:?
Black bars appear on the screen’
No sound, picture,okay, ,
,
No closed captioning
i. $’
/’
l
Maybe batteries in remote control~are “dead”. Try replacing batteries.
.* Maybe remote was not ,$imed at reinote sensor. Press POWER button on TV
l
Make sure power cord is fully inserted into back of TV. I
? -If using remote control, make sure remote is in “TV Mode” by first pressing
the TVbutton.
l
Try ,unplugging set for two minutes and then, turning ‘t on again.
l
Make sure power cord is fully inserted into back of T t .
~
.-
-
l
Maybe something-was between the remote and the remote sensor. *
.i Maybe the remote was not aimed directly at the component (TV or VCR)
you weie trying. to control.
. Maybe’ remote is not in “TV Mode”. press the TV button so remote will
control TV
l
Maybe batteries in remote are weak or dead. Try replacing batteries.
0. Maybe batteries were installed incorrectly. ,Try replacing batteries correctly.
l
Remove batteries and hold down one or more buttons for several seconds.
Re-install the batteries and try remote again.
; SLEEP TIMER function may-have been activated.
’
\
l
ALARM OFF function may have been activated.
l
Electronic protection circuit may have been. activated because of a p.ower.
surge. Wait 30 seconds and then turn on again. If this happens frequently,
the voltage in your house may be abnormally high.
l
Make sure power cord is fully inserted into back of TV
l
ALARM ON function may have been activated.
’ ; 0
1 Check ALARM ON/OFF function. Must be set to ON.. :
‘_ .I,
l
Check to,make sure CLOCK function is set<to the correct time.
b Maybe Channel 90,91, or 92 selected, but device connected to those
INPUTjacks is not turned on. ;
i Try another channel.
\
l
Maybe sound is muted. ‘Try pressing VOL up buttonto restore sound. ,
l
M,aybe TV’s speakers are turned off. Check SPEAKERS ON/OFF‘function.
l
Check position of SPEAKER switch on back of TV.
l
Turn on ,@e CAIfTZONZNG function.
;
I
l
TV program does not have closed captioning.
‘.
.,
:,,. ‘, ’ 1
.,, . . .‘, ..
~
:
‘.
.-
.’
/ ‘i
‘,-’ ‘,
.,
>
:
I,, ._,
,’ ‘.’
Page 46

Noisy stereo reception
,‘, ’
, .‘,_
-
!
No picture, no sound but power light
: ,ison ’ ~
.-1
-1
1 c
I
,
Sound okay, picture poor
Picture okay, sound poor
,
No stereo on known stereo station
/
,Can’t get two channels in Pix-in-Pix
/ ‘..
,No picture’ while using Pix-in-Pix,
,with S-VI-IS VCR or camcorder.
.,
-.-
Small picture does not have color.‘:” ‘:‘;,~
; ,.= ‘!,
-,
.,( .’
..+-. .,
._ ’
,-
.’
I ‘.
1
1 , : _ ‘, ..., ‘, :: ,’ ,’ <” ..>‘I
1
Remote no longercontrols cable box, i
VCR
or audio q~jjj&~, y-~::_‘,I-,:,~( r ”
“,, r
., ., I
,I...
.~
‘.
; :\
,, ,,..
.._
l
Channel may not be in Channel Memory. Try pressing number buttons.
l
Ifusing VCR, check to make sure,:TlWC~,switch on VCR’is in correct ”
: ,psi&n.“
.’
,‘:
l
To select cable channels l’& tbru 128, press number button 1 until l-- ’
appears. , Then press other two number buttons.
CABLEJAZR
function’ must
;
be in
CABLE
mode to select channels higher than 69. -,
l
Channel may be locked-out with Parental Control feature. 1’
l
May be a
weak
station: Change
STEREOk@fiinction
to MC?NO setting
instead of
STEREO.
c
l
Maybe someone changed
CABLE/AIR
function to wrong position.
l
Maybe a vacant channel is tuned.
:
l
For Channels 90,91, and 92, make sure the component connected to those
INPUT
jacks is turned on in order to see the picture.
l
If watching VCR (connected only through antenna input), make sure TV is
tuned to channel 3 or 4-same as
,CH3/CH4
switch on VCR. Also check to
make sure
TWVCR
switch on VCR is in correct position.
l
Check antenna connections.
l
Try adjusting
SHARf’NESS
function to improve weak signals.
l
Try another channel.
l
Try adjusting
VOLUME, BASS,
and
TREBLE
controls.
l
If station is sending stereo, try changing
STEREO/SAP
function to
MONO
setting for clearer sound.
l
Try adjusting
SRS (0)
controls to
turn’SRS (0) off
or on.
~
---7
4
Make sure
3TEREO/SAP
function is in
STEREO
mode.
‘,
l
If using the
VCR1
or
VCR2*LD
button, make sure it is programmed to select
the proper videoinput channel as described on page 26
l
Ifusing an S-VHS component, make sure i®ular
VZDEO
cable is
connected to
INPUT I VZJIEO
jack on the TV
l
If using a VCR, make sure the
AUDIO
and
VZDEO OUT.
jackson the VCR
are connected to the TV’s
AUDIO
and
VIDEO
IN jacks. .i
l
If you have an S-VHS VCR (or camcorder) connected, you m,ust~,also
connect a cable from the VCR’s
VIDEO OUT
jack to the TV’s corresponding
VIDEO [N
jack in addition to the S-VHS cable.
t The small picture will not have color if the large picture signal does not have
:I’ the color burst reference. All color signals ‘and some black-and-white. signals i
are sent with color burst information.’ Try changing channels of the large
‘,,” .
picture. j ,
. . . . . ‘. ; ,.
‘,
.< :
/’
j
l
,L
Try not to press any buttons on the remote while changing its batteries. ‘IJou .,
’ may have to reprogram the proper code into the remote. .’ ‘,’ :
.<y ;
: ., I’ :..’
J
,
’ \
Page 47

, Dust TV as required, using a soft cloth or the dusting
j attachment of your vacuum cleaner., Occasionally
-, vacuum the, ventilation slots in the cabinet @help assure
adequate ventilation. Take care not to scratch the plastic
,-
‘,
. surftikes.
.
To clean the screen, you can wipe it with a damp soft
’ cloth. (A very diluted, mild ‘soap can be’used on .the.
screen if it, is .,extremely dirty.)’ ,YoU: can also use ,a non-’
abrasive glass cleaner like.windex@ or Glass Plus@ with a
soft cloth. Be sure to apply cleaner to a cloth. Do not put
cleaner directly on the screen:
.If your TV’s cabinet has a textured finish, do not use
furniture polish. Because textured finishes are porous,
using furniture polish will mar their appearance. They
can’be easily cleaned with a damp, soft cloth.
,, .‘-
,
,’
Do not use strong cleaners, polishes, or chemicallytreated cloths to clean the screen or cabinet.
Never place drinks or vases with water on top
of your
. .
h.
_
;.+
-.
/
I \
I
I, ; -.
’
/I
EXPORTED BY:
0 ,jHOltil&bN COhMEFi kLEi2tflOfUICS
,.1 \,
,“.
;
.’
1
10330
North Meridian Street
*
,
_ 5 In&napolis,IN 46290-1024
.'
,
/
01995 Thomson Consumer Elect&x&s, Inc.
Trademark(s)@ ,Registered
~I~UUUM 50% POST
CONSUMER
j ..’
Marc&)~Registrada(s) _
‘_’
‘p&ted&~eUSA “.
’ ”
/.
USA :,
:
_'
I’
:.
. .
j. ’
,’
/
 Loading...