

Page 1
D
MANUAL
Pad N®,: RNOSS2R24011
02
02
04
O5
Check Accessories 05
Setup TVTable Stand 05
Select TV Location 05
' ' 05
O5
07
Turning On and Off 07
Choosing TV Channel 07
Selecting Input Source 07
Channel Bar 08
Adjusting Volume 08
08
Adjust the OSD Screen 08
@
®
e
e
e
@
@
@
@
®
e
e
e
@
@
@
@
e
e
¢
e
¢
@
@
e
e
¢
e
¢
@
e
@
e
¢
Congratulations on your purchase!As you enjoy your new produ_,
pleasekeepshesesafetydps in mind :
The Issue
The home theater ented.ainment experience is a
growing trend and larger flat panel displays and
popular purchases.
However, flat panel dbplays are not always supported
on the proper stands o1:installed according to the
manula(;turer's recommendations.
Fiat panel displays that are inappropriately sitJated
on dressers bookcases, shelw_s, desks, speakers,
chests or cats may fall over and cause injury
This Manufacturer Cares!
The consumer electronics industrg is comnfitted to
making home entertainrnent enjoyable and safe.
Tune Into Safety
- One size does NOT fit all, follow the manufacturer's
recomn/endafion br the safe instatation and use of
your flat panel display.
- Carefully read and understand all enclosed
instructions for proper use of this product
- Don't allow children to cNmb on or play with
furniture and television sets.
- Don't place fiat panel displays on furniture that can
easily be usc_i_as steps, such a_a chest of drawers.
- Remember that children can become excited while
watcNng a program, espcciaty on a "larger than Iik}"fiat
panel display Care should be taken to place or install
the dbplay where it cann@: be pushed, pulled oveL or
knocked down.
- Care should be taken to route all cords and cables
connected to the panel display so that they cannot be
pulled or grabbed by curious children_
e
@
@
e
@
¢
iMuchas gracias )or su uso del presente producto!
@
e
Cuando usted disfruta de su nuevo producto, pot favor ten_
e
en cuenta los conseios de s%uridad:
@
@
e
@
Posibles Problemeas
¢
@
- La experiencia de entretenimiento de cine en casa
@
es una tendencia creciente y los grandes monitores
¢
@
de pantalla plana son muy populates
¢
embargo, los monitores de pantaNa plana no se
¢
han instalado siempm en los soportes adecuados o
@
instalado de acuerdo con las recomendaeiones de
e
e
labrbante.
@
- Los motfitores do pantalla plana que se han
¢
instalado h_adecuadament en tocadores, estanterias
@
estantes, escdtorios, oradores battle s o cartes se
¢
¢
pueden eaer y eausar el dano eorporak
@
e
¢
e
¢
@
iA[ Fabricante [e Importa
@
¢
- La industria electr6nica del censumidor estD.
÷
comprometida a hacer el entretenimiento de casa
agradable y seguro.
DE NI_OS_
El C6mo y Do6nde Usted usar Su
Monitor de Psnnta/a P!ana
Marocx La Diferrenda
Aiustar Hasta Seguridad
Un tamaiio qo NO es adecqado para todos, siga las
recomendack)nes de labncante para la inslalacion segura y
el uso de su menRor de pantala plana
Lea (}on c'uidado y entienda tedas las instruccbnes
adjuntas para el uso prepio de esle preducto.
Ne permita a k)s nifSes a subir al equipo e jugar (son
muebles y televisk)nes.
No doque los monitores de pantaNa plana en el mueble
quese pued@ usar [f]cilelerlte ceme esoald)rl as[ cored _lr/a
comoda,
Recuerde que k)s nifSes pu<x_en Ilegar a set axdtados al vet
una pregramacion, especialmente en el/r/onitor de pantala
plana "m_s grange que vida", El cuidade se tiene que
ernpezar pot poner o ins/alar el menblr donde no se puede
ernpqar, delener al castado gel camine ni echat abajo,
El cuidado se tiene que empezar per encaminar to<:bs
k)s cordones y cables conectados al monitor de pantalla
plana para que no se puedan tirar o agarrar coneclados
al moniter de pantala plana para que ne se pueden tirar o
agarrar pot k)s niflos cudosos.
MODEL
LED32G30RQ
Please register your product at ww_'_._a.¢om
Please k_p your sales rn<)eiptand keep the record of the serial number
and the dale of purchase in ®rder t® receive warranty parts and service.
[he serial number is located at the back ®fthe TM
Serial Number
Date of Purchase
MADE FOR TODAY
Cable Connections 05
Side Panel Connections 05
Connecting #% Composite video device 05
ConnectingYPbPr Component device 06
Connecting HDMI device 06
07
Keypad Buttons 07
FrorltParlel 07
Quick Menu 08
Channel Menu 08
Picture Menu 08
Audio Menu 09
Time Menu 09
Setup Menu 10
Lock Menu 10
12
13
14
e
@
e
¢
o
¢
@
e
e
e
e
@
@
@
@
e
e
e
e
¢
@
@
@
e
e
¢
e
¢
¢
@
®
e
¢
e
e
e
Wall Mounting : iF YOU OIClOE TO WALL MOUNT YOUR F_T PANEL DISP_Y, ALWAYS :
- Use arnount lilqat has been recommended by the display manufacturer and/or listed by an independent
laboratory (such as ULCSA,ETL).
- Follow all instructions supplied by the display and wall mount manufacturers.
- IFyou have aqy doubts about your ability to safely instal youi flat panel dis:>lay, contact youi retalei about
professienal installation.
- Make sure Ihat Ihe wall where you are mounting the dispb# is appropriate. Some block construction. If you are
unsure, contac[ a professional installer
- A minimum of two people are required for i_stalation, Flat panel displays ear be heavy,
Caution and Warning
A A
Caution:Tereducetheriskof elecrc shock,donot remove
cove or backNouser,-servceabJepartsnsde
Refe_selvicingto q lalifedservicepersonnel
eq ] la e_aJ triangle s intended to alert the user to the
r}resence of u nhsulated dangerous voltage with n the
p_oduct endosue that may be of ufflde,,t
I A The Jightnilg flash wth arrowhead symbol wi hi a/
magn rude to oflsRhte a rsk oreletd shok
intended to alet the use to the prese_ce of
[mporta_t operatng and _aa_tenance(servk[ng)
instruction in the JReratu_e accompanying the rv
A The excJarnatiorl po nt w thin an equ/ateral tdangle }s
e
_ontaje de Pared: s_USTED DECIDEA MONTAR SU MONITOR DEPANTALLA PLANA LA PARED.SIEMPRE
@
¢
- Use una mer_tura que se ha recomendadop or el fabricante de monitor y/o Iistado pot un laboratorio
¢
independiente(como U L, CSA, EFL).
e
e
- Siga todas las instrucciones ofrecidas pot el fabrieante de monitor y montaje de pared.
@
- 81 usted tiene cualquiei duda sobie su l_abilidad para instalar seguramer-_te su nonitor de par-_talla i:>lar-_a,
@
contacte a su distrbuidor para la h_stalaciOn profesional.
@
¢
- Compruebe que la pared adonde se estS. montande el monitor es adecuada_ Akgunos montajes de la pared
@
no son diseflados para set montados a paredes con tachones de acero o la vieja construccbn de bloque de
¢
ceniza. S[ Listed est,. inseguro, contacte a un instalador profesionak
@
e
- Por Io rnenos dos personas se requbren para la instalacbn. Los monitores de pantaNa plana puede set pesados.
e
@
@
¢
@
¢
@
Fcc Information
e
e
Thb equipment has been tesled and feund to cempiy with the
@
¢
Nns/s fer a Class B digitN devbe, pursuanl to Part I S of the FCC
¢
rises,
¢
These lmits are designed 1:opa)vide reasenable pretection against
e
harmfl.l inlerference in a mNdentiai inslallation,
¢
@
This equipment generales, uses and can radiate radio
¢
flequency energy and, if not instaNed and used in accerdance
@
with the instructions, may ca use harmful irflerference to radio
¢
Cornmunicalions,
¢
¢
However, Ihem is no Guaranlee trial h-lterference will nol occur in a
e
particular inslallation.
¢
@
if tlqis equipmelfl does cause harrnfui interference to radio er
interference by one or more of the following measures:
Reerient or re.locale Ilse roceiving antenna,
increase the separation between II_e equipment and Ihe roceiven
Connect the equipment inlo an outbt on a circuit differenl frem
tha o whbh the receiver is connected,
Consult the dealer er an experienced radio/IV technician fer
help,
Device complies with FDA radiation performance standards, 21
CFR subchap er,
Caulion: (hMsibb) Laser Radialion when open,
Do nol slate into beam,
I, Read these instructior_s,
2, Krupp these hmsMucfions,
3, Heed aNwarnings.
4, FeNow aii ins_'rucfions,
S, Do not use this apparalus near waler, For example, do not use
near a laundry tub, in a wel basernerA er near a swin_rnir_g pool,
and the like.
6, Clean only with dry cloth,
7, De no block any vel_tilation openings, Inslal in accordance wih
the manufacturer's inslruclions, Slots and openings in he cabinel
back er bottom are provided for ventilation+ o ensure tenable
eperalion of the ]V and o protect it from everhealing, These
openings must not be blocked or covered, The openings sheuld
never be block_:t by placing the IV on a bed, sofa, rug, er ether
simlar suri_ce,
S. Do not instaN near any heal sources such as radialors, heat
registers, st<yves, or ether apparah_s (including ampNfiers) 1:hal
produce fxual,
9, Do nel defeat he safely purpose of the polarized or grounding
type plug, A pelarb£:t plug has twe blades with ere wider than the
<)then A gleundir_g type plug has Iwe blades and a thiRJ greunding
prong, Ihe wide blade or the third prong is provided for yeur
saflrty, If the provided plug does not fit inte your outlet, consult an
el_trician for replacement of Ihe obsolele outbt.
10, Protect the power cord from being walked en or pinched
particularly al plugs, cenvenience receptacles, and the point where
they exit from the apparatus,
1 1, Drily use altachments/accessedes specified by the
rl lanufactureK
12, Use only with cart, sland, tripod, bracke/, or table specifk£J by
the mar_ufaclurer; or sold wilh the apparalus,
When a cart is us(xL use caution when movi-_g the carl/apparalus
cernbinafior_ to aveid injury from tip over,
A TV and car combination should be moved with care, Quick
sops, excessive force, and uneven surfaces may cause the FV and
cad cernbinafion to overluns,
I 3, Unplug this apparatus during lghhsing storms er when unused
fer long periods of lime,
For added protection 1or thb TV receiver dunng a lightning stor/r],
or when it is left unus_uJ for long periods of time, unplug il frem the
wall Duller and disconnect antenna or cable syslem,
[bb will prever/t damage to Ihe FV due to Nghtlfing and pewer line
sur_ges,
14, Re[er aN servbing to quaNfied service personnek Servicing is
requiring when the apparalus has been damaged in aIV way, such
as poweFsuppiy cerd or plug is damaged, lquld has been splied
or objects have faNen into the apparalus, the apparatus has been
exposed to rain or moislure, does not operale nermaliy, or has
been dropped,
I S, This TV should be operaled eniy from Ihe lype d pewer supply
indicated en Ihe raling iabek
if customer is not sure the ype of powe_ supply in your home,
censult yeur appNance dealer or local power company, For FV
remote conlrel balte_7 power, re/er to the eperating inslructions,
16, The FV sel sham net be exposed o ddpph-_g or splashing, No
ebjeds filb_Swlh liquids, such as wxses, shall be placed en the IV set.
17, Never push objects of any kind into tiffs IV tN'ough epenings
as they rnay touch dangerr>us vol age or other eleclricai parts II_al
ceuld rosuil in fire er eb_;tric shock, Never spin lquid ef any kind into
the F_Z
18. Unplug the ]V frorn tie wall eutlet be[ore cleaning, De n<X use
liquid or aere cleaners, Use a damp cloth for cleaning,
19, This FU should never be placed near or over a radiator or heat
resoume, This IV should not be placcq in a buiitdn inslallation such
as a bookcase or rack unless preper ventilation is provid_£J or the
manufacturer's insln_clions have been adhered to,
20. Do not place this iV on an unstabb cart sland, tripod, bracket
er table, [he ]V may f:_ll, cauNrlg serious h-i]u_, 1:o som_)rle, and
serious damage Io the applance,
21. Do not allempl to service Ibis iV by yourself because <)pering
er removing covers may expose you 1:o dangerous high voltage or
elher hazards, Refer aii servicing Io quaiifi_J service personnek
22, )his device complies with Pad: 15 of the FCC Rules. Operafior_
is subject o Ihe feliowh-_g two conditions: (1) his device may
not cause harmful in ederence, and (2)his device musl accept
any i_ erfemnce leceived, including intelkrrence that may cause
undesb_ eperaliorl,
23. WARNING: [b prevent injury, this apparalus musl be securely
attached to the floor/wall in accordance wilh the installation
ir_sMuctions.
24, [b requce the risk of eleclric shock the gr_unding of center pin
ef plug musl be mair_tained.
25, If an outside antenna or cable syslem is cel][lecl_x}t o the TU,
be sure the antenna or cable syslem is greunded 1:o previde some
pretection against voltage surges and builDup stalic charges,
Section 810 of the Na ional Electrical Code, ANSWNFPA NO,70,
prevides inlermafior_ with respect Io proper grounding ef the masl
and supporting structure, grounding of the lead in wire to an
an enna discharge urfil, size ef grounding conduclors, location d
antenna discharge unil, connection to grounding electrodes, and
r_uirerner/ts for the grounding ek_tredes, (See figure A)
D_SCHARGE UNiT
(NEC $ CTION 810_20)
(NO S CT_ON 810_2t )
Safety Strap
Caution: Pushing, puling or clmbing on the ]V rnay cause the YV
faiNng, Do net ie/chldren cNrnb or hang on he fV, Always place Ihe
Hg_ _ (Nmc_T 250,P_nTH)
B[ BCTRODE SYSTBM
Dd on a ._turdy, level stable sur/ace thai carl hold the weight ef IV,
And if posNble, secure Ihe IV according Io the h]slruction below
(Note: ]he faslening components such as screws are not suppled
wilh IV).
Step one: insert the M6 rnounting screws into the upper twe wan
/nounti_g screw holes and faslen Ihern (Figure B),
Step two: h_ser/anchors to vvaN and cennect the bolls and anchors
wilh ropes or chains (Figure C),
@
@
¢
e
@
e
@
Before Turning On TV
e
@
Check Accessories
@
Check the accessories that are pack_ with your [M
¢
(refer Io Qubk Slat Guide)
e
@
e
Setup TV Table Stand
@
Please refer 1:o Quick Star Guide to cam,, oul stand instaNing.
@
@
Select TV Location
¢
Select a fiat, slable table Io place your IV set. Please bHow the
¢
safely instructions when placing the IV,
@
@
@
Connection and Using
@
After placing your iV properl% yeu carl conrlect the iV with power
¢
supply and cable components. Fer fuNher infermation, s_ page S
@
to page 6,
¢
¢
@
@
@
@
¢
¢
@
@
¢
e
@
The firs slep il_ connecting your Dd is obtaining the Ngnak _t_ur
IV LED32G30RQ has a back panel, which aNows you to receive
analog and/or digital televbion channels via AN)/CABLE jack,
Before, conr/ecting your iV, determine using an anlenna era cable
@
service Io oblain Ihe Ngnak
¢
e
A. Antenna
e
¢
Connect the antenna to rv via ceaxial cable on AN I/CABLE jack
@
of he back panek Yeu are ready 1:o receive air local dig/al and
¢
analog channels,
¢
¢
B. Oable TVserdce
@
Connect the cable FVwall jack to IV via coaNal cable on
e
ANI/CABLE jack of the back panel, Yeu are ready o receive <)flair
@
local digilai arxJanalog channels,
@
@
C. Set-Ttqp Box
¢
if you use a sel top box, you rnay nr£_d to call your cable company
¢
¢
or saleNte service provider; which use a sp_ial cennection, please
@
rder 1:<7the user's guide of s_ -top box,
e
/Wore: lo rot hi_g 2>e AC o/_: uP/,'o_ h_a' _d<:on_o//,'d_ed ;_//tte
@
co/7!7oc/ior_s 77}u, T'/:£x:s ne s _peo/i (/4.# _r}o':_/::x_b#: :::f_ann®i
@
s_;_/:::/7
@
¢
¢
@
¢
e
100=l20v J L::_rj_
@
¢
@
¢
t_J
@
@
@
e
@
¢
@
Cable rv Antelna
Choose Your Connecffons
Dd I EDS2G30RQ supports various cennections to other devices
(such as DVD, VCR, Set top box, etc,), Please foNow the lable to
cheese Ihe cables whicl_ adapl Io your device,
Jacks
COMPOSITE
L_AUDIO_R
i !ii!i'i
COMPONENT % Pb, Pr
L_AUDiO-R _COMPONENT video cable
NDMI IN 1/DVI/MNL 2/ARC f{},_....................._[T}
Cables Further
See the below
Video/Audio cable
Audio Cable
HO_-DWcable
ti[t_ r0f GOto page 6
_DMI cable
Go to page 6
MHL cable
A/or HDi_4/, !>e HDh?/ /ego, _r_:7 his,! > D tT utu:> _ M ,its _;_ :ls _
irA_rfT<:_: ue /fiemu/,, :>/ / 7s:,,'ere:7 s :7 ,}//,;, EiDMi
L£ e/ _ss_gZ[ C
,_c7 f J £)sO'__ ,s; NL# :)O/(# we#7 't)[ (OUC ohe/ (# wce,! o
TW
Connecting A V Composite device
(Good Video Quality)
Corot osite connector will be shared with Compenent Y connector,
% connect a cernpoNle/W device, such as a DVD player, foNow
these steps:
I ,Connect the COMPOSITE jack on the side <7[ IV to the video
e
eutput jacks ef device via video cable (y _llow),
2,Connect the L ALJDIO R jacks on the side of IV 1:o the audio
eutput jacks of device via audio cable,
Notice the left channel jack and plugs are while and the right
channel jack and plugs are red.
#,/O AY _I/#H/ J)/Ottg<S O (;O/ ?po,fi '/do _ius /,#rK# O '/deo
sigea/Has/eguiar gc)(;)<;_ a?spiay (_#_!_//t!,i
Composite Video Connection
The picture below i,s an example ef a connection using the
cerHposile video jack,
¢
e
¢
@
e
@
e
e
¢
e
¢
@
e
@
e
@
@
¢
@
¢
@
ConnecUng _(PbPr Component device
@
(Setter Wdeo Qua#ty)
e
[o connect a component device, such as a DVD player, feNow
@
these sleps:
¢
1,Connect the COMPONENT iN Y/Pb/Pr jack on the side of ]V 1:o
@
the vide<) eulpul jacks of device via vide<) cable (green, blue and
¢
red),
@
2,Connect the L AUDIO-R jacks on the side of TV 1:othe audio
@
output jacks of device via audio cable.
e
Notice the left channel jack and plugs are while and the righl
channel jack and plugs are red.
@
&/eM: <7%, i_ , _l hs a/_ comeo er t /_deo 7Tis/drd <{/_,: _<:>ss{inqi
¢
n_s )etg, (A_/)/ayc qi#>'
@
@
Component Video Connection
¢
@]e pictuls below is an example o[ a conr/_;tion using Ihe cornFx_nerll
¢
vid<>.ojack,
@
@
¢
@
e
@
@
¢
@
e
@
e
e
e
e
¢
@
e
Connecting HDM/ device (BestVideoQuality)
@
[b cennecl a HDMI device, such as a DVD player, please Conn_x;t
e
the HDMI1/DVI/MHL, 2/ARC jack on the side of IV 1:o Ihe output
e
jacks of devbe via HDMI cable,
e
It> connect a DVI device, via DVI port ef PC er Devbe and HDMI
e
jack ef IV:
¢
¢
I, Connect he HDMI1/DVWMHI jack en the side of IV 1:othe DVI
¢
poN of PC via HDMI DUI cable,
¢
2, Connect the L AUDIO-R jack en the side of IV te the audio
®
eutput jack of computer wlh audio cable (dual channel RCA jacks
@
1:o3,5rnm slereo jack er the L AUDIO_R jack).
¢
@
Pc cennect an ARC HDMI OUT devbe, please cennect to Ihe HDMI
¢
i-_put pea of the devbe such as amplfbr,
¢
i',/u e: 7 HD'4i/Hi2it L)eL,,iPun ,'vT_#_u_}eet,u ir!,>Ha(et/,s a co/, )_ct
@
a :Do'v/<', o s,Tsr'/s;_ce/el flsn:>,'?7ik)g _r)c;>nee>saed :S'sola/ebi;_ i/
¢
:]),7/?s:JS UT( > i_7(J ' ) arT(]J Y/O'lt ) aorta/y/,7 /@ :ram+: )/7)#: /TrTd ha:, Ute
e
be:, ;D:,f,v;syqsa#)
@
¢
The output panel of othet device
2 HL_MPDM <:a)/e/rars£:is o!y v_: ee s_.?/_##>,'! DW po/t of
DI/s (/:lice So HF)/vff j, ck of TV /o/ a <Do s?./t aL /)/case ::or nect
;_#dO O U/_ It t? [ A N JO R _Ci( or 7'/£:t_i(©ar>d
HDMI Connection
The pictur_:_ below is an example of a connection uNng Ihe HDMI
video jack.
\
/
How to Obtain Various Kinds of Input Sources
After cennecdon is done, press INPUT button on renK)te control
er Dd top tanel to choose the i_put source you n_d, S_ page 7,
Basic Op_x_ation of P4
e N_D PNON_. _Connect a 3,Smm headphone for persenal audio,
® _SB: Connect your USB slorage device to enjoy music/photo files
e on your Dd. {Alse used for service purpose),
®
tDMI IN
®
® ItDMI1/DVI, 2: (I Ngh-Definition Multimedia Inte@]ce) It prevides an
e uncompressed digital connection that caries bolh video and audb
® data by way of an integrated mini plug cable.
® MHL: (Mobile High Definitio/_ link) To standard HDMI input, tlanslnit
® the video/audio from portable electronic devi< e (cellphone,digitN
e camera, digitN videe camera) te IV set,
® ARC: (/\udio Retuul Channel)Adopted in TV output ef digita audio, can
® be connected to the de',Acesupporting ARC, transmit g/e Dd sound to the
® devce,
® COMPONENT _/_bl_r_ Connect a device that has component
® vide<) jacks, such as a DVD player, Io access devbe connected
® to the '//Pb/Pr jack, press the INPUT bullon on your mmele; hen
® press the up/dewn arrow Io select Comporlenl, Press the OK
® butlon at last to confirrll.
® e Y/_bl_r (@o_po_e_t Video};They previde good picture quali y
® b_x;ause the video sigrlal is separa ed into Ihree components, Use
® Ihree videe grade or cornponent video cables for the cennection.
® When using '{/Pb/Pr_ make sum yeu cennect b_" and righl audio
® cables to Ihe AUDIO iN R/I jacks,
® L=AUDIOoR_ COMPOSITe; Connec an AV device that has
® composite video jacks, such as a VCR or a DVD player, % access
® device connecled to these jacks, press the INPUT button on your
® rernote; hell press he up/down arrew to selecl /W. Press the
® OK bullon at lag to corlfirm,
®
e AUDIO IN L; Left audio channel connection, The left audio
® cennector is usuaNy while, Fer mono audio sources, be sure to
® use the lefl AUDIO INPUf,
®
® e A_DIO IN R= Right audio channel cennection, The right audio
® cennector is usually red.
® ANT/OABL_; Connect to receive the signal from your arlteru-la er
® cable via coaxial cabb,
_igital Audio out: Connect a coaxial cable for digital audie
output,
®
®
Keypad Buttons
®
If you cannot locate your remote, you can use the keypad buttons
®
on your IV 1:ooperate many IV features.
e
®
e
®
®
®
®
®
®
®
e
®
®
®
iNPUT
®
®
®
®
®
®
®
®
®
®
®
®
®
®
®
®
®
®
Displays the Seurce Select List.
M_NU
Displays the IV Main Menu,
CN_
Scans up through the channel list,
In the DJ mer/u system, it acts like the up arrow on the
rerHole contrel and can be used 1:oseled menu options,
OH_
Scans down through he channel Iisl, In the fM menu
syslem, il acts like the down arrow en the rerrK)te
control and can be used o select menu oplions,
VOL+
Increases Ihe volume, In the IV menu system, it acts
like the right arrew on the remete cenlrel and can be
used o select menu oplions,
VOL-
Decreases the volume. In the IM menu syslem, it acts
like the left arrew on he remole centrel and can be used
1:oselect menu options,
[urns the FV on and off,
Front Panel
About remole control
werking dislance and
angle, see the quick
slart guide,
R÷mote Oontrot 8enso_
\\. PoweffStandby Indicator j
Power/S_a_dby ladicatar; Light up in red when the TV is in
slandby mode,, light oul whet/he IV is on,
_emef_e OanlIFal 8er_÷er_ Remote cenlrol I1_ sensor, whicl-_
receives ifframd ray sent by remote contr_)k
Codes for Cox Communications: 0178
Codes for Comcast: 10178
Codes for Dish Network: 627
Codes for Fios Verizon: 0205, 0057, 0493, 0775
Turning On and Off
Connect the AC cerd 1:opower the LED LCD fU, At this time the
IV will enter standby mode and power indica or will turn red, Use
Pewer button ((.I)) on the top panel ef Pd or en the r_:_mete conlrol
1:olurn er/the fU, After swilching off the fV for 5 secends, you can
turn en Pd again,
Choosing TV Channel
Tu_i_g Ta Anatag eha_aels
an analog channel has a chanrarl number b_jirlning with "A'L
Input the diqital number with /_umeric buttons directly and press
OK buRon 1:ocenfirrn. For example, to watch analog channel "AS1 ",
press "S"+ "1 "+ "OK" on remete conlrol in sequence,
/Wot_: A/ttx:x g 2>e_+ s:, rx:> er aiD7 %/sign,# r / u/a :>/,: ir_ A," e/ /_:a,
',as U S_JVeA Tt/ i_ItTC!iO/TS/<)/ se/rTe _:x/)a/Tsl_)/l: i#S_:
Tarring Ta _igital Ohannela
A digi al channel has a channel number beginnh_g wih "D'L Inpu
the m_in digtaJ number with nurnerb buRons directly, then press
'" butlon en remole centa)l, and inpul the sub number a laM'.
tor example+ 1:o walch analog channel "D,S1 1"+ press "3", "I", "",
"I ", "OK" on lemole control in sequence,
Changing Channels Directly You can use CIM, bulton 1:o increase
char_nel number and CIIv to decrease channel number:
When no OSD (On Screen Display) is used, the up/down arrows
can also werk as CNA/CNv buttons,
Source Select
TV
Selecting Input Source
Press INPUT button on remote
centrol 1:o display Source Select list,
Use up/down arrows to highlight Ihe
source you need and press OK to
cenfirm,
AV
Component
HDMI 1
HDMI 2
USB
S..... @.....
Page 2
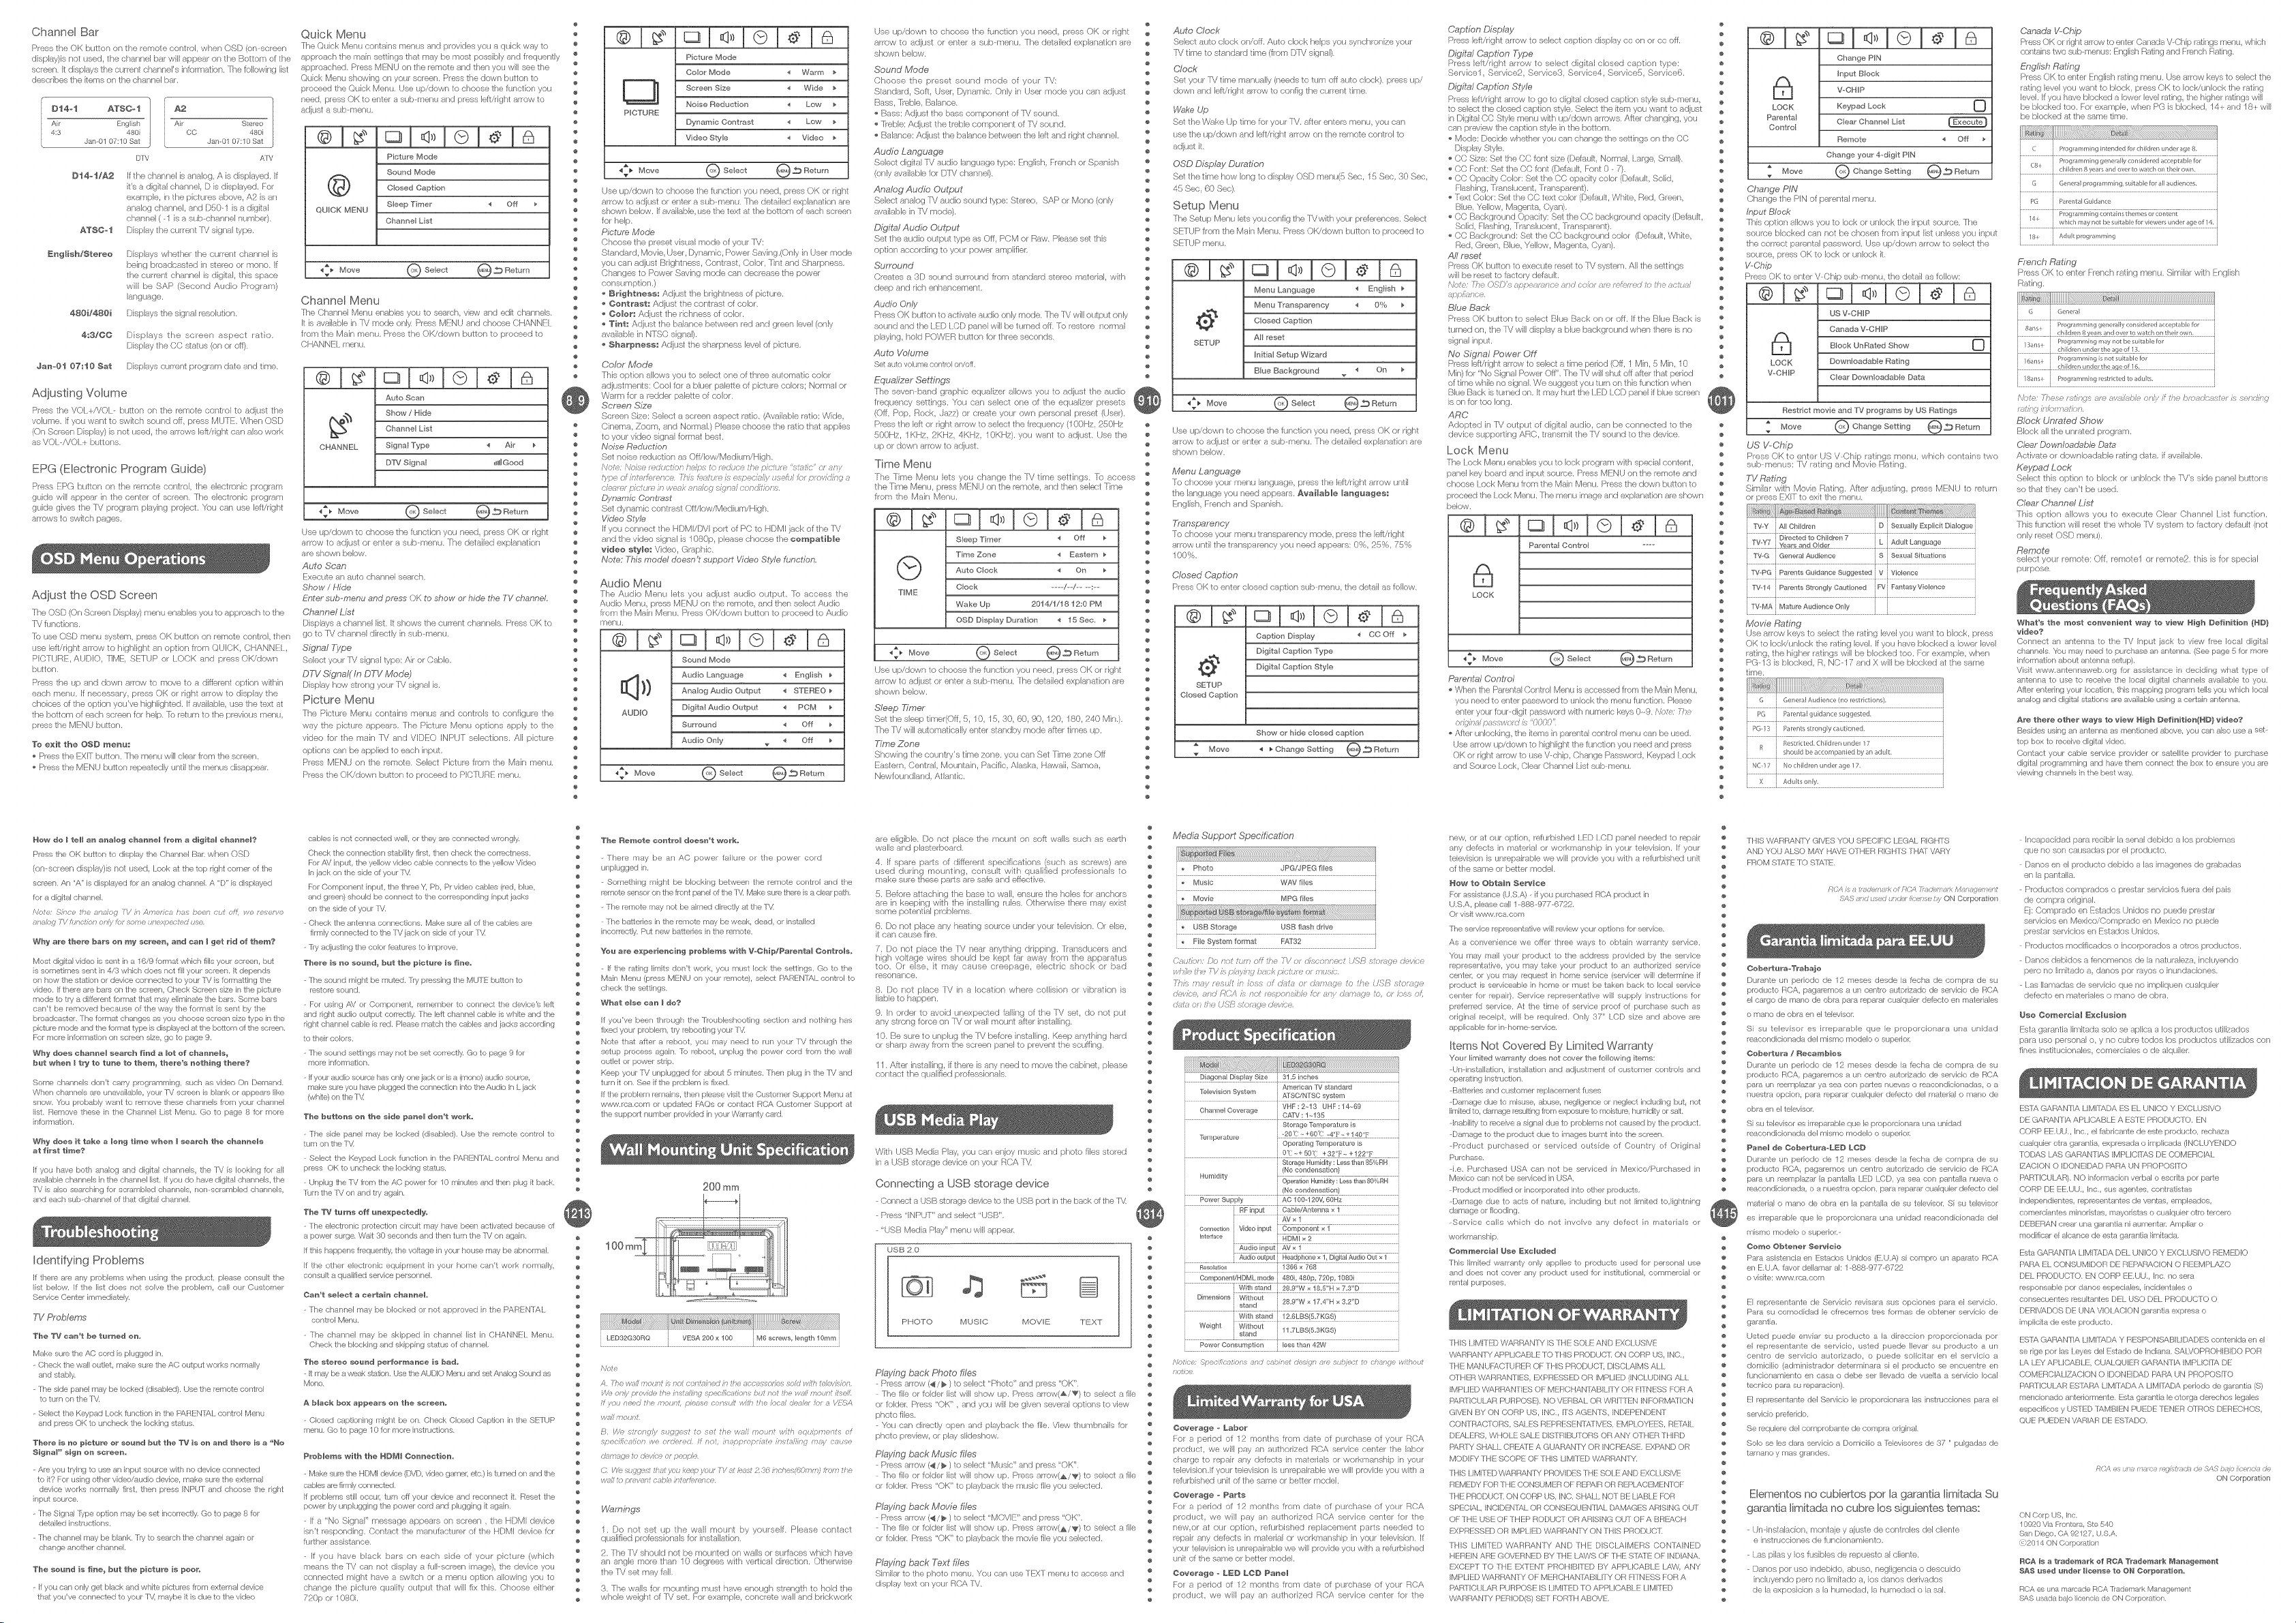
ChannelBar
Press the OK button on the remole control, when OSD (on screen
display)is not used, the channel bar wU appear on the Bottom of the
screen. It displays the cu_rer: channel's in=urn ration, The [ullowi _glist
describes the items on the channel bar,
Dt4ot AT$C4
Air English
4:5 480i
Jan-01 07:10 Sat
Dt44/A2
If the channel is analog, A is displayed, If
t's a digital channel, D is displayed, For
exart _ple, in the picturos above, A2 is an
analog channel, and D50 1 is a digital
channel ( 1 is a sub chanl_el number).
ATSC-t
English/Stereo
Display the current I_/signal type.
Dis:Jays whether the current channel [s
being brcadcasted il_ sterea or mono, if
the ctarent channel is digital, this space
will be SAP {Second Audio Prograln)
language,
480i/480i
4=$/OO
_Jaz_=0t07:t0 Sat
Displays the sigl a} rosolution,
Displays the screen aspect rote,
Display the CC status (on or off).
Dis :)lays current program date and time.
Adjusting Volume
Press the VO[ MVOI - button on the female control to adjust the
vobme, If you want to switch sound off, press MUTE, When OSD
{On Screen Display) is not used, the arrows left/right con also work
as VOI/MO[ f buttons.
EPG (Electronic Program Guide)
Press EPG button on the remete corffrel, the electrx)nic program
guide will appear [n the center of screen, The electrenic program
guide gives the IV ppegram playi ig prelect, Yot/con ose left/right
arrews to switch pages,
Adjust the OSD Screen
The OSD (On Scre.en Display) menu enablos you to appreach to the
VV fla ictions,
re use OSD menu system, press OK button on remote control, then
use left/right arrow to highlight an option from QUICK, CHANNEl,
PICTURE, AUDIO, [!ME, SETUP or lOCK and press OK/down
button,
Press the up and dowll arrow to mere to a different option w}tt in
each menu, If necessary, press OK or right arrow to display the
che[ces of the option you've highlighted, If available, use the text at
the bottom of each screen for help, re a£urn to the _re.vious inenu,
_re.ss the MENU button,
"lee exit the OSD _er_u:
Press the EXIT button, The menu will clear from the screen,
Press the MENU button repeatedly until the inenus disap:_ear,
A2
Air Stereo
DW
CC 480i
Jan01 07:10 Sat
AIV
Quick Menu
The Quick Menu contains menus and plevides you a quick way to e
approach the main settings that may be most possibly and freq_lently
approached. Press MENU on the remote asd then you will see the
Quick Menu showing or_yate scleen, Press the dcwn button to e
proceed the Quick Menu. Use up/down to choose the function you
i_eed, press OK to enter a sub _enu and press Jeff/right arrow to
adjust a sub _enu,
®!:
Picture Mode
Sound Mode
@
QUICK MENU
43_+ Move @ Sees= @_Return
Channel Menu
[T_e Channel Menu enablos you to seamh, view and edit channels,
It is available n IV mode only Press MENU and choose CHANNEl
from tile Main menu, Press the OK/down button to )roceed to
CHANNEl menu,
-6-t
W
CHANNEL
_3_, Move
Use up/dowl_ to choose the function you need, press OK or dght
arrow to adiust or enter a sub menu, The do=ailed ex _lanat[o/
are shown below,
Auto Scan
Execute on auto channel search,
Show / Hide
Enter sub-menu and press OK to show or h/da the TV channel
Channel L/.st
Displays a channel list, It shows the current chant els, Press OK to
go to Pd channel directly n sub _enu,
Signal Type
Selec your IV signal type: Air or Cable,
DTV Signal( In DTV Mode)
Display how strong your TV signal is,
Picture Menu
The Picture Menu contains menus and controls to configure the
way the picture appears. The Picture Menu options apply to the
video for the main [\/ al_d VIDEO INPUT selections. All picture
options can be applied to each input,
Press MENLJ on the remote, Select Picture. frem the Mah menu,
Prse's the OKidow/button to p_oceed to PICTURE inenu,
Closed Caption
Sleep Time < OFF _'
Channe Lst
Auto Scan
Show / Hide
Channe List
Signal Type < Air
DTM Signal _llJGood
ti
csj <,>jej
Picture Mode
e
e
PICTURE
4_t. Move @ Seer= @ _ Return
¢ Use up/down to choose the function you/eed, press OK or right
e arrow ts adjust or enter a sub menu, The dorailed explanation are
e shown below. If available, use the text at the bottom of each screen
e for help.
e Picture Mode
e Choose tie preset visual mode of your IV:
Standard, Mevie, Ijser, I)yl_amic, Power Saving,{Only in User mode
yoo can adjust Brightness, Contrast, Color, Tint and Sharpness.
¢ Changes to Power Saving mede can declease the power
e
e consumptioll,)
e _ Bright_ess: Adiust the brightl_ess of picture.
e * ¢oHtrast: Adios= the contrast of color,
e _ Color: Adjust the richness of color,
e _ Tier: Adjust the balance between red al_d green Isvel (only
e available in NTSC signal).
_ Sharp_ess: Adjust the sharpness level of picture.
e
CoMr Mode
e
e
This option allows you to select one of three automatic color
adiustments: Cool for a bluer palntte of picture colors; Normal or
Warm for a redder palntte of coler,
Screen Size
Screen Size: Select a screen aspect ratio. (Availabb rada: Wide,
e
Cinema, Zoom, and Normal.} Please choose the raUo that ap ::>lies
s
to your video signal format best,
e
Noise Reduction
e
Sst noise reduction as Of_/bw/Medium/High,
@
Nob i,io/se r,,d/odor is/r;a to as,', ()e t!e p(t/re _/'aUc o_ ,wy
@
=)be afin/r r_ re, re 77/a #,'_,B is aape./a#) serif t,_r prod//: _,
@
dc,q; e, ,":_ct k e in i>#e k a _;Uo£ dgn;U (:o/}a}Uonn
@
Dynamic Contrast
e
Set dynamic contrast Off/Iow/Medhsm/High,
e
Wdeo Sty/s
e
If you connect the HDMIA }VI port of PC to HDMI jack of the Pd
e
and the video signal is 1080p, please choose the compatible
e
_ideo style: Video, Graphic,
@
Note: Yhis model doesn't support Wdso Style function.
e
@
e
Audio Menu
@
Tile Audio Menu lets you aditlst audio ot/tpllt, Is access the
e
Audio Menlh press MENU on tile remote, and then select Audio
e
from tile Maill Menu. Press OK/dow/button to #roceed to Audio
e
Inerltl,
@
ti
@
e
e
e
e
e
@
¢
¢
e
e
e
e
e
@
@
AUDIO
_ Move
Color Mode < Warm
Screen Sze 4 Wide
Noise Reduction < Low i_
Dynamic Contrast 4 Low
Video Stye _ Vdeo _-
Sound Mode
Audio Language _ English
Analog A_.ldio Output < STEREO
D gital Audio Output ,_ PCM
Surround <_ Off
Audo Ony _ _ Off
Use up/down to choose the funeHon you l_eed, press OK or right
arrew to adjust or enter a sub _enu, The derailed explanaUon are
shswn below,
Sound Mode
Choose the preset soulKJ mode of yoor TV:
Standard, Soft, User, rb,_amic. Only in User inode you can adjust
Bass, beble, Balance.
Bass: Adjust the bass component of IX/sound.
[reble: Adjust tile trebb component of [M sound.
Balance: Adjust the balance between the left and right c anl el,
Audio Language
Select digital R/audio language type: EngNsh, french or Spanish
{only available for I)bd channel),
Analog Audio Output
Select analog PV a s(.fio sound type: Steax>, SAP or Mono {only
available h_ IV mode),
Digital Audio Output
Set the audio output type as OFF, PCM or Raw, Please set this
option according to your power amplifier,
Surround
Croates a 3D sound surreund from standard stereo inateria}, with
deep and rich enhancement.
Audio Only
Press OK button to adivate audio only made, The [V win output only
sound and the lED [CD aanel will be turned ell, Ts restore, nom_al
playing, hold POWER button for three seconds.
Auto Volume
Set alto veil me central en/ofL
Equalizer Settings
The seven band graphic equaNzer allows you to adiost the a s(:tio
frequency settings, "You can select one of the equalizer presets
(Off, Pop, Rock, .Jazz) or create you _own personal laeset (I.JseO,
Press the left or right arrew to select the frequency (100Hz, 250Hz
500Hz, 1KHz, 2KHz, 4KHz, 10KHz), you want to adjust. Use the
up or down arrow to adjust.
Time Menu
The Time Menu lets you change the rv time settings, fe access
the Tree Menu, press MENLI on tie "emote, aid then sei_;t Tilne
from the Mah Menu.
Sleep Timer
Time Zone _ Eastern
Auto Clock < On _,
Clock ....../----/-----:-
Wake Up 2014/1/1 8 12:0 PM
OSD D splay Durat on _ 15 Sec
4_ Move
Use up/down to choose the funelion you need, press OK or right e
arrow to adjust or enter a sub _enu, The detailed explanation ore e
showl_ below,
Sleep _;nqer e
Set the sleep timer(Off, 5, 10, 15,30,60,90, 120, 180,240 Min,), e
The Pd will automatically enter standby inode after thnos up, e
Time Zone e
Showing the coul_try's time zone, you can Set Time zsne OFF e
Eastern, Central, Mountain, Pacific, Alaska, Hawaii, Samoa,
Newfoundland, Atlantic.
@
Auto Clock
@
Select auto clock on/off, Auto clock helps yeu synchrenize your
@
s
[V time to standard time (froln D]Ri signal),
e
Clock
e
Set yota IV time manually {needs to turn o[f auto clock), press up/
e
e
down and left/right arrow to config the current time.
@
Waka C{o
@
s
Set the Wake Up time for your IV, after enters menu, you can
e
use the up/dawn and leftirigt t arrow o/the relnote co/trol to
e
adjust it,
e
e
OSD Display Duraffon
e
Set the time how long to display OSD menu(b Sac, 15 Sec, 30 Sec,
@
e
45 Sec, 60 Sac),
e
Setup Menu
e
e
The Sotup Menu lets you config the IVwRh your prderences, Select
@
SETUP from the Mail Menu, Press OK/dow/ burro/ to _roceed to
e
SETUP menu.
e
@
e
®I:
e
e
e
@
@
e
e
e
e
e
e
SETUP
csl<,>lel la
Menu Language < English
Menu Transparency <t 0%
Cosed Caption
AH reset
Initial Setklp Wizard
Blue Background _ _ On
,_> Move @ Sebct
e
Use upidowr_ to choose the function you need, press OK or right
e
arrow to adjust or enter a sub menu, The detailed oxplanatio/arc
e
shewn below,
e
e
e
Menu Language
e
To c[oose your menu language, press the left/right arrow until
@
the language you need appears. Available lar<_g_ages:
s
English, French and Spanish.
e
e
Tsansparency
e
To choose your menu transparency mode, press the left/right
e
arrow until the transparency you need appears: 0%, 21}%,75%
e
100%,
@
@
Closed Caption
Press OK to enter closed caption sub menu, the detail as follow,
®1:
Caption Dispay 4 CC Off _.
Digital Caption Type
D gital Capt on Stye
SETUP
Closed Caption
@
e
Move '_ _ Change Setting _ _ Return
e
@
Show or hide closed caption
Caption Display
Press left/right arrow to select caption display cc on or cc off,
Digital Caption Tjq)e
Press left/right arrow to select digital closed caption type:
Service1, Selvice2, Service3, Service4, Serviceh, Seraice6,
Dsg,14al Captien Style
Press left/right arrew to go ts digital closed captien style sub-menu,
to select the closed caprion style, Selrust the item yoo want to adjust
in D gital CO Style menu wkh up/down arrews, After changing, you
can preview the captbn style in the bottom,
Mode: D_ide whether you can change the settings on the CC
Display Style,
CO Size: Set the CC font size (Ddault, Nom_al, Iarge, Small),
OC Font: Sd the CO font (Ddauk, Font 0 -7),
CO Opacity Color: Set the CC opacity cobr (Default, Solk:J,
Flashing, Translucent, Transparent).
Faxt Color: Set the CC text color {Default, White, Red, Green,
Blue, Yellow, Magenta, Cyan),
ec Backgre_ ind Opacity: Snt the CC background opacity (DefauR,
Solid, Flashing, Translucent, Transparent),
CC BackgK)und: Set the CC backgreund c(>lor (Default, White,
Red, Green, Bkle, Yellow, Magenta, Cyan),
At reset
Press OK button to execute reset to [V systena All the settings
will be reset to farrow ddatflL
,",/,_te Fire (b.'l)s ,osf:>e_m'c ,_?/do/r/! _t,_ mfrv7,_i t! tie,_ct_, U
t )/>/','__n(.{
Blue Back
Press OK button to seled Blue Back on or off, If the Blue Back is
turned on, the IV will display a blue background when there, is no
signal input
No Signal Power OFF
Press lehMdght arrow to select a time period {OFF,1 Min, 5 Min, 10
Min) fer 'No Signal Power Off", The IV will shot off after that pedod
of time while no signal. We suggest you turn on this function when
Blue Back is turned on, It may hurt the lED [CD panel if bkle screen
is on for too long.
ARC
Adopted in _' output of digital audio, con be connected to the
device supporting ARC}, transmit the IRi sound to the dovice,
Lock Menu
The lock Menu enables you to lock program with sps<Jal content,
panel key board and input source, Press MENU on the remete and
choose Iock Menu from the Mail Menu. Press the down burro/to
procured the [ock Menu. The inenu image and explanation are show/
below,
Parental Centrol
LOCK
_ Move
Parental Centre/
When the Parental Control Menu is accessed from the Main Menu,
you need to enter password to unlock the menu function, Please
enter youl k)ul digit password with numerb ke,ys 0_9,/'/ut: 7%e
original )/;_s_, c, di_ /)000
Offer unlocking tie items }n palental control menu can be used,
Use arrow ul£down te highlight the function you need and press
OK or light arma to use V chip Char_ge Password Keypad [ock
and Source [ock, Cleal C[ annel [ is= sub menu,
@
e
e
e
e
e
@
@
e
e
e
e
@
@
e
e
e
e
e
e
e
@
e
e
e
e
e
e
e
@
e
e
e
e
e
LOCK
Parental
Control
_" Move @ Change Setting @_Return
Change PIN
Change the PiN of parental menu,
Input f_/ock
This option allows you to lock or unlock the input source, The
source blocked can not be chosen from input list unless you input
the correct parental password, Use up/down arrow to select the
source, press OK to lock or unlock k,
V-Chip
Press OK to enter V Chip sub menu, the dotail as follow:
LOCK
V-CHP
csl
Change MN
Input Block
V-CHP
Keypad Lock
Clear Channe_ List
Remote
Change your 4-d git PIN
US V-CHIP
Canada WCHP
Brock UnRated Show
Downloadable Rating
Clear Downloadab_e Data
Rest ict movie and TV programs by US Ratings
e
e
e
e
e
@
@
e
e
e
e
e
@
@
e
e
e
e
e
@
@
e
e
e
e
e
e
@
e
e
e
e
e
¢
e
@
e
Move @ Change Setting @ _ Return
x
US V--Chip
Press OK to enter US V Clip ratings menu, which contains two
sub menus: rv rating and Movie Rating,
TV Rating
Similar with Movie Rating, After adjusting, press MENU to return
or press EXiT to exit t_e menu,
i TV-Y All Children
j TV--G j GeneralAud[ence j S j Sexual Situat ons
i i i
j TV-MA j Mature Audi.....Only j j j
Movie RaM_g
/Hse arrow keys to select the rating level you want to block, press
OK to IocWunlock the rating k,wel, If you have blocked a lower le.vel
rating, the higher ratings will be blocked too, For example, when
PG 13 is blocked, R, Ne 17 and X will be blocked at the same
thne,
......................................... i [
G Genera} Audien e (no restri t ons)
j PG13 I arents arongly cautioned
R_str eed Children under 17
R
should be accori/pan ed by an adult
NCI No chi}dren under age I
X Adults only
O
'_ Off _<
Cana@ V Ch©
Press OK or light arrow to enter Ca _ada V Chip ladngs menu, which
cor_tains two sub menus: English Rating and French Rating.
English Rating
Press OK to enter English r _ting menu. Use arrow keys to select the
ratin9 level you want to block, press OK to IocWunlock the rating
level. If you have blacked a Iowe_ level _ating, the higher radngs wiU
be blocked too, For example, when P(} is blocked, 14 _ and 18 _will
be blocked at the same time.
Program/nillgintended for hildrell underage 8
F>rogralnmillggenerally onsideredacceptablefor
8
j children8 yearsandoverto watchon their owl1.
G Gelw,ral program _illg, suitablefo; all audiences.
PG ParentalGuidance
4 Programmingco,sabrathemesor co_serlt
, + wh chmaynot besuitablefor v}ewelsunderageo[ }4
8_ Adultprogrammng
French Rating
Press OK to enter French raUng menu, Similar with English
Rating.
I ;
G Gen_,ral
dabs, Programmhsggenerallyconsid_*redacceptablefor
children8yearsandoval towatchon theirown
6ans, Piogrammhlgisnot suitablefor
clsildrenundertheaqeo! j6_
8ans_ Piogrammb/grestrictedtoadule.
:'/ae iie,se ;lfftg,' se,_/#abi,o'f)' f _)ebe_u,_ae r, setk_g
/e,vg_ );;!_h,;n
Block Unrafed Show
Block all the unrated pregram,
Clear Down/oad_'_b/e Data
Activate or downloadable rating data. if available.
Ke2?)ad Lock
Select this optio/_ to block or unblock the TV's side _anel butto/s
so that they calCt be used,
Clear Channd List
This option allows you to execute Clear Channel list funct on,
This function will re.set t_e wh(>le PV systeln to factory default (not
only reset OSD menu),
Remote
select your remote: Off, remote1 or remote2, this is for special
_urpose,
What's the _est ce_ve_[est way te vie_e Higb Def[nitie_ (N#}
rides?
Co mect _n _ntelm _to the fV Input jack to view free local digital
channels, Ynu may need te puR:hase an antenna, (See page 5 Cnr nlom
nh:ematier_ about aldenna eetup),
Visit www, antennaweb,org for assistance }n deciding what type o[
antenna to use te receive the }oral digital cha/inels avalable te you,
After entering ye_r }oration, this mapping program tells you which local
_l_alog and dig tal statiolls are available us}rig a certain antenna,
Are there other ways to uie_ Nigh Def[nitien(HD) rides?
Resides using an antenna as mentiened abeve, you can Mso use a sn!
top bex te recoiw} dig tal video,
Centact your cable service previder er sateINle provider te purchase
dig[tM pregramm[[ig and haue them connect the bex to ensure you [m
viewh _g chanl_els in the best w_y,
14ee_ de I tell as analeg chassel fre_ a digital chansel?
Press the OK button te display the Chanllel Bar when OSD
(on screen display)is net used, I eek at the top right cemer of the
screen, An 'W' }s displayed for an _nalog chanlleL A "D" is d spl _yed
Cnra digit d cha reel,
Mice: /,u ee e!!aio,g 7Y u A!!ertce :_a" beea ci_ e;' 4!e ese;,e
s,s#')g V _/!eh'>/7 e!_,';../(.reeme i//t(>//Ded_k'/ /se
Why are there bars en my screen_ asd ca_ I get rid ef them?
Most digital video is sent ill a 16/g fermat which fills your screen, but
s sometimes sent n 4/3 which does _et fill your screen, It depends
oil how tile sla2iol_ or device corlnected te your ]V is lnrnlattillg the
videe, Ifthere are bars ol_ tile screen, Check Screen size ill the p}ctom
mode to try a d fferent fonnat that may eliminate the bars, Sonle bars
can't be removed beca_se o[ the way the fomlat is sent by the
breadcaster, The ferma4 cha _gesas yeo choose screen size type ih tie
piclum mode al_dt-_e ton nat type is displayed at the bollom of the scr_} _,
Fnr nlore irffon nat}or_ oil screen size, go to page 9,
Why does channel search find a let ef chasnels_
but _ehen I t_ te t_ne te the_ there's nethiag there?
Some chahnels don= carry pregrammi ig, such as video On Demand.
When cha illele am unavailable, your Pd scu;en ie blank or appears; like
sllew, You probably want to remeve these channele frem yeor channel
list. Remove these /_ the Chanl_el List Me_u, Ge to page 8 tnr more
n/nnn rtiol L
Why does it take a le_g time _,ehe_ Isearch the cha_aels
at first ti_'_e?
If you have both analog and d}gital channels, the P,/ is Iookh/g for all
available chanllele in tie channel liet If you de haue digital cha reels, the
f\/is zqso eearclgng for ecmmbled channels, non scmxmbled channe}e,
_nd each eub channel of that digi al channel,
Identifying Problems
If there are any problenls when usihg the product, please consult the
Uet below, If the list dees not _;elve the preblerrh cW our Cuetomer
P.,erviceCenter hnmediately,
7]/Problems
The _ cau't be turned e_
M_ke sure the AC cord is plugged in,
- Check the wall outlet, make sur_.>the AC output works norltlally
_lld stably,
The side panel may be locked (disabled), Use the remete control
to turn on the TM
Select the Keypad lock fuhcton in the P/\REN [AI cenml Menu
and press OK to uncheck the locking status.
There is ne pictu_ er sound but the TV is e_ a_d there is a "He
Signal" sig_ e_ screen.
Are you try}rig te use an input source with no device corlnected
to it'? For usillg other videoM_udio device, make sure the external
device works normally first, then pu;ss INPUT and cheose tile rght
nput so_u:e,
The Sig lal [_/pe option may be set incermclly, Go te page 8 for
detailed h/structions,
The channel may be blal_k, [ry to seamh Ule cha inel _gain or
change another cha ineL
The seu_d is fine_ but the picture is peer°
If you can only ge black and white pictures from external device
that yeu've connected to your I\( m_ybe it is due to the video
cables is hot connected well, or thsy _u;connected wrnngly, e
Check the col_nect}orl stability first, then check the corn;c= -_ess, e
Fer/W i/put, the yellow v}deo cable conl lects to the yellow Video e
Injack on the eide of your f\L
I%r Component input, the tMne Y, Pb, Prvideo cable.<; (red, blue,
_nd greeii) shoold be connect to the cormspondh/g h/put jacks
on the side ofyoor Pd, e
Check the antellna conl/ecl}ons, Make sum all of tile cables _m
firmly connected to the TV jack on side of yoor V\L e
hy adjusting the color features to impreve, e
There is _e seund, but the picture is fine_
The sound might be muted, hy pu;ssh/g the MUTE bulton to e
r_,store so_nd, e
- For ushlg/W or Componel_t, remember to connect the device's left e
_lld dght audo output norrectly, The left chanl_el cable is white ahd he
rght channel cable [s red, Pin d_n mstch thn c _blesand jacke _ccord[ng e
to their colors,
The sound settings may not be set correctly, Go to page g for ¢
more informatio i, e
If your audio seus_e hae only one jack or b a (roche) audb eource,
make sure you have plugged the connection into the Audio In L jack
{white) on the [M
The but=arts en the side 9anal de_'t _r_erko
The side panel may be locked (d}sabled) Use the remote control to
turn on the f\L e
Select the Keypad Lock fu icUon in the PAREN]Y\I control Menu and •
prees OK to uncheck the locking status,
Unplug the ]M from the AC power for 10 minutes and th_l plug it back, e
[orn the T\/en and try again,
The _ turns eft usexpectedly.
- The electe/nic pretectioh circuit may have been activated because of
power sorge, Wai 30 seconds and then turn the ]\/on again,
If this happens hequen ly, the voltage ih yoor loose may be abnonnaL
If the ether electronic eqoipment ill your home ca/_t work non';sally,
consult a q_al}f}ed service personnel
Can't select a cer_i_ cha_aeL
Tie channel may be blocked or nol approved in tie PARENTAl
control Menu.
The charu/el may be skipped ill channel list ill CHANNEL Menu.
Check the blockh ig and skipping sta!us of chanlleL
The stereo sousd pert%r_aece is bad_
It may be a vvesk statien, Use the AUI)IO M_lu and _>et/tnaleg Snu_d s
Mene,
A black bex appears o_ the screen.
Closed capt}oning might be on, Check Clos_J Caption in the SFIUP
menu, Ge te page 10 for mere instruodens,
Problems with the HD_I Ce_aectie_.
- Make sure the HDMI dovbe (B\/D, video)gaff/e< etc.} is turn_] oil and the
cables are firmly conl i_;h;d,
If prublenls still occur, tun/ off your device and mcennect it, Reset the
power by unplugging the power cord and ph_ggng it again,
if a "No Signal" message appears on screen , the HDMI device
sn't responding, Contact the manuh_(basr ol the FIDMI device tcr
fu =her assistance.
if you have black bars on each side of your picture {which
]qeans the I%_con not display a fun scrcen image), the dovice you
connected might have a switch or a T/enu option aNowing you to
change the picture quality outpld that will fix this. Choose either
720p or 1080i,
e
The Re_ete central deesn't werko
e
- There may be an AC power failure or gle power cord
ul _ph_gged in,
Somelhl_g miglt be blecking between the remote control and tile
n;mote sensor oil tie front palel of the T\L Make suu; there is a clear path,
The remote may not be aimed directly at the V\L
e
Tile batteries ill t_e renlole ma_/be weak, dead, or installed
e
il_correctly, Put new batteries }n tie remote,
"You are experiencing preWer¢_s with WCh[piParen_l Cestrels.
¢
If the r rting limits dent work, you must lock the se!tings, Go to the
Main Menu (press MENU on your mmete), select PAREN]Y\I control to
check the se tings,
What else cas I de?
If you've been thn)ugh the ]roubleshooth/g secUon and noth}ng has
fixed your preblem, try rebeeting your [M
Note that after a mbeet, you nlay need to run your TV threug i the
_;etup process aga}n, fo reboot, unplug the power cord ffnm the wall
outlel er pewer slrip,
e
Keep your [M unplugged fer about 5 minute._;, Thell plug in the T\/and
e
turn it on, See if tie problem is fixed,
If the preblem remains, then please visit tile Customer Support Mel_u at
www,R_a,com or u )dated _M\Qs or ce _tacl RCA Custemer Supporl al
the support number previded in your Warral4y card,
e
e
200 mm
e
@
"100m ÷...........................__
e
e
e
e
@
LED32G30RQ VESA 200 x 100 M6 screws, length 10ram i
ti
e
/,/_ e
e
e
/, 7n() n¢_,:/rroit e_ ,'70 O(.vtUl<.d I ;_eeees(;/_o_ s(/_Z 4e'/? ;(sor_:,/et
/,_)Oi?iy/?sea,/ /V _me'sdrs] s/Dnc_e;_hons b/,'to L_d__;is' me/t u'e(>i
@
if;,,O/ ,'_lS d h<' .we/t /aes,sr, COnS i/t yeut he /,>ca/ u_>ak:r inr s, L/(\nr.
4/s,is ,w 'O r t;
ti
B ¢iW> ro_g!y eB;gest to set he 4!eli r)eis>; ',dh equgr'en!s ef
e
epec/ficatw 4'e ec/!>red /f he, /r appropn/, e /r sta/'/;,! g may cu/se
e
//se,_je 0 :A qc e Or/woaai,
e
(X g>b s :,qgu:i:net ;.<.i:knu'is._is 7Vai/<,::t :'36 ssm#v d:/Y)iY_rr_:4*:;rahe
:i:_ss/,>/w:n;,ut7r;::/g].!s: n:k,ro:_::,
Warnings
e
e
1, Do not set up the wall mount by yourself, Please contact
qualified professionals for b_stallation,
e
2, The Pd should not be mounted on walls or sudaces which have
an angle more t_an 10 degrees with vertical dke.ction, Otherwise
the IRi sot may fall.
3, The walls for mour_ting must have enough strength to hold the
whole weigt t of TV set, For example, concrete wall and brickwork
e
nnnnnnnnnnnnni..........
are eligible, Do not place the mount on soft walls such as earth
walls and plasterboard,
4, If spare parts of differs R specifications (s_lch as scrcws) are
used during mou ging, consult with qualified professionals to
make sure these pads are safe and effective,
5, Bdore attaching the base to wall, ensure the holes for ar_chors
are in keeping with the installing rules. Otherwise there may exist
some potential pK)blems,
6, Do not place any heating source under your television, Or else,
it con cause fire,
7, Do not place the [V near anything dripping, _'ar_sducers and
high voltage wires should be kept for away from the apparatus
too, Or else, it may cause creepage, electric shock or bad
rsssnanca,
8. Do not place FV in a Iocatien where colNsion or vibration is
liable to happen,
9, In order to avoid unexpected falNng o[ the IV" set, do not put
any sbong force on IV or wall mount after installing,
10, Be sure to unpk/9 the Pd beRae, installing, Keep anything hard
or sharp away ffeln the screen panel to prevent the scuffil_g,
11, Aer h/st dNng, if there is any need to inove the cabb_et, pie _se
co/tact the qualified prefessionals,
With USB Media Play, you can enjoy music and photo files stored
il a USB storage device on yeur RCA I\L
Connecting a USB storage device
(3or/nect a USB <dotage de,vice to the USB port in the back of tile rv
Press "INPUT" and select "USB',
'IJSB Media Play" rnenu will appear,
UdB 20
PHOTO MUSIC MOVIE TEXT
i
Playing back Photo fifes
Press anx_w (_/_ ) to select "Photo" and p_,ss "OK",
The file or folder list will show up, Press arrow(_/_) to select a file
or folder, Press "OK" , and you will be given several opdons to view
photo files,
You can directly opell and playback the file, Viuvv thumbnails tot
photo preview, or play sUdeshow,
Playing back Music fifes
Press anx_w (4/_) to select "Mush" and press "OK",
The file or folder list will show up, Pl_ss arrow(_/_) to select a file
or =cider, Press "OK" to playback the mlJsic file you selected.
P/_>4ng back Movie files
Press arrow (_/_) to select "MOVIE" and pm,ss "OK",
The file or folder list will show up, Pl_ss arrow(_/_) to select a file
or =cider, P/ass "OK" to playback the mavis file you selected.
Playing back Text files
Similar to the photo menu, You con use TEX] "qenu to access and
dis:_lay text on your RCA rv,
e
s
Medh Support Specification
e
@
e
_ hoto JPG/JPEG files
e
_ Music WAV files
m
i
@
e
s
e
e
e
e
m
¢
e
e
e
@
@
@
@
e
e
e
e
@
@
@
@
e
e
e
e
e
@
@
Movie MPG files
USB Storage USB flash drive
j_ File System format FD{T32
_,#:,_::k t:t? og tit 71/Ot a?ato er._M:_tBa,_ta{!e,i+i,:<e
I:,':;"'tit,7/:< #'/;::';t/iar/"#,i:?':r:u n:<:,
77/,',et _/ rc:,:it/: i,s_s_/ r,t_t,_o= ri,:,/g:< t<,tit>L! i.t,stos,g,
r/r>v:cs,_,:/F:O/t :: :;d rs:,p:::,':_>i/<:,u;:r;art<:c to,o: i,::u_a/,
r/at,_<,r t;rU>[:,s,_:,l:_t/c/_<
, Diagonal Display Size 31,S inches
, ]olevision System ! ATSC/NTSC system
Channel Coverage
Ten/pelaSne , -20T - +60'(7 -4°],.. +140_h
Humidity ' OperationHumidity:Lessthan80%RH '
. _ (No condensation)
Power Supply AC 100-120V, 60Hz
American TV standard
VldF; 2-13 UHF ; 14_69
CATV: 1--135
Storage Temperature is
Operating Temperature is
, 0'(i-+50<i +32_},- +122_f ,
StorageHumidity:Less titan85%RH
(Nocondensation)
RFinpu[ i Cab[e/Antennax 1
e
¢
e
e
e
e
e
s
¢
@
e
@
@
e
e
e
e
@
e
@
@
e
e
e
@
e
@
@
e
e
e
e
@
e
@
@
e
e
Connection Video input Component ×1
InterUce [ HDMI x 2
i Audi°inputi AV× 1
, , +
i A_dio OL_p{iti HeaSphon_ 17Di@talAudio5lit× { '
eesohltiol] 1366 x 768
+
Component/IdDMLnnodei 480i, 480p, 720p, 1080i
, With stand , 28.9W × 18.5"H x 7.3D
Dimensions Without
stand 28.9W x 17.4"H x 3.2'D
, With stand 12.6LBS(5.7KGS)
Weight Without
stand 11.7LBS(5.3KGS)
Power Consumption less than 42W
htoti<6 Spcicrt/ons End (E)i:e d ?s/g) "6 ;t)/{ t tO (M:/n{]6 W/'ro]
soiine
©overage - Labor
For a period of 12 months from date of purchase of your RCA
product, we will pay on author}zeal RCA service center the labor
charge to repair any defects in mater}a}s or workmanship in your
television,ff your television is unrepaimble we will provide you with a
refurbished unit of the same or better model,
©average - Parts
For a period of 12 months from date of purchase of your RCA
product, we will pay an authorized RCA service center for the
new,st at our option, refurbished replacement parts _eeded to
repair any defects in material or workmanship in your telovision, f
your television is unl_pah\qble we will previde you with a returbished
unit of the same or be_rter model,
©eve_age - LED L©D Panel
For a period of 12 T/onths from date of purchase of your RCA
product, we will pay on authorized RCA service center for the
new, or at our option, retu/bished LED [CD panel needed to i_-spair
any defects }n material or workruansh}p in your television. If your
television is unrepairable we will previde you with a refi_rbished unit
ol the same or be_Tter model.
New te Obtai_ SeP,_iee
Fnr aeeistance (U,S,A) f yoo Mschaeed f!CA prnducl h_
tJ,S,A, pleaee call I g8s g77-g722,
Or v}si www,R:a,com
The service reprssehtative will mviow your eptions for service,
As a cenvenieiice we oRer three ways to obtain warranty service,
Ynu inay mail your product to the address provided by the service
represent _Uve,you may take your preduct to a/_ authorized service
center, or you nay request ill home service (servicer will detennine if
preduct ie serviceable in home or must be taken back to lecal service
cehter for repair), Service /epresentative will supply h/structions for
preferred service, At the time of service proof of purnhase such as
origh/al receipt, win be /equired, Only 37" ICI) size and above _m
applicable for in home ::ervice,
Items Not Covered By Limited Warranty
Your limited wananty does net cover the following items:
Un-installation, instalhdion and adjustnlent of costomer colltrels a/_d
operating inetruction,
d:3atterien and customer mpl:_cemetlt rosen
-Damage due to nl}SUSe, Fibuse, negli{jence or isJglect hK;hstihg but, not
limi[erJto, damage renoltblg frem expos[Tre 1o moMus% hun kii{y or sail
dnabilily to receive a sig lal due to preblems not caused by the pmducL
Damage to the product due to images burn1 into the screen,
Produc pumhased or serviced outside of Country of Original
Purchaee,
i,e, Pumhased USA can net be serviced in Mexice/Purchased in
Mexico can nel be serviced in USA,
Product modified or incorporated into other preduote,
Damage due to acts of nature, includhlg but lot limited to,lightning
darnage er flooding.
Service calls which de not i ivolve _ny defect in nl _teri de or
vrerklnanship,
Cer¢_ercial _se _xcladed
This limited wanan y only applie._ to prnducte used for per_;orlal use
tnd dee!; net cover tny product ueed fnr h_stitutional, cemmersial er
rentd purposes,
THIS LIMITED WARRANIM IS THE SOLE AND EXCLUSME
W/\R_i\N [Y APPI ICABI E ]O ]HIS PRODUC[ ON CORP US, INC,,
THE MANUI-_\C rURER OF THIS PRODUCI_ DISCI AIMS ALl
O]HER W/\Rt_ANTIEP, FXPRESSED OR IMPLIED (INCLUDING ALl
IMPLIED WARRANTIES OF MEROHANTABII_rrY OR Frl NESS FOR A
PARTICUI AR PURPOS[), NO VERF_AL OR WRIT]EN INfaRMATION
GIVEN BY ON CORP US, INC,, rls AGENTS, INDEPENDENT
CONTRAC[ORS, SALbS REPREBENh_\FIVES, EMPI OYEES, RF[AII
Dt!\LERS, WHOLE SALE DISTRIBUTORS OR ANY O]HER THIRD
PARIY SHALl ORFArE A GUARANTY OR INCREASE, EXPAND OR
MODIf Y THE SCOPE OF THIS IIMITED W!\RRAN rY,
THIS I IMrl ED w/gg _,AN[M PRO\/IDES THE}SOlE AND bXOI tJS}IVE
REMEDY fT)R THE CONSUMER OF REPAIROR REPI AOEML[NEOF
THE PRODUC[ ON CORP US, INC, .<}HALl NO] BE LIABI E FOR
SPFCIAL, INOIDEN [AL OR OONSI GUENTIAL I)AMAGES ARISING OUT
OF THE USE OF THEP RODUCr OR ARISING OU] OF A BREACH
FXPRESSED OR IMPLIED WARRAN VY ON THIS PRODUC I,
THIS LIMITED WARRANTY AND THE DISCLAIMERS CONT?\INbD
HHI_EIN ARE GOVErn,NED BY THE I.AWS OF THI_ S[AIE OF INDIANA,
EXOEPr TO THIi EXTEN] PROHIBITIi[) BY APPI ICABLI$ lAW, ANY
IMPLIED W/\RRAN] Y OF MEROHAN [ABII_IIM OR FITNESS FOt _<A
PAR FICUI AR PURPOSE IS I IMI] ED TO APPLICABLE LIMITED
WARRANrY PERIOD(S) SFI FOP]H ABOVE,
e
e
THIS WARRAN FY GIVES YOU SPECIFIC LEGAL RIGHTS
e
AND YOI_ ALSO MAY HAVE OTHER RIGHT.<}TH/\F VABY
¢
e
@
@
e
e
e
e
¢
@
e
e
e
e
e
¢
e
@
e
e
e
e
e
e
e
@
e
e
e
e
e
e
@
e
o
F[_,OM ._ lY\[E TO Slb, rE,
B(}/a ({t::¢o(.m/)/i et R(_'/9 [ 7d iY //A3 7S 7{!'?Sl
{W'S nf use/:_/:_ iics rse ib' ON Corporation
Cobe_ura-Trabajo
Du/ante un periodo de 12 meses desde la fecha de colnpra de su
pn)duclo RCA, pagaremos a u_ cel_tm autodzade de servicio de RCA
el cargo de mano de obra para r_.>parsrco dquier d_.ffeclo en nlaleriales
o male de ohm en el televiser
Si su televiser es irreparable qua le preperciorlara una unidad
macondicionada del mismo modelo e superior
Cebe_ura / Reca_bies
Durante un periodo de 12 meses desde b_fecha de cempra de su
pmduclo RCA, pag:selnos :_.un centre autorzado de servic}o de RCA
pare orl reemplarar ya sea corl partes nuevas o r:.>acondicionadas, o a
_uestm opcien, pare u;parar coalqoier def_.>ctodel nl rterial o mano de
obm en el televiser
Si so tel_.>visores irreparable que le preporniohars una unidad
macondicienad _del rr_islno modele o super er.
Pasel de CebeAura-LE# LC#
Durante un periodo de 12 meses desde b_fecha de cempra de su
pmducte RCA, pagamnles un centre auterizade de servicie de RCA
par_ un reenlplas'ar la pantalla LFD / CD, ya sea con pantalla nueva o
macondiciorlada, o a nue.<;tra opcion, part repamr cualqu}er defecto del
material o nlano de obm en la pan=alia de so televise/ Si su tekMsor
es irreparable que le pmporciorlara ula unid _d reacolldicionad _del
mismo modelo o superior,
e
Cede Obteaer Se_icie
Para aeisterlcb._en Estados UnkJos (17:,U,A)si compm un apamto RCA
eh E,U,A, ffwor dellaln _r d: 18889776/'22
e
o visite: www,rcs,com
e
e
El mpmsehtante de Servicio mvisara sus opciones para el servicio,
e
Pare su cemodidad le offecenlos tu;s fennas de oblener servicie de
gararltia,
Usted puede enviar su producto a la direccion pmporcienada por
el mpreseiitante de servicio, usted puede Nevar su preducto a un
centro de servicio autorizado, o puede solicitar en el servicio a
e
domicilio (admi/istrador detennh/ara si el pred_esto se encuentre en
e
funciorlam ell o erl casa o debe ser flevado de vuelta a servicio local
e
tern}co pare su/epamciorl),
El repmsentan e del Servicio le prepoRJonam las instrucciol_es pare el
servic}o pmfnrido,
Se mqoiere del compmban e de cornpm original,
e
Solo se les dam servicio a Domicilio _ [olevisores de 37 " pulgadas de
e
talnano y mas gmndes,
e
@
Elementos no cubiertos per la garantia Iimitada Su
e
garantia Iimitada no cubre los siguientes temas:
e
e
tin instalacion, msntaje y ajuste de contreles del clients
e
e instrucciones de funcionamiento,
as pilas y los fusibles de repuesto al cliente,
@
@
Danos por uso indebido, abuso, neglkjencia o descuido
e
ncluyendo per() no Iiruitado a, los danos derivados
de la expos}cion a la humedad, la humedad o la sal,
e
In(apacidad para i_cibir la senal debido a los problemas
que no son causadas I)or el p/oducto,
Danos en el preducto debido alas imagenes de gmbadas
en la pantalla,
Preductos cortlpradss o prestar servicios flJera del pais
de compra original,
Fj: Comprado en Estados Unidos no puede prestar
servicios en Mexice/Coruprado en Mexico no puede
prestar servicios en Estados LJnidos,
Productos modificados o incsrporados a ol_s pK)ductos,
Danos debidos a tenomenos de a natumleza, incluyendo
per() no beitado a, danos pot rayos o inundaciones,
[ as Ilamadas de se:vicio qua no irnpliquen cualqlJet
detecto en materiales o mano de obra,
_so Oo_ereial _xcl_sie_
Esla gerantia Ih'aitadn solo sc aplicn _ los productos utilizados
para uso personal o, y no cubre tsrlos Io.q productos utilizados con
fir_es ir_stitucionales, cometciales o de alquiler,
ES]A GAfV\NTIA IJMnADA ES EL UNICO Y EXCLUSIVO
DE GARANTIA API ICABI E A ESTE PRODUOf(}, EN
CORP EE,UU,, Inc,, elf tbdcai_te de eete preducte, rechaz t
cualquier etm garantia, expreeada e implicada (INCI UYENDO
TOItAS IAS GA_tAN [IAS IMPLIOrlAS DE OOMERCIAI
IZAOION O IDONEII_AD P/\RA UN PROPOSlTO
P/\RTIOUI A_), NO infennacien verbal e e._;crita per parte
CORP DE EE,UU. Inc,, sus agentee, corltmtistae
ndependieiites, representantes de yen=as, empleados,
comeuJan es nlinoristas, mayoristas o cualquier otto temen)
DEBERAN crnar una garant}a ni aumentar Anlpliar o
modificar el alcance de esta gamnt}a Iimitada,
Eeta GARAN] IA I IMI]?\DA DEL UNICO Y / XCI USIVO REMEDIO
PARA EL CONSUMIDOR DE REPARACION O REEMn/_BO
DEL PRODUC to, EN CORP I_E,UU,, Inc, io sera
mspons _blepot danos espec}ales, ihcidet4ales o
consecuentes resul antes DILL USO DEL PROIDUCTO O
DERIVADOS DE UNA VlOLACION gararlt}a expresa o
InplkJta de este prnduoto,
ESfT\ GARANTIA LIMnADA Y RESPONSABII IDADES contenida en el
ee/ige per las I.eyee del Estado de I _diana, SAI VOPROHIBIDO POR
IA IEY API ICABI E, CUALQUIER GA[V\NTIA IMPI_IOI[?\ DE
COMERCIALlYACION O IDONEID/\D PAW\ UN PROPOSrlO
PARTICULAR [ S [7\[M\ I IMrI?\DA A I_IMI tAR/\ periodo de gamn }a (S)
menc}onado anteriermel 4e, Esta garanda le otorga demchos legales
especificos y USTED [AMBIEN PUFDE TENER O]ROS DERECHOS,
QUE PUEDEN VARIAR DE ES]YtDO,
B()i' _e f/?a r a o g/s a<#a _ x 7 ;>/O d6r O r.
ON Corp US, IncL
10920 Via Frontera, Ste 540
San Diego, CA 9212}', US,A,
(_2014 ON Corpora=on
ROA is a trademark ot RCA Trademark I'Vlasagel_ellt
BA$ ussd under Iiselrlss te OI/ ¢orpsratisrl,
ACA es una marcade ROA ]tademark Management
SAS usada bao Iicencia de ON Co/po/a on
ON Corporation
 Loading...