

Page 1
USER’S
GUIDE
LDR611
LASERDISC PLAYER
Page 2
i
Introduction
Important Information
Please fill out the product registration card and return it immediately. Returning this card
allows us to contact you if needed.
Keep your sales receipt to obtain warranty parts and service and for proof of purchase.
Attach it here and record the serial and model numbers in case you need them. The
numbers are located on the back of the player.
Model No._____________________________________________________________________
Serial No. _____________________________________________________________________
Purchase Date: ________________________________________________________________
Dealer/Address/Phone: ________________________________________________________
_______________________________________________________________________________
LDR611
CAUTION
RISK OF ELECTRIC SHOCK
DO NOT OPEN
This symbol indicates “dangerous voltage” inside the product
that presents a risk of electric shock or personal injury.
This symbol indicates important instructions
accompanying the product.
CAUTION: To prevent electric
shock, match wide blade of plug to
wide slot, fully insert.
ATTENTION: Pour éviter les
chocs électriques, introduire la lame
la plus large de la fiche dans la
borne correspondante de la prise et
pousser jusqú au fond.
Cautions
FCC regulations state that unauthorized changes or modifications to this equipment may void the user’s
authority to operate it.
Use of controls or adjustments or performance of procedures other than those specified herein may result in
hazardous radiation exposure.
This product satisfies FCC regulations when shielded cables and connectors are used to connect the unit to
other equipment. To prevent electromagnetic interference with electric appliances, such as radios and
televisions, use shielded cables and connectors for connections.
The use of optical instruments with this product will increase eye hazard.
Information To User
This equipment has been tested and found to comply with the limits for a Class B digital device, pursuant to
Part 15 of the FCC rules. These limits are designed to provide reasonable protection against harmful
interference in a residential installation. This equipment generates, uses and can radiate radio frequency
energy and, if not installed and used in accordance with the instructions, may cause harmful interference to
radio communications. However, there is no guarantee that interference will not occur in a particular
installation. If this equipment does cause harmful interference to radio or television reception, which can be
determined by turning the equipment off and on, the user is encouraged to try to correct the interference by
one or more of the following measures.
• Reorient or relocate the receiving antenna.
• Increase the separation between the equipment and receiver.
• Connect this equipment into an outlet on a circuit different from that to which the receiver is connected.
• Consult the dealer or an experienced radio/TV technician for help.
The digital apparatus does not exceed the Class B limits for radio noise emissions from digital apparatus set
out in the Radio Interference Regulations of the Canadian Department of Communications.
Product Registration
WARNING
To reduce the risk of fire or shock hazard,
do not expose this LaserDisc player to
rain or moisture.
TO REDUCE THE RISK OF ELECTRIC SHOCK, DO NOT REMOVE
THE COVER (OR BACK). NO USER-SERVICEABLE PARTS ARE
INSIDE. REFER SERVICING TO QUALIFIED SERVICE PERSONNEL.
Page 3

1
Introduction
Important Information
Warning, Cautions, and Information to User _____________________________i
Product Registration__________________________________________________ i
Setting Up the Player
Startup
Check Accessories with Player___________________________________ 2
Insert Batteries in Remote_______________________________________ 2
Connect Player ________________________________________________ 2
Turn on TV ___________________________________________________ 2
Turn on Player ________________________________________________ 3
Load a Disc ___________________________________________________ 3
Play a Disc____________________________________________________ 4
Pause Playback Temporarily ____________________________________ 4
Remove Disc from the Player____________________________________ 4
Turn off Player ________________________________________________ 4
Using the Remote Control
Buttons_____________________________________________________________ 5
Playing a Disc
On-Screen Displays ________________________________________________ 6-7
Display On/Off Feature ______________________________________________ 8
Theatre Mode _______________________________________________________ 8
Last Memory Feature_________________________________________________ 9
Search by Chapter (Track), Time, or Frame __________________________ 10-11
Intro and Hi-Lite Scan _______________________________________________12
Variable-Speed Playback_____________________________________________ 13
Still Frame and Frame Advance_______________________________________ 13
Manual (Visual) Scanning____________________________________________ 14
Random Playback __________________________________________________ 15
Repeat Playback _________________________________________________ 16-17
Program Playback________________________________________________ 18-19
Select Audio on Laser Discs __________________________________________ 20
Select Audio on Compact Discs_______________________________________ 21
CX Noise Reduction System__________________________________________ 21
Listening for a Lifetime______________________________________________ 21
References
Location of Controls
Front Panel __________________________________________________ 22
Display Panel ________________________________________________ 23
Back Panel ___________________________________________________ 24
Choosing a Hookup _________________________________________________24
Connect Player to TV Monitor (or VCR) With
AUDIO/VIDEO IN Jacks ______25
Connect Player to TV Without Audio/Video Inputs _____________________26
Connect Player to Amplifier/Receiver _________________________________27
Types of Discs that Can be Played_____________________________________ 28
Glossary___________________________________________________________ 29
Care of Player and Discs _____________________________________________ 30
Trouble Checks __________________________________________________ 31-33
Customer Assistance and Service _____________________________________ 34
Limited Warranty ________________________________________________ 34-35
Specifications ______________________________________________________ 36
Index______________________________________________________________ 37
Table of Contents
Page 4
2
Setting Up the Player
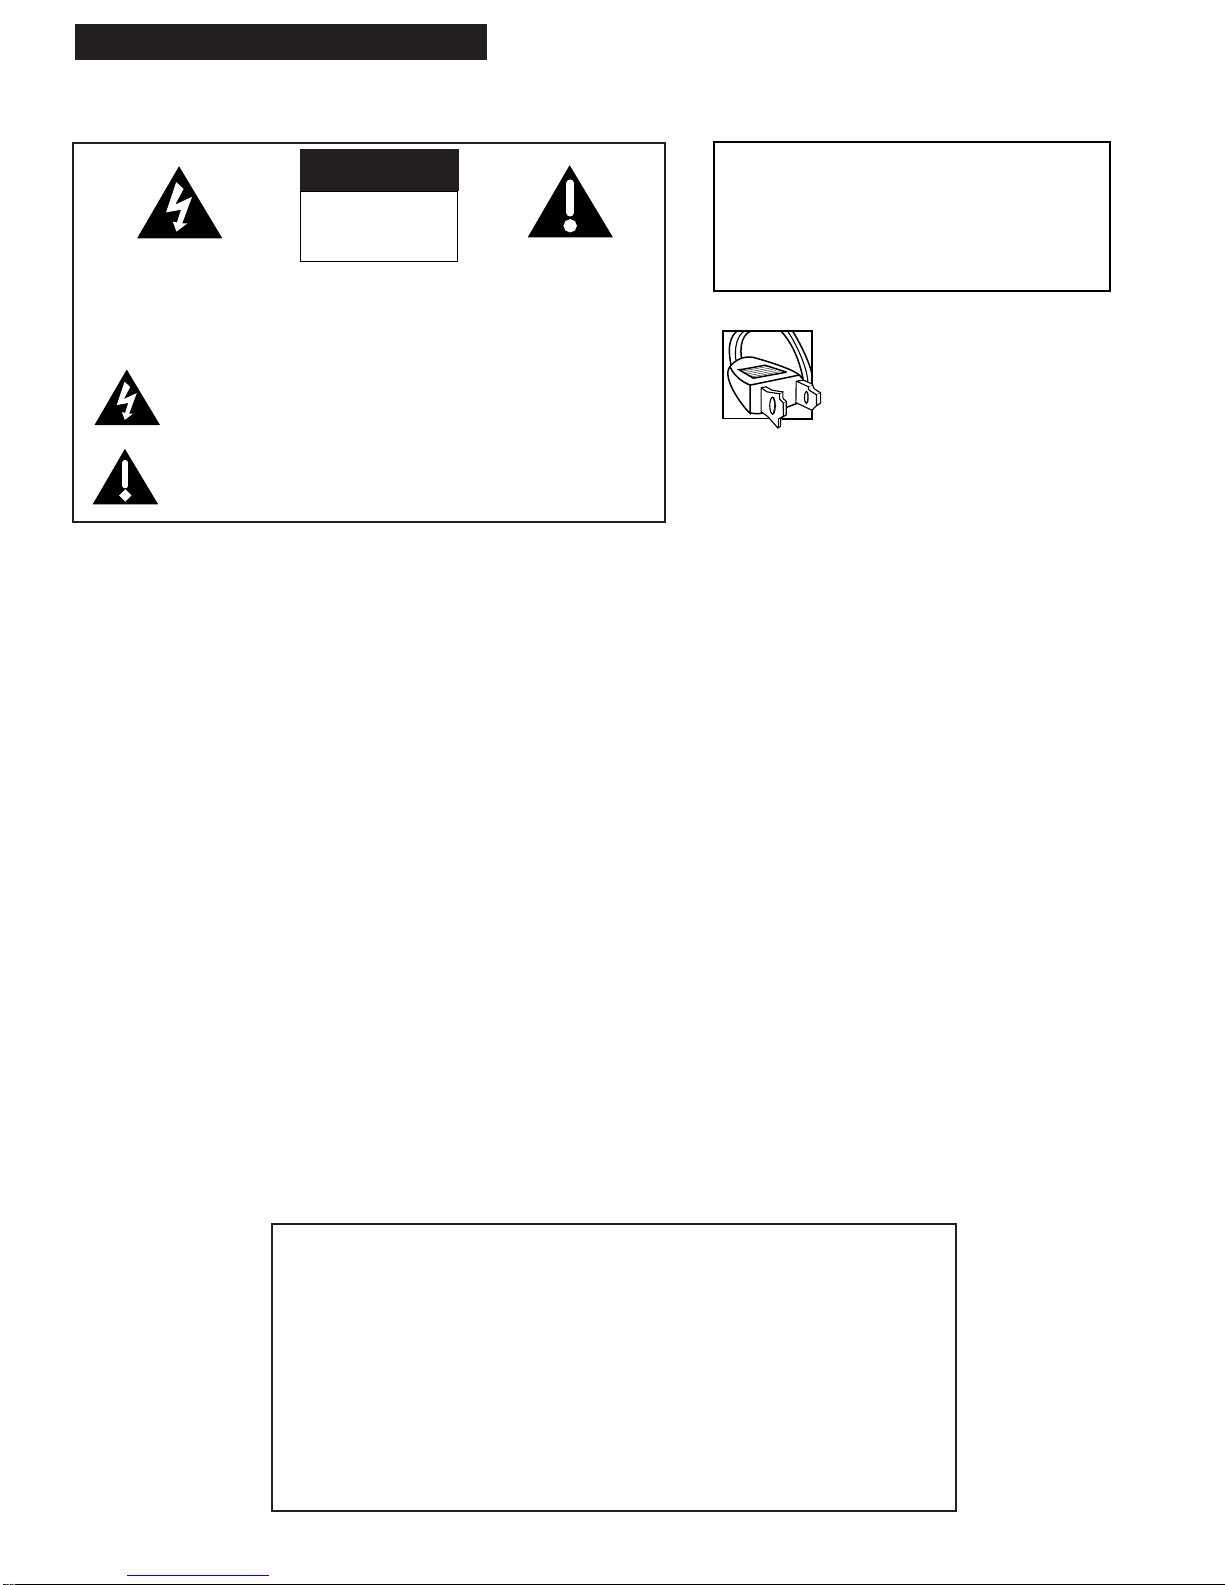
1. Check accessories with player.
Contact your dealer if any items are missing.
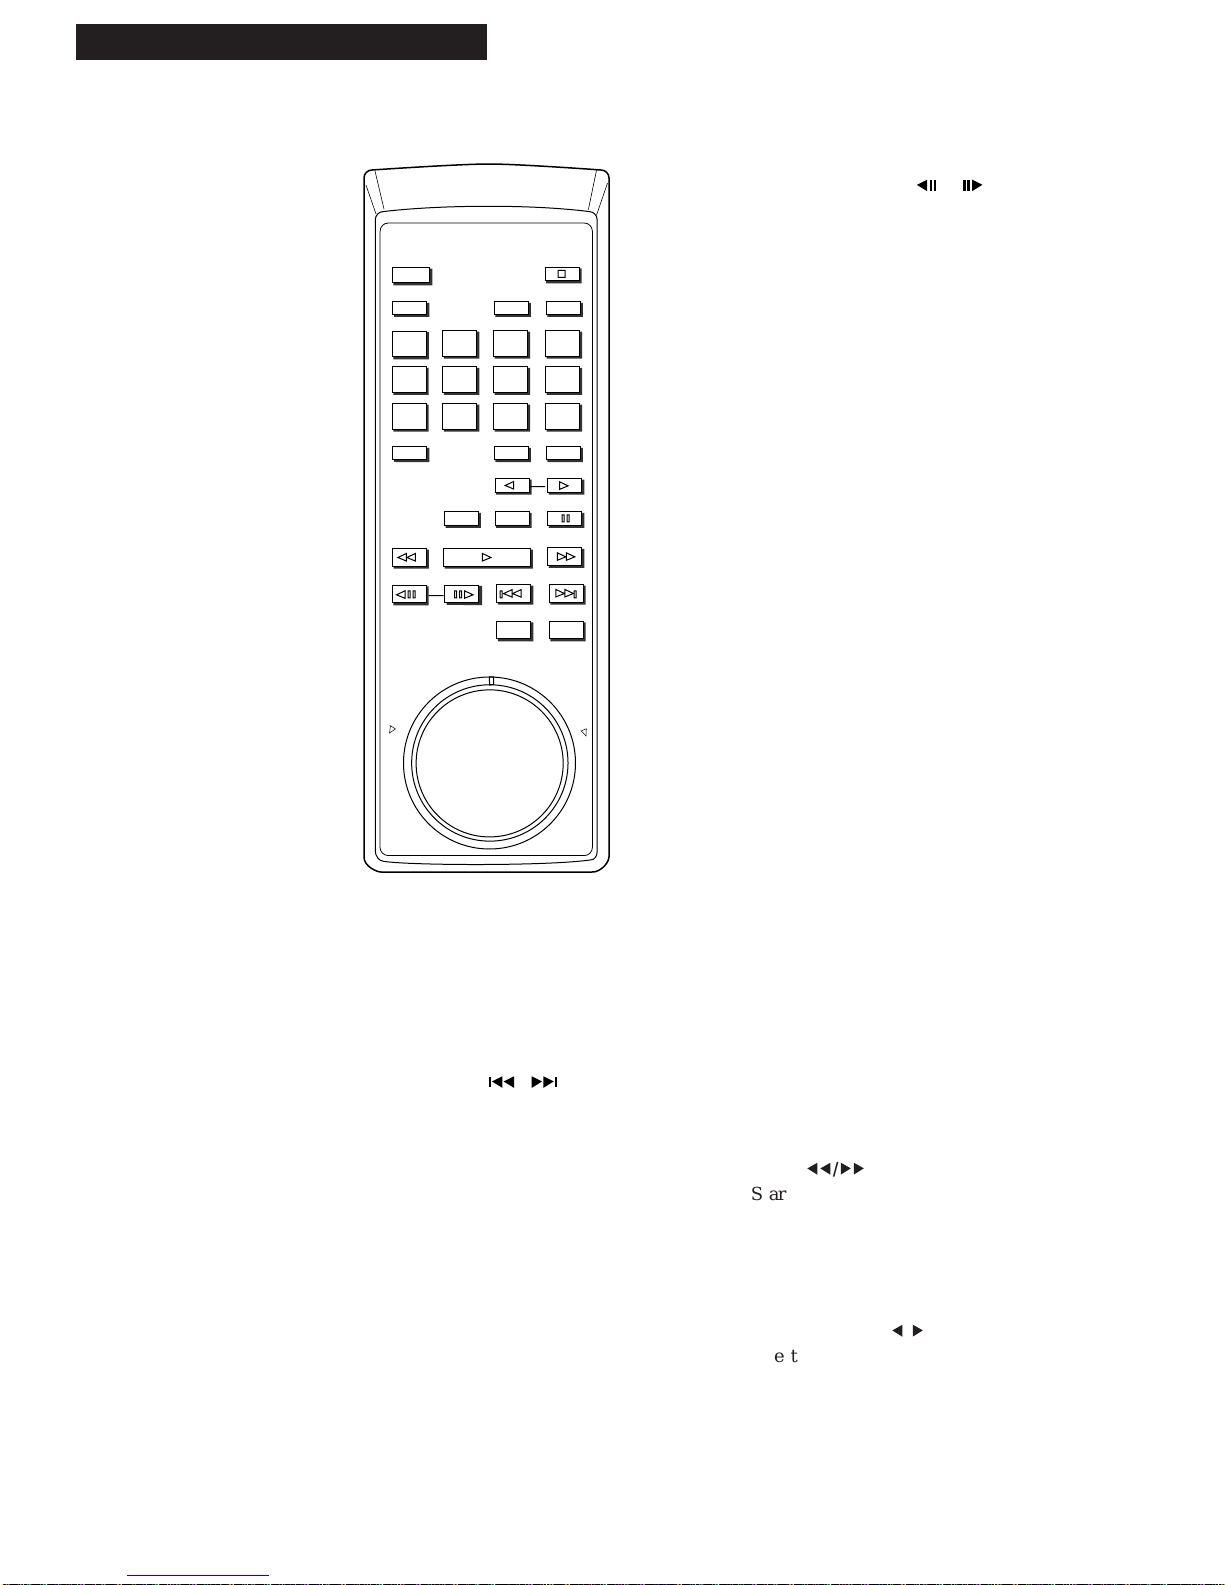
Remote
(Stock No. 221365)
11
1
2 3
CLEAR
SCANSCAN PLAY
PROGRAM CHAP•TIME DISPLAY
CHAP•TRACK SRCH
DISC SIDE
AUDIO
REPEAT
REPEAT
STOP
4 5 6 +10
7 8 9
A•B
0
FRAME ADVANCE
PAUSE
POWER
SPEED SELECT
A B
SCAN
R
E
V
E
R
S
E
•
•
•
•
•
•
•
•
•
•
•
•
•
•
•
•
F
O
R
W
A
R
D
RANDOM
HI - LITE
INTRO
Video Cable
(Stock No. 221367)
11111
Audio Cable
(Stock No. 221366)
2 “AAA” Batteries
Startup
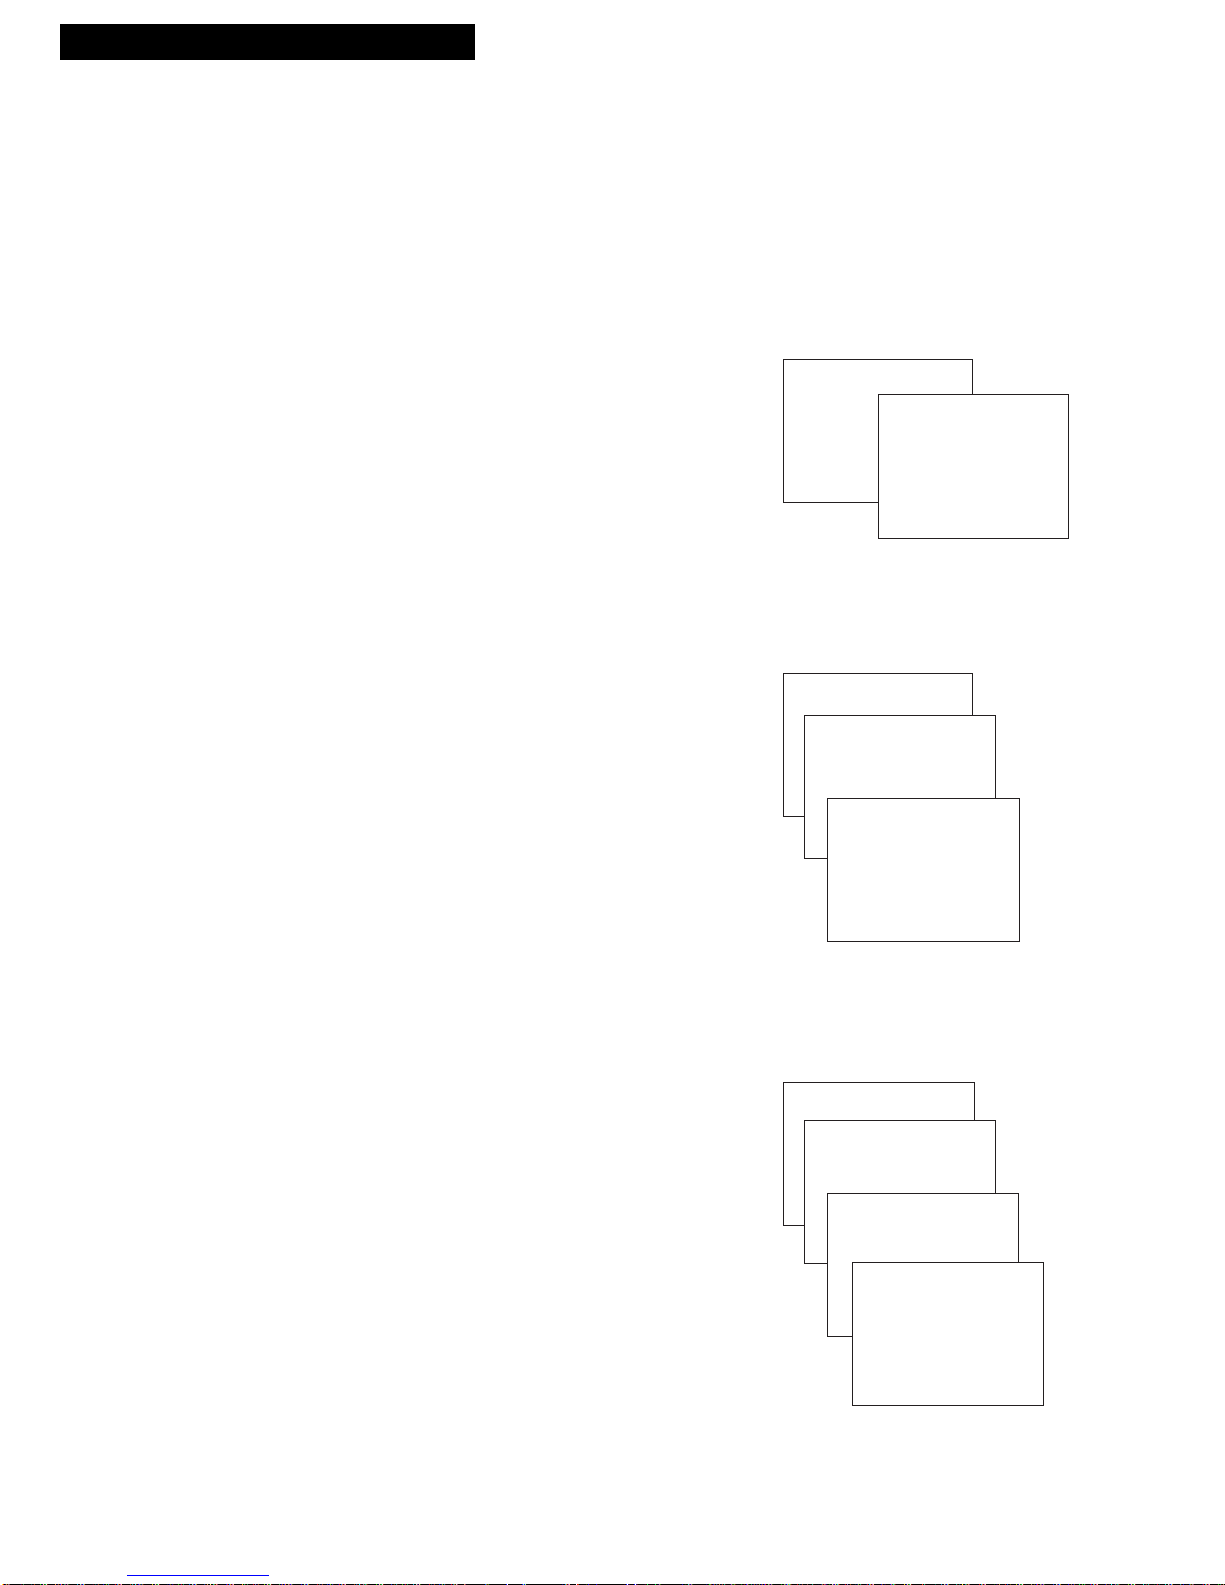
2. Insert batteries in remote.
A.
B.
C.
3. Connect player.
• Connect the player to a TV monitor (or VCR) with AUDIO/VIDEO IN jacks. Details on
page 25
• Connect the player to a TV that does not have audio/video inputs using an optional
RF adapter. Details on page 26.
• Optional: You also may want to connect the audio from the player to an
amplifier/receiver – especially for playing CDs. Details on page 27.
4. Turn on the TV.
A. Turn on the TV (or TV and VCR).
B. If you connected your player to the AUDIO/VIDEO IN jacks, tune the TV (or VCR) to
its video input channel.
If you connected your player using an optional RF adapter, tune the TV to the same
channel as the CH3/CH4 switch on the adapter.
Page 5
3
Setting Up the Player
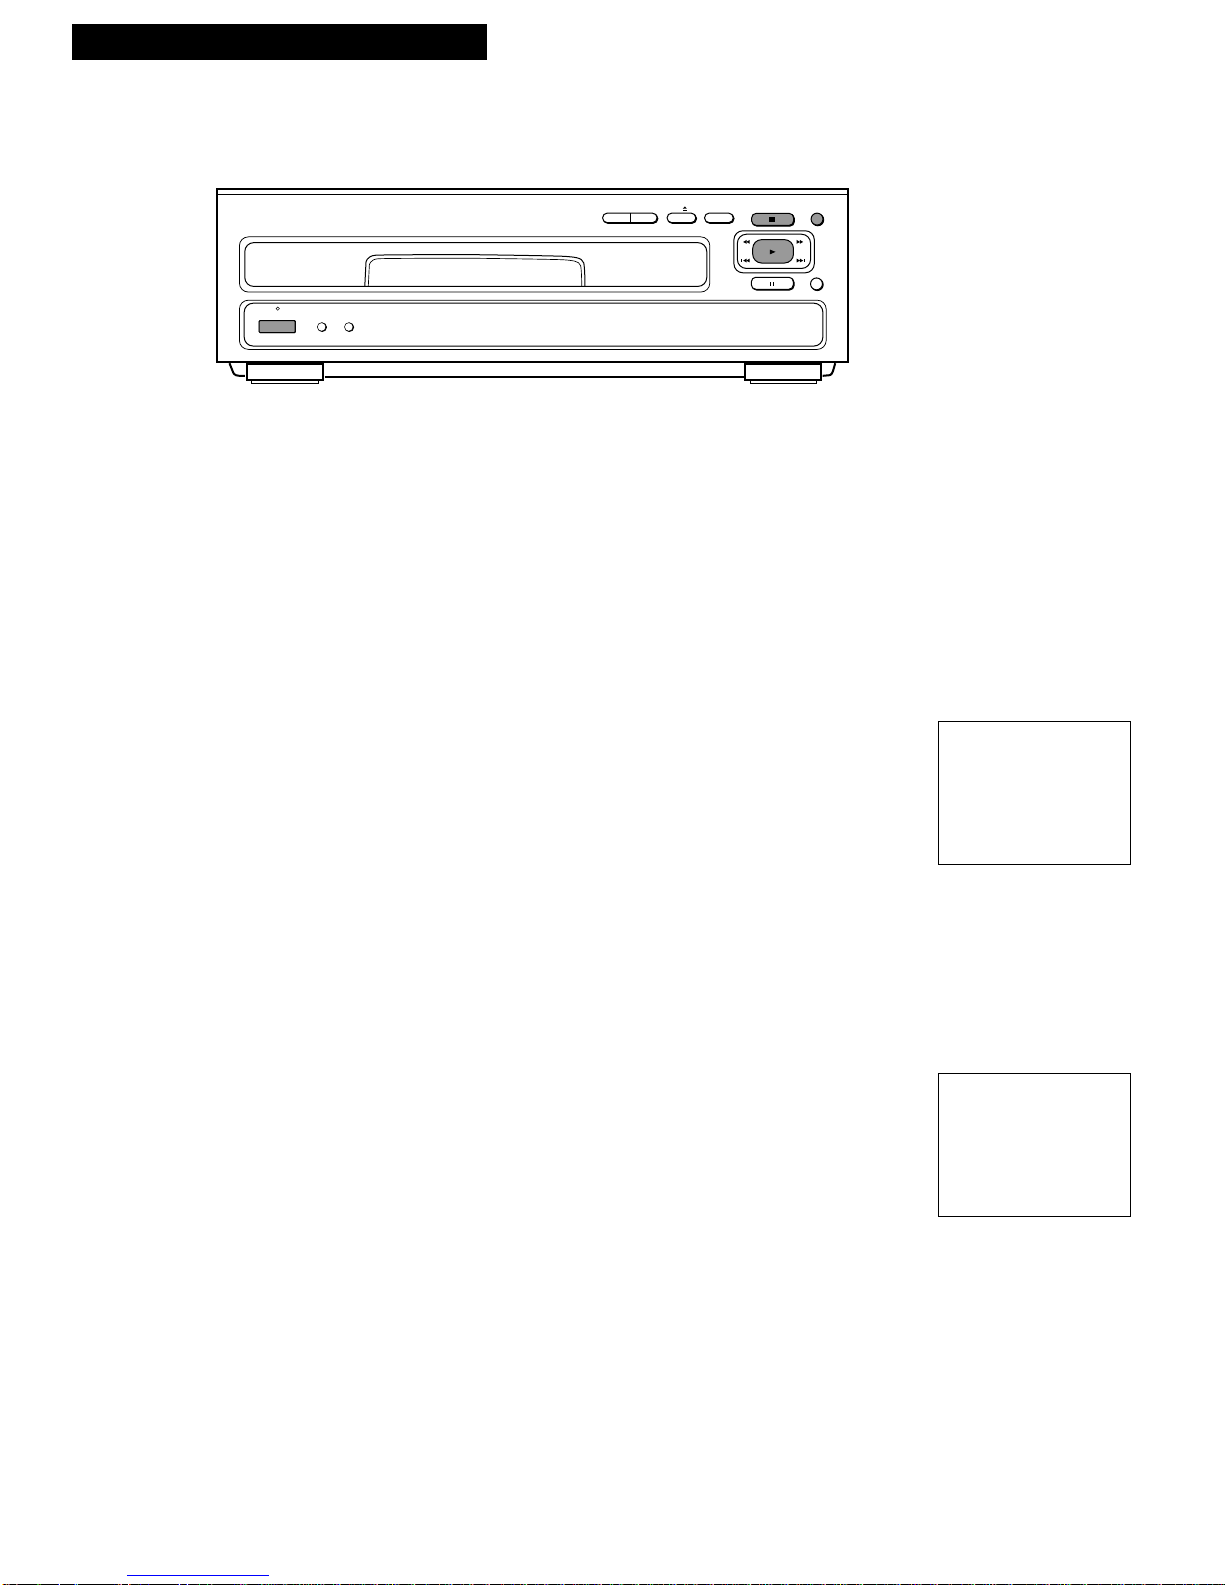
5. Turn on the player.
A. Press POWER on player or remote.
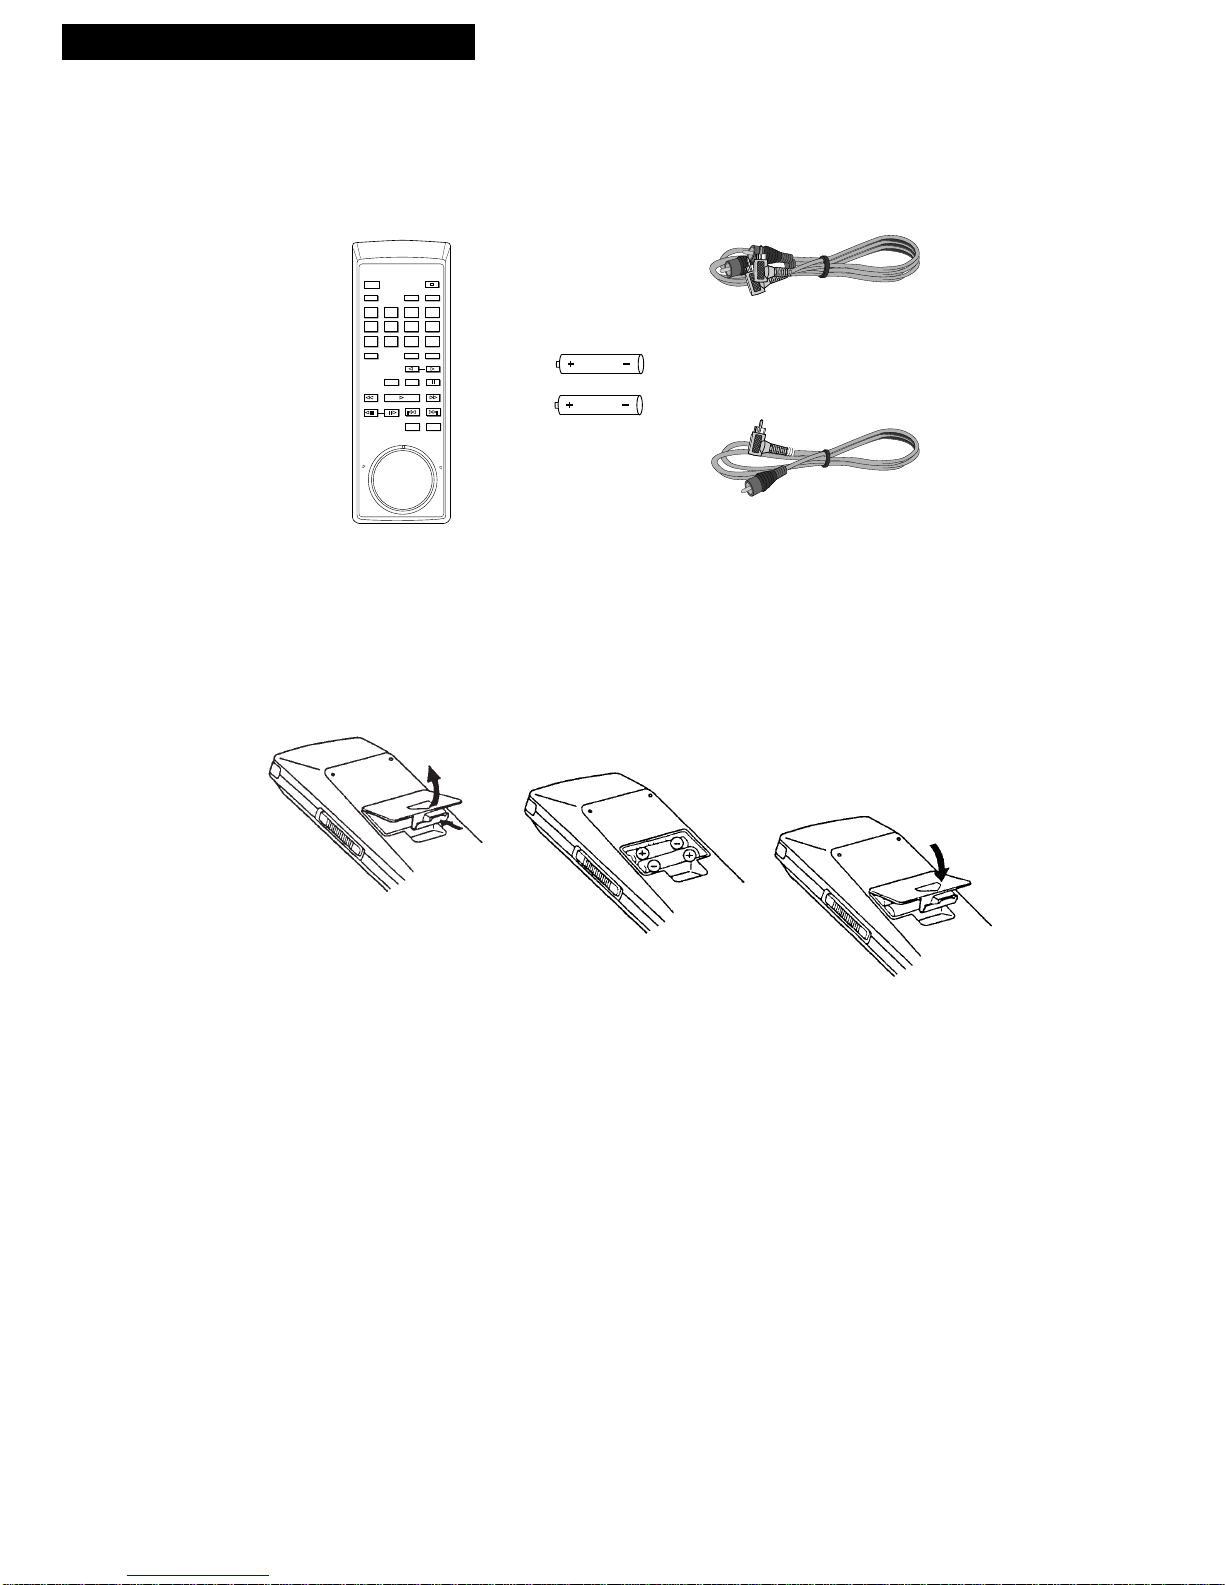
6. Load a disc.
A. Press OPEN•CLOSE CD or LD on the player to open the appropriate disc table
— CD (compact disc) or LD (laser disc).
appears in the display panel when
the disc table is opening or closing.
Pressing OPEN•CLOSE CD or LD on the player will also turn on the player
when the power is turned off.
B. Load a disc as shown.
CAUTIONS
Loading more than one disc or loading a disc incorrectly may cause damage to
the disc and disc player.
Center the disc properly in the groove corresponding to the size of the disc.
Place only one disc on the disc table at a time.
Do not use adapters with this disc player.
Do not place any objects other than a disc on the disc table.
Do not move the player while a disc is playing. This may cause the disc to be
scratched.
Do not let children put their hands into the disc player when the table is open.
This may cause injury.
8-Inch LD
12-Inch LD
Place side up you want to play.*
Load a Laser Disc
* On two-sided disc, the side facing up
will play first and then the other side
5-Inch CD (CDV)
3-Inch CD
CD (CDV) – Place label side up.
Load a CD
Startup
continued on next page
Page 6

4
Setting Up the Player
Startup
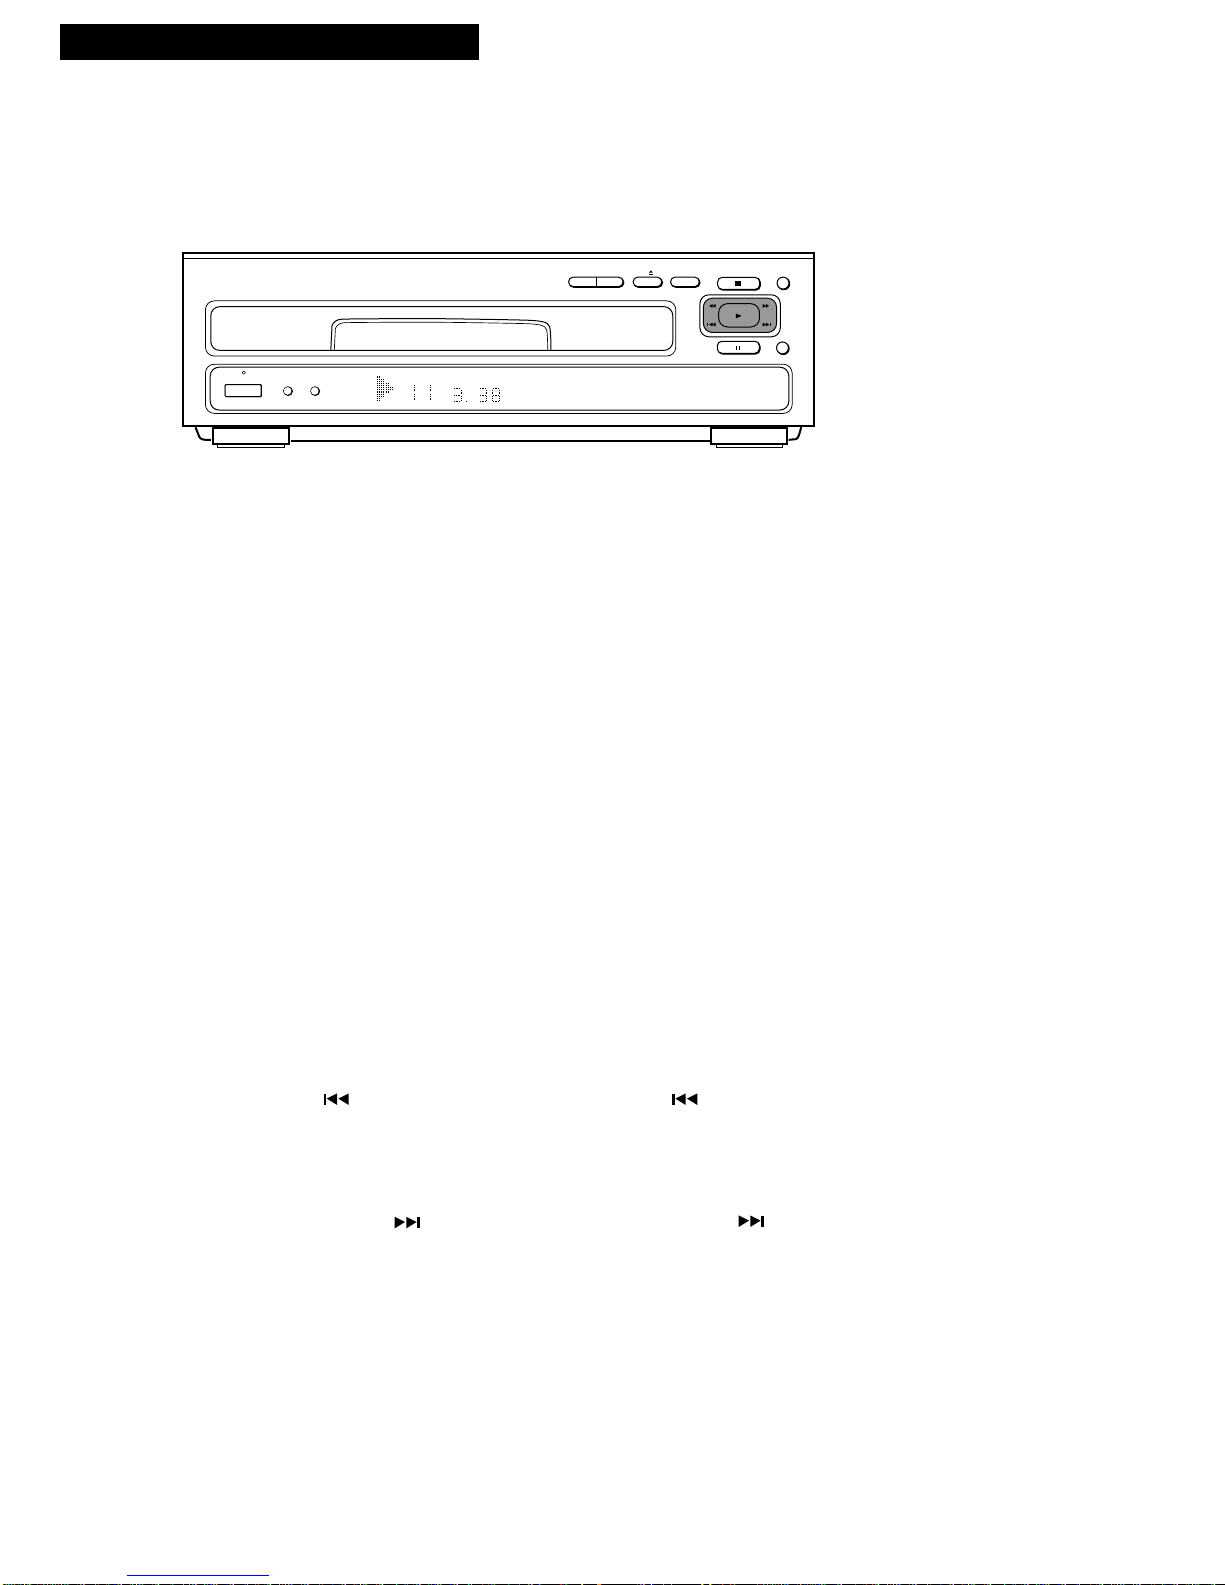
7. Play the disc.
A. Press OPEN•CLOSE CD or LD on the player to close the disc table.
B. Press PLAY. appears along with information about the disc
that is playing in the display panel.
You can also press PLAY to close the disc table and start playing
the disc.
To play only one side of the disc, press DISC SIDE A or B . The
side selected will be played, and then playback will stop.
8. Pause playback temporarily.
A. Press PAUSE. appears in the display panel when a disc is
paused.
B. Press PLAY or PAUSEto return to normal playback from that
point on the disc.
9. Remove the disc from the player.
A. Press STOP to stop playing the disc.
B. Press OPEN•CLOSE CDor LD on the player to open the
appropriate disc table.
C. Remove the disc, place it in its jacket, and store upright away from
heat and humidity.
D. Press OPEN•CLOSE CD or LD on the player or PLAY to close the
disc table.
10. Turn off the player.
A. Press POWER. The STANDBY indicator on the player lights.
Page 7
5
Remote Control
Buttons
1
2 3
CLEAR
SCANSCAN PLAY
PROGRAM CHAP•TIME DISPLAY
CHAP•TRACK SRCH
DISC SIDE
AUDIO
REPEAT
REPEAT
STOP
4 5 6 +10
7 8 9
A•B
0
FRAME ADVANCE
PAUSE
POWER
SPEED SELECT
AB
SCAN
R
E
V
E
R
S
E
•
•
•
•
•
•
•
•
•
•
•
•
•
•
•
•
F
O
R
W
A
R
D
RANDOM
HI - LITE
INTRO
AUDIO
Selects type of audio (digital, analog, stereo,
left channel, or right channel).
CHAP•TIME
(Chapter•Time)
Allows you to search for a particular frame,
chapter (track), or time location depending on
the type of disc.
CHAP•TRACK SRCH
/
Searches forward or in reverse for a chapter
(track) on a disc that is playing.
CLEAR
Clears repeat, program, random, and intro
scan features.
Allows you to change entries during
programming.
DISC SIDE A or B
Plays side A or B of a laser disc.
Used for programming two-sided disc.
DISPLAY
Displays information about the disc that is
playing in the display panel and on the TV
screen.
FRAME ADVANCE /
Lets you view one frame of a CAV disc either
forward or reverse with each press of the
button.
HI-LITE INTRO
Starts hi-lite scan on CDs and audio portion of
CDVs.
Starts intro scan on laser discs and video
portions of CDVs.
Number Buttons
(0 Through 9 and +10)
Use these buttons to direct search for a chapter
(track).
Also used during programming.
PAUSE
Pauses action during playback.
PLAY
Plays a disc.
Closes disc table .
Starts player searching.
POWER
Turns the player on or off.
PROGRAM
Used to program player to playback chapters
(tracks) in certain order.
RANDOM
Plays the chapters (tracks) of a disc back in
random order.
REPEAT
Repeat plays a specified chapter (track), one
side, or both sides of a two-sided disc.
Also repeats a program or random playback.
REPEAT A•B
Repeat plays a portion of the disc from a
specified memory point or repeats a specified
section of a disc.
SCAN
55/66
Searches visually forward or in reverse at faster
than normal speed.
SCAN Shuttle
Searches at three faster-than-normal speeds in
forward or reverse.
SPEED SELECT 5/
6
Selects playback speed and direction — reverse
or forward.
STOP
Stops the normal functions, such as playback
and search of the player.
Page 8
6
Playing a Disc
On-Screen Displays
Status displays appear automatically on the TV screen whenever the disc player is turned on, changes functions, or
performs special functions. More information can be displayed about the disc that is playing. The type of disc
determines the information and number of displays. This information also appears in the player’s display panel.
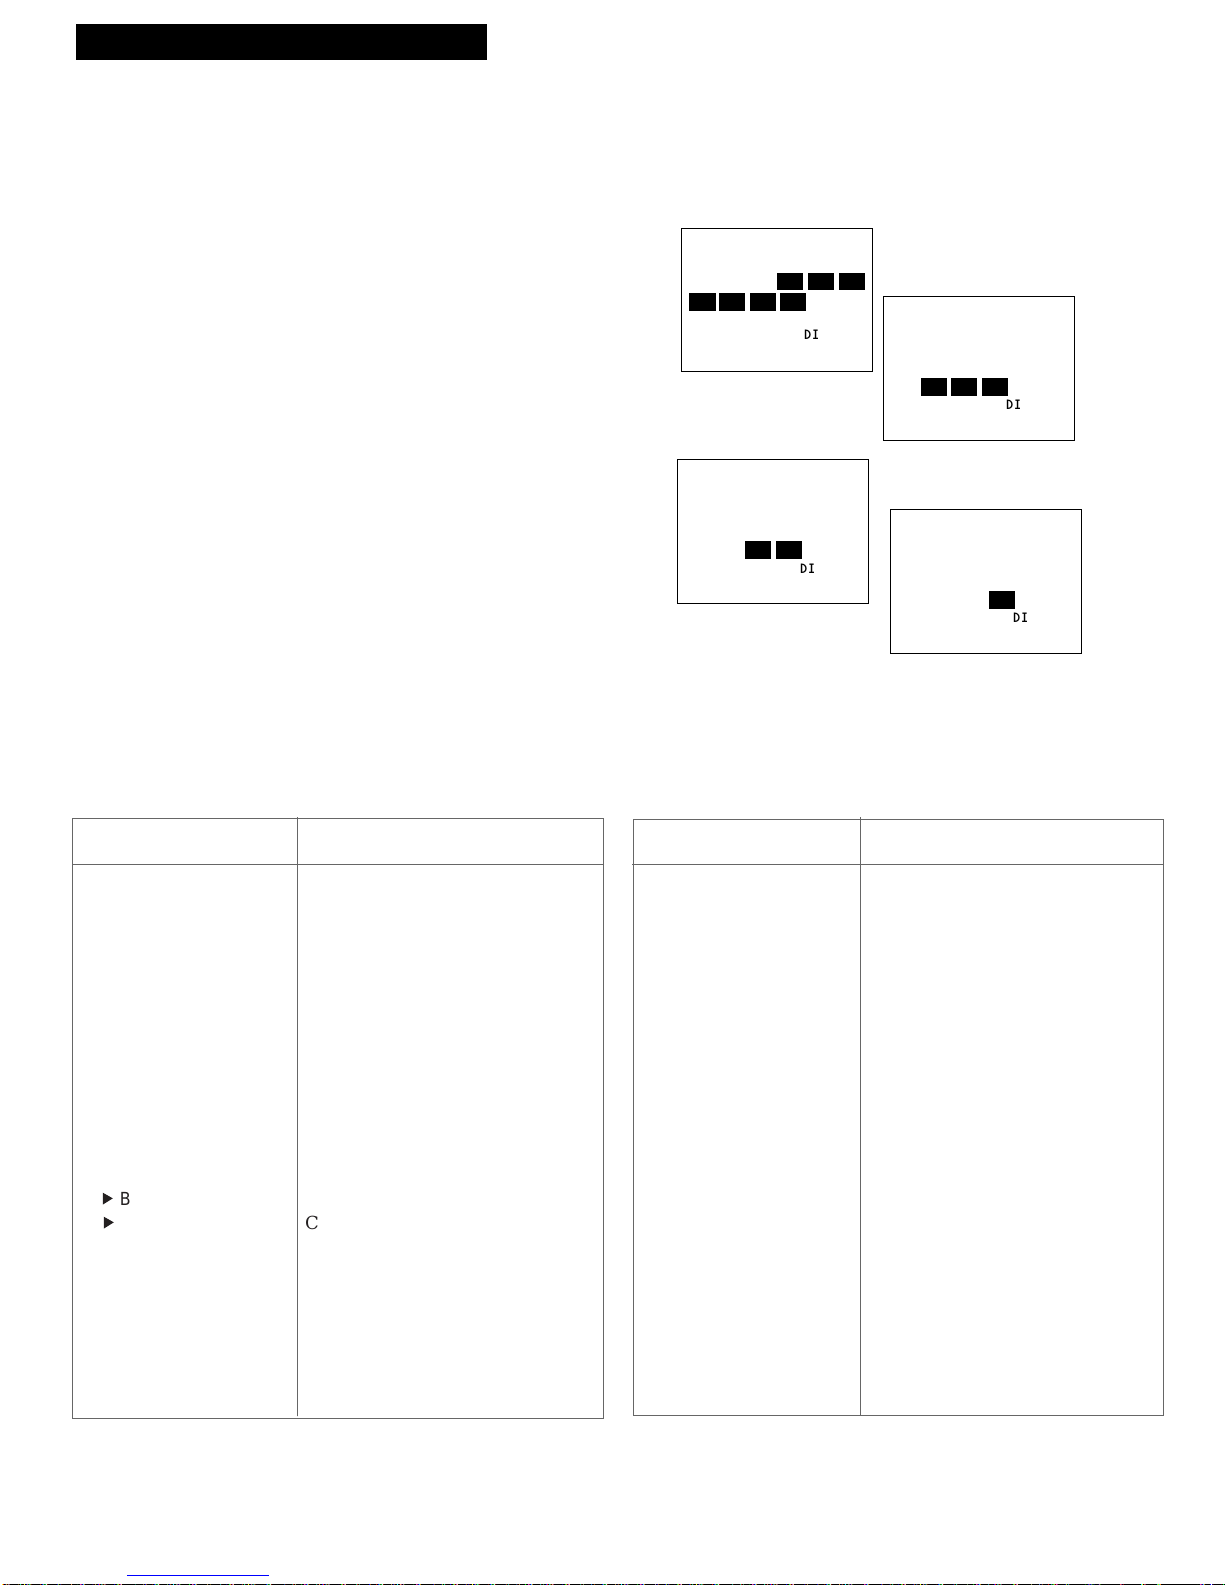
Playback Features
3 05782 A PLAY
3 12.49 A PLAY
3 12.49 A PLAY
DIGITAL
STEREO
Laser Disc – No Table of Contents (TOC)
1. Press DISPLAY while disc is playing.
Standard play (CAV): Displays chapter number,
frame number, side of disc (A or B), and audio mode.
Extended play (CLV): Displays chapter number,
time in minutes and seconds, side of disc (A or B),
and audio mode.
2. Press DISPLAY again to remove the display.
3 12.49 A PLAY
REMAIN TIME
ALL 31.08
3 12.49 A PLAY
TOTAL TIME
12 43.57
DIGITAL
STEREO
3 5782 A PLAY
3 5782 A PLAY
DISC TIME
12.08
3 5782 A PLAY
REMAIN TIME
ALL 23.45
3 5782 A PLAY
TOTAL TIME
9 35.53
DIGITAL
STEREO
Laser Disc – Extended Play (CLV) with Table of Contents (TOC) and Video Portion of
Compact Video Disc (CDV)
1. Press DISPLAY while disc is playing. Displays
chapter number, elapsed play time, side of laser disc
(A or B), and audio mode.
The table of contents must be read before
information can be displayed.
2. Press DISPLAY again to display remaining play time
(ALL) on the disc.
3. Press DISPLAY again to display the total number of
chapters and total play time of the disc.
4. Press DISPLAY again to remove the display.
Laser Disc – Standard Play (CAV) with Table of Contents (TOC)
1. Press DISPLAY on remote while disc is playing.
Displays chapter, frame numbers, and sound mode.
2. Press DISPLAY again to display elapsed play time on
the disc.
The table of contents must be read before
information can be displayed.
3. Press DISPLAY again to display remaining play time
(ALL) on the disc.
4. Press DISPLAY again to display the total number of
chapters and play time of the disc.
5. Press DISPLAY again to remove the display.
Page 9
7
Playing a Disc
On-Screen Displays
Playback Features
Display Function
OPEN Opening of the table
CLOSE Closing of the table
STOP Stop mode
SEARCH Searching
CHAPTER Indicates chapter number
FRAME Indicates frame number
OFF Power turned off
COMPACT DISC Compact disc playing
LASERDISC Laser disc playing
CLV CLV disc playing
CAV CAV disc playing
A Side A play
B Side B play
A
6
B Changing from side A to B
B 6A Changing from side B to A
PLAY Play mode
LAST MEMORY MODE1 Last memory turned on
LAST MEMORY MODE2 Last memory mode 2 selected
1/2,1/8,1/30 Slow-speed play
X2 High-speed play
MEMORY Point selected to repeat play
REPEAT MEMORY Repeat playing from memory point
Display Function
REPEAT A-B Repeat play section A–B
REPEAT CHAPTER (TRACK) Chapter or track repeat
REPEAT SIDE A (B) One-side repeat
REPEAT ALL Two-side repeat
REPEAT OFF Repeat off
REPEAT PROGRAM Repeat the program playing
REPEAT RANDOM Repeat random playback
PROGRAM Program playback
PROGRAM STEP- Program step number
RANDOM Random play
HILITE Hilite scan mode
INTRO Intro scan mode
DIGITAL Digital audio setting
ANALOG Analog audio setting
STEREO Stereo audio setting
1/L Main audio/left channel
2/R Sub audio/right channel
CX ON CX noise reduction system on
CX OFF CX noise reduction system off
PSC ON Picture stop cancel function on
PSC OFF Picture stop cancel function off
Other Displays That Appear on TV Screen
Compact Disc (CD) and Audio Portion of Compact Video Disc (CDV)
4 2.49 PLAY
01 02 03 04 05 06
07 08 09 10
DIGITAL
STEREO
1. Press DISPLAY while the disc is playing
to display the current track number,
elapsed play time of current track, and
audio mode.
The track numbers appear on the screen.
differently indicating which ones have
been played.
2. Press DISPLAY again to display
remaining play time (TRK) of the track
that is playing.
3. Press DISPLAY again to display
remaining play time (ALL) of the disc.
4. Press DISPLAY again to display the total
number of chapters and play time of the
disc.
5. Press DISPLAY again to remove the
display.
8 2.42 PLAY
REMAIN TIME
TRK 1.45
01 02 03 04 05 06
07 08 09 10
DIGITAL
STEREO
08
05 06
09 10
08 09 10
10 2.42 PLAY
TOTAL TIME
10 31.45
01 02 03 04 05 06
07 08 09 10
DIGITAL
STEREO
10
9 3.42 PLAY
REMAIN TIME
ALL 6.45
01 02 03 04 05 06
07 08 09 10
DIGITAL
STEREO
09 10
07
04
Page 10
8
Playing a Disc
Theatre Mode – Laser Disc (LD)
This feature reduces the time required to start a laser disc playing or to change sides on a laser
disc during playback.
1. Press THEATRE MODE on the player to activate the theatre feature.
The indicator in the button lights.
The table of contents is not read. Random playback does not
function. The elapsed, total, and remaining time functions on a CAV
disc and the total and remaining time functions on a CLV disc do not
operate unless you play the disc back once before using the theatre
feature.
The theatre function does not operate during CD play.
2. Press THEATRE MODE on the player to turn off the theatre mode for
normal operation. The indicator in the button turns off.
Display On/Off Feature
The DISPLAY OFF button turns the fluorescent display panel and on-screen displays on and off.
Turning off the display panel may prevent low levels of noise from affecting the audio.
1. Press DISPLAY OFF on the player to turn off the display panel and on-
screen displays. The indicator in the button lights.
If a function button is pressed, the displays will appear briefly. The
screen background will turn from blue to black while a CD is playing,
the player is changing sides, or the player is stopped.
2. Press DISPLAY OFF again to turn the display panel and on-screen
displays back on. The indicator in the button turns off.
Playback Features
MEMORY
STOP
PLAY
PAUSE
DISPLAY
OFF
THEATRE
MODE
STANDBY
POWER
HI-LITE INTRO
OPEN•CLOSE
DISC SIDE
CD
B
A
LD
Page 11
9
Playing a Disc
Last Memory Feature – Laser Disc (LD)
The player remembers where you are on the laser disc that is playing when you press STOP or
POWER. The player must be plugged into an outlet that has power to it at all times for the last
memory feature to operate. The STANDBY indicator lights when power is turned off.
There are two last memory modes. Mode 1 starts playback from the point on the disc where
playback was stopped. Mode 2 reviews the portion that has been played and then starts
playback slightly before the point where playback was stopped.
Mode 1: Start Playback From the Point Where Playback Was Stopped
1. While a disc is playing, press STOP to stop playback or POWER to
turn the player off.
2. Press MEMORY once on the player. Playback starts slightly before the
point on the disc where playback was stopped.
LAST MEMORY MODE1 appears briefly while the player searches for
the ”last memory“ point.
If PLAY is pressed while the player is stopped, playback starts at the
beginning of the disc.
Mode 2: Review Highlights of the Played Portion and Start Playback
Slightly Before the Point Where Playback Was Stopped
1. While a disc is playing, press STOP to stop playback or POWER to
turn the player off.
2. Press MEMORY twice on the player. The player will scan and play
brief segments of the portion of the laser disc previous played.
Playback will then start at a point slightly before the point where
playback was stopped.
Press MEMORY on the player during the scan and play to start
playback slightly before the point where playback was stopped.
LAST MEMORY MODE2 appears briefly on the TV screen while the
player searches for the ”remembered“ point.
If PLAY is pressed while the player is stopped, playback starts at the
beginning of the disc.
Playback Features
SEARCH
TIME 12.49
LAST MEMORY MODE2
SEARCH
TIME 12.49
LAST MEMORY MODE1
STANDBY
POWER
THEATRE
MODE
DISPLAY
DISC SIDE
A
OFF
OPEN•CLOSE
B
CD
STOP
LD
PLAY
PAUSE
MEMORY
HI-LITE INTRO
Page 12
10
Search For a Particular Chapter (Track) on Laser (LD) and Compact
(CD) Discs
1. Direct Search: Enter the chapter (track) number by pressing the
corresponding number(s) on the remote.
For example, press 3 to play chapter (track) 3.
For chapters (tracks) 10 or above, press number +10. Example: Press
+10, then 6, to play chapter (track) 16. Press +10, then +10, then 6, to
play chapter (track) 26.
Normal Search: Repeatedly press CHAP•TIME on the remote until
CHAPTER or TRACK appears on the TV screen and a flashing 0
appears in the player’s display panel. Enter the chapter (track)
number by pressing the corresponding number(s) on the remote.
Press PLAY.
Direct search and normal search are not available on all discs.
A still frame will be displayed at the beginning of the chapter on a
CAV disc when you normal search by pressing PLAY on the remote.
2. Press CLEAR on remote while player is searching to cancel the
search.
Search for Beginning of Chapter (Track) on Laser (LD) and Compact
(CD) Discs
1. Press on the player or CHAP•TRACK SRCH on the remote
to return to the beginning of the chapter (track) that is playing.
Repeatedly press the button to return to the beginning of a previous
chapter (track). Each press advances you back one chapter (track).
2. To advance to the beginning of a chapter (track) following the one
playing, press on the player or CHAP•TRACK SRCH on the
remote. Each press advances you one chapter (track).
Playing a Disc
Playback Features
Search by Chapter (Track), Time, or Frame
MEMORY
STOP
PLAY
PAUSE
DISPLAY
OFF
THEATRE
MODE
STANDBY
POWER
HI-LITE INTRO
OPEN•CLOSE
DISC SIDE
CD
B
A
LD
CHP/TRK 1/L 2/R
Page 13

11
Playing a Disc
Playback Features
1
2
3
CLEAR
SCANSCAN PLAY
PROGRAM CHAP•TIME DISPLAY
CHAP•TRACK SRCH
DISC SIDE
AUDIO
REPEAT
REPEAT
STOP
4
5
6
+10
7
8
9
A•B
0
FRAME ADVANCE
PAUSE
POWER
SPEED SELECT
A B
SCAN
R
E
V
E
R
S
E
•
•
•
•
•
•
•
•
•
•
•
•
•
•
•
•
F
O
R
W
A
R
D
RANDOM
HI - LITE
INTRO
Search by Chapter (Track), Time, or Frame
Search For a Certain Time on Extended Play (CLV) Laser
Discs and Video Portions of Compact Video Discs (CDV)
1. During playback, press CHAP•TIME on remote.
2. Enter the time using numbers on the remote.
For example, for 12 minutes and 15 seconds, press 1,
then 2, then 1, then 5. If the disc does not contain
second information, enter the time only in minutes.
The +10 button cannot be used to enter time
numbers.
Press CLEAR on the remote to correct an entry.
3. Press PLAY. The player will search for the specified
time and begin playback.
4. Press CLEAR on the remote to stop a time search in
progress.
Search For a Particular Frame on Standard Play (CAV)
Laser Discs
1. Press CHAP•TIME on the remote. FRAME appears
with a flashing 0 on the TV screen. A flashing 0 also
appears in the player’s display panel.
2. Enter the frame number using numbers on the
remote.
For example, press 9, then 6, then 2, then 1 to locate
frame 9621 on the disc.
Press CLEAR on the remote to correct an entry. The
+10 button cannot be used to enter frame numbers.
3. Press PLAY.
The player will search for the specified frame and
display it as a still frame.
4. Press CLEAR on the remote to stop a frame search in
progress.
Page 14

12
Playing a Disc
Playback Features
Intro Scan on Laser and Video Portion of CDV Discs
You can search all the chapters on the disc. The player will play a few seconds of the
beginning of each chapter.
1. Press HI-LITE INTRO.
INTRO appears in the player’s display panel and on the TV
screen.
The video part of a CDV will be scanned first and then the
audio part will be hi-lite scanned.
2. Press PLAY to begin normal playback of the chapter being
scanned.
The player will enter the stop mode after all the chapters are
scanned.
3. Press STOP to stop intro scan.
Hi-Lite Scan on CDs and Audio Portion of CDVs
On a CD or the audio portion of a CDV, you can hi-lite search all the tracks from a time
location of approximately one minute after the beginning or a time location you select.
1. Press HI-LITE INTRO when the player is stopped to search
the tracks from a time location of approximately one minute
after the beginning of the track. HILIT appears in the
player’s display panel and HILITE appears on the TV screen.
Press HI-LITE INTRO when the disc is playing to select the
elapsed time location from the beginning of the track you
want the player to search. HILIT appears in the player’s
display panel and HILITE appears on the TV screen. The
video part of a CDV will be intro scanned first and then the
audio part will be hi-lite scanned.
2. Press PLAY to begin normal playback of the chapter being
scanned.
The player will enter the stop mode after all the chapters
(tracks) are scanned.
3. Press STOP to stop hi-lite scan.
Intro and Hi-Lite Scan
1
2
3
CLEAR
SCANSCAN PLAY
PROGRAM CHAP•TIME DISPLAY
CHAP•TRACK SRCH
DISC SIDE
AUDIO
REPEAT
REPEAT
STOP
4
5
6
+10
7
8
9
A•B
0
FRAME ADVANCE
PAUSE
POWER
SPEED SELECT
A B
SCAN
R
E
V
E
R
S
E
•
•
•
•
•
•
•
•
•
•
•
•
•
•
•
•
F
O
R
W
A
R
D
RANDOM
HI - LITE
INTRO
MEMORY
STOP
PLAY
PAUSE
DISPLAY
OFF
THEATRE
MODE
STANDBY
POWER
HI-LITE INTRO
OPEN•CLOSE
DISC SIDE
CD
B
A
LD
CHP/TRK 1/L 2/R
Page 15

1/8 1/8th normal speed
1/2 1/2 normal speed
X2 Twice normal speed
1/2 1/2 normal speed
1/8 1/8th normal speed
1/30 1/30th normal speed
13
During playback of a standard play disc, you can vary the speed in reverse or
forward playback. The sound is turned off during variable-speed playback.
1. Press SPEED SELECT6to play the disc at 1/8th the
normal speed in the forward direction or SPEED
SELECT 5to play the disc at 1/8th the normal speed
in reverse.
2. Repeatedly press SPEED SELECT5or 6to change
the playback speed as shown in the chart.
Press DISPLAY to display the speed selected on the
TV screen.
If playback automatically switches to a still frame,
the disc may contain special picture stop codes
(PSCs). Press PLAY or SPEED SELECT6or 5to
continue playback.
Press and hold PLAY on the player for
approximately two seconds to turn PSC on and off.
• Turn PSC on and the player will not stop at the
picture stop codes. PSC ON appears briefly on
the TV screen.
• Turn PSC off and the player will stop at the
picture stop codes. PSC OFF appears briefly on
the TV screen.
Variable-Speed Playback – Standard Play (CAV) Disc Only
Playing a Disc
Still Frame and Frame Advance –
Standard Play (CAV) Disc Only
During playback, you can view the picture one frame at a time or freeze a
frame. The sound is muted during frame advance.
Display a Still Frame
1. Press FRAME ADVANCE or on the remote to
pause the picture.
2. Press FRAME ADVANCE to advance the picture
one frame forward or to move the picture one
frame backwards.
3. Press PLAY or PAUSE to return to normal playback.
The visual scan and variable-speed playback features
can be used with frame advance.
1. Press FRAME ADVANCE or .
• Press SCAN66or 55to visually scan the picture.
Release to return to a still frame.
• Press SPEED SELECT 6or 5to select a multi-
speed playback feature.
• Press PLAY to return to normal playback.
Playback Features
1
2
3
CLEAR
SCANSCAN PLAY
PROGRAM CHAP•TIME DISPLAY
CHAP•TRACK SRCH
DISC SIDE
AUDIO
REPEAT
REPEAT
STOP
4
5
6
+10
7
8
9
A•B
0
FRAME ADVANCE
PAUSE
POWER
SPEED SELECT
A B
SCAN
R
E
V
E
R
S
E
•
•
•
•
•
•
•
•
•
•
•
•
•
•
•
•
F
O
R
W
A
R
D
RANDOM
HI - LITE
INTRO
Display Playback Speed
Press SPEED SELECT 6or
5
Page 16

14
Manual (Visual) Scanning
During playback, you can visually search (scan) forward or in reverse for a particular segment at
a faster than normal speed using SCAN 55or 66or the SCAN shuttle on the remote. The sound
is muted or heard at a low level during scanning.
Search Using the SCAN Shuttle on the Remote
Rotate the SCAN shuttle on the remote to the right to search
forward or to the left to search in reverse at three different
speeds.
Clear Scan: Turn the SCAN shuttle slightly to the right or
left. The picture may not fluctuate and digital sound can
be heard at low volume when you scan at this speed.
This mode does not operate on CDs or the audio part of
CDVs.
Low Scan: Turn the SCAN shuttle farther to the right or
left to scan at approximately 10 times the normal
playback speed.
High Scan: Turn the SCAN shuttle even farther to the
right or left to scan at approximately 30 times the normal
playback speed.
During low or high scan, sound is heard at a low volume
on CDs and the audio part of CDVs and muted on all
other disc.
Search Using SCAN
5555or6666
Press and hold SCAN 55to search in reverse or SCAN
66
to search forward.
Clear Scan: Press SCAN 55or 66while the on-screen
display appears on the TV screen.
High Scan: Press SCAN 55or 66when the on-screen
display does not appear on the TV screen. The search
speed begins slow and then changes to a higher speed.
Speed may vary on different discs. Colors may fade and
the picture become distorted or noisy during searching.
1
2
3
CLEAR
SCANSCAN PLAY
PROGRAM CHAP•TIME DISPLAY
CHAP•TRACK SRCH
DISC SIDE
AUDIO
REPEAT
REPEAT
STOP
4
5
6
+10
7
8
9
A•B
0
FRAME ADVANCE
PAUSE
POWER
SPEED SELECT
A B
SCAN
R
E
V
E
R
S
E
•
•
•
•
•
•
•
•
•
•
•
•
•
•
•
•
F
O
R
W
A
R
D
RANDOM
HI - LITE
INTRO
Playing a Disc
Playback Features
MEMORY
STOP
PLAY
PAUSE
DISPLAY
OFF
THEATRE
MODE
STANDBY
POWER
HI-LITE INTRO
OPEN•CLOSE
DISC SIDE
CD
B
A
LD
CHP/TRK 1/L 2/R
Page 17

15
Playing a Disc
Playback Features
9 24.23 PLAY
RANDOM
DIGITAL
STEREO
Random Playback
Laser discs having table of contents, CDs, and CDVs can be played back in random
order.
1. Press PLAY and then press RANDOM on the remote.
RDM appears in the display panel and RANDOM appears
on the TV screen. The chapters (tracks) will be played in
random order.
Press DISPLAY to display the tracks played on the TV
screen.
Press button on the player or CHAP•TRACK SRCH
on the remote to play the next chapter (track) during
random playback. The chapters (tracks) that have been
played cannot be played.
2. Press DISPLAY to display the tracks played on the TV
screen.
Chapter 0 will not be played during random playback.
On CDV discs, the audio and video portions will be
played in random order.
To play programmed chapters (tracks) in random order,
press RANDOM on remote while the program is playing
back.
To Cancel Random Playback
Press CLEAR on the remote. The chapters (tracks) will be
played back in order.
To Stop Random Playback
Press STOP. The player will enter the stop mode.
1
2
3
CLEAR
SCANSCAN PLAY
PROGRAM CHAP•TIME DISPLAY
CHAP•TRACK SRCH
DISC SIDE
AUDIO
REPEAT
REPEAT
STOP
4
5
6
+10
7
8
9
A•B
0
FRAME ADVANCE
PAUSE
POWER
SPEED SELECT
A B
SCAN
R
E
V
E
R
S
E
•
•
•
•
•
•
•
•
•
•
•
•
•
•
•
•
F
O
R
W
A
R
D
RANDOM
HI - LITE
INTRO
Page 18

16
Playing a Disc
Playback Features
Repeat Playback
During playback, the player will return to a specified point, repeatedly play a
specified section, chapter (track), program, one side of the disc, or both sides of
a laser disc.
Return to a Specified Point (Memory Repeat)
1. Press REPEAT A•B on the remote at the point you
want to return to (point A).
A– RPT appears in the player’s display panel and
MEMORY appears on the TV screen.
2. When you want to return to that point, press PLAY.
The player will return to the point you selected and
begin playback.
This repeat play does not operate between the video
and audio portions of CDV discs. It can be used
within the video or audio portion.
Repeat a Specific Section
1. Press REPEAT A•B on the remote at the starting
point of the section you want to repeat (point A).
A– RPT appears in the player’s display panel,
MEMORY appears on the TV screen.
2. Press REPEAT A•B at the ending point of the section
you want to repeat (point B).
The player will play the section over and over.
AB RPT appears in the player’s display panel,
REPEAT A-B appears on the TV screen.
This repeat play does not operate between two sides
of a laser disc or the video and audio portions of
CDV discs. It can be used within the video or audio
portion.
Repeat a Chapter (Track) That Is Playing
1. Press REPEAT on the remote while the chapter
(track) is playing.
RPT appears in the player’s display panel, REPEAT
CHAPTER (TRACK) appears on the TV screen.
This repeat play does not operate on laser discs that
do not have chapters. The player will repeat play the
entire side of the disc when you press REPEAT again.
MEMORY
MEMORY
REPEAT
A-B
REPEAT
CHAPTER
Page 19

17
Playing a Disc
Playback Features
1
2
3
CLEAR
SCANSCAN PLAY
PROGRAM CHAP•TIME DISPLAY
CHAP•TRACK SRCH
DISC SIDE
AUDIO
REPEAT
REPEAT
STOP
4
5
6
+10
7
8
9
A•B
0
FRAME ADVANCE
PAUSE
POWER
SPEED SELECT
A B
SCAN
R
E
V
E
R
S
E
•
•
•
•
•
•
•
•
•
•
•
•
•
•
•
•
F
O
R
W
A
R
D
RANDOM
HI - LITE
INTRO
Repeat Playback
Repeat One Side of the Disc
1. Press REPEAT twice on the remote while the side is
playing.
S – RPT appears in the player’s display panel and
REPEAT SIDE – A or B appears on the TV screen.
The entire side is played over and over.
Repeat Both Sides of the Laser Disc
1. Press REPEAT three times while the laser disc is
playing.
AL – RPT appears in the player’s display panel and
REPEAT ALL appears on the TV screen. The entire
disc is played over and over.
Repeat a Program
1. Program the player as described on pages 18-19.
2. Press REPEAT while the program is playing.
P – RPT appears in the player’s display panel and
REPEAT PROGRAM appears on the TV screen.
Repeat Random Play
1. Press REPEAT while the chapters (tracks) are playing
back in random order.
R – RPT appears in the player’s display panel and
REPEAT RANDOM appears on the TV screen.
To Cancel Repeat Play
Repeatedly press REPEAT until REPEAT OFF is
displayed on the TV screen or press CLEAR on the
remote. Repeat play is cancelled and the player
returns to normal playback.
REPEAT
SIDE A
REPEAT
ALL
REPEAT
PROGRAM
Page 20

18
Playing a Disc
Program Playback
The disc player can be programmed to play back a maximum of 24 chapters (tracks) on laser discs, CDs, and
CDVs in the order you select.
Playback Features
1. Press PROGRAM on the remote to
display the program menu.
A flashing – – and P – 1 appears in the
player’s display panel and the program
menu appears on the TV screen.
2. Two Sided Laser Disc: Use DISC SIDE
A or B to enter the side. Then use the
number(s) on the remote to enter the
number of the chapter you want to
play.
One Sided Disc: Use number(s) on
remote to enter number of the first
chapter (track) you want to play.
Use the +10 button to enter numbers 10
or greater. For example, to play
chapter 18 on side A of a laser disc,
press DISC SIDE A, +10, and 8. To
play track 14 on a CD, press +10 and 4.
Press CLEAR on the remote to remove
an incorrect entry.
The programmed chapters (or tracks)
appear in the player’s display panel
and on the TV screen. Total playing
time of CD and CDV tracks
programmed will be displayed.
3. You may want to program a pause so you can record a blank
portion on the tape for narration, etc. If you are copying a disc to
tape, enter a pause so the player will enter the pause mode while
you change the tape side.
•Press PAUSE to place a pause indicator ( ) in place of the
chapter (track) number in the program. PA appears in the player’s
display panel.
•A pause may not be programmed as the first step, two consecutive
steps, or the last step.
4. Press PLAY to start playing the program.
Total time will not be displayed if track 33 or higher is selected
during programming. If the total time of programmed tracks
exceed 100 minutes, the 100’s digit will not appear in the player’s
display panel.
Press or on the player or CHAP•TRACK SRCH or
on the remote to go to the next or previous chapter (track) of
the program.
Press SCAN 66on remote or 66on the player or turn SCAN
shuttle on the remote clockwise to search forward during program
playback. The next chapter (track) in sequence will be scanned.
Release to return to program playback.
PROGRAM
STEP- 1
66
--- --- --- --- --- ---
--- --- --- --- --- ---
--- --- --- --- --- ---
--- --- --- --- --- ---
PROGRAM
STEP- 4
A18 A07 B11
66
--- --- ---
--- --- --- --- --- ---
--- --- --- --- --- ---
--- --- --- --- --- ---
TOTAL TIME PROGRAM
3 9.36 STEP- 4
09 07 1866-- -- --
-- -- -- -- -- --
-- -- -- -- -- --
-- -- -- -- -- --
On-Screen Program Displays for LD
TOTAL TIME PROGRAM
0 0.00 STEP- 1
66
-- -- -- -- -- --
-- -- -- -- -- --
-- -- -- -- -- --
-- -- -- -- -- --
On-Screen Program Displays for CD or CDV
continued on next page
Page 21

19
Playing a Disc
Playback Features
Program Playback
Press SCAN55on remote or 55on the player or turn the SCAN shuttle
on the remote counterclockwise to search in reverse during program
playback. Release to return to program playback. If the player moves to
the previous chapter (track) in the program, playback will return to the
beginning of the chapter (track) that was playing when searching began.
Playback will not go to a previous chapter (or track).
If SPEED SELECT6is pressed, the player will enter multi-speed playback
and playback the program in order. If SPEED SELECT5is pressed, the
player will enter multi-speed playback but will resume normal playback at
the beginning of the programmed chapter (track).
If you enter the number of a chapter (track) that does not exist, the player
may not play the program in order.
Edit the Program
1. Press PROGRAM on the remote to display the program menu on the TV
screen.
2. Press or on the player or CHAP•TRACK SRCH or on
the remote to place the cursor (6) on the left side of the chapter (track)
number or pause indicator you want to change.
A programmed chapter (track) or pause being played cannot be erased or
changed.
1
2
3
CLEAR
SCANSCAN PLAY
PROGRAM CHAP•TIME DISPLAY
CHAP•TRACK SRCH
DISC SIDE
AUDIO
REPEAT
REPEAT
STOP
4
5
6
+10
7
8
9
A•B
0
FRAME ADVANCE
PAUSE
POWER
SPEED SELECT
A B
SCAN
R
E
V
E
R
S
E
•
•
•
•
•
•
•
•
•
•
•
•
•
•
•
•
F
O
R
W
A
R
D
RANDOM
HI - LITE
INTRO
3. Press CLEAR on the remote to delete a chapter (track) or
pause from the program. Enter a new number using the
numbers (or PAUSE) on the remote.
4. Press PLAY to begin playback of the new program.
The chapters (tracks) will be played in the order you selected.
When the program is finished, the player will enter the stop
mode.
Press on the player or CHAP•TRACK SRCH on the
remote to go to the next chapter (track) of the program.
Review the Program
Press PROGRAM on the remote to display the program menu on
the TV screen. Press PROGRAM again to remove it.
Pause Program Playback
Press PAUSE to temporarily stop the program. Press PAUSE
again to resume playback from this point of the program.
Stop Program Playback
Press STOP to stop program playback.
Press PROGRAM on the remote and then PLAY to start playing
the program from the beginning.
Clear a Program
Press STOP to stop program playback, and then press CLEAR on
the remote.
Page 22

20
The chart gives examples of different types of audio recorded on discs.
Movies, animations, etc. Audio of the main program Soundtrack
Dual music Music 1 Music 2
Various types of digital 1/L Karaoke (monaural) Stereo
audio karaoke 2/R Assisting vocals karaoke
Stereo bilingual Native language Foreign language
Trilingual Native language 1/L Foreign language 1
2/R Foreign language 2
Quadlingual 1/L Native language 1/L Foreign language 2
2/R Foreign language 1 2/R Foreign language 3
Audio
Disc Analog Audio Digital Audio
Playing a Disc
Select Audio on Laser Discs
Some laser discs with digital audio also have analog audio encoded on the disc.
Some laser discs having the symbol have different audio recorded on the
different channels.
To Select the Audio You Want to Listen To
1. During playback, press AUDIO on the remote.
• Select DIGITAL STEREO to hear the audio in digital stereo.
• Select ANALOG STEREO to hear the audio in analog
stereo.
• Select ANALOG 1/L to hear the left channel only during
analog playback.
• Select ANALOG 2/R to hear the right channel only during
analog playback.
• Select DIGITAL 1/L to hear the left channel only during
digital playback.
• Select DIGITAL 2/R to hear the right channel only during
digital playback.
2. Press DISPLAY at any time to display the type of audio
selected.
Playback Features
1
2
3
CLEAR
SCANSCAN PLAY
PROGRAM CHAP•TIME DISPLAY
CHAP•TRACK SRCH
DISC SIDE
AUDIO
REPEAT
REPEAT
STOP
4
5
6
+10
7
8
9
A•B
0
FRAME ADVANCE
PAUSE
POWER
SPEED SELECT
A B
SCAN
R
E
V
E
R
S
E
•
•
•
•
•
•
•
•
•
•
•
•
•
•
•
•
F
O
R
W
A
R
D
RANDOM
HI - LITE
INTRO
Page 23

21
Playing a Disc
Playback Features
1
2
3
CLEAR
SCANSCAN PLAY
PROGRAM CHAP•TIME DISPLAY
CHAP•TRACK SRCH
DISC SIDE
AUDIO
REPEAT
REPEAT
STOP
4
5
6
+10
7
8
9
A•B
0
FRAME ADVANCE
PAUSE
POWER
SPEED SELECT
A B
SCAN
R
E
V
E
R
S
E
•
•
•
•
•
•
•
•
•
•
•
•
•
•
•
•
F
O
R
W
A
R
D
RANDOM
HI - LITE
INTRO
Select Audio on Compact Discs
You can listen to both channels (stereo), the right channel, or the left channel of
audio on compact discs.
To Select the Audio You Want to Listen To
1. During playback, press AUDIO on the remote.
• Select STEREO to hear both channels.
• Select 1/L to hear the left channel only.
• Select 2/R to hear the right channel only.
CX Noise Reduction System
Discs having the
*
symbol are recorded with analog audio and the CX noise
reduction system. However, some discs are not encoded with the information
necessary to turn on the CX system.
• If you are playing a disc with the symbol and
the sound is noisy, press AUDIO on the remote.
The CX ON indicator will appear on the TV screen.
Listening for a Lifetime
We want you to get the most out of your equipment by playing it at a safe level
– one that lets the sound come through clearly and comfortably without
annoying blaring or distortion. More importantly, we do not want the sound to
affect your sensitive hearing.
Sound can be deceiving. Over periods of time, your hearing “comfort level”
adapts to higher volumes of sound. So what sounds “normal” can actually be
loud and harmful to your hearing. Guard against this by setting your
equipment at a safe level before your hearing adapts. Take a minute now to do
this to prevent hearing damage or loss in the future. We want you listening for
a lifetime.
Establish a Safe Level
1. Set volume at a low setting.
2. Slowly increase the sound until you can hear it
comfortably and clearly – without distortion.
3. Once you have established a comfortable sound
level — set the volume there and leave it there.
* is a trademark of CBS, Inc. The player meets the CX Expanding Specification.
Page 24

22
References
Location of Controls
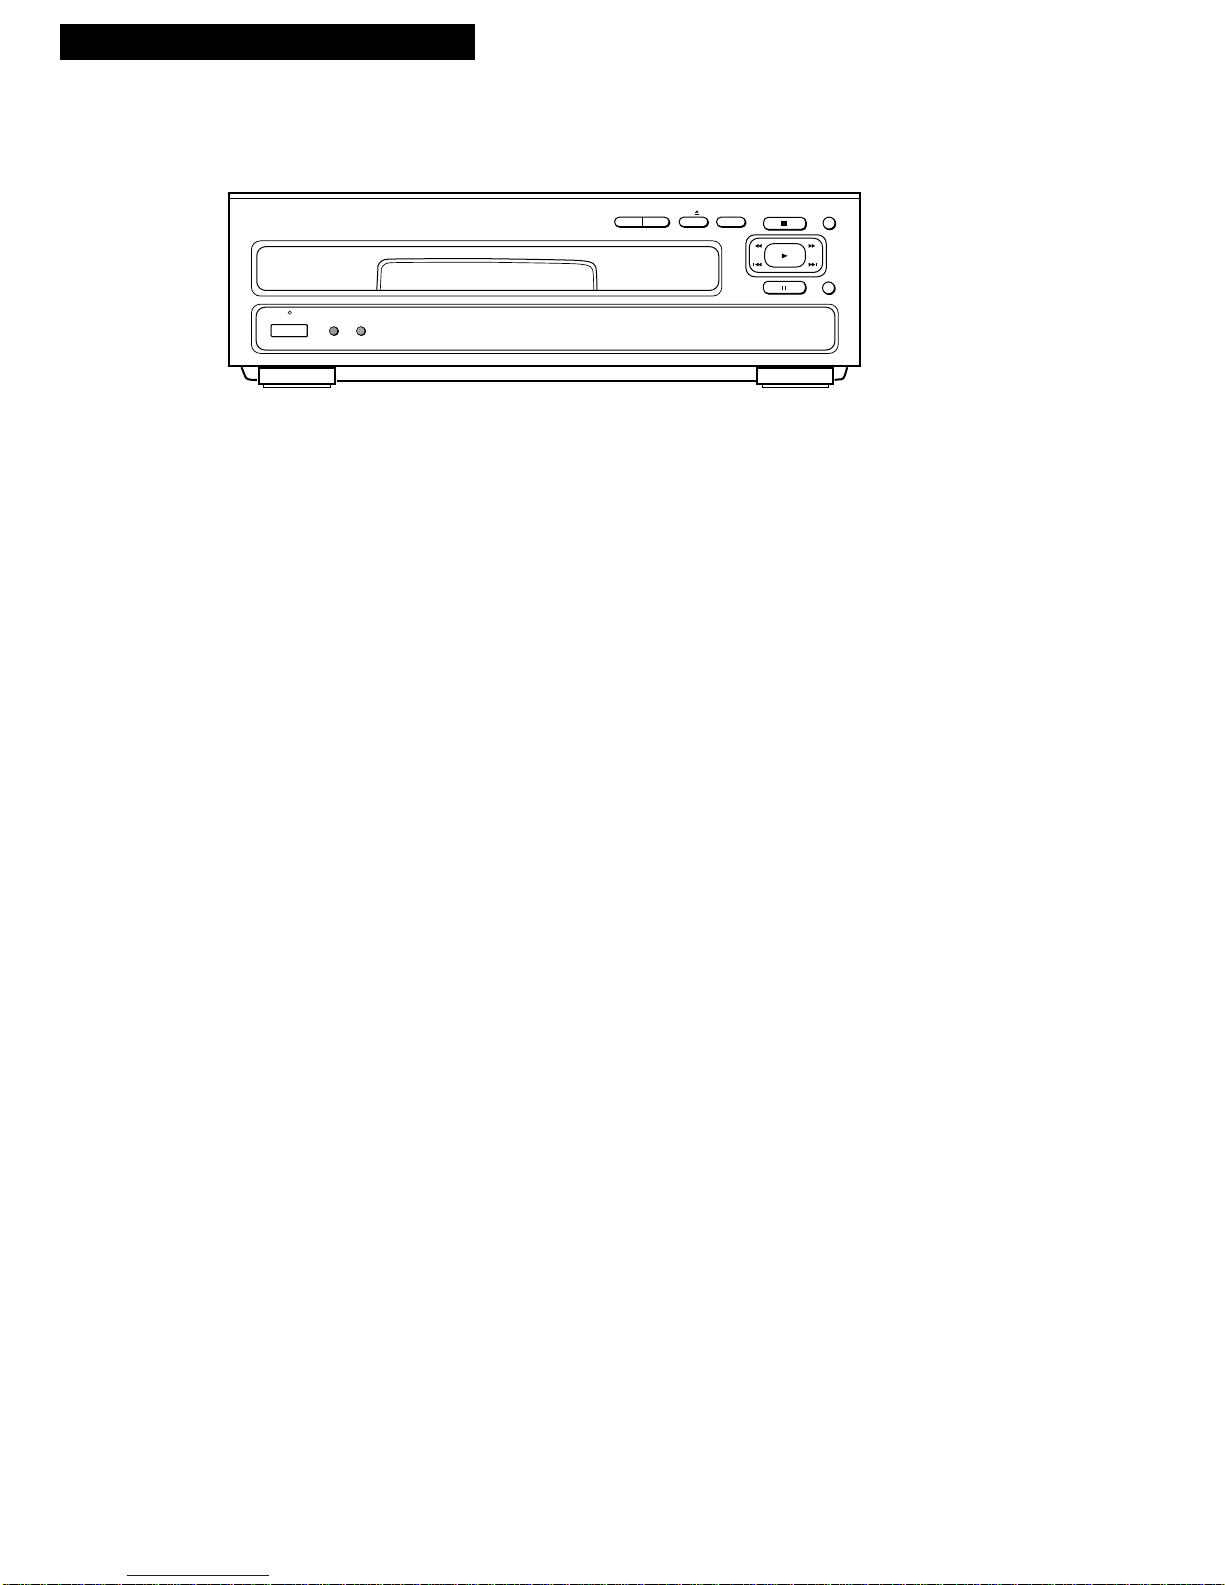
Front Panel
MEMORY
STOP
PLAY
PAUSE
DISPLAY
OFF
THEATRE
MODE
STANDBY
POWER
HI-LITE INTRO
OPEN•CLOSE
DISC SIDE
CD
B
A
LD
and
Advances playback to the previous or next
chapter (track) on the disc that is playing.
and
Searches (scans) visually forward or in
reverse at faster than normal speed.
DISC SIDE A or B
Plays only side A or B of a two-sided laser
disc.
DISPLAY OFF
Turns fluorescent and on-screen displays
off and on.
HI-LITE INTRO
Starts hi-lite and intro scan.
MEMORY
Selects last memory feature and starts
playing disc where playback was stopped.
OPEN•CLOSE CD
Opens and closes the disc table for CDs.
OPEN•CLOSE LD
Opens and closes the disc table for LDs.
PAUSE
Pauses a disc that is playing.
PLAY
Plays a disc.
Used to start search functions.
POWER Button and STANDBY Indicator
Turns the player on or off.
STANDBY indicator lights when power is
turned off and player is plugged into a
working outlet.
Remote Sensor
Receives signals from the remote control.
Aim the remote at this sensor with no objects
between them.
THEATRE MODE
Shortens the time to change sides or start
playing a laser disc.
STOP
Stops normal functions of the player.
Remote Sensor
CD Disc Table
LD Disc Table
Display Panel
Page 25

23
References
Display Panel
Location of Controls
1/L (Left) and 2/R (Right)
Show the channel the audio is coming from.
See pages 20 and 21.
CHP/TRK Number
Displays chapter (track) number that is
playing.
Information and Status Displays
Gives information about what the player is
doing or shows the status of the player.
Switching from side B to A
AL-RPT Repeat one side
Switching from side A to B
CLOSE Disc table closing
CD Compact disc
CDV Compact disc with video
END End of laser disc
HILIT(e) Hi-lite scan
INTRO Intro scan
LD Laser disc
NODISC No disc in player
OPEN Disc table opening
B
A
CHP/TRK TOTAL REMAIN 1/L 2/R
– OFF – Power turned off
PGM Programmed playback
P–RPT Program repeat
RDM Random playback
RPT Repeat chapter (track)
R-RPT Random repeat
S-RPT Repeat one side
Play, Pause, and Open/Close Indicators
appears when the player is playing.
flashes when the player is searching.
appears when the player is paused.
appears when the disc table is opening
or closing.
REMAIN
REMAIN appears when the display shows
time remaining.
TOTAL
TOTAL appears when the display shows
total time on a disc.
Play, Pause, and
Open/Close
Indicators
Information or Status Indicators
Page 26

24
Back Panel
Location of Controls
AC-3 RF OUT Jack
This jack is for future use with Dolby AC-3
components. This jack cannot be used to
playback current disc.
Caution: Do not connect the audio input
jacks of a normal stereo or amplifier to this
jack.
AUDIO OUT 1 (2/R and 1/L) Jacks
Sends audio signals from player to a stereo
component when the component is
connected to these jacks.
If your TV has monaural audio, connect the
AUDIO (MONO) jack to the TV’s audio jack.
2
VIDEO
AUDIO
(MONO)
DC
1
1
2/R
2
1
1/L
S-VIDEO
OUT
AUDIO OUT
AC-3
RF OUT
VIDEO
OUT
VHF ADAPTER
AUDIO OUT 2 (2/R and 1/L) Jacks
Sends audio signals from player to another
stereo component when the component is
connected to these jacks.
Use for connecting a stereo audio system when
the AUDIO OUT 1 jacks are connected to a TV
monitor. Permits playing CDs without having
to turn on your TV.
S-VIDEO OUT 1 Jack
Sends S-VHS video signal from player to
another S-VHS component connected to the
connector with an optional S-VHS cable.
VHF ADAPTER VIDEO, DC, and AUDIO
(MONO) Jacks
Use these jacks with an optional RF output
adapter to connect the player to a TV that does
not have audio/video inputs.
If your TV has monaural audio, connect the
AUDIO (MONO) jack to the TV’s audio jack.
VIDEO OUT 1 Jack
Sends the video signal from the player to a
component connected to the jack.
VIDEO OUT 2 Jack
Sends video signal from the player to a
component connected to the jack.
Choosing a Hookup
Choose the connection for your player.
References
A. TV monitor (or VCR) having AUDIO/VIDEO IN jacks — See page 25.
B. TV that does not have audio/video inputs using optional RF adapter — See
page 26.
Additional Optional Hookup: amplifier/receiver — See page 27.
Page 27

25
TV Monitor (or VCR) With AUDIO/VIDEO IN Jacks
Connection A
2
VIDEO
AUDIO
(MONO)
DC
1
1
2/R
2
1
1/L
S-VIDEO
OUT
AUDIO OUT
AC-3
RF OUT
VIDEO
OUT
VHF ADAPTER
S-VIDEO
AUDIO
CABLE /
ANTENNA
L /
MONO
RIGHT
VIDEO
INPUT
INOUT
Video Cable
(Supplied)
Audio Cable
(Supplied)
Optional
S-VHS Cable
Back of Typical Stereo TV Monitor (or VCR)
Back of LaserDisc Player
A
1. Connect the player to a TV monitor (or VCR) as shown.
If your TV (or VCR) has an S-VIDEO IN connector, connect it to the
S-VIDEO OUT connector on the player. An optional S-VHS cable is required.
If your TV (or VCR) has monaural audio, connect the AUDIO jack on the TV
to the AUDIO (MONO) jack on the player.
Optional: You also may want to connect the player to an amplifier/receiver
as shown on page 27.
2. Plug in the power cords.
Because the player has memory features, be sure to plug it into an outlet that
has power supplied at all times.
Tune the TV (or VCR) to its video input to watch the player.
References
Caution: Unauthorized
copying, broadcasting,
renting, or public performance of a disc is a
violation of copyright
laws and infringes the
rights of the copyright
owner.
* Optional accessories are available from your dealer or electronics supply store.
Page 28

2
VIDEO
AUDIO
(MONO)
DC
1
1
2/R
2
1
1/L
S-VIDEO
OUT
VHF ADAPTER
AUDIO OUT
AC-3
RF OUT
VIDEO
OUT
OUT TO TV
IN FROM ANT
CH3
CH4
OR
OR
OR
VHF
VHF
Back of TV
Antenna
Antenna
Optional RF
Output Adapter
Optional
300/75 Ohm
Transformer
Optional RF Cable
Back of LaserDisc Player
Optional 75-300 Ohm
Transformer
26
TV Without Audio/Video Inputs
B
1. Connect the player using an optional RF output adapter (such as LD1150*)
and an optional RF cable (such as AH065G*) as shown.
Optional: You also may want to connect the player to an amplifier/receiver
as shown on page 27.
2. Plug in the power cords.
Because the player has memory features, be sure to plug it into an outlet that
has power supplied at all times.
Tune the TV to the same channel as the CH3/CH4 switch on the output
adapter.
Connection B
References
* Optional accessories are available from your dealer or electronics supply store.
Page 29

27
Amplifier/Receiver
This connection lets you play CDs without turning on the TV or provides stereo audio if
your TV is not stereo.
References
2
VIDEO
AUDIO
(MONO)
DC
1
1
2/R
2
1
1/L
S-VIDEO
OUT
AUDIO OUT
AC-3
RF OUT
VIDEO
OUT
VHF ADAPTER
PHONO TUNER TAPE AUX
REC
LEFT
RIGHT
PLAY
CD
Back of LaserDisc Player
Back of Optional Stereo Amplifier/Receiver
Optional
Audio
Cables
Optional
1. Connect the player to the amplifier/receiver as shown.
This connection requires additional cables not provided.*
2. Plug in the power cords.
Optional Connection
* Optional accessories are available from your dealer or electronics supply store.
Page 30

28
References
LD (Laser Disc)
Laser discs include 8- and 12-inch discs.
They can be one-sided or two-sided. There
are two video recording systems for laser
discs: Standard play (CAV) or extended
play (CLV). These types differ in respect to
recorded time available on each side of the
disc.
• Discs with video recorded in standard
play normally indicate “Standard Play
Disc CAV” or “Standard Play” on their
jackets.
• Discs with video recorded in extended
play normally indicate “Extended Play
Disc CLV” or “Extended Play” on their
jackets.
Laser discs may have digital audio signals
in addition to the conventional analog
audio system. The jackets and labels of
these discs have the digital sound symbol.
Selected laser discs have different audio
recorded on the analog and digital systems.
Either audio can be selected for playback.
The jackets and labels of these discs have
the symbol.
CD (Compact Disc) With Audio Only
CD (compact disc) is the standard
name for one-sided digital audio 3and 5-inch discs. Information about
the disc is provided by a TOC (table
of contents).
CDV (Compact Disc With Video)
Compact discs with video (CDVs) are
5-inch digital audio discs which
include a video portion.
Of the total 25-minute playback time,
up to 20 minutes is conventional CD
digital audio. The remaining 5
minutes contains both the digital
audio and CLV (extended play)
video.
Discs
Identifiying
Symbols
Type of Discs Size
Number of
recorded
sides
Audio
Identifying
Symbol
Audio
recording
system
Video
recording
system
Other
CD (Compact Disc)
Single
CD (Compact Disc)
CDV (CD with Video)
Laser Disc
COMPACT
DIGITAL AUDIO
CD VIDEO
CD VIDEO
LD
LASER
DISC
5-inch
3-inch
5-inch
12-inch,
8-inch
12-inch,
8-inch
TOC
TOC
TOC
TOC
One side
One side
One side
One or
Two sides
One or
Two sides
Digital (20
minutes max.)
Digital (74
minutes max.)
Digital (20
minutes max.)
Digital
and Analog
Digital
and Analog
Multi-Digital
Analog Only
None
None
CLV
(Extended Play)
(5 minutes max.)
CAV
(Standard Play)
CLV
(Extended Play)
CAV
(Standard Play)
CLV
(Extended Play)
LaserVision
Types of Discs That Can Be Played
The player can play back any of the disc types shown in the chart. The identifying symbols shown are
normally printed on the label or jacket of the compatible disc.
Page 31

29
References
Analog Audio
Analog audio is a standard method of
recording audio used on all laser discs.
CAV (Standard Play)
A video recording system is used where
signals are recorded on the disc one frame
(picture) per disc revolution, and the disc
is played at a fixed rotational speed (CAV
= Constant Angular Velocity) of 1,800 rpm
(revolutions per minute).
This system is well suited for frame-byframe playback and variable-speed
playback. One side of a CAV disc can
have a playback time of up to 30 minutes
(for a 12-inch disc), which is equivalent to
54,000 individual frames. Each frame –
from frame 1 to frame 54,000 – is encoded
with its frame number. Playback time
varies according to the contents of the
disc.
CLV (Extended Play)
A video recording system where signals
are recorded on the disc at a Constant
Linear Velocity (CLV), and the rotational
speed during playback varies from 1,800
rpm (revolutions per minute) for the
innermost track to 600 rpm for the
outermost track. As a result, one side of a
CLV disc can have a playback time of up
to 60 minutes (for a 12-inch disc), which is
twice as long as a standard play (CAV)
disc.
CLV discs are encoded with time numbers
which correspond to the elapsed playback
time from the beginning of the disc.
Playback time varies according to the
contents of the disc.
Chapter Number
Some discs have chapter numbers used to
indicate the boundaries of sections on the
disc – similar to the chapters in a book. If
chapter numbers are recorded on a disc, it
will be indicated on the disc’s jacket. The
chapter search feature uses chapter
numbers to locate a certain chapter on the
disc.
Digital Audio
Digital audio is a method of recording
audio that is used on CDs, CDVs, and
laser discs in addition to the analog
audio. Digital audio provides wider
dynamic range and less distortion for a
more accurate reproduction of the
actual sound.
Frame Number
Frame numbers are the numbers
assigned to each picture frame on a
CAV (standard play) laser disc. The
frame search feature uses numbers to
locate a certain frame on the disc.
Time Number
Time numbers indicate the actual time
elapsed from the beginning of a CLV
(extended play) laser disc. The time
search feature uses the time number to
locate a certain place on the disc.
Track Number
Track numbers indicate the boundaries
of the sections (or tracks) on a compact
disc or compact disc with video. Track
numbers are assigned consistently
throughout the audio and video
portions of a disc. The track search
feature uses numbers to locate certain
tracks on the disc.
TOC (Table of Contents)
Compact discs (CDs), compact discs
with video (CDVs), and selected laser
discs (LDs) are provided with a section
called TOC at the beginning of the disc.
The TOC section is similar to the table
of contents of a book. It contains
information on the contents (number of
chapters, tracks, playing time, etc.) of
the disc.
Glossary
Page 32

30
Heavy Books – 10 Pounds
Laser
Disc
Glass Plate
Protective
Envelope
Glass Plate
References
Cleaning the Player
Use a soft cloth or the dusting attachment of your vacuum cleaner to dust the exposed surface of the
player. Use the vacuum cleaner attachment to remove dust from the ventilation holes on the top,
back, sides, and bottom of the cabinet.
Some of the plastic surfaces are easily scratched, and they can be marred by alcohol and various
solvents. Avoid excessive use of oil-based furniture polishes since the materials used in the cabinet
are non-porous and the residue will accumulate more dust.
Handling Discs
When loading or removing discs, try not to touch
their playing surface.
Cleaning Discs
Fingerprints or other dirt on the discs may affect
sound and picture quality.
To clean your discs, use a soft clean cloth to wipe
them. If necessary, moisten a soft cloth with a
diluted neutral detergent solution to remove
heavy deposits and oil from fingerprints.
Discs should not be cleaned with record cleaning
sprays, static prevention sprays, or volatile liquids
such as benzine or thinner.
Do Not Play Cracked or Warped Discs
Never play a cracked, scratched, or warped disc.
This may damage the player or cause it to
malfunction.
Storing Discs
After playing a disc, always remove it from the
player and return it to its jacket. Then store it
standing upright away from heat and humidity.
Store discs carefully. If you store discs at an angle,
or stacked on top of each other, discs may become
warped even when in their jackets.
Do not leave discs in locations such as the seat of a
car, which may become excessively hot.
Warped Laser Discs
1. Put the warped laser disc into its protective
envelope.
2. Place the envelop between two flat plates of
glass.
3. Place heavy books on top of the plates so that
approximately ten pounds of pressure is
applied.
4. Leave the disc like this for a day or two. The
warp may be corrected.
Care of Discs
Care of Player and Discs
Page 33

31
References
Trouble Checks
Trouble When Laser Disc Is Playing Here's What to Try:
Sometimes problems can be easily solved by checking a few basic things. Check below
before you call for help or take your player to an Authorized RCA LaserDisc Player
Servicenter.
Disc table does not open when OPEN•CLOSE CD
or LD is pressed on player
Small disc table opens
Disc table comes out automatically
TV no longer receives other channels after it has
been connected to the player
Interference during normal TV viewing (slanted
stripes appear on TV screen)
Remote control will not operate disc player
Remote control interferes with operation of TV
Player stops immediately after playback is started
Player repeats one part of the disc or entire disc
Player plays chapters (or tracks) in random order
Display panel does not operate
Last memory feature does not operate
Wrong time location found during time search
•Check to see if player’s power plug is plugged into an operating outlet.
•Make sure player’s power is turned on. Press POWER.
•Press OPEN•CLOSE LD on player to open large disc table. Details are on
page 3.
•Disc may be dirty. Try cleaning disc. See page 30.
•The disc is not properly set on the disc table. Make sure the disc is set in
the groove corresponding to its size.
•Moisture has condensed on parts in the player. Remove the disc and let
the player set for one to two hours until it is dry.
•Disc is warped. Try to remove the warp from the disc (LDs only). Details
are on page 30.
•TV is set to video input. Select a different TV channel.
•TV broadcasting signal is weak. Try a different channel.
•Player’s power turned on. Turn player off when not in use.
•Make sure remote is aimed at remote control sensor. There can be no
obstructions between them.
•The batteries may need replacing. Details on page 2.
•TV may be responding to player’s remote control. Try moving the TV and
player farther apart or cover the TV’s remote sensor when operating the
player.
•Disc may be loaded upside down. Open disc table and turn disc over.
Details are on page 3.
•Player is in repeat play mode. Turn off repeat play. Details are on
pages 16-17.
•Player is in random play mode. Turn off random play.
Details are on page 15.
•Display off. Press DISPLAY OFF on player to turn display on.
•Player not plugged into working outlet when turned off. STANDBY
indicator does not light when player is turned off.
•PLAY was pressed and disc starts playing from the beginning. Press
MEMORY to start playback at the memory point.
•Some discs do not have seconds encoded. Enter the time only in minutes.
See pages 10-11.
Page 34

32
References
Trouble Checks
Trouble When Laser Disc Is Playing Here's What to Try:
Disc is rotating but there is no picture
Picture continually moves vertically
Disc does not play back properly or playback
stops in the middle of the disc
No audio during playback
Picture “jitters” during frame advance
Chapter skip, chapter program play, or chapter
number search features will not operate
Disc will not start playing or takes too
long to start
Search takes too long or will not operate on
certain discs
Time search does not function properly
Player takes too long to find point A during
repeat operation
Sound is not natural on discs with CX
Service code appears in display panel and on TV
screen (U1, U2, F5, P2, L3, E4, H0, H1, H2, or A0)
•Player’s power turned on. Turn player off when not in use.
•The TV set is not turned on and tuned to the proper channel. If TV is
connected using its audio/video inputs, tune TV to its video input. If TV is
connected using RF adapter, tune TV to channel 3 or 4.
•Carefully check the connections between the player and TV.
•TV’s vertical hold control may need adjusting.
•Disc is dirty. Try cleaning disc. Details are on page 30.
•Disc is warped. Try to remove the warp. Details are on page 30.
•Player is in pause mode. Press PLAY to return to playback.
• Player is in scan (search), frame advance, or variable-speed playback.
Sound is muted or turned off during these operations.
•Some “jitter” (picture bouncing up and down) is normal during frame
advance.
•The disc being played has no chapter numbers. Press DISPLAY while the
disc is playing to see if chapter numbers are displayed.
•It takes time to read the recorded code depending on the disc.
•There are errors when the disc’s code is read. Press STOP and then press
PLAY.
•It takes time to read the recorded code depending on the disc.
•Press CLEAR. A different picture than the one searched for may appear.
•Make sure time is entered correctly.
•It takes time to read the recorded code depending on the disc.
•There are errors when the disc code is read.
•CX is turned off. Press AUDIO to turn CX on. See page 21.
•U1 or U2 Disc is not loaded properly. Reload disc and press PLAY.
Disc is dirty. Wipe with soft cloth.
F5 Two disc are loaded on disc table. Remove one disc.
Disc is dirty. Wipe with soft cloth.
P2, L3, E4 Open the disc table and press PLAY. If the same code appears
again, take the player to an Authorized Servicenter. The
number displayed after F, P, L, or E depends on the condition
of the player. Tell the servicer which code the player displayed.
H0, H1, Take the player to an Authorized Servicenter, and tell them
H2, or A0 which code the player displayed.
Page 35

33
References
Trouble Checks
Trouble When CD Is Playing Here's What to Try:
Cannot hear audio
Sound is distorted
Portion of disc is repeated
Service code appears in display panel and on TV
screen (U1, U2, F5, P2, L3, E4, H0, H1, H2, or A0)
•Check connections to TV monitor and/or stereo amplifier/receiver.
•Make sure TV monitor and/or stereo amplifier/receiver are set to proper
positions to hear audio from player.
•Check connection terminals and/or plugs on audio/video cables to make
sure they are not dirty.
•Make sure the plugs on the audio/video cables are fully inserted into the
jacks.
•Player is in pause mode. Press PLAY.
•The player is connected to the PHONO jacks on the amplifier/receiver.
Make sure player is connected to AUX, CD, VDP, LD or VCR jacks.
•The terminals or plugs on the cables are dirty.
•Make sure the plugs on the audio/video cables are fully inserted into the
jacks.
•Player is set for hearing only one channel. Press AUDIO to select stereo
sound. Details are on page 21.
•Player is in repeat-play mode. Turn off repeat play. Details are on
pages 16-17.
•U1 or U2 Disc is not loaded properly. Reload disc and press PLAY.
Disc is dirty. Wipe with soft cloth.
F5 Two disc are loaded on disc table. Remove one disc.
Disc is dirty. Wipe with soft cloth.
P2, L3, E4 Open the disc table and press PLAY. If the same code appears
again, take the player to an Authorized Servicenter. The
number displayed after F, P, L, or E depends on the condition
of the player. Tell the servicer which code the player displayed.
H0, H1, Take the player to an Authorized Servicenter, and tell them
H2, or A0 which code the player displayed.
Page 36

34
References
Limited Warranty
What your warranty covers:
• Any defect in materials or workmanship.
For how long after your purchase:
• One year for labor charges.
• One year for parts.
What we will do:
• Exchange your LaserDisc player with a new or,
at our option, refurbished unit at no cost to you.
You can reach Thomson at the
following number:
1-800-283-6503
(Toll free inside U.S.A.)
Our toll-free LaserDisc number
operates from 8 a.m. to 5 p.m.,
CST Monday – Friday
Important information to
customers who ship defective
equipment to Thomson
Consumer Electronics
The Thomson representative who authorized the
return of your equipment will give you an RA
number over the phone. They will also provide
you with instructions on where and how to return
your player. Write the number in large, clear
characters on the outside of the box. To avoid
confusion and misunderstandings, shipments
without an RA number clearly visible on the
outside of the box will be returned to you at your
expense.
Include a brief note describing the problem and
any conversations about the problem you have had
with Thomson personnel. Include your name,
address and model/serial number of your
LaserDisc player. These numbers are located on
the back of your unit. If your player is within the
warranty period, please provide a copy of the bill
of sale to verify purchase date. Use the original
box and packing material to protect the equipment
from damage in shipment.
For your protection, insure all shipments for full
replacement value and use a reliable shipper.
Thomson assumes no responsibility for warranty
shipments from the customer to the factory if not
shipped in the manner prescribed by Thomson.
Customer Assistance & Service
Thomson provides a toll-free telephone number to
help you with any problems you may encounter
with your player. Many can be diagnosed over the
phone, and if necessary, a replacement unit can be
shipped to you. Please have your player
model/serial number and date of purchase ready
when you call. If your unit is out of warranty, we
will quote the cost of an exchange unit to you.
Returning equipment to
Thomson for repair or exchange
If we are unable to resolve your problem over the
phone, we will gladly service your unit or
exchange it for a new or refurbished player. Refer
to the limited warranty to learn about your specific
rights and responsibilities.
Always consult Thomson and get a Return
Authorization number before returning anything!
Obtain a Return Authorization (RA) number from
the telephone representative before returning your
equipment to avoid delays, accounting errors, or
even loss of your unit.
How you get service:
• Call 1-800-283-6503 and have your unit’s date of
purchase and model/serial number ready. The
model/serial number information is on the back
of your player.
• A representative will troubleshoot your
problem over the phone. If the representative
determines that you should receive a
replacement unit, you will be provided with a
Return Authorization (RA) number and the
location of a nearby exchange point if one exists.
No returns will be accepted without the RA
number.
continued on next page
Page 37

References
To receive a replacement LaserDisc
player before you return yours:
If you are located near an exchange point:
1. We will send a replacement unit to our
exchange point next business day delivery.
2. The exchange location will notify you of its
arrival.
3. Take your unit, including all accessories, and
your bill of sale which validates date of
purchase to the exchange location and you will
be provided the new or refurbished unit.
4. If the repairs were covered by your warranty,
you will not be billed.
If you are
not located near an exchange point:
1. Provide your Discover, MasterCard or Visa
account number and expiration date to our
phone representative. This is for security
purposes. If you return the unit to us within 14
days from the date you were provided a Return
Authorization number, only items not covered
by warranty will be charged to your account. IF
YOUR UNIT IS NOT RECEIVED WITHIN 14
DAYS, THE SUGGESTED RETAIL VALUE
OF THE LASERDISC PLAYER AND/OR
ACCESSORIES WILL BE CHARGED TO
YOUR CREDIT CARD. This amount will be
credited if the unit is subsequently received.
2. We will send you a replacement unit next
business day delivery.
3. You will receive an invoice packed with the
replacement product, but will not be charged for
the unit portion of the invoice amount if we
receive your unit including all accessories
within 14 days from the date you were provided
the RA number. Any labor and parts charges
not covered by our warranty will be included
and charged against your account.
4. Ship the unit back to us along with all
accessories included with your LaserDisc player
using the replacement unit’s carton. Shipping
instructions will be included in the carton along
with your RA number, which will allow you to
easily ship the unit back to us. Make sure you
insure your shipment in case of damage or loss.
Include with the shipment:
• A copy of your dated bill of sale to verify
your unit’s warranty eligibility.
• A brief note describing your player’s
problem.
• Your name, address and phone number.
Return transportation, storage, handling costs and
insurance are your responsibility. We accept no
liability in case of damage or loss.
Limited Warranty
To receive a replacement LaserDisc
player after we have received your
unit:
1. Write the RA number on the outside of the
carton used to return the unit. Make sure you
insure your shipment in case of damage or loss.
2. Carefully pack the unit along with all
accessories included with your LaserDisc
player, using the original box and packing
material if possible. Include with the shipment:
• A copy of your dated bill of sale to verify
your unit’s warranty eligibility.
• A brief note describing your LaserDisc
player problem.
• Your name, address and phone number.
Return transportation, storage, handling costs and
insurance are your responsibility. We accept no
liability in case of damage or loss.
3. Include a cashier’s check or money order for
payment if there are any out of warranty labor
or parts charges which were indicated by the
representative, and you elected not to use your
credit card.
4. Upon receipt of your product a new or
refurbished unit will be shipped to you next
business day delivery.
What your warranty does not cover:
• Adjustment of customer controls.
• Damage from misuse or neglect.
• A unit that has been modified or incorporated
into other products or is used for institutional or
other commercial purposes.
• Battery for clock and other features.
• LaserDisc players purchased or serviced outside
the U.S.A.
• Return transportation, storage and handling
costs of your unit, including insurance for loss
or damage.
Product Registration:
• Please complete and mail the Product
Registration Card packed with your LaserDisc
player. It will make it easier to contact you
should it ever be necessary. The return of the
card is not required for warranty coverage.
How State Law relates to warranty:
• This warranty gives you specific legal rights and
you also may have other rights that vary from
state to state.
If you purchased your player outside
the United States:
• This warranty does not apply. Contact your
dealer for warranty information.
35
Page 38

36
Specifications
General
System.................................................Laser disc system and
compact disc digital audio system
Laser....................Semiconductor laser wavelength 780 nm
Power requirements
U.S. and Canadian models......................AC 120V, 60 Hz
Power consumption
U.S. and Canadian models..........................................34W
Weight.............................................................7.1 kg (15.7 lbs)
Dimensions.......................mm: 430 (W) x 401 (D) x 132 (H)
inches: (17 x 15.8 x 5.2)
Operating temperature ........................................5
o
C ~ 35oC
(41
o
F ~ 95oF)
Operating humidity................................................5% ~ 85%
(There should be no condensation of moisture.)
Discs Types
Laser Discs
*Maximum playing times
12-inch standard play disc....................1 hour/both sides
12-inch extended play disc..................2 hours/both sides
8-inch standard play disc......................28 min/both sides
14 min/one side
8-inch extended play disc.....................40 min/both sides
20 min/one side
Spindle motor speed
Standard play disc................................................1,800 rpm
Extended play disc ........1,800 rpm (inner circumference)
to 600 rpm (outer circumference)
(For a 12-inch disc)
Compact Discs
Disc Diameter: 5-inch, 3-inch, Thickness: 1.2 mm
Rotation direction (pickup side)..............counterclockwise
Linear speed ....................................................1.2 ~ 1.4m/sec
*Maximum playing time.......................74 min. 5-inch discs
20 min. 3-inch discs
(For stereo playback)
Compact Discs with Video
Disc Diameter: 5-inch, Thickness: 1.2 mm
Rotation direction (pickup side)..............counterclockwise
Linear speed.........................Audio portion: 1.2 ~ 1.4m/sec
Video portion: 11 ~ 12m/sec
*Maximum playing time........Video portion: 5 min. (CLV)
Audio portion: 20 min. (Digital)
*Actual playback time differs for each disc.
Video Characteristics
Format ....................................................NTSC specifications
Video output
Level...........1 Vp-p nominal, sync, negative, terminated
Impedance.................................................75Ω unbalanced
Jacks..............................................................RCA-type jack
S-Video Output
Video output
Y (luminance) – Output level.......................1 Vp-p (75Ω)
C (color) – Output level.........................286 mVp-p (75Ω)
Connector...............................................S-video connector
Audio Characteristics
Output level
During analog audio output...........................200 mVrms
(1 kHz, 40%)
During digital audio output...........................200 mVrms
(1 kHz, -20 dB)
Jacks ................................................................RCA-type jacks
Digital Audio Characteristics
Frequency response ...........................4 Hz-20 kHz (EIAJ)
SN ratio ..........................................................115 dB (EIAJ)
Dynamic range................................................96 dB (EIAJ)
Total harmonic distortion .........................0.0035% (EIAJ)
Wow and flutter..........................Below measurable limit
(± 0.001% W.PEAK) (EIAJ)
Other Terminals
VHF adapter output (Video/Audio).........Both RCA jacks
with DC jack
AC-3 RF OUT .......................................................... RCA jack
References
Page 39

37
References
Index
1/L Indicator . . . . . . . . . . . . . . . . . . . . . . . . .20,21,23
2/R Indicator . . . . . . . . . . . . . . . . . . . . . . . . .20,21,23
AC-3 RF OUT Jack . . . . . . . . . . . . . . . . . . . . . . . . .24
Accessories, Included . . . . . . . . . . . . . . . . . . . . . . . .2
Analog Audio . . . . . . . . . . . . . . . . . . . . . . . . . . . . .20
Assistance . . . . . . . . . . . . . . . . . . . . . . . . . . . . . . . . .34
AUDIO Button . . . . . . . . . . . . . . . . . . . . . . . . .5,20,21
Audio, Selecting on Laser Discs . . . . . . . . . . . . . .20
AUDIO/VIDEO OUT Jacks . . . . . . . . . . . . .2,24,25,27
Back Panel . . . . . . . . . . . . . . . . . . . . . . . . . . . . . . . .24
Batteries, Remote . . . . . . . . . . . . . . . . . . . . . . . . . . . .2
Care and Cleaning, Disc and Player . . . . . . . . . . .30
Cautions . . . . . . . . . . . . . . . . . . . . . . . . . . . . . . . . . . .i
CD Description . . . . . . . . . . . . . . . . . . . . . . . . . . . .28
CDV Description . . . . . . . . . . . . . . . . . . . . . . . . . . .28
CHAP•TIME Buttons . . . . . . . . . . . . . . . . . . .5,10-11
CHAP•TRACK SRCH Buttons . . . .5,10-11,18-19,22
Checks, Trouble . . . . . . . . . . . . . . . . . . . . . . . . .31-33
Choosing a Hookup . . . . . . . . . . . . . . . . . . . . . . . .24
CHP/TRK Indicator . . . . . . . . . . . . . . . . . . . . . . . . .23
Cleaning Discs . . . . . . . . . . . . . . . . . . . . . . . . . . . . .30
CLEAR Button . . . . . . . . . . . . . . . . . . . .5,10-11,18-19
Connections
Amplifier/Receiver . . . . . . . . . . . . . . . . . . . .27
Choosing . . . . . . . . . . . . . . . . . . . . . . . . . . . . .24
TV Monitor With AUDIO/VIDEO IN Jacks .25
TV Without Audio/Video Jacks . . . . . . . . .26
Contents` . . . . . . . . . . . . . . . . . . . . . . . . . . . . . . . . . .1
Customer Assistance . . . . . . . . . . . . . . . . . . . . . . .34
CX Noise Reduction . . . . . . . . . . . . . . . . . . . . . . . .21
Definitions . . . . . . . . . . . . . . . . . . . . . . . . . . . . . . . .29
Design Specifications . . . . . . . . . . . . . . . . . . . . . . .36
Digital Audio . . . . . . . . . . . . . . . . . . . . . . . . . . .20,21
DISC SIDE A/B Buttons . . . . . . . . . . . . . . . . . .4,5,22
Discs, Cleaning . . . . . . . . . . . . . . . . . . . . . . . . . . . .30
Discs, Cracked or Warped . . . . . . . . . . . . . . . . . . .30
Discs, Handling . . . . . . . . . . . . . . . . . . . . . . . . . . . .30
Discs, Loading and Removing . . . . . . . . . . . . . .3,30
Discs, Storing . . . . . . . . . . . . . . . . . . . . . . . . . . . . . .30
Discs, Types . . . . . . . . . . . . . . . . . . . . . . . . . . . . . .28
Discs, Warped . . . . . . . . . . . . . . . . . . . . . . . . . . . . .30
DISPLAY Button . . . . . . . . . . . . . . . . . .5,6-8,13,15,20
DISPLAY OFF Button . . . . . . . . . . . . . . . . . . . . .8,22
Display On/Off Feature . . . . . . . . . . . . . . . . . . . . . .8
Display Panel . . . . . . . . . . . . . . . . . . . . . . . . . . . . . .23
Displays, On-Screen . . . . . . . . . . . . . . . . . . . . . . .6-7
Features, Playback . . . . . . . . . . . . . . . . . . . . . . . .6-21
FRAME ADVANCE Buttons . . . . . . . . . . . . . . . .5,13
Frame Advance . . . . . . . . . . . . . . . . . . . . . . . . . . . .13
Glossary . . . . . . . . . . . . . . . . . . . . . . . . . . . . . . . . . .29
Handling Discs . . . . . . . . . . . . . . . . . . . . . . . . . . . .30
HI-LITE INTRO Button . . . . . . . . . . . . . . . . . .5,12,22
Hi-Lite Scan . . . . . . . . . . . . . . . . . . . . . . . . . . . . . . .12
Hookups
Amplifier/Receiver . . . . . . . . . . . . . . . . . . . .27
Choosing . . . . . . . . . . . . . . . . . . . . . . . . . . . . .24
TV Monitor With AUDIO/VIDEO IN Jacks .25
TV Without Audio/Video Jacks . . . . . . . . .26
Important Information . . . . . . . . . . . . . . . . . . . . . . .i
Included Accessories . . . . . . . . . . . . . . . . . . . . . . . .2
Indicators . . . . . . . . . . . . . . . . . . . . . . . . . . . . . . . . .23
Information, Important . . . . . . . . . . . . . . . . . . . . . . .i
Intro Scan . . . . . . . . . . . . . . . . . . . . . . . . . . . . . . . . .12
Last Memory Feature . . . . . . . . . . . . . . . . . . . . . . . .9
LD Description . . . . . . . . . . . . . . . . . . . . . . . . . . . .28
Limited Warranty . . . . . . . . . . . . . . . . . . . . . . .34-35
Listening for a Lifetime . . . . . . . . . . . . . . . . . . . . .21
Loading and Removing Discs . . . . . . . . . . . . . .3,30
MEMORY Button . . . . . . . . . . . . . . . . . . . . . . . . .9,22
Multi-Audio Discs . . . . . . . . . . . . . . . . . . . . . . . . .20
Noise Reduction . . . . . . . . . . . . . . . . . . . . . . . . . . .21
Number Buttons . . . . . . . . . . . . . . . . . .5,10-11,18-19
On-Screen Displays . . . . . . . . . . . . . . . . . . . . . . . .6-7
OPEN/CLOSE CD Button . . . . . . . . . . . . . . . .3,4,22
OPEN•CLOSE LD Button . . . . . . . . . . . . . . . .3,4,22
PAUSE Button . . . . . . . . . . . . . . . . . . . . . . .4,5,13,22
Pause During Playback . . . . . . . . . . . . . . . . . . . . . .4
PLAY Button . . . . . . . . . . . . . . .4,5,11,12,13,15,18-19
Playback Features . . . . . . . . . . . . . . . . . . . . . . . .6-21
Playback Pause . . . . . . . . . . . . . . . . . . . . . . . . . . . . .4
Player, Care and Cleaning . . . . . . . . . . . . . . . . . . .30
Playing a Disc, First Time . . . . . . . . . . . . . . . . . . . .3
POWER Button . . . . . . . . . . . . . . . . . . . . . .3,4,5,9,22
Problem Solving . . . . . . . . . . . . . . . . . . . . . . . . .31-33
Product Registration . . . . . . . . . . . . . . . . . . . . . . . . .i
PROGRAM Button . . . . . . . . . . . . . . . . . . . . .5,18-19
Program Playback . . . . . . . . . . . . . . . . . . . . . . .18-19
RANDOM Button . . . . . . . . . . . . . . . . . . . . . . . . .5,15
Random Play Feature . . . . . . . . . . . . . . . . . . . . . . .15
REMAIN Indicator . . . . . . . . . . . . . . . . . . . . . . .6-7,23
Remote Batteries . . . . . . . . . . . . . . . . . . . . . . . . . . . .2
Remote Control Buttons . . . . . . . . . . . . . . . . . . . . . .5
Remote Sensor . . . . . . . . . . . . . . . . . . . . . . . . . . . . .22
Removing and Loading Discs . . . . . . . . . . . . . .3,30
REPEAT A•B Button . . . . . . . . . . . . . . . . . . . .5,16-17
REPEAT Buttons . . . . . . . . . . . . . . . . . . . . . . .5,16-17
Repeat Playback Feature . . . . . . . . . . . . . . . . .16-17
RF Output Adapter . . . . . . . . . . . . . . . . . . . . . . . . .26
S-VIDEO OUT Connector . . . . . . . . . . . . . . . . .24,25
SCAN Buttons . . . . . . . . . . . . . . . . .5,13,14,18-19,22
SCAN Shuttle . . . . . . . . . . . . . . . . . . . . . . . . . . . .5,14
Scanning, Visual . . . . . . . . . . . . . . . . . . . . . . . . . . .14
Search by Chapter (Track), Time or Frame . .10-11
Searching, Visual . . . . . . . . . . . . . . . . . . . . . . . . . . .14
Sensor, Remote . . . . . . . . . . . . . . . . . . . . . . . . . . . .22
Setting Up the LaserDisc . . . . . . . . . . . . . . . . . . .2-4
Solving Problems . . . . . . . . . . . . . . . . . . . . . . . .31-33
Specifications . . . . . . . . . . . . . . . . . . . . . . . . . . . . . .36
SPEED SELECT Buttons . . . . . . . . . . . . . . . . . . .5,13
STANDBY Indicator . . . . . . . . . . . . . . . . . . . . .4,9,22
Status Displays . . . . . . . . . . . . . . . . . . . . . . . . . . . .23
Still Frame . . . . . . . . . . . . . . . . . . . . . . . . . . . . . . . .13
STOP Button . . . . . . . . . . . . . . . . . . . . . . . . .4,5,19,22
Storing Discs . . . . . . . . . . . . . . . . . . . . . . . . . . . . . .30
Table of Contents . . . . . . . . . . . . . . . . . . . . . . . . . . .1
THEATRE MODE Button . . . . . . . . . . . . . . . . . . .8,22
Theatre Mode . . . . . . . . . . . . . . . . . . . . . . . . . . . . . . .8
TOTAL Indicator . . . . . . . . . . . . . . . . . . . . . . . . . . .23
Trouble Checks . . . . . . . . . . . . . . . . . . . . . . . . .31-33
Turn on LaserDisc Player . . . . . . . . . . . . . . . . . . . .3
Turn on TV . . . . . . . . . . . . . . . . . . . . . . . . . . . . . . . . .2
Types of Discs . . . . . . . . . . . . . . . . . . . . . . . . . . . . .28
Variable Speed Playback . . . . . . . . . . . . . . . . . . . .13
VHF ADAPTER Jacks . . . . . . . . . . . . . . . . . . . . .24,26
Warped Discs . . . . . . . . . . . . . . . . . . . . . . . . . . . . . .30
Warranty, Limited . . . . . . . . . . . . . . . . . . . . . . .34-35
Page 40

If your LaserDisc player needs service,
please contact your dealer or the nearest
Servicenter from the yellow pages. Please do
not send any products to the Indianapolis
address listed in this manual or on the
carton. This will only add delays in service
for your product.
10330 N. Meridian Street
Indianapolis, IN 46290
©
1995 Thomson Consumer Electronics, Inc.
Trademark(s)® Registered
Marca(s) Registrada(s)
Printed in Japan
Part Number 95-LDR611-1
For your nearest Home
Entertainment Dealer
or Authorized Servicenter
call toll-free in the U.S.A.
1-800-336-1900
Canadian Consumers –
Your toll free numbers are:
English: 1-800-522-0338
French: 1-800-522-0445
 Loading...