

Page 1
)’
Appliance Registration
Broiling
Care and Cleaning
Electronic Oven Control
Clock
Qven/Timer Controls
Self-Clean Cycle Controls 14
Features
Installation
Electrical Supply
Location
Light Bulb Replacement
Model and Serial Number
Oven Cooking
Problem Solver
Recipes
Repair Service
(
Safety Instructions
Themostat Adjustment
Warranty
Back Cover
2
10
13-16
7
7
8
6
3,4
4.
3
16
2
8,9
17,18
11,12
19
5
18
_--—
I
I
Page 2
immediately conlact the dealer (or
builder)that sold youthe oven:
Savetime and money.
Beforeyou request
service...
Check the Problem Solver. It lists
causes of minor operating problems
that you can correctyourself.
—
Help us
help YOU...
Readthisbook carefully.
It is intendedto help youoperate and
maintain your new oven properly.
Keep it handy for answers to your
questions.
If you cfon’tunderstand somethingor
need more help, write (include your
phone number):
ConsumerAffairs
RCA
Appliance Park
Louisville,KY 40225
Write down the model and
serial numbers.
You’llfind them on a Iabeion the front
of the oven behindthe oven or broiler
door.
Write these numbers into the space
below. Alsowritethe numbersintothe
spaceon ~hewarranty cardthat came
with your oven before you send the
card in.
@
YOUreceived
damagedoven...
@
.
ModelNumber
SerialNumber
Use these numbers in any correspon-
denceor servicecallsconcerning your
oven.
2
CNOT03
Page 3
—
INSTALLATION
IMPORTANT Save these insfructiOnsfor the Iacal electrical insDectOr’suse.
#
TOOL LIST
Thefolfowingtoois areneededto installyour newoven.
1. 1/8”drill bit
2. Electricor handdrill
3. Flat bladed and Philipsscrewdrivers
4. Pencil
5. Ruleror tape measureand straightedge
6. Handsaw or sabersaw
LOCATION
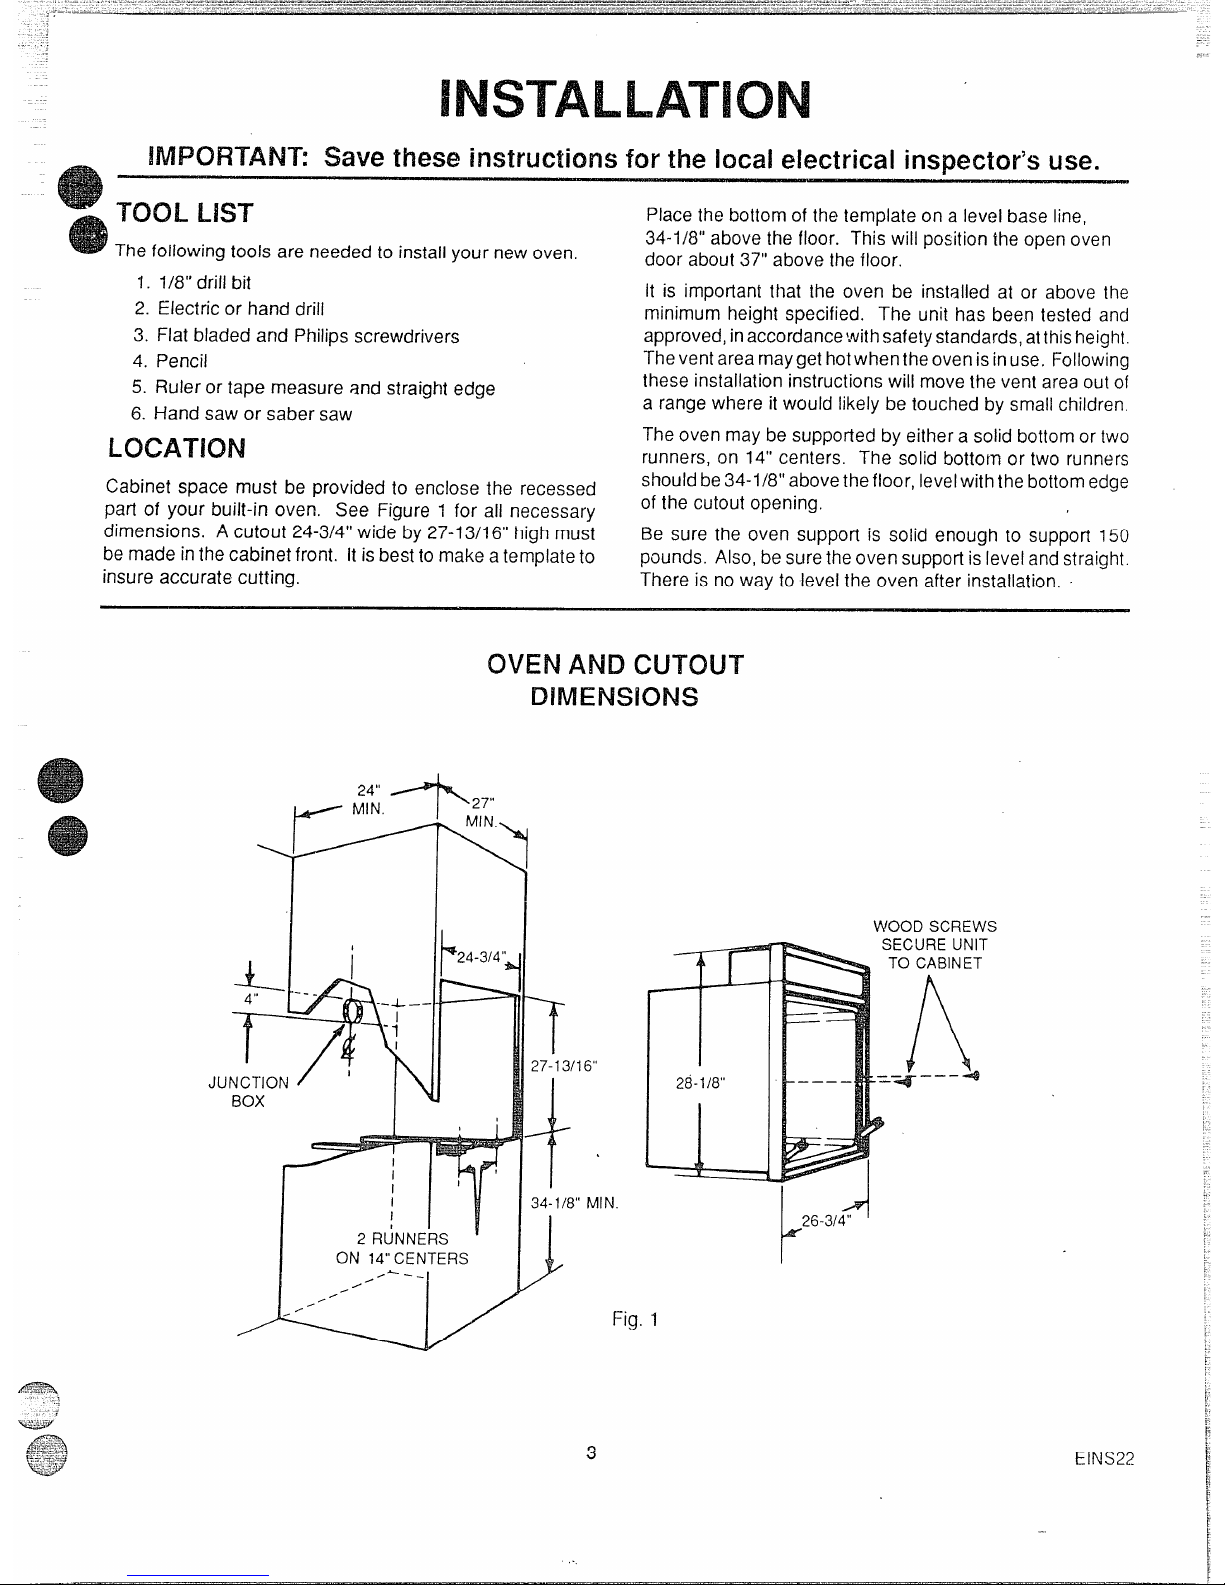
Cabinet spacemust be providedto enclosethe recessed
part of your built-in oven. See Figure 1 for all necessary
dimensions. Acutout 24-3/4”wide by27-13/16“highmust
bemadeinthecabinetfront. It isbestto makeatemplateto
insureaccuratecutting.
Placethe bottomof the templateon a levelbaseline,
34-1/8”abovethe floor. This willpositiontheopenoven
doorabout37” abovethe floor.
It is important that the oven be installed at or abovethe
minimumheight specified. The unit hasbeen tested and
approved,inaccordancewithsafetystandards,atthisF]eight.
Theventarearnaygethotwhentheoven isinuse. Following
theseinstallationinstructionswill moveIhe ventareaout of
a rangewhere itwould likelybe touchedby smallchildren.
Theovenmaybe suppofiedby eithera solidbottomor two
runners,on 14”centers. The solid bottom or two runners
shouldbe34-1/8”abovethefloor, levelwiththebottomedge
of the cutoutopening,
Be sure the oven support is solid enough to support150
pounds. Also,besuretheoven supportislevelandstraight.
Thereis noway to levelthe oven afterinstallation.
L
4“
T
24”/
~
MIN.
1
--
JUNCTION
BOX
!
1
I
2 RtiNNERS
OVEN AND CUTOUT
DIMENSIONS
\~7$,
MIN.,
\
*24-314’;
,
I
ON 14” CENTERS
/&_-
/“
/0
/“
7
27-13116”
+
,
34-1/8” MIN.
J
Fig. I
‘1
~26-3i4°
Page 4
Werecommendthatyouhavethe electricalhookupofyour
oven doneby a qualified electrician, Havefhe electrician
showyouwhereyourmain ovendisconnectis located.
Call your ElectricCompanyand askwhich codesapply in
your area. If there are no codes, you must follow the
NATlONALELECTRICALCODE,ANS1/NFPANO.70-1987.
Youcanget a copyby writing:
NationalFire ProtectionAssociation
Batterymarch Park
Quincy,MA 02269
If youfail to wire your oven in accordancewilh governing
codes,you maycreate a hazardouscondition.
Youmustusea three-wire,single-phaseAC120/240Voltor
208Y/120Volt, 60 Hertz electricalsystemto operateyour
oven. If you connect ~o aluminum wiring, properly
installedconnectionslistedfor usewith aluminumand
copperwiring must be used.
Use#12 copperwire and20Amp fuseor circuitbreakerfor
120/240Volt and 208Y/120Volt systems.
Before installingthe oven or moving it to anotherlocation,
havethe electrician verify:
D That your home is provided with adequate electrical
service.
o Thattheadditionoftheovenwi!lnotoverloadthehousehold
circuiton which it is used.
The electrical power to the oven supply line must be
shutoffwhile line connectionsare beingmade. Failure
to do so could result in serious injuryor death.
Instailan approvedjunctionbox inthe upper4“of thecutout
(see Fig. 1).
Whenmakingthe wireconnections,usethe entirelengthof
conduit provided (4feet). The conduit must notbe cut.
The neutralof the unitis groundedto the framethroughthe
bare groundwire.
UNITS WITH NEUTRAL WIRE: Frame
grounded by connection of grounding
lead to neutral lead. If used in a mobile
home or if local codes do not permit
groundingthrough neutral,
openconnec-
tion and use groundingleadto ground
unit inaccordance withlocalcodes. Connect neutrallead tobranchcircuit neutral
conductor in usual manner.
ALL UNITS: Whenapplyingsetscrewtype
connectors care should be taken not to
damage conduit.
Yourbuilt-inovenispackedwi!ha shippingbasepadonthe
bottomoftheunit. Thispadprotectsthelowerfronttrimand
shouldnotberemoveduntilyouarereadytoinstalltheov
Beforeinstallingtheoven,you mayremovethe ovend
tolessentheweightoftheunit ifyouwish. Seethecare
cleaningsectionoftheuseandcaremanualforinstruct!
Putthe ovenintothe cabinet and usea 1/8”drill bitto drill
holesinthecabinetfrontthroughthe holesinthe oventrim.
Securethe oveninthe cabinetwiththe screwsprovided.
See the care and cleaning section of the use and care
manualfor instructionson how to instali oven racksand
guides.
,-
Page 5
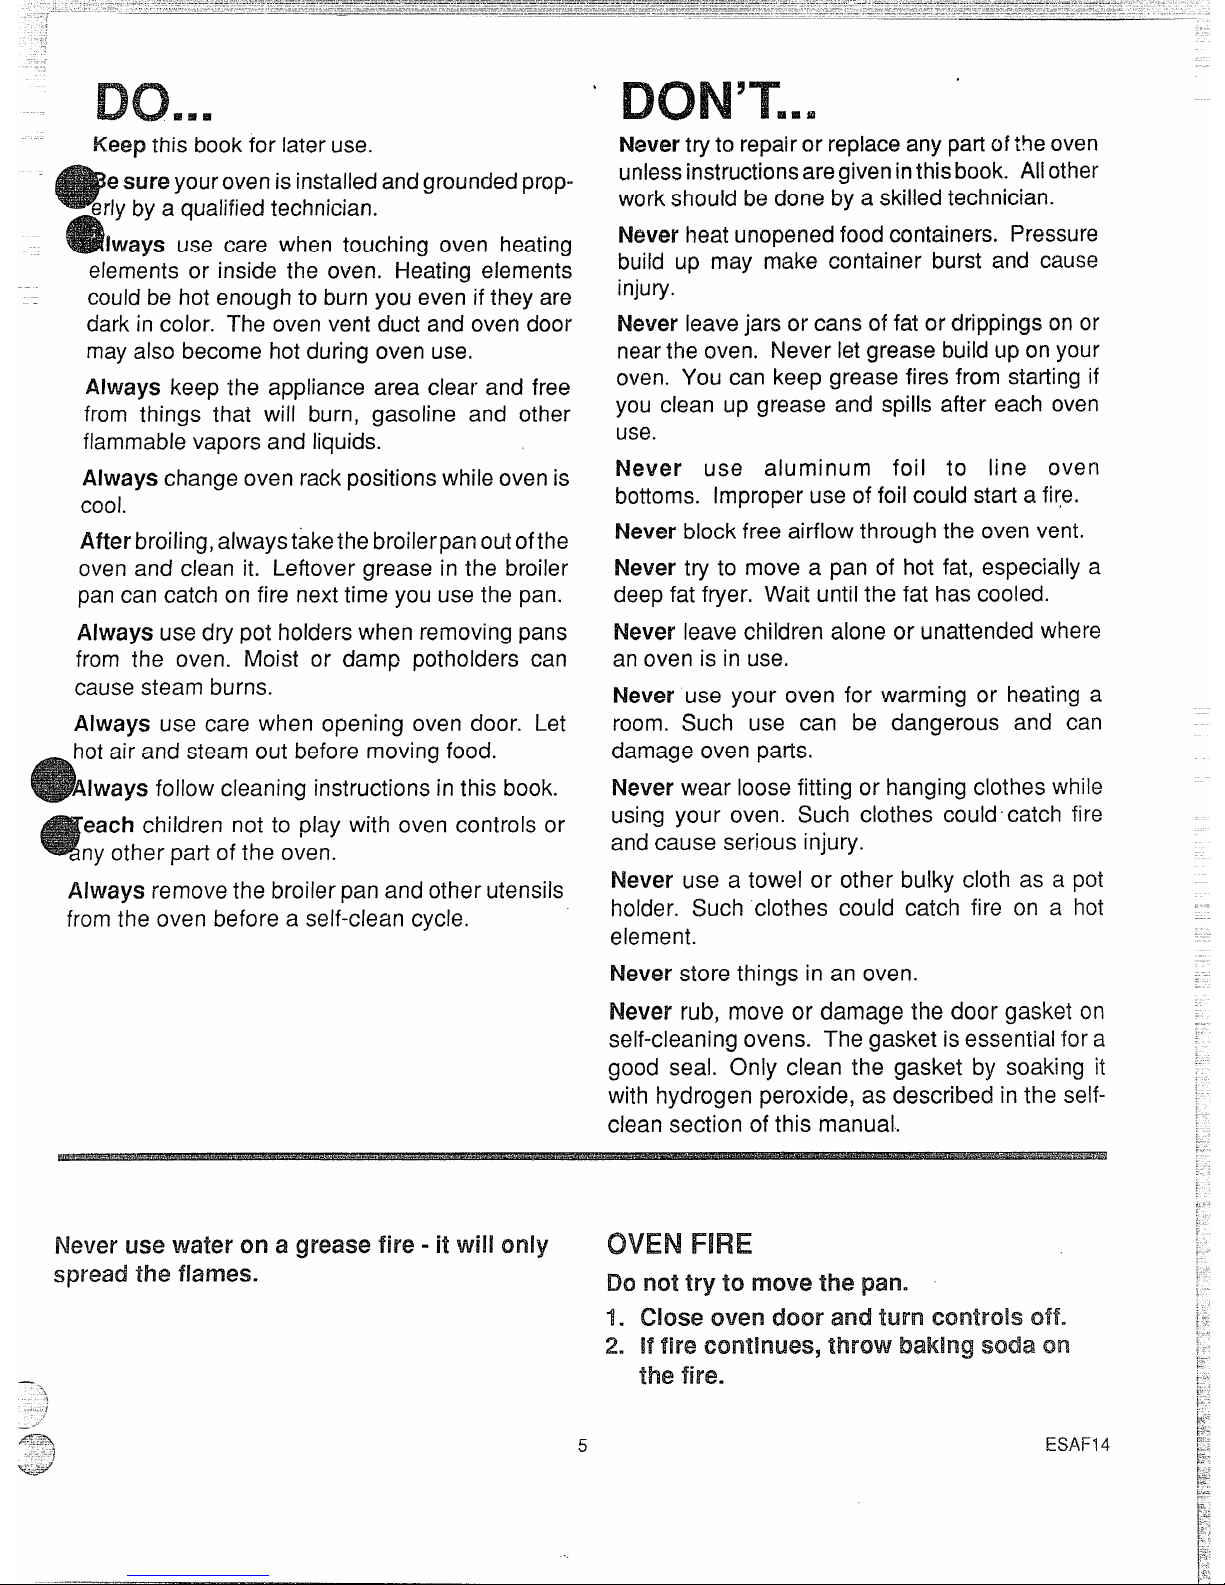
Keepthis bookfor lateruse.
esure yourovenisinstalledandgroundedprop-
erlyby a qualifiedtechnician.
!ways use care when touching oven heating
elements or inside the oven. Heating elements
couJdbe hot enoughto burn you evenifthey are
darkincolor. The ovenvent duct and oven door
mayalso becomehotduring oven use.
Always keep the appliance area clear and free
from things that will burn, gasoline and other
flammablevapors and liquids.
Always changeoven rackpositionswhile ovenis
cool.
After broiling,alwaystakethebroilerpanoutofthe
oven and clean it. Leftovergrease in the broiler
pancan catch on fire nexttime you usethe pan.
Always usedry pot holderswhen removingpans
from the oven. Moist or damp potholders can
causesteam burns.
Always use care when opening oven door. Let
hotair and steam out before moving
food.
Always follow cleaning instructionsin this book.
each children not to play with oven controls or
nyother part of the oven.
Always removethe broilerpanand other utensils
fromthe oven before a self-clean cycle.
‘ DON’T...
Nevertryto repairor replaceany partoftheoven
unlessinstructionsaregiveninthisbook. Allother
workshould bedoneby a skilledtechnician.
Never heatunopenedfoodcontainers. Pressure
build up may make container burst and cause
injury.
Never leavejars orcans of fat or drippingson or
nearthe oven. Never letgrease buildup on your
oven. You can keep grease fires from startingif
you clean up grease and spills after each oven
use.
Never use aluminum foil to line oven
bottoms. Improperuse of foil could starta fi(e.
Never block free airflowthroughthe ovenvent.
Never tryto move a pan of hot fat, especiallya
deepfat fryer. Wait untilthe fat hascooled.
Never leavechildren aloneor unattendedwhere
anoven is in use.
Never use your oven for warming or heating a
room. Such use can be dangerous and can
damageoven pans.
Never wear loosefitting or hanging clotheswhile
using your oven. Such clothes could-catch fire
andcause serious injury.
Never use a towel or other bulky cloth as a pot
holder. Such clothes could catch fire on a hot
element.
Never storethings in an oven.
Never rub, move or damage the door gasket on
self-cleaningovens. The gasket is essentialfor a
good seal. Only clean the gasket by soaking it
with hydrogen peroxide, as described in the self-
clean section ofthis manual..
Never
usewaterona greasefire-it willonly
OVEN FIRE
spreadthef~ames.
Donottryto
move the pan.
1.
2=
5
.-
Page 6
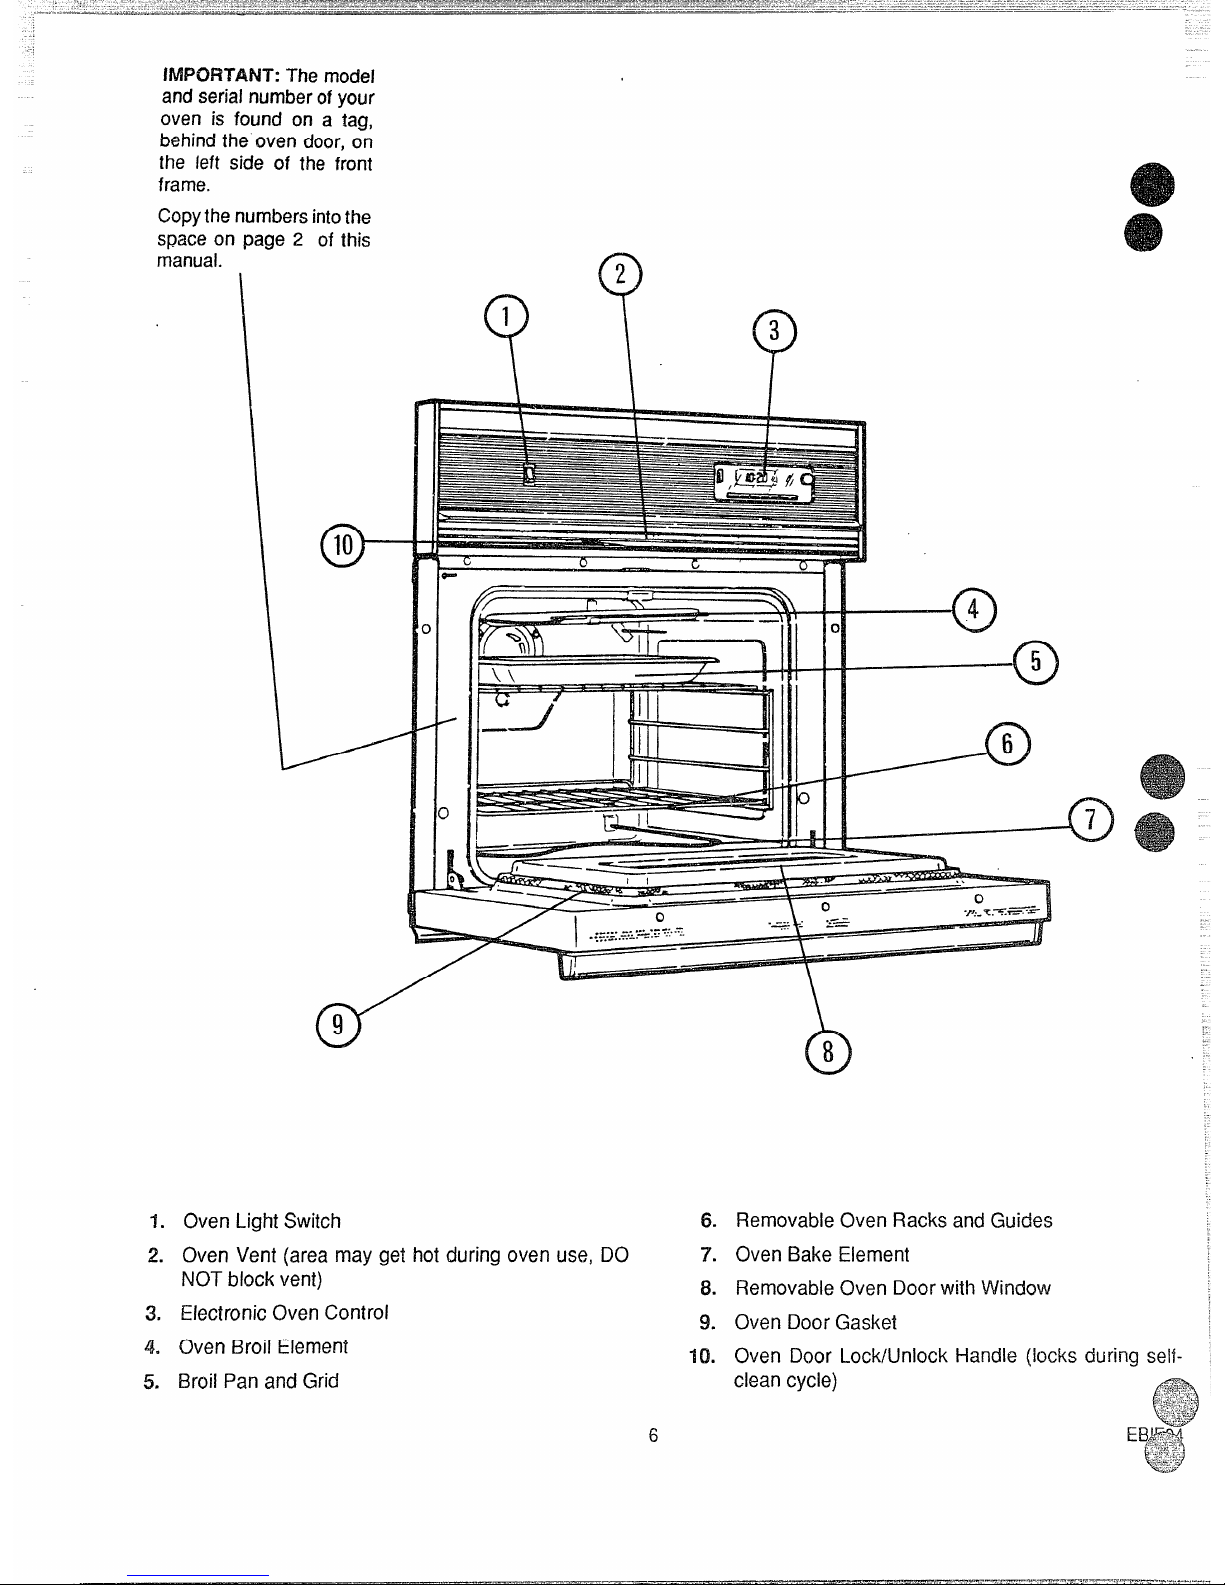
IMPORTANT:The model
andser~alnumberofyour
oven is found on a tag,
behindthe oven door,on
the left side of the front
frame.
Copythenumbersintothe
spaceon page 2 of this
manual.
*
10
Q
2
Y\
1
?
3
~. Oven Light Switch
2. Oven Vent (areamaygethot duringovenuse,DO
NOTblockvent)
3. ElectronicOvenControl
4. Oven Broil Element
5. Broil Pan and Grid
6.
7.
8.
9.
10.
0
8
..
RemovableOven Racksand Guides
Oven Bake Element
RemovableOven Doorwitt~Window
Oven
Oven
clean
Door Gasket
Door Lock/Unlock
cycle)
Handle (locks during self-
Page 7

.
The ElectronicRangeCorItrol(ERC)
o
—
c)-
1
1.
2.
3.
4.
5.
6.
0
2
\ ??
3
4
P
5
H
;ANCEL
iIMER CLOCK ;;[
COOK
CLEAN TIME
BROIL BAKE
OVENCANCEL BUTTON- Cancelseverything
exceptthe clockand timer. Pushthis buttonto
turn theoven off orto cleareverythingif you’ve
madea mistakein programming.
DISPLAYINDICATORS- Lightup totell you
what is beingshownin the TIME DISPLAY
WINDOW.
TIME DISPLAY WINDOW- Showsthe timeof
day orthe times youset for thetimer or automaticoven operation.
OVEN TEMPERATUREAND BROIL DISPLAY
WINDOW- Shows theoven temperatureor broil
setting you haveselected.
FUNCTION INDICATORS- Lightup to show
whether oven isbaking, broilingor self-cleaning.
SET KNOB -Turn to set times andtempera-
tures after pushing afunction button.
/-13 FUNCTION BUTTONS
7.
BAKE- Push before setting baketemperature.
8.
BROIL - Push beforeselecting BROIL setting.
7
9.
10.
11.
12.
13.
SET
P
6
COOK TIME- Pushbeforesetting length
cooktime for automaticovenoperations.
CLEAN - Pushto use self-cleancycle.
of
STOP TIME- Pushbeforeselectingthe time
when youwantthe ovento turn off for automatic
oven operations.
CLOCK - Push beforesettingclock or to bring
time of day into the TIME DISPLAYWINDOW.
TIMER- Pushbefore setting amountof time
TO SET THE CLOCK
Q
Turnto set ~
time of day
:ANCEL
L
J
‘Top CLEAN ;;;
“MER cLOcK TIME
BROIL BAKE
o
1
Push
CERC03-3
Page 8

ToBAKEORROAST
9
3
PUSHWHEN
9
TURNTO z
FINISHED
SETTEMP
0
PUSH 1
Thereddisplaywill showthe oventemperatureas
it rises(in 50steps).
A tonewill soundwhenthe oven isready.
AUTOMATICOVENOFF
CANCEL
L
J
[
‘TopCLEAN ;;:
T!”ER jCL*CK TIME
BROIL BAKE
/ I
~PusH @ PusI-i
The ERCwill calculatewhen to turn the oven off.
Whenthe stop time is reached,a tonewil! sound andthe
ovenwill turn off,
AUTOMATICOVEN ON AND OFF
TURNTO
TURNTO
TURN TO
SET LENGTH
SETTEMP
SETOVEN
OF COOK
TIME
CANCEL ~~
‘T*P CLEAN ;;;
“MER CL*CK TIME
BROIL BAKE
&
I
I 1
J
PUSH
PUSH
PUSH
Whencooktime hasended,atonewillsoundandtheoven
will turnoff.
,
ToUSETHETIMER
TURNTO
SET AMOUNT
?
2
OFTIME
u
1
PUSH
u
3
PUSHAND HOLD
3 SECONDSTO CANCEL
A tonewill soundwhen time is up.
NOTE:Thetimer isa reminderonlyandwill notoperate
the oven.
INCOMPLETEOR INCORRECT
SETTINGS
1. Attention Tonewill sound ifoven hasonly beenpartially
programmed. Forexample,if youhaveselecteda cook
time butnotemperature,youwillheartheAttention Tone
until you select atemperature or push CANCEL.
2. Function ErrorTonewill soundifthere isa problemwith
oneof the range functions. Cancelthe tone by pushing
the CANCEL button. If the tone starts again, call for
service.
RECALLING FUNCTIONS
Youmayrecall anyset functionbypushingthe buttonof
function.
hat
8
CANCELLING TONES
Ifyou preferthat your rangenot haveatone whenever you
push a button, you can eliminate tones by pushing and
holdingthe CANCEL buttonuntil you heara beep. Repeat
to activatetones again.
PREHEATING FORAUTOMATICOVEN
OPERATIONS
Cook times programmedfor automaticovenoperationsstafl
countingdownwhentheovenfirstcomeson, notwhenit has
reachedthe settemperatures. It takes 10tol 5 minutesto
reachthe settemperature,thus additionalcooktime maybe
Page 9

OvenCooking
Always follow recipe carefully.
Measureingredients properly.
Useproper pan placement.
Placepans on the oven racks with 1fi - 2“ of
air space on all sides of each pan.
Avoid
overcrowding the oven.
Pans too close to each other, to oven walls
or to the oven bottom block the free movement of air. Improper air movement causes
uneven browning and cooking.
—
2 cakelayers
--
4 cake
layers
@ Most baking should be done on the second
shelf position from the bottom. When baking
several items, use two shelves placed on the
-—
Let the oven preheat thoroughly before
cooking baked #roducts, Allow IG15 min-
utes preheat time. ~
Avoid opening the door too often to check
the food during baking as heat will be lost,
This may result in poor baking results.
Cakes, cookies, muffins, and quick breads
should be baked in shiny pans — to reflect
the heat — because
they should havea light
golden crust. Yeast breads and pie
crusts
should be baked in glass or dull (non-shiny
pans)
— to absorb the heat —
because they
should have a brown, crisp crust.
Oven temperatures should be reduced 25
degrees below recommended temperatures
if you use dark pans or oven proof glass.
There may be some odor when the oven is
first used, This is caused by the heating of
new parts and insulation.
Do not cover the oven bottom or an entire
oven rack with foil, The foil can block nor-
mal
heat flow, cause cooking failures, and
damage the oven interior.
second and fourth rack positibns from the
bottom of the
oven. Stag~er pans so that no
pan is directly above another. Bake angel
food cakes on the first she!f position from
- the bottom of the oven.
t~;~’
I
I
t
,.
Page 10

Broiling POSITIONINGBROILER PAN
Tum to
Y
2 HIor LO
Broil
set
?
3 Push When
Finished
Broilingis cookingby direct heatfrom the broil element.
Tendercutsof meatormarinatedmeatshouldbeselecte
forbroiling. Forbest resultssteaks shouldbeat least3/4
~
[X-
+
CANCEL
‘Tm CLEAN ;;;
“MER cLOcK TIME
BROIL BAKE
thick.
0
Afterplacingfoodonthebroilerpan,putthepanonanove
rackinthe properposition. The recommendedrackposi-
tion andcooking time can befound inthe chartbelow
Thecloserthe food is to the broilelement,the fasterthe
meat brownson the outside,yet stays red to pink in the
center. Movingthemeatfartherawayfromtheelementlets
the meatcookto the center while browningoutside. Side
oneshouldbecooked 1-2 minuteslongerthan sidetwo.
Mostfoodscanbebroiledatthe HIBroilSetting. Selectthe
LO Broilsetting to avoid excessivebrowningor dryingof
foodsthat shouldbe cooked to the well-donestage (such
asthick porkchops orpoultry).
Rack
Position TotalTime
4 = Highest
(minutes)
Food
BROILINGTIPS
/
I 1 = Lowest I
I
Steak– 1“Thick
I
I
e
Your oven door should be open to the broil stop
position while broiling. If the door is closed,the
foodwill roastand not broil.
Rare
I
4
I
9-11 ‘
.
Useonly the broiler panand gridthat camewith your
range for broiling. They are designed for proper
drainage of fat and liquids and help preventspatter,
smokeor fire.
Medium
I
3
I 13-15
I
Well Done
3 21-23
—
GroundBeef Patties
Medium-1”Thick
Medium-1/2°Thick
e
Do notpreheat when broiling. For evenbroilingon
both sides,start the food on acold pan.
●
Whenbroilingfrozenmeat,use one rackpositionlower
than recommended and up to 1 1/2 times the suggested broilingtime.
Lamb Chops – 1“ Thick
PorkChops– 1“ Thick
1~
.
Trimthe outer layerof fat from steaksand chops. Slit
the fatty edges to keepthe meatfrom curling.
9
For maximumjuiciness, saltthe first sidejust before
turning the meat.
Salt the second side just before
serving.
0
Brush chicken and fish with butter several times as
they broil Whenbroilingfish, greasethe gridto keepit
from sticking and broil with skin side down. It is not
necessaryto turn fish.
0
Never leave a soiled broiler pan in the range.
Greaseinthe pan maysmokeorburnthe nexttimethe
oven is use.
o
Besureyou knowthecorrectprocedurefor putting
IOut
a greasefire. See t!le section on safety.
PorkChops 1/2” Thick
3 16-18
3
lfl-12
3
11-13
2 45-55
3 8-11
3
9-11
Ham Slice– l/2’’Thick
Fish (Fillets)
Chicken( Pieces)
Frankfurters
Bacon
This chartis ageneralguide. The size,weight, thickness,
and starting temperature of the food as well as yourown
personalpreference will affectthe cookingtime. Times in
the chad arebased on the food being at refrigeratortemperature.
1A
Donotcovertheentire broiiergrid
I
I
with foil. Poor drainage of hotfat
may cause a broiler fire.
!fa fire starts, closethe oven door
Page 11

FavoriteAmericanRecipes
AcollectionfromAroundthecount~
e
UZY=DAY COFFEE CAKE
3/4cup margarine,softened
1cupsugar
2eggs
1cupsour cream
2cupsall-purposeflour
I teaspoonbakingpowder
7teaspoonsoda
1/2teaspoonsalt
1teaspoonnutmeg
3/4cup light brownsugar
112cupchopped pecans
1teaspooncinnamon
Creammargarineandsugaruntillightandfluffy.Addeggsandsourcream;mixwell.Combineflour,bakingpowder,soda,
saltandnutmeg.Addto batterandmixweil.Pour batterinto greasedandfloured 13”x 9’ x 2“ bakingpan.
Combinebrownsugar,pecansandcinnamon;mixwell.Sprinkleone halfofthismixtureovercakebattenswirlmixture
throughbatter.Sprinkleremainingonehalfmixtureevenlyovercakebatter.
Coverandchiliovernight.Uncoverandbakein preheated350°Fovenfor 35to 45 minutesor until caketests donewith
toothpick.
BROCCOLICASSEROLE
frozenchoppedbroccoli
2-10
OZ. pkg.
1cup mayonnaise
7cup sharpcheddarcheese,grated
2 eggs,beatenslightly
1can creamof mushroomsoup
2 tablespoonschoppedonion
1cup cheesecrackercrumbs
Preheatoven to 375°F.Cook broccoli accordingto packagedirections; drain.
Mix with other ingredients.Pour into greasedtwo (2)quart casserole.Sprinkle
with cheese crackercrumbs. Bakeat 375°Ffor 2@25minutes.
w
SOUTHERN BRUNSWICK STEW
A deliciousquick-to-makeheartystewthat will feeda crowd or feed the family.
Refrigerateot freezethe remainderfor
anotherday.
1-10 oz. canbarbecuebeef
1-10 oz. canbarbecuepork
1-24 oz. canBrunswick stew
7-5 oz. canbone/esschicken
1-12 oz.can vacuumpackedcorn niblets
1-76 oz.can baby lima beans,drained
2-16 oz. cans stewed tomatoes
I - 141/2oz.cansliced okra, drained
Drain okraand lima beans.Add to all other ingredients in 4quafl
pan.Heat on medium to servingtemperature.
11
Page 12

TwoCORN CASSEROLE
1/2cup margarine
3/4 cupchoppedgreenpepper ~
1/3
cup chopped onion
3eggs,wel!beaten
17
oz.can creem stylecorn
17oz.can wholekernelcorn with liquid
%’/2oz.
pkg. corn muffinmix
1cup cheddarcheese,shredded
Preheatovento350°F.Saut#greenpeppersandonionin margarine;combine
withremainingingredientsexceptcheese,Pourintogreasedtwo(2)quartcasserole;sprinklewithcheeseandbake45-55minutesin350°Foven.Letstand5
minutes“beforeserving.
-my
Illinois Cw~rative Exfonsion Homemakers
w
2-1 oz.squaressemi-sweetchocolate
1stick margarine
1cup sugar
1/4cup flour
2eggs
1tsp. vanilla ‘
Dashsalt
$/zcup choppedpecans
Frozen9“ pie shell
Preheatovento 350°F. Meltchocolateandmargarine,Add other
ingredientsto meltedmixture.Pour into unbakedpie shell and
bake35-40 minutesor untilpie appearsset.Servewarmwith ice
creamorwhippedcream.
APPLE DESSERT
1-20 oz.canapplepiefilling
1/2cupsugar
1-9 oz. boxwhitecakemix (1layersize)
1stickmargarine,melted
1/2cupchoppedpecans
Preheatovento 350°F. Placein layersingreased9“ or 10“square baking dish:
apples,sugar, dry cake mix.Pourmeltedmargarineovertopof cakemix.Bake
at 350°F for 35 minutes. Sprinkle with pecans. Continue baking 15 minutes.
Servewarm.
CORN BREAD
approximately2 tablespoonscoQk-
or8“or9“squarebakingpan.Place
Tilt panto coatbottomevenly.Mix
‘into hot greasedpan. Bake 2&25
Page 13

BEFORE A CLEAN CYCLE
1. Removethe broilpanandgrid, ovenracks,rackguides
(somemodels) allutensilsandanyfoil that maybeinthe
oven. Donot try to cleanutensilsor anyotherobjectsin
the ovenduring aself-cleancycle. If ovenracks are left
in the rangeduringa cleancycle,they will cfarken,lose
their lusterand becomehardto slide. If youchooseto
leavethe racksin theoven, youcan polishthe edgesof
the rackswith steelwool and applya smallamount of
vegetableoil to therackedgesafterthe self-cleancycle.
Thiswill makethe rackseasierto slide.
3. Wipeupheavyspilloverson!heovenbottom. Toomuch
soilmaycausesr~~okingduringthe cleancycle.
2. Soil on the oven frontframe, the door lineroutside the
doorsealand thefrontedgeof the ovencavity(about1“
intotheoven)will notbecleanedduringacleancycle(see
illustration below). Clean these areas by hand before
startinga cleancycle.
Usehotwaterwith asoap-filledsteelwoolpad,then rinse
well.
AFTER A CLEAN CYCLE
4. Cleanthedoorsealbyusinga cleanspongeto soakthe
soiledareawith hydrogenperoxide. Repeatedsoaking
maybeneededdependingontheamountofsoil.Frequent
cleaningwillhelppreventexcessivesoilbuildup. Donot
rub the doorseal. Thefiberglassmaterialof thesealhas
an extremelylow resistanceto abrasion. An intact and
welltitlingovendoor~ealisessentialfor energyefficient
oven operation andgoodbakingresults. IfyOIJnoticethe
sealbecomingworn,frayed ordamagedin anywayor if
it hasbecomedisplacedonthe door,youshouldreplace
the seal.
After a cleancycle, you may noticesomewhite ash inthe
oven. Justwipe it up with a damp cloth.
Ifwhite spots remain,removethem with a soap-filledsteel
wool pad. Be sure to rinse thoroughlywith a vinegarand
watermixture.Thesedepositsareusuallyasaltresiduethat
cannot beremovedby theclean cycle.
Ifthe ovenis notclean after onecleancycle,the cyclemay
be repeated.
ESCL08
Page 14

To SET SELF-CLEAN CYCLE
fl. Slide door lock handle to the right. You may
CYCLE
‘1-oINTERRUPT A CLEAN
need to slightly press on the door to get it to
lock properly.
Q
1
PUSH
(!)
2 PUSH
The self-clean cycle lasts 3-1/2 hours.
When the oven reaches locking temperature the
word
LOCKwill be -shown in the ERC display.
You can push STOP TIME BUTTON to find out
when the cycle will
end. Push CLEAN BUTTON
to return to count down.
WHEN A CLEAN CYCLE IS
FINISHED
7
WAIT UNTIL 1
LOCKGOESOUT
(20-30 minutes)
Then follow instructions under WHEN A CLEAN
CYCLE Is FINISHED
2. Slide door lock handle to the left.
After a clean cycle the oven door cannot be
unlocked
unlessthe word LOCK is off inthe ERC
display and the oven has cooled.
NEVER force the door !ock/unlock
handle. Forcing the handle may damage the
door lock mechanism.
14
Page 15

REMOVABLEOVEN DOOR
Theovendoor(s)canberemovedforcleaning.
To remove:
1, Openthedoorto[hebroilsfoppositionandgrasp thedoor
ateach side(see illustration).
2. Lift the-doorup a bil,then
pIJllstraighttowardyou.
Toreplace:
1. Makesurethathinge armsareinposilion B(stopposition).
Note: Ifa hingearmsnapsInto positionA, itmustbe
movedbacktoposition Bbefore ihedoor can
be repiaced.
2. Carefuliy insertthe hingearms throughthe openingsin
thefrontframeandpushthedoorintoplacewhilehoiding
the doorup.
3. Whenthebottomedgeofthedoorisflush againslthefronf
frame, allowthe door to settleinto place.
REMOVABLERACKSAND GUIDES
Becareful not 10scratch the oven finish when installing or
removingoven racks.
To install:
1. Putthe pegs onlhe endof therackguide intothe holesin
the oven back.
$
2. Lockthe front hookin the slot in the oven side.
3. Setthe raisedbackedgeoftheoven rackson apairofrack
guidessothehooks atthesidesofthe rackrununderneath
the rack guides.
4. Pushthe rackinuntil youreachthe bumpinthe rack,then
lift thefront ofthe racka bit andpush the rack all the way
in.
To remove:
I. Pullthe oven rack out, then up.
2. Liftthe front of the rackguide to unhook it from the oven
wall and pull out.
RACKHOOK
RACK
BUMP
REPLACING THE OVEN LIGHT
(self-cleaningoven)
GLASS
Besurethat the iight switch is intheoff position. Do not
RETAINER
touch hot oven bulb.
Do not touch buib with wet
GASKET
hands. Never wipe oven light area with wet cloth.
SOCKET
@
o
.
Nevertouch the electrically live metal collar on the bulb
when replacing it.
Electrical power must be shut off if you have to replace
a broken bu:b.
R;~
GLASS
COVER
1. Remove the three screws and lift off Ihe glass retainer,
BULB
glasscover and gasket.
2. Replace the bulb with a 40 watt appliance bulb.
1
~. ~eplace Ihe gasket, glass cover and glass
..
refainer. Tighten screws securely.
16
.— __
————...—— _____
..
. .. —.__..
Page 16

Before Calling forSertiice
savetime andmoney<heck this listbeforeyou call forservice.
To eliminateunnecessaryservicecalls,first,readalltheinstructionsinthis manualcarefully. Then, ifyouhavea prob-
—
4
Iem,alwayscheckthis listof commonproblemsandpossiblesolutionsbeforeyoucallfor service,
DON’TCALLFORSERVICE
UNTILYOU CHECK
PROBLEM
POSSIBLECAUSE
● Oven does not work; totally
inoperative.
o Checkhouseholdcircuitbreakeror fuse.● Nopowerto range,
o C!ocksetincorrectly(ifequipped)
o Ovencontrolsset incorrectly
o Door latch in incorrect position
(self-clean, manual door lock
modelsonly)
o Ovendoes notheat
* Check clock instructions.
o Checkoven controlinstructions.
G Checkself-cleaninstructions.
● Foodsdo not bakeproperly
Ovennotpreheatedlongenough
Improperrackorpanplacement
Ovenvent blockedor covered
Improperuseof foil
Impropertemperaturesettingfor
utensilused
Recipenotfollowed
Rangeand ovenracknot level
Usingimpropercookware
Be sureto pre-heat:
10minutesbelow350 degrees
15 minutesabove350degrees
Maintain uniform air space around pans
andutensils; seecookinghints section.
Be sure that airflow through oven vent is
unobstructed.
Foilusenot recommended
Reducetemperature25degreesfor glass
or dull/darkenedpans.
Is recipetested and reliable?
Checkthe installation sectionfor leveling
instructions(modelswithleglevelersonly).
See ovencookingsection.
●
m
0
s
m
0
0
e
* Thermostatcalibration o See adjustmentsdescribedon the follow-
ingpage.
o Oven temperatureseems in-
accurate
o Improperrack position
s Check broil pan placement. See broiling
section.
D Do notpreheat when broiling.
“ Usebroilerpanandgridsuppliedwithrange.
o Open door to broil stop position; see re-
movableoven door section.
o Check broiling chart inbroiling seclion.
o Foodsdo notbroil properly
● Ovenpreheated
“ improperutensil used
o Oven doorclosedduring broil
o Improperbroilinglime
r
o Oven smokes
o Dirtyoven ‘
o Broiler pan containing grease
left in oven
o Checkfor heavyspillover.
o Clean pan and grid aftereach use.
~ Check switch setting.
I
o oven or work light does not
work (if equipped)
s Lightswitch in off position
E Light bulb or fluorescent light
starter burnedout
o Check or replace light buib; see use and
care instruction.
ESER20-2
—- -—..— .. ....-=...———
Page 17

Before Callina forService
PROBLEM
c Oven does not clean or
poor cleaning results
(self-cleanmodelsonly)
● Ovendoorwill notunlock
(self-cleanmodelsonly)
● Tonedoes not sound
~
POSSiBLECAUSE
* Controlsnot setproperly
o Clean cycle interrupted too
soon
s Oventoo dirty
s Cleancyclenotcomplete
● Tone hasbeen eliminatedby
pushingandholdingCANCEL
button
ADJUSTING OVENTEMPERATURE
Thetemperatureinyournewoven has been setcorrectlyat
thefactory,sobe suretofollowthe recipetemperaturesand
timesthe first few timesyou bake inyour newoven.
If you think the oven should be hotter or cooler, you can
adjust ityourself. To decide how muchto changethe tem-
perature,settheoventemperature25°Fhigherorlowerthan
thetemperatureinyourrecipe,thenbake. Theresultsofthis
“test”shouldgive youan ideaof howmuchthetemperature
shouldbe changed.
To adjust temperature:
1. Pushthe BAKE button.
2. Select the temperature between 500°F and 550°F with
the SET knob.
18
3.
4.
5,
DON’TCALL FORSERVICE
UNTILYOUCHECK
—..
o Checkself cleaninstructions.
s Heavily soiled ovens require a 3 1/2 hour
cleancycle.
● Heavyspilioversshould be removedbefore
settingcleancycle. Repeatcleancycle.
* Oven must cool below lock temperature
(approximately30minutesaftercleancycleis
complete).
)
~ Push and hold CANCEL button to activate
tone.
Quickly(within two seconds, beforethe BAKE function
energizes)push andholdthe BAKEbutton.
Thedisplaywill changeto the amountof degreescliff
encebetweentheoriginalfactorytemperaturesettingan
thecurrenttemperaturesetting. ifthe oventemperat
hasthe originalfactory setting,the displaywill read
The temperature can be adjusted up to 35°F hotter or
35°Fcooler (in 5°F steps), by turning the SET knob. A
minus
sign(-)beforethenumbermeansthat the OvenWi!l
~.
be coolerby displayedamount ofdegrees.
Whenyou have madethe desired adjustment, pushthe
CLOCKbuttonto gobackto thetimeof daydisplayoruse
--
youroven as youwouldnormally.
Note: Theself-cleantemperaturewill notbechangedbythe
adjustmentsdescribed above.
Page 18

IfYou Need Service
To obtain service, see your warranty
onthe backpage of this book.
We’reproudof our service and want
youto bepleased. Ifforsome reason
youarenot happywiththe serviceyou
receive,hereare three steps to follow
for further help.
FIRST, contact the peoplewho serv-
icedyour appliance. Explainwhy you
are not pleased. In most cases, this
willsolvethe problem.
NEXT,ifyouarestill notpleased,write
all the details-including your phone
number-to:
Manager, Consumer Relations
RCA
Appliance Park
Louisville, Kentucky 40225
JNALLY,if your problem is still not
Major Appliance
Consumer Action Panel
20 North Wacker Drive
Chicago, Illinois 60606
19
Page 19

YOUR RCA OVEN
WARRANTY
Save proof of original purchasedate such as yoursales slip or cancelledcheckto establishwarranty period.
We at RCA striveto providethe
~
WHATisCOVERED
FULL ONE=YEARWARRANTY
Forone year fromthe date of
original purchase,we will provide,
free of charge, partsand service
labor inyour home to repairor
replaceany pati of the oventhat
fails because of a manufacturing
defect.
This warranty is extendedto the
original purchaserand any succeed-
ing ownerfor productspurchasedfor
ordinary home use inthe 48 mainland states, Hawaiiand Washington,
D,C, in Alaska the warranty isthe
same except that it is LIMITED
because youmustpayto ship the
product to the service shop or for the
service technician’stravel coststo
your home.
est quality productsand service.
Therefore,we havedesignated GE
CONSUMER SERVICE, a leaderin
the service industry,to fulfill your
service needs. Should your appliance
need service,during the warranty
period or beyond,look inthe White or
Yellow pagesof yourtelephone
directoryfor GE CONSUMER SERVICE or an Authorized RCAAPPLl-
ANCE SERVICER.
WHATIS NOTCOVERED
o Service trips to your home to teach
you howto use the product.
ReadyourUseandCarematerial.
If you
thenhaveanyquestions
aboutoperatingthe product,
pleasecontactyourdealeror our
ConsumerAffairsofficeataddress
below.
o Improper installation.
if you have an installation problem,
contact your dealer or installer. You
are responsible for providing adequate electrical, plumbing and other
connecting facilities.
o Replacementof housefuses or
resetting of circuit breakers.
= Failure of the product if it isus
for other than its intended purposeor
used commercially.
‘ Damage to product caused by
accident, fire, floods or acts of God.
WARRANTOR IS NOT RESPONSIBLE FOR CONSEQUENTIAL
DAMAGES.
Some statesdo notallowthe exclusion or limitation of incidental or consequential damages, so the above
limitation or exclusion may not apply to you. This warranty gives you specific legal rights, and you may also have
other rights which vary from state to state.
Toknow what your legal rights are in your state,
consult your local or state consumer affairs office or your state’s Attorney General.
Warrantor: RCAAppliances
Iffurtherhelp isneededconcerting thiswarranty,write:
Manager—ConsumerAffairs,RCA,
AppliancePark,Louisville,KY40225
—
PartNO. MNL069 (342497)
L3K335GL (64-68)
~Ub No. 79-4024
 Loading...