

Page 1
)
contents
I
Aluminum Foil 18 Door Latch
Anti-TipDevice
Amliance Registration
Cannirw lips 9
Care and Cleaning
Clock/Timer
Consumer Services
Energy-SavingTips
Features 6,7
Installation Instructions
Leveling
Model and SerialNumbers 2
Oven
Baking/Baking Guide 15,16
Broiling/BroilingGuide 18,19
Control Settings
3,26 Door Removal
2
20-25
13
31 Shelves
5 Thermostat Adjustment 24
26-29
27
12
13,14
Oven Light
Preheating
Roasting/RoastingGuide 17
Self-Cleanin~
Problem Solver
SafetyInstructions
Surface Cookhz
Control Settings
Cooking Guide
Cookware
Cooktop Light
Warranty
15,22–24,30
5,15,16
12121,22,24,25
TiPs
BackCover
21
12,21
22-24
30
2-5
8-11
10,11
10,11
20
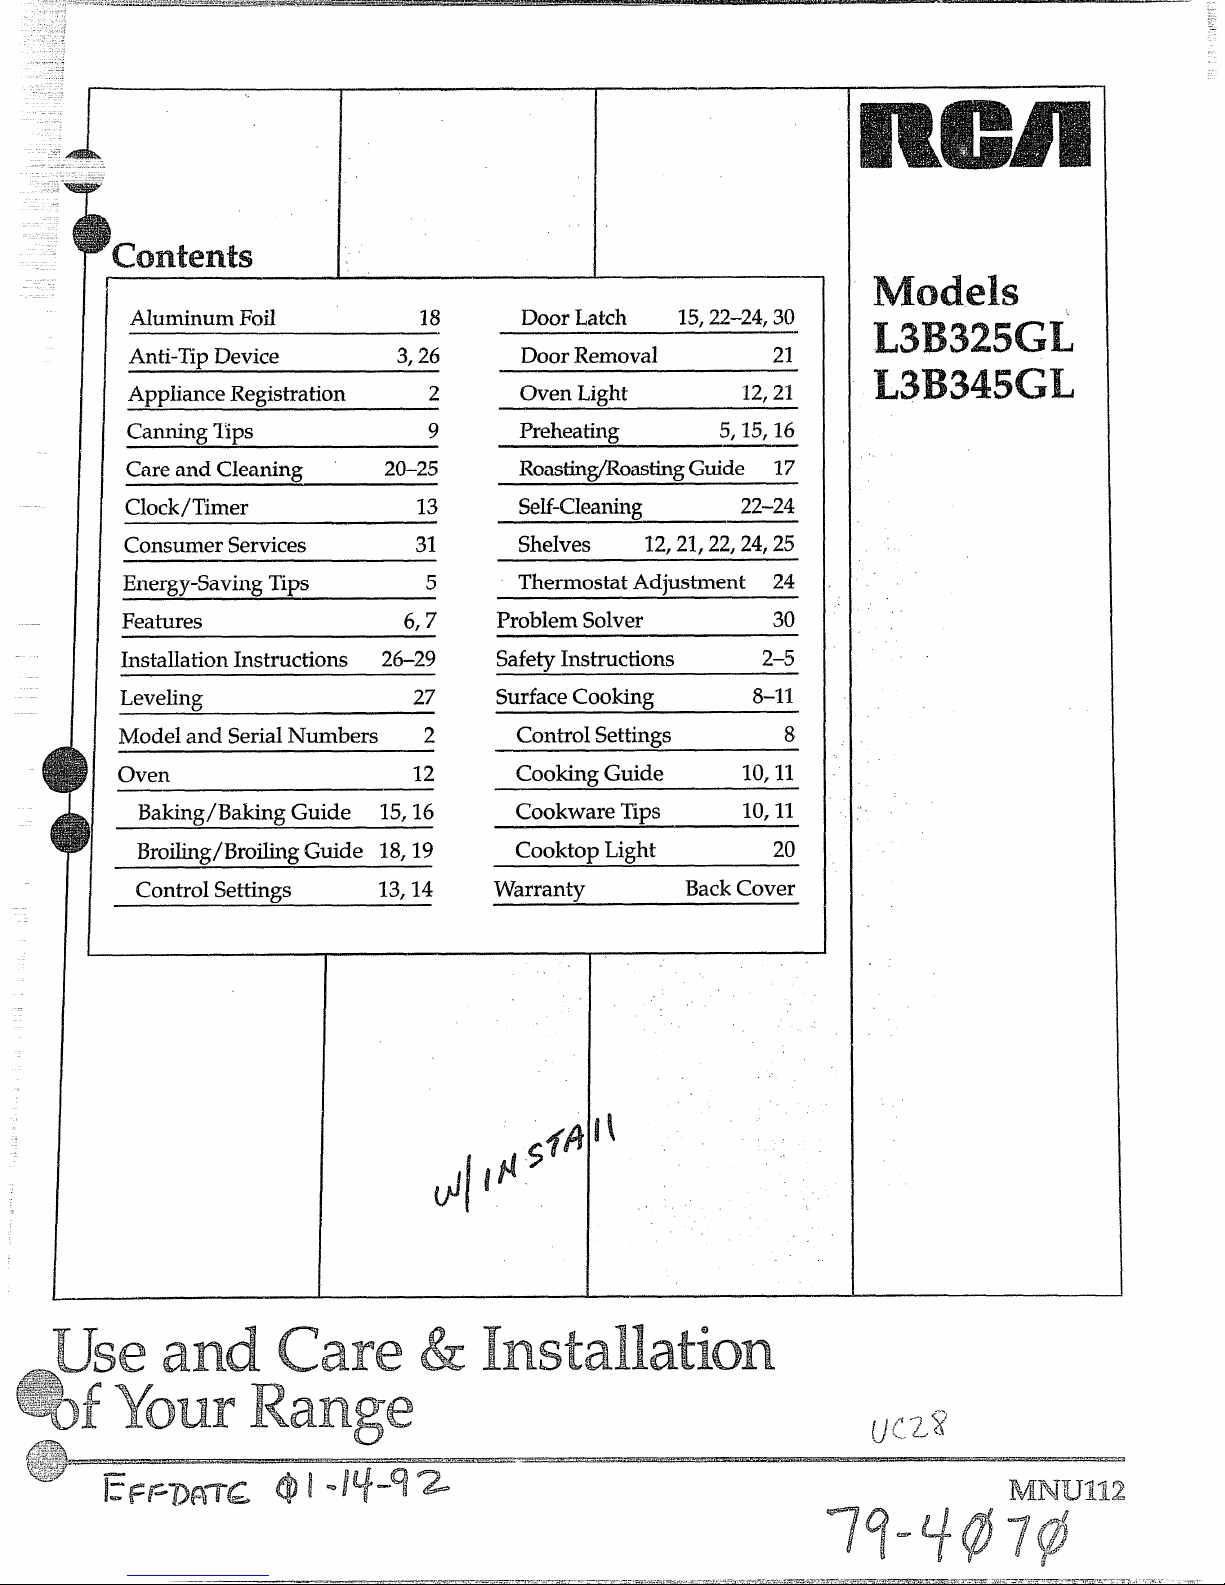
L3B325GL
L3B345GL
8
Page 2
.. .;<j
..
...”....—.“...———.———.=
.-. —....—-.-——-.—..-
.—....—.
.“,
.
.——
BeforeI.Rsingyour rangq
readthisbookUwefdly.
It is intendedto help you
operate and maintain your new
range
properly.
Keepit
handy for answersto your
questions.
If yOLIdon’tunderstandsomething
or need more help, write (include
your
phonenumber):
ConsumerRelations
AppliancePark
Louisville, KY 40225
writedownthemodel
andserial I’M.mbers.
You’llfind them on a label on
the front of the range behind the
storagedoor.
These numbers are also on the
Consumer Product Ownership
Registration Card that came with
your range. Before sendingin this
card, please write these numbers
here:
ModelNumber
SerialNumber
Use these numbers in any
correspondence or service calls
concerning your range.
If‘you received
a damagedrangy%
Immediatelycontactthe dealer(or
builder)thatsoldyou the range.
save time and money.
Before ‘youmqumt
service...
Check theProblem Solver in the
back of this book.It lists causes of
minoroperatingproblemsthatyou
can correct yourself.
If you need
senice.e.
Toobtainservice,seethe
ConsumerServicespagein the
backofthis book.
We’reproudofourserviceand
wantyoutobepleased.If forsome
reasonyouarenothappywiththe
serviceyoureceive,herearethree
stepsto followforfurtherhelp.
FIRST,contactthepeoplewho
servicedyourappliance.13xplain
whyyouarenotpleased.In most
cases,thiswillsolvetheproblem.
NEXT,ifyouarestillnotpleased,
writeallthedetails—including
yourphone number—to:
ConsumerRelations
AppliancePark
Louisville,KY40225
FINALLY,if yourproblemisstill
notresolved,write:
MajorApplianceConsumer
ActionPanel
20NorthWackerDrive
Chicago,IL60606
IMPORTANT
SAFETY
INSTRUCTIONS
z
Readau
instructio
beforeusingthis
appliance.
IMPOI%TANT
SAFETYNOTICE
TheCaIifomiaSafeDrinking
WaterandToxicEnforcement
ActrequirestheGcwernorof
Californiatopublisha list of
substancesknownto the state
to causebirthdefectsor other
reproductiveharm,and
requiresbusinessesto warn
customersof potential
exposureto suchsubstances.
Thefiberglassinsulationin
self-cleanovensgivesoff a
very smallamountof carbon
mofioxideduringthe cleaning
cycle.Exposurecanbe
minimizedby ventingwith
an openwindowor usinga
ventilationfan or hood.
2 .—
.-
Page 3
.,:,
i~:-*=.9.kik*+?%i-’.~;z%m?m%~”~” ““-
. . ..-. --.— . . ..- ——.. ..—-..— .—-—————.——-———
.. .. —. .-—
———
>“
when using electrical
]iances~basicsafety
cautionsshoL~ldbe followed,
includingthe following:
*Usethis applianceonlyfor its
intendeduse as
describedinthis
mamal.
oBesureYour
ap@ance is
properly
ihstalkii-aniigrounded
byaqualified technicianin
accordancewiththe provided
installationinstructions.
~Don‘t attempt to
repairor
replaceany partof yourrange
Umk!ss’it is specifidy
recommendedin this book.All
otherservicingshouldbe referred
to a qualifiedtechnician.
~Beforeperforming
any
Service9DISCONNECTNIE
RANGEPOWERSUPPLY
THE HOUSEHOLD
STRIBUTIONPANEL
BYREMOVINGTHE
FUSE
SWITCHINGOFF THE
RCUITBREAKER.
cm tip am?
injury ‘could
result.TO
pniwent
accidental
tipping of’the
rangefrom
abnormal
mage9
including
‘excesskmhg
of the oven door?attach it to
the wall or floor by installing
the Anti-T’@devic_esupplied.
Tocheck if the device is installed
and engaged properly>remove
the drawer and inspect the
rear Ieveling leg. Make sure
c
~;~j fits securely into the slot ~
2$%2%%
%.~%1the device.
~~$yoU pull the I“angeout from the
+=~Ldlfor any reasOn,n~akesure
tlw rear leveling leg is returned to
itspositionin thedevicewhen
youptlshtherangeback.
Pleaserefer to the Anti-Tip
deviceinformationin thisbook.
Failureto takethisprecaution
couldresultin tippingof the
rangeandinjury.
eDO~Q~leave ChildFellt&NNchildrenshouldnotbe left alone
or unattendedin an areawherean
applianceis in use.They should
neverbe allowedto sit or stand
on anypart of the appliance.
0~~~~~a~~~w
anyone to CIhlll),
shn~ 0~
hang m the doq
drawerorrangetop
They
coulddamagethe rangeand
eventip it over9causingsevere
personalinjury.
eO-HYmNw
H’EMSOF
nNTEREsTmcHmDREN
SHOULDN(YI’BESTORED
ml Osm’wrrsABOVEA
Rf?Jwm OR ‘ON
mm
BACKSPLASHm’ A
MNGE—CHILDWN
CLIMBING
ONmmRANGE
TO REACHITEMSCOULD
BE SEMOUSLYINJ~~~.
@~~~~~ w~~~ loose.f~ttingor
hanginggmnmts whileusing
the appliance.Flammable
material.couldbeignitedif
broughtincontactwithhot
heatingelementsandmaycause
severeburns.
ouseonly dry potIRokkm-
moistordamppotholdersonhot
surfacesmayresultinburnsfrom
steam.Donotletpotholderstouch
hotheatingelements.Donotuse
atowelorotherbulkycloth.
eFor your safety Ii-leveruse
yourapplianceforwarming or
-heatingthe liw’flm.
~~~~p ~IOO(j~~~ greaseflhm
cleantomaintaingoodventing
andtoavoidgreasefires.
eD()~()~~~~cookinggreaseor
otherfiammablematerials
accumulatein ornew the
?mnge.
o~fj ~o~usewaterm grease
fires.Neverpickup a flaming
pm.
Smotherflamingpm on
surfaceunitbycoveringpan
completelywithwell-fittinglid,
cookiesheetorflattray.Flaming
greaseoutsideapancanbe
put
outby covering with bakingsoda
or,if available,a multi-purpose
dry chemicalor foam-typefire
extinguisher.
QDO~d touch
heating
den’mtsor’interior
SWfaceof
mm.
Thesesurfacesmaybehot
enoughtoburneventhoughthey
aredarkincolor.Duringand
afteruse,donottouch,orlet
clothingorotherflammable
materialscontactsurfaceunits,
areasnearbysurfaceunitsorany
interiorareaoftheoven;ailow
sufficienttimeforcooling,first.
Potentiallyhotsurfacesinclude
thecooktop,areasfacingthe
cooktop9ovenventopening,
surfacesneartheopening,
crevicesaroundtheovendoor,
andmetaltrimpartsabovethe
door.Remember:Theinside
surfaceoftheovenmaybehot
whenthedooris opened.
~men cookingpork$foHow
thedirectionsexactlyandalways
cookthemeattoaninternal
temperatureofatleast11’O*F.
Thisassuresthat,intheremote
possibilitythattrichinamaybe
presentinthemeat,itwillbe
killed.andthemeatwillbe safe
toeat.
Page 4
(him
e
standawayfromrange
when
openingovenCkXM’.Hot
airor steamwhichescapescan
cause burns to hands9face
‘and/oreyes.
* Don‘theatunopened food
containersin the oven.
Pressure could buildup and
the container could burst,
musing an injury.
~Keep oven vent duct
lmobstmcted.
~Keep oven freefromgrease
buildup.
oPlace oven shelf in desired
position whik oven is cool. If
shelves must be handled when
hot, do not let potholder contact
heating units in the oven.
~Pullingoutshelf totheshelf’
stop is a conveniencein lifting
heavy foods. It is also a
precautionagainsthums from
touching hot surfacesd the
door m“oven walk.
* When using cmkhg or
roasting bags in fovtq
follow
themanufacturer’sdirections.
eDonot11.iweyour ‘oventodry
newspapers. If overheated,
theycancatchfire.
oDo not leave paper prducts9
cooking uWensiIs9or food in
the oven when not in use. Do
not store
flammablematerialsin
anovenor nearthesurfaceunits.
Self=cleaning oven
*
Do KM.dean door gasket
before readingspecial
cleaning imtmctims in the
SeIf-Cleaningsectionof this
book. The door gasketis
essential for a good seal. Care
should be taken not to rub,
damage or move the gasket.
*Do not use oven cleanemoNo
commercial oven cleaner or
oven liner protectivecoating of
any kind shouldbe used in or
around any part of the oven.
~Clean only parts listed in
this Use and CareBook.
@Before seM-cIeaningthe
cwen9removebroiler pan and
other tcookwaree
eIf the SWW%uIingmode
malfunctions turn off ad
disconnect the power supply.
Haveserviced by a qualified
technician.
Q13esure to wipe up excess
spi~lagebefore starting the
self-cleaning operation.
surface cooking units
euse pxlper pan size
—This
applianceis equippedwithone
ormoresurfaceunitsof
differentsize.Selectcookware
havingflat bottomslarge
enoughto coverthe surfaceunit
heatingelement.Theuseof
undersizedcookwarewill
exposea portionoftheheating
elementto directcontactand
mayresultin ignitionof
clothing.Properrelationshipof
cookwaretoburnerwillalso
improve efficiency.
* Never kavesurface udts _
unattendedat high heat
settings,
Boilover causes
smoking and greasy spillovers
that may catch on fire.
e
ISBe sure drippans and vent
ductsam not covered
and are
in place.Their absence during
coo”kingcould damage range
parts and wiring.
~Don9tuse aluminulnfoil to
he drip pans or anywhere in
theovenexceptas described in
this book. Misuse could result
in a shock, fire hazard or
damage to therange.
* Only certain types ofgkw+
gkws/ceramic9earthenwarem
other gkmd containers are
suitabk for range-top service;
othersmay break because of the
sudden change in temperature.
See the section on Surface
Cooking for suggestions.
ISTo minimizethe possibility
of bmms~ignition of flarnrnabl
materials, and spillage, the
handle of a container should be,
turned toward the center of the
range without extending over
nearby surface units.
s Always
turnsurface unit‘to
OFF’before E=emwing
cookware.
~Keepan eye on hods being
fried at m ‘orMEDIIJM
HIGH heat settings.
%Toavoid.thepossibwltyd’a
bum.
‘m ‘ektr-ieshock,always
be
certainthattheConhi?dsfor
allmitiacedts areatOFF
positionand.au.(consal%? ?md.
beforeattemptigtoliftfor
removethe limit.
Page 5
..
IMPORTANT
AAFETY
W4STRUCTIONS
-.
ol-i9timmelw’or soak
FemQvabIesurfaceUtitse
Dm’t
putthemina
dishwasher.
Donot Self=”dean
thesurfacewnit.sintheoven.
* whenfkming fwds are
Imierthehood, turnthefan
off.me
M&if Op%?i%iting,may.
spreadthe fkme.
~Ahmys heat fat Skwlyyand
watchasit heats.
@K.kiK?deep fatth?mm’neter
whenever
possible to prevent
overheatingfatbeyondthe
smokingpoint.
@Findsforfrying should be
as dry as possible.
Froston
frozenfoodsormoistureon
freshfoodscancausehotfatto ~
bubbleupandoversidesofpan.
seMm?fatforeffediwi!
ahvv or deep-fatfrying.
Filling the pan too full offat
causespilloverswhenfood
QIf a combination d’ oils m
fats WWbe KK3edin fkying,
stir
togetherbeforeheating,or as
fatsmeltslowly.
SAVETHESE
INSTRUCTIONS
Sutiacecooking
oUse cookwareof medium-weight
aluminum,with tight-fitting
covers,and flat bottomswhich
completelycoverthe heated
portionof the surfaceunit.
oCook fresh vegetableswith a
minimumamountof waterin
a
covered pan.
oWatchfoods when bringing them
quicklytocookingtemperatures at
high heat. When foodreaches
cookingtemperature,reduce heat
immediatelyto lowest settingthat
willkeep it cooking.
Q
Use residual heat with surface
cooking wheneverpossible,For
example, when cookingeggs in
their shells,bring water and eggs
toa boil,thenturncontrolknobto
(M+Jpositionandcovercookware
withlidto completethecooking;
eWhenboilingwaterforteaor
coffee,heat onlyamountneeded.It
isnoteconomicaltoboila
containerfullofwaterforoneor
twocups.
ovenchoking
~Preheat oven only when
necessary.Most foodswill cook
satisfactorilywithoutpreheating.
If you find preheating is necessary,
watch the indicatorlight, and put
food in the oven p~omptlyafter the
light goes out.
~Always turn oven off before
removing food.
eDuring baking, avoidfrequent
door openings. Keep door open
as short a time as possible if it
is opened.
@Cook complete oven meals
instead ofjust one food item.
Potatoes, other vegetables, and
some desserts will cook together
with.a main-dish casserole, meat
loaf, chicken or roast. Choose
foods that cook at the same
temperature and in approximately
the same amount of time.
~Use residual heat in the oven
whenever possible to finish
cooking casseroles, oven
meals,
etc.Alsoaddrollsor precooked
dessertsto a warmoven,using
residualheatto warmthem.
B
*
i=
Q?
5
Page 6
.-.
FeamresofYourRange
L3B325GL
L.3B34.5GL(shown)
\
@
6
Page 7
ExpW-di
matureh’k?x
onpage
21,25
1 StoraEeDrawer
2
3,26 –
2 ModelandSerialNumbers
3 Anti-TipDevice
(seeInstallationInstructions)
12,21
23
4 Oven InteriorLidt
5 Oven Door Latch
(usefor self-clean function only)
9,20,21
20
12 —
6 Lift-UpCooktop
7 FluorescentCooktopLight
8 OvenLight Switch
(letsvouturninteriorovenlighton andoff)
8,9,21
9 Surface Unit Controls
10 “ON” Indicator Light for Left Surface Units
8
13
11 Oven CANCEL Button
(pushit to cancel anyoven operation)
13,14
14
13,14,24
13
13
13
13
12 Oven Controls
Automatic Oven Timer
Oven Control and Thermostat
Clock
Timer
Oven “ON’ Indicator
Electronic Display Panel
13, 14
13 Set Knob
(letsyou set oven temperature,
clock. timer, and HI or LO broil)
14 “ON”IndicatorLiizhtforRight SurfaceUnits
8
15 CooktopLightSwitch
16 OvenVent
(locatedunderrightrearsurfaceunit)
17 SurfaceUnits
18 Chrome-PlatedDripPans
19 BroilUnit
20 OvenShelfSupports
21 OvenShelves
(easilyremovedor repositionedon shelfsupports)
22 BakeUnit
23 RemovableOvenDoor
24 OvenDoorGasket
2.5 BroilerPan andRack
—
4
8,20,25
20,25
18,25
12,21,25
15,25
21
4,22,24
18,20,25
Page 8

......X=..-,,.-.,=-=+.,=.=+—
. . . .-. ... . . . . . .—. .——-..— .-. ——-. .—.——
-----
..————-—.—.—..-———..——. .—.——... -.. -.- —————. .——. -.—-..- —.. .———.
.- .7 ..-=, ,. . . .. . . . . . . . . . .
..-=&:”-—~—~
..----- ——...——
...
.—..-- ——. .-. —....
.-.—.
..--..-—.
_.—-.—.———
--———-
——
-———-
.——.
.—
— .-
SurfaeeCoowg
SWSurface Cooking Wide.
surface‘cookingwith
Huwv
tosetthecontrols
InfiniteHeatcontrols
P?A
At both
OFFandHIpositions,
thereisa slightnichesocontrol
“clicks”atthosepositions;“click”
onthewordHImarksthehighest
setting;thelowestsettingisthe
wordLO.In a quietkitchen,you
mayhearslight“clicking”sounds
duringcooking,indicatingheat
settingsselectedarebeing
maintained.
Switching heats to higher settings
Step 1: Grasp controlknob and
always shows a quicker change
push in.
than switching to lower settings.
Step 2: Turneitherclockwiseor
counterclockwiseto desiredheat
setting.
Control must be pushedin to set
onlyfrom OI?Fposition. when
Controlis in any positionother
thanW@’,it
maybe rotated
withoutpushingh.
Be
sure you turn control to OFF
when you finish cooking. The
surface unit indicator light will
glow when ANY heat on any
surface unit is on.
-
COokim?Guidefor
using Ii’eatsettings
Hi—Quick startfor cooking;bring
water to boil.
MEDIUM HIGH—Fast fry, pan
broil;maintain fast boil on large
amountof food.
MED—Saute and brown; maintain
slow boil on large amount of food.
MEDIUM LOVV-Steam rice,
cereal;maintain serving
temperatureof most foods.
LO—Cook afterstartingatHI; coo
with little water in covered pan.
NOTE:
L At HI, MEDIUM HIGH, never
leave food unattended. I%ilovers
cause smoking; greasy spillovers
may catch fire.
2.AtMEDIUMLOWor LO, melt
chocolate,butteron smallunit.
Page 9
‘---Questions& Answers
a). May I Carl foods and
wreservw cmmy surface units’?
.-
. Yes,but only use cookware
signedfor canningpurposes.
heckthe manufacturer’s
instructionsand recipes for
preservingfoods. Be sure canner is
flat-bottomedand fits over the
centerof the surfaceunit. Since
canning generates large amountsof
steam,becarefultoavoidburns
fromsteamorheat.Canningshould
onlybedoneonsurfaceunits.
Q.
Can I cover my drip pans
withfoil?
A. No. Clean as recommended in
CleaningGuide.
the cookware’sfinish. - -
omeCa*g Tips
amingshouldbe done on
surface
mitsdy.
h
surface cooking, the use of pots
extending more than one inch
beyond the edge of the surface
unit’s drip pan is not recommended.
However, when canning with a
\vater-bathor pressure canner,
large-diameter pots may be used.
This is because boiling water
[temperatures(even under pressure)
are not harmful to cooktop surfaces
surroundingthe surface units.
HOWEVER,DONOTUSE
L.4RGE-DIAIvIETERCANNERS
OROTHERLARGE-DIAMETER
POTSFOR FRYINGOR
BOILINGFOODSOTHER
THANWATER.Mostsyrupor
since mixtures-and all typesof
frying-cook attemperatures
muchhigherthanboilingwater.
~==+gSLlchtemperaturescould
o
s....-..
%.%yeventuallyharmcooktopsurfaces
~<.-i;:~‘:
“‘“”surroundingsurfaceunits.
Q. Can I use special cooking
equipment, like an orientalwok,
on any smface unit?
A. Cookware withoutflat surfaces
is not recommended. The life of
the surface units can be shortened
and the range top can be damaged
from the high heat needed for this
type of cooking.
Q. Why
amI notgettingtheheat
1needfrommysurfaceunits
even
though I have the bobs on
the right setting?
A. After turning surfaceunits off
and making sure they are cool,
check to make sure that your plugin units are securely fastened into
the surface connection.
Q.‘Wy dm mycookwaretit
whenI placeitonthesurfaceunit?
A. Because the surfaceunit or the
cookwareis notflat. Make sure
that the “feet” on your surface
units are sittingtightly in the range
top indentationandthe drip pan is
flat on the range surface.
Q. ‘Whyis the
porcelainfinishon
mycokware comiriguM’?
A. If you set your surface unit
higher than required for the
cookware material,and let the
cookware sit too long,the
cookware’sfinishmay smoke,
crack, pop or burn, depending on
the pot or pan. Also, cooking small
amountsof dry food may damage
observetheFolioWing
Points
incanning
1, Be sure the canner fits over the
center of the surface unit.
If your
rangeor itslocationdoesnotallow
thecannertobe centeredonthe
surfaceunit,use smaller-diameter
potsfor goodcanningresults.
2. Forbestresultsusecannerswith
flat bottoms. Canners with flanged
or rippled bottoms (often found in
enamelware) don’t make good
contact with the surface unit and
take a long time to boil water.
Flat-bottom canners are
mmmmmded.
3. When canning, use recipes and
procedures from reputable sources.
Reliablerecipes andprocedures are
available from the manufacturer of
your canner; manufacturers of
glassjars forcanning,suchasBall
andKerr;andtheUnitedStates
Departmentof Agriculture
ExtensionService.
4. Rememberthatcanningis a
processthatgenerateslarge
amountsofsteam.Toavoidburns
fromsteamorheat,becareful
whencanning.
NOTE:Ifyourhousehaslow
voltage,canningmaytakelonger
thanexpected,eventhough
directionshavebeencarefully
followed.The
process time will be
shortened by:
(1) using a pressure canner, and
(2)
startingwithHOTtapwaterfor
fastestheatingoflargequantities
ofwater.
P
b
c)
1%
I
Page 10
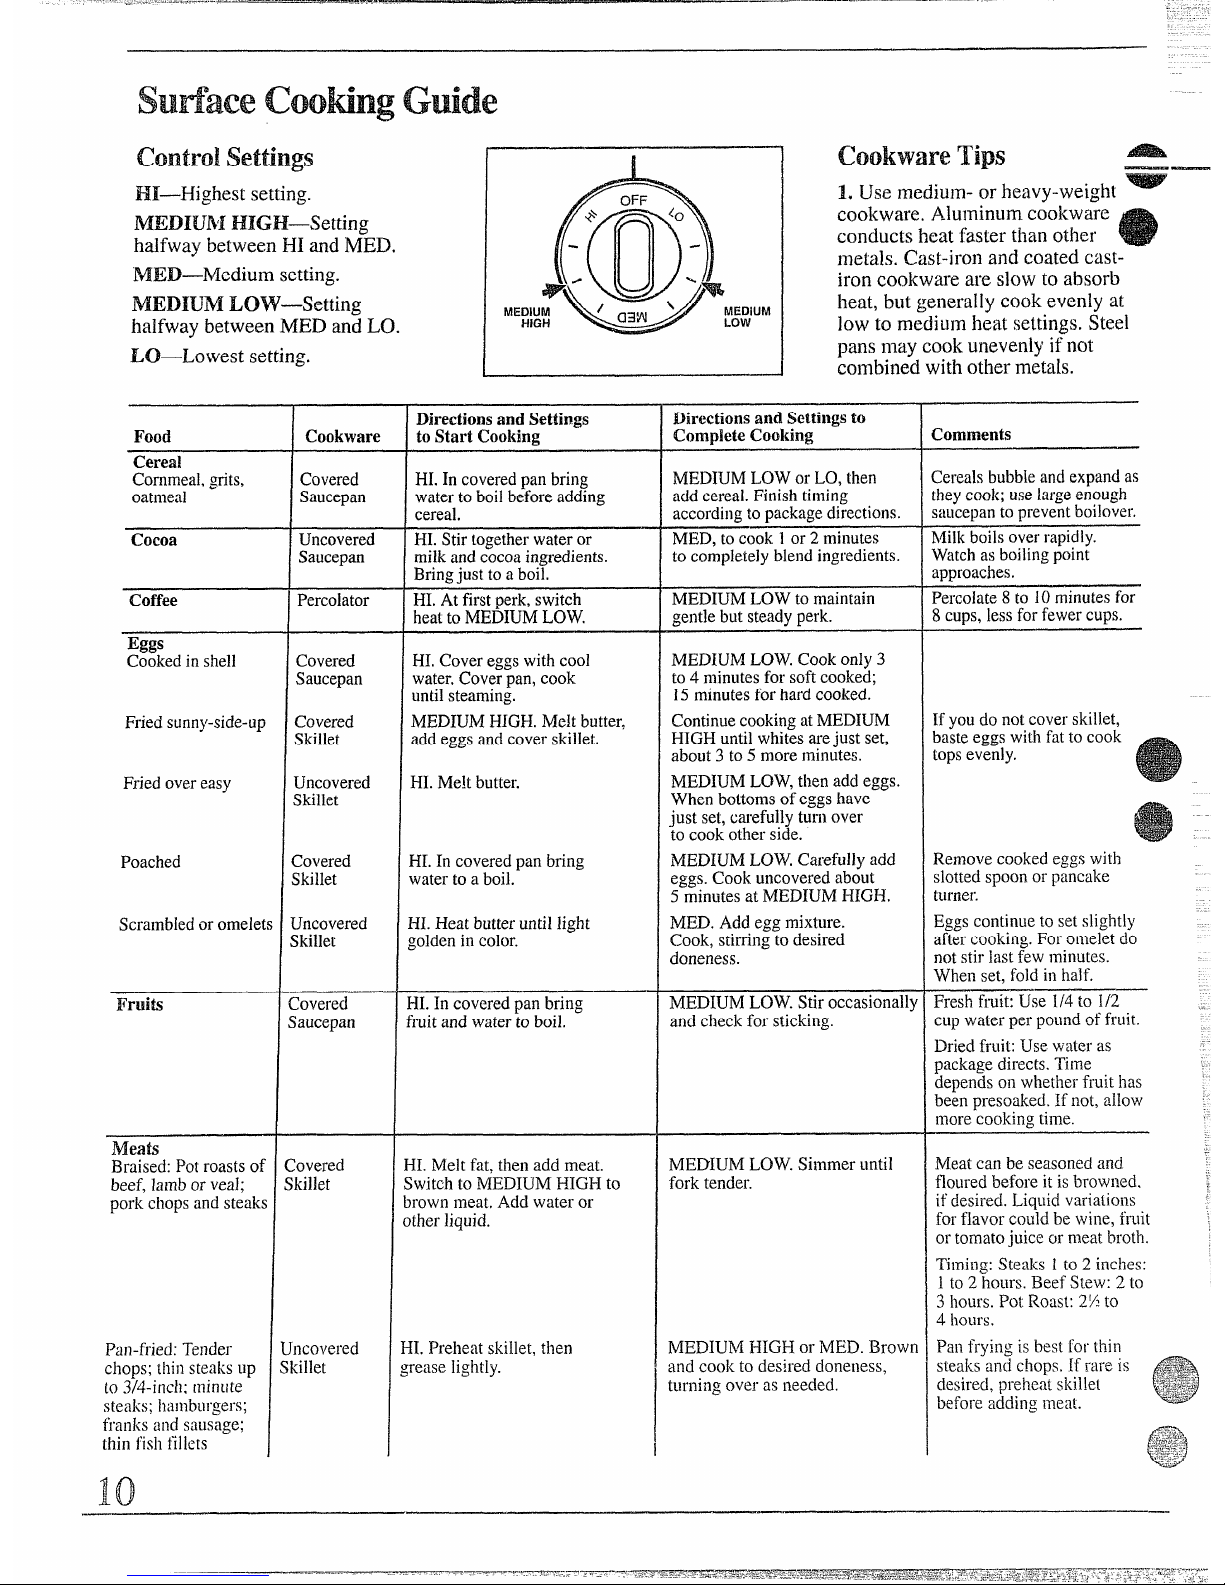
controlsettings
Hi—Highest setting.
MEDIUNI HIGH—Setting
halfwaybetween HI andMED.
MED—Medium setting.
MEDIUM LOW—Setting
halfway betweenMED andLO.
LO—Lowest setting.
Food
Cereal
Cornmeal,grits,
oatmeal
Cocoa
Coffee
Eggs
Cookedinshell
Friedsunny-side-up
Friedovereasy
Poached
Scrambledoromele
Fruits
Meats
Braised:Potroastso
beef,lamborveal;
porkchopsandsteak
Pan-fried:Tender
chops;lhinsteaksup
to3/4-inch:minute
steaks:hamburgers;
franks
mcl sausage;
thinfishfillets
N)
I 1
CWkwm?Tips
. . —
@
1. Use medium- or heavy-weight
.=–
oFF
+
(~
cookware. Aluminumcookware
m
conductsheatfaster than other ~
meta]s.Cast-ironand coated cast-
.,:ww~:~’”M
iron cookware are slowto absorb
MEDIUM
heat, but generallycook evenly at
low to mediumheat settings, Steel
pansmay cookunevenlyif not
combinedwith othermetals.
Cookware
Covered
Saucepan
Uncovered
Saucepan
Percolator
Covered
Saucepan
Covered
Skillet
Uncovered
Skillet
~overed
Skillet
Jncovered
;killet
;overed
iaucepan
~overed
killet
~covered
illet
I
Directions and Settings
to Start Cooking
HI.Incoveredpanbring
watertoboilbeforeadding
cereal,
HI.Stirtogetherwateror
milkandcocoaingredients.
Bringjust to aboil,
HI.Atfirstperk,switch
heatto MEDIUMLOW.
HI,Covereggswithcoo]
water,Coverpan,cook
untilsteaming.
MEDIUMHIGH.Meltbutter,
addeggsandcoverskillet.
H1.Me!tbutter.
HI.Incoveredpanbring
waterto a boil.
I-H.Heatbutteruntillight
goldenincolor.
HI.Incoveredpan bring
fruitand waterto boil.
I-II.Meltfat,thenaddmeat.
SwitchtoMEDIUMHIGH to
wownmeat.Addwateror
)therliquid,
11.Preheatskillet,then
reaselightly.
Directions andSet@s to
U3m@eteCooking
MEDIUMLOWorLO,then
acidcereal.Finishtiming
accordingto packagedirections.
MED,tocook 1or 2minutes
tocompletelyblendingredients.
MEDIUMLOWtomaintain
gentlebutsteadyperk.
MEDIUMLOW.Cookonly3
to4 minutesforsoftcooked;
15minutesforhardcooked.
ContinuecookingatMEDIUM
HIGHuntilwhitesarejust set,
about3 to5 moreminutes.
MEDIUMLOW,thenaddeggs.
Whenbottomsofeggshave
just set,carefullyturnover
tocookotherside,
MEDIUMLOW,Careful]y add
eggs.Cookuncoveredabout
5minutesatMEDIUMHIGH.
MED.Addeggmixture.
Cook,stirringtodesired
doneness.
MEDIUMLOW.Stiroccasionally
andcheckfor sticking.
MEDIUMLOW.Siinmeruntil
forktender.
MEDIUhlHIGHor MED.Brown
and cookto desireddoneness,
turningoveras needed.
Comments
Cerealsbubbleandexpandas
theycook;uselargeenough
saucepantopreventboilover.
h4ilkboilsoverrapidly.
Winchasboilingpoint
approaches.
Percolate8to 10minutesfor
8cups, lessforfewercups.
Ifyou donotcoverskillet,
ba&eeggswithfatto cook
topsevenly.
Removecookedeggswith
slottedspoonorpancake
turner.
Eggscontinueto setslightly
aftercooking.Foromeleldo
notstirlastfewminutes.
Whenset,fold in half.
Freshfruit:Use 1/4to 1/2—
cup waterperpoundoffruit.
Driedfruit:Usewaleras
packagedirects.‘Time
dependsonwhetherfruithas
beenpresoaked.Ifnot,allow
morecookingtime.
Meatcanbeseasonedand
flouredbeforeit isbrowned.
ifdesired.Liquidvaria[ioils
for flavorcouldbe wine,fruit
ortomatc)juiceormeatbroth.
Timing:Steaks1to 2 inches:
1 to 2 hOUrs.BeefStew:2 to
3
hOLlL3.PotROaSt:2fitO
4 hours.
Panfrying is best forthin
steaksandchops,Ifrareis
P
..*:*::
desired,preheatskille[
beforeaddingmeat.
$~y
Page 11

.
1
Wrong
!I
Li%i&$!~u~
ConcaveBottom
RoundedBottom
Right
2. To conserve themostcooking
anergy, pans should be flat on the
_ottom, have straightsidesand
tight-fittinglids. Match thesize
the saucepanto the sizeof the
rface unit.A pan that extends
more than one inch beyond the
edge of the drip pan will trapheat
causingdiscolorationon chrome
drippansrangingfrom blue to
dark grey.
3. Deep Fat Frying.Do not oveti]ll
cookwarewithfat that may spill
overwhen addingfood.Frosty
foodsbubblevigorously.Watch
Wrong
foodsfryingat high temperatures.
Keep range andhood clean from
accumulatedgrease.
Right
L
A
%NOTOVER1“
.—
Cookware
DirectionsandSettings
to Start Cooking
DirectionsandSettings to
CompleteCooking
Comments
I
Food
Meats
FriedChicken
Porcrisp,drychicken,coveronly
idlerswitchingtoIMEDIUM
LOWfor 10minutes.
Uncoverandcook,turning
Occasionallyfor 10to20 min,
I-H.Meltfat.SwitchtoMEDIUM
HIGHtobrownchicken.
MEDIUMLOW.Coverskillet
andcookuntiltender.
Uncoverlastfewminutes.
Covered
Skillet
Uncovered
Skillet
Covered
Skillet
Covered
DutchOven
Kettleor
Large
Saucepan
Small
Uncovered
Saucepan.
Usesmall
surfaceunit
A moreattention-freemethod
istostartandcookatMED.
HI.Incoldskillet,arrange
baconslices.Cookjustuntil
startingtosizzle.
HI.Meltfat.SwitchtoMED
tobrownslowly.
MEDIUMHIGH,Cook,turning
overasneeded.
MEDIUMLOW,Coverandcook
untiltender.
Pan-friedbacon
Meatmaybebreadedor
marinatedinsaucebefore
frying.
Sauteed:Lesstender
thinsteaks(chuck,
round,etc.);liver;
thickorwholefish.
Simmeredorstewed
meat;chicken;
cornedbeet smoked
pork;stewingbeet
tongue;etc.
MEDIUMLOW.Cookuntilforktender.(Watershouldboilslowly.)
For verylargeamounts,medium
Addsaltorotherseasoning
beforecookingif meathas
notbeensmokedor
otherwisecured.
HI.Covermeatwithwater
andcoverpanorkettle.
Cookuntilsteaming.
I
heatmaybe needed.
LO.AIIow10to 15minutes
tomeltthrough.Stirto smooth.
Whenmeltingmarshmallows,
addmilkorwater.
lhleltingchocolate9
butteqmarshmallows
Pancakes or
French toast
Cook2to 3 minutesperside.
Thickbattertakessli~htly
MEDIUMHIGH.Heatskillet
8to 10minutes.Greaselightly.
Skilletor
Griddle
longertime.Turnov& pancakeswhenbubbles
riseto surface.
Pasta
Noodlesorspaghetti
MEDIUMHIGH.Cook
uncovereduntiltender.For
largeamounts,HImaybe needed
tokeep wateratrollingboil
throughoutentirecookingtime.
MEDIUMHIGHforfoods
cooking10minutesorless.
MEDforfoodsover10minutes.
lJselargeenoughkettleto
preventboilover.Pasta
doublesin sizewhencooked.
HLIn coveredkettle,bring
saltedwatertoa boil,uncover
and addpastaslowlysoboiling
doesnotstop.
Large
Covered
KettleorPot
Pressure
Cookeror
Canner
Cookershouldjiggle2 to 3
timesperminute.
HI.Heatuntilfirstjiggleis heard.
Pressure Cooking
MEDIUMLOW.Tofinish
Puddings, Sauces,
Candies, Frostings
Stirfrequentlytoprevent
sticking
Uncovered
Saucepan
Covered
HI.Bringjust to boil.
..
cooking.
Vegetables
Uncoveredpanrequiresmore
waterandlonger
time.
MED.Cook1pound
10to30 or moreminutes,
dependingontenderness
ofvegetable.
HI.Measure1/2to 1inch
waterin saucepan.Addsalt
and preparedvegetable.
Incoveredsaucepanbring
toboil.
HI.Measurewaterandsalt
asabove.Addfrozenblock
ofvegetable.In covered
saucepanbringtoboil.
HI.In skillet,meitfat.
Fresh
Saucepan
MEDIUMLOW.Cookaccording
totimeonpackage.
Breakup orstiras needed
while
cooking.
Covered
Saucepan
Frozen
MED.Addvegetable.
Cookuntildesired
tendernessisreached.
LO.Coverandcook
accordingtotime.
Turnover or stirvegetablea!
necessaryforevenbrowning
Sauteed:Onions;
greenpeppers;
mushrooms;celery;etc.
--%-%&,
p
+~~~
Riceand (h-its
=3&
Uncovered
Skillet
Riceand gritsW@einvolum
aftercooking.TimeatLO.
Covered
Saucepan
I-H.
Bringsaltedwatertoaboil.
Rice:1cup~iceand2cups
waterfor25minutes.
Grits:1cupgritsand4 cups
waterfor40minutes.
1
Page 12

.-
—
usingYour O%’en
BeforeusingYm.mOven
L Lookat the controls.Be sure
you understandhow to set them
properly.Readoverthedirections
fortheOvenControlssoyou
understandhowto usethem.
2. Check oven interior.Look at
the shelves.Takea practicerun at
removingand
replacing them
properly,togivesure,sturdysupport.
3.
Readoverinformationand tips
thatfollow.
4. Keep this book handy so you
can refer to it, especiallyduring
thefirst weeks of usingyour
newrange.
ovenshelves
~7
....-.
The shelvesare designed with
stop-locksso when placed
correctly on the shelf supports,
they will stop before coming
completelyout of the oven and
will not tilt when you are removing
food from them or placing food
on them.
When placing cookware on a shelf,
pull the shelf out to the “stop”
position.Place the cookware on
the shelf, then slide the shelfback
into the oven. This will eliminate
reaching into the hot oven.
To remove the shelf from the
oven,
pulltheshelftowardyou,
tiltfrontendupward,andpullthe
shelfout.
TOreplace, place the shelf on the
appropriate shelf supportwith stop-
locks (curved extensionof shelf)
facing up and toward rear of oven.
Tilt the front end upward and push
the shelf toward back of oven until
it goes past the “stop” on oven
wall. Then lower front of shelf, and
push it all the way back.
shelfPositions
The oven has four shelfsup~orts—- -–
A (bottom),B, C andD (to~j.She
positions for cooking are suggest
on Bakingand Roastingpages.
I
ovenLight
Use the switch on the panel to turn
light on and off.
12
.
Page 13

.. ..
If W’-” and a number flash
on the dis@By,this indicates a
function error code. Pushthe
CANCEL button. Allow the
oven to cool for one hour.Put
oven back into operation.If the
function error code repeats,
disconnectpower to the range
and call for service.
oven‘ml” Indicator
The word “ON” is displayed when
e BAKE or BROIL functionis
used. It goes out when oven
AI’4CELbutton is pushed or
hen oven shuts off automatically.
The oven operation is controlled
electronically.The following
instructions tell you how
the electronic controls.
TOsetthe clod
L PushCLOCK button.
to operate
2. Turn SET knob to correct time
of day. Clock is now set. The clock
must be set to the correct time of
day for accurate automatic oven
timing operations.
‘mlsettheTimer
L Push TIMER button.
2. Turn SET knob to desired
amount of time (up to 9 hours and
59 minutes). The Timer will begin
to count down within a few
seconds.
3. When time is up, the End-ofCycle Tone (3 long beeps) will
sound and the display will again
show the time of day.
NOTE: The Timer is a reminder
only and will not operate the oven.
Youcan use the Timer whether or
not the oven is being used. The
Timer does not interfere with oven
operations.
TO cancel the Timer
PushandholdTIMERbuttonfor
threeseconds.Thiswillclearthe
Timerfunction.
To
Bake
L Push BAKE button.
2. Turn SET knob until desired
temperatureisdisplayed.
A one-secondbeepwill sound
when the oven has preheated to
and stabilizedat selected
temperature.
3. When finishedbaking,push
oven CANCEL button.
NOTE: To recall what temperature
you have selectedwhile the rising
temperatureis being shown,push
and hold the BAKE button. The
selectedtemperaturewill be shown
while you hold the BAKE button.
The actual oven temperaturewill
be shown after a few seconds.
Youcan push the CLOCK button
to display time of day without
canceling the oven operation.
~
s
K/
i=d
%
c
4
pushingtheBAI@buttonand ‘ =turningtheSETknob.
l-bBroil
1. Push BROIL button.
2. Turn SET knob until your
choice of HI BROIL or LO BRO1
is visible in the display.
When finished broiling, push the
oven CANCEL button.
(continuednextpag
Page 14

... __..
.-..:.
=-----
..___,”_.——
——-.—.
AutomaticovenTimer
The oven timer will automatically
start and stop your oven cooking or
self-cleaningoperationfor you.
F(Mmltornatk oven
cooking:
1.PUShOVEN TIME button.
2. Turn SET knob to set length of
balkingtime.
3. Push BAKE button.
4. Turn SET knob to set desired
temperature.
When cook time is reached, the
13nd-of-CycleTone wilI sound and
the oven will turn off.
During
automaticcooking:
~You
canpushtheSTOPTIME
buttonto findoutwhenthe13ndof-CycleTonewillsoundand the
ovenwillturn off.
~YoucanpushtheCLOCKbutton
to displaytimeofdaywithout
canceling theovenoperation.
Howtochange a
Program
When a function has been
entered, you can recall what has
been programmed by pushing
the corresponding function
button. The messages in the
display show you which
function is currently being
displayed. While the function is
displayed, you can change it
with the SET knob. You can
change any programmed
function at any time
p
o
ToDelay
startingan
Automatic
ovenoperation
M’a delayed Cooking operation
is desired:
1. Push OVEN TIME button.
2. Set length of baking time with
SET knob.
3. Push STOP TIME button.
4. Turn SET knob to time of day
when baking shouldbe completed.
Do not set a stop time that is less
than the length of cookingtime
plus the current time of day.
5. Push BAKE button.
6. Turn SET knob to desired
temperature.
When stop time is reached, the
End-of-Cycle Tone will sound and
the oven will turn off.
NOTE: Foods that are highly
perishable such as mills,eggs,
fish, stuffings, poultry and pork
should not be allowed to sit out
for more than one hour before or
after cooking. Room temperature
promotes the growth of harmful
bacteria. Be sure that the oven
light is off because heat from
the bulb will speed harmful
bacteria growth.
NOTE: You can push the STOP
TIME button to find out when the
oven will turn off.
If a delayed self-cleaning oven
operation is desired, see the self”
clean section of this book.
I
!nMRfi?s
End-of-CycleTone (3 long
beeps—onesecondon,one
secondoff):showsthata timed
oven operationhas reached STOP
TIME or that the Timer has
counted down.
Attention Tone (series of short
beepsuntilproper response is
given):will sound if oven has on]y
been partiallyprogmmmed,For
example,ifyou have selected a
cook time but no temperature, you
will hear the AttentionToneuntil
you select a temperature or push
CANCEL.
NotificationTone(single, one-
secondbeep): indicates oven has
stabilizedat selected temperature.
Key Tone (single, l/10-second
beep): sounds when any button
is pushed.
Function Error ‘Mm (series of
very rapid beeps). The display will
show a failure code. Cancel
Function Error Tone by pushing
the CANCEL button. If the
Function Error Tone starts again
(after about 15 seconds), call for
service. Disconnect the range
electrical supply to stop tone.
If the function error occurred
while you were programming the
Oven Control, push the CANCEL
button and try again.
To
~filld the %’wN!.e.~fYOUdon’t
want an audible tone when you
push a
button,youcaneliminate
thetone by pushingandholding
theCANCELbutton untilyouhear
a shortbeep(inapproximatelytwo
seconds).Toactivatethetone
again,push andholdtheCANCEL
buttononcemoreuntilyouhear a
shortbeep.CanceHingor
activatingthetoneshould onlybe
donewhenthereis no oven
operationprogrammed.
Pushing the CANCELbutton will
clear all functions except the Clock
and Minute/Second Timer,
c
..-4,,,.
&$Jgj
~~,gl-
..-,
L-d,.
i!l:-.3
-.=*
Page 15

.—
‘ Bating
-o notlockthe oven door
—-.—_..._.
-ltb thedoor latch during
baking.This is used for
if-cleaningdy.
H(?TVtosetYour
Range
forBaking
L Positionthe shelf or shelvesin
theoven.If cooking on two
shelvesat the same time, stagger
thepans for best heat circulation.
2. Close oven door.
3. Push the BAKE button and turn
the SET knob until desired
temperatureis displayed. If
preheatingis desired do not put
food in the oven until a one-second
beep soundsto tell you the oven
is preheated.
4. Open the door and place food in
oven on center of shelf. Allow at
least 2 inches between the edge of
thebakeware and oven wall or
adjacentcookware.
. Close oven door.
6.Checkfoodfordonenessat
inimum time shown on recipe.
ook longer if necessary. Push the
CANCEL button and remove food.
shelf Positions
Most baking is done on the second
shelfposition (B) from the bottom.
When baking three or four items,
use two shelves positioned on the
second and fourth sets of supports
(B& D) from bottom of oven.
Bake angel food cakes on first shelf
position(A)frombottom of oven.
BatingTips
~Follow a tested recipe and
measure the ingredientscarefully.
If you are using a package mix,
followlabel directions.
eDo not open the oven door during
a baking operation—heat
willbe
lost and the baking time might
need to be extended.This could
cause poor baking results. If you
must open the door, open it
putially--only3 or 4 inches—and
close it as quickly as possible.
Comon BakingProbk?ms
am!P’ofixi?dldeSolutiom
PIES
Bw=ningaround edges
oEdges of crust too thin.
~Incorrect baking temperature.
Bottom crust soggy and mbaked
sAllow crust and/or filling to cool
sufficiently before filling pie shell.
~Filling may be too thin or juicy.
@Filling allowed to stand in pie
shell before baking. (Fill pie shells
and bake immediately.)
@Ingredients and proper measuring
affect the quality of the crust. Use
a tested recipe and good technique.
“Makesure there are no tiny holes
or tears in a bottom crust.
“Patching” a pie crust could cause
soaking.
l% filling runs over
~Top and bottom crust not well
sealed together.
~Edges of pie crust not built up
high enough.
~Too much filling.
~Checksizeofpieplate.
Pastryis tough;crustnotflaky
@
Too much handling.
@Fat too soft or cut in too
fine.
Rolldoughlightlyandhandleas
littleaspossible.
CAKES
Cake rises higher on me side
oBatter spread unevenly in pan.
~Oven shelvesnot level.
oUsing warped pans.
Cakescracking on top
oOven
temperaturetoohigh.
@Battertoothick,followrecipeor
exactpackagedirections,
~Checkforpropershelfposition.
~Checkpansizecalledforinrecipe.
*Impropermixingofcake.
Cakefalls
~Too
much shortening,sugar
or liquid.
~Check leavening agent, baking
powder or baking soda to assure
freshness. Make a habit to note
expiration dates of packaged
ingredients.
eCake not baked long enough or
baked at incorrect temperature.
~If adding oil to a cake mix,
make
certain the oil is the type and
amount specified.
‘crust is hard
@Check temperature.
~Check shelf position.
Cakehassoggylayerorstreaks
atbottom
~LJndermixingingredients.
~Shortening too soft for proper
creaming.
~Too much liquid.
COOHES & BISCUITS
Doughy center; heavy cxwst
on surface
@Check temperature.
~Check shelf position.
~Follow baking instructions
carefully as given in reliable recipe
or on
conveniencefoodpackage.
~Flatcookiesheetswillgivemore
evenbaking results.Don’t
overcrowdfoodson a bakingsheet.
~Conveniencefoodsused beyond
theirexpirationdate.
Browning more
noticeable am
wileside
~IOVen
doornotclosedproperly,
checkgasketseal.
*Checkshelfposition.
Page 16

.—
1.Aluminumpans conductheat
2. Dark or non-shinyfinishesand
cookhmgerthan30to40minutes.-
quickly.Formost conventional glasscookwaregenerallyabsorb
Forfoodswithshortcookingtimes,_
baking,light,shinyfinishes
heat,whichmayresultindry,crisp
preheatinggivesbestappearance
generallygivebestresultsbecause crusts.Reduceovenheat25”F,if
*
andcrispness.Akhoughpreheatirw
theyhelppreventoverbrowning.
1ighter
crusts are desired.Rapid
is not necessarywithmeats,itis
For best browning results, we browningof somefoods can be preferredforbaked goods.
recommend dull bottomsurfaces
achievedby preheating cast-iron
4. ToPreventunevenheatingand to
for cake pans
andpieplates. cookware.
.
saveenergy,opentheovendoor as
3.Preheatingtheovenisnotalways littleasp~ssib~eincheckingfood.
necessary,especiallyfor foodsthat
—
Comments
Shelf
Position
Oven
‘Ikmperature
400°-4750
350°-4000
400°-4500
350°
400°-4250
375°
350°-3750
375°-4250
375°-4250
350°-3750
mm,
Minutes
Food
Cookware
Bread
Biscuits(1/2in.thick) Canned,refrigeratedbiscuitstake2to
4 minuteslesstime.
ShinyCookieSheet
B,C
B
:
B
B
B
B
:
15-20
20-30
20-40
45-55
20-30
45-60
45-60
45-60
10-25
20-30
Coffeecake ShinyMetalPanwith
satin-finishbottom
Cast-ironorGlassPan
ShinyMetalPanwith
satin-finishbottom
ShinyMetalMuffinPans
DeepGlassorCast-ironCups
Preheatcast-ironpanfor crispcrust.
Cornbreador muffins
Gingerbread
Decreaseabout5minutesformuffin
mix,orbakeat450”F,for25minutes,
thenat350”F.for 10to 15minutes.
Muffins
Popovers
Dark
metalor glassgivedeepest
browning.
Quickloafbread
Yeastbread(2loaves)
MetalorGlassLoafPans
MetalorGlassLoafPans
Plainrolls
Sweetrolls
ShinyOblongorMuffinPans
ShinyOblongorMuffinPans
Two-piecepanis convenient.
Cakes
(withoutshortening)
Angelfood
Jellyroll
Sponge
325°-3750
375°-4000
325°-3500
30-55
10-15
45-60
AluminumTubePan
MetalJellyRollPan
34etalorCeramicPan
A
B
B
.—
A,B
B
A,B
B
B
B
Linepanwithwaxedpaper.
—
Cakes
45-65
20-25
2-4
hrs.
20-35
25-30
40-60
13undtcakes
Cupcakes
Fruitcakes
MetalorCeramicPan
ShinyMetalMuffk Pans
tietalorGlassLoaforTubePan
325°-3500
350°-3750
275°-3000
350°-3750
350°-3750
350°
Paperlinersproducemoistercrusts.
Use300”F.and ShelfB for smallor
individualcakes.
~hinyMetalPanwith
atin-finishbottom
;hinyMetalPanwith
atin-finishbottom
detalorGlassLoafPans
Layer
Layer,chocolate
Loaf
Cookies
Brownies
Drop
Refrigerator
Rolledor sliced
fletal orGlassPans
~ookieSheet
~ookieSheet
~ookieSheet
B,C
B,C
B,C
B,C
325°-3500
350°-4000
400°-4250
375°-4000
25-35
10-20
6-12
7-12
Barcookiesfrommixusesametime.
UseShelf C andincreasetemp.25°F.
to50°F.for morebrowning.
Other Desserts
Bakedapples
Custard
ilassorMetalPans
ilassCustardCupsorCasserole
~etinpanofhotwater)
lass CustardCupsor Casserole
B,C
B
B
350°-4000
300°-3500
325°
30-60
30-60
50-90
Reducetemp.to 300°Eforlarge
custard.
Cookbreadorricepuddingwith
custardbase80to 90minutes.
Puddings,rice
andcustard
Pies
For l~ge piesuse400°F.andmoretime.
To qu~cklybrownmeringue,
use400”F.for9 to 11minutes.
Custardfillingsrequirelower
temperature,longertime.
Frozen
Meringue
~ijPanonCookieSheet
xead to crustedges
B%
B
B
B
400°-4250
325°-3500
400°-4250
400°-4250
450°
325°-4000
325°-3750
300°-3500
45-70
15-25
45-60
40-60
12-15
one crust
Two crust
Pastryshell
lassorSatin-finishMetalPan
lassor Satin-finishMetalPan
[assorSatin-finishMetalPan
IWsceWmeotns
ion OvenShelf
~assor MetalPan
assPan
60-90
30-60
30-75
Bakedpotatoes
Scallopedclishes
souffles
16
.
Page 17

* Roastingis cooking by dry heat.
......
....
- Tendermeat m poultry can be
—
roasteduncovered in your oven.
oastingtemperatures,which
shouldbelow and steady,keep
spatteringto a minimum. When
roasting,it is not necessary to sear,
baste,cover,or add water to your
meat.Roastingis easy,just follow
thesesteps:
Step 1. Position the oven shelfat
secondfrombottom position (B)
for small size roast (3 to 5 lbs.) and
at bottom position (A) fox:larger
roasts.
OastingGdde
Tvue
NIeat
Tendercuts;rib,highquality
sirlointip,rump or toproundf
Lamblegor bone-inshoulder~
I’ealshoulder,legorloint
Porkloin,ribor shoulder?
Ham,pre-cooked
Ham,raw
Poultry
ChickenorDuck
Chickenpieces
Turkev
Step 2:Check weightof roast.
Place meat fat-side-upor poultry
breast-side-upon roastingrack in a
shallowpan.Do not cover.Do not
stuffpoukry untiljust before
roasting.Use a meat thermometer
for more accuratedoneness(do not
place thermometerin stuffing)or
refer to the Roasting Guide for
approximatecookingtimes. The
melting fat will baste the meat.
Select a pan as close to the size of
the meat as possible. (Broilerpan
with rack is a good pan for this.)
Step 3: Push BAKE button and
turn SET knob until desired
temperature is displayed. Remove
fat and drippings as necessary.
Baste as desired. Check the
Roasting Guide for temperatures
and approximate cooking times.
Step4:Mostmeatscontinueto
cookslightlywhilestandingafter
beingremovedfromtheovert.
Standingtimerecommendedfor
roastsis 10to 20 minutes.
Oven
Temperature
325°
325°
325°
325°
325°
325°
325°
350°
325°
Doneness
Rare:
Medium:
WellDone:
Rare:
Medium:
WellDone:
WellDone:
WellDone:
ToWarm:
WellDone:
WellDone:
WellDone:
WellDone:
This allowsroasts to firm up and
makesthemeasier to carve.
Internaltemperaturewillr~seabout
5°F.;to compensatefor the
temperatureincrease,if desired,
removeroast from oven sooner
(at 5°F,less than the temperaturein
guidebelow).
Frozen
Roas&
Frozen roasts of beef, pork, Iamb,
etc., can be started without
thawing,but allow 15to 25
minutesper pound additionaltime
(15 minutes per pound for roasts
under 5 pounds, more time for
largerroasts).
Thaw most frozen poultry before
roastingto ensure even doneness.
Some commercial frozen poultry
can be cooked successfullywithout
thawing.Follow directionsgiven
on package label.
Approximate Roasting Time
in Minutes per Pound
3to 5lbs.
6
to 8 h. “
24-33 18-22
35-39
22-29
40-45
30-35
21-25
20-23
25-30 24-28
30-35
28-33
35-45 30-40
35-45
30-40
17-20minutesperlb.(anyweight)
Under 10lbs. 10 to 15w%.
20-30 17-20
3 to 5
NM.
over 5b.
35-40
30-35
35-40
10
toM b.
over15 Ibs.
18-25 15-20
Internal
“Ikmperature“1?
140°-1500*
150°-160°
170°-1850
140”-~50”*”
150°-160°
170°-1850
170°-180°
170°-180°
115°-1250
170°
185°-1900
185°-1900
In thigh:
185°-1900
-1-Forbonelessro}ledroastsover6inchesthick,add5 to 10minutesperpoundtotimesgivenabove.
*TheU.S.DepartmentofAgriculturesays“Rarebeefis pomdar,but youshouldknowthat cookingittoonly140°F.means
c
s~~mefoodp~isoningorgan-ismsmaysurvive.“ SafeFo;d Book.Yo&KitchenGuide.USDARev.Junem8
.+;&>f=
:?~e:?:-
3
..l.=-==—,
:~2&s.-
._.=.,:l~.=-.
..”,-;+-.
-%
1’7’
Page 18

..
Broilingis cooking foodby intense
radiantheat from the upper unit in
the oven. Most fish and tender cuts
of meat can be broiled.Follow
these stepsto keep spattering and
smokingto a minimum.
Step 1:Ifmeathasfator gristle
nearedge,cutverticalslashes
throughbothabout 2“apart.If
desired,fatmaybetrimmed,
leavinglayerabout1/8”thick.
Step 2: Place meat on broiler rack
in broiler pan which comes with
rmge. A1waysuse rack
so fat drips
into broiler pan; otherwisejuices
may become hot enough to catch
fire.
Step 3:Positionshelfon
recommendedshelfpositionas
suggestedinBroilingGuide.
Step 4: Leavedooropento broil
stopposition.Thedoorstaysopen
byitself,yetthepropertemperature
is maintainedin theoven.
Step 5: PresstheBROILbutton
and turntheSET’knobuntilyour
choice of I-IIBROILorLO BROIL
is displayed.Note:Chicken and
ham arebroiledat LOBROILin
ordertocookfood without
overbrowningit.
Step 6: Turnfoodonlyonce
duringbroiling.Timefoodsfor
firstsideperBroilingGuide.
Turn food, then use times given for
second side as a guide to preferred
doneness. (where two thicknesses
and times are given together, use
first times given for thinnest food.)
Step 7: When finished broiling,
push the oven CANCEL button.
Serve food immediately,leaving
the broiler pan and rack outside
oven to cool during meal for
easiest cleaning.
useofAluminumFoil
You can use aluminumfoiltoline
yourbroilerpanandbroilerrack.
However,youmustmoldthefoil
tightlyto therackandcutslitsin it
just likethe rack.Withouttheslits,
thefoilwillpreventfat andmeat
juicesfromdrainingtothebroiler
pan.Thejuices couldbecomehot
enough to catchfire.If you.donot
cuttheslits,youarefrying,not
broiling.
Questions(kAnswers -
Q. Whenbroiling,is it necessary
to alwaysuse a rack in the pm?
A. Yes.Using the rack suspends
the meatoverthepan.As~hemeat
cooks,thejuicesfallintothepan,
thuskeepingmeatdrier.Juicesare
protectedbytherackandstay
cooler,thuspreventingexcessive
.
spatterandsmoking.
Q.ShouldI salt the meatbefore
ilmmlg?
A. No. Salt draws out thejuices
and allows them to evaporate.
Always salt after cooking.Turn
meatwithtongs;piercingmeat
withaforkallowsjuicesto escape.
Whenbroilingpoultryorfish,
brusheachsideoftenwithbutter.
Q.
VVhyare mymeatsnottuning
outas brown as they should?’
A..In some areas, the power
(voltage)to the range maybe low.
In these cases, preheat the broil
unit for 10 minutes before placing
broiler pan with food in oven.
Check to see if you are using the
recommended shelfposition. Broil
for longest period of time indicated
in the Broiling Guide. Turn food
only once during broiling.
Q.
m) 1need tofy.%asemy
broilerH--d topreventmeat
fmm
sticking?
A.No.Thebroilerrackis designed
toreflect broiler heat,thuskeeping
thesurfacecoolenoughtoprevent
meatfromstickingtothesutiace.
However,sprayingthebroilerrack
lightlywitha vegetablecooking
spraybeforecookingwillmCake
cleanupeasier.
Page 19

BroilingGuide
* 1.Always use broiler pan and rack
the meat. Use tongs to turn meat
6. Broilerdoesnot need to be
_ thatcomeswith your oven. It is
over to prevent piercing meat and
preheated.However,for very thin
designedto minimize smoking and
losingjuices. foods,or to increasebrowning,
patteringbytrappingjuices in the
4. If desired, marinatemeats or
preheatif desired.
shieldedlower-part of the pan.
chickenbefore broiling.Or brush 7. Frozen steakscan be
2. Oven door should be open to the
with barbecue sauce last 5 to 10
conventionallybroiled by
broilstoppositionfor all foods.
minutesonly.
positioningthe oven shelf at next
3. For st&ks and chops, slash fat
5. When arranging food on pan,
~owestshelfpositionandincreasing
evenlyaroundoutsideedgesofmeat.
do not let fatty edgeshang over
cookingtime given in this guide
To slash, cut crosswise through
sides,which could soil oven with
1!4times per side.
outerfat surfacejust to the edge of fat dripping.
Quantityandlor
Shelf HI or First Side
SecondSide
Food Thickness
Position LO Broil Time, Minutes Time, Minutes
Comments
Bacon
1/2lb.(about8
c HI
4!4 4% Arrangein singlelayer.
thinslices)
GroundBeef
1 lb. (4patties)
c HI 10
7
Spaceevenly.
Well Done 1/2to3/4in.t-hick Up to 8pattiestakeaboutsametime.
Beef Steaks
Rare
1in.thick c HI 6 5 Steakslessthan1in. thickcook
Medium (1to 1Xlbs.) c
8 6 throughbeforebrowning.Panfryingis
WellDone
c
12 11 recommended.Slashfat,
Rare
1!4in.thick
c
10 7-8
Medium
(2to2!4Ibs.)
c
15 14-16
WellDone
c
25
20-25
Chicken
1whole
A
LO
35
10-15
Reducetimeabout5to 10min.perside
(2to 2Xlbs.),
forcut-upchicken.Brusheachsidewith
splitlengthwise
meltedbutter.Broilwithskin-side-down
first.
BakeryProducts
Bread(Toast)or
2to4 slices c HI
1Z-2
1/2
Spaceevenly.PlaceEnglishmuffinscut-
ToasterPastries 1pkg.(2)
side-upandbrushwithbutter,ifdesired.
Eng]ishMuffIns
2 (split) c 3-4
Lobster
T.aiIs
2-4 B HI
13-16
Donot Cutthroughbackof shell,spreadopen.
(6to 8 oz.each)
turnover. Brushwithmeltedbutterbeforebroiling
andafterhalfofbroilingtime.
l?;sh
1-lb.fillets1/4to
c
HI
5
5
Handleandturnverycarefully.Brushwith
1/2 in.thick
lemonbutterbeforeandduringcooking,if
desired.Preheatbroilertoincreasebrowning.
HamSlices
11n. thick B LO
8
!3 Increasetimes5to 10min.persidefor
(precooked)
1%in.thickorhome-curedham.
Pork ‘chops 2( 1/2 in.)
c HI
10
10
Slashfat.
\\TellDone
2( 1 in. thick), El
i3 13
about 1lb.
Lamb amps
hlediurn
2(1 in. thick)
c HI 10
9 Slashfat.
We]}Done about10to 12oz.
c
12
10
Medium
2(1%in.thick), c
14
12
}VellDone
about1lb.
c
17 12-14
Wienersand l-lb. pkg.
(10)
c
I-H
6
1-2
Ifdesired,splitsausagesinhalf
similarprecooked
Sausages,Bratwurst
I
I
1.
lengthwise;cutinto5-to 6-in.pieces.
I
Page 20

.r.
.
—
.-
Propercare and cleaningare
importantso your range will give
you efficientand satisfactory
service.Follow these directions
carefullyin caring for it to help
assure safe and propermaintenance.
BE SURE ELECTRICAL
POTVERIS OFF BEFORE
CLEANINGANY PARTOF
THE RANGE.
Cooktop Light and
starter
(onsomeInodels)
Do !llOttouch the bulb Whenit is
hot or with wethand!%I“+k!wi?r
wipethelight area with a wet
ddh. Electrical ~OVWXmust be
shut Offif you have to replace a
broken Mb.
Torqdace bulb:
L Flip front of the hinged canopy
Lip.
2. Remove fluorescent light bulb.
Replace the bulb with one of the
same length and wattage.
3. Lower the canopy.
To replace starter:
1.
Opencanopyandremovebulb
asexplainedabove.
2. Graspstarter,turn it
counterclockwise,aboutone
quarterturnandlift out.Replace
withoneof the samewattage.
3. Repositionbulbandlower
thecanopy.
20
Cooktop
The porcelain enamel cooktop is
sturdybut breakable if misused,
This finish is acid-resistant.
However, any food with a high
acid content spilled(such as fruit
juices, tomato or vinegar), should
not be permitted to remain on
the finish.
~1u@3
Surface Units
Cleanthe area under the drip pans
often. Built-up soil, especially
grease, may catch fire.
To make cleaning easier, the plugin surface units are removable.
Lift a plug-inunitabout1inch—
just enoughto graspit—andpuil
it out.
Do
notlift a plug-inunitmore
thm 1 inch H-youdo9it may not
lieflat on the drip panwhenyou
plugit back in.
RepeatedWtingofthe plug-in
unitmm?than 1 inchabovethe
drippancm permanently
damage the receptacle.
Caution: Be sum W controls are
turned to Ol?F andsurfaceunits
al%?cd beforeattemptingto
K%3mo%%lWm.
Afterremovinga plug-inunit,
removethedrip panundertheunit
and cleanit accordingto directions
givenin the C]eaningGuide.Wipe
~aroundthe edgesofthe surface
unit opening.Cleantheareabelow
the swiace unit.Rinseallwashed
areas with a dampclothor sponge.
“ a
Receptacle
-
.
Terminals
Drip Pan
I
‘l%replace a plug-in surface unit:
8First place the drip pan into the
surfaceunit cavity found on top of
the cooktop so the unit receptacle
can be seen through the opening in
the drip pan.
~Insert the terminals of the plug-in
unit through the opening and into
the receptacle, guiding unit so it
fits snugly into ~31ace.
CAUTION
*Do notattempt to clean plug-in
surface units in an automatic
dishwasher.
~Do not immerse plug-in surface
units in liquids d any kind.
~Do not bend the plug-in surface
unit plug terminals.
~Do
notattempt to clean, adjust
or in any way repair the plug-in
receptacle.
BroilerPan & Rack
Afterbroiling,remove the broiler
panandrackfromthe oven.
Carefullypouroutthe greasein the ~
panintoa propercontainer.Wash
andrinsethepanandrack in hot,
soapywater.
If foodhasburnedon, sprinklethe ..
rack,while hot, with detergentand .
coverwithwetpapertowelsor a
dishcloth.Thatway,burned-on
foodswill soakloosewhilethe
mealisbeingserved.
DOnotstorea soiledbroilerpan ~
andrackin theoven.Do notclean ~
in self-cleaning oven.
Page 21

m
Lift-up Cooktop
- Clean theareaunde rthecooktop
—
often. Built-upsoil,especially
~,-:ase,may catch fire.
.
SupportRods
Be sure all surface units are
turned off before raising the
cooktop. Raisethecooktop all the
way up until the supportrods snap
into place at the bottom. They will
hold the cooktopup while you
clean underneath it.
To lower the cooktop, push the
bottom of each rod forward
slightly so that it will slide down
into the side of the range.
After cleaning under the cooktop
- with hot, mild soapy water and a
:s~;Gcloth, lower the cooktop. Be
------careful not to pinch your fingers.
— control Knobs
The controlknobsmayberemoved
for cleaning.
To remove knob, pull it straightoff
the
stem.If knobis difficultto
remove,place a thincloth(likea
handkerchief’)or a pieceof string
under and aroundtheknobedge
andpullup.
Washknobsin soapandwaterbut
do notsoak.
To replace knob, locate the groove
in each side of the knob stem. One
—
-.-1!the grooves contains a spring
-..—.:
j;-~~i>and the other groove is clear.
-- Locate the nmIded rib inside the
..+- b Fit the molded
ribof the
=.!%1o .
%%+obin[otheclc.argrooveonthe
km)bstem.
ovenLightmm
The lightbulbis locatedon therear
wallof the oven.Before replacing
thebulb,disconnectelectrical
powerto the range at the mainfuse
orcircuitbreakerpanel or unplug
therangefrom the electricaloutlet.
Letthe bulb cool completelybefore
removingit. Do nottouch a hot
bulbwith a damp cloth.If youdo,
thebulbwill break.
(%7
Socket
‘< t“
3Y<Max. Length
‘\
m
‘(, I
Bulb
\
Toremove:
~Unscrew the cover and remove
the bulb.
Toreplace:
~Putin a new40-wattappliance
bulb.
NOTE:
A 40-wattappliancebulb
is smallerthana standard40-watt
householdbulb.Werecommend
youuseanappliancebulbthatis
nolongerthan3Xinches.
~Replace and tighten the cover.
~Reconnectelectricalpowertothe
range.
DO NOT
REMOVESCREWS.
Cleaningunder theRange
Thearea undertherangecanbe
reachedeasilyfor cleaningby
removingthebottom storage
drawer.Toremove,pullthe storage
draweroutalitheway,tiltup the
frontandremoveit. Toreplace,
insertglidesat backof thestorage
drawerbeyondstoponrange
glides.Liftthe storagedrawerif
necessarytoinserteasily.Letfront
of thestoragedrawerdown,then
pushinto close.
.
RemovableovenDoor
I
TOremove the door, open it a fev
inches to the special stop position
that will hold the door open. Gras
firmly on each side and lift the
door straightup and off the hinge!
NOTE: Be careful no~to place
hands between the spring hinge
and the oven door frame as the
hinge could snap back and pinch
the fingers.
To
replacethedoor,makesure
thehinges are in the “out”
position.Positiontheslotsin the
bottomofthedoorsquarelyover
thehinges.Thenlowerthedoor
slowlyandevenlyover both
hingesatthe sametime.If hinges
snapbackagainsttheovenframe,
pullthembackout.
ovenshelves
Ovenshelvesmaybecleaned
witha mildabrasivecleanser
followingmanufacturer’sdirections.
Aftercleaning,rinsethe shelves
withclean wateranddrywitha
cleancloth.
To remove heavy, burned-on soil,
soapy metal pads may be used
following manufacturer’s
directions. After scrubbing, wash
with soapy water, rinse and d~y.
f-l
)
m
Page 22

.-
fchr’eandCleatig
operatingtheSeu”cleating oven
ProgrammedCleaningTim:
3%hour’s
Prepare theovenBefore
settingthe controls
Step 1:
Remove thebrcder pan, broiler
rack, all cookware and any
aluminumfoilfrom the oven.
(Oven shelvesmay be left in the
oven.NOTE:Shelveswill discolor
after the self-cleancycle.)
Step 2:
Wipe up heavy soil on oven
bottom. If you use soap, rinse
thoroughlybefore self-cleaningto
prevent staining.
Step 3:
0Clean spatters or soilon the oven
front frame (A), under the front
edge of the cooktop, the door liner
outside thedoor gasket and the
frontedgeof the oven cavity(about
1“into the oven). Use detergent
and hot water with a soap-filled
steel wool pad, then rinse well
with a vinegar and water mixture.
This will help prevent a brown
residue from forming when the
oven is heated. Buff these areas
with a dry cloth.
0Clean top, sides and outside front
of oven door with soap and water.
Do not use abrasives or oven
cleaners+
Do notletwaterrundownthrough
openingsin thetopof thedoor(B).
Cleanthedoorgasket(C)usinga
c]eanspongeto SO* the soiled
areawithhydrogenperoxide.
Repeatedsoakingmaybeneeded
dependingon theamountof soil.
FrequentcleaningwiHprevent
excessivesoilbuildup.
22
Do notrub thedoor gasket—the
fiberglass materialof the gasket
has an extremelylow resistanceto
abrasion.An intact and well-fitting
oven doorgasketis essentialfor
energy-efficientoven operation
and goodbakingresults.If you
noticethe gasket becomingworn,
frayed or damaged in any way, or
if it has become displacedon the
door,you shouldreplace it.
Make surethe oven light bulb
cover (D) is in place.
A. Oven Front I?rmne
B. Openings in Door
C.Oven Door Gasket
D. Oven Light Bulb Cover
Step 4:
Closetheoven doorandmakesure
theovenlightis off.
Oven
shelves may be cleaned in
the self-cleaning oven. However,
they will darken, lose their luster
and become hard to slide. Wipe the
shelf supports with cooking oil
after self-cleaning to make shelves
slide more easily.
Important
Theoven door must be closed
andall controlsmust be set
correctlyfor the clean cycle to
workproperly.To help you
understandhow the clean cycle
works, the stagesof the cycle
are notedbelow.
L Slide the door latch handle to
the right.
2. Set the controls.
3. The words “CLEAN TIME”
are displayed.The oven begins
to heat and the word “LOCK”
is displayed.
If the oven door is not latched,
the word “DOOR’ is displayed
and the oven beepscontinuously.
4. When the 375hour clean
cycle is over, the word
TLEAN>3 goes out and the
oven begins to cool.
5. When the oven temperature
has fallen below the locking
temperature (about 20-30
minutes after the word
“CLEAN” goes out at the end
of the clean cycle), the word
“LOCK’ goes out, the door
latchhandiecanbemovedtothe
leftandthedoorcanbeopened.
D
Do not use commercialoven
cleanersoroven protectorsin
m-neartheself-cleaningoven.
A combinationof anyofthese
productsplusthehighclean-cycle
temperaturemaydamagethe
porcelainfinishof theoven.
Page 23

Quick Reminder
for SeIf’-Clean:
L Prepare oven for cleaning.
2. Slide the latch handle to the
rightas far as it will go.
I
3. Push the CLEAN button.
4. Turn the SET knob.
settheovenforCkming
1.Slide the latch handle to the
rightas far as it will
go. YOU may
need to slightly press on the door
to get it to lock properly.
Neverforce the door latch
handle. Forcing the handle may
damage the door lock
mechanism
2.PushtheCLEANbutton,
3,Turnthe SETknobclockwise
~~~~out1/2
turn. The display will
show
“3:30.”
The words “CLEANTIME” will
[Wdisplayedon theleft. Within20
seconds, the words “CLEAN
LOCK”willbedisplayedon
(hcright.
ROTE: Youcan find out whenthe
ckzmcyclewillbe finishedby
pushingthe STOPTIME button.
~“lwword “DOOR” is displayed
c
_$]~*\i’hCil yOLltry to set t12eclean cycle
‘J-;~;~$l~ith
the door unlatched.
TOSeta Delayed Start
Quick Reminder—
Delay Start for SeIf-Clean:
L Prepare oven for cleaning.
2. Slide the latch handleto the
right as far as it will go.
3. Push the STOPTIMEbutton.
4. Set time you want oven to
stop cleaning.
5. Push the CLEAN button.
6.TurntheSETknob.
Time that appears is 3!4hours
later than the time of day. Turn
the SET knob to the time of
day you wish cleaning to be
completed. The self-clean cycle
willautomaticallybegin3%hours
before the stop time you select.
L Slidethelatchhandleto the
rightasfarasit willgo.
2. PushSTOPTIMEbutton.
3.Turnthe SETknobtotimeof
daywhenyouwishcleaningtobe
completed(mustbe morethan31A
hourslaterthancurrenttime
of day).
4. PushtheCLEANbutton.
5. TurntheSETknobin a
clockwisedirectionabout1/2turn.
Thewords“DELAYCLEAN”
willbe on in the displayuntilthe
cleancyclestarts.Aftertheclean
cyclestarts,the words“CLEAN”
and “LOCK”willbe onin the
display.
NOTE: Duringa delayedself-
cleanoperation,youcanfind out
whentheovenwillbeginthe selfcleancycle by pushin~andholding
theCLEANbutton.
To
Stopa Clean Cycle
L Pressthe CANCEL button.
2. Waituntilthe oven has cooled
belowlockingtemperature (about
20-30minutes)andthe word
“LOCK” is off in the display.
3.Slidethedoorlatchhandleto
theleftasfar as itwill go.
Youwillnot be able to open the
door right away unless the oven
temperatureis
ata safelevel.If
youcannotopentheovendoor
immediatelyaftertheword
“LOCK”goesoff,waitone
minuteandtry again.
AfterSelf-ckming
L When a clean cycle is finished,
the word “CLEAN” will be off in
the display.
2.Waituntiltheovenhascooled
belowlockingtemperature(about
20-30minutes)andtheword
“LOCK”is offinthedisplay.
3. Slidethedoorlatchhandleto
theleftasfar as it willgo.
Youwillnotbe ableto openthe
doorunlesstheoventemperature
is at a safelevel.If youcannot
opentheovendoorimmediately
aftertheword “LOCK” goesoff,
waitoneminuteandtry again.
Youmay noticesomewhiteashin
theoven.Justwipeitup witha
dampcloth.If whitespotsremain,
removethemwitha soap-filled
steelwoolpad.Be sureto rinsethe
ovensurfacethoroughlywitha
vinegarandwatermixture.These
depositsareusua~lya saltresidue
thatcannotberemovedby theclean
cycle.If theovenis notcleanafter
oneclean cycle,repeatthe cycle.
(continuednextpage
Page 24

.-
QuestionsandAnswers
Q. Why won’t my ovenclean
immediately even thoughI set
the controls correctly?
A. Check to be sure the latch
handle is moved to the right.
Q. Can I use commercialoven
cleaners on any part of my
self-cleaning oven?
A. No cleaners or coatings should
be used around any part of this
oven. If you do use them and do
not wipe the oven absolutely
clean, the residue can scar the
oven surface and damage metal
parts the next time the oven is
automatically cleaned.
Q. ICanI clean the Woven
Gasket around the oven door?
A. Yes,but carefully, and only
with a ciean sponge to soak the
soiled area with hydrogen
peroxide.
Q. After having just used the
oven, the IA3CKED light came
on and I could not move the
Mch handle. Why?
A. After several continuous hightemperature bakings or broilings,
the LOCKED light may come on.
The oven door can’t be latched for
self-cleaning while the LOCKED
light is on. If this happens, let the
oven cooi until the LOCKED light
goes off. Then the oven door can
be latched for self-cleaning.
Q. What shodd I do if excessive
smoking occurs during cleaning?
A. Thisis causedby excessivesoil.
PresstheCANCELbutton.Open
windowstorid roomofsmoke.
Waituntilthe ovenhascooled
(about20-30minutes)andthe
wordLOCKisoff in thedisplay.
Wipeup theexcesssoilandreset
thecleancycle.
Q. Is the “crackling” sound I
hear during c!eaningnormal?
A. Yes.This is the soundof the
metal heating and cooling during
both the cooking and cleaning
functions.
Q. Should there be any odor
during the cleaning?
A. Yes,there maybe a slight odor
during the first few cleanings.
Failure to wipe out excessive soil
might also cause a strong odor
when cleaning.
Q.
Whatcauses the hair-like
lines on the enameled surface of
my oven?
A. This is a normal condition,
resulting from heating and cooling
during cleaning. These lines do not
affect how your oven performs.
Q. Why do I have ash left in my
oven after cleaning?
A. Sometypesof soiIwillleave
a depositwhichisash.Rcanbe
removedwitha dampsponge
or cloth.
Q. My ovenshelvesdo not
slide
easi~y.What is the matter?
A.
Aftermanycleanings,oven
shelvesmaybecomesocleanthey
do notslideeasily.Ifyouwish
shelvesto slidemoreeasily,
dampenfingerswitha small
amountof cookingoilandrub
lightlyover sidesof shelfwhere
theycontactshelfsupports.
Q. My oven shelveshave become
gray after the self-cleancycle.Is
thisnormal’?
A. Yes.Aftertheself-cleancycle,
theshelvesmaylosesomeluster
anddiscolorto a deepgray color.
ovenThermostat
Adjustment
The temperaturein yournewrange
has beensetcorrectlyatthe
factory,sobesuretofollowthe
recipetemperaturesandtimesthe
firstfewtimesyoubakeinyour
newoven.
If you
think the oven should be
hotteror cooler,you can adjustit
yourself.To decide how much to
changethe temperature,set the
oventemperature 25”F.higher or
lower than the temperature in your
recipe, then bake. The results of
thistest should give you an idea of
how much the temperature should
be changed.
Toadjust temperature:
L
PushtheBAKE button.
2. Selecta temperaturebetween
500”F.and550°F.withtheSET
knob.
3.@ickiy (withintwoseconds,
beforeth; BAKEfunctionenergizes) –
push and hold the BAKE button
for about 5 seconds. The display
will show a plus number, a minus
number, or 00.
4. Turn the SET knob to adjust the
temperature in 5°E steps. YoLlcan
raise it until +35”F. shows on
display or lower it until -35”I?.
shows on display. If the control
beeps and flashes, push the
CANCEL button and start over.
5. When you have made the
desired adjustment, pLxsJ~the
CLOCK button to go back to the
time of day display or to use your
ovenasyouwouldnormally.
NOTE: Theadjustmentdescribed
above wiHnotchangethe self-clean
temperature.
Page 25

..
CleallingGtide
NO’FE:Let irmgdoven parts cod before touching or handling.
PART
MA~lIXIA.LFJT(3 USE
GENERAL IMRE(HWIJ’4S
BakeUnitand
Do
notcleanthebakeunitorbroilunit,Anysoilwillburnoffwhentheunitis heated.
BroilUnit
NOTE:
Thebakeunitcanbeliftedgentlytocleantheovenfloor,Ifspillover,residue,
orashaccumulatesaroundthebakeunit,gentlywipearoundtheunitwithwarmwater.
Broiler Panand Rack
*
SoapandWater
Drainfat,coolpanandrackslightly.(Donotletsoiledpanandrackstandinovento
“Soap-FilledScouringPad cool.)Sprinkleondetergent.Fillthepanwithwarmwaterandspreaddampclothorpaper
0CommercialOvenCleaner towelovertherack.Letpan andrackstandforafewminutes.Wash;scourifnecessary.
(useonpanonly,notrack) Rinseand dry.OPTION:Thebroilerpanandrackmayalsobecleanedin adishwasher.
● Dishwasher-Safe
Chrome-PIated
*
SoapandWater
Cleanindishwasher.IXlNOT CLEANINSELF-CLEANINGOVEN;theywill —
DripPansunder
*
Stiff-BristledBrush discolor.Wipeaftereachcooking,sounnoticedspatterwillnot“burnon”thenexttime
Hug-h Units
*
Soap-FilledScouringPad youcook.Toremove“burned-on”spatters,useanyorall cleaningmaterialsmentioned.
● Dishwasher-Safe Rublightlywithscouringpadtopreventscratchingofsurface.
ControlKnobs
e
MildSoapandWater
Pulloff knobs.Washgentlybutdonotsoak.Dryandreturncontrolstorange.
k!etal, including
● SoapandWater
DOlWYI’
USEsteel wool,
Wash,rinse,andthenpolishwitha drycloth.
SideTrims abrasives, ammonia, acids
orcommercialoven cleaners.
OutsideGlassFinish *
SoapandWater Cleanoutsideof cooledblackglassdoorwitha glasscleanerthatdoesnotcontain
ammonia.Washotherglasswithclothdampenedinsoapywater,Rinseandpolishwith
adry cloth.If knobsareremoved,donotallowwatertorundowninsidesurfaceof
glasswhilecleaning.
(MenDoorX’
I
~Soapand Water
oven Gasket’{
PorcelainEnamel ant
Painted Surfaces*
Shelves
~SeeSelf-Cleaning
O\’enDirections)
Storage Drawer
SurfaceUnit Coils
~SoapandWater
0PaperTowel
“DryCloth
eSoapandWater
~SoapandWater
eDishwasher-Safe
@SoapandWater
DONOT
USE oven
cleaners, cleansing
powders or harsh
abrasives.
INSIDEOFDOOR:CleanONLYthedoorlineroutsidethe
gasket.Thedooris automaticallycleanedif theovenisin
theSelf-Cleaningcycle.DONOTrub or damagegasket.
Avoidgettingsoapandwateronthegasket.
OUTSIDEOFDOOR:Usesoapandwatertothoroughly
cleanthetop,sidesandfrontoftheovendoor.
Seeinstructionsin theSelf-Cleansectionofthisbook.
Coolbeforecleaning.Frequentwipingwithmildsoapand waterwillprolongthetime
betweenmajorcleanings,Besure to
rinse thoroughly to avoid additional staining.
Forheavysoiling, useyourself-cleaningcycle often.
DO NOT USE oven
cleaners, cleansing
powders or harsh
abrasives. These might
scratch the surface.
If acidsshouldspillontherangewhileit ishot,usea dry
papertowelorclothto wipeuprightaway.Whenthe
surfacehascooled,washandrinse.Forother spills,
suchasfatsmatterings,etc.,washwithsoapandwater
whencooledandthenrinse.Polishwitha drycloth.
Shelvescanbecleanedinself-cleaningovenordishwasher.Forheavysoil,cleanby
handandrinsethoroughly.
Forcleaning,removedrawerbypullingit all thewayopen,tilt upthefrontandlift out.
Wipewithdampclothorspongeandreplace.Neveruseharshabrasivesorscouringpads.
DO NOT attempt to clean
the plug-in units in the
self-cleaning oven.
D(I N(3T immerse plug-in
units in any kind of liquid.
Ml N(YI’USEdishwasher.
Spattersandspillsburnaway whenthecoilsare
heated.Attheendof a meal,heatsoiledunitsatHI.
Letthesoilburnoff“aboutoneminute”andswitch
unitstoOFF.Avoidgettingcleaningmaterialsonthe
coils.Wipeoffanycleaningmaterialswitha damp
papertowelbeforeheatingthesurfaceunit,
Letsurfaceunitcoolcompletelybeforehandling.
‘::Si>illageofmarinades,fruitjuices,tomatosaucesandbastingmateriakcontainingacidsmaycausediscoloration.Spilloversshouldbewipedup
immeciia[eiy,withcarebeingtakennotto touchanyhotportionoftheoven.Whenthesulfate iscool,cleanandrinse,
Page 26

.
.
.. .
.
—
Anti-TipDeticehstillationInstmctions
forDetieeRt Nob34M73
eALL RANGESCANTIP
oH$LJulwCOULDRESULT
eUwmUJL
AJvn”%’m
DEVICEIPACKEDVWI’H
RAJVGE
*
SEE INSTRUCTIONS
1
TookNeeded
~Phillips head screwdriver
~1%” or adjustable wrench
Thedeviceattachestofloor or wall
toholdeitherrightor leftrear leg
Ieveler.If fasteningtofloor,be
surethatscrewsdonotpenetrate
electricalwiringor plumbing.If
thiscannotbedetermined,use
shorterscrewsthatwillnot
penetratethroughflooring.
If thedevicecamewithyour
range,it is shippedattachedto the
lowerrangeback.Removeand
discardtheshippingscrewthat
holds the deviceand thenfoHow
theinstructionsbelow.
1.Decidewhetherthedevicewill
beinstaHedon the rightor left side
ofrangelocation.
26
Adjacent cabinet or fin~ Outside edge of bracketto be flush
location of range side panel
with left or right side of range
Attachment to wall
II
./.
;.
I
‘igure2
1’1
.,,
Bracket \
Screw must enter wood or metal
n\
o
m
2. If the device side of the range is
masonry, you can buy suitable
adjacent to a cabinet, place the
screws and anchors at a hardware
device against the back wall and
store. Use a rnasomy drill to drill
cabinet as shown in Figure 1.
the required holes.
If there is no adjacent cabinet,
4. Using the wrench, back out the
determine wher~ the location of
the range side (painted outside
panel) will be. Place the device
with its outside edge at this
location and against the back wall.
See Figure 1.
3. Determine whether you will
anchor the device to the floor or
to the wall as shown in Figure 2.
Fasten the device securely with
the screws provided. Screws are
self-drilling in wood, plywood,
particle and chip board, and most
metal framing. If attaching to
four leg levelers at least two turns.
See your installationguidefor more
leveling information before
positioning the range.
5. Slide the range into p~ace.Be
sure rear leg leveler fully engages
slot in device. If range cannot be
moved back far enough for rear leg
leveler to enter the device, move
device forward as required and
Page 27

RangeInstillationIns
tmctiom
moRTmR saw! these titmctions far’the kd electfid hpwtor’s use.
a
Figure1
I
II
1!1
II
f
b-
30”
4
Min.
--j :‘
6“
Min.
1t?”
‘1
Min.
*
1
v
i :
3
i ,/
!/
o“
/&
A ~ “ <
//
/;,
/
““o“
-~
Minimum dimensions between cooktop and wails above cooktop
oSee Figures 1 and 2 for allrough-in and spacing
dimensions.These dimensionsmust be met for safe use
ofyourrange.Electricityto therangecan be disconnected
at the outlet without moving the range if the outlet is in
thepreferred location (remove lower drawer).
~To eliminate Therisk of burnsor fue when reaching
over hot surface elements, cabinet storage space above
the cooktop should be avoided. If cabinet storage space
Figure2
4?/
--I!
\$\\
Preferredelectricaloutlet area “\ S’;
/
Preferred’electrical outlet area
Roughed-in dimensions
reduced by installing a range hood that sticks out at
least 5“ beyond the front of the cabinets. Cabinets
installedabove a cooktop may be no deeper than 13“.
@The range may be placed with O“clearance (flush) at
the back wall and side walls of the range if the front
edges of the range side panels stick out beyond the
cabinetfronts at least 1/4”.See Figure 2.
is to be provided above the cooktop, the risk can be
Preparation
1.Remove all tape and packaging. Be sure to remove
clear plastic film that covers some chrome parts
(around glass oven doors, side trim) and any tape or
packaging from inside the oven.
2. Take the accessory pack out of the oven.
3. Check to be sure that no range parts have come loose
during shipping.
Shipping wire or tape
=?
~.Relllovetiles]lippingwireOr tape from each of the
~
$$~~ [our cooktop e~elllellts(coil cook~opelenlent models
*’=:*(rely).
5.Lewdthe range. For propercookingandbakingthe
rangemustbelevekd:
a.Installtheovenracks(seetheUsingYourOven
sectionofthisbookforinstructions).
b.Usea 1%”openend
wrenchor an adjustable
wrenchtoequallybackoutthefourleglevelerstwo
or threeturnseach.
E&!
e.Puta spiritlevelorglassmeasuringcuppartiaHy
filledwithwaterononeoftheovenracks.
1
d.Usethewrenchtoadjusttheleglevelers.
27d
I_-.,.
Page 28

Electricalconnection
Werecommend that you have theelectricalhookupof
yourmnge done by a qualifiedelectrician.Have the
electricianshow you where your range disconnectis
located.
Call your Electric Company and ask which codes apply
in your area. If there are no codes, you must fol]owthe
NATIONALELECTRICAL CODE, AI’WWNFPANO.
70-LatestEdition.Youcan get a copy by writing:
NationalFire Protection
Association
Batterymarch Park
Quincy,MA 02269
If you fail to wire your range in accordancewith
governingcodes, you may create a hazardous condition.
Youmustusea three wire,single-phaseAC 120/240
Volt or 208Y/120 Volt,60 Hertz electrical systemto
operate your range.
Use
#8 wireand40 Ampfuseor circuitbreakerfor
120/240Voltand208Y/120Voltsystems.
The range connector block is approved for copper wire
connectiononly.If youareconnectingtoaluminum
housewiring,youmustusea specialU.L.approved
connectorforjoiningcopperto aluminum.
‘rhret?”wirecord comectio13
v
Ground Strap
‘>~
Ground Screw
,F=ak
z - Strain Relief Clamp
1.Removethe screwsonthe terminalblock.
2.Installthethree-wirecordandthestrainreliefinthe
holeinthestrainreliefbracket.
Ifhmdicodesrequire an ungroundedneutral:
a. Removegroundstrap.
o
b. Fastenthewhitewiretothecenterterminal.
c.Useagroundingterminalor leadto groundunitin
accordancewith local codes.
TOMake Ek!ctrical connection:
1. Remove thejunction block accesscover (on range
back). See Fig. A or Fig. B. Some models will have
a one-piecewire cover shown in FigeB. When
reinstallingtheone-piececover,makesurethat
wiredoes notbecomepinchedbetweenwirecover
andmainback.
FigureA
--T
FigureB
2. Use a 3-wire flexible cord kit marked for ranges. If
rangeis ratedbetween8,750-16,500watts,cordmust
beratedfor40Amps-125/250Volts.Ifrangeisrated
between16,501-22,500watts,thenthecordmustbe
ratedfor50Amps-125/250Volts.Mobilehomesor
installationswherelocalcodesdonotallowgroundhg
throughtheneutralrequirea4-wireflexible cord.The
samecordsizingconditionsdescribedaboveapply.
3. When using a cord rated 40 Amps, remove the next
to outermost knockout (~~s”diameter) in the connection
plate. Likewise, when using a cord rated 50 Amps,
remove the outermost knockout (17(’ diameter) in the
plate.
4.Terminationsshallbe eitherclosedloopterminalsor
open-endspadelugswithupturnedends.
Mmmustusea damp or strain reliefto hold the 4xBrd.
3. Connect theouterleadstotheouterterminalsandthe
centerleadtothecenterterminal.
4. Pushthecordupward(torelievestrain)while
tighteningthestrainreliefclamp.
Page 29

Fotnsvvire‘cm-dC!Onm?dion
und Screw
ain ReliefClamp
L Remove the screws on the terminal block.
2. Remove the ground screw, then remove the ground
strap.
3. Install the four-wire cord and strain relief in the hole
in the strain relief bracket.
4. Connect the red and black lead to the outside
terminalsand the white lead to the center terminal.
5. Attach the green lead below thejunction block with
the ground screw that was removed earlier (step 2).
6. Push the strain relief upward (to relieve strain), while
tighkmin~ the strain relief clamp’.
“m
N
b.a
Page 30

..
m
PROBLEM
OVENWILL
NOT WORK
OVENLX&IT ~
DOESNOI’WORK
FOODIX&3 NOT
BROILPROPERLY
!.1
FOOD DOES NOT
ROAST OR BAKE
PROPERLY
SURFACEUNITS
NOTFUNCTIONING
PROPERLY
OVEN WILLNOT
SELF-CLEAN
“F-” ANDA NUR413ER
FLASHONDISPLAY
PCMMMBLECAUSE
~
~]ug~xl~mgeisnotco~p[etelyinsertedintheelectricaloutlet.
*
ThecircuitbreakerinyourQousehasbeentripped,or afusehasbeenblown.
@Ovencontrolsnotproperlyset. i
@Doorleftinlockedpositionaftercleaning.
*Light bulbjs 10CX%
e.Bulbis defective.Replace.
*Switchoperatingovenlightisbroken.Call for service.
~
Ovencontrolnotsetat 13R01L.
eDoornotleftajar& recommended.
*
Irnpro-pers~elfposi~on being used. Check Broiling Guide.
~Food is being cooked on hot pan.
~Cookw&e is not suitable for broiling.
@Aluminumfoilusedon broilpanrackhasnotbeenfittedproperlyandslit
asrecommended.
s(Mm controlnotsetqorrectly.
~Shelfpositionisincorrect.CheckRoastingorBakingGuide.
~oven shelfis notlevel.
*Incorrect~ookwareorcookwareof impropersizeisbeingused.
eA
foil tent was not usedwhenneededto slowdownbrowningduringroasting.
~Surface.unitsare notpluggedin solidly.
*Drippansare not setsecurelyintherangetop.
~Surfaceunitcontrolsarenotproperlyset.
~STOPTIMEmustbemorethan3!4hourslaterthanSTARTTIME.
~Latchhandlenotmovedto theright.
JIf thetimedisplayflashes“F-”
andanumber,youhavea functionerrorcode.Press
he CANCELbutton.Allowthe ovento coolfor onehour.Restart ovenoperation.
‘fthefailure coderepeats,disconnectallpower
totherange.Callforservice.
30
Page 31

‘ Yve’11BeThere
With tk ~urc~ase of pm new R(L%appliance, receivethe
awurance that
ifycm ever need kfcmnatim w assktmce,
we’llbe there. All you have to do is cdl-td-fkee!
lPHomeRepair
service
8004E4ARES
(8flM32-z73q
Our consumer service professionals
willprovicle expert repair service on
your RCA appliance, scheduled at a
time that’s convenient for you. Many
EConsumer Service company-
peratecl locations offer you service
today or tomorrow, or at your con-
\Tefience (’7:00a.m. to 7’:00
p.m.week-
days,9:00a.m.to2:00p.m.Sahwdays).
Ourfactory-trainedtechnicians know
your appliance insideand out—so
most repairs can be handled injust
one
visit.
Rf cust@m@rs
with
lmpairedH@arkgm..
800”8334322
~~c>rlsurnerswith impaired l~earing or
slleech
WhO have access to a Tll13 or a
conventional teletypewriter may call
~~)~h~~~-(lmc
(800-8334322)to
1
rt~~~~estservice.
You can have the secure feeling that
GE Consumer Servicewillstill be
there after your RCA product war-
ranty expires. Purchase a GE contract
whileyo~rwarran~ isstillin effect
and you’llreceivea substantialdiscount,.Withamultiple-yearcontract,
you’reassuredoffuture serviceat
today’sprices.
TelecommunicationDevicefortheDeaf
Idivichdscpl.ifiedtoservicetheir
own
appliances can have needed
parts or accessories sent directly to
their home. Our parts system pro-
vides access to over 4’7,000Genuine
Renewal Parts.. and all are fully warranted.
VISA,MasterCardand
Discovercardsareaccepted.
User maintenanceinstructions
containedin thisbookletcoverprocedures intended tobeperformed by
anyuser. Other servicinggenerally
shouldbe
referredtoqualifiedser-
vicepersonnel.Gmtionmustbe
exercisedsinceimproperservicing
may cause unsafe operaticme
Page 32

I
WHAT Is (XYVERED
mL ol?dE-YEARW-NH
Foroneyear fromdate of originalpurchase,we
willprovide,freeofcharge,parts andrservicelabor
in
your home to repairor replace any pafi of the ~
Range
thatfailsbecauseofamanufacturingdefect.
Thiswarrantyisextendedtotheoriginalpumhaser
andanysucceedingownerforproductspurchased
forordinaryhome
use in the 48 mainland states,
Hawaii and Washington, D.C. In Alaska the
warranty is the same except that it is LIMITED
because you must pay to ship the product to the
service shop or for the service technician’s travel
costs to your home.
i
(
J
(
s
C(
a
Is’
n
:(
mm. RCA IRANGEw~mm
Save proof of original purchasedatesuchas your salesslipor cancelledcheckto establishwarranty period.
FORSm.wm
WeatRCAstrivetoprovidethe
highestquality
productsandservice.Thereforewehavedesignated
GECONSUMERSERVICE,aleaderintheservice
industry,tofulfillyourserviceneeds.Shouldyour
applianceneedservice,duringwarrantyperiodor
beyond,call
I-800=GE-CARES(1-800-432-2737).
T“wwKrE NOT COWRED
~Servicetrips toyour home to teachyouhowto
use the product.
Read your Use and Care
material. If you then have
any questions about operating the product, please
contactyour dealer or
Manager-Consumer Affairs
RCAAppliances
AppliancePark
Louisville,KY40225
~Improper installation.
f you have an installationproblem,contactyour
iealer or installer. Youare responsiblefor providing
adequateelectrical,gas,exhaustingandother
connectingfacilitiesasdescribedintheInstallation
Instructionsprovidedwiththeproduct.
*I/e Iacementofhousefusesorresettingofcircuit
[brea ers.
~l%iiureoftheproductifitisusedforotherthanits
intendedpurposeorusedcommercially
oDamagetoproductcausedbyaccident,fire,
floodsoractsofGod.
w~oll IsNOTRESPONSIBLEFOR
COBJSEQUENHALDAJ!+4AGES.
ome statesdonotallowtheexclusionorlimitationofincidentalor
%%mantol% RCA AppIimces
onsequentiaIdamages,sotheabovelimitationorexch.wionmaynot
pplytoyou.Thiswarrantygivesyouspecificlegalrights,andyou
If fitiher help is needed C%3nceming this
layalsohaveotherrightswhichvaryfromstatetostate.Toknow
Thatyourlegal
rightsareinyourstate,consultyourlocalorstate
warranty,write:
msumeraffairsofficeorvourstate’sAttorneyGeneraI.
Manager--consumer Atiahs
. .
Rcf! Apphmces
Appkmce Rwk
Lumisviwr KY 40225
1 1
I
--
I
I
>,
I
f
Part No. 164DI 913P067
Pub
$dO. 79-4070
L3B325GL
L3B345GL
 Loading...