

Page 1
Page 2
Readthis book carefully.
His intendedto help you operate and
maintain your new oven properly
Keep it handy for arxwmr$ to your
questions.
If you don’t understand something or
need more help, write (include your
phonenumber):
ConsumerAffairs
RCA
Appliance pa~
Louisville,KY 40225
Write down the model and
serial numbers.
You’llfind them on a label on the front
of the oven behind the oven or broiler
door.
Write these numbers into the space
below. Alsowrite the numbersintothe
spaceon thewarranty cardthat came
with your oven before you send the
card in.
ModelNumber
serial Number
Usethese numbers in any correspon-
denceor service calls concerning your
oven.
Hyou received
a damagedoven...
Immediately contact the dealer (or
builder)that sold youthe oven.
Savetime and money.
Beforeyou request
service...
Check the Problem Solver. It lists
causes of minor operating problems
that you can correct yourself.
2
,.
-.
Page 3
I
#- =%
Hyx! W“mMgas:
1.
OperIwindows
2 Don’ttouch electrical switches.
3. Extinguish any open fkme.
4. Immediatelycallyour gassupplier
A
~~
Donotstoreor usegasolineor other
flammable vapors and liquids in the
vicinitycdthisor any otherappliance.
b
/
#sm.
—.
-USE=
IJ?
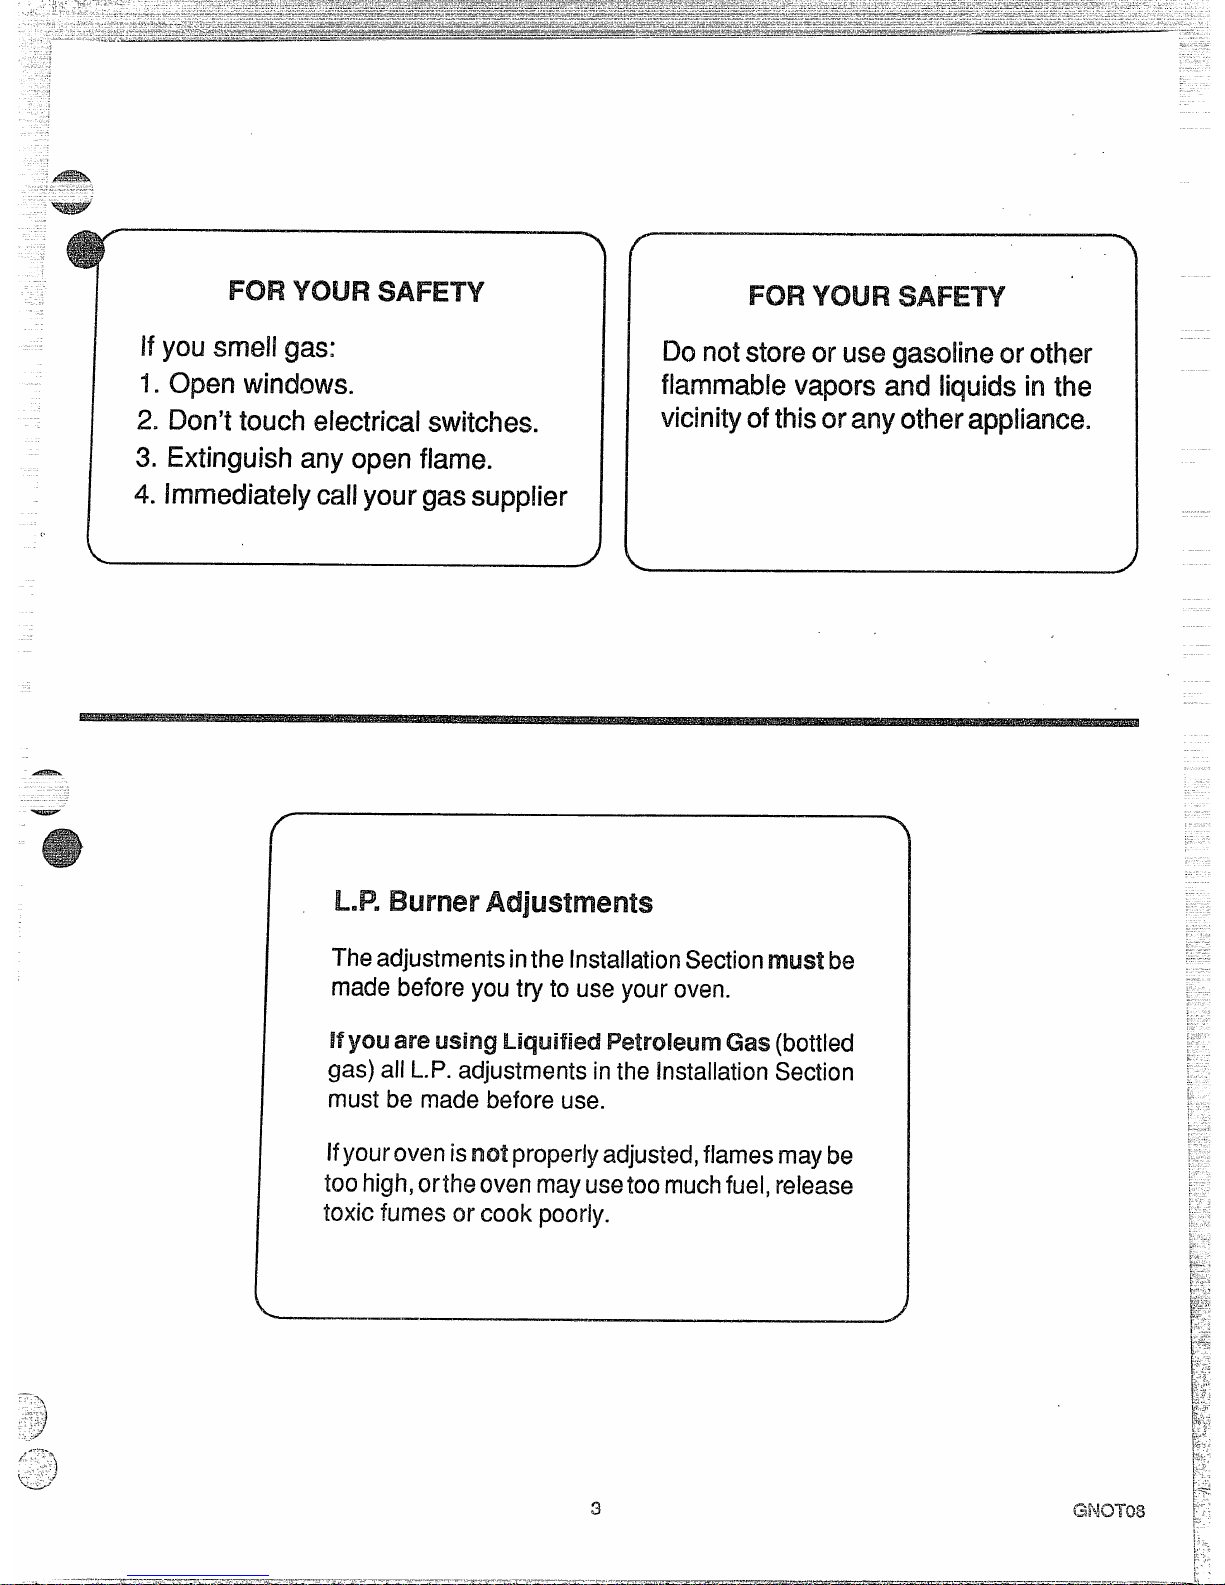
TheadjustmentsintheInstallationSectionmust be
madebeforeyoutry to useyourown.
lfyou are using Gas(bottled
gas)allM? adjustmentsintheinstallationSection
mustbe madebeforeuse.
Hyowovenisnotproperlyadjusted,flamesmaybe
toohigh,ortheown mayusetoomuchfuel,release
toxicfumesor cookpoorly.
3
GNcmN3
Page 4
LK3T’
1.
2.
3*
4.
5.
6.
7.
8.
9.
10.
~/8°drill bit
Electricor hand drill
Flat bladed screwdriver
No. ~or No. 2 Phillips screwdriver
Pencil
Rulerand straight edge
Hand saw or saber saw
pipe wrench
5/8” wrench and 1/2” wrench or adjustable wrench
3/16“ hexsocket driver
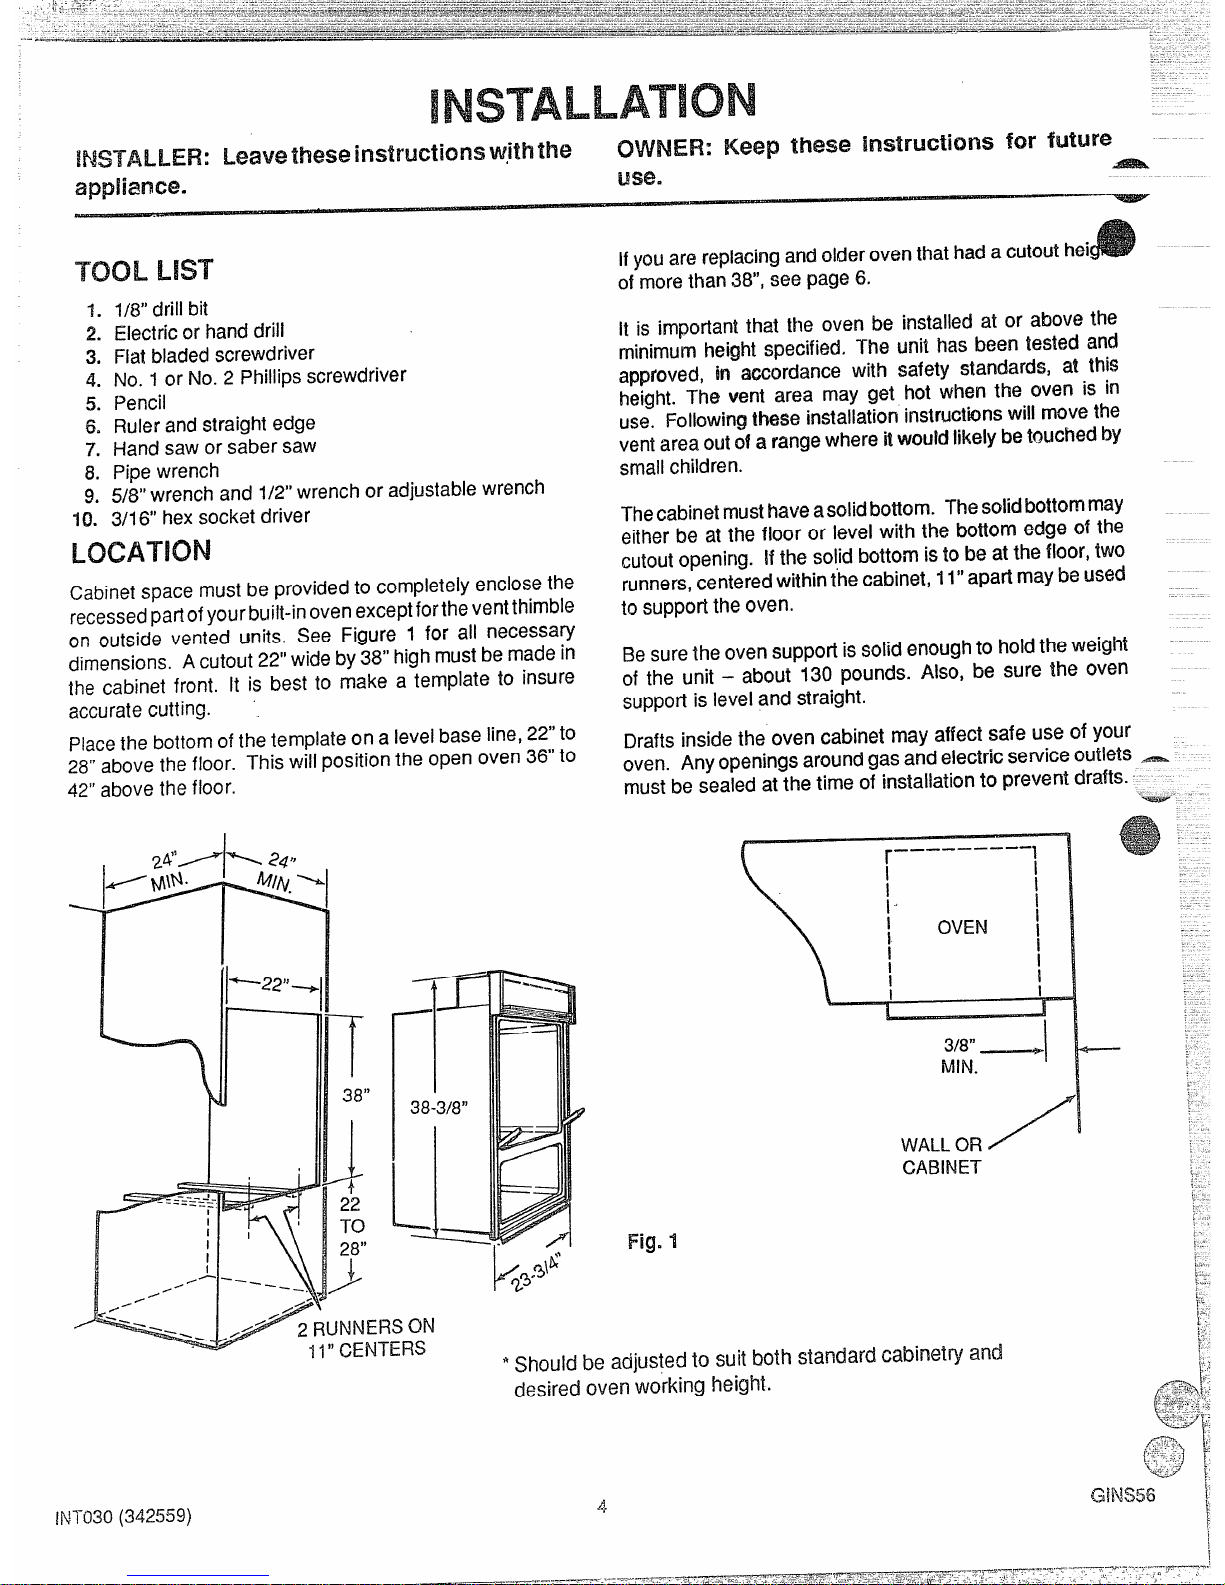
Cabinetspace must be providedto completely enclosethe
recessedpartofyourbuilt-inovenexceptfortheventthimble
on outside vented units. See Figure 1 for all necessary
dimensions. A cutout 22’’wide by 38” highmustbe madein
the cabinet front. It is best to make a template to insure
accuratecutting.
Placethe bottom of the template on a level base line,22”to
28” above the floor. This will position the open oven 36” to
42” abovethe floor.
i
I
I
I
,/--
‘ -----
/“
-.
INT030(342559)
l=’
~\ti’
@“
Ifyou are replacingand older oventhat hada cutout hei
of morethan 38”, see page 6.
II is important that the oven be installed at or above the
minimum height specified. The unii has been tested and
approved, in accordance with safety standard% at this
height. The vent area may get hot when the oven is in
use. Followingthese installation instruc~bnswill movethe
ventarea out of a rangewhere itwould likely betouched by
smallchildren.
Thecabinet mustha~ea~~~idbo~om. ThesoiidbottQm~maY
either be at the floor or level with the bottom edge of Ihe
cutoutopenir~g.Hthe solid bottom is to be at the floor, two
runners,centeredwithin the cabinet, 11”apart maybe used
to support the oven.
Besurethe oven supportis solid enoughto holdthe weight
of the unit –
about 130 pounds. Also, be sure the oven
support is ieveland straight.
Drafts inside the oven cabinet may affect safe use of your
oven. Any openings aroundgas and electricsewice outlets —
must be sealed at the time of installation to prevent drafts.
-ww–
WALLOR
/“”
CABINET
3/8” —*
MiN.
I
2 FHJNNERSON
I -f“ CENTERS
* Should be adjusted to suit both standard cabinet~ and
desired oven working height.
I
Page 5
Checkwithyourlocal utilitiesforelectricai codeswhichapplyinyour
area. if there are no kxal codes,the Nafional Electrical Code,
~a- ANS1/NFPANo.70-1987must befollowecf.Youcanget acopyby
—.— .,.——
.-...s-
““-“
National Fire ProtectionAssociation
5attetymarch Park
C?uincy,IvIA
02269
An adequateelectrical supply and outlet mustbe usedto operate
the electrical parts of your oven, The oven cord hasthree prong
plugand mustbe used with a properly groundedthree holeoutlet
with a standard 120volt, 60 cycleAC householdcurrent.
Instalitheelec!ricaloutlet belowtheovenon the rightside. Itshould
be easily reached through cabinet doors below the oven, See
Figure5.
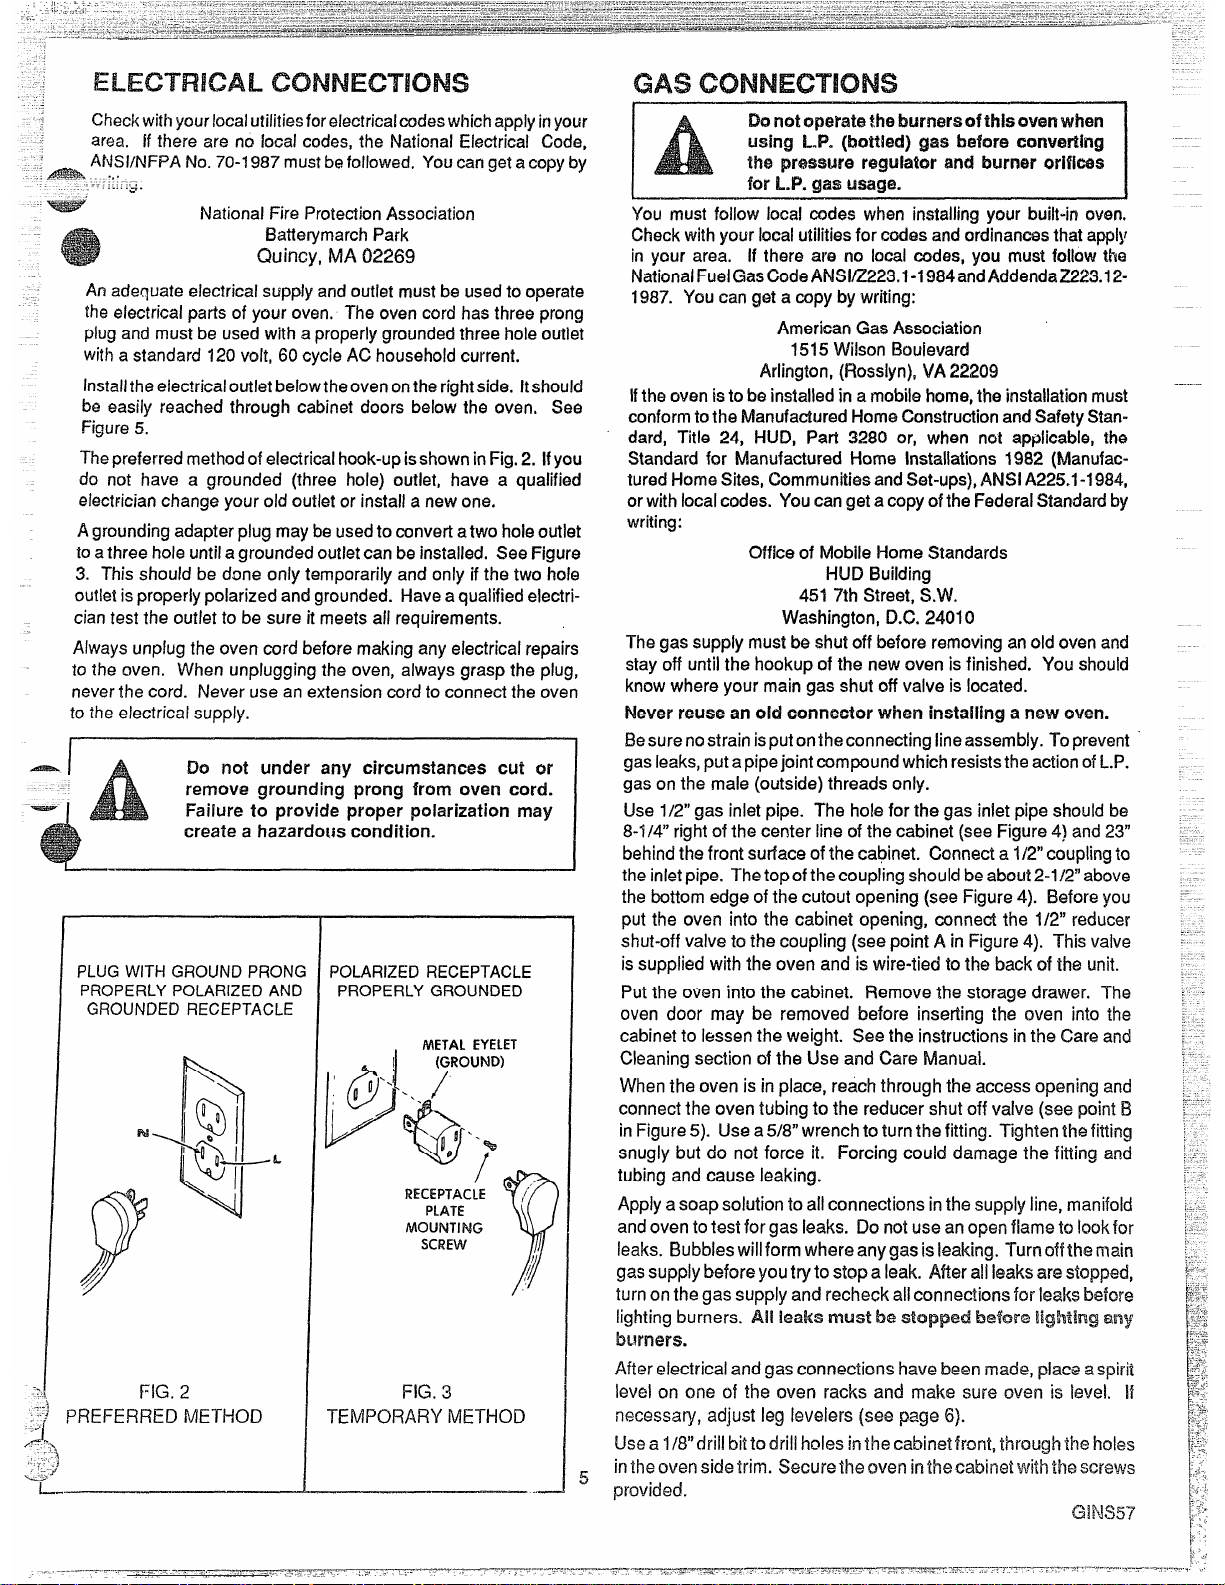
Thepreferredmethodofelectricalhook-upisshowninFig.2. Ifyou
do not have a grounded (three hole) outlet, have a qualifi~d
eiect~icianchange your old outlet or install a newone,
Agroundingadapter plug maybe usedto convert atwo holeoutlet
to athree hole untilagrounded outletcan beinstalled. SeeFigure
3. This should be done only temporarily and only if the two hole
outletis properly polarized andgrounded. Havea qualified electrician test the outlet to be sure it meets all requirements.
Always unplug the oven cord before making anyelectrical repairs
to the oven. When unplugging the oven, always grasp the plug,
neverthe cord. Never use an extensioncord to connectthe oven
to the electrical supply.
L
\
PLUGWITHGROUNDPRONG
PROPERLYPOLARIZEDAND
GROUNDEDRECEPTACLE
FIG. 2
PREFERREDMETHOD
POLARIZEDRECEPTACLE
PROPERLYGROUNDED
METALEYELET
(GROUND)
@ ,
P@
0 0“ ‘..
a
11,~“%7
/
v
RECEPTACLE‘ /
PLATE
MOUNTING
SCREW
FIG. 3
TEMPORARYMETHOD
5
!.%3
notoperatethe bwmwsofthlscwm when
wing fW. @ottkdJ gas imfom mnvmting
the prwmm rfaguiakw and burner orifices
for L.P. gas usage.
You must foilow kmai codes when installing your built-in oven.
Checkwith your local utilitiesfor codes andordinancesthat appiy
in your area.
If there are no local codes, you must foilow the
NationalFuelGas CodeANSi/Z225.l -1W?4andAddendaZ223.12-
1987. YOUcan get a capy bywriting:
American Gas Association
1515Wilson Boulevard
Arlington, (Flossiyn),VA22209
Ifthe oven isto ba installedin a mobilehome,the installationmust
conformtothe l’vianufactur~dHomeConstructionandSafetyStandard, Title 24, HUD, Part 3280 or, when not applicable, the
Standard for Manufactured Home installations 19$2 (Manufactured HomeSites, CommunitiesandSet-ups),ANSi A225.I -1984,
orwith localcodes. Youcangetacopyof the FederalStandardby
writing:
Office of Mobile HomeStandards
HUD Building
451 7th Street, S.W.
Washington, D.C.24010
Thegas supply mustbe shutoff before removing anold ovenand
stay off until the hookup of the new oven is finished. You should
knowwhere your main gas shut off valve is located.
iVeverreuse an oid connector when installing a new oven.
Besure nostrain isputonthe connectingiineassembly. Toprevent
gasleaks,put apipejoint compoundwhichresiststhe actionofLP.
gas on the male (outside) threads only.
Use 1/2”gas inlet pipe. The hole for the gas inlet pipe should be
8-1/4” right of the center iine ofthe cabinet (see Figure 4) and.23”
behindthe front surfac.eof the cabinet. Connecta l/2’’ couplingto
the inletpipe. Thetopof the coupling shouldbeabout2-1/2’’above
the bottom edgeof the cutout opening (see Figure 4). Beforeyou
put the oven into the cabinet opening, connect the
1/2”reducer
shut-offvalvetothecoupling(seepointA inFigure4).
This valve
is supplied with the oven and is wire-tied to the backof the unit.
Put the oven into the cabinet. Remove the storage drawer. The
oven door may be removed before inserting the oven into the
cabinetto lessen the weight. Seethe instructions inthe Care and
Cleaning section of the Use and Care Manual.
Whenthe oven is in place, reachthrough the accessopwiing and
connect the oven tubing to the reducer shut off valve (see point B
inFigure5). Usea5/8”wrench to turnthe fitting. Tightenthe fitting
snugly but do not force it. Forcing could damage the fitting and
tubing and cause leaking.
Applyasoap solution to all connections in the supplyline, manifold
andoven to test for gas leaks. Do not use anopen flame to !ookfcx
leaks. Bubbleswill form where anygasisleaking. Turn offthemain
gassupplybefore youtryto stopa leak. Mterali Ieaksare stopped,
turn on the gas supply and recheck all connections for leaksbefore
lighting burners.
Ni leaks must be before any
!oWmm3.
After electrical and gas connections havebeen made,p!acwaspirit
level cm one of the oven racks and make sure oven is level. If
necessary, adjust leg levelers (see page 6).
Usea 1/8”drill bitto drill hcdesinthe cabinet frcmt,through the holes
intheoven sidetrim. %curethe oven inthe cabirwt with the screvvs
provided.
GNX?7
Page 6

F!(3.4
h-
2-1/,
22
-1-o
2?”
L
.
SHUTOFFVALVEHEREIF
RECWIREDBY LOCALREGULAT~Q~~
B
FIG. 5
Hyou are repiacing an older unit that had a cutout height
of more than WY’ (39” to 39-3/8” are normal, aHernat@
standaf’d~) Wow steps below:
1,
Measure by how much your cutout height exceeds 38”.
2. Relocateand raiseyourgas inlet pipe if necessary. See
figure 4. The 2-1/2” dimension (shown in figure 4) need
only change ifyourcutout height is morethan 38-1/2”. If
your cutout height is morethan 38-1/2”, increase the 2-
1/2” dimension shown in figure 4 by amount measured
instep 1,above.
3. Removethe storagedrawer (see Care and Cleaning
sectionof UseandCareManual).
4. Extend the leg levelers (using a 3/16” hex socketdriver
or a fIat bladed screw
driver)bytheamountmeasuredin
step1, above.
3/16””
h
&
SLOTTED
HEX HEAD ; ,
/
I
/
/
II
I
LEG
LEVELER
s, Insert the oven in the cutoutand adjustleglevelersso
thatovenracksareIevei(checkwithspiritlevelonoven
rack)andthetopofthecontrolpaneloverlapsthetopof
Ihe cutout.
6. Makeelectricaland gas connectionsanddrivescrevvs
throughsidetrim as explainedon previOUSpage.
7. Twolowertrimpieces arePr@Jided”lfyouhave@~tended
the leg levelers 3/4” or more,usethetal!ertrim. Attach
to the unitwith the 3 screwssuppliedandto thecabinet
belowwith the 2 wood screws supplied.
It leg levelers are extended less Iban 3/4”, use tkc-
Shorter trim.
Attach to the unit With the ~ SGJEW~- .
supplied.
IL.!%
To adjust your oven for use with L.P. gas, follow the steps
below.
Step ~: Adjust Pressure F?egulaUJr
NOTEI:The pressure regulator issetfornat~ra~ gas. To
use L.P.
gas, the regulator must be adjustedm
Locatethe pressureregulator(~ee Fig.5). UnscreWthecaP
and
rernovethe springretainer, Fig.6. T+urntheretainer@Jer
andput it backinto the cap soL.P. is showingonthe bottom
end of the retainer. Replacethe cap.
Step 2:
MjuSt Burner OrificeS
CXWW3N:
The fdowing adjustment must be made
before t~rnhlg on lhe burners. Failure tO dQSOc~u~~
result in serious injury due to high fkimes and toxic
fumes.
AFzm.
Usea
~/2JJOpenendoradjustabie vurenc!l totumbothc~fil:=:-. ‘-- .-
hoods in the L.P. direction, about 1-1/2turns or until snug.-”—
See next page. Do not overtighten or you may distofl t
orifice hoods and needles.
~- ------
*Gregu’a
n I l-m II
~—+ I-IL–-I
&qualto or less tban 1/2 psig.
Page 7
:
Ail?
SHUTT
used
in mostareas. But, sincethe gas in some areas may
SCREW
va~~,y~u ShOUIdcheck alladjustmentsdescribed below. if
youare using t_.P.gas, allthe adjustments must bemade.
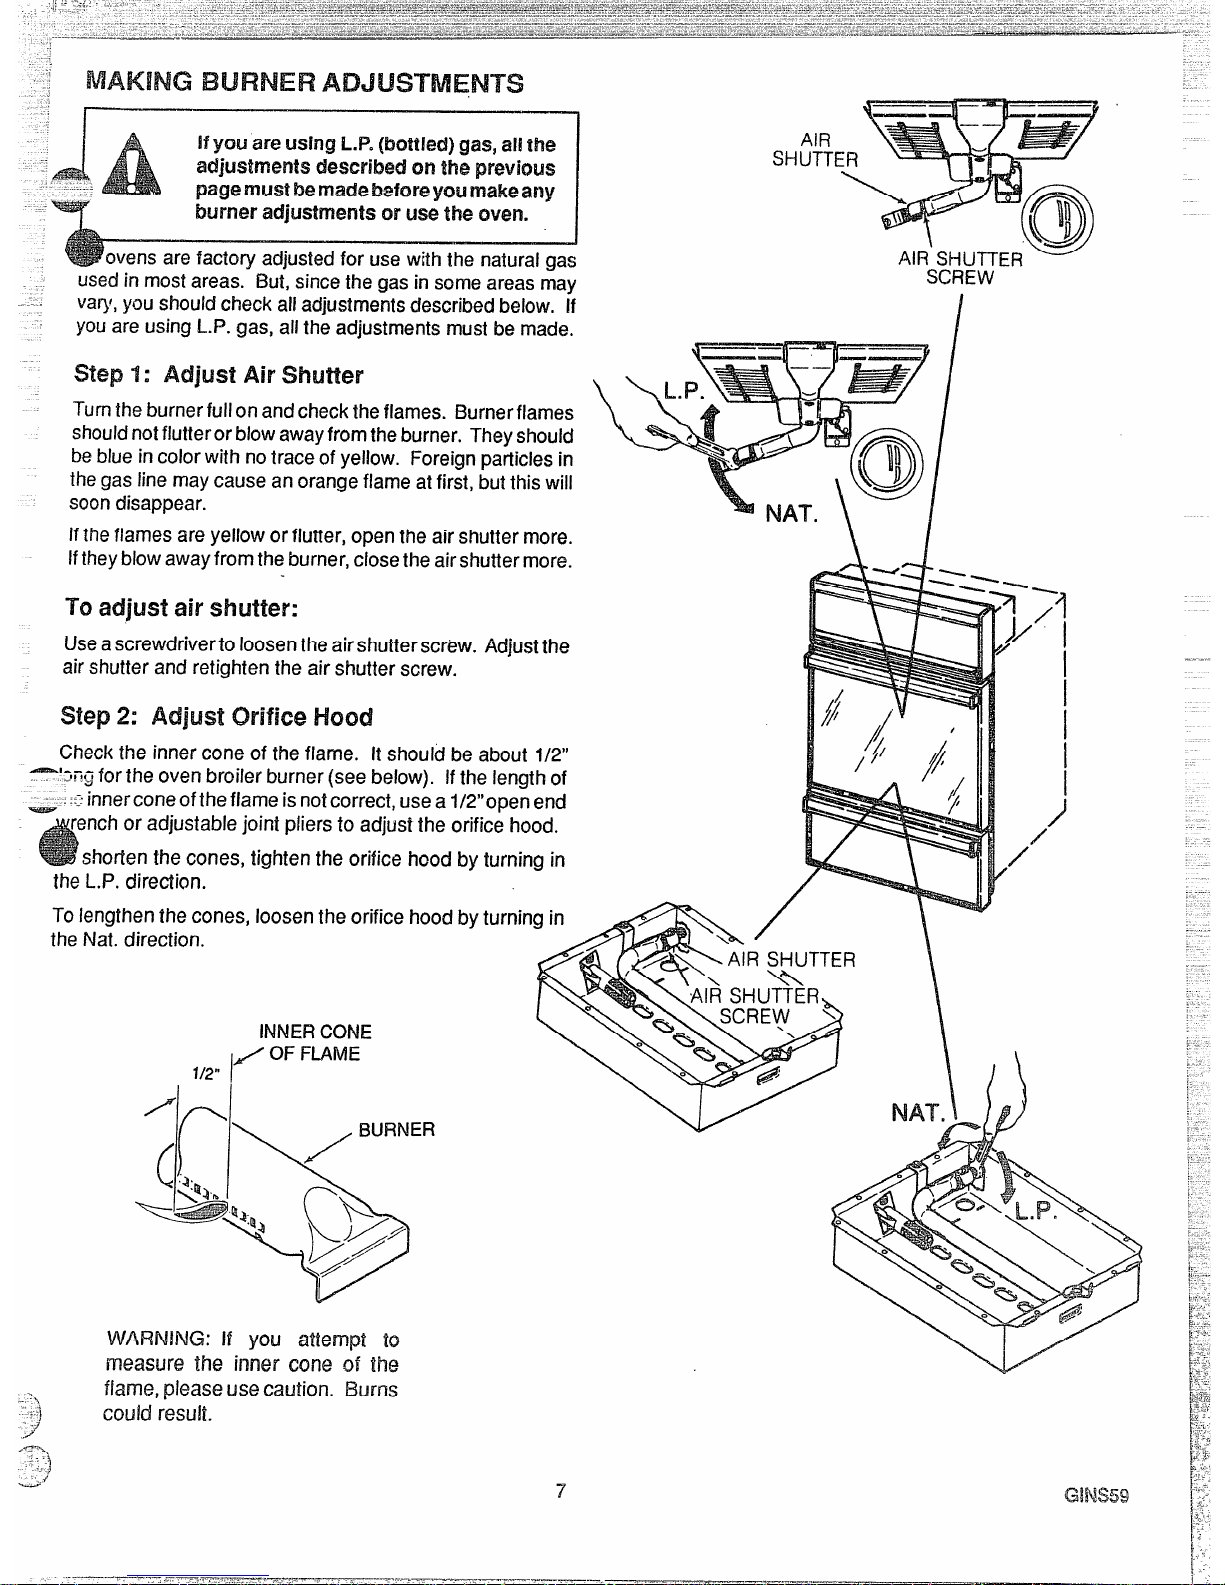
~~e~ 1:
Air Shutter
Turntheburnerfuilon and checktheflames. Eh.wnerflames
shouldnotf!utterorb!ow awayfromthe burner. Theyshould
be
blue incolorwith notrace of yellow. Foreignparticles in
thegas finemaycause an orange flame at first, but thiswill
soondisappear.
If the flames areyellow or flutter, open the air shutter more.
If
they blow awayfrom the burner,closethe airshuttermore.
TO i3~Jus~
air shutter:
Use ascrewdriverto loosenthe airshutterscrew. Adjustthe
airshutter and retighten the air shutter screw.
Step2: orifice Hood
Checkthe inner cone of the flame. It should be about 1/2”
-’~=tgforthe oven broiler burner(see below). Ifthe iength of
=-. =::innercone of the flame is notcorrect,usea 1/2’’open end
renchor adjustable joint pliers to adjust the orifice hood.
shorten the cones, tighten the orifice hood by turning in
the L.P. direction.
To lengthen the cones, loosen the orifice hood
the Nat. direction.
INNERCONE
/OF
FLAME
1/2”
H
/
(. \~’BuRNER
by
WARNING: !f yOL! atkWIPt to
measure the inner cone of the
flame, please use caution. Bums
--.
.-y
-:
could result.
,.3’
./’
#-
-3
“/-
<4.
7
G!NS59
Page 8
Keep this book for later use.
I&3sure
your oven is installed and gmunciecl pmp-
edy
13ya qualified technician.
keep the oven area clear and free from
thifigsthat willburn, gasolineand other flammable
vapors and liquids.
change oven rack positions while oven is
cool.
ARer broiling,alwaystakethe broiler panoutofthe
ovenandcleanit. Leftovergrease inthe broilerpan
can catch on fire next time you usethe pan.
Always
use dry pot holders when removing pans
from Me oven.
MoM or damp potholders can
cause steam burns.
Always usecarewhen opening ovendoor. Lethot
air and steam out before moving food.
follow cleaning instructions in this book.
Teachchildren nottoplay withovencontrols or any
other part of the oven.
Never try to repair or replace any part ofthe ovem
unlessinstructionsaregiveninthis book.
All Oiii&l-
work should be done by a skilled technician.
Never heatunopened food containers, Pressu
build up may make container burst and cause
injury.
INeverleave jars or cans of fat or drippings near
theoven. Never letgrease build upon yourovem
You can keep grease fires from starting if you
clean up grease and spills after each oven use.
Never use aluminum foil to line oven bottoms.
Improper use of foil could start a fire and cause
incomplete combustion.
Never block the flow pf combustion and ventila-
tion air through oven vents.
Never try to move a pan of hot fat, especially a
deep fat fryer. Wait until the fat has cooled.
Never leave children alone br unattended where
an oven is in use.
Never use your oven for warming or heating a -
room. Such use can be dangerous and could —- -
damage oven parts.
..
.-
~
Never wear loose fitting or hanging clothes whe
using your oven.
Such clothes could catch fir
and cause serious injury.
Never use a towel or other bulky cloth as a pot
holder. Such cloths could catch
fire on a burner.
Never’ store things in an own.
Never use wateron a greasetire—-itwill CM’Ny
1. CIcxx?oven Ckmr and turn off.
spread the flames.
2. if ‘fire fcxmtirws,thnwv soda cmthe
OVEN FIRE
fireoruseadry foamor type
D(?nottrytomove m?pan.
TheCaliforniaSafeDrinkingWaterandToxic Enforcement andsoot, causedprimarilybythe incompletecombustionof
Actrequiresthe Governorof Californiato publisha listof
naturalgasorL.P.fuels.Properlyadjustedranges,indicated
substancesknowntothestatetocausecancerandrequires
by abluish ratherthan a yellowflame,will minimizeinccm-
businessestowarncustomersofpotentialexposure10such
plete combustion.Exposureb Uwse subskmcescan be :
substances.Gasappliancescancauseminorexposureto
T
minimizedfur!herby venlhg with anopen~~~~~~or
us~fl(g:~~$~
threeof thesesubstances,namelybenzene,forrnakiehyck?
aventilationfanor hood.
-..
.--2>
-=>&
@’2?l,
.~-.---.:-
)
(d
~.,-----
.,.
>-7
%&_..#
8
GSAFCM-I
Page 9

The model
1. Oven l_ightSwitch
and serial number of your
2.
Oven Vent (area may get hot during oven
oven
is found orI a tag,
x
—
behindthe u~perovendoor,
II e
—
?
2
we; DO NOT b!ock vent)
HecWmic Oven Gontrol
Oven
Broil Burner
Oven
Light
Broil pan and (Zirid
Q<
4
5
‘lopy the numbers into the
I
61
ace on page 2 of this
manual. ----
1 / II
7. Removable Oven E30tlom
. . . .. ... .abie Oven Doorwith
9. Removable Sforage Drawer
0. Door Gasket
7“%
w
I Ii R F?6?rYlm/
1
c
.
*
F
I
(“3)
u--i ~m?%dl-
\\
\Y/-- II
I
I
H
- --=-..$-..
.--— ------
It 1
Whenyou turn the Oven Controlon, the glow bar igniter
belowtheovenbottoni beginsto heat. Whenthe igniteris
hotenough,inabout1minute,thegasf!owsintothe burner
andis ignited.
Theigniterglowsbrightorangewhenhot. Itcyclesonandoff
withthethermostatandwillglowwhenevertheburnerison.
1A
.s-
.=-,
., -.
DLmng a
----
1
4 14kk!li
be lit ‘and ycw SMwbl MMtryto‘do so.
.. . -,:
I
I
Window
Whentheoven ken, heatedairrncwesfhroughawmt below
thecontrolpanel. This hotair maymakecontrolpanelarea
hot.
Thevent is necessaryfor properair circulationinthe oven
andgoodbakingresults. DOI
may CaLlse fm’.$!’e,fireor %0theRangQ=
—
Page 10

(3--
1
YNKXL
1.
OVEN CANCEL- BUTIWN - Cancels everything
2.
3.
4.
5.
6.
except the clock andtimer. Pushthis button to
turn the oven off orto clear everything if you’ve
made a mistake in programming.
DISPLAY UW31CATORS- Light upto tell you
what
is being shown in the TIME DISPL/4Y
WlfNDOW.
WVl~
DISPLAY WHWXIW- Shows the time of
dayorthetimesyousetforthetimeror auto-
matic oven operation.
OVEN TEMPERATURE AND BROIL DISPLAY
WINDOW - Shows the oven temperature or broil
settingyou haveselected.
FUNCTION
INDICATORS - Light up to show
whether oven is baking,broilingor self-cleaning.
SETKNOB- Turnto settimesandtempera-
turesafterpushingafunctionbutton.
7-13 B!.rr’nxw
7.
BAKE- Pushbeforesettingbaketemperature.
8.
E3FKNL-
Push before selecting BROIL setting.
9.
10.
11.
12.
13.
10
COOK TIME - Push before setting length of
cook time for automatic oven operations.
CLEAN - Pushto use self-clean cycle.
STOP TME - Push before selecting the
time :e---
when you want the oven to turn off for aAI-fiiik _‘.
oven operations.
CLOCK uPush before setting clock or to bring
time of day into the TIME DISPLAY WINDOW.
TIMER - Push before setting amount of time.
TO
Page 11

TURNTO
TiJRhi T(3
TIJR~ TO
SEET1...I3WTH
SET TH’vIP
SET OVEfd
OF COOK
TlfvlfE
CANCEL~
TIMER
CLOCK ::: CLEAN ;:: BROIL BAKE
b
I
3
CANCELI-
.~
‘Top CLEAN;::
“MERCLWKTIME
BROILBAKE
●
I 1 I
.4
0
PUSH ~
(i)@@
PUSH
PUSH
PUSH
The red display will show the oventemperature as
it rises (in 5° steps).
Whencooktime hasended,atone willsoundandthe oven
will turn off.
A tone will sound when the oven is ready.
OFF
IT) THE
TURN TO SET ~
TURN TO ~
TURN TO
SET NVIOUNT ~
OF TIME
f -’l
0
:ANCEIANCEL
\
J
~AN COOK
~,M~ BROIL BAKE
TIMER CLOCK ;;:; c1
I I
I
/
1
I
n
u
1
PUSH
u
~ PUSH
( I ) PUSH
(~ ) PUSHA~D HOLD
~ 3 SECONDS TO CANCEL
Atone will sound when time is up.
NOTE:
The timer is a rerninderonly and wi!l not operate
the oven.
The ERC will calculate when to turn the oven off.
When the stop time is reached, a tone willsound and the
oven wil~turn off.
Ifyou prefer that your range not have a tone whenever you
push a button, you can eliminate tones by pushing and
holding the
CANCELbutton until you hear a beep. Repeat
to act!vate tones again.
1. Attenlion Tonewill sound if oven has only beenpartially
programmed. Forexampie, if you have selected acook
time but notemperature, you will hear theAttention Tone
wlil you select a temperature or pmh CANCEL.
2,
FunctionErrorTonewillsound ifthereisaproblemwith
oneofIhe rangefunctions.
Cancel the tone by pushing
the CANCEL button. If the tone starts again, call for
service.
IFOR
Cooktimes programmed for automatic oven operations start
counting downwhen ihe ovenfirst comes on, notwheri it has
reachedthe settemperatures. Ittakest(l !055 minutesto
reachthesettemperature,thusadditionalcocktimemaybe
necessary.
:.,:
“ Youmay recall any set function by pushing the button of that
.--m,
7L-~’unction.
..=.-
11
CCI-L042
-.—m .-. ...—..”-......——.— ——..———.— ————.—.. .————————— —-—
Page 12

Always follow recipe carefully.
Measure
ingredientsproperly.
Use
properpan placement.
Placepanson the oven rackswith 1%- 2“ of
air space onall sides of qch pan. Avoid
overcrowdingthe oven,
Panstoo close to each other, to oven WMS
or to the oven bottom i510ck the free movement of air.
knproper air movement causes
unevenbrowningand
cooking,
&i*
.<-.=
/
.-w
.’
>>. .
.:Q
---
---..—-*=—
4 cake layers
Q ~OS~ ~~~ingshIould be done cm the SEXXN?d
shelf p3si%ion from the fmtkwn.
several items, use two shelves placed cmthe
second and fourth rack positicwls from the
bottom of -theoven. stagger pans so that no
pan is directly above another, ERN<eangei
food cakes 0!7 the first shelf ‘fI”om
Me of the oven.
’12
b?t the oven ~reheat h3NN@l~y before ‘:-;---
cooking baked products. $411(IW10-1’5reinWs preheattime.
Avoid opening the door too often to check
the food during bakingas heat will be lost.
Thismay resultin poorbakingresults.
Cakes, cookies, muffins, and quick bread
should be baked in shiny pans — to reflect
the heat —
becausethey shouldhavea light
gokkm
crust. ‘feast breads and pie crusts
shotikl be baked in glassor dull (non-shiny
pans)
— to absorbthe heat —
becausethey
shouldhavea brown,crispcrust.
Oven temperatures should be reduced 25
degrees below recommended temperatures -ifyou use dark pansor oven proofglass. ~
‘Theremay be some odor when the oven is
first used. This is caused by the heating of
new parts and insulation.
Do not cover the oven bottom or an entire -. -
oven rack with foii. The foil can Mock nor-
mal heat flow, cause
cookhwjfaih-m~,~~d :-:
damagethe oven interior.
.
;-.
Page 13

CANCEL ~
>
—
~
t
‘Tw CLEAN
;::
“MER CLWK TIME
BROIL BAKE
o
~
$Wsh When
Finished
c1
1 Push
-.
Ivfostfoocfscanbe broilecfatthe HI BroilSetting. Select the
!&l Broil setting to avoid excessive browning or’drying of
foodsthat should be cooked to the well-done stage (such
as thickpork chops or poultry).
v
Broilingiscooking by directheatfrom the broil burner.
Tender cuts of meat or marinated meat should be selected for broiling. For best results steaks and chops
should be at least 3/4” thick.
After placing food on the broilerpan, putthe panon an
oven rack in the proper rack position. The recommended rack position and cooking time can be found
in the chart at right.
Thecloser the food IStothe broil burner, the faster the
meatbrowns on theoutside,yet stays redto pink inthe
center. Moving the meatfarther awayfrom the burner
letsthe meatcooktothecenterwhile browningoutside.
Side one should be cooked 1–2 minutes longer than
side two.
Yomoven dcmrshmkf be while
broiling.
Use only the broiler pan and grid that came with your
range for broiling. They are designed for proper
drainage of fat and liquids and help prevent spatter,
smoke or fire.
Do not preheat when broiling. Preheating may cause
the thermostat to cycle the broil burneroff and on. For
evenbroiling onboth sides, startthe food on acoldpan.
Whenbroiling frozen meat, useone rackposition lower
than recommended and up to 1 1/2 times the sug-
gestedbroilingtime.
Trimtheouterlayeroffatfromsteaksandchops. Slit
thefattyedgesto keepthe meatfromcurling.
Formaximumjuiciness,saltthe first sidejust before
turningthe meat. Salt the second side just before
serving.
Brushchickenand fish with butterseveraltimes as
they
broil. When broiling fish, grease the grid to keep
it from sticking and broil with skin side down. !$is not
necessary to Iurn fish.
Newer leave a soiled br~i!er pan In the range,
~rea~e inthe pan may smoke nEXttime the
Ovenis used.
CM a grcmw fire. Seethe
sectiontansafety.
Donot
with foil. Poor of hotfat
may &alMe a IWoiier fire.
Mafire
stark, dose the cweridoor
lffirecmtinWx3,Wow sodaonthefire.
m not put water an the fire.
Rack Total
Time
Food F%@tion (minutes)
4 = Highest
I
I
1 = Lowest
I
I
Steak - 1“ Thick
Flare 4
10-12
Medium
3
14-16
Well Done
3
20–22 I
Ground Beef Patties
Medium
3
11–13
Well Done 3
13–15
Lamb Chops – t“ Thick
3
16-20
Pork Chops - 1“ Thick
3
20-25
Pork Shoulder Steaks
3
15-20
l-lamSlice - 1“ Thick
3
14--16
Fish (Fillets)
3
10--15
chicken (Halves) 1 40-60
‘frankfurters
3
1o–t 5
Zacon
3 !5-7
Open-face Sandwiches .2
6--10
This chart k a generalguide. The siz~,
-..
Pm5
perahwe.
13
‘GiEmuxi
Page 14

3/4 wp margarine,softened
7cup sugar
2 eggs
1CUP
sour cream
2cups all-purpose flour
7teaspoonbaking powder
7teaspoonsoda
1/2 teaspoonsalt
1teaspoonnutmeg
3/4 cup light brown sugar
1/2cup chopped pecans
1teaspooncinnamon
Cream
margarineandsugaruntillightandfluffy. Add eggs and sourcream; mix well. Combine flour, baking powder,soda,
salt and nutmeg. Add to batter and mix well. Pour batter into greasedand
floured 13” x 9“ x 2“ baking pan.
Combine brown sugar, pecans and cinnamon; mix weii. Sprinkie one haif of this mixture over cake batter; swiri mixture
through batter.Sprinkie remaining one haif mixture evenly overcake batter.
Cover and chiil overnight. Uncover and bake in preheated 350°F oven for 35to 45 minutes or untii caketests done with
toothpick.
v
2-10 oz. pkg. frozen chopped broccoli
1cup mayonnaise
1cup sharp cheddar cheese,grated
2 eg&, beaten slightly
-
1can cream of mushroom SOUp
2 tablespoons chopped onion
1cup cheese cracker crumbs
P~eheatoven to 375°F. Cook broccoii according to package directions; drain.
Mix with other ingredients. Pour into greasedtwo (2) quart casseroie.SprinKie
with cheese cracker crumbs. Bakeat 375°Ffor 20-25 minutes.
A delicious quick-to+nake hearty stew that wiii feed a crowd or feed the famiiy. Refrigerate or freeze the remainder for
another day.
1-70 oz.
can barbecue beef
?- ?0oz. can barbecue pork
1-24 oz. can Brunswick stew
7-5 oz. can boneless chicken
A
7-12 oz. can vacuum packed corn niblets
7-16 oz. can baby !ima beans, drained
2-1602. cansstewed tomatoes
j - IGI/zoz. can sliced okra, drained
Drain okra and iirna beans. Addto allother ingredients in.4 quart
pan. i-led on medium to serving temperature.
Page 15

1/2cup margarine
3/4 cup chopped green pepper
a 1/3cup chopped onion
3 eggs, well beaten
v 17oz.can cream style corn
7oz. can who!e kernel com with liquid
Ilzoz.p)fgcornmuffin ‘ix
1cup cheddar cheese,shredded
Preheatoven to
350° F. Sautd green peppers and onion in margarine; combine
with remaining ingredients except cheese, Pour into greasedtwo (2) quart casserole; sprinkie with cheeseand bake 45-55minutes in 350°F oven. Let stand 5
minutes before serving.
—.
.s3Em+.
—-
G
::
..-
.4%
CcwteSy:Illinois CooperativeExtensionHomemakers
2-1 oz.squares semi-sweet chocolate
1stick margarine
1cup sugar
1/4 cup flour
2 eggs
1tsp. vanilla
Dash salt
1/2 cup chopped pecans
Frozen 9“ pie shell
Preheat oven to 350°F. Melt chocolate and margarine. Add other
ingredients to melted mixture. Pour into unbaked pie shell and
bake 35-40 minutes or until pie appears set. Serve warm with ice
cream or whipped cream.
1-20 oz. can apple pie filling
1/2 cup sugar
1-9 oz. box white cake mix (1 layer size)
1stick margarine, melted
1/2 cup chopped pecans
Preheat oven to 350° F. Place in layers in greased 9“ or 10” square baking dish:
apples, sugar, dry cake mix. Pour melted margarine over top of cake mix. Bake
at 350° F for 35 minutes. Sprinkle with pecans. Continue baking 15 minutes.
Serve warm.
apprcmimateiy 2 tablespoons cook-
or /3”or 9“ square baking pan. F%3ce
Tilt pan to coat bottom evenly. Mix
into+hot gK?asE?dpan, Ehke 20-25
1
Page 16

A
1. Remove‘thebroil pan and grid, oven racks, all utensils
2.
3.
4.
and any foil that may be inthe oven. Do nottryto clean
utensils or any other objects in the oven during a selfclean cycle. It oven racks are left inthe rangeduring a
cleancycle, theywiildarken, Iosetheirlwsterand become
hard to slide.Ifyouchooseto Ieavethe racksinthe oven,
youcanpo!ishthe edgesofthe rackswith steelwooland
apply asmall amount of vegetable oil to the rackedges
afterthe self-cleancycle. Thiswill makethe rackseasier
to slide.
Soil onthe oven front frame, underthe front edge of the
cooktop (doesnot apply to built-inovens), the door liner
outside the door seal and the front edge of the oven
cavity (about 1“ intothe oven)will not be cleaned during
a clean cycle (see illustration). Clean these areas by
hand before starting a clean cycle.
Use hot water with a soap-filled steel wool pad, then
rinse well.
Wipeup heavy spilloversonthe ovenbottom. Too much
soil may cause smoking during the clean cycle.
Cleanthe door seal by using a cleanspongeto soakthe
soiled area with hydrogen peroxide. Repeated soaking
maybe needed depending ontheamountofsoil.Frequent
cleaning will help prevent excessive soilbuild-up. Donot
rubthe door seal. Thefiberglass material ofthe seal has
an extremely low resistance to abrasion. An intact and
well fitting ovendoor seal isessential for energyefficient
ovenoperation and good baking results. Ifyounoticethe
seal becoming worn, frayed or damaged in any way or
if it has become
replacetheseal.
displaced on the door, you should
16
FRCW+$TFRAME
--
,, --..
-._...--i-e
~
I
1
1
I
i-l
.
I
A
After a clean cycle, you may notice some white ash in the ~ .
oven. Just wipe it up with a damp cloth.
.-
If white spots remain, remove them with a soap-filled steel ~” ‘
WOOIpad. Be sure to rinse thoroughly with a vinegar an
water mixture. These deposits are usually a saltresiduethat
cannot be removed by the clean cycle.
if the oven
isnotCleanafter one clean ~Y~le,the V~~e maY ~DJŠ-.
need to be repeated.
esclul
I
Page 17

-.
--
A
TURN.COUNTER
.+-
CLOCK WISE
1/2
-
TURN ~-
Q
Y
1 Pus+
c1
1 PUSH
Thedoor locks automatically after the controls are set.
Thenfollow instructions under WHEN A CLEAN CYCLE IS
FINISHED.
Theself-clean cycle lasts 3-1/2 hours.
Whentheovenreaches Iockingtemperature the wordLOCK
will be shown in the ERC display.
You can push STOP TIME BUTTON to find out when the
cycle will end. Push CLEAN BUTTON to return to count
~down.
!S
7
WAITUNTIL 1
LOCKGOES OUT
(20-30 minutes)
o
SET
Afferaclean cycle,the oven doorcannotbeunlockedunless
the word LOCK is off in the ERC display and the oven has
cooled. If you cannot open the door immediately after the
-17
Cxxx.w
Page 18

On the following pages, all rimova~le pafl~
Warmwater, amilddetergent anda softclot
—
as Fantastic@,ca
cmyour range are shown.
Referto those pageswhen cleanin9your range.
hare~afeto
USeon allcleanable aprtsof yourfan9e. All Pu~P~~ecleaners’
m also be used. DO nol use metai scourin9 pads,exceptwhere recommended”
d
CLHMNG
MATEFl!A~~
PART
Control panel
Detergent,warmwater,softcloth
Donot
use abrasivecleaners.
Glassoven door/window
Glass cleaner and papertowels
Removestubborn soilwith paste of bakingsoda and
water.
DO not use abrasive cleaners. Rinse tb~r-
oughly.
-—
Self-cleaningoven finish
Detergent, warm water and scour-
Rinse well after cleaning. Cleaning inside the oven
ing pad orsoap
filledsteelwool pad
need only be done as an optional touchup between
self-cleancycles. Seethe self-cleaning oven section
in this manual for more information.
Ovendoor gasket
Hydrogenperoxide
Soak with hydrogen peroxide} using a
sponge. Frequent soaking helps prevent soil bui!d-
up. Do not rub. See se!f-cleanin9 section fOr more
1-
I
I information.
I
Oven
racks
Detergent,warmWatE!r,scouringpad
Remove from oven to clean”
Rinsethoroughly.
or soap-filled steel wool pad
—-
——
-- ‘-
Page 19

--
meoven $(XM’can i%?KwYN3vedforfc$eanhge
To remove:
“A#ss%h
.-~=#SS%hOpenthe door@ the broil stop position (see illustration).
.
Graspthedoor ateachsideam.fliftup andoff thehinges.
E: When the door Is removed and Mnge arms areat
slop position, do not bump or try to move the hinge
arms. The hinges could snapback causing an lnjw-yto
thehandsor damageto the porcelain onthefrontof the
range. Cover the hinges with towelhqj or ernp{ytowel
rollswhile working in the oven area.
To replace:
1. f-foldthe dooroverthe hingeswilh the slots atthe bottom
edgeof thedoor lined upwith the hinges.Thehingearms
must still be in Ihe stop position.
2. Slidethe cfoorcfownontothe hingesasfar asitwill go and
close the door.
~-
Be careful not to scratchthe oven finish when ilnstal!ing
or removing oven racks.
TOinstall:
1.
Set the raised back edge of the rack on a pair of rack
.-
-- guides.
<-- Push the rack in until you reach the bump in the rack
.
uide,then lift the front oftherack a bit and push the rack
Ithe way in.
To remove:
1.
Pull the oven rack out, then up,
THE OW3+J
Do not touch oven bulb when hot, with wet IwKfs, or
vidpeown light area with wet clolh.
Electrical pm.fvermust be shut
offMyou have to .repkice
a Ibf’o!wm
bulb.
GLASS –
I. Remove the three screwsand liftoff the glassretainer,
B.r
SC%!N
GLASS
glass cover and gasket.
w
COVER
2.
Replace thebulb with a 40 watt appliance bulb.
3.
Replace the gasket, glass cover and glass
~{e~ainer. Tightenscrewssecurely.
)
-“,!,,
3
19
ENMW-21
Page 20

The oven bottom may be removed for cleaning heavy
spilloversor to reachthe oven burner.
Be
careful not to scratch the oven finish when removing
‘- ‘-
or replacing the oven bottom.
--
70 remove:
1. Slide
the tab at the centerfmnt to the left.
2. Lift the oven bottom up and out.
To replace:
1. Sliptheoven bottom intOtheovensothetabsintheoven
bottom fit into the slots in the oven back.
2. Lowerthe front of the oven bottom into place and slide
the tab at the front right to lock the oven bottom into
place.
--
This drawer provides space for keepingcookwareand
bakeware.
Hastics and flammable material should not
be kept
in this drawer.
Donotoverloadthe storage drawer. Ifthe contentsofthe
draweraretooheavy,thedrawermay
slipoff the trackwhen
opened. Toopen the drawer, graspthe centerof the handle
and pull straight out.
To remove: pull drawer straight out and Iiffover the guide
stops.
TOreplace: lift over the guide stops and slide drawer into
place.
20
Page 21

Savethe and mmey-—ClWckthis list before yw cdl W service.
t
FTKH3LEWI
o Ovenburners do not work. .
I
)
“ Foods do not bake properly
Pcxsumx CJuwE
Gas supply not connected or
not turned on. If using L.P.
gas, tank may be empty
Appliance
not properly
grounded or polarized. This
can affect spark ignition(on
models so equipped).
Controls not set correctly
Burnersnot adjusted properly
Oven not preheated long
enough
Improperrackor
pan place-
ment
Ovenven?blockedorcovered
Improper use Offoil
Improper temperature setting
for utensil used
Recipe not followed
Improper thermostat calibra-
tion
Using improper cookware
23
Dcm’-r
(XWLFORSE3!WKXUNTIL
Ycw C%!ECX
o Ch~ckthe reducershut-offvaive andthe
gassupplyshut-off valve to be surethey
are open (see installation section).
If using L.P, gas; is there any gas in the
L.P. tank?
o Checkinstallation sectioninthis manual.
o Check operating instructions in this
manual.
~ See the installation ,seciion in this man-
= Be sureto preheat.
10 minutes below 350 degrees
!5 minutes above 350 degrees
IDMaintainuniformair spacearoundpans
andutensils; seeoven
cooking section.
~
Besure oven vent is not blocked
~ Foil use not recommended,
s Reducetemperature 25degreesforglass
or dull/darkened pans.
~ Is recipe tested and reliable?
o Checkoventemperature adjustment pro:
cedures (next page).
o See oven cooking section.
Page 22

I
CALLiFc)iRSERVKX
You
“ ~:X&broii pan placement; see Broiling
.
0 Do not preheatwhen broiling.
4
~ Usebroiler pan and grid supplied with range.
s Check broiling chart.
s Improperrackposition
* Foods do not broil
properly.
~
Oven preheated
“ Improper utensil used
o Improper broiling time
~ Check for heavyspilkwer.
o Clean pan and grid after eachuse.
o Dirtyoven
* Broilerpanfullofgreaseleftin
oven
o Oven smokes.
~
Checkswitch setting.
o Check or repiace light bulb or fluorescent
light start~r; see use and care instructions.
o Light switch in off position
● Light bulb or fluorescent light
starter burned out
o Ovenlightorwork
lightdoesnot
work
(ifequipped).
o Check self-clean instructions.
o Heavily soiled ovens require a 3 1/2 hr. clean
cycle.
M Heavy spillovers should be removed before
setting clean cycle.
o Controlsnotsetproperly
o (lean cycleinterruptedtoo
soon
s Oventoodirty
~ Ovendoesnotclean
or poor cleaning
results (Self-clean
models only).
o Oven must cool below locktemperature
(20 to 30 minutes after clean cycle is
complete).
E Cleancyclenotcomplete
o Ovendoorwill not
unlock (Self-clean
modelsonly).
I
o Tone has been eliminated by
pushing and holding CANCEL
button
o Push and hold CANCEL button to activate
tone.
* Tonedoesnotsound
.
e
See theinstructions, under Cleaning Tips, ~
forcleaningchrome cooktops.with oven
cleaner. This procedure requires extreme
caution. Read instructions carefully.
D Spillswerenotwipedup
promptly
o Heavily soiled or
stained chrome
cooktop cannot be
satisfactorilycleaned
Quicklv(withintwoseconds,beforetheBAKEFunction
3.
energi;es)pushandholdthb BAKEbutton.
Thetemperaturein yournewovenhasbeensetcorrectly
at thefactory, so be suretofollowthe recipetemperatures
andtimesthefirstfew timesyou bakeinyournewoven,
Ifyouthinkthe ovenshouldbe hotterorcooler,youcan
adjustityourself. Todecidehow muchtochangethe
4.
temperature,setthe oventemperature25°F higheror
lowerthanthetem~eratureinyour recipe,thenbake. The
The display will change to theamountof degrees
differencebetweentheoriginalfactorytemperature
settingandthe currenttemperaturesetting.if theoven
hastheoriginalfactorysetting,thedisplaywill read00.
Thetemperaturecanbe adjustedupto 35°F hotteror
cooler(in5°F steps), by turningthe SETknob. A
minussign(-) beforethe numbermeansthattheoven
will becoolerby displayedamountof
degrees.
When You have made the desired adjustment, push
r;sulls of this‘lest; shouldgiveyou anideaof howmuch
the temperatureshouldbechanged.
~0
5.
theC~~OCKbuttontogo backto thetimeof day display
or useyourovenas
you would normally.
Pushthe BAKEbutton.
Selecta temperaturebetween500°Fand
550°Fwith Me
SETknob.
Note:Theself-cleantemper’atwewillnotbectmngedby
theacljustmen~sdescribedabove.
/44>,
$’$’$!
22
Page 23

To obtain setvice, see yourwarranty
on the back pageof this book.
We’re proud of our service and want
youto be-pleased. Ifforsome reason
youarenot happywiththeserviceyou
receive,herearethree Stepsto follow
for fu~her help.
FIRST, .conlactthe peoplewho servicedyour appliance. Explainwhyyou
are not pleased. In mostcases, this
‘will solve the problem.
NEXT,ifyouarestill notpleased,write
ail the details-including your phone
number-to:
Manager, Consumer Relations
RC14
Appliance Park
Louisville, Kentucky40225
FINALLY, if your problem is still not
\
I
f
.
-.
,,
Aim%
resolved,write:
,,,
..
-waw-
Major Appliance
Consumer Action Panei
20 North Wacker Drive
Chicago, Illinois 60606
23 CxN3w-i
Page 24

Save proofof original purchasedate such as your salesslip or cancelledcheckto establishwarrantyperiod.
—
!s
FULL
Forone yearfrom the date of
original purchase,we will provide,
free of charge,parts and service
labor inyour home to repairor
replace
anypafl of theran~~ that
fails becauseof a manufacturing
defect.
This warranty is extendedto the
original purchaser and any succeed-
ing owner for products purchasedfor
ordinary home use inthe 48 main-
land states, Hawaii andWashington,
D.C. In Alaska the warranty isthe
same exceptthat it is LIMITED
because you must payto ship the
product to the service shopor for the
service technician’s travel costs to
your home.
We at RCAstriveto providethe highest quaiity productsand service.
Therefore,we havedesignatedGE
CONSUMERSERVICE, a leader in
the service inclustfy,to fulfill your
serviceneeds. Should your appliance
need service,during thewarranty
periodor beyond, lookin the White or
Yellow pagesof yourtelephone
directow for GE CONSUMERSEIW-
iCE or an ALJTH~RizE~ RCAAPPLl-
ANCE SERVICER.
I!SNOT e
Service trips to your home to teach
you how to usethe product.
!Readyour Use and Care material.
If you tpen have any q8.MXiQfl~
about operating the product,
please contact your dealer or our
Consumer Affair$
officeataddress
below.
I
E Improper installation.
Ifyouhave an installation problem,
contact your dealer or installer. You
are responsible for providing adequate electrical, plumbing and other
connecting facilities.
o
Replacement of housefuses or
resettingof circuit breakers.
*
Failureof the product if it is used
for other than its intended purpose of
used commercially.
e
Damageto product caused by
accident,fire, floods or acts of God.
WARRANTOR IS NOT RESPON-
SIBLE FOR CONSEQUENTIAL
DAMAGES.
Some states do not allow the exclusion or limitation of incidental or consequential damages, so the above
limitation or exclusion may not apply to you.
This warranty givesyou specific legal rights, and you may also have
other rights which vary from state to state.
To know what your legal rights are in your state,
consult your local or state consumer affairs office or your state’s Attorney General.
 Loading...