

Page 1

.
... —-
... ..
;
/!
AhnnFo
T
17
Pro
So
2
SaInst
2-
AntiDev
3,
SuCoo
7
ApplRegis
2
Caa Clea
16
BuGr
1
Clock
9
Bu
1
CoSet
7
ConsServ
3
ConPa
: 1
Feat
6
Floount Ra2
Grou
3
InstalInstr
26
CooT
7
D P
1
FlS
7
War
B C
Leve
3
LifCoo
—
Moa SerNum2,
Ov
8
A Adjus
23,
BakingGu1 1
BroilingGu1 1
ConSett
9 1
DoRem
1
Prehe
1
RoastingGu1
She
8 U 1
ThermAdju2
VeDu
8
---lliseandCare&
i Y Range
-...,
.—.:
.
(J’
4
!-, (
j \\,;
-.
o’. (
Page 2

Readthisibookearefdhy.
I k intet hey opea
maifitainyournewrangeproperly.
Keepithandyforanswerstoyour
questions.
IfyoLldon’tunderstandsomething
or needmore help,write (include
yourphonenumber):
ConsumerRelations
AppliancePark
Louisville.KY
40
Wri
dothemaid
a serialmmdws.
You’llfindthem on a labellocated
behindthe storagedrawer panelon
theleftsideof the rangefront
frame. Seepage6.
Thesenumbersare also onthe
ConsumerProductOwnership
RegistrationCard that camewith
yourrange. Beforesending in this
card, pleasewrite these numbers
here:
ModelNumber
Serial Number
Usethese numbersin any
correspondenceor service calls
concerningyour range.
2
Ifyoureceived
a damagedrange..●
hnmediateiycontactthedealer(or
builder)thatsoldyoutherange.
Saw timeandmoney.
Befm-’eyourequest
service...
Checkthe ProblemSolveron
pages24and 25.It listscausesof
minoroperatingproblemsthatyou
cancorrect yourself.
If
youl-ledservice.••
Toobtainservice, seethe
Consumer Services
p i t
backofthis book.
Toobtainreplacementparts,
contactRCA/GEServiceCenters.
We’reproud of our serviceand
wantyouto bepleased. If forsome
reasonyou are not happywith the
service you receive,here are three
stepsto followfor further help.
FIRST,contactthe peoplewho
serviced your appliance.Explain
whyyou are notpleased. In most
cases, thiswill solvethe problem.
NEXT, if you are stillnotpleased,
write all the details—including
yourphone number—to:
Consumer Relations
Appliance Park
Louisville, Kentucky40225
FINALLY, ifyourproblem is still
notresolved, write:
Major Appliance
Consumer ActionPanel
20 North WackerDrive
Chicago,
Ill60
g
Is
2.
3. any
Clperlfhnea
4. call
*Don’tturnelectricswitches
cmoroffbecause sparksmay
ignitethegas.
Donot orfLwe
and
of orany
or
Carl CM
this
For or
I
Page 3

T CalifSa
Drin
Wata ToEnfor
A requt Goveo
Calift pubalio
substknt t st
t
cau
canbidefo
othreprodhaa
requbusint wa
custoo poteexp
t susubst
( applic ca
minexpot foo th
substanambenz
carmonoforma
ansocauprimb t
incomcombuo nat
gao L
fueProp
adjuburnindib a
bluratthayeifla
wiminiincom
—combExpt th
-~=::c b mini
~Uihb venwia op
..+o usaventf
mho
when YImGMYourRange
@~~v~the hlfiitalk!rshow y
the location of’the range gas
cut-off’valve a how tosh
i
off if nece
~l-he your ra
and propgmnby 8
insti acco
wit InstaInstr
A
adjusa sersho
b perfoonb qual
garaninstao ser
techni
@pitig your Hinge intoa 120-VOU
odd
only. Do n
remt rogroupr
frt plI i doab
t grouo t hoelec
“4
‘=:Vi i yoper
,.--
.....-
-L~”~sL~U]is~lUilit~”a oblit
~-f ungrourep
\
L:!,
J;
w apropeth
proui accw
t
Nat
EleC D
n u a extc w
t app
ranges
cm tip
a
incould
reT
pr
acc
tio t
raati
t t w o
f b
inst
Antde
sup
(
InstInstT
chi t dei in
a enproca
t t rafou i
ent de
I y p t rao f t
w f a rem s
t deent r
w y p t r b
@B stM pamat
a removed fromt ra
beopei t prf
o smdasht
pamaig
@Locate raoutofkitchen
traffic path
a outofdrafty
locations to prevent
pow a
~Be sure y range& Inc
adjustedbya. service
or forthe
typeof~as orU?) on
whi i t b us
Y
rac b conf u
o eit o g S
InstInst
s A pdoIBgd u o a
raryy+
h floor
may
r m m f
co
will n w
t k M
N i t
r o v t o l
t c w s t o
u N i i d a
ink
ca
IJshgYourRange
e~()~~~~$1~~~&~~&g3~a]~~~Or
unw a n i h
o i opT
c b
seb
@D a a
t I
s o h o t d
std o r t
T c d t r a
e t i o c s
pei
a~A~ ~
INT
SI
N B S I
CM
A AR
O O T
C AR.A
CLO T R
T R I C B
SERIOUSLYmLnJRED.
@Let
b f a o
suc b
t o ! t w
chc r t
@N w l o
u
t apB
c w
ref i s i
cao t r I
mac b i i
bri c w f
o h o s a r
c s b
@F y s n W
your for 01”
het I
{coilriw?d narpagc)
3
Page 4
~Y (continued)
.
eD notI.m? water(m grease
fires.
Never piu a fla
paTuo burth
smoflap b cov
p compwiwell
licoosho fltr
Flagroutap
c b p o b cov
wi
baksoo i avaia
multi-d che
o foamfiextin
e Do ~~~ s~o~efi~
mate
i a ovo ne
th
cookD n sto u
gaso
o otfla
vapa liqi t vic
o tho a otappl
@Do notl cooking gr
o otflam
mate
accumi o net ra
@Whcoopofo
t direexaa al
cot met a int
tempeo a le17
Thassthi t rem
possithtrim b
prei t mei wib
kila mewib sat e
SWfacefcooking
@~fyfy lea~~r~~
a hifl
sett130ica
smoa grspii
thm cao fi
@ t buflsi
s i don exbeyt
edo t cookExc
fli haza
em ( d
pothdders-
moo dapotho h
surfm rei bufr
steD n J poth
coneopflawh
liftcookD n u a
towo otbucli
plao a potho
coohatot s
o b o t r wi
exto adbu
@Alt subu
o bereco
@Carw f b
fra h f se
@Neblt v (
opeo t raT
prt a i a ou
whi necf t r
t opprw co
com
eD n u aw o ~
cosui t w h a
rour w h
pl
o t bug t su
t w T r a a ah t whm dat
bu
gra buh A i
m cat but w
impT m c a
camol a t
alb custa
resi aheha
~~of
frshbe a
d a posF o fr
foo moo f f
c cah f t buu a
o sio p
~u le
posamd
f f effshm d
f frFit p t f
o f c caspiw
f i ad
@~f~ of~i~~~~
f w b u i frs
togbeheo a f
m sl
s
AhV~yS htw ht s1a
waa i he
~Use ~~~pfat ,
t pr
overf bet
Srnpo
Q u ~Rp skx
pat a unso ea
tipSecool
ent procof
t a
bo
a s
a w b l e
t c b g T w
b s c a p
haaco f
s h spo s
l o r c i U p
w h t c e b
g a w r c
4V u g c
m s i i d f t
ofc
~K a p a f
t I
$T a t poo
b a b c t
t
co
f a b a
a O p a a g
a c b a t
r t g
*~ f f a
u t h t t f
o T f i o m
s t f
~I r
i ! n a
w d n u l c
w c b o t t
b a c af h
~I Y s g t t
g t t r a c aq
s teN u a
o f t l al
Bating, and
~D n
IWS43o f a s
a
@S a f t r
w o t d o a h
o T h a o s w
e c c b t
face eyes.
eK o f f g
‘ p ~ $ ~ &
w O i c
Page 5
outshelfto theshelf
c$Mlv#M?rMx?m
lifting
w uis’also $3
m agabufr
fiuchothrof’
do(iwal
*DoheunopfO
contai t m Pre
cou
Ihu a t cmt
: coubucaua inj
@Dom alumfo
anywi t ovexca
descri thbo
Mi
coresi afihao
damt t ra
@Whuscooo
roas
bai ovfollow
t manufacdirec
@
Us
onglcoo
thi recom
f u
i
ga
ove
@Alwrembrop
frova soa y fin
—h~oiGrelei t p
cafii ovi us
=r:+remt gr
w-t
bropa
@Whbroii mei t
ciot t flat f m
igniTrexcf t pre
excesflare
@Masu
brop i i
plcmrt ret
possio grfi
~Hyoshohaa gr
fii t brop tuo
ova keovdocl
t confiuni buou
* IIOt clt d g
berespcl
insto p M
T
d gai esf ag
seB can t r da
o m i
~Do not use oven cleN
como clo o
liprocoo a
k shb u i o ar
a p o t o
~Ret brp a
otcoobe
se
clet ov
cleaningYourRange
@Clean only paIii t
U a C Bo
@Keep racla f
o
accum
o gro
spiwhm ig
mim.1Needse
*Re‘gPrSo
o pa2 a 2 o t b
sDoatt re
o rea p o y
rang
i i spe
recoi t b A
otsershb re
t a qua
tech
c
Page 6
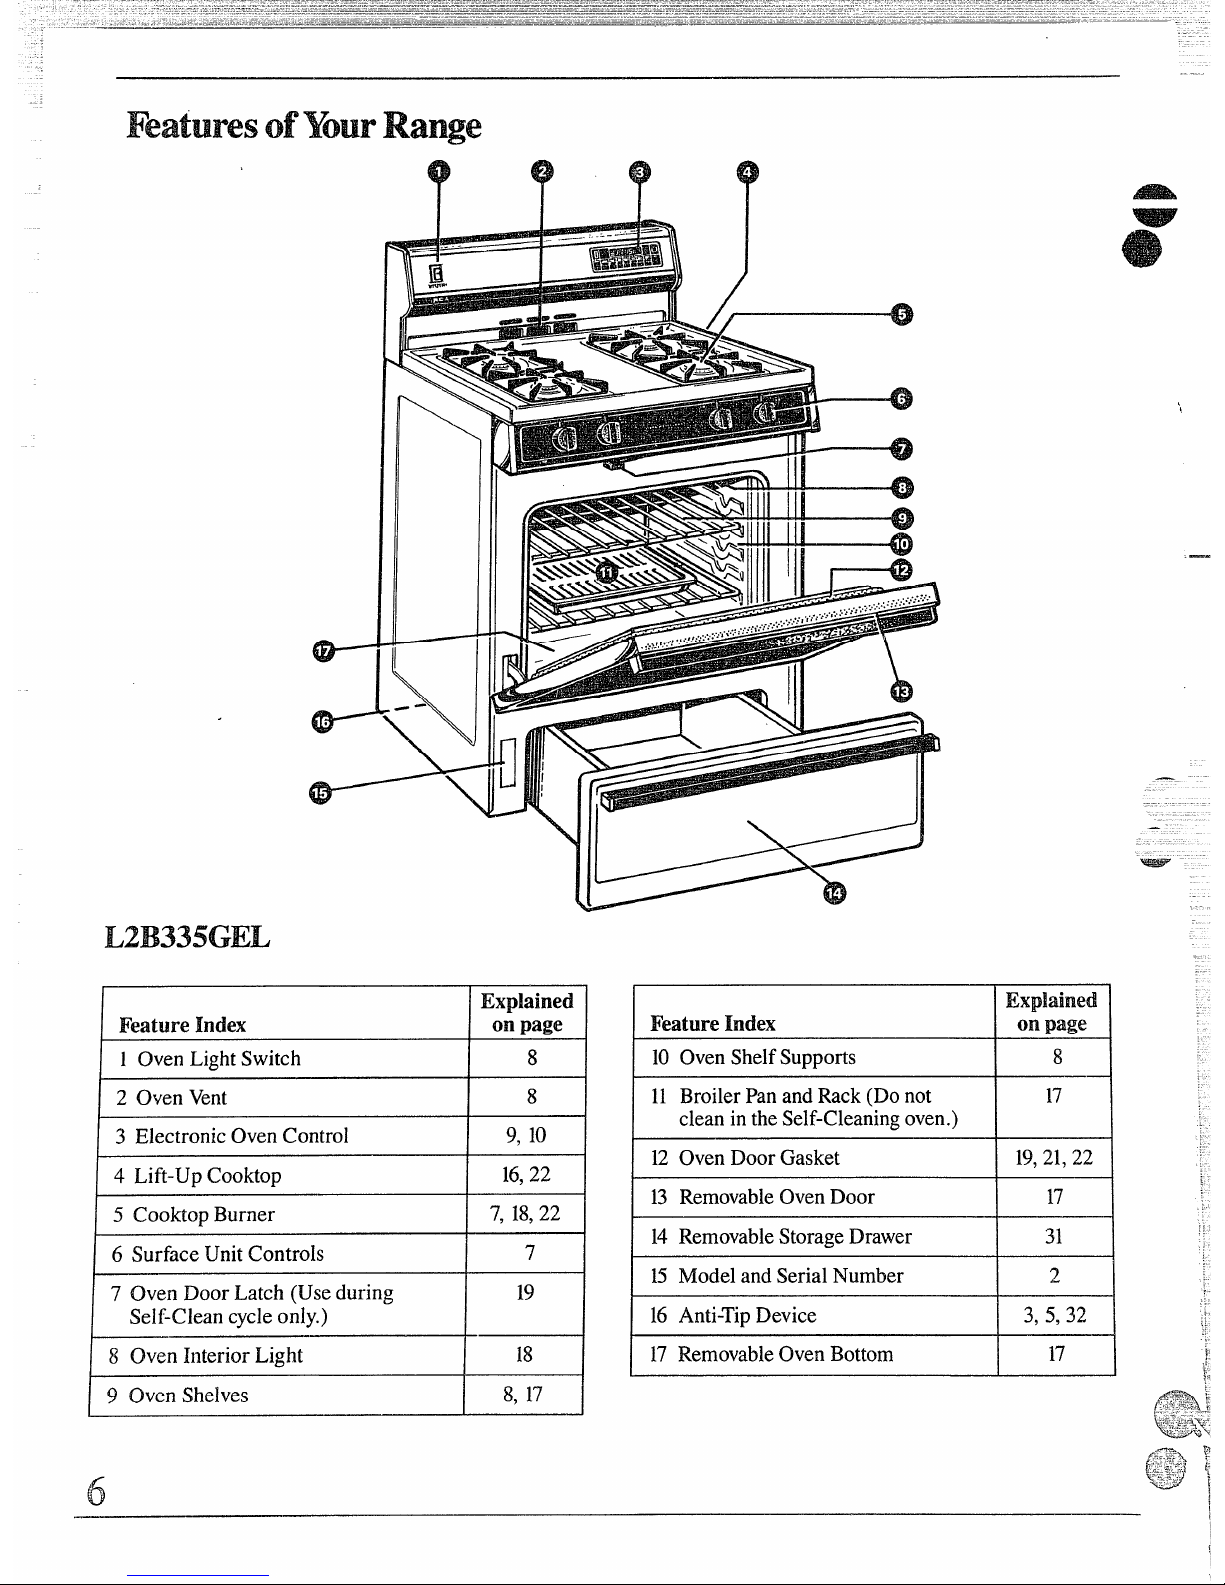
FeaIn
I
5 Cooktop Burner
1
OvLiSwi
2 OvVe
3 ElectOvCon
4 LifCoo
I 6 SurUnCont
I
7 OvDoLa(Udu
Self-cyonl
I 8 Ovh~teri
I 9 OvShe
‘
Eqdahed
on page
8
8
9 10
16
7 18
7
8 1
Explained
FeI o p
1
Oven S Su8
1 BrP a R ( n
1
c i t Selo
1 O D G
1
1 ReO D 1
1 ReStD 3
1 M a S N
~
1 AnDe3
1 ReO B
1
6
Page 7

Imtrwtkms
f b
U actimerson theserana
htedbyelectric ignition,ending
e needfor standingpilotswith
constantlyburningflames.
h case
ofa poweroutage,youcan
lightthepilotlessignitionsurface
burnersonyourrangewith a match.
Holda lightedmatchtotheburner,
thenturnthe knobtothe LITE
position.Useextremecautionwhen
lightingburnersin this
man
Surfaceburners in use whenan
electricalpoweroutageoccurswill
continueto operatenormally.
SW’faceEh.m’$erControls
Theknobsthatturn the surface
burners on and offare locatedon
thelowercontrolpanel in front of
theburners.
Thetwoknobsonthe leftcontrol
theleftfront and1eftrear burners.
Thetwoknobson theright control
heright front andrightrear burners.
ToLighta SurfaceBurner
Pushthe control knob in andturn it
toLITE. Onelectricignitionmodels,
youwillheara littleclickingnoise—
thesoundoftheelectricspark
ignitingthe burner.
Afierthe burnerignites,turnthe
knobtoadjusttheflamesize.
Note:
~Do notoperatea burnerfor
extendedperiodsoftime without
havingcookwareon thegrate.The
finishon thegratemay chipwithout
cookwareto absorbtheheat.
~Checkto besurethe burneryou
turnedon isthe one youwanttouse.
@Be surethe burners andgratesare
coolbeforeyou place your hand, a
potholder, cleaningclothsor other
materials on them.
HowtoSelectFlameSize
Theflamesizeona gasburner
shouldmatchthecookwareyou
are using.
~-
FOR SAFE HANDLING OF
COOKWARE,NEVER LET THE
FLAMEEXTEND UPTHE SIDH
OF THE COOKWARE.Anyflame
largerthan the bottomofthe
cookwareis wastedandonly
servestoheat thehandles.
When
u a o
ahsts
p a p
adjusttheflameso
the circle it makes isabout 1/2inch
smallerthan thebottomof the
cookware.
W bouse this same
flame size-–l/2 inchsmaller than
thebottomof the cookware:no
matter what thecookwareismade
of. Foodscookjust asquicklyat a
gentleboil asthey do ata furious,
rollingboil. A highboil creates
steamand cooksawaymoisture,
flavorand nutrition. Avoidit except
for the few cooking processes
which need a vigorousboil,
W’henfrying or warming foods
in stainlessstee19cast iron or
enamelware, keepthe flame down
lower—toabout
1 t d
o t p
When frying inglass or ceramic
cookware9 lower the flameeven
more.
7
Page 8
oven
I“nitiorl
The own burner andbroilburner
arelightedbyelectricignition.
TOlighteitherburner,pushthe
buttonforthedesired functionand
turn the SET knobuntil the desired
temperatureisdisplayed.The
burnershouldignite within60
seconds.
Poweroutage?
The ovenandbroilerburnerswill
notlight in theeventofan electrical
poweroutage.Donot attemptto
lightthemrnanuaUywithamatch.
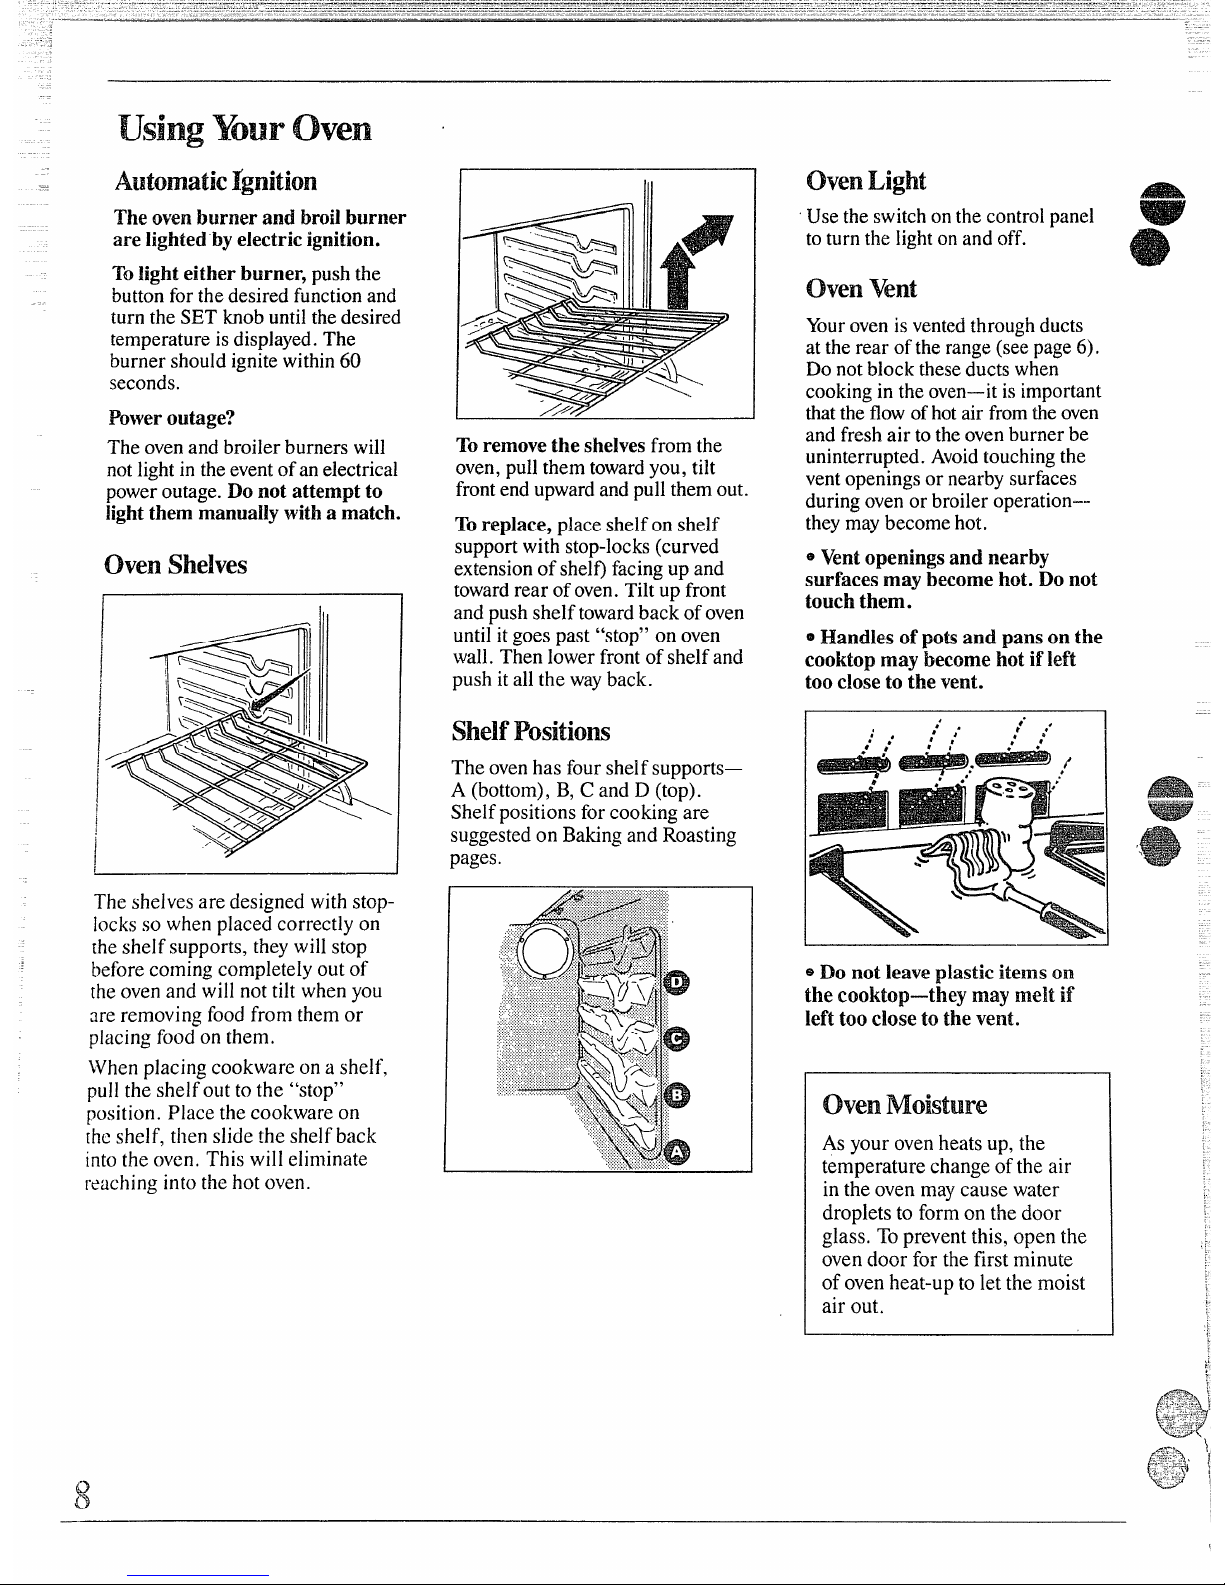
ChenSMves
The shelvesare designedwith stop-
Iocksso when placed correctly on
theshelf suppo~~s,they will stop
beforecomingcompletelyout of
(heovenand willnottiltwhenyou
me removing food from them or
placingfood
o th
Whenplacing cookware on a shelf,
pullthe shelfoutto the “stop”
position. Place thecookwareon
[hcshelf, then slidethe shelfback
intothe oven. This will eliminate
reachinginto the hot oven.
1
Toremovethe shelves from the
oven,pullthemtowardyou, tih
frontendupwardandpullthemout.
Toreplace,placeshelf on shelf
supportwithstop-locks(curved
extensionofshelf)facingupand
towardrear ofoven.Tilt up front
and pushshelftowardback ofoven
untilitgoespast “stop”on oven
wall. Then lowerfront of shelfand
pushitall the wayback.
shelf Positions
The ovenhas fourshelfsupports—
A (bottom),B, C andD (top).
Shelfpositionsforcooking are
suggestedon Bakingand Roasting
pages.
o Light
Usethe switchonthecontrol panel
toturn the lightonand off.
o v
Yourovenisventedthroughducts
attherear ofthe range(seepage6).
Do notblock theseductswhen
cookingin theoven—itis
i
t t f o h a f t o
a f a t t o b b
uniA t t
v opo n s
d o o b o
t m b h
@
Ventopeningsand nearby
surfacesmaybecome hot. Do not
touchthem.
@Handks ofpotsandpanson the
cooktopmaybecome hotif M
tooclose to thevent.
~Do not leaveplasticitemson
the eooktop—theymay melt if’
lefttoodose tothe vent.
o Moisture
As your ovenheats up, the
temperature changeofthe air
in the oven maycause water
dropletsto formon the door
glass. Topreventthis, open the
ovendoor fo~the first minute
of ovenheat-up toletthe moist
air out.
Page 9
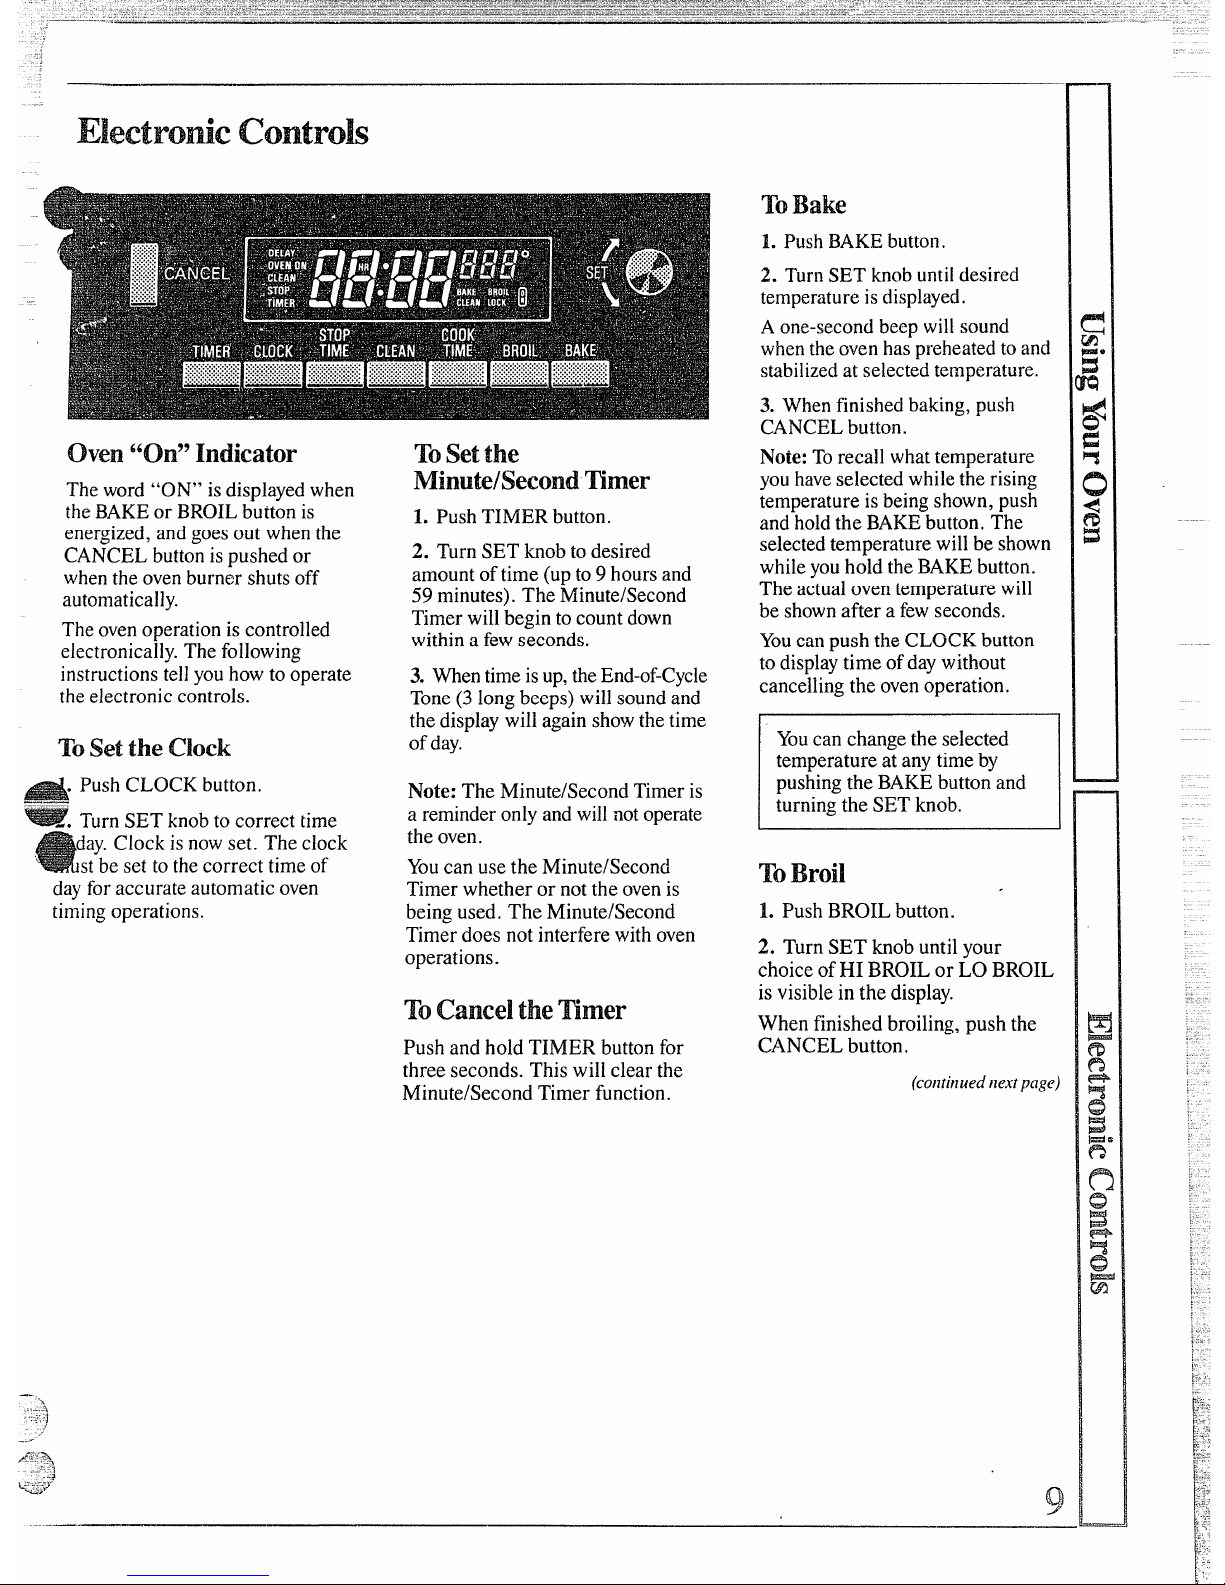
mlBake
L PushBAKEbutton.
2. TurnSETknobuntil desired
temperatureisdisplayed.
A one-secondbeep willsound
whentheovenhaspreheatedtoand
stabilizedat selectedtemperature.
ov“on” hldi
Theword“ON” is displayedwhen
theBAKEor BROILbuttonis
energized,andgoesout whenthe
CANCELbuttonispushed or
whentheovenburnershutsoff
automatically.
Theovenoperationis controlled
electronically.Thefollowing
mls the
Minute/SecondTher
L PushTIMER button.
2. TurnSET knobtodesired
amountoftime (upto9hoursand
59 minutes).The Minute/Second
Timerwill begintocountdown
withina fewseconds.
instructionstellyouhow tooperate
3. Whentimeisup,theEnd-of-Cycle
theelectroniccontrols.
Tone(3long beeps)will soundand
thedisplaywillagainshowthetime
ToSetthe clock
ofday.
PushCLOCK button..
Note: The Minute/SecondTimer is
——
TurnSET knobto correct time
a reminderonlyandwillnotoperate
day.Clock isnowset. The clock
the oven.
stbeset to the correct time of
Youcan use the Minute/Second
dayforaccurateautomaticoven
Timerwhether or notthe ovenis
timingoperations.
beingused. The Minute/Second
Timerdoes notinterfere withoven
operations.
Tocancel ‘theTimer
Push and holdTIMER buttonfor
three seconds. Thiswill clear the
Minute/SecondTimer function.
3. Whenfinishedbaking,push
CANCELbutton.
Note: Torecallwhattemperature
youhaveselectedwhilethe rising
temperatureisbeingshown,push
andholdthe BAKEbutton.The
selectedtemperaturewill be shown
whileyouholdtheBAKEbutton.
Theactualoventemperaturewill
beshownafter a fewseconds.
Youcanpush the CLOCK button
todisplaytimeofdaywithout
canceling the ovenoperation.
Youcanchangethe selected
temperatureatanytimeby
pushing the BAKEbutton and
turningthe SET knob.
I
mBroil
.
L PushBROIL button.
2. TurnSET knobuntil your
choiceof HI BROILor LO BROIL
is visiblein the display.
When finishedbroiling,pushthe
CANCEL button.
(continuednextpage)
(l)
J
.—
Page 10
Awmatk O Timer
Theoventimer willautomatically
startandstopyourovencookingor
self-cleaningoperationforyou.
~01’a.ItOIni3tiC OVfXlcooking:
L Push COOK TIME button.
2. TurnSET knobtoset lengthof
bakingtime.
3. Push BAKEbutton.
4. Turn SET knobto setdesired
temperature.
Whencook timeisreached,the
End-of-CycleTonewill soundand
theovenwillturn off.
Duringautomaticcooking:
o Youcanpush the STOPTIME
buttontofindout when the End-ofCycleTonewillsound andtheoven
willturn off.
~Youcan push theCLOCK button
todisplaytime of day without
canceling theovenoperation.
lb why stam
o
Ha delayedcookingoperation
isdesired:
L PushCOOKTIME button.
2. Setlengthofbakingtimewith
SETknob.
3. Push STOPTIME button.
4. TurnSET knobtotimeofday
whenbakingshouldbe completed.
Stoptimemustbeequaltoor
greaterthanthe cooktimeplusthe
currenttime of day.
5. Push BAKEbutton.
6. TurnSET knobto desired
temperature.
When stoptime is reached, the
End-of-CycleTonewill soundand
theovenwillturn off.
Caution:Neverletfood sit in the
ovenformorethan4 hoursbefore
cookingstarts.
R tem
i idf t gro ha
bacB s o lii o
bech f t b w
spbacgr
Note:Youcan push the STOP
TIME buttonto findout whenthe
ovenwillturn off. Push and hold
the COOK TIME button to findout
when the ovenwill turn on.
H’ adelayedself-cleaningoven
operationis desired, seepage
2
Howtofchange
a
When a function has been
entered,you can recall what has
beenprogrammedbypushingthe
corresponding functionbutton.
Themessagesinthedisplayshow
you which functionis currently
being displayed. While the
function isdisplayed, you can
changeit with the SET knob.
Youcanchangeanyprogrammed
function at any time.
—
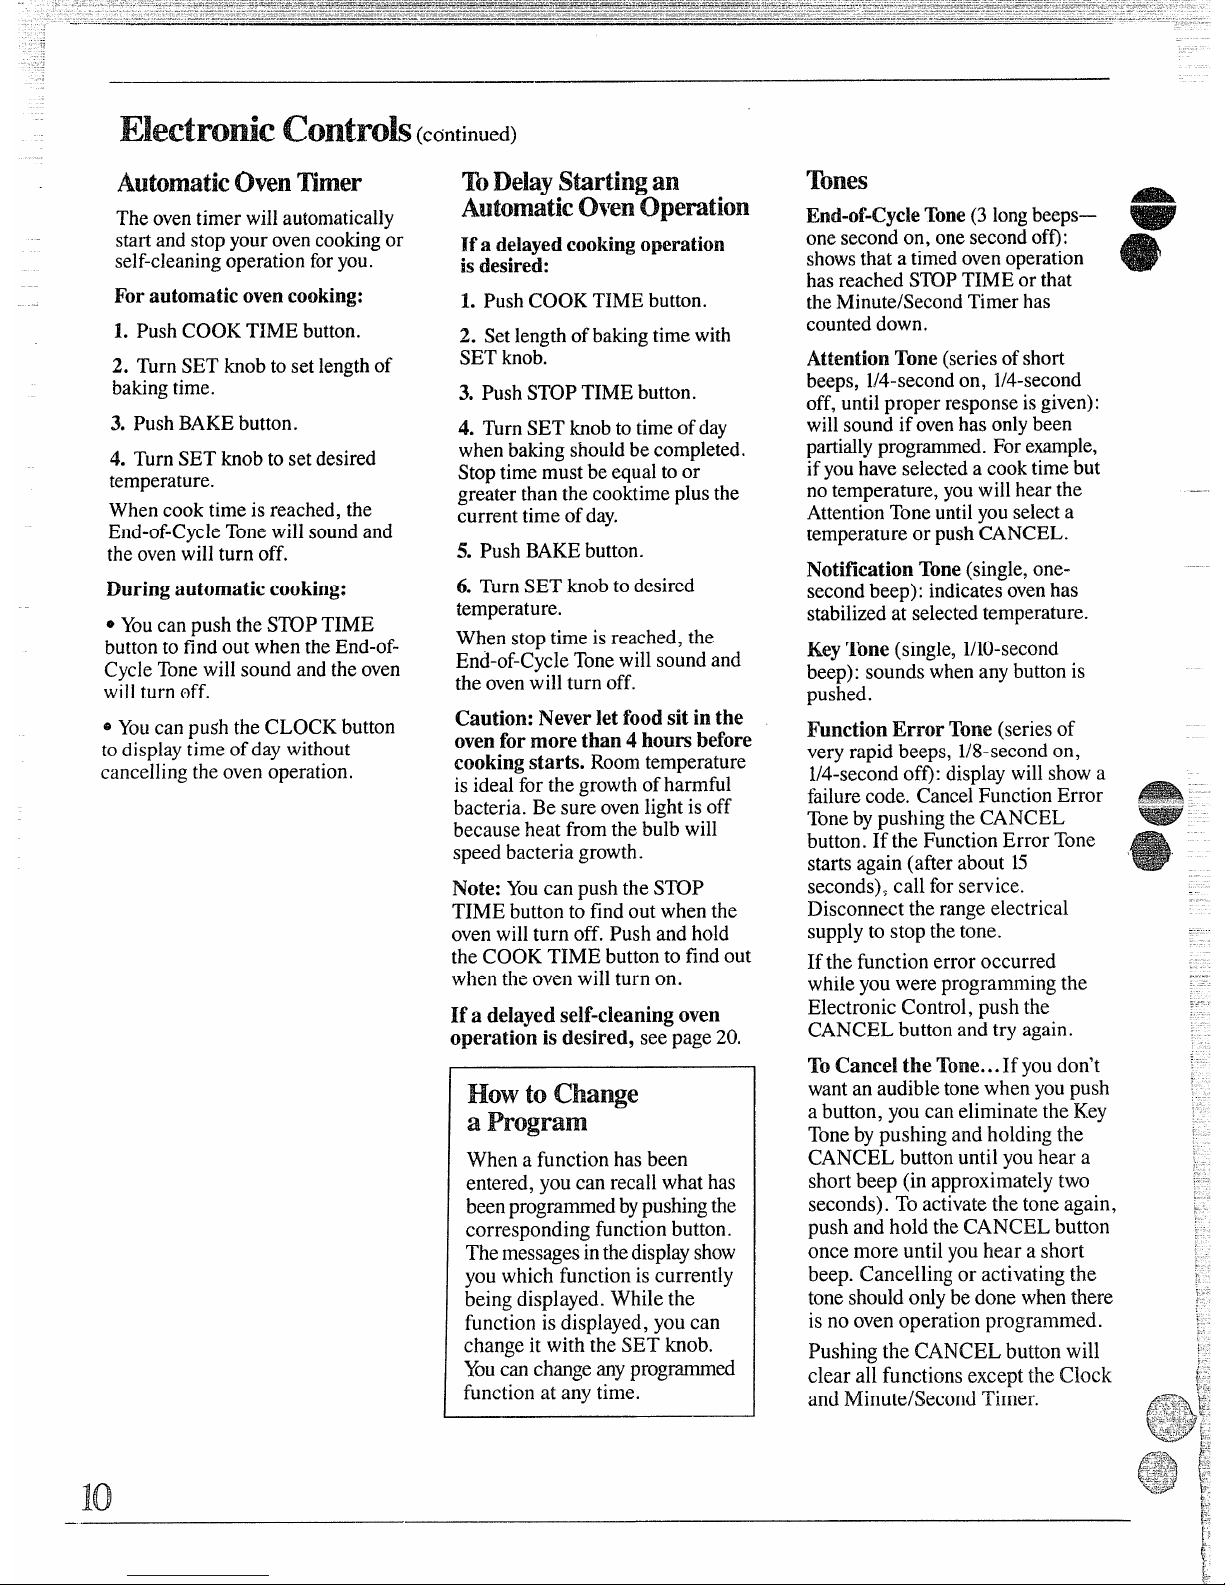
Tones
End-of-CycleTone(3 longbeeps—
onesecondon, onesecondoff):
showsthata timedovenoperation
hasreachedSTOPTIME orthat
theMinute/SecondTimerhas
counteddown.
AttentionTone(seriesofshort
beeps, l/4-secondon, U4-second
off, untilproper responseisgiven):
willsoundifovenhas onlybeen
partiallyprogrammed.Forexample,
ifyouhaveselecteda cooktimebut
notemperature,youwillhear the
AttentionToneuntil you selecta
temperatureor pushCANCEL.
NotificationTone(single,onesecondbeep): indicates ovenhas
stabilizedat selectedtemperature.
KeyTone (single,I/lO-second
beep): soundswhenanybuttonis
pushed.
FunctionErrorTone(seriesof
very rapid beeps, l/8-secondon,
l/4-secondoff): displaywillshowa
failurecode.CancelFunctionError ._. ..:
Tonebypushingthe CANCEL
......
button. If the FunctionError Tone
startsagain(afterabout 15
seconds), call for service.
Disconnectthe rangeelectrical
supplyto stop thetone.
If the function error occurred
whileyou were programmingthe
Electronic Control, pushthe
CANCEL buttonand try again.
To Cancel the Tone...
I y d
w a a t w y p
abuy c e t K
T b p a h t
C b u y h a
s b ( apt
seT a t t a
p a h t C b
o m u y h as
b Cao a t
t s o b d w t
i n o op
pr
Put C b w
c a fue t C
a MiT
Page 11
toset YourRange
aking
Positionthe shelfor shelves in
eoven.If cookingontwoshelves
atthesametime, staggerthe
cookwarefor bestheatcirculation.
2. Close ovendoor.
3. Pushthe BAKEbuttonand
—
turnthe SET knobuntildesired
temperatureis displayed.If
preheatingisdesired, do not put
foodinthe ovenuntila one-second
beepsoundsto tellyoutheovenis
preheated.
4. Opendoor and place foodin
ovenon center ofshelf. Allowat
least 2 inchesbetweenedgeof
bakewareand ovenwallor adjacent
cookware.
5. Closeovendoor.
6. Check food fordonenessat
minimumtimeon recipe. Cook
longerif necessary.Push CANCEL
button and removefood.
ostbaking isdoneon thesecond
shelfposition (B)from the bottom.
Whenbaking three or four items,
ustwsheposito t
seca fouseo sup
(BD frboto ov
Ba
angel foodcakeson firstshelf
position(A) from bottomofoven.
Tips
~Folatesreca
meast ingrecare
I yoa usapacmi
fcd1adirec
e i moiisnoticeableonthe
frontoftheovenorontheglassdoor
whenfirstturningontheoven,leave
theovendoorajarforaminute.
~DOnot
O theovendoorduring
abakingoperation—heatwillbelost
aridthebakingtimemightneedto
beextended.Thiscouldcausepoor
bakingresuhs.Ifyoumustopenthe
door,openitpartially—only3 or4
inches—andcloseit as quicklyas
possible.
@Donotdisturb theheatcirculation
intheovenwiththeuseofaluminum
foil.Iffoilisused,placeasmall
sheet ofit, about10by 12inchesat
themost,ona lowershelf several
inches belowthefood.Do notplace
foilontheovenbottom.
common Baking Problem
and Possible SOllltiom
PIES
Burningaroundedges
~
E ofcrusttooth
@Incbatemp
Bottomcrustsoggyandunbaked
@Al]owcrust and/or
fih’ig to COO1
sufficientlybeforefillingpieshell.
@Filling may betoothin orjuicy.
~Fillingallowedtostandinpieshell
beforebaking.(Fillpie shellsand
bakeimmediately.)
@Ingredientsandproper measuring
affectthequalityofthe crust. Usea
testedrecipeand goodtechnique.
Makesurethere are notinyholesor
tearsinabottomcrust. “Patching”
apiecrust couldcausesoaking.
Pie fil!ingruns over
@
T a bocrn w
setog
@Edo p crn buu
hieno
@T
mu
fil
@Chs o p pl
R&-y istough;crustnot flaky
*TOO
mu
han
@F t s o c i t fi
Rodolia haa
lia pos
GNKEs
Cakeriseshigherononeside
@Batterspreadunevenlyin
p
@o
sh
n ]
@
Usingwarpedpans.
Cakescrackingontop
eoven temperaturetoohigh.
@Batter
too thick,f r
o e p di
@C f p s p
aC
p size calledforinr
~Imm o c
Cakefalls
@Toomuchshortening,sugaror
liquid.
@Checkleavening
a b
p o b s t a
frM a h t n
exd o p
ing
*C b a in
teo n b l
en
eI a o t ac m m
cet o i t t a
a sp
Gust ishard
@Checktemperature.
s Check shelfposition.
Cakehassoggylayerorstreaksat
bottom
.
@JUnderminingingredients.
~Shorteningtoosoftforproper
creaming.
eToomuch liquid.
CO
&I
Doughycenter;heavycruston
surface
@
C te
eC s po
oF b in
caa g i r r
o o cof p
~F c s w g m
e b reD o
f o ab s
~Cof u b
t exd
IhNvning more noticeableon
one side
~o door notclosed p
c g s
=C s p
Page 12

.
—
1. Preheatingisveryimportant
whenusingtemperaturesbelow
225”F.and whenbakingfoods
suchas biscuits,cookies,cakes
Preheatingisnotnecessarywhen
roastingor forlong-timecookjng
ofwholemeals.
3. Dark or non-shinyfinishesand
glasscookwaregenerallyabsorb
heat, which mayresultin dry,crisp
crusts.Reduceovenheat25°F.if
lightercrusts are desired.Rapid
browningof somefoodscanbe
2. Ah.tminumpansconductheat
quickly.For mostconventional
baking,light,shinyfinishesgive
bestresultsbecausetheyhelp
preventoverbrowning.Forbest
browningresults, werecommend
andother pastries.Afterpushing
theBAKEbuttonand turningthe
SET knobto thedesired achieved-bypreheatingcast iron
cookware.temperature,besure to waitforthe
one-secondbeepbeforeputting
. .
foodinto
thoven.
dullbott~msurfacesforcakepans
andpie
pl
Time,
Minutes
Shelf
POsition
Oven
Temperature:
400°-4750
350°-4000
400°-4500
350°
400°-4250
375°
350°-375”
375°-4250
375°-4250
350°-3750
Cookware
Comment..
Foo
Bread
Biscui(M-ithic
Coffcak
Corbreo muffi
Gingerbr
Muffll
Popove
Quicloabre
Yeasbre( loave
Plainrolls ,
Sweerol
15
20
20
45
20
45
45
45
10
20
30
10
45
Carefbit 2 t 4
mil t
ShiCookShe
ShiMetPawi
satin-fibot
CaIro GlaPa
ShiMetPawi
satin-fibot
ShiMetMufPa
DeGlao CaIrCu
Meto GlaLoPa
Meto GlaLoPa
ShiObloo MufPa
ShiObloo MufPa
B C
B A
B
B
A B
B
B
A B
A B
B A
Prc i p f c c
Dea 5 mif m m
O b a 45f 2 mit a
35f 1 t 1 mi
D m o g g d
bro
F t roS Bm u
F t roS Bm u
Cakes
(withoshorteni
Angefoo
Jellrol
Spon
Cakes
Bundcak
Cupcak
Fruitca
Laye
Layechocol
Loa
AlumiTuPa
VletJelRoPa
Meto CeraPa
A
B
A
325°
375°
325°
T p p i co
L p w w p
Vleto CeraPa
;hiMetMufPa
vleto GlaLoo
~uPa
ihiMetPawi
atin-fibot
lhiMetPawi
atin-fibot
4eto GlaLoPa
A B
B
A B
B
B
B
325°
350°
275°
350°
350°
35
45
~(
2 h
20
25
40
Pa1i prm m c
U 30a S Bf s o
indca
I baf lau
shBa D
Cookies
Browni
Dro
Refrigera
Rollo slic
Fruits,
other Desserts
Bakeappl
Custa
Puddingric
ancusta
feto GlaPa
‘ookShe
B C
B C
B C
B C
325°
350°-4000
400°-4250
375°-4000
25
10-20
6-12
7-12
B cof m u s t
U
Sh
C a inte
2 t 5 f m br
‘ookShe
ookShe
lao MetPa
laCustCuo
asser(si pao howa
laCustCuo
Isser
A B C
B
B
350°-4000
300°-3500
325”
30
30
50-90
Retemt 3 f l
cu
C b o r puw c
b 8 t 9 mi
Pies
Froz
Mering
Oncrus
Twcrus
Pastshe
Miscellaneous
Bakepotato
Scallopdish
souffles
400°
325°
400°
400°
45
325°
325°
300°
45-70
15-25
45-60
40-60
12-16
60-90
30-60
30-75
Lap u 40a int
T qub meu 4 f
9 t !1 mi
Cufirel te
lot
)iPao CooShe
wet cruedg
A
B C
A B
B
B
aso Satin-fMetPa
Glao Satin-fMetPa
Glao Satin-fMetPa
Int f l a o s
leo OvShe
Glao MetPa
GlaPa
A B C
A B C
B
Page 13

Roastingiscookingbydry heat.
Ttmdermeator pouitrycanbe
roasteduncoveredinyouroven,
oastingtemperatures,which
shouldbelowandsteady,keep
spatteringtoa minimum,When
roasting,it is notnecessarytosear,
baste,coveror addwatertoyour
meat.Roastingiseasy,just follow
thesesteps:
Step 1:Positionovenshelfat
secondfrombottomposition(B)
forsmallsizeroast(3 to 5 lbs.)and
a bottomposition(A) forlarger
roasts.
Roastingwi
Afeat
Tender
cutribhigquali
sirlotiprumo toroun
Lmnleo bone-should
\ktishouldeleo loi
Purlloinrio shouklc
H:imprwm
}imlra
*FobonelemIlcmasov6-inc
[hic:d5 t 1 minutpclbt
tinws
~il,~n~bove,
RAtry
L-hico Duc
Chicpicc
Turk
.. ..-—-
Step2:Checkweightofroast.
Placemeatfat-side-uporpoultry
breast-side-upcmroastingrackin a
shallowpan. The meltingfatwill
bastethe meat. Selectapanas
closetothesizeofmeataspossible,
(Broilerpan with rack is a good
panforthis.)
Step 3: PushBAKEbuttonand
turn SET knob untildesired
temperatureisdisplayed.Check the
RoastingGuidefortemperaturesand
approximatecookingtimes.
—
—
Oven
Temperature
32
32
32
32
32
32
3~
37
32
Doneness
Ra
Med
WeDo
Ra
Med
WeDo
WeDo
WeDo
T V&
WeDo
WeDo
WeDo
WeDo
Step 4: Mostmeatscontinueto
cookslightlywhilestandingafter
beingremovedfrom theoven.
Standingtimerecommendedfor
roastsis 10to20 minutes.This
allowsroaststo firm up and makes
themeasierto carve.Internal
temperaturewillriseabout5°to
10”F.;tocompensatefortemperature
rise, if desired, removeroastfrom
ovenat5“to IO°F.lessthan
temperatureonguide.
FrozenRoasts
Frozenroastsofbeef, pork,
lamb,etc., can be started without
thawing,butallow 15to25 minutes
per pound additional time (15
minutes per pound for roastsunder
5 pounds, more time for larger
roasts).
Thawmost frozenpoultrybefore
roastingto ensure evendoneness.
Somecommercial frozenpoultry
can becooked successfullywithout
thawing.Followdirectionsgiven
on packer’slabel.
ApproximateRoastingTime
inMinutesper Pound
3 to5-lbs.
6to8-lbs.
2418
3522
40
30
2120
2524
3028
3530
3530
17minp l ( we
Under10lbs.
10to Is-lbs.
27-35
24-27
3 to5-lbs.
Over5Ibs.
35-40
30-35
30-35
10to15-lbs.
(lver 15lbs.
18-25
15-20
Internal
Temperature“F
!30°-1400
150°-1600
1700-185°
130°-1400
150°-1600
170°-1850
170°-1800
170°-1800
115°-1250
170°
1 ”
18
I
thigh:
185°-1900
1
Page 14

Broilingis cooking foodbydirect
heatfromabovethefood. Your
ovenisdesignedfor waist-high
broiling. A speciallydesigned
broilerpan andrack allows
drippingfattodrain awayfrom
thefoodsand be keptawayfrom
thehighheatofthe gas flame.
HowtoBroil
L If meathasfatorgristlenearthe
edge,cutverticalslashesthroughit
about 2 inchesapart, butdon’tcut
intomeat. Werecommendthatyou
trimfattoprevent excessive
smoking,leavinga layerabout
l/8-inchthick,
2 Arfoodon rack and
positionthe broilerpan on the
appropriateshelfinthe oven.
Placingfoodcloserto flame
increasesexteriorbrowningof
food,butalso increasesspattering
andthepossibilityoffatsandmeat
juices igniting.
3. Closethe ovendoor.
4. Pressthe BROILbuttonandturn
theSET knobuntilyourchoice
of “I-IIBROIL”or “LO BROIL”is
displayed.Note:Chickenandham
are broiled at LO BROILin order
tocookfoodthroughwithout
over-browningit.
5. Turn most foodsonceduring
cooking(theexceptionis thinfillets
of fish; oil one side,place that side
downonbroilerrackandcookwithout
turninguntil done). Timefoods for
aboutone-half thetotalcooking
time, turn food, then continueto
cook topreferred doneness.
6. Push CANCEL button. Remove
broilerpanfrom ovenand servefood
immediately.Leavepan outsidethe
oventocool.
Qumstions&Ansvw3rs Q.When
broiling,is it necessary
toalwaysusea rackinthepan?
A. Yes.Usingtherack suspends
themeatoverthepan. Ast_hemeat
cooks,the juices fall intothepan,
thuskeepingmeatdrier. Juices
areprotectedbythe rack and stay
cooler,thuspreventingexcessive
spatterandsmoking.
Q. Should I saltthe meatbefore
broiling?
A. No. Saltdrawsout thejuices
andallowsthemtoevaporate,
Alwayssaltaftercooking.Turn
meatwith tongs;piercingmeat
witha forkalso allowsjuicesto
escape.When broilingpoultry
or fish,brush eachside often
withbutter.
Q. Why m-emymeats not turning
outas brownasthey should?
A. Checkto seeifyouare using the
recommendedshelfposition. Broil
forlongestperiod oftime indicated
inthe BroilingGuide.Turn food
onlyonceduringbroiling.
Q. Do I need togreasemybroiler
racktopreventmeatfrom
stietig?
A. No.
The broilerrack isdesigned
to reflectbroiler heat, thuskeeping
the surface coolenoughtoprevent
meatstickingtothesurface.However,
sprayingthebroilerrack lightlywith
a vegetable cooking spraybefore
cookingwill make cleanup easier.
—
Page 15

—
Broilingshouldbedonewithoven
setongstoturnmeatover—
piercednleatlosesjuices.
~Steaksandchopsshouldbeat least
1inchthickforbestbroilingresults.
Panbroil thinnerones.
@Alwaysusebroilerpanandrack
thatcomeswithyouroven.Itis
designedtominimizesmokingand
spatteringbytrappingjuicesinthe
shieldedlowerpartofthepan,
oAfier
p irtgfoodonthe
broilerpan, putthepanonanoven
shelf intheproperposition.The
recommendedshelfpositionand
cookingtimecanbefoundinthe
guidebelow.
Thecloserthefoodistotheflame
thefasterthemeatbrownsonthe
outside,yetstaysredtopinkinthe
center.Movingthemeatfarther
awayfromtheflameletsthemeat
cooktothecenterwhilebrowning
outside.
@Ifdesired,marinatemeatsor
chickenbeforebroiling.Orbrush
withbarbecuesaucelast5to 10
~Whenarrangingfoodon
p
donotlet fattyedgeshangover
sides,whichcouldsoilovenwithfat
dripping.
@Broilerdoesnotneedtobe
preheated.However,forverythin
foods,ortoincreasebrowning,
preheatifdesired.
~~ s~~a~ can b
conventicmallybroiledbypositioning
theovertshelfatnextlowestshelf
positionandincreasingcookingtime
giveninthis guidelfi timesperside,
minutesonly.
QuantityandlHIor LO
Shelf
FirstSide
SecondSide
Rmd
Thickness
Broil Position Time,Minutes Time,Minutes Comments
BacOn
‘A-lb.
(aboS
H
c 3
2 % Ari sil
thislic
GroundBeef l-l(4pattiH
c 8-10
5-7
SpevU t 9
pa
t
RktDon%t 37-ithi
abs t
BeefSteaks
H
Rarl-ithi
B 7
5 Stl t l c t
Me(ii( t 1%-ib) B 10
5 bebrP f i
B
1
8
rec
1‘h-ithi
B
10 5 Slf
( [(2fi-!b
B 12
7
B
20 12-14
1
whoie
L A 25-30
15-20
Ret a 5t 1 m
( t 2 fi-ibs
p s f cuchB
spilength
e s w m
bu
B
w s s d f a b
w d ci
BakeryProducts H
Brea(Toaso 2 4 siic
c 2
y 1
SpevP Enm
Toos[Pastrii pkg(2
cuta b w b i
En:li
Mutll2-spi
c 3
de
I,ohsterThils
~_4
H
c
13
D n t ov
C thb o s s
((t s-m-eac
opB w m b b
a a h t
t;isil
i-ill.
fiilc
H
B
5
5
Haa t v caB
‘hto
‘/2-inthi
w l bub a d
coi dePrb t
inbr
—
II:m
Slices (450
l-ithi
L
c 8
8
Int 5 mip s
l%c~xwkc
f iV2t o h c
Pot-
chops
2(Y2
in) H
B
8-
4 Slf
\\i’Don2(i-n thicB
10-i
8
abo
t i ib.
Iam
Chops
HI
Nltkii
2( i , B
8
4-7
S f
\\2iD(m
iih)llt 10 to 12 -o
B
io
10
hlL’Lii
2 ( v in)
B 10
4
\\tiD aboi lb
B 1
12
-..\! ’icnm,
i-lb.pkg.
(lo)
H c
6
l-~
I d irs sai h
~ ji!!!:!T
pi”tX\)(ikc?d
lenc i 5t 6 p
~;;i.;u:ebrawur
.,>...
:
—--
-<.-.
..<--,
e:
-L
..- -.,
E
..._.
1
Page 16

Care
(SeeCleaning,Guide on page22,)
Propercare andcleaning are
imp-ortantsoyourrange-willgive
youefficientand satisfactory
service.Followthesedirections
carefullyincaring for it tohelp
tissures~feandpropermaintenance.
YOIJRRANGEHAS
ELECIGPWIB
SUREELECTRICPOWERIS
OFFBEFORECLEANING
ANY PARTOFH’.
OuPaihi
Whenthe rangeiscool, washthe
top, frontand, ifexposed,the sides
wi[~mild
Soandwater.Neveruse
tinyharshabrasivesor cleaning
powdersthatmayscratchor mar the
pai{ltedsurhce. Rinsethe surface
witclean wateranddry witha soft
cloth. If you wish, occasionally
applya thincoat of mild cleaning
waxto help pi-otectthe finish.
P’oCoddop
There are anumber of precautions
youcan taketo avoidmarring the
porcelainenamel surface ofthe
cooktopand preventit from
becomingdull. Don’tslideheavy
pansacross it. If you spill foods
with a lotof acid (tomatoes,
sauerkraut, fruitjuices, etc.)or
foodswith high sugar content,
clean them up as soon as possible.
Ifallowed to set, thesefoodscould
cause a dullspot. Also, nomatter
howstubborn the foodstain, never
useharsh abrasive”cleansers.They
COpermanently damagethe
enamel surface. Werecommend a
cleanser such as “Soft Scrub@”
brand.
controlRind
It’sa good ideatowipethecontrol
panelcleanafter each useofthe
oven.Fora morethoroughcleaning,
theknobscan be removedby
pullingthemofftheknobstems.
Cleanwith mildsoapand water,
rinsewithcleanwaterandpolish
dry witha softcloth.
Do notuse abrasivecleansers,
strongliquidcleanersor oven
cleanerson the controlpanel—
theywilldamagethe finish.
LiCooktop
Cleanthe area underthe cooktop
often.Built-upsoil, especially
grease, may catchfire.
Tomakecleaningeasier, the
cooktopmaybe liftedup.
Before raisingthecooktop:
L Be sure burners are turned off.
2. Removethe grates and the drip
pans.
This rangeis equippedwith dual
supportrods that will snap into
placewhen the frontofthecooktop
isliftedall thewayup. Tolowerthe
cooktopagain, supportthe raised
cooktopwith onehand, then
carefullypush thebottom ofeach
rod awayfrom you until rod slides
backdown intothe side of the
range.
s
Bwmer’G
Gratesshouldbewashedregular]y
and, ofcourse, after spi]lovers.
Washtheminhot, soapywaterand
rinsewith cleanwater.Drythe
grateswitha cloth--don’tputthem
backon the rangewet. When
replacingthe grates,be surethey’re
lockedintopositionovertheburners.
Togetrid ofburned-onfood,soak
thegratesin a slightlydiluted
liquid cleaner.
Althoughthey’redurable,the
grateswill graduallylosetheir
shine,regardlessofthe bestcare
youcan givethem. Thisisdueto
their continualexposuretohigh
temperatures.
Do notoperatea burner for an
extendedperiodoftime without
cookwareonthegrate.The finish
on the grate maychip without
cookwareto absorbthe heat.
Drip
Pans
Removethe gratesand liftoutthe
chromedrip pans.Washthemin
hot, soapywater.Rinse themwith
clean, hotwater andpolishthem
dry witha cloth.Neveruse
abrasivecleaner or steelwool—
theywill scratchthe surface.
Instead, soak thedrip pansfor
about20 minutesin slightlydiluted
liquidcleanser or mild solutionof
ammonia and water(1/2cup of
ammoniato one gallon of water).
After soaking,washthem in hot,
soapywater. Rinsewith clean water
and polish withaclean, softcloth.
1
Page 17

k o Bottom
ttcan be removed
makecleaningeasier afterheavy
dloversand to enableyoutoreach
theovenburner.
L “ ====-—-.--.======————\
/
—.
fl~
c.
\\
-’
— -
“
—.———
L-----G+,
I
UnlocLo
T remove:
L Slidethetab atthe centerfront
oftheovenbottomto thelefl.
2. Liftthe ovenbottom up andout.
TorepIace:
L Sliptheovenbottomintothe
ovensothetabsin the rear ofthe
ovenbottomfit intothe slotsin the
ovenback.
2. Lowerthe frontoftheoven
bottominto placeand slidethe
fronttabto therightto lockthe
ovenbottomintoplace.
The ovenbottom hasa porcelain
namelfinish. Tomake cleaning
protectthe ovenbottom
omexcessivespillovers.Thisis
reticularlyimportantwhen baking
a fruitpie or other foods with high
acidcontent. Hot fruit fillingsor
foods that are highin acid content,
suchas milk, tomatoor sauerkraut,
and
sauwivino le
juim capita dam
t thporcenasur
Toprotectthe ovenbottom surface,
placea piece of aluminum foil
slightlylarger than the bakingdish
or asmallcookie sheeton alower
sheo unt bakdit
cat
an
spillI shon
complcot sha th
woucaunehei t
oveAlumfoshon b
plao t ovbot
I aspil~dooco t
ovbottalt ovt co
first. Youcan clean the bottomwith
soapand water,a mild abrasive
cleanser, soap-filledabrasive pads
+r llsethe self-clean cycle.
.--i
-.,:./..
--.
Lift=cmo Door
Theovendoor isremovableto
maketheinteriormore accessible
duringreplacementofthelampbulb.
Hinge
I
Toremove the door, openit a few
inchestothe specialstopposition
thatwillhold the door open. Grasp
firmlyoneach sideand liftthedoor
straight up and offthe hinges.
Note: Becareful notto placehands
betweenthe springhingeandthe
ovendoorframe as the hingecould
snapback andpinchyour fingers.
TorepIacethe door,makesure the
hinges are in the “out” position.
Position the slotsin the bottomof
the door squareIyoverthehinges.
Then lowerthe door slowlyand
evenlyoverboth hingesatthe same
time. If hingessnap back against
the ovenframe, pull them back out.
o shelves
Ovenshelvesmaybe cleanedwith
amildabrasivecleanserfollowing
manufacturer’sdirect~ons.After
cleaning,rinsetheshelveswith
cleanwateranddry withach$an
cloth.
Toremoveheavy,burned-onsoil,
soapymetalpadsmaybeused
followingmanufacturer’sdirections.
Afterscrubbing,washwithsoapy
water,rinseanddry.
h-oilerPan&Rack
Afterbroiling,removethebroiler
rackand carefullypouroffthe
grease.Washandrinse thepanand
rackin hot, soapywater.
If foodhas burned on, sprinkle
the rack while hotwith detergent
andcoverwithwetpaper towelsor
a dishcloth.That way,burned-on
foods will soakloose whilethe
mealis being served.
Do not store a soiledbroiler pan
and rack in the oven.Do notclean
in self-cleaningoven.
(continuednextpage)
Page 18

—
--
~~~~ (cdntinued)
o LiBum
Thelight bulb islocatedin the
upperrightcorneroftheoven.
Beforereplacingthebulb,
disconnectelectricalpowertothe
rangeatthemainfuseor circuit
breakerpanelor unplugtherange
fromtheelectricoutlet. Letthe
bulbcoolcompletelybefore
removingit. Donottoucha hot
bulbwitha dampcloth. Ifyou
do,thebulbwillbreak.
RangeTopIh’mfws’
The holesin theburnersofyour
rangemustbekeptcleanat all
timesforproper ignition and an
even,unhamperedflame,
Youshould clean theburners
routinely,especiallyafter bad
spilloverswhichcouldclogthese
holes.Burnersliftrightoutfor
cleaning,
T i-f?IT10V6!:
@
Removethe 3 screwsin thelamp
cover. ‘
@Detachlamp coverand remove
bulb.
Toreplace:
@Putin a new40-wattappliance
bulb.(Note: A 40-wattappliance
bulbis smaller than a standard
40-watthouseholdbulb.)
~Installlamp cover.Replace3
screwsand tighten,making sure
coverfitsflushwith ovenwall.
~Reconnectelectrical powerto
therange.
Note: A screw holdseach of
the burners in place to keepthem
from wobblingaroundduring
shipment. Removeand discardthe
shipping screws. Tilt the burner to
the rightto releaseitstwo tabs from
“ slotsin theburner support and
movetheburner towardtheback of
the range. This disengages it from
the gas valveat the front of the
range, and itliftsout easily.
Toremoveburned-on food, soak
theburner in a solutionof water
and a productused for cleaning the
insideof coffee makers. Soakthe
burner for20 to 30minutes. Ifthe
fooddoesn’trinse offcompletely,
scrub itwith soap and wateror a
mild abrasive cleanser and adamp
cloth.
Beforeputting theburner back, dry
it thoroughly bysetting it ina warm
ovenfor 30 minutes.Then place it
back in the range, making sure it is
properly seated and level.
controlKnobs
Thecontrolknobs may beremoved
forcleaning.
Toremoveknob,pull it straight
offthestem. If knobisdifficultto
remove,place a thincloth (likea
handkerchief)or a pieceofstring
underandaroundthe knobedge
andpullup.
Washknobsin soapand water,but
do notsoak.
Toreplaceknob, locatethegroove
ineach sideof the knobstem. One
ofthe groovescontains a spring
clipandthe othergrooveisclear.
Locatethemolded rib inside the
knob.Fit the moldedrib ofthe
knobintothe clear grooveonthe
knobstem.
—------
——-
Page 19

care
the
o~ramnmdCleaningTime:
—
iiolu”s
PreparetheOvenBefore
sethe
con
Theovenmustbecompletelycool
inordertosettheself-cleancycle.
step 1:
Removethe broilerpan, broiler
rack, allcookwareandany
aluminumfoilfromthe oven.
(Ovenshelvesmaybe left inthe
oven.Note:shelveswill discolor
aftertheself-cleancycle.)
st2
Remt ovbotpa(s
pa17i i
is excessivelysoiled.
Cleanitand put it back in the oven.
Ifyouusesoap, rinse thoroughly
beforeself-cleaning;this will
pre}fentstaining.Toomuch soilon
ovenbottommaycausesmoking
duringthecleaningcycle.The
otton~must beinplace during the
f-cleancycle.
p 3:
anspattersor soilon the oven
Font fr~me(A), underthe front
edgeofthe cooktop,the door liner
outsidethe door gasketand the
frontedgeof the ovencavity (about
1“intotheoven). No matter how
stubbornthe foodstain, neveruse
harshabrasivecleaners.They could
permanentlydamage the enamel
surface.Werecommend a cleanser
suchas “Soft Scrub”” brand ora
similarcleaning product to keep
whi[esurfaceslookingclean and
nm. After cleaning, rinse well with
a vincgarand watermixture. This
willhelppreventa brownresidue
fromformingwhen the ovenis
heated. Buffthese areas with a dry
cloth.
Clean top, sides and outside front
ofo~endoor withsoap and water.
DOnot use abrasives or oven
cleaners.Do not letwater run down
--thl.<}~!ghopenings in the top of the
Cleanthedoorgasket(C)usinga
cleanspongeto soakthe soiledarea
withhydrogenperoxide.Repeated
soakingmaybe neededdepending
ontheamountofsoil. Frequent
cleaningwill preventexcessivesoil
buildup.Do notrub thedoor
gasket—thefiberglassmaterialof
thegaskethasan extremelylow
resistancetoabrasion.An intact
andwell-fittingovendoor gasketis
essentialfor energy-efficientoven
operationandgoodbakingresults.
Ifyounoticethegasket
bec(n
worn, frayedordamagedinany
wayor ifithasbecomedisplaced
onthe door, youshouldreplaceit.
Makesuretheovenlightbulbcover
(D)isinplace.
(ii)
A<
B.
c.
D.
o
B
OvenFront Frame
Openingsin Door
OvenDoor Gasket
oven Light Bulb cover
Step4:
Closethe ovendoor and make
surethe ovenlightis off.
Chrome drip pansfrom thetop
of’vmwrange should neverbe
cleaned in the self-cleaningoven.
Oven shelves maybe cleaned inthe
self-cleaningoven. However,they
willdarken, losetheir lusterand
become hard to slide. Wipethe
shelfsupports with cookingoil
after self-cleaning to make shelves
slidemore easily.
...
,
~;$;Scrui a registetrademo thCloComp
–.-:
~::><
Do notuse commercialoven .
cleanersor ovenprotectorsin
or neartheself-cleaningoven.
A combinationofany ofthese
productsplusthe highclean-cycle
temperaturemaydamagethe
porcelainfinishofthe oven.
h-rqmrtant
Theovendoor mustbeclosed
andall controlsmustbe set
correctlyfor the clean cycle to
workproperly.Tohelp you
understandhowthe clean cycle
works,the stages of the cycle
are notedbelow.
1. Slidethedoor latchhandle
totheright.
2. Setthe controls.
3. The words“CLEAN TIME”
aredisplayed.The ovenbeginsto
heat,thedoorlocksautomatically
when lockingtemperatureis
reachedand theword “LOCK”
isdisplayed.
If the ovendoor isnot latched,
the word “DOOR” is displayed
andtheovenbeepscontinuously.
Closethedoor,touchCANCEL
and beginagain.
4. When the 31Ahour clean
cycleisover,the word
“CLEAN” goesout and the
ovenbeginsto cool.
5. When theoventemperature
has fallenbelow the locking
temperature (about20-30
minutesafter theword
“CLEAN” goesout at theend
ofthe clean cycle), the word
“LOCK” goesout,
t door
latchhandlecan be movedto
the left and the door can be
opened.
Page 20

-—
tht? (continued)
3. SlidethedoorLA~Fl HANDLE
s t ‘of Ck
Therangemustbe completelycool
inorder-tosetthe self-cjean~ycle.
1. Slidethe LATCH HANDLE to
therightas faras it will go. You
mayneedto slightlypress onthe
doorto get itto lock properly.
Neverforcethe doorlatchhandle<
Forcingthe handle may damage
the door Ilockmechanism.
2. Push the CLEAN button.
Thedisplaywill show “3 :30~’
The words “CLEAN TIME” will
bedisplayedon the left. Within20
seconds,the words “CLEAN
LOCK” will bedisplayedon the
right.
NotYoucan fio wht
clecywib finib
pusht STTIbut
The word “DOOR” is displayed
whenyou try to set a clean cycle
withthedoor unlatched or when
theoventemperature is toohigh.
T S aDelayedStart
L
Slidethe LATCHHANDLEto
the rightas faras itwillgo.
2. Push STOPTIME button.
3. Turn SET knob to timeofday
whenyou wishcleaningtobe
completed(mustbemore than
3~ hourslaterthan currenttime
ofday).
4. PushtheCLEAN button.
The words “DELAYCLEAN”
willbe on in thedisplay untilthe
cleancyclestarts.After theclean
cyclestarts,theword “CLEAN”
willbe on in thedisplay.
Note: During a delayedself-clean
operationyoucan findoutwhen
the oventurns on bypushingand
holdingthe CLEAN button.
To stop a clean cycle
1. Press theCANCEL button.
2. Waituntilthe ovenhascooled
belowlocking temperature(about
20-30 minutes)and the word
“LOCK” is offin the display.
Btheleftas far asitwillgo.
Youwillnotbeableto openthe
doorright awayunlesstheoven
temperatureis at asafelevel.If
youcannot open the ovendoor
immediatelyaftertheword“LOCK’
goesoff, waitoneminuteandtry
again.
Aftersd
L When a cleancycleisfinished,
theword “CLEAN” willbe off in
thedisplay.
2. Vv’aituntilthe ovenhascooled
belowlockingtemperature(about
20-30minutes)and the word
“LOCK” isoff in the display.
3 S t d L H
t t l a f a i w g
Youwill notbe ableto open the
door unless the oventemperature
isat a safe level. If you cannotopen
the ovendoor immediatelyafter the
word “LOCK” goesoff, waitabout
one minuteand try again.
Youmaynotice somewhite ash
inthe oven.Justwipe itup with
a damp cloth.
I w s r r t
w a sos w p
B
sureto rinse thoroughlywith a
vinegarand water mixture. These
depositsare usuallya salt residue
thatcan notbe removedbythe
clean cycle.
If the ovenis not clean after one
clean cycle, repeatthe cycle.
i-
r.
2
Page 21

care
the (Contimxed)
Questions a An
.
w wonm ovdean
immediatelyeventhoughIset the
controlscm-rectIy?
A. Checktobesurethelatch
handleis movedtothe right.
Q.If my oven clock is not
working,canIstillseM-ck3an
myoven?
A. No. YourAutomaticOven
Timerusesthe clockto help start
andstopyourself-cleaningcycle.
Q. CanI usecommereia~oven
cleanersonany part of my
self-cleaningoven?
A. No cleanersor coatingsshould
beusedaroundanypart ofthis
oven.Ifyoudo usethem and do not
wipetheovenabsolutelyclean, the
residue can scar the ovensurface
anddamagemetalparts the next
timethe ovenisautomatically
cleaned.
Q Can I clean the WovenGasket
aroundtheovendoor?
. Yes,but carefully,and onlywith
aclean spongeto soak the soiled
areawith hydrogen peroxide. See
page 19.
Q.After having just used the
o}’en,theLOCKED light came
onand 1couldnot move the latch
handle. Why?
A. After severalcontinuous hightcmperaturebakings or broilings,
tfwLOCKED lightmay comeon,
Theovendoor can’tbe latchedfor
self-cleaningwhilethe LOCKED
lightison. If thishappens, letthe
oivn cool untilthe LOCKED light
LUMSoff. Then the oven door can
~+
belatched for self-cleaning.
Q. What shouldI do ifexcessive
smokingoccursduringcleaning?
A. Thisiscausedbyexcessivesoil.
PresstheCANCELbutton.Open
windowsto rid roomof smoke.Wait
until the ovenhascooled(about
20-30minutes)andthewordLOCK
isoffin thedisplay.Wipeupthe
excesssoiland resetthecleancycle.
Q. Is the “crackling” soundI
hearduringcleaningnormal?
A. Yes.Thisisthesoundofthemetal
heatingand coolingduringboth the
cookingand cleaningfunctions.
Q. Shouldtherebe any odor
duringthe cleaning?
A. Yes,theremaybe a slightodor
duringthe first fewcleanings.
Failuretowipeoutexcessivesoil
might also causea strongodor
whencleaning.
Q. What causesthe hair-like
lineson the enameledsurface
ofmyoven?
A. This is a normal condition,
resultingfrom heatingand cooling
duringcleaning. These linesdo not
affecthowyour ovenperforms.
Q.
W doIhaveashleftin my
ovenafter cleaning?
A. Sometypesofsoilwillleave
adepositwhich is ash. It can be
removedwitha damp spongeor
cloth.
IQ.My ovenshelvesdo notslide
easily.Whatisthe matter?
A. Aftermanycleanings,oven
shelvesmaybecomeso cleanthey
do notslideeasily. If youwish
shelvesto slidemoreeasily,
dampenfingerswitha small
amount of cookingoiland rub
lightlyoversidesofshelfwhere
theycontactshelfsupports.
Q.
I ovenshelveshave become
grayafterthe self-cleancycle.Is
thisnormal?
A. Yes.Afterthe self-cleancycle,
the shelvesmaylosesomeluster
anddiscolorto a deep gray color.
I
Page 22

—
—
PART MATERIALSTOUSE GENERALDIRECTIONS
BroilerPanandRack
o SoanWat
Drf a cop a rasli( n l sop a r s i o 1
~ Soap-FiScouI%
co)Sprideteo p a raF p w
w w a s d
o
PlasScourPa
clo patoovraL p a r stf a f miW
scour
. Dishwasher-Safe
ifnecessrmv.Rinseanddrv.C)PTIOhJ:Cleanmmandrackindishwasher,DO NOT
I
I CLEANIfi SELF-CLEANINGOVEN. “
‘ @MiSoanWaPulloffknobs.Washgently,butdonotsoak.Dryandreturncon{rolknobstorange.
Seeinstructionsonpage18.
Washcontrolpanelwithsoapandwater,usingasoftcloth.Donotuscabrasive
cleaners.Rinseanddrywithasoftcloth.
ControlKnobs
ControlPanel
o MildSoapandWater
OutsideGlassFinish
o
SoanWater
Waa glwicldaminsoapywater.Rinseandpolishwithadrycloth.
Ifknobsareremoved,donotallowwatertorundowninsidesurfaceofglasswhile
cleaning.
Waria thpowiad clDONOTUSEsteelwool.abrasives,
ammonia,acids,orcommercialovencleanerswhichmaydamagethefinish.
JIetal, including
SideTrims,
TrimStrips and
BrushedChrome
Backsplash
* SoapandWater
PorcelainEnamel
Surface*
including
oven Frame,
Insideoven Door
and Removable
oven Bottom
e PaperTowel
~DryCloth
@SoapandWater
Avoidcleaningpowdersor harshabrasives whichmayscratch theenamel.
Ifacidsshouldspillonthe rangewhileitis hot, useadry papertowelorcloth
towipeuprightaway.Whenthesurfacehascooled, washandrinse.
Forotherspills, suchas fatsmatterings,etc., washwithsoap and waterwhen
cooledandthenrinse.Polishwithadry cloth.
PaintedSurfaces
OutmSideJ1’ails
@Soapand Water
Usea solutionofmildsoapandwater.Donotuseanyharshabrasivesorcleaning
powderswhichmayscratch or mar the surface.
DHydrogenPeroxide Soakwith hydrogenperoxide.Frequentsoakinghelpspreventsoil build-up.Do
notrub. See self-cleansectionformore information.
(hen Liner )SoapandWater Coolbeforecleaning.Frequentwipingwith mild soapandwaterwillprolongthe
timebetweenmajorcleanings.Besureto rinse thoroughly.
1Soapand Water
1Dishwasher-Safe
Shelvescanbecleaned indishwasherorby hand, usingsoap and water.Rinse
thoroughlytoremoveanysoapafter cleaning. Shelves mayalsobecleaned in selfcleaningoven,butmaylose some luster and discolor.
Cleanasdescribed belowor indishwasher.DO NOT CLEAN INSELF-
CLEANING OVENas theywilldiscolor. Wipeallchrome drip pansafter each
cookingsounnoticedspatter will notburn on the nexttimeyoucook.Toremove
burned-onspatters, useanyorall cleaning materials mentioned. Rublightlywith
scouringpadto preventscratchingofthesurface.
Chrome-Plated
Drip Pans
Soapand Water
Stiff-BristledBrush
Soap-FilledScouringPad
(Non-metallic)
Dishwasher-Safe
Burner Grates SoapandWater
Soap-FilledScouringPad
(Non-metallic)
Liftout whencool. Soak5-10minutes ifdesired in solutionofwarmwaterand
dishwasherdetergent. Scourwithmaterials mentionedtoremoveburned-onfood
particles. DO IWYI’CLEAN IN SELF-CLEANING OVEN.
Surface Burners
Solutionfor Cleaning
InsideofCoffee Makers
Soap and Water
MildAbrasive Cleanser
~ DampCloth
Wipeoffburner heads.If heavy spilloveroccurs, removeburners from range (see
page 18)and soakthemfor20 to30minutes in solutionof hotwaterandproduct
forcleaning inside ofcoffeemakers, such as Dip-It@brand. If soildoesnot rinse
offcompletely, scrubburners with soap and water or a mildabrasivecleanser and
adampcloth. Dryburnersin a warmovenfor 30minutesbefore returningthem to
[hcrange.
!+orage Drawer Storagedrawer mayberemovedforcleaning. Washwith soap and water, Rinse
withadamp clothand dry.
CISoapandWater
‘Spil][]geOfmarin:]dcsqfn,tit.juices,tomatosaucesandbastingmaterialscontainingacidsmaycausediscoloration.Spilloversshouldbewipedupimmediately.
u
itcarbeitaknot toumy hotportion oftheoven. When the surface is cool, cleanand rinse,
Page 23

o mermmstit
Adjustment
—
Thetemperatureinyournewoven
asbeenset correctlyatthefactory,
sobesuretofollowtherecipe
temperaturesandtimesthefirstfew
timesyoubakeinyournewoven.
Ifyouthinkthe ovenshouldbe
hotterorcooler,youcanadjustit
yourself.Todecidehowmuchto
changethetemperature,settheoven
temperature25°F.higheror lower
thanthe temperaturein yourrecipe,
thenbake.Theresultsofthistest
shouldgiveyouanideaofhow
muchthetemperatureshouldbe
changed.
Toadjusttemperature:
1. PushtheBAKEbutton.
2. Selecta temperaturebetween
500”F.and550”F.withtheSET
knob.
3. Quickly(withintwoseconds,
beforethe BAKEfunctionenergizes)
pushandholdtheBAKEbutto~for
about 5 seconds.The displaywill
showaplusnumber,a minus
umber,or “00~’
4. TurntheSETknobtoadjustthe
temperaturein
5“steY c
raii un“+F sho t
dispo loi un‘~3
shoo t dispI t con
beeps and flashes, push the
CANCELbutton aid startover.
5. Whenyouhavemadethedesired
adjustment,pushtheCLOCK
buttontogobacktothe timeofday
displayor touseyourovenasyou
wouldnormally.
NotT adjusdesc
abowin chat self
temper
Broilando Bwner
Air $Ymtters
Air adjustmentshuttersforthe
broilandovenburnersregulatethe
flowofair totheflames.
The air adjustment shutter forthe
top(broil)burnerison the rear
wallofthe oven.
The shutterforthe bottom(oven)
burner is near theback wall.
Toadjustthe flowof airtoeither
burner,loosenthePhillipshead
screwandrotatethe shutterto
allowmoreor lessair intothe
burnertubeasneeded.
I
-
The flames for the top (broil)
burner shouldburn steadywith
approximately1“bluecones and
shouldnot extendout overthe
edgesofthe burnerbaffle.
Todetermine it’the bottom (oven)
burner flames areproper, remove
theovenbottom (see page 17)and
theburner baffle. The flames
shouldhave approximately 1“blue
coneswith no yellowtipping.
When the baffle is back inplace,
the flames will resettle.
I
Page 24

——
PROBLEM
I
POSSIBLE CAIJSEAND/ORWHAT T’ODO
17BUR
D N LI
BURHA
YELLOWOR
YELLOW-TIPPED
FLAMES
BURNERFLAMES
VERYLARGE
ORYELLOW
SURBUR
KNWILL
TU
TIC
SOtJNDOF
SPARKIGNITER
PERSISTSAFTER
BURNER LIGHTS’
TICKING SOUND OF
SPARKIGNITER
PERSISTSAFTER
BURNER 1STURNED
O
OVENDOES NOT
COOK PROPERLY
CLO
A
MHWJTW
TIND N WO
eMakesuretheelectricalplugispli alive,properlygroundedpOWf)~c)LJdfX.
* Gas s n ~oo n t
on.
(A)%!iehm’
f%MI
ca
f se
~~
( Yellow-tipsonhmer
(c) Softbhwfkwnes–
comf L g
N f n g
eIfburner flameslooklike(A),callforservice.Normalburnerflamess l l
( ordepo t t o g y u
@WiL
g s y tioninner cones is normal.
~Ifrage isconnectedto LPg c d s i theinstallationinstructions.
~Toturn fromOFF position,
p t k inandthenturn.
oSparkigniternotde-activated.Turnburneroffandrelight.
eSom habuu o t b o t k P t k sto t s a
clS pa1
~Aluminumf beingused impi o
~@
vent blockedon top ofrange,
~Incorrectcookwarebeingused. Check eachcookingsectionfor cookwaretips.
=1oven bottomnotsecurelyseatedin
po
sEle
Con
s incorrectly.Reviewpages9a 1
sCh~o
b ~oandbroilingproblemson pages 11-15.
~M&e surethe e~ectrica]@~gispluggedintoalive,properly groundedpower out~et’.
!Check forPoweroutage.
N COM
I @Lightbeino
Page 25

—
PROJ3LEM
OVENWILLNOT
SELF-CLEAN
CIVENDOO’RWILL
NUTUNLOCK
STRONGODOR
—
POSSIBLECAUSEAND/ORWHATTODO —
@iYK?PTIME mustbemorethan3?4hours later thanSTARTTIME.
*Oventemperatureis toohighto setself-cleanoperation.Allowtherangetocoolto
roomtemperature.
@Theself-cleancycleisnotfinished.T-heovenmust cool belowthe locking
temperaturewhichtakesapproximately20 to 30 minutesaftercleancycleis
completed.
~Improperair/gasratioin oven.Adjustovenburnerair shutter.
e An odorfromtheinsulation aroundthe ovenliner is normalforthe first fewtimes
ovenisused. This istemporary,
2
-
Page 26

Beforey begirthinsandcarefully.
-.
ALL CODE3 AND
Notetohwalkr-lk? suretokm thesein$tructkm$withthecmsunm!r.
Notetocm$umer—Keepthesehstrlnctiomforfuturereftmmce.
Note—Thisappliancemustbeproperlygrounded.
lnstalo thramu
conf
wilocodo i
th
abso locodwi
th
NatiFuG Co
ANZ223
Thrange has been design-
certified by the American
GasAssociation according to
ANSI Z21.la-1989.As with any
appliance usinggas and
generating heat, there are
cer
safprecay sho
follY wifitho
pag
2thr5i thbo
Rethsaprec
care
~Hayorainstb
aqualinsto ser
techni
@Yora
mub elect
groui accorwi
loccoo i t abso
loccodi accorwit
NatiElectCo(AP
NF
70-1S Gro
Instro pa3
eBtfinstayor
o
limMm o a ot
synthflmwr
ma
sut
flcovec
M)wit
shr~nwaro disco
D n inst raov
carpeunla sho
1/4-incplyo sim
insuli plabett
rana carpe
a ~a~~s Anti-Tip device is
inst
~
Ma
s t w
cov
art rac
wit
hegenb t
ra
u
t 20
~Avplca
a
t raT ret ha
cab reao t o
flo opebu
insa mevenh
ovt rat pr
fora le5 inbe
t fro t cab
T venth m b
conso shmen
let 0.01
th
(
2 U StagaIn
abt cot w a
cleo n l t 1 i
bett h a t
undo t com
mato mecaT
hom b lea w a
t appa ceo
t appClebe
t
coo
sua t
venth suM
PWN H ‘T2
INC
@I
ca
a p a t
r a am c
o 3 i b t c
s a t b o
unc
@I a3 c b
c s a o
com o m
cac b m
p t u o t
caa t c t
w n l t l
inm c w
s m n l t 0 i t ( 2 U
Stg
Clb t c
s a p c
M N B L Y
2 D T v
dif t p o t
c s t t b o
ado c
exc t 1i t
t p o t r s m
n b l t 1 i (
d o f p
~~ o a r t a m
det h y k
T b s n b o
w c o t g
S a c r i f
a d t y r a
w v y w
?Z5?
Page 27

t..
a ck%
=i1
G-enerd
@See Figures 1and 2 for all rough-
inand spacingdimensions.These
dimensions must be met for safe
seof your range. The locationof
theelectricaloutlet and pipeopening
shownon page29 may be adjusted
to meet specificrequirements.
@The rangemaybe placed withO“
clearance (flush)at the back wali
and side wallsof the range ifthe
frontedgesof the rangesidepanels
stickout beyondthe cabinetfronts
at least 1/4’;See Figure 2.
Do not locate the range where it
maybe subjectto strongdrafts.
Anyopenings in the floor or wall
behindthe range should be sealed.
Makesure theopeningsaroundthe
baseof therange that supply fresh
air forcombustion and ventilation
:~renotobstructed by carpeting or
\\oodwork.
6“Min
bet
raa
refrig
n
‘i U
i
I
+
S —
+
a
ra
~
i
clea
bet
raa
wao
combu
surf
Fi2
o free
I
~OJ~1 Mi
Pm.iFl=l
.-..—.—
A ?
9
rh
u
l
I
-
Mad
r
f caa ;
r
.
‘; ~~~fr
F e
o r
s p
f
f c
f
Important:Toreduce therisk of
burns or firewhen reachingover
surfaceburners, cabinetstorage
spaceabovethe rangeshouldbe
avoided.If cabinet storagespaceis
to be providedabovethe range,the
risk can bereduced byinstallinga
rangehoodthat sticksout at least
5“beyondthe front ofthe cabinets.
Cabinetsinstalledabovea range
maybe no deeper than 13!’See
Figure2.
Yimrm
Your range, m many Otkr
household
items, is heavyand
can settle intosoft floor coverings
such as ‘cushionedvinylor
carpeting. When movingthe range
on this type of flooring, use care,
and itis recommended that these
simpleand inexpensiveinstructions
be followed.
The rangeshouldbe installedon
a sheet of plywood (or similar
material)as follGws:When the
J700rcoveringends at thefront oj
the range,the
a t t r
w r o s b b u w
plt t s l o h
t t f coT w
a
op
o t s d
a a t r t b m f
clo se
Modelandserial
N Lomtion
The modeland serial numbers are
on a labellocated on the leftfront
frame when you open the storage
drawer. (See illustrationbelow.)
Page 28

(con
‘h
Needed
*Phillipsandflatblade
screwdrivers(oneflat bladewitha
shafidiameteroflessthan3/16”)
*Pencilandruler
~Twopipewrenches(one
forbackup)
~ l;{”open-endor adjustable
wrench
~3/16”open-endor socketwrench
@Nutdriver
Inaddition,for LP gasconversion,
youwillneed:
~5/16”open-endwrench
~1/2”open-endwrench
Additional
Needed
~Gasline shut-offvalve
~Pipejoint sealantthat resists
actionofnaturaland LP gases
@Flexiblemetalappliance
connector(1/2”I.D.). A lengthof
5 feetis recommended for ease of
installationbutother lengthsare
acceptable.
@Flare unionadaptor for
connectiontogas supply line (3/4”
or 1/2”NIT x 1/2”I.D.)
@Flare union adaptor for
connectiontopressure regulatoron
range(1/2”N~ x 1/2”I. D.)
@Removealltapeand packaging.
Besureto removethe plasticfilm
thatcoverssomechromeparts
(aroundglassovendoors,sidetrim).
@Taketheaccessorypackoutof
theoven.
~Checkto be surethat no range
partshavecomeloose during
shipping.
@Liftthecooktopand removeand
discardthe shipp~ngscrewsholding
downthetop burners.
STEP1
P Adequate
GM
Yourrangeisdesignedtooperate
ata pressureof4 inchesofwater
columnon naturalgasor, if
designedforLP gas(propaneor
butane), 10inchesofwatercolumn.
Makesureyouare supplyingyour
rangewiththetypeofgasforwhich
it isdesigned.The type ofgas and
theoperatingpressure forwhich
your rangeisdesignedare identified
on the modeland serialnumber
platelocatedon the rangeframe
belowthe surfaceburner knobs.
If, at anytime in the future, you
decideto use this rangeon a
differenttypeofgas, conversion
adjustments must be made bya
qualifiedservice technicianbefore
attemptingtooperate therangeon
thatgas.
For proper operation,thepressure
ofthe gassuppliedto the regulator
mustbe betweentheoperating
pressure shownon themodel and
serial number plateand 13inches
of watercolumn. When checking
for proper operationofthe
regulator,the inletpressure must
beat least 1inchgreater than the
operating(manifold)pressure
shownon the modeland serial
number plate. The pressure
regulatorlocatedatthe inlet of the
rangemanifoldmust remain in the
supplylineregardlessof whether
naturalor LP gasisbeing used. A
flexiblemetal appliance connector
used to connectthe rangeto the gas
suppIyline shouldhavean I.D. of
1/2inchand be 5 feet in length (but
shorter and longer lengthsare
acceptable) for ease of installation,
Page 29

2
d
t Rangeto(IW
~
offthe maingassupply valve
oredisconnectingtheoldrange
andleaveit offuntil new hook-up
hasbeencompleted.
Becauserigidpipingrestricts
movementoftherange,theuseof
anA.G,A.-certifiedmetalappliance
connectoris recommendedunless
localcodesrequirea rigid-piped
connection.Neveruse anold
connectorwhen installinga new
range.
Topreventgasleaks,putpipe joint
compoundor wrappipe threadtape
withTeflon*onall male (external)
pipethreads.
L Install a manualgas lineshut-off
valveinthe gas linein aneasily
accessedIocationoutsideof the
range.Make sure everyone
operatingthe rangeknowswhere
andhowto shutoff the gassupply
totherange.
Install male 1/2”flare union
aptorto the 1/2”NPT internal
‘adat inlet ofpressure regulator.
Installmale 1/2”or 3/4”flare
unionadaptortothe NPT internal
threadof the manualshut-offvalve,
takingcare to back-upthe shut-off
valveto keep it fromturning.
4. Connectflexible metal
applianceconnector to the adaptor
on the range. Positionrangeto
permitconnectionat the shut-off
valve.
5. ll%en all connections have
been made, make sure aHrange
controlsare inthe off position
and
tuon the ma~ sq
vah
Use a liquid leak detector at
alljoints and connectionstocheck
for leaks in thesystem.
CAUTION: Do No%’USE A
FLAME TO
CHl?G
LEA
G P a ElOuLo
V / e
R W
+
,/’!
A.. R’””‘
ArOcc
b Ra
RiPiHo
frF!o W
112
!/
BlIron Pi
ThrWa
(AltHoo
Iron Nip
FlCol
Pre
Reg
1/2
rf
1
M
Ad
E;
Co
When usingtestpressures greater
than 1/2psigto pressure testthe gas
supply systemofthe residence,
disconnectthe rangeand individual
shut-offvalvefrom the gassupply
o 1 psig or less to testthe gas
supply system, simply isolate the
range from the gas supply system
by closing the individualshut-off
valve.
piping. When using test pressures
an
Page 30

(con
3
cot Range
-toElectricity
(Forrangesrequiringelectrical
power)
ElectricalR
120-volt,60 Hertz, properly
groundedbranch circuitprotected
bya15-amp, or20-amp. circuit
breakerortime delayfuse.
ExteCoCau
Becauseofpotential safetyhazards
associatedwith certain conditions,
westronglyrecommendagainst
theuseofanextension cord.
However,ifyoustillelectto use an
e~ten~ioncord, it isabsolutely
necessary thatitbe a UL-listed
3-wiregroundingtypeappliance
extensioncord and thatthecurrent
carryingrating of the cordin
timperesbe equivalentto,or greater
than, the branch circuit rating.
Grou
HVIPORPlease readthis
sectioncareftdiy.FORPERSONAL
SAFETY,THISAPPLIANCE
MUSTBEPROPERLY
GROUNDED.
Thepower cord ofthis range
isequipped with a three-prong
(grounding)plug which mateswith
a standard three-prong (grounding)
wallreceptacleto minimizethe
possibility of electric shock hazard
fromthis range.
Thecustomer should have the wall
receptacleand circuit checkedbya
qualifiedelectrician to make sure
thereceptacle isproperly grounded.
Whereastandardtwo-prongwall
receptacleisencountered,it isthe
personalresponsibilityy and
obligationofthecustomerto haveit
replacedwitha properly grounded
three-prongwallreceptacle.
DO NOT,UNDER ANY
ICIRCUMSTANCES,CUT OR
REMOVE THE THIRD
(GROUND)PRONG FROM
THE POWER ICORD.
USAGESITUATIONSWHERE
THEAPPLIANCEPOVWERCORD
WILL BE DISCONNECTED
INFREQUENTLY. For 15amp.
circuits only.Do notuse an adapter
on a 20 amp. circuit.Where local
codespermit, a TEMPORARY
CONNECTIONmaybe madeto a
properlygroundedtwo-prongwall
receptaclebytheuseof a UL listed
adapteravailableatmosthardware
stores.
TEMPOMET
(ADAPLN
~
‘ ,
PERMI
I CAN
I F
ALILA
I ~ f,
PRONGS
-
t
\ d
_
P
I ‘< ‘“ e I-A I
a
/
Q
“ INPR
GRA
FICONN
BEU
The largerslotintheadapter must
be alignedwith the largerslotin the
wallreceptacletoprovideproper
polarity in the connectionofthe
powercord.
Caution: Attachingtheadapter
groundterminal to thewall
receptaclecoverscrew doesnot
groundthe applianceunlessthe
coverscrew is metal,
a n
insua t w reci
grotht howi
Y shh t cich
b aquaelet m
sut reci pr
gro
Whendisconnectingthepower
cordfromtheadapter,alwayshold
theadapterwithonehand.If this
isnotdone, the adapter ground
terminalisverylikelyto breakwith
repeateduse.Shouldthis happen,
DO NOTUSEtheapplianceuntila
propergroundhasagainbeen
established.
USAGESITUATIONSWHERE
APPLIANCEPOWERICORD
WILL13EDISCONNECTED
FREQUENTLY.
Do notusean adapterplugin these
situationsbecausedisconnectingof
thepowercordplacesunduestrain
on theadapterandleadstoeventual
failureoftheadapterground
terminal. Youshouldhavethe twoprongwallreceptaclereplacedwith
a three-prong(grounding)receptacle
byaqualifiedelectricianbefore
usingtheappliance.
The installationofappliances
designedformobilehome
installationmustconformwiththe
ManufacturedHomeConstruction
and SafetyStandard,Title24 CFR,
Part3280(formerlythe Federal
StandardforMobileHome
Constructionand Safety,Title24,
HUD (part
2 o w s
sti n apt
Stf MaH
Ins1 (M
H S Coa S
U A A2o w
l c
13Di
T dip i l o
t b o t r T d
g p a p s o o
r b
3
Page 31

ealanyopeningsin thewall
ehindtherangeand in the.floor
undertherang=whenhookups are
completed.
5
For Electric Ignition
check
surface Burner
Ignition
Selectatop burner knoband
simultaneouslypush in andturn to
LITE position. Youwillhear a
snappingsoundindicatingproper
operationofthe sparkmodule.
Oncethe air hasbeen purgedfrom
thesupply lines, burner should
lightwithin4 seconds.After burner
lights,rotateknob out of the LITE
position.Try eachburner in
successionuntilall burners have
beenchecked.
‘checko Burner
(!C
ouovi desit ope
quietlyand automatically.This
electricignitionmodelrequires
electricalpowertooperate. In the
caseofapoweroutage,theoven
burnercannot belitmanuallywith a
match.Attemptsto do so mayresult
ininjuryifelectrical poweris
restored.
6
AdAir
imkcessary
Theair adjustmentshutterforthe
ovenburnerislocatedatthe open
endoftheventuritubeand sitson
thehoodofthe valve.
Screw
A Shu
Loosenthe Phillipshead screw
and rotatethe shuttertowardopen
or closedpositionas needed.
Todetermine if the ovenburner
flamesare proper,observethe
flames. They shouldsteadywith
approximately 1“ blue conesand
shouldnotextendout overthe
edgesof the burner baffle.
L’eveh’lgt Range
For proper cookingand baking, the
rangemust be leveled. Leveling
legsare located on each corner of
the base of the range. Removethe
bottomdrawer and youcan level
the rangeon an uneven floor.
T ret drp t
dro a t w t u t
fra t i o T ret
draingla t b o
t drbet s
o t
ragliL t dri
nect ineaL t
fro t drdot p
i t cl
l/8y’Minimurn
O of the rear levelinglegs will
engagetheAnti-Tipdevicebracket
(allowforsomesideto side
adjustment).Allowa minimum
clearanceof 1/8”betweenthe range
andthelevelinglegthat isto be
installedintotheAnti-Tipdevice.
Install the oven shelves(seeuse
andcare sectionfor instructions).
Puta spirit levelor a glass
measuringcup partially filledwith
wateronone of theoven shelves.
U a 1 o e w o a
adw t e b
o t f lel t o
t t e N u t
w t a t l l
u t r i l
Page 32

(con
H toc theR
f u withm Gas
theA4Mi-!npDem N
wmING:
@VerifythattheAnti-Tipdevice
*Rangemustbe securedwiththe
isin place(seepage3).
Anti-Tipdevicesupplied.
@Thisrangehasbeen designedto
@Unlessproperlyinstalled,the
meetallrecognizedindustrytip
rangecouldbetippedbyyouor a
standardsforailnormalconditions.
childstanding, sittingor leaning
@Theuseofthisdevicedoesnot
on opendoor ordrawer.
precludetippingofthe range
whennotproperlyinstalled.
I
C t P R
Do not removethepressure
regulator.
L
ToNe
2 I t brs o t r
@Philhescrew
i adjt acap t
bragb w a
@l openo adju
caa shi Fi1
wre
I thi n adca
Pressure
Regulator
L Removethecooktopandlocate
thepressureregulatorat rightrear
ofrange.
Bracketattachesto floor or wall
toholdeither right or leftrear leg
leveler.If fasteningto floor,be
surethat screwsdo notpenetrate
electricalwiring or plumbing.
If thiscannotbe determined, use
shorterscrewsthat will not
penetratethroughflooring.
detwht loo t
ras (paoupa
w b Plt brw i
oue a t loa
agb waS Fi1
2 U ac t r t c
f t p r
3. Turnthecap overand engage
itin the slots. LP shouldnowbe
visibleonthetopof the cap.
3. Determine whether youwill
anchorthe brackettothe flooror
wall.Fastenthe bracket securely
withthe screwsprovided. Screws
are self-drillingin wood, plywood,
particleand chip board, and most
metalframing. SeeFigure 2. If
attachingto masonry,you can buy
suitablescrewsand anchors at a
hardwarestore. Usea masonry
drill todrill therequired holes.
If the bracketcame with your
range,it isshipped attached to the
lowerrangeback. Removeand
discardthe shippingscrew that
holdsthe bracket aild then follow
instructionsbelow.
2
Co
S B
Or
forI G
CAm mowing
adjustmentmustbe madebefore
turningon the burner. Failureto
do so could result in serious
injury due to high flamesand
toxicfumes.
L Decidewhether the bracketwill
beinstalledon theright or left side
ofrangelocation.
4. Usingthe wrench, back outthe
fourleglevelersat least twoturns.
Seethe installationguide formore
levelinginformationbefore
positioningrange.
b
~ Adjacent cabinet or final
location or range side panel
\\\12
Wall
L Lift and lockcooktop.
I
Fi1
5. Slide the range into place. Be
sure rear leg levelerfully engages
slotinbracket. Ifrange cannotbe
movedback far enough for rear leg
levelerto enter bracket, move
bracket forward as required and
attachto floor in new location.
I
Fi2
I
\
Bracket i
I ‘
‘ Wall plate
Screw must enter
~ 1’
I
1
3
Page 33

onv(hBurOri
Removeovendoor,storage
wer,ovenbottomandflame
spreader.Theburnerorificeis
locatedbehindametalshieldat
centerbottomofrange.
r
Screw
Air Shutter
I
2. Removethemetalshieldand
usea 1/2”wrenchtoturntheburner
orificespudclockwiseuntilitissnug
withthebase.Donotovertighten.
4
AdA AdjuShu
Theairadjustmentshutterforthe
ovenburner islocatedattheopen
doftheventuritubeandsitson
lehoodofthevalve.
Theairshutter shouldbecompletely
openforusewithLP gas. Loosen
thePhil]ipshead screwand rotate
theshuttertoopenposition.
I
1
Todetermineiftheovenburner
flamesareproper,observethe
flames.Theyshouldburnsteady
withapproximately1“bluecones
andshouldnotextendoutoverthe
edgesoftheburnerbaffle.ForLP
gas,thisshouldoccurwhentheair
adjustmentshutteriscompletely
open.
33
—.
Page 34

.-
-
VVt ~mxo y n R a~~ret
vmrthi y evneirlfc ass
e’b
the
A y hat c i call
,
wiIlprovideexpertrep~irserviceon
ur RCAappliance,scheduledat a
e that’sconvenientfor you.ManY
ConsumerServicecompany- ‘
eratedlocationsofferyouservice
t~dayor tomorrow,or at yourconvenience(’7:00a.m.to 7’:00p.m.weekdap, 9:00a.m.to2:00p.m.Saturdays).
Our factory-trainedtechniciansknow
yotlrapplianceinsideand out—so
most repairscan be handledinjust
one visit,
Consumerswithimpaired hearingor
speechwhohaveaccessto a TDDor a
conventionalteletypewritermaycall
800-TDD-GEAC(800-833-4322)tO
request service.
You can have the secure feeling hat
CE Gonsumer Service will still be
there after your IKYi product warranty expires. purchase a GE contract
while your warranty is still in effect
and you’ll receive a substantial discount. With a multiple-year contract,
you’re assured of future service at
today’s prices.
Tekmmatm
Devf theDeaf
kdivichds q to servicetheir
ownappliancescanhaveneeded
partsor accessoriessentdirectlyto
theirhome,freeof shippingcharge!
Our partssystemprovidesaccessto
over47,000GenuineRenewalParts...
and allare fillywarranted.VISA,
MasterCardand Discovercardsare
accepted.
Usermaintenanceinstructions
containedin this
bookletcoverpmeeduresintendedtobe performedby
anyuser.Otherservicing generally
shouldbe referredtoqwdifkd servicepemmneL Cautionmustbe
exercised,sinceimproperservicing
maycause unsafeoperation,
1
I
Page 35

L
Yam RCA IMJ$JGE
Saveproofof originalpurchase date such asyour salesslipor cancelledcheckto establishwarranty period.
Is COVERED
FULL 0.NE-YEARWARRANTY
For orte year
frdao oripurw
wiprovfro chapaa sela
i yohot repo repa
part ofthe
Rt-nzgethat failsbecause of a manufacturing defect,
This warranty is extended to the original purchaser
and any succeeding owner for products purchased
for ordinary home use in the 48 mainland states,
Hawaii and Washington, D.C. In Alaska the
warranty is the same except that it is LIMITED
because you must pay to ship the product to the
service shop or for the service technician’s travel
costs to your home.
F(3R SERVICE
W a R stt prt h q
pra seThw h d
G COSEa l i t s
indt fuy sen S y
appn sed w p o
bel i t W o Y P o y
teldif G COS
o a autR APS
WHI N ca
~Sertrt yohot tey h
t u t pro
Readyour Use and Carematerial. I y t h
a quesabopert propl
conYodeao
Manag&- Consumer Affairs
RCA Appliances
Amliance Park
~;isvK 40
@Imprinstal
f y haa instaprocony
ieao instaY a respf pro
ideqelectgaexhaa ot
:onnefacil
@Repo h f o reo c
bre
~Fao t pri i i u f o t i
inpuo u co
@Dat prc b acf
flo a o G
WARI N REF
COINDA
omstatesdonot allowthe exclusionorlimitationofincidentalor
Warrantor:RCA Appliances
)nsequentialdamages, so theabovelimitationor exclusionmaynot
oply to you. This warrantygivesyouspecificlegalrights,andyou 1f
further Iaelpis needed concerning this
laalshavothrighwhivafrstat staT kn
hayoulegrighari yostaconsyoloco st
mmrwr
I$4arnager-Commmer Affairs
)nsumaffaioffio yostatAttorGene
llA.~~
Appliance Park
Louisville, KY40225
~2E3335G~~(1
b
6
c
 Loading...