

Page 1
—
I i
Anti-TipDevice 3,30
l?roblem Solver
22
.
Appliance Registration
2
Care and Cleaning
16-20
Clock/Timer 9
Safetv Instructions
2-5,23
Surface Cooking
8,9
Burner Grates “
16,20
Burners
19,20
Consumer Services 35
Control Panel
16 Clock and Timer
9
Energy-Saving Tips
5 Control Settinm
8
Features 6,7
Cookware Titx
9
.
Flooring under the Range 24
Drip Pans
16,20
Grounding
27 Flame Size
8
Installation Instructions
23-31
Lighting Instructions
8
Warranty
Back Cover
Levelirw
29
Lift-up CooktoP
16
—1
Model and Serial Numbers 2,24
Oven
10,
U.
BakindBakin~ Guide 12, 13
Broiling/Broiling Guide
15
Control Settings
H
Door Removal
16
Lighting Instructions
10
Preheating
5, 13
Roasting/Roasting Guide 14
Shelves
11,19,20
Thermostat Adjustment 21
—
Page 2
Read this book Um!flmy.
Itisintendedtohelpyouoperateand
maintainyournewrangeproperly.
Keepithandyforanswersto your
questions.
Ifyoudon’tunderstandsomething
or needmorehelp, write (include
yourphonenumber):
ConsumerRelations
AppliancePark
Louisville,KY40225
down the model!
and serial
nlm’lbers.
You’llfindthem ona label located
behindthestoragedrawerpanel on
theleftside oftherange front
frame.See page6.
Thesenumbers arealso on the
ConsumerProduct Ownership
RegistrationCard that came with
yourrange. Beforesendingin this
card, please writethese numbers
here:
Model Number
Serial Number
Usethese numbers in any
correspondence or service cak
concerningyour range.
rfea?iwxi
a range. e .
Immediatelycontactthedealer(or
builder)thatsoldyoutherange.
save time and
money.
Before you request
service.
● *
Checkthe ProblemSolveron
page22. It listscauses ofminor
operatingproblemsthat
YOUcan
correctyourself.
Hyoll need service.
● e
Toobtainservice, seethe
ConsumerServicespage inthe
back ofthisbook.
Toobtainreplacementparts,
contactRCA/GEService Centers.
We’reproudof our serviceand
wantyouto bepleased. If for some
reasonyou arenot happywiththe
serviceyou receive,here arethree
stepsto followfor further help.
FIRST,contactthe peoplewho
serviced yourappliance. Explain
whyyou are notpleased. In most
cases, thiswill solve the problem.
NEXT, if youare stillnot pleased,
write allthe details-including
yourphone number—to:
Consumer Relations
Appliance Park
Louisville, Kentucky40225
FINALLY, ifyourproblem is still
notresolved, write:
Major Appliance
Consumer ActionPanel
20 North WackerDrive
Chicago,Illinois 60606
Do or’use
.
Page 3
- Pmo~rrm~sAF~TYmsTRucTIoNs
.-:
1
-.
he California Safe Drinking
WaterandToxicEnforcerne~t
ActrequirestheGovernorof
California topublish a list of
substances knownto the state
tocauseca~cer,birthdefectsor
otherreproductiveharmand
requiresbusinessestowarn
customersofpotentialexposure
tosuchsubstances.
Gasappliancescancause
minorexposuretofourofthese
substances,namelybenzene,
carbonmonoxide,formaldehyde
aridsoot,causedprimarilybythe
incompletecombustionofnatural
gasorLl?fuels.Properly
adjustedburners,indicatedbya
bluishratherthanayellowflame,
willminimizeincomplete
combustion.Exposuretothese
‘-!!!$
ubstancescanbeminimized
– furtherbyventingwithanopen
windoworusingaventilationfan
rhood.
YouG-etYour
@~~~~ the show you
the oftheH%qy?.gas’
fcmMlf’‘valveandhowtoshut
it
offii’necessary.
@
~~~&!your range
and bya
inaccordance
withthektdlation Instructionsd
Anyadjustmentandserviceshould
beperformedonlybyqualified
gasrangeinstallersor service
technicians.
withaproperly-groundedthreeprongoutletinaccordancewith
theNationalElectricalCode.Do
notuseanextensioncordwith
thisappliance.
mmtipad!
i~”uryQmnkl
I’W!.lkTo
prevent
accidental
tippingofthe
range,attachit
tothewallor
floorby
installingthe
Anti-Tipdevicesupplied.(%x
InstallationInstructions.)To
checkifthedeviceis installed
andengagedproperly,carefully
tiptherangeforwarduntilit
engagesthedevice.
Ifyoupulltherangeoutfromthe
wallforanyreason,makesure
thedeviceengagestherange
whenyoupushtherangeback.
~~~ sure an
We removed from the range
beforeoperatingit,topreventfire
orsmokedamageshouldthe
packingmate~ialignite.
mngecanbeconvertedforuse
oneithertypeofgas.See
Instructions.
Page 4
T (continued)
fkes.Never
pickup a&ning
pm.Turndf’bumier,then
smotherflamingpanbycovering
panCmnpletelyWMlwell-fitting
M,cookiesheet01flattray.
Fkuninggreaseoutsideapan
canbeputoutbycoveringwith
b~ingsodaor,ifavailable,a
multi-purposedryclNMlkXd
orfoam-typefireextinguisher.
e ~~ ~g)~ $$~~fj
h an‘oven orm?w
the Do
notstoreoruse
gasolineorotherflammable
vaporsandliquidsinthevicinity
ofthisoranyotherappliance.
@ml not M cookinggrease
Or other IMteriaki
inmI-Mar therange.
@ pm-k,follow
thedirectionsexactlyandalways
cookthemeattoaninternal
temperatureofatleast170”F+.
Thisassuresthat,intheremote
possibilitythattrichinamaybe
presentinthemeat,itwillbe
kiliedandmeatwillbesafetoeat.
cookwarehandlestowardtheside
orbackoftherangewithout
extendingoveradjacentburners.
‘@Alwaysturn surface
@ watchfoodsbeing
friedat high!flameSettinge
@pJ~~~~~~~~~&@~@~@(~~~
oftherange.They
providetheairinletandoutlet
whichisnecessaryfortherange
tooperateproperlywithcorrect
combustion.
e~~ ~~t~~~~~~~~~~~~
surfaceifthewokhasa
ringwhichisphx’d
Wertheburnergratetosupport
thewok.Thisringactsasaheat
trapwhichmaydamagetheburner
grateandburnerhead.Also,it
maycausetheburnertowork
improperly.Thismaycausea
carbonmonoxidelevelabovethat
allowedbycurrentstandards,
resultingiriaheakhhazard.
@~o~~~f’r bea$
dryas Frostonfrozen
foodsormoistureonfreshfoods
cancausehotf%tobubbleupand
oversidesofpan.
~use least of
fatfor effective or deep”
fatfrying.Ming thepantoofull
offatcancausespilloverswhen
foodisadded.
@If ~ of#J;]~~~
fatswillbeusedin stir
togetherbeforeheating,orasfats
meltslowly.
s Mw~ysheatM
and
watchasitheats.
F2J~se deepfat
toprevent
fatbeyond.the
smokingpoint.
oUSe~HWpW=pansize—-Avoid.
pans
thatare oreasily
tipped.Selectcookwarelarge
enol.lgh$0
Contain.food,
toavoidboiloversaridspillovers,
andwithbottomskirgeenough
tocoverburnergrates.Thiswill
bothsavecleaningandprevent
hazardousaccumulationsoffood,
sinceheavyspatteringorspillovers
leftonrangecanignite.?Jsepans
withhandlesthatcaneasilybe
graspedandwiUremainCOOL
ISvyh~n UWhgg!kisscookware?
makesureitisdesignedfortopof-rangecooking.
@KeeptallJ@astksawayfrom
tophmws.
@TOav~idthe Of
bums,alwaysbecertainthat
thecmtrdsford burnersare
d OFF andM grates
am!cool to
thegrate.
@ foodsare
lm.kr the ‘km thefall
foff.Thefan,if may
spread
thef’lme.
e ~rqgfjiskmktedliWtWa
window9donotuselongcurtains
whichCOUMblowoverthetop
burnersandcreatea firehazard.
@ a pilotgoesout9(m
modelssoequipped),youwill
detecta faintodorofgasasyour
signaltorelightthepilot.V&m
relightingpilot,makesureburner
controlsarein,oOFFpositionand
followinstructmnsdescribedOH
followingpagestorelight.
e
If YOU SXIW gi3s9 and.youhive
alreadymakesurepilotsarelit,
Wrnoffthegastotherangeand
callaqualifiedservicetechnician.
Neveruseanopenflametolocate
aleak.
/
—$.
-k”
Page 5
@&amiawayfromtherange
when
openingthedoorda hot
OveneThehotairorsteam
which
escapes can cause Itmrmto
hands, face andhr
eyes.
~Keepovenfreefromgrease
!
@Maceovenshehesindesired
position
while oven is cool.
@Pullingoutshelf tothe shelf
stopisaconvenienceinlifting
heavyfoods.Itisalsoa
precautionagainstburnsfrom
touchinghotsurfacesofthe
doororovenwake
~Do#~heat food
h theoven.Pressure
could upandthe
odd burstcausingan
62 ~s~ fo~!j
anywhereintheovenexceptas
h thisbook.Misuse
couldresultinafirehazardor
damagetotherange.
* wingcookingW
bagsinoven,fobv
thernarwfiwturer’sdirections.
@U$eonly$$ass4XdKware
thatis foruse
ingasovens.
~AIw~~sremovebroiler
pan
from Ibroik
as
soon8syoufinish
Greaseleftinthepancancatch
fireifovenisusedwithout
removingthegreasefromthe
broilerpan.
aVIWn ifmeatistoo
closetothefkm?,thefat may
ignite.Trimexcessfattoprevent
excessiveflare-ups.
@MakeSlw’ebroik?rpm
isin
placecorrectlytoreducethe
possibilityofgreasefires.
@Ifyou haveagrease
fireinthebroilerpan,turnoff
mm, andkeepovendoorclosed
tocontainfireuntilitburnsc@.
@-&q! range Ckw andfree
of of’grease or
spimers which
mayignite.
* Daft torepair
orrepklceanypartofyour
rangetmkssit isspecifically
inthisbook.AH
otherserwicingshouldbereferred
toaqualifiedtechnician.
.
SurfaceCooking
~Use cookwareof mediumweight
aluminum, with tight-fittingcovers
and with bottomsthat completely
coverthe heatedportion of the
surface unit.
~Cook fresh vegetableswith a
minimumamount of waterin a
coveredpan.
~wat& foodswhen bringing them
quicklyto cooking temperatures at
highheat. When food reaches
cookingtemperature, reduce heat
immediately to lowestsetting that
willkeep it cooking.
e [Jse re~id~a]heat whenever
F=m
L
i ;.,:;yossible.For example, when
‘:--Y~ookingeggs in the she]~,bring
waterand eggsto boil, then turn
f~~~?OFF Position and ~ove~.with ]id
~~J complete the cooking.
~Alwaysturn surface unitoff
beforeremovingcookware.
@When boiling waterfor teaor
coffee, heat onlyamount needed.
It isnot economical to boila full
container ofwater for only
one or two cups.
owl-l Cwking
~Preheat the oven onlywhen
necessary. Most foods will cook
satisfactorilywithout preheating.
If youfind preheating is necessary,
put foodin the ovenpromptly after
the ovenis preheated.
QAlwaysturn ovenoff before
removing food.
~During baking, avoid frequent
door openings. Keep door open as
short a time as possible if it is
opened.
~Cook completeovenmeals
insteadofjust one fooditem.
Potatoes,other vegetablesand
somedesserts willcook together
with amain-dish casserole, meat
loaf, chicken or roast. Choose
foodsthat cook at thesame
temperature andin approximately
the sametime.
@Use residual heatin oven
wheneverpossible tofinish
cookingcasseroles, oven meals,
etc. Also add roHsor precooked
dessertsto warm oven, using
residualheat to warm them.
5
Page 6

L2BU5GPL
with
StandingPilotIgnition
LL?DILyi3wHMJ~ .B..J.42H.JAUCJUXK-JLJ
L2BIEWEL
withElectricIgnition
t
Page 7
—
see L2BWGE%
page
L2BW5GEL
LU.M35GEL
L2B235GEL
1 BroilerDrawer
19
I
2 Model and SerialNumbers
.
3 Anti-TipDevice
4 RemovableOvenBottom
2
I
e
—
3,30
I
+i--+--
4s
——
5 Oven TemperatureControl
e
4
4
63
4
4
6 SurfaceBurner Controls
7 SurfaceBurners andGrates
8
I
4
16, 19
I
4
8 Oven Light Switch
(letsyouturn interiorovenlight
on andoff)
9 Clock and Timer
H
9
C9 60
DigitalDigital
1
10 OvenVent
11 Chrome-Plated Drip Pans
al
16,20
I
d
54
I
12 Lift-Up Cooktop
-3---+-
e
13 PorcelainEnamel OvenInterior
14 Continuous-CleaningOven Interior
1’7
‘
1115 Oven Interior Light
16 Oven Shelves
e
2
1%
11, 19
2
“2
xl
(easily removedor repositioned
on shelf supports)
-@
17 Oven Shelf Supports 11 I
18 RemovableOven Door
(easily removedfor ovencleaning)
19 Window
20
I
SJ
~o ~roilerpanand~ack
19,20
I
Page 8
standingPM Model
L2BI.15GPL
Thesurfaceburnersonthese ranges
havestandingpilotsthatmustbelit
initially.TOlight them:
L Besuresurfaceburnercontrol
knobsareintheOFF position.
2. Removethegratesand Iiftthe
cooktopup(seepage 16).
3. Locatethetwopilotports and
lighteachofthemwith amatch.
4. Lowerthe cooktop.Yoursurface
burners are nowready for use.
Ekctrk IgnitionModels
L2M15GEL
L2M35GHJ
L2B235GEL
Surfaceburners onthese rangesare
lightedbyelectric ignition,e~ding
theneedfor standingpilotswith
constantlyburning flames.
hi caseofa power
outage,youcan
lightthepilotlessignitionsurface
burnerson yourrangewithamatch.
Holdalighted matchto theburner,
thenturntheknobtotheLITEposition.
use extreme caution when
J@@~ng~urner$ in this mawn!er.
Surfaceburners in usewhen an
electricalpoweroutageoccurs will
continue to operate normally.
8
sd’’ux?EhmRer
Theknobsthatturn thesurface
burnerson andoffare locatedon
thelowercontrolpanel irifrontof
theburners.
Thetwoknobsonthe left control
theleilfrontand leftrear burners.
Thetwoknobson therightcontrol
therightfrontandrightrearburners.
ToLi@t a surfaceBummer’
How
toselect mimesize
The flamesizeon agasburner
should match the cookwareyou
are using.
FOR SAFEHANDLING OF
COOKWARE,NEVER LET THE
FLAMEEXTEND UP THE SIDES
OF THE COOKWARE.Any flame
largerthan thebottomofthe
cookwareis wastedand only
servestoheat the handles.
Pushthe controlknob inandturn it
When using aluminum or
toUTE. On electricignitionmodels,
almninum”ckwlstainless steel
youwillhear alittle clickingnoise—
pots and pans, adjustthe flameso
thesoundoftheelectricspark
the circleit makesisabout 1/2inch
ignitingtheburner.
smallerthan the bottomofthe
cookware.
Afterthe burnerignites,turn the
knobto adjustthe flamesize.
Note:
@Do notoperatea burnerfor
extendedperiodsof timewithout
havingcookwareon the grate.The
finishon thegrate maychip without
cookwareto absorbthe heat.
C+Check tobe sure theburner you
turnedon isthe one youwantto use.
~Be SUrethe burners and grates are
COOIbeforeyouplace your hand, a
pot holder, cleaning cloths or other
materials on them.
Vi-Mmboiling, use this same
flame size—1/2inch smallerthan
the bottomof thecookware—no
matterwhat the cookwareis made
of. Foodscookjust as quickly ata
gentleboil asthey do at afurious,
rollingboil. A highboil creates
steamand cooks awaymoisture,
flavorand nutrition. Avoiditexcept
for thefew cookingprocesses
which need a vigorousboil.
when frying or
warmingfoods
instainless stw!lpaast ironor
enamelware keep the flame down
lower—toabout 1/2the diameter
of thepan.
when
fryinginglassor Wramic
cookware? lowerthe flame even
more.
--
Page 9
,
Ckdwvare
Aluminum:
Medium-weight
cookwareisrecommendedbecause
“theatsquicklyandevenly.Most
oocisblownevenlyin analuminum
skillet,Mineralsinfoodand water
.
willstainbutnotharm aluminum.
Aquickscour witha soap-filled
steel woolpad after each-usekeeps
aluminumcookwarelookingshiny
new.Use sauceDanswith ti~ht-
fittinglidsfor c~okingwit:
minimumamountsof water.
Cast Eon: If heatedslowly,most
skilletswillgive satisfactoryresults.
Emmdware: Under some
conditions, the enamel ofsome
cookwaremaymelt.Followcookware
manufacturer’srecommendations
forcookingmethods.
Glass:There are twotypes ofglass
cookware—thosefor ovenuseonly
andthosefor top-of-rangecooking
(saucepans,coffeeand teapots).
G1assconductsheat very slowly.
eatproof’CHassCeramic:Can
beusedfor either surfaceor oven
cooking.It conductsheat very
lowlyand coolsvery slowly.Check
cookwaremanufacturer’sdirections
tobesureitcanbe usedon gasranges.
StainlessSteel: Thismetalalonehas
poorheatingproperties,andis usually
combinedwith copper,aluminum
or othermetals forimprovedheat
distribution. Combinationmetal
skii!etsgenerally worksatisfactorily
ifused at mediumheat as the
manufacturerrecommends.
and
clack
TosettheClock,turntheknob to
theleft until thewords“SETTIME”
appearinthedisplay.Thenturnthe
knobineitherdirectionuntilthe
correcttimeisdisplayed.Aftera
slightpause,timeisset.
mmer
&?Amswws
Q. Howcan I use myMinute
Timerto makemysurface
cockingeasier?
A. YourMinuteTimer will help
timetotalcookingwhichincludes
timetoboilfoodandchange
temperatures.Do riotjudge
cookingtime byvisiblesteam
only. Food will cookin covered
containerseventhoughyoucan’t
seeanysteam.
Q. CanI usethe MinuteTimer
duringovencooking?
A. TheMinuteTimercan be used
duringanycookingfunction.
Toset the Timer,turn theknob
totherightuntil the words “SET
TIMER” appear inthedisplay.
Thenturn theknobin either
directionuntil thedesired time
(minutesand seconds)isdisplayed.
Thetimer willstartcountingdown.
Tocamel the timer,turn theknob
ineither directionuntil “0:00”
appearsinthedisplay.
Athe endoftk timeroperation,
afterthe 3beeps, thedisplayreturns
totimeofdayautomatically.During
thetimer function,thedisplay
flashesbackto thetimeofday
every 10seconds.
..—.—.—.——.——.—..—.— .——..
$=%
----
Page 10
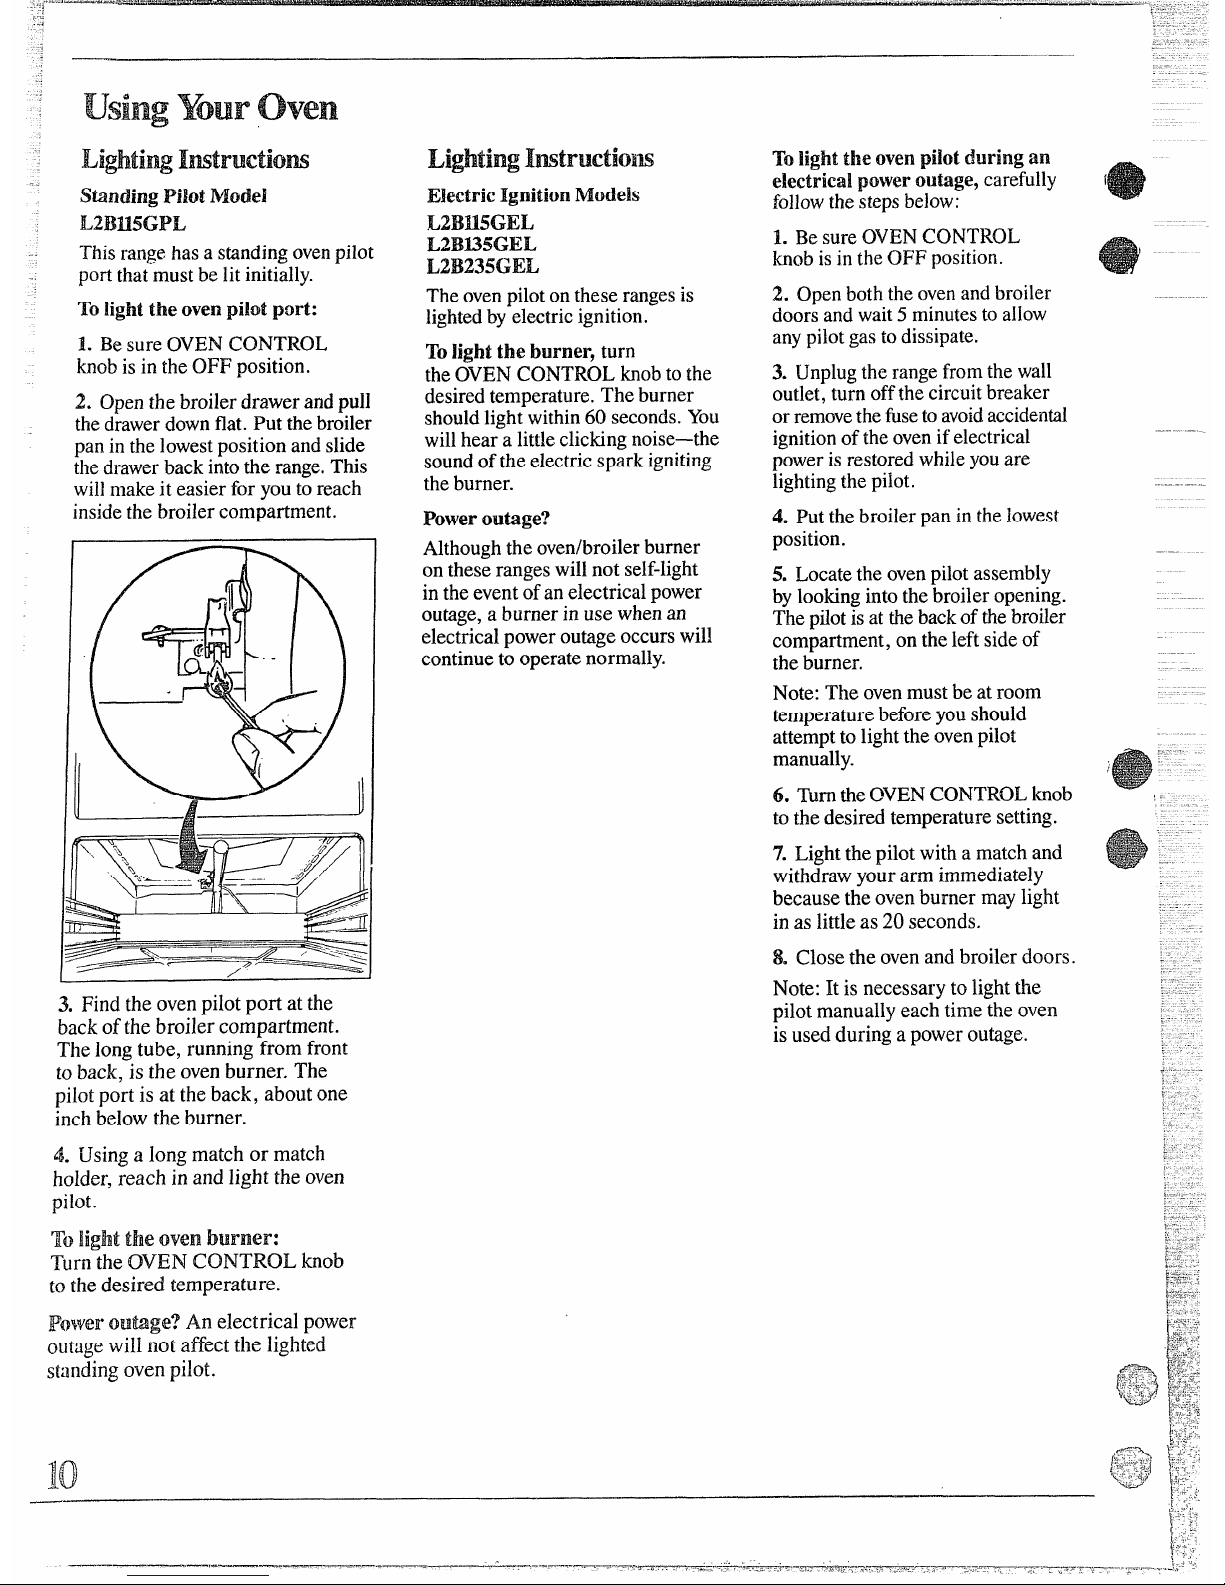
standing Pilot NhM
L2BU5GPL
Thisrangehas astandingovenpilot
portthatmustbe litinitially.
T“ lightthe ovenpilot port:
1. Besure OVENCONTROL
knobis in theOFF position.
.2.Openthe broilerdrawerandpull
thedrawerdownflat. Put thebroiler
pan inthelowestposition andslide
thedrawerbackintothe range. This
willmakeit easier foryou to reach
inside the broiler compartment.
\.\
3. Find the ovenpilot port at the
backof the broiler compartment.
The longtube, running from front
to back, is the ovenburner. The
pilotport is at the back, about one
inch belowthe burner.
4. Usinga long match or match
holder, reach in and light theoven
pilot.
To light the oven burner:
Turn the OVEN CONTROL knob
to thedesired temperature.
Power =m@ge?An electrical power
outagewiHnot affect the Iighted
standingoven pilot.
Electric~gnithm
~OddS
L2BJ15GEL
L21KL35GEL
L2B235GEL
Theovenpilotonthese rangesis
lightedby electricignition,
3’0light.
theburner,turn
theOVENCONTROL knob to the
desiredtemperature.The burner
shouldlightwithin60 seconds.You
willhear a little clickingnoise—the
soundof theelectricspark igniting
theburner.
Power outage?
Althoughthe overdbroilerburner
ontheserangeswill notself-light
inthe eventofan electricalpower
outage,a burnerin use whenan
electricalpoweroutageoccurswill
continueto operatenormally.
Tolight the ovenpilotduringan
electricalpoweroutage,carefully
followthestepsbelow:
1. Besure OVENCONTROL
knobisin theOFF position.
2. Openboththeovenandbroiler
doorsandwait5 minutesto aHow
anypilotgasto dissipate.
3. Unplugthe rangefromthewall
outlet,turn offthecircuitbreaker
orremovethefuseto avoidaccidental
ignitionofthe ovenif electrical
poweris restoredwhileyouare
lightingthe pilot.
4. Putthe broilerpan inthe lowest
position.
5. Locatethe ovenpilotassembly
bylookingintothebroiler opening.
Thepilotisat thebackofthebroiler
compartment, ontheleft sideof
theburner.
Note:The ovenmustbeat room
temperaturebeforeyoushould
attempt to lightthe ovenpilot
manually.
6. TurntheOVENCONTROLknob
tothe desiredtemperature setting.
7. Lightthe pilotwith a match and
withdrawyour arm immediately
becausethe ovenburner maylight
in aslittleas 20 seconds.
8. Closethe ovenand broilerdoors.
Note: It isnecessary tolightthe
pilotmanually eachtime theoven
isused during apoweroutage.
Page 11

“j
—
oven control
TheOVENCONTROL knobis
1ocatedon [hecontrolpanelonthe
mntofthe range(seepage6).
Simpiyturn theknob tothedesired
cooki~gtemperatures,whichare
markedin 2501?.incrementsonthe
dial.Rwill normaHytake60
secondsbeforethe flamecomeson.
Afterthe ovenreachesthe selected
temperature,theovenburnercycles—
offcompletely,thenon witha full
flame-to keeptheoventemperature
controlled.
ownLight
(onmodels soequipped)
Usethe switchonthe backguardto
turnthe lighton andoff.
oven SheIves
Toremove the shelvesfromthe
oven,pullthemtowardyou,tilt
frontendupwardandpullthemout.
Toreplace, placeshelfonshelf
supportwith stop-locks(curved
extensionunder shelf)facingup
andtowardrear ofoven.Tiltup
frontand pushshelftowardbackof
ovenuntilit goespast “stop”on
ovenwall. Thenlowerfrontofshelf
andpush itallthe wayback.
shelf Positiom
Theovenhas fourshelfsupports—
A (bottom),B,C and D (top).
Shelfpositionsfor cookingare
suggestedonBakingand Roasting
pages.
Theshelvesare designed with stoploc.ksso when placed correctly on
theshelf supports,they will stop
beforecoming complete~youtof
theovenand will nottilt when you
arc removingfoodfrom them or
phwingfood onthem.
Whenplacing cookware on a shelf,
pullthe shelf outto the “stop”
pc}sition.Place the cookware on
theshe~f,then slidethe shelf back
intothe oven. This wil~eliminate
reachinginto the hot oven.
—
ownvent
Theovenisventedthroughduct
openingsat thecenterrear ofthe
range,(seepage6). Do notblock
theseopeningswhencookingin the
oven—itisimportantthattheflowof
hotair fromtheovenandfreshairto
theovenburners beuninterrupted.
@Ventopwings md nearby
surfacesmaybecomeM. Donot
touchthem.
@Hades of potsandpanson the
Cooktopmaybecomehot ifMt
toodose to thevent.
I . I
@Do not leaveplasticitems on
thecooktop—theymaymelt if
lefttoo CIOS63to thevent.
.
oven
As yourovenheatsup, the
temperaturechangeofthe air
in theovenmaycause water
dropletsto form onthe door
glass. Topreventthis, openthe
ovendoor for thefirst minute
ofovenheat-up toletthe moist
air out.
Page 12

M9w$0setYil.n-Range
for
1. Positiontheshelfor shelvesin
the oven.If cookingon twoshelves
atthesametime, staggerthe pans
forbestheat circulation.
2. Closeovendoor.Turn
OVENCONTROL knob todesired
temperature.Preheatovenforat
least15minutesif preheatingis
necessary.
3. Placefoodin ovenoncenter
ofshelf,Allowat least2 inches
betweenedgeof bakewareandoven
wall or adjacentcookware.
4. Checkfoodfordonenessat
minimumtimeon recipe. Cook
longerif necessary.Turn OVEN
CONTROLknobto OFF and
removefood.
Preheatingisveryimportantwhen
usingtemperaturesbelow225”F.
andwhenbakingfoods suchas
biscuits,cookies,cakesandother
pastries.
Preheatingisnotnecessarywhen
roastingor forlong-timecookingof
wholemeals.
Mostbakingis doneon the second
shelfposition (B)from the bottom.
When
~&ingthree or four items,
usetwoshelvespositionedon the
secondand fourthsets ofsupports
(B& D) from bottomof oven.
Bakeangel foodcakes on firstshelf
Position(A) from bottomof oven.
-j‘9
.’:..Ad
Tips
e FO11OW a testedrecipeand
measuretheingredientscarefully.
Ifyouareusingapackagemix,
followlabel“directions.
@Do notopentheovendoorduring
abakingoperation-–heatwillbelost
andthebakingtimemightneedto
beextended.Thiscouldcausepoor
bakingresults.Ifyoumustopenthe
door,open itpartially—only3or4
inches—andcloseitasquicklyas
possible.
~Donotdisturbtheheatcirculation
intheovenwiththeuseofaluminum
foil.Iffoilis used,placea small
sheet of it, about 10by 12inchesat
themost,on alowershelfseveral
inchesbelowthefood. Donotplace
foil on the ovenbottom.
Problem
andPossibksolutions
HIM
Burningaroundedges
~
Edgesofcrust toothin.
eIncorrectbakingtemperature.
Bottomcrust soggyandunbaked
@
A11ow crust and/or fillingto COO1
sufficientlybeforefillingpie shell.
@Fillingmaybe toothin orjuicy.
@Fillingallowedtostandinpieshell
beforebaking. (Fillpie shellsand
bakeimmediately.)
~Ingredientsandproper measuring
affectthequality ofthecrust. Use a
testedrecipe andgoodtechnique.
Makesurethere areno tinyholesor
tearsina bottomcrust. “Patching”
apiecrust could causesoaking.
I% filling runs over
~Topand bottomcrust notwell
sealedtogether.
~
Edgesofpie crustnot built up
highenough.
e Toomuch falling.
@Check sizeofpieplate.
Pastry istough; Crust not flaky
Q Tio much handling.
~Fattoo softor cutintoo fine.
RoHdough lightlyand handleas
littleaspossible.
CAKES
Cakeriseshigherononeside
@Batterspreadunevenlyinpan.
Qoven shelve~notlevel.
~Usingwarpedpans.
Cakescrackingontop
~Oventemperaturetoohigh.
oBattertoothick,followrecipe
orexactpackagedirections.
echeck forpropershelfposition.
eCheckpansizecalledforinrecipe.
~Impropermixingofcake.
Cake falls
e
TOO muchshortening,sugaror
liquid.
~Checkleaveningagent,baking
powderorbakingsodatoassure
freshness.Makeahabittonote
expirationdatesofpackaged
ingredients.
@Cakebakedatincorrect
temperatureor not bakedlong
enough,
~Ifaddingoiltoacakemix, make
certaintheoil isthetypeand
amountspecified.
Crust ishard
~Checktemperature.
ocheck shelfposition.
Cakehassoggy layerorstreaksat
bottom
~Underminingingredients.
*Shorteningtoosoftfor proper
creaming.
~
TOO much liquid.
COOKIES & Blscmm
Doughy
center;heavycruston
surface
~Checktemperature.
e Checkshelfposition.
~
~OllOW bakinginstructions
carefullyasgiveninreliablerecipe
or onconveniencefoodpackage.
@Flat cookiesheetswillgivemore
evenbakingresults.Don’tovercrowd
foodson abaking sheet.
~Conveniencefoods used beyond
theirexpirationdate.
more on
Oneside
~Oven doornotclosed properly,
check gasketseal.
@Check shelfposition.
Page 13

-.
.-
-.
r---a --
1. Preheating isvery important
when
usingtemperatures below
225°F’.and when baking foods
2. Aluminumpansconductheat
quickly.Formostconventional
baking, light, shiny finishesgive
3. Dark or non-shinyfinishesand
glasscookwaregenerallyabsorb
heatwhichmayresultindry,crisp
such as biscuits~cookies,cakes
bestresults becausetheyhelp crusts.Reduceovenheat25°F. if
and
other pastries. Preheatthe
preventoverbrowning.Forbest lightercrusts aredesired. Rapid
ovenforat least15minutes.
browningresults,werecommend
browningofsomefoodscan be
Preheatingisnotnecessarywhen
dullbottomsurfacesforcakepans
achievedbypreheatingcastiron
roastingor forlong-timecooking
andpieplates.
cookware.
ofwholemeals.
Time,
Minutes
15-20
20-30
20-40
45-55
20-30
45-60
45-60
45-60
10-25
20-30
30-55
10-15
45-60
45-65
20-25
~_4hrs.
20-35
25-30
40-60
25-35
10-20
6-12
7-12
30-60
30-60
50-90
45-70
15-25
45-60
40-60
13-16
60-90
30-60
30-75
Shelf
Positions
Oven
Temt)eratures Comments
Food
Cookware
ShinyCookieSheet
ShinyMetalPanwith
satin-finishbottom
CastIronor GlassPan
ShinyMetalPanwith
satin-finishbottom
ShinyMetalMuffinPans
DeepGlassor CastIronCups
Metalor GlassLoafPans
Metalor GlassLoaf Pans
ShinyOblongor MuffinPans
Shinl/Oblont?or MuffinPans
Bread
Biscuits(%-in. thick)
Coffeecake
Corn breador muffins
Gingerbread
Xiuftins
Popovers
Quickloaf bread
}k:st bread(2 loaves)
Plainrolls
Sweetrolls
Canned, refrigeratedbiscuitstake2 to 4
minuteslesstime.
B,C
B
B
B
B
B
B
A, B
B
B
400°-4750
350°-4000
400°-4500
350°
400°-4250
375°
350°-3750
375°-4250
375°-4250
350°-3750
Preheatcast ironpan forcrisp crust.
Decreaseabout5minutes for muffinmix.
Or bakeat450”F.for 25minutes, then at
350”F.for 10to 15minutes.
Dark metalor glassgivesdeepest
browning.
Cakes
(v;ithoutshortening)
I
Twopiecepanis convenient.
Line pan withwaxedpaper.
A
B
A
325°-3750
375°-4000
325°-3500
325°-3500
350°-3750
275°-3000
350”-375°
350°-3750
350°
325°-3500
350°-4000
400°-4250
375°-4000
~nyl food
AluminumTube Pan
Jellyroll MetalJellyRollPan
Sponge MetalorCeramic Pan
Cakes
(
Metalor CeramicPan
ShinyMetalMuffin Pans
h4etalor GlassLoafor
A, B
B
A, B
B
B
B
Paper linersproducemore moistcrusts.
Use 300”F. and Shelf B for stiall or
individualcakes.
If bakingfourlayersuse
shelvesB and D.
TubePan
ShinyMetalPanwith
satin-finishbottom
ShinyMetalPanwith
satin-finishbottom
Metalor GlassLoaf Pans
Layer,chocolate
Loaf
C’ookies
Barcookies frommix use same time.
Use Shelf C andincreasetemperature
25 to 50”F.for morebrowning.
Metalor GlassPans
CookieSheet
B,C
B,C
B,C
B,C
A, B,C
B
B
Brownies
Drop
Refrigerator
I
CookieSheet
Rolledor sliced CookieSheet
Fruits,
Other Desserts
B:Aedapples
Custard
350°-4000
300°-3500
325°
400°-4250
325°-3500
400°-4250
400°-4250
450°
Glassor
MetalPans
Glass CuslardCups or
Casserole(set in pan of hot water:
Glass CustardCups or
Casserole
Reducetemperature to 300”F.for large
custard.
Cook bread orrice puddingwithcustard
base 80 to 90 minutes.
Puddings,rice
:lnLi custard
Pks
Frozen
Nfrringue
Large pies use 400”F.andincreasetime.
Toquickly brown meringue use 400”F.for
9 to 11minutes.
Custard fillingsrequire lowertemperature,
longer time.
Foil Panon Cookie ;heet
Spreadtocrust edges
A
B
A. B
Et
B
(>IICcrust
Glass or Satin-finishMetal
Tl)i>crust
G!t~ssor Satin-finishMetal
I%[ry shell
Glass or Satin-l nish MetalPan
.* %isceilaneous
~ “’-~Blkedpotatoes
Set onOven Shelf
‘“’ Smllopeddishes
Glass or Metal
Soutlles Glass Fan
.~.
(;”.,’:;;)
\;VJ-
Increase time for large amount or size.
A, B, C
A, B,C
B
325°-4000
325°-3750
300°-3500
Page 14

Roastingis cookingbydryheat.
Tendermeator poultrycanbe
roasteduncoveredinyouroven.
Roastingtemperatures,which
shouldbe lowandsteady,keep
spatteringtoa minimum.When
roasting,it isnotnecessaryto sear,
baste,coveror addwatertoyour
meat. Roastingiseasy,just follow
thesesteps:
Step 1:Positionovenshelfat
secondfrombottomposition(B)
forsmallsizeroast(3 to5 Ibs.)and
atbottom position(A) forlarger
roasts.
Step 2:Checkweight of roast.
Placemeatfat-side-uporpoultry
breast-side-upon roastingrackin a
shallowpan. Themeltingfatwill
bastethemeat. Selecta panas
closeto thesizeofthemeatas
possible.(Broilerpanwithrack isa
goodpan forthis.)
Step 3: TurnOVENCONTROL
knobto desiredtemperature.Check
theRoastingGuidefortemperatures
and approx~matecookingfimes.
I
,
!
I
Step 4:Most meatscontinueto
cookslightlywhilestanding after
beingremovedfromthe oven.
Standingtime recommendedfor
roasts is 10to 20minutes.This
allowsroaststo firmup andmakes
themeasierto carve.Internal
temperaturewill riseabout5°to
10”F.;to compensatefortemperature
rise, ifdesired, removetheroast
fromovensoonerat (5°to 10”F.
lessthantemperatureshownon
RoastingGuide).
I’mzen Roasts
Frozenroastsof beef,pork,
lamb,etc., can be startedwithout
thawing,but allow15to 25minutes
additionaltimeper pound(15
minutesadditionaltime perpound
for roastsunder 5 pounds,more
timefor largerroasts).
Thawmostfrozenpoultry before
roastingto ensureevendoneness.
Somecommercialfrozenpoultry
can be cookedsuccessfully without
thawing.Followdirectionsgiven
on packer’slabel.
Rwting Guide
Type
!Meat
Tendercuts; rib, highquality
sirloin tip, rumpor top round*
Lambleg or bone-in shoulder*
Vealshoulder, legor loin*
Porkloin, rib or shoulder*
Ham, pre-cooked
Ham, raw
*Forboneless rolled roasts
over6-inches
thick, add5 to IOminutesper lb. to times
~ivenabove.
~
Poultry
Chickenor Duck
Chickenpieces
Turkey
Oven
Temperature
325°
325°
325°
325°
325°
325°
325°
350°
325°
Doneness
Rare:
Medium:
WellDone:
Rare:
Medium:
WellDone:
WellDone:
WellDone:
ToWarm:
WellDone:
WellDone:
WellDone:
WellDone:
Approximate Roasting Time
in Minutes per Pound
3 toS-lbs.
6to $-lbs.
24-35
18-25
35-39
25-31
39-45
3i-33
21-25
20-23
25-30
24-28
30-35
28-33
35-45
30-40
35-45
30-40
18-23minutesper lb.(any weight)
Under
10h.
10to 15-Ibs.
27-35
24-27
3 to 5-lbs.
Over
5 h.
35-40
30-35
35-40
w
to M-b.
over E b.
16-22
13-19
Internal
Temperature ‘1!?
130°-1400
150°-1600
170°-1850
130°-1400
150°-1600
170°-1850
170°-1800
170°-1800
115°-1250
170”
185°-1900
185°-1900
h thigh:
185°-1900
.-
——
Page 15

--
Broihngiscookingfoodbydirect
heatfromabovethefood.Your
rangehasa convenientcompartment
beiowtheovenforbroiling,Italso
‘MSaspeciallydesignedbroilerpan
ndrackthatallowdrippingfatto
piercedm~atIosesjuices.
least1inch thick-forbestbroiling
results.Panbroil thinnerones.
chide
-.
drain away from thefoods and be
keptaway-fromthehighheatof
thegasflame.
Quantity
andlor
Food Thickness
IstSide
Broil Time,
Position Minute!
2nd Side
Time,
Minutes Comments
Distancefromtheheatsourcemay
bechangedbypositioningthebroiler
panandrack ononeofthreeshelf
positionsinthebroilercompartment-A(bottomofbroilercompartment),
B(middle)andC (top).
Bacon Y2-lb. (about8
thinslices)
3
I
Arrangeinsinglelayer.
Ground Beef
l-lb.(4patties)
WellDone
Y2 to %-in. thick B 8-9
,
BeefSteaks
Rare
Medium
WellDone
Rare
Medium
WellDone
Chicken (450°)
l-in.thick
(1-1k Ibs.)
1%-in.thick
(’2-2YZIbs.)
1whole
(2to2 %-lbs.),
splitlengthwise
Boththe ovenandbroiler
mnparhmmt doorsshouldbe
C)osedduring broiling.
9
12
13
10
15
25
7
5-6
8-9
6-7
12-14
16-18
Steakslessthanl-in, cook
throughbeforebrowning.
Panfryingisrecommended.
Slashfat.
B
B
B
B,C
B
B
HowtoBrd!
1. Ifmeat hasfatorgristle nearthe
edge,cutverticalslashesthrough
bothabout2 inchesapart, butdon’t
cut intomeat. Werecommendthat
you trim fattopreventexcessive
25-30 I Reducetimesabout5to 10min.A 30-35
I
persideforcut-upchicken.
Brusheachsidewithmelted
] butter.Broilwithskinsidedown
firstandbroilwithdoorclosed.
I
2-3
3-5
13-16
Bakery Products
Bread(Toast)or
ToasterPastries
EnglishMuffins
Lobster tails
(6to8-02.each)
smoking,leavinga layerabout
I/S-inchthick.
2. Removebroilerpanand rack
%-1 Spaceevenly.PlaceEnglish
muffinscut-side-upandbrush
withbutter ifdesired.
‘2-4slices
1pkg.(2)
2-split
2-4
c
c
Donot
turn
over.
frombroiler com~artmentand
B
Cutthroughbackofshell,spread
open. Brushwithmelted butter
beforeand afterhalftime.
lacefoodonrac~.
3. Pulloutdrawerand position
B,C 5
5 Handle andturnverycarefully.
Brushwithlemonbutterbefore
andduring cookingifdesired.
Preheatbroilertoincrease
browning.
Fish l-lb.fillets U to
%-in,thick
broilerpan incompartment.Placing
foodclosertoflameincreasesexterior
browningoffood,butalso increases
spatteririgand thepossibilityoffats
andmeatjuices igniting.
4. Closebroilerdoor and, for
mostfoods,turn OVENCONTROL
knobto BROIL. Note: Chicken and
hamare broiledat450°in order
tocookfood throughwithout
o~er-browningit.
5e Turnmost foodsonce during
cooking;(theexceptionisthinfillets
offish;oil oneside,place thatside
dowl~onbroilerrackand cookwithout
turninguntildone). Time foodsfor
a[?outone-half thetotalcooking
time,turn food, thencontinueto
cooktopreferred doneness.
-=%6. TurnOVEN CONTROL knob
~=~o OFF.Removebroiler pan from
compartment andserve food
,,-immediately. Leavepan outside
“’~:&31npartment
tO CAN].
‘+&-&-
—.
8 Increasetimes5-10min.perside
for 1Y~-in.thickorhomecured.
Slash fat.
Ham slices(450°)
Precooked
Pork chops
WellDone
Lamb chops
Medium
WellDone
Medium
WellDone
Wieners,
similarprecooked
sausages,
bratwurst
1-in.thick
2(% in.)
2(l-in. thick),
about 1 lb.
2(1 inch)
about 10-12oz.
2(1Minch),
about 1 lb.
l-lb, pkg. (10)
B
8
B
10
B 13
B
8
B
10
B 10
B 17
B, C
6
4-5
9-12
4-7 ] Slash fat.
10
4-6
12-14
1-2 Ifdesired, splitsausages in half
lengthwise;cutinto5to6-in.
pieces.
;..-
,
!-.
Page 16

Care
(see (mming chide on page20.)
Propercare and cleaningare
importantso yourrange willgive
youefficientand satisfactory
service.Followthesedirections
carefullyin caringfor itto help
assuresafeandpropermaintenance.
IF YOURRANGE HAS
ELECTRICIGI’WHOPd,BE
SUREELECTRICI?(NVERIS
(IFFBEFORE CLEANING
AP+WR4LRTm? IT.
outerPainted Finish
Whentherange iscool, washthe
top,front and, if exposed,thesides
withmildsoapandwater.Neveruse
anyharsh abrasivesor cleaning
powdersthat mayscratchor mar the
paintedsurface. Rinsethe surface
withclean waterand dry witha soft
cloth.If you wish, occasionally
applya thin coatof mild cleaning
waxto help protectthe finish.
‘chktop
There are anumber ofprecautions
youcan take toavoidmarring the
porcelainenameled surface ofthe
cooktopand preventit from
becomingdull. Don’tslideheavy
pansacross it. If you spillfoods
witha lotof acid (tomatoes,
sauerkraut, fruitjuices, etc.) or
foods with high sugarcontent,
cleanthem up as soon aspossible.
If allowedto set, these foods could
causea duHspot. Also, no matter
howstubborn the food stain, never
useharsh abrasive cleansers. They
couldpermanently damage the
enamelsurface. Werecommend a
cleanser such as “Soft Scrub””
brand.
It’s a goodideatowipethecontrol
panelcleanaftereach useofthe
oven.Fora morethoroughcleaning,
theknobscanbe remo~~edby
puHingthem offtheknobsterns.
Cleanwith mildsoapandwater,
rinsewith cleanwaterandpolish
dry witha softcloth.
Do notuseabrasivecleansers,
strongliquidcleanersor oven
cleanerson thecontrolpanel—
theywilldamagethe finish.
Lift-up
Clean thearea underthecooktop
often. Built-upsoil, especially
grease, maycatchfire.
Tomake cleaningeasier,the
cooktopmaybe liftedup.
Before raisingthe
cooktop:
L
Besure burnersare turnedoff.
2. Removethe gratesand, on
modelsso equipped,the drip pans.
Note: Somemodels areequipped
with dualsupport rodsthat will
snap intoplace when thefront of
the cooktopis liftedall thewayup.
Tolowerthe cooktopagain,
supportthe raised cooktopwith
one hand, then carefullypush the
bottomofeach rod awayfrom you
until rodslides backdown intothe
sideof therange.
.-
(hates
Gratesshouldbewashedregularly
and, ofcourse,after spillovers.
Washtheminhot, soapywaterand
rinsewithcleanwater.Dry the
grateswitha cloth—don’tputthem
backonthe rangewet,When
replacingthegrates,be surethey’re
lockedintopositionovertheburners.
Togetrid ofburned-onfood, soak
thegratesin aslightly diluted
liquid cleaner.
Althoughthey’redurable,the
grateswill graduallylosetheir
shine,regardlessofthe bestcare
youcan givethem. Thisisdue to
theircontinualexposureto high
temperatures.
Do notoperatea burnerfor an
extendedperiod oftimewithout
cookwareon thegrate. The finish
onthe gratemaychip without
cookwareto absorbthe heat.
Drip Pm-M
(onmodelsso equipped)
‘-
Page 17

$xid cared’
own
fodd I,2B235GEL
The
Conti~lllous-Cleaning oven
deans itself while cooking.
The
insideofthe oven—top,sidesand
back—isfinishedwith aspecial
codng which cannotbe cleaned
intheusualmannerwith soap,
detergents,steelwoolpads,
commercialovencleaners, coarse
abrasivepads orcoarse brushes.
Useofsuch cleansersand/orthe
useofovensprayswillcause
permanentdamage.
‘Nw
special coating is a porous
ceramic materialwhich isdark in
colorand feelsslightlyroughtothe
touch.If magnified,the surface
wouldappear as peaks, valleysand
sub-surface“tunnels:’This rough
finishtends topreventgrease
spatters from forminglittle beads
_or dropletswhichrun downthe
:.+=walksof ahard-surfaceoven
_]inel- leavingunsightlystreaksthat
requirehand cleaning.Instead,
henspatter hitstheporous finish,
isdispersed and ispartially
absorbed. This spreadingaction
increasesthe exposureof oven
soiltoheated air, and makesit
somewhatless noticeable.
Soil
may nd disappeareompktdy
and atsome timeafter extended
usage,stains mayappear which
cannotbe removed.
The
specialcoating worksbest on
smallamounts of spatter.
Itdoes
notwork well withlarger spills,
especiallysugars, egg or
dairy
m
ixlures.
Thisspecialcoating is not used
cmovensheks9 ovenbottom or
doorliner. Removethese to
preventdamaging the oven’s
continuous-cleaning coating and
clean them with a commercial oven
clraner.
mlawnthe
Cm?n:
L Let rangepartscool before
handling.Werecommend rubber
glovesbeworn when cleaning.
2. Removeshelvesandcookware.
3. Soilvisibilitymaybe reduced
byoperatingthe ovenat 400°F.
Closethedoor and turn OVEN
CONTROLknobto400°F.Timefor
atleast 4 hours.Repeatedcyclesmay
be necessarybeforeimprovement
in appearanceis apparent.
l?EMEMBER:DURING THE
OPERATIONOFTHE OVEN,THE
DOOR.WINDOW AND OTHER
RANGE SURFACESWILLGETHOT
ENOUGH TOCAUSEBURNS.DO NOT
TOUCH.LET THERANGE COOL
BEFOREREPLACINGOVENSHELVES.
4.
If a spilloveror heavy soiling
occurson the poroussurface, as
soonas the ovenhas cooledremove
asmuch of thesoil aspossible
usinga small amountof waterand a
stiffbristle nylonbrush. Usewater
sparingly,blottingit up with paper
towels,cloths or sponges, and
changeit frequently,keepingit as
clean aspossible. Do not rubor
scrub with paper towels, cloths or
sponges,since they will leave
unsightlylint on the ovenfinish. If
waterleavesa white ring on the
finishas it dries, apply water again
and blot
itwith a clean sponge,
startingat the edgeof the ring and
workingtowardthe center.
.Donot use soap, detergent,
steelwoolpads, commercial
ovencleaner,siliconeoven
SprQyS9coarsepadsor coarse
brusheson theporoussurface.
Theseproductswillspot, clog
and marthe porous surface and
reduceitsabilityto work.
Do not scrape the porous
surfacewithaknifeorspfdda-
theycouldpermanentlydamage
the finish.
The ovenbottomand theinside
of
the oven door hve ti porcelain
enamelfinish The door liftsoff
and thebottomcomes outfor
cleaningawayfrom thecontinuous
cleaningoven.
(contimiednextpagt
Page 18

oven
The ovenbottom can be removedto
makecleaningeasier.
Fla~ge
l-bremove:
L Grasp ovenbottomat finger
slotson each side.
2. Liftfront edgeofoven bottom
enoughto raisetabs from slotsin
frontframe.
3. Pushovenbottomback about
1/4”to release flangefrom front
frame, then pullout.
‘lbreplacetheovenbottom:
1. Slideovenbottom intoovenso
rear tabsfit intoslotsin rearwallof
oven.
2. Graspovenbottom at finger
slotsandpush itback andthen
downtohookthe flangeunderthe
frontframe.
3. Fit fronttabsintoslotsinfront
frame.
The oven
bottom hasa porcelain
enamelfinish. Tomakecleaning
easier, protect the ovenbottom
fromexcessivespillovers.This is
particularlyimportantwhen baking
a fruitpie orother foods with high
acid content.Hot fruitfillingsor
foodsthat areacid in contentsuch
as milk, tomatoor sauerkraut, and
sauceswithvinegar orlemonjuice,
maycausepittingand damageto
the porcelainenamelsurface.
Toprotectthe ovenbottomsurface,
place apiece of aluminum foil
slightlylarger thanthe bakingdish
or a smallcookie sheeton a lower
shelfor under thebakingdish to
catch anyboilovers.It shouldnot
comp~etelycoverthe shelfas this
wouldcauseunevenheat inthe
oven.Aluminum foilshould notbe
placed onthe ovenbottom.
If a spilloverdoes occur onthe
ovenbottomallowthe ovento cool
first, Youcan clean thebottomwith
soap andwater, a mildabrasive
cleanser, soap-filledabrasivepads
or causticoven cleaner following
manufacturer’sdirections.
—-...
Page 19

.—.
Drawer
Range Top Burners
ovenDoor
heovendoor isremovableto Theholesinthe burnersofyour
rangemustbekeptcleanatall
timesforproper ignitionand an
even,unhamperedflame.
Youshouldcleanthe burners
routinelyand especiallyafterbad
spilloverswhichcouldclogthese
holes,Burnerslift right out for
cleaning.
Toremove:
1. Whenbroileriscool, remove
rackand pan.
maketheinteriormore accessible.
Roller Guide
BroilerCompartment
/
/
/
“)
FrontFrame
Hinge
2. Pullthe broilerdraweroutuntil
itstops,then pushitback inabout
one inch.
3. Grasphandle,lift andpull
broilerdrawerout (liftthe rollers
locatedunder thedraweroverthe
rollerguide stops in the range).
Toremove the door, open ita few
inches to the specialstop position
thatwillhold thedoor open. Grasp
firmlyon each sideand liftthedoor
straight up and offthe hinges.
Toreplace:
Note: A screwholdseachof
the burnersin placeto keepthem
from wobblingaroundduring
shipment.Removeanddiscard the
shippingscrew.Tiltthe burner to
the rightto release itstwo tabsfrom
slotsin theburner supportand
movetheburner towardtheback of
the range.This disengagesit from
the gasvalveat thefront ofthe
range, andit liftsouteasily.
L Put therollers underthe broiler
drawerbehindthe rollerguide
stopsin the range.
Note:Be carefulnotto placehands
etweenthe springhingeandthe
ovendoor frame asthe hinge could
2. Hold thebroiler drawerioqthe
raisedpositionas youslideIt
partwayinto therange. Then lower
thedrawer andpush it completely
closed.
snapback and pinchfingers.
ashwith hot, soapywater. For
stubbornspots, usea solutionof
vinegarand water. Do not immerse
thedoor in water.
TorepIacethe door,make surethe
hinges are in the “out” position.
Positionthe slotsin the bottom of
thedoor squarely overthe hinges.
Then lowerthe door slowlyand
evenlyover bothhinges atthe same
time. Ifhinges snapback against
the ovenframe, pull them backout.
Broiler Pm& Rack
Toremoveburned-on food, soak
the burner ina solutionof a producl
usedforcleaningthe insideof coffee
makers. Soakthe burner for 20 to
30 minutes.If the fooddoesn’t
rinse offcompletely,scrub it with
soap andwater or a mild abrasive
cleanser and adamp cloth.
After broiling,removethebroiler
rack andcarefully pour offthe
grease. Washand rinse therack
inhot, soapy water.
If foodhas burned on, sprinkle
therack while hot with detergent
and coverwith wet paper towelsor
a dishcloth. That way,burned-on
foodswill soak loose whilethe
meal isbeing served.
ownshelves
Beforeputting theburner back, dry
itthoroughlyby settingit in a warnovenfor 30 minutes.Then place it
back in the range, makingsure it is
properly seated and level.
O\cn shelves maybe cleaned with
a miidabrasive cleanser following
manufacturer’sdirections. After
Do notstore a soiled broiler pan
and rack in the ovenor broiler
compartment.
chinning,rinsethe shelveswithclean
wtitcrand dry with a dry cloth. To
removeheavy,burned-on soil,soapy
mct:dpads may be used following
~~~~l;l[lllfacturer’sdirections. After
\
,:.—
-+&rubbing, wash with soapy water,
rinseand dry.
Page 20

Note:Letrange/ovenpartscoolbeforetouchingorharding.
--——
——
GENERAL IIIX4EC’I’K.INS
Drain fat,COOIpanand rack
slightly.(Donotletsoiledpanandrackstandinbroiler
compartmenttocool.)Sprinkledetergentonrackandpan.
Fill panwith warm waterandspread
clothorpapertoweloverrack.Letpanandrackstandforafewminutes.
Wash; scourif
necessary.Rinseanddry.OPHON:
Clean pan and rack in dishwasher.
Pull off knobs. Washgently but do
notsoak.Dryandreturncontrolstorange.
Cleanoutsideofcooledblackglassdoorwithagiasscleanerthatdoesnotcontainammonia.
Washglasscontrolpanelwithclothdampenedinsoapywater.Rinseandpolishwithadry
cloth,Ifknobsareremoved,donotallowwatertorundowninsidesurface ofglasswhile
PART
Broihx Pan and Rack
MATERIALS TO USE
@SoapandWater
@Soap-FilledScouringPad
@PlasticScouringPad
CIDishwasher
~ MildSoapandWater
e SoapandWater
Control Knobs
Outside Glass Finish
cleaning,
Wash,rinseandthenpolishwithadrycloth.
~ SoapandWater
Ml NOT USE steel wool,
abrasives, ammonia, acids or
commercial oven cleaners.
These mightdamagethe finish.
Metal, including
Side Trims, Trim
Strips
Werecommend“SoftScrub”brandcleanser.
Ifacidsshouldspillon therangewhileitis hot,usea dry
papertowelorclothtowipeup rightaway.Whenthesurface
hascooled,washandrinse.
Forotherspills,suchasfatsmatterings,etc., washwithsoap
andwaterwhencooledandthenrinse.Polishwithadry
cloth.
Usea mildsolutionofsoapandwaterandasoftcloth.
Porcelain Cooktop*
0 PaperTowel
@DryCloth
* SoapandWater
~ “SoftScrub”
brandcleanser
DO NOT USE oven c!eaners,
cleansing powders or harsh
abrasives. These might
scratch theenamel.
Painted Surf’aces
(doorfront, broiler
drawerfront,
sidepanels)
DO NOT USE ovencleaners,
cleansing powders or harsh
abrasives. These might
scratch or mar thesurface.
PSoapandWater
SoapandWater
Soap-FilledScouringPad
PlasticScouringPad
Shelvescanbecleanedbyhandusingsoapandwater.Rinsethoroughlytoremoveanysoap
aftercleaning.
Liftoutwhencool.Soak5 to 10minutesifdesiredinwarmsolutionofdishwasherdetergent.
Scourwithmaterialsmentionedheretoremoveburned-onfoodparticles.
clean asdescribedbelowor indishwasher.Wipedrippansaftereachcookingsounnoticed
jpatterWili not “burnon”nexttimeyoucook.Toremove“burned-on”spatters,useanyorall
cleaningmaterialsmentioned.Rublightlywithscouringpadtopreventscratchingofthe
;urface.
iVipeoffburnerheads.If heavyspilloveroccurs,removeburnersfromrange(seepage
19)and
;oakthemfor20to 30minutesinsolutionofhotwaterandproductforcleaninginsideofcoffee
nakers,suchas Dip-Itbrand.Ifsoildoesnot rinseoffcompletely,scrubburnerswithsoapand
vateroramildabrasivecleanseranda dampcloth. Dryburnersina warmovenfor30minutes
]eforereturningthemtotherange.
Shelves
SurfaceBurner
Grates
SoapandWater
Soap-FilledScouringPad
(Non-metallic)
Chrome-Plated
DripPans(onmodels
soequipped)
SoapandWater
Stiff-BristledBrush
Soap-FilledScouringPad
(Non-metallic)
SolutionforCleaning
InsideofCoffeeMakers
SoapandWater
~ IMildAbrasiveCleanser
~ DampCloth
I
SurfaceBurners
UsefollowingdirectionsforStandardPorcelainEnatmeIOvensonly.
Seepage17forContinuous-Cleaningovens(ModelL2B235GEL).
I
OvenLiner*
(C’AUTION:Whenin
USC,lightbulbscan
becomewarmenough
[~~breakiftouchedwith
moistclothor towel.
W-hencleaning,avoid
[~mchingwarmlamps
withcleaningcloths.
@SoapandWater
@Soap-FilledScouringPad
~CommercialOvenCleaner
Coolbeforecleaning.
FORLIGHTSOIL:Frequentwipingwithmildsoapandwater(especiallyaftercookingmeat)
willprolongthetinlebetweenmajorcleaning.Rinsethoroughly.
NOTE:SOW-IkftOR~i~e~
causesadditionalstaiaswhenovenis reheated.
FORHEAVYSOIL:Chooseanon-abrasivecleanerandfollowlabelinstructions,usingthin
layerofcleaner.Use ofrubberglovesisrecommended.Wipeorrublightlyonstubbornspots.
Rinsewell.Wipeoffanyovencleanerthatgetson thermostatbulb.Whenrinsingovenafter
cleaningalsowipethermostatbulb.
-.
‘!:Spillageof marinades, fruit juices, tomato sauces and basting materials containing acids may cause discoloration, so should be wipedupimmediately
(i~lt~ttedup if in Continttous-Cleaningoven).Takecare notto touchhot portionofoven.Whensurfaceiscool, cleanand rinse.
Page 21

oven
‘i%etemperaturecontrolinyour
newovenhasbeencarefidlyadjusted
toprovideaccuratetemperatures,
However,if thisovenhas replaced
one youhaveused for severalyears,
youmaynoticea differenceinthe
degreeofbrowningor the lengthof
timerequiredwhen usingyour
favoriterecipesbecauseoven
temperaturecontrolshavea tendency
to “drift”overaperiod ofyears.
Beforeattemptingto havethe
temperatureofyournewoven
changed,be sureyouhavefollowed
thebakingtimeand temperatureof
therecipecarefully.Then, after
Youhave used theovena fewtimes
andyou feelthe ovenistoo hot
or toocool, there isa simple
adjustmentyoucan makeyourself
on-theOVE-NCONTROL-knOb.
Pullthe knoboffthe shaftand look
at the backside. Tothe leftofthe
centerthere isa r)ointerand a
seriesof notches:
@
,----—.
-.<
6sd@
-
%&..
‘ &+,
/
@
$,,
i
OJ
\\;\,
‘.~ GOODE*o++
,/
,.._—-------
Note pointer position
before adjustment
Noteto which notchthe pointer is
pointing.Tomake an adjustment,
carefullyloosen (approximately
oneturn), but donot completely
removethe two screwsthat hold the
skirtto theknob. Hold the knob
bladein onehand and the outer
skirtin the otherhand.
if actualoven temperature seems
tt~be hotter thansetting indicated
on knob,movethe top screw in
the “RAISE” direction. If oven
[cmperatureseems cooler than
settingindicatedon knob, move
screwin “LOWER” direction.
-% Ei]chnotch changes temperature
,-j~}[}r~knob approximate~y~~°F.
s
‘“-”Vk suggestthat youmake the
adjustmentone mark from the
:.>>
-.=3
\
..3’
original settingand checkoven
performancebeforemakingany
additionaladjustments.
Aftertheadjustment is made,
pressskirtand knobtogetherand
retightenscrewssotheyare snug,
butbecarefulnotto overtighten.
Reinstallknobon rangeand
checkperformance.
Note:After an adjustmenthas
beenmadetotheOVENCONTROL
knob,OFF andBROILwillnot
lineup withthe indicatormark on
thecontrolpanelas theypreviously
did. Thisconditionis normaland
willnotcreate aproblem.
surface Burner
Air shutters
An air adjustmentshutterfor each
surfaceburner regulatesthe flowof
air tothe flame.
When the right
amountofair
flowsinto the burner,the flame
willbe steady,relativelyquietand
haveapproximately3/4” sharpblue
cones. Thisis usuallythe casewith
factorypreset shuttersettings.
With too much air,the flamewill
be unsteady,possiblywon’tburn all
the wayaround, and willbe noisy,
soundinglike a blowtorch.
With
not enough air, youwon’tsee
any sharpblue cones in theflame,
youmay see yellowtips, and soot
mayaccumulate on potsandpans.
Air adjustment shutter
The air adjustment shutters, on the
hood ofthe valves, are positioned
on the burner tubes by friction fit.
TO
adjust theflowofair‘tothe
bmmem, apply a blade-type
screwdriver againstthe friction-fit
shutters and push to adjustthe
shutters, allowing more or less air
into theburner tubesas needed.
ovenBurner
Air shutter
Theair adjustmentshutterforthe
ovenburner regulatestheflowof
air tothe flame.
The shutterforthe ovenburner is
neartheback wallofthe oven
behindthe broilerdrawer.
,
..
Loosen+
Air Adjustment
Shutter
To reachthe shutter,remove
thebroiler drawer(page 19).
Toadjust the flowof airto the
burner,loosenthe Phillipshead
screwand rotatetheshutterto
allowmore orless air intothe
burner tubeas needed.
TO
determine if theburner fhne
is proper, light theburner. The
flame shouldhave 1/2”to3/4”blue
cones withno yellowtipping, and
shouldnot extendoutover the
baffle edges.
Visuallycheck the color ofthe
flames every sixmonths. If they
look likethe illustration(A) on
page22, call for service.
Page 22

—
PR43MXM
TOP
BURNERS
Do No-r LIGHT
ORDO NOT
BURNEVENLY
BURNERSHAVE
YELLOWOR.
YELLOW-TIPPED
FLAMES
BURNER FLAMES
VERYLARGE
OR YELLOW
PCXNW$LECAUSEAND/ORWHAT TO DO
s Pilots are notlit. On modelswith standingpilot, lift cdctap and holdlightedmatch
next to pilotopenifigbetweenfrontandrear burners(page8). On modelswith electric
ignition,makesureelectricalplug is pluggedintoalivepoweroutlet.
@Burnerholesonthe sideor aroundthetop ofburner maybeclogged.Removeburner
andcleanthemwitha safetypin orpaperclip. Makesureyoudo noten~argetheholes.
~Burnersmaynotbe fittedcorrectlyontothemountingbrackets. Removeand reinstall
themproperly.
OVENDOES Nm
COOKPROPERLY
CLOCK DOES
NOTWORK
(onmodels soequipped)
~Make surethermostatcapillary bulb (locatedin upperportion ofoven) isincorrect
position, nottouchingovensidesand notcoatedwith anything.
OVENLIGHT’DOES
NOTCOME ON
(onmodels so equipped)
I
Il—l
(A)Ye~~O~fhlleS–
(B)YWowtips on inner
(c) soft blue fiames–
CaHfor service
cones—Normal forLP gas
Normal fornaturaigas
~If burner flameslook like(A), callfor service.Normal burner flames shouldlook
like(B)or (C), dependingon thetypeofgas youuse.
s WithLP gas, someyeUowtippingon inner conesis normal.
~If rmge is connectedto LPgas,
check d Stepsin the installationinstructions.
~Aluminumfoilbeingused improperlyin oven.
~Oven vent blocked on top of range.
* Incorrectcookwarebeingused. Check each cookingsection for cookwaretips or
recommendations.
~Ovenbottomnot securelyseated inposition.
~OVENCONTROL knob setincorrectly or notturned on.
~Check commonbaking, roasting and broilingproblems onpages 12-k5.
~Rangeelectrical plug mustbe securely seatedin a livepower outlet. Check for blown
fuse or tripped circuitbreaker.
~Bulb maybe looseor burned out.
~Ekxtrical plug mustbe pluggedinto alive power outlet.
!H’ROJNGODOR s Improper air/gas ratio in oven. Adjustovenburner air shutter.
*An odor from the insulation around the ovenliner is normal for the first few times
ovenis used. This
istemwmrv.
Page 23

Ekfb”e you lbegin-lwdl these and carefully.
ALL iwm
N-deto suretokave -these with the
Note
to these imtmdims forfuturereference.
l?we—’his mustbeproperly
Installationofthisrangenmt
conformwithlocalcodes9orin
theabsenceoflocd codes,with
theNationalFuelGasCode,
ANSIZ22UJ.988.
Thisrangehasbeendesign-
certifiedbytheAmericanGas
AssociationaccordingtoANSI
Z21.la-1989.Aswithany
appiianceusinggasand
generatingheat,thereare certain
safetyprecautionsyoushould
foilow~Youwillfindthemon
pages2through5inthisbook.
Readthesesafetyprecautions
Haveyourrangeinstakdby
2qualifiedinstallerorservice
Ikchician.
oYourrangemustbeelectrically
groundedinaccordancewith
localcodesor,
in theabsenceof
localcodes,inaccordancewiththe
NationalElectrical
Code
(ANSI/IWPA
70-1!%’7).See
droundingInstructionsonpage27.
@Before your range
m many
other
s@hetkfloorcovering?make
surethefloorcoveringcan
180°1Rwithout
slminking,warping or discoloring.
Do not installthe range over
cilrpetillgunless a sheet of
IiJ-inch-thick
plywoodorsimilar
insulatorisplacedbetweenthe
~~’$mngeandcarpeting.
“<- RMmSW%theAIRti”Tipdevice
.,,misilW3MML
63~~~esure ~~ewa~]~overings
aroundtherangecanwithstand
heatgeneratedbytherangeup
to200”F.
~Avoidplacingcabinetsabove
therange.Toreducethehazard
causedbyreachingovertheopen
flamesofoperatingburners,install
ametalventilationhoodoverthe
rangethatprojectsforwardatleast
5inchesbeyondthefrontofthe
cabinets.
Theventilatinghoodmustbe
constructedofsheetmetalnotless
than0.0122-inchthick(No.28
U.S.Standardgauge).Installabove
thecookingtopwithaclearanceof
notlessthan1/4inchbetweenthe
hoodandtheundersideofthe
combustiblematerialormetal
cabinet.Thehoodmustbeatleast
aswideastheapplianceand
centeredovertheappliance.
Clearancebetweenthecooking
surfhceandtheventilationhood
sutiaceMNJSTIWEVERBELESS
THAN24INCHES.
s Ifcabinetsareplacedabovethe
range,allowaminimumclearance
of30inchesbetweenthecooking
surfaceandthebottomof
unprotectedcabinets.
@Ifa30-inchclearancebetween
cookingsurfaceandoverhead
combustiblematerialormetal
cabinetscannotbemaintained,
protecttheundersideofthe
cabinetsabovethecookingtop
withnotlessthanl/4-inch
insulatingmillboardcoveredwith
sheetmetalnotlessthan0.0122-
inchthick(No.28U.S.Standard
gauge).
Clearancebetweenthecooking
surfaceandprotectedcabinets
MUSTi?lEYJERBELEN THAN
24INCHES.Thevertical
distancefromtheplaneofthe
cookingsurfacetothebottomof
adjacentoverheadcabinets
extendingcloserthan1inchto
theplaneoftherangesidesmust
notbelessthan18inches.(See
diagramonfollowingpage.)
~~iu~mm andrangetoparen~f
designedtoheatyourkitd’mo
Topburnersshouldnotbe
operatedwithoutcookwareonthe
grate.Suchabusecouldresultin
fireanddamagetoyourrangeand
willvoidyourwarranty.
Page 24

Fig. 1
I
Fig. 2
General
@SeeFigures 1and2 for allrough-
inand spacingdimensions.These
dimensionsmust bemet for safe
useofyour range. The locationof
theelectricaloutlet and pipeopening
shownon page26 maybe adjusted
tomeet specificrequirements.
@The range maybeplaced with O“
clearance(flush) atthe back wall
andside wallsofthe range ifthe
frontedges ofthe range sidepanels
stickout beyondthe cabinetfronts
otleast 1/4”.See Figure 2.
L4xatim
Do notlocate therange where it
maybe subject to strongdrafts.
.~nyopeningsin the floor or wall
behindthe range should besealed.
I%lakesure theopenings aroundthe
baseof therange that supply fresh
air forcombustion and ventilation
~irenot obstructed bycarpeting or
~toodwork.
Important:Toreduce therisk of
burns or firewhen reachingover
surfaceburners, cabinetstorage
spaceabovethe rangeshouldbe
avoided.If cabinetstoragespace is
to beprovidedabovetherange,the
risk can bereduced byinstallinga
rangehood thatsticksout atleast
511beyondthe frontof thecabinets.
Cabinetsinstalledabovea range
maybe no deeperthan 13!’See
Figure2.
Protect Yim- Floor
Yourrange, likemany other
!hu,whddl
items,iskavy and
txm
sewintosoftfkm Covexings
such as vinyl or
carpeting. When movingthe range
on thistype offlooring, usecare,
and it isrecommended thatthese
simpleand inexpensiveinstructions
be followed.
The rangeshouldbeinstalledon
a sheetofplywood(or similar
material)as follows:When the
jloorcovering endsat thefi-ontof
therange,the areathat therange
willrest onshouldbe builtupwith
plywoodtothe samelevelor higher
thanthe floor covering.This will
allowoperationof thebroiler
drawerand allowthe rangeto be
movedfor cleaningor servicing.
and.serial
IL4Eatim
The modeland serial numbersare
on a labellocatedon theleft front
frame when youopen thebroiler
drawer.(See illustrationbelow.)
1.
Page 25

r---
~Phillips and flat-blade
screwdrivers(oneflat-bladewitha
I-mftdiameteroflessthan 3/16”)
*Pencil and ruler
@Twopipewrenches(one
forbackup)
* 1~”open-endor adjustable
wrench
e 3/16”open-endor socketwrench
~~Nutdriver
Inaddition,for LP gasconversion,
youwillneed:
a 5/16”open-endwrench
e 1/2”open-endwrench
Materials
A’ceded
@Gasline shut-offvalve
~Pipejoint sealantthat resists
ac[ionofnatural andLP gases
@Flexiblemetalappliance
connector(1/2”I.~~). A lengthof
feetis recommended foreaseof
installationbutother lengthsare
acceptable.
~Flareunion adaptor for
connectionto gassupply line(3/4”
or 1/2”NPT x 1/2”I.D.)
~Flare unionadaptor for
cclnnectionto pressure regulatoron
range(1/2”NPT x 1/2”I.D.)
~Removealltapeand packaging.
Besureto removetheplasticfilm
thatcoverssomechromeparts
(aroundglassovendoors,sidetrim).
@Taketheaccessorypackoutof
theoven.
@Checktobe surethatno range
partshavecomelooseduring
shipping.
$ Liftthe cooktopand removeand
discardthe shippingscrewsholding
downthetop burners.
1
(.%s
supply
Yourrangeisdesignedtooperateat
a pressureof4 inchesof water
columnon naturalgasor, if
designedfor LP gas(propaneor
butane), 10inchesofwatercolumn.
Makesureyouare supplyingyour
rangewiththetypeofgasforwhich
itis designed. The typeofgasand
theoperatingpressureforwhich
yourrangeisdesignedare identified
onthe modeland serialnumber
platelocatedon therangeframe
belowthe surfaceburner knobs.
If, at anytime inthe future,you
decidetouse thisrangeon a
differenttype ofgas, conversion
adjustmentsmust.bemade bya
qualifiedservicetechnicianbefore
attemptingto operatethe rangeon
thatgas.
Forproper operation,the pressure
ofthegas supplied to the regulator
mustbe betweentheoperating
pressureshownon themodeland
serial numberplateand 13inches
ofwatercolumn. When checking
for properoperationof the
regulator,the inletpressure must
beat least 1inch greaterthan the
operating(manifold)pressure
shownon the modeland serial
numberplate. The pressure
regulatorlocated atthe inletofthe
rangemanifold mustremain in the
supplyline regardlessof whether
naturalor I-l gas isbeing used. A
flexiblemetal applianceconnector
used toconnect therange tothe gas
supplyline shouldhavean I.D. of
1/2inch and be 5 feetin length (but
shorter and longerlengthsare
acceptable)for ease ofinstallation.
(eowinued ilc.rt page
—
Page 26

—
(continued)
2
conned
the Range toGas
Shutoffthemaingas supplyvalve
beforedisconnectingtheold range
andleaveitoffuntilnewhook-up
hasbeencompleted.
Becauserigidpipingrestricts
movementof therange, theuseof
anA.G.A.-certifiedmetalappliance
connectorisrecommendedunless
local codesrequirea rigid-piped
connection.Neveruse anold
connectorwheninstallinga new
range.
Topreventgasleaks,put pipejoint
compoundor wrap pipethreadtape
withTeflon*on allmale (external)
pipethreads.
1. Install a manualgasline shut-off
~~alvein thegaslinein an easily
accessedlocationoutsideofthe
range.Makesureeveryone
operatingthe rangeknowswhere
andhowto shutoffthe gassupply
tothe range.
2. Installmale 1/2”flare union
adaptortGthe 1/2”NI?Tinternal
threadat inletofpressure regulator.
3. Installmale 1/2”or 3/4”flare
unionadaptor tothe NPT internal
threadof themanual shut-offvalve,
takingcare toback-up the shut-off
valveto keep itfrom turning.
4. Connect flexiblemetal
applianceconnector to the adaptor
onthe range. Positionrange to
permitconnection atthe shut-off
valve.
5. ‘when all UNm!dions have
‘beenmade, make
sum! aurange
mm”ds are
inthe M position
andhm on the main gas supply
~dve. Use
aliquid leak detector at
alljoints and connections tocheck
forleaks in thesystem.
CAIJTION: DO NO%’USE A
FLAMETO ICHECKWOE?GAS
LEAKS.
$Tefl~n:Registered trademark OfD1.l~Onl.
~~
Gas
PipeandElectricOutlet Locations
-4, ,, FlearVVall
1
Rigid Pipe Hookup
from Flooror Wall
1/2
fi
Black Iron Pipe
Through Wall
(Alternate Hook-up)
Black Iron Nipple
When using testpressures greater
than 1/2psig to pressure testthe gas
supply syst~mof theresidence,
disconnect the range and individual
shut-offvalve froti thegas supply
piping. When usingtest pressures
FlexibleConnector Hookup
Pressure
Regula!or
1/2
F!
II
Male
Adapter
E;t:;:a!
Connection
of 1/2psifjOrlesstotestthegas
supplysystem,simply
isolatethe
rangefrom the gas supply system
bychxing the individual shut-off
valve.
—.
Page 27

‘orranges requiring ekctrical
EkctricaSRequirements
120-volt,60 Hertz, properly
groundedbranchcircuitprotected
bya 15-amp.or 20-amp.circuit
breakeror timedelayfuse.
Extension (h-d
Cautions
Becauseofpotentialsafetyhazards
associatedwith certainconditions,
westronglyrecommendagainst
theuseofan extensioncord.
However,ifyoustillelectto usean
extensioncord, itis absolutely
necessarythatit bea UL-listed
3-wiregroundingtype appliance
extensioncord andthat thecurrent
carryingrating of the cord in
amperesbe equivalentto, or’greater
than, thebranchcircuit rating.
!rW.ding
MPORTAI?W:Pkmse readthis
sectioncarefuiiy.FORPERSONAL
FETY,THI$ APPLIANCE
USTBE PROPERLY
GROUNDED.
Thepowercord of thisrange
isequippedwith athree-prong
(grounding)plug whichmates with
a standardthree-prong (grounding)
wallreceptacle tominimizethe
possibility of electric shockhazard
fromthisrange.
The customershould havethe wall
receptacleand circuit checkedbya
qualifiedelectrician to make sure
the receptacleisproperly grounded.
Q
P!?EFEREI.I <
METHOD
IQ
y\ “
H’
%
..0
“ ‘\\ /
INSUREPROPER
GROUNDEXWS
BEFOREUSE
Wherea standardtwo-prongwall
receptacleis encountered,it isthe
personalresponsibilityand
obligationofthecustomerto haveit
replacedwith aproperly grounded
three-prongwallreceptacle.
DO NOT, UNDERANY
CIRCUMSTANCES,CUT(JR
REM(NE THETHIRD
(GROUND)PRONGFROM
THEPCWVERCCMUl
USAGE SH’UA’I’IONSWHERE
mfwmiowwovvmtfcom
WILL
BEDISCONNECTE~
INFREQUENTLY.For 15amp.
circuitsonly.Do notusean adapter
ona 20 amp.circuit. Wherelocal
codespermit, a TEMPORARY
COI?NECI’IONmaybe madeto a
properlygroundedtwo-prongwall
receptaclebythe useof a ULlisted
adapteravailableat mosthardware
stores.
TEMPORARYMETHOD
(ADAPTERPILJGSNOT
PERMllTEDINCANADA)
m
ALIGNLARGE
ll~B
‘\
PRONGS/SLOfS
~-
-’y&#p~ ~,
m
w’”’
INSUREPROPER
GROUNDAND
““” “’VNECTION
JSE
rl~lvl~ul
BEFOREI
The 1argerslotin theadapter must
be alignedwith thelarger slotin the
wallreceptacleto provideproper
polarity inthe connection ofthe
powercord.
Caution: Attachingthe adapter
ground terminalto the wall
receptaclecover screwdoes not
ground theappliance unlessthe
coverscrew is metal, and not
insulated, and thewall receptacleis
grounded throughthe house wiring.
Youshouldhavethe circuit checked
bya qualified electrician to make
sure thereceptacle is properly
grounded,
Whendisconnectingthepower
cord fromthe adapter,alwayshold
theadapterwithone hand.If this
isnotdone, theadapterground
terminalis verylikelytobreak with
repeateduse. Shouldthishappen,
DO NOTUSE theapplianceuntil a
propergroundhas againbeen
established.
USAGES1TUATIONSWHERE
APPLIANCEIK9WERC(MW
WILLBE DMXN4NECTED
FREQUENTLY.
Do notuse anadapterplug inthese
situationsbecausedisconnectingof
thepowercord placesunduestrain
on theadapterand leadsto eventual
failureofthe adapterground
terminal. Youshouldhavethe two-
prongwallreceptaclereplaced with
athree-prong(grounding)receptacle
bya qualifiedelectricianbefore
usingtheappliance.
The installationof appliances
designedfor mobilehome
installationmust conformwith the
ManufacturedHome Construction
and SafetyStandard, Title24 CFR,
Part 3280(formerly theFederal
Standardfor MobileHome
Constructionand Safety,Title24,
HUD (Part 280)or, when such
standardis notapplicable, the
Standardfor ManufacturedHome
Installations 1982(Manufactured
Home Sites, Communitiesand SetUps), ANSI A225.1-1984,or with
local codes).
Electrical Disconnect
The disconnectplug is locatedon
theback of therange. Todisconnect
grasp plug andpull straightout of
rangeback.
2./
y=-
.—.——..—
——...————— .—..-—....
—....,—
-----w-. ?-’
Page 28

—
(continued)
4
set-d
the
Sealanyopeningsin thewall
behindthe rangeand inthefloor
under the rangewhenhookupsare
completed.
5
For with
mm
checkBurnerqiylition
Opera~ionof allcooktopandoven
burnersshouldbe checkedas
directedon thefollowingpages
afterrangeand gassupplyline
connectionshavebeen carefully
checkedfor leaksand rangehas
beenconnectedto electricpower,
ifyourrange requireselectricity
tooperate.
Light the surface
Burner Pilots
L
2.
Raisethe cookiop.
Lightbothpilotswith a match.
Flame
ding Pilot
only)
\\-
Each pilot flame wasadjusted at
thefactory tobe approximately 1/4”
t:]ll.A tinge ofyellow appearing at
theupper tip is normal. If you -find
pdotadjustment is necessary, see
irlstructims at right.
8
/-?);
‘i
*4
theSa$rfau!+
PiM+s
L
Raisethe cooktop.
PilotAdjustment Screw
(cmStanding PdotModelsonly)
4/
2, Locatethe pilotadjustment
screw.It canbe foundto theright
ofthethermostat.
3. Toadjust, usea blade-type
screwdriver.Turnpilotadjustment
screwuntilpilotis 1/4”high.Do
notreduce theflameto lessthan
1/4”or pilotoutagemayoccur. A
largerthan recommendedpilot
flamemay generatesoot(carbon
black)on thebottomofyour
cooktop.
LighttheovenPilot
CAUTION: Make surethe
OVENCONTROL knob is in the
“OFF” positionbeforeattempting
to light;he pilot. If itis not, turn OVENCONTROL to OFF and
waitone minute.
1. Open thelower broiler
compartment andpullthe door
down flat. Put thebroiler pan inthe
lowestposition. Slidethe drawer
back intothe rangeso youcan
reach tothe back ofthe
compartment.
2. The tube runningfrom front to
back atthe top ofthe broiler
compartment isthe burner. The
piJotis atthe back of the
compartment, about one inch
belowthe burner. Light the pilot
with a match.
3. Lightthe pilot with a match.No
adjustmentsare requiredfornatural
ga~.Seepages30 and31forLP gas.
Stand-By Pilot Flame
1
I
I
Heater Pilot Flame~
I
4. Turn the OVENCONTROL
knobto a settingabove200”F.The
pilotflame willincrease in sizeand
impingeonthetemperatureresponse
element. The ovenburner will light
in 30-60seconds.
The ovenburner will operate until
the settemperature is reached. The
ovenburner will continueto cycle
on andoff as necessaryto maintain
theovenat thetemperatureindicated
bythe OVEN CONTROL knob.
r
——:—.—..— —-.—.—--- .
.—.—-.=.—-,--
Page 29

Wtl%!Ijy-litim
Chi?ckb!hrfac$?Burner
Operationofallcooktopand oven
burnersshouldbecheckedafter the
pilotshavebeen lighted(on models
soequipped)andrangeand gas
supplylineshavebeen carefully
checkedfor leaks.
stardhgPMModels
Selecta topburner knoband
simultaneouslypushin and turnto
HI position.The burnershould
lightwithina fewseconds.Try
eachburner in successionuntilall
burnershavebeen checked.
Electric Ignition Models
Selecta top burnerknob and
simultaneouslypushin and turn to
ITE position. Youwill heara
appingsound indicatingproper
operationof thespark module.
Oncethe air has beenpurged from
supplylines, burners should
htwithin4 seconds.After burner
li~hts,rotateknoboutof the LITE
position.Try each burner in
successionuntil allburners have
beenchecked.
check ovenBmma”
standing Pilot and
ElectricIgnitionModels
Yourovenis designedto operate
quietlyand automatically. To
operatethe oven, turn the OVEN
CONTROL knob to a setting above
200°F.After 30-60 seconds, the
ovenburner will igniteand burn
untilthesettemperatureisreached.
Theoven
burnerwillcontinueto
cycleon and offas necessary to
maintainthe ovenat the temperature
~+qdi~i~~tedby the OVEN
CONTROL
-’ad,
..i~!+”~’““
*—.
Important: Electric ignition
modelsrequireelectricalpowerto
operate.In the caseof apower
outage,the ovenburner on these
models cannot be litmanuallywith
amatch. Attemptstodo som-ay
resultin injuryifelectricalpower
isrestored.
‘7
AdjustAir
shutterifr$kessary
The airadjustmentshutterfor the
ovenburner is locatedat theopen
endof theventuritube andsitson
thehoodof thevalve.
Loosenthe Phillipshead screw
and rotatethe shuttertowardopen
or closedpositionas needed.
Removethe broilerdrawer.Use a
3/16”open-endor socket wrench to
backoutboth rear levelinglegs
approximatelytwoturns. Usea lx’
open-endor adjustablewrenchto
backoutthe frontlevelinglegs two
turns.Installtheovenshelves in th~
oven(seepage 11).
Positionthe rangewhere itis tobe
installed. Puta spirit level,or a CUI
partially filledwith water,on one
ofthe ovenracks tocheck for
levelness.If usinga spirit level,
taketwo readings—withthe level
placed diagonallyfirst in one
direction, and then theother. Use
the wrench toadjust theleg
levelers.The rear leg levelersmay
Todetermine if theoven burner
be accessed throughthe openings
flames areproper, observe the
inthe sides ofthebroil
flames. They should burn steady
compartment. After leveling,slid(
with approximately 1“blue cones
the rangeawayfrom the wallfor
and shouldnot extend out overthe
installationof the Anti-Tipdevice.
edgesof theburner baffle.
.—-..-.-
Page 30

-.
.-
-.
—
wmmG:
~Verifythatthe Anti-Tipdevice
*Rangemustbe securedwith the
isin place(seepage3).
.4nti-Tipdevicesupplied.
~This rangehasbeen designedto
~Unlessproperlyinstalled,the
meetall recognizedindustrytip
rangecouldbe
tippedbyyouor a
standardsforallnormalconditions.
childstanding,sittingor leaning
~The useofthisdevicedoesnot
onopendooror drawer.
precludetippingof therange
when notproperly installed.
Tools
Needed
.QPhillips head screwdriver
~ 1~S”or adjustablewrench
Device attachesto floor or wallto
holdeither rightor left rear leg
leveler.If fasteningto floor,be sure
thatscrewsdo notpenetrate
electricalwiringor plumbing.
Ifthiscannotbedetermined, use
shorterscrewsthat willnot
penetratethroughflooring.
If thedevicecamewith yourrange,
itis shippedattachedto the lower
rangeback. Removeand discard
theshippingscrewthat holdsthe
deviceand thenfollowinstructions
below.
L Decide whetherthe devicewill
beinstalledon theright or leftside
ofrangelocation.
Fig. 1
+
Fig. 2
2. If thedevicesideofthe range
is adjacentto acabinet, placethe
deviceagainst back walland
cabinetas shownin Figure 1.
If thereis no adjacentcabinet,
determinewhere the locationof the
rangeside (paintedoutsidepanel)
willbe. Place thedevicewith its
outsideedge atthis locationand
againstback wall. SeeFigure 1.
3. Determine whether youwi~l
anchor the deviceto thefloor or
wall. Fastenthe bracket securely
with the screwsprovided. Screws
are self-drillingin wood,plywood,
particle and chipboard, and most
metalframing. See Figure2. If
attachingto masonry youcan buy
suitablescrewsand anchors at
hardware stores. Use a masonry
drill todrill the required holes.
4. Using thewrench, backout the
four leglevelers atleast twoturns.
See yourinstallationguide for
more levelinginformation before
positioningrange.
5. Slidethe range intoplace. Be
sure rear leg leveler fully engages
slot indevice. If range cannotbe
movedback far enough for rear leg
leveler to enter device, movedevice
forward as required and attach to
floor in new location.
HkY$’v
toconverttheRange
forR$$ewith UP Gas
1
chnvwt
the pm?ssl.mregulator
Do notremovethepressure
regulator.
Gasket
gap
NAT
L.P.(4” W.
.)
,---
,c_.,--4tiz,
,A
;1
:<;..-j ~,.
‘“i...
Pressure
Ftegulator
1. Removethe cooktopand locate
thepressure regulatorat rightrear
ofrange.
2. Use acoin toremovethe cap
fromthe pressureregulator.
3. Turnthe cap overand engageit
inthe slots.IX shouldnowbe
visibleon thetop ofthe cap.
2
CUmvertsurfaceBwm!r
orificesforM’ Gas
Cwul’lor’d: The fohw’ing
N.@stmnt mustbe made Mimi!
turningonthe bwm!re Faihn-%to
do so6XM3Mresultinserious
injury
h! tohighfwm’lesand
toxicfw’-nes.
1. Liftandlockcooktop.
Page 31

—
‘ovenBm’rler ‘orifice
Removeovendoor,broilerdrawer,
enbottomandflamespreader.The
urnerorificeislocatedbehinda
metalshieldatcenterbottomofrange.
2. Removethe metalshieldand
usea 1/2”wrenchtoturntheburner
orificespudclockwiseuntilit issnug
wirhthebase.Do notovertighten.
4
AdjtktAirAdjustmentShutter
Theair adjustmentshutterforthe
—
ovenburner islocatedattheopen
j-: Yoftheventuritube and setson
—the hoodofthevalve.
Theairshuttershouldbecompletely
openfor usewith LPgas. Loosen
thePhillipshead screwand rotate
theshutterto openposition.
1
Todetermineiftheovenburner
flameisproper,observetheflame.
Itshouldsteadywithapproximately
1“blue cones andtheflameshould
notextendoutoverthe edgesofthe
baffle.For LPgas,this should
occurwhentheairadjustment
shutter iscompletelyopen.
!5
Adjust
oven Thermostat
foru? Gas
L
RemovetheOVENCONTROL
knob.(Seefirst3stepsunder “To
AdjusttheSurfaceBurner Pilots?)
Oven Pilot
Adjustment Screw
2. Locatethethermostatadjustment
screwatleftofthermostatshaft.Turn
screwuntilthe smallpointerisatLP.
3. ReplaceOVENCONTROL~ob.
6
Adjustthe SurfaceBurnerPilots
(Standing
L
Raisethe cooktop.
Pilot Adjustment Screw
(on Standwg Pilot Modelsonly)
4/
2. Locatethepilotadjustment
screw.Ncan be foundto theright
ofthethermostat.
3. Toadjust, use ablade-type
screwdriver.Turn pilotadjustment
screwuntilpilotis 1/4”high.Do
notreduce flametoless than 1/4”
or pilotoutagemayoccur. A larger
than recommendedpilot flamema!
generatesoot(carbon black)on thf
bottomofyour cooktop.
31
———
-———.. -——...—.. . .... --”. L-...—--
-.. .... a.-
Page 32

Be
WViththe pmdlase d pur new NM appkmm, receive the
snmance-that if you f+er need kfixmatkm cm assistance,
Ube there. AM
you have tOcb is czdl-toll-free!
Our consumerserviceprofessionals
willprovideexpertrepair serviceon
ourRCAappliance,scheduledat a
timethat’sconvenientfor you.l’vfany
GEConsumerServicecompany-
eratedlocationsofferyouservice
dayor
tomorrow,or at yourcon-
venience(7:00a.m.to 7:00
p.m.weekda}>9:00a.m.to 2:00p.m.Saturdays).
Our factory-trainedtechniciansknow
yourapplianceinsideand out—so
mostrepairscan behandled injust
onevisit.
Fi3f’
Consumerswithimpaired hearingor
speechwhohaveaccessto aTDDor a
conventionalteletypewritermaycall
80t~-T~D-G~C(800-833-4322)to
requestservice.
Youcanhavethesecurefeelingthat
GEConsumerServicewillstillbe
thereafteryour RCAproductwarrantyexpires.Purchasea GEcontract
whileyourwarmntyisstillin effect
and you’llreceivea substantialdis-
count.Wj.tha multiple-yearcontmct,
you’reassuredof futureserviceat
today’sprices.
IndivichdsC@.ifkd. toSetice their
ownappliancescan haveneeded
partsor accessoriessentdirectlyto
theirhome,freeofshippingcharge!
Our partssystemprovidesaccessto
over4’7,000GenuineRenewalParts...
and allarefullywarranted.VISA,
MasterCardand Discovercardsare
accepted.
user maintenanceklstrwt.ions
containedin thisbookletcoverproce
dlwesintended tobe performed by
anyuser.Other servicinggenerally
dlOUki be referredtoqwdifiedser-
vicelpm’$omd.chltion Xmllnstbe
exercised,sinceimproperservicing
maycauseUn$afeoperation.
‘Mecom-mnicatiQm Device fortheDeaf
Page 33

m“m. RCA
Saveproofof originalpurchasedate such asyoursalesslip or cancelled check to establish warranty period.
Is cm/-EmD
FULL ONE-YEAR WARRANTY
For one year from date of original purchase, we
will provide, free of charge, parts and service labor
in your home to repair or replace anypart of the
Rangethatfailsbecauseof amanufacturingdefect.
Thiswarrantyis extendedto the originalpurchaser
and anysucceedingownerforproductspurchased
forordinaryhome usein the 48 mainland states,
Hawaii and Washington, D.C. In Alaska the
warranty is the same except that it is LIMITED
because you must pay to ship the product to the
service shop or for the service technician’s travel
costs to your home.
FOR SERVICE
Weat RCA strive to provide the highest quality
products and service. Therefore we have designated
GE CONSLJMERSERVICE,a leader in the service
industry, to fulfillyour service needs. Should your
appliance need service, during warranty period or
beyond, look in the White or YellowPages of your
telephone directory for GE CONSUMER SERVICE
or an authorized RCA APPLIANCE SERVICER.
VVHM’ Is Nor CCWERED
e Servicetrhmtovourhome to teach vou how
I
to use the p;odu&.
J
Read vour Use and Care material. Ifvou then have
anyq;estions about operating the pr~duct, please
contact your dealeror
Manager–Consumer Affaks
RCA Appliances
Appliance Park
Louisville,KY40225
~Improperinstallation.
f youhavean installation problem, contact your
iealer or installer. Youare responsible for providing
ldequate electrical, gas, exhausting and other
onnecting facilities.
~Replacement of house fuses or resetting of circuit
breakers.
~Failure ofthe product ifit is used for other than its
intended purpose or used commercially.
oDamagetoproductcausedby accident,fire,
floodsor actsof God.
ome statesdonot allowthe exclusioncr limitationofincidentalor Warrantor:RCA Appliances
msequential damages, so the above limitation or exclusion may not
)ply to you. This warranty gives you specific legal rights, and you
If tiller help is needed concerning this
ay Aso haveother rightswhichvaryfrom stateto state.To know
hat yourlegalrights are in your state,consult yourlocal or state
waman&yf wrk
Affairs
msumer affairs office or your state’s Attorney General.
K(X &3~l~i3~t2ef+
Appliiie Park
Lm.Risvim!,
KY 4W25
I
: PartNo.164D1913P035
/ plk),No,79-4036
L2EHI!5GPL(%?38)
 Loading...