

Page 1

Television
User’s Guide
Changing Entertainment. Again.
Page 2

Important Information
WARNING
To reduce the risk of fire or electric shock, do
not expose this product to rain or moisture.
CAUTION
RISK OF ELECTRIC SHOCK DO
NOT OPEN
This symbol indicates "dangerous
voltage" inside the product that presents
a risk of electric shock or personal injury.
Refer to the identification/rating label located on the back panel of your product for its proper operating
voltage.
FCC Regulations state that unauthorized changes or modifications to this equipment may void the user’s
authority to operate it.
Caution: Using video games or any external accessory with fixed images for extended periods of time can
cause them to be permanently imprinted on the picture tube (or projection TV picture tubes). ALSO, some
network/program logos, phone numbers, etc. may cause similar damage. This damage is not covered by
your warranty.
Cable TV Installer: This reminder is provided to call your attention to Article 820-40 of the National Electrical
Code (Section 54 of the Canadian Electrical Code, Part 1) which provides guidelines for proper grounding and,
in particular, specifies that the cable ground shall be connected to the grounding system of the building as
close to the point of cable entry as practical.
Caution: To reduce the risk of electric shock, do not remove cover (or
back). No user serviceable parts inside. Refer servicing to qualified service
personnel.
This symbol indicates important
instructions accompanying the product.
Product Registration
Please fill out the product registration card (packed separately) and return it immediately. Returning the card allows us to contact you if needed.
Product Information
Keep your sales receipt to obtain warranty parts and service and for proof of purchase. Attach it here and record the serial and model numbers in case you need
them. These numbers are located on the product.
Model No._______________________ Serial No._____________________ Purchase Date: _________________________________________________
Dealer/Address/Phone: __________________________________________________________________________________________________________
Page 3

Table of Contents
Chapter 1: Getting Started
Things to Consider Before You Connect ..........................2
Protect Against Power Surges ........................................................ 2
Protect Components from Overheating ...................................... 2
Position Cables Properly to Avoid Audio Interference ............ 2
Important Stand and Base Safety Information ......................... 2
Use Indirect Light .............................................................................. 2
Things Needed Before You Connect ............................................. 2
TV + VCR ............................................................................. 3
Back of TV........................................................................... 4
The Front of Your TV .........................................................5
Start-up ..............................................................................6
Put Batteries in the Remote ........................................................... 6
Turn on the TV .................................................................................... 6
Place All Available Channels Into Memory ................................ 6
Set the Time ........................................................................................ 6
The ClonePRO™ ...................................................................6
Understanding the Menus ................................................. 6
Using Master and Basic Menus......................................... 6
Setting Limits in Master Menus ....................................... 7
Audio Menu ......................................................................................... 7
Picture Quality Menu ....................................................................... 7
Channel Menu .................................................................................... 8
Access & Power Options Menu ...................................................... 8
Time and Timers Menu ..................................................................... 9
Parental Controls ............................................................................. 10
Chapter 2: Using the Remote Control
Access & Power Options Menu ...................................... 17
Closed Captioning Menu ................................................ 17
Time and Timers Menu ................................................... 18
Parental Controls and V-Chip ........................................ 18
How V-Chip Works .......................................................................... 18
Lock/Unlock Parental Controls ..................................................... 19
Parental Controls Access ............................................................... 19
V-Chip Movie Rating Limit ........................................................... 19
V-Chip TV Rating Limit .................................................................. 19
Blocking Specific Content Themes ............................................. 20
Viewing Specific Content Themes............................................... 21
V-Chip Unrated Program Block ................................................... 21
Channel Block ................................................................................... 21
Password ............................................................................................ 21
Menu Language ............................................................... 21
Chapter 4: Other Information
Using the ClonePRO™...................................................... 22
Modes of operation ......................................................................... 22
DSCI mode ......................................................................................... 22
IR mode .............................................................................................. 23
Cloning a TV ...................................................................................... 24
Channel Banner ............................................................... 25
Why You Should Use the Auto Tuning Feature ........... 25
How to Set Up the Auto Tuning Feature................................... 25
Troubleshooting ............................................................... 26
Care and Cleaning ........................................................... 28
Limited Warranty ............................................................ 29
Types of Remote Controls ............................................... 11
Master (CRK17TD1) or Basic (CRK17TC1) Remote
Buttons .............................................................................. 11
Universal Remote Buttons (CRK76TK1) ........................ 12
ClonePRO™ Remote Buttons .......................................... 13
Using the WHO•INPUT or INPUT Button...................... 14
Using the SYSTEM Button.............................................. 14
Programming the Remote to Operate Other
Components ................................................................... 14
Find Out If You Need to Program the Remote ........................ 14
How to Use the Remote After You’ve Programmed It. 14
Remote Codes .................................................................. 15
Chapter 3: Using the TV’s Menu System
How to Use Your TV’s Menu System ............................. 16
Menus ................................................................................................. 16
Audio Menu ..................................................................... 16
Picture Quality Menu ..................................................... 17
Channel Menu ................................................................. 17
1
Page 4

Chapter 1: Getting Started
Things to Consider Before You Connect
Protect Against Power Surges
•Connect all components before you plug any of their power cords into the wall outlet.
•Turn off the TV and/or component before you connect or disconnect any cables.
•Make sure all antennas and cables are properly grounded. Refer to the Important Safeguards sheet packed
with your TV.
Protect Components from Overheating
•Don’t block ventilation holes on any of the components. Arrange the components so that air can circulate
freely.
•Don’t stack components.
• When you place components in a stand, make sure you allow adequate ventilation.
• If you connect an audio receiver or amplifier, place it on the top shelf so the heated air from it won’t flow
around other components.
Position Cables Properly to Avoid Audio Interference
•Insert each cable firmly into the designated jack.
• If you place components above the TV, route all cables down the side of the back of the TV instead of
straight down the middle of the back of the TV.
• If your antenna uses 300-ohm twin lead cables, do not coil the cables. Also, keep the twin lead cables away
from audio/video cables.
Important Stand and Base Safety Information
Choose the location for your TV carefully. Place the TV on a stand or base that is of adequate size and strength
to prevent the TV from being accidentally tipped over, pushed off, or pulled off. This could cause personal injury
and/or damage the TV. Refer to the Important Safeguards sheet packed with your TV.
Use Indirect Light
Don’t place the TV where sunlight or room lighting will be directed toward the screen. Use soft or indirect
lighting.
Things Needed Before You Connect
You will need a Master remote or ClonePRO™ to set up the TV. Contact your RCA commercial distributor to
purchase one of these.
2 Chapter 1
Graphics contained within this publication are for representation only.
Page 5
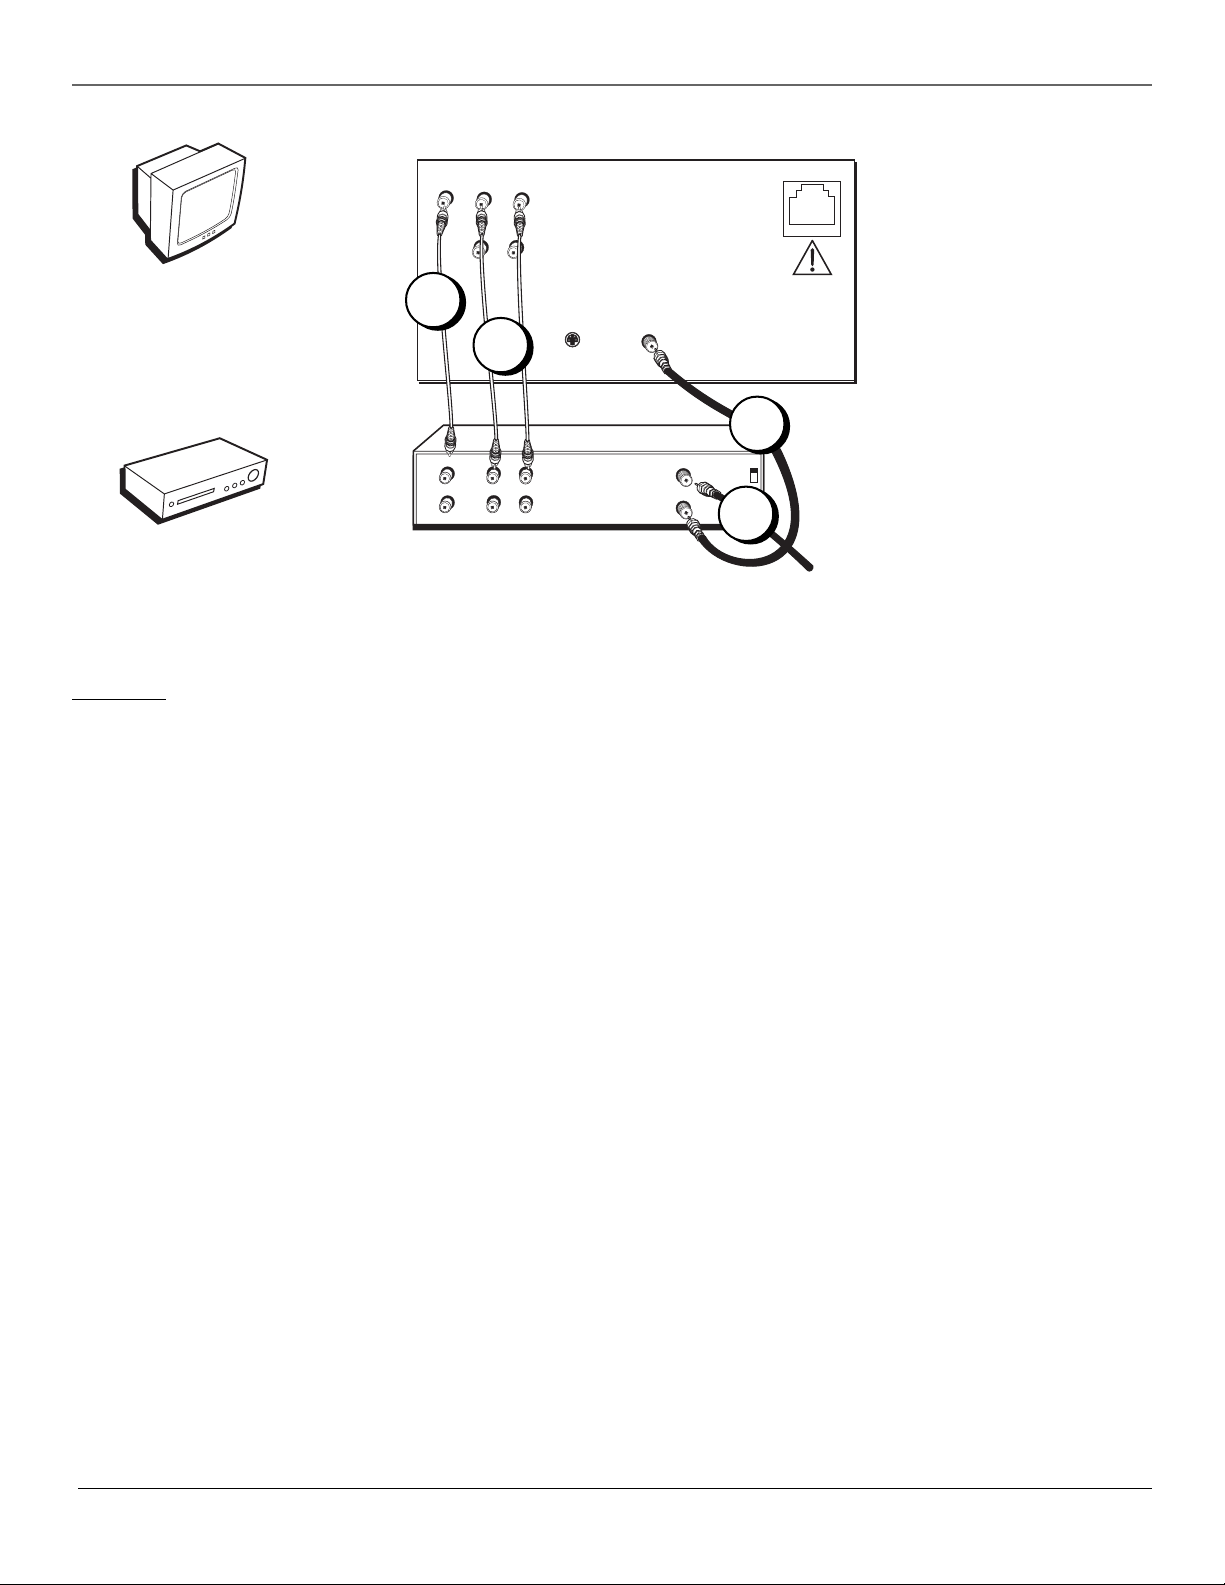
Getting Started
TV + VCR
TV
VCR
TV
VIDEO
R
R
R
AUDIO
L /MONO
IN
L
OUT
1C
CABLE/
ANTENNA
IN FROM ANT
OUT TO TV
1A
CH3
CH4
2
VCR
VIDEO
1B
OUT
IN
AUDIO
S-VIDEO
IN
LR
LR
Note: The back of your TV might vary from the above graphic. Go to
the next page for information on the back panel.
DSCI PORT
From Cable
or Antenna
1. Connect your TV to your VCR
A. Connect a coaxial cable to the CABLE/ANTENNA jack on your TV and to the Output Jack on your VCR
(sometimes labeled OUT TO TV).
B. Connect the audio/video cables. Connect audio cables (white and red) to the AUDIO R and L/MONO jacks
on the back of the TV and to the Audio Output Jacks on the VCR (sometimes labeled OUT R L).
C. Connect the video cable (yellow) to the VIDEO jack on the back of the TV and to the Video Output Jack
on the VCR.
2. Connect cable or antenna to your VCR
Connect the coaxial cable from your cable outlet or antenna to the Input Jack on your VCR (sometimes
labeled IN FROM ANTENNA or IN FROM ANT).
Chapter 1 3
Graphics contained within this publication are for representation only.
Page 6
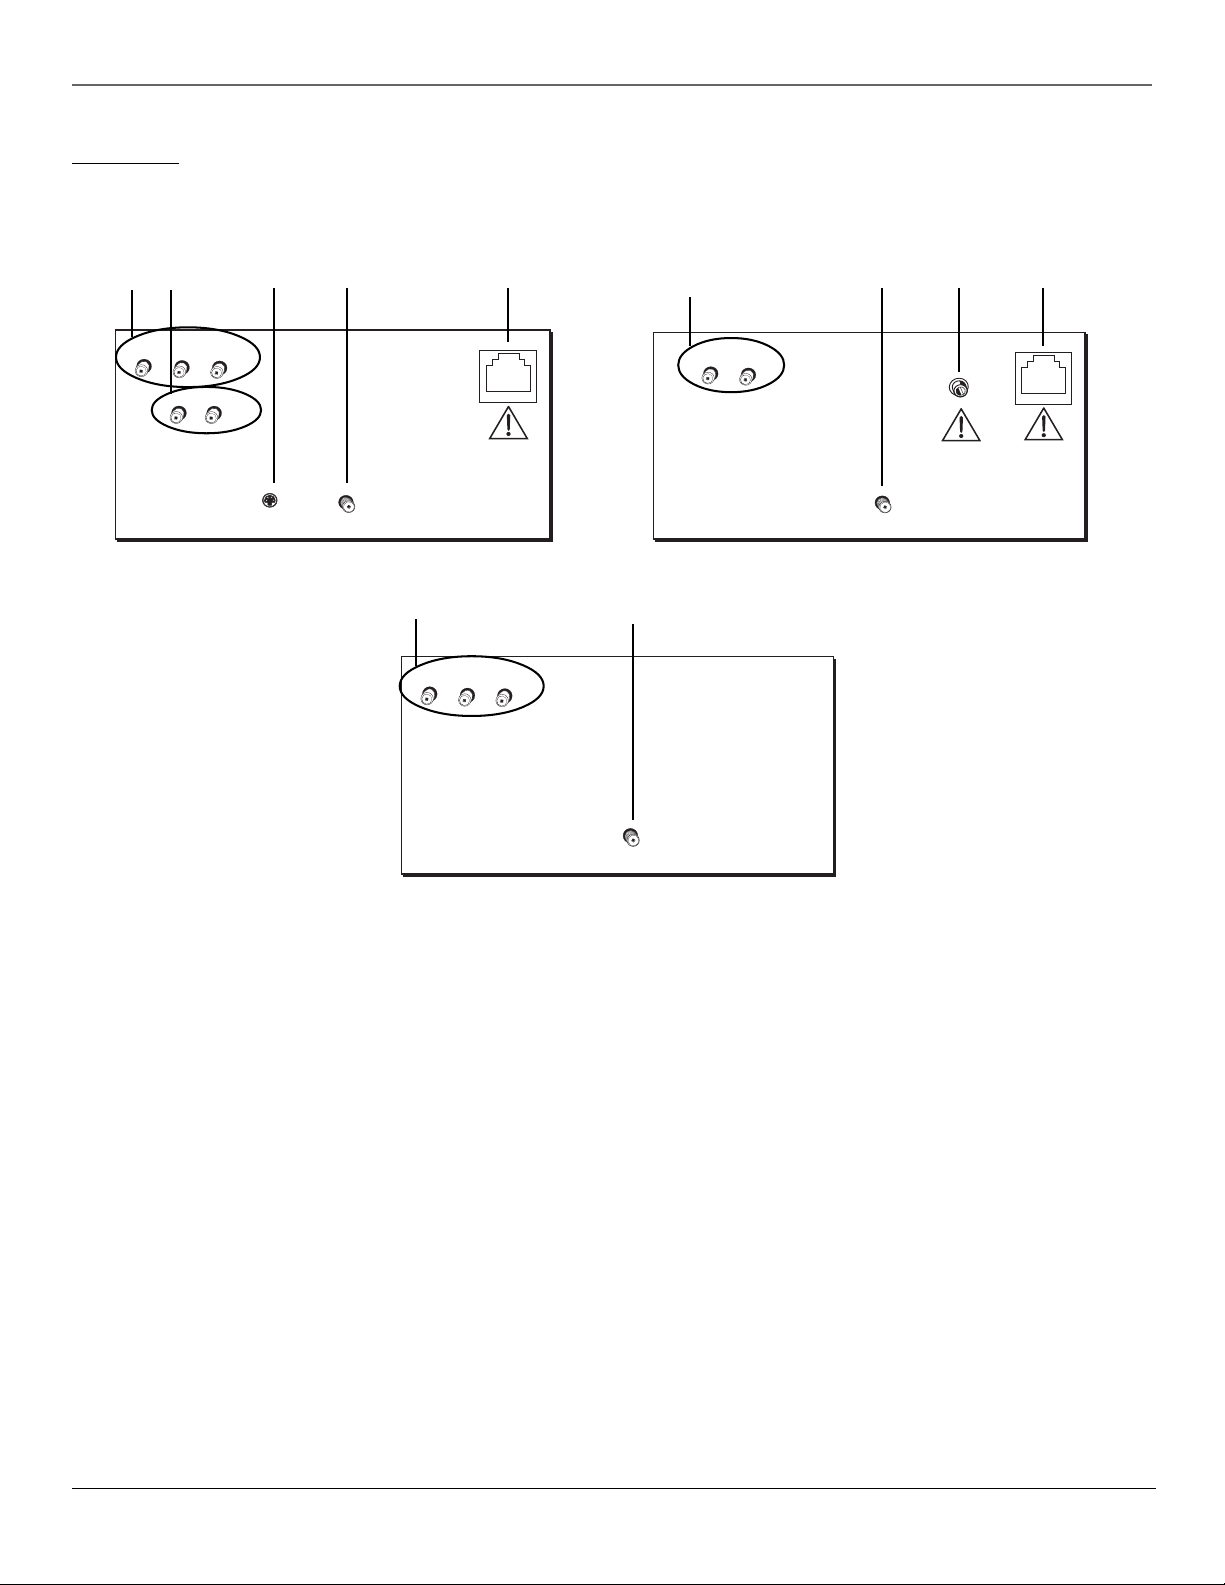
Getting Started
Back of TV
This manual covers TV models that have different back panels. Match the back panel of your TV to one of the
back panels shown below.
2
1
TV
VIDEO
AUDIO
R
R
34
L /MONO
IN
L
OUT
S-VIDEO
IN
CABLE/
ANTENNA
Models J20435, J25435, J27435, J32435, J36435 and J27433
1
TV
VIDEO
R
AUDIO
6
DSCI PORT
L /MONO
1
TV
VIDEO
AUDIO
4
PATIENT REMOTE
PENDANT
CABLE/
ANTENNA
5
6
DSCI PORT
Model J20542
4
IN
CABLE/
ANTENNA
Model J25400
1 VIDEO and AUDIO R and L/MONO IN Jacks
Used to connect video devices, such as VCRs, camcorders, laserdisc players, or video game consoles with audio/
video outputs.
2 AUDIO R and L OUT Jacks
Allows connection of external audio amplifiers, powered speakers, or other devices with line-level audio inputs.
Note that these outputs cannot drive standard speakers directly.
3 S-VIDEO IN
Used to connect devices with S-Video capability (an S-Video cable is required). Remember to connect audio
cables as well, because the S-Video cable carries only video.
4 CABLE/ANTENNA Jack
Used to attach either a home antenna or cable system to your TV.
5 PATIENT REMOTE PENDANT
Used to connect to pillow speaker, nurse-call system, or other device to supply speaker-level audio or accept
remote control. The connector is a stereo (3-wire) phone jack. For more information on its connection and
operation, please contact your RCA distributor or the supplier of the nurse-call system.
6 DSCI PORT
Also known as “Smartplug,” this port is used to transfer information between a TV and other devices, such as a
clone box or interactive system. This port is an eight-pin telephone-type port. For more information on its
connection and operation, please contact your distributor or the supplier of the interactive system.
4 Chapter 1
Graphics contained within this publication are for representation only.
Page 7
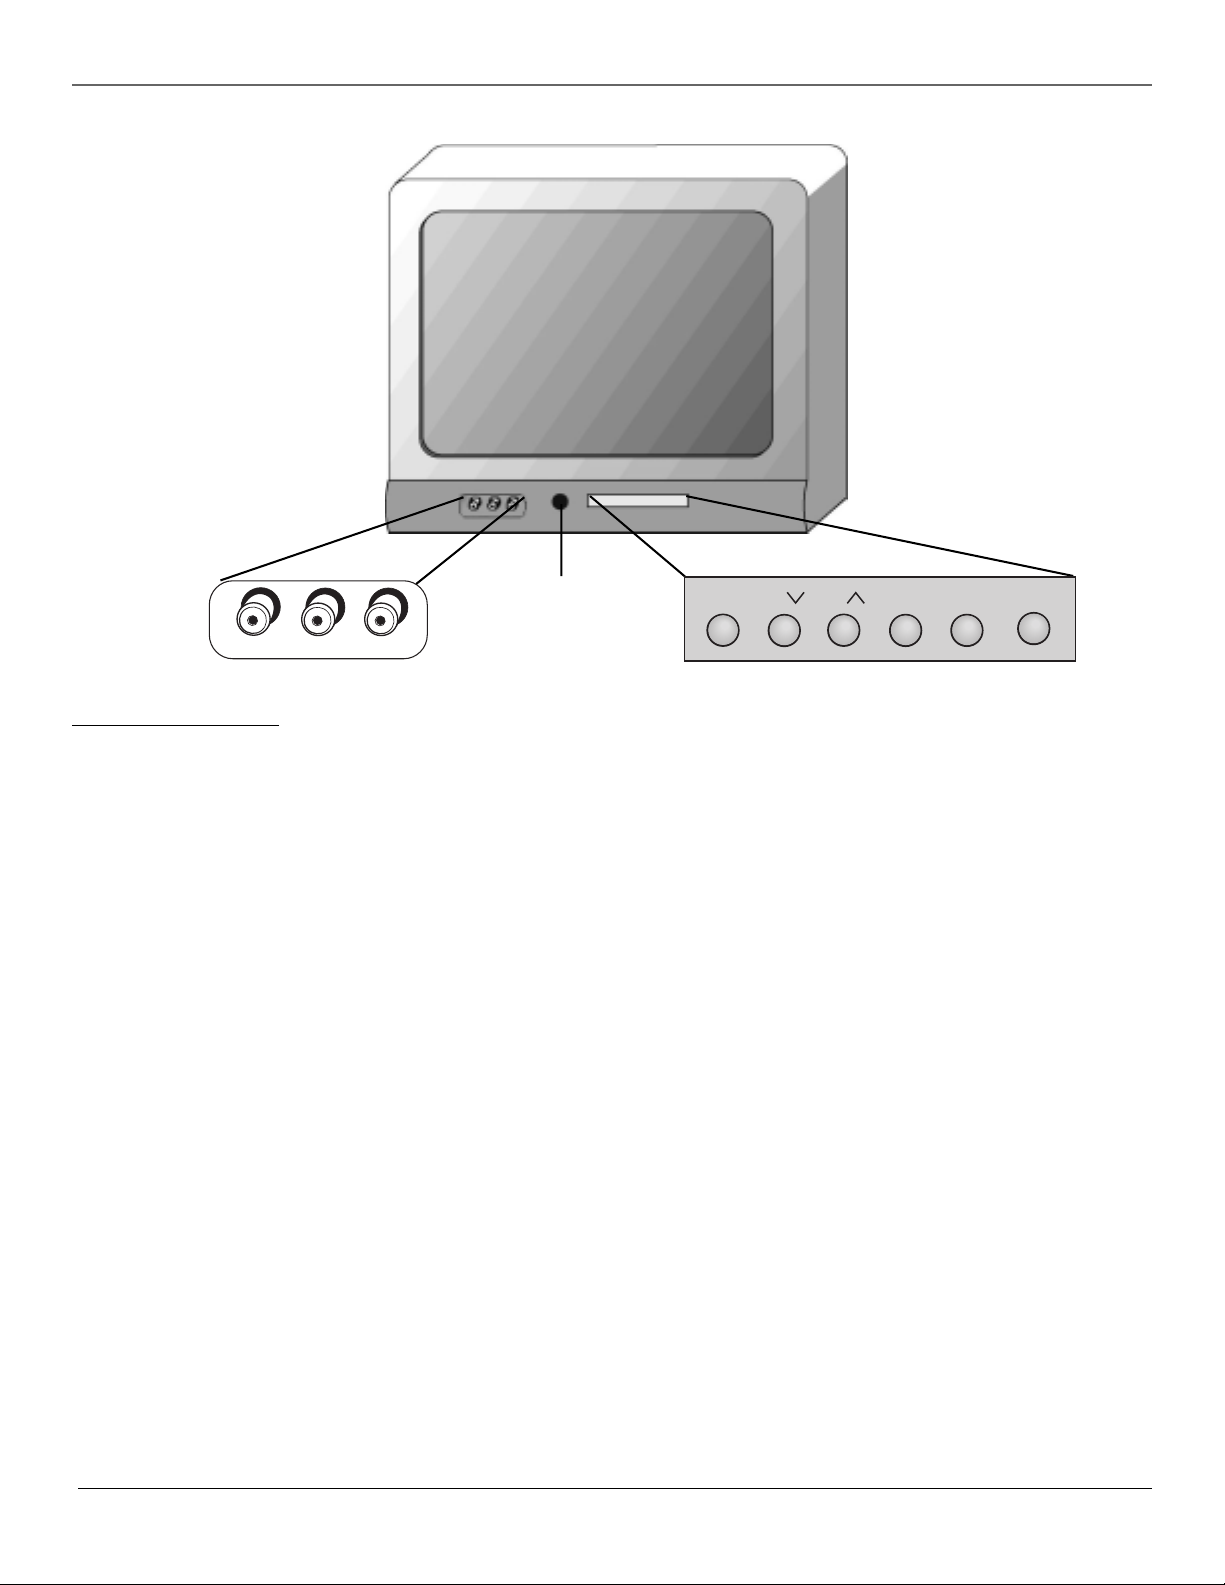
Getting Started
VIDEO
L/MONO
Remote sensor
R
MENU CH VOL–VOL+POWERCH
The Front of Your TV
If you cannot locate your remote you can use the front panel of your TV to operate basic user features.
Note that front panel access may be blocked by master menu settings. Go to Access & Power Options menu for
more information.
MENU Brings up the basic Main menu. When in the menu system, it selects highlighted items.
CH v Scans down through the channel list. When in the menu system, it points down to items and adjusts
menu controls.
CH ^ Scans up through the channel list. When in the menu system, it points up to items and adjusts menu
controls.
VOL – Decreases the volume. When in the menu system, VOL – is used to point left to items and adjusts menu
controls.
VOL + Increases the volume. When in the menu system, VOL + is used to point right to items and adjusts menu
controls.
POWER Turns the TV on and off.
Front Panel Jacks
Only available on models J20435, J25435, J27433, J27435, J32435, and J36435
You can access the component you connected to the front of the TV by pressing the WHO•INPUT or INPUT
button on your remote until VID appears on the screen. The jacks are ideal for using a video game console or a
camcorder. A component connected to the front panel jacks will override a component that is connected to the
back panel jacks.
VIDEO (in) Receives video from another component such as a VCR, camcorder or video game console.
L/MONO and R AUDIO Receives audio from another component such as a VCR, camcorder or video game
console.
Chapter 1 5
Graphics contained within this publication are for representation only.
Page 8

Getting Started
Start-up
The steps below get your TV connected and ready to watch.
Put Batteries in the Remote
1. Pull off the cover of the battery compartment.
2. Place the two AAA batteries into the remote, matching the + and – end of each battery in the compartment.
3. Replace the cover.
Turn on the TV
Press POWER on the TV or remote.
Place All Available Channels Into Memory
1. Press MENU on the remote control, then select Channel, then Auto Channel Search.
2. Select which channel list you’d like to find channels for (List A is the default).
Note: Inputs (VID, SVID, etc.) must be added to the active channel list separately before they can be accessed. Refer to pages at the
end of this chapter for more information on the Channel menu and List & Labels.
Set the Time
To set the time, select automatic setting of the time, or to prevent viewers from accessing the Current Time and
Schedule options, go to page 9.
If the control panel is not set to the current time, use the arrow and digit buttons on the remote control to
make changes. You can also enter numbers by using the up and down arrows on the remote.
The ClonePRO™
If several TVs need to be programmed with the same menu settings, an optional ClonePRO remote can be used to
copy all of the menu settings from one TV into another TV to reduce installation time. Information can be both
downloaded to and uploaded from the ClonePRO using the DSCI port on the TV’s back panel or using the IR
sensor. A ClonePRO can be obtained from your RCA commercial distributor. To use the ClonePRO now, go to
page 22 for information. If you want to set other menu options before using the ClonePRO go to the next pages
of this chapter. Note you can use the ClonePRO at any time.
Note: Model J25400 can be cloned in IR mode from an RCA commercial model with DSCI port. Information cannot be copied from
the J25400 to other TVs.
MAIN MENU
1 Audio
2 Picture Quality
3 Channel
4 Access & Power Options
5 Closed Captioning
6 Time and Timers
7 Parental Controls
8 Menu Language/Idioma/Langue
0 Exit
The master Main menu.
MAIN MENU
1 Channel Guide
2 Menu Language/Idioma/La ng u e
3 Closed Captioning
4 Time and Timers
5 Picture Presets
6 Audio Processor
7 Parental Controls
0 Exit
The basic Main menu. The choices
available in this menu change
according to limits set by the master
user.
Understanding the Menus
This television displays two levels of menus: master and basic.
The master menus are accessible by pressing MENU on the master remote (CRK17TD1). The master Main
menu will always display eight choices.
The basic menus are accessible by pressing MENU on a basic remote (CRK17TC1 or other remote) or the front
panel. The choices available on the basic menus and control panels will vary depending on limits set by the
master user and the input selected. You can turn off the basic menu completely through the Access & Power
Options menu. For more information on the effects of master user choices on the basic menu and basic user
functionality, go to the next pages of this chapter.
Note: Options set in the master menu are stored in nonvolatile memory. If any options are changed in the basic menu, and
then the TV is turned off, the TV defaults to the master menu settings once it’s turned back on.
Using Master and Basic Menus
Menus and choice lists use the point and select rule to navigate, but control panels use a variety of methods
to adjust features on your TV. The following pages detail how to use these controls to customize the
functions of your TV.
The first menu is called the Main menu. Press MENU on the remote (master remote for master menu; basic or
universal remote for basic menu) or on the front panel (basic menu) to bring up the Main menu.
Menu choices take you to another menu or a control panel. There are two ways to select a menu item:
•Point with the arrows and then select with MENU or OK.
•Press a digit button on the remote. For example, in the master Main menu, press 3 to go straight to the
Channel menu.
6 Chapter 1
Graphics contained within this publication are for representation only.
Page 9

Getting Started
Exiting a Menu
There are three ways to exit a menu. Note that not all methods work in all menus:
•Point to Exit and press MENU or OK.
•Press 0 on the remote control.
•Press CLEAR. The on-screen displays are cleared from the screen and you return to TV viewing.
Setting Limits in Master Menus
Some screens in the main master menus are not available in the main basic menu. There also might be some
options you want to make unavailable to the basic user. These next few pages describe these type of menu
options. To make all options unavailable, set the Basic Menu Access in the Access & Power Options menu. For
more information on other menu options not mentioned in this chapter, go to Chapter 3.
AUDIO
1 Mute
2 Audio Levels
3 Audio Processor
4 Audio Output & Speakers
5 Sound Logic
0 Exit
PICTURE QUALITY
1 Picture Adjustments
2 Picture Presets
3 Auto Color
4 Color Warmth
0 Exit
Audio Menu
The Audio levels, output and speakers, and sound logic aren’t available in the basic menu.
Audio Levels Adjust the TV’s Balance (Speaker In/Ext on model J20542), Treble, Bass, Initial Volume, and
Maximum Volume.
In all models except the J20542, the Balance feature fades between left and right speakers. In the J20542,
Speaker In/Ext fades between internal and external speakers. Treble and Bass adjust the proportion of high
and low notes, respectively. Initial Volume sets the TV’s volume to the specified level every time it is turned
on. The Maximum Volume feature re-scales the volume control slider so that the far right position is always
the maximum allowable volume (but not necessarily the maximum possible volume).
Audio Output & Speakers (not available on models J20542 and J25400) Lets you turn the TV’s internal
speakers on or off and set the audio outputs to fixed-level or variable control level.
Variable Output, Speakers On Turns the TV’s speakers on and sets the variable output from the TV’s
audio output jacks, proportional to the volume setting.
Variable Output, Speakers Off Turns the TV’s speakers off and allows variable output from the TV’s
audio output jacks.
Fixed Output, Speakers Off Turns the TV’s speakers off and allows fixed output from the TV’s audio
output jacks to an external device such as a surround sound amplifier. When this feature is turned on,
the TV’s volume control, tone controls, Expanded Stereo, and mute are disabled.
Volume Hold Turns the TV’s speakers on and sets the audio outputs proportional to the current volume
setting. When this feature is turned on, mute and other volume controls are disabled.
Sound Logic Turning this feature on reduces the annoying blasts in volume during commercial breaks to
create more consistent audio output.
Picture Quality Menu
Picture adjustments, auto color, color warmth and picture tilt (for models J32435 and J36435 only) are not
available on the basic menu.
Picture Adjustments Displays the five slider controls for adjusting the way the picture looks in the current
video input source (this feature can be set differently for each video input source).
Contrast Adjusts the difference between the light and dark areas of the picture.
Color Adjusts the richness of the color.
Tint Adjusts the balance between the red and green levels.
Black Level Adjusts the brightness of the picture.
Sharpness Adjusts the crispness of edges in the picture.
When exiting the Picture Adjustments menu, the Save Custom Picture Preset choice list appears. You can
choose either Yes or No. If you save the settings as a Custom Picture Preset, the TV will store the settings so
that you can select them quickly if someone changes the settings.
Auto Color Displays a choice list that lets you turn on the feature that corrects the color of the picture.
(This is especially useful for tracking realistic flesh tone colors as you switch from channel to channel.)
Choose Off or On, depending on your preference.
Color Warmth Displays a choice list that lets you set one of three automatic color adjustments: Cool for a
more blue palette of picture colors; Normal; and Warm for a more red palette of picture colors. The warm
setting corresponds to the NTSC standard of 6500 K.
Picture Tilt (available only on models J32435 and J36435) These models have an extra large picture tube
that makes it vulnerable to the effects of the Earth’s magnetic field. You may need to adjust the picture tilt.
Chapter 1 7
Graphics contained within this publication are for representation only.
Page 10

Getting Started
CHANNEL
1 Channel Guide
2
Channel Selection
3 Signal Source
4 Auto Channel Search
5 List and Labels
6 Auto Tuning
0 Exit
Channel Menu
There isn’t a Channel menu in the basic menu, rather a Channel Guide. Most of the Channel menu options
are more advanced and you might not feel you need to customize any of the options.
Channel Selection Allows the master user to set the initial channel and to select which of the three
channel lists will be active (accessible to the basic user). If no initial channel is selected, the TV tunes to the
last channel when turned on. If Hold is selected, the user will not be able to select any channel other than
the initial channel.
Signal Source Displays a choice list that lets you select the current signal source and turn muting and
blanking on or off for weak signals.
UHF/VHF Choose this if you are currently using an off-air antenna for TV signals.
Cable TV Choose this if you are currently using cable or a cable box for TV signals.
Auto Channel Search Tells the TV to search for all the channels available through the antenna input. When
the TV finds an active channel, it places it in the selected channel list; inactive channels (weak stations or
channels with no signal at all) are removed from that channel list.
List and Labels Displays a control panel that lets you edit the three channel lists and choose an eightcharacter label for each channel. Follow the on-screen directions to customize channel lists and labels. Note
that pressing RESET or SKIP in the Lists and Labels menu returns the highlighted field to its default status.
Channel Use the up and down arrows to scroll up and down through the channels available via your
antenna. You can enter the channel number directly using the digit buttons.
Lists A, B, and C Use the up and down arrows to indicate whether you want the channel number to be
included in the highlighted channel list. Channels included in a list will be available to users when that
list is active. Channels not included in the active list will not be accessible to users.
Channel Label Use the up and down arrows to enter a label of up to eight characters for each channel.
Hold an arrow button down to scroll quickly through the characters. Press RESET or SKIP to clear the
currently highlighted label. To prevent a channel number from displaying on the screen, select “#” as the
eighth label character.
Auto Tuning Displays a choice list that lets you set up the TV to tune to the correct input channel when you
press its component button (VCR1, DVD, VCR2, or SAT) on a universal remote. Go to Chapter 4 for details on
the Auto Tuning feature.
ACCESS & POWER OPTIONS
Remote Config. TV1
^
Press ^v to change, MENU to exit.
Remote Config. TV1
Basic Menu Access Enabled
TV Power Config. Always
Front Panel Enabled
Energy Saver Disabled
Parental Controls NoBasic
Access & Power Options Menu
This control panel allows the master user to specify which features and functions basic users will be able to
access. Yellow and green color coding shows each item’s status:
• Yellow default setting
• Green change from default setting
Remote Config. (Configuration) This feature tells the TV under what circumstances to respond to remote
control commands:
TV1 This TV will only respond to a remote in TV1 mode.
TV1 or TV2 This TV will respond if the remote is in either mode.
TV2 This TV will only respond to a remote in TV2 mode.
Disabled This TV will not respond to a remote at all, except MENU from the master remote.
Once you have assigned TV1 or TV2 status to your TVs, you will need to tell the remote control which TV you
want to operate. On a master or basic remote:
1. Point the remote at the first TV (TV1).
2. Simultaneously press and hold the SYSTEM and 1 buttons.
3. After three seconds, release the buttons. The TV should now respond to the remote.
4. To control the second TV (TV2), simply repeat the process using the SYSTEM and 2 buttons.
On a universal remote:
1. Point the remote at the first TV (TV1).
2. Press the TV1 button to put the remote in TV1 mode.
3. To control the second TV (TV2), simply repeat the process using the TV2 button and the second TV.
8 Chapter 1
Graphics contained within this publication are for representation only.
Page 11

Getting Started
ACCESS & POWER OPTIONS
Basic Menu Access Enabled
^
Press ^v to change, MENU to exit.
Remote Config. TV1
Basic Menu Access Enabled
TV Power Config. Always
Front Panel Enabled
Energy Saver Disabled
Parental Controls NoBasic
TIME
1 Current Time
2 Sleep Timer
3 Schedule
4 Time Configuration
0 Exit
TIME CONFIGURATION
Time Offset +01:00
^
Use ^v to select Item or Setting.
Press MENU to exit.
Schedule Recurrence One-time
Set Time Access Basic
Daylight Savings No
Time Offset +01:00
Basic Menu Access This feature tells the TV to either enable or disable the basic menu. When the basic
menu is disabled, users cannot access menus through the basic remote or the front panel.
TV Power Config. (Configuration) This feature determines whether the TV can be turned on and off with
the POWER button on the remote or the front panel. You can toggle between:
Switched The TV can be turned on or off; the Energy Saver can be enabled.
Always The TV is always on and cannot be turned off; all Energy Saver settings are ignored.
Front Panel This feature determines whether the front panel buttons are active (able to be used to control
the TV) or not.
Energy Saver Setting When enabled, this feature turns the TV off after a specified period of disuse (no
remote or front panel button presses). You can toggle between Disabled, 2-hour, 1-hour, and 30-minute
settings. When disabled, the TV won’t turn itself off. If TV Power Config. is set to Always, Energy Saver
Settings are ignored.
Parental Controls This feature determines the amount of access basic users have to Parental Controls.
Blocking age-based rating and content themes is described in Chapter 3. You can toggle between:
Basic&Pwd Basic users are able to enter the Parental Control menu and change the password. Basic
users can watch blocked programming by entering the system password.
Basic Basic users are able to enter the Parental Control menu but cannot change the password. Basic
users can watch blocked programming by entering the system password.
NoBasic Parental Control does not appear on the basic Main menu. Basic users can watch blocked
programming by entering the system password.
If Parental Controls is set to NoBasic, Movie Rating Access, TV Rating Access, Unrated Program Block, and
Channel Block will not be available to basic users, regardless of what those items have been set to
individually in the Parental Controls menu.
Note that the master user is always able to enter Parental Controls and change the password.
Time and Timers Menu
The Current Time and Schedule options might not be available to the basic user, depending on how they’ve
been set by the master. Time Configuration isn’t available in the basic menu.
Current Time Enter the current time. The on-screen directions guide you through the steps needed to set
the time. This feature is accessible by basic users only if Set Time Access is set to Basic (unless an invalid time
is received).
Schedule Set up a schedule for the TV to turn itself on and off. The on-screen directions guide you through
the steps needed to set the schedule. (If the current time has not been set, you will be required to set it.) This
feature isn’t available to basic users if Schedule Recurrence is set to Disabled. If TV Power Config. is set to
Always, Schedule will not work.
Note that pressing the RESET button while in the Schedule control panel clears both the start and stop times
and selects Inactive in the Schedule Status field.
Time Configuration This control panel lets you control several time-related functions. Scroll to the feature
you want to set in the Item field. Then, highlight the Setting field and scroll to select the setting you want
for that item. Your choice should be reflected in the table at the bottom of the control panel.
Schedule Recurrence Select what sort of access you want users to have to the scheduling function:
Disabled Prevents the basic user from viewing or changing the Schedule menu item.
Recurring This schedule is in effect indefinitely; both the master and basic user can view and
change the Schedule menu item.
One-time This schedule is only active once unless reset; both the master and basic user can view
and change the Schedule menu item.
Set Time Access Select who is able to change the current time:
Disabled Prevents the basic user from viewing or changing the Current Time menu item unless an
invalid time is received. The basic user will still be able to view the current time in the Status Display
if a time has been set.
Automatic TV sets the time using a time-set channel. Basic users can view the Current Time menu
item, but cannot change it.
Basic Both the master and basic user can view and change the Current Time menu item.
Chapter 1 9
Graphics contained within this publication are for representation only.
Page 12

Getting Started
Daylight Savings When on, the TV adjusts for daylight savings time.
Time Offset Set an offset (from +12 to -12 hours) from Universal Time (UTC). Common US offsets from
UTC are:
Eastern -5:00
Central -6:00
Mountain -7:00
Pacific -8:00
Alaska -9:00
Hawaii -10:00
PARENTAL CONTROLS
1 LOCKED (Blocking in Effect)
2 Parental Controls Access
3 V-Chip Movie Rating Limit
4 V-Chip TV Rating Limit
5 V-Chip Unrated Programs
6 Channel Block
7 Password
0 Exit
Parental Controls
If basic users are able to access the Parental Controls menu, the master user can still set limited access within
the menu through the Parental Controls Access menu. Setting movie and TV ratings, content themes, etc. are
explained in Chapter 3.
Parental Controls Access You can choose which of the following Parental Controls menu items basic users
have access to (Setting toggles between Basic and NoBasic):
Movie Rating Access This feature determines whether the Movie Rating Limit screen is accessible
through the basic menus.
TV Rating Access This feature determines whether the TV Rating Limit screen is accessible through the
basic menus.
Unrated Prog. Block This feature determines whether the Unrated Program Block feature is accessible
through the basic menus.
Channel Block This feature determines whether the Channel Block feature is accessible through the
basic menus.
10 Chapter 1
Graphics contained within this publication are for representation only.
Page 13
Chapter 2: Using the Remote Control
Types of Remote Controls
All of the remote controls mentioned here, in addition to other remotes and accessories, are available from your RCA distributor. Descriptions of the
remote buttons and how they work are on the next pages. Except as otherwise specified, the master remote is the remote described throughout the
manual for operating the TV and setting up the TV's features.
Master Remotes
The master remote control (CRK17TD1) allows access to all of the TV's menus. It is used to customize the TV’s functionality for specific users or specific
situations.
Basic Remotes
The basic remote control (CRK17TC1) is used by the viewer for basic operating functions. It is designed so that the viewer cannot alter certain master
remote-specified features. The Sleep, Closed Captioning, and Channel Guide features can be accessed directly with remote buttons.
Universal Remotes
These remote controls offer basic control of the television within the limits specified through the master remote (i.e., with the same limitations as the
CRK17TC1). In addition, they can be programmed to control other components (such as VCRs).
ClonePro
The ClonePro has main operating buttons that function the same as a master remote.
Hospital-Type Remotes
These specialized remote controls are UL-recognized for use in patient beds. Some offer simple, single-button operation of the TV; others have
enhanced capability for greater control. Specific models and requirements depend upon what other devices might also be in the room, such as nursecall systems. See your distributor for more information.
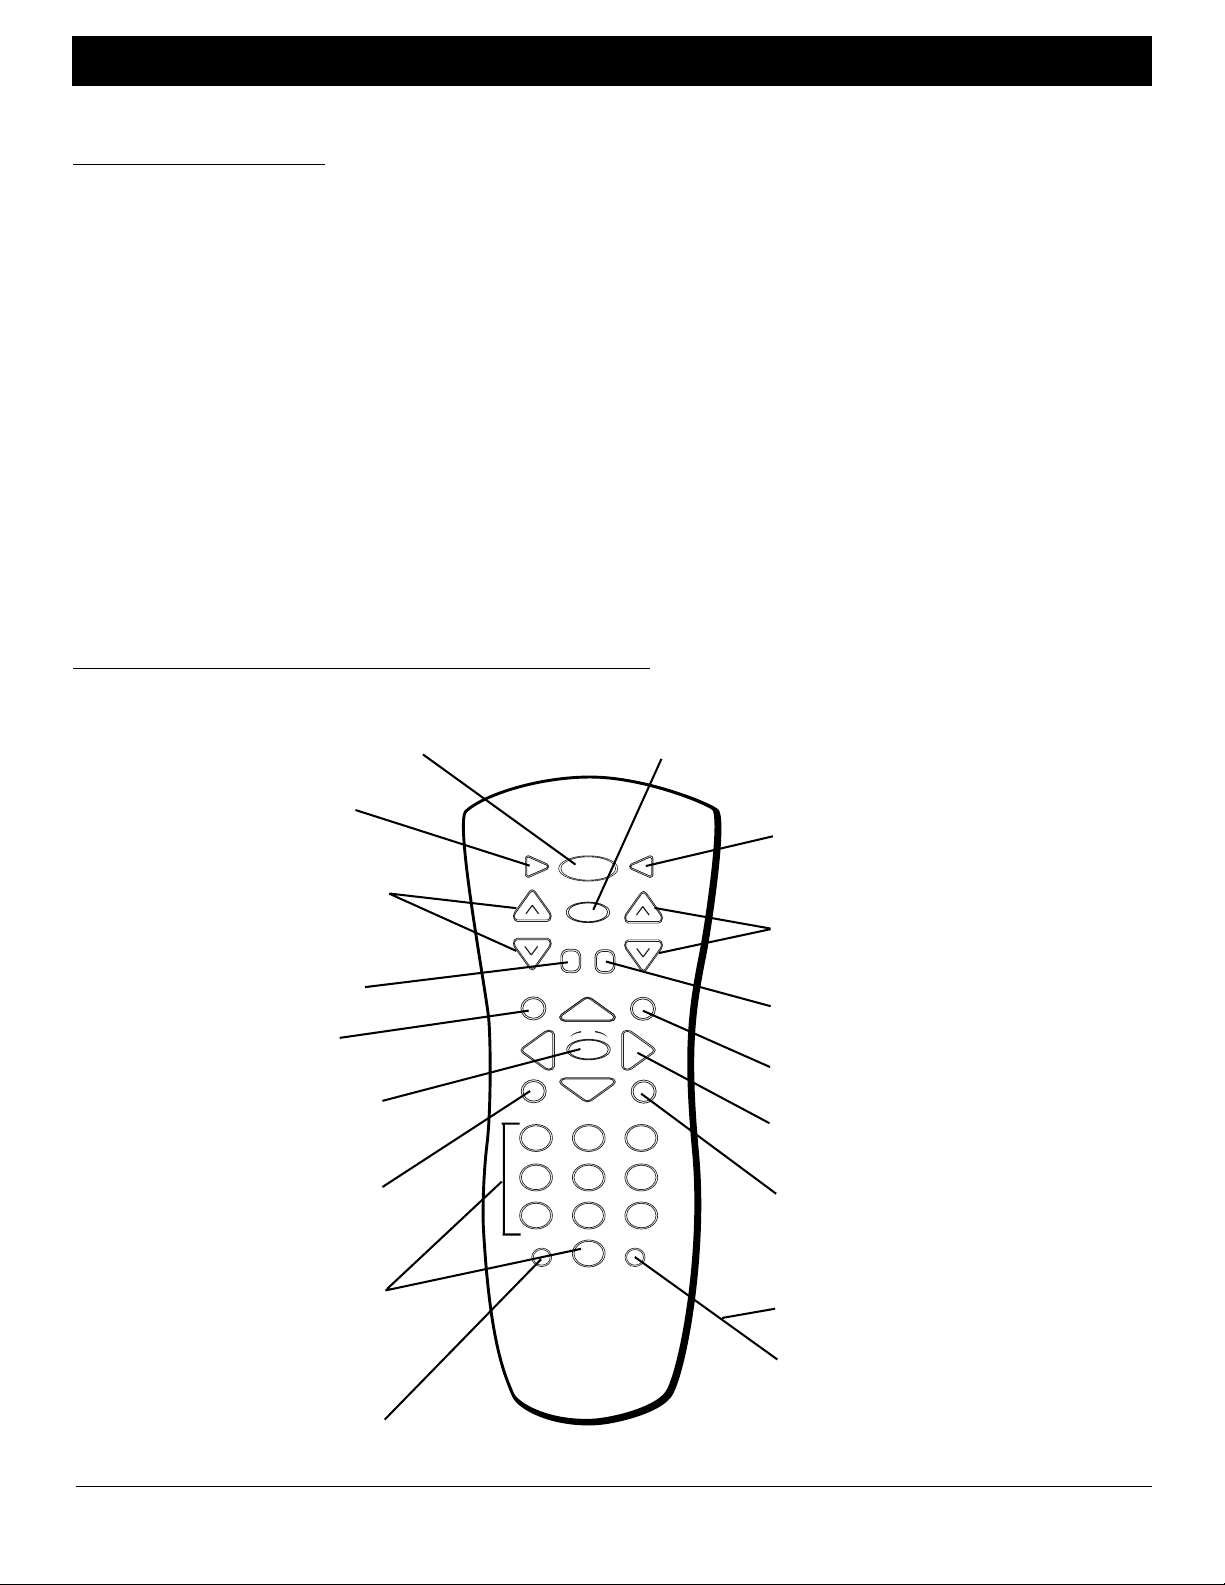
Master (CRK17TD1) or Basic (CRK17TC1) Remote Buttons
SYSTEM This button allows the remote to change
between TV1 and TV2 mode. It also allows access to
POWER Turns the TV on or off.
CC (Closed Captioning) Displays the
Closed-Caption Display.
VOL (Volume up or down) Decrease or
increase the TV’s volume (unless Volume Hold
is on). Go to Chapter 1 for more information
on Volume Hold.
MUTE Lowers the volume to its minimum
level. Press again to restore volume.
GUIDE Displays the Channel Guide.
OK Press OK to select a menu item that is
highlighted.
MENU Displays the TV’s master Main menu
if using a master remote. Displays the basic
Main menu if using a basic remote.
Digit Buttons (0-9) Selects an available
channel number or numbered menu option.
Two digits must be pressed for each channel.
Press 0 then 6 for channel 6. For three-digit
channel numbers, press and hold 1 until “1--”
appears on the screen. Then press the other
two digits.
INPUT Switches between TV (channels 01-
125) and other available inputs. See the
description later in this chapter for more
details.
system-defined functionality, when available. See the
description later in this chapter for more details.
SLEEPCC POWER
SYSTEM
1
4
7
VOL
GUIDE
MENU
INPUT
MUTE
2
5
8
0
OK
GO
BACK
CHAN
CLEAR
3
6
9
RESET
M A S T E R
INFO
SLEEP On first press, displays the Sleep Timer
control panel, which allows the user to set a time for
the TV to turn itself off. Subsequent presses increase
the Sleep Timer’s setting by 15-minute increments.
CHAN (Channel up or down) Scans up and down
through channels in the TV’s memory.
GO BACK Tunes to the last selected channel or
video input.
INFO Displays channel information.
Arrow buttons (up, down, left, right) Use to move
through the on-screen menus.
CLEAR Removes any menu or display from the
screen and returns you to TV viewing.
RESET (CRK17TD1) Returns the picture to the
original settings and displays the Picture Presets
choice list.
SKIP (Commercial Skip- CRK17TC1) If you press
this button before you change the channel, the TV
waits 30 seconds then takes you back to the original
channel. Each subsequent press adds 30 seconds to
the skip time. Press CLEAR to cancel. Also functions
as RESET in some menus.
Chapter 2 11
Graphics contained within this publication are for representation only.
Page 14

Using the Remote Control
Universal Remote Buttons (CRK76TK1)
ON•OFF Turns the TV on and off. When the remote is
in another mode and the remote is programmed to
operate that component, press ON•OFF to turn that
component on and off.
VCR1 Puts the remote in VCR mode. If
you set up Auto Tuning, pressing VCR1
tunes the TV to the correct channel.
VCR2 Puts the remote in VCR mode to control
a second VCR. If you set up Auto Tuning, pressing
VCR2 tunes the TV to the correct channel.
DVD Puts the remote in DVD mode. If you set up
Auto Tuning, pressing DVD tunes the TV to the
correct channel.
MUTE Lowers the volume to its minimum level.
Press again to restore volume.
VOL (up and down) buttons Decrease or
increase the TV’s volume, unless Volume Hold
is enabled. Go to Chapter 1 for more
information on Volume Hold.
CC Displays the Closed-Caption Display.
GUIDE Displays the Channel Guide.
VCR1
DVD
L
O
V
CC
GUIDE
ON OFF
VCR2
S
L.E.D. Lights when you are programming the
remote.
TV1 Turns on the TV and puts the remote in TV1
mode. Go to Chapter 1 for more information on
TV1 mode.
TV2 Turns on the TV and puts the remote in TV2
mode. Go to Chapter 1 for more information on
TV2 mode.
TV1
SAT•CABLE Puts the remote in SAT•CABLE
mode. If you set up Auto Tuning, pressing
TV2
SAT
CABLE
SAT•CABLE tunes the TV to the correct channel.
SKIP If you press SKIP before you change the
SKIPMUTE
+
H
C
channel, the TV waits 30 seconds and then goes
back to the original channel. Each subsequent
press adds 30 seconds to the skip time. Press
V
O
L
CLEAR to cancel.
CH (up and down) buttons Scan up or down
through the current channel list.
C
H
-
GO BACK
Y
INFO
M
S
E
T
GO BACK Tunes to the last selected channel or
video input.
SYSTEM This button allows the remote to
OK
change between TV1 and TV2 mode. It also
allows access to system-defined functionality,
when available. See the description later in this
chapter for more details.
Arrow buttons (up, down, left, right) Use to
move through the on-screen menus. Also moves
PIP window to different areas on the screen.
MENU Displays the TV’s Main menu.
0-9 (Number buttons) Use to enter channel
numbers and time settings. To enter a two-digit
channel, press the two digits. To enter a threedigit channel, press and hold the first digit for
two seconds until two dashes appear to the
right of the number, then add the second two.
WHO•INPUT In TV mode, press to toggle
through the available Video Input channels. In
SAT mode, press to select available channel lists.
REVERSE Press REVERSE to go backwards on a
videotape or disc.
RECORD If the remote is in VCR mode, press
to start recording.
MENU
1
4
7
WHO INPUT
2
5
8
CLEAR
3
6
9
ANTENNA
0
PLAY FORWARDREVERSE
RECORD
STOP PAUSE
PIP
SWAP
universal
RESETCH CTRL
PIP, SWAP and CH CTRL do not have a function
for these models
INFO Displays channel information.
OK Press OK to select a menu item that is
highlighted.
CLEAR Removes any menu or display from the
screen and returns you to TV viewing.
ANTENNA Functions as TV/VCR button in VCR
mode and TV/receiver button in SAT•CABLE
mode.
FORWARD Press to advance a videotape or disc.
PLAY Plays a videotape or disc.
PAUSE Press to pause playback.
STOP Stops playing a videotape or disc.
RESET Returns the picture to the original
settings and displays the Picture Presets choice
list.
12 Chapter 2
Graphics contained within this publication are for representation only.
Page 15

Using the Remote Control
ClonePRO™ Remote Buttons
The ClonePRO can be used as a master remote. Some of the buttons only apply when using the ClonePRO to download
or upload information to or from a TV. Those buttons are described in Chapter 4.
RESET Returns the picture to the original
settings and displays the Picture Presets
choice list.
INFO Displays channel information.
Arrow buttons (up, down, left, right) Use
to move through the on-screen menus. When
a menu isn’t displayed, the up and down
arrows scan the channel list. The left and
right arrows decrease or increase the TV’s
volume, unless Volume Hold is enabled. Go to
Chapter 1 for more information on Volume
Hold.
MENU Displays the TV’s Main menu.
OK Press OK to select a menu item that is
highlighted.
CLEAR Removes any menu or display from
the screen and returns you to TV viewing.
Chapter 2 13
Graphics contained within this publication are for representation only.
Page 16

Using the Remote Control
Using the WHO•INPUT or INPUT Button
Use the WHO•INPUT or INPUT button to toggle through the available input sources and view the content from the component you have connected to
the TV.
1. Press TV to place the remote in TV mode. Make sure the component you want to view is turned ON.
2. Press WHO•INPUT or INPUT to tune to the available input source and view the component.
3. Press WHO•INPUT or INPUT again to tune back to the channel you were previously watching.
Using the SYSTEM Button
When the television is connected to an interactive system or similar device, the SYSTEM button allows you to access system programming or other
special functionality through the DSCI jack (also known as “Smartplug”).
On a master or basic remote, the SYSTEM button can also allow independent remote control of two TVs. Once you have specified TV1 or TV2 status for
the TVs (Access & Power Options menu in Chapter 1), follow these steps to tell the remote which TV you want to operate:
1. On the remote control, simultaneously press and hold the SYSTEM button and 1 (for TV1) or 2 (for TV2).
2. After three seconds, release the buttons. The specified TV should now respond to that remote.
3. To control the other TV, simply repeat the process using the other (1 or 2) button.
Programming the Remote to Operate Other Components
The universal remote control can be programmed to operate most brands of remote controllable VCRs, DVD players, audio receivers, satellite receivers
and cable boxes. The remote is already programmed to operate most RCA, GE and Proscan VCRs, DVD players, audio receivers and satellite receivers.
Note: The DVD button cannot be pr ogrammed.
Find Out If You Need to Program the Remote
To determine whether the remote needs to be programmed, turn a component ON, point the remote at the component, and press the component
button. Then press ON•OFF or channel up or channel down to see if the component responds to the remote commands. If not, the remote needs to be
programmed.
1. Turn on the component you want the remote to operate.
2. Look up the brand and code number(s) for the component on the code list at the end of the chapter.
3. Press and hold the component button that corresponds to the component you want the remote to operate (VCR, etc.)
4. Enter the code from the code list.
5. Release the component button.
6. Press ON•OFF to see if the component responds to the remote commands. If it doesn’t, try pressing the component button and then ON•OFF
again.
7. If you get no response, repeat these steps using the next code listed for your brand until the component responds to the remote commands.
How to Use the Remote After You’ve Programmed It
Once the remote has been programmed successfully, you are ready to use it to control your components. To operate the component:
1. Press the component button (VCR1, VCR2, DVD, or SAT•CABLE) to set the remote to operate the component.
2. Press ON•OFF to turn the component ON or OFF.
3. Use the remote buttons that apply to that component.
Note: If you keep pr essing buttons and nothing happens, the r emote is pr obably in the wr ong mode. Y ou must pr ess the component button that matches the component you
want to oper ate (i.e., if you want to oper ate the VCR, pr ess VCR1 on the r emote contr ol to put the r emote in VCR mode.)
14 Chapter 2
Graphics contained within this publication are for representation only.
Page 17

Using the Remote Control
Remote Codes
VCRs
Admiral ................................................................................................ 2131
Adventura ............................................................................................ 2026
Aiko ...................................................................................................... 2027
Aiwa ........................................................................................... 2002, 2026
Akai ........................... 2003, 2004, 2005, 2007, 2008, 2111,2112, 2113
American High ................................................................................... 2021
Asha ......................................................................................................2013
Audio Dynamics ..................................................................... 2009, 2010
Audiovox .............................................................................................2014
Bell & Howell...................................................................................... 2011
Beaumark ............................................................................................ 2013
Broksonic ................................................................................. 2012, 2025
Calix ..................................................................................................... 2014
Candle ................................ 2013, 2014, 2015, 2016, 2017, 2018, 2019
Canon ............................................................................. 2021, 2022, 2114
Capehart ................................................................................... 2020, 2110
Carver ..................................................................................................2062
CCE ........................................................................................... 2027, 2061
Citizen ..................... 2013, 2014, 2015, 2016, 2017, 2018,2019,2027
Colortyme .......................................................................................... 2009
Colt ....................................................................................................... 2061
Craig .................................................................... 2013, 2014, 2023, 2061
Curtis-Mathes .................................................. 2000, 2002, 2009, 2013,
........................................................ 2016, 2018, 2021, 2022, 2024, 2115
Cybernex ............................................................................................. 2013
Daewoo ................... 2015, 2017, 2019,2025, 2026, 2027, 2028, 2110
Daytron................................................................................................ 2110
Dbx ............................................................................................ 2009, 2010
Dimensia ..............................................................................................2000
Dynatech .................................................................................. 2002, 2026
Electrohome ............................................................................ 2014, 2029
Electrophonic ..................................................................................... 2014
Emerson ....................................................................... 2002, 2012,2014,
................................... 2015, 2021, 2024, 2025,2026,2029, 2030, 2032,
...................... 2033, 2034, 2035, 2036, 2037, 2038, 2039, 2040, 2041,
............ 2042, 2044, 2045, 2047, 2065, 2105, 2113, 2116, 2117, 2130
Fisher ........................ 2011, 2023, 2048, 2049, 2050, 2051, 2052,2118
Fuji ............................................................................................. 2021, 2119
Funai .......................................................................................... 2002, 2026
Garrard ................................................................................................2026
GE ............................ 2000, 2001, 2013, 2021, 2022, 2053, 2115, 2120
Goldstar ................................................... 2009, 2014, 2018, 2054, 2121
Gradiente ............................................................................................ 2026
Harley Davidson ................................................................................ 2026
Harman Kardon .................................................................................2009
Harwood ............................................................................................. 2061
Headquarter ....................................................................................... 2011
Hitachi ..................... 2002, 2055, 2056, 2057, 2107, 2111, 2120, 2122
HI-Q ..................................................................................................... 2023
Instant Replay .....................................................................................2021
JCL ........................................................................................................ 2021
JC Penney .................................... 2009, 2010, 2011, 2013, 2014, 2021,
................................. 2022, 2055, 2056, 2058, 2059, 2060, 2107, 2118
Jensen ............................................................................. 2055, 2056, 2111
JVC ...................................... 2009, 2010, 2011, 2018, 2058, 2111, 2123
Kenwood .................2009, 2010, 2011, 2016, 2018, 2058, 2111,2123
KLH ...................................................................................................... 2061
Kodak ........................................................................................ 2014, 2021
Lloyd ..........................................................................................2002, 2026
Logik .....................................................................................................2061
LXI ........................................................................................................ 2014
Magnavox ........................... 2021, 2022, 2062, 2063, 2104, 2108, 2124
Magnin ..................................................................................................2013
Marantz .........................................................................2009, 2010, 2011,
......................................................... 2016, 2018, 2021, 2058, 2062,2064
Marta .................................................................................................... 2014
Masushita .............................................................................................2021
MEI ........................................................................................................2021
Memorex ......................................................................2002, 2011, 2013,
....................................................... 2014, 2021, 2023, 2026, 2104, 2131
MGA ...............................................................................2029, 2065, 2113
MGN Technolog y ............................................................................... 2013
Midland ................................................................................................ 2053
Minolta ........................................................................... 2055, 2056, 2107
Mitsubishi ......................... 2029, 2055, 2056, 2065, 2066, 2067, 2069,
................................. 2070, 2071, 2072, 2073, 2074, 2106, 2113, 2123
Montgomery Ward ...................................................... 2075, 2131
Motorola ....................................................................... 2021,2131
MTC .................................................................... 2002, 2013, 2026
Multitech ........................... 2002, 2013, 2016, 2026, 2053, 2061
NEC ..............................................2009, 2010, 2011, 2016, 2018,
................................. 2058, 2064, 2076, 2078, 2079, 2111, 2123
Nikko......................................................................................... 2014
Noblex ......................................................................................2013
Olympus ................................................................................... 2021
Optimus .........................................................................2014, 2131
Optonica ................................................................................... 2096
Orion ....................................................................................... 2035
Panasonic ........................... 2021, 2022, 2109, 2125, 2126, 2127
Pentax ........................................... 2016, 2055, 2056, 2107, 2120
Pentex Research .....................................................................2018
Philco ........................................................2021, 2022, 2062, 2063
Philips ....................................................... 2021, 2062, 2096, 2124
Pilot ........................................................................................... 2014
Pioneer .......................................... 2010, 2055, 2080, 2081, 2123
Portland ................................................... 2016, 2017, 2019, 2110
PROSCAN .................................................................... 2000, 2001
Protec ....................................................................................... 2061
Pulsar .........................................................................................2104
Quarter .................................................................................... 2011
Quartz ....................................................................................... 2011
Quasar ................................................................ 2021, 2022, 2125
RCA .............................................. 2000, 2001, 2003, 2013, 2021,
........................ 2055, 2056, 2082, 2083, 2084,2085, 2086,2087,
....................... 2088, 2089, 2090, 2091, 2107, 2115, 2120, 2125
Radioshack/Realistic .............................. 2002, 2011, 2013, 2014
........... 2021, 2022, 2023, 2026, 2029, 2049, 2050, 2096, 2131
Radix .......................................................................................... 2014
Randex ......................................................................................2014
Ricoh ......................................................................................... 2128
Runco ....................................................................................... 2104
Samsung ............................. 2005, 2013, 2015, 2033, 2053, 2112
Sanky .............................................................................. 2131, 2104
Sansui ....................................................... 2010, 2092, 2111, 2123
Sanyo ................................................................... 2011, 2013, 2023
Scott .. 2012, 2015, 2025, 2032, 2035, 2038, 2065, 2093, 2116
Sears ............................................. 2011, 2014, 2021, 2023, 2048,
.................................. 2049, 2050, 2051, 2055, 2056, 2107, 2118
Sharp ....................... 2002, 2017, 2029, 2094, 2095, 2096, 2131
Shintom .................................................... 2004, 2056, 2061, 2098
Shogun ...................................................................................... 2013
Signature ...................................................................... 2002, 2131
Singer ................................................................... 2021, 2061, 2128
Sony .................................... 2002, 2004, 2098, 2099, 2119, 2128
STS ..................................................................................2021, 2107
Sylvania ......... 2002, 2021, 2022, 2026, 2062, 2063, 2065, 2124
Symphonic .....................................................................2002, 2026
Ta ndy ..............................................................................2002, 2011
Ta shiko ......................................................................................2014
Ta tung ............................................................................. 2058, 2111
TEAC ............................................. 2002, 2026, 2058, 2085, 2111
Technics .........................................................................2021, 2109
Teknika ............................... 2002, 2014, 2021, 2026, 2100, 2129
TMK ................................................................... 2013, 2024,79047
To shiba .................... 2015, 2049, 2051, 2055, 2065, 2093, 2116
To teVision ..................................................................... 2013, 2014
Unitech .................................................................................... 2013
Ve ctor Research .................................... 2009, 2010, 2015, 2016
Victor ....................................................................................... 2010
Video Concepts .......................... 2009, 2010, 2015, 2016, 2113
Videosonic .............................................................................. 2013
Wards ......... 2002, 2013, 2014, 2015, 2021, 2023, 2026, 2029,
.2055, 2056, 2061, 2096, 2101, 2102, 2103, 2107, 2116, 2131
XR-1000 ............................................................. 2021, 2026, 2061
Ya maha ............................... 2009, 2010, 2011, 2018, 2058, 2111
Zenith ............................................ 2004, 2098, 2104, 2119, 2128
Cable Boxes
ABC ......................... 5002, 5003, 5004, 5005, 5006, 5007, 5053
Antronix ........................................................................ 5008, 5009
Archer ......................................................5008, 5009, 5010, 5011
Cabletenna .............................................................................. 5008
Cableview .................................................................................5008
Century .................................................................................... 5011
Citizen .......................................................................................5011
Colour Voice ................................................................. 5012, 5013
Comtronics .................................................................. 5014, 5015
Contec ..................................................................................... 5016
Jasco ......................................................................................... 5011
Jerrold .......... 5003, 5005, 5007,5018, 5023, 5024, 5046, 5053
Magnavox................................................................................. 5025
Memorex ................................................................................. 5026
Movie Time ....................................................... 5002, 5027, 5028
NSC .................................................................... 5002, 5027, 5028
Oak ...................................................................... 5002,5016, 5029
Panasonic ...................................................................... 5048, 5052
Paragon .................................................................................... 5026
Philips ........... 5011, 5012, 5013, 5019,5025, 5030, 5031, 5032
Pioneer .......................................................................... 5033, 5034
Pulsar ........................................................................................5026
RCA .................................................................... 5047, 5049, 5052
Realistic ......................................................................... 5009, 5049
Regal .............................................................................. 5022, 5035
Regency ................................................................................... 5017
Rembrandt .............................................................................. 5003
Runco ....................................................................................... 5026
Samsung ........................................................................ 5014, 5034
Scientific Atlanta .................................... 5006, 5036, 5037, 5038
Signal .............................................................................. 5014, 5018
Signature .................................................................................. 5003
SL Marx .................................................................................... 5014
Sprucer .................................................................................... 5052
Starcom .............................................................. 5007, 5018, 5053
Stargate ......................................................................... 5014, 5018
Starquest .................................................................................. 5018
Ta ndy ........................................................................................ 5040
Te leview ................................................................................... 5014
To com ................................................................ 5004, 5023, 5041
To shiba ..................................................................................... 5026
Tusa ........................................................................................... 5018
TV86 ......................................................................................... 5027
Unika .................................................................. 5008, 5009, 5011
United Artists ......................................................................... 5002
United Cable .......................................................................... 5053
Universal ................................................. 5008, 5009, 5010, 5011
Videoway ................................................................................. 5044
Viewstar .................................................. 5015, 5025, 5027, 5040
Zenith ................................................................. 5026, 5050, 5051
Satellite Receivers
Chapparal ..................................................................... 5056, 5057
Drake ............................................................................ 5058, 5059
GE ............................................................................................. 5000
General Instruments ....................................... 5060, 5061, 5062
Panasonic ................................................................................. 5075
Primestar ................................................................................. 5076
PROSCAN .............................................................................. 5000
RCA .......................................................................................... 5000
Realistic .................................................................................... 5063
Sony .......................................................................................... 5072
STS1 .......................................................................................... 5064
STS2 .......................................................................................... 5065
STS3 .......................................................................................... 5066
STS4 .......................................................................................... 5067
To shiba ..................................................................................... 5068
To shiba ..................................................................................... 5073
Uniden ...................................................................................... 5069
Audio
AM/FM ..................................................................................... 4003
Aux ........................................................................................... 4004
Phono ....................................................................................... 4005
CD ............................................................................................ 4007
Ta pe .......................................................................................... 4006
(for RCA and Dimensia brands only)
Chapter 2 15
Graphics contained within this publication are for representation only.
Page 18

Chapter 3: Using the TV’s Menu System
How to Use Your TV’s Menu System
Use the buttons on the remote or the front of your TV to access the menu system and make changes to the settings.
MAIN MENU
1 Audio
2 Picture Quality
3 Channel
4 Access & Power Options
5 Closed Captioning
6 Time and Timers
7 Parental Controls
8 Menu Language/Idioma/Langue
0 Exit
AUDIO
1 Mute
2 Audio Levels
3 Audio Processor
4 Audio Output & Speakers
5 Sound Logic
0 Exit
AUDIO PROCESSOR
1 Expanded Stereo
2 Stereo
3 Mono
4 Second Audio Program (SAP)
Models other than J20542 and J25400
will feature these options under Audio
Processor.
AUDIO PROCESSOR
1 Mono
2 Second Audio Program (SAP)
Menus
Press MENU on the remote or on the front panel to bring up the Main menu.
There are two ways to select a choice in a menu:
•Use your arrow buttons on your remote control to highlight your choice, and press OK.
•Press a number button on the remote. For example, in the Main menu press 3 to go straight to the
Screen menu.
Exiting a menu
There are three ways to exit a menu:
•Highlight Exit and press OK.
•Press 0 on the remote.
•Press CLEAR.
Audio Menu
Mute Switches audio muting on or off.
Audio Levels Allows you to adjust the TV’s Balance, Treble, Bass, Initial Volume and Maximum Volume.
These options aren’t available to the basic user. Go to Chapter 1 for more information.
Audio Processor Controls the available audio modes, which control the way the sound comes through
your speakers.
Expanded Stereo* Electronically “widens” sound from stereo broadcasts, stereo VCRs, digital satellite
systems, DVD players, and laserdisc players for a fuller, more spacious sound. This choice will not be
present if Fixed Output, Speakers Off is selected from Audio Output & Speakers.
Stereo* Splits the incoming stereo audio signal into left and right channels. Most TV programs and
recorded materials have stereo audio. The TV displays the word STEREO when you tune to a program that
is broadcast in stereo.
Mono Plays the sound in mono only (same signal sent to all speakers). Use this setting when receiving
broadcasts with weak stereo signals.
Second Audio Program (SAP) Plays the program’s audio in a second language, if one is available. The
TV displays the word SAP when you tune to a program that is broadcast with SAP information. SAP audio
is broadcast in mono. SAP is also used to broadcast a program’s audio with descriptions of the video for
the visually impaired.
Volume Hold (for models J20542 and J25400) This menu item is available for all models, but is listed
under the Audio Output & Speakers option. Lets you turn Volume Hold on or off.
Audio Output & Speakers* Lets you turn the TV’s internal speakers on or off and set the audio outputs to
fixed-level or variable control level. This option isn’t available to the basic user. Go to Chapter 1 for more
information.
Sound Logic This option isn’t available to the basic user. Go to Chapter 1 for more information.
J20542 Audio Processor menu
AUDIO PROCESSOR
1 Stereo
2 Mono
3 Second Audio Program (SAP)
J25400 Audio Processor menu
*This feature is not available on model J20542. Expanded Stereo and Audio
Output & Speakers are not available on model J25400.
16 Chapter 3
Graphics contained within this publication are for representation only.
Page 19

Using the TV’s Menu System
MAIN MENU
1 Audio
2 Picture Quality
3 Channel
PICTURE QUALITY
4 Access & Power Options
5 Closed Captioning
1 Picture Adjustments
6 Time and Timers
2 Picture Presets
7 Parental Controls
3 Auto Color
8 Menu Language/Idioma/Langue
4 Color Warmth
9 PC Video Input Controls
0 Exit
0 Exit
Models J32435 and J36435 will have a
fifth option in the Picture Quality menu—
Picture Tilt.
CHANNEL GUIDE
03 WPTF 19
04 NBC 28 NVC
05 FEWWERTS 29 FEWWERTS
07 GRW 48
08 FOX 57 FOWTRF
10 MOVIE 59
12 ABC 112 ABCLIVE
13 GT 114
Use ^v to view all channels.
Press MENU to exit.
Picture Quality Menu
The Picture Quality menu items allow you to adjust the appearance of on-screen images. Pressing RESET on
the remote control returns all Picture Quality menu settings to their factory defaults.
Picture Adjustments Displays the five slider controls for adjusting the way the picture looks . This option
isn’t available to the basic user. Go to Chapter 1 for more information.
Picture Presets Displays a choice list that lets you select one of four preset picture settings: Bright Lighting,
Normal Lighting, Soft Lighting, or Custom Picture Preset. Custom Picture Preset is the default and will be
selected if the RESET button is pressed while in this menu.
Auto Color , Color Warmth and Picture Tilt These options aren’t available to the basic user. Go to Chapter
1 for more information.
Channel Menu
Channel Guide Displays the list of channels and their labels (if labelled) in the active channel list. Press
GUIDE on the remote to display the Channel Guide menu. This is the only channel option available to basic
users.
Channel Selection Allows the master user to set the initial channel and to select which of the three
channel lists will be active (accessible to the basic user). Go to Chapter 1 for more information.
Signal Source Displays a choice list that lets you select the current signal source . Go to Chapter 1 for
more information.
Auto Channel Search Tells the TV to search for all the channels available through the antenna input. Go to
Chapter 1 for more information.
List and Labels and Auto Tuning Go to Chapter 1 for more information.
CLOSED CAPTIONING
1 Closed-Caption Display
2 Closed-Caption Mode
3 PIP Closed-Caption Display
4 PIP Closed-Caption Mode
0 Exit
Access & Power Options Menu
This control panel allows the master user to specify which features and functions basic users might be able
to access, depending on how you set it up in Chapter 1. Go to that chapter for more information.
Closed Captioning Menu
Many programs are encoded with closed captioning information, which lets you display the audio portion of
a program as text on the TV screen. Closed-Caption Display allows you to choose when closed-captioning is
displayed. Closed-Caption Mode allow you to choose how closed captioning is displayed.
Closed captioning is not available on all channels at all times. It only appears on specific programs encoded
with closed captioning information. When a program is closed captioned, the letters CC are displayed in the
Channel Banner. Go to Chapter 4 for more information about the Channel banner.
Closed-Caption Display
The Closed-Caption Display lets you choose when you want to have Closed Captioning on.
Closed-Caption Mode
Your TV offers eight closed-captioned modes, including four text modes. To set the Closed-Captioning
Mode:
1. Select Closed Captioning from the Main menu.
2. Highlight Closed-Caption Mode and press OK. A choice list will appear.
3. Point to your choice and press OK to select it and return to the Closed Captioning menu.
Chapter 3 17
Graphics contained within this publication are for representation only.
Page 20

Using the TV’s Menu System
TIME
1 Current Time
2 Sleep Timer
3 Schedule
4 Time Configuration
0 Exit
PARENTAL CONTROLS
1 LOCKED (Blocking in Effect)
2 Parental Controls Access
3 V-Chip Movie Rating Limit
4 V-Chip TV Rating Limit
5 V-Chip Unrated Programs
6 Channel Block
7 Password
0 Exit
Time and Timers Menu
Current Time The on-screen directions guide you through the steps needed to set the time. This feature is
usable by basic users only if Time Configuration is set to Basic (unless an invalid time is received). Also, if the
master user hasn’t set the time, the feature is unavailable.
Sleep Timer Select the amount of time you want to give the TV before it shuts itself off (up to four hours).
The volume starts to decrease as a warning before the TV turns off. Press any remote or front panel button to
turn the Sleep Timer off. This feature will not work if TV Power Config. is set to Always.
The Sleep Timer can also be accessed directly using the SLEEP button on the remote.
Schedule Set up a schedule for turning the TV on and off automatically. The on-screen directions guide you
through the steps needed to set the schedule. (If the current time has not been set, you will be required to
set it.) This feature isn’t available to basic users if Schedule Recurrence is set to Disabled. If TV Power Config.
is set to Always, Schedule will not work.
Note that pressing the RESET button while in the Schedule control panel clears both the start and stop times
and selects Inactive in the Schedule Status field.
Time Configuration Go to Chapter 1 for more information.
Parental Controls and V-Chip
The first three choices in the Parental Controls menu involve software inside your TV (referred to as V-Chip)
which allows you to block TV programs and movies based on violence, sex, or other content you may believe
children should not view.
Once you block programs, you can unblock programs by entering a password.
By default, the software inside your TV is turned “off.”
How V-Chip Works
V-Chip reads the program’s age-based rating (TV-MA, TV-14, etc.) and content themes [(Violence (V), Adult
Language (L), etc.)]. If you have blocked the rating and/or content themes that the program contains, you
will receive the message This channel is not approved for viewing.
Broadcasters are not required to provide content themes, so programs received with no content themes will
only be blocked if you block their age-based rating. You can also block out programs that have been given a
rating of “Not Rated,” and programs that are considered “unrated.” The TV age-based ratings and content
themes you can block are listed below.
TV-MA – Mature Audience Only. Specifically designed to be viewed by adults and may be unsuitable for children under
17. It contains one or more of the following content themes: crude indecent language (L), explicit sexual activity (S), or
graphic violence (V).
TV-14 – Parents Strongly Cautioned. Contains some material that many parents would find unsuitable for children under
14. Parents are strongly urged to exercise greater care in monitoring this program and are cautioned against letting
children under the age of 14 watch unattended. This program contains one or more of the following content themes:
intensely suggestive dialogue (D), strong coarse language (L), intense sexual situations (S), or intense violence (V).
TV-PG – Parental Guidance Suggested. Contains material that parents may find unsuitable for younger children. Many
parents may want to watch it with their younger children. The program contains one or more of the following content
themes: some suggestive dialogue (D), infrequent coarse language (L), some sexual situations (S), or moderate violence (V).
TV-G – General Audience. Most parents would find this program suitable for all ages. It contains little or no sexual
dialogue (D) or situations (S), no strong language (L), and little or no violence (V).
TV-Y7 – Directed to Children 7 years and older. Designed for children ages 7 and above. It may be more appropriate for
children who have acquired the developmental skills needed to distinguish between make-believe and reality. Themes and
elements in this program may include mild fantasy violence (FV) or comedic violence, or may frighten children under the
age of 7.
TV-Y – All Children. Themes and elements in this program are designed for a young audience, including children from
ages 2-6. It is not expected to frighten younger children.
18 Chapter 3
Graphics contained within this publication are for representation only.
Page 21

Using the TV’s Menu System
Lock/Unlock Parental Controls
Selecting this option lets you lock and unlock Parental Controls settings using a password. Follow the on-screen
instructions to lock or unlock blocked programming (the default password is 5625).
If you do not lock Parental Controls, none of the settings for V-Chip, Channel Block, or Front Panel Block
will take effect.
Master users can enter a new password at any time through the Password menu option.
Parental Controls Access
This option isn’t available to basic users. Go to Chapter 1 for more information.
V-CHIP MOVIE RATING LIMIT
Rating Status
PG-13 Block
Press ^v to select rating.
Press MENU to exit.
RATING STATUS
NR Block
X Block
NC-17 Block
R Block
PG-13 Block
PG View
G View
^
V-Chip Movie Rating Limit
Set movie rating limits by blocking movies rated above a specified level.
To access the V-CHIP MOVIE RATING LIMIT menu:
1. Press MENU on the remote control (the TV MAIN MENU appears).
2. Select Parental Controls.
3. Select V-Chip Movie Rating Limit .
Blocking Movie Ratings
You can automatically block all program ratings above a specified age-based rating level.
To block programs with higher ratings:
1. Use the arrow buttons to highlight the Rating field.
2. Press the up/down arrow buttons on the remote to scroll to the rating corresponding with the lowest
rating you do not want the child to watch.
3. Press the right arrow button to move the yellow highlight to the Status field.
4. Press the up or down arrow button to toggle between View and Block. The status for the rating listed to
the left and all higher ratings automatically changes to Block (and B).
5. Press OK on the remote to return to the menu or exit the screen when you are finished.
6. Select UNLOCKED (No Blocking) from the Parental Controls menu. Enter a password; if you have not set
your password, you will be prompted to enter it again.
V-Chip TV Rating Limit
The V-Chip TV Rating Limit lets you decide which TV programs can and cannot be viewed. To set TV
programming limits:
1. Choose Parental Controls from the Main menu. If Parental Controls are locked, you must enter your
password. If they are not locked, you will get a message reminding you that your limits will not be
effective until you lock Parental Controls.
2. Press MENU to continue.
3. Highlight and select V-Chip TV Rating Limit.
4. Use the arrow buttons and the OK button on your remote to change the status of a TV program rating or
content theme from View to Block.
Changing the status of TV program limits is described in more detail later in the chapter.
Chapter 3 19
Graphics contained within this publication are for representation only.
Page 22

Using the TV’s Menu System
The V-Chip Rating Limit Screen
The following is an example of where items are located within the Rating Limit screen.
Rating Field
Lets you select from a list of
age-based ratings you can block
or view.
Hierarchy of Age-Based Ratings
Rating Status Field
Lets you select whether the status of
the age-based rating limit to the left is
View or Block.
Content Themes
Lists the content themes you
V-CHIP TV RATING LIMIT
Rating Status
TV-MA VIEW
^
Press ^/v to select rating.
- - Content - -
DLSVFV
VVV
can block or view.
Press MENU to exit.
RATING STATUS
TV-MA
TV-14
TV-PG
TV-G
TV-Y7
TV-Y
Blocking Age-Based Ratings
Once you are in the TV Ratings menu, follow the same steps described for blocking Movie ratings.
View
View
View
View
View
View
Rating Settings Area
Lets you see the current block/view state of age-based
ratings and associated content. The View (V) settings are
coded in green, and the Block (B) settings are coded in
red.
DLSVFV
VVV
VVVV
VVVV
V
Content Status Fields
Lets you select which content
themes to view for the selected
rating, and whether the status
of the content theme is
currently View (V) or Block (B).
TV-MA Mature Audience Only
TV-14 Parents Strongly Cautioned
TV-PG Parental Guidance Suggested
TV-G General Audience
TV-Y7 Directed to Children 7 years
and older
TV-Y All Children
Content Themes
DSexually explicit dialogue
L Adult language
SSexual situations
VViolence
FV Fantasy Violence
Viewing Age-Based Ratings
After you block age-based ratings, you can change some of the ratings back to View.
1. Use the up/down arrow buttons to select the rating with a status of Block.
2. Press the right arrow button to move the yellow highlight to the rating status field.
3. Press the up button to select View.
Note: The content status fields corresponding to the unblocked rating become View as well. They and the age-based rating
status are the only fields that automatically change back to View when you complete this process.
Remember to lock Parental Controls for rating limits to take effect.
Blocking Specific Content Themes
You can block programs based on their content. (Content is represented by the D, L, S, V and FV on your
screen.) When you block a content theme for a particular rating, you automatically block that content
theme for higher rated programs as well.
To block program content:
1. Determine the lowest level of content you don’t want the child to watch.
2. Press the up/down arrow buttons on the remote to scroll to the rating corresponding with the lowest
content you do not want the child to watch.
3. Press the right arrow button to move the yellow highlight to the content theme you want to block.
4. Press the up or down arrow button to toggle between View and Block. The higher ratings’ content theme
automatically change to Block (and B).
Notes: Broadcasters are not required to provide content themes or age-based ratings.
You must remember to lock Parental Controls for rating limits to take effect.
20 Chapter 3
Graphics contained within this publication are for representation only.
Page 23
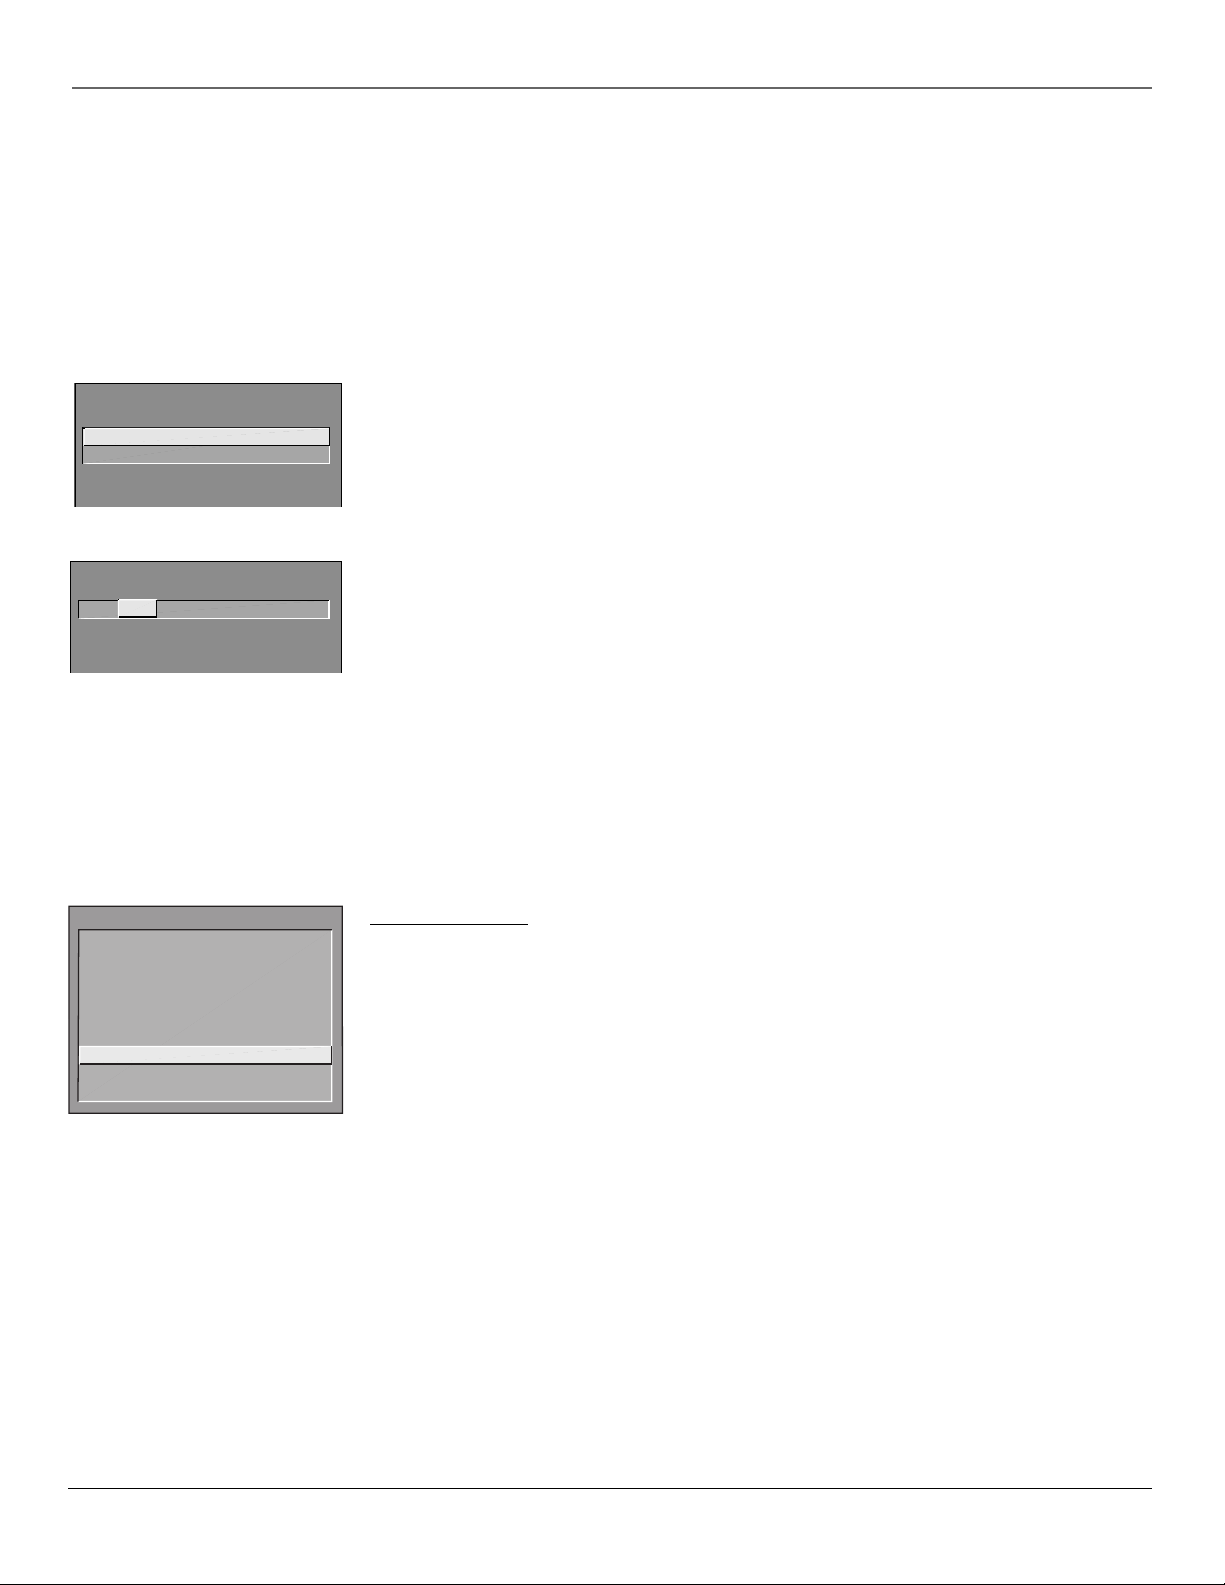
Using the TV’s Menu System
Viewing Specific Content Themes
If you block specific content themes, you have the option of going back and changing some of the content
themes back to (V) View:
1. Determine the content themes you want to change to (V) View.
2. Use the up/down arrow buttons to scroll to the rating whose content theme you want to change to View.
3. Press the right arrow button to move the yellow highlight to a particular content theme status.
4. Press the up or down arrow button to change its status back to V.
Note: Only the content theme status corresponding to TV-14 (L) language changes to (V) View. Higher rated content themes,
such as that for TV-MA language, do not change.
V-CHIP UNRATED PROGRAM BLOCK
1 View
2 Block
CHANNEL BLOCK
Channel # Status
59 HEADLN Block
^
Press ^ or v, keypad, or CH ^/v
to set channel, MENU to exit.
MAIN MENU
1 Audio
2 Picture Quality
3 Channel
4 Access & Power Options
5 Closed Captioning
6 Time and Timers
7 Parental Controls
8 Menu Language/Idioma/Langue
0 Exit
V-Chip Unrated Program Block
This option lets you decide if programs that the V-Chip recognizes as “unrated” can be viewed. “Unrated” TV
programs may include news, sports, political, religious, local and weather programs, emergency bulletins,
public announcements, and programs without ratings.
View All unrated programs are available.
Block All unrated programs are not available.
Note: You must remember to lock Parental Controls for rating limits to take effect.
Channel Block
Selecting this option lets you decide what channels can be viewed.
View Makes the selected channel viewable.
Block The front panel and remote control CH (channel) buttons will tune only to channels that you have
marked as View. The remote will still tune to the blocked channel if you use the digits to access the
channel, but the channel will be blocked.
Don’t forget to lock parental controls after you change the status of Channel Block. If you don’t, the channel
block will not take effect.
Note: If you have a digital cable box channels 126-999 can be blocked but will not be removable from your scan list.
Password
Selecting this option lets you specify a Parental Controls password (the default password is 5625 —spells
“lock” on a telephone-style keypad). Master users can enter a new password without being prompted for the
old one. Basic users must enter the old password before they can create a new one.
Menu Language
Use the arrow buttons on the remote to highlight your preferred language for the menu system. Press OK to
select that language.
Chapter 3 21
Graphics contained within this publication are for representation only.
Page 24

Chapter 4: Other Information
Using the ClonePRO™
Modes of operation
The ClonePRO operates from one of two modes:
DSCI Connect a DSCI cable to the ClonePRO and to the TV’s DSCI port on the back panel.
IR The wireless operation. Press ON to begin using the remote in IR mode.
The corresponding “ready” light indicates the mode of operation, and the corresponding “busy” light indicates
activity in this mode.
Buttons with black labels function similarly in both modes, while green labels operate DSCI mode and red labels
operate IR mode.
Note: Model J25400 can be cloned in IR mode from an RCA commercial model with DSCI port. Information cannot be copied from
the J25400 to other TVs.
DSCI mode
The ClonePRO enters this mode when it is connected to the TV’s Digital Serial Communications Interface port
(“SmartPlug”) via a cable (included).
• Any standard (no-flip, 1-to-1) 8-conductor computer-networking cable may be used.
• No battery is required in this mode.
• If the unit is already in IR mode, press OFF to speed the transition to DSCI mode.
DSCI (green) buttons
Comm Restores the TV to normal commercial operation, essentially undoing the effect of the Legacy and
Decom buttons.
Decom “Decommercializes” the TV to facilitate aftermarket resale.
[Factory] Press and hold the RESET button for several seconds to re-initialize the TV, reverting all settings to
factory defaults.
Note: Pressing Factory overwrites any settings already in the TV.
LEARN Begins the process of learning the settings from a TV that has been setup as desired.
Note: Pressing LEARN overwrites any settings already in the ClonePRO.
Legacy Places the TV in a mode in which it emulates the behavior of older models- a required part of the
configuration for some applications.
POWER Turns on the TV. It is recommended, though not required, when in DSCI mode to view on-screen
displays.
[Status]: Press and hold the INFO button for several seconds to display settings stored in the ClonePRO and the
TV. For example:
Mem: CB:36 TV:36
This tells you the ClonePRO and the TV have 36 pages of information stored in memory.
Across the screen are red dashes. Press any button on the remote control you are using. Red pulses should
appear, telling you the TV is recognizing the remote and is able to send out that information. If red pulses don’t
appear, contact your RCA distributor.
TEACH: This begins the process of teaching the settings stored in the ClonePRO to the TV to which it is
connected.
Note: Pressing TEACH overwrites any settings already in the TV.
After successful teaching, the TV will turn off and reboot.
If the memory-image stored in the clone-box is not valid for the TV, an on-screen message will advise of the
conflicting memory-sizes.
22 Chapter 4
Graphics contained within this publication are for representation only.
Page 25

IR mode
The ClonePRO enters this mode when the operator presses a button on the bottom row of the keypad (without
connection to a TV DSCI port). A standard 9V battery (accessed via a small rear panel) is required to enable this
mode.
Notes: Like any IR (infra-red) remote control, the ClonePRO requires a reasonable line of sight between it and the TV for proper
signaling. Obstructions, long distances, sharp angles and certain specialty lighting can reduce the effective range of the unit.
If the “IR ready” light stays on longer than 1 minute by itself, temporarily remove the battery from the unit to reset the unit.
Remove the battery prior to long-term storage of the unit.
IR (red) Buttons
Note: You must press the ON button for the IR buttons to operate.
Master+ & Master- The Master- button disables access to the TV’s master menus via the master remote.
(Some third-party devices, attached to the TV’s DSCI port as part of a larger system, may disable access to master
menus even after they are disconnected.) To enable the master menus, press Master+.
OFF Turns the TV off, as well as turning the ClonePRO off.
ON Turns the TV on, as well as turning on the ClonePRO into IR mode, ready for subsequent buttons. Note
that the unit will automatically turn itself off 30 seconds after the last button has been pressed to extend
battery-life.
TEACH Begins teaching the settings stored in the ClonePRO to the TV, effectively “Cloning” the initially
configured TV.
Note: Pressing TEACH overwrites any settings already in the TV.
•A TV must be turned on before being taught in IR mode.
•After successful teaching, the TV turns off and reboots.
• If the TV displays the message Cloning Timeout or Cloning Aborted, press TEACH again to retry,
experimenting with the ClonePRO at different distances and angles from the TV.
• If no valid settings have been stored via a DSCI LEARN, the IR ready light will come on but nothing will
appear on the TV screen.
Other Information
Buttons for IR and DSCI modes
MENU, CLEAR, RESET, INFO, OK and the arrow buttons Use these buttons as if they were on a master remote
control to operate the TV. Go to page 13 for information on using these buttons.
Chapter 4 23
Graphics contained within this publication are for representation only.
Page 26

Other Information
Cloning a TV
Use the ClonePRO or a master remote to complete any necessary setup steps to the TV, such as Auto Channel
Search, changing Access & Power options, etc. Go to Chapter 1 for more information on setting up the TV.
When you have finished setting up the TV, you can use it as your example TV.
1. Connect the ClonePRO to the example TV’s DSCI port.
2. It is recommended, though not required, to turn on the TV. Press the POWER button.
3. Press the LEARN button to begin the cloning process. When it is complete, Cloning Complete is
displayed on-screen.
4. Take the ClonePRO to each subsequent TV and then (in either DSCI or IR mode) TEACH each TV,
monitoring the process on-screen.
The settings learned by the ClonePRO remain indefinitely, ready to TEACH the next TV until overwritten by a
new LEARN operation.
General troubleshooting
The ClonePRO cannot be used to cross clone (to copy the memory of older models into newer models, or vice
versa), because the two have completely different memory-maps, memory-sizes, features and settings.
IR TEACH for older models may be made more reliable by first filling the memory of the example TV with
channel-labels on unused channels.
After an IR TEACH, older-model TV’s do not need to reboot.
[Config]: Pressing and holding this button in IR mode toggles the “decommercialization” and aftermarket resale
of older-model televisions. Note that this is not reversible after turning-off older-model TV’s.
DSCI mode troubleshooting
• Make sure the TV is plugged in to a live electrical outlet
• Make sure the ClonePRO is plugged into the TV’s DSCI port
• The connecting cable should have at least 6 wires, mapping 1-to-1 (not flipped)
IR mode troubleshooting
• If the ClonePRO isn’t working, check the battery. Place a new 9V battery in the unit if the battery is old.
• Make sure the ClonePRO is pointed at the TV with a clear line of sight.
• If you are trying to TEACH , make sure there is a valid memory stored in the ClonePRO (Check by going
into DSCI-mode [Status].)
24 Chapter 4
Graphics contained within this publication are for representation only.
Page 27

Other Information
12:01 CC ESPN 60
Mute SAP
Locked
SLEEP 00:00
MAIN MENU
1 Audio
2 Picture Quality
3 Channel
4 Access & Power Options
5 Closed Captioning
6 Time and Timers
7 Parental Controls
8 Menu Language/Idioma/Langue
9 PC Video Input Controls
Use ^v to change the input tuned
0 Exit
when key pressed, MENU to exit.
If a component button has not been
programmed, its input will appear as “----.”
AUTO TUNING
VCR1 VCR2 DVD AUX SAT
CH 4 VID SVID PC CH 3
^
Channel Banner
There are several indicators that might appear when you press the TV or INFO buttons on the remote. This
display is called the Channel Banner. The following list describes the items on the Channel Banner screen
(left to right and top to bottom).
12:01 Displays the current time.
CC Displayed when Closed Captioning is available on the current channel.
ESPN Displays the label assigned to the current channel.
60 Displays the current channel or input channel .
Mute Mute is displayed when you mute the audio.
SAP Displayed when the current channel is broadcasting SAP (Second Audio Program) information.
Locked Displayed to indicate when Parental Controls are locked or unlocked.
SLEEP Displayed when the Sleep Timer has been set.
00:00 Displayed to count down time left on the commercial skip (SKIP) timer.
Why You Should Use the Auto Tuning Feature
The auto-tuning feature tunes the TV to the correct channel for different components you have connected
to your TV (like a VCR, DVD Player, etc.) When you set up auto tuning in the menu system you don’t have to
remember to change your TV to channel 3, for example, when you want to watch the tape in your VCR.
How to Set Up the Auto Tuning Feature
The way you set up the auto tuning feature in the TV’s menu corresponds to the component buttons on the
remote and the way you have each component connected to your TV. When you set auto tuning, you’re
telling the TV what channel to tune to when you press the VCR, DVD, or SAT•CABLE button on the remote
control.
1. Press MENU (the TV MAIN MENU appears).
2. Highlight Channel and press OK on your remote control.
3. Highlight Auto Tuning and press OK.
4. Choose which channel you would like to set:
VCR1 Select the channel that the TV tunes to when you press the VCR1 button.
VCR2 Select the channel that the TV tunes to when you press the VCR2 button.
DVD Select the channel that the TV tunes to when you press the DVD button.
AUX Select the channel that the TV tunes to when you press the AUX button (for remotes with the
AUX button).
SAT Select the channel that the TV tunes to when you press the SAT (or SAT•CABLE) button.
5. Highlight the choice that matches the way you have the component connected to this TV, and press OK.
The choices and a brief explanation follow:
Ch 3 Choose this if your component is only connected to the antenna jack on the back of the TV.
Reminder: Make sure the component’s Ch 3/4 switch is set to channel 3.
Ch 4 Choose this if your component is only connected to the antenna jack on the back of the TV.
Reminder: Make sure the component’s Ch 3/4 switch is set to channel 4.
VID Choose this if your component is connected to the Audio/Video IN jacks on the back of the TV.
The TV will tune to the VID input when you press the specified component button.
SVID (not available on models J20542 and J25400) Choose this if your component is connected to
the S-VIDEO jack on the back of the TV. The TV will tune to the SVID input when you press the specified
component button. Reminder: Make sure to also connect audio cables to get sound when using
S-Video.
Chapter 4 25
Graphics contained within this publication are for representation only.
Page 28

Other Information
Troubleshooting
Most problems you encounter with your TV you can correct by consulting the Troubleshooting list that follows.
Note: If you prefer, we can provide you with the name of an Authorized Service Representative who will visit your location for a
fee to install your electronic entertainment system and to instruct you in its operation. For details about this service, call
1-888-206-3359.
TV Problems
TV won’t turn on
•Press the TV button.
•Make sure the TV is plugged in.
• Check the wall receptacle (or extension cord) to make sure it is “live” by plugging in something else.
•Something might be wrong with your remote control. Press the POWER button on the front of the TV. If the TV
turns on, check the remote control solutions on page 27.
•The front panel controls may be locked (disabled). Use the remote control to unlock the front panel controls by
selecting Front Panel in the Access & Power Options menu and choosing Disabled.
Controls don’t work
• If you’re using the remote control, press the TV button first to make sure the remote is in TV mode.
•The front panel controls may be locked (disabled). Use the remote control to unlock the front panel controls by
selecting Front Panel in the Access & Power Options menu and choosing Disabled.
• Unplug the TV for two minutes and then plug it back in. Turn the TV on and try again.
TV turns off while playing
• Schedule Recurrence function may have been activated. Go to page 9 for instructions.
• Electronic protection circuit may have been activated because of a power surge. Wait 30 seconds and then turn
the TV on again. If this happens frequently, the voltage in your house may be abnormally high or low.
• Sleep Timer or Energy Saver may have been set.
TV turns on unexpectedly
• Schedule Recurrence function may have been activated. Go to page 9 for instructions.
Blank screen
•Make sure the component connected to the TV is turned on.
•Try another channel.
•Press RESET, in case the picture controls are set too low.
No sound, picture okay
•Maybe sound is muted. Press the volume up button to restore sound.
•Maybe speakers are turned off. Check the Audio Output and Speakers control panel in the Audio menu. Go to
page 7 for detailed instructions.
•Maybe Maximum Volume was set low. Check Audio Levels control panel in the Audio menu.
Can’t select certain channel
• Channel may be blocked or not approved in the Parental Controls menu.
• If using a VCR, make sure the TV/VCR button on the VCR is in the correct mode (press the TV/VCR button on your
VCR).
Noisy stereo reception
•The station might be weak. Press the SOUND button on your remote control to change from stereo to mono.
26 Chapter 4
Graphics contained within this publication are for representation only.
Page 29

Other Information
No picture, no sound but TV is on
•Maybe the cable/air setting is set to the wrong position. Select Signal Source from the Channel menu. Go to page 8
for more information.
•The channel might be empty — change channels.
• If you’re watching your VCR and it’s connected with coaxial cable to the CABLE/ANTENNA jack, tune the TV to
channel 3 or 4 (whichever channel is selected on the 3/4 switch on the back of your VCR). Also check to make sure
the TV/VCR button on the VCR is in the correct mode (press the TV/VCR button on your VCR).
• If you’re trying to watch content from a component that’s connected to the TV (like a DVD player or VCR), press the
INPUT button on the remote control until the content appears.
•Weak Signal Muting and blanking may be on. Check Signal Source in the Channel menu.
Sound okay, picture poor
• Check antenna connections. Make sure all of the cables are firmly connected to the jacks.
•Try adjusting sharpness function to improve weak signals. Go to page 7 for more instructions.
Black box appears on the screen
•Closed-captioning might be on. Check the Closed-Caption Display control panel in the Closed-Captioning menu. Go
to page 17 for more instructions.
Can’t see commercial skip timer
• If closed-captioning is on, skip timer does not stay on-screen. To turn off closed-captioning, go to page 17.
The Remote Control Doesn’t Work
•Something might be between the remote and the remote sensor on the component. Make sure there is a clear path.
•Maybe the remote isn’t aimed directly at the component (TV or VCR) that you’re trying to operate.
•Maybe remote is not in TV Mode. Press the TV button so remote will control the TV.
•Maybe batteries in remote are weak, dead or installed incorrectly. Put new batteries in the remote. (Note, if you
remove the batteries, you may have to reprogram the remote to operate other components.)
•You might need to drain the remote’s microprocessor: remove batteries and press the number 1 button for at least
60 seconds. Release the 1 button, replace the batteries, and (if necessary) program the remote again.
• Operation of certain remote control buttons might be restricted by master menu settings.
•Maybe remote is in wrong configuration (TV1 or TV2) for that TV. Check the Remote Config. settings in the Access &
Power Options menu.
Problems with V-Chip/Parental Controls
The rating limits don’t work
•You must lock the settings. Go to the Main menu, select Parental Controls, then UNLOCKED (No Blocking) to lock.
I don’t remember my password and I want to unlock the TV
•Use the master remote to access the Password option in the Parental Controls menu.
The V-Chip won’t let me watch a program even though it’s not rated as violent.
•Maybe the movie was given an NR (Not Rated) status. After you block movie ratings, you must set NR to View
separately in order to view movies with an NR rating.
•Inputs (VID, SVID) aren’t available unless they have been manually added to the channel list.
Chapter 4 27
Graphics contained within this publication are for representation only.
Page 30

Other Information
Menu Problems
•Menu access may be blocked by ClonePRO programming.
•Try unplugging the TV for two minutes and then plug it back in and turn it on.
•The Energy Saver settings won’t work if the TV Power Config. is set to Always in the Access & Power Options menu.
•The basic menu options might be restricted by master menu settings.
•The ClonePRO might have disabled master menus.
• Sleep and Schedule functions won’t work if the TV Power Config. is set to Always.
Care and Cleaning
CAUTION: Turn OFF your TV before cleaning.
You can clean the TV as required, using a soft lint-free cloth. Be sure to occasionally dust the ventilation slots in
the cabinet to help assure adequate ventilation.
The TV’s screen may be cleaned with a soft, lint-free cloth as well. Take care not to scratch or mar the
screen. If necessary, you may use a cloth dampened with warm water. Never use strong cleaning agents,
such as ammonia-based cleaners, or abrasive powder. These types of cleaners will damage the TV.
While cleaning do not spray liquid directly on the screen, or allow liquid to run down the screen and inside the
TV. Also, avoid placing drinks or vases with water on top of the TV. This could increase the risk of fire or shock
hazard or damage to the TV.
Caution: Using video games or any external accessory with fixed images for extended periods of time can cause
them to be permanently imprinted on the picture tube (or projection TV picture tubes). ALSO, some network/
program logos, phone numbers, etc. may cause similar damage. This damage is not covered by your warranty.
28 Chapter 4
Graphics contained within this publication are for representation only.
Page 31

Other Information
Limited Warranty
What your warranty covers:
• Any defect in materials or workmanship.
For how long after your purchase:
• 90 days for remote control through the selling distributor.
• One year for labor charges.
• One year for parts.
•Two years for picture tube.
(The warranty begins at time of first installation or 45 days after shipment, whichever comes first.)
What we will do:
•Pay any Authorized RCA Commercial Television Service Center the labor charges to repair your television.
•Pay any Authorized RCA Commercial Television Service Center for the new or, at our option, refurbished replacement parts and picture tube
required to repair your television.
How you get service:
•Request service from any Authorized RCA Commercial Television Service Center at your place of business.
•To identify your nearest Authorized RCA Commercial Television Service Center, ask your distributor, visit www.rcacommercial.com, look in the
Yellow Pages, or call 1-800-880-5966.
•Show the Authorized Service Center Representative your sales receipt or other evidence of purchase date or first rental.
What your warranty does not cover:
•Remote control replacement by anyone other than the selling distributor.
• Customer instruction. (Your Owner’s Manual clearly describes how to install, adjust, and operate your television. Any additional information
should be obtained from your distributor.)
•Installation and related adjustments.
•Acts of God, such as, but not limited to lightning damage.
• Signal reception problems not caused by your television.
•Damage from misuse or neglect.
•Batteries.
•Damage from images burnt onto the screen.
•A television that has been modified or incorporated into other products.
•A television purchased or serviced outside the USA.
•In-room service.
Product registration:
• Please complete and mail the Product Registration Card packed with your TV. It will make it easier to contact you should it ever be necessary. The
return of the card is not required for warranty coverage.
Limitation of Warranty:
• THE WARRANTY STATED ABOVE IS THE ONLY WARRANTY APPLICABLE TO THIS PRODUCT. ALL OTHER WARRANTIES, EXPRESS OR IMPLIED
(INCLUDING ALL IMPLIED WARRANTIES OF MERCHANTABILITY OR FITNESS FOR A PARTICULAR PURPOSE) ARE HEREBY DISCLAIMED. NO VERBAL OR
WRITTEN INFORMATION GIVEN BY THOMSON INC., ITS AGENTS OR EMPLOYEES SHALL CREATE A GUARANTY OR IN ANY WAY INCREASE THE SCOPE
OF THIS WARRANTY.
•REPAIR OR REPLACEMENT AS PROVIDED UNDER THIS WARRANTY IS THE EXCLUSIVE REMEDY OF THE CONSUMER. THOMSON INC. SHALL NOT BE
LIABLE FOR INCIDENTAL OR CONSEQUENTIAL DAMAGES RESULTING FROM THE USE OF THIS PRODUCT OR ARISING OUT OF ANY BREACH OF ANY
EXPRESS OR IMPLIED WARRANTY ON THIS PRODUCT. THIS DISCLAIMER OF WARRANTIES AND LIMITED WARRANTY ARE GOVERNED BY THE LAWS OF
THE STATE OF INDIANA. EXCEPT TO THE EXTENT PROHIBITED BY APPLICABLE LAW, ANY IMPLIED WARRANTY OF MERCHANTABILITY OR FITNESS FOR
A PARTICULAR PURPOSE ON THIS PRODUCT IS LIMITED TO THE APPLICABLE WARRANTY PERIOD SET FORTH ABOVE.
How state law relates to this warranty:
•Some states do not allow the exclusion nor limitation of incidental or consequential damages, or limitations on how long an implied warranty lasts, so the
above limitations or exclusions may not apply to you.
•This warranty gives you specific legal rights, and you also may have other rights that vary from state to state.
If you purchased your product outside the USA:
•This warranty does not apply. Contact your distributor for warranty information.
Service calls which do not involve defective materials or workmanship are not covered by this warranty. Costs of such service calls are the sole
responsibility of the purchaser.
Chapter 4 29
Graphics contained within this publication are for representation only.
Page 32

Visit the RCA web site at www.rcacommercial.com
Please do not send any products to the Indianapolis address listed in this manual or on the carton. This will only
add delays in service for your product.
Thomson Inc.
10330 North Meridian Street
Indianapolis, IN 46290
©2002 Thomson Inc.
Trademark(s)® Registered
Marca(s) Registrada(s)
Printed in USA
TOCOM 1598177B
THOMSON
 Loading...