

RCA J32530YX52CJ5, J32530YX52CJ9, J36530YX52CJ5, J27530TX52AJ9, J32530YX58CJ6 User Manual
...Page 1
Page 2
WARNING
To reduce the risk of fire or shock
hazard, do not expose this TV to
rain or moisture.
RISK OF ELECTRICSHOCK
DO NOT OPEN
To reduce the risk of electric shock, do not remove cover
(or back). No user serviceable parts inside. Refer servicing
to qualified service personnel.
This symbol indicates "dangerous A
voltage" inside the product that
presents a risk of electric shock
or personal injury.
This symbol indicates
important instructions
accompanying the product.
Cautions
Note to Cable TV Installer
CAUTION: To prevent electric shock, match wide blade of plug to
wide slot, fully insert.
ATTENTION: Pour eviter les chocs electriques, introduire la lame la
plus large de la fiche dans la borne correspondante de la prise et
pousser jusq0 au fond.
Refer to the identificationlrating label located on the back panel of your product for its
proper operating voltage.
FCCRegulations state that unauthorized changes or modifications to this equipment
may void the user's authority to operate it.
Caution: If fixed (non-moving) images are left on the screen for long periods, they may
be permanently imprinted on the picture tube. Such images include network Iogos,
phone numbers, and video games. This damage is not covered by your warranty.
Extended viewing of channels displaying these images should be avoided.
This reminder is provided to call your attention to Article 820-40 of the National
Electrical Code (Section 54 of the Canadian Electrical Code, Part I) which provides
guidelines for proper grounding and, in particular, specifies that the cable ground shall
be connected to the grounding system of the building as close to the point of cable
entry as practical.
Product Registration
Please fill out the product registration card and return it immediately. Returning the card allows us to contact you if needed.
Keep your sales receipt to obtain warranty parts and service and for proof of purchase. Attach it here and record the serial and
model numbers in case you need them. The numbers are located on the back of the television.
Model No.
Serial No.
Purchase Date:
DealedAddresgPhone:
Page 3
QUICK GUIDE TO THE TV ........................................... 3
Startup .............................................................................................. 3
Understanding the Menus ............................................................... 6
Using Master and Basic Menus ................................................. 7
USING THE REMOTE .................................................... 9
Types of Remotes .............................................................................. 9
Master Remote Buttons (CRK17TD1) ............................................ 10
Universal Remote Buttons (CRK76TK1) ......................................... 12
Using the iNPUT Button ................................................................. 14
Using the SYSTEM Button .............................................................. 14
Universal Remote Features ............................................................ 15
Controlling Components ......................................................... 15
PIP(Picture-In-Picture) Operation ................................................. 16
Using the PIP Feature .............................................................. 16
MASTER MENUS .......................................................... 19
Audio Menu .................................................................................... 19
Picture Quality Menu ..................................................................... 21
Channel Menu ................................................................................ 22
Access& Power Options ................................................................. 24
Closed Captioning Menu ............................................................... 27
Time and Timers Menu ................................................................... 28
Parental Controls Menu ................................................................. 30
Locked/Unlocked ...................................................................... 30
V-Chip Movie Rating Limit ...................................................... 31
V-Chip TV Ratin9 Limit ............................................................ 32
TV Age-Based Ratings .............................................................. 33
V-Chip Unrated Program Block ............................................... 38
Channel Block .......................................................................... 38
Password ................................................................................... 39
Menu Language ............................................................................. 39
PCVideo Input Controls ................................................................. 40
Using the PCVideo Input Controls ......................................... 41
Page 4
BASIC MENUS ............................................................. 43
Channel Guide ......................................................................... 43
Menu Language ....................................................................... 43
Closed Captioning Menu ......................................................... 44
Time and Timers Menu or Sleep Timer ................................... 44
Picture Presets Menu ............................................................... 45
Audio Processor Menu ............................................................. 45
Parental Controls Menu .......................................................... 45
PCVideo input Controls .......................................................... 46
CONNECTIONS ........................................................... 47
Back of TV Jacks ............................................................................. 47
PCINPUT Connection ..................................................................... 47
Antenna or Cable Connection ....................................................... 48
Cable Box Connections .................................................................. 49
Cable Box and VCR Basic Connection ........................................... 50
VCR Basic Connection .................................................................... 50
Cable Box and VCR Advanced Connection ................................... 51
VCR Intermediate Connection ....................................................... 51
VCR Advanced Connection ............................................................ 52
Audio Connection .......................................................................... 52
REFERENCE ................................................................... 53
Front Panel ..................................................................................... 53
Status Displays ................................................................................ 54
Troubleshooting ............................................................................. 55
FCCInformation ............................................................................. 58
Warranty ......................................................................................... 59
INDEX ......................................................................... 60
2
Page 5
STARTUP
The steps below will get your TV connected and ready for watching. For
more details, refer to the sections listed.
CAUTION:
If you choose to use a stand with your TV, take precautions that the
stand or other furniture the TV is placed on is properly located and
of adequate size and strength to prevent the TV from accidentally
being tipped over, pushed off, or pulled off. This could cause
damage to the TV and/or personal injury.
1. Hook up Your TV
See the "Connections" section for details.
Hook up any antennas, cables or other equipment to your TV before you
follow the steps below.
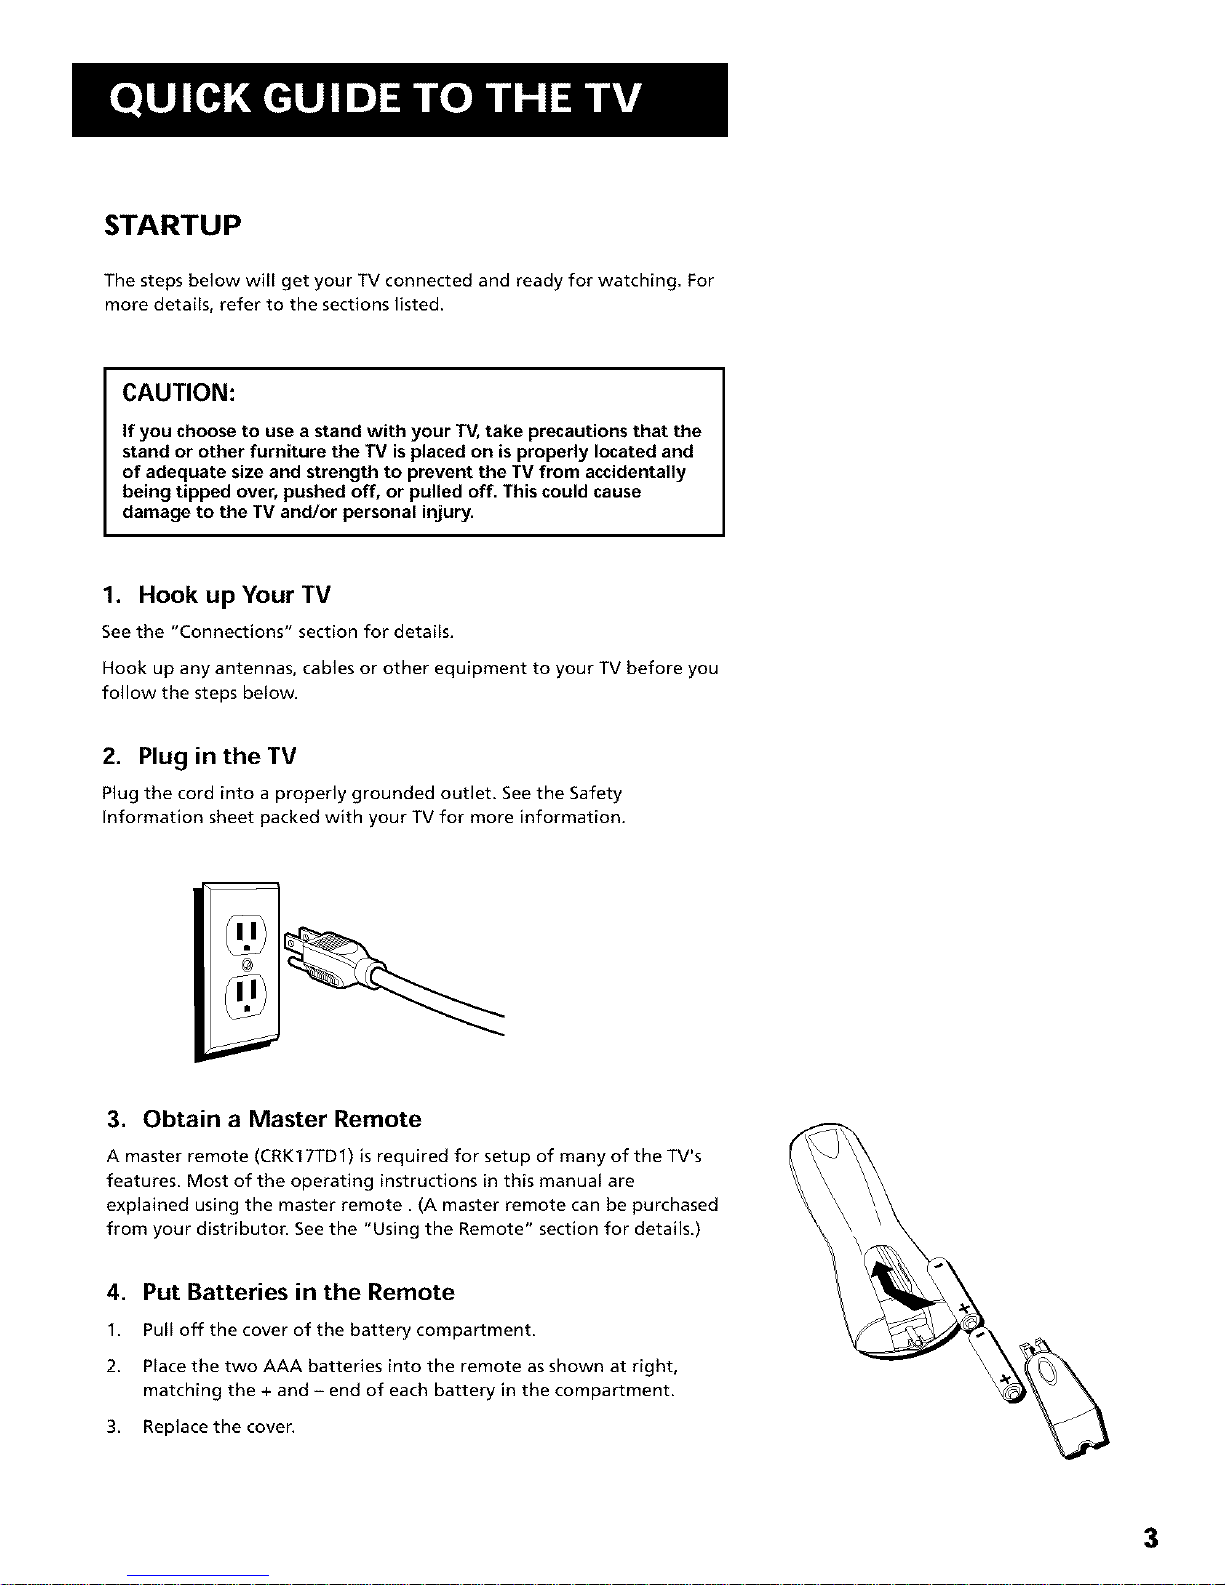
2. Plug in the TV
Plug the cord into a properly grounded outlet. See the Safety
Information sheet packed with your TV for more information.
3. Obtain a Master Remote
A master remote (CRK17TD1) is required for setup of many of the TV's
features. Most of the operating instructions in this manual are
explained using the master remote. (A master remote can be purchased
from your distributor. See the "Using the Remote" section for details.)
4. Put Batteries in the Remote
1. Pull off the cover of the battery compartment.
2. Place the two AAA batteries into the remote as shown at right,
matching the + and- end of each battery in the compartment.
3. Replace the coven
3
Page 6
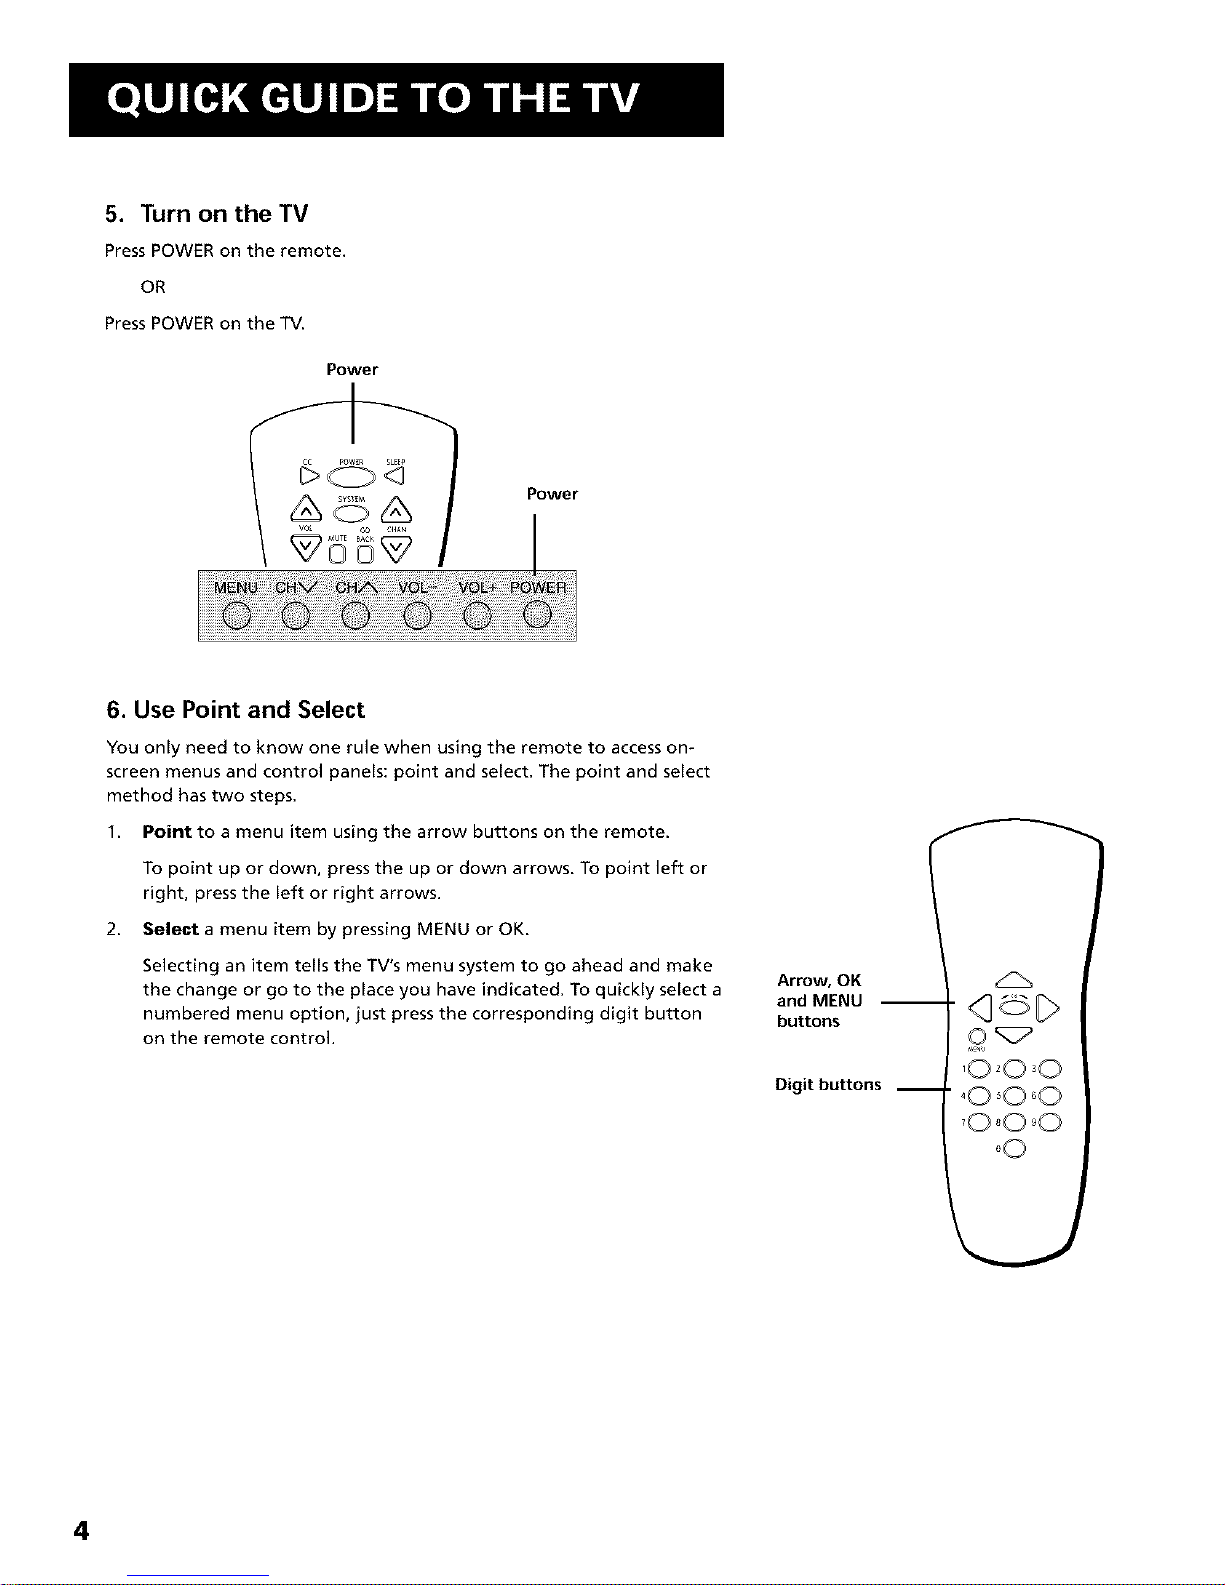
5. Turn on the TV
Press POWER on the remote.
OR
Press POWER on the TV.
Power
&
Power
6. Use Point and Select
You only need to know one rule when using the remote to access on-
screen menus and control panels: point and select. The point and select
method has two steps.
1. Point to a menu item using the arrow buttons on the remote.
To point up or down, press the up or down arrows. To point left or
right, press the left or right arrows.
2. Select a menu item by pressing MENU or OK.
Selecting an item tells the TV's menu system to go ahead and make
the change or go to the place you have indicated. To quickly select a
numbered menu option, just press the corresponding digit button
on the remote control.
Arrow, OK
and MENU
buttons
Digit buttons __
,0 _0,0
4
Page 7
7. Place All Available Channels Into Memory
See the Channel Menu portion of the "Master Menus" section for
details.
1. Press MENU on the remote control, then select Channel, then Auto
Channel Search.
2. Select which channel list you'd like to find channels for (List A is the
default).
8. Set the Time
To set the time, select automatic setting of the time, or to prevent
viewers from accessing the Current Time and Schedule functions, see the
Time and Timers Menu portion of the "Master Menus" section.
If the control panel is not set to the |
current time, use the arrow and digit
J
buttons on the remote control to make
changes.
You can also enter numbers by using the
up and down arrows on the remote.
m
9. Use the Clone Box
If several TVs need to be programmed with the same menu settings, an
optional clone box can be used to copy all of the menu settings from
one TV into other TVs to reduce installation time. Information can be
both downloaded to and uploaded from the clone box using the DSCI
port on the TV's back panel or using the IR sensor. Refer to the clone
box owner's manual for operating instructions.
Your setup is complete! Please read the "Understanding the Menus" description that
follows before customizing menu options. Instructions on operating more advanced
features are given throughout the rest of this manual.
5
Page 8
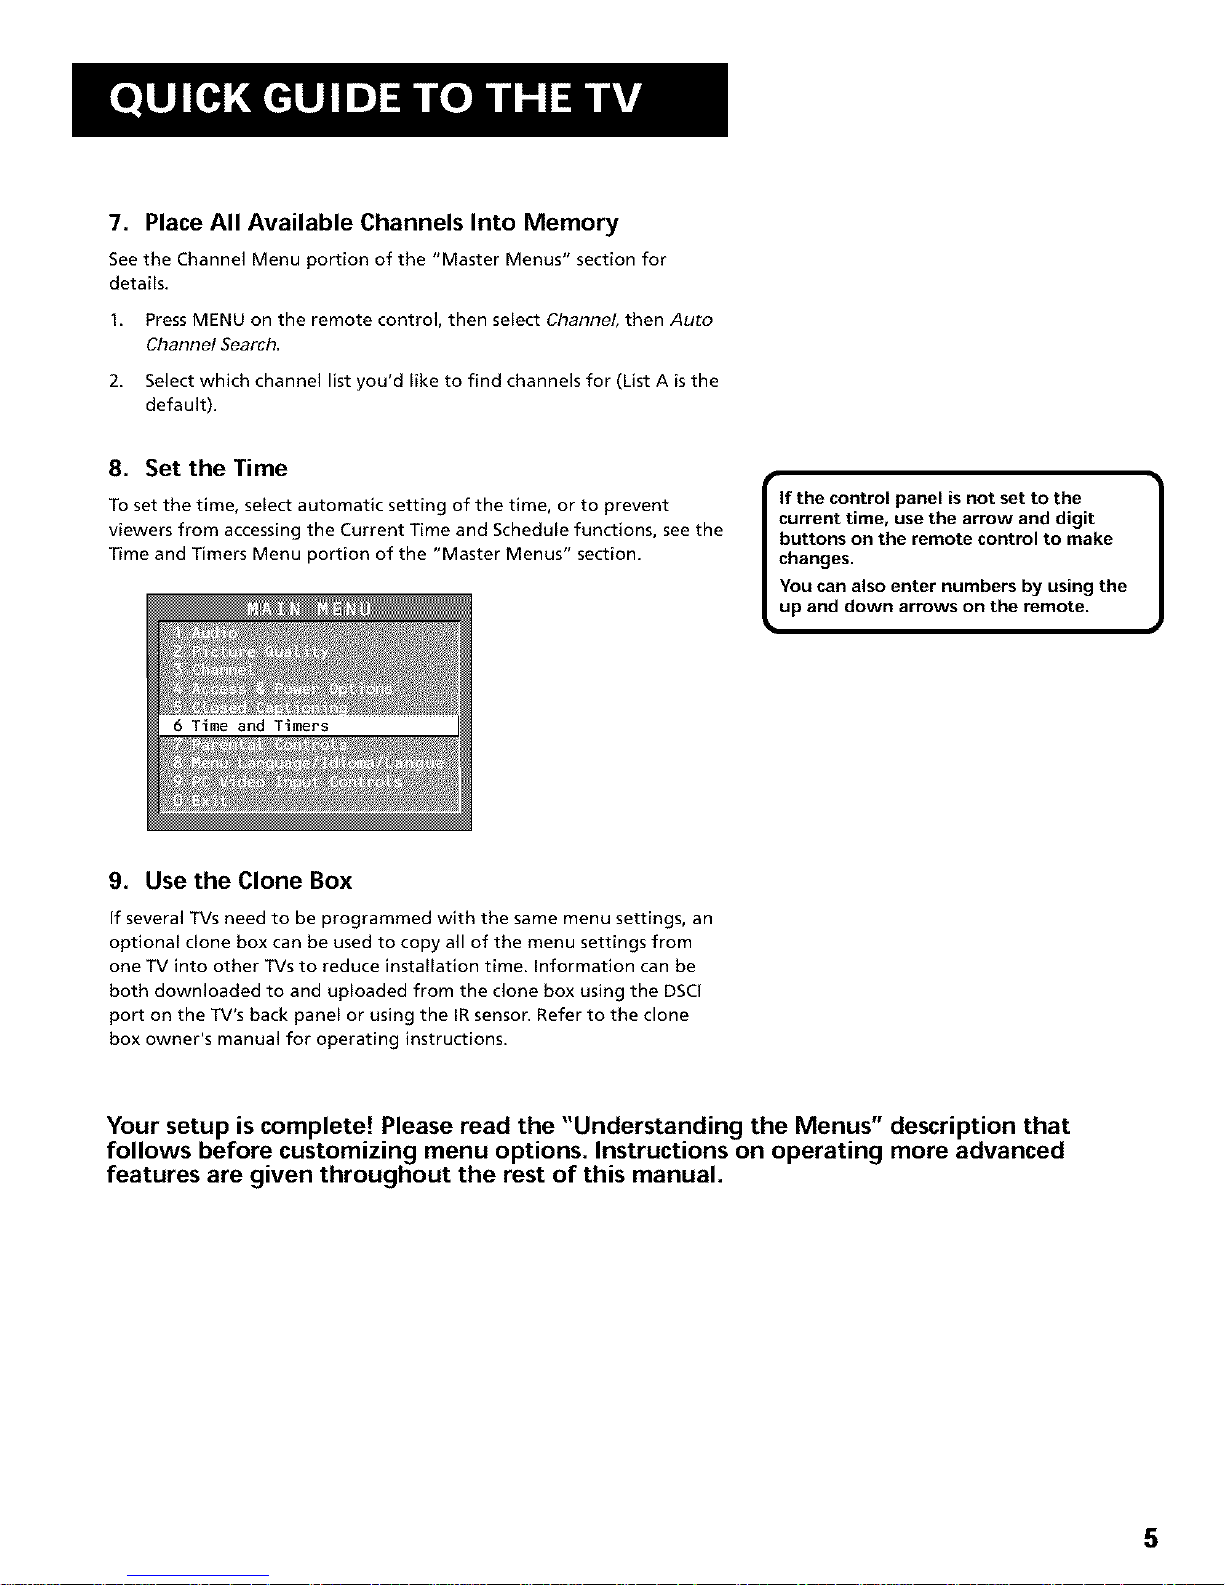
UNDERSTANDING THE MENUS
This television displays two levels of menu system: master and basic.
The master menus are accessible by pressing MENU on the master
remote (CRK17TD1). The master Main menus will always display the
eight choices shown below. A ninth choice, PCVideo Input Controls, will
appear if the PCinput is selected.
The master Main menu. If the PC input isnot selected, the
ninth item wil! not appea_
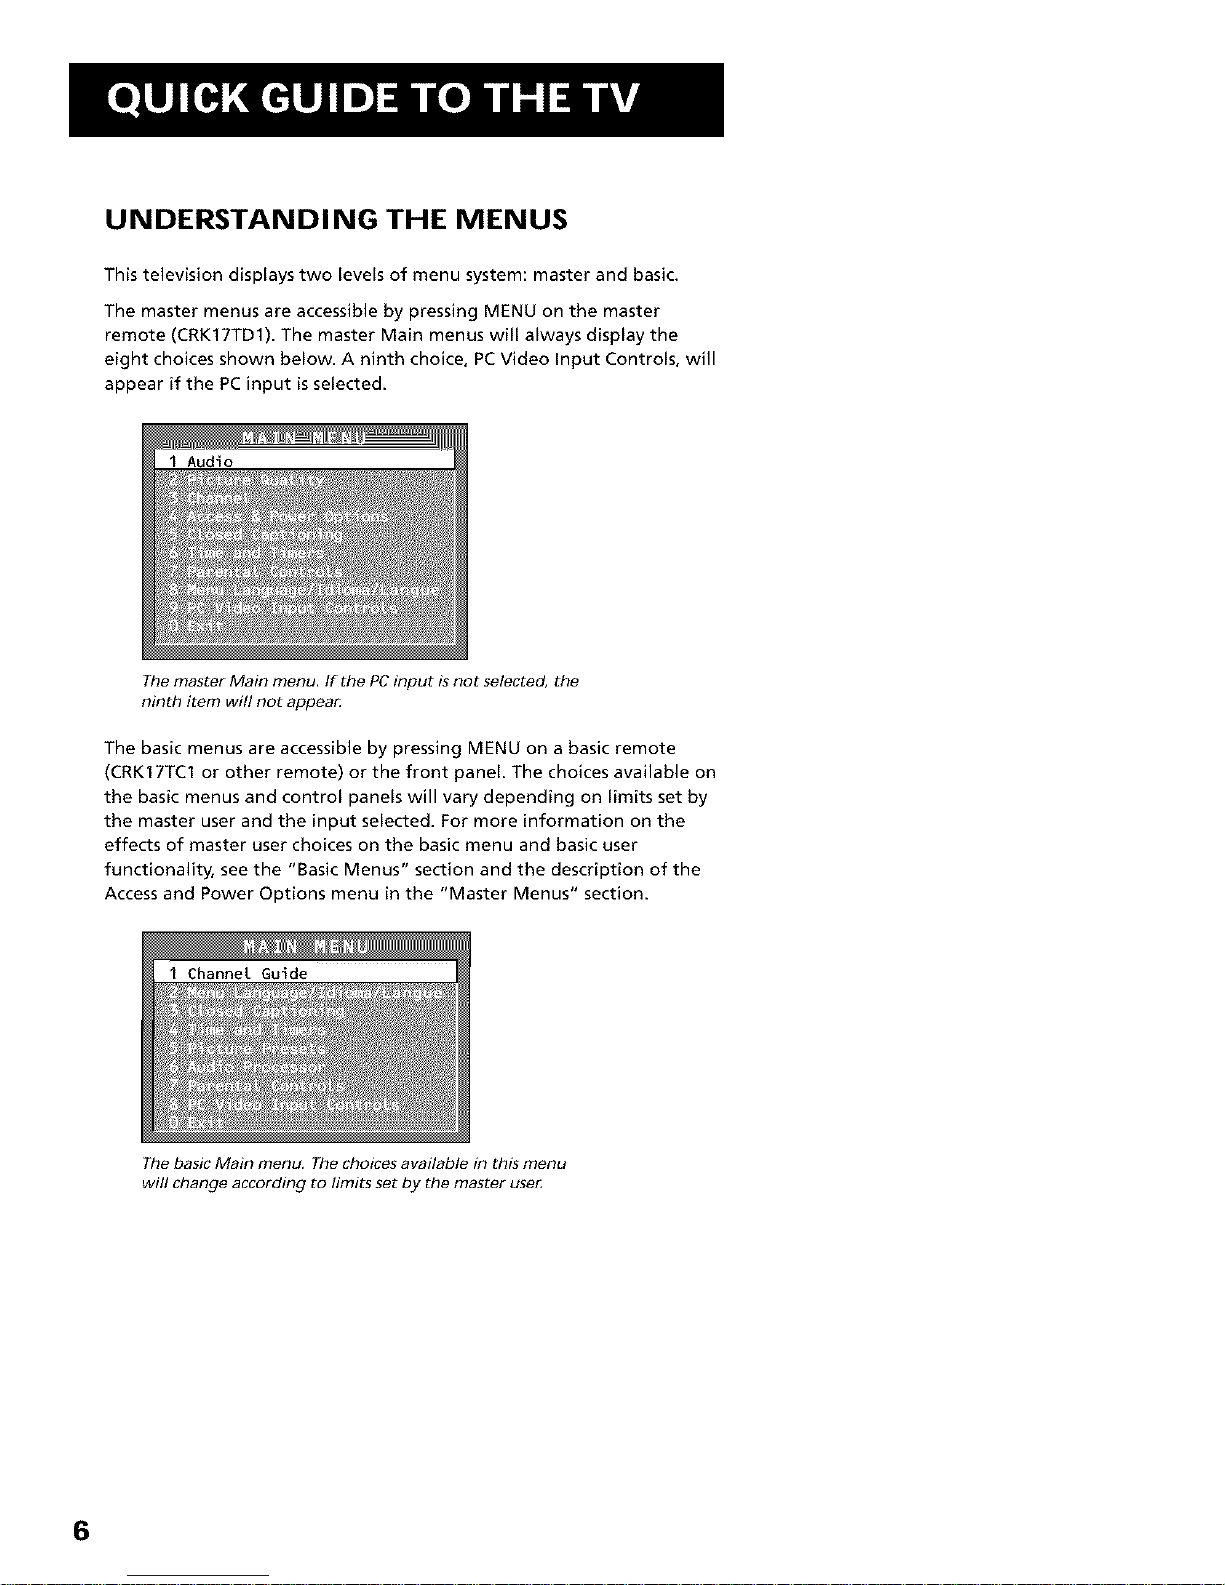
The basic menus are accessible by pressing MENU on a basic remote
(CRK17TC1 or other remote) or the front panel. The choices available on
the basic menus and control panels will vary depending on limits set by
the master user and the input selected. For more information on the
effects of master user choices on the basic menu and basic user
functionality, see the "Basic Menus" section and the description of the
Access and Power Options menu in the "Master Menus" section.
The basic Main menu. The choices available in this menu
wil! change according to limits set by the master use_
6
Page 9
USING MASTER AND BASIC MENUS
Menus and choice lists use the point and select rule to navigate, but
control panels use a variety of methods to adjust features on your TV.
The following pages detail how to use these controls to customize the
functions of your TV.
The first menu is called the Main menu. Press MENU on the remote
(master remote for master menu; basic or universal remote for basic
menu) or on the front panel (basic menu) to bring up the Main menu:
Menu choices take you to another menu or a control panel. There are
two ways to select a choice in a menu:
• Point with the arrows and then select with MENU or OK.
• Press a number button on the remote. For example, in the master
Main menu press 3 to go straight to the Channel menu.
Exiting a menu
There are three ways to exit a menu. Not all methods work in all menus:
• Point to Exit and press MENU or OK.
• Press 0 on the remote.
• Press CLEAR. The on-screen displays are cleared from the screen and
you return to TV viewing.
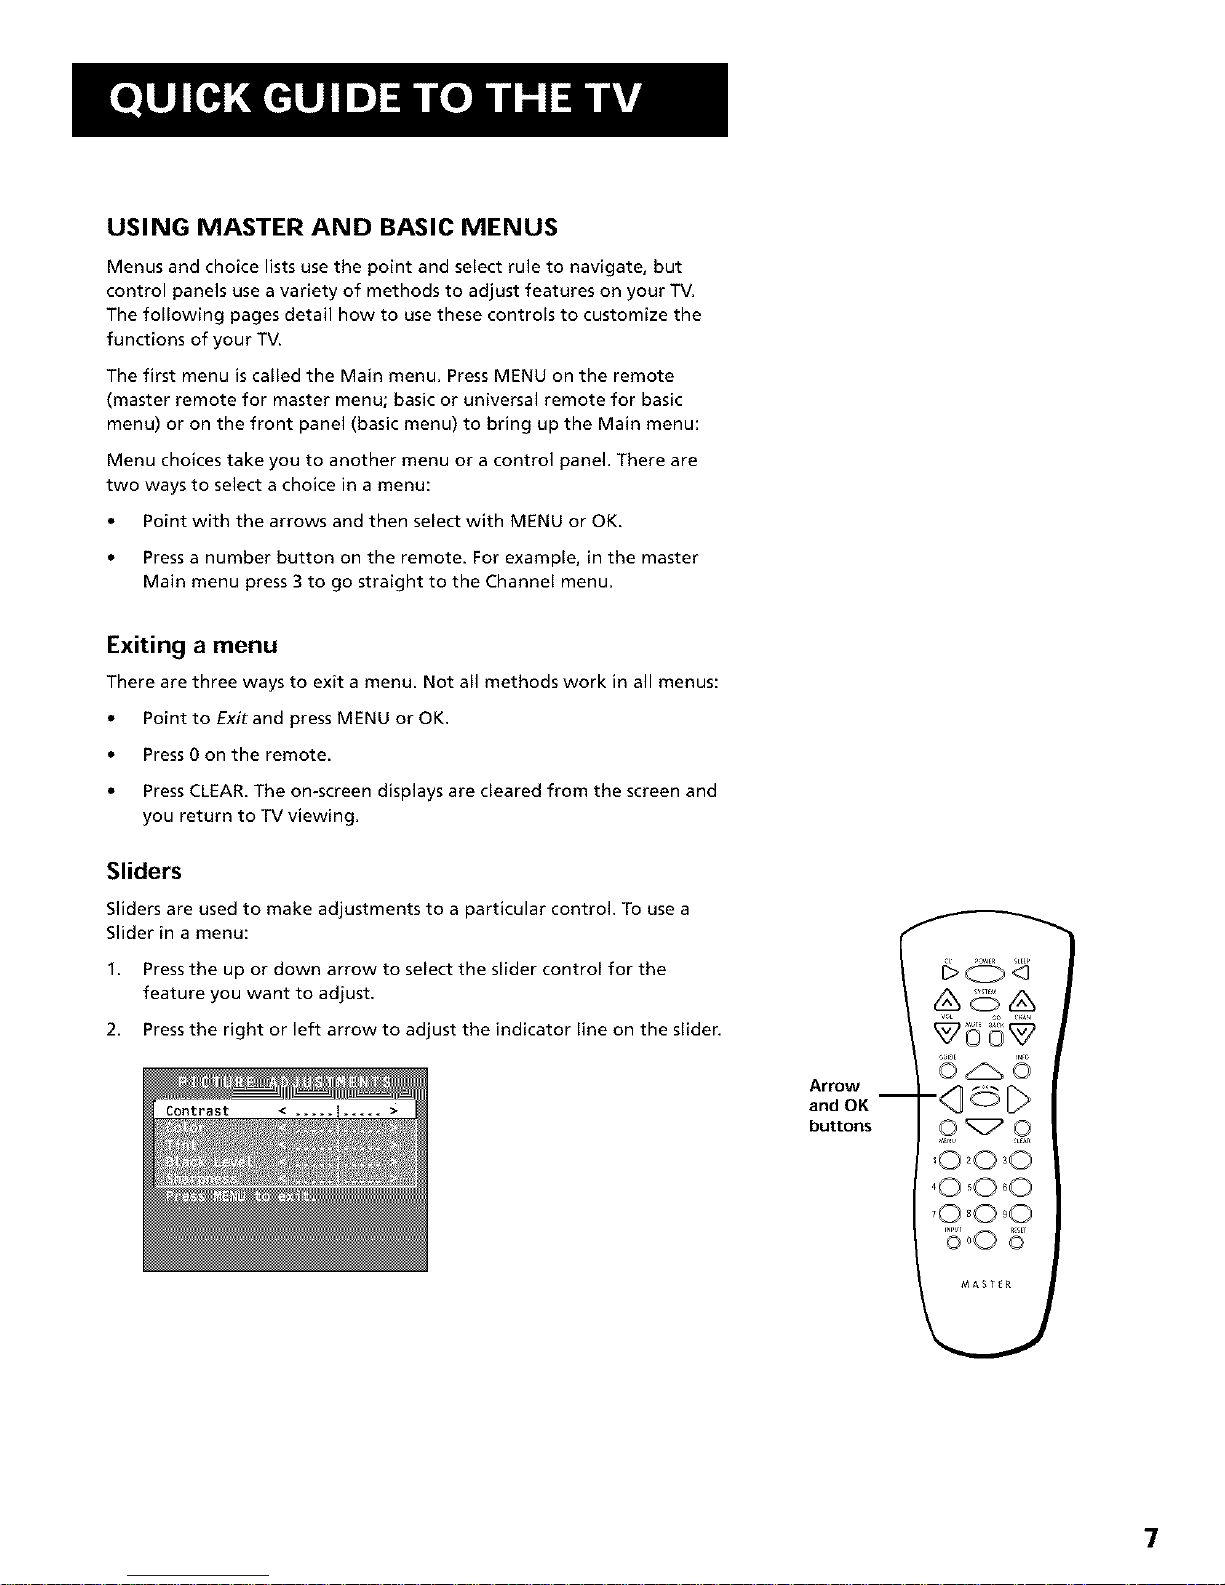
Sliders
Sliders are used to make adjustments to a particular control. To use a
Slider in a menu:
1. Pressthe up or down arrow to select the slider control for the
feature you want to adjust.
2. Pressthe right or left arrow to adjust the indicator line on the slider.
Arrow
and OK I I_ _
buttons O_
0°08'
MASTE_
7
Page 10
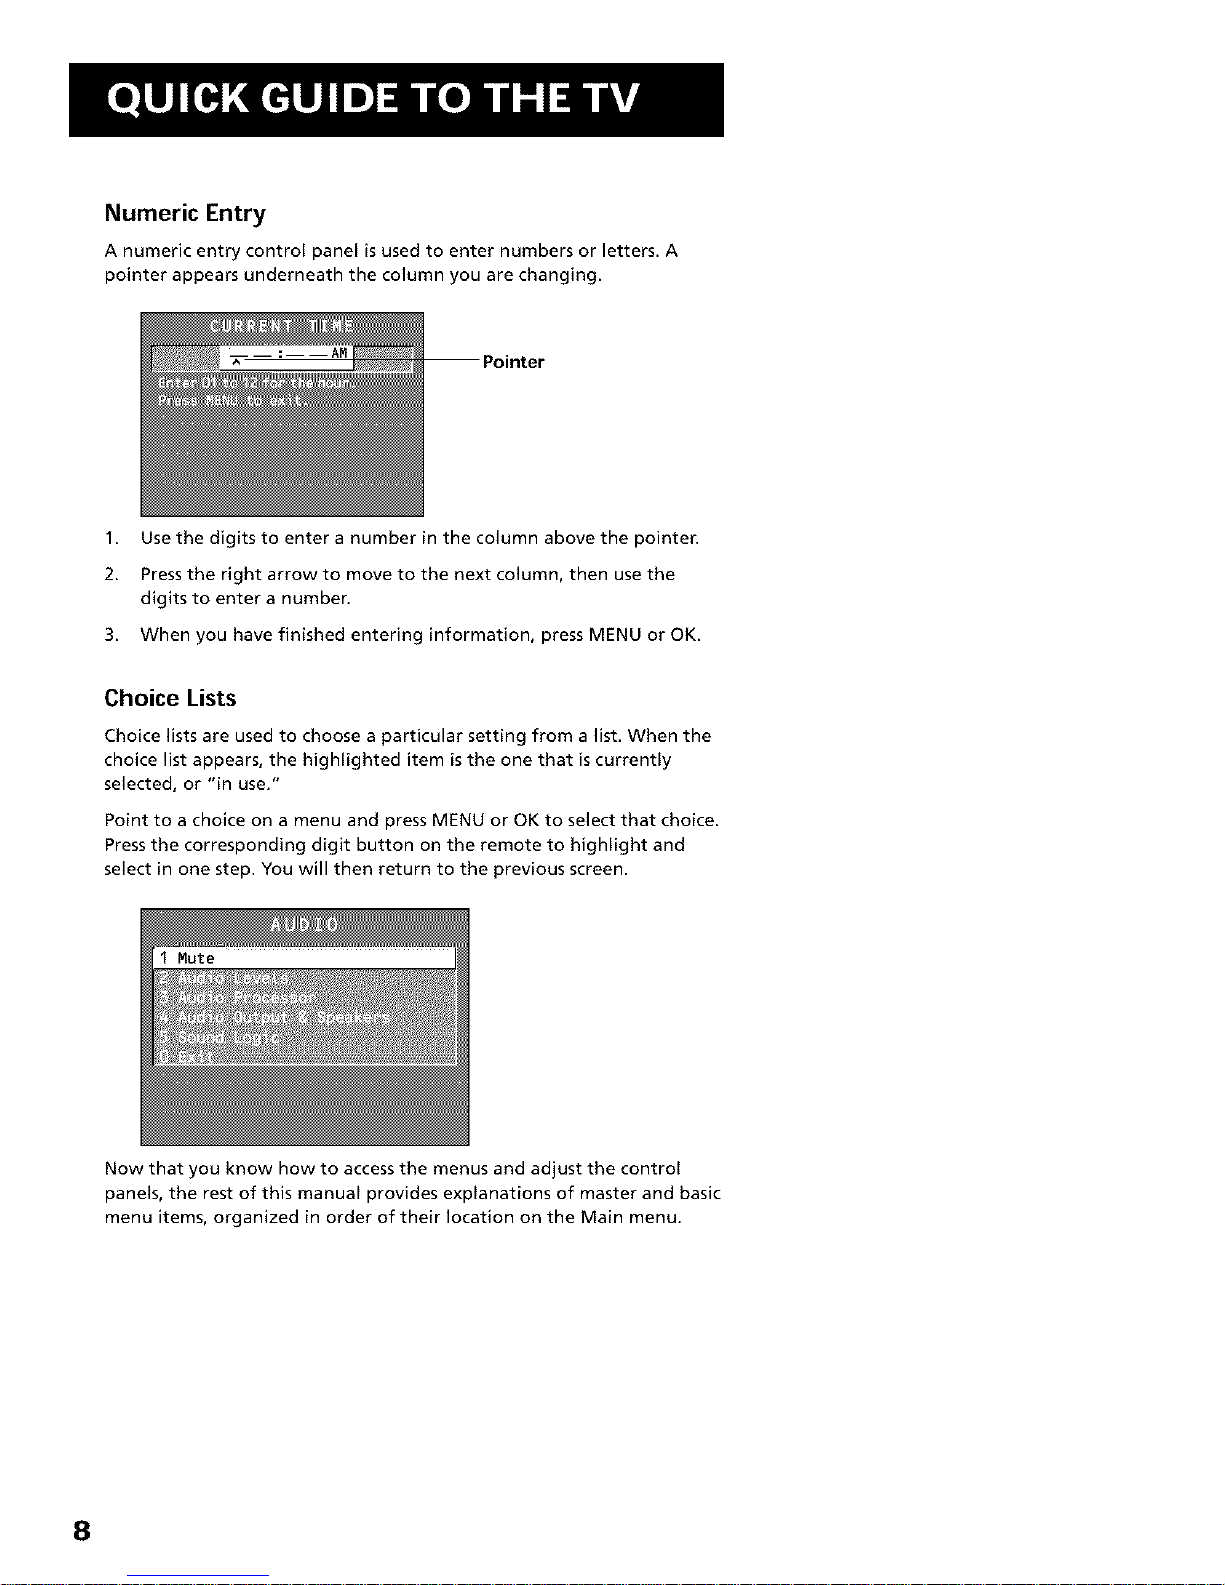
Numeric Entry
A numeric entry control panel is used to enter numbers or letters. A
pointer appears underneath the column you are changing.
1. Use the digits to enter a number in the column above the pointer.
2. Pressthe right arrow to move to the next column, then usethe
digits to enter a numben
3. When you have finished entering information, press MENU or OK.
Choice Lists
Choice lists are used to choose a particular setting from a list. When the
choice list appears, the highlighted item is the one that is currently
selected, or "in use."
Point to a choice on a menu and press MENU or OK to select that choice.
Pressthe corresponding digit button on the remote to highlight and
select in one step. You will then return to the previous screen.
Now that you know how to access the menus and adjust the control
panels, the rest of this manual provides explanations of master and basic
menu items, organized in order of their location on the Main menu.
8
Page 11
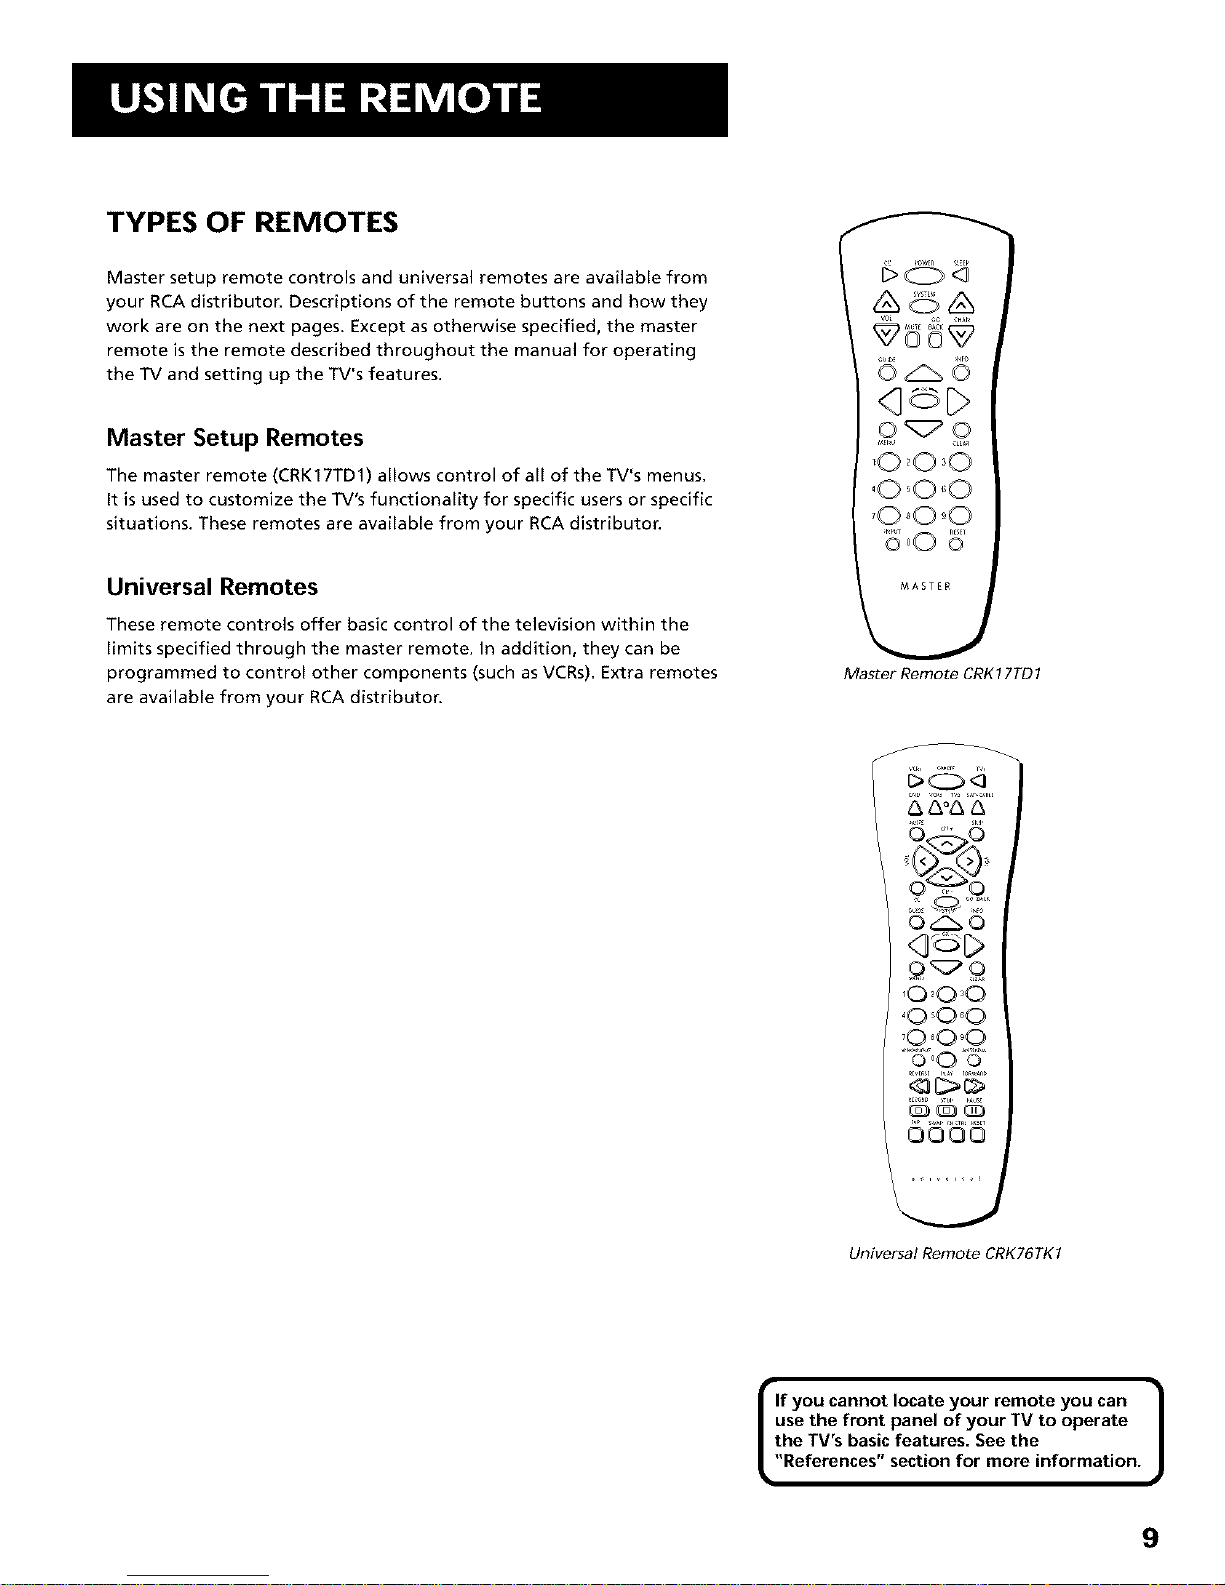
TYPES OF REMOTES
Master setup remote controls and universal remotes are available from
your RCA distributor. Descriptions of the remote buttons and how they
work are on the next pages. Except as otherwise specified, the master
remote is the remote described throughout the manual for operating
the TV and setting up the TV's features.
Master Setup Remotes
The master remote (CRK17TD1) allows control of all of the TV's menus.
It is used to customize the TV's functionality for specific users or specific
situations. These remotes are available from your RCA distributor.
Universal Remotes
These remote controls offer basic control of the television within the
limits specified through the master remote. In addition, they can be
programmed to control other components (such asVCRs). Extra remotes
are available from your RCA distributor.
o°0 S
MASTER
Master Remote CRK17TD 1
DD k T pc
q C>
9_9
,0,0 _0
40 O 60
O o0 o0
8:) {i]_ !]D
OOOO
Universa! Remote CRK76TK1
If you cannot locate your remote you can |
use the front panel of your TV to operate
J
the TV's basic features. See the
"References" section for more information.
9
Page 12
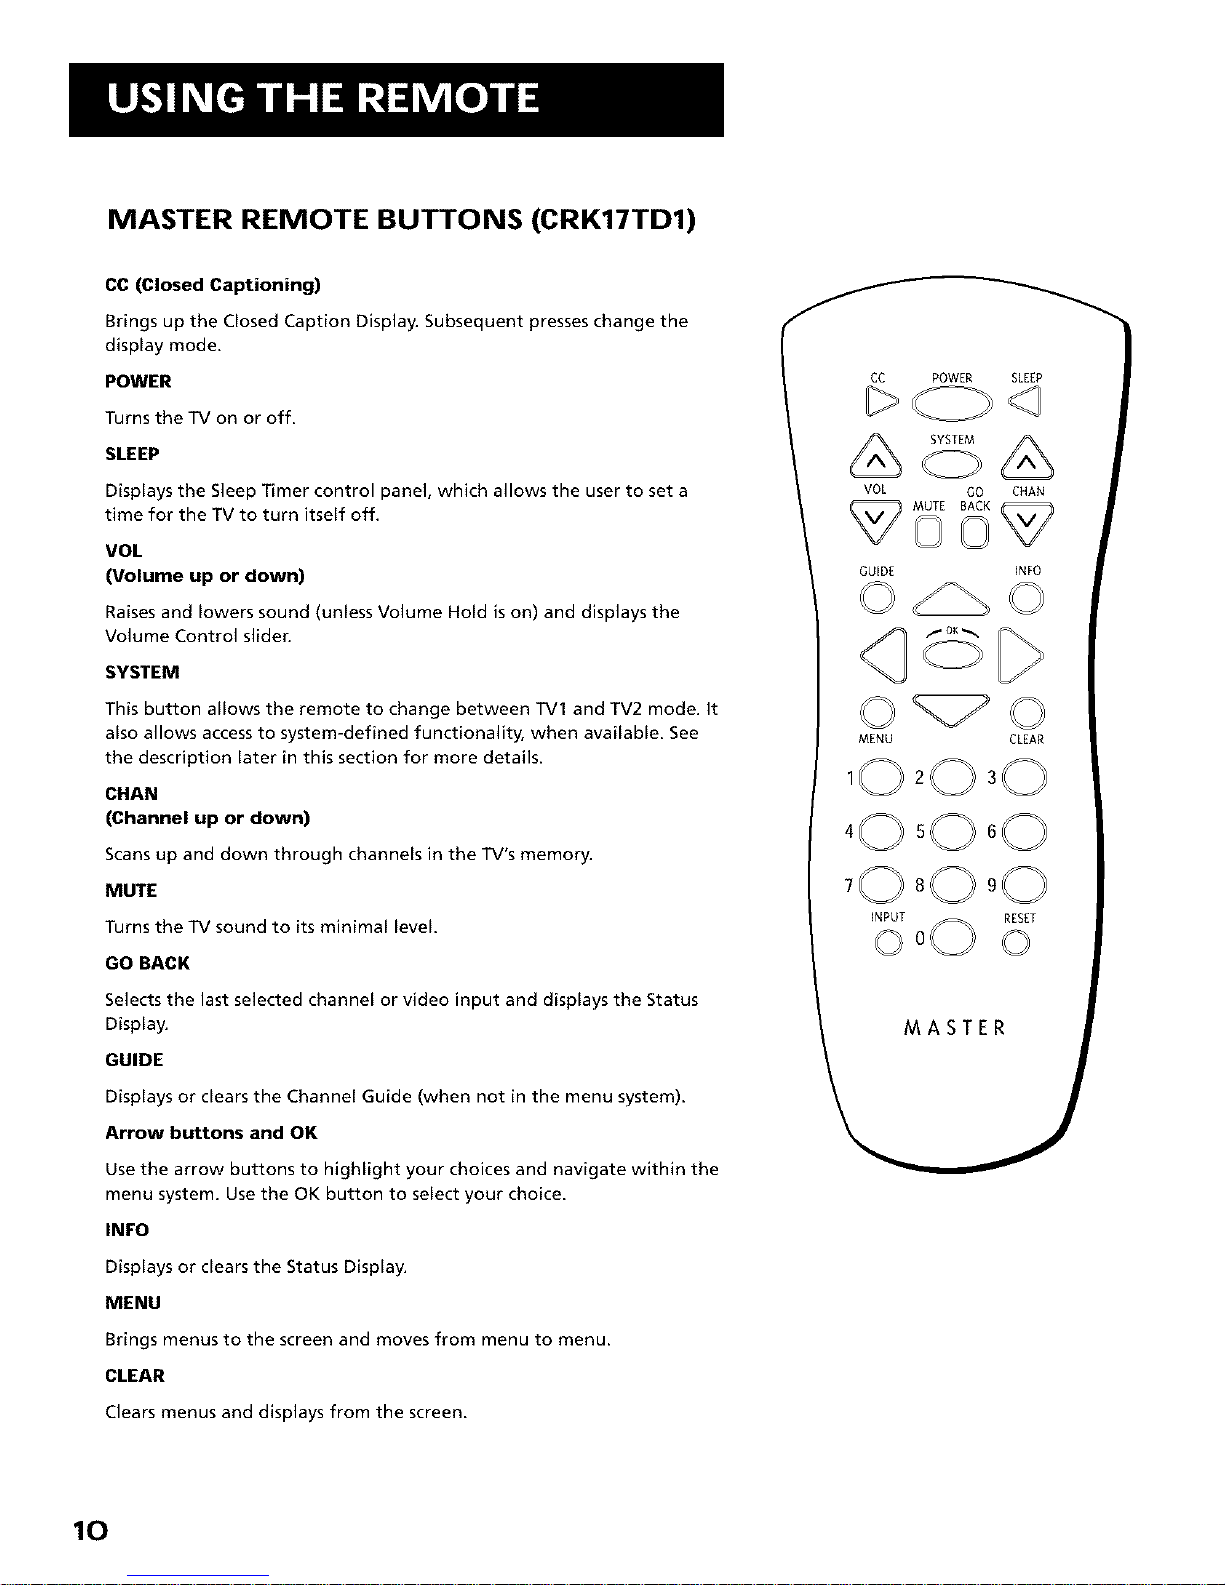
MASTER REMOTE BUTTONS (CRK17TD1)
CC (Closed Captioning)
Brings up the Closed Caption Display. Subsequent presses change the
display mode.
POWER
Turns the TV on or off.
SLEEP
Displays the Sleep Timer control panel, which allows the user to set a
time for the TV to turn itself off.
MOL
(Volume up or down)
Raisesand towers sound (untess Volume Hotd is on) and displays the
Volume Control slider.
SYSTEM
This button allows the remote to change between TVl and TV2 mode. It
also allows access to system-defined functionality, when available. See
the description later in this section for more details.
CHAN
(Channel up or down)
Scans up and down through channels in the TV's memory.
MUTE
Turns the TV sound to its minimal level.
GO BACK
Selects the last selected channel or video input and displays the Status
Display.
GUIDE
Displays or clears the Channel Guide (when not in the menu system).
Arrow buttons and OK
Use the arrow buttons to highlight your choices and navigate within the
menu system. Use the OK button to select your choice.
INFO
Displays or clears the Status Display.
MENU
Brings menus to the screen and moves from menu to menu.
CLEAR
Clears menus and displays from the screen.
CC POWER SLEEP
/
1 GUIDE INFO
MENU CLEAR
INPUT RESET
MASTER
10
Page 13
Digit Buttons (0-9)
Selects an available channel number or numbered menu option.
Two digits must be pressed for each channel. Press 0 then 6 for channel 6.
For three digit channels, press and hold 1 until 1-- appears on the screen.
Then press the other two digits.
INPUT
Selects between TV (channels 01-125) and other available inputs. See the
description later in this section for more details.
RESET
Returns the picture to the original settings and displays the Picture Presets
choice list.
11
Page 14
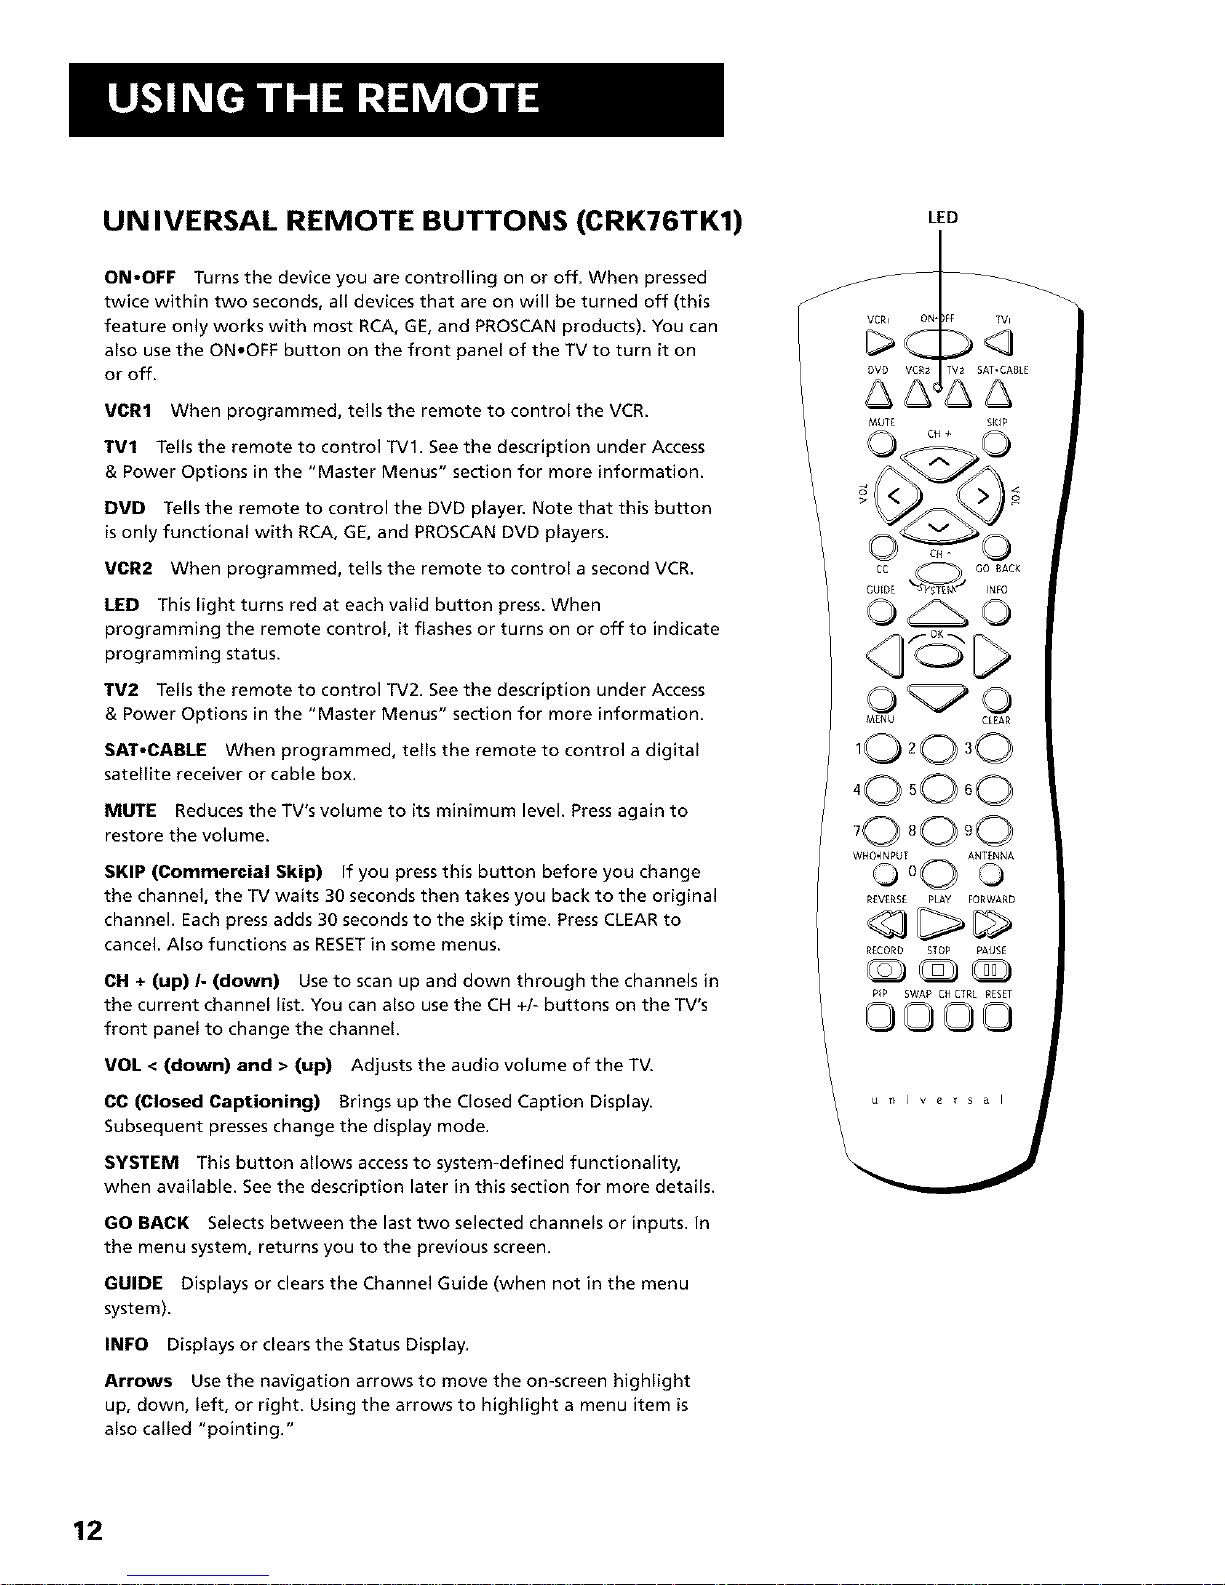
UN IVERSAL REMOTE BUTTONS (CRK76TK1)
LED
ON-OFF Turns the device you are controlling on or off. When pressed
twice within two seconds, all devices that are on will be turned off (this
feature only works with most RCA, GE, and PROSCAN products). You can
also use the ON.OFF button on the front panel of the TV to turn it on
or off.
VCR1 When programmed, tells the remote to control the VCR.
TVI Tells the remote to control TVI. See the description under Access
& Power Options in the "Master Menus" section for more information.
DVD Tells the remote to control the DVD player. Note that this button
is only functional with RCA, GE, and PROSCAN DVD players.
VCR2 When programmed, tells the remote to control a second VCR.
LED This light turns red at each valid button press. When
programming the remote control, it flashes or turns on or off to indicate
programming status.
TV2 Tells the remote to control TV2. See the description under Access
& Power Options in the "Master Menus" section for more information.
SAT-CABLE When programmed, tells the remote to control a digital
satellite receiver or cable box.
MUTE Reduces the TV's volume to its minimum level. Press again to
restore the volume.
SKIP (Commercial Skip) If you press this button before you change
the channel, the TV waits 30 seconds then takes you back to the original
channel. Each press adds 30 seconds to the skip time. Press CLEAR to
cancel. Also functions as RESETin some menus.
CH + (up) I- (down) Use to scan up and down through the channels in
the current channel list. You can also use the CH +/- buttons on the TV's
front panel to change the channel.
VOL < (down) and > (up) Adjusts the audio volume of the TV.
CC (Closed Captioning) Brings up the Closed Caption Display.
Subsequent presses change the display mode.
SYSTEM This button allows access to system-defined functionality,
when available. See the description later in this section for more details.
GO BACK Selects between the last two selected channels or inputs. In
the menu system, returns you to the previous screen.
GUIDE Displays or clears the Channel Guide (when not in the menu
system).
INFO Displays or clears the Status Display.
Arrows Use the navigation arrows to move the on-screen highlight
up, down, left, or right. Using the arrows to highlight a menu item is
also called "pointing."
CC _j GO BACK
GUEDE INFO
MENU CLEAR
WHO(_JT00 ANTENNA
R[VERSE PLAY FORWARD
R_CORD STOP PAUSE
P_P SWA_ CHCTRL R_SET
©000
u n I V e _ s _ I
12
Page 15

OK Selects the highlighted choice.
MENU Displays the basic Main menu. If you are already in the menu
system, press OK or MENU to select a highlighted choice. When you are
using the remote control to operate an RCA, GE, or PROSCAN VCR (and
the remote is in VCR mode), the MENU button functions as a PROGRAM
button.
CLEAR Removes the on-screen displays and returns you to normal
viewing.
Digit Buttons (0 - 9) Selects an available channel number or
numbered menu option. Two digits must be pressed for each channel.
Press0 then 6 for channel 6. For three digit channels, press and hold 1
until 1-- appears on the screen. Then press the other two digits.
WHO*INPUT Selects among the possible input choices. See the "Using
the Input Button" description later in this section for more information.
ANTENNA In VCR mode, functions as a TV/VCR input button.
Transport Buttons (REVERSE, PLAY, FORWARD, RECORD, STOP,
PAUSE) When programmed, these buttons are used to control an
auxiliary device, such as a VCR or laserdisc player. Some of these buttons
are also used when viewing the PC input.
PIP (Picture-In-Picture) Brings up the PiP (Picture-In-Picture) window.
PressPiPagain to remove the window. When Alternate with PIPhas
been selected in PIP Closed-Caption Display, the TV will display closed
captioning in the PIP window at the second press of the PIP button.
SWAP Switches, or "swaps," the video from the PIPwindow with the
main picture.
CH CTRL (Channel Control) Lets you switch channel control between the
PIPwindow and the main picture. To determine whether you are
controlling he PIP window or the main picture, bring up the Status
Display by pressing INFO. The yellow channel number is the one you are
controlling.
RESET Displays the Picture Presets choice list. See the description of the
Picture Quality menu in the "Master Menus" section for more
information.
Entering certain channel numbers
automatically selects specific inputs:
Channel Input
126 VID
127 S-VID
128 PC
m
I See the description of the PIP feature |
later in this manual for more information
J
about using PIR
13
Page 16
USING THE INPUT BUTTON
In addition to a cable or antenna signal, you might have VCR, DVD, PC,
Laserdisc, or other signals coming in to your TV (not all inputs available
on all models). Use the INPUT or WHO.INPUT button to select the
desired signal source.
1. Make sure that the component you want to view is turned on. If
you are using a remote control with component buttons (TV, VCR,
etc.) press TV to place the remote in TV mode.
2. Press INPUT until you have selected the desired input source.
Inputs and On-screen Displays
The Status Display shows which input signal(s) is selected. The following
table shows which display term usually corresponds with which input.
See Auto Tuning under the Channel Menu description in the "Master
Menus" section for more information on naming inputs.
Input Signal I"V Display
ANTENNA/CABLE jack (channel number)
A/V jacks VID
S-VIDEO jack SVID
PC INPUT PC
<3©D
INPUT button -- '_ 0O _'
USING THE SYSTEM BUTTON
When the television isconnected to an interactive system or similar
device, the SYSTEM button allows you to access system programming or
other special functionality through the DSCl jack (formerly called
"Smartplug").
When using a master remote, the SYSTEM button can also allow
independent remote control of two TVs. Once you have specified TVl or
TV2 status for the TVs (see the Access and Power Options description in
the "Master Menus" section), follow these steps to tell the remote
which TV you want to operate:
1. Simultaneously press and hold the SYSTEM button and 1 (for TVl)
or 2 (for TV2).
2. After three seconds, release the buttons. The specified TV should
now respond to that remote.
3. To control the other TV, simply repeat the process using the other
(1 or 2) button.
SYSTEM button --
1and 2
buttons
q©D
000 S
MASTER
14
Page 17
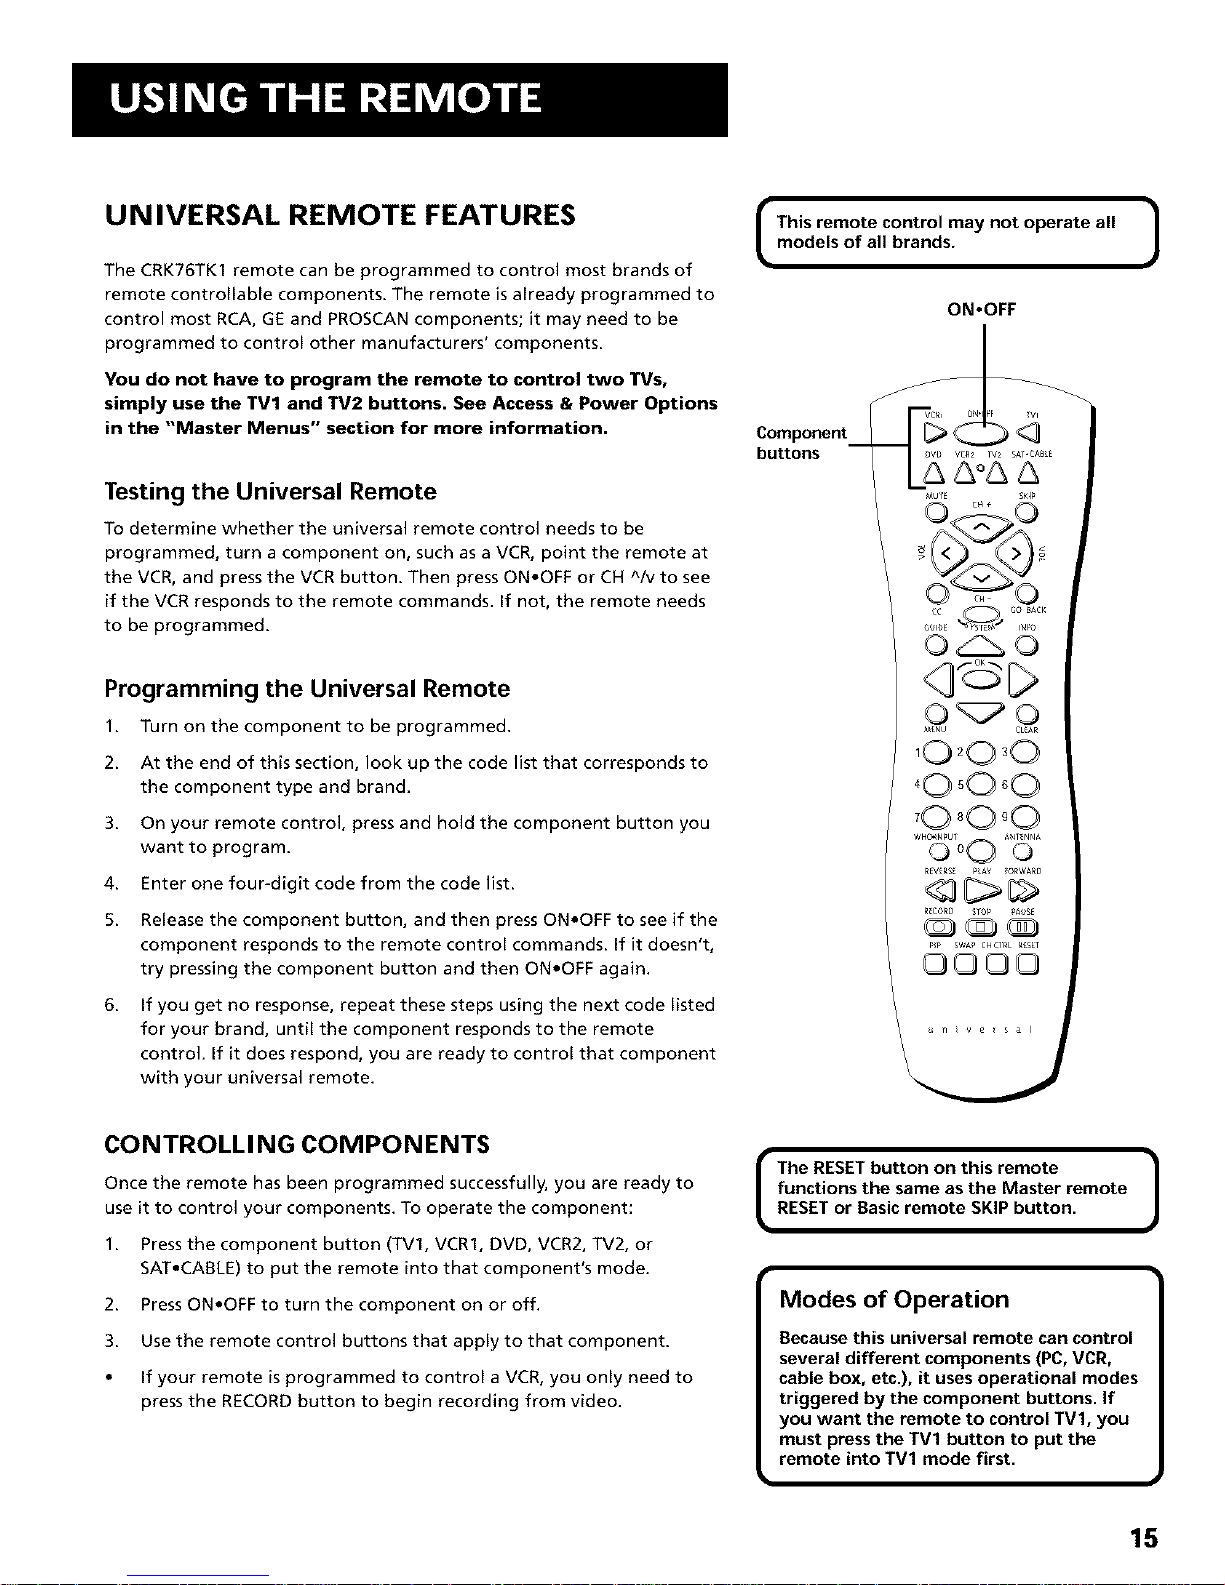
UN IVERSAL REMOTE FEATURES
The CRK76TKI remote can be programmed to control most brands of
remote controllable components. The remote is already programmed to
control most RCA, GE and PROSCAN components; it may need to be
programmed to control other manufacturers' components.
You do not have to program the remote to control two TVs,
simply use the TV1 and W2 buttons. See Access & Power Options
in the "Master Menus" section for more information.
Testing the Universal Remote
To determine whether the universal remote control needs to be
programmed, turn a component on, such as a VCR, point the remote at
the VCR, and press the VCR button. Then press ON.OFF or CH ^Iv to see
if the VCR responds to the remote commands. If not, the remote needs
to be programmed.
Programming the Universal Remote
I. Turn on the component to be programmed.
2. At the end of this section, look up the code list that corresponds to
the component type and brand.
3. On your remote control, press and hold the component button you
want to program.
4. Enter one four-digit code from the code list.
5. Release the component button, and then press ON,OFF to see if the
component responds to the remote control commands. If it doesn't,
try pressing the component button and then ON,OFF again.
6,
If you get no response, repeat these steps using the next code listed
for your brand, until the component responds to the remote
control. If it does respond, you are ready to control that component
with your universal remote.
CONTROLLI NG COMPONENTS
Once the remote has been programmed successfully, you are ready to
use it to control your components. To operate the component:
1. Pressthe component button (TVl, VCR1, DVD, VCR2, TV2, or
SAT.CABLE) to put the remote into that component's mode.
2. PressON.OFF to turn the component on or off.
3. Use the remote control buttons that apply to that component.
• If your remote is programmed to control a VCR, you only need to
press the RECORD button to begin recording from video.
(
This remote control may not operate all
models of all brands.
ON,OFF
_¢ _ GO BACK
o0 o0
REV_RS_ PAY ORW&_D
R_CORD _ @gA SE
PP SW&_ CHC1RL RISE1
000{3
_n_versal
(
)
The RESET button on this remote |
J
functions the same as the Master remote
RESETor Basic remote SKiP button.
Modes of Operation
Because this universal remote can control
several different components (PC, VCR,
cable box, etc.), it uses operational modes
triggered by the component buttons. If
you want the remote to control TV1, you
must press the TV1 button to put the
remote into TV1 mode first.
15
Page 18
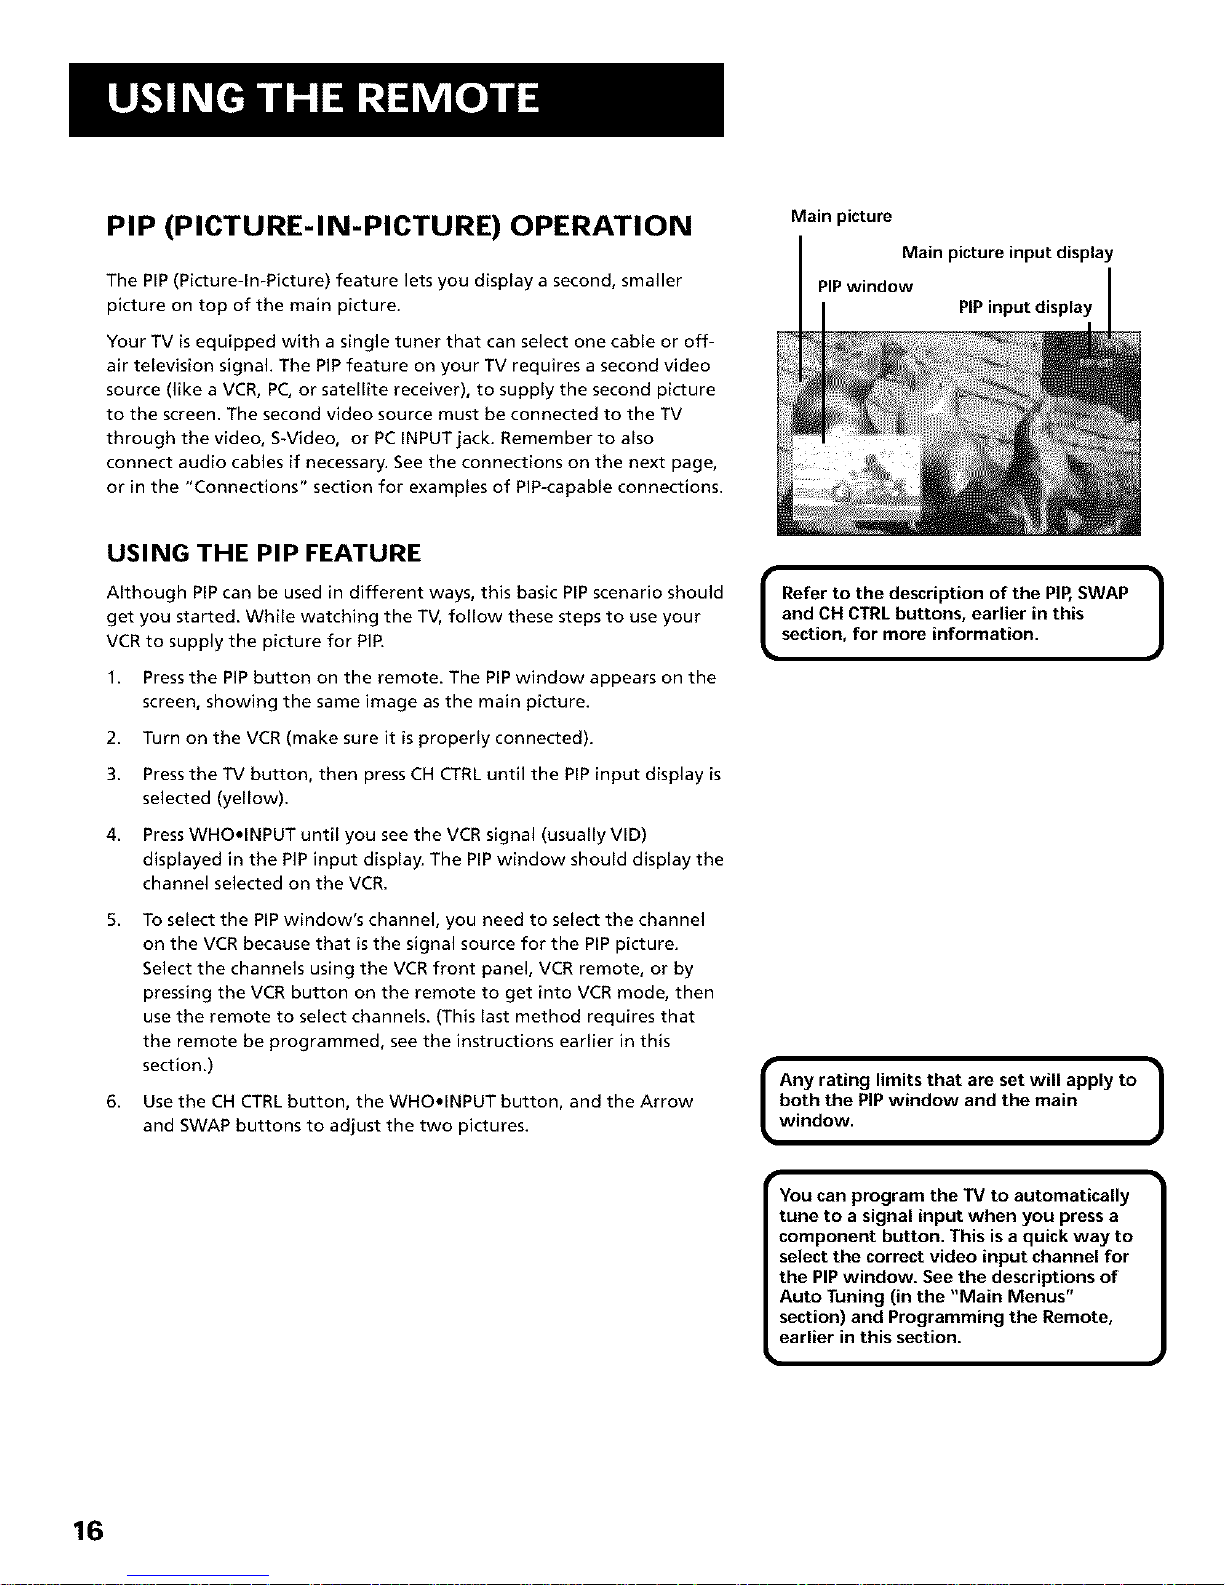
PIP (PICTURE-IN-PICTURE) OPERATION
The PIP(Picture-In-Picture) feature lets you display a second, smaller
picture on top of the main picture.
Your TV is equipped with a single tuner that can select one cable or off-
air television signal. The PIP feature on your TV requires a second video
source (like a VCR, PC, or satellite receiver), to supply the second picture
to the screen. The second video source must be connected to the TV
through the video, S-Video, or PC INPUT jack. Remember to also
connect audio cables if necessary. See the connections on the next page,
or in the "Connections" section for examples of PIP-capable connections.
Main picture
Main picture input display
PIP window
PIP input display
USING THE PIP FEATURE
f
Although PIP can be used in different ways, this basic PIP scenario should |
get you started. While watching the TV, follow these steps to use your
LVCR to supply the picture for PIR
1.
2.
3.
4.
Pressthe PIP button on the remote. The PIP window appears on the
screen, showing the same image as the main picture.
Turn on the VCR (make sure it is properly connected).
Pressthe TV button, then press CH CTRL until the PIP input display is
selected (yellow).
PressWHOalNPUT until you see the VCR signal (usually VID)
displayed in the PIP input display. The PIPwindow should display the
channel selected on the VCR.
5.
6.
To select the PIP window's channel, you need to select the channel
on the VCR because that is the signal source for the PIP picture.
Select the channels using the VCR front panel, VCR remote, or by
pressing the VCR button on the remote to get into VCR mode, then
use the remote to select channels. (This last method requires that
the remote be programmed, see the instructions earlier in this
section.)
Use the CH CTRL button, the WHOalNPUT button, and the Arrow
and SWAP buttons to adjust the two pictures.
Refer to the description of the PIP,SWAP |
and CH CTRL buttons, earlier in this
J
section, for more information.
I Any rating limits that are set will apply to |
both the PIP window and the main
J
window.
You can program the TV to automatically
tune to a signal input when you press a
component button. This is a quick way to
select the correct video input channel for
the PIP window. See the descriptions of
Auto Tuning (in the "Main Menus"
section) and Programming the Remote,
earlier in this section.
16
Page 19
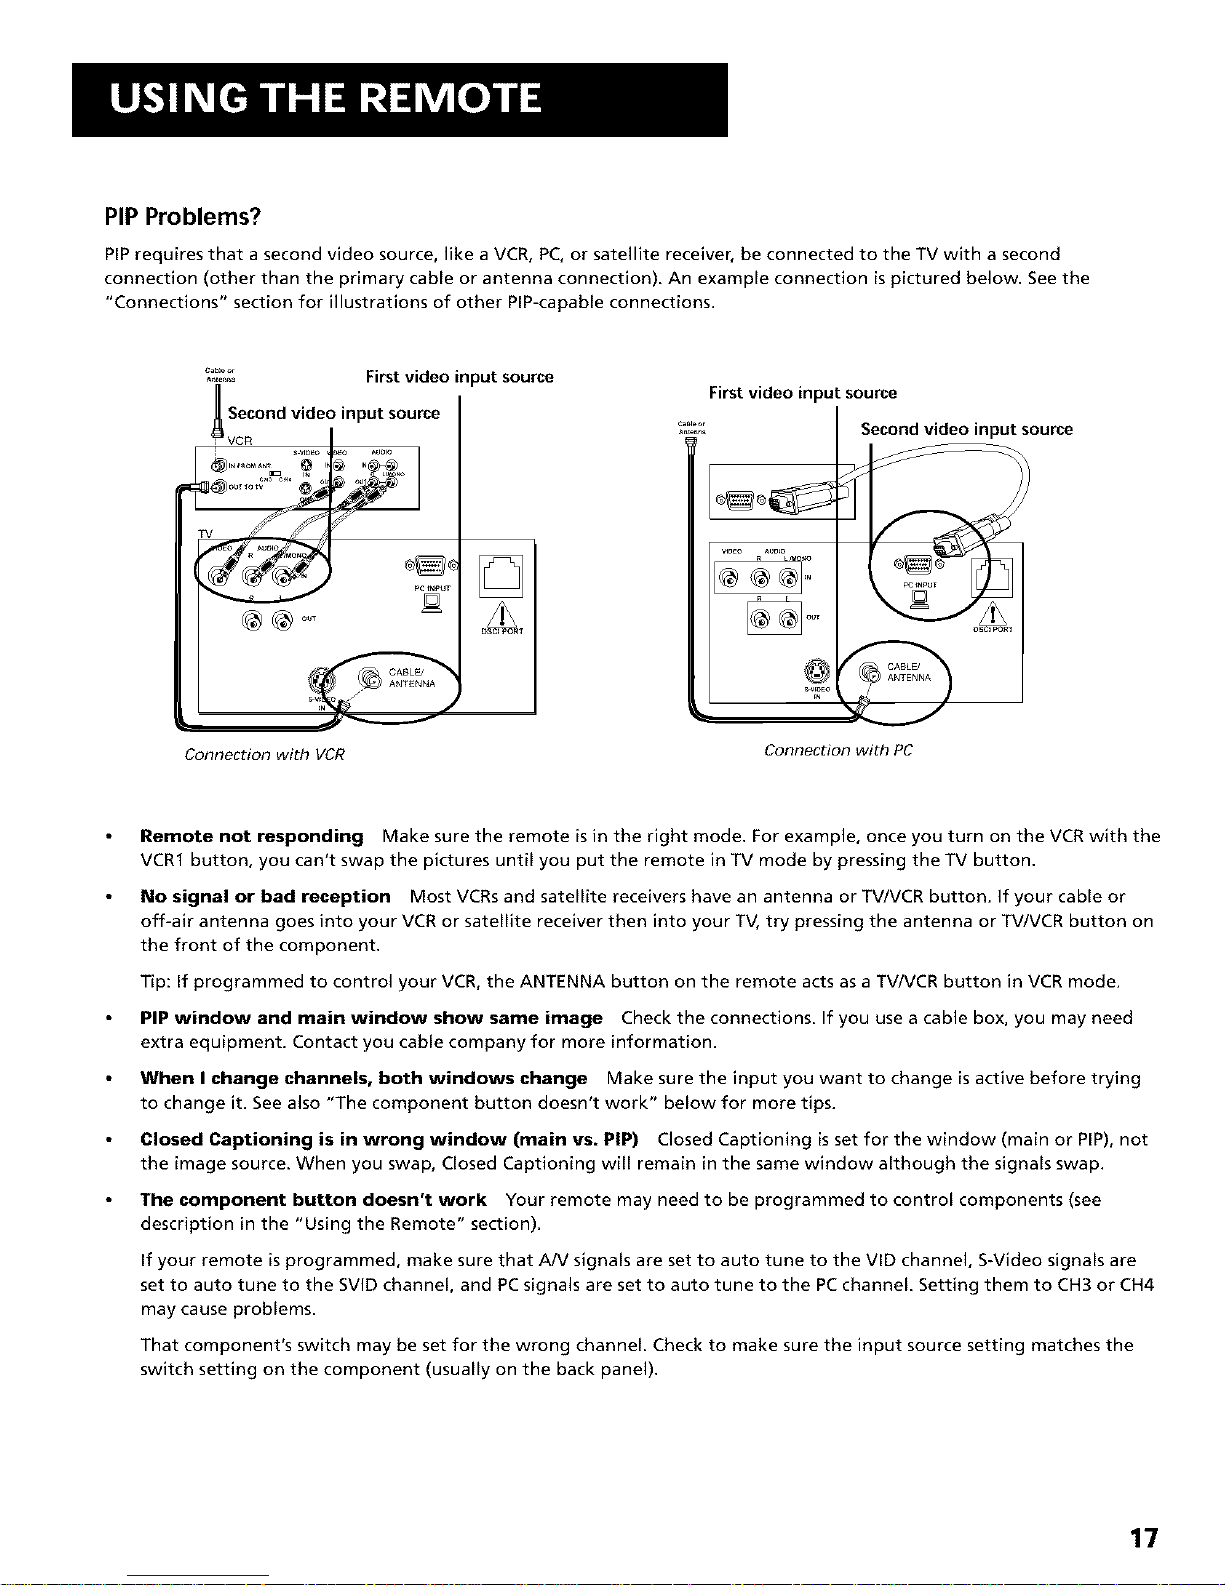
PIP Problems?
PIPrequires that a second video source, like a VCR, PC, or satellite receiver, be connected to the TV with a second
connection (other than the primary cable or antenna connection). An example connection is pictured below. See the
"Connections" section for illustrations of other PIP-capable connections.
......... First video input source
_ Second video input source
VCR=
First video input source
....... Second video input source
1@@@],.
Connection with VCR
Connection with PC
Remote not responding Make sure the remote is in the right mode. For example, once you turn on the VCR with the
VCR1 button, you can't swap the pictures until you put the remote in TV mode by pressing the TV button.
No signal or bad reception Most VCRs and satelEte receivers have an antenna or TV/VCR button. If your cable or
off-air antenna goes into your VCR or satellite receiver then into your TV, try pressing the antenna or TV/VCR button on
the front of the component.
Tip: If programmed to control your VCR, the ANTENNA button on the remote acts as a TV/VCR button in VCR mode.
PIP window and main window show same image Check the connections. If you use a cable box, you may need
extra equipment. Contact you cable company for more information.
When I change channels, both windows change Make sure the input you want to change is active before trying
to change it. See also "The component button doesn't work" below for more tips.
Closed Captioning is in wrong window (main vs. PiP) Closed Captioning is set for the window (main or PIP), not
the image source. When you swap, Closed Captioning will remain in the same window although the signals swap.
The component button doesn't work Your remote may need to be programmed to control components (see
description in the "Using the Remote" section).
If your remote is programmed, make sure that A/V signals are set to auto tune to the VID channel, S-Video signals are
set to auto tune to the SVlD channel, and PC signals are set to auto tune to the PCchannel. Setting them to CH3 or CH4
may cause problems.
That component's switch may be set for the wrong channel. Check to make sure the input source setting matches the
switch setting on the component (usually on the back panel).
17
Page 20
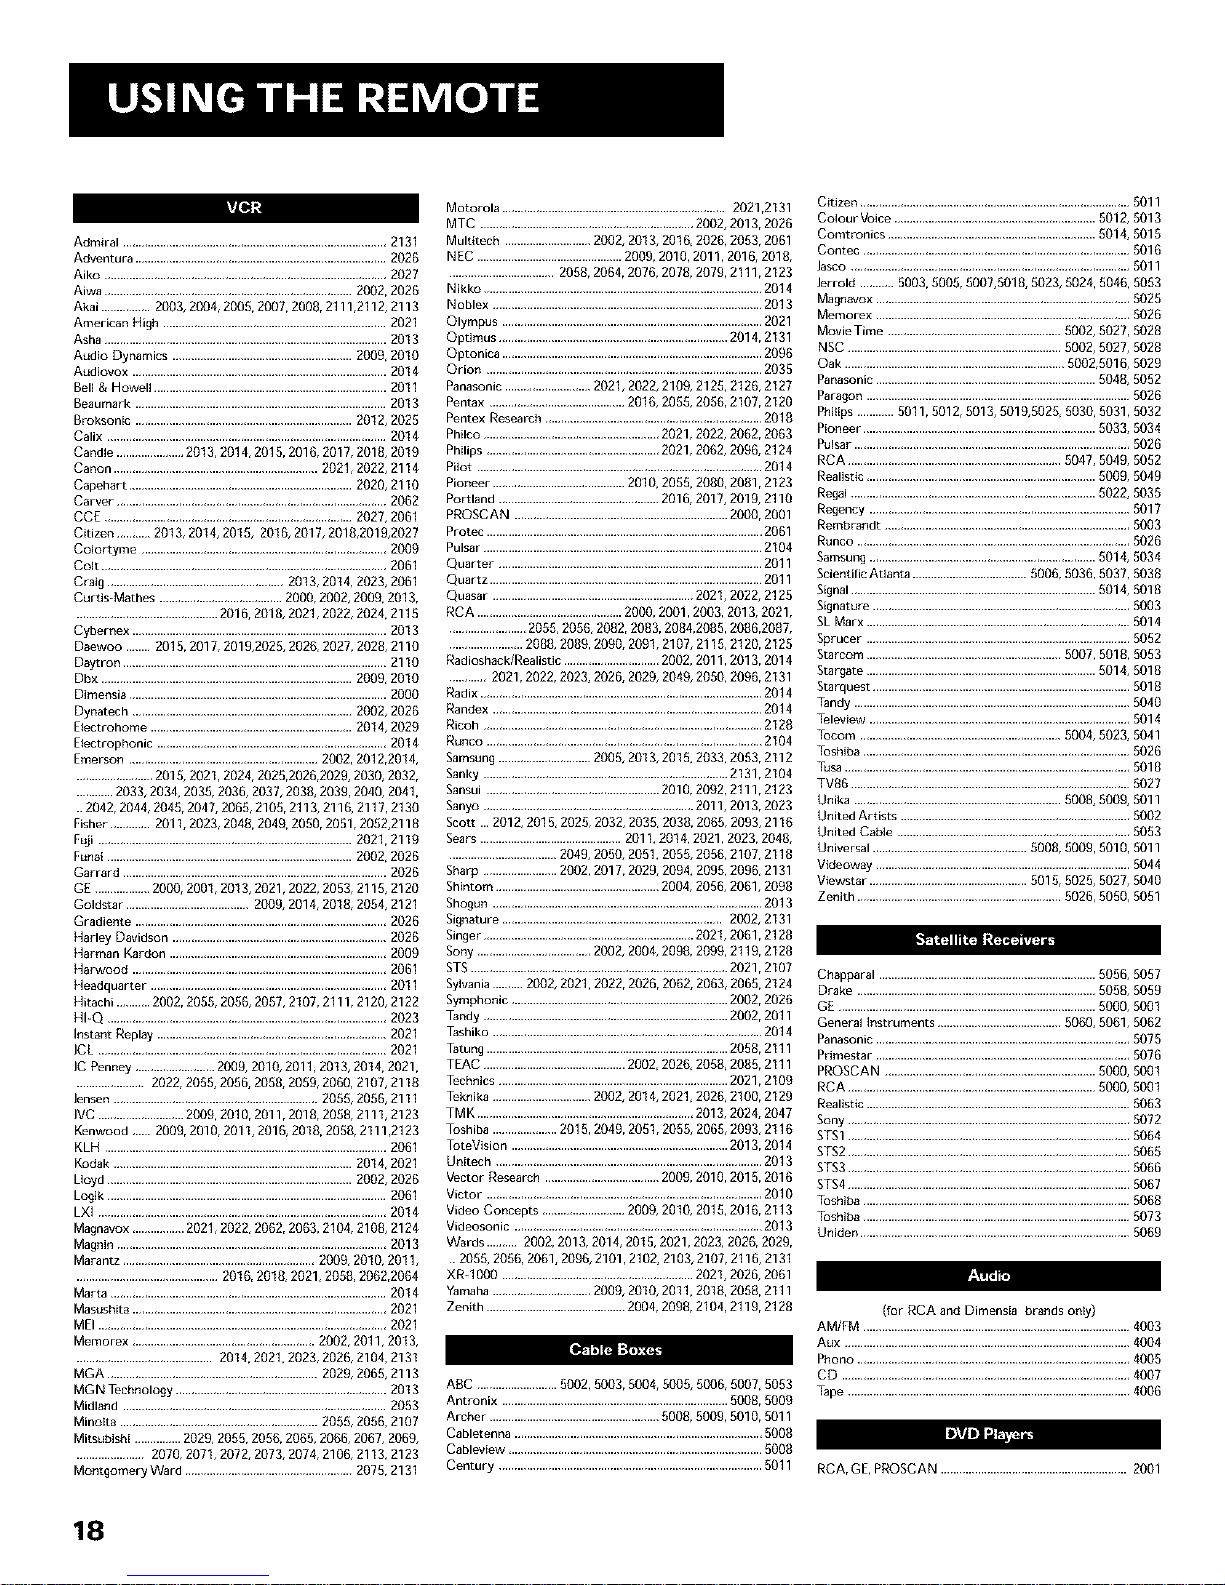
kv£eJ,'| Motorola ........................................................................2021,2131
MTC .....................................................................2002, 2013, 2026
Admiral .....................................................................................2131 Multitech ............................2002, 2013, 2016, 2026, 2063, 2061
Adventura .................................................................................2026 NEC ...............................................2009, 2010, 2011,2016, 2018,
Aiko ...........................................................................................2027 ..................................2068,2064,2076,2078,2079,2111,2123
Aiwa ................................................................................2002, 2026
Akai ................2003, 2004, 200& 2007, 2008, 2111,2112, 2113
American High ........................................................................2021
Asha ...........................................................................................2013
Audio Dynamics ..........................................................2009, 2010
Audiovox ..................................................................................2014
Bell & Howell ...........................................................................2011
Beaumark .................................................................................2013
Broksonic ......................................................................2012, 2026
Calix ..........................................................................................2014
Candle ......................2013, 2014, 2015, 2016, 2017,2018, 2019
Canon ..................................................................2021, 2022, 2114
Capehart ........................................................................2020, 2110
Carver .......................................................................................2062
CCE ................................................................................2027, 2061
Citizen ...........2013, 2014, 2016, 2016, 2017, 2018,2019,2027
Colortyme ...............................................................................2009
Colt ............................................................................................2061
Craig .........................................................2013, 2014, 2023, 2061
Curtls-Mathes ........................................2000,2002, 2009, 2013,
..............................................2016,2018, 2021, 2022, 2024, 2116
Cybernex ..................................................................................2013
Nikko ..........................................................................................2014
Noblex .......................................................................................2013
Olympus ....................................................................................2021
Optimus ..........................................................................2014, 2131
Optonica ....................................................................................2096
Orion .........................................................................................2035
Panasonic ............................2021,2022, 2109, 2126, 2126, 2127
Pentax ............................................2016, 2066, 2066, 2107, 2120
Pentex Research ......................................................................2018
Philco .........................................................2021, 2022, 2062, 2063
Philips ........................................................2021, 2062, 2096, 2124
Pilot ............................................................................................2014
Pioneer ...........................................2010, 2065, 2080, 2081, 2123
Portland ....................................................2016, 2017, 2019, 2110
PROSCAN .....................................................................2000, 2001
Protec .........................................................................................2061
Pulsar ..........................................................................................2104
Quarter .....................................................................................2011
Quartz ........................................................................................2011
Quasar .................................................................2021, 2022, 2125
RCA ...............................................2000, 2001, 2003,2013, 2021,
.........................2056, 2056, 2082, 2083,2084,2085, 2086,2087,
Daewoo ...... 2015, 2017, 2019,2026, 2026, 2027, 2028, 2110 ........................2088, 2089, 2090,2091, 2107, 2116, 2120, 2125
Daytron .....................................................................................2110
Dbx .................................................................................2009, 2010
Dimensia ...................................................................................2000
Dynatech .......................................................................2002, 2026
Electrohome .................................................................2014, 2029
Electrophonic ..........................................................................2014
Emerson .............................................................2002, 2012,2014,
.........................2015, 2021, 2024, 2025,2026,2029, 2030,2032,
............2033, 2034, 2035,2036, 2037, 2038, 2039, 2040, 2041,
• 2042, 2044, 2046, 2047, 2066, 2105, 2113, 2116, 2117, 2130
Fisher .............201I, 2023, 2048, 2049, 2060, 2051, 2052,2118
Fuji ..................................................................................2021, 2119
Radioshack/Realistic ...............................2002,2011,2013,2014
............2021,2022,2023,2026,2029,2049,2050,2096,2131
Radix ...........................................................................................2014
Randex .......................................................................................2014
Ricoh ..........................................................................................2128
Runco .........................................................................................2104
Samsung..............................2006,2013,2015,2033,2063,2112
Sanky ...............................................................................2131, 2104
Sansui ........................................................2010,2092,2111,2123
Sanyo ....................................................................2011, 2013, 2023
Sco_ •••2012,2015,2025,2032,2035,2038,2065,2093,2116
Sears ..............................................2011,2014,2021,2023,2048,
Funai ...............................................................................2002,2026 ...................................2049,2050,2051,2056,2056,2107,2118
Garrard .....................................................................................2026
GE ..................2000,2001,2013,2021,2022,2053,2116,2120
Goldstar ........................................2009,2014,2018,2054,2121
Gradiente .................................................................................2026
Harley Davidson .....................................................................2026
Harman Kmdon ......................................................................2009
Harwood ..................................................................................2061
Headquarter ............................................................................2011
Hitachi ...........2002,2055,2056,2057,2107,2111,2120,2122
HI-Q ..........................................................................................2023
Instant Replay ..........................................................................2021
ICE .............................................................................................2021
]C Penney ..........................2009,2010,2011,2013,2014,2021,
......................2022,2055,2056,2058,2059,2060,2107,2118
Jensen..................................................................2056,2056,2111
]VC ............................2009,2010,2011,2018,2058,2111,2123
Kenwood ,... 2009,2010,2011,2016,2018,2068,2111,2123
KLH ...........................................................................................2061
Kodak .............................................................................2014,2021
Lloyd ...............................................................................2002,2026
Logik ..........................................................................................2061
LX( .............................................................................................2014
Magnavox .................2021,2022,2062,2063,2104,2106,2124
Magnin .......................................................................................2013
Marantz ..............................................................2009,2010,2011,
..............................................2016,2018,2021,2058,2062,2064
Marta .........................................................................................2014
Masushita ..................................................................................2021
MEI .............................................................................................2021
Memorex ...........................................................2002,2011,2013,
............................................2014,2021,2023,2026,2104,2131
MGA ....................................................................2029,2066,2113
MGNTechnology ....................................................................2013
Midland .....................................................................................2053
Minolta ................................................................2056,2056,2107
Mitsubishi ...............2029,2065,2066,2065,2066,2067,2069,
......................2070,2071,2072,2073,2074,2106,2113,2123
MontgomeryWard ......................................................2075,2131
Sharp ........................2002,2017,2029,2094, 2096,2096,2131
Shintom .....................................................2004,2056,2061,2098
Shogun .......................................................................................2013
Signature .......................................................................2002, 2131
Singer ....................................................................2021,2061,2128
Sony .....................................2002,2004,2098,2099,2119,2128
STS ...................................................................................2021,2107
Sylvania ..........2002, 2021, 2022, 2026, 2062, 2063, 2065, 2124
Symphonic ......................................................................2002,2026
Tandy ...............................................................................2002,2011
Tashiko .......................................................................................2014
Tatung ..............................................................................2058,2111
TEAC ..............................................2002,2026,2068,2085,2111
Technics ..........................................................................2021,2109
Teknika ................................2002,2014,2021,2026,2100,2129
TMK ......................................................................2013,2024,2047
Toshiba .....................2015, 2049, 2051, 2055, 2066, 2093, 2116
ToteVision ......................................................................2013, 2014
Unitech ......................................................................................2013
Vector Research .....................................2009, 2010, 2015, 2016
Victor .........................................................................................2010
Video Concepts ...........................2009,2010,2016,2016,2113
Videosonic ................................................................................2013
Wards .......... 2002,2013,2014,2015,2021,2023,2026,2029,
.2056,2066,2061,2096,2101,2102,2103,2107,2116,2131
XR-IO00 ..............................................................2021,2026,2061
Yamaha ................................2009,2010,2011,2018,2068,2111
Zenith .............................................2004,2098,2104,2119,2128
Ir.,Y_Ift_l
ABC ..........................5002, 5003, 5004, 5005, 6006, 5007, 5053
Antronix .........................................................................6008, 6009
Archer .......................................................5008,5009,5010,5011
Cabletenna ................................................................................6008
Cableview ..................................................................................5008
Century .....................................................................................5011
Citizen .......................................................................................5011
Colour Voice .................................................................5012, 5013
Comtronics ...................................................................6014, 5015
Contec ......................................................................................5016
]asco ..........................................................................................5011
Jerrold ...........5003,5005,5007,5018,6023,5024,5046,5063
Magnavox ..................................................................................5025
Memorex ..................................................................................5026
MovieTime ........................................................5002,5027,5028
NSC .....................................................................5002,5027,5028
Oak .......................................................................6002,6016,5029
Panasonic.......................................................................6048,6052
Paragon .....................................................................................5026
Philips ............5011,5012,5013,6019,6026,5030,5031,5032
Pioneer ...........................................................................6033,5034
Pulsar.........................................................................................5026
RCA .....................................................................5047, 5049, 5052
Realistic ..........................................................................6009, 5048
Regal ...............................................................................6022,5035
Regency ....................................................................................5017
Rembrandt ...............................................................................5003
Runco ........................................................................................5026
5amsung .........................................................................6014,6034
5cientificAt]anta .....................................5006,5036,5037,5038
Signal...............................................................................6014,5018
Signature ...................................................................................5003
5L Marx .....................................................................................5014
Sprucer .....................................................................................5052
5tarcom ...............................................................5007,5018,5053
5targate ..........................................................................6014,5018
Starquest ...................................................................................5018
Tandy .........................................................................................5046
Teleview ....................................................................................5014
]ocom .................................................................5004,5023,5041
]oshJba ......................................................................................5026
]_sa ............................................................................................5018
TV86 ..........................................................................................5027
Unika ...................................................................5008,5009,5011
United Artists ..........................................................................5002
United Cab]e ...........................................................................5053
Universal ..................................................5008,5009,5010,5011
Videoway ..................................................................................5044
Viewstar ...................................................5016,5025,5027,5040
Zenith ..................................................................5026,5050,5051
Chapparal ......................................................................6056, 5057
Drake .............................................................................6068, 5059
GE ...................................................................................6000, 5001
General Instruments ........................................5060, 5061, 5062
Panasonic..................................................................................5076
Primestar ..................................................................................5076
PROSCAN ....................................................................6000, 5001
RCA ................................................................................6000, 6001
Realistic .....................................................................................5063
Sony ...........................................................................................5072
STS1...........................................................................................5064
STS2...........................................................................................5065
STS3...........................................................................................5066
STS4...........................................................................................5067
loshJba ......................................................................................5068
Toshiba ......................................................................................5073
Uniden .......................................................................................5069
(_r RCA and Dimensia brands one)
AM/FM ......................................................................................4003
Aux ............................................................................................4004
Phono ........................................................................................4006
CD .............................................................................................4007
Tape ...........................................................................................4006
RCA, GE,PROSCAN ............................................................2001
18
Page 21

AUDIO MENU
Mute Switches audio muting on or off.
Audio Levels Displays the slider controls for adjusting the TV's initial
volume, maximum volume, balance, treble, and bass.
Initial volume sets the TV's volume to the specified level every time it is
turned on. The maximum volume feature re-scales the volume control
slider so that the far right position is always the maximum allowable
volume (but not necessarily the maximum possible volume). The
Balance feature fades between left and right speakers.
Audio Processor Displays a choice list of available audio modes,
which control the way the sound comes through your speakers.
Expanded Stereo Electronically "widens" sound from stereo
broadcasts, stereo VCRs, digital satellite systems, DVD players, and
Laserdisc players for a fuller, more spacious sound. This choice will
not be present if Fixed Output, Speakers Off is selected from Audio
Output & Speakers.
Stereo Splits the incoming stereo audio signal into left and right
channels. Most TV programs and recorded materials have stereo
audio. The TV displays the word STEREO when you tune to a
program that is broadcast in stereo.
Mono Plays the sound in mono only (same signal sent to all
speakers). Use this setting when receiving broadcasts with weak
stereo signals.
Second Audio Program (SAP) Plays the program's audio in a
second language, if one isavailable. The TV displays the word SAP
when you tune to a program that is broadcast with SAP
information. SAP audio is broadcast in mono. SAP is also used to
broadcast a program's audio with descriptions of the video for the
visually impaired.
19
Page 22

Audio Output & Speakers Displays a choice list that lets you turn
the TV's internal speakers on or off and set the audio outputs to fixed-
level or variable control level.
This setting turns the TV's
speakers on and sets the variable output from the TV's audio output
jacks, proportional to the volume setting.
Variable Output, Speakers On
Variable Output, Speakers Off This setting turns the TV's
speakers off and allows variable output from the TV's audio output
jacks.
Fixed Output, Speakers Off This setting turns the TV's speakers
off and allows fixed output from the TV's audio output jacks to an
external device such as a surround sound amplifier. When this
feature is turned on, the TV's volume control, tone controls,
Expanded Stereo, and mute are disabled.
Volume Hold This setting turns the TV's speakers on and sets the
audio outputs proportional to the current volume setting. When this
feature is turned on, mute and other volume controls are disabled.
Sound Logic Turning this feature on reduces the annoying blasts in
volume during commercial breaks to create more consistent audio
output.
I Audio
I or information on connecting speakers to 1
your television, see the "Connections"
section.
20
Page 23

PICTURE QUALITY MENU
The Picture Quality menu items allow you to adjust the appearance of
on-screen images. Pressing RESETon the remote control returns all
Picture Quality menu settings to their factory defaults.
Picture Adjustments Displays the five slider controls for adjusting
the way the picture looks in the current video input source (this
feature can be set differently for each video input source).
Models J32530, J32430 and J36530 wil! have a fifth
option in the Picture Quality menu Picture Tilt.
Contrast Adjusts the difference between the light and dark
areas of the picture.
Color Adjusts the richness of the color.
Tint Adjusts the balance between the red and green levels.
Black Level Adjusts the brightness of the picture.
Sharpness Adjusts the crispness of edges in the picture.
When exiting the Picture Adjustments menu, the Save Custom Picture
Preset choice list appears. You can choose either Yesor No. If you save
the settings asa Custom Picture Preset, the TV will store the settings so
that you can select them quickly if someone changes the settings.
Picture Presets Displays a choice list that lets you select one of four
preset picture settings: Bright Lighting, Normal Lighting, Soft Lighting
or Custom Picture Preset. Bright Lighting isthe default and will be
selected if the RESETor SKIP button is pressed while in this menu.
Auto Color Displays a choice list that lets you turn on the feature
that automatically corrects the color of the picture. (This is especially
useful for tracking realistic flesh tone colors as you switch from
channel to channel.) Choose Off or On, depending on your preference.
Color Warmth Displays a choice list that lets you set one of three
automatic color adjustments: Coolfor a more blue palette of picture
colors; Normal; and Warm for a more red palette of picture colors. The
warm setting corresponds to the NTSC standard of 6500 K.
Picture Tilt Models J32530, J32430 and J36530 have extra-large
picture tubes, which make them vulnerable to the effects of the Earth's
magnetic field. You may need to adjust the picture tilt by using the left
and right arrow buttons. Model J27530 does not have this feature.
I While watching TV, press the RESET 1
button on a master remote to bring up
the Picture Presets choice list. Point to the
desired setting; press MENU or OK to
select it.
21
Page 24

CHANNEL MENU
Channel Guide Displays the list of channels and their labels (if
labelled) in the currently selected channel list.
Channel Selection Allows the master user to set the initial channel
and to select which of the three channel lists will be accessible to the
basic user. If no initial channel is selected, the TV will select the last
tuned channel when turned on. If Hold is selected, the user will not be
able to select any channel other than the initial channel.
Signal Source Displays a choice list that lets you select the current
signal source and turn muting and blanking on or off for weak signals.
UHFIVHF Choose this if you are currently using an off-air antenna
for TV signals.
Cable TV Choose this if you are currently using cable or a cable
box for TV signals.
Auto Channel Search Tells the TV to search automatically for all the
channels available through the antenna input. When the TV finds an
active channel, it places it in the selected channel list; inactive channels
(weak stations or channels with no signal at all) will be removed from
that channel list.
List and Labels Displays a control panel that lets you edit the three
channel lists and choose an eight-character label for each channel.
Follow the on-screen directions to customize channel lists and labels.
Note that pressing RESET or SKIP in the Lists and Labels menu returns
the highlighted field to its default status.
Channel Use the up and down arrows to scroll up and down
through the channels available via your antenna. You can enter the
channel number directly using the number buttons.
Lists A, B, and C Use the up and down arrows to indicate
whether you want the channel number to be included in the
highlighted channel list. Channels included in a list will be available
to users when that list is active. Channels not included in the active
list will not be accessible to users.
Channel Label Use the up and down arrows to enter a label of
up to eight characters for each channel. Hold a button down to
scroll quickly through the characters. Press RESETor SKIP to clear
the currently highlighted label. To prevent a channel number from
displaying on the screen, select "#" as the eighth label character.
I o deselect the initial channel, press the
RESETbutton while in the Channel
Selection screen.
[
When the muting and blanking feature is
on and a weak signal is received, video
will be replaced by a grey screen with the
message "Unusable Signal" and audio will
be muted.
]
]
22
Page 25

Auto Tuning Displays a choice list that lets you set up the TV to
automatically tune to the correct input channel when you press its
component button (VCR1, DVD, VCR2, or SAT) on a universal remote.
The autotuning feature will work with RCA, GE and PROSCAN
components; it may not work with all models of other brands.
The component button choices are:
VCR1 Displays a choice list that lets you select the channel that the
TV tunes to when you press the VCR1 button.
VCR2 Displays a choice list that lets you select the channel that the
TV tunes to when you press the VCR2 button.
DVD Displays a choice list that lets you select the channel that the
TV tunes to when you press the DVD button.
AUX Displays a choice list that lets you select the channel that the
TV tunes to when you press the AUX button.
SAT Displays a choice list that lets you select the channel that the
TV tunes to when you press the SAT (or SAT,CABLE) button.
The input channel choices are (not all choices available on all models) :
Ch 3 Choose this if your component is connected to the antenna
jack on the back of the TV, and you want the TV to tune to channel
3 when you press the specified component button. Reminder: Make
sure the component's Ch 3/4 switch is set to channel 3.
Ch 4 Choose this if your component is connected to the antenna
jack on the back of the TV, and you want the TV to tune to channel
4 when you press the specified component button. Reminder: Make
sure the component's Ch 3/4 switch is set to channel 4.
VlD Choose this if your component is connected to the Audio and
Video In jacks on the back of the TV and you want the TV to tune to
the VID input channel when you press the specified component
button.
SVID Choose this if your component is connected to the S-VIDEO
jack on the back of the TV and you want the TVto tune to the SVID
input channel when you press the specified component button.
S-VHS, or Super-VHS, is an extended format of VHS and improves
the picture quality of the signal passing through the S-VIDEO input.
Reminder: Make sure to also connect audio cables in order to get
sound when using S-Video.
PC Choose this if your component is connected to the PC iNPUT
jack on the back of the TV and you want the TVto tune to the PC
input channel when you press the specified component button.
If a component button has not been programmed,
its input wi!! appear as "----_ "
Component
and --
ON-OFF
buttons
WHO-INPUT
button
_¢ _ GO B/<CK
._.%u0o %.,
REV_RS_ pLA'_ ORW_RD
p_ SWAP CHC1RL RISE1
OOOO
I emember that you can also press the
WHO,INPUT or INPUT button on the
remote to switch between the input
signals.
J
23
Page 26

ACCESS & POWER OPTIONS
This control panel allows the master user to specify which features and
functions basic users will be able to access. Yellow and green color
coding shows each item's status:
• Yellow default setting
• Green change from default setting or unset password
Remote Configuration This feature tells the TV under what
circumstances to respond to remote control commands
TV1 This "IV will only respond to a remote in TV1 mode.
TV1 or TV2 This TV will respond if the remote isin either mode.
TV2 This TV will only respond to a remote in TV2 mode.
Disabled This TV will not respond to a remote at all, except MENU
from the master remote.
Once you have assigned TV1 or TV2 status to your TVs, you will need to
tell the remote which TV you want to operate. On a master remote:
1. Point the remote at the TV1 TV.
2. Simultaneously press and hold the SYSTEM and 1 buttons.
3. After three seconds, release the buttons. The TV1 TV should now
respond to the remote.
4. To control a TV2 TV, simply repeat the process using the 2 button
and a TV2 TM
On a universal remote:
1. Point the remote at the TV1 TV.
2. Press the TV1 button to put the remote in TV1 mode.
3. To control a TV2 TV, simply repeat the process using the TV2 button
and a TV2 TV.
SYSTEM button
1and 2
buttons
q©D
o°0
MASTER
24
Page 27

Basic Menu Access This feature tells the TV to either enable or
disable the basic menu. When the basic menu is disabled, users cannot
access menus through the basic remote or the front panel.
TV Power Configuration This feature determines whether the TV can
be turned on and off with the POWER button on the remote or the
front panel.
Switched The TV can be turned on or off; the Energy Saver can be
enabled.
Remote The TV cannot be turned on or off with the front panel.
Always The TV cannot be turned on or off; all Energy Saver
settings will be ignored.
Energy Saver Setting When enabled, this feature will turn the TV off
after a specified period of disuse (no remote or front panel button
presses). When disabled, the TV will not turn off automatically. If TV
Power Config. is set to Always, Energy Saver Settings will be ignored.
Power
&
Power
"t
Pressing MENU on a master remote will |
allow access to the TV's menu settings
J
unless blocked by clone programming.
Parental Controls This feature determines the amount of access basic
users have to Parental Controls: f Pressing RESETon the remote will set the 1
L highlighted item to its default setting.
J
25
Page 28

• Basic & Pwd Basic users are able to enter the Parental Control
menu and change the password, Basic users can watch blocked
programming by entering the system password.
• Basic Basic users are able to enter the Parental Control menu but
cannot change the password. Basic users can watch blocked
programming by entering the system password.
• NoBasicParental Control does not appear on the basic Main menu.
Basic users can watch blocked programming by entering the system
password.
I Note that the master user is always able |
to enter Parental Controls and change the
J
password.
If Parental Controls is set to NoBasic, Movie Rating Access, TV Rating
Access, Unrated Program Block, and Channel Block will not be available
to basic users, regardless of what those items have been set to
individually in Access and Power Options.
Movie Rating Access This feature determines whether the Movie
Rating Limit screen is accessible through the basic menus or not,
TV Rating Access This feature determines whether the TV Rating
Limit screen is accessible through the basic menus or not.
Unrated Program Block This feature determines whether the
Unrated Program Block feature is accessible through the basic menus
or not.
Channel Block This feature determines whether the Channel Block
feature is accessible through the basic menus or not,
Yellow and green color coding shows
each item's status:
• Yellow default setting
• Green change from the default
setting or an unset password
I
26
Page 29

CLOSED CAPTIONING MENU
Many programs are encoded with closed captioning information, which
lets you display the audio portion of a program as text on the TV screen.
Closed-Caption Display allows you to choose when closed-captioning is
displayed. Closed-Caption Modes allow you to choose how closed-
captioning is displayed.
Closed captioning is not available on all channels at all times, it only
appears on specific programs encoded with closed captioning
information. When a program is closed captioned, the letters "CC" are
displayed in the Status Display. See the "Reference" section for more
information about the Status Display.
Closed-Caption Display
The Closed-Caption Display and PiP Closed-Caption Display let you
choose when you want to have Closed Captioning on. In the PIP Closed-
Caption Display, selecting the Alternate with PIP button choice results in
the following sequence when the PIP button is pressed: PIPwithout
closed captioning, PIPwith closed captioning, no PIR
Closed-Caption Modes
Your TV offers eight closed-captioned modes, including four text modes.
To set the Closed-Captioning Mode for the main screen or PIPwindow:
1. Select Closed Captioning from the Main menu.
2. Highlight Closed-Caption Mode or PIP Closed-Caption Mode and
press OK, A choice list will appear:
3.
The PIP Closed-Caption Mode screen looks very similar to
the Closed-Caption Mode screen above, except CC1 and
CC3 are the only accessible options.
Point to your choice and press OK to select it and return to the
Closed Captioning menu.
l ote that when one of the text modes is
selected, Closed Captioning leaves a black
box on the screen at all times, even when
no closed captioning information is being
transmitted.
If you don't know which Closed-Caption
Mode to use, select CC1. COl is probably
the mode that is used in your area. CC2,
CC3, and CC4 are reserved for foreign
languages, and are rarely used at
this time.
i
27
Page 30

TIME AND TIMERS MENU
Current Time Enter the current time. The on-screen directions guide
you through the steps needed to set the time. This feature is accessible
by basic users only if Time Configuration is set to Basic(unless an invalid
time is received).
Sleep Timer Select the amount of time you want to give the TV before
it shuts itself off. One minute before the scheduled shutoff, a warning
will appear on the screen to let you know the Sleep Timer's status. When
this message is present, any remote or front panel button press will turn
the Sleep Timer off.
The Sleep Timer can also be accessed directly using the SLEEP button on
the remote.
Schedule Set up a schedule for turning the TV on and off
automatically. The on-screen directions guide you through the steps
needed to set the schedule. (If the current time has not been set, you
will be required to set it.)
I Note that if TVPower Config. is set to |
Always in Access & Power Options, Sleep
J
Timer and Schedule will net turn the
TV off.
Note that pressing the RESETor SKIP button while in the Schedule
control panel clears both the start and stop times and selects Inactive in
the Schedule Status field.
28
Page 31

Time Configuration This control panel lets you control several time-
related functions. Scroll to the feature you want to set in the Item field.
Then, highlight the Setting field and scroll to select the setting you want
for that item. Your choice should be reflected in the table at the bottom
of the control panel.
Use the arrow and OK or MENU buttons on the remote to
highlight and select your choices.
Schedule Recurrence Select what sort of access you want users to
have to the scheduling function:
• Disabled prevents the basic user from viewing or changing the
Schedule menu item.
• Recurringthis schedule will be in effect indefinitely; both the
master and basic user can view and change the Schedule menu
item.
• One-timethis schedule will only be active once unless reset;
both the master and basic user can view and change the
Schedule menu item.
Set Time Access Select who is able to change the current time:
• Disabled prevents the basic user from viewing or changing the
Current Time menu item unless an invalid time is received. The
basic user will still be able to view the current time in the Status
Display if a time has been set.
• Automatic sets the time automatically using a time-set
channel. Basic users can view the Current Time menu item, but
cannot change it.
• Basic both the master and basic user can view and change the
Current Time menu item.
Daylight Savings When on, tells the TV to automatically adjust
for daylight savings time.
Time Offset Set an offset (from+12 to -12 hours) from the UCT.
Yellow and green color coding shows
each item's status:
• Yellow default setting
• Green change from the default
setting or an unset password
t
]
29
Page 32

PARENTAL CONTROLS MENU
The Parental Controls menu allows you to program your TV so that
children cannot see certain programs, channels, or use the front panel
controls.
The choices in the Parental Controls menu involve software inside your
TV (dubbed V-Chip) which allows you to block TV programs and movies
containing violence, sex, or other content you believe children should
not view. Programs can be unblocked by entering a password.
The software inside your TV comes turned "off," so if you choose not to
implement it, you can just ignore it. Note however, that in the default
state, basic users have no access to Parental Controls (see the description
of "Parental Controls" under "Access and Power Options" for more
information).
When turned "on," the software reads a code that most broadcasters
send with programs. That code tells the software the program's age-
based rating (TV-MA, TV-14, etc.) and content themes (Violence (V),
Adult Language (L), etc.).
If you have blocked the rating or content themes that the program
contains, you will receive the message, "This channel is not approved for
viewing." Broadcasters are not required to provide content themes, so
programs received with no content themes will only be blocked if you
block their age-based rating. You can also block movies that have been
given a rating of "Not Rated," and programs that are considered
"unrated" because no code has been sent by the broadcaster.
7 Parental Controls
I ovie and TV rating access can also be 1
limited in the Access and Power Options
menu.
LOCKED/UNLOCKED
Selecting this option lets you lock and unlock parental controls settings
using a password. Follow the on-screen instructions to lock or unlock
blocked programming (the default password is 5625).
If :you do not lock parental controls, none of the settings for V-
Chip, Channel Block, or Front Panel Block will take effect.
Master users can enter a new password at any time through the
Password menu option.
I UNLOCKED (No BLockinc
30
Page 33

V-CHIP MOVIE RATING LIMIT
You set movie rating limits by blocking movies rated above a specified
level. To access the V-Chip Movie Rating Limit menu:
1. Press MENU on the remote control (the TV Main menu appears).
2. Select Parental Controls.
3. Select V-Chip Movie Rating Limit.
Blocking Movie Ratings
If you only want your child to watch movies that have a PG rating and
lower (in other words, movies rated PG and G), you can automatically
block all movies with higher ratings by doing the following:
1.
2.
Highlight the Rating field and press the up and down arrows to find
the rating that is the lowest rating you do not want the child to
watch. (In the example above, you would point to the rating status
button corresponding to PG-13, since the highest rating you want
the child to watch is PG.)
Use the right arrow to highlight the Rating Status field. Pressthe up
and down arrows to change the button from Viewto Block. All
higher ratings' Viewbuttons will automatically change to Block.
3. Press OK to return to the menu or exit the screen.
4. If Parental Controls are not locked, you must lock them so the movie
rating limits will take effect. See Locking Parental Controls, later in
this section.
Rating field
Rating Status field
Viewing Movie Ratings
After you block movie ratings, you have the option of changing some of
the Rating Status fields back to View.
1. Highlight the Rating field and press the up and down arrows to find
the rating you want to view.
2. Use the right arrow to highlight the Rating Status field. Pressthe up
and down arrows to change the button from Block (red) to View
(green).
For example, if movies with a rating of PG-13 and higher are blocked,
you can change the rating status for NC-17 back to View. Your child
would then be able to watch all movies with a G, PG, or NC-17 rating.
3. Press MENU or OK to exit the screen, and be sure parental controls
are locked (see Locking Parental Controls, later in this section ).
Rating field Rating Status field
I Some movies may be given a Not Rated /
(NR) rating. After blocking movie ratings,
J
you must set NR to Viewseparately to
view NR movies,
31
Page 34

V-CHIP TV RATING LIMIT
The V-Chip TV Rating Limit lets you decide what TV programs can and
cannot be viewed.
To set TV programming limits:
1. Choose Parental Controlsfrom the Main menu. If Parental Controls
have previously been locked, you must enter your password. If they
are not locked, you will get a message reminding you that your
limits will not be effective until you lock Parental Controls.
2. PressMENU to continue.
3.
4.
Highlight and select V-Chip TV Rating Limit.
Once you get to the V-Chip TV Rating Limit screen, use the arrows
and OK on your remote to change the status of a TV program rating
or content theme from Viewto Block.
The following sections give you more details about how to change the
status of TV program limits.
The TV Rating Limit Screen
Below is an example of where items are located within the TV Rating
Limit screen.
I ovie and TV rating accesscan also be 1
limited in the Access and Power Options
menu.
Rating field
Lets you select from a list of age-based
ratings you can block or view.
Rating Status field
Lets you select whether the status of the age-
based rating limit to the left is Viewor Block.
Content Themes
Lists the content themes you can
block or view.
Content Status fields
Lets you select which content themes
to view (V, green) or block (B, red) for
the seiected rating.
Rating Settings area
Lets you see the current block/view
state of age-based ratings and
associated content. The View(V)
settings are green, and the Block (B)
settings are red.
32
Page 35

TV AGE-BASED RATINGS
The TV age-based ratings and content themes you can block are listed in
the table below.
Age-Based
Rating
TV-MA
TV-14
TV-PG
TV-G
TV-Y7
TV-Y
Description and Content Themes for
Age-Based Ratings
Mature Audience Only. Specifically designed to be
viewed by adults and may be unsuitable for
children under 17. It contains one or more of the
following content themes: crude indecent
language (L), explicit sexual activity (S), or
graphic violence (V),
Parents Strongly Cautioned. Contains some
material that many parents would find unsuitable
for children under 14. Parents are strongly urged
to exercise greater care in monitoring this program
and are cautioned against letting children under
the age of 14 watch unattended. This program
contains one or more of the following content
themes: intensely suggestive dialogue (D),
strong coarse language (L), intense sexual
situations (S), or intense violence (V).
Parental Guidance Suggested. Contains material
that parents may find unsuitable for younger
children. Many parents may want to watch it with
their younger children. The program contains one
or more of the following content themes: some
suggestive dialogue (D), infrequent coarse
language (L), some sexual situations (S), or
moderate violence (V),
General Audience. Most parents would find this
program suitable for all ages. it contains little or
no sexual dialogue (D) or situations (S), no
strong language (L), and little or no
violence (V).
Directed to Children 7 years and older. Designed
for children ages 7 and above. It may be more
appropriate for children who have acquired the
developmental skills needed to distinguish
between make-believe and reality. Themes and
elements in this program may include mild
fantasy violence (FV) or comedic violence, or
may frighten children under the age of 7.
All Children. Themes and elements in this program
are designed for a young audience, including
children from ages 2-6. it is not expected to
frighten younger children.
33
Page 36

Blocking Age-Based Ratings
You can automatically block all program ratings above a specified age-
based rating level. For example, if you only want your child to watch
programs that have a TV-G rating and lower (in other words, you want
the child to watch TV-G, TV-Y7, and TV-Y), then you need to block all
programming with higher ratings.
To block programs with higher ratings:
1. First, determine the lowest level rating you do not want the child to
watch.
2.
3.
4.
Use the left and right arrows to highlight the Rating field.
Use the up and down arrows on the remote to scroll through the
age-based rating limits. Keep scrolling until the rating
corresponding with the lowest rating you do not want the child to
watch appears.
In the example discussed above, you would scroll through the
choices in the Rating field until TV-PG appears, since the highest
rating you want the child to watch is TV-G.
Use the right arrow to move the yellow highlight to the Rating
Status field.
5. Press the up or down arrow to toggle between View and Block. The
status for the rating listed to the left and all higher ratings
automatically changes to Block (B, red).
Rating field Rating Status field
Content Status fields
Hierarchy of
Age-Based Ratings
TV-MA Mature Audience
Only
TV-14 Parents Strongly
Cautioned
TV-PG Parental Guidance
Suggested
TV-G General Audience
TV-Y7 Directed to Children
7 Years and Older
TV-Y All Children
6.
7.
Press MENU or OK on the remote to return to the menu or exit the
screen when you are finished.
Select Lock Parental Controls from the Parental Controls menu.
Enter a password, and if you have not already set your password,
you will be prompted to enter it again to confirm.
When you change the status of a rating to |
Block, the system will automatically block
J
higher ratings and all corresponding
content themes.
34
Page 37

Viewing Age-Based Ratings
After you block age-based ratings, you have the option of changing
some of the ratings back to View.
1. Determine which blocked rating you want to view.
2. Use the left and right arrows to highlight the Rating field.
3. Use the up and down arrows to select the rating whose status
is Block.
4. Press the right arrow to move the yellow highlight to the rating
status field.
5. Press the up or down arrows to toggle between View and Block.
Rating Status field
Ratin( Content Status field
• j
You must remember to lock Parental
Controls for rating limits to take effect.
Note that the content status fields corresponding to the unblocked
rating become Viewas well. They and the age-based rating status are
the only fields that automatically change back to Viewwhen you
complete this process.
Pressing RESET (on the master remote) or |
SKIP (on a basic remote) will reset all
J
ratings to View and V (green).
35
Page 38

Blocking Specific Content Themes
You can block programs based on their content. (Content is represented
by the D, L, S, V,and FVon your screen. See the beginning of this section
for details.) When you block a content theme for a particular rating, you
automatically block that content theme for higher rated programs as
well.
For example, if you do not want your child to watch programs that have
adult language (L) rated TV-PG or higher, then you could block all
programming TV-PG and above containing adult language.
To block program content:
1. Determine the lowest level of content you do not want the child to
watch.
2.
3.
4.
5.
Use the left and right arrows to highlight the Rating field.
Use the up and down arrows on the remote to scroll through the
age-based ratings until the rating that corresponds with the lowest
content you do not want the child to watch appears, (In the
example above, you would scroll through the ratings until the TV-PG
rating appeared.)
Press the right arrow to move the highlight to the field
corresponding with the content theme you wish to block out.
Press the up or down arrow to change content status from Vto B.
All higher ratings' content theme will automatically change to B.
Rating field Rating Status field
Content Status fields
6. Press MENU or OK to return to the menu or exit the screen.
Content Themes
D Sexually Explicit Dialogue
L Adult Language
S Sexual Situations
V Violence
FV Fantasy Violence
I roadcasters are not required to provide
content themes or age-based ratings.
Programs received with no content
themes will only be blocked if you block
their age-based rating.
36
Page 39

Viewing Specific Content Themes
If you block specific Content Themes, you have the option of going back
and changing some of the Content Themes back to View (V):
1. Determine the content themes you want to change to View (V).
2. Use the left and right arrows to highlight the Rating field.
3. Use the up and down arrows to scroll through the age-based ratings
until the rating whose content theme you want to change to View
appears.
4. Pressthe right arrow to move the yellow highlight to a particular
content theme status, such as the B under language (L)
corresponding with TV-14.
5,
Pressthe up or down arrows to change its status back to V. Your
child would then be able to watch programs with TV-14 adult
language content, but net programs with TV-PG or TV-MA language
content.
Rating field Rating Status field
themes
Note that only the content theme status corresponding to TV-14
language (L) changes to View(V). Higher rated content themes, such as
that for TV-MA language, do net change.
C
Pressing RESETor SKIP on the remote will
reset all ratings to View and V.
You must remember to lock Parental
Controls for rating limits to take effect.
J
37
Page 40

V-CHIP UNRATED PROGRAM BLOCK
Selecting this option lets you decide if programs that the V-Chip
recognizes as "unrated" can be viewed. Note that "unrated" TV
programs may include news, sports, political, religious, local and
weather programs, emergency bulletins, and public announcements.
Also, the first few seconds of a rated program may be blocked due to a
brief delay in the transmission of the rating.
View All unrated programs are available.
Block No unrated programs are available.
Don't forget to lock parental controls after you change the status of
unrated program viewing. If you do not, the limit will not take effect.
CHANNEL BLOCK
Selecting this option lets you decide what channels can be viewed.
View Makes the selected channel viewable.
Block The front panel and remote control CH ^Iv (channel up and
down) buttons will tune only to channels that you have marked as
View. The remote will still tune to the blocked channel if you use
the digits to access the channel, but the audio will be muted and
the video will be replaced with the Channel Block Warning Display:
Don't forget to lock parental controls after you change the status of
Channel Block. If you do not, the channel block will not take effect.
38
Page 41

PASSWORD
Selecting this option lets you specify a Parental Controls password (the
default password is 5625 --"lock" on a telephone-style keypad). Master
users can enter a new password without being prompted for the old
one. Basic users must enter the old password before they can create a
new one.
After you enter a new password, the system is automatically locked.
MENU LANGUAGE
The Menu Language selection affects only the menus. It does not
change the audio language. The menu language choices are: English,
Spanish or French.
8 Menu e/Idioma/Lan
Choosing a menu language is not the same as choosing a
Second Audio Program (SAP). See the description earlier
in this section for more information,
39
Page 42

PC VIDEO INPUT CONTROLS
This menu item will appear if the TV PC input is selected. There are four
ways of selecting the PC input:
• by selecting the PC input from the active channel list using the CH
+/- buttons
• by pressing the WHOalNPUT button
• by auto tuning with the remote (see the "Using the Remote"
section)
• by selecting channel 128
Make sure your TV is connected to a PC or similar device before selecting
PCVideo Input Controls.
Computer or
similar device
@ @@,. %°,
L i
DSCIPORT
CABLE/
ANTENNA
• ]
Most computer video signals operate at
speeds substantially higher than those of
television signals. Because of this, when a
computer video signal is converted for
display on a television, some reduction in
clarity from the original image isto be
expected.
This monitor accepts signals with a resolution of up to
2048x 1536@ 152 hertz vertical refresh rate.
Selecting PCVideo Input Controls from the Main menu brings up the
screen shown below, which explains how to use the remote control
when the PC input is selected. The functionality of these controls is
explained below; there is also a Quick Reference at the end of this
section.
40
Page 43

USING THE PC VIDEO INPUT CONTROLS
Zooming
You may want to enlarge or reduce the on-screen image by zooming.
The OK button allows you to toggle the zoom options:
lx displays the image at full size
2x displays the image at twice its full size
Panning
When "zoomed in" to 2x, the viewable image will be larger than can be
shown on the screen at one time. Panning with the Arrow buttons
allows you to view different portions of these enlarged images. Pan up
to view portions of the image currently above the screen, pan left to
view portions of the image currently to the left of the screen,
and so on.
Freezing and Unfreezing
This functions like a "Pause" button with a VCR. The word FREEZEwill
be displayed on the screen until this function is deactivated.
Using Video Settings
Video settings are changed by pressing the FORWARD (FF) or REVERSE
(REW) buttons, which simply take you through the presets in different
orders. The Video Presets are:
1. Text & Graphics (Default) - Choose this if your PC input image
contains both text and graphics.
2. Text on Bright Bkgrd - Choose this if your PC input image contains
dark text on a light background.
3. Text on Dark Bkgrd - Choose this if your PCinput image contains
light text on a dark background.
4. Graphics Optimized - Choose this if your PC input image contains
mainly graphics or if graphics are more important than text.
Resetting
Pressing RESETsimply resets zooming, panning, freezing and video
settings to their defaults. See the Quick Reference that follows for
details.
41
Page 44

PC Video Input Controls Quick Reference
Arrow Up Pan Picture Up
Arrow Down Pan Picture Down
Arrow Left
Arrow Right
OK
>> FF
<< REW
PAUSE
RESET
Pan Picture Left
Pan Picture Right
Zoom states (lx, 2x)
Video Setting Presets (1,2,3,4,)
Video Setting Presets (4,3,2,1,)
Freeze toggle (on/off)
Zoom = 1, Pan = center, Freeze = off, Video = 1
Arrows and
OK
FORWARD (FF),
REVERSE (REW),--
and PAUSE
RESET
42
Page 45

BASIC MENUS
The basic menus are accessible through basic remote controls and the
front panel. Which menu items are available will depend on the
restrictions set by the master user and the active input. For instance, if
Basic Menu Access has been set to Disabled in the Access and Power
Options menu, the basic menus and many features will not be available.
Also, except for some Parental Controls settings, many of the changes
made in the basic menu will revert back to their master menu settings
the next time the TV is turned on. Many of the basic menu items
function exactly the same astheir master menu counterparts. This
section describes only what is different or unique about the basic menus.
(See the "Quick Guide To the TV" and "Master Menus" sections for more
details on the master menus.)
CHANNEL GUIDE
The basic menu's Channel Guide functions the same way as the master
menu's Channel Guide. It is available by pressing the GUIDE button on
the remote. See the "Master Menus" section for more information.
MENU LANGUAGE
Changing the menu language affects only the menus, not the audio
language. The Menu Language choices are: English, Spanish or French.
If the PC input is not selected, the eighth
item will not appea_
&&°AA
GUIDE button -- - O _, O
<3r c>
0,0,0
'0 _0 o0
,0 o0',0
Basic users can access some menus directly using
remote control buttons.
43
Page 46

CLOSED CAPTIONING MENU
This menu functions the same way as the Closed Captioning item in the
master Channel menu. It is also available by pressing the CC button on
the remote. See the "Master Menus" section for more information.
TIME AND TIMERS MENU OR SLEEP TIMER
The Time and Timers choice will not appear in the basic menu if the
Schedule and Set Time features are disabled and the master user has not
set the current time. Instead, Sleep Timer will be the fourth menu
choice.
CC (Closed
Captioning) --
button
Basic Main menu showing Sleep Timer as the fourth
option.
Current Time This choice will not be available if Set Time is disabled
and the master user has not set the current time. This choice will be
available but will not be able to be set if Set Time is disabled but the
master user has set the time or if Set Time is set to anything but Basic
(unless an invalid time is received).
Sleep Timer This feature will not be available. If TVPower Config. is
set to Always.
Schedule This choice will not be available if Schedule has been
disabled by the master user or TV Power Config. is set to Always.
&&°&&
<3 b
,0'0 0
'0,0,0
'0 '0 o0
0000
44
Page 47

PICTURE PRESETS MENU
This menu functions very similarly to the Picture Preset item in the
master Picture Quality menu.
AUDIO PROCESSOR MENU
This menu functions the same way as the Audio Processor choice on the
Master Audio menu. Seethe "Master Menus" section for more
information.
PARENTAL CONTROLS MENU
If the master user has selected NoBasie asthe Parental Controls setting in
the Access & Power Options menu, Parental Controls will not appear on
the basic menu.
Otherwise, all accessible options will appear in the Parental Controls
menu. If only one option is available, selecting Parental Controls will
take the user directly into that option's control panel.
In the TV and Movie Rating control panels, pressing the SKIP button on a
basic remote sets the highlighted rating to View (V). See the "Master
Menus" section for more information.
Parental Controls basic menu with options
limited by master user.
45
Page 48

PC VIDEO INPUT CONTROLS
This option functions the same way as the PC Video Input Controls item
in the master menu. it will only appear when the TV is tuned to the PC
input. See the "Master Menus" section for more information.
PC Video Input Controls Quick Reference
Arrow Up
Arrow Down
Arrow Left
Arrow Right
OK
>> FF
<< REW
PAUSE
RESET
Pan Picture Up
Pan Picture Down
Pan Picture Left
Pan Picture Right
Zoom states (lx, 2x)
Video Setting Presets (1,2,3,4,)
Video Setting Presets (4,3,2,1,)
Freeze toggle (on/off)
Zoom = 1, Pan = center, Freeze = off, Video = 1
Arrows and
OK
FORWARD (FF),
REVERSE(REW),
and PAUSE
o0
RESET
46
Page 49

BACK OF TV JACKS
Use these jack descriptions with the connections information that
follows to successfully connect your TV.
1 VIDEO INPUT, AUDIO RIGHT and L/MONO IN Jacks Used to
connect video devices, such as VCRs, camcorders, laserdisc players, home
computers or TV games with audio/video outputs.
2 AUDIO RIGHT and UMONO OUT Jacks
Allows connection of external audio amplifiers.
3 S-VIDEO (S-VHS) Connector
Used to connect devices with S-Video capability (an S-Video cable is
required). Remember to connect audio cables as well, because the S-
Video cable carries only video. (For more information, see Auto Tuning
in the "Master Menus" section.)
4 CABLE/ANTENNA Jack Used to attach either a home antenna or
cable system to your TV.
5 PC INPUT Used to connect the TV to a personal computer or similar
VGA device. See description below for more information.
6 DSCl PORT Formerly called a "Smartplug," this port is used to
transfer information between a TV and other devices, such as a clone
box or interactive system. This port is an eight-pin telephone-type. For
more information on its connection and operation, please contact your
distributor or the supplier of the interactive system.
flat, twin-lead cables.
PC INPUT CONNECTION
1 2 3
@@oo,
4 5
P_ IJT
i
6
Ax
DSCI PORT
CABLE/
ANTENNA
FN
Models J27530, J32530, and J36530
Computer or
similar device
Use this connection to receive video from a PC or similar component, or
to receive VGA or SVGA signals. (This monitor accepts signals with a
resolution of up to 2048x1536@152 hertz vertical refresh rate). You will
need one PC (VGA) cable to make the connection shown at right.
Pressing the WHO,INPUT button on the remote selects between the
signal of the TV (CABLE/ANTENNA jack), the signal of the device
connected to the Audio/Video jacks, the signal of the S-VIDEO jack, and
the signal of the device connected to the PC INPUT jack.
You can also program your remote control to automatically select the PC
input when a component button is pressed. See the "Using the Remote"
section for more information.
If the PC input is not selected, PCVideo Input Controls will not appear
on the Main menu. (For more information, see PCVideo input Controls
in the "Master Menus" section.)
VlO_O
@@@,.
@@oo,
PC_NPUT
[]
i
D
DSC_ _'ORT
CA£LE]
ANTENNA
_o
47
Page 50

ANTENNA OR CABLE CONNECTION
1. Use This Connection To:
Connect an indoor or outdoor antenna, or
cable that does not require a cable box, to
the TV.
Match Your Type of Antenna or Cable
A B C D
TV
VIDEO AUDIO
R
@@,.
R
PC _NPUT
[]
-
I,
DSCl PORT
:CABLE/
ANTENNA
S-VIDEO
_N
2. Accessories Needed
Some antennas require an adapter. Use the
diagram at the left to determine if one is
needed.
.
A.
B,
C,
D.
Connect as Shown
Connect the antenna or cable to the TV
using option A if the cable is a round,
coaxial cable that carries only VHF
or UHE
Connect the antenna to the TV using
option B if your cable is a flat, twin-lead
cable that carries only VHF or UHF.
Connect the antenna to the TV using
option C if the cable(s) are: one round,
coaxial cable that carries VHF and one flat,
twin-lead cable for UHE
Connect the antenna to the TV using
option D if the cables coming from the
antenna(s) are two flat, twin-lead cables.
4. Follow the Steps in the "Quick
Guide To the TV" Section.
48
Page 51

CABLE BOX CONNECTIONS
Cable
i Cable Box
I
TV
V_DEO AUDIO
R L ]MONO
@@,.
R L
@@oo
A
PC INPUT
_D
DSCI PORT
CABLE/
ANTENNA
S.VIDEO
IN
Cable
A Cable Box
c[_ @@@"
@@o_,
B
1
PC_PUT
[]
i
CABLE/
ANTENNA
TV
,,,k
DS¢I PORT
1. Use This Connection To:
Connect a cable box that can be controlled
using a remote.
2. Accessories Needed
A. One coaxial cable
3. Connect as Shown
4. Follow the Steps in the "Quick
Guide To the TV" Section.
1. Use This Connection To:
Connect a cable box that cannot be controlled
using a remote. This connection is usually used
for premium channels such as Disney,
Showtime, etc.
2. Accessories Needed
A. One signal splitter
B. Four coaxial cables
C. A-B switch
3. Connect as Shown
4. Operation
Place the A-B switch in the "A" position to
watch non-cable box channels. Place the A-B
switch in the "B" position to watch cable box
channels. Remember to tune the TV to the
cable box output channel (usually 2, 3 or 4).
5. Follow the Steps in the "Quick
Guide To the TV" Section.
49
Page 52

CABLE BOX AND VCR BASIC CONNECTION
Cable
_ Cable Box
I
_VCR
_ S-VlDEO vlDEoTV AUDio
j out
TV
"_OEO AUDIO
R L IMONO
@@,.
L
@@o.T
PCINPUT
u_
4,,
DSCI PORT
CABLE/
ANTENNA
S.VIDEO /"
1. Use This Connection To:
Connect a VCR cable box for premium channels.
2. Accessories Needed
A. Two coaxial cables
3. Connect as Shown
4. Operation
Tune the TV to the same channel as the
position of the VCR's CH3/CH4 switch.
Tune the VCR to the output channel of the
cable box, usually 2, 3, or 4.
Switch between the cable and VCR signals by
pressing the TV/VCR button on the VCR.
5. Follow the Steps in the "Quick
Guide To the TV" Section.
VCR BASIC CONNECTION
Cable
_VCRJ
J s.viD_o VJBEO AUDIO
........_ ? ,._ ,._
out
TV
WBEO AUDIO
R L a_ONO
@@,°
L
@@OUT
PC_NPUT
u
_ CABLE/
ANTENNA
S.VIBEO .."
DSCI PORT
1. Use This Connection To:
Connect a VCR to the TV.
2. Accessories Needed
A. One coaxial cable
3. Connect as Shown
4. Operation
Tune the TV to the same channel as the
position of the VCR's CH3/CH4 switch.
Switch between the cable and VCR signals by
pressing the TV/VCR button on the VCR.
5. Follow the Steps in the "Quick
Guide To the TV" Section.
50
Page 53

CABLE BOX AND VCR ADVANCED CONNECTION
A
Cable
CaMe Box
'! J :i
B _ VCR
1. Use This Connection To:
Connect a cable box for premium channels and
a VCR.
Record a scrambled (premium) channel on the
VCR at the same time you are watching an
unscrambled channel through the TV.
2. Accessories Needed
A. One signal splitter
B. Three coaxial cables
C. Two audio/video cables for mono VCRs or
three audio/video cables for stereo VCRs
DSCI PORT
@
S.WDEO .
CABLE/
ANTENNA
3. Connect as Shown
4. Operation
To record or watch premium channels, turn on
the TV, VCR and cable box. Tune the TV to the
video input (usually VlD) to see the signal
coming through the VCR. Then tune the VCR to
the cable box output channel (usually 2, 3 or 4).
VCR INTERMEDIATE CONNECTION 5. Follow the Steps in the "Quick
Guide To the TV" Section.
_VCR
1. Use This Connection To:
Receive stereo broadcasts from a stereo VCR
Hear stereo playback from a stereo VCR
u
/k
DSCI PORT
S.WDEO _
IN _i_ "_"
CABLE/
ANTENNA
2. Accessories Needed
A. One coaxial cable
B. Two audiolvideo cables for mono VCRs or
three audiolvideo cables for stereo VCRs
3. Connect as Shown
4. Follow the Steps in the "Quick
Guide To the TV" Section.
51
Page 54

VCR ADVANCED CONNECTION
Cable
1. Use This Connection To:
Receive stereo broadcasts from a stereo VCR.
Hear stereo playback from a stereo VCR.
Record one channel with a VCR and watch a
different channel on TV.
VCR
pC I_IPUT
/ix
DSCI PORT
_ CABLE/
ANTENNA
S-VIDEO ,
IN
2. Accessories Needed
A. One signal splitter
B. Two coaxial cables
C. Two audio/video cables for mono VCRs or
three audio/video cables for stereo VCRs
3. Connect as Shown
4. Follow the Steps in the "Quick
Guide To the TV" Section.
AUDIO CONNECTION
TV
VIDEO AUDIO
R L/MONO
@@.
R L
OUT
S-VIDEO
IN
INPUT
PCINPUT
_u_
CABLE/
ANTENNA
/k
DSCI PORT
Audio Cassette Recorder or
Amplifier
Use this connection if your amplifier is not part
of a system with its own remote. Consult the
amplifier's owner's manual for the
recommended hookup.
This TVs enhanced stereo imaging and effects
work best when used with the TV's own
speakers. If external speakers are used, this
enhanced stereo effect may decrease.
1. Use This Connection to:
Adjust and mute amplifier volume with the
TV's remote.
2. Accessories Needed:
A. Two audio/video cables
3. Connect as Shown
Connect the AUDIO OUT (RIGHT AND L/MONO)
jacks to the corresponding input jacks on the
stereo amplifier.
52
Page 55

FRONT PANEL
If you cannot locate your remote you can use the front panel of your TV
to operate basic user features. For details on using buttons with menus,
see the "Quick Guide To the TV" section.
The front panel above shows a typical button layout, The exact look of
the buttons may be different from those on the front of your TIX
Note that front-panel access may be blocked by master menu settings.
See the "Master Menus" section for more information.
MENU Brings up the Main menu (basic). When in the menu system, it
selects highlighted items.
CH v Scans down through the channel list and brings up the basic
status display. In the menu system, it points down to items and adjusts
menu controls.
CH ^ Scans up through the channel list and brings up the basic status
display. In the menu system, it points up to items and adjusts menu
controls.
VOL - Decreases the volume. When in the menu system, VOL - is used
to point left to items and adjust menu controls.
VOL + Increases the volume. When in the menu system, VOL + is used
to point right to items and adjust menu controls.
POWER Turns the TV on and off.
53
Page 56

STATUS DISPLAYS
This display shows the status of several features. Several remote and
front panel buttons trigger this display, including INFO.
Sample Status Displa_
12:01 Displays the current time.
60 Displayed when Closed Captioning is available on the current
channel.
ESPN Displays the label assigned to the current channel.
60 Displays the current main picture window channel or signal input
(CH3, CH4, VID, SVID or PC).
Mute (or Stereo) Mute is displayed when you mute the audio. Stereo
is displayed when the current channel is broadcasting in Stereo.
SAP Displayed when the current channel is broadcasting SAP (Second
Audio Program) information.
PIP 59 (PIP 6han) Displays the current Picture-In-Picture (PIP) channel
or signal input (CH3, CH4, VID, SVID or PC).
SLEEP Displayed when the Sleep Timer has been set.
Locked Displayed when Parental Controls are locked.
00:00 Displays time left on the commercial skip (SKIP) timer.
54
Page 57

TROURLESHOOTI NG
Most problems you encounter with this TV can be fixed by consulting the following list. Unless otherwise specified,
suggestions in this list refer to the master remote and menus. To contact the nearest RCA Service Center call 1-800-880-5966.
TV will not turn on
• Check to make sure it is plugged in.
• Check the wall receptacle (or extension cord) to make sure it is "live" by plugging in something else.
• Maybe batteries in remote control are "dead."
• Maybe remote control is not aimed at remote sensor.
• TV power or remote configurations may be preventing this. Use a master remote control to change menu settings.
TV turns on or off unexpectedly
• The Scheduled Off or Scheduled On function may have been activated in the Time and Timers menu.
• An electronic protection circuit may have been activated because of a power surge. Wait 30 seconds and then turn on
again. If this happens frequently, the voltage in your house may be abnormally high or low.
• The Sleep Timer or Energy Saver function may have turned the TV off.
• Unplug. Wait five minutes. Plug in again.
No picture or bad reception
• Try another channel.
• Check antenna connections.
• If watching video from an external component, make sure the component is connected to the input jacks and is
turned on.
• Press RESET,in case the picture controls are set too low.
• If using a VCR (connected only through antenna input), make sure TV is tuned to channel 3 or 4_-the same as CH3/4
switch on VCR.
• If using a VCR, check to make sure the TV/VCR button on the VCR is in the correct "mode."
• Weak Signal Muting and Blanking may be on (from the Main menu, select Channel Menu, then Signal Source)
• Try adjusting sharpness to improve weak signals (from the Main menu, select Picture Quality, then Picture Adjustments).
Black box appears on the screen
• Closed Captioning may be turned on and in text mode. Check the Closed-Caption Display control panel by pressing CC
on the remote control or through the Main menu.
No sound, picture okay
• Maybe sound is muted. Try pressing the VOL ^ (up) button to restore sound.
• Maybe speakers are turned off. Check the Audio Output and Speakers control panel in the Audio menu.
• If using an S-VHS connection, remember to also connect the component's L and RAUDIO OUT jacks to the TV's L and R
INPUT jacks.
• Maybe Maximum Volume is set very low. Check the Audio Levels control panel in the Audio menu.
55
Page 58

Noisy stereo reception
• May be a weak station. Select Mono in the Audio Processor control panel of the Audio menu.
Problems with remote
• Maybe something is between the remote and the remote sensor.
• Maybe the remote is not aimed directly at the device you are trying to control.
• Operation of certain remote control buttons might be restricted by master menu settings.
• If using a remote with component buttons, maybe remote is not in TV mode. Press the TV button so remote will control
TV. See also the Input signal problems description later in this section.
• Maybe remote is in wrong configuration (TVl or TV2) for that TV. Check the Remote Configurations setting in the
Access and Power Options menu. See the "Master Menus" section for more details.
• Maybe batteries in remote are weak, dead or installed incorrectly. Try replacing batteries. (If you have a programmable
remote and remove the batteries, you may have to reprogram the remote to control other components.)
• Remove batteries and hold the 1 button for at least 60 seconds to drain the microprocessor inside the remote. Release
the 1 button, replace the batteries, and (if necessary) reprogram the remote.
PIP Problems
• See the "PIP Problems?" entry in the "Using the Remote" section.
Can't select certain channel
• Channel may be blocked or not approved in the Parental Controls menu.
• Channels not in the current channel list cannot be accessed except through the master Channel menu.
• If using a VCR, check to make sure the TV/VCR button on the VCR is in the correct "mode."
Input signal problems
• Make sure that the input channel choice in the Auto Tuning menu matches the component's physical connection. For
example, if you have set VCR1 to CH4 in AutoTuning, but the VCR is connected by AudioNideo cables or an S-Video
cable, you will see normal channel 4 programming when the VCR1 button is pressed. See the Auto Tuning description
under Channel Menu in the "Master Menus" section for further instruction.
Menu problems
• Menu access may be blocked by clone box programming.
• Try unplugging the TV for two minutes and then plug it back in and turn it on.
• The Energy Saver settings will not work if TV Power Config. is set to Always in the Access and Power Options menu.
• The basic menu options might be restricted by master menu settings.
• PC Video Input Controls only appears in the Main menu if the PC input is selected. See the PC Input Video Controls entry
in the "Main Menus" section for more information.
• The clone box may have disabled master menus.
• Sleep and Schedule functions won't work if TVPower Config. is set to Always.
The PCVideo Input Controls option will appear when the PC input is selected regardless of whether there is anything
connected to the PC INPUT jack.
56
Page 59

Forgot password
• Use the master remote to enter a new password.
Rating limits don't work
• You must lock the parental controls (from the Main menu, select Parental Controls, then Lock Parental Controls).
Program is blocked and it shouldn't be
• It may be a Not Rated (NR) movie. After you block movie ratings, you must set NR to View separately in order to view
movies with an NR rating (from the Main menu, select Parental Controls, then V-Chip Movie Rating Limit).
• It may be an unrated television program. To unblock unrated television programs, select Parental Controls from the Main
menu, then select V-Chip TV Rating Limit and set unrated to V.
I CAUTION: If fixed (non-moving) images are left on the screen for long periods, they may be permanently imprinted |
on the picture tube. Such images include network Iogos, phone numbers, and video games. This damage is not
J
covered by your warranty. Extended viewing of channels displaying these images should be avoided.
Care and Cleaning
CAUTION: Turn OFF your TV before cleaning.
You can clean the TV as required, using a soft lint-free cloth. Be sure to occasionally dust the ventilation slots in the
cabinet to help assure adequate ventilation.
The TV's screen may be cleaned with a soft, lint-free cloth as well. Take care not to scratch or mar the screen. If
necessary, you may use a cloth dampened with warm water.
Never use strong cleaning agents, such as ammonia-based cleaners, or abrasive powder. These types of cleaners will
damage the TV.
While cleaning do not spray liquid directly on the screen, or allow liquid to run down the screen and inside the TV.
Also, avoid placing drinks or vases with water on top of the TV. This could increase the risk of fire or shock hazard or
damage to the TV.
57
Page 60

FCC DECLARATION OF CONFORMITY AND
INDUSTRY CANADA INFORMATION
FCCRegulations state that unauthorized changes or modifications to this
equipment may void the user's authority to operate it.
This device complies with part 15 of FCC Rules. Operation is subject to the
following two conditions: (1) This device may not cause harmful
interference, and (2) This device must accept any interference received,
including interference that may cause undesired operation.
This Class A digital apparatus meets all requirements of the Canadian
Interference Causing Equipment Regulations.
Cet appareil num6rique de la classe A respecte toutes les exigences du
Reglement sur le materiel brouilleur du Canada.
Note: This equipment has been tested and found to comply with the limits
for the Class A digital device, pursuant to Part 15 of the FCC Rules. These
limits are designed to provide reasonable protection against harmful
interference when the equipment is operated in a commercial environment.
This equipment generates, uses, and can radiate radio frequency energy
and, if not installed and used in accordance with the instruction manual,
may cause harmful interference to radio communications. Operation of this
equipment in a residential area is likely to cause harmful interference in
which case the user will be required to correct the interference at his own
expense.
If this equipment does cause interference to radio or television reception
(which you can determine by turning the equipment off and on), try to
correct the interference by one or more of the following measures:
Reorient or relocate the receiving antenna (that is, the antenna for the radio
or television that is "receiving" the interference).
Change the position of the TV/PC Monitor with respect to the radio or
television equipment that is receiving interference.
Move the TV/PC Monitor away from the equipment that is receiving
interference.
Plug the TV/PC Monitor into a different wall outlet so that the TV/PC
Monitor and the equipment receiving interference are on different branch
circuits.
If these measures do not eliminate the interference, please consult your
dealer or an experienced radio/television technician for additional
suggestions. Also, the Federal Communications Commission has prepared a
helpful booklet, "How To Identify and Resolve RadioFrV Interference
Problems." This booklet is available from the U.S. Government Printing
Office, Washington D.C. 20402. Please specify stock number 004-000-00345-
4 when ordering copies.
For more information on FCCconformity: Thomson Consumer Electronics,
Inc., 10330 N. Meridian St., Indianapolis IN 46290; 1-800-587-5850.
58
Page 61

COMMERCIAL PRODUCTS LIMITED WARRANTY
What your warranty covers:
For how long after your
purchase:
What we will do:
How you get service:
What your warranty does
not cover:
Product registration:
How state law relates to
this warranty:
If you purchased your
product outside the USA:
Any defect in materials or workmanship.
One year for labor charges.
One year for parts.
Two years for picture tube.
(The warranty begins at time of first installation or 45 days after shipment,
whichever comes first.)
Pay any Authorized RCA Commercial Television Service Center the labor charges to
repair your television.
Pay any Authorized RCA Commercial Television Service Center for the new or, at our
option, refurbished replacement parts and picture tube required to repair your
television.
Request service from any Authorized RCA Commercial Television Service Center at
your place of business.
To identify your nearest Authorized RCA Commercial Television Service Center, ask
your distributor, look in the Yellow Pages, or call 1-800-880-5966.
Show the Authorized Service Center Representative your sales receipt or other
evidence of purchase date or first rental.
Customer instruction. (Your Owner's Manual clearly describes hew to install, adjust,
and operate your television. Any additional information should be obtained from
your distributor.)
installation and related adjustments.
Acts of God, such as, but not limited to lightning damage.
Signal reception problems not caused by your television.
Damage from misuse or neglect.
Batteries.
images burnt onto the screen.
A television that has been modified or incorporated into other products.
A television purchased or serviced outside the USA.
in-room service.
Please complete and mail the Product Registration Card packed with your TV. it will
make it easier to contact you should it ever be necessary. The return of the card is
not required for warranty coverage.
This warranty gives you specific legal rights, and you may also have other rights that
vary from state to state.
This warranty does net apply. Contact your distributor for warranty information.
Service calls which do not involve defective materials or workmanship are not covered by this warranty. Costs
of such service calls are the sole responsibility of the purchaser.
59
Page 62

A
Access, controlling 24
Age-Based Ratings 33, 35
Alarm menu 5
Antenna 48
Arrows on remote 12
Audio 19
Auto Tuning 23
B
Basic
menus 6, 43
picture controls 21
Batteries 3, 55
Black Level 21
Blocking 39
Buttons 12
front panel 53
INPUT 14
remotes 10, 12
SYSTEM 14
C
Cable box connections 49, 50
Cable TV 48
Care and Cleaning 57
CC (Closed Captioning) 27, 54
Channel
block 38
CH3/CH4inputs 23
in memory 5
labels 22
lists 22
menu 22
search 22
CLEAR button 10, 13
Clone box 5, 47
Closed Caption 27
Codes
remote 18
Color settings 21
Color warmth 21
Connections 48
VGAZPCiNPUT 47
Content Themes 33, 37
Contrast 21
D
DVD button 12
E
EnergySaver 24
Exiting menus 7
F
Fixed images 57
Fixed output 20
Freeze toggle 41
Front panel 53
INFO button 12
INPUT button 11, 14
inputs, assigning 23
L
Labels 22
LED light 12
Limits, establishing 24
M
Master
menus 19
remotes 10
Memory 5
MENU button 10, 13, 53
Menu Language 43
Menus 6, 19, 43
Mono 19
Movie rating limits 25, 31
MUTE button 10, 12, 19
P
Panning 41
Parental Controls 25, 30, 45
channel block 38
Password 39
PC INPUT 47
PC Video Input Controls 40, 46
Connection 47
Pendants 9
Picture Quality menu 21
Picture Tilt 21
Point and Select 4
Power options 25
Problems, solving 55
Programming the remote 15
R
Rating Limits
Movie 31
TV 32
RECORD button 15
Remote control 9
batteries 3, 56
buttons 10, 12, 14
codes 18
master 3, 10
problems with 55
programming 15
universal 12
with two TVs 24
Reset 41
RESETbutton 11, 13, 21, 22, 41
S
SAP (Second Audio Program) 19, 54
SAT,Cable channel 23
Scan Converter 40
Schedule 28
Screen settings 21
Set input channel 23
Set Time 28
Signal Type 22, 23
SKIP button 12
Sleep Timer 28, 44, 54
Speakers 20, 52
Status Display 54
Stereo 19, 54
SVGA, viewing signal 40
SYSTEM button 14
60
Page 63

T
Tilt 21
Time 5, 28, 44, 54
Tint 21
Troubleshooting 55
TV
controlling two 24
rating limits 25, 32
TV button 12
U
UHF/VHF antenna 22
Universal remotes 12
Unlocking Parental Con-
trols 38
Unrated programs 38
Unusable Signal 22
V
V-Chip 30
Movies 31
Ratings 30, 35
Themes 30, 37
Variable speaker output 20
VCR
autotuning 23
button on remote 12
connection 50, 51, 52
recording 13
VGA
connection 47
input jack 47
VGA, viewing signal 40
Video settings 41
W
Warranty 59
WHO.INPUT button 13
Z
Zooming 41
61
Page 64

Please do not send any products to the Indianapolis address listed in this manual or on the carton. This will only add delays in
service for your product.
_ "IHOMSON CONSUMER ELECTRONICS
10330 North Meridian Street
Indianapolis, IN 46290
©2000 Thomson Consumer Electronics, inc.
Trademark(s)© Registered
Marca(s) Registrada(s)
Printed in USA
TOCOM 15560580
The following materials were used in
printing this publication:
68%
RECYCLEDPAPER
MINIMIIM20%POSTCONSmER
_ IpRINTED WITHI
I_._ SOYINK M
 Loading...