

Page 1

1
Page 2

Interference Information
This device complies with Part 15 of the FCC Rules. Operation is subject to the following two conditions: (1)
This device may not cause harmful interference; and (2) This device must accept any interference
received, including interference that may cause undesired operation. Privacy of communications may not
be ensured when using this phone.
This equipment has been tested and found to comply with the limits for a Class B digital device, pursuant to
Part 15 of the FCC Rules. These limits are designed to provide reasonable protection against harmful
interference in a residential installation.
This equipment generates, uses, and can radiate radio frequency energy and, if not installed and used in
accordance with the instructions, may cause harmful interference to radio communications. However, there
is no guarantee that interference will not occur in a particular installation.
If this equipment does cause harmful interference to radio or television reception, which can be
determined by turning the equipment off and on, the user is encouraged to try to correct the interference
by one or more of the following measures:
• Reorient or relocate the receiving antenna (that is, the antenna for radio or television that is “receiving”
the interference).
• Reorient or relocate and increase the separation between the telecommunications equipment and
Receiver.
• Connect the telecommunications equipment into an outlet on a circuit different from that to which the
receiving antenna is connected.
If these measures do not eliminate the interference, please consult your dealer or an experienced
radio/television technician for additional suggestions. Also, the Federal Communications Commission has
prepared a helpful booklet, “How To Identify and Resolve Radio/TV Interference Problems. This booklet is
available from the U.S. Government Printing Office, Washington, D.C. 20402. Please specify stock number
004-000-00345-4 when ordering copies.
Warning: The changes or modifications not expressly approved by the party responsible for compliance
could void the user’s authority to operate the equipment.
The RCA IP170 phone is designed for business environment use. It is a full-featured SIP solution,
interoperable with most IP PBX and VoIP providers.
Please read through the instruction booklet before you get started to better understand the features of the
IP170.
FCC RF Radiation Exposure Statement
This equipment complies with FCC RF radiation exposure limits set forth for an uncontrolled environment.
This equipment should be installed and operated with a minimum distance of 20 centimeters between the
radiator and your body. This transmitter must not be co-located or operated in conjunction with any other
antenna or transmitter.”
This is a class B device, in a domestic environment; this product may cause radio interference, in which case
the user may be required to take adequate measures. To avoid the potential effects on the environment
and human health as a result of the presence of hazardous substances in electrical and electronic
equipment, end users of electrical and electronic equipment should understand the meaning of the
crossed-out wheeled bin symbol. Do not dispose of WEEE as unsorted municipal waste and have to collect
such WEEE separately.
2
Page 3

Table of Contents
Getting Started 4
Packing List 4
Setup the base 4
Setup the desk phone 4
Registration 5
SIP account Configuration 5
Base Web interface 5
Retrieving the base IP address 5
Input SIP account information
via web interface 5
Desk Phone menu 6
Overview 7
Desk Phone 8
Desk Phone keys layout 9
Master Desk Phone 12
Desk Phone Menu tree 12
General Settings 15
Call Forward 16
Call log 16
Accessing call logs 16
Call list item management 17
During an active call 17
Mute 17
Hold 17
Call Waiting 17
Call Transfer 17
Call Conference 17
Contacts 18
Advanced Functions 18
H/S Registration 18
1H/S Deregistration 18
Account Settings 18
Network Settings 18
Maintenance Tasks 19
Basic Call functions 15
Making calls 15
Making an external call 15
Anonymous call 15
Inc
oming calls 1
Answer an incoming call 16
Reject an incoming call 16
DND 16
Desk Phone Keys configuration 20
Web Interface 20
Se
rvice 2
Warranty 22
6
1
3
Page 4

Getting Started
Packing List
The following components are included in
your package:
IP DECT Gateway
IP170 DECT Desk Phone
AC Adaptor (6V, 0.5A) for Desk Phone
AC Adaptor (5V, 0.5A) for Gateway
1.5M Ethernet Cable (CAT 5)
Quick Setup Guide
Setup the base
1. Plug the adaptor (5V, 0.5A) into a power
output and connect its power plug to the
base.
2. Connect the base to a router or switch with the Ethernet cable to access the internet.
The IP address of the base is assigned dynamically by default. Make sure the router’s DHCP server is on.
When the base is powered up, the amber led will be amber colored. Once the network connection is
established, the led will turn off. When the base obtains the IP address, the amber led will light up again.
Setup the desk phone
Connecting the charging cradle
1. Plug the adaptor (6V, 0.5A) into a power outlet and connect its power plug to the charging cradle.
Registration
On the base:
1. Hold down the page key on the back of the base.
2. After the button is held down for five seconds, the amber led begins blinking amber and blue. The page
key can now be released. The base is now in registration mode.
On the desk phone:
1. If the desk phone has not registered to any base, it will show “Unregistered” on idle screen.
2. Press “OK” button on the desk phone to enter the main menu.
3. Use the navigation keys to highlight the item “Settings” and then press “Select” soft key.
4. Use up/down navigation keys to highlight the item “Registration” and then press “Select” soft key.
5. Highlight the item “Base Registration” and press “Select” soft key
6. Select “BS 1” and press “Select” soft key. The desk phone will attempt to register to the base.
7. Once the registration succeeds, “Deskphone #” will display on idle screen of hand- set.
4
Page 5
8. If registration fails, ensure that the base is still in registration mode (with the led blinking blue and amber)
and that the base and desk phone are in close proximity, then try again.
SIP account Configuration
The SIP account can be configured through IP DECT base web interface or desk phone menu.
Base Web interface
Retrieving the base IP address
In order to access the web interface of the base, the IP address is required. This information can be obtained
from a properly registered desk phone.
Press “OK” button to enter the main menu.
Using the up and down navigation buttons, highlight the icon “System” and then press the “Select” soft key.
Select the item “Network settings”.
Enter the Admin Password (Default password is “7227”) and then press the “OK” soft key.
Using the left and right navigation buttons, find the item “IP Address.” This shows the current IP address of
the base.
Inputting SIP account information via web interface
Open a web browser on a PC.
Enter the base IP address into the address bar and press “Enter”
A login window pops up. Enter the username and. The default username and passwords are “admin” and
“7227”.
The main page will load.
5
Page 6
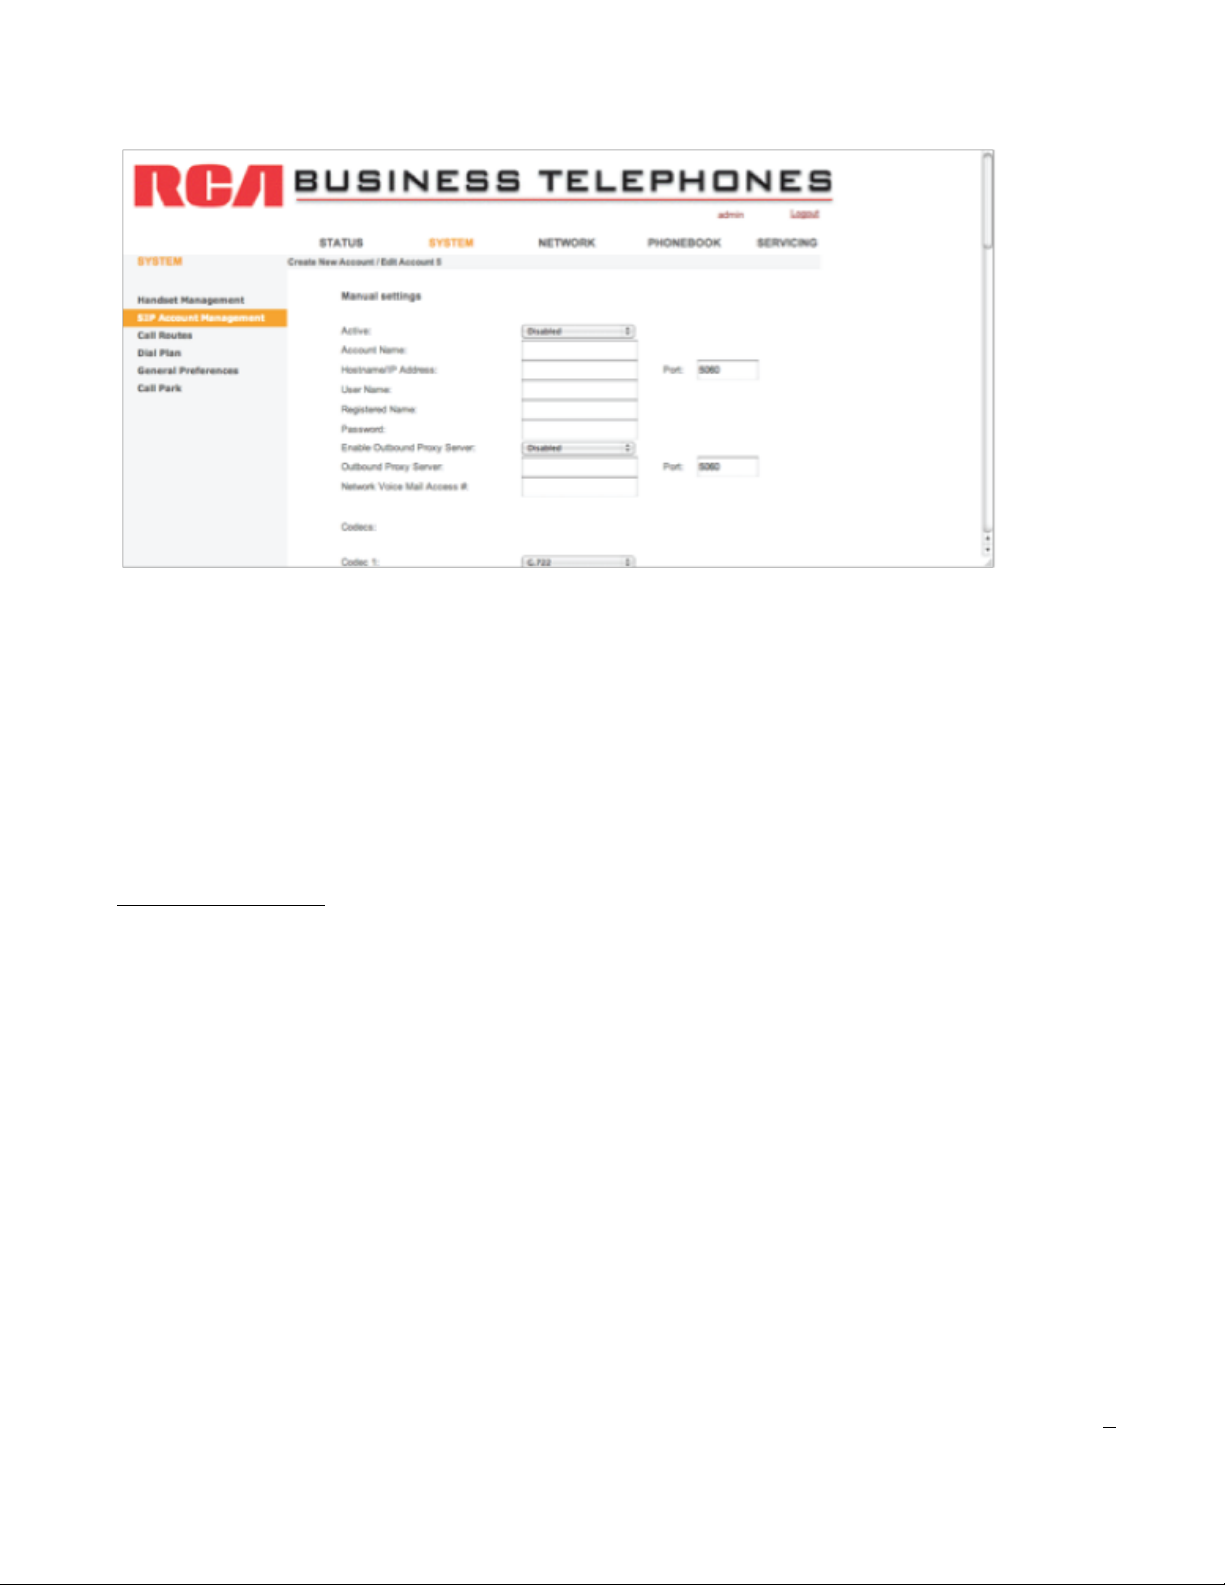
Enter display name, user ID, password, SIP Server, and Outbound Proxy server of the SIP account. Check the
Active field to Enable/Disable. Press the “Save” button to confirm.
If the SIP settings are configured correctly, the desk phone will now be able to make and receive VOIP calls.
Desk phone menu
On the desk phone, go to menu “Settings [ VOIP Account Setup”, Select an account to edit and input the
information (Account Name, Label, Display Name, Register Name, User Name, Password, SIP Server,
Outbound status, Outbound Proxy, STUN Status and STUN server).
6
Page 7

Overview
LED status
Description
Steady amber
Off
Blinking amber (0.3s on, 03s off)
Blinking blue (0.5s on, 0.5s off)
Network link is up
Network link is down
Data activity on the LAN port
In registration mode
Base
Functions of registration/paging button on the base.
The registration/paging button is located on the right hand side of the gateway. When the gateway is
powered up, the status LED will be on and amber colored for 5 seconds. After the initialization, the LED status
indicators are as follows:
7
Page 8
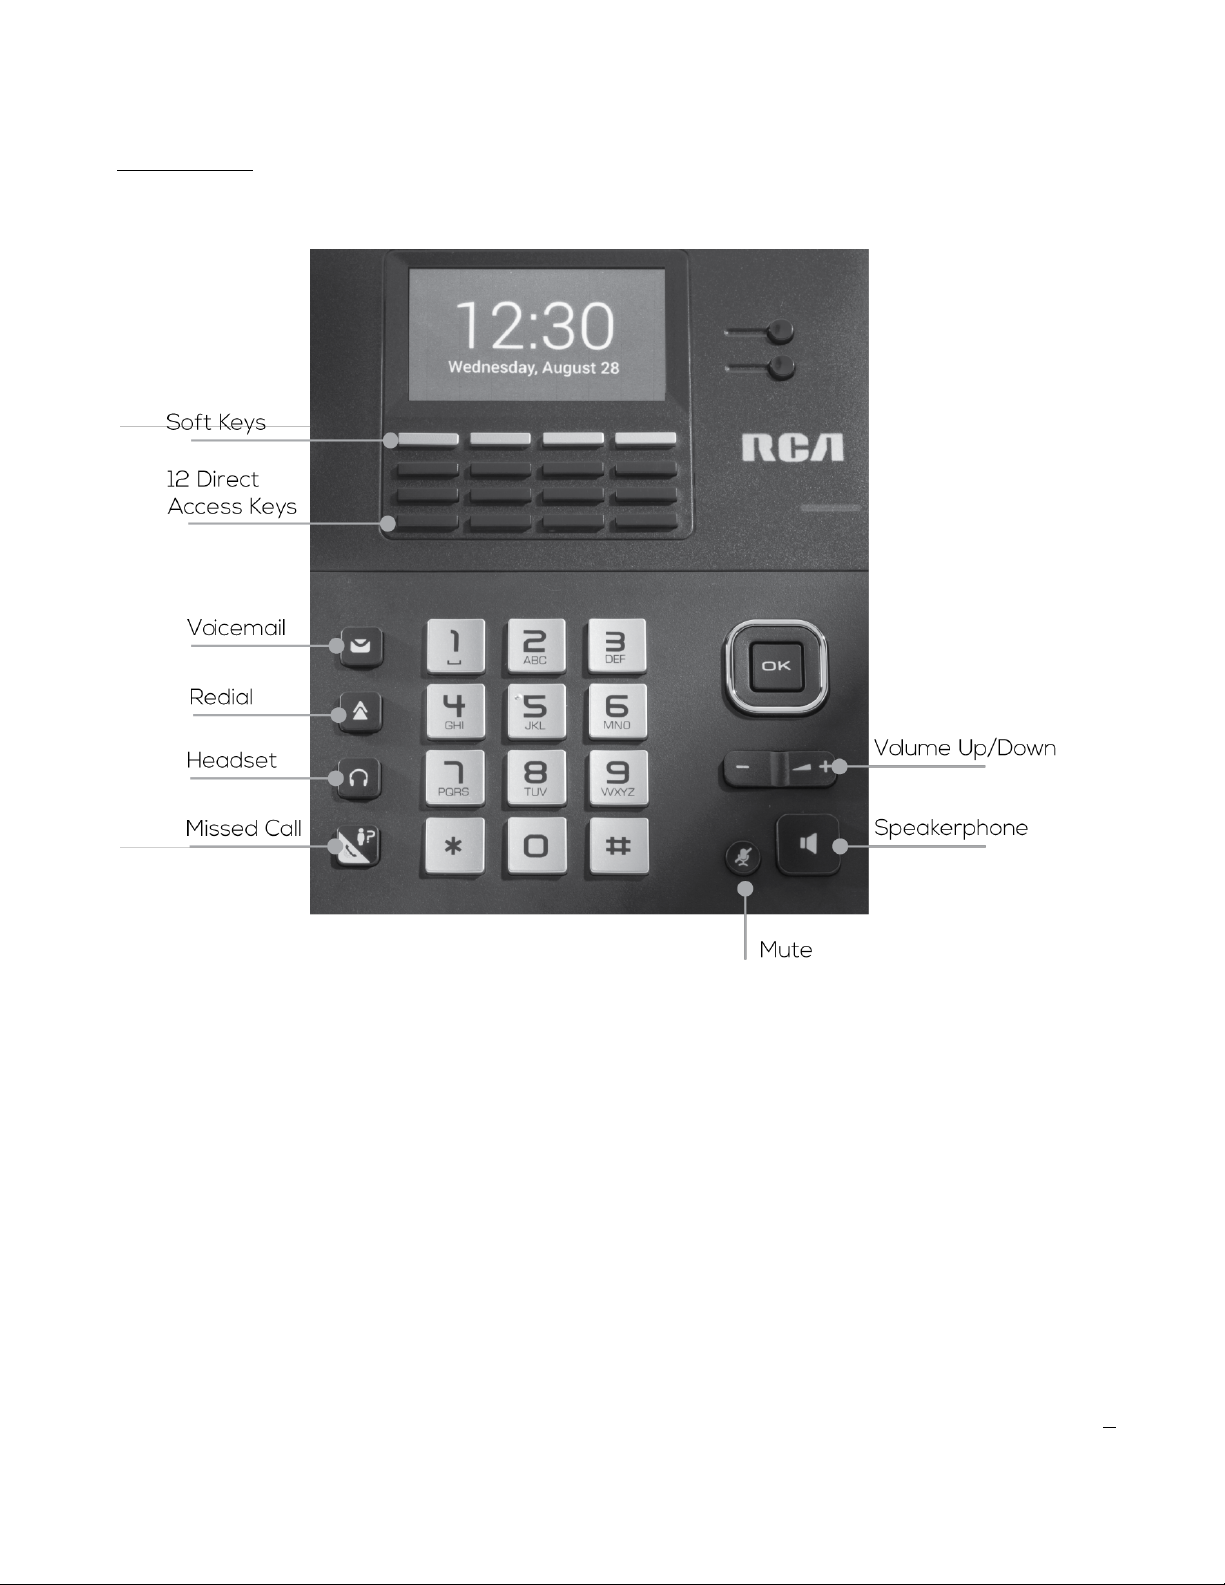
Desk Phone
Desk Phone key layout
8
Page 9

Functions of Key on the desk phone
Key
Key
Press
Idle
Menu
Edit
Off Hook
Line 1 Key
Tap
Line 1
Line 1
Line 1
** Refer to MMI
Line 2 Key
Tap
Line 2
Line 2
Line 2
** Refer to MMI
Soft Key 1
(Left to Right)
Tap
Logs
Back
Clear
Soft Key 2
(Left to Right)
Tap
Directory
--
Abc
Soft Key 3
(Left to Right)
Tap
DND----
Soft Key 4
(Left to Right)
Tap
Menu
Select
Save
Cancel
12x
Direct Access Keys
(Optional: Backlight)
Tap
Direct Memory List on
Display
Direct Memory
List on Display
Direct Memory List on
Display
Direct Memory List on Display
Hold
Direct Memory
Dialing
Direct Memory
Dialing
Direct Memory
Dialing
Direct Memory
DialingUpTap Select Up
Select Up
Up for on-screen menu
Down
Tap Select Down
Select Down
Down for on-screen menu
Left
Tap
Cursor Left
Right
Tap
Cursor Right
Navigation Select
(Backlight)
Tap
Status
Select Select on-screen option
Hold
Line Select before
Call On 1
Tap1
Text & Number
Hold
Direct Memory
Dial2Tap2
Text & Number
Hold
Direct Memory
Dial3Tap3
Text & Number
9Hold
Page 10

Direct Memory
Dial4Tap4
Text & Number
Hold
Direct Memory
Dial5Tap5
Text & Number
Hold
Direct Memory
Dial6Tap6
Text & Number
Hold
Direct Memory
Dial7Tap7
Text & Number
Hold
Direct Memory
Dial8Tap8
Text & Number
Hold
Direct Memory
Dial9Tap9
Text & Number
Hold
Direct Memory
Dial0Tap0
Text & Number
Hold
Direct Memory
Dial#Tap#
* Insert space
during text edit
* Insert "#" during
number edit
Dial
Hold
Silent On/Off
*Tap*
* Switch upper case / lower
case / first capital during
phonebook name or handset
name edit (ABC abc Abc)
Dial
Hold
Key Lock
Voice Mail (Backlight)
Tap
Voice Mail
Voice Mail
Voice Mail
Voice Mail
Redial
Tap
Outgoing
Call Log
Outgoing
Call Log
10
Page 11

RJ9 Headset
Tap
Headset ON
Headset ON
Headset ON
Headset ON
Missed Call Log
Tap
Missed
Call Log
Missed
Call Log
Volume Up
Tap
Volume Up
Volume Up
Volume Down
Tap
Volume Down
Volume Down
Speakerphone
Tap
Speakerphone
Speakerphone
Speakerphone
Speakerphone
Mute
Tap Mute / Unmute
11
Page 12

Master Desk Phone
Main Menu
Sub Menu
Function description
Services
Voicemail
Call Forward
DND
Call Waiting
Blocked Number
Intercom
Anonymous Call
Speed Dial
Direct Access Key
Configures the external voice
mail access numbers of SIP
accounts (*)
Configures the call forward
functions provided by the SIP
accounts (*)
Configures the DND functions
provided by the SIP accounts (*)
Enables/disables call waiting
function provided by the SIP
accounts
Accesses the backlist of SIP
accounts in the gateway (*)
Calls another desk phone on
the same gateway
Enables/disables anonymous
call and anonymous call
rejection of SIP accounts (*)
Assigns frequently dialed
numbers to a digit key (0-9).
Hold down the digit key in idle
mode to make an outgoing call.
Assigns function to 12 available
direct access keys
When a SIP account is created on the gateway through desk phone menu, the handset will be set as the
master headset of the SIP account. Users of this desk phone can configure the settings in base related to the
SIP account through the menu on the master desk phone.
The administrator can change the master desk phone of SIP accounts via the web interface of the gateway.
Desk Phone Menu Tree
Those functions marked with (*) are available in the master desk phone only.
12
Page 13

Contacts
Private Directory
Public Directory
Network Directory
Accesses local phonebook,
Maximum 150 entries
Accesses shared phonebook
which is stored in the gateway,
Maximum 300 entries
Accesses network phonebook
by LDAP
Call Lists
Outgoing Calls
Accepted Calls
Missed Calls
Accesses outgoing calls list from
the gateway
Accesses answered calls list
from the gateway
Accesses missed calls list from
the gateway
Voicemail
SIP Account X VM
Accesses external
voicemail box
Settings
Date & Time
Language
Display
Audio
Registration
Telephony
Sets date & time manually or
gets the information from the
gateway
Configures the language of the
phone user interface
Configures the backlight,
contrast, brightness,
screensaver and wallpaper of
the desk phone
Configures the tone settings,
volumes and ringers of the desk
phone
Registration/deregistration to
gateway. Selects the gateway
to attach each desk phone
Configures the auto answer and
default outgoing line settings of
desk phone. Sets up SIP
accounts on the gateway.
13
Page 14

System
Network
H/S User Password
System Admin Password
Firmgrade Upgrade
Handset Factory Default
Base Factory Default
Views the network settings of
the gateway
Changes desk phone user
password.
Changes the system Admin
Password
Upgrades deskphone software
Resets desk phone settings to
factory default
Resets base settings to factory
default
Status
SIP Account Status
Network Status
Views SIP Account information
on the gateway. Only those SIP
accounts attached to this desk
phone are visible.
Views the network settings of
the gateway
14
Page 15

General Settings
Phone status
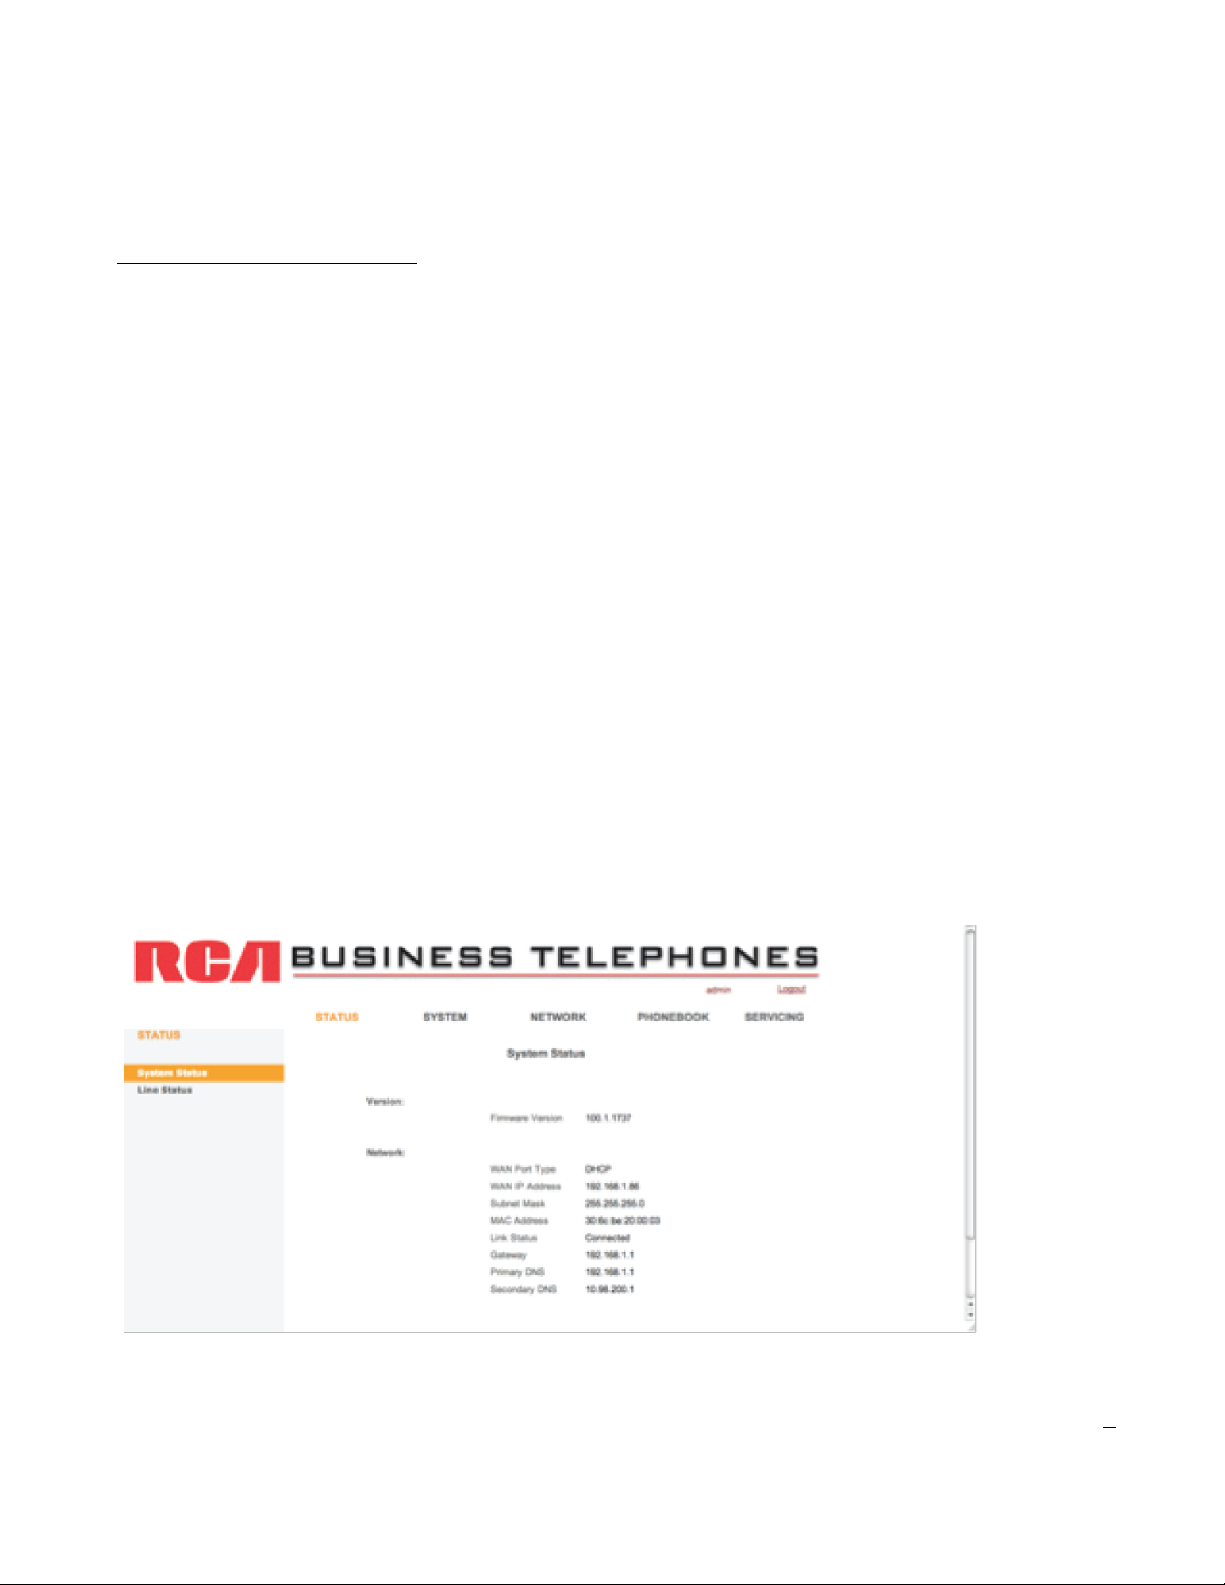
Enter “Status” menu. Select item “SIP Account Status” to view the associated SIP accounts status
(registered/disabled). Select item “Network Status” to view the base network information. This includes
base network type, IP Address, subnet mask, default gateway and DNS.
Time and date
Enter “Settings” menu, Select item “Date & Time”. To enter manually, select “Manual Setting”. Enter the
date and time and then press “Save” soft key. The date format is DD/MM/YYYY. To have the phone
automatically sync with a server, select “NTP” and select “On”.
Basic Call functions
Making calls
Making an external call
An external call is the call made between desk phone and remote party by SIP protocol. Users will need a
line to send out the invite request. To set up a line and assign it to desk phone, please refer to the section
“SIP account Configuration”.
To make an external call through default line:
Enter the number/IP address in pre-dialing page or select a record in phonebook/call log list. Then press
the Talk On key or OK key. The default outgoing line will be selected automatically for the call making.
To select line before making an external call:
Enter the number/IP address in pre-dialing page or select a record in phonebook/call log list. Select “Acc”
soft key, select the desired line and press “Dial”.
Anonymous call
To configure the anonymous call function, users must use the master desk phone. Enter the “Services”
menu. Input the desk phone user password. Select the SIP account to enable/disable the anonymous
feature. There are 2 items to configure. When “Anonymous call” setting is enabled, the phone’s phone
number is prevented from being displayed when calling other numbers. When “Anonymous call rejection”
setting is enabled, any caller who has explicitly restricted his/her number is prevented from calling this
desk phone.
15
Page 16

Incoming calls
Answering an incoming call
When there is an incoming call, pick up the handset, press the speakerphone key or press the headset key
to answer the call.
Rejecting an incoming call
When there is an incoming call, press the “Reject” soft key to reject the call.
DND
On the master desk phone, Enter “Services” [“DND” menu or “DND” soft key during idle. Highlight and
select the SIP account you want to enable/disable DND, select enable or disable to confirm. A DND icon
should appear on H/S screen. Any incoming call will be rejected until the DND is deactivated.
Call Forward
On the master desk phone, Enter “Services” [ “Call Forward” menu. Highlight the SIP account to
enable/disable call forward, highlight & select the call forward options. There are 3 types of call forwarding
options:
1) Call forwarding unconditional (Always) -When this is enabled, the incoming call of this account will be
forwarded to an external phone number.
2) Call forwarding on all assigned desk phones when this line isn’t answered (No Answer) - When this is
enabled and all desk phones attached to this SIP account do not answer the call, the call will be
forwarded to an external number.
3) Call forwarding on all assigned desk phones when this line is busy (Busy) -When this is enabled and all desk
phones attached to this SIP account are busy, the call will be forwarded to an external number.
Call log
Accessing call logs
Press the “call lists” soft key on idle screen to show the call log types. There are 3 types of call log, plus a log
that displays all calls.
- Outgoing Calls
- Accepted Calls
- Missed Calls
Highlight a type and press the “Select” soft key to view the list of a specified call log type.
16
Page 17

Call list item management
To make call from the call log list, highlight a call log record and pick up the handset or press speakerphone.
To save the record to phonebook, highlight a record, press the “Options” soft key and select “Save Number”
option. You can select “Private Phonebook” to save in the desk phone or select “Shared Phonebook” to save
the phone number to base.
During an active call
Mute
Press the Mute button. Press the button again to unmute.
Hold
Press “Hold” soft key during call. To unhold the call, press “Unhold”.
Call Waiting
When there is a call waiting, you can
- Press “Accept” soft key to answer the call waiting and put the current call on hold.
- Press “Reject” soft key to reject the call.
Call Transfer
During a conversation with an external call, users can press the “Tran” soft key, then enter calling phone
number and press the “Tran” soft key to transfer the call to the dialed number immediately. Or, to attend the
transfer, users initiate “2nd Call”, choose external call, select one of the available lines, and dial a number
and press “Dial”. When the 2nd Call is answered and the user may transfer the held call to the dialed
number at any time by pressing “Tran”.
Call Conference
During a conversation with an external call, users can press the “Tran” soft key, then enter calling phone
number and press the “Tran” soft key to transfer the call to the dialed number immediately. Or, to attend the
transfer, users initiate “2nd Call”, choose external call, select one of the available lines, and dial a number
and press “Dial”. When the 2nd Call is answered, start 3-way conference by pressing “Conf”.
17
Page 18

Contacts
There are two types of contact list. They are private phonebook and shared phone- book.
Each desk phone has its own private phonebook. This phonebook holds a maximum of 100 records. These
numbers are only viewable to this desk phone. The shared phonebook is stored in the IPDECT gateway and
is viewable to all of the desk phones. This phonebook holds a maximum 250 records.
To access the contact lists, press the left navigation key when the display is idle screen. Alternatively, select
the “Contacts” in main menu.
Advanced Functions
Desk Phone Registration
Please refer to the section Registration.
Desk Phone Deregistration
On the desk phone, go to the menu “Settings”[ “Registration”. Select the item “Base De-registration” to
deregister the desk phone from the current base. Note: Desk phones cannot make any calls, internal or
external, without first registering to a base.
Account Settings
SIP Account Setup:
Users can only setup SIP Accounts via the Web GUI of the gateway
View SIP Account Status:
Users can view the status of the accounts which are associated with the desk phone.
On the desk phone, go to menu “Status” [ “SIP Account Status”.
Network Settings
Network setup:
You can configure the network type of the base to have a static IP address or obtain IP address from DHCP
server.
On the desk phone, go to the menu “System” [ “Network Settings”
18
Page 19

Maintenance Tasks
User Levels
Desk Phone:
There are different types of security levels to access the desk phone settings
User level password: User with this password is allowed to change call settings
(i.e. call waiting) of the desk phone. If the desk phone is the master desk phone of SIP accounts, user can also
modify settings (anonymous call/anonymous call reject/ blacklist records/DND and Call forward) of the SIP
accounts.
Admin level password: User can change the account settings (VOIP account setup/ base network
type/Change admin password) on the base
Base:
There are different types of security levels to access the Web server on the base.
user1 – user8: These are normal users. User # can access the settings related to desk phone #.
admin: This is a special account which allows the user to access all settings of the base.
Reset to Factory
Desk Phone:
Go to the Menu “System”. Select the “Handset Factory Default”. The settings and memory in this desk phone
are all reset to factory default.
Base:
Hold down the page key for 60 seconds then release the key. The settings in base will go back to factory
default.
Firmware Upgrade
Desk Phone:
Go to the menu “System” [ “Firmware Upgrade”. The phone will check the availability of new software
version. If new firmware is available, a popup window will ask “New Firmware is available. Upgrade now?”
Select “Yes” soft key will automatically proceed with the software upgrade.
19
Page 20

Desk Phone Keys Programmable keys
Speed Dial Keys:
On the desk phone, user can program 0-9 keys as speed dial key. Go to the menu.
“Services” [“Speed Dial”. Select a key to program the number and decide which account will make the call.
Direct Access Keys:
On the desk phone, user can program 12 available direct access keys as speed dial key with directory lookup
on the LCD display. Go to the menu
“Services”[ “Direct Access Key”. Select a key to program the number and decide which account will make
the call.
Web Interface
Administrators can configure the phone system settings through the web interface. This section will describe
how to use the web interface to access the phone settings.
Administrators need to know IP address of the base prior to accessing the interface. Please refer to the
section Get the base IP address.
On the PC, open a web browser and enter the IP address (e.g. http://192.168.1.155) of the base. Username
and password is required to access the web pages. The default values are “admin” and “7227” respectively.
20
Page 21

Service
If trouble is experienced with this equipment, for repair or warranty information, please contact customer
service at 1-800-511-3180. If the equipment is causing harm to the telephone network, the telephone
company may request that you disconnect the equipment until the problem is resolved.
This product may be serviced only by the manufacturer or its authorized service agents. Changes or
modifications not expressly approved by Telefield NA Inc. could void the user’s authority to operate this
product. For instructions on how to obtain service, refer to the warranty included in this guide or call
customer service at 1-800-511-3180.
Telefield NA Inc.
Manager, Consumer Relations
4915 SW Griffith Dr. #302
Beaverton, Or 97005
Attach your sales receipt to the booklet for future reference or jot DOWN the date this product was
purchased or received as a gift. This information will be valuable if service should be required during the
warranty period.
Purchase date __________________________________________________________________________________________________________________
Name of store, installer or dealer ___________________________________________________________________________________________
21
Page 22

Warranty
Limited Warranty
What will your warranty cover?
• Defects in materials or workmanship For how long after your purchase?
• Two years, from date of purchase What we will do:
• Provide you with a replacement unit. The exchange unit is under warranty for the remainder of the original
product’s warranty period.
How to get service?
• Locate your proof of purchase in the form of a bill of sale or receipted invoice which is evidence that the
product is within the warranty period. Proof of warranty eligibility is required and must be presented to obtain
warranty service.
• Contact RCA Customer Care at (800) 511-3180. Our representatives will help you troubleshoot and
diagnose the problem. You may be asked to disconnect your RCA telephone from the power source, so you
must call from another telephone. If the issue cannot be resolved by our Customer Care Team, you will be
issued an RMA (Return Merchandise Authorization) number and be given instructions on how to submit your
proof-of-purchase paperwork, And where to send your defective merchandise.
You will be responsible for shipping the defective unit back to our warranty fulfillment center at your own
expense. You are responsible for damage or loss during shipment so insuring the product during return
shipping is highly recommended.
• We will ship a replacement to you freight prepaid. What your warranty does not cover:
• Customer instruction. (Your Instruction Book provides information regarding operating instructions and user
controls. Additionally, our Customer Care Center is staffed 24x7 with product experts that can assist you with
any questions that may arise during setup and use of your RCA telephone.
• Installation and setup service adjustments
• Batteries, if applicable
• Damage from misuse or neglect
• Products that have been modified of serviced outside the USA
• Products purchased from non-authorized retailers, dealers or resellers
• Products purchased or serviced outside the USA
• Acts of nature, such as, but not limited to lightning damage
• 3rd party products, such as headsets
22
Page 23

Product Registration:
• Please complete and mail the Product Registration Card packed with your unit. It will make it easier to
contact you should it ever be necessary. The return of the card is not required for warranty coverage.
Limitation of Warranty:
• THE WARRANTY STATED ABOVE IS THE ONLY WARRANTY APPLICABLE TO THIS PRODUCT. ALL OTHER
WARRANTIES, EXPRESS OR IMPLIED
(INCLUDING ALL IMPLIED WARRANTIES OF MERCHANTABILITY OR FITNESS FOR A PARTICULAR
PURPOSE) ARE HEREBY DISCLAIMED. NO VERBAL OR WRITTEN INFORMATION GIVEN BY TELEFIELD NA
INC., ITS AGENTS, OR EMPLOYEES SHALL CREATE A GUARANTY OR IN ANY WAY INCREASE THE SCOPE OF
THIS WARRANTY.
•REPAIR OF REPLACEMENT AS PROVIDED UNDER THIS WARRANTY IS THE EXCLUSIVE REMEDY OF THE
CONSUMER. TELEFIELD NA INC. SHALL NOT BE LIABLE FOR INCIDENTAL OR CONSEQUENTIAL DAMAGES
RESULTING FROM THE USE OF THIS PRODUCT OR ARISING OUT OF ANY BREACH OF ANY EXPRESS OR
IMPLIED WARRANTY ON THIS PRODUCT. THIS DISCLAIMER OF WARRANTIES AND LIMITED WARRANTY
ARE GOVERNED BY THE LAWS OF THE STATE OF OREGON. EXCEPT TO THE EXTENT PROHIBITED BY
APPLICABLE LAW, ANY IMPLIED WARRANTY OF MERCHANTABILITY OR FITNESS FOR A PARTICULAR
PURPOSE ON THIS PRODUCT IS LIMITED TO THE APPLICABLE WARRANTY PERIOD SET FORTH ABOVE.
How state law relates to this warranty:
• Some states do not allow the exclusion nor limitation of incidental or consequential damages, or limitations
on how long an implied warranty lasts so the above limitations or exclusions may not apply to you.
• This warranty gives you specific legal rights, and you also may have other rights that vary from state to state.
If you purchased your product outside the USA, Mexico or Canada:
This warranty does not apply. Contact your dealer for warranty information.
Visit the RCA web site at www.rca4business.com
Please do not send any products to the Oregon address listed in this manual or on the carton. This will only
add delays in service for your product.
Telefield NA Inc.
4915 SW Griffith Dr. #302
Beaverton, Or 97005
RCA is a trademark of RCA Trademark Management S.A.
Used under license.
© 2014. All rights reserved.
23
 Loading...