

Page 1

IP Phone
IP110
Page 2

Interference Information
This device complies with Part 15 of the FCC Rules. Operation is subject to the following two
conditions: (1) This device may not cause harmful interference; and (2) This device must accept
any interference received, including interference that may cause undesired operation. Privacy of
communications may not be ensured when using this phone.
This equipment has been tested and found to comply with the limits for a Class B digital device,
pursuant to Part 15 of the FCC Rules. These limits are designed to provide reasonable protection
against harmful interference in a residential installation.
This equipment generates, uses, and can radiate radio frequency energy and, if not installed and
used in accordance with the instructions, may cause harmful interference to radio communications. However, there is no guarantee that interference will not occur in a particular installation.
If this equipment does cause harmful interference to radio or television reception, which can be
determined by turning the equipment o and on, the user is encouraged to try to correct the
interference by one or more of the following measures:
• Reorient or relocate the receiving antenna (that is, the antenna for radio or television that is
“receiving” the interference).
• Reorient or relocate and increase the separation between the telecommunications equipment
and Receiver.
• Connect the telecommunications equipment into an outlet on a circuit dierent from that to
which the receiving antenna is connected.
If these measures do not eliminate the interference, please consult your dealer or an experienced
radio/television technician for additional suggestions. Also, the Federal Communications Commission
has prepared a helpful booklet, “How To Identify and Resolve Radio/TV Interference Problems.” This
boOKlet is available from the U.S. Government Printing Oce, Washington, D.C. 20402. Please specify
stock number 004-000-00345-4 when ordering copies.
Warning: The changes or modications not expressly approved by the party responsible for
compliance could void the user’s authority to operate the equipment.
The RCA IP110 phone is dedicated to business environment use. It is a full-featured and a exible
SIP solution. It is compatible with most IP PBX and VoIP providers.
Please read through the administrator’s guide before installing your phone.
FCC RF Radiation Exposure Statement
This equipment complies with FCC RF radiation exposure limits set forth for an uncontrolled
environment. This equipment should be installed and operated with a minimum distance of 20
centimeters between the radiator and your body. This transmitter must not be co-located or operated in conjunction with any other antenna or transmitter.”
This is a class B device, in a domestic environment; this product may cause radio interference, in
which case the user may be required to take adequate measures. To avoid the potential eects on
the environment and human health as a result of the presence of hazardous substances in electrical and electronic equipment, end users of electrical and electronic equipment should understand
the meaning of the crossed-out wheeled bin symbol. Do not dispose of WEEE as unsorted municipal waste and have to collect such WEEE separately.
Table of Contents
Getting Started 5
Packing List 5
Assembling IP110 6
Conguration and Registration 7
Basic Conguration via Web Page 7
Account Settings 8
Basic Conguration using phone keypad 9
Overview 11
LEDs 12
Icons 12
User Interface 13
User levels 15
Administrator Mode 15
Reboot 16
Customizing Your Phone 16
General Settings 16
Phone Status 16
Time and Date 17
Keypad Lock 18
Audio Settings 18
Volume 18
Ring Tones 19
Codec Selection 19
Contact Management 20
Edit/Add/Delete Contacts 20
Basic Call Functions 23
Outgoing calls 23
Call Devices 23
Call Methods 23
Send Key conguration 24
Hot Line 24
Anonymous call 25
Dial Plan 26
Incoming calls 27
DND 28
Call Forward 28
Auto Answer 29
32
Call log 30
Accessing Call log 30
Accessing Missed Calls list 30
Accessing Dial Calls list 30
Call list items management 30
During an Active Call 31
Mute 31
Call Hold 31
Call Waiting 31
Handling a waiting call 31
Call Waiting Conguration 32
Call Transfer 32
3-way Conference 33
Voicemail 33
Voicemail settings 33
Retrieving your Voicemail messages 33
Advanced Functions 34
Account Setting 34
Network Settings 35
Advanced Network Settings 35
VLAN 35
HTTPS 36
802.1X 36
Reset to Factory 36
Firmware Update and Autoprovisioning 37
Decryption 37
System Export 38
Keys conguration 38
Send Key conguration 38
Programmable keys 39
Line keys Conguration 39
Line 40
Speed Dial 40
Confernce 40
Transfer 41
Hold 41
DND 41
Page 3

Table of Contents
Getting Started
Call Return 41
Pick Up 41
Call Park 42
Voice Mail 42
Prex 42
Redial 42
Trouble shooting 43
Appendix A. 45
Line Key conguration menu 45
Memory Key conguration menu 46
Service 46
Warranty 47
Packing List
The following components are included in
your package:
IP110
Handset & Handset Cord
AC Adapter
Ethernet Cable
Quick Start Guide
Setting up your IP110
This section introduces how to set up the phone with the components in the
packing list:
Connecting the Handset Cord
Connecting to the Network and Power.
Connecting the Handset and Headset
(not included)
54
Page 4

Connect Network and Power
Connect the phone to AC Power directly using the included power adapter.
The LAN Port can also be connected to Hub/Switch/IP PBX or other internet devices.
The phone can also share the network connection with other network devices such
as a PC. Connect the phone’s PC port to the computer’s network port using an
Ethernet cable.
Power Socket
PC
Conguration and Registration
Some simple congurations are needed to get your phone ready for making calls:
network and account information must be correct.
If you are not an administrator, please contact your internet administrator or
service provider for more details.
Telephone Features and your VoIP Service Provider
Not all phone features are available with all VoIP service providers. Please make
sure all features are properly congured with the service provider before installing
the IP110.
Basic Conguration via Web Page
The IP110 features an embedded web server to help administrators and users congure,
manage and use their phone in an intuitive and simple manner. The phone’s web server can
be accessed with any web browser.
Press the OK button when the phone is in idle mode to nd out your IP110’s IP address.
Enter it (for example http://10.0.4.66) into the address bar of your web browser. The default
administrator’s login name and password are admin/admin.
Headset
Press here to release stand
Network Socket
Handset
Network Settings
Click on NETWORK[INTERNET PORT (WAN) Settings.
DHCP: By default the phone attempts to contact a DHCP Server in your network in order to
obtain its valid network settings, e.g. IP address, subnet mask, gateway, DNS server, etc.
Static IP Address: If your phone cannot contact a DHCP Server for any reason, you need to
enter the network settings manually via Static IP Address. Please contact your network
administrator for more details.
76
Page 5

Account Settings
The phone attempts to register to the SIP server using the account data provided
by automatic or manual initialization.
Click on ACCOUNT[ACCOUNT SETTINGS. Select Account to Account 1. You will
nd the following parameters:
Fill the elds and press the SAVE button.
The phone will try to register to the SIP server.
If all accounts registering fail, the phone will display “No Service” by default.
Field Description
Account Active You can choose to Enable or Disable this account.
Label The name shown on the LCD screen.
Display Name What the phone will display on the other phone’s Caller ID.
This may be overridden by data at the service provider.
Register Name Register name, provided by your service provider.
User Name User name, provided by your service provider.
User Password User password provided by your service provider.
SIP Server SIP server address provided by your service provider.
SIP Server Port SIP server port provided by your service provider. The
default is 5060.
Note: Should the IP PBX (SIP Server) require an authentication, a correct password
is needed. Make sure you are using the appropriate input method or enter the password via the web user interface.
Basic Conguration using phone keypad
You will need admin privileges to perform this and other congurations. By
default the phone will be in user mode, so you will need to perform a simple
procedure to switch to admin mode.
98
Page 6

Change phone to admin mode: Press MENU/BACK[7. User Type. Press the RIGHT
navigation key until you see “admin” on the screen. Then press the DOWN key to
be prompted for the password. It is “admin” by default. Type and press OK.
Network Settings: Press MENU/BACK[3. SETTINGS[2. ADVANCED[OK. Enter
the admin password, and choose NETWORK->WAN PORT or VLAN or WEB TYPE or
802.1x Settings to enter the internet relating conguration page.
Account Settings: Press MENU/BACK[3. SETTINGS[2. ADVANCED[OK. Enter the
admin password, and choose ACCOUNTS[OK to congure the account settings.
Enter the following parameters:
Overview
Field Description
Activation Enable/disable the account
Label What the phone will display on the other phone’s Caller ID.
This may be overridden by data at the service provider.
Display Name The local phone name showing on the other phone
when calling
Register Name Register name provided by your service provider.
User Name User name provided by your service provider.
Password Account password provided by your service provider.
SIP Server SIP server address provided by your service provider.
Press the UP and DOWN buttons to scroll through the parameter list and ll in
proper information. Press the OK button to conrm.
Note:
The active User Type is shown with an * on the left of display when you enter MENU/
BACK[7. User Type MENU/BACK, like this:
Once you nish all admin related tasks you should change back to user mode with
the same procedure.
<*user>
2 Lines
Menu/Back
Hold/DND
Conference
DIR/Toggle
Mute/Cancel
Volume Up
Volume Down
Speaker
Voicemail
Call Transfer
Headset
Hot Key/Call Log
1110
Page 7

LEDs
Line Keys
LED Status Description
Steady blue The line is open
Blinking blue There is an incoming call to the account, or there is a
call on hold
O The phone is in idle status whatever registered /
unregistered
Power Indication LED
LED Status Description
Steady blue You have new messages or new missed calls
Blinking blue There is an incoming call or a call is muted
Slow blinking blue The network is not available or SIP server failure
O IDLE MODE
Icons
The IP110 displays icons on its LCD, you can refer to the following
table for their meanings:
Icon Description
Flashes when the internet is disconnected
MISSED CALLS
CALL IN
CALL OUT
Input method: all letters and numbers
2aB
Input method: numbers
123
Icon Description
Input method: multi-lingual letters in lower case
abc
Input method: multi-lingual letters in upper case
ABC
CALL MUTE
VOICEMAIL
CALL FORWARD
AUTO ANSWER
DND
In HANDSET mode
In HEADSET mode
In SPEAKER mode
Keypad Lock
User Interface
There are two ways to customize specic options on your phone:
- Using the keypad and display of the phone.
- Using the Web user interface in an Internet browser from your PC;
please refer to “Conguration and Registration” to get into the Web interface.
1312
Page 8

PHONE OPTIONS PHONE UI WEB UI
Status
IP 44
MAC 44
Firmware 44
Network 44
Phone 4
Accounts 44
Call Features
Forward 44
Call Waiting 44
Function Keys 44
Send Key 44
Hot Line 44
Anonym Call 44
DND 44
Logs Setting 44
Basic Phone Functions
Language 4
Time & Date 44
Ring Tone 44
Phone Volume 4
Advanced Phone Functions
Accounts 44
Network 44
Reset Factory 4
Set Password 44
Set AES Key 44
Auto Provision 44
Other Features
Messages 4
History 44
Directory 44
User Mode 4
Note: 1) The above table only indicates most of phone functions rather than all of them. Please refer
to next chapters for more details. 2) Some functions are password protected. In this case when you are
prompted for a password make sure to introduce one in accordance with active User Type
The default administrator password is admin.
Maintenance Tasks
User levels
The phone allows three modes to congure the phone:
- User Mode
- VAR mode
- Administrator Mode
Administrator mode grants unlimited access to the phone conguration on both
Web and Phone interface. User Mode is not able to access the settings on the
Phone interface such as: Accounts, Network, Reset to Factory, other advance
phone settings. VAR mode grants access to subset of Administrator functions
(Login and password are var/var).
Administrator Mode
Administrator mode grants unlimited access to the phone conguration on both
the web and the phone user interface. The administrator/user password is used to
access:
• Web interface.
• The advanced settings of the phone, such as Network, Account
and Reset to Factory settings via the phone interface.
The default administrator password for the phone interface is admin. The user
name for the web interface access is admin and the password is admin.
To change the administrator password via Phone interface:
1) Make sure active User Type is admin
2) Press MENU/BACK[3. SETTINGs[2. Advanced
3) You are prompted to enter the required password.
4) Scroll to Set Password option, then press OK button.
5) You are prompted to enter the Current PWD, New PWD and Conrm PWD, Press
DIR/TOGGLE to change the input method.
6) Press OK button to conrm the change, or MENU to return to previous menu.
To change the administrator password via Web interface:
Go to SECURITY[PASSWORD
1514
Page 9

Reboot
You should reboot the phone when you are asked to, e.g. after applying specic
changes to phone conguration.
To reboot via Web interface:
1) Go to SYSTEM[UPGRADE.
2) Click REBOOT button.
Note: Please do not power o during reboot, or it may cause a ash memory error.
Customizing Your Phone
General Settings
Phone Status
You can view the status of your phone using the phone interface or the web interface.
This option allows you to review:
- IP address
- MAC (Machine Access Control) address
-Firmware version
-Network: MAC, LAN, Netmask, Gateway, DNS, etc
-Phone: Model, Hardware, Firmware, Product ID and MAC
-Accounts: The status of the two SIP accounts
To check the Phone Status via phone interface:
Press OK button to check the IP. Use the navigation keys to check the other information.
To view the Phone Status via web interface:
Open a web browser and input the IP Address of the phone. Enter login and
password (default login and password are admin and admin).
Select STATUS [HARDWARE STATUS.
Time and Date
Time and date are displayed on the idle screen. By default the date and time of the
phone are congured manually, but you can set to obtain them from a precongured SNTP server, if needed. Please contact your system administrator if the time
or date is incorrect.
To change Time and Date via the Phone interface:
Press MENU [3. SETTINGS[1. BASIC[1. TIME & DATE[OK.
If SNTP is chosen, the phone will automatically get the time from an NTP Server.
Use the UP and DOWN navigation keys to select the specic options and change
parameters to meet your needs. You can set Time Zone, NTP Server respectively.
If Manual is chosen, the time can be set manually. Use the UP and DOWN navigation keys to select the option and enter the specic date and time.
1. DATE (M-D-Y):
01-01-12
Press the OK button to save your changes. Or press MENU/BACK key to return to
the previous screen.
To set time format via the Phone interface:
Press MENU/BACK[3.Settings [1.BASIC [1.TIME & DATE [3.TIME & DATE
[OK.
Use the LEFT and RIGHT navigation keys to choose a preferred time format: 12
hour or 24 hour.
Press the OK button to save the changes and return to the previous screen.
Note: By default date and time setting is set to “Manual”.
1716
Page 10
Keypad Lock
You can lock the menu key of your phone to protect it from unauthorized use.
When the menu key is locked, you can’t access the menu of the phone.
To enable the lock via Phone interface:
Press MENU/BACK [3. SETTINGS[2. ADVANCED, enter the password of current
user type, and then press OK button.
Scroll down to Keypad Lock and press OK.
Use the LEFT or RIGHT navigation keys to change to “MENU KEY”.
Press OK button to active the change, or MENU button to return to the previous
screen. The icon will be displayed on the top right corner of the idle screen.
To unlock the phone via Phone interface:
Press MENU key, you are prompted for the password.
Enter the password of current user type, and then press OK button, you can enter
the main menu and the keylock function is disabled as well.
To enable keypad lock via Web interface:
Choose Phone Preference web page to change the Keyboard lock option.
Audio Settings
Volume
Handset, speaker, headset and ringer volumes can be adjusted independently.
To adjust the volume in idle mode:
Press MENU/BACK[3. SETTINGS[1. BASIC.
Scroll to 3. Phone Volume, and press OK button. Select the item you wish to adjust
and use VOLUME UP and VOLUME DOWN or LEFT and RIGHT navigation keys to
increase or decrease volume.
Press OK button to save volume change or MENU key to cancel.
To adjust ring volume you can also press VOLUME UP and VOLUME DOWN when
the phone is in idle status.
To adjust the volume when you are in an active call:
When handset/headset/speaker mode is activated, press VOLUME UP or VOLUME
DOWN to adjust the volume.
Note: The volume can only be adjusted via Phone interface.
Ring Tones
There are seven unique ring tones on the IP110.
To select Ring Tone Type via Phone interface:
Press MENU/BACK[3. SETTINGS[1. BASIC[OK.
Scroll to 2. RING TONE, and press OK button.
Use the UP and DOWN navigation keys to select your selection. A sample of each
tone will be played.
Press OK button to save the change or MENU/BACK to cancel.
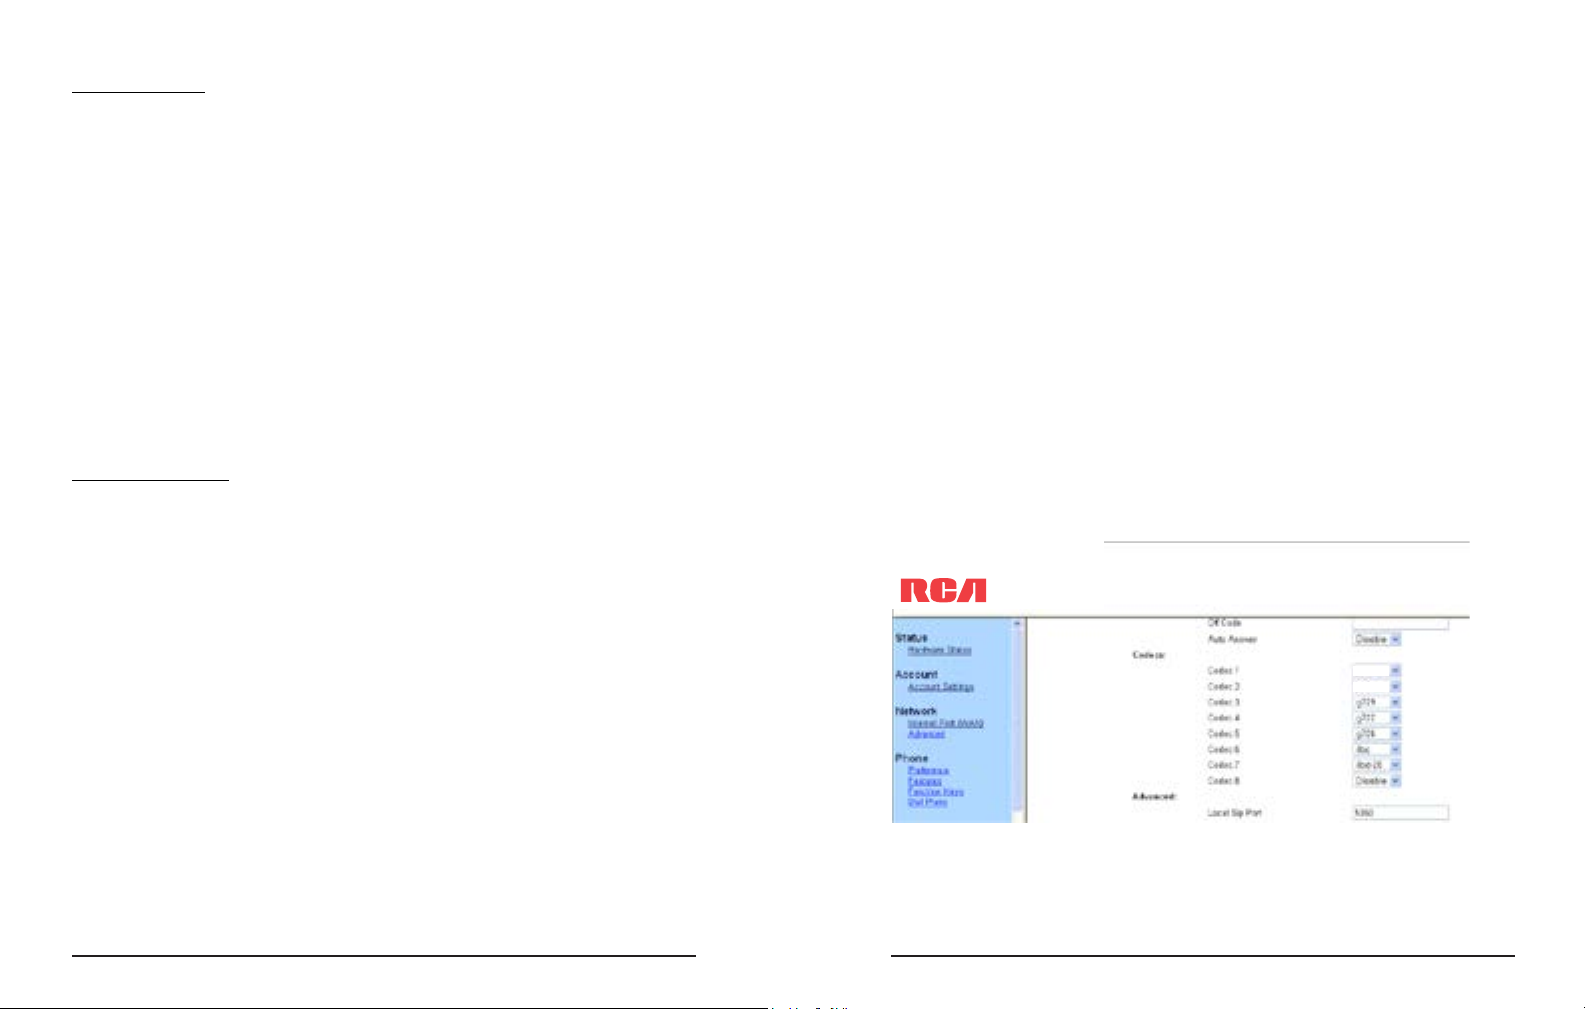
Codec Selection
The IP110 supports the following voice codecs:
-PCM u-law , PCM a-law, G.729, G.722, G.726, iLBC, iLBD-20
You can enable/disable the desired codecs via Web interface. Please contact your
System Administrator for more details about the codecs.
To enable/disable the codecs via web interface:
Choose ACCOUNT[ACCOUNT SETTINGS (Account 1/Account2)
Select the desired codecs in Codecs section.
Click Save button to save the change.
PCM U-LAW
PCM A-LAW
Note: Codec Selection can only be done via Web interface.
1918
Page 11

Contact Management
Edit/Add/Delete Contacts
The IP110 features a 300 entry phonebook and 10 speed dial keys.
With the phonebook you can add, edit, delete, dial, search for a contact or create
groups of contacts.
The phonebook also includes a Blacklist feature to block unwanted calls.
To add a contact via Phone interface:
Press DIR/TOGGLE and the OK button
Or
MENU/BACK[6. DIRECTORY[1. DIRECTORY.
Press OK button to enter into the Contacts list, press UP navigation key to select
the ADD option, Press the OK button, and enter a Name for your contact. Then
press the DOWN navigation key to enter phone number of the contact via the
keypad. Use the DIR/TOGGLE key to select between numeric and upper/lower case
alphanumeric modes.
Press the DOWN navigation key to select if you would like this contact to be associated with a specic VoIP account on this phone. The default is Auto.
Press DOWN navigation key to set and choose a special ring tone for the contact.
If you want to assign this contact to a group, use the DOWN navigation key to
select the group.
Press OK button to add the contact, or the MENU/BACK key to cancel the change.
To add a Group via Phone interface:
Press DIR/TOGGLE and OK button or
MENU/BACK[6.DIRECTORY[1.DIRECTORY.
Use the LEFT and RIGHT navigation keys to choose AddGroup, press the OK button
to enter to the Add Group page.
Enter the group name and choose a ring tone to be associated with this group.
Press OK button to save.
To congure the speed dial keys via Phone Interface:
Press MENU/BACK[2. FEATURE[2. FUNCTION KEYS [2. MEMORY KEYS
Use the UP and DOWN navigation keys to select the key on which you want to
store a contact number, press the OK key to conrm
Use the RIGHT and LEFT navigation keys to select Speed Dial, then use the UP
and DOWN keys to select Account if you want to assign this speed dial keys to a
specic account. Use the UP and DOWN navigation keys to select Value, enter the
desired number and press OK key to conrm.
To use a Speed Dial key, simply hold DOWN the desired key for 2 seconds. The
IP110 will automatically begin dialing that selection.
To edit/delete a contact via Phone interface:
Press DIR/TOGGLE [1. DIRECTORY or MENU/BACK[6. DIRECTORY [1. DIRECTORY
Use the UP and DOWN navigation key to select the contact list (e.g. 1.Contacts)
and press the OK button.
Use the UP and DOWN navigation key to select the contact you want to edit or delete,
then press LEFT/RIGHT navigation keys to select Edit or Del and press the OK button.
John Smith
123-4567-8888
If you select Edit, you will be able to change the Name, Numbers, Account, Ringtone and Group of the selected contact. Make the desired changes, press the OK
button, or press MENU return to previous menu. If you select Del, the phone will
ask if you are sure you wish to delete this contact. Press OK again, and the contact
will be deleted.
2120
Page 12

To move a contact to the Blacklist via Phone interface:
If you add a contact to the blacklist your phone will automatically reject all calls
from this contact.
Press DIR/TOGGLE [1. DIRECTORY or MENU/BACK[6. DIRECTORY[1. DIRECTORY
Use the Up or DOWN navigation key to select the contact list (e.g. 1.Contacts) and
press the OK button.
Use the Up or DOWN navigation key to select the contact you want to move to
blacklist, then press LEFT or RIGHT navigation keys to select M2B.
John Smith
123-4567-8888
Press the OK button, or press MENU to return to previous menu.
A warning message will ask for conrmation to move the contact to the Blacklist.
Press the OK button to conrm the operation, or press the MENU button to return
to the directory.
M2B
Basic Call Functions
Outgoing calls
Call Devices
You can make a phone call via the following devices:
Pick up the handset, icon will be shown on the screen.
Press the SPEAKER button, and this icon will be shown on the screen.
Press HEADSET button if a headset is connected to the headset Port.
This icon will be shown on the screen. Pressing the HEADSET button again
will hang up the headset.
Note: You can dial the number rst, and then choose the device you will use for your
call.
To move a contact from Call Log to Contacts via Phone interface:
Press MENU/BACK[5. HISTORY, or use the LEFT key shortcut
Use the navigation keys to select a record, then press the DIR/TOGGLE key to enter
the edit page. From here you can give the contact a name, add additional phone
numbers, change the account association or give a VIP ringtone to the contact.
Press the OK key to save the contact.
To search a contact via Phone interface:
Press DIR/TOGGLE [1. DIRECTORY
Or
MENU/BACK[6. DIRECTORY [ 1. DIRECTORY
Use the Up or DOWN navigation key to select the contact list (e.g. 1.Contacts) and
press the OK button.
Press a key on the dial pad to enter the search mode. Enter the contact name to
be searched for and press the OK button. Contact list will be searched for matching records.
Call Methods
There are several ways to initiate a call:
1. Press an available Line button and dial the number you want to call, or
2. Dial a number and press the SPEAKER button, the HEADSET button or pick up
the handset, or
3. Go to Directory, use the navigation keys to select the desired contact, or
4. Press the LEFT navigation key to enter the call log interface, then use the navigation keys to make your selection (press LEFT/RIGHT button to choose All Calls,
Dialed Calls, Received Calls, Missed Calls and Forwarded Calls) or
5. Press the UP navigation key to enter the Dialed Calls interface, then choose a
record to dial out or
6. Press and hold a key on the dial pad that has been set as speed dial key.
To terminate a call you can:
1. Press the MENU/BACK key or
2. If you are in handset mode, replace the handset on hook or
3. If you are in speakerphone mode, press the speaker key
2322
Page 13

Send Key conguration
Admin can set a specic button (“#” or “*”) as the send key. If this feature is
enabled, once you’ve dialed the desired number, you can press this send key to call
your correspondent immediately.
To set the send key via the IP phone interface:
1) Make sure active User Type is admin or var.
2) Press MENU/BACK [ 2. FEATURES[ 4. SEND Key to enter the conguration page.
1. Send Key:
<*# >
3) Press the LEFT/RIGHT navigation keys to choose a button that you want to use
as the send key: “#”, “*”, or disable this option. Note that currently active option
has an “*” on the left.
4) Press the OK button to save the changes, or MENU to cancel.
Hot Line
Hot Line allows your phone to dial a number automatically if it has been o hook
for a specied time period and no keys have been pressed. Both destination number and timeout can be congured.
The service is enabled if Hot Line Number has been congured.
To set the hot line number via the IP phone interface:
Press MENU/BACK[2. FEATURES [3. HOT LINE to enter the conguration page.
( if the active user type is admin or var , press MENU/BACK [2. FEATURES [5.
HOT LINE )
Anonymous call
Anonymous call, also known as Caller ID restriction, allows a user to request the
network to hide their identity when they are performing outgoing calls.
The IP110 supports Permanent Caller ID restriction, meaning that while enabled
all calls will request to be anonymous and the user will need to disable the feature
if they want their identity to be transmitted. This service can be performed locally
or by sending an activation code to the network, depending on your network.
Additionally the IP110 allows users to automatically reject anonymous incoming
calls.
These services can be managed through both phone and Web interfaces.
To set Anonymous call via phone interface:
1) Press MENU/BACK[2. FEATURES [4. ANONYM CALL to enter the conguration page. ( if the active user type is admin or var , press MENU/BACK [
2. FEATURES[6. ANONYM CALL )
2) Use LEFT or RIGHT navigation keys to select the account to be anonymous.
3) Press DOWN navigation key to display “Block CID”, then press LEFT or RIGHT
navigation keys to enable/disable the anonymous call function.
4) If you want to perform this function locally, press OK to save your changes.
5) If your user type is admin and you would like to activate this function in your
service provider please press DOWN key and enter the Anonym On Code and Anonym O Code. Whenever you enable/disable the anonymous call function on your
phone, it will automatically send these codes to the server.
6) Press OK to save your changes, or MENU to cancel.
Enter the hot line number and press UP or DOWN navigation key to select HotLine
Delay. Set the Hot Line Delay (default is 4 seconds), then press the OK button to
save the changes.
2524
Page 14

To set Anonymous call rejection using phone interface:
1) Press MENU/BACK[2. Features [ 4. Anonym Call to enter the conguration
page.
2) Press the UP or DOWN navigation keys to enter the Rejection page
(if the active user type is admin or var , press MENU/BACK [ 2. FEATURES [ 6.
ANONYM CALL ).
3) Press RIGHT or LEFT navigation keys to enable/disable Anonymous Call Rejection
function.
4) If your user type is admin and you would like to use your service provider to
get this service , please press the DOWN key and enter the Rejection On Code and
Rejection O Code. Whenever you enable/disable the Rejection option on your IP
phone, it will automatically send these codes to the server.
5) Press OK to save your changes, or MENU to cancel.
Note: To manage Anonymous Calls and Rejection codes you need to have admin
or var rights. Check active User Type before attempting to congure using phone
interface.
Dial Plan
A dial plan establishes the expected number and pattern of digits for a telephone
number. This includes country codes, access codes, area codes and all combinations of dialed digits.
Dial plans can be used for least cost routing, dialing convenience or to prevent
users from calling specic numbers or groups of numbers.
Dial plans require admin or var privilege.
The entire dial plan is enclosed in brackets (). Each dial plan is pipe seperated (|).
The dial plan can include the digits 0 to 9, * and #. “x” represents any digit from 0
to 9. Repetition (i.e. x.) represents any digit (x) repeated 0 or more times. Big letter
T means to dial the numbers immediately after the dial plan sequence is matched
(e.g. 1234T). Square brackets [] are for digit matching. For example, [578] xxx will
match any four digit sequence starting with either 5, 7 or 8. [5-8]xxx will match
any four digit sequence starting with 5, 6, 7 or 8.
Here is a dial plan example:
(111T|[0-4] xxxxxxxxT)
111T This will dial 111 immediately after you entered the third digit.
[0-4]xxxxxxxxT Any 9-digit number starting with 0,1,2,3 or 4 will be dialed out
immediately after you enter the 9th digit.
To create a Dial Plan in the web interface, use the following elds:
-Dial Plan: Enter the dial plan here
-DP Enable: To enable or disable the dial plan
-Dial Plan tmo: Timeout before phone converts the dialed number
according to dial plan (if enabled)
-Dial End tmo: Timeout before phone makes the call after the last digit
of the number is entered
-Dial End tmo Enable: To enable or disable the Dial End timeout.
-Hook O tmo: Timeout for the unit to go back to standby mode after
the handset is o hook
-Hook O tmo Enable: To enable or disable the Hook O timeout
Incoming calls
Answering an incoming call
1) Lift the handset or press the SPEAKER button to answer using the speakerphone, or press the HEADSET button to answer using the headset.
2) If you are already talking on the phone, press the corresponding LINE key or OK
button to answer the new call.
During the conversation, you can alternate between handset, headset and speakerphone by pressing the corresponding buttons or picking up the handset.
Rejecting an incoming call
Press the MUTE/CANCEL key to reject an incoming call directly.
2726
Page 15

DND
When DND function is enabled, the phone will display the DND icon and all
incoming calls will be rejected. You can nd a record of all the calls that were
rejected in the incoming call record of the Call History. Pressing HOLD/DND in idle
mode will activate or deactivate the DND function.
To congure the DND function via Phone interface:
1) Go to MENU/BACK[2. FEATURES[5. DND to enter the conguration interface.
2) Use the RIGHT or LEFT navigation keys to choose Enable/Disable.
3) Press the OK button to save the changes.
4) Choose DND option again to deactivate DND mode.
You can also DND function using DND Codes if your IPPBX or server provides
this function:
1) If your user type is admin go to MENU/BACK[2. FEATURES[5. DND to enter
the conguration interface.
2) Set the DND On Code and the DND O Code by pressing UP or DOWN naviga-
tion keys, then press the OK button to save the changes.
3) When you select to enable/disable the DND function it will send these codes to
the server, and the server will turn on/o the DND function. In this case, any calls
addressed to the phone’s extension will be rejected by the server automatically,
and will not be included in the Call Log.
Note: When DND is locally enabled, the corresponding icon will be shown in the
display.
CALL FORWARD
This feature allows you to divert an incoming call to another phone number like a
cell phone or voice mailbox.
The following CALL FORWARDing events can be congured:
- Always: Incoming calls are immediately forwarded.
- Busy: Incoming calls are immediately forwarded when the phone is busy.
- No Answer: Incoming calls are forwarded when the phone is not
answered after a specic time period.
To congure CALL FORWARD via Phone interface:
1) Go to MENU/BACK[2. FEATURES[1. FORWARD. You can also press the DOWN
navigation button to enable/disable CALL FORWARD when the phone is in idle mode.
2) There are 3 options: Always, Busy and No Answer. Select using 1, 2 or 3.
3) Enter the phone number to which calls will be forwarded. For No Answer you
can also select the No Answer timeout pressing the DOWN navigation key.
4) If you prefer the server to perform this function, please enter the On Code and
O Code options. When you choose to enable the call forward function via your
IP phone it will send the corresponding code to the server, which will take care of
forwarding your calls. In this case, forwarded calls will not be stored in the Call Log.
5) Press the OK button to save changes.
Notes:
1. While an incoming call is ringing, if you press CALL TRANSFER you can dynamically forward the call to a desired number.
2. You can quickly enable/disable Forward by pressing DOWN key from idle mode.
Forward type and target number will be the last ones congured using the menu.
3. Only admin/var can set the On/o codes. Make sure the right User Type is active.
4. When CALL FORWARD is enabled, the corresponding icon will be shown on the
display
5. “FWD To …” will be displayed on the idle screen after an incoming call was forwarded. Users can press the MUTE/CANCEL button to clear the message.
Auto Answer
Auto Answer allows an incoming call to be answered without requiring any action
by the user. This function is set on a per account basis.
This function can only be enabled/disabled by admins or vars.
To set Auto Answer via the IP phone interface:
1) Make sure active User type is var or admin.
2) Press MENU/BACK[3. SETTINGS[2. ADVANCED, enter the password and press OK button.
3) Then choose 1. ACCOUNTS[LINE X to enter the conguration page, use the UP
and DOWN navigation keys to choose Auto Answer option.
4) Use the LEFT or RIGHT navigation keys to enable or disable the auto answer
function. The default is Disable.
5) Press the OK button to save the changes.
To set Auto Answer via Web interface:
1) Go to ACCOUNT[ACCOUNT SETTINGS page
2) Go to BASIC [AUTO ANSWER option.
3) Select Enabled or Disabled in the pull-down menu, click Save button to save the change.
2928
Page 16

Call log
The IP110 can store up to 100 calls in its Call log. There are 5 dierent lists:
• All calls
• Forwarded calls
• Missed calls
• Received calls
• Dialed calls
The call logs can be accessed through the web interface (Contact[Phone Call
Info). In the next paragraphs we will explain how to access them from the phone
interface.
Accessing Call log
You can access the Call Log by pressing the LEFT navigation key from idle mode.
You will be in the “All Calls” list, where calls are sorted sequentially, and each call
is marked with the corresponding icon.
To change list type, use the RIGHT nagivation key. Note the icons at the top of the
screen which indicate the list you are on.
Accessing Missed Calls list
You can access the Missed Calls list by pressing the LEFT navigation key from idle
mode to reach the Call Log and then RIGHT navigation key twice as explained
above. When you are in the Missed Calls list you should see the icon on the
screen.
Accessing Dial Calls list
You can access the Dialed calls list directly by pressing the UP navigation key from
idle mode.
You can also access this list by pressing LEFT navigation key to enter the Call Log,
and then LEFT navigation key again.
When you are in the Dialed Calls list you should see icon on the screen.
Call list items management
When you are in a call list, you can:
1) Dial the current entry by pressing the OK key, or
2) Store it in the Directory by pressing the DIR/TOGGLE key, or
3) Delete it using the MUTE/CANCEL key
During an Active Call
Mute
This function allows you to mute the microphone of your phone during a call; you
cannot be heard by the other party. You can still hear all other parties while mute
is enabled.
To mute/resume the conversation:
Press MUTE/CANCEL button during a conversation to mute the current call. The
icon will be shown on the LCD, and the power indication LED will blink.
Press MUTE/CANCEL again to unmute the call.
Call Hold
This call function allows you to place an active call on hold. In this case your IP
PBX might play a melody or message to the other party while waiting. Other calls
can be received and made while having a call on hold.
To hold/resume a call:
Press HOLD/DND button to put your active call on hold.
If there is only one call on hold, press HOLD/DND button again to retrieve the call.
If there is more than one call on hold, press the UP/DOWN navigation keys to
select the desired call, then press HOLD/DND button again to retrieve the call.
Call Waiting
This call feature allows your phone to accept incoming calls even when you are
currently on a call.
Handling a waiting call
By default Call Waiting is enabled, and when an incoming call is received during
another active call a short tone will be played.
In this situation, user can:
1) Accept the second call using the OK key. The rst one will be put on hold automatically. Or
2) Reject the call using MUTE/CANCEL button
3) Ignore the incoming call
3130
Page 17

Call Waiting Conguration
To congure Call Waiting via Phone interface:
1) Make sure active User Type is admin or var
2) Press MENU/BACK[2. FEATURES[2. CALL WAITING.
3) Use the LEFT or RIGHT navigation keys to enable/disable the call waiting feature.
4) Use the navigation keys to enable/disable the Play Tone option. This option is used
to dene whether to play a short tone when there is an incoming call during an
active call.
5) Press the OK button to save the changes, or MENU/BACK to return to the previous
menu.
Call Transfer
This call function allows your phone to transfer an active call to another phone :
Blind Transfer, Attended Transfer and Semi-Attend Transfer are supported.
To make a Blind Transfer via phone interface (no prior announcement of the call):
1) Press the CALL TRANSFER button during an active call, placing the call on hold.
2) Dial the second phone number and press the CALL TRANSFER button to complete
the transfer.
To make an Attended Transfer via phone interface (with prior announcement):
1) Press the CALL TRANSFER button during an active call, putting the call on hold.
2) Dial the second phone number.
3) When the call is answered, press the CALL TRANSFER button to complete the
transfer.
To make a Semi-Attended Transfer via phone interface (no prior announcement
of the call):
1) Press the CALL TRANSDER button during an active call, putting the call on hold.
2) Dial the second phone number.
3) While third party’s phone is ringing, press the CALL TRANSFER button or hang up.
Note: Make sure that the service provider you have registered with supports this function.
3-way Conference
Your IP110 can establish a three-party conference by using both lines.
To establish a conference via the phone interface:
1) Once a call has been connected with the 1st caller, press the CONFERENCE
button, placing 1st caller on hold.
2) Dial 2nd party number.
3) Once connected with the 2nd party, press the CONFERENCE button to establish
the conference.
4) Hang up to disconnect all parties.
Voicemail
Your voicemail messages, stored in your local or hosted VoIP telephony system, can
be accessed from your phone.
New voice messages can be indicated both acoustically and visually as described
below:
The idle screen will indicate the new voice messages.
The VOICEMAIL button backlight will be on.
The LED of the phone will turn solid blue.
Voicemail settings
To congure the voicemail code via Phone interface:
1) If your user type is admin go to MENU/BACK[4. MESSAGEs[ 2. SET VOICE MAIL.
2) Use the navigation keys to select the Line you want to set, enter the number to
connect to your system voicemail. You can press DIR/TOGGLE to choose the proper
input method.
3) Press the OK button to save the changes, or press MENU/BACK to return to the
previous menu.
Note: Please contact your system administrator for the voicemail code. Dierent
systems have dierent codes.
To congure voicemail settings using the Web interface:
1) Go to ACCOUNT[ACCOUNT SETTINGS and set voicemail number.
Retrieving your voicemail messages
To check your voicemail status via the Phone interface:
1) Press MENU/BACK[4. MESSAGES[1. VIEW VOICE MAIL.
2) You can view your messages (new and old messages).
3332
Page 18

To listen to your new messages via the Phone interface:
1) Press the VOICEMAIL button directly.
2) You may be prompted to enter the password which is needed to connect to your
VoIP telephony system.
3) Your voice mailbox is connected and you are able to listen to your new and old
voicemails.
Note: Before retrieving a new VOICEMAIL, please make sure that the connecting code has been set on the phone. If you have more than one account set on the
phone, when pressing the VOICEMAIL button you will be calling the active account
mailbox.
Advanced Functions
Account Setting
Please refer to “Conguration and Registration” chapter for the basic account
setting information. The following table lists the parameters in Advanced Account
Setting section of the web interface.
Field Name Description
Local SIP Port Local SIP port. The default value is 5060.
DTMF Type Select DTMF type.
Session Timer This toggles the Session Timer on or o.
Session Initiation Protocol (SIP). This extension allows for a periodic refresh
of SIP sessions through a re-INVITE or
UPDATE request. The refresh allows both
user agents and proxies to determine if
the SIP session is still active.
Voice Encryption (SRTP) Voice Encryption (SRTP)
ptime(ms) The time between two RTP packets of
the current used codec
SIP Server Type The type of SIP Server
You can only congure these settings via Web interface:
1) Go to ACCOUNT [ ACCOUNT SETTINGS.
2) Select desired account.
3) Make desired selections in Advanced section.
Check with your system administrator or service provider for more information.
Network Settings
Please refer to chapter “Conguration and Registration” for the Basic Network
WAN setting information. In the next paragraphs we will describe other Network
related settings.
Advanced Network Settings
VLAN
VLAN is a group of hosts with a common set of requirements that communicate
as if they were attached to the Broadcast domain, regardless of their physical
location.
The IP110 supports 802.1p and q packet tagging. VLAN ID and Priority can be set
via phone or web interface.
To congure VLAN settings via Phone interface:
1) Make sure the active User Type is admin or var
2) Press MENU/BACK[3. SETTINGS[2. ADVANCED.
3) Enter the password required, scroll to Network option, press OK button and
select VLAN, then press OK to enter.
4) Choose WAN Port and press OK button to enter.
5) Use the LEFT or RIGHT navigation keys to choose and set the VLAN Status; input
the VID Number, Priority.
6) Press OK button to save the settings, or MENU/BACK to return to VLAN menu.
To congure VLAN settings via Web interface:
Choose NETWORK[ADVANCED. Perform necessary changes. Check with your
system administrator for more information.
3534
Page 19

HTTPS
The IP110 supports HTTPS (Hypertext Transfer Protocol over Secure Socket Layer).
Adding SSL layer under HTTP, adds a security layer to HTTP. Admins can set this
transmission mode via web page.
To congure HTTPS settings via Web interface:
Go to NETWORK[ADVANCED, choose Web Server option. In the pull-down menu
of Type eld, choose the transmission mode, then click the CONFIRM button to
save the changes.
802.1X
IEEE 802.1X is an IEEE Standard for port-based Network Access Control (PNAC).
It is part of the IEEE 802.1 group of networking protocols. It provides an authentication mechanism to devices wishing to attach to a LAN, either establishing a
point-to-point connection or preventing it if authentication fails. It is used for
securing wireless 802.1x access points and is based on the Extensible Authentication Protocol (EAP).
This IP phone supports 802.1X. For the details, please consult your system administrator or technical support.
Reset to Factory
You should reset the phone only when the phone conguration has been changed
and the phone is no longer functioning anymore. To maintain the conguration of
the phone, please see a network administrator or service provider for assistance.
To reset to factory via phone interface:
1) Make sure active User Type is admin or var.
2) Press MENU/BACK[3. Settings[2. Advanced.
3) You are prompted to enter the required password.
4) Scroll to Reset Factory option, then press OK button.
5) You are prompted to conrm the change, press OK to reset to factory settings,
or MENU/BACK to return to previous menu.
It will take a few minutes to reset, please do not power o during resetting, or it
will cause ash memory error.
Note: If you perform a factory reset, current settings including contact list, call
history, account settings, etc will be lost.
Your phone will have to be congured manually or reprovisioned.
Firmware Update and Autoprovisioning
The phone is delivered with pre-installed rmware. To update the phone’s rmware, please contact your system administrator. You can only update the rmware
via Web interface.
To update the rmware manually via Web interface:
Choose SYSTEM[UPGRADE; select the rmware le in your local computer.
Click UPGRADE button to update the new rmware.
Please do not power o during updates.
To update the rmware and conguration automatically, you can use auto provi-
sioning.
Note: Please check with your network administrator for the Autoprovisioning guide.
To launch Autoprovisioning using web interface:
Go to SYSTEM[PROVISIONING Settings
Set Auto Provision via phone interface:
1) Go to MENU/BACK[3. SETTINGS[2. ADVANCED
2) You are prompted to enter password
3) Scroll to 7. Auto Provision and press OK button.
Enter the URL, User Name and Password (optional).
Click OK key to save the changes and reboot the phone.
Note: Any power interruption during the subsequent process will most likely lead to
a ash memory error. As a result the system may not initiate. The procedure
can be only conducted in Administrator Mode. The upgrade priority is rst the DHCP
option eld, then the precongured URL eld.
Decryption
Your IP110 supports conguration le encryption for provisioning. In case encryption is used, AES key needs to be congured on the phone.
Set AES key via Web interface:
Go to SYSTEM[PROVISIONING Settings
Note: You can ask your system administrator for the decrypt password.
3736
Page 20

Set AES Key via phone interface:
Go to MENU/BACK[3. SETTINGS[2. ADVANCED[6. Set AES Key.
Enter the Common AES and the MAC-oriented option.
Press the OK button to save the changes.
System Log Export
To help with troubleshooting, users can export the system log and send it to the
network administrator for diagnosis.
To enable the system log capture via phone interface:
1) Make sure the active User Type is admin
2) PRESS [ 2. FEATURES [8. LOGS SETTING
3) Use the LEFT and RIGHT navigation keys to choose ENABLE
4) Press the OK button to save the changes
5) Reboot the phone
To enable the system log capture via web interface:
1) Go to SYSTEM [LOG SETTINGS
2) Change the “Print Enable” to Enable
3) Press the SAVE button.
4) After the Log Settings is saved successfully, reboot the phone
To export the system log via web interface:
When the desired data is collected, follow these steps to export the system log.
1) Go to SYSTEM [ LOG SETTINGS in the web interface
2) Press the “EXPORT” button
3) After the log le is created successfully, press the link “SAVE IT LOCALLY” to
download the log le.
Keys conguration
Send Key conguration
Admins can set a specic button (“#” or “*”) as the send key. If this feature is
enabled, once you’ve dialed the desired number, you can press this send key to
call your correspondent immediately.
Please check Send Key conguration in Basic Calls chapter for a complete description.
Programmable keys
The keys from 0-9 (memory keys) on the keypad are editable. Users can customize
specic features for these keys according to their needs. (The keys are only available when the phone is in idle mode).
This function can only be set via the Web interface:
PHONE[FUNCTION keys (Memory Key)
Conguration of function keys for idle mode is:
- Up key: access to dialed list
- DOWN key: access to CALL FORWARD
- LEFT key: access to call log
- RIGHT key: access to account switch
- OK key: access to status
- DND key: access to DND
Line keys Conguration
The phone has 2 line keys to which functions can be assigned out of a list of functions. The following list shows the functions you can set on the Line keys. The next
paragraphs provide a description for each function. The default conguration for
each key is Line.
- Line
- Speed Dial
- Conference
- Transfer
- Hold
- DND
- Call Return
- Pick Up
- Call Park
- Voicemail
- Prex
- Redial
Note: Many of those features require IP PBX or service provider support and hence
must be congured in the server rst in order to work on your phone. Contact your
system administrator or Technical support for more details.
In addition, please note that not all the servers support the above-mentioned
features.
3938
Page 21

Line
The most frequent use for the line keys is assigning them one of two possible
user accounts for call management.
To assign the key as a Line via the web interface:
Go to PHONE[FUNCTION Keys (Line Key)
Speed Dial
You can congure the key as a simplied speed dial key. This key function allows
you to easily access the most frequently dialed numbers.
To assign the key as a Speed Dial via the web interface:
Go to PHONE[FUNCTION Keys (Line Key)
Conference
You can congure the Line key to be used as a conference key while remaining in
the current call. This key allows a user on a call to conference another party while
remaining in the conference.
‘To assign the key as Conference via the web interface:
Go to PHONE[FUNCTION Keys (Line Key)
Transfer
You are able to congure a key as a TRANSFER key to perform a Blind/Attended/
Semi-Attended Transfer. The main dierence this key and the CALL TRANSFER
hard key is in this case you can pre-congure the number to which transfer will
be performed. This is very useful when there are only a few numbers to which you
usually transfer calls.
To assign the key as the Transfer key via the web interface:
Go to PHONE [FUNCTION Keys (Line Key)
Hold
The key can be congured as a HOLD key. You can use this key to hold and retrieve
a call during the conversation.
To assign the key as Hold via the web interface:
Go to PHONE[FUNCTION Keys (Line Key)
DND
If the key is congured as DND key, it will work as a toggle key to enable/disable
this service.
Please check DND chapter in the Incoming calls section of Basic Call Functions
chapter for more information about this function.
To assign DND to a key via the web interface:
Go to PHONE[FUNCTION Keys (Line Key)
Call Return
Call Return function dials out the last number from which you received a call.
If there is already an active call, when pressing Call Return key the rst call will be
put on hold and a new one will be sent to the Call Return number
To assign Call Return to a key via the web interface:
Go to PHONE[FUNCTION Keys (Line Key)
Pick Up
Pickup key allows you to perform call capture from another ringing station with a
single key press. This feature is not supported by all servers. Please check with your
service provider or network administrator for more details.
To assign Pick Up to a key via the web interface:
Go to PHONE[FUNCTION Keys (Line Key)
4140
Page 22

Call Park
Call Park is a feature that allows a person to put a call on hold at one telephone
set and continue the conversation from any other telephone set. Your server needs
to support this feature. Please check with your service provider or IP PBX vendor
for more details.
The “call park” feature is activated by pressing a preprogrammed button or a special sequence of buttons.
To assign the key as Call Park via web interface:
Go to PHONE[FUNCTION Keys (Line Key)
Trouble shooting
I cannot register to the server
Check the IP address (press OK key for status).
Check your gateway.
Check your DNS server.
Make sure your account information is the same as you got from your service provider.
Check whether the SIP server is on.
Check the SIP register port, the default value is 5060.
Voice Mail
When the key is congured as a voicemail key you can access voicemail quickly by
pressing this key.
To assign the key to Voice Mail via the web interface:
Go to PHONE[FUNCTION Keys (Line Key)
Prex
When you press a key in which prex function has been set up, the phone will
automatically dial the prex and you will only have to dial the rest of your correspondent number to call him out. Prex can only be assigned to the line keys.
To assign the key as Prex via the web interface:
Go to PHONE[FUNCTION Keys (Line Key)
Redial
If a key is congured as Redial key:
• If you press this key in idle status, it will enter the Dialed Calls
interface
• If you press this key in o hoOK mode, last dialed number will be
sent directly
• If you press this key when there is an active call, it will be put on
hold and a new call sent to the last dialed number
To assign Redial to a key via the web interface:
Go to PHONE[FUNCTION Keys (Line Key)
I can’t get an IP address
Make sure you have plugged the Ethernet cable into the WAN port.
Make sure there is an available DHCP server on, and there are available IP addresses
in the server.
Try to set your WAN port to static IP client mode.
During a call, I cannot hear any voice
Make sure your handset is tightly connected with the phone.
Check whether you have muted the conversation or not.
Consult the outbound server details with your service provider.
I have problems sending DTMF digits during calls
Check which kind of DTMF you are using, and whether it is compatible with the server.
Consult the payload value with your service provider.
Time and date are not correct
Select the right time zone or enter the time information manually on the phone.
Check your DST settings.
How do I answer incoming calls during a call?
If a call comes in when you are in a conversation, press OK key to answer the incoming call.
4342
Page 23

How to refuse incoming calls during a call?
To refuse all incoming calls that may arrive when you are in a conversation you can
turn o call waiting function or enable the DND mode by pressing the HOLD/DND
button.
How to update the rmware?
Enter the webpage of your phone, go to System -> Upgrade.
1) Select the le to update, and then click the upgrade button.
Note: Make sure the rmware you choose is provided by your service provider, or the
device may crash after the update.
How to auto provision?
Consult auto provision server address with your service provider.
4544
Page 24

Service
If trouble is experienced with this equipment, for repair or warranty information, please
contact customer service at 1-800-511-3180. If the equipment is causing harm to the
telephone network, the telephone company may request that you disconnect the equipment
until the problem is resolved.
This product may be serviced only by the manufacturer or its authorized service agents.
Changes or modications not expressly approved by Teleeld NA Inc. could void the user’s
authority to operate this product. For instructions on how to obtain service, refer to the
warranty included in this guide or call customer service at 1-800-511-3180.
Or refer inquires to:
Teleeld NA Inc.
Manager, Consumer Relations
4915 SW Grith Dr. #205
Beaverton, Or 97005
Attach your sales receipt to the booklet for future reference or jot DOWN the date this
product was purchased or received as a gift. This information will be valuable if service
should be required during the warranty period.
Purchase date ________________________________________________
Name of store, installer or dealer _________________________________
Warranty
Limited Warranty
What your warranty covers:
• Defects in materials or workmanship
For how long after your purchase:
• Two years, from date of purchase
What we will do:
• Provide you with a replacement unit. The exchange unit is under warranty for the
remainder of
the original product’s warranty period.
How you get service:
• Locate your proof of purchase in the form of a bill of sale or receipted invoice which is
evidence
that the product is within the warranty period. Proof of warranty eligibility is required and
must be presented to obtain warranty service.
• Contact RCA Customer Care at (800) 511-3180. Our representatives will help you
troubleshoot and diagnose the problem. As you may be asked to disconnect your RCA
telephone from it’s power source, you must call from another telephone. If the issue cannot
be resolved by our Customer Care Team, you will be issued an RMA (Return Merchandise
Authorization) number and be given instructions on how to submit your proof-of-purchase
paperwork and where to send your defective merchandise.
• You will be responsible for shipping the defective unit back to our warranty fulllment
center at your own expense. You are responsible for damage or loss during shipment so
insuring the product during return shipping is highly recommended.
• We will ship a replacement to you freight pre-paid.
What your warranty does not cover:
• Customer instruction. (Your Instruction BoOK provides information regarding operating
instructions and user controls. Additionally, our Customer Care Center is staed 24x7 with
product experts that can assist you with any questions that may arise during setup and use
of your RCA telephone.
• Installation and setup service adjustments
• Batteries, if applicable
• Damage from misuse or neglect
• Products that have been modied of serviced outside the USA
• Products purchased from non-authorized retailers, dealers or resellers
4746
Page 25

• Products purchased or serviced outside the USA
• Acts of nature, such as, but not limited to lightning damage
• 3rd party products, such as headsets
Product Registration:
• Please complete and mail the Product Registration Card packed with your unit. It will
make it easier to contact you should it ever be neccessary. The return of the card is not
required for warranty coverage.
Limitation of Warranty:
• THE WARRANTY STATED ABOVE IS THE ONLY WARRANTY APPLICABLE TO THIS
PRODUCT. ALL OTHER WARRANTIES, EXPRESS OR IMPLIED
(INCLUDING ALL IMPLIED WARRANTIES OF MERCHANTABILITY OR FITNESS FOR
A PARTICULAR PURPOSE) ARE HEREBY DISCLAIMED. NO VERBAL OR WRITTEN
INFORMATION GIVEN BY TELEFIELD NA INC., ITS AGENTS, OR EMPLOYEES SHALL
CREATE A GUARANTY OR IN ANY WAY INCREASE THE SCOPE OF THIS WARRANTY.
•REPAIR OF REPLACEMENT AS PROVIDED UNDER THIS WARRANTY IS THE EXCLUSIVE
REMEDY OF THE CONSUMER. TELEFIELD NA INC. SHALL NOT BE LIABLE FOR
INCIDENTAL OR CONSEQUENTIAL DAMAGES RESULTING FROM THE USE OF THIS
PRODUCT OR ARISING OUT OF ANY BREACH OF ANY EXPRESS OR IMPLIED WARRANTY
ON THIS PRODUCT. THIS DISCLAIMER OF WARRANTIES AND LIMITED WARRANTY
ARE GOVERENED BY THE LAWS OF THE STATE OF OREGON. EXCEPT TO THE EXTENT
PROHIBITED BY APPLICABLE LAW, ANY IMPLIED WARRANTY OF MERCHANTABILITY
OR FITNESS FOR A PARTICULAR PURPOSE ON THIS PRODUCT IS LIMITED TO THE
APPLICABLE WARRANTY PERIOD SET FORTH ABOVE.
Visit the RCA web site at www.rca4business.com
Please do not send any products to the Oregon address listed in this manual or on the
carton. This will only add delays in service for your product.
Teleeld NA Inc.
4915 SW Grith Dr. #205
Beaverton, Or 97005
RCA is a trademark of RCA Trademark Management S.A.,
Used under license.
© 2012. All rights reserved.
Model IP110
T0001157 (Rev.0 E)
12-15
Printed in China
How state law relates to this warranty:
• Some states do not allow the exclusion nor limitation of incidental or consequential
damages, or limitations on how long an implied warranty lasts so the above limitations or
exclusions may not apply to you.
• This warranty gives you specic legal rights, and you also may have other rights that vary
from state to state.
If you purchased your product outside the USA, Mexico or Canada:
This warranty does not apply. Contact your dealer for warranty information.
4948
 Loading...