

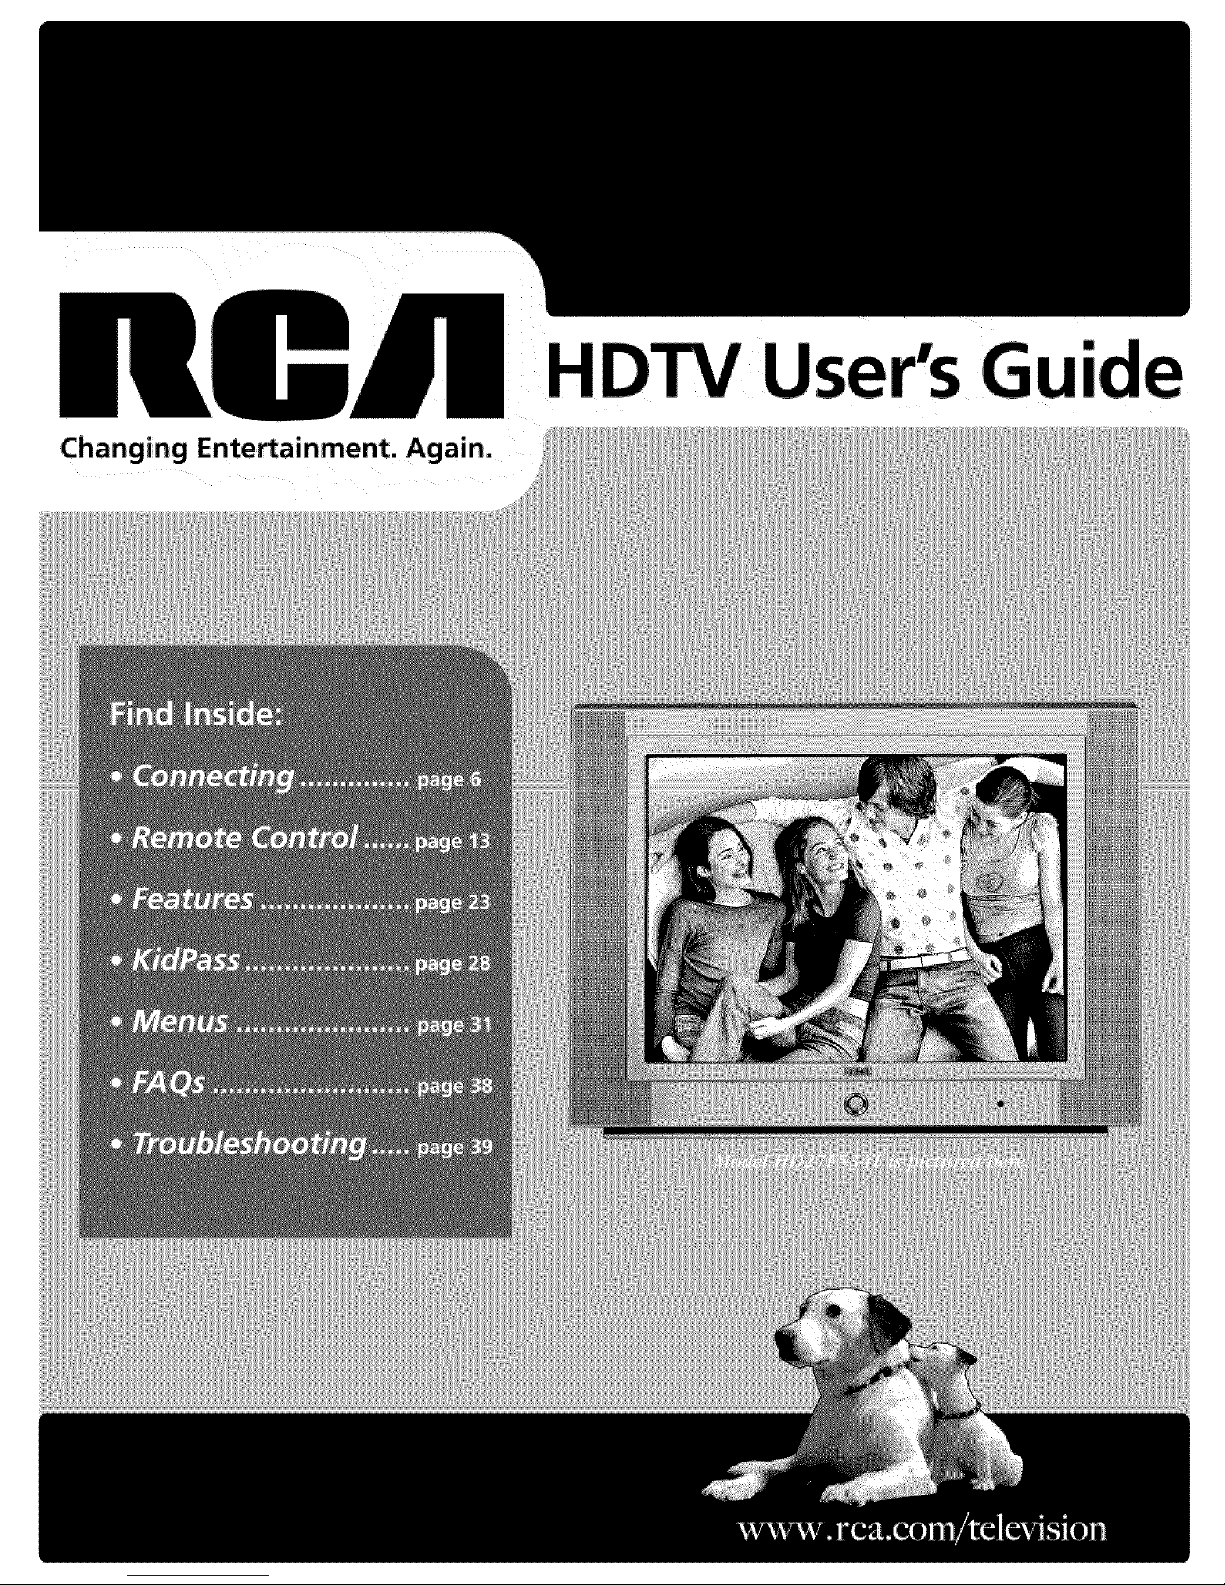
Changing Entertainm¢ _nt.
i p@r a nt jnfor ma i@ n
RISK OF ELECTRIC SHOCK
DO NOT OPEN
[_ h,is symbN indicates that this product incorporates double insulation
between hazardous mains voltage and user aeeessiNe parts. When servicing
use only identical replacement parts.
Caution: To reduce the riskof electric shock, do not remove cover [or back}. No user serviceable parts inside. Refer
servicing to qualified servicepersonnel.
' i
Thussymbol ndlcates dangerous voltage inside lhis symbol indicates important nstructions
_the product that presents a risk of electric shock or accompanying the producL
personal injury,
WARNING
To reduce the risk of fire or elect:rio
shock, do not expose this product to
rain or me sture
The apparatus shall not be exposed
to dripping or splashing and no
objects fil!ed with liquids, suchas
vases, shou!d be placedonthe
apparatus.
Refer to the identification]rating [abe Focated on the back panel of your product for
its proper operating voltage.
FCCRegulationsstate that unauthorized changesor modifications to this equipment
may void the user's authority to operate it.
Caution: To prevent electric shock, match wide blade of plug to wide slot, fully insert.
Caution: Using video games or any external accessory with fixed images for
extended periods of time can cause them to be permanently imprinted on the
picture tube (or projection IV picture tubes], ALSO, some network/program loges,
phone numbers, black borders {sides,. top and bottom), etc. might cause similar
damage. This damage is not covered by your warranty.
Cable IV Installer: This reminder isprovided to call your attention to Art cle 820-40
of the National Electrical Code (Section 54 of the Canadian Electrical Code, Part 1)
which providesguidelines for proper grounding and, in particular, specifics that the
cable ground shal be connected to the grounding systemof the building asclose to
the point of cable entry aspractical,
important Stand and BaseSafety Information
Choosethe Bocationfor your IV earefu[iy. Placethe IV on a stand or basethat isof
adequatesize and strength to prevent the W from being accidentally tipped over,
pushed off, or pulled off. This could cause personal injury and/or damage the 1V
Refer to the Important Sa%ty Instructions on the next page.
Prod uct Registration
Please fill out the product registration card {packed separately) and return it immediately. For US customers: Your RCAConsumer
Electronics product can also be registered at www.rca.com/tdevision. Reg storing this product allows us to contact you if needed.
Product Information
Keepyour .salesreceipt to obtain warranty parts and servicea_dfor proof of purchase,Attach it hereand recordthe seriai and
mode!numbers in caseyou need them°Thesenumbersar_ located on the product,
Mode! No_ Serial No, PurchaseDate:
Dealer/Address/Phone:
iinf@r atii@n
IMPORTANT SAFETY ;INSTRUCTIONS
Read before operating equipment
4
5
6
7_
10,
11,
12.
13.
14.
15.
16.
Read these instructions.
Keep these instructions.
Heed ell warnings.
Fellow all instructions.
Do not use this apparatus near water.
Ciean only with a dry cleth_
Do net block any of the ventilation openings, Install in accordance
with the manufacturer's instructions.
Do not instafl near any heat eeumes such as radiators, heat
registers, stoves, or other apparatus (!ncludimg amplifiers} that
produae heat,
Do not defeat the safety purpose of the poladzd or grounding
type pl_g. A poaarized plug has two b_ades wi_hone wide_ than the
other. A grounding type plug has two b!ades and athird grounding
prong, The wide blade or third prong are provided for your safety.
When the provided plug does mot fi_ into your outlet, eons_l_ art
electrician, for rep_eeemsef o! the obse4ete eaflet.
Protect the ;_awer cord from being walked emor pinched,
particularly at plugs, convenienee receptacles, _d the point where
they exit from the apparatus.
, Only use attachmen_s/acees_hee specified by the
manufactures
Use only with a cart, stand, t_ipod, brackeL ar table specified by
the manufacturer or said with the apparatus. Whee a cart is used,
use caution, when moving the carl/apparatus csrobinatien to avoid
injury from tip-over.
Unplug this apparatus during lightning storms or when an,used for
long pededs of time,
Refer all servicing to qualified service personnel. Servicing is
requirsd when the apparatus has been damaged in any way, such
as if the power-supply cord or plug is damaged, liquid has been
spilled or objects have fa]lee into the apparatus, st if the apparahJs
has been ex_sed to rain ar moisture, does _ot operate sernlally,
uf has been dropped.
This product may contain lead and mercury. Disposal of these
metedals may be regulated due to eavironmentat cons_deratieas.
Far disposer or recycling information, please coat.st your Ioea_
authorities or the E|ectrenic |ndustdes Ai|ian,ce (www=eiae.org}.
Damage Requiring Service - The appliance should be serviced by
quailtied Service personnel when:
A, _e power supply cord or the plug has bea_ damaged;
B. Objects have faiien or liquid has been sp_ned into the appliance;
C, The appliance has been ex_sad to rai_;
D, _e appliance does _et appea_ to operate normally or exhib_s a
marked change _n,performance;
E, _e appliance has been draped or the enclosure damaged.
17. Tilt/S tability -AII televisions must corn ply with recom mecd_
internatianal global safety standards fo_ tilt and stability proper ties
of its cabinet design,
= Do _oi compromise these design standards by applying
excessive pull force to the kent, or top, of the cabinet, which could
_ltimate_y overturn the product,
• Aloe, do not e_danger yo_=rseff,or children, by placing electronic
equipmerd/loys en the top af the cabinet. Such items could
ansuspecU_gly fall from the top of the set and cause product
damage and/or personal injury.
18. Power Lines _An outdoor an_eena should be located away from
power _ines,
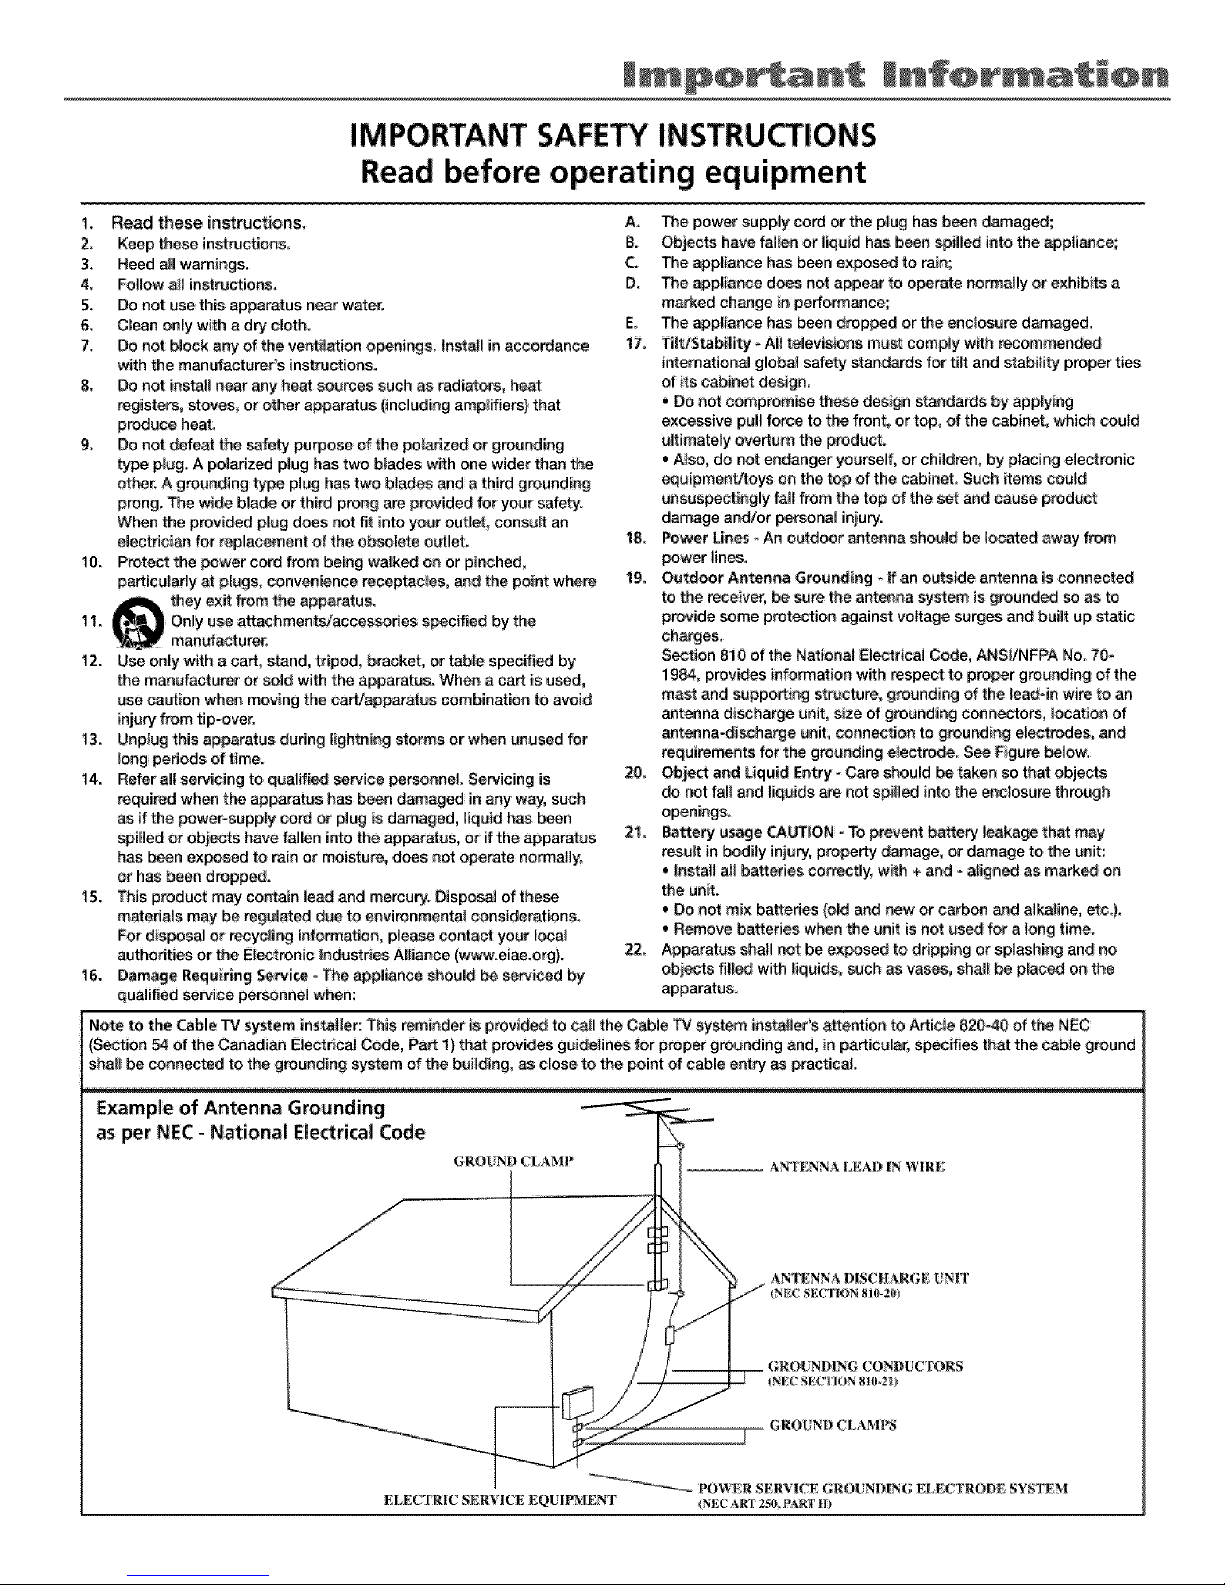
19. Outdoor Ante_ea Gro_mdimg . lf an outside antenna ie connected
to the receiver, be sure the antenna system is _roueded so as to
provide some protection against voltage surges a_d built up static
charges,
Section 810 of the N_ional Electrical Code, ANS_!NFPA No. 70-
19_, provides _nformatioo with respect to proper grounding of the
mast and supporting s'tr_cture, grounding ofthe lead-in 'wire toan
antenna discharge umit,size of gro_eding connectors, I_ation of
antenna-discharge _nit:, eemnectio_ togroundimg e_ec_rodes,and
requirements for the grn_ding electrode, See Figure below,
20. Object and Uquid Entry - Care should be taken so that objects
do net fall and liquids are nor spilled into the e_deeurs through
opeei_gs,
21. Battery usage_UTION -To prevemt battery leakage that may
resc_t in bodily injury, pro_rty damage, or damage to the unit:
• InstaB aI_batteries correctly, with ÷ and - aligned as marked on
the unit.
• Do t_et mix batteries (old a._d mewor carbon and alkaline, etc_).
• Remove batteries when the _nit is net used fora long time.
2L Apparatus shall no_ be exposed ta dripping er splashing and no
obiects filled with tiq_ids, such as vases, shall be pieced eo the
apparatus_
Note to the Cable "PCsystem ins_ller: This reminder is provided to call the Cabie TV system instalieC's attention to Artlcie 820-40 of the NEe
(Section 54 of the Canadian Eiectr_cai Cede, Pa_ 11that provides guidelines for proper grounding and, n particular, s_cifies that the cable ground
shaB be comnected to the grounding system of the b_iiding, as close to the point of cable emt_ as practical.
Example of Antenna Grounding
as per NEe - National Electrical Code
(;RO[ ND (?LAMP
__ ANTENNA LEAD IN WIRE
GROI ND CLAMPS
_ I_)WER SERVICE GRO[ NDING ELECTRODE SYSTEM
ELECTRIC SER¥1CE EQUIPMENT _NEC ART 2A0 PAR'_ $_

Thank you for choosing RCA
(kmgmmhllh_ns on yon _purcImse of an RCA High l)Uir_i_ion _elevision a truc viewi_g
experience. 5%ur purchase decision represents an investment in a new genera[ion of technolog3,.
High Definition: What Makes it a True Viewing Experience
Y_m have chosc_ to cmburk on the _cxl _e_cration o_ "|_" _icvdng HIYFV. T_erc me mm_y
[echno[ogical advamcem,mts that make Ht)qw better; (me ot the ]argcs_ aspects 0mr 10ring you a
superio_ yielding experience is resolution.
The crisp, iifetike p_cture people rave about when experiencing role ftDqV is due _o the
r<:solutfon this _e(hnology pJ_vides. The resolution is measured by calculatiJ_g the mimber ol
active lines of pixels, A pixel (which stands [or picture elemen0 is a small dot. The picmw yon
see on your TV is composed of these dots
A regular television (called standard defi_ition or analog) has a rcsok_tion of about 200,000
pixels (480 veJlical pixels x 440 horizor, ai pixels 2;il.200 pixe_s)_ The HDTV _;,ITFI;,K _S capab]_J
of morn than 2 million pixels. And morn pixels mean gmamr detail. So ltlYIW is capable o_
r_.*sotution that is up to almost 10 _imes the resolution of the picture on a regular, analog TV
Integrated HDTV Tuner with QAM
RCA was the fir,_ to offer an _ntc.gn_ted _:uner with its ttl)T\,'s (no nccd for another box to receive
digital programming). Now, weve gone one be{ter_ your HDTVs tuner is ready t);_rdigital cable
(no need ff:_ra cablebox to view unscrambled digital cable programming). The tuner is aMe to
dec{}de all 16 formats of digita_ television broadcasts and i_car_ iniel:prc_ digita_ cane signals
becattse it includes QAM (Quadrature Amphtude Modulation).
Aole A cggbh_,b_,_v*?t<Fbe necessa_]' go _'i__,_scr'_w_b[ed cbattize]s. (.bnl_ct .),ot_r cabh,
prot,fderJbr tno,v f,,{fi:_rmatfn_._.
÷hi÷ @f ¢@nten s
Chapter 1: Connections & Setup
Things to Consider Before You Connect ............................................................................. 5
Protect Against Power Surges ............................................. 5
Protect Devices from Overheating ............................................................................. 5
Position Cables Properly to Avoid Audio Interference ............................................... 5
Use indirect Light ....................................................................................................................5
Get the Picture ........................................................................................................................... 6
Receiving Digital Channels ...................................................................................... 6
What You Need ............................................................................................................ 6
What You Need to Know ................................................................................................. 6
Receiving Analog Channels .............................................................................................. 7
What You Need ................................................................................................................. 7
What You Need to Know ................................................................................................ 7
Choose Your Connection ......................................................................................................... 8
Y Pb Pr Connection ................................................................................................................. 9
Video Connection ................................................................................................................. 11
Using the Side Jacks................................................................................................................. 12
Plug in the TV ...................................................................................................................... 13
Put Batteries in the Remote .................................................................................................. 13
Use the Remote Control to Complete the Initial Setup .................................................. 13
Turn on the TV .......................................................................................................................... 13
Complete the Initial Setup ..................................................................................................... 14
Choose the Menu Language .................................................................................. 14
Tuning to a Channel ................................................................................................ 14
What to Expect ......................................................................................................................... 15
Watching TV 15
Remote Buttons ....................................................................................................................... 16
Component Function Buttons ..................................................................................................17
Programming the Remote to Operate Other Components ........................................... 18
Using the Input Button ............................................................................................................. 19
Remote Code List .........................................................................................................................20
Explanation of Jacks.................................................................................................................. 21
Front/Side input Jacks .......................................................................................................... 22
Front/Side Buttons .................................................................................................................. 22
Chapter 2: Using the TV Features
Channel Banner 23
Parental Controls and V-Chip ............................................................................................. 23
How V-Chip Works .......................................................................................................... 24
A_ivate Parental Control ..................................................................................................... 24
Set V=Chip TV Programming Limits .............................................................................. 24
The V=Chip Rating Screen............................................................................................ 25
÷,bii÷ @9 C@nt÷nts
Blocking Age_Based Ratings ..............................................................................................25
Blocking Specific Content Themes ...................................................................................26
Blocking VoChip Movie Ratings ............................................................................... 26
V-Chip Exempt Program Block .................................................................................. 27
A_ivate KidPass.......................................................................................................... 28
Block Channe_ ............................................................................................ 28
Front Panel Lock .................... 29
Future Ratings (Rating Region). ..................................................................................... 29
Change Your Password ................................................................................................... 29
Resetting the Password .......................................................................................... 29
Format Options ......................................................................................................... 30
Chapter 3: Using the TV's Menu System
Sound Menu .......................................................................................................................... 31
Picture Menu ............................................................................................................................ 32
Setup Menu ................................................................................................................................. 32
Parental Control Menu ........................................................................................................... 36
Time Menu .............................................................................................................................. 36
Notepad Menu ....................................................................................................................... 37
Chapter 4: Other information
FAQs (Frequently Asked Questions) .................................................................................. 38
Troubleshooting 39
USA V-Chip Rating System ................................................................................................... 41
Canadian English V-Chip Rating System ............................................................................ 41
Canadian French V-Chip Rating System .............................................................................. 42
Limited Warranty ............................................................................................................ 43
Care and Cleaning ........................................................................................................... 45
FCCInformation .................................................................................................................... 45
Things to Consider Before You Connect
Protect Against Power Surges
• Connect all devices betT)reyou p]ug mLv of lheh: power cord,_into _hc w_li outleL
• Tt!rll oft the 1%;and/or device before you cormec't or disconnuc any cables,
Q lJsing a sLlrl{c prolcdor eail help prcvcnt damage to yotir TV [/-Oln clc(t_kal power Stll-gt's. 11]
case of ]ightnitlg, uI_pltJg your {1_:.
° Make sure all m_mn*ms a_d ca:hies arc: properly grounded Refl:, to tile Important SaD:ty
h_s ructhms at _he beginr_ing of the User's Gukie.
Protect Devices from Overheating
o Don't tJock vundlatkm tolus on any of"t_u de_ iues. Arrangu the duqcus so that air can
circulam freely.
- l)on't stack devices.
• If yot, place devices in a sland_ make sure yoc_ allow adequate vv,nlilation.
• If:you cons_ect an audio receiver or amplifier, place it on the top sheK so the heated air from
it wont flowaround other devices.
Position Cables Properly to Avoid Audio Interference
- I_surt each cabb firmly into the designated ja<l<.
° If:yoti place devices above the 1% route all cables down the side of the back of the *l_v'
instead o[ straight dowr_ the middle of the TV
° tf your antenna uses 300-ohm _win lead canes do not coil [he cabtes, Also, keep the twin
lead cables t_ay flx}rn audiolvideo cables.
Use Indirect Light
Dont i_iace the T\<whew stmlight or room tigbting will be directed toward the scieun, tse soft
or indirect lighting,
Chapter
C@nn+ct+@++ N++up
m
t_m_+lrll|
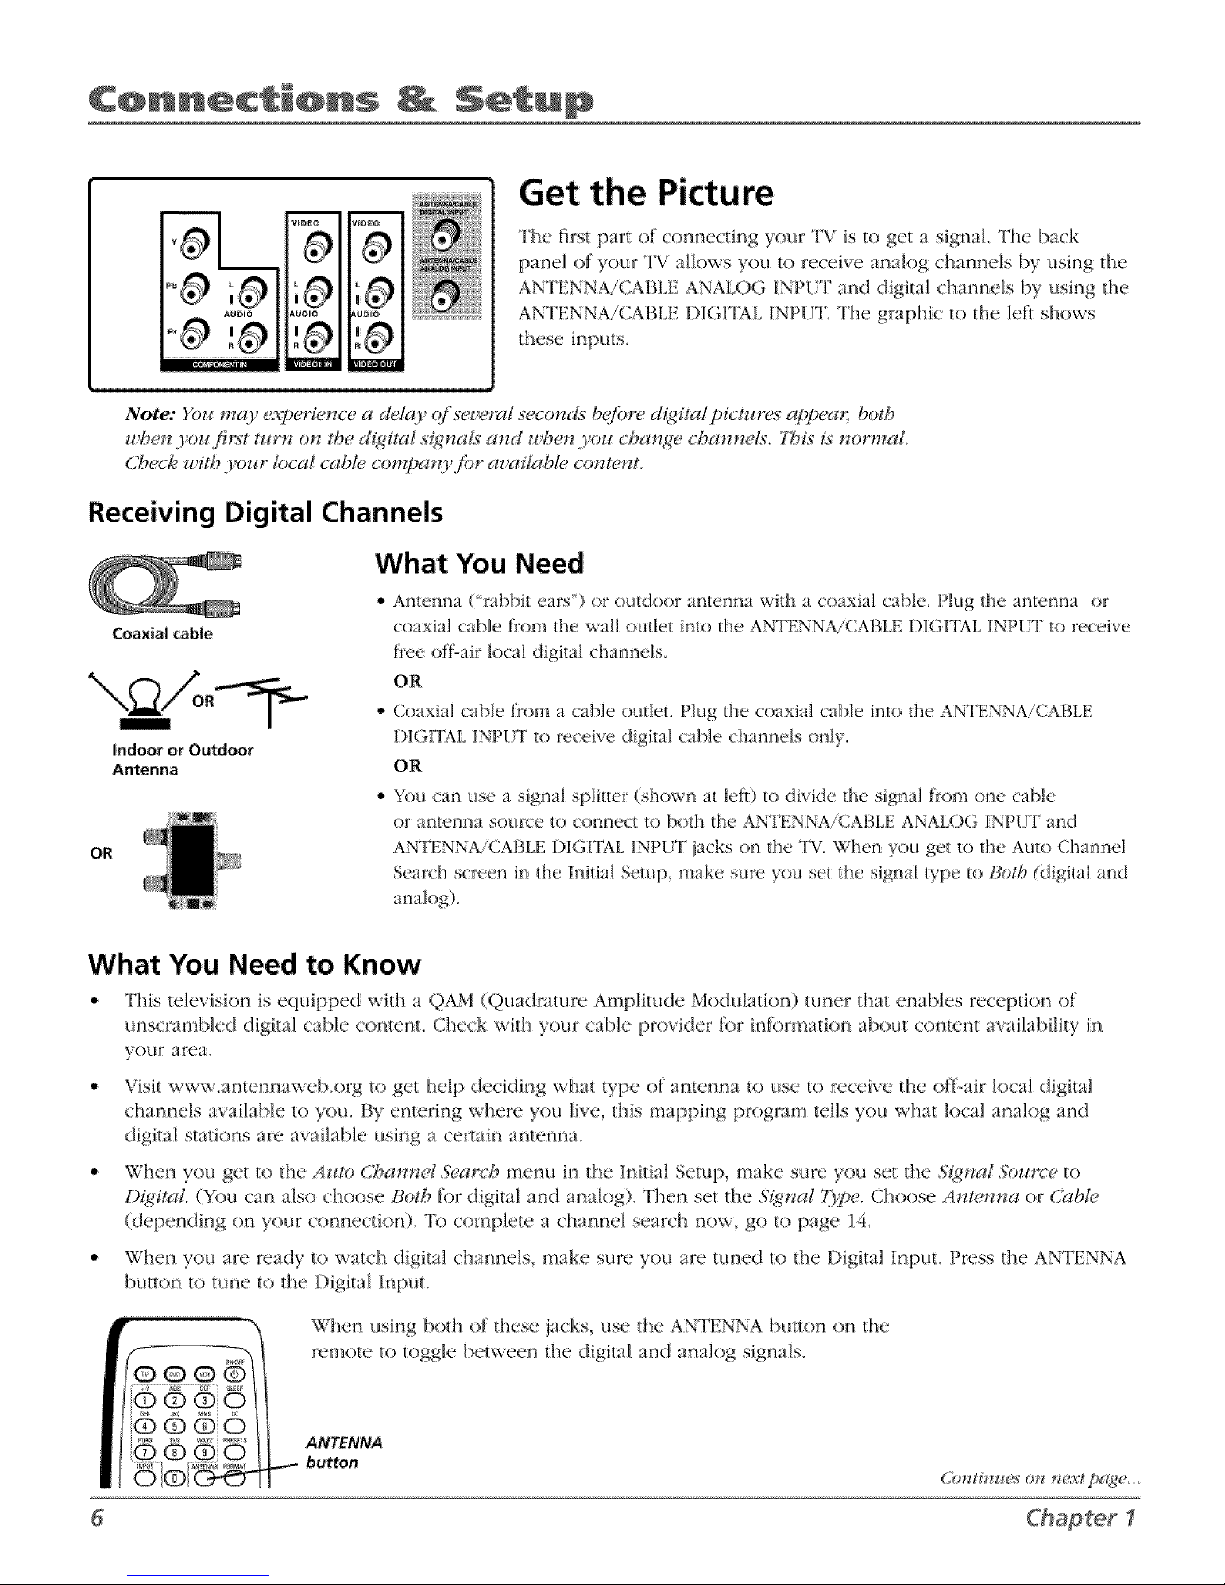
Get the Picture
TEe first p_r_ of connecting your TV is to get a sigl_a]. The back
pa+l of your TV alows yo++to receive analog channels by using the
AN17::NN:\iCABI,E ANALOG iNP{ +1' and digital channds by _+singthe
ANTI NNA!CABLE DIGIT,\L tNPIZ l'he grapl_ic to the left shows
these inputs.
Receiving Digital Channels
Coaxial cabl+
illlll=
Indoor or Outdoor
Antenna
OR
What You Need
° _,ntc,nua ("rabbit ea_:s') <' ot_tdoor antenna with a eoaxial eah]e, l?ltg th(: autetTna or
coaxial +:aNe from the wall <>+]_lel rico Ihe ANTENNA/(;ABLE DIG[TAI [NP[T to recdve
bc,e off:air k>caldigital cbannek
OR
- ( oaxia] cabe koma cable ottO]el.Plug _l)ecoaxial cable into the ANTI{NNAi(;Ai_LE
I)IGITIT;XI+INPUT to receive d*gital cable chat?nels only.
OR
• You can use a signa_ spIi_+r (shown at left) _o divde the si:a] from one cable
or antenna so+re to connect to lx)_h the ANTENNAi{;A[:}LEANAl:)() INP{T at_d
ANTENN;V(;ABLE 1)IG:VIAL1NPU1 iaeks on the 'IW?When you get t;) the Auto Channel
Seat+In scl'+,en i_ the Iniiia] Setq:_, m_+kes_l++,yo_ set tt_e signal type Eol:b/h(digital and
What You Need to Know
• This tek-visi<))_is eq++ipped with a QAM (Quadrature Amplitk++le Moduk'_io_9 tuner that enablus rcec/:io+,, of
+mscrambk'd digital cable eonk:+_t, Check with your cable pr<_vider Ihr intbrmatb_t about cora:_7_ availability in
yo_r area.
- Visit www.ar_tenr_aweb.o_\_ to get help deeidir_g what vype of an{e_r_a to use to receive the off-air ]<xal digital
d_atmels available to you. By enlerirg where you Iive, this mapping program tells you what local a_alog fred
d_gital statio_*s arc av;_i/able usi_Tga ce+:ta n ante,ma.
• When you get to the A+_:r_(;?_alfnot S'eard', menu in tie I_itia] Setup, make sure you se_ +]_e,ggt+a: ,Sb_t_z:'eto
DNi_al. (52)u can also ch(>se B++_bfl)r digital a_d anabg). Tl]er_ set the ,S?:_,_d"1'17._:,.Choose Anl_*_na or (;;_bk
(deper+ting ornyour co_+ectio_). To complete a charmel search now, go to page 14,
° when you are mad} to watch digital charme]s, make sure you am tuned t+) the 1)igital >put. Press the ANTENNA
bt t_or_t+>time to the Digita input.
Whets using both of these jacks, use the ANTENNA bu_t<m on the
)c_:i_ote to _oggk: beh_een tl+_ dig ta_ and a_;tl<)g signals.
ANTEN'NA
_._ btttton
Gmlfm_es 0+_*_0a:/p_tiqe-
Chap'_+r I

C@nnecti@ns Ne ;up
Receiving Analog Channels
What You Need
• Antem'm ("rabbit cars _') or outdoor antenna wid_ ('oa_iM cable. Pk_g OK•antenna or
coa×ial ca)le lion? tiie aa]] outlet into the AN I"ENN,\,.(]ABI E ANAL(IG INPNT to
Coaxial cable
indoor or Out:door
Antenna
OR
• Coaxial cable from a cable outleL Plug the coaxial cable horn the souict _,outlet into the
ANTENNAiCAi3LE ANAI£)G INPUT _o receive cable channels,
What You Need to Know
,. Visit www.antem_aweb org to get help deciding what type of antenna touse to receive the local analog d_annels
available to you. By entering where you _he, this mapping pro.Rram tells you what local analog and digital s_atkms
are available using a certain antenna.
,, When y{_uget to @e Au_(}Channel Search menu in the Initial Setup, make sun? y(}L_set the S@na! N?ur_:t_t{}
Ana/q_4. (D)u can also choose Both for dgimI and aJnalog). Then set the ,Signal 7)pe. Choose AnW_,na or (2_b/c
(dependh'_g or_ yo__H-connection) To complete a channel search rtow, go to page 14.
* _,_heli lOLl _.ilTeready t<) watch aria {,g cha_mels, make sure you are ttmed to the analog iHput Press the ANTENNA
buuof_ to rune to tile analog irput.
© 6 ®©
@®
@ @
o©ol
When using bolh ot: @ese jades, use lie AN'I];INNA bHtto_] on the
remote to toggle betv_een the digital and analog signals.
ANTENNA
button
Chap{er _ 7
C@nnecti@ ns Se up
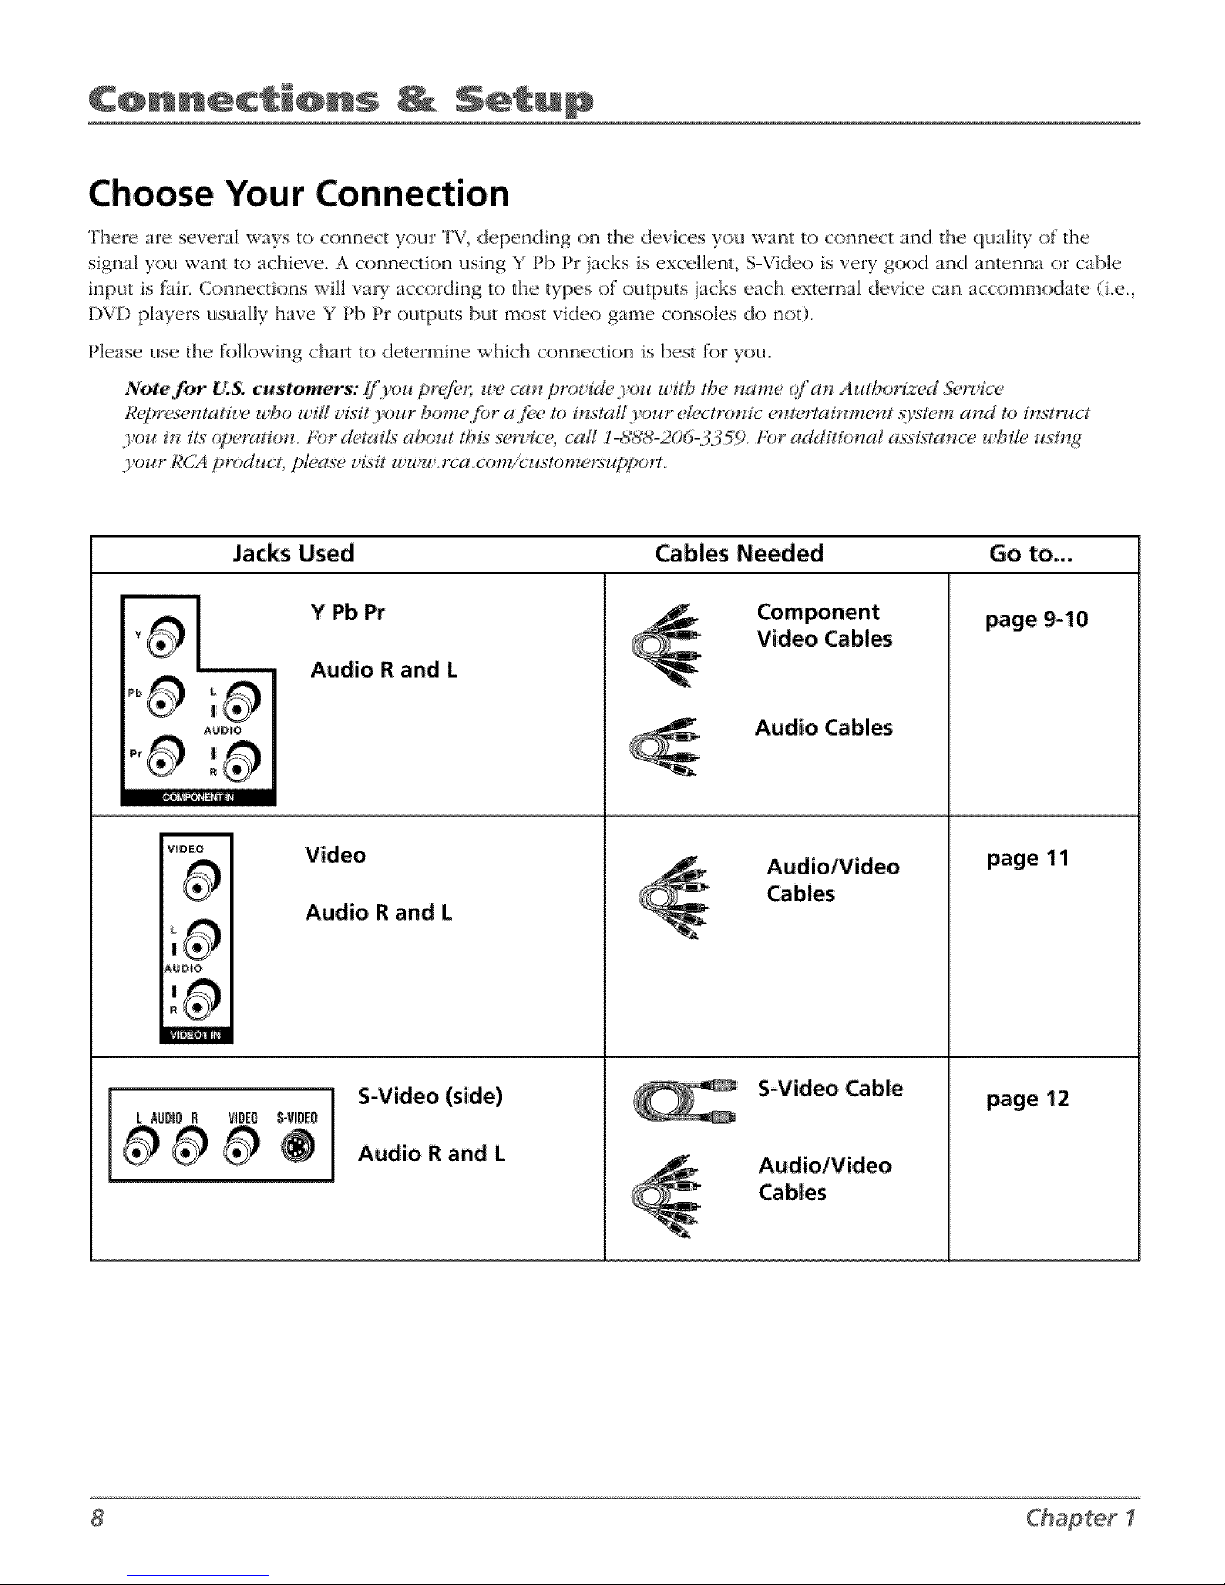
Choose Your Connection
'Ihere are seve_¢il ways to connect yotlr TV, dependi_g on the devices yof_ want to connect and the q_miity of the
signa_ you want to achieve. A connection _lsing Y Pb Pr jacks _s e._(cellenL S Video is very good and ar_ten_a or c_ble
input is l_Jir.Connectiol-_s ",viiiva_T according to the types of outputs iacks each externa_ device can accommodate (Le.,
DVD players usually have Y Pb Pr outpL_ts bt_t most video game consoles do trot).
Please use {he fl_llowing chart to de_em3me which co_mectkm is besE t_)r you.
Note for U.S. custome_: I/[_ou prefer; w_, caa_ prov&&,3,rm wflb l_e Name ofan A_tborized .9e_icc
l,_#*resematJt,_÷ wJ_o _vil[ visit Fof_r /_ome for a /'ce to m._taH 3'o_r {4#ctr*mfc emcrlc_mm_';¢t .'{}:_lvma*zd to i*tslrg_ct
.yo*_in itsopt,,wlioa_.P'::dclaf[sabout tbLs"._g,a_::c<ca[[I-_?,_1&20(5-:::)59 For add:tio,mla._:sist_'mccu&fle ,_sf_:_
yo_:rRCA prods,el,pleam_,visit u'ww.rca.com/_:z_ston:_,r._(/_po_.
Jacks Used
Y Pb Pr
Audio R and t
Video Cables
Audio Cables
page 9-10
v,_o Video _ Audio/Video page 11
Audio R and L
Audio R and L
AudiotVideo
page 12
Chap'_r

C@nnecti@ns Ne :,up
Q
Go to page 6 for
instructionson
getting a signal
DVD Player
Y Pb Pr Connection
COmponent Video
cables (Y Pb Pr) are
color coded- Green,
Blue and Red
Connecting the Device
Tllis connection allows you to connect at device tlmt has Y Pb Pr jacks, k_r example, a I)VD
player If the device y;a_ are com_ecting a]so has S Video or composite video, we recommend
you use tim compor_em video input: tot better quali_y.
Tl_e iHustratio_ shows how to connect a DVD to yot_r TV using component (Y Pb P_0 and
audio cabtes,
Using the example of a DVD player:
L Connect your cable and/or antenna as described on page 6. (If y,re're adding a VCR to the
connection, follow steps 2-4 only).
2_ Connect your Y Pb Pr component video cables.
Comaect {hrce vkk'o cables or speckd Y }% Pr cabDs o the Y Pb Pr iacks olq tia back of fine
TV and to the Y Pb Pr otltputs on the DVD pIayea Y Pb Pr cabIes are colored g_x.en, bkte and
red..!_ls{ ma{ch {tEecolors on _i_ecabies {o the Y Pb _r jacks.
Chap{er _ 9
C@nnect @ ns Ne :up
Audio cables are color
coded- Red= right audio;
white= left audio
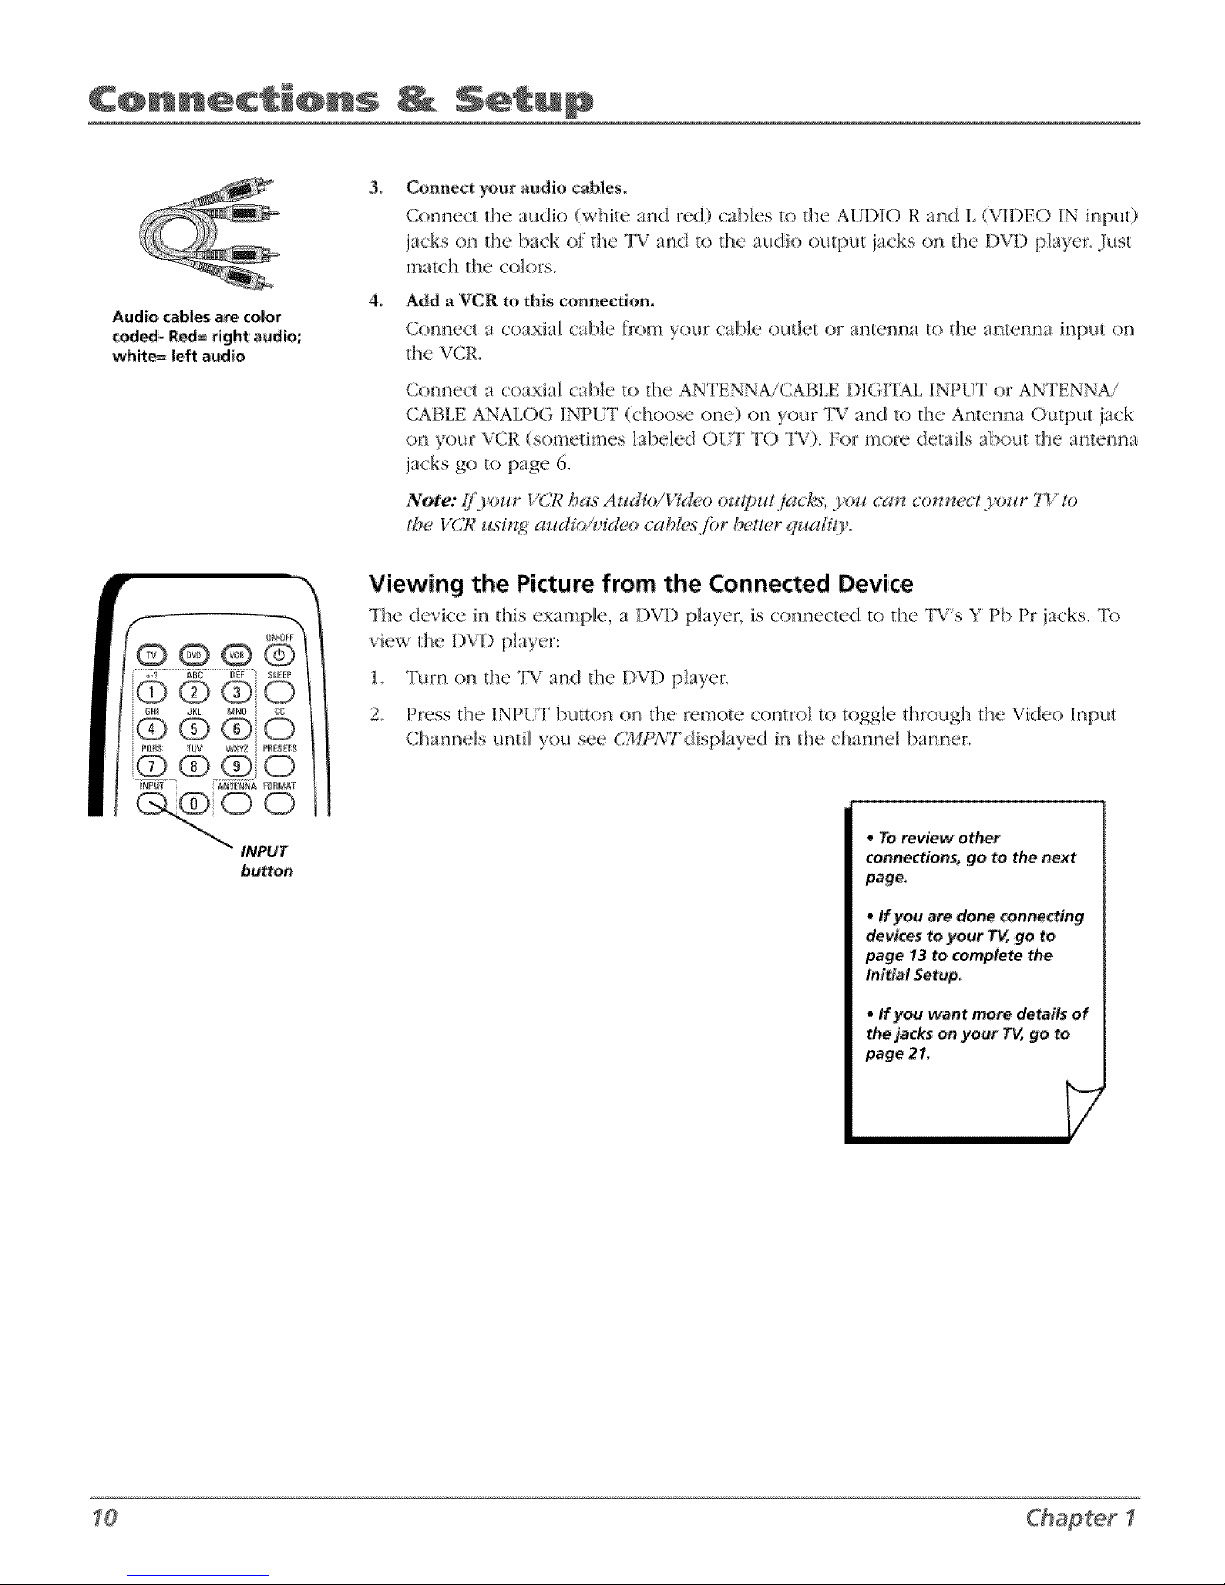
3.
4_
Connect y(mr audio cables.
Compeer d_e audio (_v}_ite and red) canes to the AUDIO R _md L (VIDE() IN mpt_t)
jacks on the back of die TV and to d_e aud}o outpt:it jacks on tt_e DVD playcr, Just
match {he colors,
Add a VCR to this connection.
(_(H'll'lk'({a coaxia_ (ZI[)]_? fYO[ll ._OtH7 Clh]_! OU[kt{ Or all[ell[la [O [/]e all{_k_ll[la II_pltl On
the V('R,
ConJqe<l a coaxia_ cabIe to the ANTENNA/CAB[£ DIGI_IAL INPtT or ANTENN/L'
CABLE ANALOG INPUT (choose one) on your TV and to d_e Ar_tcrma Output jack
on yore" VCR (sometimes labeled OUT TO "la¢> For more details about ll_e a_tenna
jacks go It_ page 6,
Note: lj)_our I'(._ ha.s"AudkVVk&o o'mT;>ut ic_cb,_',1'o_¢(,'a_ comtecl your TV to
the V(,7¢ us#_,q a_dio./uidu_ cal_h.s fi>r better quc_H(y.
®®®5
66 o
_ttl JKL MNO _g
@ @ (g)O
P_B _uv _xYz PRE_lr_
O O
_ iNPUT
button
Viewing the Picture from the Connected Device
The dcvk'c in this exampkt, a D\"I) phycr, is ¢'onr_ccied t_}the TVs Y Pb Pr jacks, To
view the DVI) player:
1, Turn on i;he TV and the DVD player,
2, P_vss the 1NPL"F bml_?n on {t_e iemote controI to toggle t[m_ugh the Video Inpt_t
Channels m_ti_ y_m see (,)Lq_,_7"dispiayed in the cha):mel ba_lner,
• To review other
connections_ go to the next
page.
• If you ara done connecting
devices to your TV, go to
page 13 to complete the
initial Setup,
• Ifyou want more details of
the jacks on your TV, go to
page 21,
Chapter I
C@nnecti@ns NeW,up
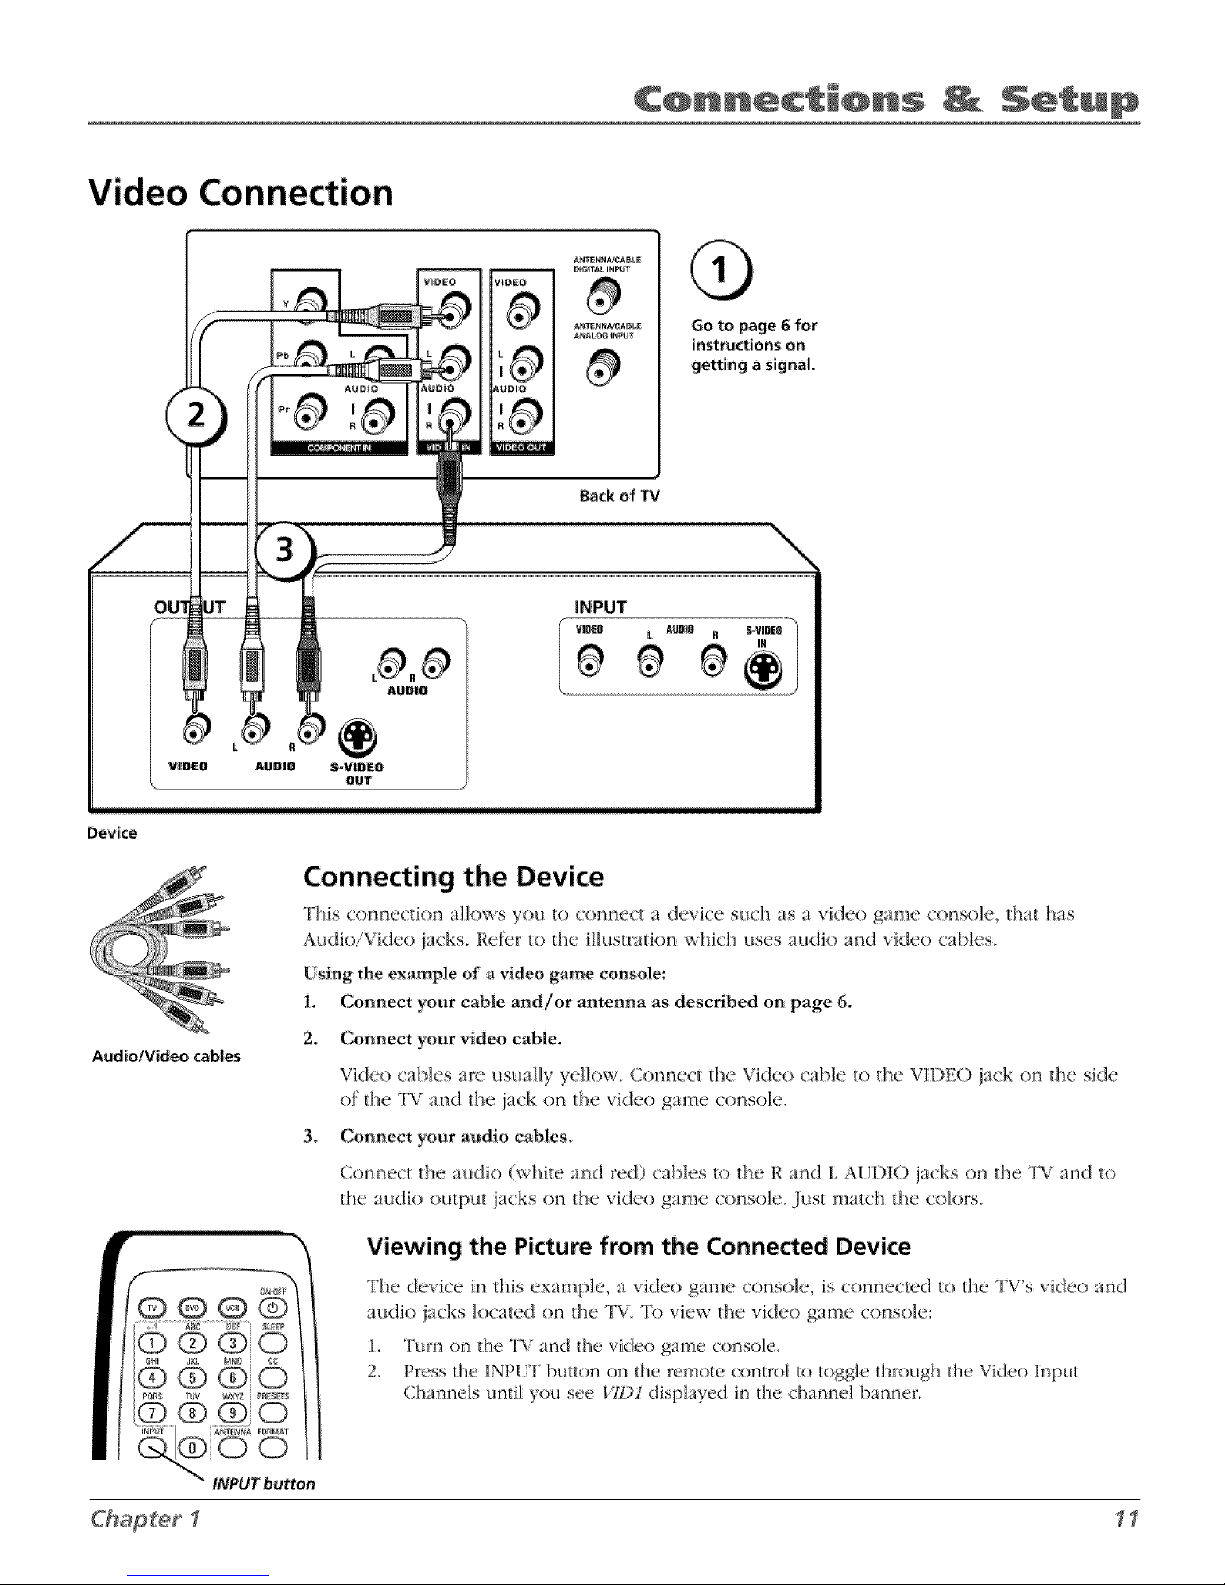
Video Connection
Go to page 6 for
instructions on
getting a signal
Device
Audio/Video cables
Connecting the Device
This cormecdon altows you _o com_ect a dcvke such as a video game console, tha_ has
Audio/Video lacks. Rck'r to the illusm_tion which uses audF_ and video cables_
Using the example of a vide() game console:
1. Co,meet your cable and/or antenna as described on page 6,
2. Connect your video cable.
Video canes ar_: usuaI[y yellow. Connect _he Video cable _o _he VtDFO lack on fl_e side
o_"the TV and the iack on the vktco game console.
3. Connect your a_dio cables.
Connect the audk:_ (whic and ,xx;l)(:tI)les _o fl_e R rind L A[?DtO jacks on fl_e "IX:and to
the audio ou_pu_ iacks on the video g_me console, Jt_s/malch _he co_ors.
Viewing the Picture from the Connected Device
The device in this example, a video game_'cons:*k', is (:oIll_l{2cU_'dlo []1¢'*[V'5 vi:leo and
audio }acks located on :lie TV "li>view the vide:> game console:
1. Turn on the 'i_: and the video game console.
2. Press the ]NPI ['button on lhe remote co_qir_*I_o_ggle thro_ gi_ d_e Video Inpu_
Channels umiI yotasee VIt) I displayed in the channel banner.
(®®®
C@nnect[@ ns Se up
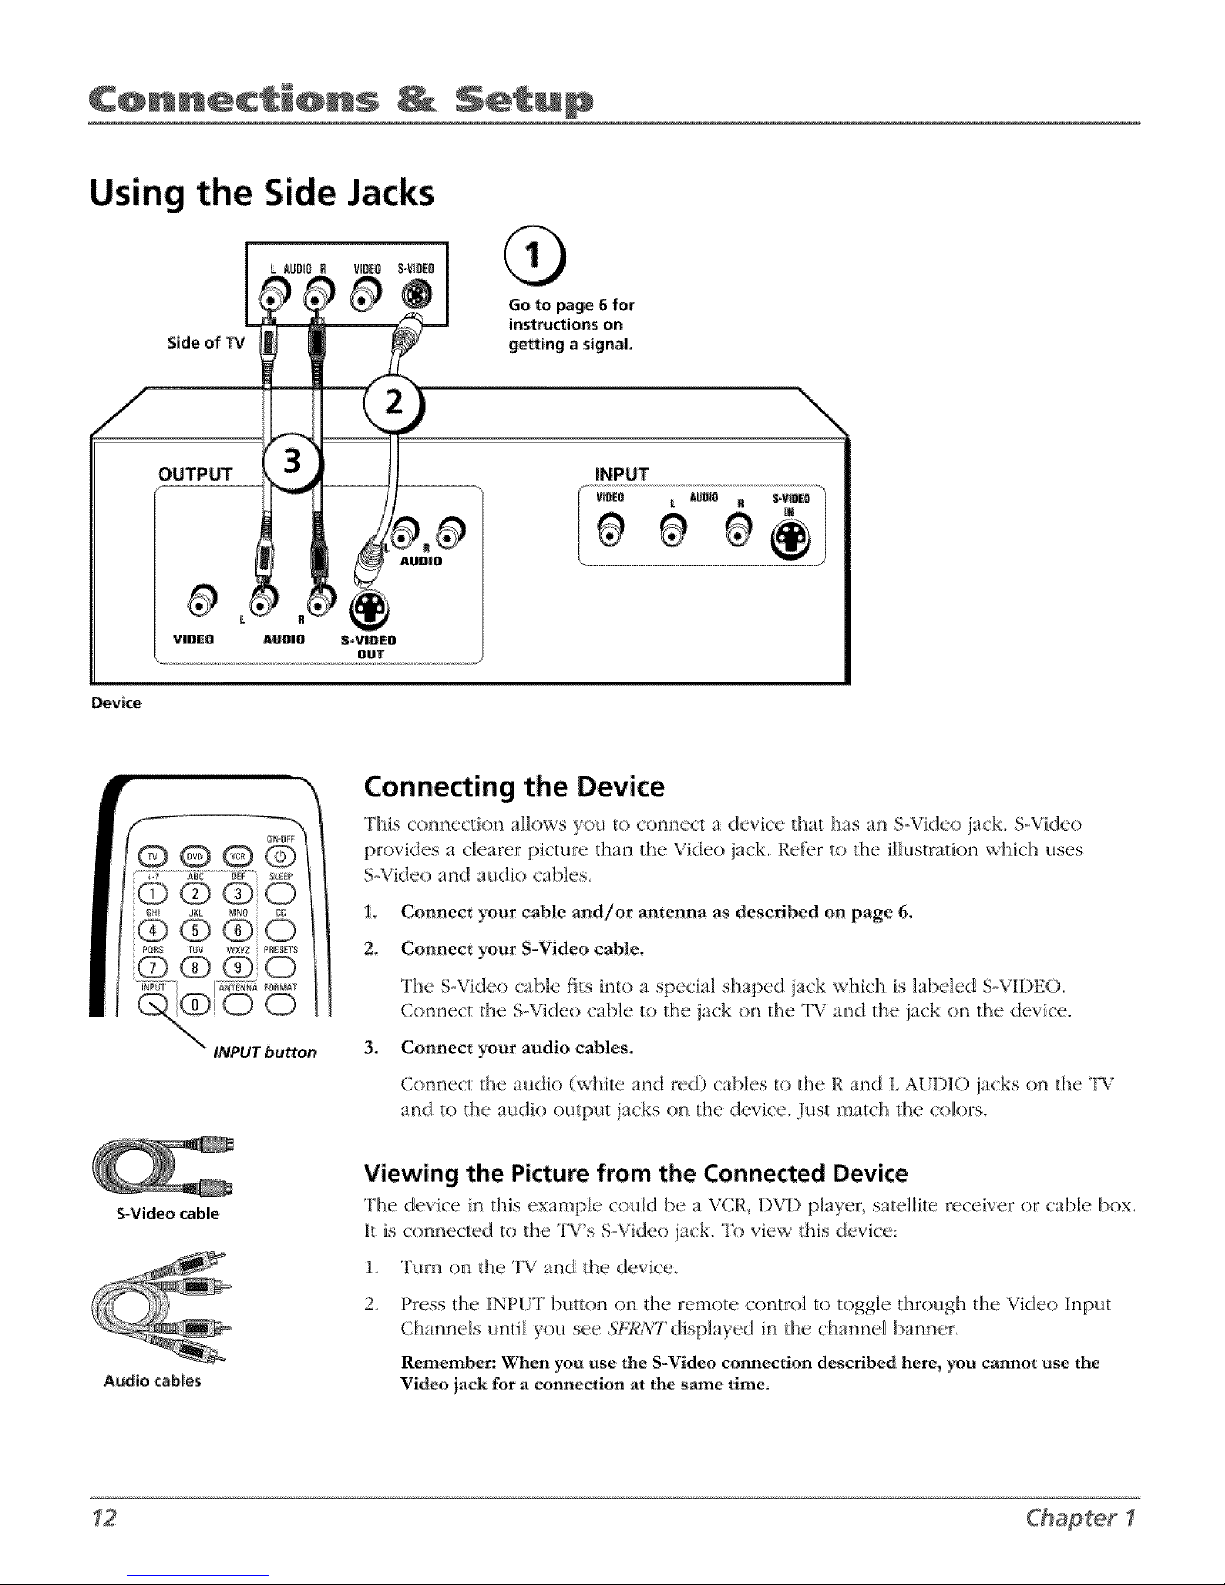
Using the Side Jacks
Side of TV
OUTPUT
®
Go to page 6 for
instructions on
geeing a signal.
\
iNPUT
v_o.............................................._;D_.....
Device
S-Video cable
Connecting the Device
This con_%c'c_ionalk)v,,s _.<>_ito connect a de_ke that has a,t 5Vidc _ jack. SoVklco
pJovktes a clearer l_iCture than tie Video jack, Refl/_r{_ vhe ilR_stratkm wifid_ uses
S \,'ideo aad _u<lk> cables,
1. Connect your cable and/or antenna as described on page 6.
2, Connec* your S-Video cable,
The S&qdeo cabbie fits h_to a special shaped itck which is labeled S.oVIDEO.
Cot'mecr @e S.Video (_£r_leto the ia(k cm the 3N' a_'ld the fad< on the (k v ce.
3. Connect yo_r audio cables.
(kmnec_: the audk_ {\_ ire and red) cables t<ad_e R and L A[1)10 jacks on tl_e _t*_
_md to d,e audio o_tpm jacks o1"_the de_icc. Jt_st match the coke, s.
Audio cables
Viewing the Picture from the Connected Device
The de,dee n _hi.sexamp e (oukl be a VCR DVD pb}er s rodlike ree<ivur o_ cable box.
it is connected _o_he i'\'s S-\idco iack To view this device:
1. 'l%rn on d_e TV and _he devke.
2_
Press the INPIT but[on on the remo_e contz'o] to toggle through the Video Input
Channels tmti you see %a_:\'Tdisplayed in ihe channd ban*_er
Re:member: When you use the S-Video c_-mnection described herc_ you cannot use t|m
Video jack for a connection at the same time,
Chap'_er

C@nnecti@ns _ Ne_:,up
in the TV
Plug the end of the i)ower cord into a grom_ded wali oufleL ]nse_ the ph_g compk_te_ 3 inK)the
outlet,
Put Batteries in the Remote
• Remove the bakery compamnent cover hom the back of _:he remo_e by pushing d<_w_
and sliding off the (oven
° Insert 2 lrcsh 'AA' bakeries, Make slate the polarities (+ and -) are aligl_ed corJ_ct_y to the
diagram inside the batmry compm_ment,
• Rep[ tee the cover,
@@@@
................ SLEEP
@ @ @ 0
® + ©@:
@PE_S ¢ @WX'_I_ESEgSO
14Pgr _N [_'NN_ F_NNA_
o o o
BI(IP
OK button
Use the Remote Control to Complete
the Initial Setup
{he technical term is _Navigati(m' - hov_you mo'_e through the
('t " '"
m-screen menus, lhe method is d_e same tt_rottgl_otlt [Iw menL scree_ s
highlight your (:hoice and select it,
*[b ose the [V's menus, press the FV button on the remote control.
['his puts the TV and mmom in TV mode, Press the MENU bum)n and
hig-_ligh_ ihe merit iiem you want wid* the up a_d dowr_ am)w bu!tons
on the remote. Use the _p or down arrow button to move up or down.
Use the right or left arrow button to move right or Ieff,
To seleei lhe item thai you've highlighted, pr(>s ()K
Note: H@bh,qbted mea_ that :be rm!,_u _tem stands out fivm
otbe:r me*_agftems <_ the l_st (2{!_p_a*>"darl,,#< br*gbter or a
Turn on the TV
Press ON.OFF, iW"((m _:lu_rcmote)_ or press PO_EI ,, o1_d:_eTV's [font
pa_eL
Chapter _ _3
 Loading...