

Page 1
RCT6A03W13F1
Gemini 10 Pro
Quick Start Guide
Page 2

IMPORTANT SAFETY
INSTRUCTIONS
Some of the following information may not apply to your particular product;
however, as with any electronic product, precautions should be observed
during handling and use.
• Read these instructions.
• Keep these instructions.
• Heed all warnings.
• Follow all instructions.
• Do not use this apparatus near water.
• Clean only with dry cloth.
• Do not block any ventilation openings. Install in accordance with the
manufacturer’s instructions.
• Do not install near any heat sources such as radiators, heat registers,
stoves, or other apparatus (including ampli ers) that produce heat.
• Protect the power cord from being walked on or pinched particularly at
plugs, convenience receptacles, and the point where they exit from the
apparatus.
• Only use attachments / accessories speci ed by the manufacturer.
• Unplug this apparatus during lightning storms or when unused for long
periods of time.
• Refer all servicing to qualified service personnel. Servicing is required
when the apparatus has been damaged in any way, such as powersupply cord or plug is damaged, liquid has been spilled or objects have
fallen into the apparatus, the apparatus has been exposed to rain or
moisture, does not operate normally, or has been dropped.
ADDITIONAL SAFETY INFORMATION
• The AC adaptor and apparatus shall not be exposed to dripping or
splashing and no objects lled with liquids, such as vases, shall be placed
on the apparatus.
• Always leave su cient space around the product for ventilation. Do not
place product in or on a bed, rug, in a bookcase or cabinet that may
prevent air ow through vent openings.
1
Page 3
• Do not place lighted candles, cigarettes, cigars, etc. on the product.
• Care should be taken so that objects do not fall into the product.
• Do not attempt to disassemble the cabinet. This product does not
contain customer serviceable components.
• To prevent the risk of re or electric shock, do not expose this apparatus
to rain or moisture.
• Do not play your headset at high volume. Hearing experts warn against
extended high-volume play.
SAR statement
The SAR limit of Europe is 2.0 W/kg. Laptop has also been tested against
this SAR limit. The highest SAR value reported under this standard during
product certification for use at the body is 1.506 W/kg. This device was
tested for typical body-worn operations with the back of the handset
kept 0 cm from the body. To maintain compliance with RF exposure
requirements, use accessories that maintain a 0cm separation distance
between the user’s body and the back of the handset. The use of belt clips,
holsters and similar accessories should not contain metallic components in
its assembly. The use of accessories that do not satisfy these requirements
may not comply with RF exposure requirements, and should be avoided.
CAUTION: RISK OF EXPLOSION IF BATTERY IS REPLACED BY AN INCORRECT
TYPE. DISPOSE OF USED BATTERIES ACCORDING TO THE INSTRUCTIONS.
Environmental Considerations
The crossed-out garbage can symbol on your product
signifies that it falls into the category of electric/
electronic equipment. Products of this type contain
substances that are potentially dangerous to the
environment and to human health. Therefore, you
should not dispose of the Venturer electronic device in
a regular trash. As such, the current European directives
ask that this device be collected:
- At places of distribution in the case of a purchase of a
similar electronic product.
- At locally created disposal areas (waste disposal centers,
sorted trash system, etc.)
2
Page 4
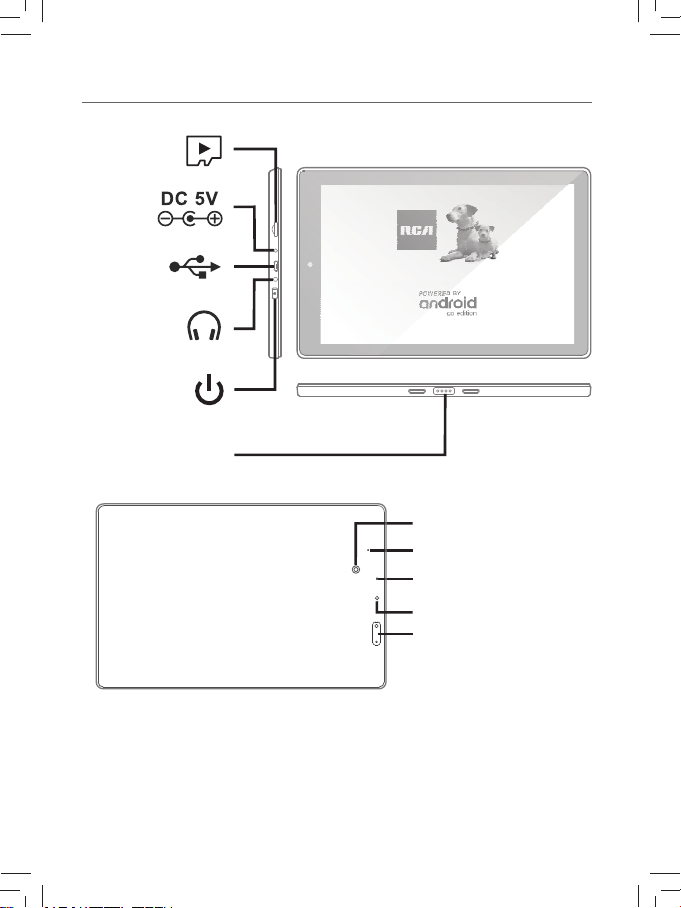
Getting to know your tablet
Micro-USB /
Charging *
Headphones
Power /
Standby
Connector
Rear camera
Reset
Charging indicator
Microphone
Volume + / -
3
Page 5

Tablet docking / undocking
Docking
Undocking
NOTE
The keyboard connects to the tablet via the Connector. When the connection is
successful, the tablet will automatically adjust its settings to use the keyboard.
4
Page 6

Charging your tablet
Before turning on your tablet for the first time, connect the supplied AC
adaptor into the tablet's DC 5V port and to a nearby wall socket to activate
the battery.
* Micro USB port for charging at either OFF mode or Standby mode.
IMPORTANT! Please Read.
We recommend fully charging your tablet before using it for
the first time. For optimum performance, please connect the
provided AC adaptor to your tablet when it falls below 20%
charge.
2
To wall socket
1
Charging time will vary depending on remaining battery
level. Charging from 0%, should take approximately 4-5 hours.
Use ONLY the included AC adaptor. You may not be able to
turn on your tablet for at least 20 minutes if the battery was
fully drained.
5
Page 7

Turning on your tablet for the rst time
When using the tablet for the first time, you will be required to setup the
following:
1. Press and hold the
2. Select the language, then tap
3. Set the Wi-Fi.
4. Follow the onscreen instructions to setup the tablet.
5. The Jumping Icons will remind you to pull up the ALL APPs menu.
6. Tap the UP arrow or swipe up from the bottom of the screen to enter the
ALL APPs menu.
Power button 4~5 seconds to turn on the tablet.
.
Jumping Icons and UP arrow
6
Page 8

Turning on your tablet screen from standby mode
Press the
Swipe up to unlock the screen.
Power button to turn on the tablet screen.
Thursday 4 April
Sleep / Standby mode
Press the Power button to turn o the tablet screen.
Setting the Auto-rotate screen
1.
Swipe down from the top edge of screen to launch the "Quick Settings".
2. Touch the icon " " to turn on the Auto-rotate screen.
Tip: You can also go to Settings -> Accessibility -> Auto-rotate screen
and turn it on.
7
Page 9

Connecting to a WiFi network
1.
Go to Settings -> Network & Internet, tap Wi-Fi to open the Wi-Fi
screen and then tap O to turn it on.
2. The device will scan Wi-Fi networks automatically and display the
available names.
• If the device finds a network that you connected to previously, it
will connect to it automatically.
3. Tap a network name to connect to it, and enter a password if necessary.
4.
Alternatively, if your Wi-Fi router supports Wi-Fi Protected Setup, you
can go to the Advanced Wi-Fi screen (tap Wi-Fi preferences and select
Advanced) and select WPS Push Button, then press the WPS button on
your router.
5. If your network does not broadcast its SSID, tap + Add network and
enter the Network SSID (name) of the network. If necessary, enter
security or other network con guration details.
8
Page 10

Power o your tablet
Press and hold the Power button until Power o appears and
tap it.
The tablet will be completely powered o .
Thursday 4 April
Speci cation
Power: DC IN 5V (operate with AC adaptor)
9
Page 11

Copyright and trademark notices
Google, Android, Google Play, YouTube and other marks are trademarks of
Google LLC.
The Wi-Fi CERTIFIED Logo is a certification mark of the Wi-Fi Alliance. The Wi-Fi
Protected Setup Mark is a mark of the Wi-Fi Alliance.
The Bluetooth® word mark and logos are registered trademarks owned by
the Bluetooth SIG Inc. Other trademarks and trade names are those of their
respective owners.
All other trademark appearing herein are the property of their respective
owners. Specifications subject to change without notice.
Limited Warranty
ALCO INTERNATIONAL LTD makes following limited warranty. This
limited warranty extends only to the original consumer purchaser and
is limited to non-commercial use of the product.
VENTURER products are warranted to be free from defects in
materials or workmanship for a period of one year from the date of
their original retail purchase. If the unit fails to conform this warranty,
we will service the product using new or refurbished parts and products
at Venturer's sole discretion.
TECHNICAL HELP ON THE OPERATION OF THIS PRODUCT IS AVAILABLE
IF THIS UNIT FALLS TO CONFORM TO THIS WARRANTY
PLEASE CALL
0345 3073611 (FOR UK ONLY)
MONDAY TO FRIDAY 9AM TO 5PM
Email address:
Website:
support@venturer.eu
www.venturer.com
10
Page 12

Printed in China
811-9A0391W030
 Loading...