

RCA G35850, F35751 Owner's Manual
nOR
Color TV
Owner's Manual
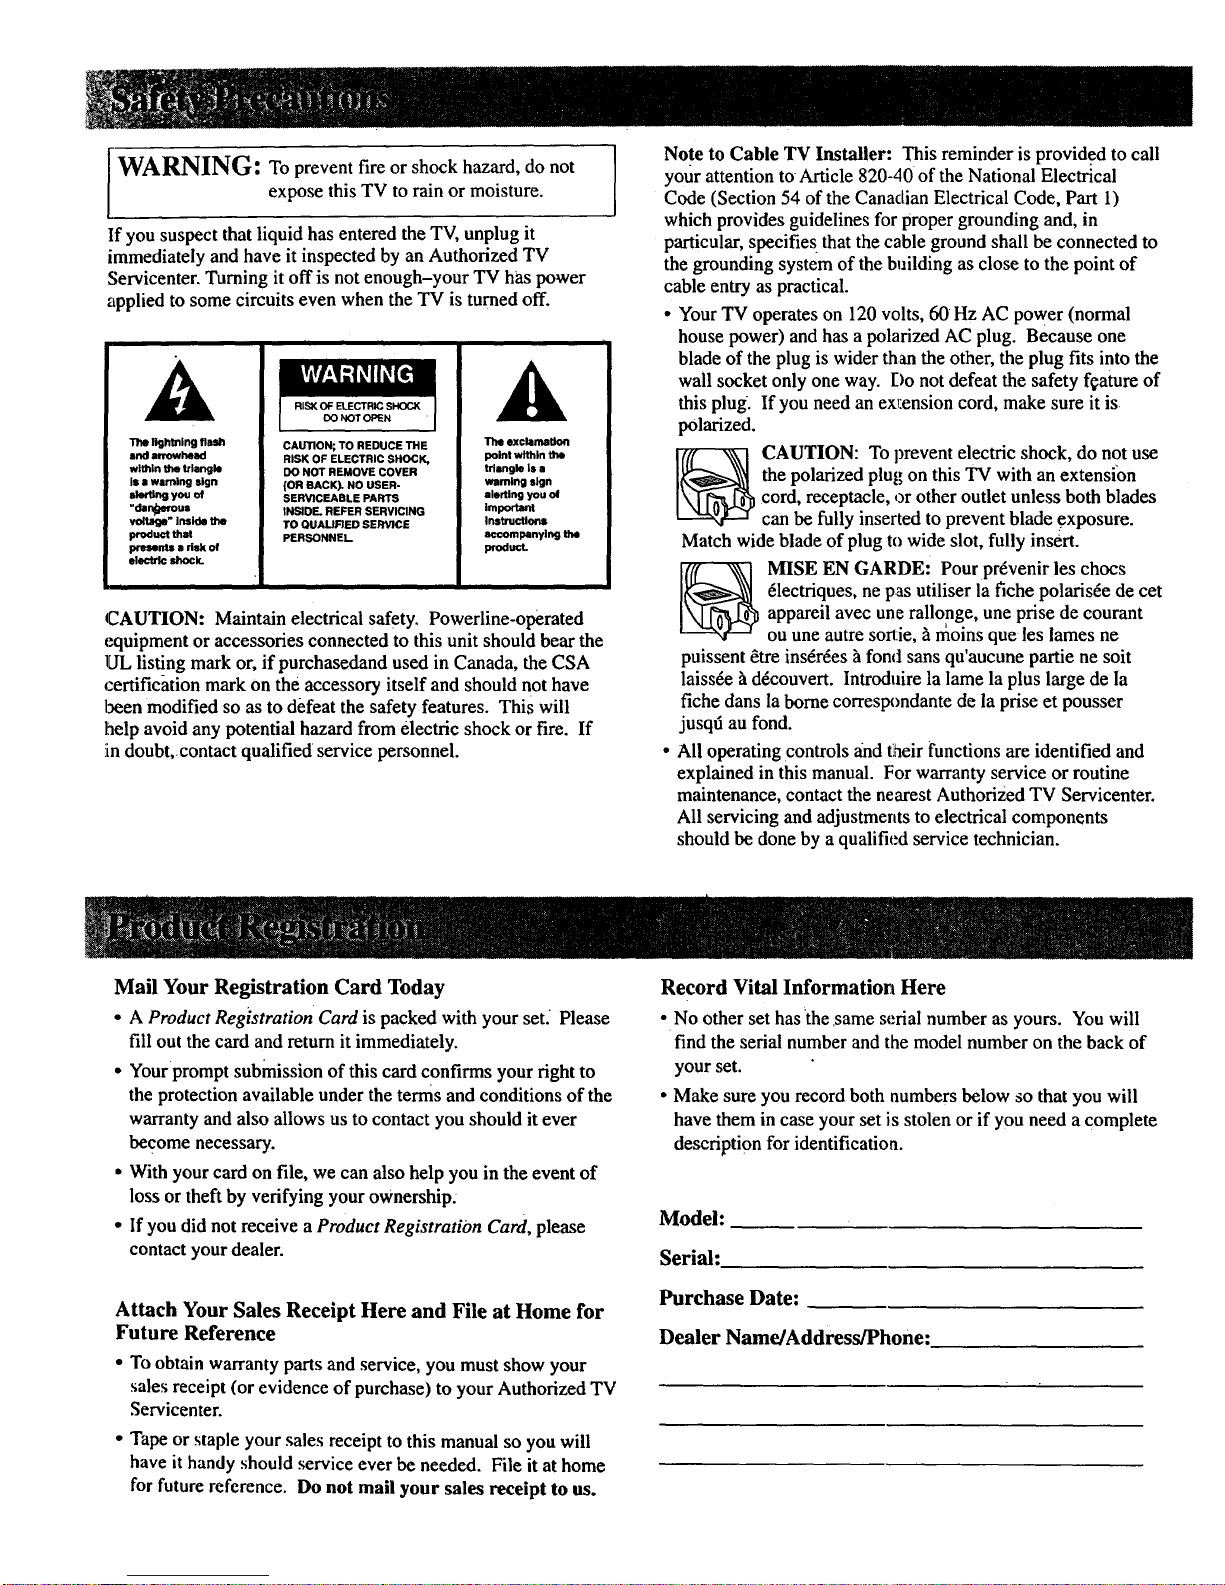
WARNING: To prevent fire or shock hazard, do not
expose this TV to rain or moisture.
If you suspect that liquid has entered the TV, unplug it
immediately and have it inspected by an Authorized TV
Servicenter. Turning it off is not enough-your TV has power
applied to some circuits even when the TV is turned off.
The lightning flash
and arrowhead
wltnln the trl•ngle
I• • warning sign
alerting you of
_" inskle the
moat_-tthat
presents • risk of
electric shock.
CAUTION; TO REDUCE THE
RISK OF ELECTRIC SHOCK,
DO NOT REMOVE COVER
{OR BACK). NO USER-
SERVICEABLE PARTS
iNSIOE. REFER SERVICING
TO QUALIFIED SERVICE
PERSONNEL
The exclamation
point wtthin the
Irlangle Is •
warning sign
alerting you of
importiml
Instructions
aocoml_n_ng
_rnduct
CAUTION: Maintain electrical safety. Powerline-operated
equipment or accessories connected to this unit should bear the
UL listing mark or, if purchasedand used in Canada, the CSA
certification mark on the accessory itself and should not have
been modified so as to defeat the safety features. This will
help avoid any potential hazard from electric shock or fire. If
iindoubt,contact qualified service personnel.
Note to Cable TV Installer: This reminder is provided to call
your attention to Article 820-40 of the National Electrical
Code (Section 54 of the Canadian Electrical Code, Part 1)
which provides guidelines for proper grounding and, in
particular, specifies that the cable ground shall be connected to
the grounding system of the building as close to the point of
cable entry as practical.
• Your TV operates on 120 volts, 60Hz AC po',ver (normal
house power) and has a polarized AC plug. Because one
blade of the plug is wider than the other, the plug fits into the
wall socket only one way. Do not defeat the safety feature of
this plug. If you need an ex_:ension cord, make sure it is
polarized.
_ AUTION: To prevent electric shock, do not use
the polarized plug on this TV with an extension
cord, receptacle, or other outlet unless both blades
can be fully inserted to prevent blade exposure.
Match wide blade of plug to wide slot, fully insert.
MISE EN GARDE: Pour pr_venir les chocs
61ectriques, ne pas utiliser la fiche polaris6e de cet
appareil avec une rallonge, une prise de courant
ou une autre sortie, h rfioins que les lames ne
puissent &re ins6r6es h fond sans qu'aucune partie ne soit
laiss_e h d_couvert. Introduire la lame la plus large de la
fiche dans la borne correspondante de la prise et pousser
jusqfi au fond.
• All operating controls and their functions are •dent•fed and
explained in this manual. For warranty service or routine
maintenance, contact the nearest Authorized TV Servicenter.
All servicing and adjustments to electrical components
should be done by a qualified service technician.
Mail Your Registration Card Today
• A Product Registration Cord is packed with your set. Please
fill out the card and returnit immediately.
• Your prompt submission of this card confirms your right to
the protection available under the terms and conditions of the
warrantyand also allows us to contact you should it ever
become necessary.
• With your card on file, we can also help you in the event of
loss or theft by verifying your ownership.
• If you did not receive a Product Registration Card, please
contact your dealer.
Record Vital Information Here
• No other set hasthe ,same serial number as yours. You will
find the serial number and the model number on the back of
your set.
• Make sure you record both numbers below so thatyou will
have them in case your set is stolen orif you need a complete
description for identification.
Model:
Serial:
Attach Your Sales Receipt Here and File at Home for
Future Reference
• To obtain warranty parts and service, you must show your
sales receipt (or evidence of purchase) to your Authorized TV
Servicenter.
• Tape or staple your sales receipt to this manual so you will
have it handy should service ever be needed. File it at home
for future reference. Do not mail your sales receipt to us.
Purchase Date:
Dealer Name/Address/Phone:
Thank you for choosing RCA
Congratulations on your purchase of
an RCA TV. You have selected a
high-quality, precision-engineered
instrument designed to give you
years of enjoyment.
About This Manual
To take full advantage of ad the
features and benefits of this unique
TV; be sure to read this owner's
manual carefully and then keep it in
a safe place for future reference.
Table of Contents
Safety Precautions ................................................. Inside Front Cover
ProductRegistration ............................................. Inside Front Cover
First-Time Operation ..................................................................... 2-4
Operating Instructions
Front Panel Controls ................................................................................... 5
TV On-Screen Status Displays ................................................................... 6
Remote Control
• Installing Batteries .......................................................................... _..........7
• Basic Operation Theory ............................................................................. 8
•'TV Functions ....................................................................................... 9-10
Freeze and Zoom ....................................................................................... 11
Channel Guide ........................................................................................... 12
VIDEO Menu- General Instructions ............................................ ............. !3
AUDIO Menu- General Instructions ........................................................ 14
• Sound Retrieval System-SRS(• ) ......................................................... 15
SETUP Menu- General Instructions .................................. :...................... 16
, Setting Closed Captioning ...................................................................... 17
• Setting the Sleep Timer ............................................................................ 18
• Setting the Alarm .................................................................................... 19
• Labeling Channels ................................. ................................................ 20
• Parental Control ................................................... •.................................. 21
• Channel Memory (Autoprogramming Channels) ................................... 22
• Channel Memory (Erasing/Adding Channels) ....................................... 22
• Changing Antenna Input ......................................................................... 23
• Setting up VCR Channels ...................................................................... 24
• Setting up Cable Box Channel .............................................................. ,.25
Picture-in-Picture (PIP) ....................................................................... 26-27
Detailed Connections
Tips to Read Before Connecting Components .......................................... 28
Monitor Panel ............................................................................................ 29
Antenna and Cable Connections
• Home Antenna Connections ................................................................... 30
• Cable-TV Connections ...... _............................................................... 31-32
• Programming Remote to Control Cable Box.i ........................................ 33
• Cable-TV Operation ............................................................................... 34
Component Connections
• Standard VCR .................................................................................... 35-36
• S-VHS (Super VHS) VCR ...................................................................... 36
• Remote Buttons That Control RCA VCRs ............................................. 37
• Controlling Other Brands of VCRs ........................................................ 38
• Camcorder .................................................................................. :._............ 39
• Computers and Other Equipment ............................................................ 40
• Audio Amplifier ....................................................................................... 41
• Programming Remote to Control Audio Equipment .............................. 42
• Speaker Connections .............................................................................. 43
Reference Section
Optional Accessories and Order Form ................................................. 44-46
Trouble Checks ..................................................................................... 47-49
Cleaning and Care ......................... ................................................... :........ 50
Index (Alphabetical Subject Reference) .............................................. 51-52
Limited Warranty ....................................................................... Back Cover
The steps below will help you get your TV connected and
working quickly. The page numbers on which you can tinct
detailed instructions for each of these steps are also listed
for your convenience.
1:. Unpack TV and accessories.
Shown here are the accessories that came packed with your TV.
Remote Control
Four AAA Batteries for
Remote
Power Cord
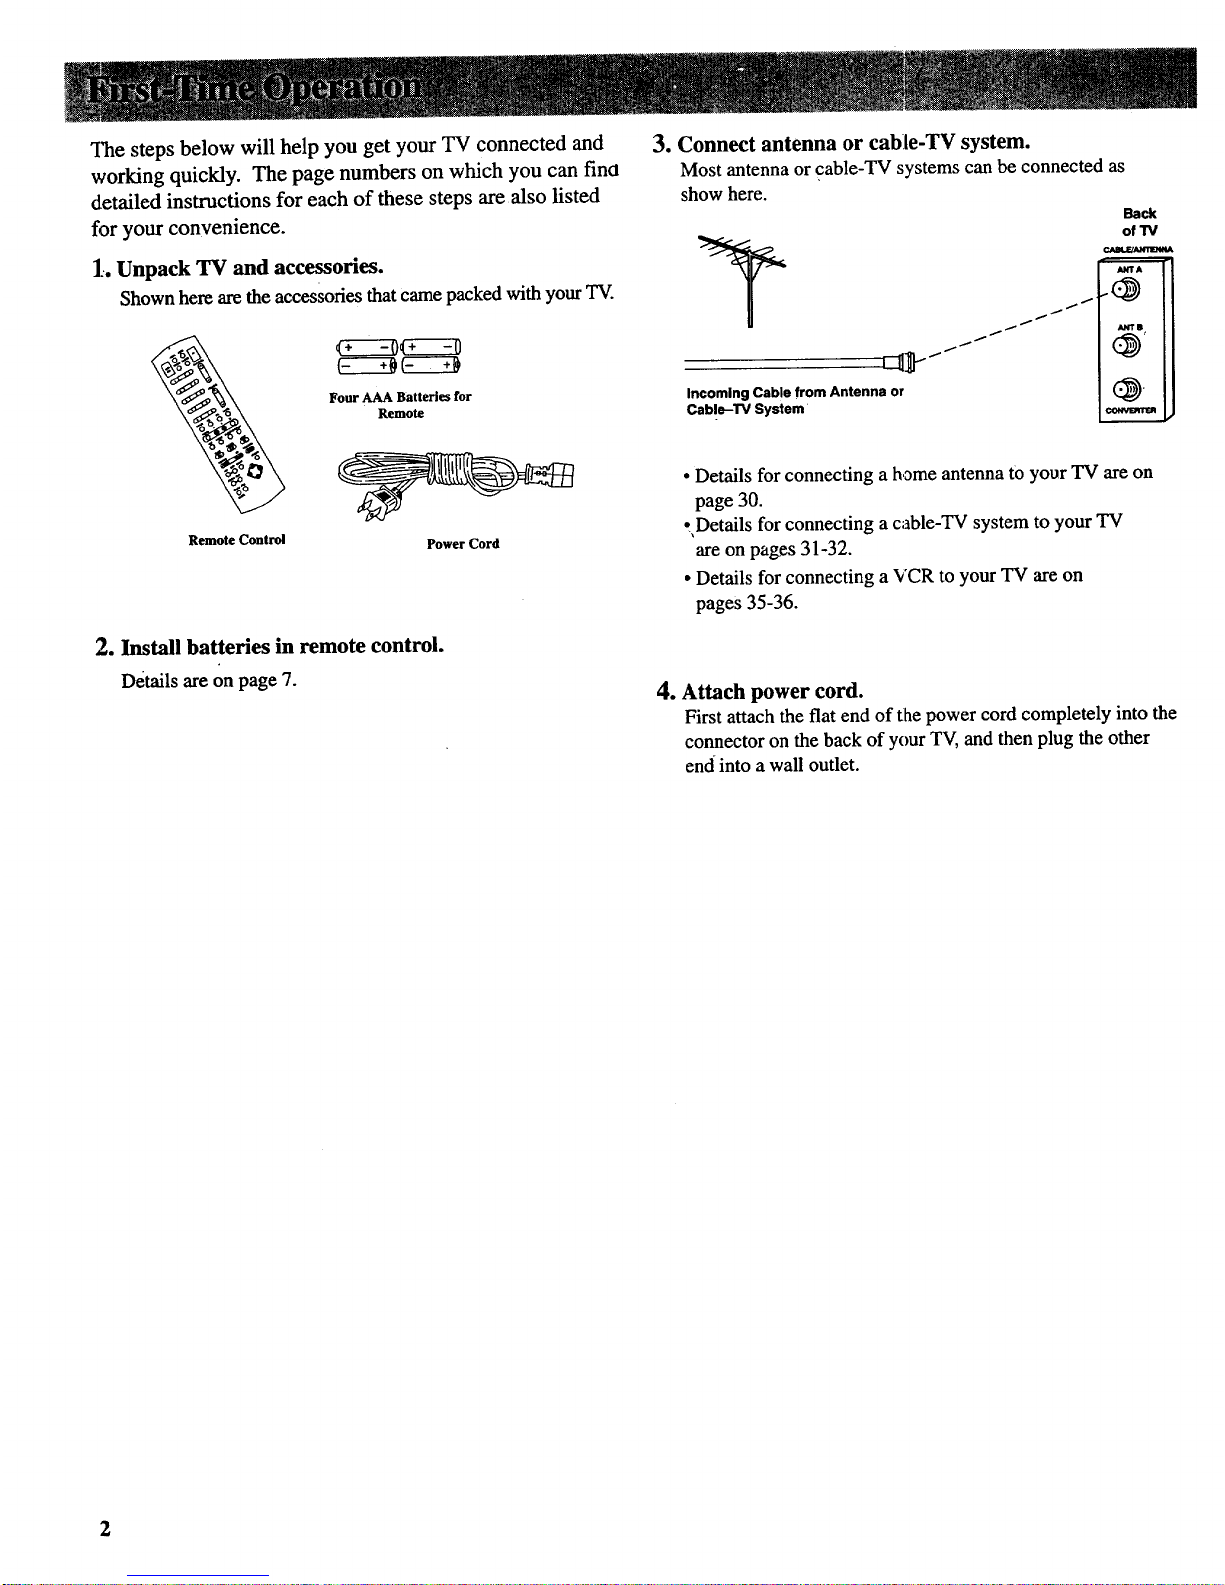
3. Connect antenna or cable-TV system.
Most antenna or cable-TV systems can be connected as
show here.
11 t1/
Incoming Cable from Antenna or
Cable-'l'V System
Back
of TV
C4WI.EtA/4TE/INA
Aftra
ANTI
• Details for connecting ahome antenna to your TV are on
page 30.
• Details for connecting a cable-TV system to your TV
are on pages 31-32.
• Details for connecting a VCR to your TV are on
pages 35-36.
2. Install batteries in remote control.
Details are on page 7.
4. Attach power cord.
First attach the flat end of the power cord completely into the
connector on the back of your TV, and then plug the other
end into a wall outlet.
2
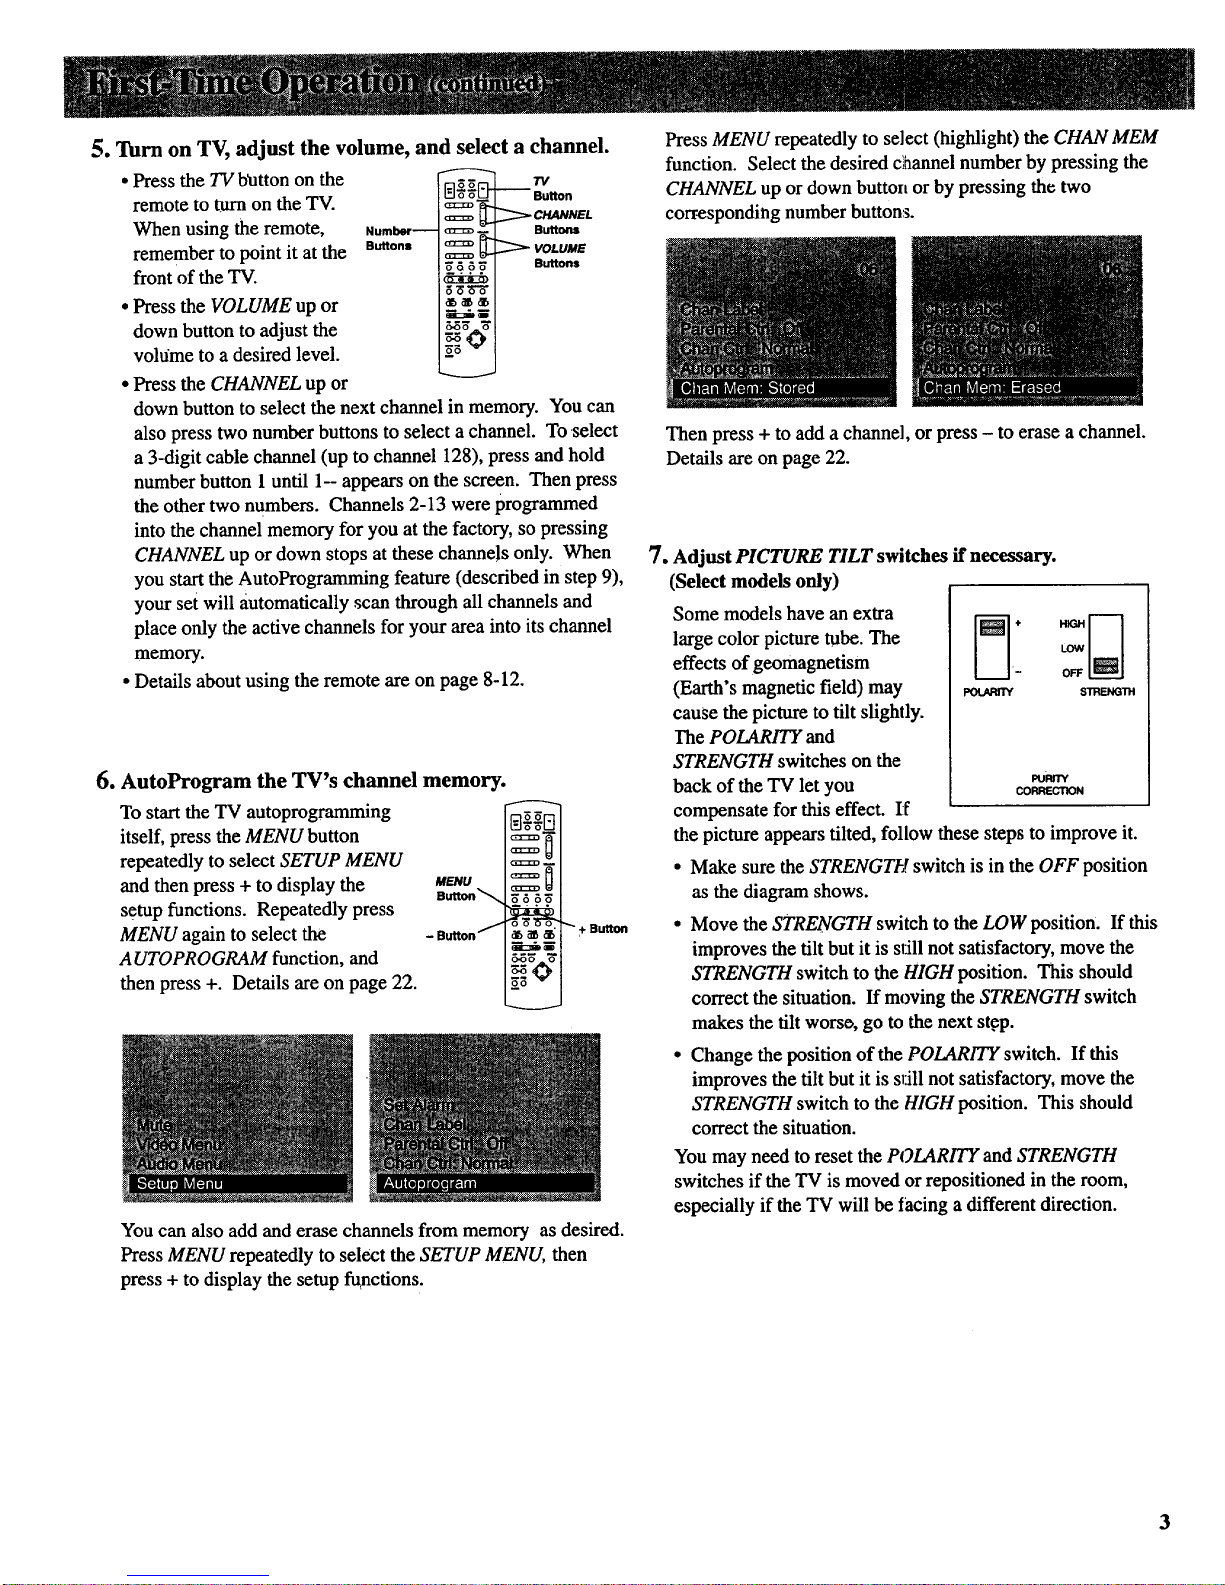
5. Turn on TV, adjust the volume, and
• Press the TV button on the
remote to turn on the TV.
When using the remote, Number--
remember to point it at the '_on-
front of the TV.
• Press the VOLUME up or
down button to adjust the
volume to a desired level.
• Press the CHANNEL up or
select a channel.
TV
o°-_" _ Button
. . •
down button to select the next channel in memory. You can
also press two number buttons to select a channel. To select
a 3-digit cable channel (up to channel 128), press and hold
number button 1 until 1-- appears on the screen. Then press
the other two numbers. Channels 2-13 were programmed
into the channel memory for you at the factory, so pressing
CHANNEL up or down stops at these channels only. When
you start the Autoprogramming feature (described in step 9),
your set will automatically scan through all channels and
place only the active channels for your area into its channel
memory.
• Details about using the remote are on page 8-12.
o
AutoProgram the TV's channel memory.
To startthe TV autoprogramming
itself, press the MENU button
repeatedly to select SETUP MENU
and then press + to display the uEsu
Button_
setup functions. Repeatedly press
MENU again to select the -Button_
AUTOPROGRAM function, and
then press +. Details are on page 22.
_°Fq
_c_ '_ + Button
::_mmm
Press MENU repeatedly to select (highlight) the CHAN MEM
function. Select the desired channel numberby pressing the
CHANNEL up or down button or by pressing the two
corresponding number button:_.
Then press + to add a channel, or press - to erase a channel.
Details are on page 22.
7. Adjust PICTURE TILT switches if necessary.
(Select models only)
Some models have an extra
large color picture tube. The _i HI_[_
effects of geomagnetism
(Earth's magnetic field) may _ sr,_r.
cause the picture to tilt slightly.
The POLARITY and
STRENGTH switches on the
Pu_crv
back of the TV let you COI_I:IEGIlON
compensate for this effect. If
the picture appears tilted, follow these steps to improve it.
• Make sure the STRENGTH switch is in the OFF position
as the diagram shows.
• Move the STRENGTH switch to the LOW position. If this
improves the tilt but it is stSllnot satisfactory, move the
STRENGTH switch to the HIGH position. This should
correct the situation. If moving the STRENGTH switch
makes the tilt worso, go to the next step.
• Change the position of the POLARITY switch. If this
improves the tilt but it is sl:illnot satisfactory, move the
STRENGTH switch to the HIGH position. This should
correct the situation.
You may need to reset the POLARITY and STRENGTH
switches if the TV is moved or repositioned in the room,
especially if the TV will be tacing a different direction.
You can also add and erase channels from memory as desired.
Press MENU repeatedly to select the SETUP MENU, then
press + to display the setup functions.
3
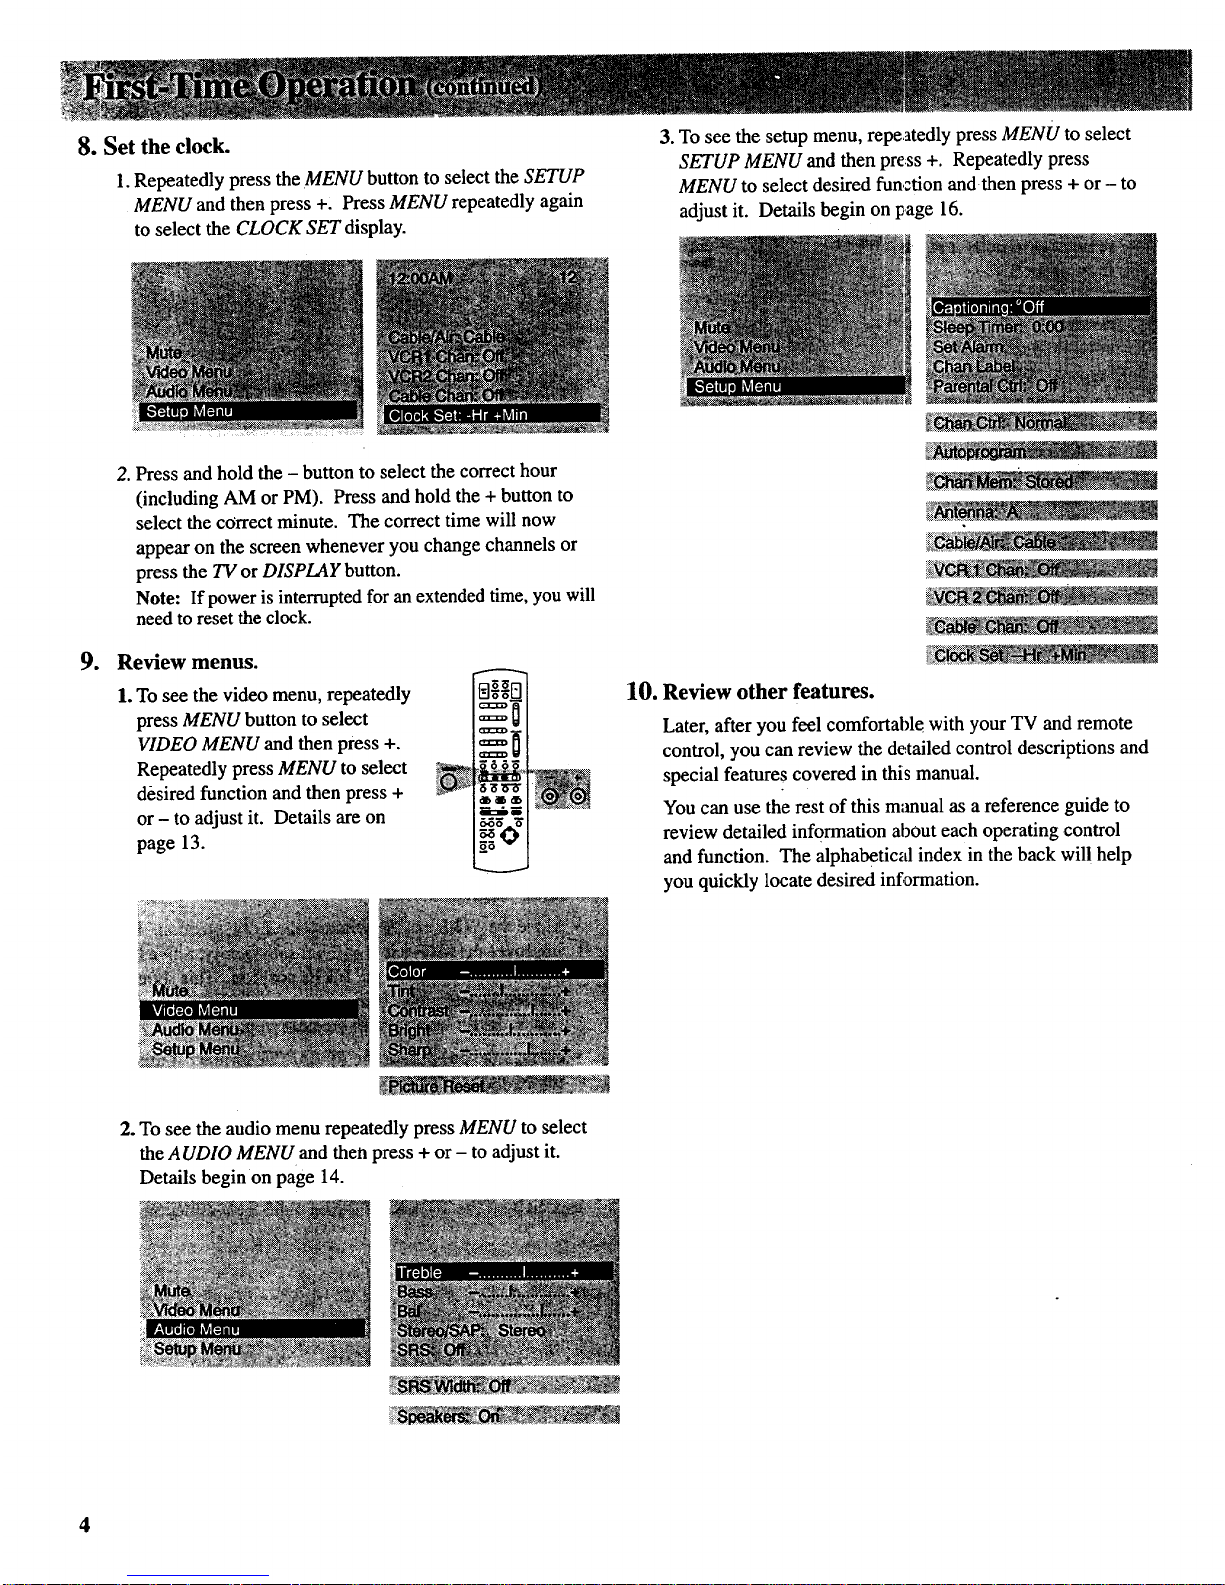
8. Set the clock.
1.Repeatedly press theMENU button to select the SETUP
MENU and then press +. Press MENU repeatedly again
to select the CLOCK SET display.
3. To see the setup menu, repeatedly press MENU to select
SETUP MENU and then press +. Repeatedly press
MENU to select desired function and then press + or - to
adjust it. Details begin on page 16.
2. Press and hold the - button to select the correct hour
(including AM or PM). Press and hold the + button to
select the correct minute. The correct time will now
appear on the screen whenever you change channels or
press the TV or DISPLAY button.
Note: If power is interrupted for an extended time, you will
need to reset the clock.
9. Review menus.
1. To see the video menu, repeatedly
press MENU button to select
VIDEO MENU and then press +.
Repeatedly press MENU to select
desired function and then press +
or - to adjust it. Details are on
page 13.
_i_:,.,._','z,e_"r'_'_'_'_'_'_'_'_ "
10. Review other features.
Later, after you feel comfortable with your TV and remote
control, you can review the detailed control descriptions and
special features covered in this manual.
You can use the rest of this manual as a reference guide to
review detailed information about each operating control
and function. The alphabetic_d index in the back will help
you quickly locate desired information.
2. To see the audio menu repeatedly press MENU to select
the AUDIO MENU and then press + or- to adjust it.
Details begin on page 14.
4
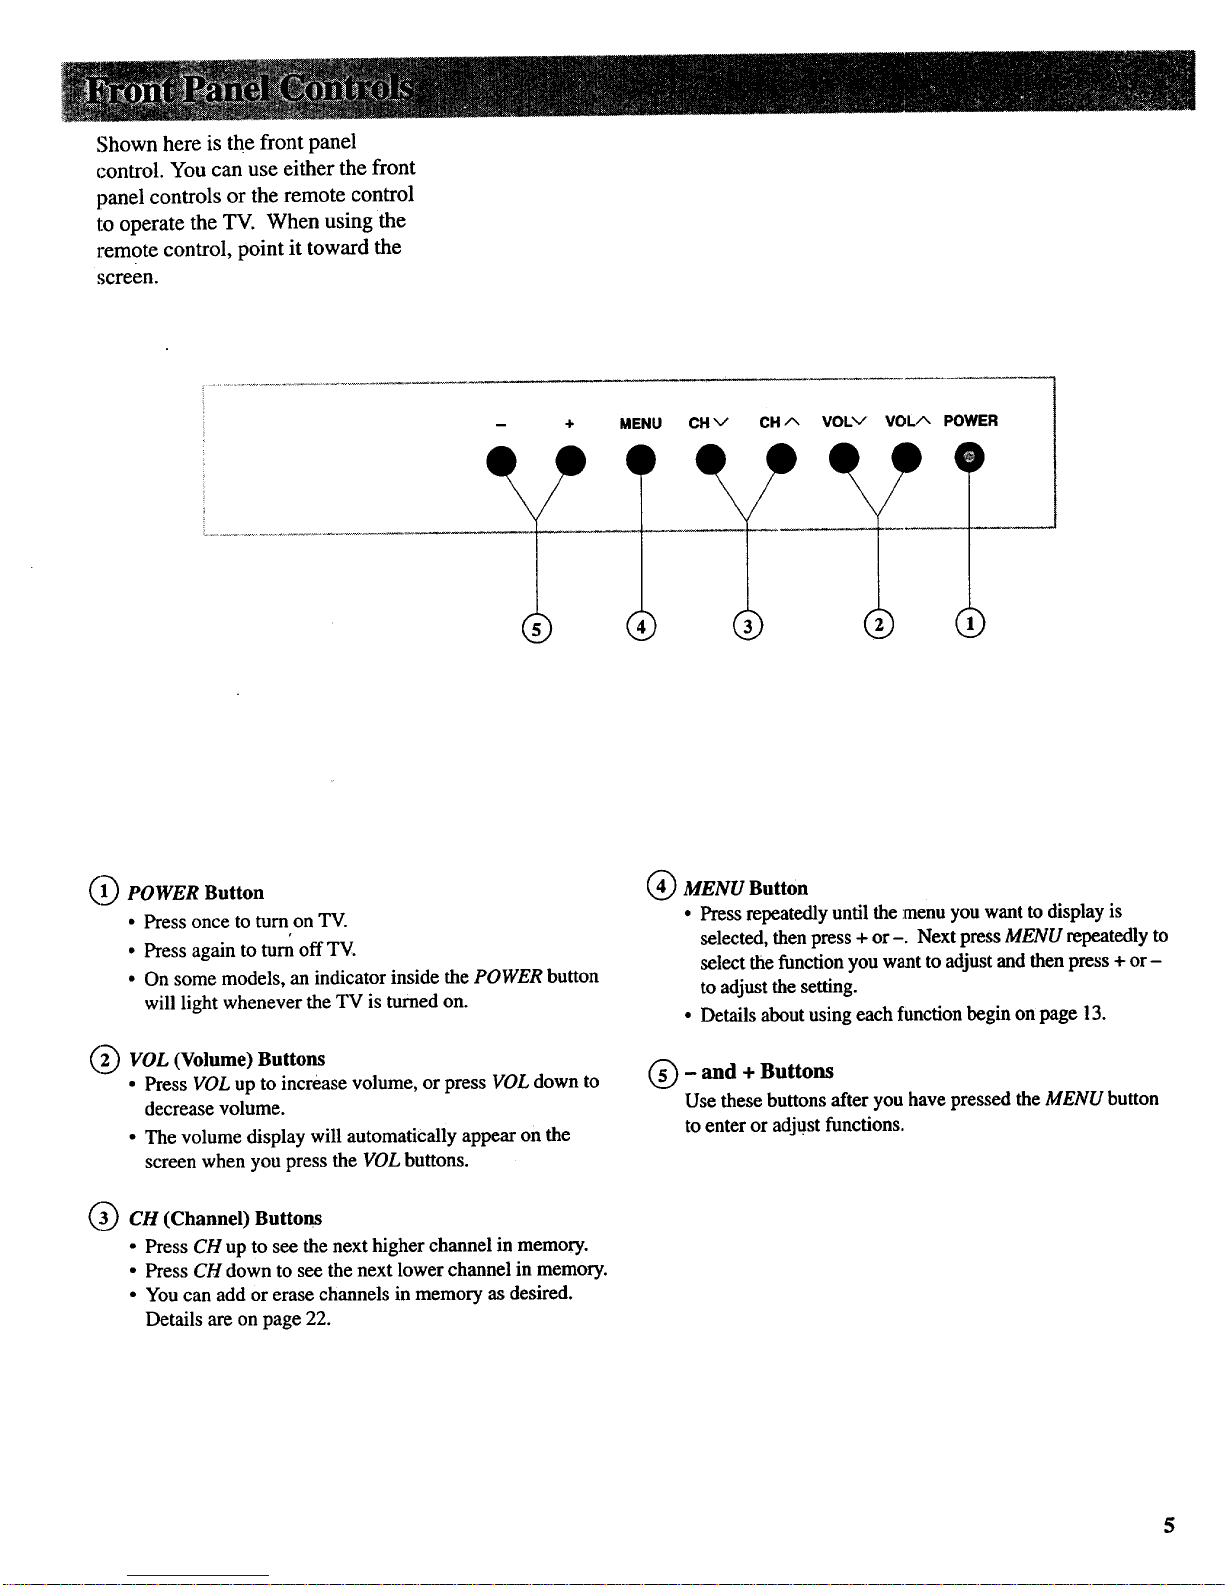
Shownhereisthefrontpanel
control.Youcanuseeitherthefront
panelcontrolsortheremotecontrol
tooperatetheTV.Whenusingthe
remotecontrol,pointit towardthe
screen.
m MENU
IP
C,)
CH v CH A VOLV VOLA POWER
D
)
(1_ POWER Button
• Press once to turn on TV.
• Press again to turn off TV.
• On some models, an indicator inside the POWER button
will light whenever the TV is turned on.
f_
(.2) VOL (Volume) Buttons
• Press VOL up to increase volume, or press VOL down to
decrease volume.
• The volume display will automatically appear on the
screen when you press the VOL buttons.
Q CH (Channel) Buttons
• Press CH up to see the next higher channel in memory.
• Press CH down to see the next lower channel in memory.
• You can add or erase channels in memory as desired.
Details are on page 22.
Q MENU Button
• Press repeatedly until the :menu you want to display is
selected, then press + or-. Next press MENU repeatedly to
select the function you want to adjustand then press + or-
to adjust the setting.
• Details about using each function begin on page 13.
_'_ - and + Buttons
Use these buttons after you have pressed the MENU button
to enter or adju.stfunctions.
5
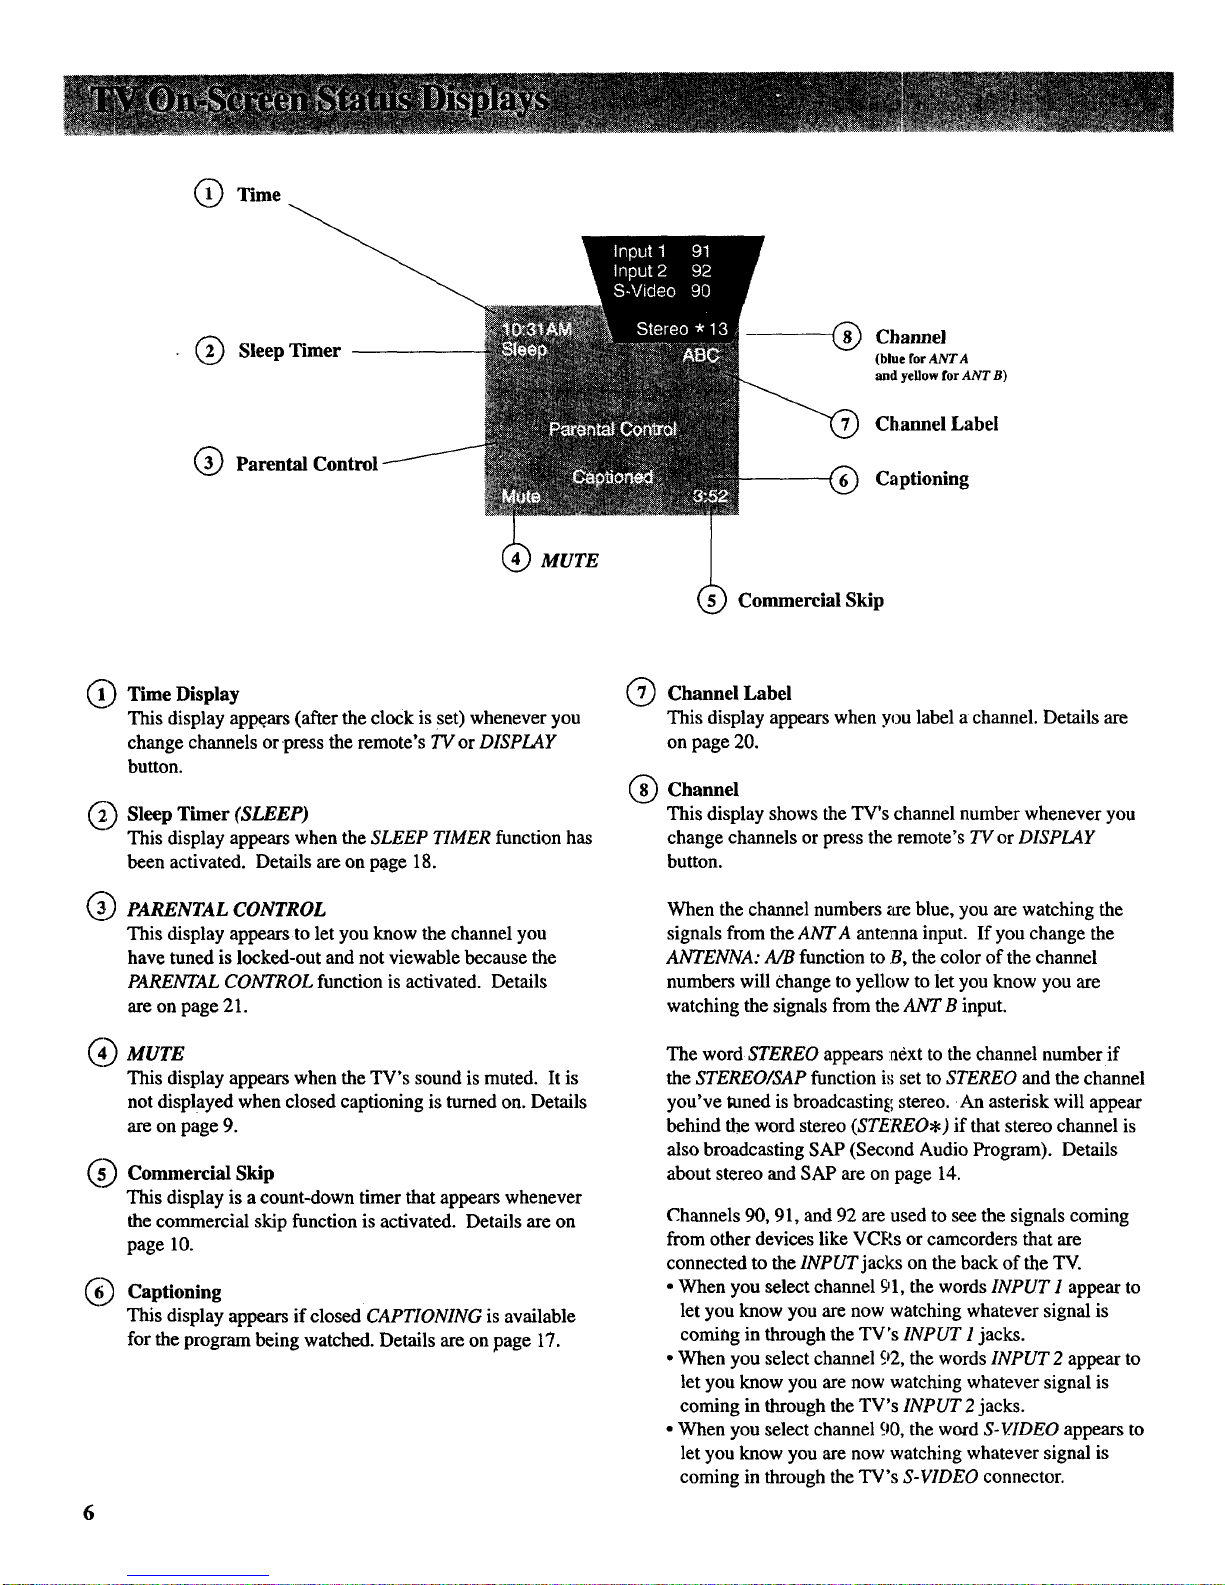
Time
Q Sleep Timer
Q Parental Control
®
®
Channel
(blue for ANTA
and yellow for ANT B)
Channel Label
Captioning
MUTE
Commercial Skip
®
®
®
®
6
Time Display
This display appe.ars (after the clock is set) whenever you
change channels or press the remote's TV or DISPLAY
button.
Sleep Timer (SLEEP)
This display appears when the SLEEP TIMER function has
been activated. Details are on p.age 18.
PARENTAL CONTROL
This display appears to let you know the channel you
have tuned is locked-out and not viewable because the
PARENTAL CONTROL function is activated. Details
are on page 21.
MUTE
This display appears when the TV's sound is muted. It is
not displayed when closed captioning is turned on. Details
are on page 9.
Commercial Skip
This display is a count-down timer that appears whenever
the commercial skip function is activated. Details are on
page 10.
Captioning
This display appears if closed CAPTIONING is available
for the program being watched. Details are on page 17.
®
®
Channel Label
This display appears when you label a channel. Details are
on page 20.
Channel
This display shows the TV's channel number whenever you
change channels or press the remote's TV or DISPLAY
button.
When the channel numbers are blue, you are watching the
signals from the ANTA antenna input. If you change the
ANTENNA: A/B function to B, the color of the channel
numbers will Change to yellow to let you know you are
watching the signals from the ANT B input.
The word STEREO appears next to the channel number if
the STEREO/SAP function is set to STEREO and the channel
you've _ned is broadcasting stereo. An asterisk will appear
behind the word stereo (STEREO,) if that stereo channel is
also broadcasting SAP (Second Audio Program). Details
about stereo and SAP are on page 14.
Channels 90, 91, and 92 are used to see the signals coming
from other devices like VCRs or camcorders that are
connected to the INPUT jacks on the back of the TV.
• When you select channel 91, the words INPUT I appear to
let you know you are now watching whatever signal is
coming in through the TV's INPUT 1 jacks.
• When you select channel 92, the words INPUT 2 appear to
let you know you are now watching whatever signal is
coming in through the TV's INPUT 2 jacks.
• When you select channel 90, the word S-VIDEO appears to
let you know you are now watching whatever signal is
coming in through the TV's S-VIDEO connector.
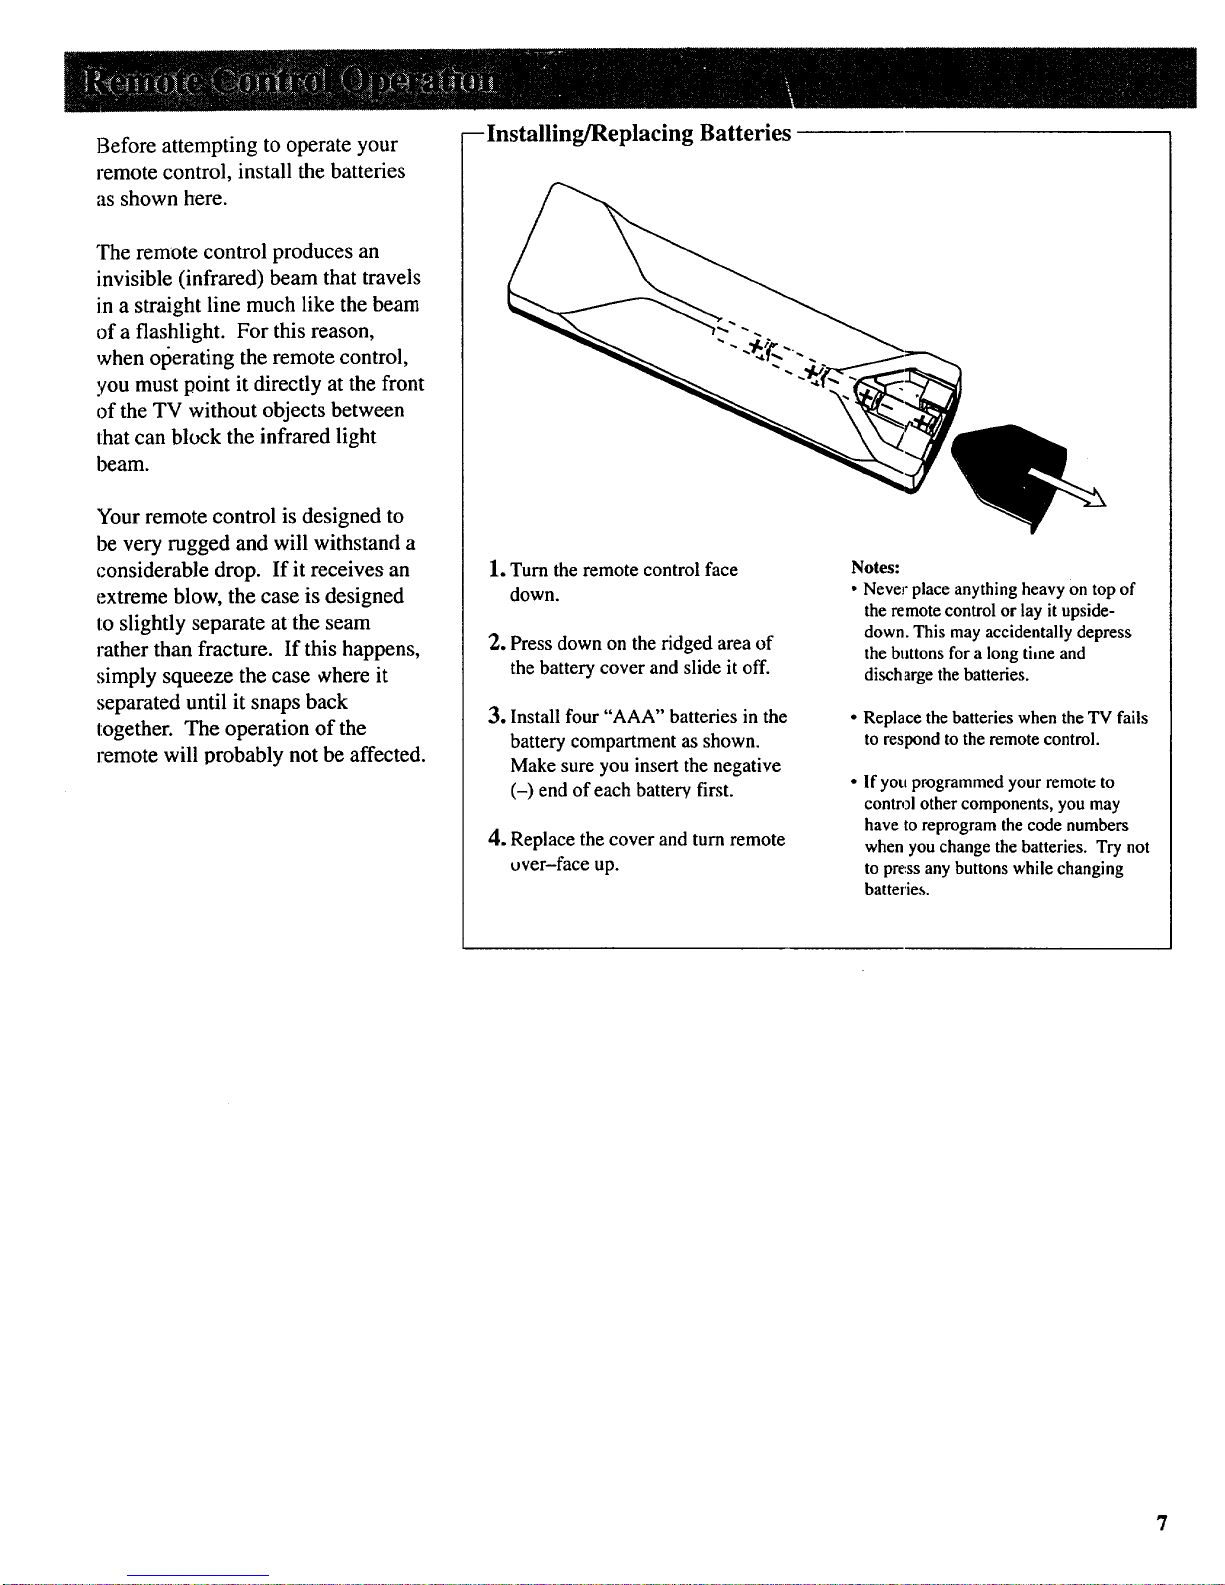
Before attempting to operate your
]'emote control, install the batteries
as shown here.
The remote control produces an
invisible (infrared) beam that travels
in a straight line much like the beam
of a flashlight. For this reason,
when olJerating the remote control,
you must point it directly at the front
of the TV without objects between
that can block the infrared light
beam.
Your remote control is designed to
be very rugged and will withstand a
considerable drop. If it receives an
extreme blow, the case is designed
to slightly separate at the seam
rather than fracture. If this happens,
simply squeeze the case cohere it
separated until it snaps back
together. The operation of the
remote will probably not be affected.
--Installing/Replacing Batteries
1. Turn the remote control face
down.
2. Press down on the ridged area of
the battery cover and slide it off.
3. Install four "AAA" batteries in the
battery compartment as shown.
Make sure you insert the negative
(-) end of each battery first.
4. Replace the cover and turn remote
over-face up.
Notes:
Never place anything heavy on top of
the remote control or lay it upside-
down. This may accidentally depress
the buttons for a long dine and
discharge the batteries.
Replace the batteries when the TV fails
to respond to the remote control.
If yot_ programmed your remote to
control other components, you may
have to reprogram the code numbers
when you change the batteries. Try not
to press any buttons while changing
batteries.
7
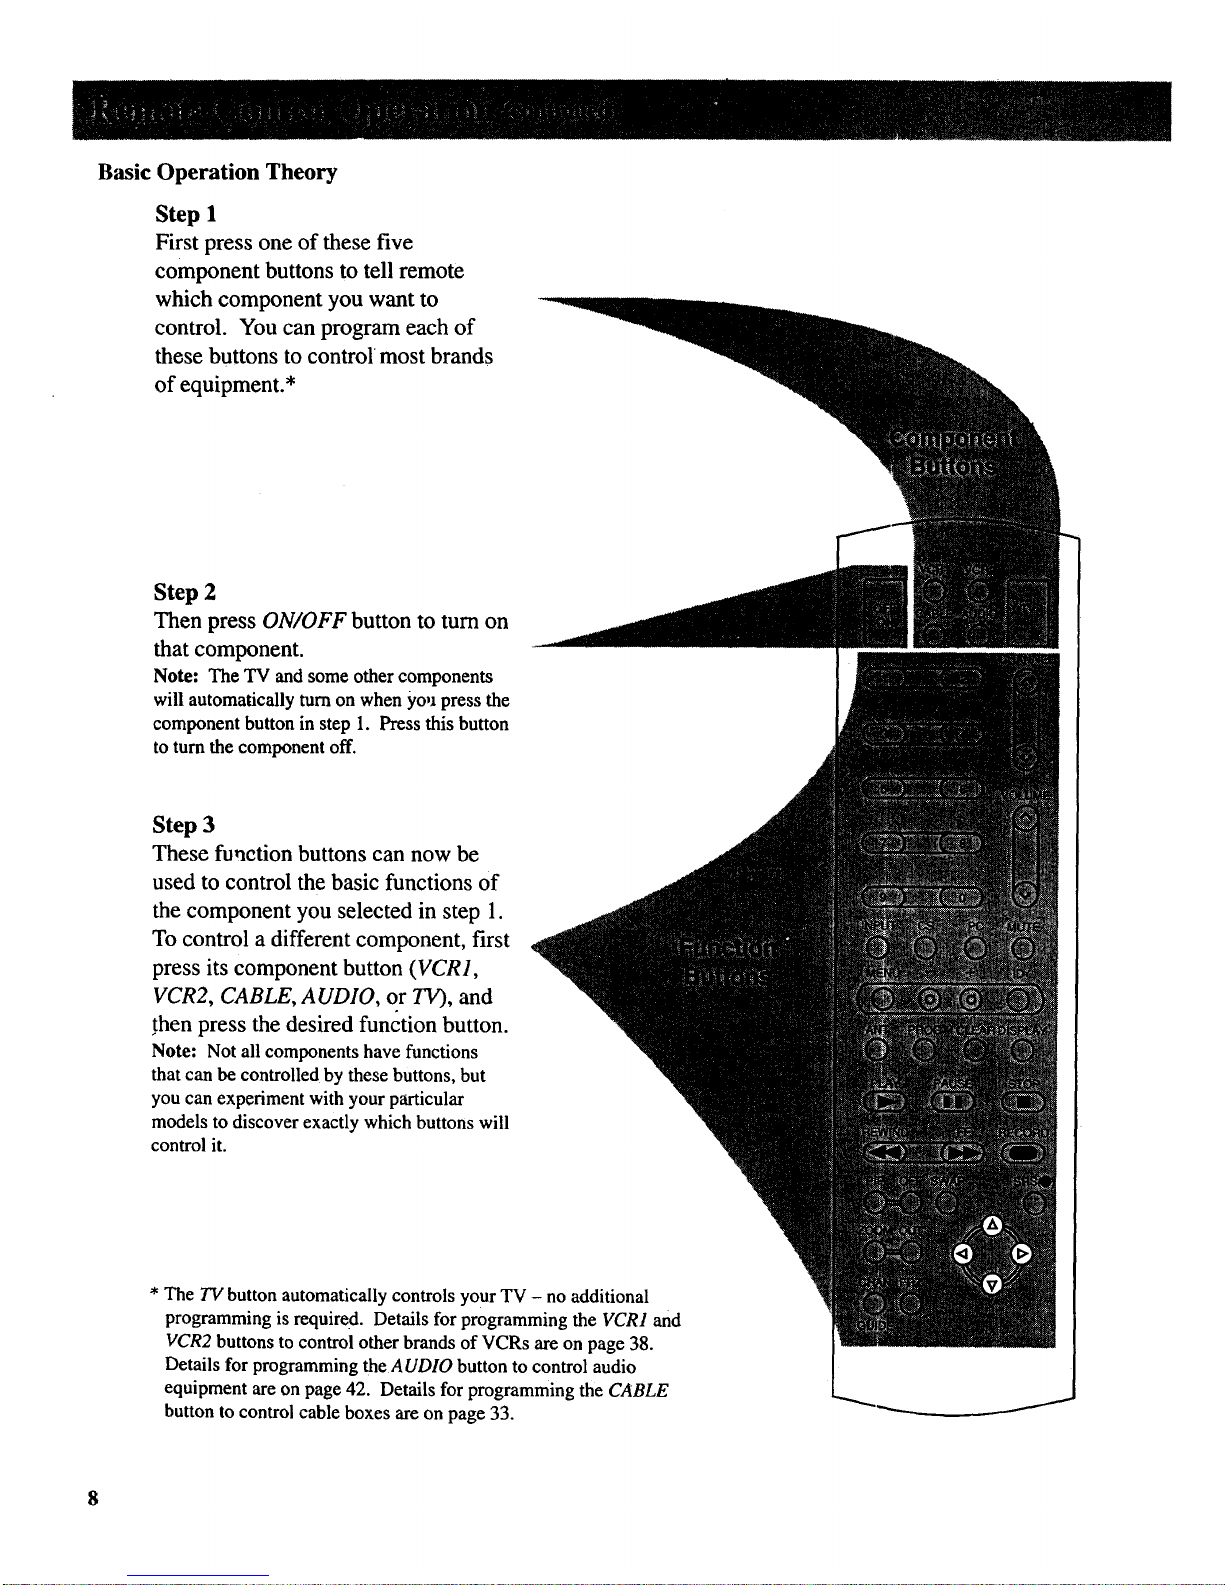
Basic
Operation Theory
Step 1
First press one of these five
component buttons to tell remote
which component you want to
control. You can program each of
these buttons to control most brands
of equipment.*
Step 2
Then press ON/OFF button to turn on
that component.
Note: The TV and some other components
will automatically turn on when you press the
component button in step 1. Press this button
to turn the component off.
Step 3
These function buttons can now be
used to control the basic functions of
the component you selected in step 1.
To control a different component, first
press its component button (VCR1,
VCR2, CABLE, AUDIO, or TV), and
then press the desired function button.
Note: Not all components have functions
that can be controlled by these buttons, but
you can experiment with your particular
models to discover exactly which buttons will
control it.
* The TV button automatically controls your TV - no additional
programming is required. Details for programming the VCR1 and
VCR2 buttons to control other brands of VCRs are on page 38.
Details for programming the AUDIO button to control audio
equipment are on page 42. Details for programming the CABLE
button to control cable boxes are on page 33.
8
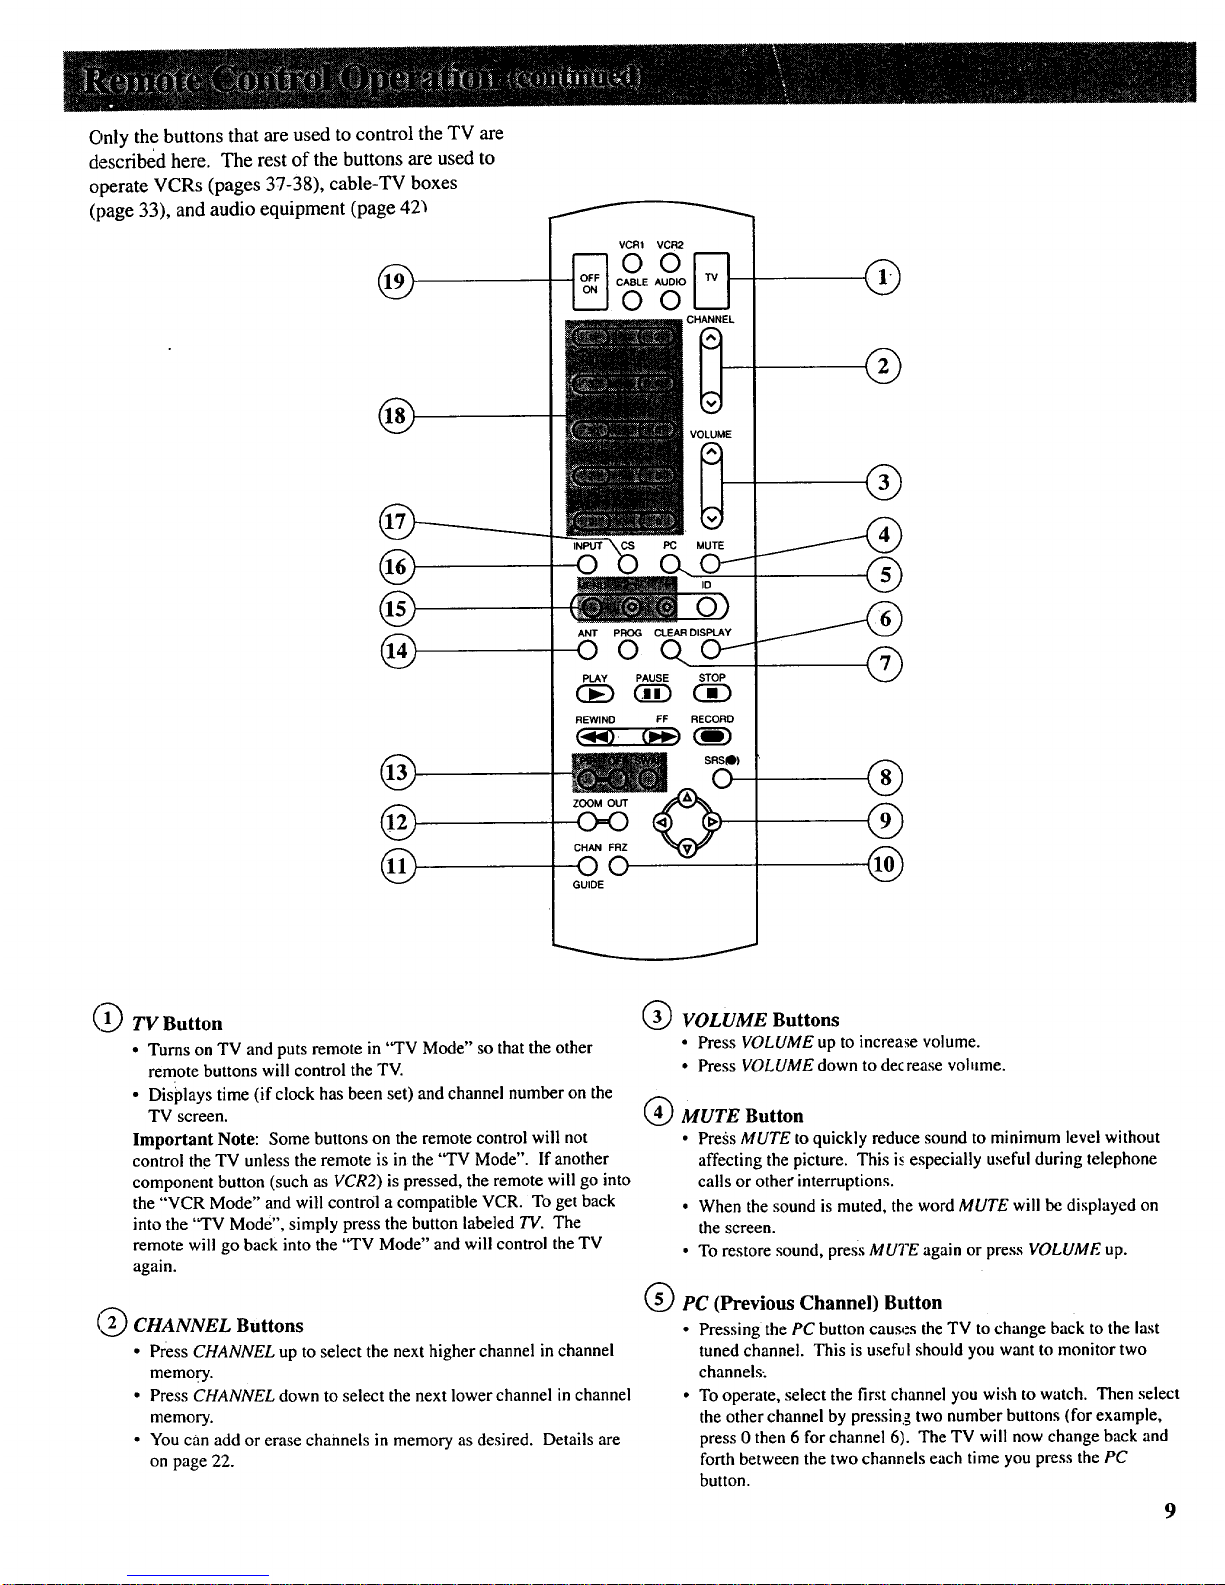
Only the buttons that are used to control the TV are
described here. The rest of the buttons are used to
operate VCRs (pages 37-38), cable-TV boxes
(page 33), and audio equipment (page 42_
@
@
@
@
@
@
@
VCRI VCR2
DooD
CABLE AUDIO
oo
ANT PROG CLEAR DISPLAY
o o o..o
PLAY PAUSE STOP
(i[D (i0
REWIND FF RECORD
ZOOM OUT
CHAN FRZ
O©
GUIDE
SRSO)
@
@
®
®
®
®
(1_ TV Button
• Turns on TV and puts remote in '°TVMode" so that the other
remote buttons will control the TV.
• Displays time (if clock has been set) and channel number on the
TV screen.
Important Note: Some buttons on the remote control will not
control the TV unless the remote is in the "TV Mode". If another
component button (such as VCR2) is pressed, the remote will go into
the "VCR Mode" and will control a compatible VCR. To get back
into the "TV Mode", simply press the button labeled TV. The
remote will go back into the "TV Mode" and will control the TV
again.
(_ CHANNEL Buttons
• Press CHANNEL up to select the next higher channel in channel
memory.
• Press CHANNEL down to select the next lower channel in channel
memory.
• You can add or erase channels in memory as desired. Details are
on page 22.
VOLUME Buttons
• Press VOLUME up to increase volume.
• Press VOLUME down to decrease volume.
MUTE Button
• Press MUTE to quickly reduce sound to minimum level without
affecting the picture. This is especially useful during telephone
calls or othe_ interruptions.
• When the sound is muted, the word MUTE will be displayed on
the screen.
• To restore sound, press MUTE again or press VOLUME up.
Q PC (Previous Channel) Button
• Pressing the PC button causes the TV to change back to the last
tuned channel. This is useful should you want to monitor two
channels:
• To operate, select the first channel you wish to watch. Then select
the other channel by pressing two number buttons (for example,
press 0 then 6 for channel 6). The TV will now change back and
forth between the two channels each time you press the PC
button.
9

_) DISPLAY Button
• Displays time (if clock has been set) and channel number on the
TV screen.
• Quickly removes menus and displays from the screen.
_) CLEAR Button
• Pressing CLEAR clears the screen of all on-screen display
messages except MUTE and PARENTAL CONTROL.
_) SRS (0)* Button
• Press repeatedly to change settings of SRS (0) function (Sound
Retrieval System).
• Details are on page 15.
* SRS and (") are registered trademarks of Hughes Aii'craft Company, a division of GM
Hughes Electronics.
_) Arrow Buttons
• When picture-in-pic[ure feature is activated, pressing these
buttons moves the little picture around the screen. Details are on
page 27.
• When zoom feature is activated, pressing these buttons lets you
move the picture around the screen (pan). Details are on page II.
I_O)FRZ (Freeze) Button
• Press once to freeze the picture.
• Press again to release freeze.
• Details are on page l 1.
I_I) CHAN GUIDE Button
• Activates the channel guide feature so you can see multiple
channels atthe same time.
• Details are on page 12.
ZOOM and OUT Buttons
• Press ZOOM to zoom in on picture.
• Press OUTto zoom out to normal size.
• Details are on page I 1.
_3_ Picture-in-Picture Buttons
• Press PIP to activate the picture-in-picture feature.
• Press OFF to deactivate the picture-in-picture feature.
• Press SWAP to switch the small picture with the large picture.
• Details are on pages 26-27.
ANT (Antenna) Button
• Because your TV has two different antenna inputs on the back
(labeled ANTA and ANTB) you can connect more than one
antenna or signal source. Press the ANTbutton to switch from
one input to the other.
• The color of the channel numbers on the screen indicates which
antenna input you are watching. The channel numbers are blue
for ANTA and yellow for ANT B. If the channel numbers are
blue, you are watching whatever is connected to the ANTA input
on the back of your TV. If the channel numbers are yellow, you
are watching whatever is connected to the ANTB input on the
back of the TV. Details are on page 23.
10
I(I_MENU Button and -/+ Buttons
• Press MENU repeatedly until the menu you want to display is
selected, then press + or -. Next press MENU repeatedly to
select the function you want to adjust and then press + or- to
adjust the setting. Details about using each function begin on
page 13.
INPUT Button
• Lets you quickly view signals from the INPUT jacks. Pressing
this button switches the TV from its current channel directly to
channel 90, then channel 91, then channel 92.
• Channel 90 lets you see the signals coming from a device that is
connected to the S-VIDEO connector. Channel 91 accesses the
INPUT 1jacks and channel 92 accesses the INPUT 2 jacks.
CS (Commercial Skip) Button
• Use this button when you want to scan other channels during a
program break
• When a break occurs, press CS once before changing channels.
The TV will count down 30 seconds on the screen and then
automatically switch channels back to the original channel.
• Press CS twice if you want the TV to count down 60 seconds.
Each additional press will add another 30 seconds to the
countdown time (up to five minutes) and then each additional
press will add another 60 seconds to the countdown time (up to
60 minutes).
• To cancel, press CLEAR. The countdown clock will disappear
from the screen, and the TV will stay tuned to the present
channel.
Number Buttons (0-9)
• These buttons let you directly access any channel number-even
if the channel is not in the channel memory.
• To select a channel, press two number buttons (first one, then
the other). For example, pre_';s0 then 6 for channel 6. Press 1
then 3 for channel 13.
• To select a 3-digit cable channel (like 127), press and hold
number button I until 1-- appears on the screen. Then press the
other two numbers.
Note: Your TV will tune up to channel 128. Check with your
cable company to determine which channels are available in
your area.
OFF/ON Button
° Press OFF/ONto turn offT\:
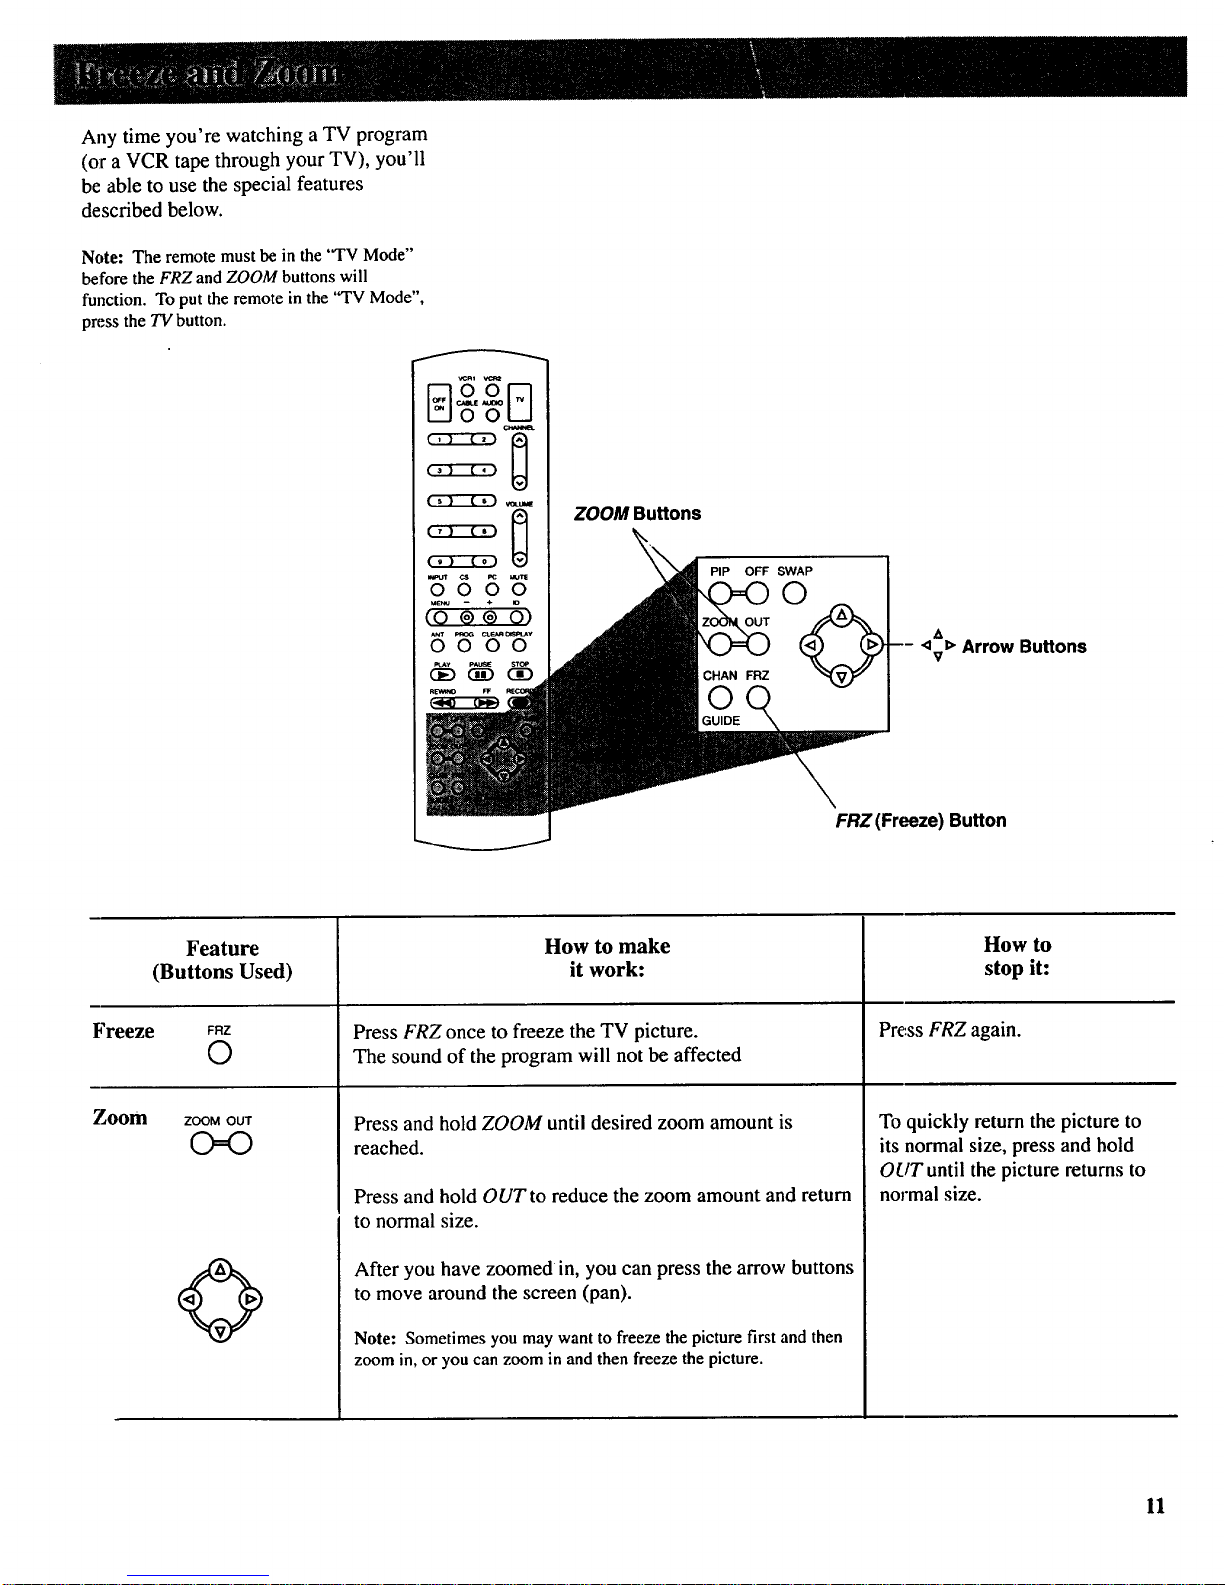
Any time you're watching a TV program
(or a VCR tape through your TV), you'll
be able to use the special features
described below.
Note: The remote must be in the "TV Mode"
before the FRZ and ZOOM buttons will
function. To put the remote in the "TV Mode",
press the TV button.
ZOOM Buttons
PIP OFF SWAP
©
A
<v _>Arrow Buttons
FRZ (Freeze) Button
Feature
(Buttons Used)
Freeze FRZ
©
Zoom ZOOM OUT
(PC>
How to make
it work:
Press FRZ once to freeze the TV picture.
The sound of the program will not be affected
Press and hold ZOOM until desired zoom amount is
reached.
Press and hold OUT to reduce the zoom amount and return
to normal size.
After you have zoomed in, you can press the arrow buttons
to move around the screen (pan).
Note: Sometimes you may want to freeze the picture first and then
zoom in, or you can zoom in and then freeze the picture.
How to
stop it:
Press FRZ again.
To quickly return the picture to
its normal size, press and hold
OUT until the picture returns to
normal size.
11
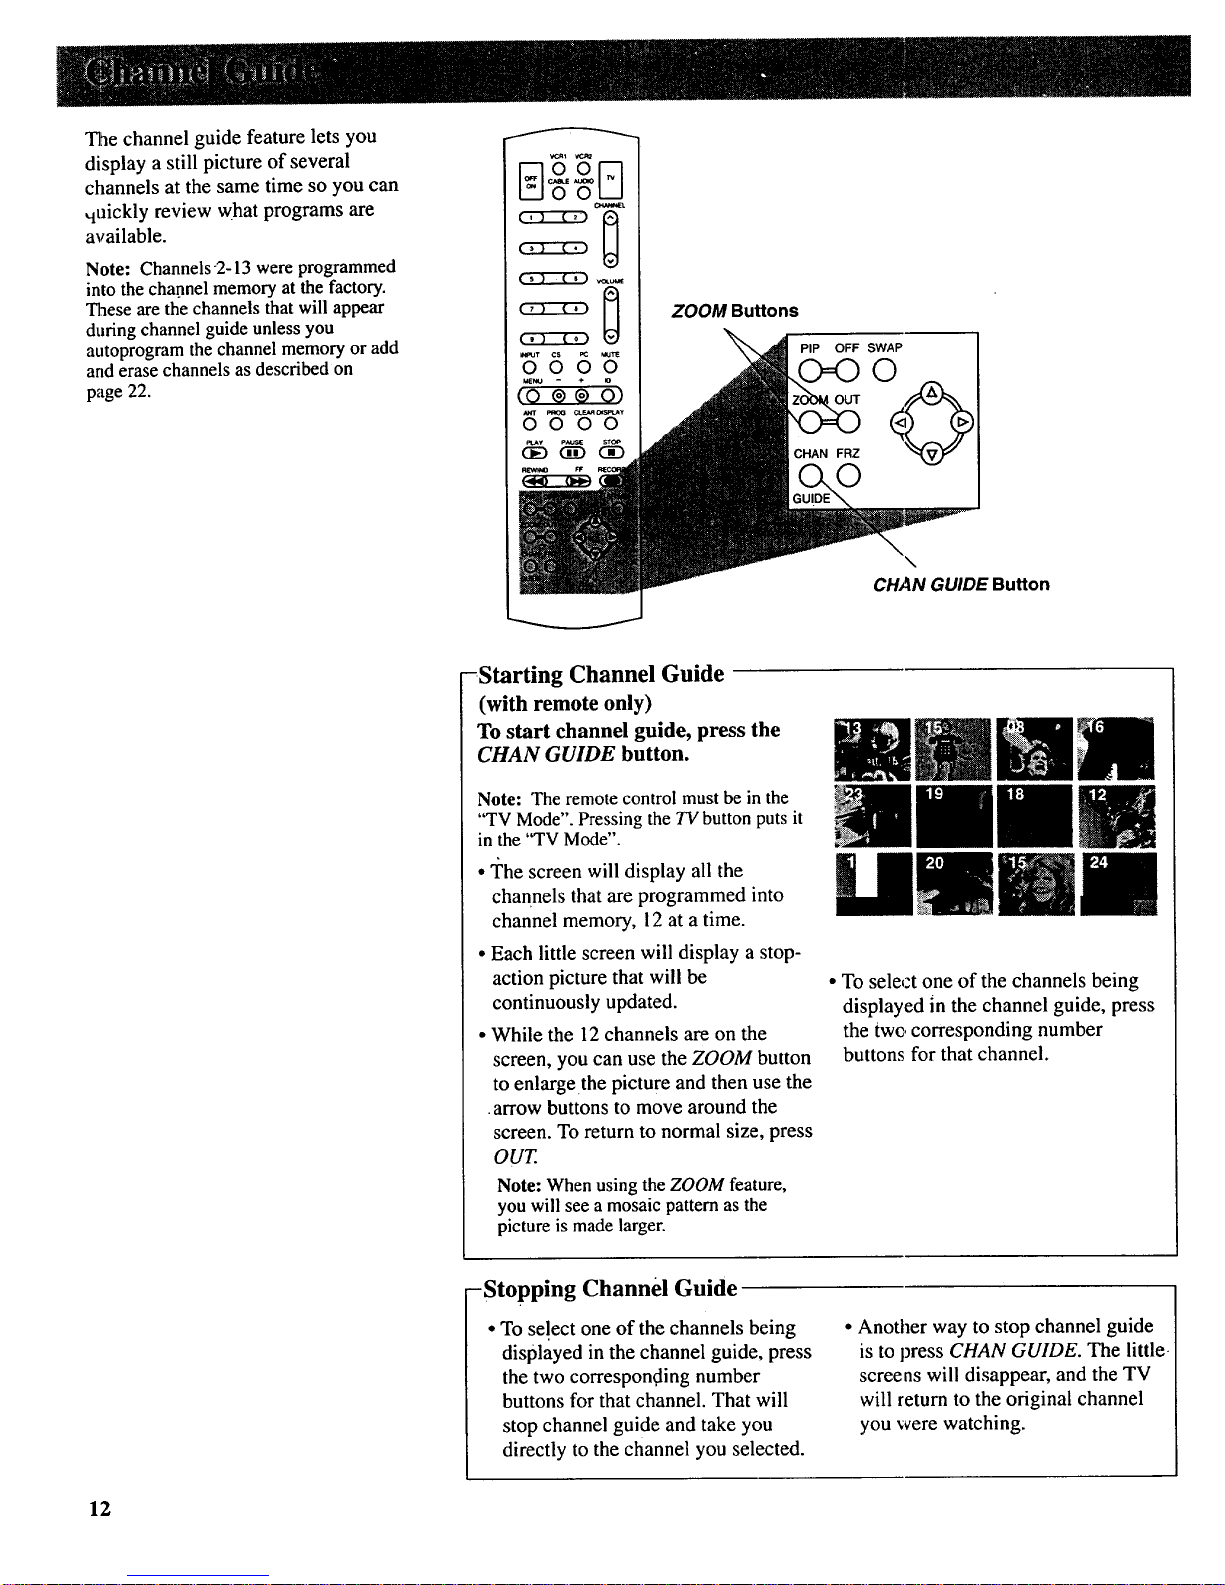
Thechannelguidefeatureletsyou
displayastillpictureof several
channels at the same time so you can
,auickly review what programs are
available.
Note: Channels2-13 were programmed
into the channel memory at the factory.
These are the channels that will appear
during channel guide unless you
autoprogram the channel memory or add
and erase channels as described on
page 22.
ZOOM Buttons
PIP
OFF SWAP
©
©
CHAN GUIDE Button
-Starting Channel Guide
(with remote only)
To start channel guide, press the
CHAN GUIDE button.
Note: The remote control must be in the
"TV Mode". Pressing the TV button puts it
in the "TV Mode".
• "i?hescreen will display all the
channels that are programmed into
channel memory, 12 at a time.
• Each little screen will display a stop-
action picture that will be
continuously updated.
• While the 12 channels are on the
screen, you can use the ZOOM button
to enlargethe picture and then use the
•arrow buttons to move around the
screen. To return to normal size, press
OUT.
Note: When using the ZOOM feature,
you will see a mosaic pattern as the
picture is made larger.
• To select one of the channels being
displayed in the channel guide, press
the twc, corresponding number
buttons for that channel.
-Stopping Channel Guide
• To select one of the channels being
displayed in the channel guide, press
the two correspon.ding number
buttons for that channel. That will
stop channel guide and take you
directly to the channel you selected.
• Another way to stop channel guide
is to press CHAN GUIDE. The little
screens will disappear, and the TV
will return to the original channel
you were watching.
12
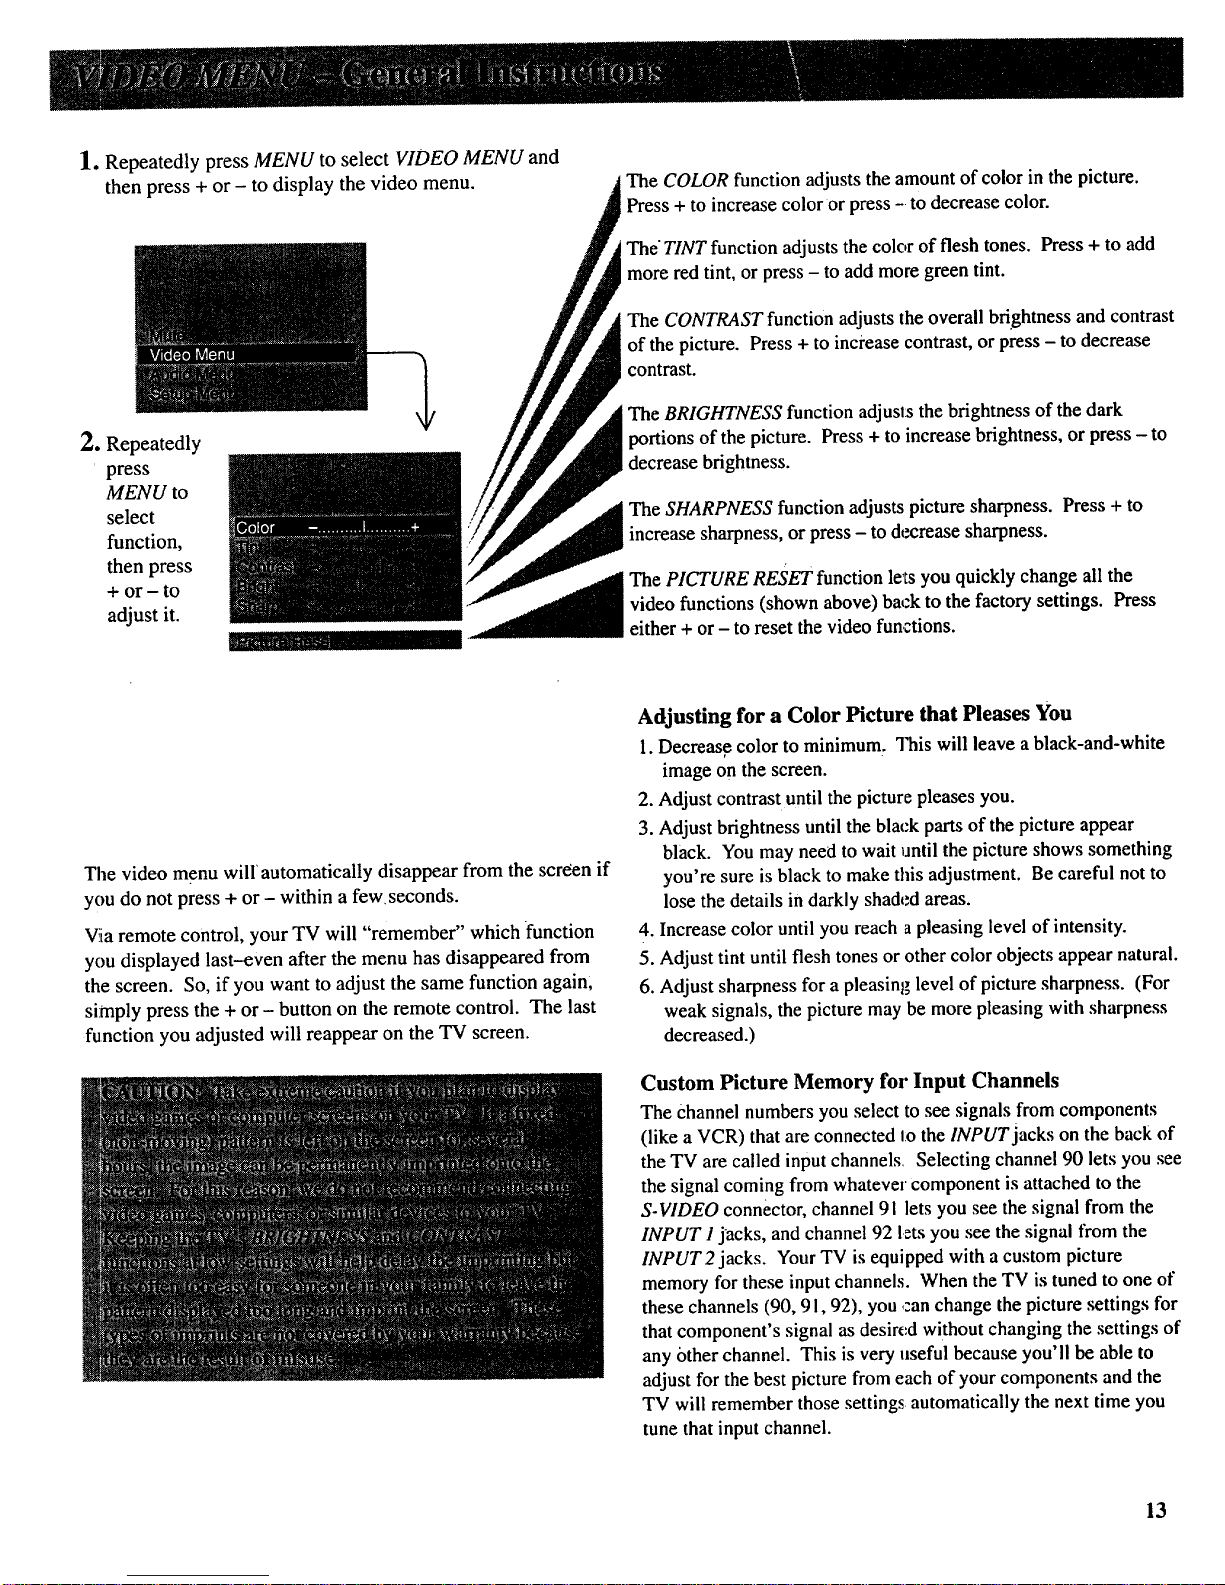
l. Repeatedly press MENU to select VIDEO MENU and
then press + or - to display the video menu.
2. Repeatedly
press
MENU to
select
function,
then press
+ or - to
adjust it.
The COLOR function adjusts the amount of color in the picture.
Press + to increase color or press -to decrease color.
The TINT function adjusts the color of flesh tones. Press + to add
more red tint, or press - to add more green tint.
The CONTRAST function adjusts the overall brightness and contrast
of the picture. Press + to inci'ease contrast, or press - to decrease
contrast.
The BRIGHTNESS function adjusts the brightness of the dark
portions of the picture. Press + to increase brightness, or press - to
decrease brightness.
The SHARPNESS function adjusts picture sharpness. Press + to
increase sharpness, or press - to decrease sharpness.
PICTURE RESET function le'ts you quickly change all the
(shown above) back to the factory settings. Press
either + or - to reset the video functions.
The video menu will"automatically disappear from the screen if
you do not press + or - within a few.seconds.
Via remote control, your TV will "remember" which function
you displayed last--even after the menu has disappeared from
the screen. So, if you want to adjust the same function again,
simply press the + or - button on the remote control. The last
function you adjusted will reappear on the TV screen.
Adjusting for a Color Picture that Pleases You
1.Decrease color to minimum. This will leave a black-and-white
image on the screen.
2. Adjust contrast until the picture pleases you.
3. Adjust brightness until the black parts of the picture appear
black. You may need to wait until the picture shows something
you're sure is black to make this adjustment. Be careful not to
lose the details in darkly shaded areas.
4. Increase color until you reach a pleasing level of intensity.
5. Adjust tint until flesh tones or other color objects appear natural.
6. Adjust sharpness for a pleasing level of picture sharpness. (For
weak signals, the picture may be more pleasing with sharpness
decreased.)
Custom Picture Memory for Input Channels
The Channelnumbers you select to see signals from components
(like a VCR) that are connected Io the INPUT jacks on the back of
the TV arecalled inputchannels Selecting channel 90 lets you see
the signal coming from whatever component is attached to the
S-VIDEO connector, channel 91 lets you see the signal from the
INPUT I jacks, and channel 92 lets you see the signal from the
INPUT 2jacks. Your TV is equipped with a custom picture
memory for these input channels. When the TV is tuned to one of
these channels (90, 9 I, 92), you ,.'anchange the picture settings for
thatcomponent's signal as desired without changing the settings of
any 6ther channel. This is very useful because you'll be able to
adjust for the best picture from each of your components and the
TV will remember those settings automatically the next time you
tune that input channel.
13
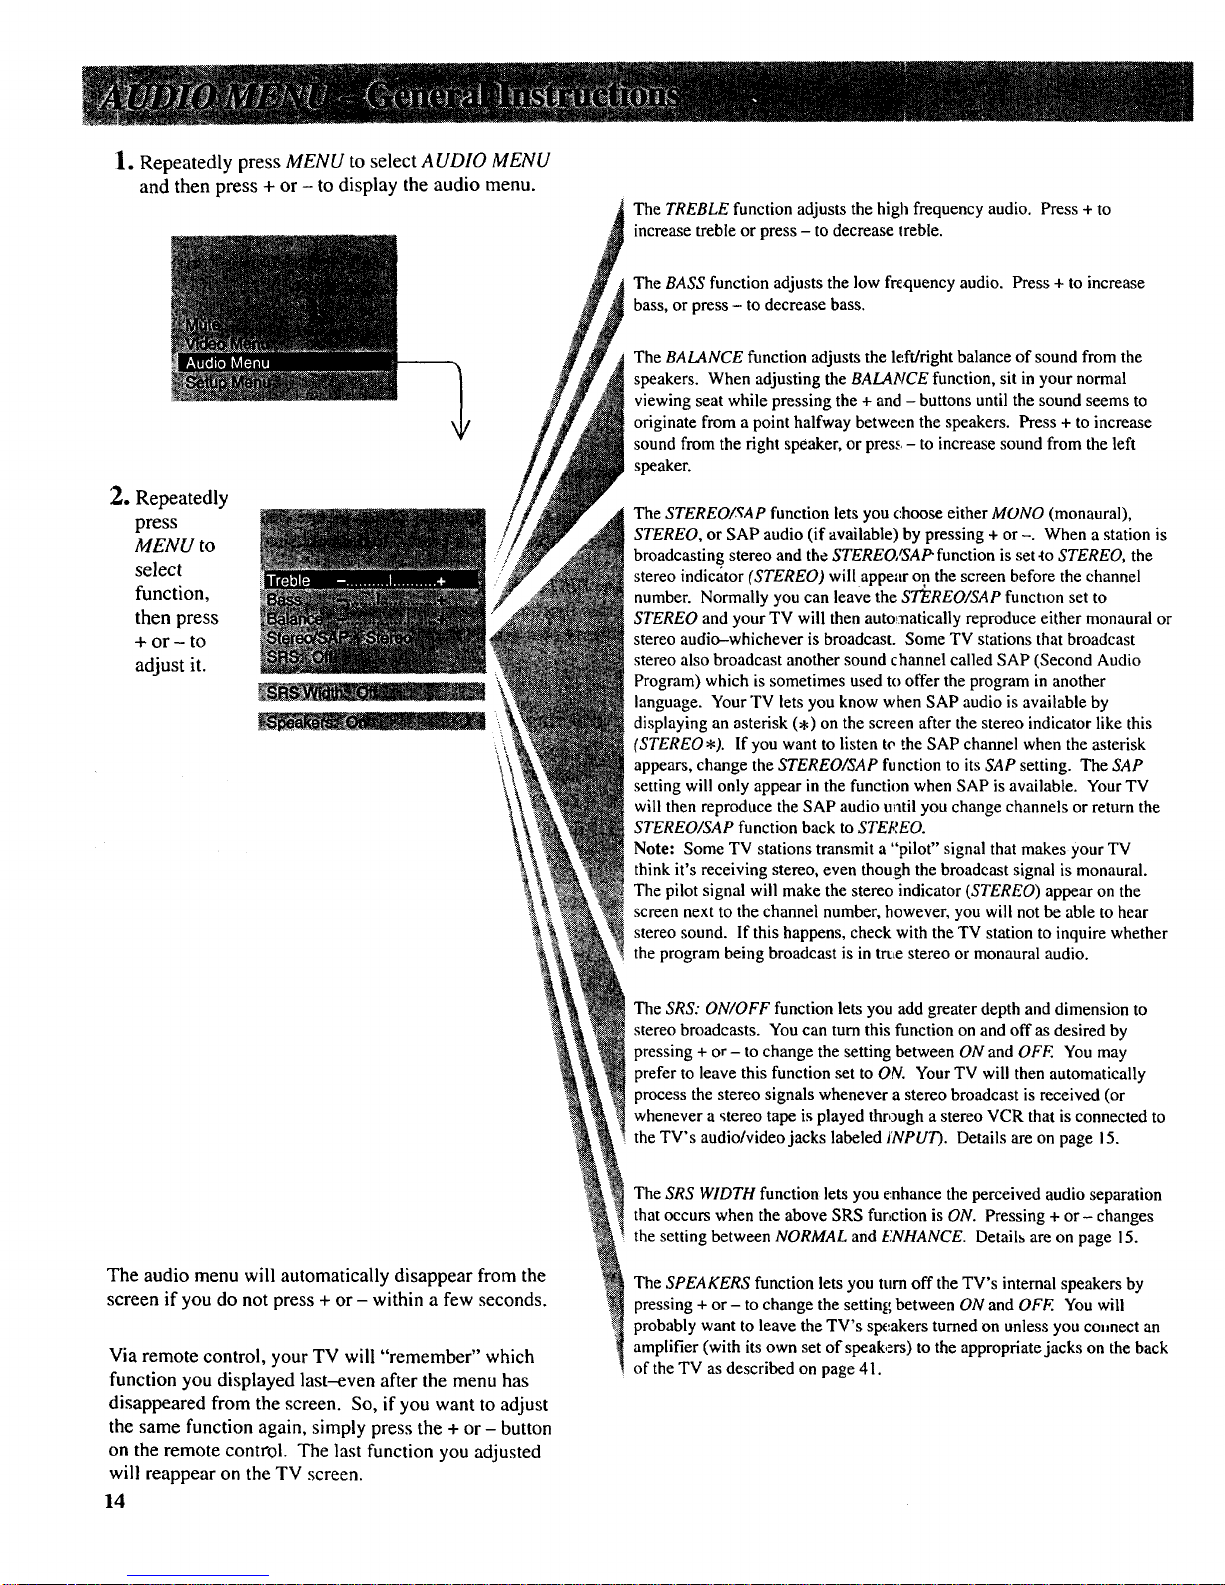
1.RepeatedlypressMENU to select AUDIO MENU
and then press + or - to display the audio menu.
The TREBLE function adjusts the high frequency audio. Press + to
increase treble or press - to decrease treble.
The BASS function adjusts the low frequency audio. Press + to increase
bass, or press - to decrease bass.
o
Repeatedly
press
MENU to
select
function,
then press
+ or - to
adjust it.
The audio menu will automatically disappear from the
screen if you do not press + or - within a few seconds.
Via remote control, your TV will "remember" which
function you displayed last-even after the menu has
disappeared from the screen. So, if you want to adjust
the same function again, simply press the + or - button
on the remote control. The last function you adjusted
will reappear on the TV screen.
14
!
The BALANCE function adjusts the leftlright balance of sound from the
speakers. When adjusting the BALANCE function, sit in your normal
viewing seat while pressing the + and - buttons until the sound seems to
originate from a point halfway between the speakers. Press + to increase
sound from the right speaker, or press. - to increase sound from the left
speaker.
The STEREO/CAP function lets you choose either MONO (monaural),
STEREO, or SAP audio (if available) by pressing + or -. When a station is
broadcasting, stereo and the STEREO, tSAt_function is set-to STEREO, the
stereo indicator (STEREO) will appear on the screen before the channel
number. Normally you can leave the STEREO/SAP function set to
STEREO and your TV will then auto_natically reproduce either monaural or
stereo audio-whichever is broadcast. Some TV stations that broadcast
stereo also broadcast another sound channel called SAP (Second Audio
Program) which is sometimes used to offer the program in another
language. Your TV lets you know when SAP audio is available by
displaying an asterisk (.) on the screen after the stereo indicator like this
(STEREO*). If you want to listen to the SAP channel when the asterisk
appears, change the STEREO/SAP function to its SAP setting. The SAP
setting will only appear in the function when SAP is available. Your TV
will then reproduce the SAP audio uatil you change channels or return the
STEREO/SAP function back to STEREO.
Note: Some TV stations transmit a "pilot" signal that makes your TV
think it's receiving stereo, even though the broadcast signal is monaural.
The pilot signal will make the stereo indicator (STEREO) appear on the
screen next to the channel number, however, you will not be able to hear
stereo sound. If this happens, check with the TV station to inquire whether
the program being broadcast is in trtte stereo or monaural audio.
The SRS: ON/OFF function lets you add greater depth and dimension to
stereo broadcasts. You can turn this function on and off as desired by
pressing + or - to change the setting between ON and OFE You may
prefer to leave this function set to ON. Your TV will then automatically
process the stereo signals whenever a stereo broadcast is received (or
whenever a stereo tape is played thr,augh a stereo VCR that is connected to
the TV's audio/video jacks labeled INPUT). Details are on page 15.
The SRS WIDTH function lets you enhance the perceived audio separation
that occurs when the above SRS function is ON. Pressing + or- changes
the setting between NORMAL and ENHANCE. Details are on page 15.
The SPEAKERS function lets you turn off the TV's internal speakers by
pressing + or - to change the setting between ON and OFE You will
probably want to leave the TV's speakers turned on unless you conmect an
amplifier (with its own set of speakers) to the appropriate jacks on the back
of the TV as described on page 41.
Your TV includes a feature called
SRS (O)* (Sound Retrieval System)
which brings dimensional realism to
both stereo and mono broadcasts.
When the SRS ON/OFF function is
set to ON and the STEREO/SAP
function is set to STEREO, your TV
electronically increases the audio
separation of the speakers so you can
perceive a more spacious stereo
sound effect. If a stereo signal is not
present, you can set the SRS
ON/OFF function to its SYNTH
STEREO setting to synthesize,and
process the mono signal.
When the SRS ON/OFF function is
se_tto ON, you can also change the
next menu item called SRS WIDTH
between NORMAL or ENHANCE.
When this function is set to
ENHANCE, the perceived audio
separation will be greater. Try both
settings and select the one you prefer
for your room acoustics.
Note: Some material (audio) will be more
affected than others.
SRS (Q) allows you to hear multiple
sound sources. Audio frequencies are
processed to establish directional
cues which gives the impression that
sound is coming from all parts of the
room. External speakers are not
required, but the addition of high
quality external speakers optimizes
the sound performance of your TV.
*SRS and (e) are registered trademarks of Hughes
Aircraft Company, a division of GM Hughes Electronics.
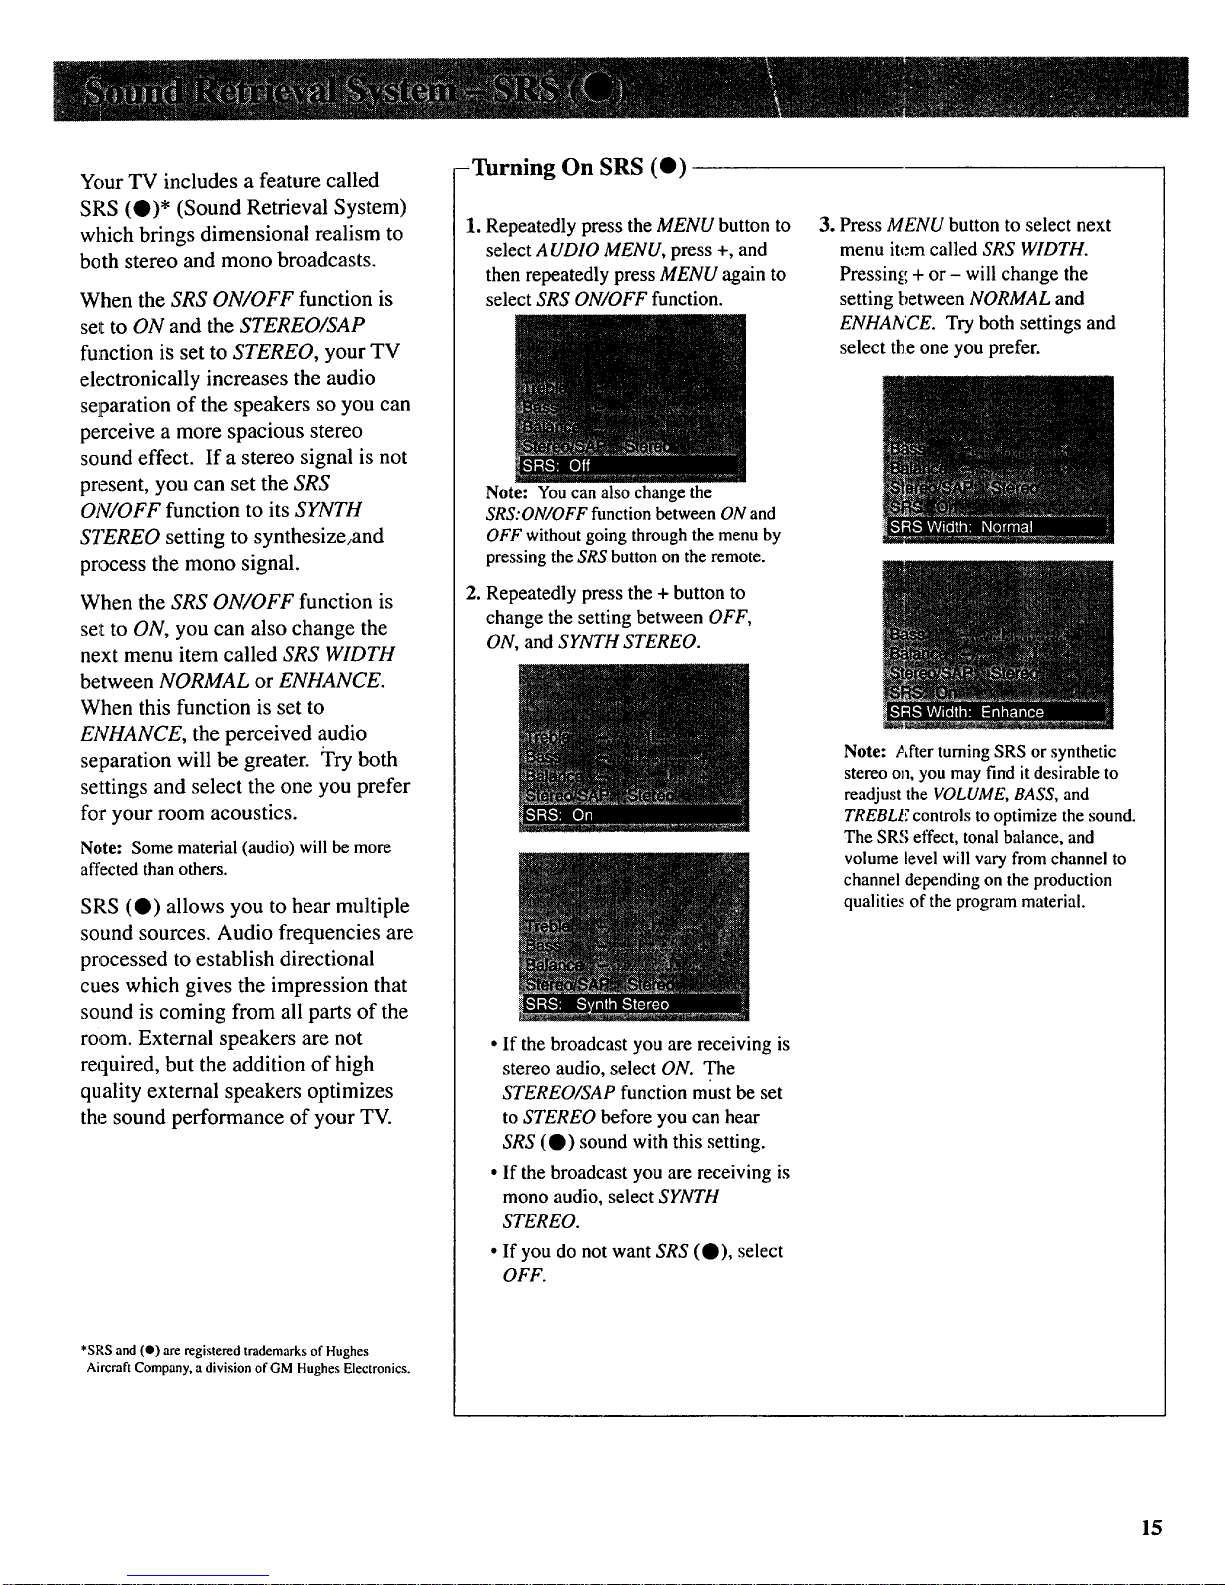
-Turning On SRS (Q)
1. Repeatedly press the MENU button to
select AUDIO MENU, press +, and
then repeatedly press MENU again to
select SRS ON/OFF function.
Note: You can also change the
SRS:ON/OFF function between ON and
OFF without going through the menu by
pressing the SRS button on the remote.
2. Repeatedly press the + button to
change the setting between OFF,
ON, and SYNTH STEREO.
ll
• If the broadcast you are receiving is
stereo audio, select ON. The
STEREO/SAP function must be set
to STEREO before you can hear
SRS (O) sound with this setting.
• If the broadcast you are receiving is
mono audio, select SYNTH
STEREO.
• If you do not want SRS (O), select
OFF.
3. Press MENU button to select next
menu item called SRS WIDTH.
Pressing + or - will change the
setting between NORMAL and
ENHANCE. Try both settings and
select the one you prefer.
Note: After turning SRS or synthetic
stereo on, you may find it desirable to
readjust the VOLUME, BASS, and
TREBLE controls to optimize the sound.
The SRS effect, tonal balance, and
volume level will vary from channel to
channel depending on the production
qualities of the program material.
15
 Loading...