

RCA F20635, F20636 Owner's Manual
COLOR TVOW
_
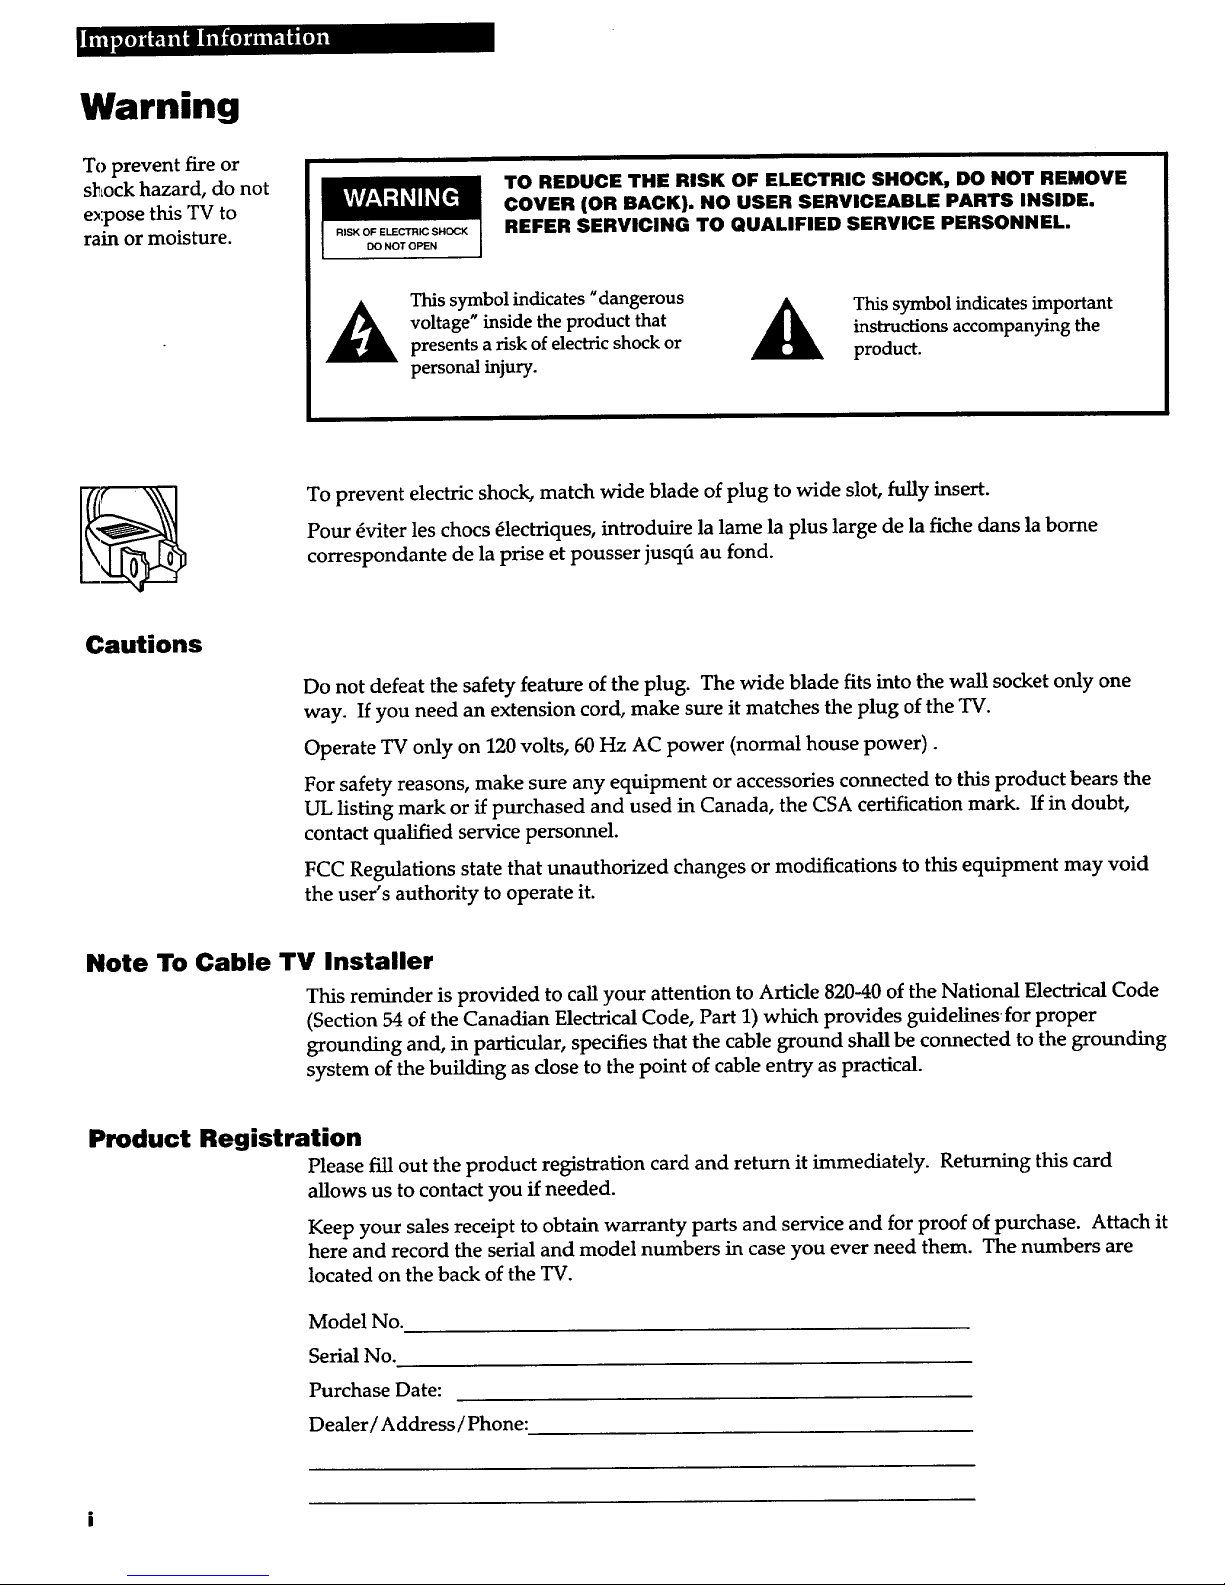
Warning
To prevent fire or
shock hazard, do not
expose this TV to
rain or moisture.
RISK OF ELECTRIC SHOCK
DO NOT OPEN
TO REDUCE THE RISK OF ELECTRIC SHOCK, DO NOT REMOVE
COVER (OR BACK). NO USER SERVICEABLE PARTS INSIDE.
REFER SERVICING TO QUALIFIED SERVICE PERSONNEL.
This symbol indicates "dangerous
_ oltage" inside the product that
presents a risk of electric shock or
personal injury.
This symbol indicates important
instructions accompanying the
product.
To prevent electric shock, match wide blade of plug to wide slot, fully insert.
Pour _viter les chocs _lectriques, introduire la lame la plus large de la fiche dans la borne
correspondante de la prise et pousser jusq6 au fond.
Cautions
Do not defeat the safety feature of the plug. The wide blade fits into the wall socket only one
way. If you need an extension cord, make sure it matches the plug of the TV.
Operate TV only on 120 volts, 60 Hz AC power (normal house power).
For safety reasons, make sure any equipment or accessories connected to this product bears the
UL listing mark or if purchased and used in Canada, the CSA certification mark. If in doubt,
contact qualified service personnel.
FCC Regulations state that unauthorized changes or modifications to this equipment may void
the user's authority to operate it.
Note To Cable TV Installer
This reminder is provided to call your attention to Article 820-40 of the National Electrical Code
(Section 54 of the Canadian Electrical Code, Part 1) which provides guidelines for proper
grounding and, in particular, specifies that the cable ground shall be connected to the grounding
system of the building as dose to the point of cable entry as practical.
Product Registration
Please fill out the product registration card and return it immediately. Returning this card
allows us to contact you if needed.
Keep your sales receipt to obtain warranty parts and service and for proof of purchase. Attach it
here and record the serial and model numbers in case you ever need them. The numbers are
located on the back of the TV.
Model No.
Serial No.
Purchase Date:
Dealer/Address/Phone:

Table of Contents
Important Information
Warning i
Cautions i
Note to Cable Installer i
Product Registration i
Quick Guide to Your TV
Startup 2-3
Hook up your TV 2
Plug in the TV 2
Put Batteries in the Remote 2
Turn on the TV 2
Place all available channels
into memory 3
Set the Time 3
Basic Tour of the Remote 4-5
TV Power Button 4
Volume, Channel, and
Feature Controls 4
Component Buttons 4
Menu Buttons 4
Menu Basics 5
Colors 5
Menu Buttons 5
Moving through the Menus _ 5
Using Your TV and
Remote
Remote Buttons 6-7
Power Buttons 6
TV Buttons 6
Number Buttons 6
Component Buttons 7
VCR, Laserdisc Player, and
Audio Equipment Buttons 7
Signal Buttons 7
With VCRs: Programming
the Remote 8
With VCRs: Setting the
VCR1 Channel 9
With VCRs: Basic Operation _ 10-11
With a Cable Box: Programming and
Basic Operation 12
With a Cable Box: Setting the
Cable Channel 13
With a Laserdisc Player: Programming
and Basic Operation 14
With Audio Equipment: Programming
and Basic Operation 15
Adjusting Your TV
Picture Settings. 16
Picture, Color, Tint, Bright(Brightness),
Sharp(Sharpness), Autocolor, Picture
Reset
Overall Picture 17
Sound Settings: Stereo and Tone m 18
Sound Settings: Speakers 19
Using Advanced Features
Listening to the FM Radio 20
Programming FM Radio Stations
into Memory 21
Tuning the National Weather Service 21
Placing Channels in Memory
(Autoprogramming) 22
Naming the Channels (Labeling) __ 23
Watching Closed Captioning.__ 24
Setting the Sleep Timer 25
Setting the Alarm Clock 26
Setting the TV for Cable or Air _ 27
Connections
Back of TV 28
Things to Know When Connecting
Components 29
Home Antenna or Cable Connection 30
Cable Box Connections 31
Cable Box and VCR Connection 32
VCR Basic Connection 33
VCR Advanced Connection 33
Audio Connection 34
Laserdisc Player Connection 34
FM Radio Connection 35
References
Accessories 36-38
Limited Warranty 39
Caring for Your TV 39
Front Panel Controls 40
Displays on the Screen 41
Trouble Checks 42-43
Glossary. 44
Index 45

}]nt, qu[e]'!Ift.m[_ IL_ iiikvd
Startup
Tile steps below will get your TV connected and ready for watching.
1,. Hook up your TV
Details are in the Connections Section starting on
page 28.
Hook up any antennas, cables or other
equipment to your TV before you follow the
steps below.
For more details, see the page numbers listed.
2. Plug in the TV
Plug the cord into the outlet, matching the
wide and the small end of the plug with the
outlet.
3. Put Batteries in the Remote
A. Remove the cover of the battery
compartment.
B. Place the four AAA batteries as shown,
matching the + and -- end of each battery
in the compartment.
C. Replace the cover.
4. Turn on the TV
Press "IVon the remote.
OR
Press POWER on the TV.
Front of the TV
2

Startup
5. Place all available channels into memory
Details are on page 22.
A. Press MENU repeatedly to select the Setup
Menu. This menu is white.
B. Press + start the TV adding all the
channels into the TV's memory.
C. Wait until the TV has cycled through all the
channels and returns to the original
channel.
D. Press DISPLAY or DONE to remove the
menu from the screen.
6, Set the Time
A. Press MENU until the Alarm menu is
selected. This menu is green.
B. Press CHANNEL down to highlight the
dock.
C. Press -- to set the hour.
D. Press + to set the minutes.
E. Press DISPLAY or DONE to remove the
menu from the screen.
3
_..,TUI?qH_ 1_5_ liiikvA
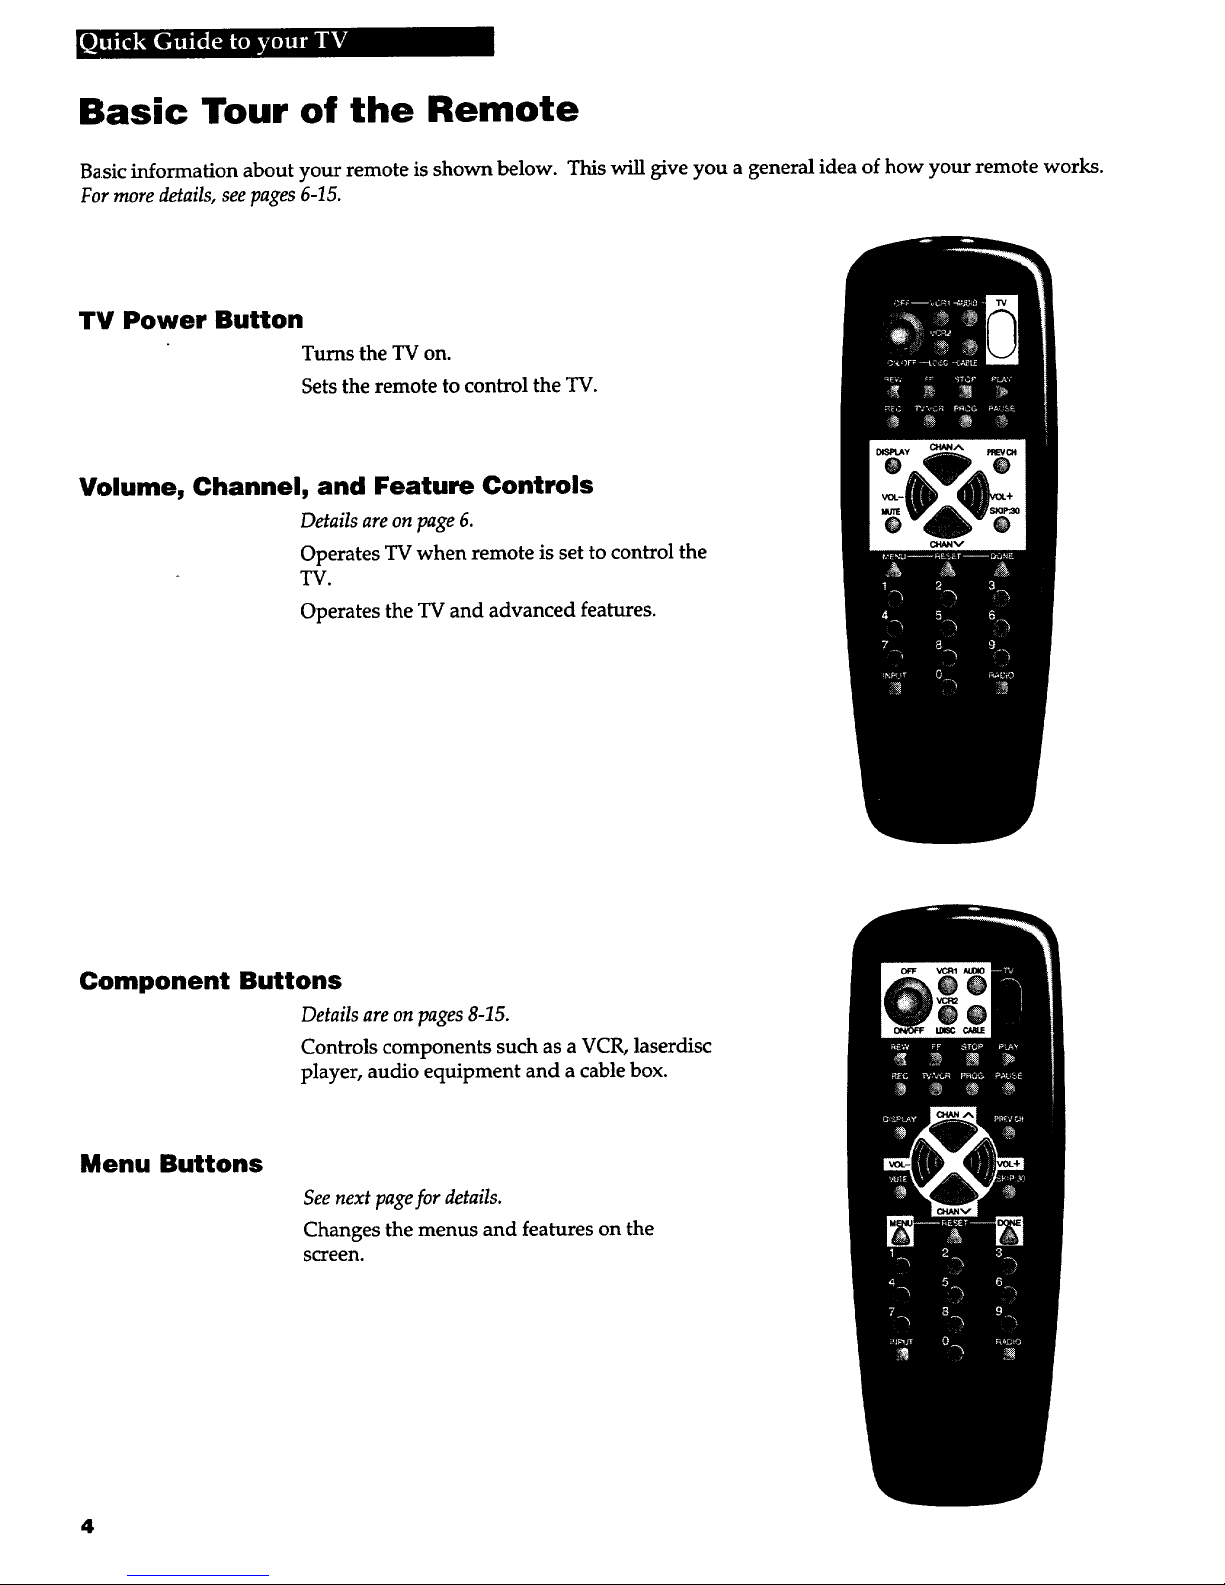
Basic Tour of the Remote
Basic information about your remote is show. below. This will _ve you a general idea of how your remote works.
For more details, see pages 6-15.
TV Power Button
Turns the TV on.
Sets the remote to control the TV.
Volume, Channel, and Feature Controls
Details are on page 6.
Operates TV when remote is set to control the
TV.
Operates the TV and advanced features.
Component Buttons
Details are on pages 8-15.
Controls components such as a VCR, laserdisc
player, audio equipment and a cable box.
Menu Buttons
See next pagefor details.
Changes the menus and features on the
screen.
4
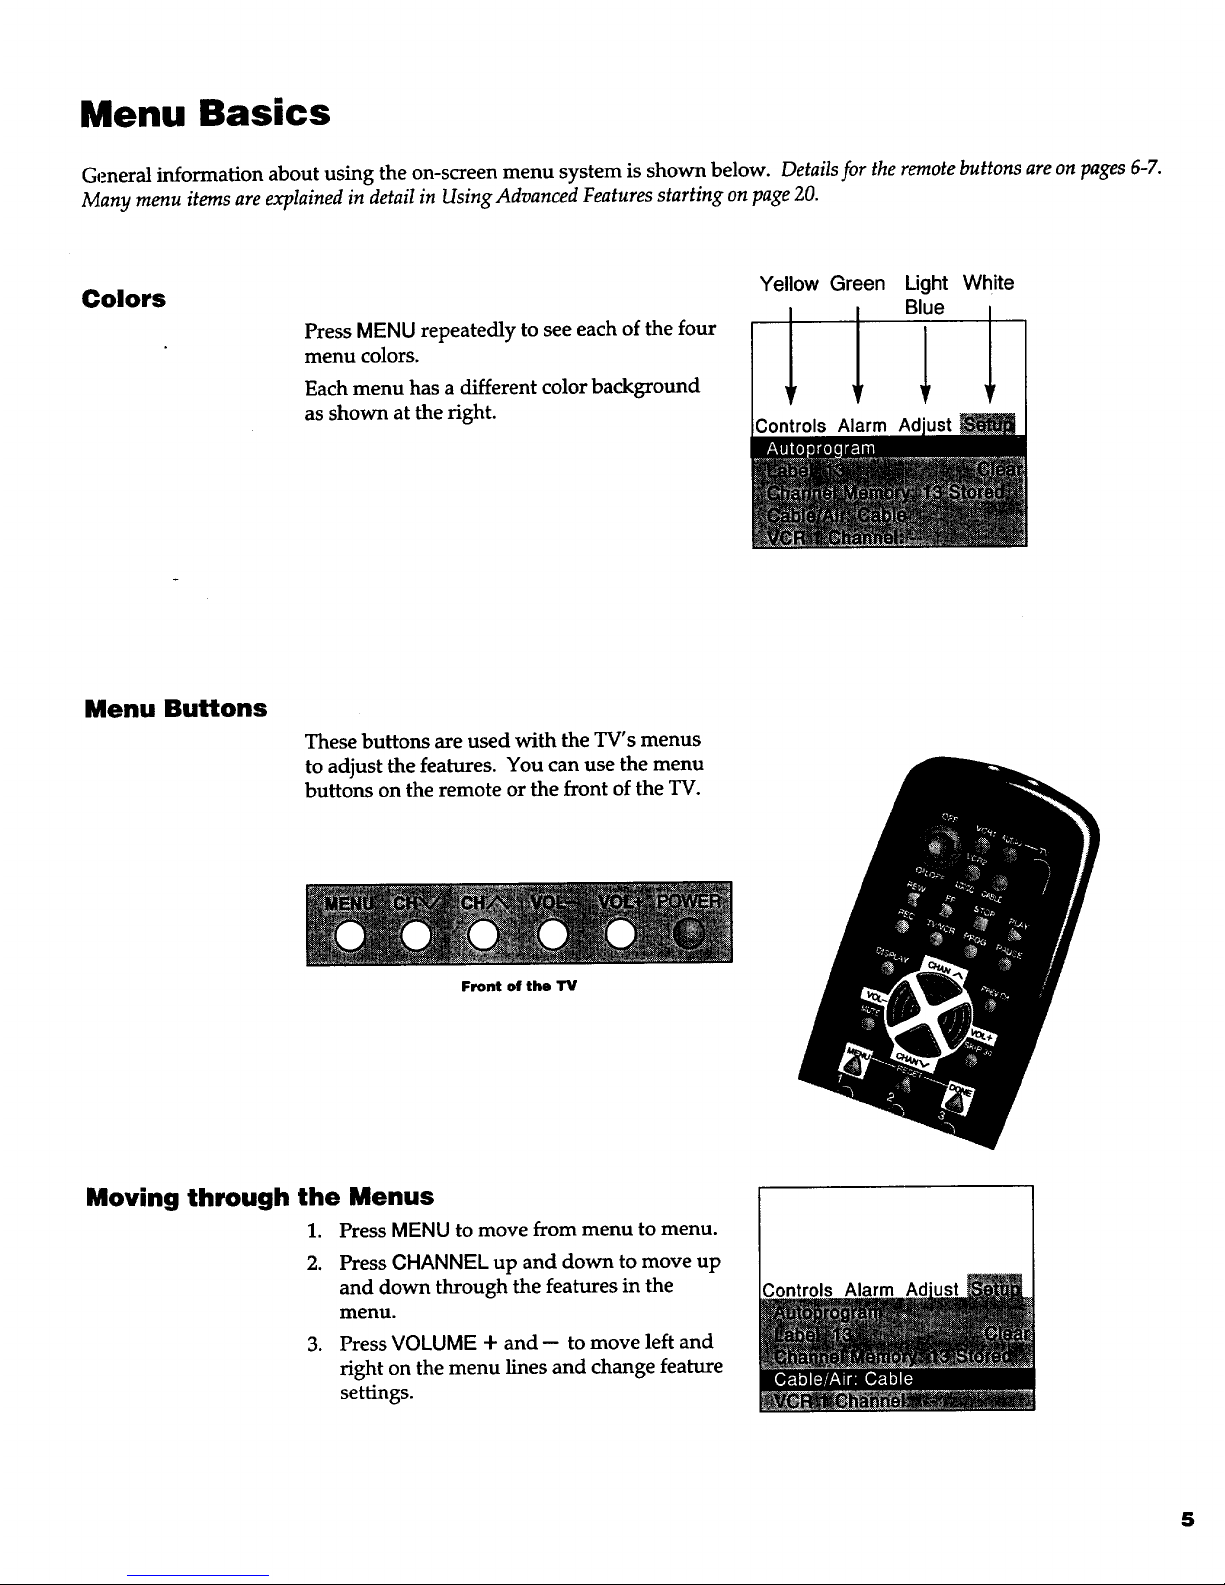
Menu Basics
General information about using the on-screen menu system is shown below. Details for the remote buttons are on pages 6-7.
Many menu items are explained in detail in Using Advanced Features starting on page 20.
Colors
Press MENU repeatedly to see each of the four
menu colors.
Each menu has a different color background
as shown at the right.
Yellow Green Light
Blue
, 1
Controls Alarm Ad
White
Menu Buttons
These buttons are used with the TV's menus
to adjust the features. You can use the menu
buttons on the remote or the front of the TV.
Front of the TV
Moving through the Menus
1. Press MENU to move from menu to menu.
2. Press CHANNEL up and down to move up
and down through the features in the
menu.
3. Press VOLUME + and-- to move left and
right on the menu lines and change feature
settings.
Controls Alarm Ad
5
b,p_ II&VA_] IR':'JTI_'13_
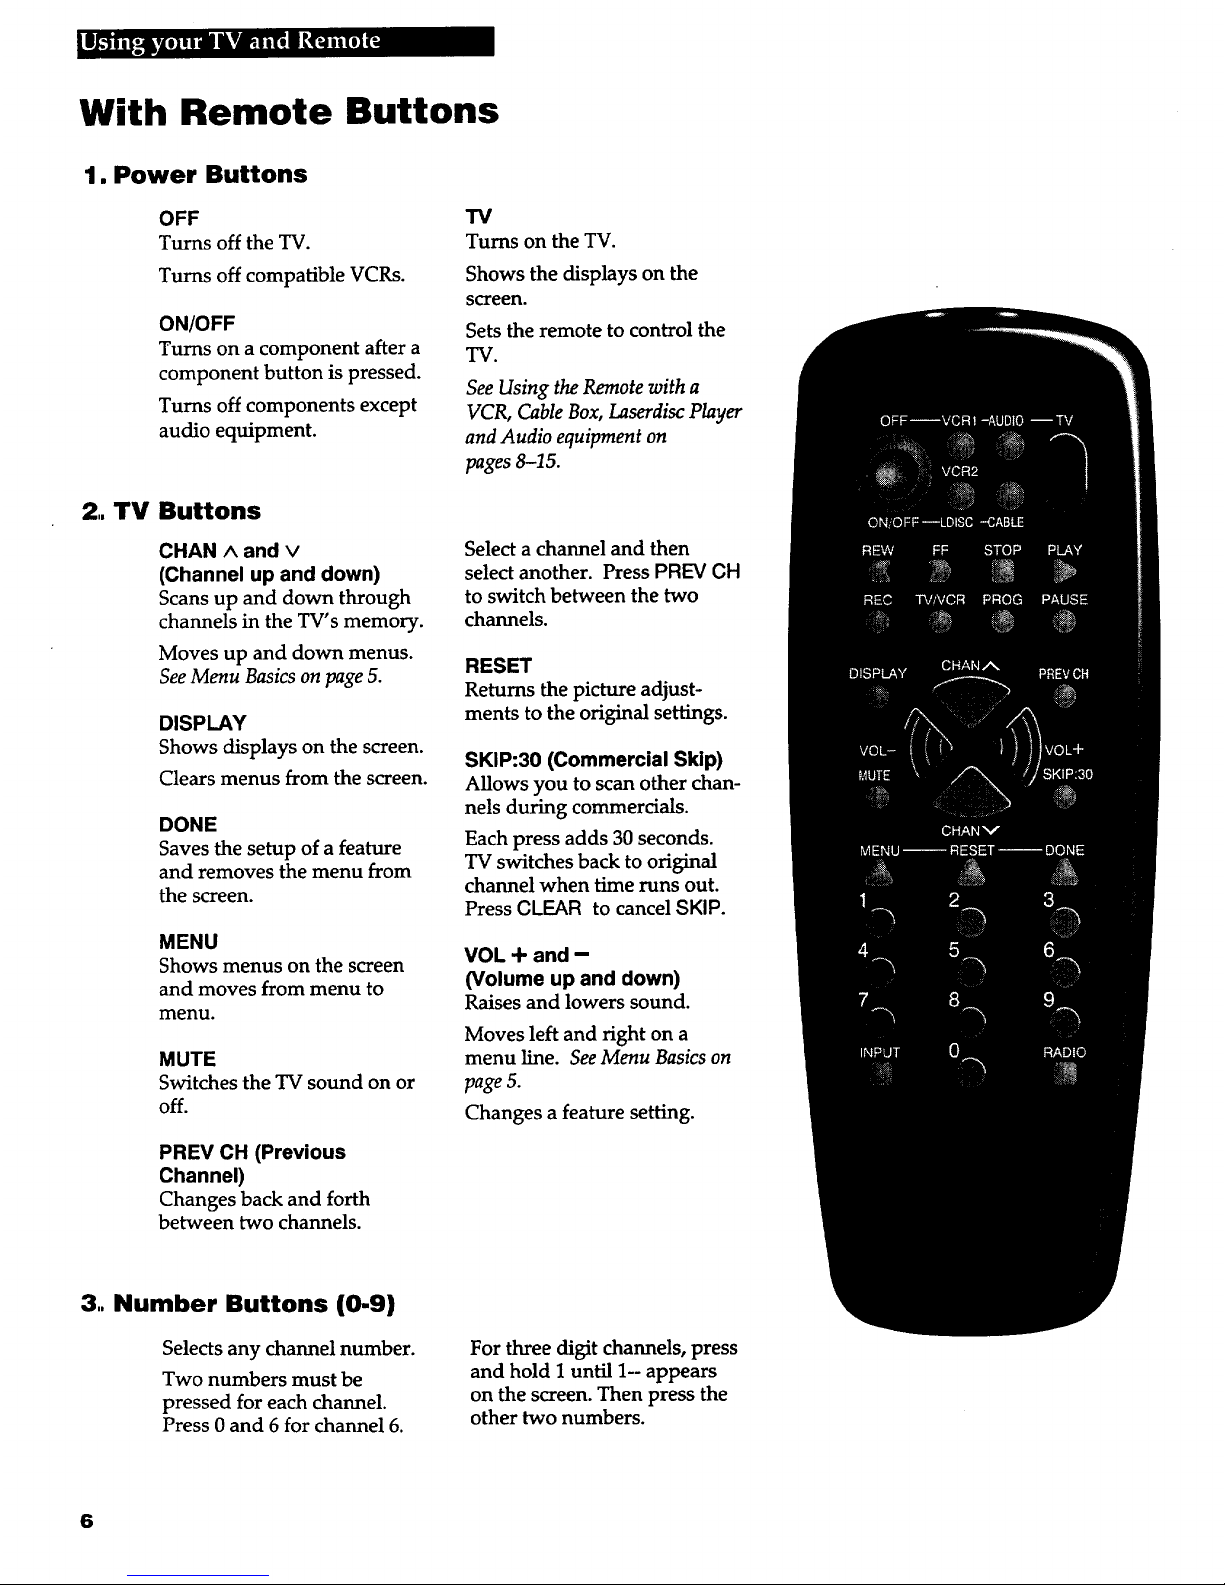
With Remote Buttons
1. Power Buttons
OFF
Turns off the _.
Turns off compatible VCRs.
ON/OFF
Turns on a component after a
component button is pressed.
Turns off components except
audio equipment.
2.. TV Buttons
CHAN ^ and v
(Channel up and down)
Scansup and down through
channels in the TV's memory.
Moves up and down menus.
See Menu Basics on page 5.
DISPLAY
Shows displays on the screen.
Clears menus from the screen.
DONE
Saves the setup of a feature
and removes the menu from
the screen.
MENU
Shows menus on the screen
and moves from menu to
menu.
MUTE
Switches the TV sound on or
off.
PREV CH (Previous
Channel)
Changes back and forth
between two channels.
TV
Turns on the TV.
Shows the displays on the
screen.
Sets the remote to control the
TV.
See Using the Remote with a
VCR, Cable Box, Laserdisc Player
and Audio equipment on
pages 8-15.
Select a channel and then
select another. Press PREV CH
to switch between the two
channels.
RESET
Returns the picture adjust-
ments to the original settings.
SKIP:30 (Commercial Skip)
Allows you to scan other chan-
nels during commercials.
Each press adds 30 seconds.
TV switches back to original
channel when time runs out.
Press CLEAR to cancel SKIP.
VOL + and -
(Volume up and down)
Raises and lowers sound.
Moves left and fight on a
menu line. See Menu Basics on
page 5.
Changes a feature setting.
3.. Number Buttons (0-9)
Selects any channel number.
Two numbers must be
pressed for each channel.
Press 0 and 6 for channel 6.
For three digit channels, press
and hold 1 until 1- appears
on the screen. Then press the
other two numbers.
6
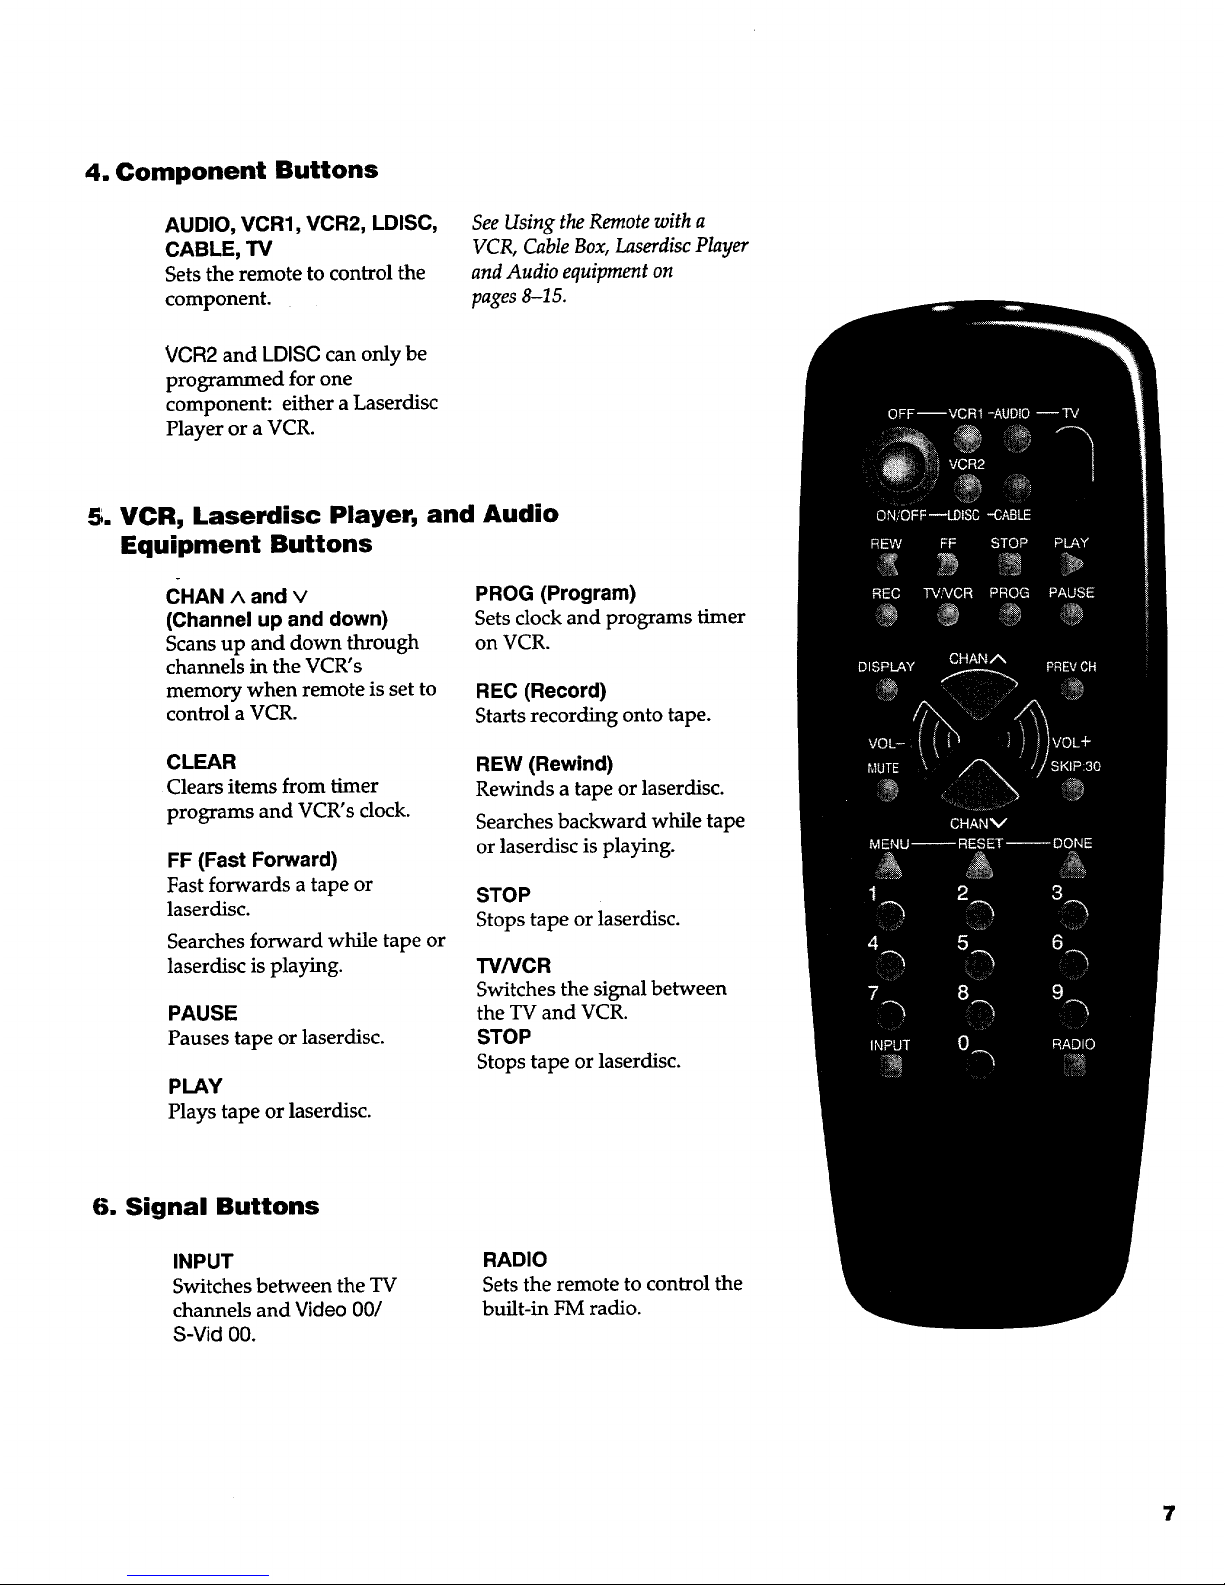
4. Component Buttons
AUDIO, VCR1, VCR2, LDISC,
CABLE, TV
Setsthe remote to control the
component.
See Using the Remote with a
VCR, Cable Box, Laserdisc Player
and Audio equipment on
pages 8-15.
VCR2 and LDISC can only be
programmed for one
component: either a Laserdisc
Player or a VCR.
5. VCR, Laserdisc Player, and Audio
Equipment Buttons
CHAN ^ and v
(Channel up and down)
Scans up and down through
channels in the VCR's
memory when remote is set to
control a VCR.
PROG (Program)
Sets clock and programs timer
on VCR.
REC (Record)
Starts recording onto tape.
CLEAR
Clears items from timer
programs and VCR's clock.
FF (Fast Forward)
Fast forwards a tape or
laserdisc.
Searches forward while tape or
laserdisc is playing.
PAUSE
Pauses tape or laserdisc.
PLAY
Plays tape or laserdisc.
REW (Rewind)
Rewinds a tape or laserdisc.
Searches backward while tape
or laserdisc is playing.
STOP
Stops tape or laserdisc.
TV/VCR
Switches the signal between
the TV and VCR.
STOP
Stops tape or laserdisc.
6. Signal Buttons
INPUT
Switches between the TV
channels and Video 00/
S-Vid 00.
RADIO
Sets the remote to control the
built-in FM radio.
7
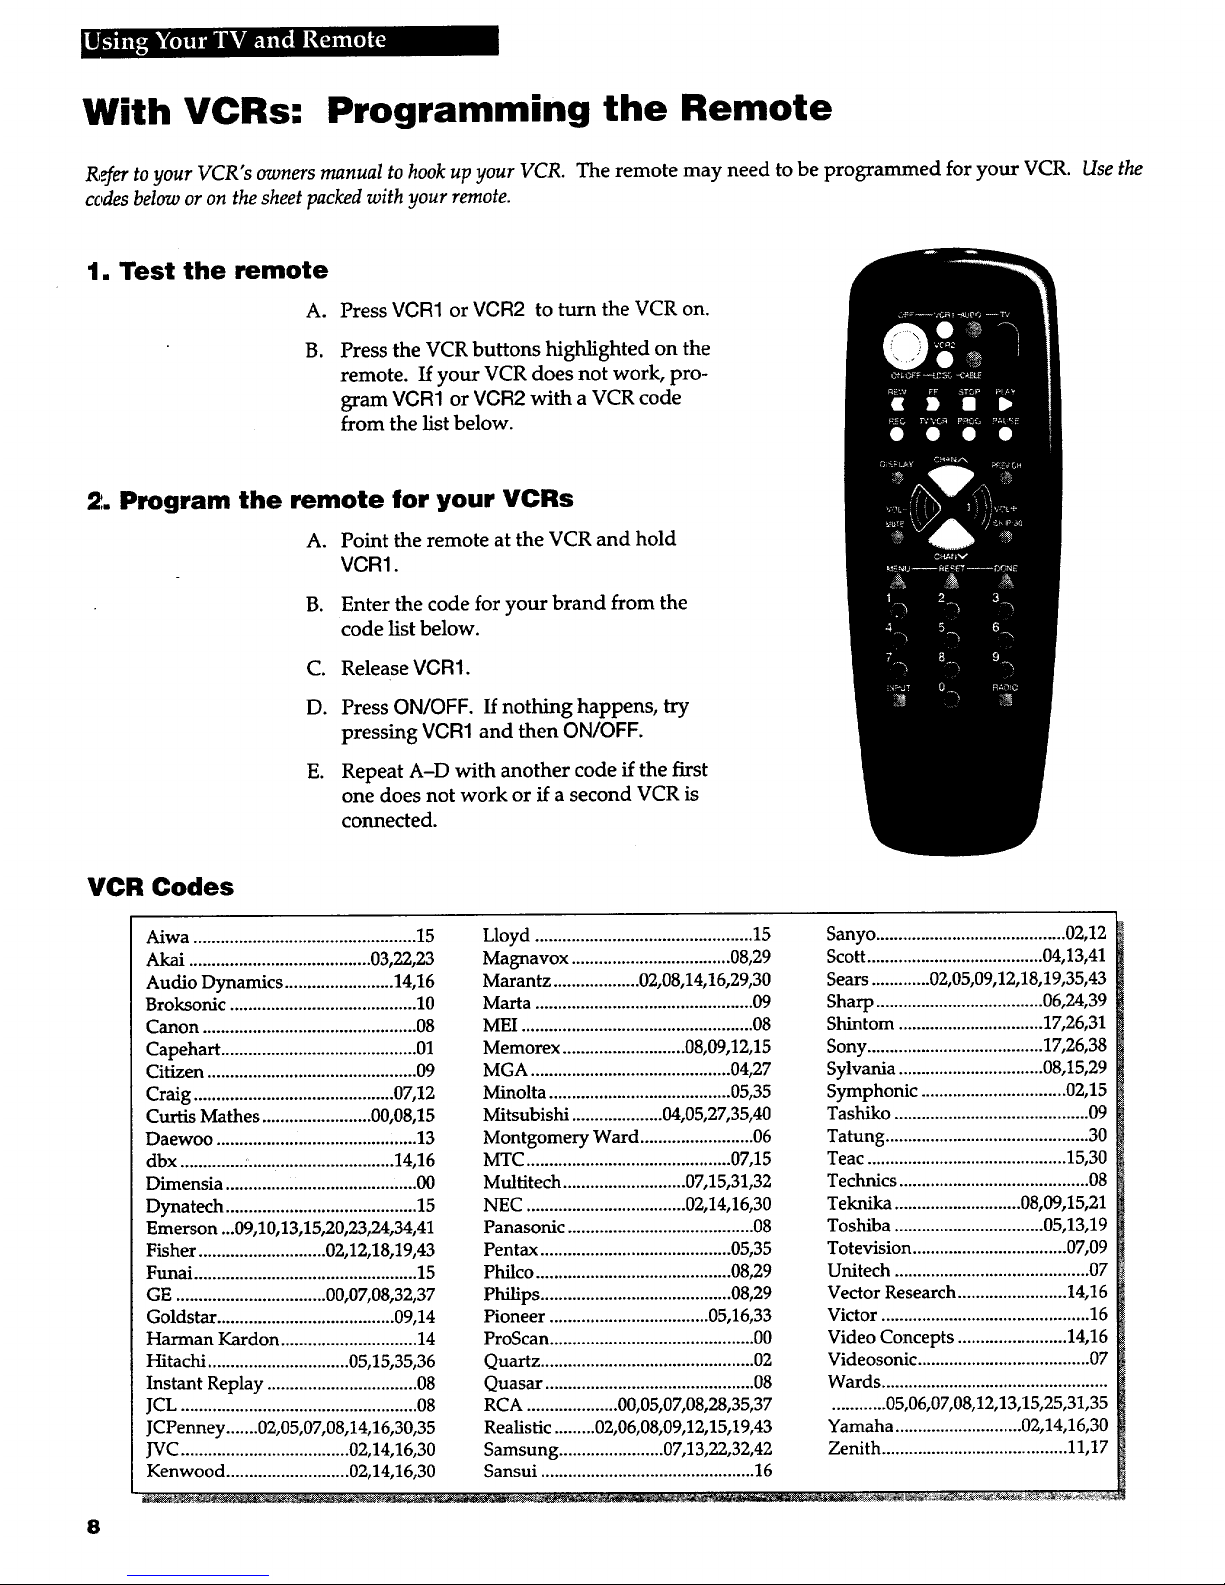
With VCRs: Programming the Remote
R,_er to your VCR's owners manual to hook up your VCR. The remote may need to be programmed for your VCR. Use the
codes below or on the sheet packed with your remote.
1. Test the remote
A.B.Press VCR1 or VGR2 to turn the VCR on.
Press the VCR buttons highlighted on the
remote. If your VCR does not work pro-
gram VCR1 or VCR2 with a VCR code
from the list below.
2. Program the remote for your VCRs
A. Point the remote at the VCR and hold
VGR1.
B. Enter the code for your brand from the
code list below.
C. Release VCR1.
D. Press ON/OFF. If nothing happens, try
pressing VCR1 and then ON/OFF.
E. Repeat A-D with another code if the first
one does not work or if a second VCR is
connected.
VCR Codes
Aiwa ................................................. 15
Akai ........................................ 03,22,23
Audio Dynamics ........................ 14,16
Broksonic ......................................... 10
Canon ............................................... 08
Capehart ........................................... 01
Citizen .............................................. 09
Craig ............................................ 07,12
Curtis Mathes ........................ 00,08,15
Daewoo ............................................ 13
dbx .............. :................................ 14,16
Dimensia .............. ,,.......................... 00
Dynatech .......................................... 15
Emerson ...09,10,13,15,20,23,24,34,41
Fisher ............................ 02,12,18,19,43
Funai ................................................. 15
GE ................................. 00,07,08,32,37
Goldstar ....................................... 09,14
Harman Kardon .............................. 14
Hitachi ............................... 05,15,35,36
Instant Replay ................................. 08
JCL .................................................... 08
JCPenney ....... 0%05,07,08,14,16,30,35
JVC..................................... 02,14,16,30
Kenwood ........................... 02,14,16,30
Lloyd ................................................ 15
Magnavox ................................... 08,29
Marantz ................... 02,08,14,16,29,30
Marta ................................................ 09
MEI ................................................... 08
Memorex ........................... 08,09,12,15
MGA ............................................ 04,27
Minolta ........................................ 05,35
Mitsubishi .................... 04,05,27,35,40
Montgomery Ward ......................... 06
MTC ............................................. 07,15
Multitech ........................... 07,15,31,32
NEC ................................... 02,14,16,30
Panasonic ......................................... 08
Pentax .......................................... 05,35
Philco ........................................... 08,29
Philips .......................................... 08,29
Pioneer ................................... 05,16,33
ProScan ............................................. 00
Quartz ............................................... 02
Quasar .............................................. 08
RCA .................... 00,05,07,08,28,35,37
Realistic ......... 02,06,08,09,12,15,19,43
Samsung ....................... 07,13,22,32,42
Sansui ............................................... 16
Sanyo .......................................... 02,12
Scott ....................................... 04,13,41
Sears ............. 02,05,09,12,18,19,35,43
Sharp ..................................... 06,24,39
Shintom ................................ 17,26,31
Sony ....................................... 17,26,38
Sylvania ................................ 08,15,29
Symphonic ................................ 02,15
Tashiko ........................................... 09
Tatung ............................................. 30
Teac ............................................ 15,30
Technics .......................................... 08
Teknika ............................ 08,09,15,21
Toshiba ................................. 05,13,19
Totevision .................................. 07,09
Unitech ........................................... 07
Vector Research ........................ 14,16
Victor .............................................. 16
Video Concepts ........................ 14,16
Videosonic ...................................... 07
Wards ..................................................
............ 05,06,07,08,12,13,15,25,31,35
Yamaha ............................ 02,14,16,30
Zenith .......................................... 11,17
8

With VCRs: Setting the VCR1 Channel
The VCR1 Channel works with the VCR1 button on the remote. If the VCR1 Channel is set,pressing the VCR1 button
turns on the TV and VCR and tunes the TV to seethe VCR signal. The VCR1 setting depends on how you have the VCR
connected. If you have the VCR connected to the VIDEO INPUT, select channel 00. If you have the VCR connected to the
ANT/CABLE IN connector, select channel 3 or 4--the one selected with the channel 3or 4 switch on the back of the VCR.
1,. Select the Setup Menu
A. Press rv to set the remote to control the
TV.
B. Press MENU to select the Setup menu.
This menu is white.
Controls Alarm Ad
13
2. Highlight VCR1 Channel
A. Press CHANNEL down to highlight the
VCR1 Channel.
B. Press + to highlight the channel.
Controls Alarm Ad
13
3. Enter channel number
Enter channel 00, 03, or 04. Press CHANNEL
down until "Disabled" is displayed to turn the
feature off.
Controls Alarm Ad
13
4. Press DISPLAY or DONE
Press DISPLAY or DONE to remove the menu
from the screen.
9
j b'L;_ i_d _'fmJ_R
With VCRs: Basic Operation
If the remote operates your VCR, this page and the next will show you how to use it for basic functions. See page 7for
more details on buttons used with your VCR.
TUrn on the VCR
A.
g.
C.
Select channel 00, 03, or 04 on the TV to
see what the VCR is doing.
Press VGR1 or VCFI2 to set the remote to
control the VCR.
Press ON/OFF to turn on the VCR if it did
not turn on when you pressed VCR1 or
VCR2.
Turn off the VCR
A. Press VCR1 or VCR2 to set the remote to
control the VCR.
B. Press ON/OFF.
10

If the remote operates your VCR, this page and page 10 will show you how to use it for basic functions. See page 7for more
details on the buttons used with your VCR.
Record one TV program and watch another
A. Press VGR1 or VCR2 to set the remote to
control the VCR.
B. Tune the VCR to the channel you want to
record using GHANNEL up and down or
pressing two number buttons.
C. Press REGORD to start recording. :
D. Press "W/VGRon the VCR or remote.
E. Press "IVto set the remote to control the
TV.
F. Press GHANNEL up or down to change
channels on the TV.
G. To see the channel you are recording, tune
the TV back to channel 00, 03, or 04.
Watch a tape in your VCR
A. Turn on VCR.
B. Insert a tape in the VCR.
C. Press PLAY to start the tape.
D. Press STOP when you are finished.
E. Press REW to rewind the tape.
11
I m _v4 _d_3 R_
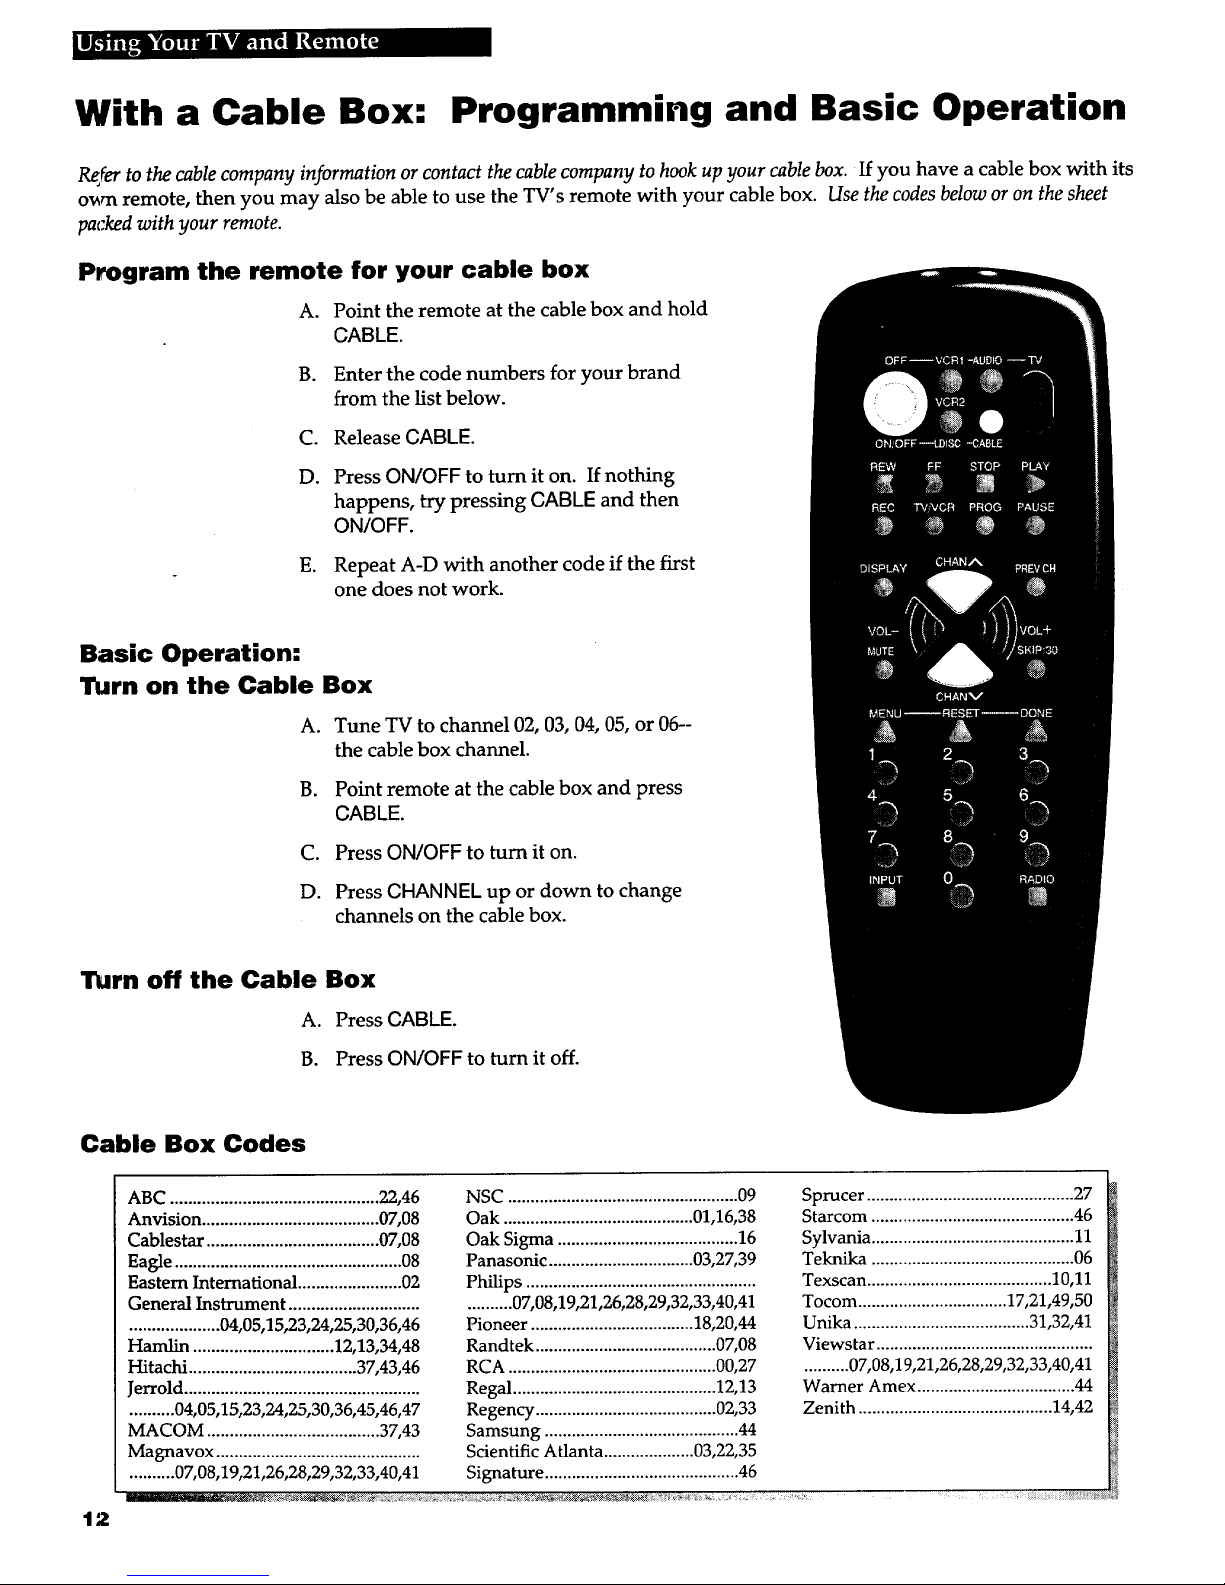
With a Cable Box: Programming and Basic Operation
R_/er to the cable company information or contact the cable company to hook up your cable box. If you have a cable box with its
o_rn remote, then you may also be able to use the TV's remote with your cable box. Use the codes below or on the sheet
packed with your remote.
Program the remote for your cable box
A. Point the remote at the cable box and hold
CABLE.
B. Enter the code numbers for your brand
from the list below.
C.
D.
E.
Release CABLE.
Press ON/OFF to turn it on. If nothing
happens, try pressing CABLE and then
ON/OFF.
Repeat A-D with another code if the first
one does not work.
Basic Operation:
Turn on the Cable Box
A. Tune TV to channel 02, 03, 04, 05, or 06--
the cable box channel.
B. Point remote at the cable box and press
CABLE.
C. Press ON/OFF to turn it on.
D. Press CHANNEL up or down to change
channels on the cable box.
Turn off the Cable Box
A. Press CABLE.
B. Press ON/OFF to turn it off.
Cable Box Codes
L
ABC ..............................................22,46 NSC ...................................................09 Sprucer..............................................27
Anvision .......................................07,08 Oak ..........................................01,16,38 Starcom.............................................46 _
Cablestar......................................07,08 Oak Sigma ........................................16 Sylvania.............................................11
Eagle..................................................08 Panasonic ................................03,27,39 Teknika .............................................06
Eastern International.......................02 Philips ................................................... Texscan.........................................10,11
General Instrument ....................................... 07,08,19,21,26,28,29,32,33,40,41 Tocom .................................17,21,49,50
....................04,05,15,23,24,25,30,36,46 Pioneer ....................................18,20,44 Unika.......................................31,32,41
Hamlin ...............................12,13,34,48 Randtek ........................................07,08 Viewstar ................................................
Hitachi .....................................37,43,46 RCA ..............................................00,27 ..........07,08,19,21,26,28,29,32,33,40,41
Jerrold.................................................... Regal .............................................12,13 Warner Amex...................................44
..........04,05,15,23,24,25,30,36,45,46,47 Regency ........................................02,33 Zenith ...........................................14,42
MACOM ......................................37,43 Samsung ...........................................44
Magnavox ............................................. Scientific Atlanta ....................03,22,35 l'_i
..........07,08,19,21,26,28,29,32,33,40,41 Signature...........................................46
12
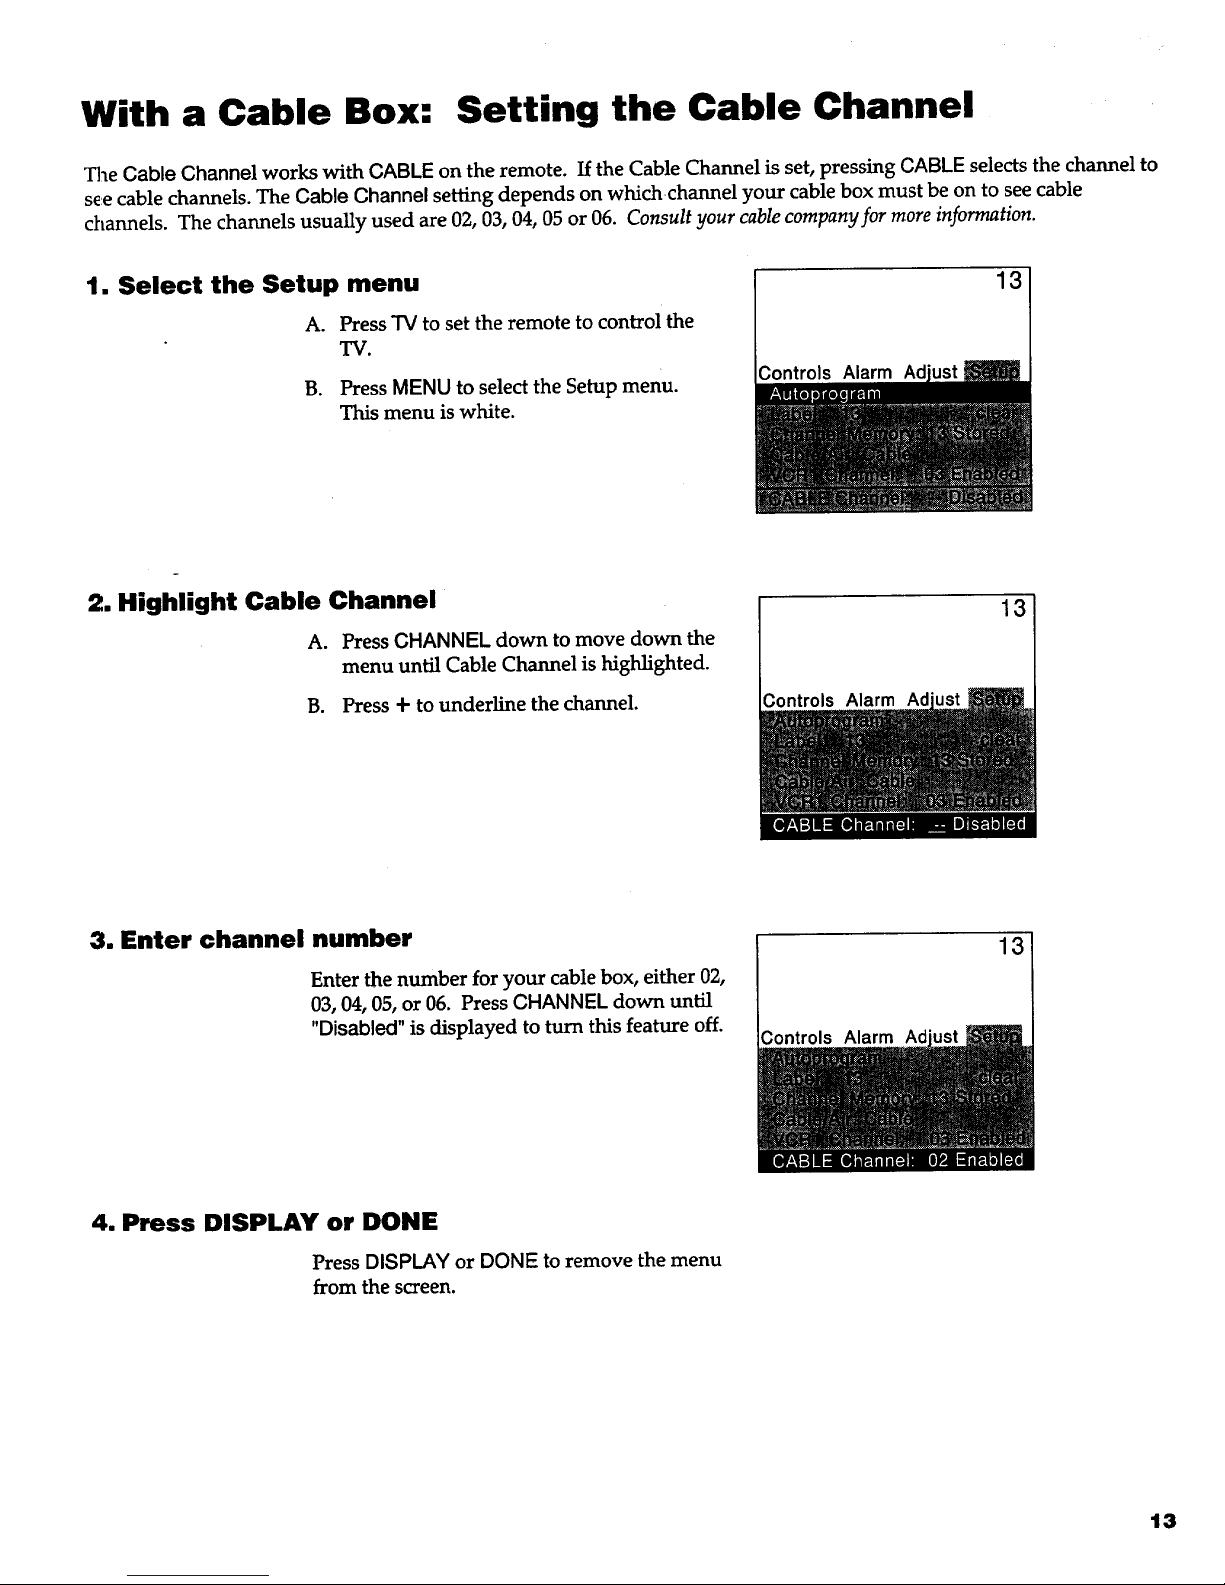
With a Cable Box: Setting the Cable Channel
The Cable Channel works with CABLE on the remote. If the Cable Channel is set, pressing CABLE selects the channel to
see cable channels. The Cable Channel setting depends on whichchannel your cable box must be on to see cable
channels. The channels usually used are 02, 03, 04, 05 or 06. Consult your cable company for more information.
1. Select the Setup menu
A. Press "IVto set the remote to control the
"IV.
B. Press MENU to select the Setup menu.
This menu is white.
13
;ontrols Alarm Adjust_
2. Highlight Cable Channel
A. Press CHANNEL down to move down the
menu until Cable Channel is highlighted.
B. Press -I-to underline the channel. Controls Alarm Ad
13
3. Enter channel number
Enter the number for your cable box, either 02,
03, 04, 05, or 06. Press CHANNEL down until
"Disabled" is displayed to turn this feature off.
13
Controls Alarm Ad
4. Press DISPLAY or DONE
Press DISPLAY or DONE to remove the menu
from the screen.
13
 Loading...